

Craftsman 919679180 Owner’s Manual
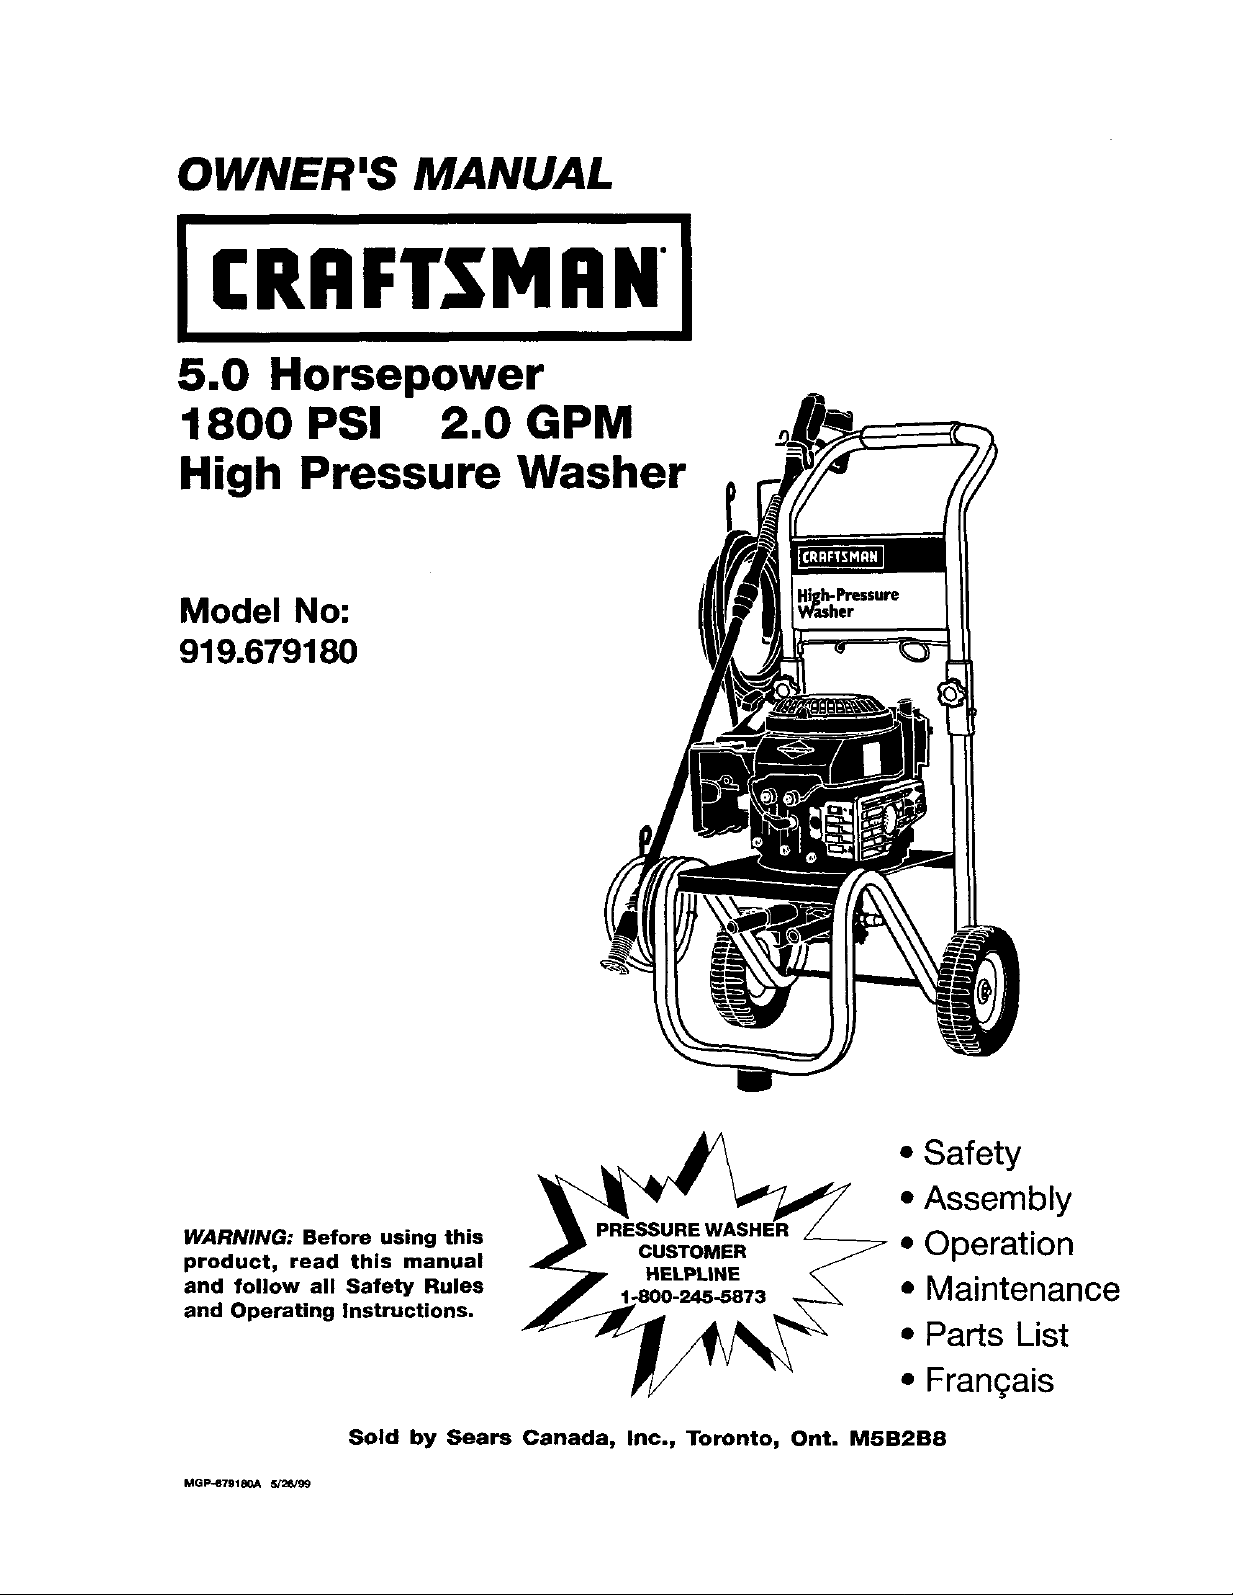
OWNER'S MANUAL
CRRFTSMIIN
5.0 Horsepower
1800 PSI 2.0 GPM
High Pressure Washer
Model No:
919.679180
WARNING: Before using this
product, read this manual
and follow all Safety Rules
and Operating Instructions.
Sold by Sears Canada, Inc., Toronto, Ont. M5B2B8
MGP-e7918GA 5/26/S9
• Safety
• Assembly
• Operation
• Maintenance
• Parts List
• Fran£_ais
TABLE OF CONTENTS
Warranty ............................................ 2
Safety Guidelines .............................. 3-4
Assembly ........................................... 5-6
Operation ........................................... 6-9
Product Specifications ...................... 10
Maintenance ...................................... 10-12
Service and Adjustments ................ 13-14
Storage .................................................. 14
Troubleshooting .................................... 15
Parts ................................................ 16-27
EPA Codes ...................................... 28-29
How to Order Parts ................ Back Cover
FULL ONE YEAR WARRANTY ON CRAFTSMAN HIGH PRESSURE WASHER
For one year from the date of purchase, when this Craftsman High Pressure Washer is maintained
and operated according to the instructions in the owner's manual, Sears will repair, free of charge,
any defect in material and workmanship.
Ifyour Craftsman PressureWasher is usedfor eommerieal or rental purposes, this warranty
applies only for 90 days from the date of purchase. If this washer isused for rented purposes this
warraty applies for only 30 days from the date of purchase.
FULL TWO YEAR WARRANTY ON CRAFTSMAN ENGINE
For two years from the date of purchase, when thisCraftsman engine is maintained and operated
according to the instructions inthe owner's manual, Sears will repair, free of charge, any defect in
material and workmanship.
Ifyour Craftsman engine is used for commericalor rental purposes, this warranty applies only for
one year from the date of purchase. This warranty does not cover expendable items such as spark
plugs and air filters, which become worn during normal use.
Repairs necessary because of operator abuse or negligence, including damage resulting from no
water being supplied to pump or failure to maintain the equipment according to the instructions
contained in the owner's manual, are not covered under warranty.
WARRANTY SERVICE IS AVAILABLE BY RETURNING THE HIGH PRESSURE WASHER TO THE
NEAREST SEARS SERVICE CENTER THROUGHOUT THE UNITED STATES. This warranty gives you
specific legal rights and you may also have other rights, which vary from state to state.
Sold by Sears Canada, Inc., Toronto, Ont. M5B2B8
2
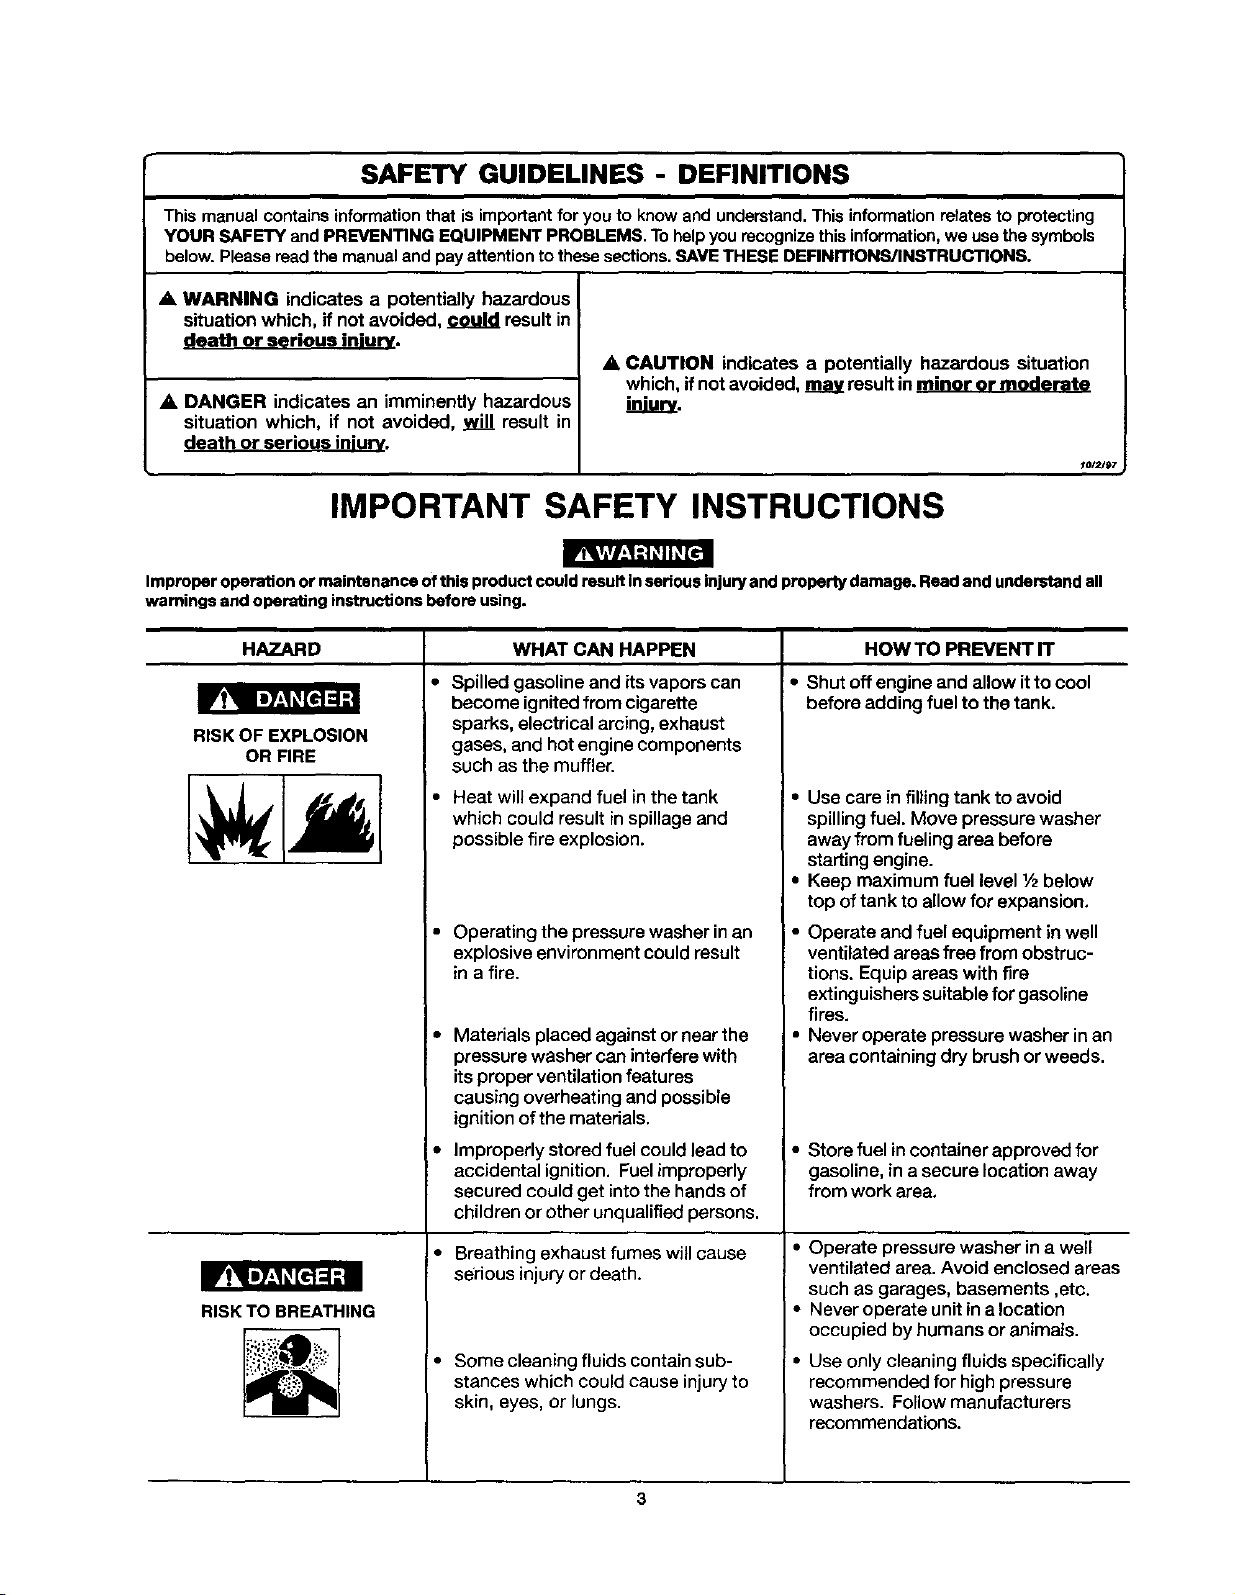
SAFETY GUIDELINES - DEFINITIONS
Thismanualcontainsinformationthatisimportantforyou to know andunderstand.Thisinformationrelatesto protecting
YOURSAFETYand PREVENTINGEQUIPMENTPROBLEMS.Tohelpyourecognizethis information,we usethesymbols
below. Pleasereadthe manualand pay attentionto thesesections.SAVETHESEDEFINrrloNS/INSTRUCTIONS.
A WARNING indicates a potentially hazardous
situation which, if not avoided, _ result in
death or serious iniurv.
A CAUTION indicates a potentially hazardous situation
which,ifnotavoided, may resultinmi t
A, DANGER indicates an imminently hazardous
iniurv.
situation which, if not avoided, will result in
death or serious iniurv.
IMPORTANT SAFETY INSTRUCTIONS
Improper operation or maintenance of this product could result in serious injury and property damage. Read and understand all
warnings and operating instructions before using.
t0/2197
HAZARD
RISK OF EXPLOSION
OR FIRE
RISK TO BREATHING
WHAT CAN HAPPEN
• Spilledgasoline and its vapors can
become ignitedfrom cigarette
sparks,electricalarcing,exhaust
gases,and hot enginecomponents
such as the muffler.
• Heat will expand fuel in the tank
which could result in spillage and
possible fire explosion.
• Operating the pressure washer in an
explosive environment could result
in a fire.
•
Materialsplaced against or near the
pressure washer can interfere with
itsproper ventilationfeatures
causingoverheatingand possible
ignitionofthe materials.
Improperlystored fuelcould lead to
accidental ignition. Fuelimproperly
secured couldget into the hands of
childrenor other unqualifiedpersons.
Breathing exhaust fumes will cause
serious injury or death.
Some cleaning fluids contain sub-
stances which could cause injury to
skin, eyes, or lungs.
HOW TO PREVENT IT
• Shut off engineand allow itto cool
beforeaddingfuelto the tank.
D Use care in filling tank to avoid
spilling fuel. Move pressurewasher
away fromfuelingarea before
startingengine.
Keep maximum fuel level V2below
top oftankto allowforexpansion,
Operate and fuel equipment in well
ventilated areasfree from obstruc-
tions. Equip areas with fire
extinguishers suitable for gasoline
fires.
Never operate pressure washer in an
area containing dry brush or weeds.
Store fuel incontainer approvedfor
gasoline, in a secure location away
from work area,
Operate pressure washer in a well
ventilated area. Avoid enclosed areas
such as garages, basements ,etc.
Never operate unit in a location
occupied by humans or animals.
Use only cleaning fluids specifically
recommended for high pressure
washers. Follow manufacturers
recommendations.
3
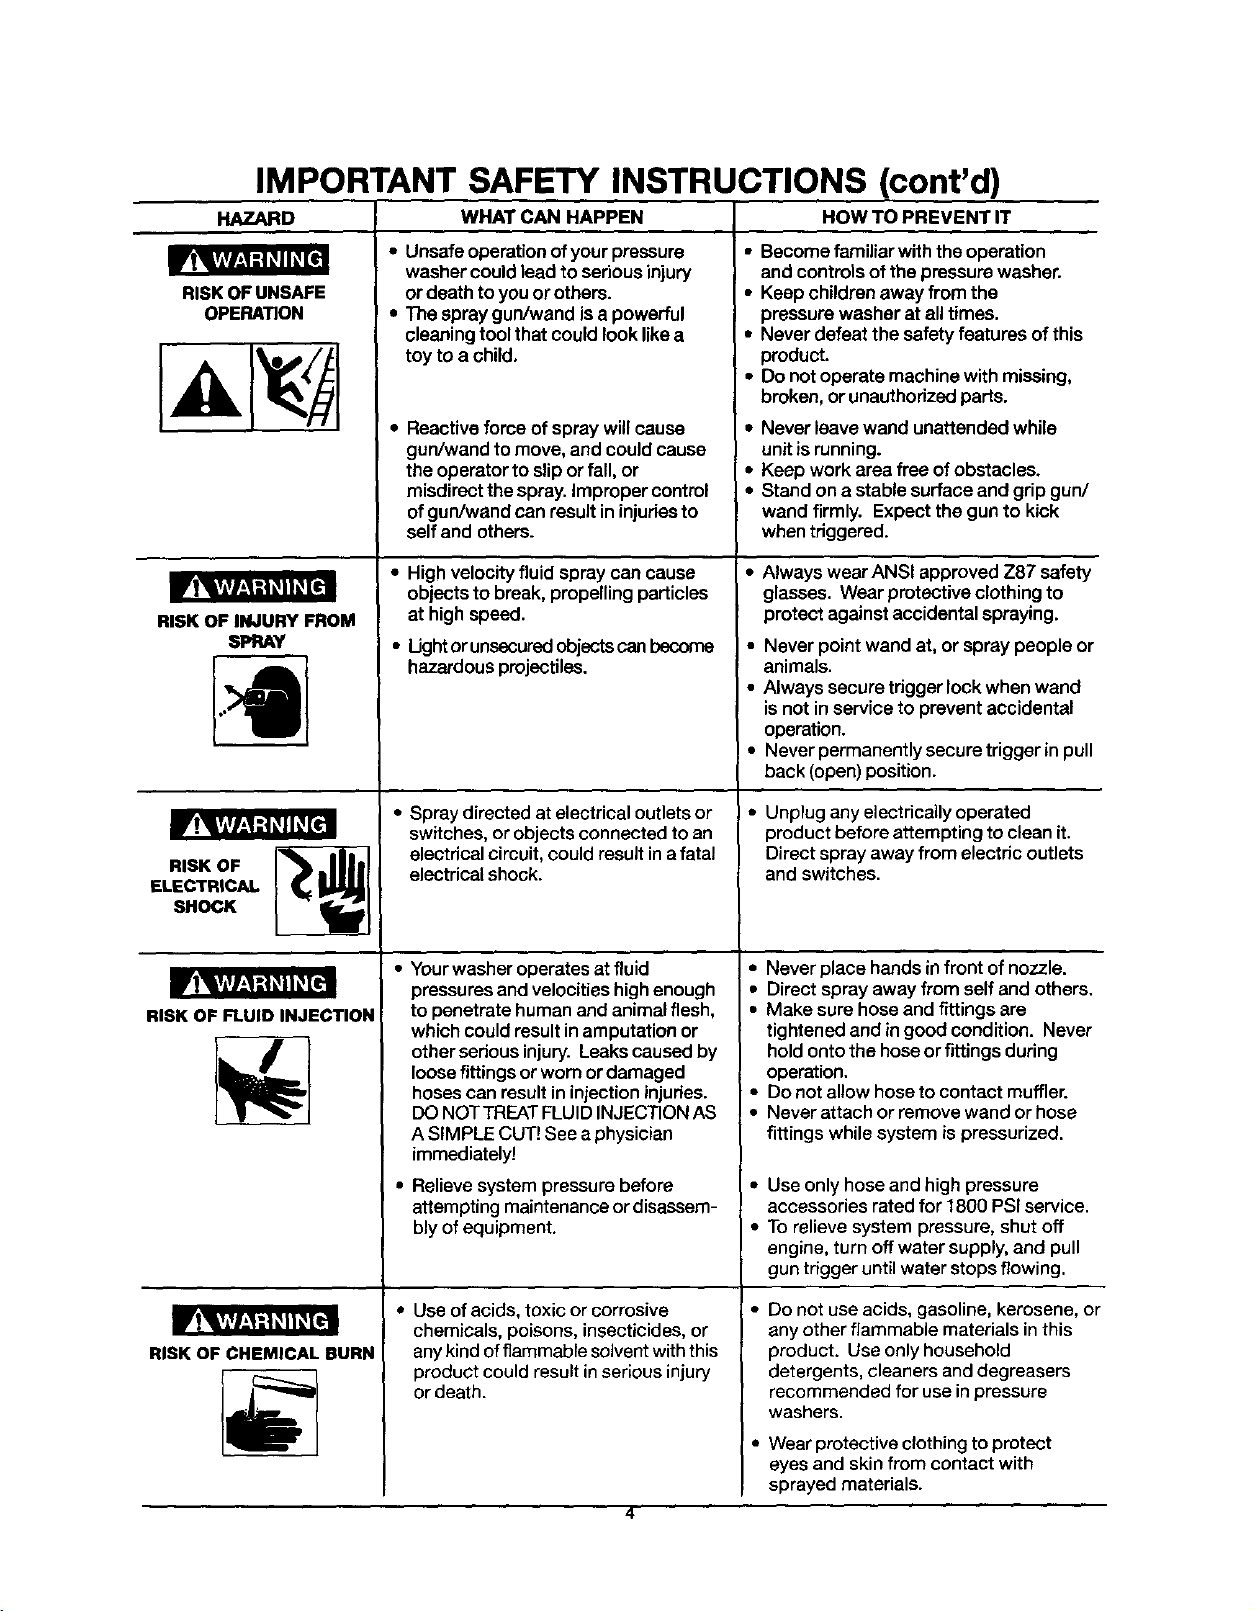
IMPORTANT SAFETY INSTRUCTIONS (cont'd)
HAZARD
WHAT CAN HAPPEN HOW TO PREVENT IT
RISKOF UNSAFE
OPERATION •
RISK OF INJURY FROM
SPRAY
RISK OF
ELECTRICAL
SHOCK
Unsafeoperationof your pressure
washer couldlead to seriousinjury
or death to you or others.
The spraygun/wand is a powerful
cleaningtool that could look likea
toy to a child.
Reactiveforce of spraywillcause
gun/wandto move, and couldcause
theoperatorto sliporfall, or
misdirect thespray.Improper control
ofgun/wand can result ininjuriesto
selfand others.
• Highvelocityfluid spray cancause
objectsto break, propelling particles
at highspeed.
• Ughtorunsecuredobjectscan become
hazardousprojectiles.
• Spray directed at electrical outletsor
switches, or objects connected to an
electrical circuit, could result inafatal
electrical shock.
• Becomefamiliar with the operation
and controlsof the pressurewasher.
• Keep childrenaway fromthe
pressurewasher at all times.
• Never defeat the safety features of this
product.
• Do not operatemaohine with missing,
broken,orunauthorizedparfs.
• Never leave wand unattended while
unit is running.
• Keep workarea free of obstacles.
• Stand on a stable surfaceand grip gun/
wand firmly. Expectthe gunto kick
whentriggered.
• Always wear ANSI approved Z87 safety
glasses. Wear protective clothingto
protect againstaccidentalspraying.
Never point wand at, or spray people or
animals.
I= Always secure trigger lock when wand
is not inservice to prevent accidental
operation.
• Never permanentlysecuretriggerin pull
back (open) position.
• Unplug any electrically operated
product before attempting to clean it.
Direct spray away from electric outlets
and switches.
RISK OF FLUID INJECTION
RISK OF CHEMICAL BURN
Your washeroperates atfluid
pressures and velocitieshigh enough
to penetrate human and animal flesh,
which could result in amputation or
other serious injury. Leaks caused by
loose fittings or worn ordamaged
hoses can result in injection injuries.
DONOTTREATFLUIDINJECTIONAS
A SIMPLE CUT! See a physician
immediately!
Relieve system pressure before
attemptingmaintenance or disassem-
bly of equipment.
• Use of acids, toxic or corrosive
chemicals, poisons, insecticides, or
any kind of flammable solvent with this
product could result in serious injury
or death.
4
• Never place handsinfront of nozzle.
• Directspray away from selfand others.
• Make sure hose and fittings are
tightened and ingood condition. Never
hold onto the hoseor fittings during
operation.
• Donot allow hose to contact muffler.
• Never attach or remove wand or hose
fittings while system is pressurized.
• Use only hose and high pressure
accessories rated for 1800 PSIservice.
• To relieve system pressure, shut off
engine, turn off water supply, and pull
gun trigger until water stops flowing.
• Do not use acids, gasoline, kerosene, or
any other flammable materials in this
product. Use only household
detergents, cleaners and degreasers
recommended for use in pressure
washers.
• Wear protective clothing to protect
eyes and skin from contact with
sprayed materials.

IMPORTANT SAFETY INSTRUCTIONS (cant'd)
HAZARD
• Contact with hot surfaces,such as
RISK OF HOT SURFACES
Symbols Owner's Manual "_ Fuel i ['_[ Choke
The powerful sprayfrom your pressure washer is capable of causingdamage to fragile surfaces suchas:wood, glass,
automobile paint, auto strippingand trim, and delicate objects such asflowers andshrubs. Before spraying, check the
item to be cleaned to assureyourself that it is robust enough to resist damage from the force of the spray. Avoid the
use of the concentrated spray stream except for very strongsurfaceslike concrete and steel.
Operating unit with water supplyshut offwithout flowof water willresult inequipment damage. You shouldnever run
this pressure washer for more than 2 minutes without pulling the tdgger to allow cool water to enter the pump and the
heated (recirculated) water to exit. Running the pressure washer with water supply shut off will void your warranty.
WHAT CAN HAPPEN
• Duringoperation,touchonlythecontrol
enginesexhaust components, could
result in sedous bum.
HOW TO PREVENT IT
surfaces of the pressure washer. Keep
childrenaway fromthe pressurewasher
at all times. They may not be able to
recognizethe hazardsof thisproduct.
Carton Contents
Main Unit pressure washer with wheels
Handle
High Pressure Hose
Chemical Pickup Hose and Filter
Gun
Wand
• Bag Containing
Video Cassette
Owner's Manual
Nozzle Cleaning Kit and Replacement O-Rings
Engine Oil
Rubber Isolator and Mounting Hardware
Handle Mounting Hardware
Main Unit pressure washer
with wheels
©
Chemical Pickup Hose and Filter
Video Cassette
Handle Mounting Rubber Isolator and
Hardware
Handle High Pressure Hose
Gun and Wand
Owner's Manual Nozzle Cleaning Kit
©
Engine Oil ][
O _ Mounting Hardware
Replacement O-Rings
5
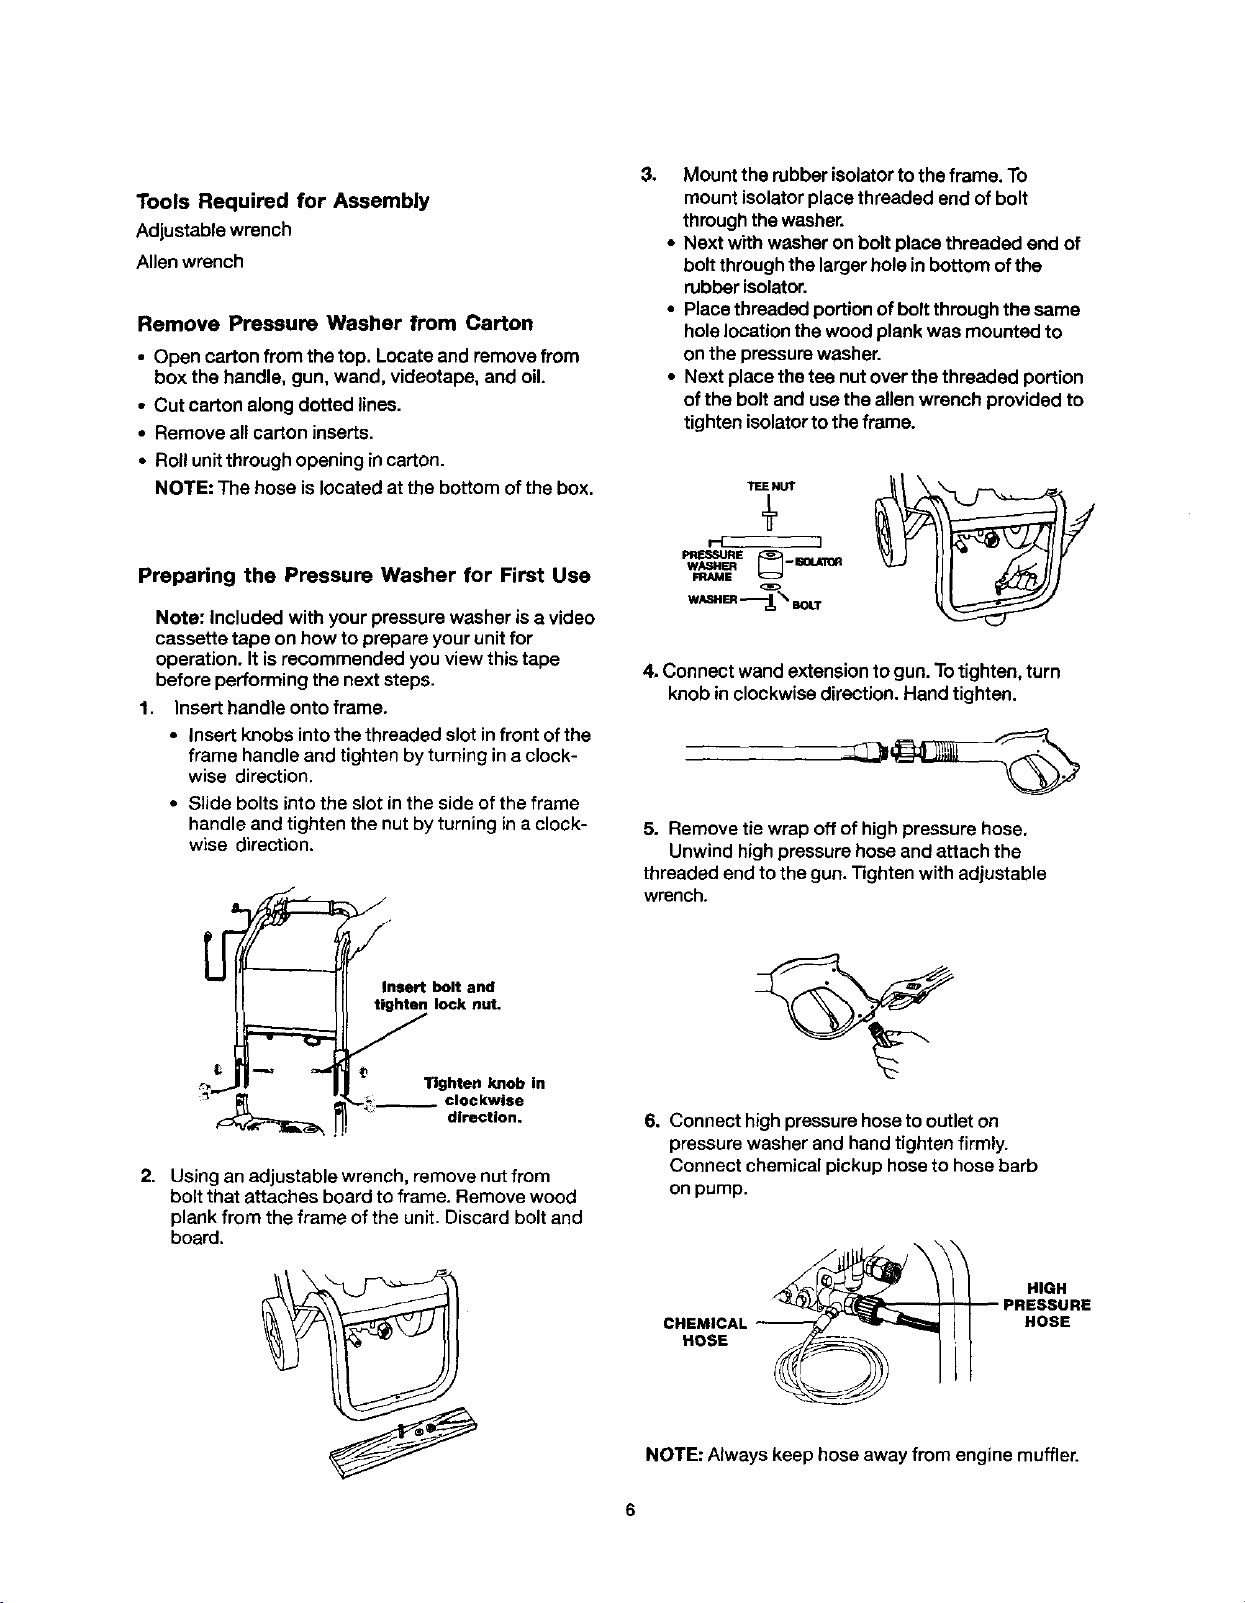
Tools Required for Assembly
Adjustable wrench
Allen wrench
Remove Pressure Washer from Carton
• Open cartonfrom thetop. Locate and removefrom
box the handle, gun, wand, videotape, and oil.
• Cut carton along doffed lines.
• Remove all carton inserts.
• Roll unitthroughopening incarton.
NOTE: The hose is located at the bottom ofthe box.
Preparing the Pressure Washer for First Use
Note: Included with yourpressure washer is a video
cassette tape on how to prepare yourunitfor
operation. Itisrecommended you viewthis tape
beforeperformingthe nextsteps.
1. Inserthandle ontoframe.
• Insert knobs into the threaded slot in front of the
frame handle and tighten by turning in a clock-
wise direction.
• Slide bolts into the slot in the side of the frame
handle and tighten the nut by turning in a clock-
wise direction.
, Mountthe rubber isolator to theframe. To
mountisolatorplace threaded end of bolt
throughthewasher.
• Nextwith washeron boltplace threaded end of
boltthroughthe largerholein bottomofthe
rubberisolator.
• Placethreadedportionof bolt throughthe same
holelocationthe wood plankwas mounted to
onthe pressurewasher.
• Next place the tee nutoverthe threaded portion
ofthe bolt andusethe allenwrench provided to
tightenisolatorto theframe.
TEENtrr
r[ ]
WASHER
PRESSURE _ -- EOL4TOR
FRAME
W/i_HER -_. BOLT
4, Connect wandextensionto gun.Totighten,turn
knobinclockwisedirection.Handtighten.
5. Remove tie wrap off of high pressure hose,
Unwind high pressure hose and attach the
threaded end tothe gun.Tightenwith adjustable
wrench.
Insert bolt and
tighten lock nut,
Tighten knob in
_.___ clockwise
direction.
2. Usingan adjustable wrench, remove nut from
bolt that attaches board to frame. Removewood
plank from the frame of the unit. Discard bolt and
board.
6. Connect high pressure hose to outlet on
pressure washer and handtighten firmly.
Connect chemical pickup hoseto hosebarb
onpump.
PRESSURE
CHEMICAL--
HOSE
NOTE: Always keep hose away from engine muffler.
6
HIGH
HOSE
7. Place assembled gun and wand on pressure
washer holder.
Pull the cord under the wire bracket to the
right of the wireloop.
Lift the pull cord handle up and slide the cord
to the left sliding the cord into the wire loop.
Next slide handle behind the wire bracket to
the leftof the wire loop.
Engine recoilwillpullthe cord intoitsfinal
position.
Checklist
Beforegoing anyfurther please reviewthe following:
• Be sure you have completed assembly instructions.
• Doublecheck allfittings to be surethey are tight.
8, Place pull cord intothewire bracket holder.
Pull the cord underthe wire bracket to the right
of the wire loop.
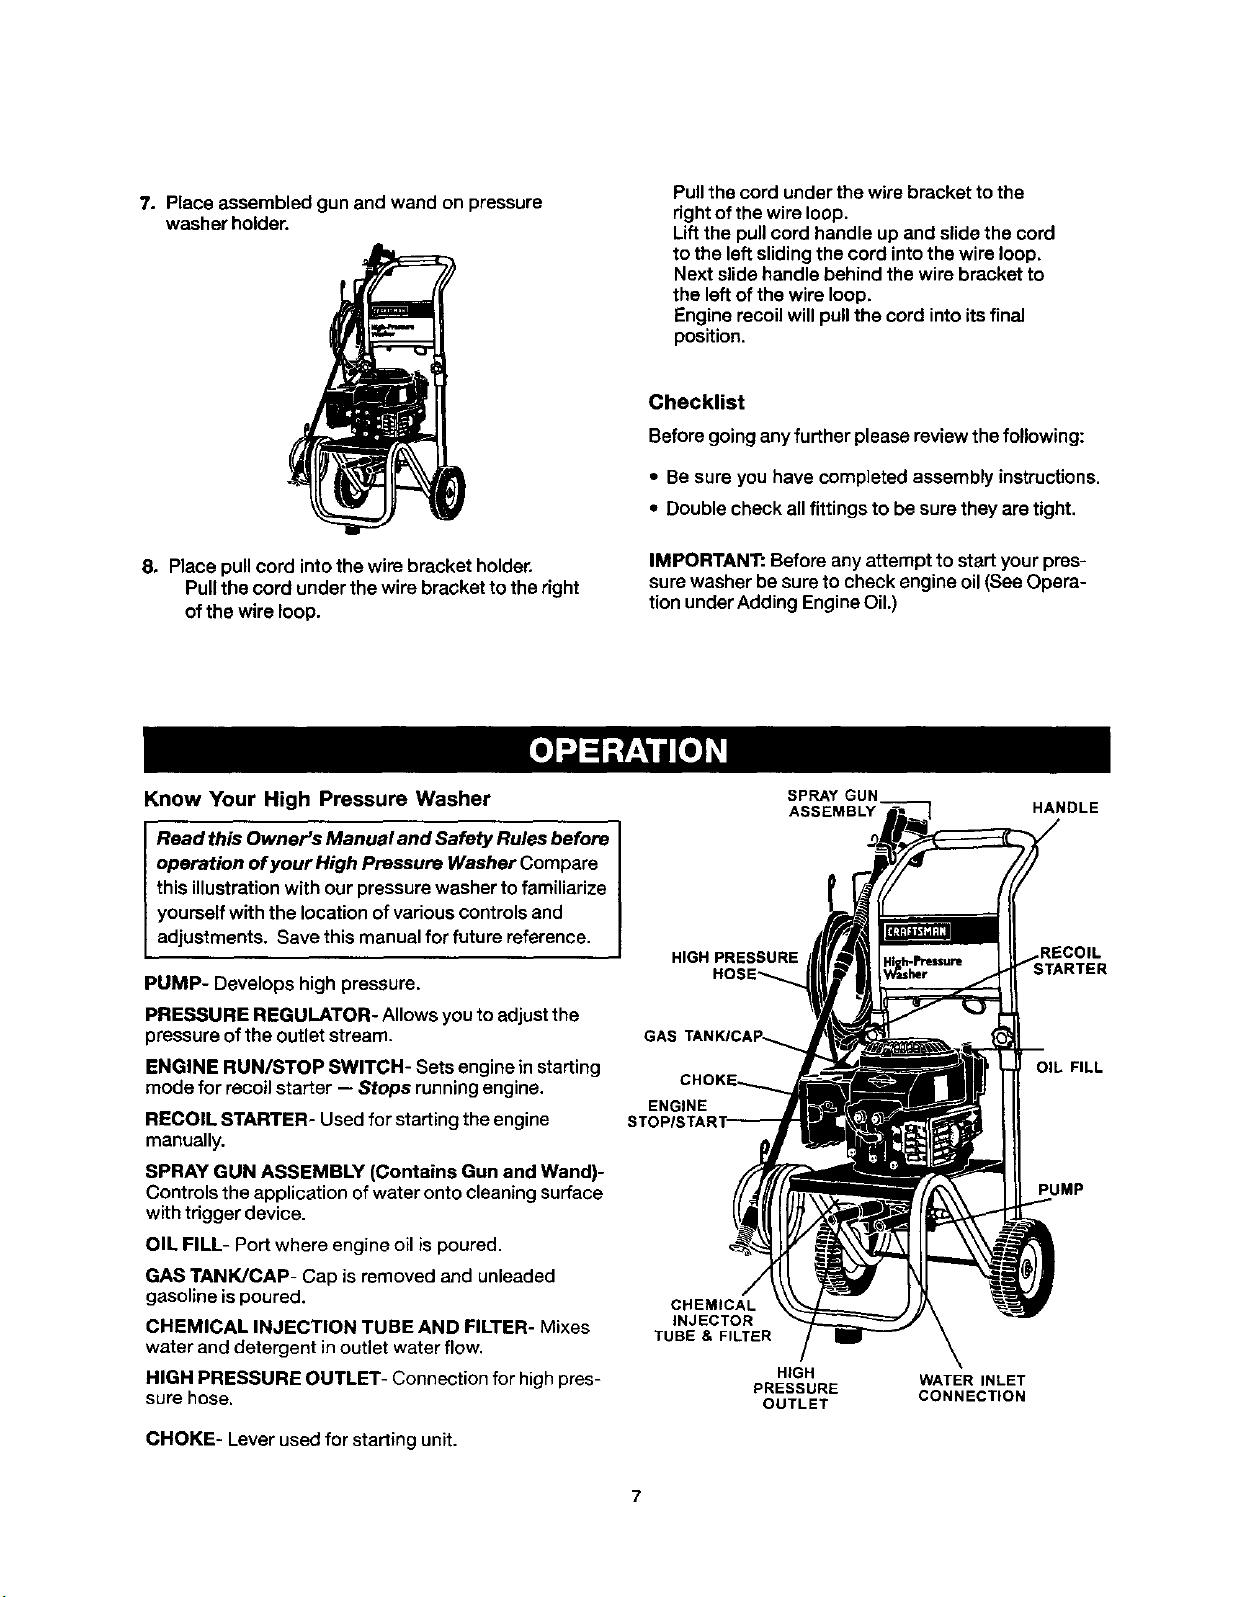
Know Your High Pressure Washer
Read this Owner's Manual and Safety Rules before
operation ofyour High Pressure Washer Compare
this illustrationwith ourpressurewasher tofamiliarize
yourselfwith the locationofvariouscontrolsand
adjustments. Save this manualfor future reference.
PUMP- Develops high pressure.
PRESSURE REGULATOR- Allows you to adjust the
pressure of the outlet stream.
ENGINE RUN/STOP SWITCH- Sets engine in starting
mode for recoil starter -- Stops running engine.
RECOIL STARTER- Used for starting the engine
manually.
SPRAY GUN ASSEMBLY (Contains Gun and Wand)-
Controls the application of water onto cleaning surface
with trigger device.
OIL FILL- Port where engine oil is poured.
GAS TANKJCAP- Cap is removed and unleaded
gasoline is poured.
CHEMICAL INJECTION TUBE AND FILTER- Mixes
water and detergent in outlet water flow.
HIGH PRESSURE OUTLET- Connection for high pres-
sure hose.
IMPORTANT: Before any attempt to start yourpres-
sure washer besure to check engine oil (See Opera-
tionunderAdding EngineOil.)
SPRAY GUN
ASSEMBLY HANDLE
HIGH PRESSURE
HOSE_
ENGINE
CHEMICAL
INJECTOR
TUBE & FILTER
HIGH
PRESSURE
OUTLET
WATER INLET
CONNECTION
RECOIL
OIL FILL
PUMP
CHOKE- Lever used for starting unit.
7
to operate equipment untilyou haveread Owners
Manualfor Safety,Operation, and Maintenance
A ARNING: Read Owner's Manual. Do not attempt I
Instructions.
Note: Included with your unit is a video cassette that
demonstrates howto operateyour pressurewasher.
Ifyou have a video cassette recorder you shouldto
viewthevideo before operation.
A,WARNING: Never adjust spray patternwhen
spraying. Never put handsinfront of spray nozzle to
adjustspray pattern you couldbe injured.
Stopping Your Pressure Washer
& CAUTION: Do not run pump withoutthe water ]
supply connected and turnedon. Failureto do so
will resultin pump damage.
• Move throttlecontroltothe stop positiontoturn
pressurewasher off.
Before Starting The Engine
Tooperate theengine youwillneed to do thefollowing.
Note: Yourpressure washer pump isa sealed pump,
you should never havetoadd or changethe oil.
everystart. Runningengine lowof oilor out of oil
Ih, CAUTION: Always check engineoil level before I
could resultinsedous damage.
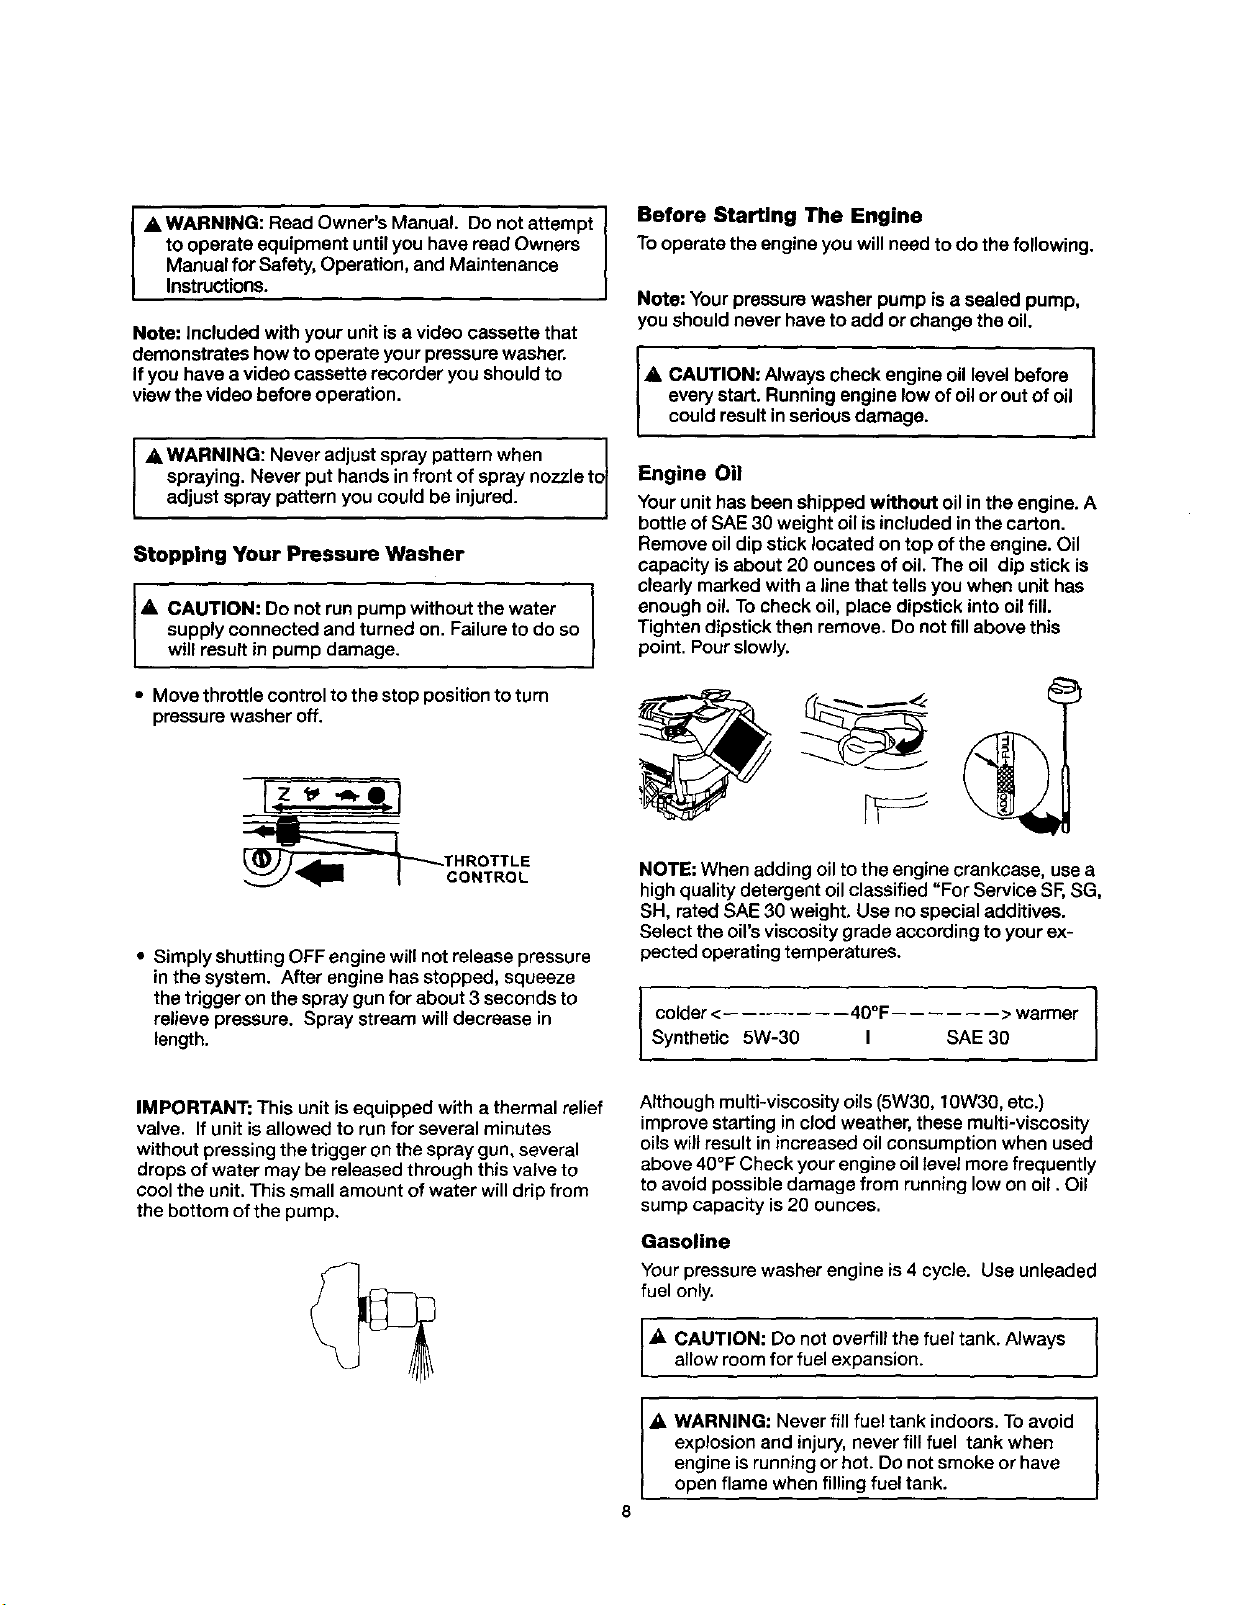
Engine Oil
Yourunithasbeen shipped without oilin the engine.A
bottle of SAE30 weight oilisincluded inthe carton.
Remove oil dip stick located on top of the engine. Oil
capacity is about20 ouncesof oil.The oil dip stick is
clearlymarked with a linethat tellsyou when unithas
enoughoil To check oil, place dipstick into oil fill.
Tightendipstick then remove. Do notfill above this
point.Pourslowly.
I
I
I
• Simply shuttingOFF engine willnot release pressure
in the system. After engine has stopped, squeeze
the trigger on the spray gun for about 3 seconds to
relieve pressure. Spray stream will decrease in
length.
IMPORTANT: This unit is equipped with a thermal relief
valve. If unit is allowed to run for several minutes
without pressing the trigger on the spray gun, several
drops of water may be released through this valve to
cool the unit. This small amount of water will drip from
the bottom of the pump,
NOTE: When adding oilto the engine crankcase, use a
highqualitydetergentoilclassified"For ServiceSF,SG,
SH, rated SAE 30 weight, Use no special additives.
Selecttheoil'sviscositygrade accordingto your ex-
pected operatingtemperatures.
colder <.......... 40°F...... > warmer
Synthetic 5W-30 I SAE 30
Although multi-viscosityoils (5W30, lOW30, etc.)
improve starting in clod weather, these multi-viscosity
oils will result in increasedoil consumption when used
above 40°F Check your engine oil level more frequently
to avoid possible damage from running low on oil. Oil
sump capacity is 20 ounces.
Gasoline
Your pressure washer engine is 4 cycle. Use unleaded
fuel only.
A, AUTION: Do not overfillthe fuel tank. Always
allowroom for fuel expansion.
explosionand injury,never fill fuel tank when
engine isrunningor hot.Do not smoke or have
A, ARNING: Neverfillfuel tank indoors.Toavoid
open flame when fillingfuel tank.
Use clean, fresh, regular unleaded gasolinewitha
minimumof 85 octane. Do not mix oilwith gasoline. If
unleaded fuel is unavailable leaded fuel may be used.
IMPORTANT: It isimportantto prevent gum deposits
from forming in essentialfuel system parts such as
the carburetor,fuelfilterhose ortank duringstorage.
Also,experience indicatesthat alcohol-blendedfuels
(calledgasohol or usingethanolor methanol)can
attract moisture which leadsto separation and forma-
tion ofacids duringstorage. Acidic gas can damage
the fuel system ofan engine whilein storage. To avoid
engine problems, the fuel system shouldbe emptied
beforestorage of 30 daysor longer.Never use engine
orcarburetor cleaner productsinthe fueltank or
permanent damage may occur.
water source turned on and connected to
pressure washer.Failure to do so willcause
I_ CAUTION: Neverstartpressure washer without I
pump damage.
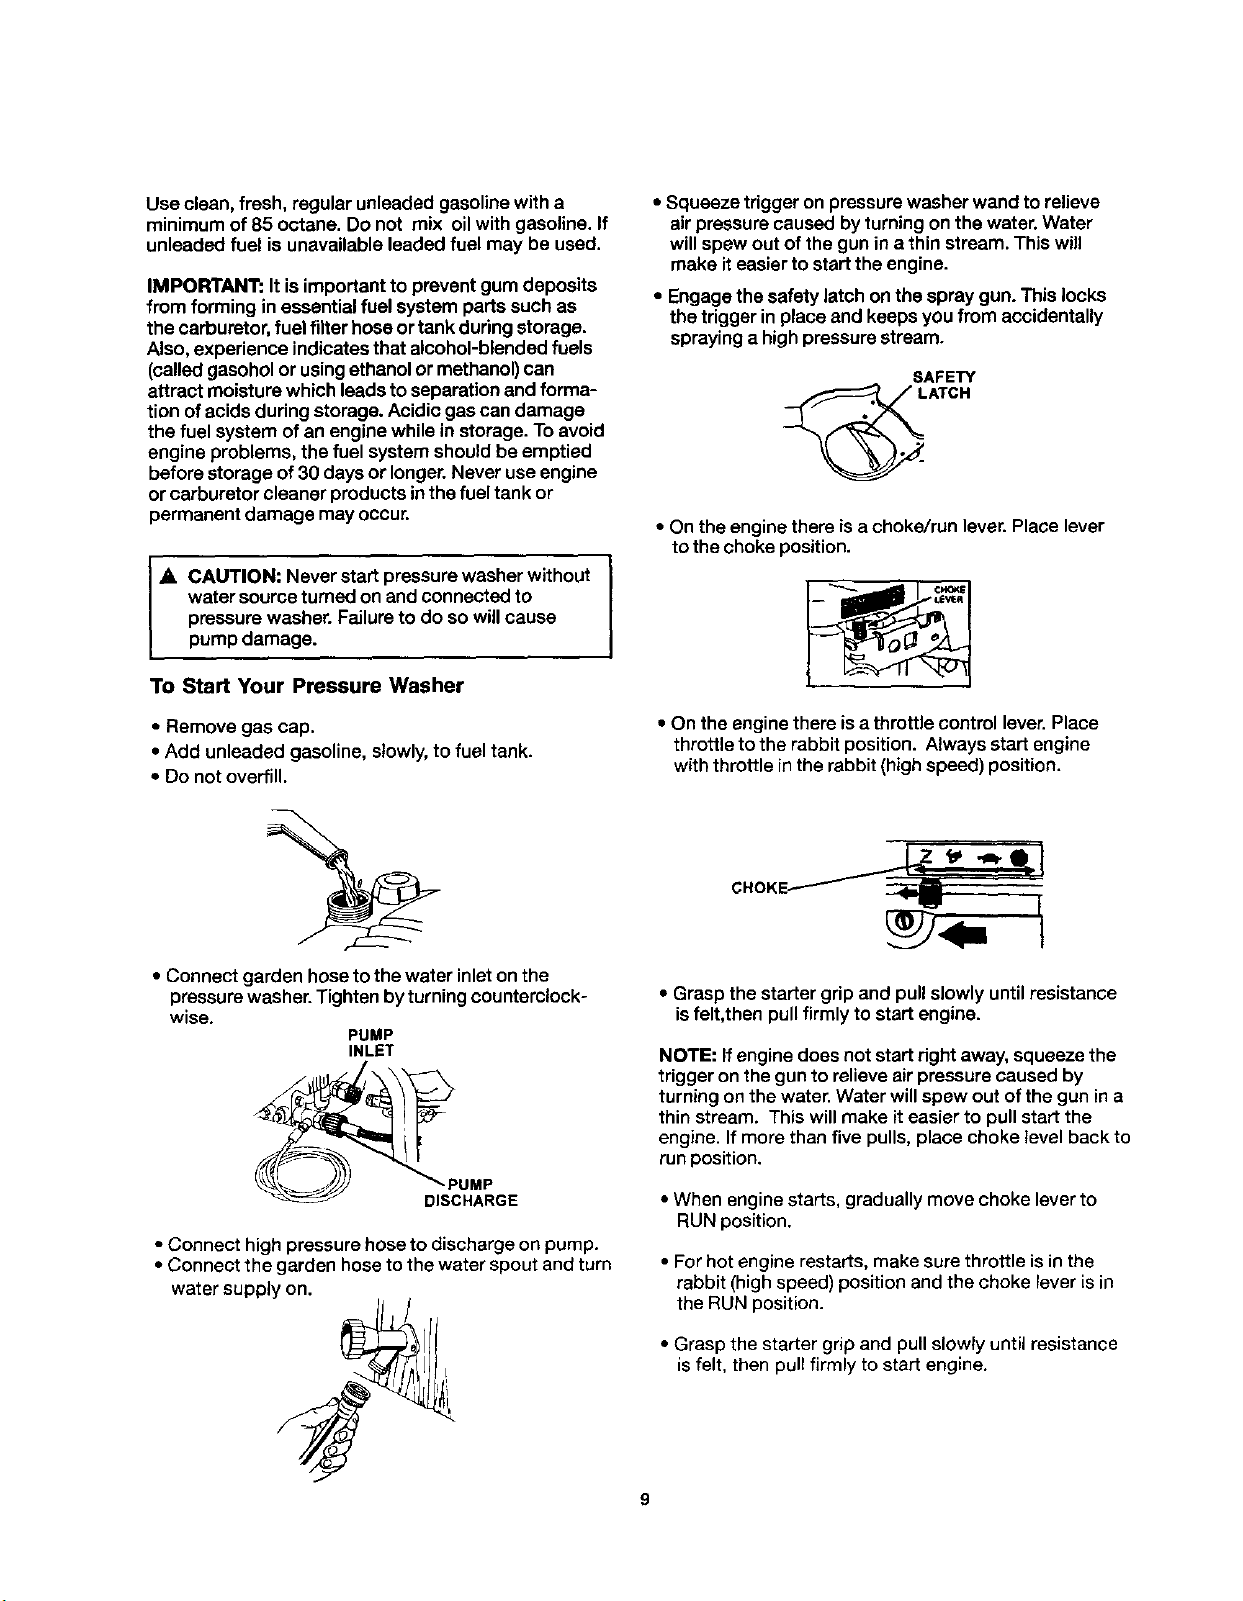
To Start Your Pressure Washer
• Squeeze trigger on pressurewasher wand to relieve
airpressurecaused by turningon the water.Water
will spewout ofthe gun ina thin stream. This will
make iteasierto start the engine.
• Engagethe safety latch on the spray gun. This locks
the triggerin place and keepsyou from accidentally
sprayinga highpressure stream.
SAFETY
.LATCH
• On the engine there is a choke/run lever. Place lever
!
to the choke position.
I "_..ml I o_1
I
• Remove gas cap.
• Add unleaded gasoline, slowly,to fuel tank.
• Do not overfill.
• Connect garden hose to the water inlet onthe
pressure washer. Tighten by turning counterclock-
wise.
PUMP
INLET
• Connect high pressure hoseto discharge on pump.
• Connect the garden hose to the water spout and turn
water supply on.
• On the enginethere is a throttle control lever.Place
throttle to the rabbit position. Always start engine
with throttle in the rabbit (high speed) position.
• Grasp the starter grip and pull slowlyuntil resistance
isfelt,then pullfirmly to start engine.
NOTE: If enginedoes not start rightaway,squeeze the
triggeron the gun to relieveairpressurecaused by
turningon the water.Water willspew outofthe gun ina
thinstream. Thiswillmake iteasier to pullstart the
engine. Ifmore than five pulls,place choke level backto
runposition.
• When engine starts, gradually move choke lever to
RUN position.
• For hot engine restarts, make sure throttle is in the
rabbit (high speed) position and the choke lever is in
the RUN position.
• Grasp the starter grip and pull slowly until resistance
is felt, then pull firmly to start engine.
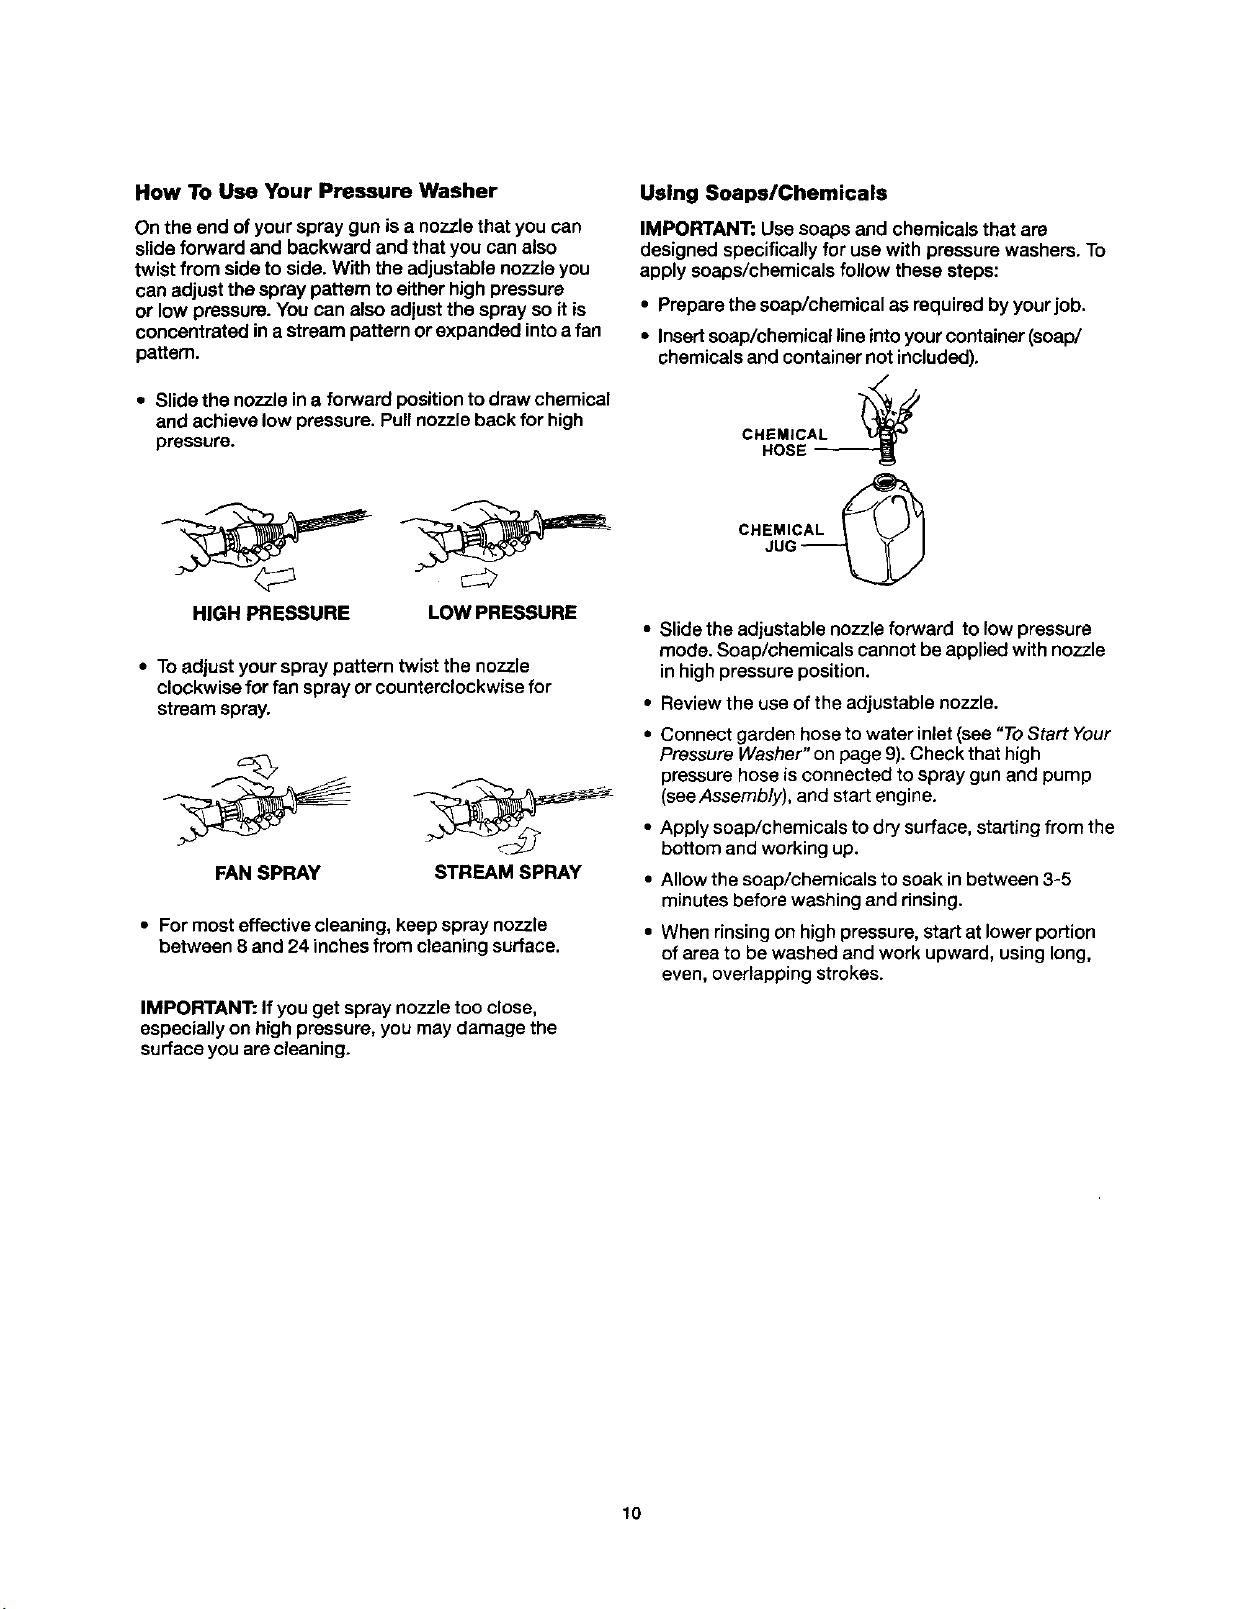
How To Use Your Pressure Washer
On the end of your spray gun is a nozzle that you can
slide forward and backward and that you can also
twist from side to side. With the adjustable nozzle you
can adjust the spray pattern to either high pressure
or low pressure. You can also adjust the spray so it is
concentrated in a stream pattern orexpanded into a fan
pattem.
• Slide the nozzle in a forward position to draw chemical
and achieve low pressure. Pull nozzle back for high
pressure.
Using Soaps/Chemicals
IMPORTANT: Use soaps and chemicalsthat are
designedspecificallyfor use with pressure washers,To
apply soaps/chemicals follow these steps:
• Preparethe soap/chemical as requiredby yourjob.
• Insertsoap/chemicalline intoyour container (soap/
chemicalsand containernot included),
CHEMICAL
HOSE --
CHEMICAL
HIGH PRESSURE LOW PRESSURE
• To adjust your spray pattern twist the nozzle
clockwisefor fan spray orcounterclockwisefor
stream spray.
FAN SPRAY
STREAM SPRAY
• For most effective cleaning, keep spray nozzle
between 8 and 24 inchesfrom cleaning surface.
IMPORTANT: If you get spray nozzle too close,
especially on high pressure, you may damage the
surface you are cleaning.
• Slide the adjustable nozzle forward to low pressure
mode. Soap/chemicals cannot be applied with nozzle
in high pressure position.
• Reviewthe use of the adjustable nozzle.
• Connect garden hose to water inlet (see "To Start Your
Pressure Washer" on page 9).Check that high
pressure hose is connected to spray gun and pump
(seeAssembly), and start engine.
• Apply soap/chemicals to dry surface, starting from the
bottom and working up.
• Allow the soap/chemicals to soak in between 3-5
minutes before washing and dnsing.
• When rinsingon high pressure, startat lower portion
of areato be washed and work upward, usinglong,
even, overlappingstrokes.
10
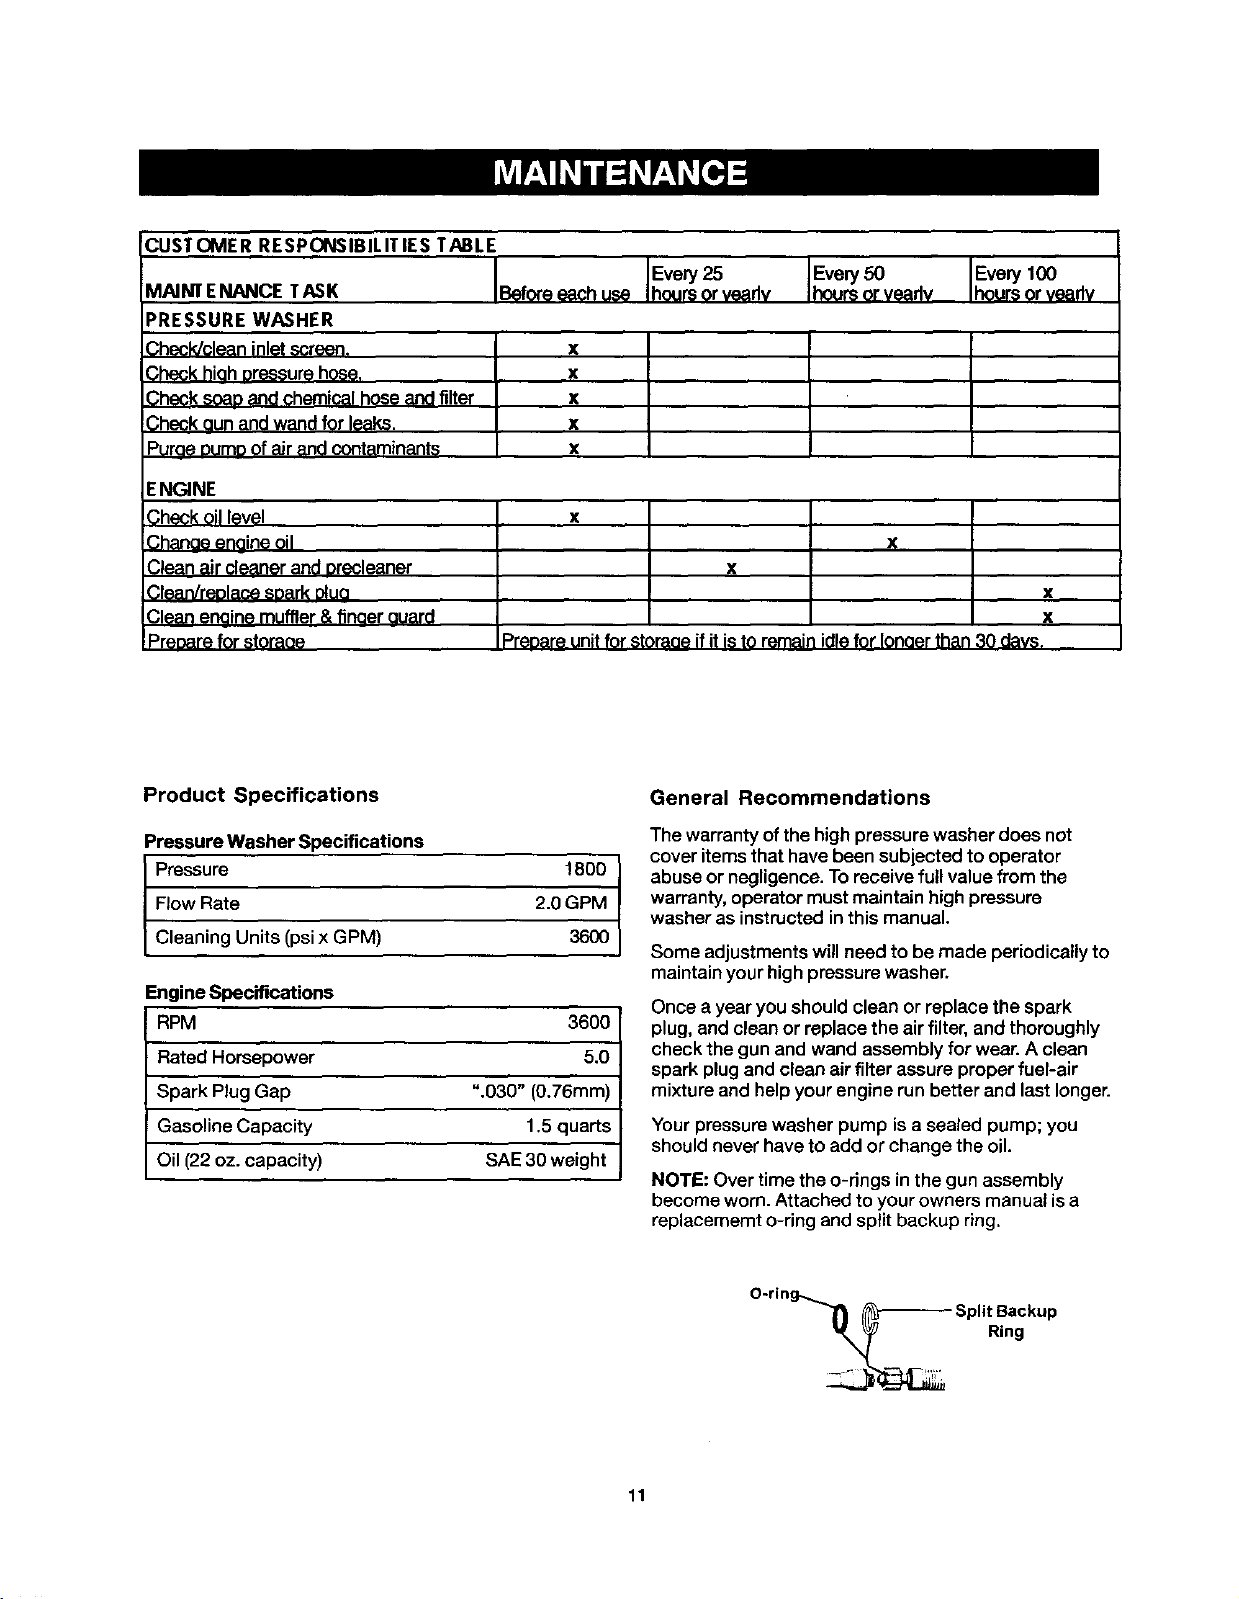
CUSTOMER RESPONSIBILITIES TABLE
Every25 Every50 Every100
MAINTENANCE TASK Beforeeachuse hoursor veadv houmorveadv hoursorveadv
PRESSURE WASHER
Check/clean inletscreen, x
Check hiah pressurehose. x
Check soaoand chemicalhoseandfilter x
Check gunandwandfor le_ks, x
Purgeoumoof air and contaminants x
ENGINE
Gheck0il level x
Char_aeengine oil }_
Cleanair cleaner and orecleaner x
ClearVreolacestark clua x
Cleanenoinemuffler &flnoer auard x
IPreDarefor storaee Precareunitfor storaneifit is to remainidlefor Ionaerthan30 davs.
Product Specifications
Pressure Washer Specifications
Flow Rate 2.0 GPM
I Pressure 1600
Cleaning Units (psi x GPM) 3600
Engine Specifications
RPM 3600
Rated Horsepower 5.0
Spark Plug Gap %030" (0.76mm)
Gasoline Capacity 1.5 quarts
Oil (22 oz. capacity) SAE 30 weight
General Recommendations
The warranty of the highpressure washer does not
cover itemsthat have been subjected to operator
abuse or negligence. Toreceive full value from the
warranty, operator must maintain high pressure
washer as instructed in this manual.
Some adjustmentswill need to be made periodically to
maintain your high pressure washer.
Once a year you shouldclean or replace the spark
plug, and clean or replace the air filter, and thoroughly
check the gun and wand assembly for wear. A clean
spark plug and clean air filter assure proper fuel-air
mixture and help your engine run better and last longer.
Your pressure washer pump isa sealed pump; you
should never have to add or change the oil.
NOTE: Over time the o-rings in the gun assembly
become worn. Attached to your owners manual is a
replacememt o-ring and split backup ring.
O-ring_._ _---- Split Backup
-_"_ _v Ring
11
 Loading...