

Craftsman 919161020 Owner’s Manual
MANUAL
MODELNO.
919.161020
CRRFTSMRN,o
PAINT TANK
IMPORTANT:
Read the Safety Guidelines and
All Instructions Carefully Before
Operating.
Sears, Roebuck and Co., Hoffman Estates, IL 60179 U.S.A.
MGP-161020 Rev. 1 5/4/01
DESCRIPTION
INSTALLATION
OPERATION
MAINTENANCE
PARTS LIST

TABLE OF CONTENTS
Page
WARRANTY .................................................................................................................................... 2
SAFETYGUIDELINES ...................................................................................................................... 3
WARNING CHART ....................................................................................................................... 3-4
GENERALINFORMATION ............................................................................................................... 5
Description ........................................................................................................................... 5-6
Assembly Instructions .............................................................................................................. 5
Operating Instructions .............................................................................................................. 5
Instructions for Regulator .......................................................................................................... 5
Cleaning Instructions ................................................................................................................ 6
TROUBLESHOOTING GUIDE .......................................................................................................... 7
PAINTTANK DIAGRAM ................................................................................................................... 8
PARTS REFERENCE ....................................................................................................................... 9
SERVICE NOTES ...................................................................................................................... 10-11
HOW TO ORDER REPAIR PARTS ........................................................................................ BACK COVER
FULL ONE YEAR WARRANTY ON CRAFTSMAN PAINT TANK
If this Craftsman Paint Tank fails due to a defect in material or workmanship within one year from the date of
purchase, RETURN IT TO THE NEAREST SEARS SERVICE CENTER/DEPARTMENT THROUGHOUT THE
UNITED STATES AND SEARS WILL REPAIR IT, FREE OF CHARGE.
This warranty gives you specific legal rights and you may have other rights which vary from state to state.
Sears, Roebuck and Co., Hoffman Estates, IL 60179 U.S.A.
2- ENG

SAFETY GUIDELINES- DEFINITIONS
This manual contains informa-
tion that is important for you to
know and understand. This infor-
mation relatesto protecting YOUR
SAFETY and PREVENTING
EQUIPMENT PROBLEMS. To
help you recognize this informa-
tion, we use symbols to the right.
Please read the manual and pay
attention to these sections.
IMPORTANT SAFETY INSTRUCTIONS
IMPROPER OPERATION OR MAINTENANCE OF THIS PRODUCT COULD RESULT
IN SERIOUS INJURY AND PROPERTY DAMAGE. READ AND UNDERSTAND ALL
WARNINGS AND OPERATING INSTRUCTIONS BEFORE USING THIS EQUIPMENT.
I _k DANGER I
URGENT SAFETY INFORMATION -A HAZARD
THATWlLLCAUS E SERIOUS INJURYOR LOSS
OF LIFE
Information for preventing damage to
equipment.
I -"LWARNING I
IM PORTANT SAFETY INFORMATION - A HAZARD
THATMIGHTCAUSE SERIOUS INJURYOR LOSS
OF LIFE.
Information that you should pay special
attention to.
• SAVE THESE INSTRUCTIONS •
I _CAUTION I
I NOTE I
• OVERPRESSURIZATION OF ATTACHMENTS •
HAZARD WHAT COULD HAPPEN HOW TO PREVENT IT
EXPLOSION OF
OBJECTS
•Attachments whose pressure rating is lower
than the adjusted pressure in the tank could
explode, resulting in serious injury or
property damage.
•Always make sure that equipment con-
nected to tank or hose outlet has a higher
pressure rating than the regulated air
pressure in the tank.
3- ENG

• TANK EXPLOSION WARNINGS •
Explosive failure of the tank, its components, or attachements to it, could result in
serious injury to self or others, or property damage from the following conditions:
HAZARD
EXPLOSION OF
TANKS
WHAT COULD HAPPEN
• Modifications to its design or construction
could weaken tank.
• Substitution of unauthorized non-standard
components could weaken tank or cause
component failure.
• Damage to the tank or its components could
weaken the tank.
• Improper cleaning or maintenance could
block air passages to the safety valve,
gauge or outlet, allowing pressure to rise
to dangerous levels, and preventing the
lowering of tank pressure.
• Tampering with the safety valve could allow
tank pressure to rise to dangerous levels.
HOW TO PREVENT IT
Assemble tank components in
accordance with service instructions. Do
not drill into tank, or weld attachments,
or alterits design in any manner.
• Use only those components furnished
with your tank, assembled in accordance
with instructions in the service literature.
• Never attempt to repair a damaged
tank. Replace it with a new one.
Following each use, clean and dry tank
and lid in accordance with maintenance
instructions. Make sure ports to safety
valve, gauge and outlet are free of hard-
ened paint or other materials which could
prevent free movement of air.
Never attempt to adjust safety valve to
change its pressure setting, or defeat its
function in any way. Operate the valve
before each use to assure that it func-
tions properly.
• Removal of the lid while the tank is under
pressure could result in the lid being propelled
violently from the tank.
• Use of reactive chemicals could attack the
the lid gasket and safety valve seal allowing
tank pressure to rise to dangerous levels.
• Halogenated hydrocarbon solvents- for
example: 1,1,1 - trichloroethane and
methylene chloride- can chemically react with
aluminum. If this reaction occurs within an
enclosed container such as this pressure feed
tank, the tank may explode.
• Overtightening clamps causing them to
weaken and fail could result in the lid being
propelled violently from the tank.
Before releasing clamp force to remove
the lid, shut off the supply of tank inlet air
and turn the regulator knob counterclock-
wise to relieve tank pressure. Check by
pulling the safety valve ring.
• Do not use reactive chemicals in your
tank such as acids, caustic solutions,
or halogenated hydrocarbon solvents.
• Do not use wrenches, pliers, or other
tools to tighten tank clamps. Use only
the torque you can apply with your hands.
If the lid gasket leaks, relieve tank pres-
sure and clean or replace the gasket.
4- ENG

GENERAL INFORMATION
DESCRIPTION
The Craftsman 21/2Gallon Paint Tank can withstand air pressure to maximum of 80 PSI. This Paint Tank is
equipped with an air regulator, gauge, safety valve, and fluid outlet. It is constructed of only the finest materials for
durability, The 21/2gallon capacity enables you to handle most any size job.
_ulu / [o]_.I
This pressure tank is not designed for highly abrasive, corrosive, or rust including materials. If used with
such materials, frequent and thorough cleaning is advised to reduce the necessity for replacement of
parts.
Assembly Instructions
1. Install the regulator assembly to the swivel adaptor
on the tank lid. Check bottom of regulator for
location of tank connection.
2. Install the lift handle in the threaded hole in center of
the tank lid. Tighten hex nut.
3. Connect the air supply hose to an air inlet fitting on
tank regulator. (Right or left side optional).
4. Attach the atomization air hose to an air outlet
fitting which is directly opposite air inlet fitting.
5. Connect material hose to the fluid outlet adaptor
located on the tank lid.
Instructions for using Air Pressure
Requlator on Paint Tank
Purpose of Pressure Regulator.
The pressure regulator on the paint tank regulates the
amount of pressure applied to the paint in the paint tank.
This controls the pressure of the paint being delivered
to the spray gun.
Recommended Paint Tank Pressures:
Internal-Mix Guns - Use higher tank pressures up to
the full amount of air pressure being delivered to the
spray gun but never in excess of 50 Ibs. air pressure at
the spray gun or paint tank.
Part of the air from the compressor or airline bypasses
the pressure regulator through the "tee" fitting and is
delivered to the spray gun. An additional pressure regu-
lator will be required between the paint tank and the
spray gun.
Operatinq The Paint Tank
You are now ready to fill the tank with material. Before
doing so be sure to thoroughly mix and strain the paint
to remove skins or undissolved particles which might
otherwise impede the flow of material through the hose
and gun.
A one gallon can of paint can be set inside the tank
instead of pouring the paint into the tank.
Place lid assembly on tank and hand tighten tank lid
clamp screws.
Shut off paint tank regulator byturning T-handle counter-
clockwise. Adjust the compressor regulator to obtain the
desired air pressure on the spray gun.
Now adjust the regulator on the paint tank to obtain the
desired pressure for the material. The higher above the
paint tank you are spraying the more pressure you will
need on the material. Normal operating pressure on
the paint tank is 25 to 30 PSI. Should you wish to re-
duce pressure, simply rotate the T-handle adjusting
screw counter-clockwise until the desired pressure set-
ting is obtained. There is no need to trigger the gun in
order to bleed off excess paint pressure.
External-Mix Guns - Use lower tank pressures. Always
start with pressure in paint tank at "zero" and increase
pressure in tank gradually until proper spray pattern is
obtained.
IMPORTANT: Before turning on air pressure, screw out
the regulator T-handle adjusting screw all the way,
counter-clockwise, to shut off the air pressure. Turn on
the air, then adjust the regulator to the required pres-
sure. (Approximately 12 Ibs. for external-mix guns.) Do
not use over 50 Ibs. working pressure in paint tank.
DO NOT USE OVER 80 PSI AIR PRESSURE
IN YOUR TANK.
5- ENG

Operatinq The Paint Tank (cont')
PRESSURE REGULATOR
(DO NOT EXCEED 80 PSI)
AIR
AIR FILTER
(RECOMMENDED,
AIR COMPRESSOR
WITH REGULATOR
NOT INCLUDED)
Cleaninq Instructions
Always shut off air pressure at source and
bleed off all pressure in Paint Tank by
gently pulling safety valve ring before
loosening thumb screw and clamps to re-
move lid.
Itis very important that the tank, material hose, and spray
gun be cleaned as soon as spray job is finished. Turn off
the main air supply to the tank. Remove all pressure from
the tank by pulling the ring on the safety valve until the
pressure bleeds down. Turn the T-handle adjusting screw
on the regulator counter-clockwise until no spring tension
is felt.
AIR REGULATOR (RECOMMENDED,
/ NOT INCLUDED)
MATERIAL HOSE
(INSIDE PAINT TANK)
J
Loosen thumb screws, tip clamps back and tip tank lid to
one side. Loosen spray gun air cap retaining ring about
three turns then turn on the air supply. Cup cloth over air
cap on the gun and pull trigger. This will force the material
back through the hose, into the tank. Empty and clean
tank and parts which come in contact with the material.
Use a suitable solvent. Pour solvent into the tank.
Replace lid and tighten the thumb screws and clamps
and spray until clean solvent appears.
6- ENG
TROUBLESHOOTING GUIDE
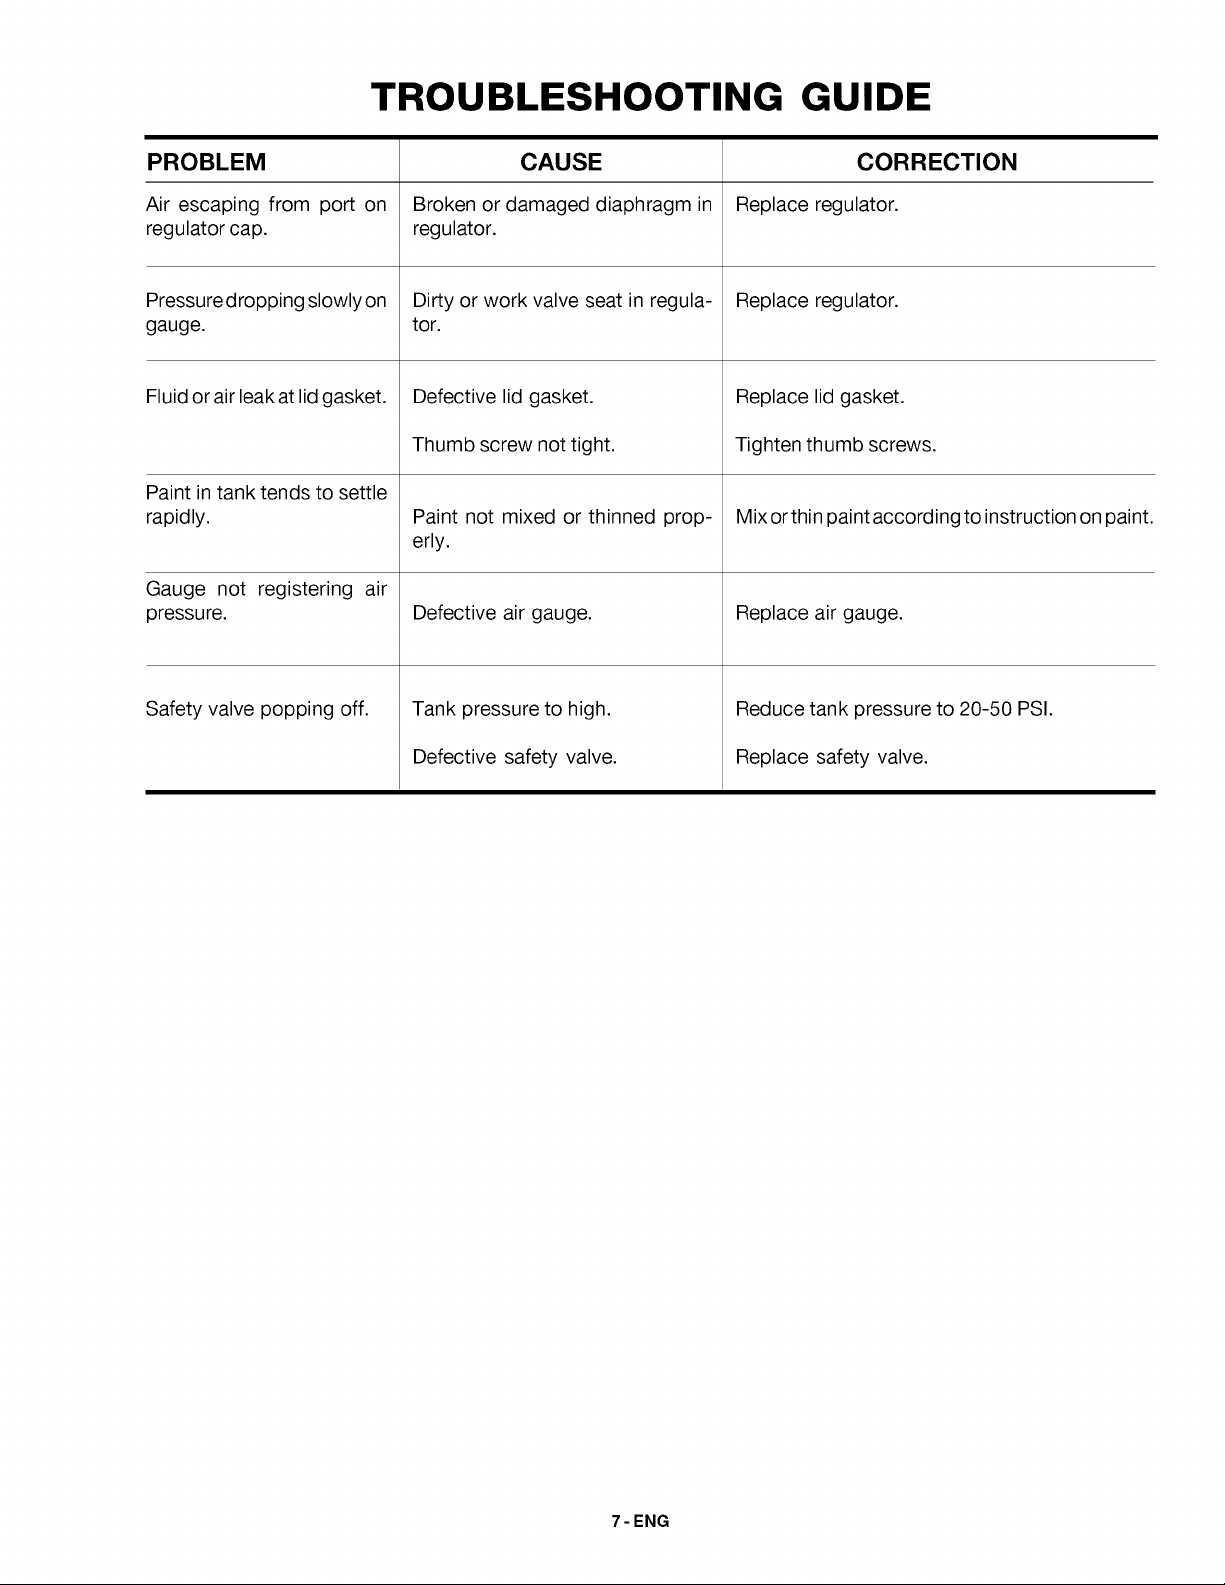
PROBLEM
Air escaping from port on
regulator cap.
Pressure dropping slowly on
gauge.
Fluid orair leak at lid gasket.
Paint in tank tends to settle
rapidly.
Gauge not registering air
pressure.
Safety valve popping off.
CAUSE
Broken or damaged diaphragm in
regulator.
Dirty or work valve seat in regula-
tor.
Defective lid gasket.
Thumb screw not tight.
Paint not mixed or thinned prop-
erly.
Defective air gauge.
Tank pressure to high.
CORRECTION
Replace regulator.
Replace regulator.
Replace lid gasket.
Tighten thumb screws.
Mix or thin paint according to instruction on paint.
Replace air gauge.
Reduce tank pressure to 20-50 PSI.
Defective safety valve.
Replace safety valve.
7 - ENG
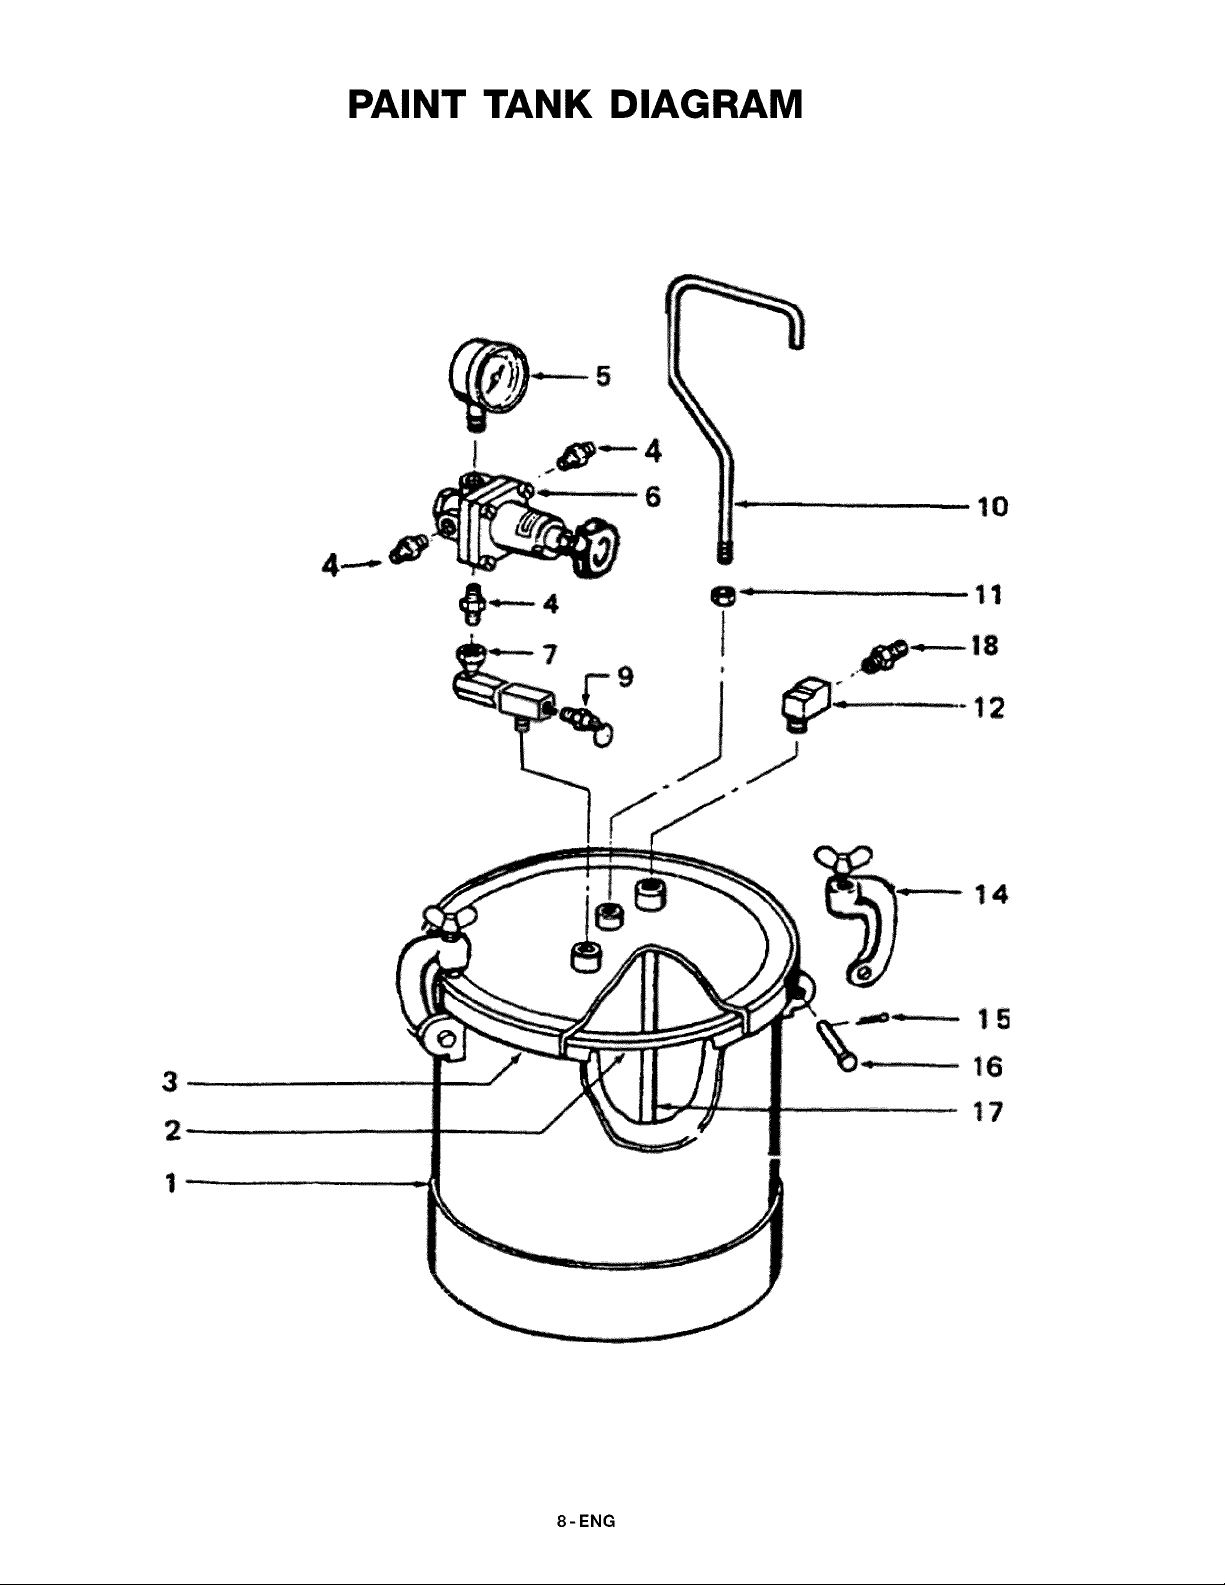
PAINT TANK DIAGRAM
............ 10
4
8_ ........"................... 11
7
!2
1
8- ENG
 Loading...