

Craftsman 919155190 Owner’s Manual
Owner's Manual
ICRRFTSMRN'I
SPRAY GUN
HLVP
High Volume
Low Pressure
Model No.
919.155190
• Safety Guidelines
• Operation
• Maintenance
= Storage
= Repair Parts
CAUTION: Read the Safety Guidelines
and A+i Instructions Carefully Before
Operating.
Sears, Roebuck and Co., Hoffman Estates, IL 60179 U.S.A.
visit our Craftsman website: www.sears.com/craftsman
D29783 _ev_ 04/26/04

Warranty ..................... 2
Safety Guidelines - Definitions .... 2
Important Safety Instructions .... 3-4
Specifications ................. 4
Assembly ................... 5-7
Operation .................. 8-t0
Maintenance ................. 11
Troubleshooting ............ 12-13
Parts List .................... 14
Spanish .................. 15-27
How to Order Repair Parts ........
..................... back cover
r_l:1 :| :q:l _ii'
FULL ONE YEAR WARRANTY
If this spray gun faits due to a defect in material or workmanship within one
year from the date of purchase, RETURN IT TO THE NEAREST SEARS
REPAIR CENTER THROUGHOUT THE UNITED STATES AND SEARS WILL
REPAIR IT,FREE OF CHARGE. If purchased from Orchard Suppty Hardware,
return to the nearest Orchard Store and Orchard wilt repair it, free of charge.
If this spray gun is used for commercial or rental purposes, the warranty wilt
apply for ninety days from the date of purchase.
This warranty gives you specific legat rights and you may have other rights
which vary from state to state.
Sears, Roebuck and Co., Hoffman Estates, IL 60179 U.S.A.
,_<l:lirii-i [itljrl] l!li_l 1{.I lll]lilllil[i]]{.l
This manual contaills [llforn_ation that is important for you to know and understated, This informatioll
relates to protecting YOUR SAFETY and PREVENTING EQUIPMENT PROBLEMS. TOhelp you
recognize this ii_fom_ation, we use the ayrnbols below, F'lee_e read the n_eJ_ualand pay attention to
these 8eotion_,
SAFETY and PREVENTING EQUIPMENT PROBLEMS= TOhelp you recog_ize this informatiom we
use th_ syn_bols below. PFease _ead the m_nual eJhd pay attention to these sections,
_]ndicates an
imminently hazardous
situation which, if not avoided, will
result in death or serious injury,
_]ndicates a potentially
hazardous situation
which, if not avoided, could result in
death or serious injury.
D29783 2-ENG
_[l_llndicates a potentially
which, if not avoided, _ result in
minor or moderate injury,
hazardous situation
_"_Ueed without the
safety alert symbol
indicates a potentially hazardous
situation which, if not avoided, may
result in oroloertv damaae,

= SAVE THESE INSTRUCTIONS =
_ IMPROPER OPERATION OR MAINTENANCE OF THIS PRODUCT
READ AND UNDERSTAND ALL WARNINGS AND OPERATING INSTRUCTIONS BEFORE
USI NG THIS EQUIPMENT°
_The Following Hazards Can Occur During The Normal Use Of This Product:
Risk of explosion or fire - flammable materials
WHAT COULD HAPPEN
Risk of explosion - incompatible materials
WHAT COULD HAPPEN HOW TO PREVENT IT
The solvents 1,1,1-Trichloroethane and Methyl.-
ene Chloride can chemicaliy react with the alu-.
minum used in most spray equipment, and this
gun and cup, to produce an explosion hazard
and could result in serious injury or death,.
i ......
COULD RESULT IN SERIOUS INJURY AND PROPERTY DAMAGE,
HAZARD
HAZARD
Read the label or data sheet for the material you
intend to spray°
1. Never use any type of spray coating material
containing these sofvents
2, Never use these solvents for equipment
cleaning or flushing
3_ If in doubt as to whether a material is
compatible, contact your material supplie_
HAZARD
Risk of breathing
WHAT COULD HAPPEN ]
L I
HOW TO PREVENT IT
,_ii:i_?f_i!!i::!!i!-!'iii_i:_i.il!!!i!__i._!_!':!!_!'i:::?_:i!!!_i_!_!!!__:!!:!i:_!i!!!!i:ii!!!!f::iii::/_!i:iii_,!_!:::i!!I:?i_
HAZARD
Risk of flying objects
WHAT COULD HAPPEN
Certain parts are under pressure whenever the
gun is connected to a pressurized air lineoThese
parts may be propelled if the gun is disassembled
i!!ii!; !?i!i!!ii i!il; i! ;iiii!iiiiiiii! ,iiii: i! !i!iiiii!i:
Prolonged exposure to air spray can result in
permanent damage to hearing.
Disconnect the gun from the air line, or com_
pletely depressurize the air' line whenever the
gun is to be disassembled,
:ii.gdggieS:i6_:_las_:w_en@ra_,!n_;_::i!_.":.i:_._i.h.'.:_i!:_.i.:.:-:._!,!::_.:::_:_.!:
Always wear hearing protection when opera6ng
spray equipment..
3- ENG
HOW TO PREVENT IT
, n H,,, i, , HH,

Risk of injection
HAZARD
WHAT COULD HAPPEN
Minimum Gun Inlet Pressure
Maximum Gun Inlet Pressure
Air Connection
Fluid Connection
Paint Canister
HOW TO PREVENT tT
20 PSt
45 PSI
Standard 1/4 NPS
Standard 3/8 NPS
1 Qt- Aluminum Wide
Mouth Canister
Needle Type
Feed Type
Bleed Type
Air compressor Requirements
Stainless Steel
Siphon*
Non-bleeder
8.6 SCFM@4O PSI
* This spray gun can easily be converted to pressure feed mode to be used
with a paint tank (sold separately) when spraying heavy bodied material or on
large projects.
029783 ,1_ENG

!:_..'_.:,]=liv_1=]li'il
Contents of Carton
1- Spray Gun
1- Owners Manuat
How to Set Up
Your Craftsman spray gun is shipped
completely assembled, and set-up for
siphon feed spraying.
Prior to shipment, this gun was treated
with an anticorrosive agent. Before
using this gun flush it with a suitable
solvent (mineral sprits is a suitabte
solvent).
To Flush Spray Gun Before Use
1. Removethe matehat cup from
lid/gun assembly. NOTE: Slide
release lever to the right, rotate
lid, and remove material cup.
Cup
"Lever
How To Connect Spray Gun to
Air Supply
t. Attach air supply line to 1/4 NPT
air inlet. NOTE: A 318" diameter
air hose is recommended for the
best atomized air pressure. If
using a 1/4" or 5/16"diameter air
hose the air pressure must be set
at the regulator to allow for the
drop in air pressure from the
regulator to spray gun.
Air Hose Recommendation Examples
lozzle Air Hose
45 PSI
lpprox.
3/8" x 25 _ Air Hose -
Recommended
10 I_i at
noz_e Air Hose
APpr°x"
1/4" x 25 _ Air Hose
at air
_ply
at gun
45 PSi
at: air
2. Fill the material cup 3/4 full with a
suitabte sotvent.
3. Aftach material cup to the lid/gun
assembly and slide release lever
to the left to secure in pIaee.
4. Aftach air suppty line to 1/4 NPT
air inlet. See "Connection"
paragraph in this section.
5. Putt trigger to spray solvent
through gun, see "How TO Use
Spray Gun" paragraph in the
"Operation" section of this manual
to operate spray gun.
6. Empty material cup of any
solvent.
10 p;i at
nozzle Air Hose
45 PSI
Approx. _i
5/16 _'x 25 _Air Hose
5-ENG [:)29783
at air
;_tgun
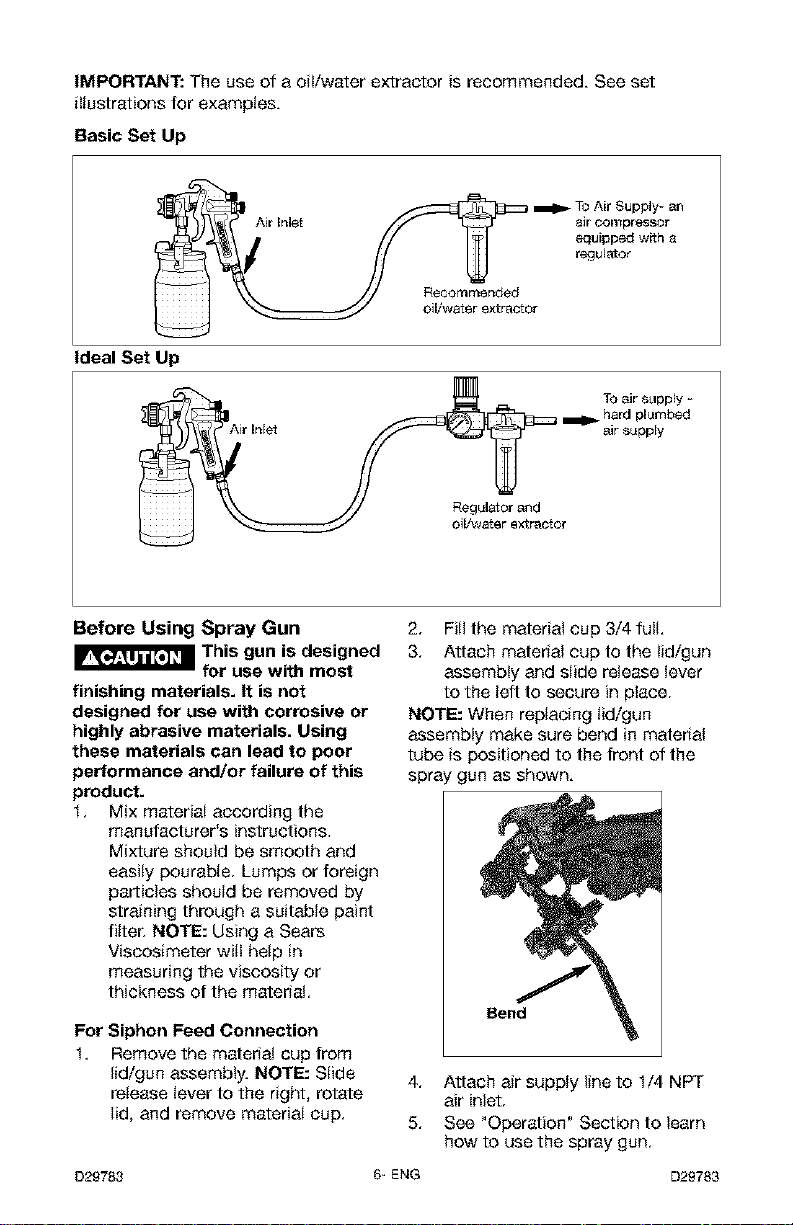
IMPORTANT: The use of a oiVwater extractor is recommended. See set
illustrations for exampIas.
Basic Set Up
Air Inlet _ir con_prsssor
_! _ _ TO Air Supply- ar_
Ideal Set Up
Before Using Spray Gun
This gun is designed
for use with most
finishing materials. It is not
designed for use with corrosive or
highly abrasive materials. Using
these materials can lead to poor
performance and/or failure of this
product.
1. Mix material according the
masufacturer's instructions.
Mixture should be smooth and
easity pourabIe. Lumps or foreign
particlas should be removed by
straining through a suitabte paint
fitter. NOTE: Using a Sears
Visceeimeter witl help in
measuring the viscosity or
thickness of the matedat.
For Siphon Feed Connection
1. Removethe matedat cup from
lid/gun assembly. NOTE: Stide
release lever to the right, rotate
tid, and remove material cup.
D29783
equipped with
regulator
R?corameeded r
TO air s_lpply -
hard plumbed
air suppFy
2, Fill the material cup 3/4 full.
3, Attach material cup to the tidigun
assembly and slide release lever
to the left to secure in ptace.
NOTE: When repiacing iidigun
assembly make sure bend in matedat
tube is positioned to the front of the
spray gun as shown.
Bend
4, Attach air supply line to 1/4 NPT
air inlet,
5, See "Operation" Section to learn
how to use the spray gun.
6- ENG
D29783
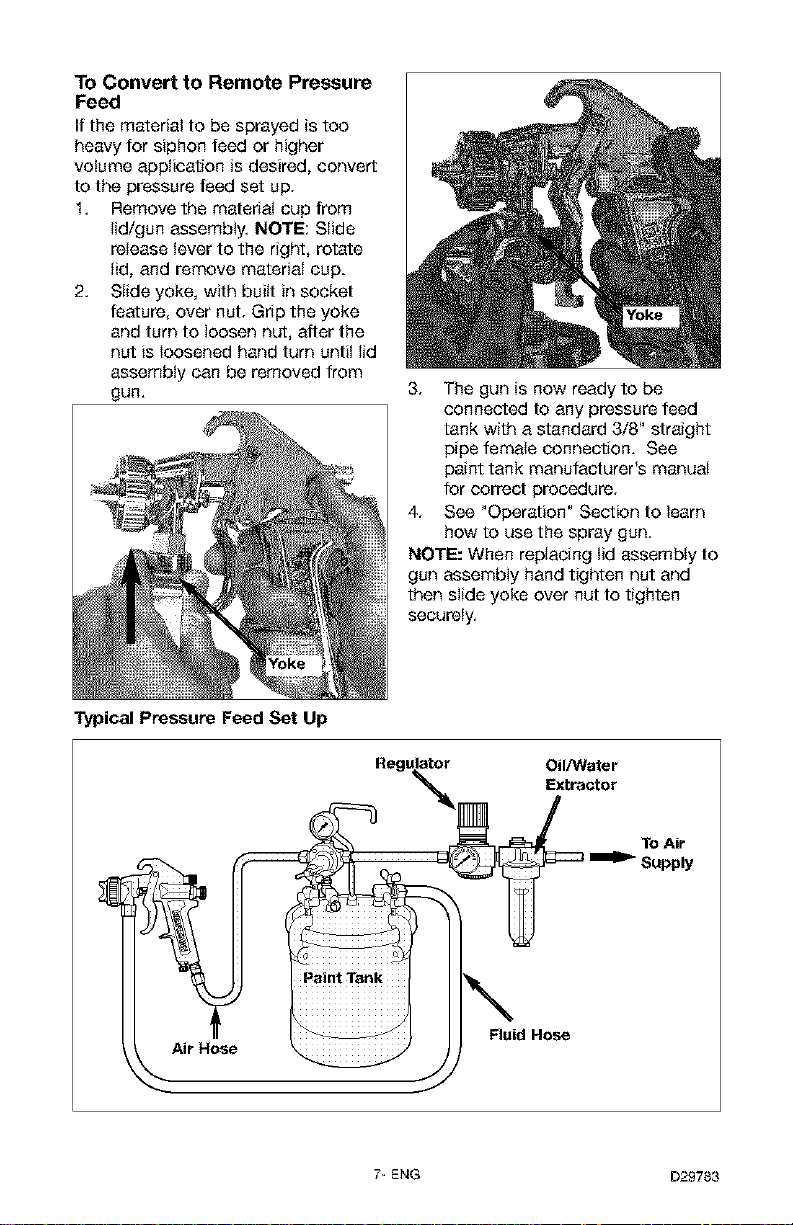
To Convert to Remote Pressure
Feed
If the material to be sprayed is too
heavy for siphon feed or higher
volume appIication is desired, convert
to the pressure feed set up,
1. Remove the material cup from
lid/gun assembly. NOTE: Stide
release lever to the right, rotate
lid, and remove material cup.
2. Siide yoke, with buiit in socket
feature, over nut. Grip the yoke
and turn to loosen nut, after the
nut is loosened hand turn untit tid
assembly can be removed from
gun.
3. The gun is now ready to be
connected to any pressure feed
tank with a standard 3/8" straight
pipe femate connection. See
paint tank manufacturer's manuat
for correct procedure.
4. See "Operation" Section to tearn
how to use the spray gun.
NOTE: When replacing lid assembly to
gun assembly hand tighten nut and
then slide yoke over nut to tighten
securely.
Typical Pressure Feed Set Up
Regu_ Oil/Water
7-ENG D29783
Extractor
To Air
Supply
Fluid Hose

Know Your Spray Gun
Machined Brass
Air Car
Hardened Steel
Fluid Tip
Release Lever
1- Quart
Siphon Feed
Material Cup
Machined Brass External Mix Cap -
The air and material are mixed after
leaving the nozzle to provide a
superior finish with thick and thin
material
Hardened Steel Fluid Tip - for long
life.
Air Cap Horns - determines a
horizontal or veriical spray pattern,
Fluid Control Knob - controts the
fluid or density of fan spray.
Pattern Control Knob - controls the
size of the pattern from a targe oblong
to small round pattern,
Air Valve Control Knob - fine tunes
the material spray with air,
1t4" NPT Air Inlet- allows the spray
gun to be connected to the air supply.
Release Lever - releases tidigun
assembly from material cup.
Yoke - with built in wrench used to
easily remove gun from material cup
without tools.
Fluid Needle Adjustment Nut
Pattern Control
__ Fluid Control
Knob
1/4" NPT Air Inlet
Air Valve
Control Knob
_ Before
disassembly or re-
moval of any part of gun or attached
components, shut off compressor,
release pressure by depressing
trigger, and disconnect power
source. NEVER assume system
pressure is zero!
_!]_ Prior to daily
operation, make
certain that all connections and fit-
tings are secure. Check hose and all
connections for a weak or worn
condition that could render system
unsafe. All replacement components
such as hose or fittings must have a
working pressure equal to or greater
than system pressure.
_TO AVOID CREATING
AN EXPLOSIVE
ATMOSPHERE, WORK ONLY IN
WELL VENTILATED AREAS.
D29783 8" ENG
F_q_,_ USE OF A FACE
MASK IS
RECOMMENDED TO PREVENT IN-
HALATION OF TOXIC MATERIAL.
Before Using Your Spray
Gun
1. Set up spray gun as described
in the "How to Set Up Spray
Gun" paragraph in the
"AssembIy" section of this
manual.
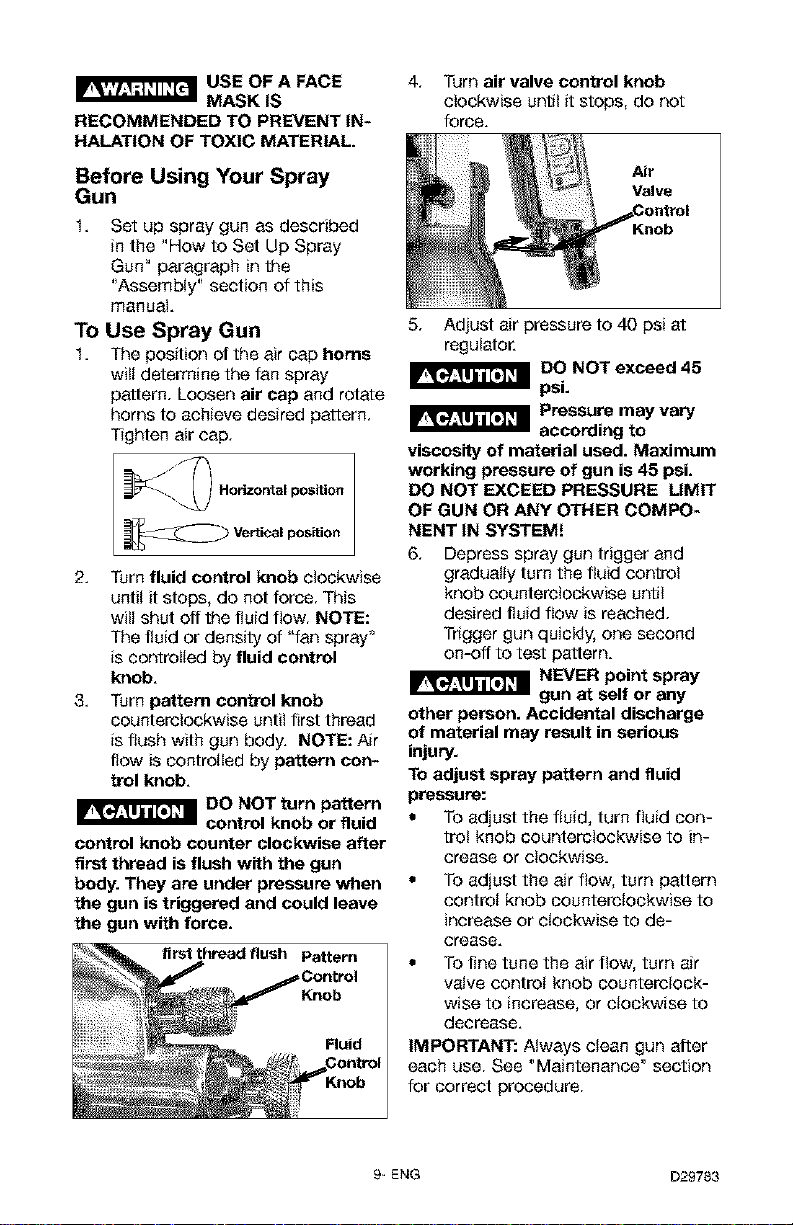
To Use Spray Gun
1. The position of the air cap horns
wilt determine the fan spray
pattern. Loosen air cap and rotate
horns to achieve desired pattern.
Tighten air cap.
Horizontal position
_ Vertical position
2. Turn fluid control knob clockwise
untit it stops, do not force. This
wilt shut off the fluid flow. NOTE:
The fluid or density of "fan spray"
is contretied by fluid control
knob.
3. Turn pattern control knob
counteretockwise untit first thread
is flush with gun body. NOTE: Air
flew is contreIted by pattern con-
trol knob.
_DO NOT turn pattern
control knob counter clockwise after
first thread is flush with the gun
body. They are under pressure when
the gun is triggered and could leave
the gun with force.
control knob or fluid
first thread flush Pattern
Knob
Ruid
4. Turn air valve control knob
clockwise until it stops, do not
force.
Air
Valve
5.
Adjust air pressure to 40 psi at
regulator.
_DO NOT exceed 45
I_-_ Pressure may vary
psi.
according to
viscosity of material used. Maximum
working pressure of gun is 45 psi.
DO NOT EXCEED PRESSURE LIMIT
OF GUN OR ANY OTHER COMPO-
NENT IN SYSTEM!
6. Depress spray gun trigger and
gradually turn the fluid contret
knob counterclockwise until
desired fluid flow is reached.
Tngger gun quickly, one second
on-off to test pattern.
NEVER point spray
gun at self or any
other person. Accidental discharge
of material may result in serious
injury.
To adjust spray pattern and fluid
pressure:
• TOadjust the fluid, turn fluid con-
troi knob counterclockwise to in-
crease or clockwise.
• To adjust the air flow, turn pattern
contret knob counteretockwise to
increase or clockwise to de-
crease.
• To fine tune the air flew, turn air
vatve control knob counterclock-
wise to increase, or clockwise to
decrease.
IMPORTANT: Always clean gun after
each use. See "Maintenance" section
for correct procedure.
9-ENG D29783
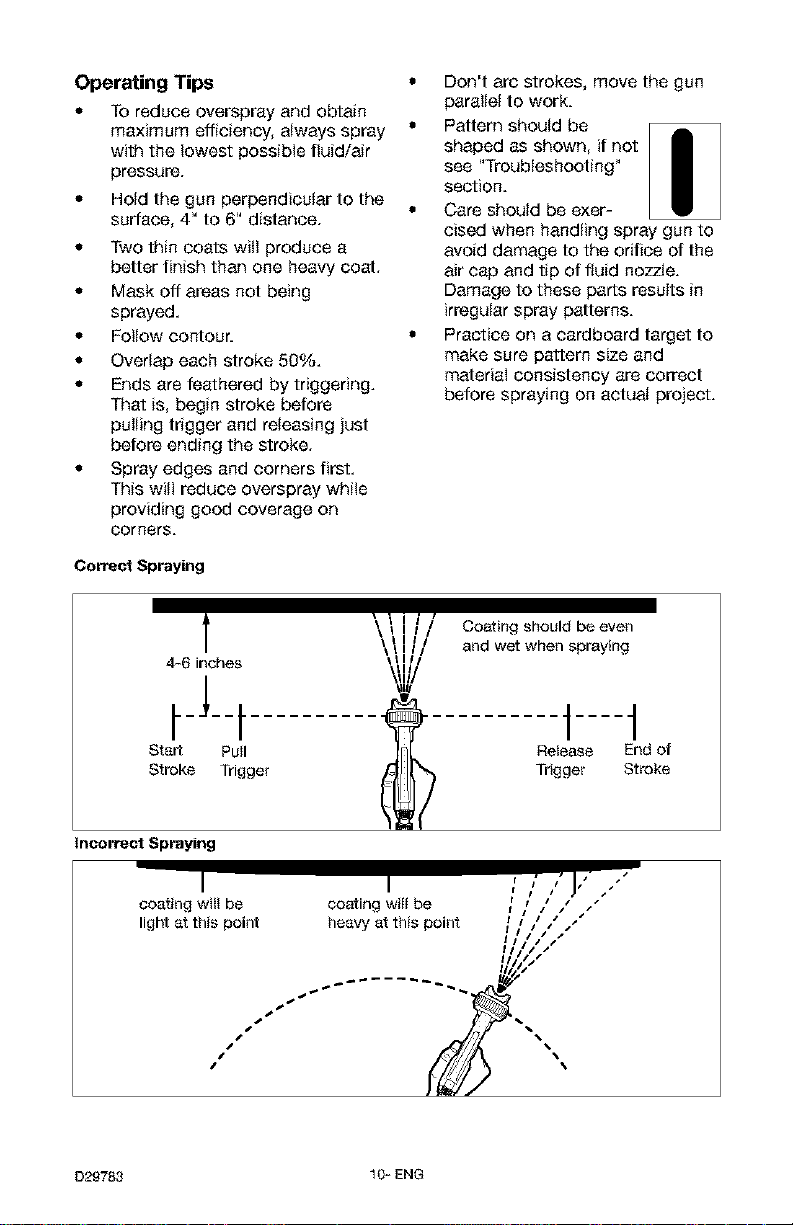
Operating Tips
To reduce overspray and obtain
maximum efficiency, always spray
with the towest possible fluid/air
pressure,
• Hold the gun perpendicular to the
surface, 4_'to 6 _'distance,
• Two thin coats witl produce a
better finish than one heavy coat,
• Mask off areas not being
sprayed.
• FoIIow contour.
• Overtap each stroke 50%.
• Ends are feathered by triggering.
That is, begin stroke before
puiiing trigger and reieasing just
before ending the stroke•
• Spray edges and corners first.
This witl reduce overspray while
providing good coverage on
corners.
Correct Spraying
Don't are strokes, move the gun
paraiieI to work.
Pattern should be
shaped as shown, if not
see "Troubleshooting"
section.
Care should be exer-
cised when handling spray gun to
avoid damage to the orifice of the
air cap and tip of fluid nozzle.
Damage to these parts results in
irregular spray patterns.
Practice on a cardboard target to
make sure pattern size and
material consistency are correct
before spraying on actual project.
t
4-6 inches
bJ--t
Start Pull
Stroke Trigger
Incorrect Spraying
I I , ,'J ,
coating wiiI be coating wiiI be _ _ / / ,"
light at this point heavy at th+spoint _] ] s /
. - - e/z/,'
,iJ S %%%
•
D29783 10+ ENG
Coating should be even
and wet when spraying
t .... t
Release End of
Trigger Stroke
r /' I I _s
Ilfl/I
II/,',"
 Loading...