

Page 1
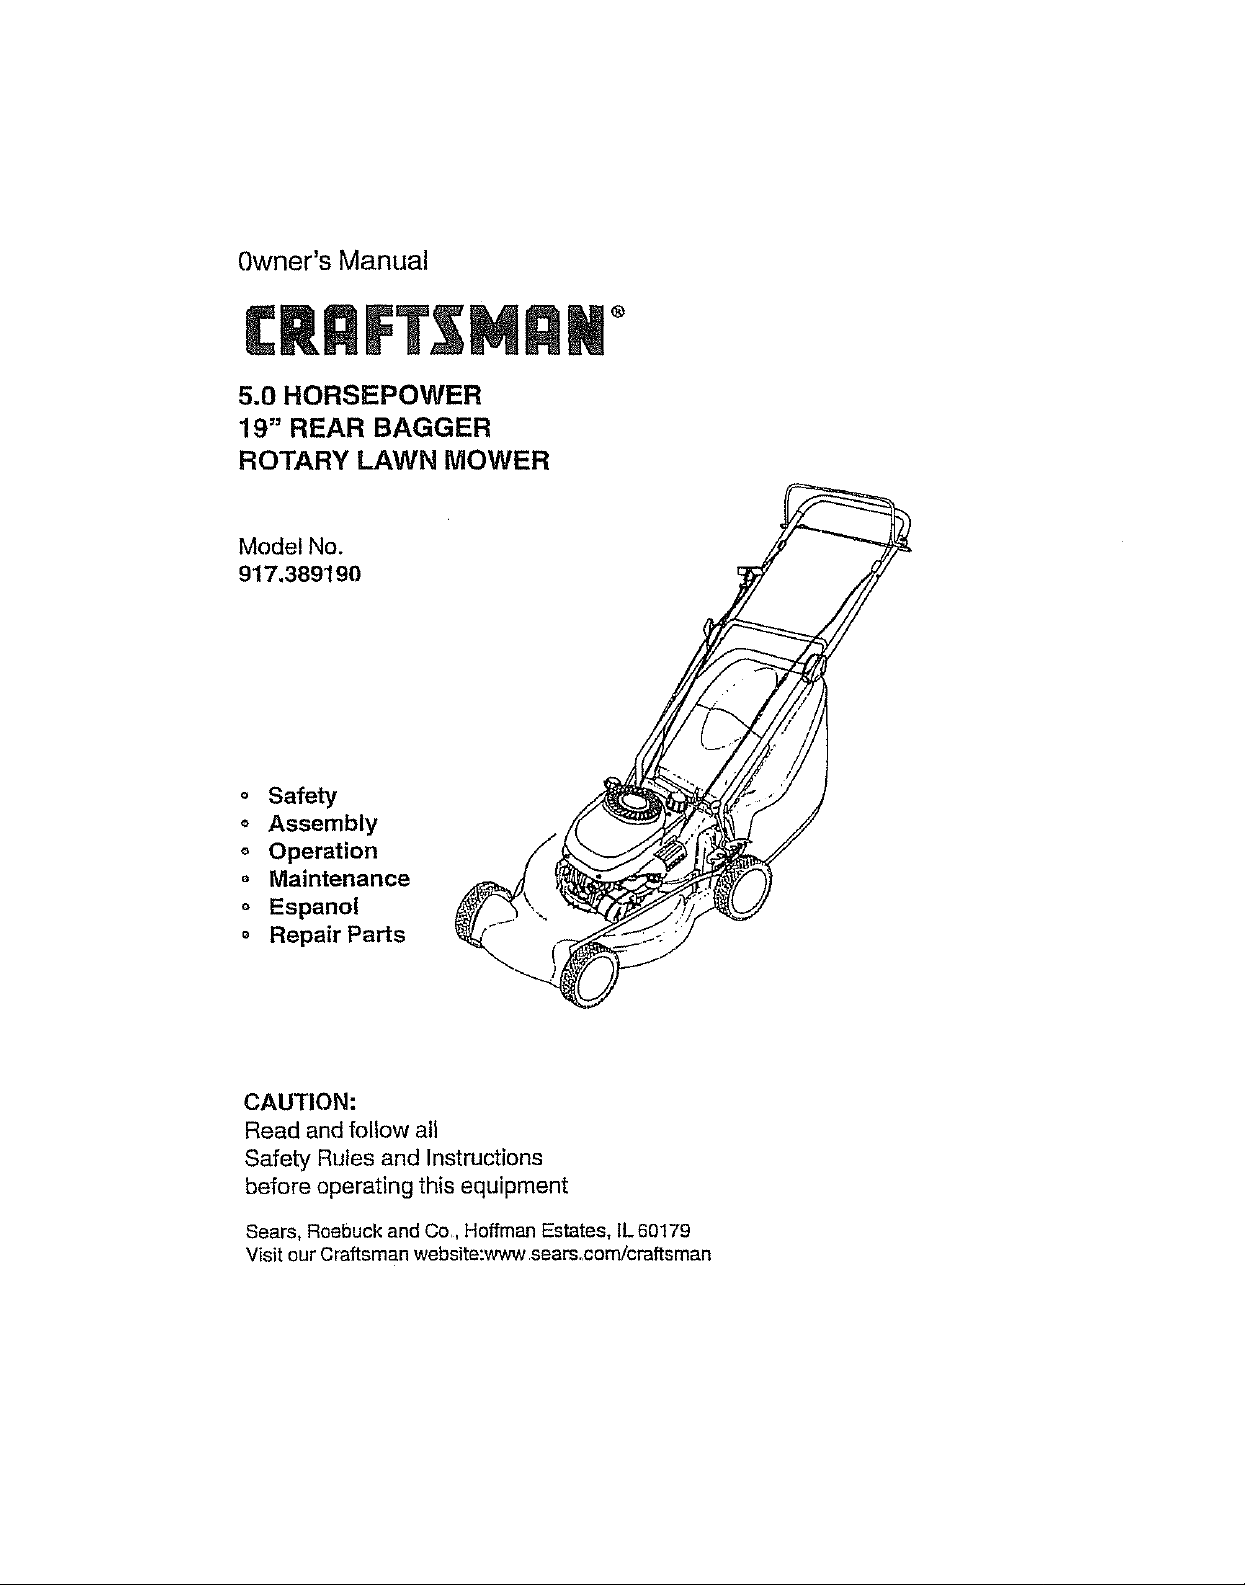
Owner's Manual
5.0 HORSEPOWER
19" REAR BAGGER
ROTARY LAWN MOWER
Model No.
917.389190
o Safety
Assembly
Operation
o Maintenance
o Espanol
Repair Parts
®
CAUTION:
Read and follow all
Safety Rules and Instructions
before operating this equipment
Sears, Roebuck and Co,, Hoffman Estates, IL 60179
Visit ourCraftsman website:vwvwsears,corn/craftsman
Page 2
WARRANTY .....
gMITED TWO YEAR WARRANT'/ON CRAFTSMAN POWER MOWER,
For two years from date of pumhase, when this Crattsman Lawn Mower is maintained, lubricated, and
tuned up accordingtothe operating and maintenance instmstlans inthe owner's manual, Sears will repair
free of charge anydefect in matedalorworkmanship. If thlsCraftaman Lawn Moweris used for
commercial ar rental purposes, this warranty applies for only 90 days from the date of purchase.
This Wananty does notcoven
. __xpendabts items which become worn dadng narmal use, such as rotary mower blades, blade
adapters, baits, air cleaners and spark plug.
o R_pairsnec_ssaryb_caus_ef_perat_rabuse_tneg_igence_inc_edingb_ntcrankshaftsandthefailurs
to maintain the equipment accordingto',he instructions contained in the owner's manual,
Warranty se_ca is available by rstuming theCraftsman power mowerto thenearest Sears SaUce
Center/Departmast in the UKffedStates._ wan'at_ appi_s an]ywhoathispreduutis inuse intheUnited States.
This Warrantyg_vesyousped_clegal fights, and you may also have otherfights which vary fromstateto state.
SEARS, ROEBUCK AND CO, D/817 WA, HOFFMAN ESTATES, ILUNOIS 60179
Ax
..... SAFETY RULES _,
NOW YOUR LAWN MOWER
EAD THIS OWNER S MANUAL AND SAFETY RULES BEFORE OPERATING YOUR
WN MOWER_
_Cempare the illustrations with your lawn mower to familiarize yourself with the location of
_,arious controls and adiustments. Save this manual for future reference.
These symbols may appear on your lawn
mower or In literature supplied with product.
Learn and understand their meaning.
lWamtag
I 1
Oil
Danger, keep hands and feet away
Safety standards require operator presence controls
to minimize the dskpf injury. Your unitis equipped
with such controls Do.riot attsmpt to defeat the
functionofthe controlsunder any circumstances_
TRAINING:
o Readthisopera_rsmanoa]care_u_. Becomefan_T_
wiLhthecor_otsaed Imow how tooperatayourmmver
propegy.Learnhowtoq_dy stop mow_,
- Do notal_3wd"J[dmnto us_yoqr mower_Never allow
adults touse mower withoutproper_tm_ons.
• Keep the area af opemtlan clear ef all persons,
especially small children and pets.
o Use rsowar only as the manufacturer intended
and as described inthis manual.
- Do not operate mower if it has been dropped or
damaged in any manner, Always have damage
repaired before using your mower.
= Do not use accesaary attachmanta that are nnt
recommended by the manufacturer. Use of such
attachments may be haz_rdoce.
• The blade tams when the engthe is runnthg,
Page 3
SAFETY RULES
PREPARATION:
• Always thoroughly check the area tn be mowed
and clear it of all stones, sticks, wires, bones and
other foreignobjects These objects will be
thrown by the blade and can cause severe
injury,
• Always wear cafety gissses or eye chields when
starting and while using your mower.
• Dress properly. Do not operate mower when
barefoot orweadng open sandals. Wear only
solid shoes with good traction when mowing.
• Checkfoeltankbeforeala_ngesgme. Donotf_[
gas tankLqdcom,when theengineisrunningor
when the engine ishot Allow the en_ne tocoolfor
sin,ere]minutes before finingthe gas tank. CLSanoff
any spilledgasoline before sta_ng the engine.
. Always make whesl height adjustments before
startingyour mower, Never attempt to do this
while the engine is running.
• Mow only in daylight or good artificial light.
OPERATION:
- Keep your eyes and mind on your mower and
{hearea being COL Do not let otherinterests
distract you.
o Do not mow wet or slippery grass. Never tun
while operating your mower. Always be sum of
your footing- keep a firm hold on the handles
and wallc
= Do not put hands or feet near or under retating
parts Keep clear of the discharge opening at all
times.
= Always stop the engine whenever you leave or
are not uslng your mower, or before crossing
driveways, walks, reads and any gravel -
covered areas.
° Never d[rent discharge of malefial toward
bystanders nor allow anyone ncar the mower
while you are operating ;L
o Before cleaning, inspecting, or repairing your
mower, stop the engine and make absolutely
sure the bisde and all moving parts have
stopped. Then disconnect the spark plug wire
and keep it away from the spark plug to prevent
accidental starting,
• Do not continue to runyour mower ifyou hit a '
foreign object. Follow the procedure outlined
above, then repair any damaged before
restading and operating your mower.
= Do not change the governor settings or
overspeed the engine. Engine damage or
personal injury may result,
• Do not operate your reower if ifv='bratas
abnormally. E-_caenive v_rat_an is an indication
of damage; stop the engine, safely check for the
cause of vibrationand repair as required,
• Donotrentheangfneindoors, Exhanalforees
are dangerous.
• Never c_Jtgrass by pulling the mower towards
you. Mow across the face ofslopes, never up
and down oryou might lose your footing. Do not
mow excessively steep slopes. Use caution
when operating the mower on uneven terrain or
when changing d_restions - maintain good
footing.
. Never operate ycar mower wifhout prepsr
guards, plates, grass bag or other safety devices
inplace.
MAINTENANCE AND STORAGE:
Check the blade and the engine mounting bolts
often to be sure they are tightened properly,
Check allboils, nuts and screws at frequent
intervals for proper tightness to be sore mower
is in safe working condgion.
Keep eJIsafety devices in place and woddng,
To reduce fire hazard, keep the engine free of
grass,leaves or excessive grease and of]
Check gress, l_ag often for detsdoraflan and
wear and repta_ worn bags, Use only
replacement bags that are recommended by
and comply with specificaflons of the
manufactarer of your mower,
Always keep a sharp blade on your mower.
AlLSWengineto cool before storing in any
encLssure_
Never store mower with fuel in the tank inside a
building where fume.smay maab an open
flame or an ignition source such as a hot water
heater, space heater, clothes dryer, eLS.
ACAUTION: Always disconnect spark plug wire
and place wire where Itcannot contactspark plug
in order to prevent accidental sta_ng when setfthg
up, transporting, adjusting or making repairs,
WARNING
The engine exhaust from this productcontains
chemicals known to the State of California to cause
cancar, birth defects, or other reprodualhte harm.
Page 4
ASSEMBLY INSTRUCTIONS
VE LAWN MOWER'FROM CARTON
e loose parts included with mower
n two end comers of carton and lay end panel down fiat,,
n mower out of carton and check carton thoroughly for additional loose
Read these instructions and _is manual in htsentirety betora you attempt to
assemble or operate your new lawn mower. Your new lawn mower has been
assembled at the ttle factory with exception of these parts left unassembled for
shipping purposes. All parts such as nuts, washers, bolts, etCo,necessaryto
complete the assembly have been placed in the parts b'ag_ To ens_Jre safe and
proper operation of your' lawn mower, all parts and hardware you assemble must be
tightened securely. Use the correct tools as necessary to ensure proper tightness..
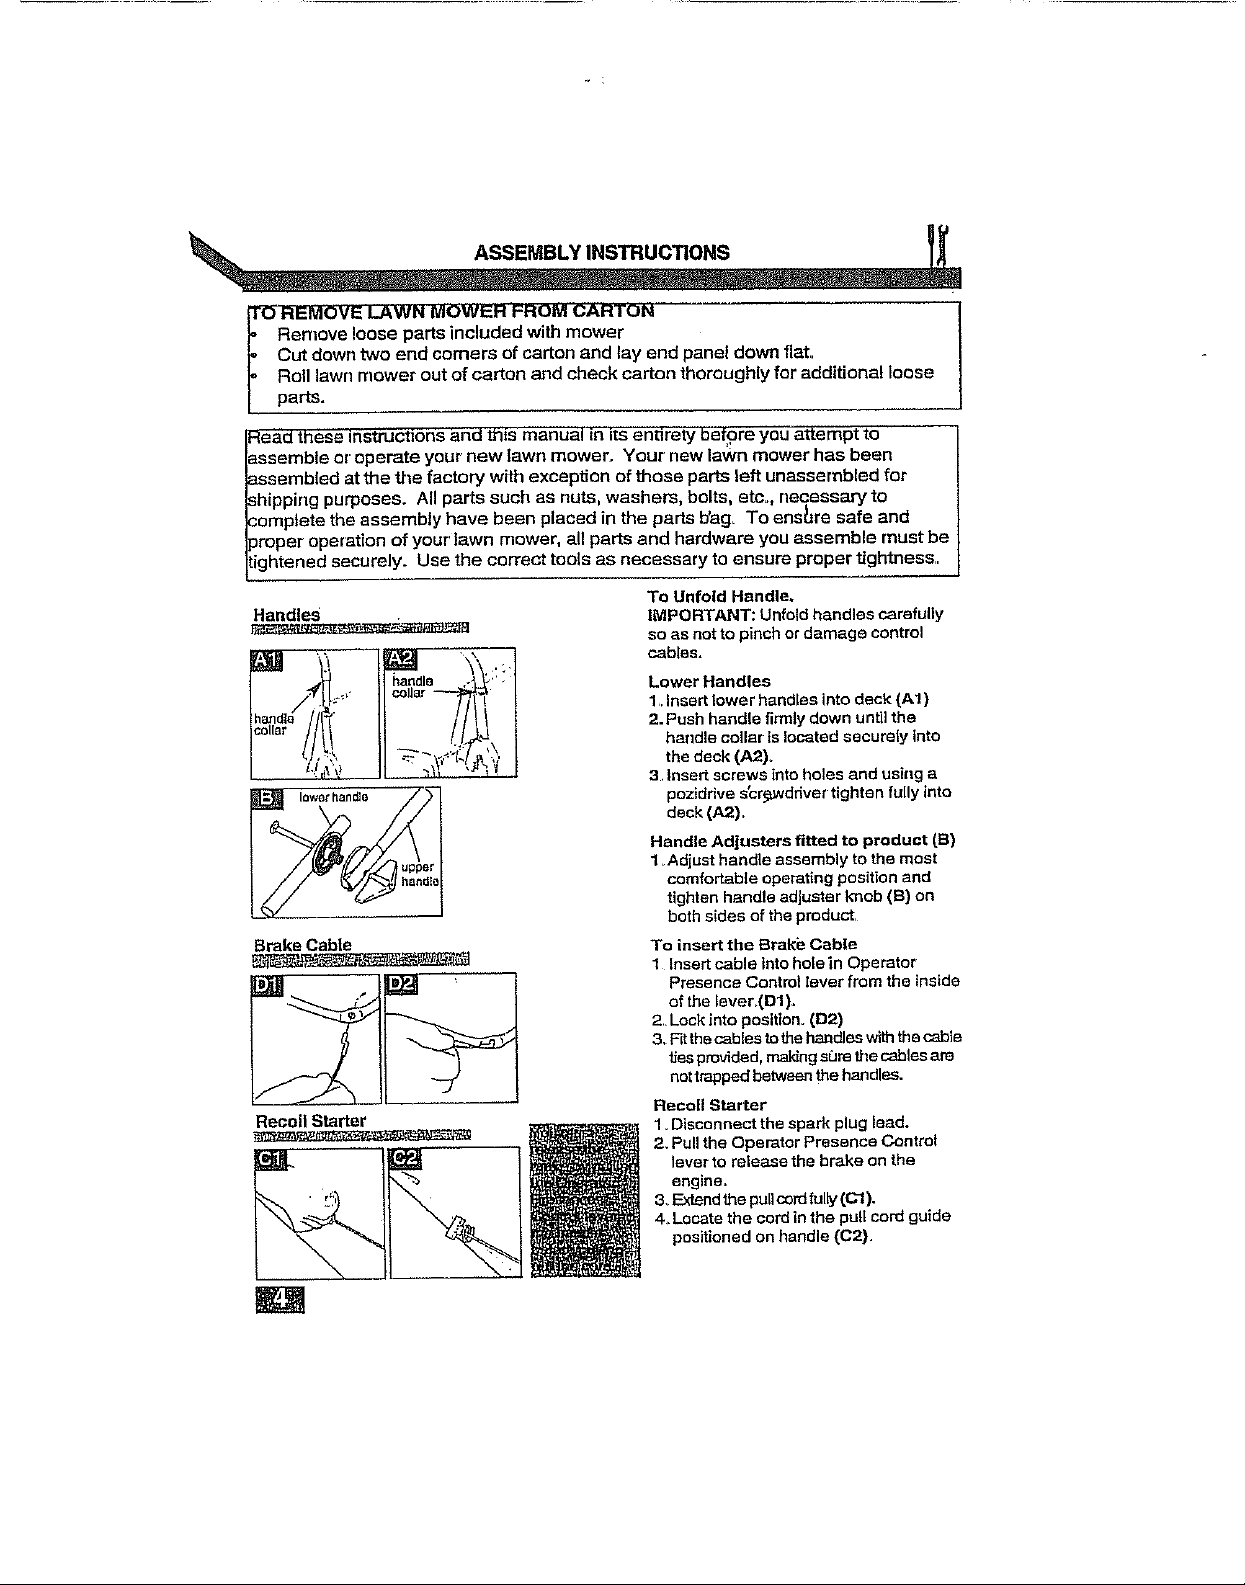
Handles
_* 10wethandio
Brake Cable
Recoil Starter
-. ,_ s
upper
To Unfold Handle,
IMPORTANT: Unfold handles carefully
so as not to pinch or damage control
cables.
Lower Handles
1. Insert tower handles into deck (A1)
2.Pcab handle firmly down until the
handle collar ts located securely Into
the deck (A2)o
3. Insert screws into boles and using a
pozidrive s'cr_ddver tighten fully into
deck (A2),,
Handle Adjusters fired to product (B)
1,Adjust handle assembly to the most
comfortable operating position and
tighten hsndle adjuster knob (B) on
both sides of the product,
To insert the Brakb Cabte
1 Insert cable into bole in Operator
Presence Control lever from the Inside
of the lever (D1).
2Lock into position. (D2)
3, Fit the cables to the hesdles with the cable
ties provided, making sure the cablesera
not trapped between the handles.
Recoil Starter
1. Disconnect the spark plug lead.
2, Pull the Operator Presence Central
lever to release the brake on the
engine.
3. Extend the pullcord_ully(C'I).
4, Locate the cord in the pull cord guide
positioned on handle (C2).
Page 5

ASSEMBLY INSTRUCTIONS
Warning
• Donotoperatamowerunlessbagfspropedythotatied. Grass Bag Assembly
• DO not remove bag wh l_e blade is moving.
• Duringnonnafuse_h: aaglssub|eottowearanddete_or'affon.
• Check bag _uent*y _'or any damage.
• Replace only with a SEARS approved part.
l_ln_lt 'U' frame Into top (E2). _ _._.=_
4. Locate safety f_p onto the tap of ?_ ._._ ..:.
• Flemovalis the reverse procedure
j_ OIL.- GASOLINE
BEFORE STARTING ENGINE
OIL
Your lawn mower is shipped without oil In the engine.
• Be sure mower Is Isvel and area around o]1 till is clean.
- Remove engine oE c_p and BI to the fUllline on the d_pstic_
• Use 20oz_ ofoil, For type and grade of otlto usa, see
"Engine Lubdcafton" in Ma_ntansnc_ se_on of this manual
- Pour oil slowly. Do not over fill
- Check o{I level before each use Add oilif needed Fill
to full line on dipstick.
• TO read proper level, tighten engine oil cap each time,
- Reinstall engine oil cap and tighten.
= Change the oil after every 25 hours of operation or each
season. You may need to change the oilmore often
under dusty, dirty c.ondltions,
GASBtJNE
-Flil fuel tank. Use fresh, clean, regular unleaded
gasoline with a minimum of 87 octane. Do not mix oil
with gasoithe. Purchase lust in quantities that can be
used within 30 days to assure fuel freshness.,
WARNING
Experience indicates that alcohol blended fuels (called
gasohol or using ethanol or methanol) can attract moisture
which leads to separation and formation of acids dudng
storage, Acidic gas can damage the fuel system of an
engine whiis in storage. To avofd engine problems, the
fuel system should be emptied before storage of 30 days
of longer. Drain the fuel tank, start the engine and let it run
until fuel Ithes and carburetor are empty. Use fresh fuel
next season, See Storage Instructions for additional
information Never use engine or carburetor cleaner
products tn fuel tank or permanent damage may occu_
:" 1/
Gasoline
Engine filler cap
oil ca_ I
Page 6

OPERATION
MEETS CPSC SAFETY REQUIREMENTS
Sears rotary walk-behind power lawn mowers
conformtothe safetystandards of the
Amelican National Standards instituteand the
U_S_Consumer Pmdust Safety Commission.
The blade turnswhen the engine is running
Operator Presence Control Lever- must be
helddown to the handle tostart the engine.
Release to stop the engine.
Pdmer- pumps additional fuel from the
carbumto_tothe cylinder foruse when sta_ng
acold engine.
Starter handle- used for stading the engine=
Power Drive lever - Forward ddve is engaged
and disengaged with the Powerddve lever at
the top of the handle
The operation of any lawn mower c_rt result in foreign objects thrown into the eyes, which can result In
severe eye damage. Always wear safety glasses or eye shields while operating your lawn mower or
performing any adjustments or repairs¸ We recommend a wide vlaion safety mask over spectaclas or
standard safety glasses.
ENGINE SPEED CONTROL
The engine speed was set at the factory for optimum performance. Speed is not adjustable.
ENGINE ZONE CONTROL
CALrnON: Federal regulations require an engine control to be installed on this lawn mower in order to
minimize the risk of blade contact injury Do not under any drcumstances attempt to defeat the function of
the operator control The blade turns when the engine is running
Starting and Stopping
t
p
i !-9
Operatorpresence
Contml Lnver
_.Powardr_ve
1 When sta_ng a co{d engine, push pdmer buth
(G) tinnty fivetimes, atiowing palmer buth to
return complstely to odgtost position between
pushes Repeat the above tot each stader
operation as necessary '_
NOTE.- DO NOT USE PRIMER 3"0 RESTART
WARM FJ_IGINE AFTER A SHORT SHUTDOWN.
2 Connect the spark plug lead.
3 Pull the Operator Presence Control lever to the
handle (H1), this releases the brake
4_ Grasp starter handle and pull rope out slowly
until you feel drag (H2). Let rope rewind slowty.
Pull with rapid, tall arm stroke, Return rope
slowly to odglnst position.
5. Folward ddve is engaged and disengaged with
the Powerddve fever underneath the handle (J).
6. Releasing the Powerddve Lever stops the
fo_ard drive automaticaily_
To stop your lawn mower - release the
Powerddve lever_ then Operator Presence Control
IBver.
Page 7

_J_ OPERATION ,
Power Drive Cable
1. If the drive does not engage when
the powerddve lever is pulled
towards the handle, screw adjuster
counte f-cIoc_se (K) wMlst In
operators posKion_
2.. Screw adjuster fn opposite direstlon
If the powerddve does not
disengage with the powerdrive lever
free (K).
How to Mow
1. Start mowing from the outstde edge
of the lawn, mowing in strips in
alternate directions (L).
2,, Mow twice a week In the growing
season, your lawn will suffer if more
that one thln_ of Ita length is cut at
one t_me and th_s may also result In
poor bollestlon
Please Note:-
Do not overload your Lawn mower
When mewing in long thick grass a first
cut with the cutting height adjusted to Its
highest setting, see Cutting Height. will
help reduce motor ovedoad and will help
prevent damage to your lawn mowel_,
PowerDrive Cable
Howto Mow
Cutting Height
Ratse wheels for low cut and lower
wheels for high cut,
Adjust cutting height to suit your
requirements, Medium position ts
best for most lawns.
The height of cut ts changed by
pulllngthe adjustment lever away
from the location slots and moving to
the desired position (M),
Cutting Height
._
Page 8

MAINTENANCE
Cutting System Removing the Blade
. Alwaysobsewesafetynule_whenparfi_rmthg
1,. DLsconneut spark plug wire from spark plug and place
wire where it caroler come in contsut with spark plug,
2 Turn lawn mower on Its side. Make sure air filter
and _d3uretsr are up
__ any maintenance.
3, Use a wrench to loosen b(ade bolt by tsmlng
counter_Jockwbe (N11.
4 Remove the blade bolt, blade and washer (N2)
5 Inspect for damage and clean as necessary.
Replacing the Blad_
1, Fit the blade tb the machine with the sharb edges
pointing away from the machine.
2, Re-fit the blade bolt through the washer ensudng that
the side stamped with '0' on the washer isfacing
aw_.y from the blade (N2).
3. Hold firmly and tighten blade bolt firmly with a
wrench, Do not over fightea The recommended
tightening torque is 22-26 ft, Ibs.
Cleaning
IMPORTANT: For b_ performance, keep mower
housing free of built-up grass and trash Clean
underside of mower housing after each use.
CAUTION: DLsconnect spark plug wire from sped<
plug and place wire where it c_nnot come th contact
with the spark plug.
1_ Turn lawn mower on its side Make sure air flltsr
and carburetor are'u p,_
2. Remove g_ from undel the deck v_th a brush (P1).
3, USing a soft bn._h - remove grass clippings from all air
Inla_es, the discharge chute and the glass bag (P2)
3. Wipe over the surface of your lawn mower with a
dry clcth.
Product S ecifications
MODEL NUMBER See Product Rating Laber.
SERIAL NUMBER
DATE OF PURCHASE
HORSSPOWER: 5.0
DISPLACEMENT: 11.5 cu. in.
GASOLINE CAPACITY/type: 1.25 quarL_
OiL TYPE (API-SF/SG/BHJ: SAE 30 (above 32_F)
OIL CAPACITY: 20 ozs.
SPARK PLUG(GAP: .030") Champion RJ19LM or J19LM
V-ALVE CLEARANCF_ iNTAKE: _004- 008
SOLID STATE IGNITION
AIR GAP: .0125 in.
=BLADE BOLTTORQUE: 22-26 FT. LBS.
o Thern_de_andsedafnumbemwit_bef_und_nadeca_attschedtstherear_fthelawnm_werh_usthg_
R_co!d both serial number and date of purchase in space provided above.
UNLEADED REGULAR
BAE 5W-30 (belaw 32_P ")
EXHAUST: .004 - .008
Page 9

MAINTENANCE
The warranty on this Learn mower does nst cover
items that have been subJested to operator abuse
or negr_gertce.To receive full value hem the
warranty, open.or must rt_ni_n mower e.s
I_ruc_d intl_ manuaL
Some ed[ustments wig need to be made
periodic:ally to propedy maintain your unit
All adjustments In the Service and
Adjustments section of this manual should be
checked at least once each seeson_
- Once a year, replace the spark pfug,
replace air flttar element and check blade
for weai_, A new spark plug and cJeanlnew
air filter element assures proper air-fuel
mixture and helps your engine run better
and last Ionge_
BEFORE EACH USE
o Check engtne oft level
* Check for loose fasteners
LEBRICATfi_N
Keep unit welt lubdcsted (Bee
"LUBRICATION CHART" (O)).
NOTE: Although rnulti--viscostty oils (5W30,
10W3O etc.) improve starting in cold weather.
these mstti_iscoslty oils wlti result to
increased oil consumption when used above
32°F Check your engine pit level more
frequently to avoid posslbta engine damage
from running low on o ='i.,
Change the oft after every 25 hours of
operation or at least once a year if the lawn
mower is not used for25 hours in one year.
Check the crankcase oil level before starting
the engine and after each live (5) hours of
continuous use. Tighten oil plug securely
each lime you check the oll level
NOTE: Before tipping lawn mower todrain oil, drain
fuel tankby runningengine until fuel tank isempty,
• Disconhect spark plug wire from spark plug and
placewire where it cannot come in contact with
spark plug,
• RemoveengineoBcap;lay aside on a dean sud-ace.
- Tip lawn ruower on tis side and drain oilinto a
suitable container, Rock lawn mower back and
General Recommendations
LUBRICATION
CHART
(_ SPRAY LUBRICANT
(_ SAE 30 MOTOR OIL
_us_0r
door
_n_ oil
(_ landlebr_cP_l
• TO Change Engine Oil
forth to remove any oil trapped inside of engine,
o Wipe off any spilled oil on lawn mower and on
side of engine.
• Fill engine with oil, Fill only to the"FULL" line on
the dipstick. DO NOT OVER FiLL
o Replace engine oil cap.
. Reconnect spark plug wire to spark plug
Your carburetorhas a non-adjustable fixedmain jet
for mixture conlroL ifyourengine does notoperate
propedy due tosuspected carburetor problems, take
your lawn mower to an authorized se_ice c_nter for
repair or adjustmenL
Engine C_
Your engine speed has been factory set Donot
attempt to increm_ engine speed or it may result in
personalinjuzy., Ifyou believe that the en_ne isrunning
_o fast or too stow. take your lawn mower toan
asthotized sewice center for repair and adjustment
Page 10

........ MAINTENANCE _J_
_Plug
Storage
Immediately prepare your lawn mower for storage
at the end of the season or if the unit will net be
u_ed for 30 days or mote_
When lawn mower is to be stored for a period of
time, clean it thoroughly, remove alldlr_, grease,
leaves, stc, Store in a clean, dry area.
. Clean estlre lawn mower (See "Cleaning" In the
Maintenance section of this manual)
- L.ubdc_ta as shown In toe Matotenance section of
this manual.
• Be sure lhat all nuts, be fls. screws, and pins are
securcly fastened. Inspect moving parts for
damage, breakage and wear. Replace tfnecessary
• Touchupagrustadorchlppedpalntsudacas;
sand tighfly before paint]ng_
FUEL SYSTEM
IMPORTANT: it Is Jmportont to prevent gum
deposits from Iormtng in essential fuel system parts
such as c_rburstor, fuel filter, fuel hose, or tank
during storage. Also, experience ]ndic_tas that
alcohol blended fuels (catied gasohcl o_"using
ethanol or methanol) can attract moisture which
leads to separaUon and formation of acids dudng
storage. Addlc gas can damage the fuel system of
an engine while in Storage.
. Dralnthefucitsn_.
• Start the engine and let It run unfii the fucl ]_nes
and carburclor are empty,
• Never use engine or carburetar cleaner products
in the fuel tank or permanent damage may occur
= Use flesh fuel nest season
NOTE." Fuel stabilizer is an acceptable agemative
AiR FILTER (R)
Your engine wtil not run property and may be
dBmaged by using a dirty air tiger,
Replace the aL__]ter evely year, more often if you mow
in very dusty, dim/condtaons. DOnot wash air filler=
1_Turn cover to the left (counterclockwise) and
remove It and tiger fu:)m flange. DIsr.ard fllta,',
2, Clean coverand flange lhomughiy.
3. fusert new filter into cova_,
4. Position cover and ftitarag_nst flange wtih tz_bon
cover i_ _'fiolowerleticomer of s{st th flange.
S. Push cover firmly against flange and fum it to
the fight (clockwise) as far as It wig go. Be sure
retainers are locked around flange,
MUFFLER
Inspect and replace corroded muffler as it could
create a fire haz.ard and/or damage
•PARK PLUG
Change your spark plug each year to make your
engine start easier and run better Set spark plug
gap at .030 inch
in minimizing the formation OFfuel gum deposits
during storage. Add stabilizer to gasoline in fuel
tank or storage costalna_, Always follow the mix
ratio found on stabilizer costa_ne_. Run engine at
least 1O minutes a_teradding stabilizer to atiow the
Stabt]lzer to _eech _hef"carburetor. Do not drai_ the
gas tank and carburetor if using fuel stsbg[zer_
ENGINE OIL
Drain oil (with engine warm) and replace with clean
engine oil, (See =To Change Engine Oil" In the
Maintenance section of this manua, t)_
CYLINDER
• Remove spark plug.
• Pour one ounce (29 ml) pf cll through spad{ plug
hcle into cylinder.
. Pullst_rterhandieslowlyafewt]mestoclstdbutooti,
= Replace wfth new spark plug
• Do nat store gasorlne from one season ta anolher.
o Rep_ce your gasoline can if yeur can sleds t0 rusL
Rust and/or d_rtin your gasci[ne will c_use problems
• If po_Ible, stsre yout unit indoors and cover ft to
give protection from dust and dirt.
o Cover your uclt with a sutiable protective cover test
does not retain rfiolsfum, DO not use p_astJa, plastic
cannst breathe which afiows condensation to form
and wilt cause your unit to rust,
IMPORTANT.* Never cover mowe_ while engk_e
and exhaust areas are still warm.
CAUTION: Never store the lawn mower with
gasoline In the tank inside a building where fumes
may reach an open flame orspark. AltsW the
engine to cool before stadng in any enclosure,.
Page 11

PROBLEM CAUSE CORRECTION
Will not start
• Dirty alr filter,
* Out of fuai.
• Stale fuel.
• Water {n fuel
• C1ez_r_mplac_ air filt e r,
• RII fuel tank,
• Drain I_nk and refillwRh fresh cfuan fuel
• DmJn fuel tank and carbumlor and refill
tank with fresh gasolise
- Spark plug wlraisdisconnected.
• Bad spark plug
• Loose blade orbroi(an
• C6nnec_ wire to pisg_
• Repisca spark plug_
• Tighten blade bolt or replace blade adapte_
blade ad_pfor_
Loss of power
Poar cut - uneven
Excessive v_brafion
• Operator Pmsence Cent ml
Lever inmisosBd position
• Operator PmsenoB _ntrai
Lever defect{re
• Rear of iswn mower housfug]
blade dragging in heavy grass
• Cutting too much grass
• Dirty air filfo_
• Build up o{ grass, leeves and
trash under mower,
• Too much allinengine,
i" Worn, bentorisose bisde,
• Wheelheighls uneven.
Buildup ofgrass,]eave_;and
_,_sh under mower.
Worn, bent or loose bisde_
Bent engine cranksha(t
• Pull Operator Presence C_ntrol isvor fo
hendle,,
• Repisce Operator Pmsenc_t Control Lever.
- Raise c_ttlng height
• Raise earring height
Cleen/repisc_ alr flfier..
Clean underside of mower housing,
Check oil level
Repis_8 bisde_ 3_ghten blade bolt,
Set all wheels at same height
Cisen underside of mower housing
Repisc_ blade "lighten blade boll
Coai_cta_ autho_z_d service
centar/dapam'nenl
Starier rope hard to pull
Engine flywheel broke is on
when Ope_tor Presenc_
Conlml lever is released.
Bent engine cr_nkshag
!- Depress control bar to upper handel
before pullfog starter rope
- Contac_ an authorized servfo_
os_nter/department
Blade adapler broken.
Blade dragging In grass_
• Replace blade adapler.
• Move iswn mower tocut grass or to hard
sudace to starte_gine,
Loss of drive
(SelFPropeIled Mowing)
Gra_.m_beg not filling
Hard to push
Ddve wheets not turning
with power drive engaged,
• Beltnot driving_
• Cutfmg height tea low.
- Uffon bisdewom off.
• Grass bag not venting aJ_
• Grass is foe htgb or wbeeJ
• Adju_l or replace ddve'o_nt ml
c_bis, if brokem
• Put belt on paiteys or replace befis g broken
• Raise cutting height
• Replace blade.
- Clean gnass bag.
• Raise cutting height,
be_ght is _oofuw_
• Rear of I_.wn mower bousing/
- Raise cutting helghL
blade dragging in gra_._s_
• Grass bag too full_
• Randis beighf posfi_on
• Empty grass beg.
° Adjust handis height to sutL
net rigbt fur you_
i
Page 12

12
 Loading...