

Craftsman 917388153 Owner’s Manual

t,__ Owner's Manual
CRAFTSMAN°
5.0 HORSEPOWER
22" REAR DISCHARGE
ROTARY LAWN MOWER
Model No.
917.388153
• Safety
• Assembly
• Operation
• Maintenance
• Espa_ol
• Repair Parts
CAUTION:
Read and follow all
Safety Rules and Instructions
before operating this equipment
Sears, Roebuck and Co., Hoffman Estates, IL60179
Warranty 2 Product Specifications 11
Safety Rules 2 Service and Adjustments 13
Assembly 4 Storage 14
Operation 6 Troubleshooting 15
Maintenance Schedule 10 Repair Parts 32
Maintenance 10 Pa_s Ordering Back Cover
I
LIMITED TWO YEAR WARRANTY ON CRAFTSMAN POWER MOWER
For two years from date of purchase, when this Craftsman Lawn Mower is maintained,
lubricated, and tuned up according to the operating and maintenance instructions in the
owner's manual, Sears will repair free of charge any defect in material or workmanship.
If this Craftsman Lawn Mower is used for commercial or rental purposes, this warranty
applies for only 90 days from the date of purchase.
This Warranty does not cover:
• Expendable items which become worn during normal use, such as rotary mower
blades, blade adapters, belts, air cleaners and spark plug.
• Repairs necessary because of operator abuse or negligence, including bent crank-
shafts and the failure to maintain the equipment according to the instructions con-
tained in the owner's manual.
Warranty service is available by returning the craftsman power mower to the nearest
sears service center/department in the united states. This warranty applies only while
this product is in use inthe united states.
This Warranty gives you specific legal rights, and you may also have other rights which
vary from state to state.
SEARS, ROEBUCKAND CO., D/817 WA, HOFFMAN ESTATES, ILLINOIS 60179
TRAINING:
• Read this operator's manual carefully.
Become familiar with the controls and
know how to operate your mower
properly, Learn how to quickly stop
mower.
• Do not allow children to use your mower.
Never allow adults to use mower without
proper instructions.
• Keep the area of operation clear of all
persons, especially small children and
pets.
• Use mower only as the manufacturer
intended and as described in this manual.
• Do not operate mower if ithas been
dropped or damaged in any manner.
Always have damage repaired before
using your mower.
• Do not use accessory attachments that
are not recommended by the manufac-
turer. Use of such attachments may be
hazardous.
• The blade turns when the engine is
running.
PREPARATION:
• Always thoroughly check the area to be
mowed and clear it of all stones, sticks,
wires, bones, and other foreign objects.
These objects will be thrown by the blade
and can cause severe injury.
• Always wear safety glasses or eye
shields when starting and while using
your mower.
• Dress properly. Do not operate mower
when barefoot or wearing open sandals.
Wear only solid shoes with good traction
when mowing.
• Check fuel tank before starting engine.
Do not fill gas tank indoors, when the
engine is running or when the engine is
hot.Allowthe engineto coolforseveral
minutesbeforefillingthe gastank. Clean
offanyspilledgasolinebeforestartingthe
engine.
• Alwaysmake wheel heightadjustments
beforestartingyourmower.Never
attemptto do thiswhilethe engine is
running.
• Mow onlyin daylightor goodartificial
light.
OPERATION:
• Keep your eyes and mind on your mower
and the area being cut. Do not let other
interests distract you.
• Do not mow wet or slippery grass. Never
run while operating your mower. Always
be sure of your footing -- keep a firm
hold on the handles and walk.
• Do not put hands orfeet near or under
rotating parts. Keep clear of the discharge
opening at all times.
• Always stop the engine whenever you
leave or are not using your mower, or
before crossing driveways, walks, roads,
and any gravel-covered areas.
• Never direct discharge of material toward
bystanders nor allow anyone near the
mower while you are operating if.
• Before cleaning, inspecting, or repairing
your mower, stop the engine and make
absolutely sure the blade and all moving
parts have stopped. Then disconnect the
spark plug wire and keep itaway from the
spark plug to prevent accidental starting.
• Do not continue to run your mower if you
hit a foreign object. Follow the procedure
outlined above, then repair any damage
before restarting and operating you
mower.
• Do not change the governor settings or
ovarspeed the engine. Engine damage or
personal injury may result.
• Do not operate your mower if it vibrates
abnormally. Excessive vibration is an
indication of damage; stop the engine,
safely check for the cause of vibration
and repair as required.
• Do not runthe engine indoors. Exhaust
fumes are dangerous.
• Never cut grass by pulling the mower
towards you. Mow across the face of
slopes, never up and down or you might
lose your footing. Do not mow exces-
sively steep slopes. Usa caution when
operating the mower on uneven terrain or
when changing directions -- maintain
good footing.
• Never operate your mower without
proper guard3, plates, grass catcher or
other safety devices in place.
MAINTENANCE AND STORAGE:
• Checkthe blade and the engine mount-
ing bolts often to be sure they are
tightened properly.
• Check all bolts, nuts and screws at
frequent intervals for proper tightness to
be sure mower is in safe working
condition.
• Keep all safety devices in place and
working.
• To reduce fire hazard, keep the engine
free of grass, leaves or excessive grease
and oil.
• Check grass catcher often for deteriora-
tion and wear and replace worn bags.
Use only replacement bags that are
recommended by and comply with
specifications of the manufacturer of your
mower.
• Always keep a sharp blade on your
mower.
• Allow engine to cool before storingin any
enclosure.
• Never store mower with fuel in the tank
inside a building where fumes may reach
an open flame or an ignitionsource such
as a hot water heater, space heater,
clothes dryer, etc.
CAUTION: Always disconnect spark plug
wire and place wire where it cannot contact
spark plug in order to prevent accidental
starting when setting up, transporting,
adjusting or making repairs.
WARNING
The engine exhaust from this product
contains chemicals known to the State of
California to cause cancer, birthdefects, or
other reproductive harm.
3
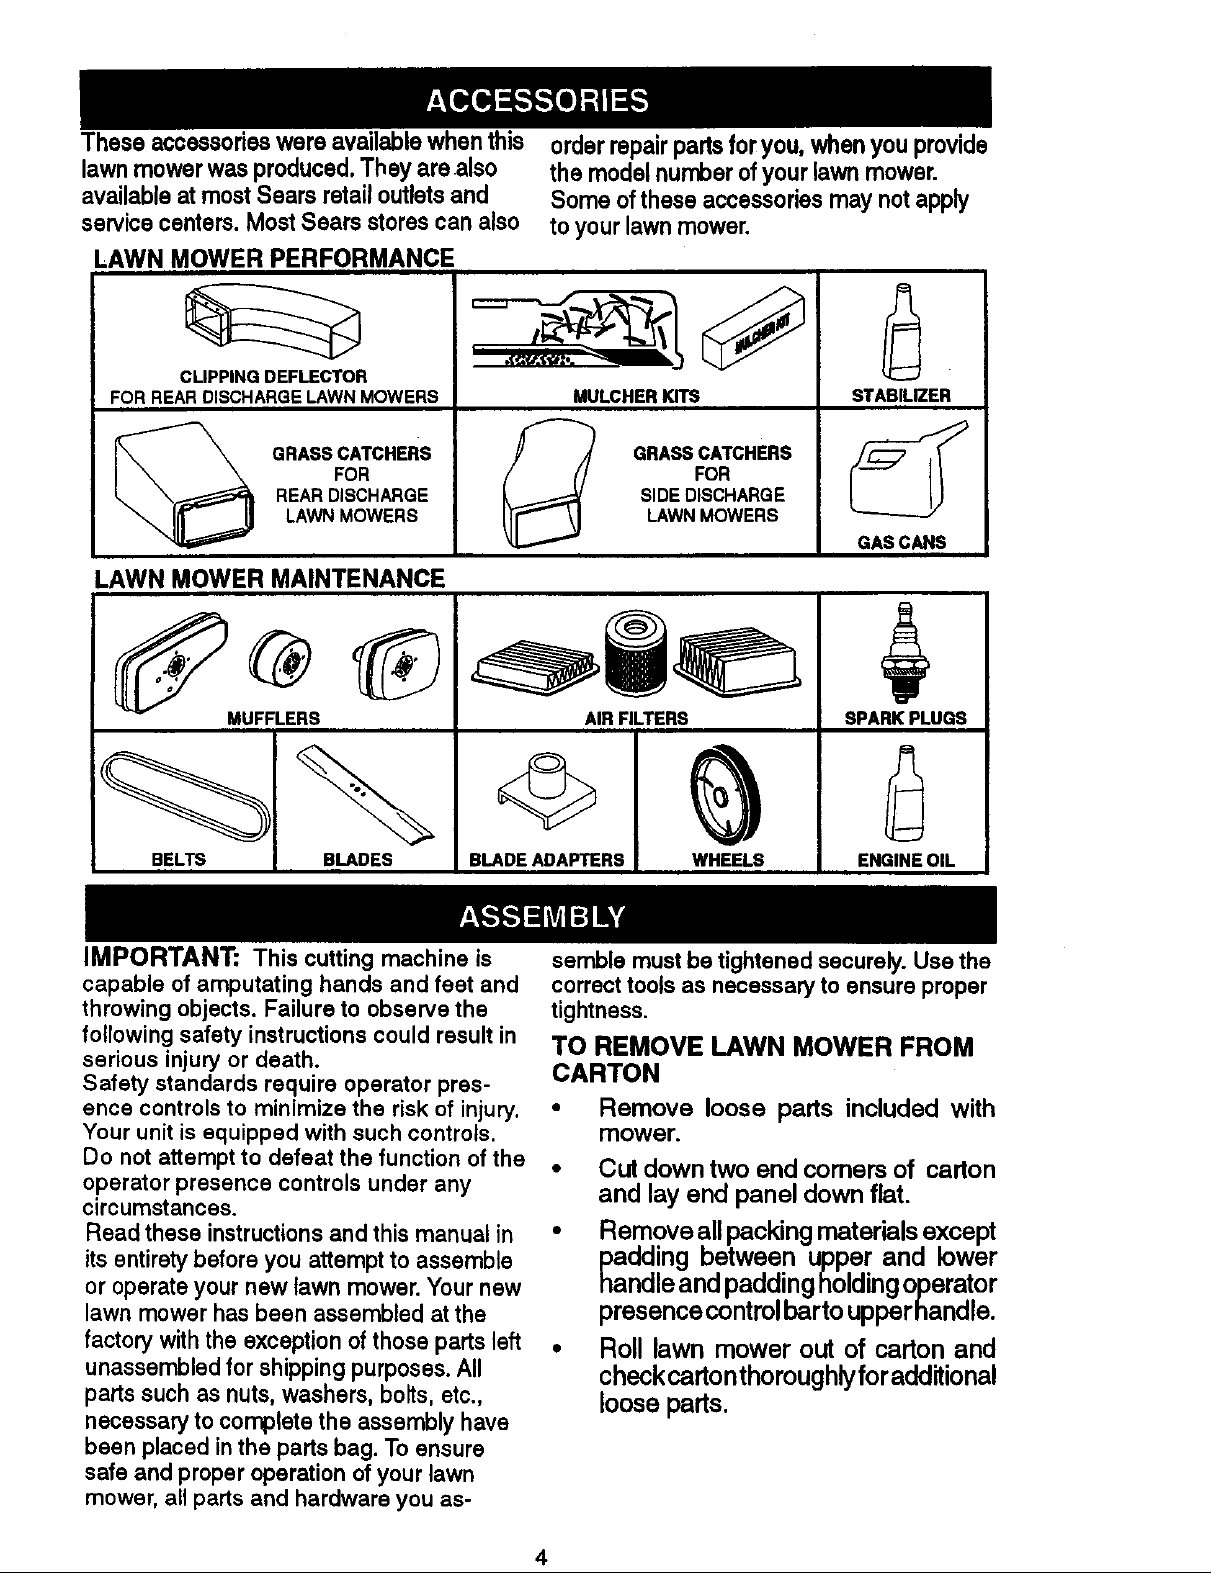
These accessorieswere availablewhenthis
lawnmowerwasproduced.They arealso
availableat most Sears retailoutletsand
servicecenters.MostSears storescan also
LAWN MOWER PERFORMANCE
orderrepairpartsforyou, whenyou provide
the modelnumberofyourlawnmower,
Some ofthese accessoriesmay notapply
to yourlawn mower.
CLIPPING DEFLECTOR
FOR REAR DISCHARGE LAWN MOWERS
FOR
REARDISCHARGE
GRASSCATCHERS
LAWNMOWERS
LAWN MOWER MAINTENANCE
MUFFLERS
BELTS
BLADES
MULCHERKrF8
GRASSCATCHERS
SIDEDISCHARGE
LAWNMOWERS
AIR FILTERS
FOR
WHEELSBLADE ADAPTERS
STABILIZER
GAS CANS
SPARKPLUGS
ENGINE OIL
IMPORTANT: This cutting machine is
capable of amputating hands and feet and
throwing objects. Failure to observe the
following safety instructions could result in
serious injury or death.
Safety standards require operator pres-
ence controls to minimize the risk of injury.
Your unit is equipped with such controls.
Do not attempt to defeat the function of the
operator presence controls under any
circumstances.
Read these instructions and this manual in
its entirety before you attempt to assemble
or operate your new lawn mower. Your new
lawn mower has been assembled at the
factory with the exception of those parts left
unassembled for shipping purposes. All
parts such as nuts, washers, bolts, etc.,
necessary to complete the assembly have
been placed inthe parts bag. To ensure
safe and proper operation of your lawn
mower, all parts and hardware you as-
semble mustbe tightenedsecurely.Use the
correcttoolsas necessaryto ensureproper
tightness.
TO REMOVE LAWN MOWER FROM
CARTON
• Remove loose parts included with
mower.
• Cut down two end comers of carton
and lay end panel down flat.
• Remove all packing materials except
padding between upper and lower
handle and padding holding operator
presence controlbarto upper handle.
• Roll lawn mower out of carton and
checkcartonthoroughly for additional
loose parts,
4
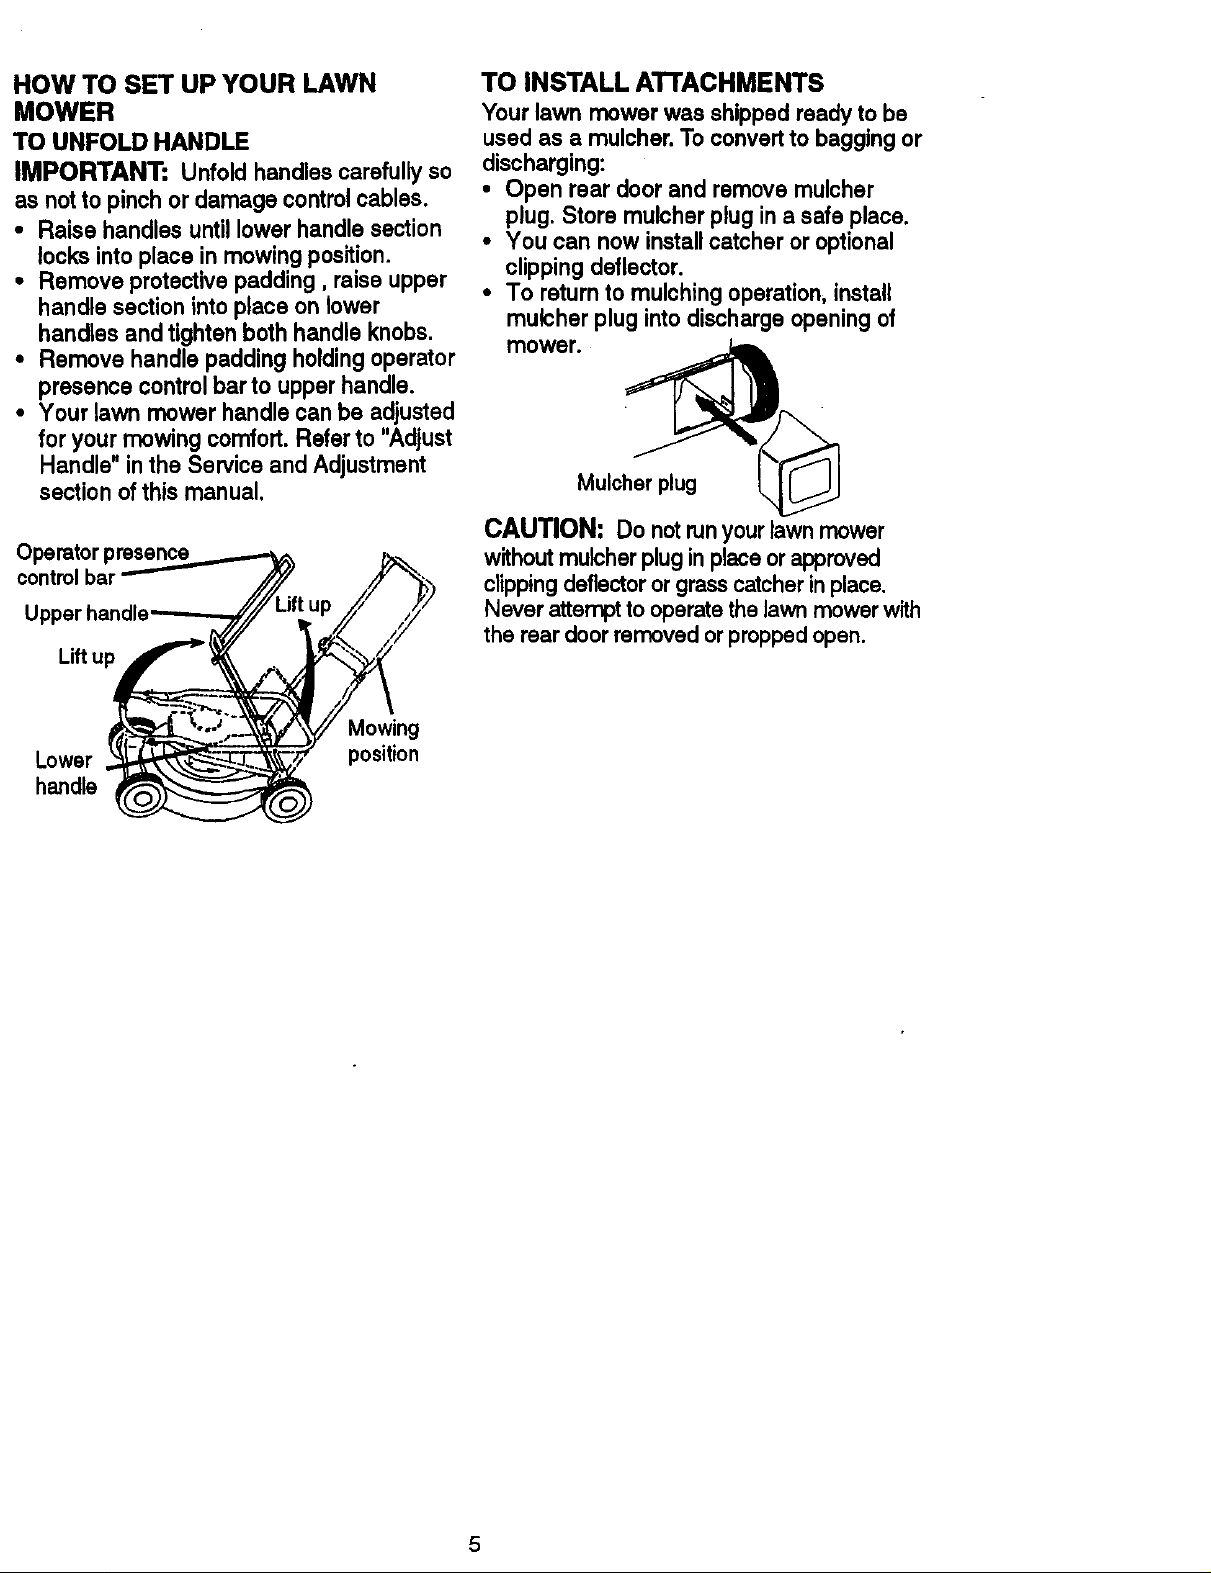
HOW TO SET UP YOUR LAWN
MOWER
TO UNFOLD HANDLE
IMPORTANT: Unfoldhandlescarefullyso
as notto pinchordamage controlcables.
• Raise handlesuntillowerhandlesection
locksintoplace inmowingposition.
• Remove protectivepadding, raiseupper
handlesectioninto placeon lower
handlesandtightenbothhandleknobs.
• Remove handle paddingholdingoperator
presencecontrolbarto upperhandle.
• Your lawnmower handlecan be adjusted
for yourmowing comfort.Referto "Adjust
Handle"inthe Serviceand Adjustment
sectionofthis manual.
Operatorpresence
controlbar
Upper handle
Lift up
TO INSTALL A'I-I'ACHMENTS
Your lawn mower was shipped ready to be
used as a mulcher. To convert to bagging or
discharging:
• Open rear door and remove mulcher
plug. Store mulcher plug in a safe place.
• You can now install catcher or optional
clipping deflector.
• To return to mulching operation, install
mulcher plug into discharge opening of
mower. __
Mulcher plug
CAUTION: Do not runyour lawn mower
without mulcher plug inplace or approved
clippingdeflectoror grass catcher in place.
Never attempt to operate the lawn mower with
the rear doorremoved orpropped open.
Lower
handle
Mowing
position
5
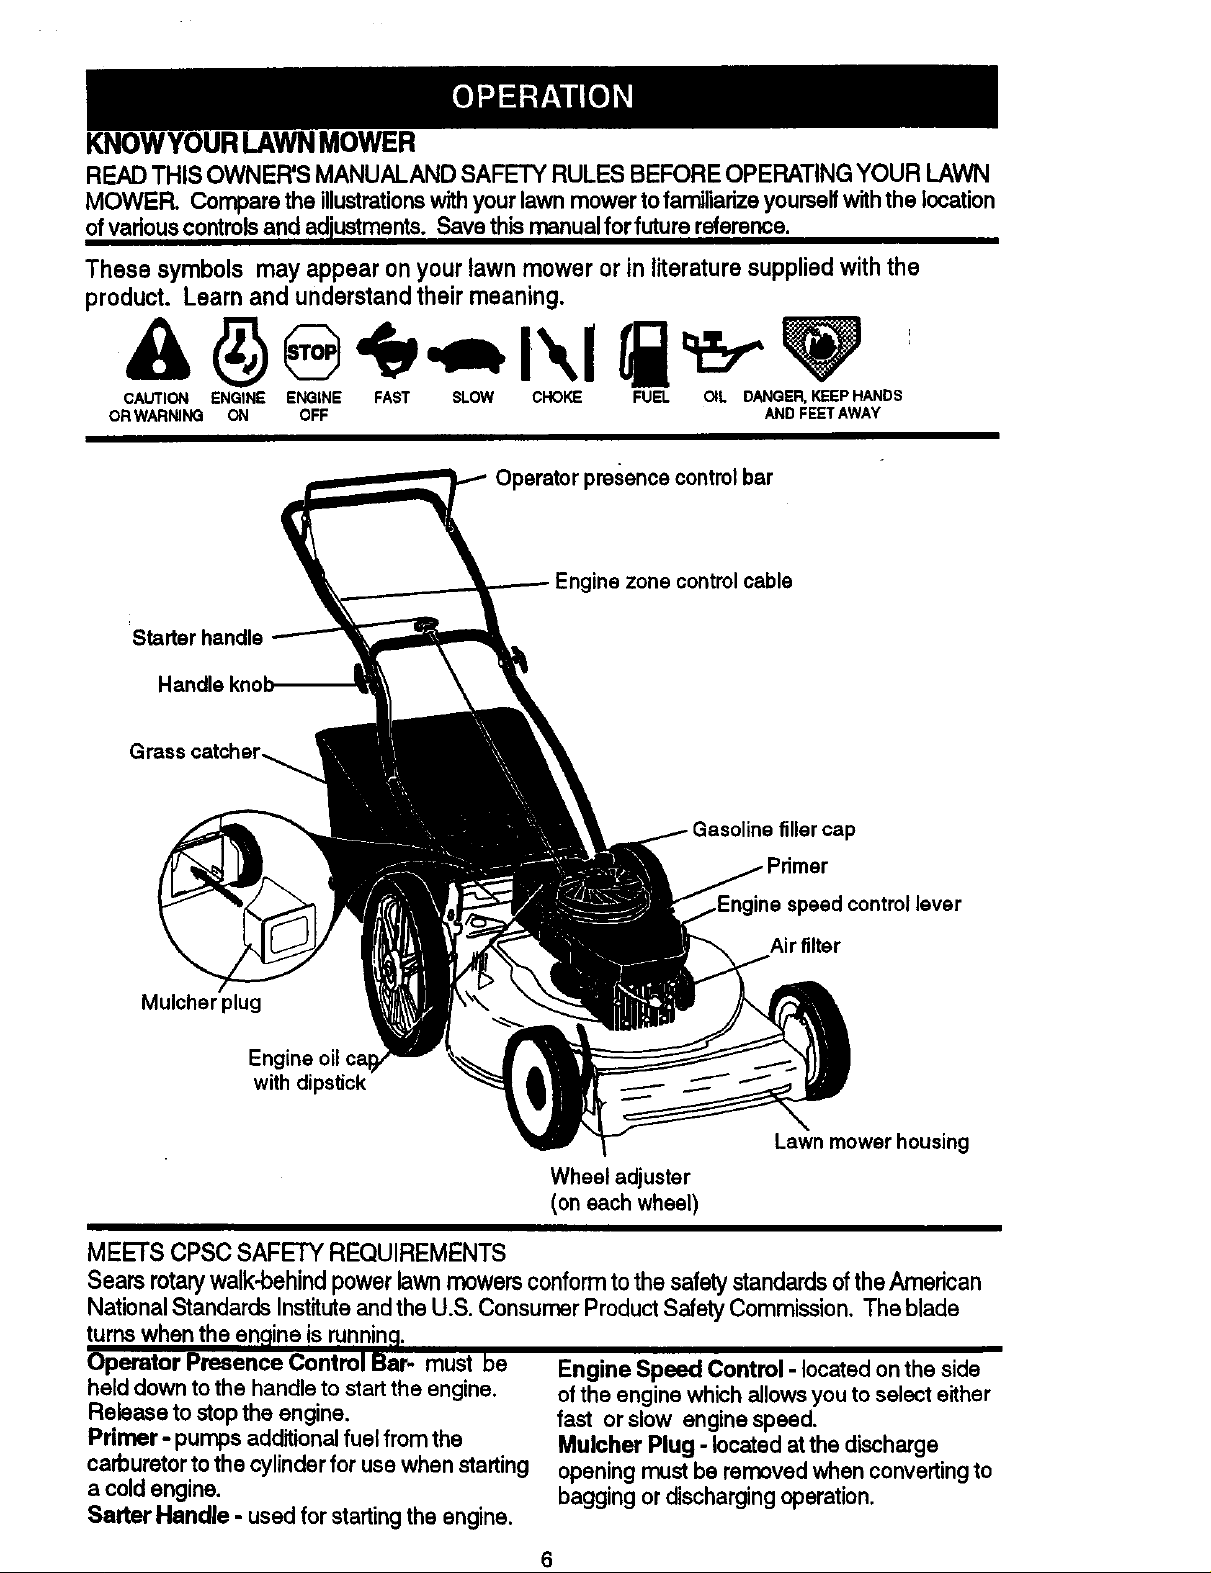
KNOWYOURLAWNMOWER
READ THIS OWNER'S MANUALAND SAFETY RULES BEFORE OPERATING YOUR LAWN
MOWER. Compare the illustrationswith your lawn mower to farniliadzeyourselfwiththe location
of variouscontrolsand adiustments. Save this manual for futura reference.
These symbols may appear on your lawn mower or in literature supplied with the
product. Learn and understand their meaning.
CAUTION ENGINE ENGINE FAST SLOW CHOKE FUEL OIL DANGER, KEEP HANDS
OR WARNING ON OFF AND FEET AWAY
Operatorpresence controlbar
ine zone control cable
Starterhandle
Handleknob---
Grass catcher_
filler cap
control lever
Air filter
Mulcher plug
Engine oil
with dipstick
Lawn mower housing
Wheel adjuster
(on each wheel)
MEETS CPSC SAFETY REQUIREMENTS
Sears rotarywalk-behindpower lawnmowersconformtothe safetystandardsoftheAmerican
National StandardsInstituteandthe U.S.Consumer ProductSafetyCommission. The blade
turns when the engine is running.
Operator Presence Control Bar- must be
held down to the handle to start the engine.
Release to stop the engine.
Primer- pumps additional fuel from the
carburetor to the cylinder for use when starting
a cold engine.
Sarter Handle - used for startingthe engine.
Engine Speed Control - located on the side
of the engine whichallows you to select either
fast or slow engine speed.
Mulcher Plug - located at the discharge
opening must be removed when convertingto
bagging or dischargingoperation.
6
Theoperation ofany lawn mower can resultin
foreign objectsthrown intothe eyes, which can
resultin severe eye damage. Always wear
safety glasses or eye shieldswhile operating
your lawnmower orperformingany adjust-
ments or repairs. We recommend a wide
vision safety mask over the spectacles or
standard safety glasses.
HOWTO USEYOUR LAWN MOWER
ENGINE SPEED CONTROL
The enginespeediscontrolledbya lever
locatedonthesideofthe engine.Fast
positionisfor startingtheengine,normal
cutting,andbettergrassbagging.Slow
positionisforlightcutting,trimmingandfuel
economy.
ENGINE ZONE CONTROL
CAUTION: Federal regulationsrequire an
enginecontrolto be installedon this lawn
mower in orderto minimize the riskof blade
contact injury.Do not under any circumstances
attemptto defeatthe function ofthe operator
control.The blade turns when the engine is
running.
* Your lawn mower isequipped withan
operator presence controlbar which
requiresthe operator to be positioned
behindthe lawn mower handle to startand
operate the lawn mower.
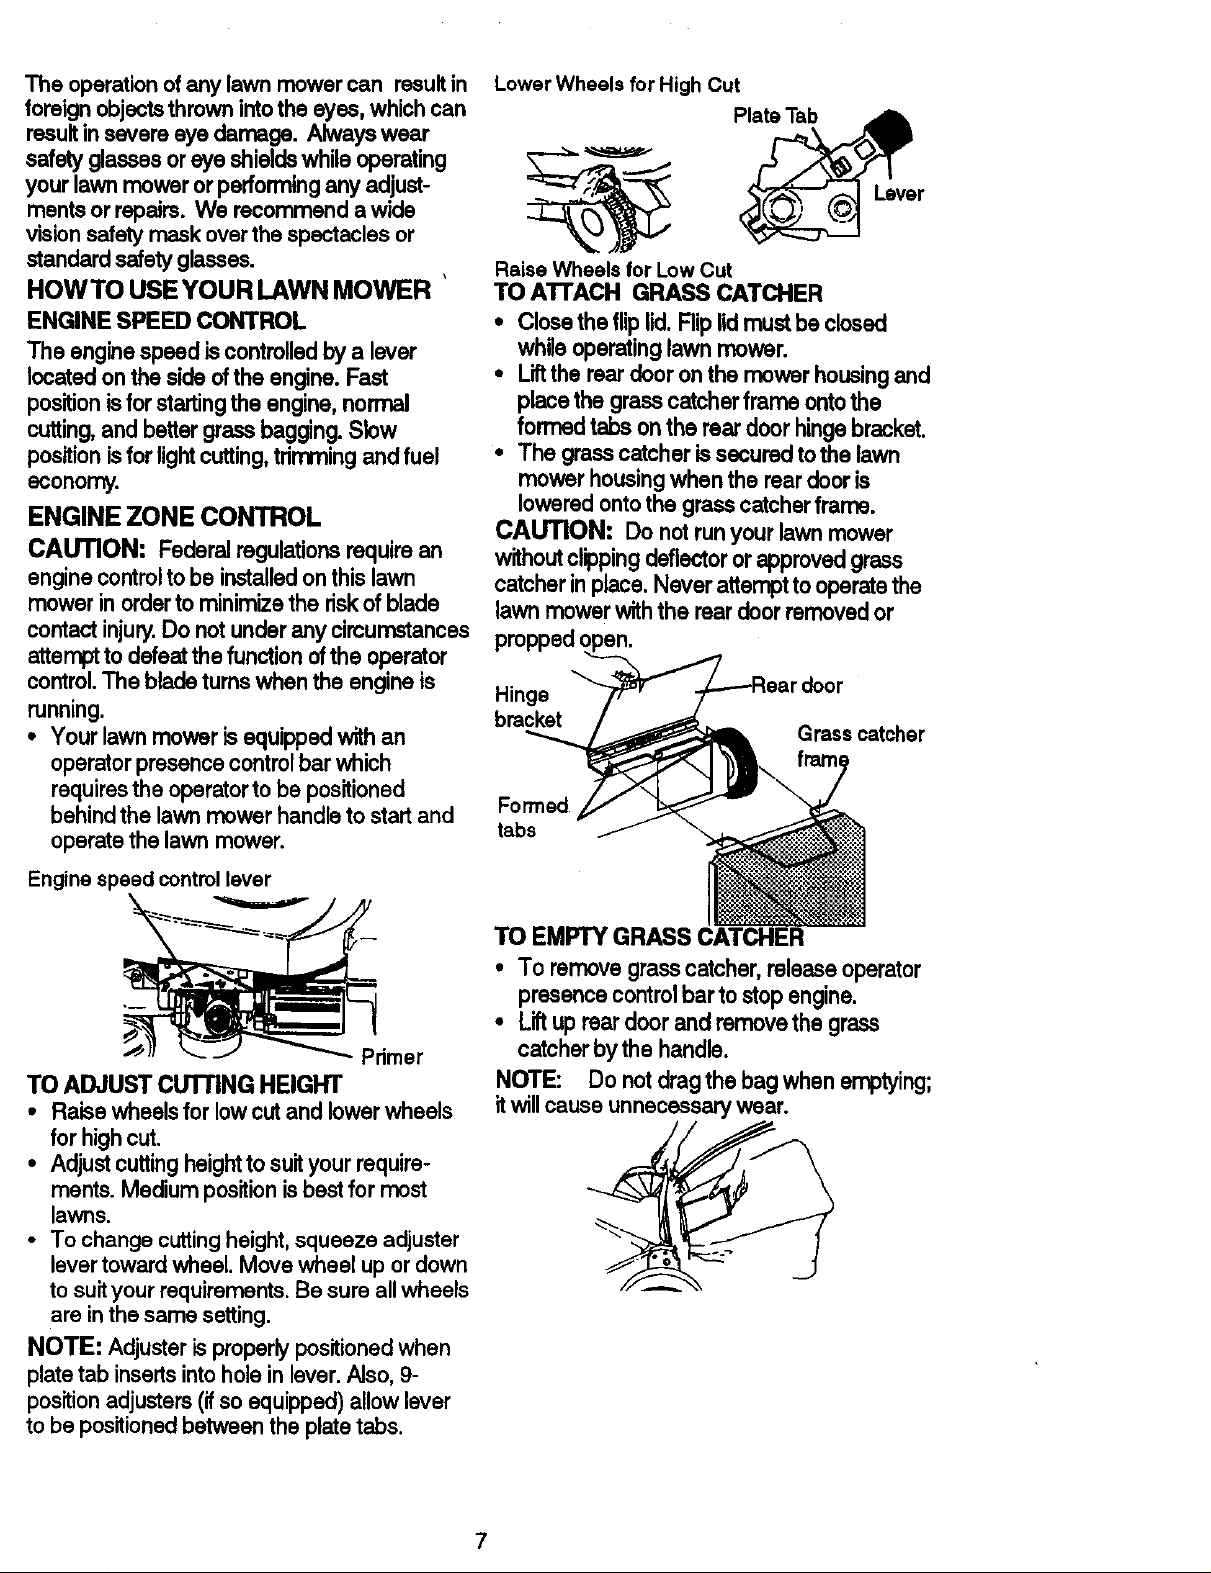
Lower Wheels for High Cut
Plate Tab
Raise Wheelsfor LowCut
TO ATrACH GRASS CATCHER
Closethefliplid. Riplidmustbeclosed
whileoperatinglawn mower.
Liltthereardooronthemower housingand
placethegrasscatcherframe ontothe
formedtabsonthe reardoorhingebracket.
• The grass catcher is secured to the lawn
mower housingwhen the rear door is
lowered onto the grass catcherframe.
CAUTION: Do not runyour lawn mower
withoutclippingdeflector or approved grass
catcher inplace. Never attempt to operate the
lawn mower withthe rear door removed or
prepped
Hinge
bracket
Grass catcher
frern=
Formed
tabs
Engine speed control lever
TO ADJUST cuTriNG HEIGHT
• Raise wheels for lowcut and lowerwheels
for highcut.
• Adjustcuttingheightto suityour require-
ments. Medium positionisbestfor most
lawns.
• To change cuttingheight,squeeze adjuster
levertoward wheel. Move wheel up or down
to suityour requirements.Be sure allwheels
are inthe same setting.
NOTE: Adjuster is properlypositionedwhen
platetab insertsintohole in lever. Also, 9-
positionadjusters (ifso equipped) allow lever
to be positionedbetween the platetabs.
TO EMPTY GRASS CATCHER
• To remove grass catcher, release operator
presence controlbar to stop engine.
• Liftuprear door and remove the grass
catcher by the handle.
NOTE: Do notdrag the bag when emptying;
it willcause unnecessary wear.
7
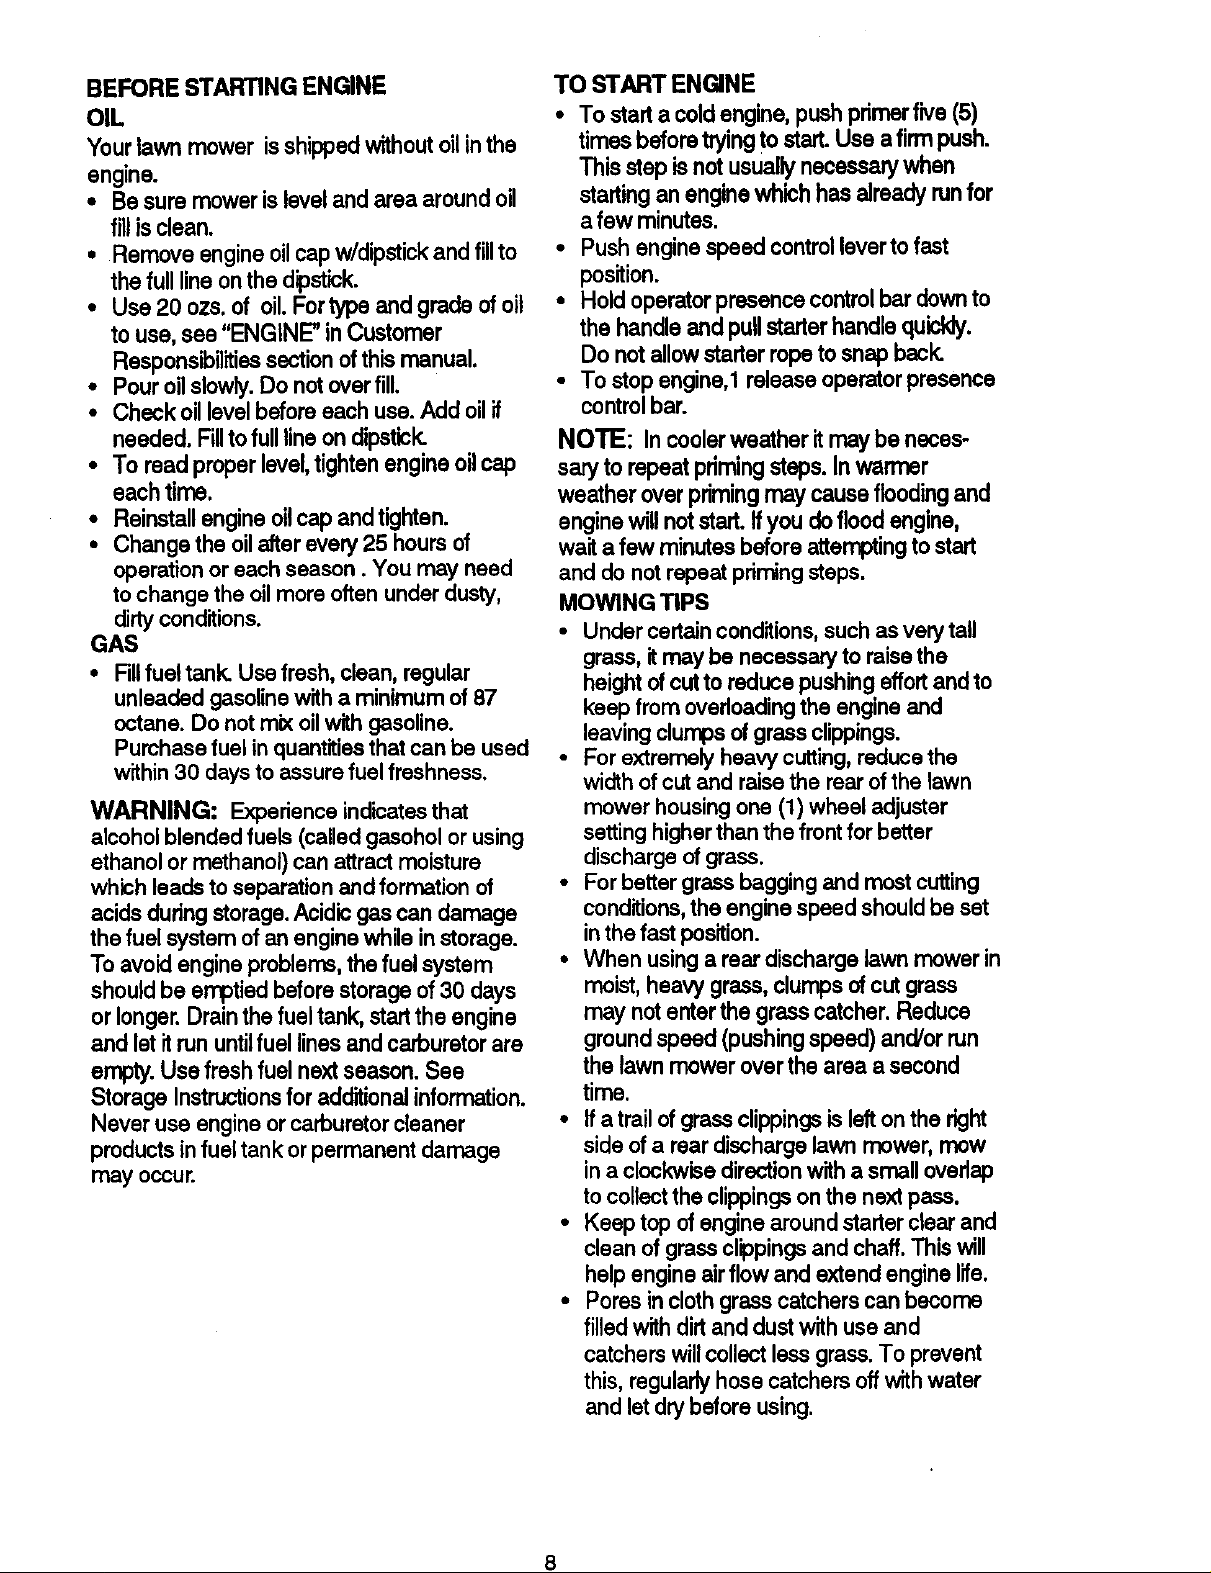
BEFORE STARTING ENGINE
OIL
Your lawn mower isshipped without oilinthe
engine.
• Be sure mower islevel and area around oil
fillis clean.
• Remove engine oilcap w/dipstickand tillto
the full lineon the dipstick.
• Use 20 ozs. of oil. For type and grade ofoil
to use, see "ENGINE" in Customer
Responsibilitiessection of this manual.
• Pour oilslowly.Do not over fill.
• Check oillevelbefore each use.Add oilif
needed. Fillto full lineon dipstick
• To read proper level,tighten engine oilcap
each time.
• Reinstall engine oilcap and tighten.
• Change the oilafter every 25 hours of
operation or each season. You may need
to change the oil more often underdusty,
dirtyconditions.
GAS
• Fillfuel tank Use fresh, clean, regular
unleaded gasolinewith a minimum of 87
octane. Do not mix oilwith gasoline.
Purchase fuel inquantitiesthatcan be used
within 30 days to assurefuel freshness.
WARNING: Experience indicatesthat
alcohol blended fuels (calledgasohol or using
ethanol or methanol) can attract moisture
which leads to separation and formation of
acids during storage.Acidic gas can damage
the fuel system of an engine while instorage.
Toavoid engine problems, the fuel system
should be emptied before storage of 30 days
or longer.Drain the fuel tank, start the engine
and let itrun untilfuel lines and carburetor are
empty. Use fresh fuel next season. See
Storage Instructionsfor additional information.
Never use engine or carburetorcleaner
products infuel tank or permanent damage
may occur
TO START ENGINE
• Tostarta coldengine,pushprimarfive(5)
timesbeforetryingto start.Use afirmpush,
Thisstep isnotusuallynecessarywhan
startingan enginewhichhasalreadyrunfor
afew minutes
• Pushenginespeedcontrollevertofast
position.
• Holdoperatorpresencecontrolbardownto
the handleandpullstarterhandlequicldy.
Do notallowstarter ropetosnapback
• Tostopengine,1releaseoperatorpresence
controlbar.
NOTE:In cooler weather it may be neces-
sary to repeat primingsteps. In warmer
weather over primingmay cause floodingand
enginewill not start. If you doflood engine,
waita few minutes before attemptingto start
and do not repeat primingsteps.
MOWING TIPS
• Under certainconditions,such as verytall
grass, it may be necessary to raisethe
height of cut to reduce pushingeffortand to
keep from overloadingthe engine and
leavingclumps ofgrass clippings.
• For extremely heavy cutting,reduce the
widthofcut and raisethe rear ofthe lawn
mower housingone (1) wheel adjuster
setting higherthan the front for better
discharge of grass.
• For better grass bagging and mostcutting
conditions,the engine speed shouldbe set
in the fast position.
• When using a rear discharge lawn mower in
moist, heavy grass, clumps ofcut grass
may not enter the grass catcher. Reduce
groundspeed (pushing speed) and/or run
the lawn mower over the area a second
time
• If a trailof grassclippingsis lefton the right
side ofa reardischarge lawn mower, mow
ina clockwise directionwitha smell overlap
to collectthe clippingsonthe next pass.
• Keep top ofengine around starterclear and
clean of grass clippingsand chaff This will
help engine airflow and extend engine life.
• Pores in clothgrass catchers can become
filledwith dirtand dust with use and
catchers willcollectless grass. To prevent
this, regularlyhose catchers off withwater
and let drybefore using
8
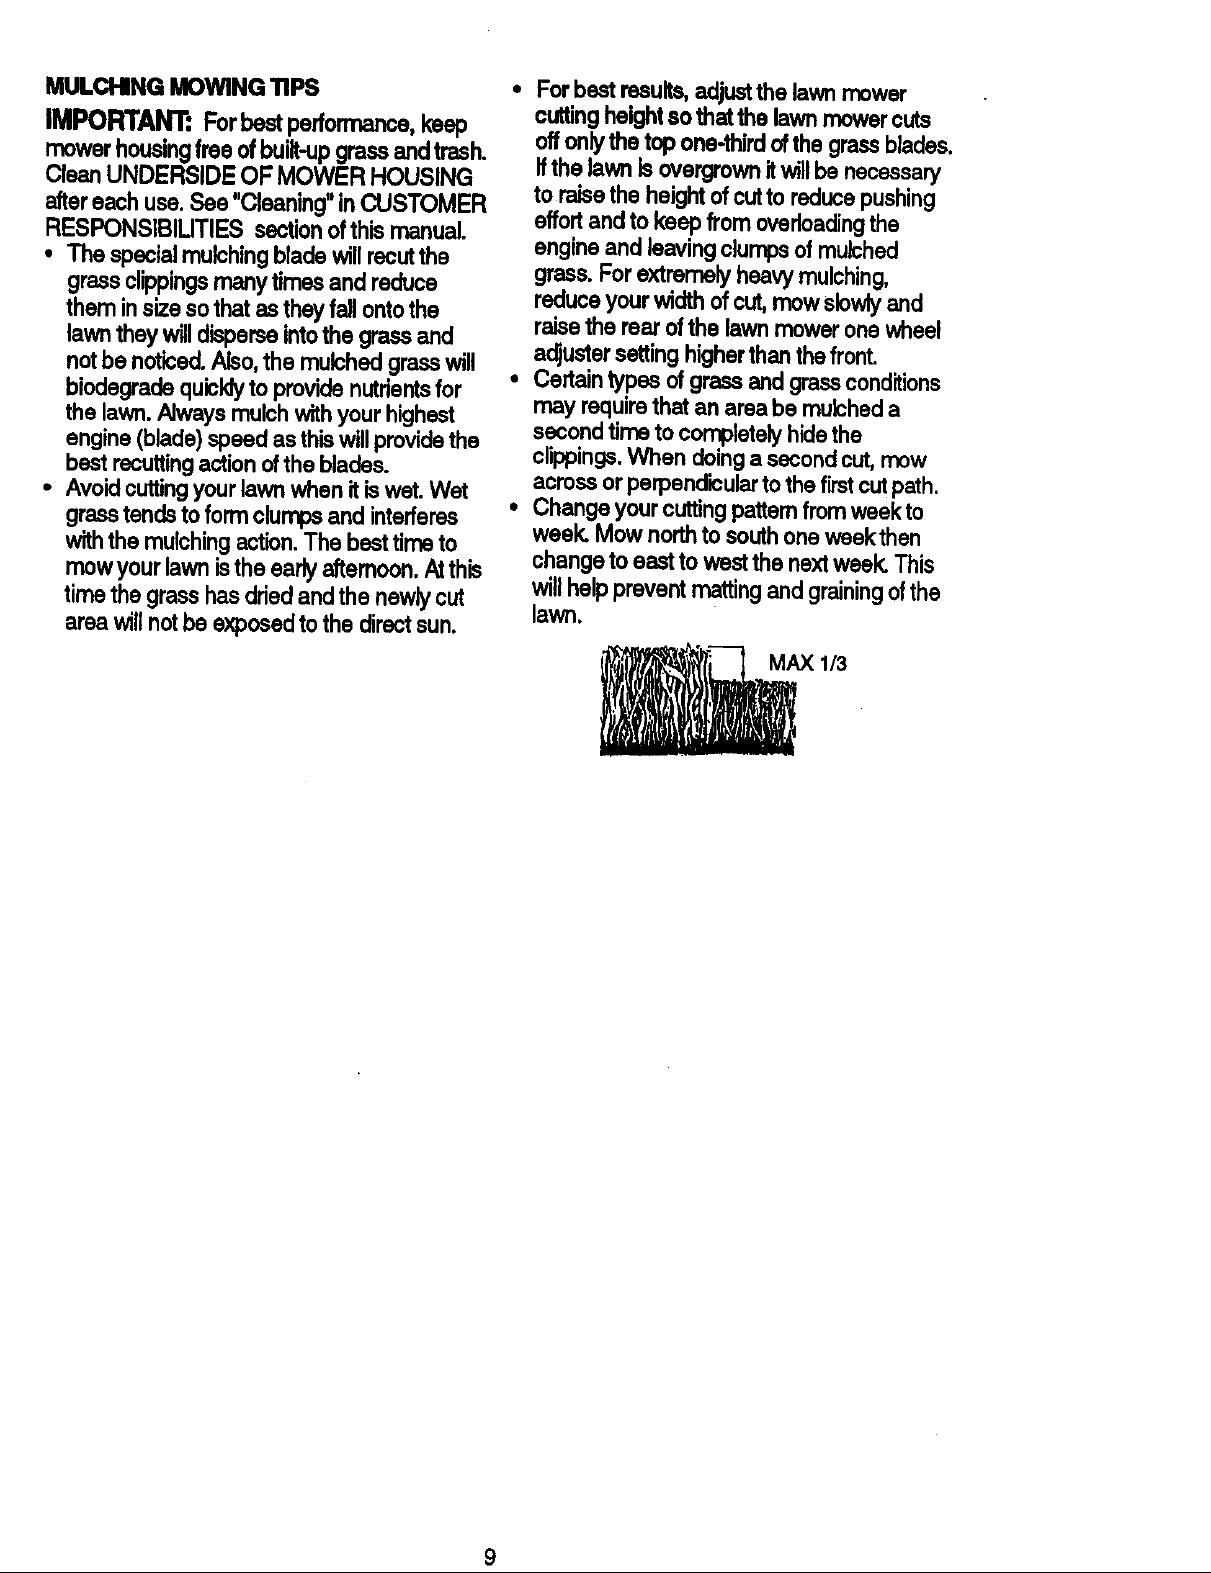
MULCHING MOWING TIPS
IMPORTANT: Forbestperformance,keep
mowerhousingfreeofbuilt-upgrassandtrash.
CleanUNDERSIDE OF MOWER HOUSING
aftereachuse.See"Cleaning"inCUSTOMER
RESPONSIBILITIESsectionofthismanual.
• Thespecialmulchingbladewillrecutthe
grassclippingsmanytimesandreduce
theminsizesothatas theyfanontothe
lawntheywilldisperseintothegrassand
notbenoticed.Also,themulchedgrasswill
biodegradequicklytoprovidenutrientsfor
thelawn.Alwaysmulchwithyourhighest
engine(blade)speedasthiswillprovidethe
bestrecuttingactionoftheblades.
• Avoidcuttingyourlawnwhenitis wet.Wet
grasstendstoformclumpsand interferes
withthe mulchingaction.The basttimeto
mowyourlawnistheearlyafternoon.Atthis
timethegrasshasdriedandthenewlycut
areawillnotbeexposedtothedirectsun.
• For best results,adjustthe lawn mower
cuttingheight so that the lawnmower outs
off onlythe top one-thirdofthe grass blades.
Ifthe lawn is overgrownitwillbe necessary
to raise the height ofcutto reduce pushing
effortand to keep from overloadJngthe
engine and leaving clumpsof mulched
grass. For extremely heavy mulching,
reduce your width of cut,mow slowlyand
raisethe rear ofthe lawn mower one wheel
adjuster setting higherthan thefront.
• Certaintypes ofgrass and grassconditions
may requirethat an area be mulched a
second time to completely h(dethe
clippings.When doing a second cut,mow
acrossor perpendicular to the first cut path.
• Change your cuttingpattern from weekto
week. Mow northto southone weekthen
change to east to west the next week. This
willhelpprevent mattingand grainingofthe
lawn.
AX I/3
9
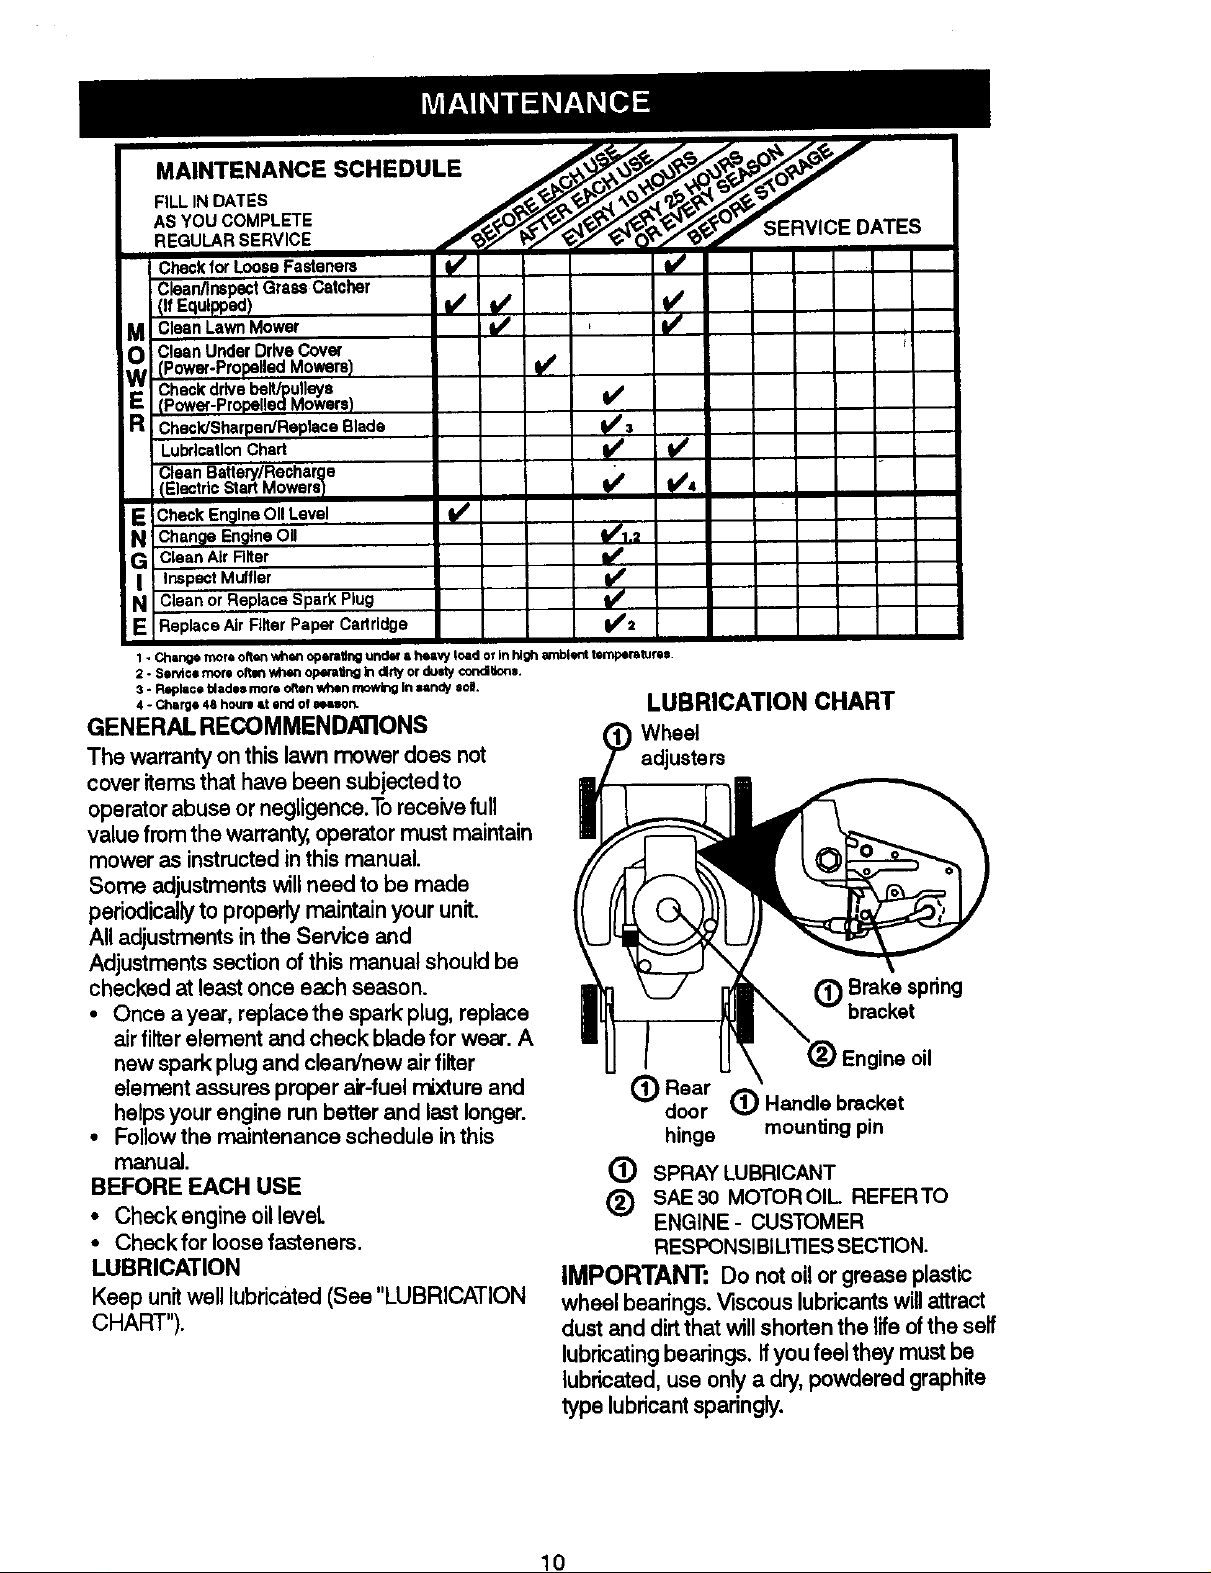
1 - Chlu_o rP,ore oRen_wn operellng under s hesw load OrIn high ambient tempera_ru.
2 - Se_ae more oftw_when op_raU_;I b_ dl_y or duaty €oP,dlUon=.
3 - Rephioe b4adesmore oRen when mowing InImn_/soil.
4 - Charge CShoum st end of sessor_
GENERAL RECOMMENDATIONS
The warranty on thislawn mower does not
cover itemsthat have been subjectedto
operatorabuse or negligence.Toreceivefull
value from the warrant, operatormust maintain
moweras instructedinthismanual.
Some adjustmentswillneed to be made
periodical_ to properly maintain your unit.
All adjustmentsin the Service and
Adjustmentssectionof this manual should be
checked at leastonce each season.
• Once ayear, replace the spark plug, replace
air filler element and check bladefor wear. A
new spark plug and clean/new airfilter
element assuresproper at-fuel mixture and
helpsyour engine run better and last longer.
• Followthe maintenance schedule in this
manuaJ.
BEFORE EACH USE
• Check engine oillevel.
• Checkfor loose fasteners.
LUBRICATION
Keep unitwell lubricated(See "LUBRICATION
CHARq").
_.ERVICE DATES
LUBRICATION CHART
Wheel
adjusters
Brake $pdng
gineoil
(_ Rear
door (_) Handle bracket
hinge mountingpin
(_ SPRAYLUBRICANT
(_) SAE30 MOTOROIL REFERTO
ENGINE- CUSTOMER
RESPONSIBILmESSECTION.
IMPORTANT: Do not oil or grease plastic
wheel bearings.Viscous lubricantswillattract
dustand dirtthat will shortenthe lifeofthe self
lubricatingbearings, if you feel they mustbe
lubricated,use only a dry,powdered graphite
type lubricantsparingly.
10
PRODUCT SPECIFICATIONS
MODEL NUMBER 917.388153
SERIAL NUMBER
DATE OF PURCHASE
HORSEPOWER: 5.0
DISPLACEMENT: 11.5 CU. IN.
GASOLINE CAPACITY/TYPE: 1.5 QUARTS
UNLEADED REGULAR
OIL TYPE (API-SF/SG/SH): SAE 30 (ABOVE 32°F)
SAE 5W-30 (BELOW 32°F)
OIL CAPACITY: 20 OZS.
SPARK PLUG(GAP: .030") CHAMPION RJ19LM
VALVECLEARANCE: INTAKE: .004" - .008"
EXHAUST: .004" - .008"
SOLID STATE IGNITION
AIR GAP: .0125 IN.
BLADE BOLT TORQUE: 35-40 FT. LBS.
• The model and serial numbers will be found on a decal attached to the rear of the
lawn mower housing.Record both serial number and date of purchase in space
provided above.
LAWNMOWER
Always observe safety ruleswhen performing
any maintenance.
TIRES
• Keep tiresfree ofgasoline, oil,or insect
controlchemicalswhichcan harm rubber.
* Avoidstumps, stones, deep ruts,sharp
objects and other hazards that may cause
tire damage.
BLADE CARE
Forbest results,mower blade mustbe kept
sharp. Replace bent or damaged blades.
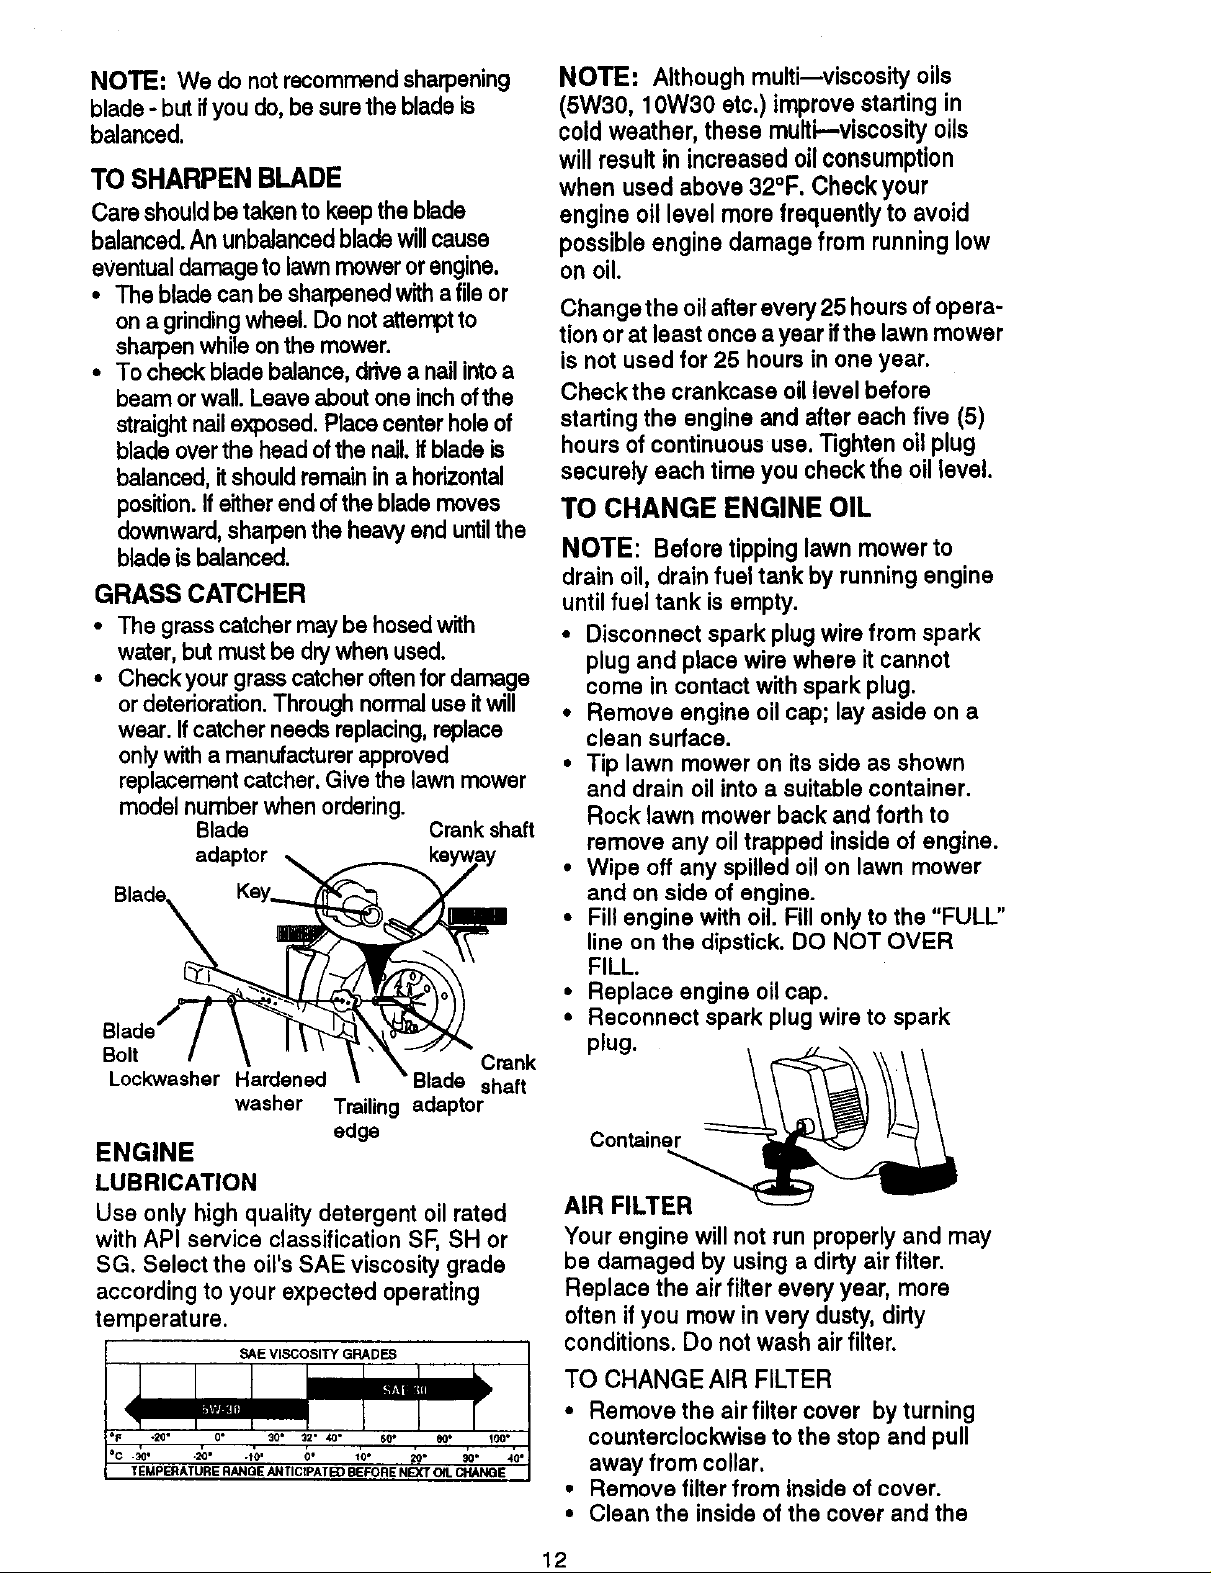
TO REMOVE BLADE
• Disconnect spark plugwire from spark plug
and place wire where itcannot come in
contactwith sparkplug.
• Turn lawn mower on itsside. Make sure air
fitterand carburetorare up.
• Use a wood block between blade and
mower housingto prevent bladefrom
turningwhen removing blade bolt.
• Protectyour handswith gloves and/or wrap
blade with heavy cloth.
• Remove blade boltbyturningcounter-
dock'wise.Use a 9/16" box or open-end
wrench.
• Remove blade and attaching hardware
(bolt,lock washer and hardenedwasher).
NOTE- Remove the blade adapter and
checkthe key inside hubof blade adapter.
The key must be in good conditionto work
properly.Replace adapter ifdamaged.
TO REPLACE BLADE
• Positionthe blade adapter onthe engine
crankshaft.Be sure key in adapter and
keyway in crankshaftare aligned.
• Positionblade on the blade adapter
aligningthetwo (2) holes inthe bladewith
the raised lugsonthe adapter.
• Be sure the trailingedge is uptoward the
engine.
• Installthe blade boltwith the lockwasher
and hardened washer into blade adapter
and crankshaft.
• Use blockofwood between blade and
lawnmower housingand tightenthe blade
bolt,turningclockwise.
• The recommended tighteningtorque ls 35-
40 ft. Ibs.
IMPORTANT."Blade bolt is grade 8 heat
treated.
11
NOTE: We do not recommend sharpening
blade -but ifyou do, be sure the blade is
balanced.
TOSHARPENBLADE
Care shouldbe taken to keep the blade
balanced.Anunbalancedbladewillcause
eventual damage to lawn mower orengine.
• The blade can be sharpened with a file or
on a grindingwheel. Do not attempt to
sharpan while onthe mower.
• To check blade balance, drivea nail intoa
beam or wall. Leave about one inchofthe
straightnail exposed. Place center holeof
blade over the head ofthe nail.If blade is
balanced, itshould remain in a horizontal
position.If eitherend ofthe blade moves
downward, sharpen the heavy end untilthe
blade is balanced.
GRASS CATCHER
• The grass catcher may be hosed with
water, but must be drywhen used.
• Check your grass catcher oftenfor damage
or deterioration.Through normaluse itwill
wear. If catcher needs replacing,replace
onlywith a manufacturer approved
replacement catcher. Give the lawn mower
model number when ordering.
Blade Crankshaft
adaptor
NOTE: Althoughmulti--viscosity oils
(5W30, 10W30 etc.) improve startingin
cold weather, these multi--viscosity oils
will resultin increased oilconsumption
when used above 32°F. Checkyour
engine oil level more frequentlyto avoid
possibleengine damage from runninglow
on oil.
Changethe oil after every 25 hours of opera-
tion or at least once a year Ifthe lawn mower
is not used for 25 hours in one year.
Check the crankcase oil level before
starting the engine and after each five (5)
hours of continuous use. Tighten oil plug
securely each time you check the oil level.
TO CHANGE ENGINE OIL
NOTE: Before tipping lawn mower to
drain oil, drain fuel tank by running engine
until fuel tank is empty.
• Disconnect spark plug wire from spark
plug and place wire where it cannot
come in contact with spark plug.
° Remove engine oil cap; lay aside on a
clean surface.
• Tip lawn mower on its side as shown
and drain oil into a suitable container.
Rock lawn mower back and forth to
remove any oil trapped inside of engine.
• Wipe off any spilled oil on lawn mower
and on side of engine.
• Fill engine with oil. Fill only to the "FULL."
line on the dipstick. DO NOT OVER
FILL.
• Replace engine oilcap.
• Reconnect spark plug wire to spark
Bolt Crank
Lockwasher Hardened Blade shaft
washer Trailing adaptor
edge
ENGINE
LUBRICATION
Use only high quality detergent oil rated
with API service classification SF, SH or
SG. Select the oil's SAE viscosity grade
according to your expected operating
temperature.
plug. '_
Container
AIR FILTER
Your engine willnot run properly and may
be damaged by usinga dirty air filter.
Replace the air filter every year, more
often if you mow in very dusty, dirty
conditions. Do not wash air filter.
TO CHANGE AIR FILTER
• Remove the air filter cover by turning
counterclockwise to the stop and pull
away from collar.
• Remove filter from inside of cover.
• Clean the inside of the cover and the
12
 Loading...