

Page 1
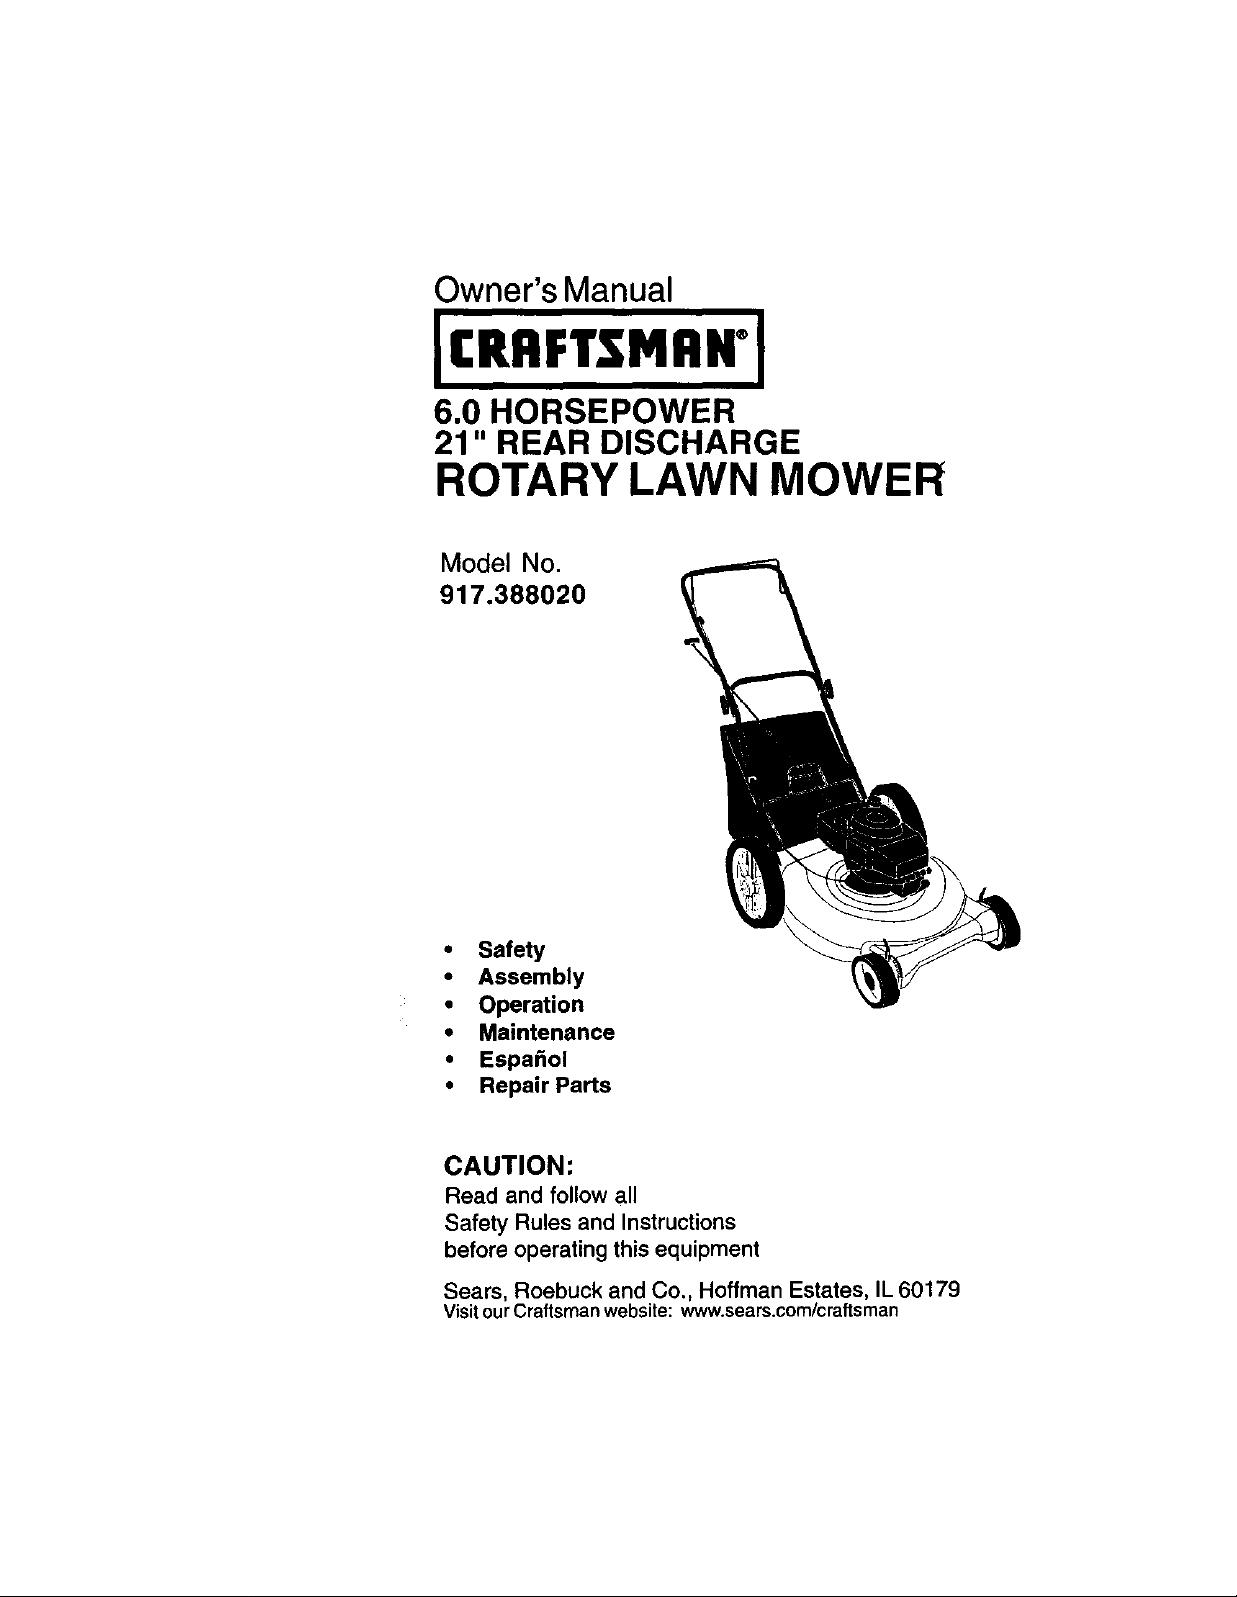
Owner's Manual
JCRRFTSMRWI
6.0 HORSEPOWER
21 " REAR DISCHARGE
ROTARY LAWN MOWER
Model No
917.388020
• Safety
• Assembly
• Operation
• Maintenance
• Espa_ol
• Repair Parts
CAUTION:
Read and follow all
Safety Rules and Instructions
before operating this equipment
Sears, Roebuck and Co., Hoffman Estates, IL 60179
visit our Craftsman website: www.sears.com/craftsman
Page 2
Warranty ................................................. 2 Product Specifications.......................... 11
Safety Rules ........................................... 2 Service and Adjustments ...................... 13
Assembly ................................................ 4 Storage ................................................. 15
Operation ................................................ 6 Troubleshooting ................................... 16
Maintenance Schedule ........................ 10 Repair Parts .......................................... 34
Maintenance ......................................... 10 Parts Ordering ...................... Back Cover
LIMITED TWO YEAR WARRANTY ON CRAFTSMAN POWER MOWER
For two years from date of purchase, when this Craftsman Lawn Mower is maintained,
lubricated, and tuned up according to the operating and maintenance instructions in
the owner's manual, Sears will repair free of charge any defect in material or workman-
ship.
If this Craftsmen Lawn Mower is used for commercial or rental purposes, this warranty
applies for only 90 days from the date of purchase.
This Warranty does notcover:
• Expendable items which become worn during normaluse, such as rotary mower
blades, blade adapters, belts, air cleaners and spark plug.
• Repairs necessary because of operator abuse or negligence, including bent
crankshaftsand the failure to maintain the equipment according to the instructions
contained in the owner's manual.
Warranty serviceis available by returning the Craftsman power mower to the nearest
Sears Service Center/Department in the United States. This warranty applies only
while this product is in use in the United States.
This Warranty gives you specific legal rights, and you may also have other rights which
vary from state to state.
SEARS, ROEBUCKAND CO., D/817 WA, HOFFMAN ESTATES, ILLINOIS 60179
IMPORTANT: This cuttingmachine is capable of amputating hands and feet and
throwing objects. Failure to observe the following safety instructions could result in
serious injuryor death.
I.GENERAL OPERATION
• Read, understand, and follow all
instructionsonthe machine and in the
manual(s) before starting.Be thor-
oughlyfamiliar withthe controlsand the
proper use of the machine before
starting.
• Do not put hands or feet near or under
rotatingparts. Keep clear of the
dischargeopening at all times.
• Only allow responsibleindividuals,who
are familiar with the instructions,to
operate the machine.
• Clear the area of objects such as rocks,
toys, wire, bones, sticks, etc., which
could be picked up and thrown by the
blade.
• Be sure the area is clear of other
people before mowing. Stop machine if
anyone enters the area.
• Do not operate the mower when
barefootor wearing open sandals.
Always wear substantial foot wear.
• Do net pull mower backwards unless
absolutely necessary. Always look
down and behind before and while
movir_g,backwards.
• DO not operate the mower with proper
guards, plates, grass catcher or other
safety protective devices in place.
• See manufacturer's instructions for
proper operation and installation of
accessories. Only use accessories
approved by the manufacturer.
• Stop the blade(s) when crossing gravel
drives,wa[ks,or roads.
• Stop the engine (motor) whenever you
leave the equipment, before cleaning
the mower or uncloggingthe chute.
Page 3
• Shut the engine (motor)off and wait
unfitthe blade comes to complete stop
before removing grass catcher.
• Mow only in daylight or good adificial
light.
• Do not operate the machine while
under the influenceof alcoholor drugs.
• Never operate machine in wet grass.
Alwaysbe sure ofyour footing: keep a
firm holdon the handle and walk;.never
run,
• Oisengage the se_f-propeUedmecha-
nismor drive clutch on mowers so
equipped before starting the engine
(motor).
• tf the equipment should start to vibrate
abnormally, stop the engine (motor)
and check immediately for the cause.
Vibration is generally a warning of
trouble.
• Always wear safety goggles or safety
_llasses with side shields when operat-
ing mower.
II. SLOPE OPERATION
Slopes are a major factor relatedto slip
and fall accidents which can resultin
severe injury.All slopes require extra
caution.If you feel uneasy on a slope, do
not mow it,
DO:
• Mow across the face of slopes:never
up and down. Exerciseextreme caution
when changing direction on slopes.
• Remove obstacles such as rocks,tree
limbs,etc.
• Watch for holes, ruts,or bumps. Tall
grass can hide obstacles.
DO NOT:
• Do not trim near drop-offs,ditchesor
embankments. The operator could lose
footing or balance.
• Do not trim excessively steep slopes.
• Do not mow on wet grass. Reduced
footing could cause slipping.
II1.CHILDREN
Tragic accidents can occur if the operator
isnot alert to the presence of children.
Children are often attractedto the
machine and the mowing activity.Never
assume that children will remain where
you last saw them.
• Keep childrenout of the tdmming area
and under the watchfulcare ofanother
responsible adult.
• Be alert and turn machine off if children
enter the area.
• Before and white walking backwards,
look behind and down for small
children.
• Never allow children to operate the
machine.
• Use extra care when approachingblind
corners,shrubs,trees, or otherobjects
that may obscure vision.
IV.SERVICE
• Use extra care in handlinggasoline
and other fuels. They are flammable
and vapors are explosive.
-Use only an approved container.
-Never remove gas cap or add fuel
with the engine running.Allow
engineto cool before refueling.Do
not smoke.
- Never refuel the machineindoors.
-Never storethe machine or fuel
containerinside where there is an
open flame, such as a water heater.
• Never run a machine inside a closed
area.
• Never make adjustmentsor repairs with
the engine (motor) running. Disconnect
the spark plug wire, and keep the wire
away from the plug to prevent acciden-
tal starting.
• Keep nuts and bolts, especially blade
attaohement bolts, tight and keep
equipment in good condition.
• Never tamper with safety devices.
Check their proper operation regularly.
• Keep machine tree of grass, leaves, or
other debris build-up. Clean oilor fuel
spillage. Allow machine to cool before
storing.
• Stop and inspectthe equipment it you
strike an object. Repair, if necessary,
before restarting.
• Never attemptto make wheel height
adjustmentswhile the engine (motor) is
running.
• Grass (;atcher components are subject
to wear, damage, and deterioration,
which could expose moving parts or
allow objects to be thrown.Frequently
check components and replace with
maeutacturar's recommended parts,
when necessary.
• Mower blades are sharp and can cut.
Wrap the blade(s) or wear gloves, and
use extra caution when servicingthem.
• Do not change the engine governor
setting or overspeed the engine.
3
Page 4
_Look for this symbolto point out
impodant safety precautions.It means
CAUTION!!! BECOMEALERT!!! YOUR
SAFETY IS INVOLVED.
CAUTION: In order to prevent
accidental starling when setting up,
transporting,adjusting or making repairs,
always disconnect spark plug wire end
placewire where it cannot contact spark
plug.
_LWARNING: Engineexhaust, some of its
constituents,and certain vehicle compo-
nents contain or emit chemicalsknown to
the State of Californiato cause cancer
and birth defects or other reproductive
harm.
_WARNING: Battery posts, terminalsand
related accessories contain lead and
lead compounds, chemicals known to the
State ofCalifornia to cause cancer and
birthdefects or other reproductiveharm.
Wash hands after handling.
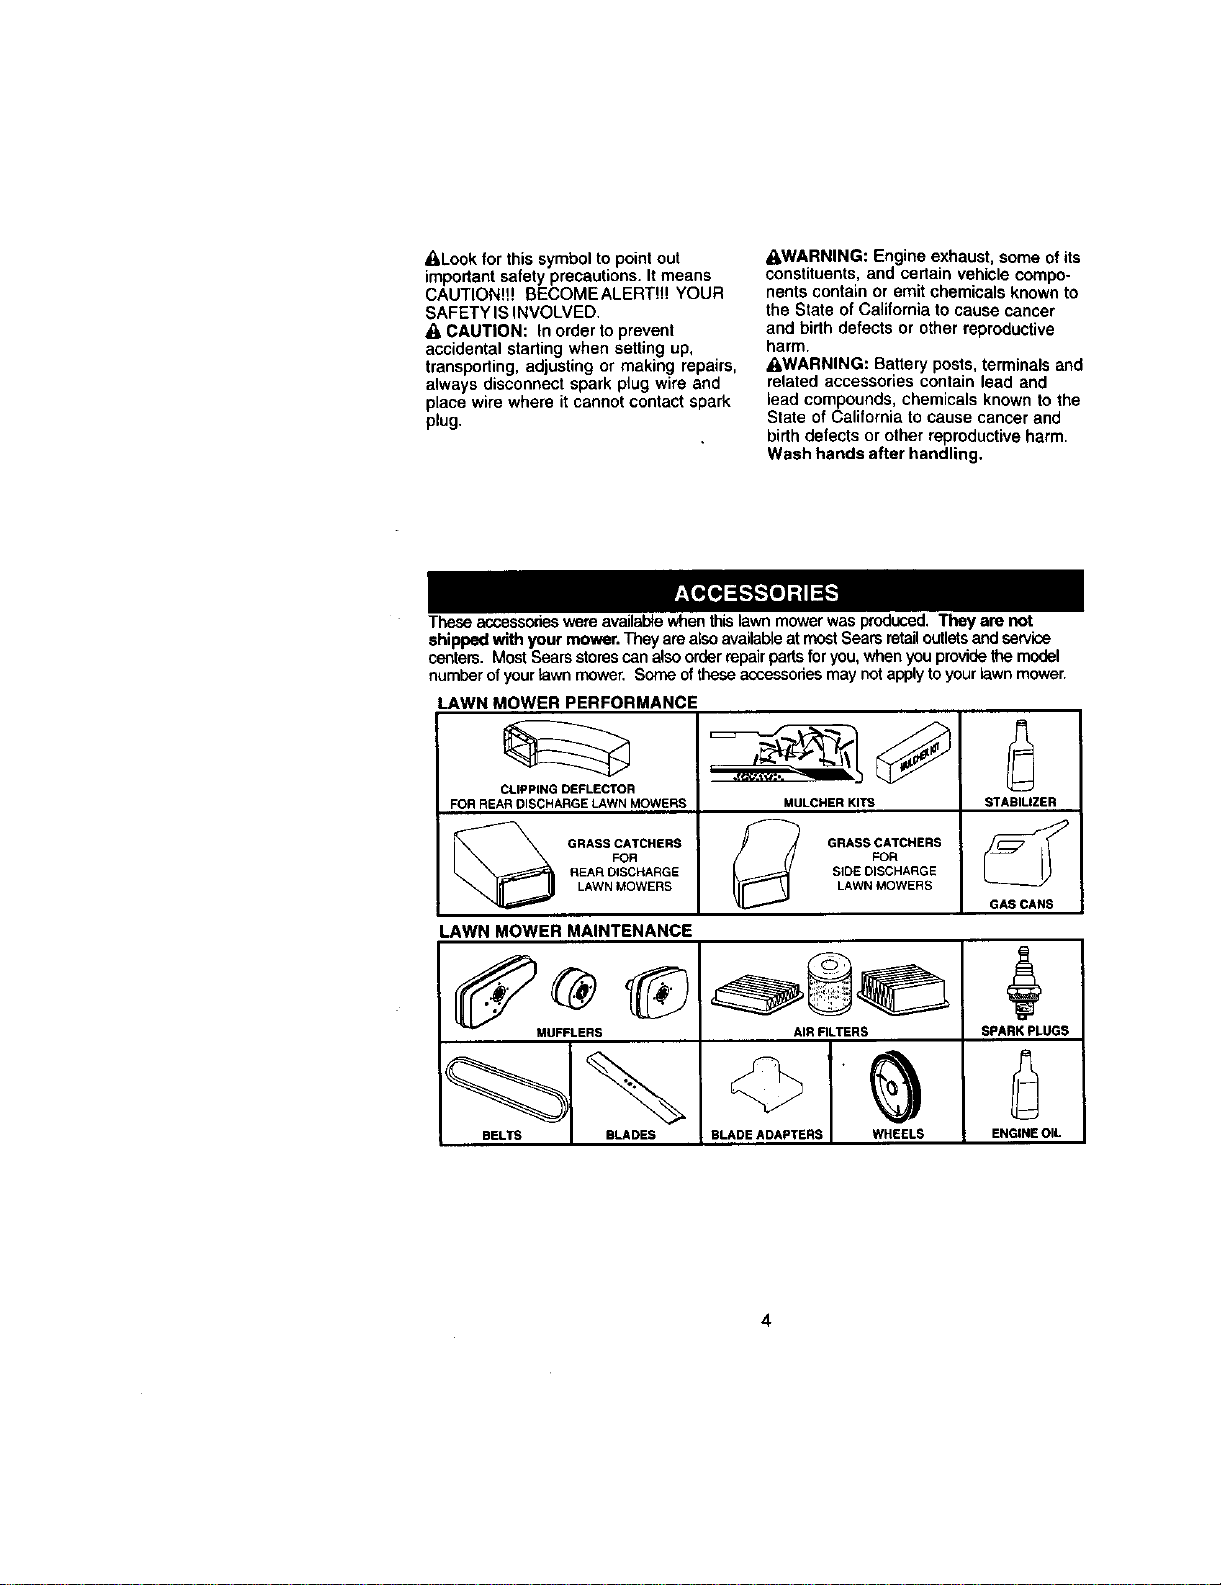
These accessorieswereavailab4ewhenthislawnmowerwas produced,They are not
shippedwith your mower.TheyarealsoavailableatmostSears retailoutletsandservice
centers.MostSearsstorescan alsoorderrepairpartsfor you,whenyou providethemodel
number of yourlawnmower.Someofthese accessoriesmaynotapplytoyourlawn mower.
LAWN MOWER PERFORMANCE
FOR REAR DISCHARGE LAWN MOWERS MULCHER KITS STABILIZER
REAR DISCHARGE SIDE DISCHARGE
LAWN MOWERS LAWN MOWERS
LAWN MOWER MAINTENANCE
AIR RLTERS SPARK PLUGS
BELTS BLADES BLADE ADAPTERS WHEELS ENGINE OIL
GAS CANS
Page 5
Read these instructionsand thismanual in
itsentiretybefore youattemptto assemble
or operate your new lawn mower.
IMPORTANT: This tawn mower is shipped
withoutoil or gasolinein the engine.
Yournew lawn mower has been assembled
at thefactory withthe exceptionofthose
partsleft unassembledfor shipping
purposes. To ensuresafe and proper
operationof yourlawn mower,all partsand
hardwareyou assemble must be tightened
securely. Usethe correcttoolsas neces-
saryto ensure propertightness.All parts
suchas nuts,washers,bolts,etc., neces-
saryto completethe assembly have been
placedin the parts bag.
TO REMOVE LAWN MOWER FROM
CARTON
• Remove looseparts includedwith
mower.
• Cut down two end cornersof cartonand
lay end panel down flat.
• Remove all packing materials except
padding between upper and lower
handle and padding holding operator
presence controlbar to upperhandle.
• Roll lawnmower out of cartonand check
cartonthoroughlyfor additionalloose
parts.
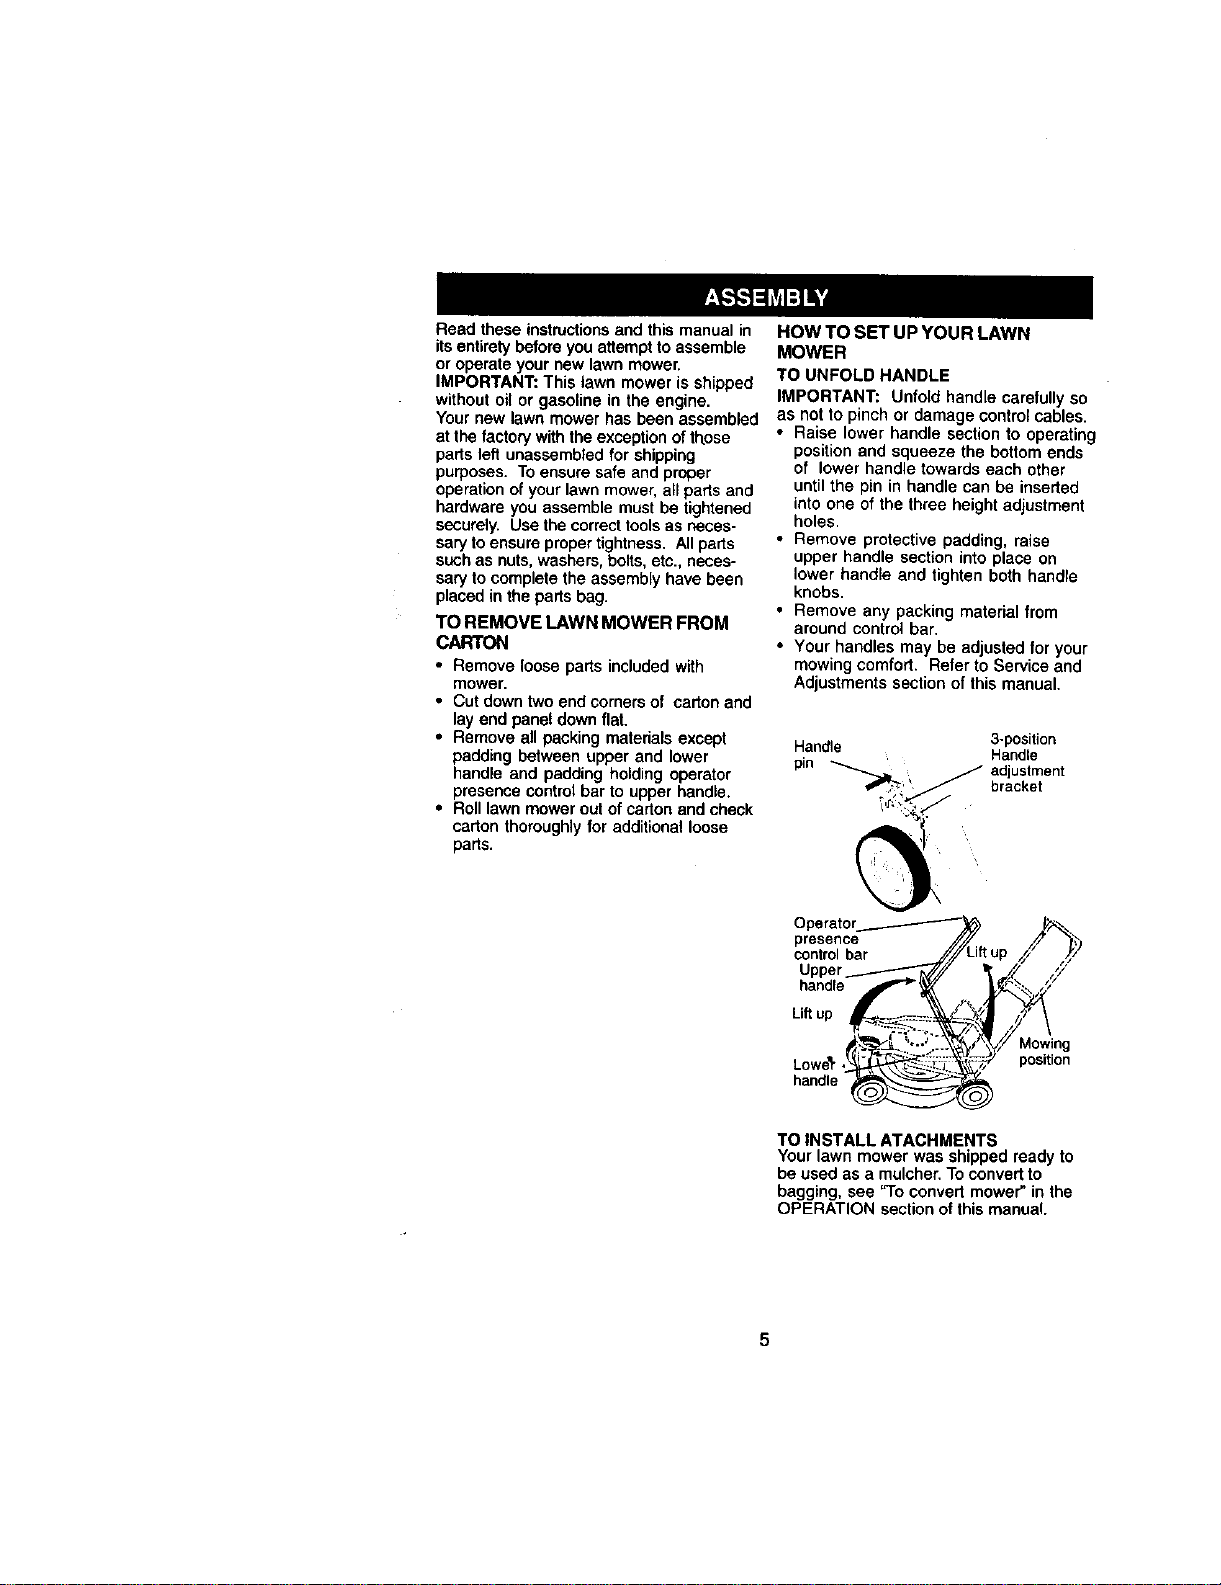
HOW TO SET UP YOUR LAWN
MOWER
TO UNFOLD HANDLE
IMPORTANT: Unfoldhandle carefullyso
as not to pinchor damage controlcables.
• Raise lower handle section to operating
positionand squeeze the bottomends
of lower handle towardseach other
untilthe pin in handle can be inserted
intoone ofthe three heightadjustment
holes.
• Remove protectivepadding, raise
upper handle sectioninto place on
lower handle and tighten both handle
knobs.
• Remove any packing material from
around cantrei bar.
• Your handles may be adjusted for your
mowingcomfort. Refer to Service and
Adjustmentssectionof this manual.
Handle 3-position
ii bracket
Handle
pin __ adjustment
presence
control bar
handle
Liftup
LoweSt position
handle
Mowing
TO INSTALL ATACHMENTS
Your lawn mower was shippedready to
be used as a mulchenToconvertto
bagging, see "To convert mower"in the
OPERATION sectionof this manual.
5
Page 6

KNOW YOUR LAWN MOWER
READTHIS OWNER'S MANUALAND SAFETY RULESBEFOREOPERATINGYOUR LAWN
MOWER. Comparethe illustrationswithyour lawn mower to familiarizeyourselfwith the
locationof variouscontrolsand adjustments.Savethis manualfor future reference.
These symbols may appear on your lawn mower or in literature supplied with the
product. Learn and understand their meaning.
CAUTION ENGINE ENGINE FAST SLOW CHOKE FUEL OIL DANGER, KEEP HANDS
OR WARNfNG ON OFF AND FEET AWAY
Operator presence control
bar
Starter handle t zone control cable
Handle
Grass catche
Engine oilcap
with dipstick
Lawn mower housing
IMPORTANT: This lawn mower is shipped
withoutoil or gasoline in the engine. • Wheeladjuster
• (oneachwheel)
MEETSCPSC SAFETY REQUIREMENTS
Searsrotarywalk-behindpowerlawnmowersconform to thesafetystandardsoftheAmencan
NationalStandardsInstituteandtheU,S. ConsumerProductSafetyCommission,The blade
turnswhenthe engineisrunning.
Operator PresenceControl Bar- must be Primer- pumps additionalfuelfromthe
helddownto the handleto starttheengine, carburetortothecylinderforusewhen
Releasetostopthe engine, startinga coldengine.
StarterHandle - usedforstartingtheengine.
6
Page 7
The operationof any lawn
mower can resultin foreign
objectsthrown into the eyes,
whichcan result in severe
safety glasses or eye shields while
operatingyour lawn mower or performing
any adjustments or repairs. We recom-
mend a wide visionsafety mask over
spectaclesor standard safety glasse.s.
HOW TO USE YOUR LAWN MOWER
ENGINESPEEDCONTROL
Theenginespeedwas setat thefactoryfor
optimumperformance.Speed isnotadjust-
able.
ENGINE ZONE CONTROL
_,CAUTION: Federal regulationsrequire
an engine controlto be installed on this _ _
lawn mower in order to minimizethe risk _. _ _
of bladecontact injury.Do not under any Pivotpins -_ _ _
circumstancesattempt todefeat the
function of the operatorcontrol.The blade
turnswhen the engine is running.
• Your lawn moweris equippedwithan
operatorpresencecontrolbar which
requirestheoperatorto be positioned
behindthe lawnmowerhandleto startand
operatethe lawn mower.
TO ADJUSTCUTFINGHEIGHT
• Raisewheelsfor lowcutand lower wheels
forhighcut.
• Adjustcuttingheight to suityourrequire-
ments.Mediumpositionisbast for most
• Tochangecuttingheight,squeezeadjuster
lawns. /
lavertowardwheel,Movewheel upor
downto suityourrequirements.BesureaH
wheelsare in the same setting.
NOTE: Adjuster is propedy positioned
when plate tab insertsinto hole in lever.
Also, 9-positionadjusters (if so equipped) handle
allow leverto be positioned between the
plate tabs.
eye damage. Alwayswear
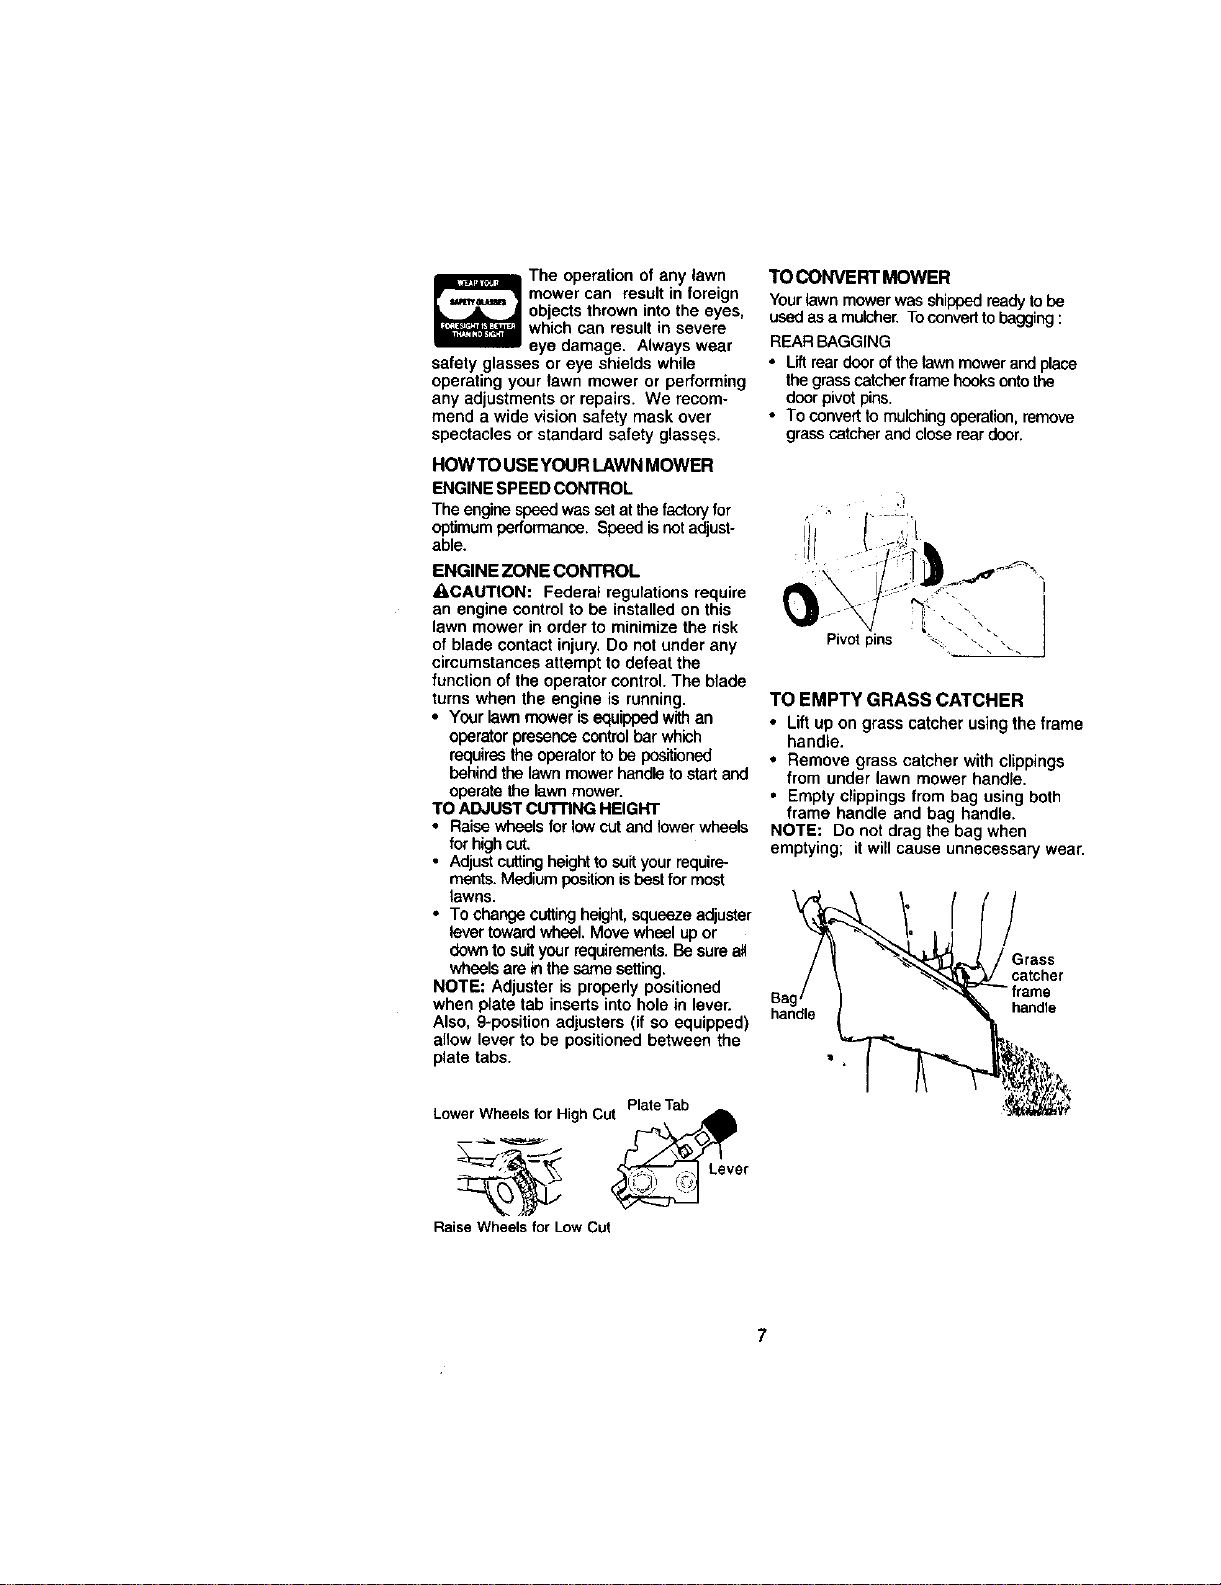
TO CONVERT MOWER
Yourlawn mowerwas shippedreadytobe
usedas a mulcher. Toconverttobagging:
REARBAGGING
• Liftreardoorofthe lawnmowerandplace
thegrasscatcherframe hooksontothe
doorpivotpins.
• Toconvertto mulchingoperation,remove
grasscatcherandclosereardoor.
TO EMPTY GRASS CATCHER
• Lift up on grass catcher usingthe frame
handle.
• Remove grass catcher withclippings
from under lawn mower handle.
• Empty clippingsfrom bag usingboth
frame handle and bag handle.
NOTE: Do not dragthe bag when
emptying; itwill cause unnecessarywear.
catcher
handle
LowerWheelsforHighCu \ j_l
Plate Tab
-@
RaiseWheelsforLowCut
Page 8
BEFORE STARTING ENGINE
OIL
Yourlawnmower isshippedwithoutoilinthe
engine.
• Be sure mower is leve] and area
around oil fill isclean.
• Remove engine oilcap and fill to the
full line on the dipstick.
NOTE: Allow oilto settledown into
engine for accurate dipstickreading.
• Engine holds 20 ozs. of oil. For type
and grade of oil to use, see "ENGINE"
in Maintenance section of this manual
• Pour oil slowly. Do not over fill
• Check oil level before each use. Add
oil if needed. Filltofull line on dipstick.
• To read proper level, tighten engine oil
cap each time.
• Reinstall engine oil cap and tighten.
• Change the oil after every 25 hoursof
operationor each season. You may
need to change the oil more often
under dusty, dirty conditions.
ADD GASOLINE
• Fill fuel tank. Use fresh, clean, regular
unleaded gasoline with a minimum of
87 octane. Do not mix oil with gasoline.
Purchase fuel in quantities that can be
used within30 days to assure fuel
freshness.
_.WARNING: Experience indicatesthat
alcohol blended fuels (called gasehol or
using ethanol or methanol) can attract
moisturewhich leads to separation and
formationof acids duringstorage. Acidic
gas can damage the fuel system of an
engine while in storage. To avoid engine
problems, the fuel system shoutd be
emptied before storage of 30 days or
longer. Drain the gastank, start the
engine and let it run untilthe fuel lines
and carburetorare empty. Use fresh fuel
nextseason. See Storage Instructions for
additional information. Never use engine
or carburetorcleaner productsin the fuel
tank or permanent damage may occur.
ACAUTION: Fill to bottomof gas tank
filler neck. Do not overfill. Wipe off any
spilled oil or fuel. Do not store, spillor use
gasoline near an open flame.
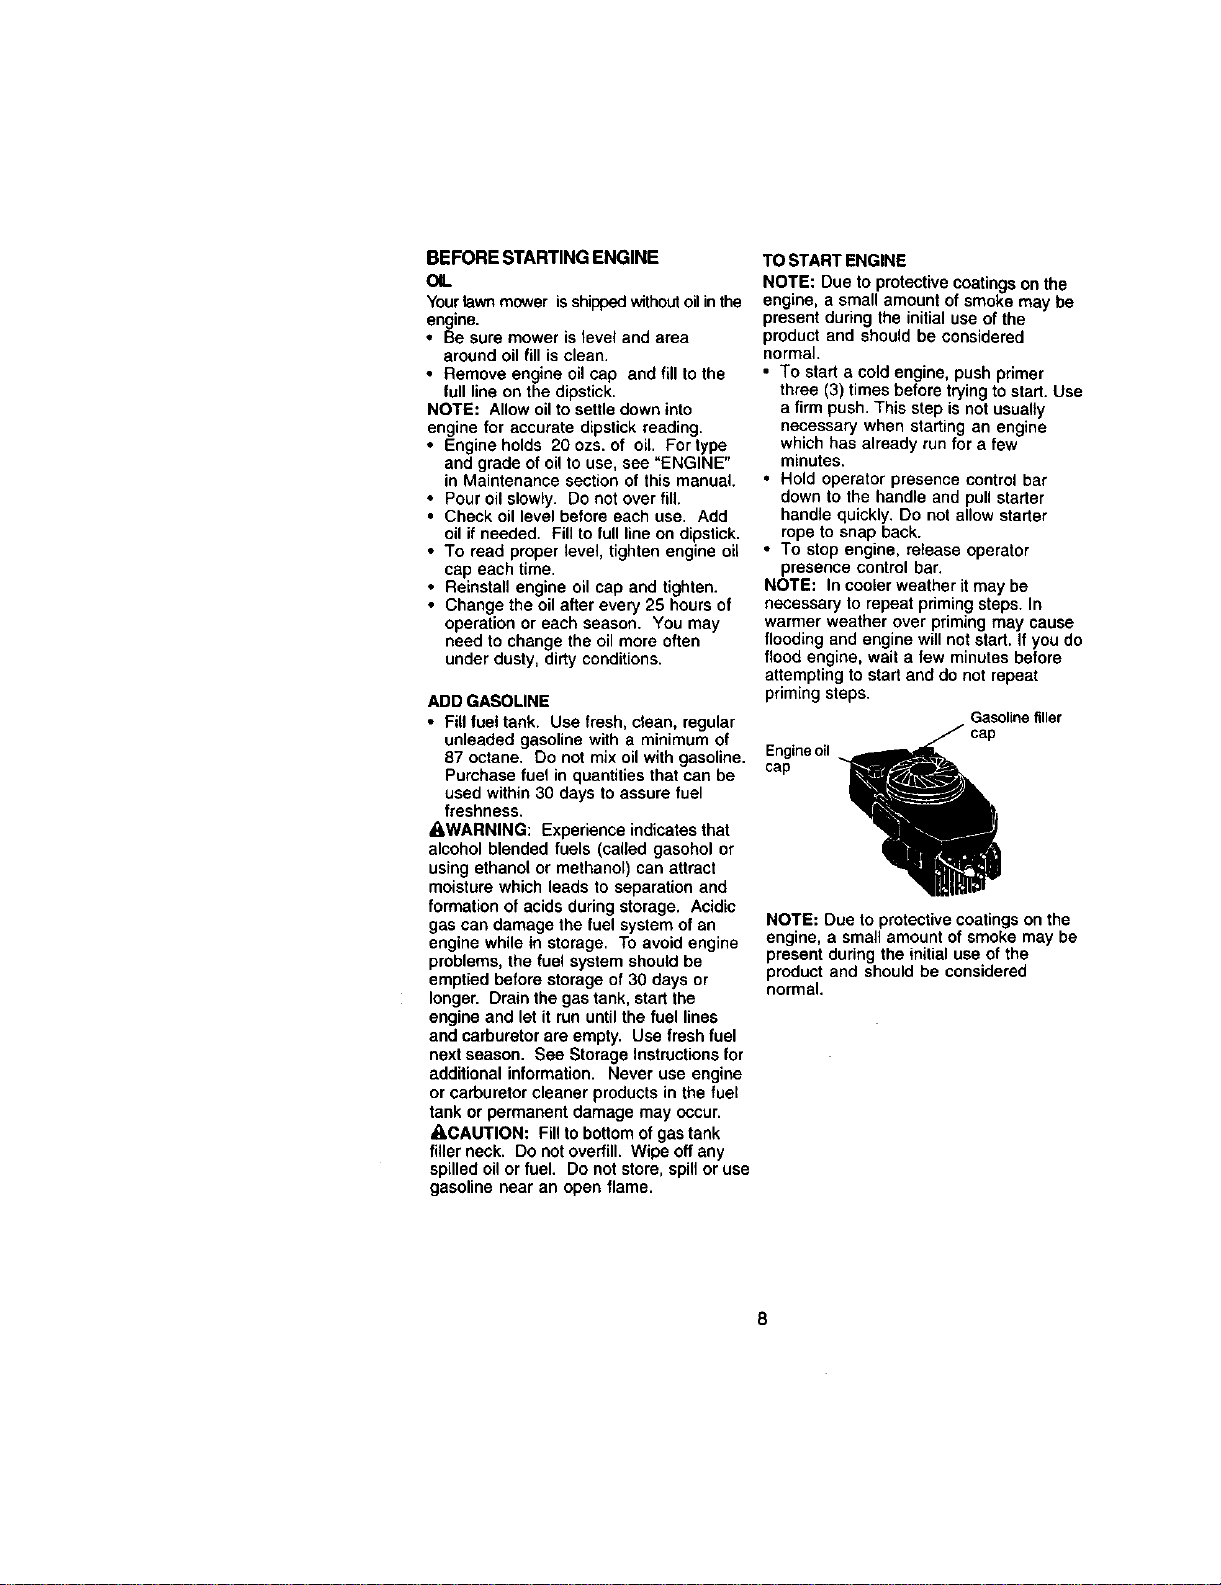
TO START ENGINE
NOTE: Due to protective coatingson the
engine, a small amount of smoke may be
present duringthe initialuse of the
product and should be considered
normal.
• To start a coldengine, push primer
three (3) times before fryingto start. Use
a firm push. This step is not usually
necessary when starting an engine
whichhas already runfor a few
minutes.
• Hold operator presence controlbar
down to the handle and pull starter
handle quickly. Do not allow starter
rope to snap back.
• To stop engine, release operator
presence control bar.
NOTE: In coolerweather it may be
necessary to repeat primingsteps. In
warmer weather over priming may cause
flooding and engine willnot start. Ifyou do
flood engine, wait a few minutesbefore
attemptingto stad and do not repeat
primingsteps.
Gasolinefiller
Engineoil
cap
NOTE: Due to protectivecoatingson the
engine, a smallamount of smoke may be
present duringthe initialuse of the
productand should be considered
normal.
8
Page 9

MOWINGTIPS
• Under certain conditions,such as very
tall grass, it may be necessary to raise
the height of cut to reduce pushing
effortand to keep from ovedoading the
engine and leaving clumps of grass
clippings. It may also be necessary to
reduce ground speed and/or run the
lawn mower over the area a second
time.
• Forextremely heavy cutting,reduce the
width of cut by overlapping previously
cut path and mow slowly.
• For better grass baggingand most
cuttingconditions, the engine speed
shouldbe set in the fast position.
• When using a rear discharge lawn
mower in moist, heavy grass, clumps of
cut grass may not enter the grass
catcher. Reduce ground speed
(pushingspeed) and/or run the lawn
mowerover the area a secondtime.
• If a trailofclippingsisleft on the right
side of a rear discharge mower, mow in
a clockwisedirectionwith a small
ovedap to collect the clippingson the
next pass.
• Pores in cloth grass catcherscan
become filled with dirtand dust with use
and catchers witlcollactless grass. To
prevent this, regularly hose catcher off
with water and let dry before using.
• Keep top of enginearound starterclear
and clean of grass clippingsand chaff.
This will help engine air flow and
extend engine lite.
MULCHINGMOWINGTtPS
IMPORTANT: For best performance,keep
mower housingfree of built-upgrass and
trash. Clean UNDERSIDE OF MOWER
HOUSING after each use. See "Cleaning"
in Maintenance section of this manual.
• The specialmulchingbladewillrecur the
grassclippingsmanytimesand reduce
themin sizesothatas theyfallontothe
lawntheywilldisperseintothe grassand
notbe noticed.Also,themulched grasswill
biodegradequicklyto providenutrientsfor
thelawn.Alwaysmulchwithyourhighest
engine(blade) speedasthiswillprovide
thebest recuttingaction oftheblades.
• Avoidcuttingyourlawnwhenit iswet.Wet
grasstendstoform clumpsandinterferes
withthemulchingaction. Thebest timeto
mowyourlawnis theeaityafternoon.At
thistimethe grasshasdriedandthe newly
cutarea willnotbe exposedto thed_rect
sun.
• Forbest results,adjustthelawnmower
cuttingheightsothatthe lawnmowercuts
offonlythe topone-thirdofthegrass
blades. Ifthelawnis overgrownitwillbe
necessa_Jto raisethe heightofcutto
reducepushingeffort and to keepfrom
overloading the engine and leaving
clumpsof mulched grasS.Forextremely
heavymulching, reduceyour wk_ of cut,
mow slowly and raisethe rear ofthe lawn
mower one wheeladjustersettinghigher
thanthe front.
• Certaintypesofgrassandgrassconditions
may _._re thatan area be mulched a
secondtime to completelyhide the
clippings.When doing asecondcut, mow
ecreseorpeq)endiculartothefiretoutpsth.
• Changeyourcuttingpatternfrom weekto
week.Mow northto southoneweekthan
chargetoeasttowestthenextweek.This
willhelp prevantmattingand grainingof
thelatwn.
Max 1/3
9
Page 10

MA,NTENANCESCH OULE
FILL IN DATES _._ _ _ _ _._
CheCkforLoose Fasteners _
Clean/Inspect Grass Catcher
(If Equipped) (P/ It/ I/
M Clean Lawn Mower I_ (I/
O Clean Under Orive Cover(Power-Prepeged Mowers) ql/
Check drive ben/pulleys
E (Power-Pr_oelled Mowers) {i/
CheeWSharpen/Replace Blade f//3
Lubricati_ Chart _,/
Clean Baden//Recha e
(Electric Slart Mowers_ _ 11_4
E Check Ermine Oil Level
N ChangeEngineOil I_;._
G Clean A_rFilter if# =
I Inspect Muffler ¥1
N Clean or Replace Spark PLug
E Replace/u_ Filter Paper Cadridge I/2
I . Ch,_nge mote o_en w_=,_ operating under a heavy toad o_ in h_gh amb_nt temperatures
2. Serv_=_ more otlan whAn _a_ng in diny Or dusty conditions
3. R_olace L_de_ more olten wh=*r]mow_g in _mJy SC_I
4 - Charge 48 hours at e_iol season.
GENERAL RECOMMENDATIONS
The warrantyonthislawnmoverdoes not
coveritemsthathavebeensubjectedto
operatorabuseornegligence.Torec_w full
valuefromthewarranty,operatormust
maintainmoweras instructedinthismanual.
Someadjustmentswillneedto be made
periodicallyto properlymaintainyourunit.
Alladjustmentsin theServiceand
Adjustmentssectionof thismanualshouldbe
checkedat leastonceeach season,
• Once a year,replacethesparkplug,
replaceair ititerelementandcheckblade
for v,_ar.A new sparkplugand clean/new
airfilterelementassuresproperair-fuel
mixtureand helpsyourenginerun hatter
and lastlonger,
• Followthe maintenancescheduleinthis
manual.
BEFORE EACH USE
• Check engineoil level.
• Checkforloosefasteners.
LUBRICATION
Keep unitwelllubricated (See"LUBRICATION
CHART").
_(_ SPRAY LUBRICANT
SAE 30 MOTOR OIL. REFER TO
ENGINE - MAINTENANCE SECTION.
IMPORTANT: Do not oil or grease plastic
wheel bearings. Viscous lubricantswill
attractdust and did that witlshortenthe
lifeofthe selflubricating bearings. If you
feel they mustbe lubricated,use only a
dry,powdered graphitetype lubricant
sparingly.
LUBRICATION CHART
Wheel
bracket
Handle bracket
• hinge mountingpin
spnng
10
Page 11

PRODUCT SPECIFICATIONS
SERIAL NUMBER
DATE OF PURCHASE
GASOLINE CAPACITY/TYPE: 1.5 QUARTS
OILTYPE (API-SF/SG/SH): SAE 30 (ABOVE 32°F)
OIL CAPACITY: 20 OZS.
SPARK PLUG(GAP: .030") CHAMPION RJ19LM OR J19LM
VALVE CLEARANCE: INTAKE: ,004 - .008
SOLID STATE IGNITION
AIR GAP: .0125 IN.
BLADE BOLT TORQUE: 35-40 FT. LBS.
• The model and serial numbers will be found on a decal attached to the rear of the
lawn mower housing.Record both serial number and date of purchase in space
provided above.
UNLEADED REGULAR
SAE 5W-30 (BELOW 32°F)
EXHAUST: .004 - .008
LAWN MOWER
Alwaysobservesafetyruleswhen performing
any maintenance.
TIRES
• Keeptiresfree of gasoline,oil,orinsect
control chemicalswhich can harm rubber.
• Avoid stumps,stones, deep ruts,sharp
objectsand other hazardsthat may cause
tire damage.
BLADE CARE
For best results, mowerblade mustbe
kept sharp. Replace bent or damaged
blades.
TO REMOVE BLADE
• Disconnect spark plugwire from spark
plug and place wire where it cannot
come in contact with spark plug.
• Turn lawn mower on its side. Make
sure air filter and carburetor are up.
• Use a wood block between blade and
mower housing to prevent blade from
turningwhen removingblade bolt.
• Protect your hands with gloves and/or
wrap blade with heavy cloth.
• Remove blade bolt by turning counter-
clockwise.
• Remove blade and attaching hardware
(bolt,lock washer and hardened
washer).
NOTE: Remove the blade adapter and
check the key inside hub of blade adapter.
The key mustbe in good conditionto work
prepedy. Replace adapter if damaged.
TO REPLACE BLADE
• Position the blade adapter on the
engine crankshaft. Be sure key in
adapter and crankshaft keyway are
aligned.
• Position blade on the blade adapter
aligning the two (2) holes in the blade
with the raised lugs on the adapter.
• Be sure the trailing edge of blade
(opposite sharp edge) is up toward the
engine.
• Install the blade bolt with the lock
washer and hardened washer into
blade adapter and crankshaft.
• Use block of wood between blade and
lawn mower housing and tighten the
blade bolt, turning clockwise.,
• The recommended tightening torque is
35-40 ft. Ibs.
IMPORTANT: Blade bolt is grade 8 heat
treated_ .
11
Page 12

TO SHARPEN BLADE
NOTE: We do not recommend
sharpeningblade - but if you do, be sure
the blade is balanced.
Care shouldbe taken to keep the blade
balanced. An unbalanced blade will
cause eventual damage to lawn mower or
engine.
• The blade can be sharpened with a file
or on a grindingwheel. Do notattempt
to sharpen while on the mower.
• To check blade balance, ddve a nail
intoa beam or wall. Leave about one
inch of the straight nail exposed. Place
center hole of blade over the head of
the nail. Ifblade isbalanced, it should
remain in a horizontalposition. If either
end of the blade moves downward,
sharpen the heavy end untilthe blade
is balanced.
Crank shaft
keyway
Bolt
Crank
LockwasherHardened Blade shaft
washer Trailing adapter
edge
GRASS CATCHER
• The grasscatchermaybe hosedwith
water,butmustbe drywhenused.
• Checkyourgrasscatcher oftenfordamage
ordeterioration.Throughnormaluseit will
wear.if catcher needs replacing,replace
onlywitha manufacturerapproved
replacementcatcher. Givethe lawn mower
modelnumberwhen ordeitng.
ENGINE
LUBRICATION
Use only highquality detergent oil rated
withAPI service classificationSF, SH or
SG. Select the oil'sSAE viscositygrade
according to your expected operating
temperature.
NOTE: Although multi--viscosity oils
(5W30, 10W30 etc.) improvestartingin
cold weather, these multi--viscosity oils
will resultin increased oil consumption
when usedabove 32°F. Check your
engine oil level more frequently to avoid
possible engine damage from running
tow on oil.
Change the oil after every 25 hoursof
operationor at least once a year if the
lawn mower is not used for 25 hours in
one year.
Check the crankcase oil level before
starting the engine and after each five (5)
hoursof continuoususe. Tighten oil plug
securely each time you check the oil level.
TO CHANGE ENGINE OIL
NOTE: Beforetippinglawn mowerto
drain oil, drainfuel tank by running
engine untilfuel tank isempty.
• Disconnect spark plug wire from spark
plug and place wire where it cannot
come in contactwith spark plug.
• Remove engine oil cap; lay aside on a
clean surface.
• Tip lawn mower on its side and drain oil
into a suitablecontainer. Rock lawn
mower back and forth to remove any oil
trapped inside of engine.
• Wipe off any spilledoil on lawn mower
and on side of engine.
• Fill engine with oil. Fill only to the
"FULL" line on the dipstick.DO NOT
OVER FILL.
• Replace engine oil cap.
• Reconnect spark plugwire to spark
plug.
AIR FILTER
Your engine will not run properly and may
be damaged by usinga dirty air filten
Replace the air filter every year, more
oftenif you mow in verydusty,dirty
conditions.Do not wash airfilter.
TO CHANGE AIR FILTER
• Remove the air filtercover by turning
counterclockwiseto the stop and pull
away from collar.
• Remove filter from insideof cover.
12
Page 13

• Clean the inside ofthe cover and the
collar to remove any did accumulation.
• Insertnew filter intocover.
• Put air filter cover and filterinto collar
aligningthe tab with the slot.
• Push in on cover and turnclockwiseto
tighten.
Collar Clip ' _ Turn
. counter-
" e,%%,eto
Slot __rn kwi
o'oc
Air filter cover totighten
MUFFLER
Inspect and replace corrodedmuffler as it
could create afire hazard and/or damage.
SPARK PLUG
Change your spark plug each year to
make your engine start easier and run
better.Set spark pluggap at .030 inch.
CLEANING
iMPORTANT: For best performance,keep
mower housingfree of built--up grass
and trash. Clean underside of mower
housingafter each use.
r_oCAUTION: Disconnectspark plug wire
m spark plug and place wire where it
cannot come incontact with the spark
plug.
• Turn lawn mower on its side. Make sure
air filter and carburetor are up. Clean
the underside of your lawn mowerby
scrapingto remove build--up of grass
and trash.
• Clean engine oftento keep trash from
accumulating.A clogged engine runs
hotterand shortensengine life.
,, Keep finished surfacesand wheels free
of al| gasotine,oil, etc.
• We DO NOT recommend using a
garden hose to clean lawn mower
unless the electricalsystem, muffler, air
filter and carburetorare coveredto
keep water out. Water in engine can
result in shortened engine life.
_CAUTION: Before performing any
service or adjustments:
• Release controlbar and stop engine.
• Make sure the blade and all moving
parts have completely stopped.
• Disconnectspark plugwire from spark
plug and place where it cannot come in
contactwith plug.
LAWN MOWER
TO ADJUST CUTrlNG HEIGHT
See "TO ADJUST CUTTING HEIGHT" in
the Operationsection ofthis manual.
REAR DEFLECTOR
The rear deflector,attached between the
rear wheels of your lawn mower, is
providedto minimizethe possibilitythat
objectswill be thrown out the rear of the
lawn mower into the operator's mowing
position.
If the rear deflectorbecomes damaged, it
should be replaced.
TO ADJUST HANDLE
The handle on your lawn mowerhas
three (3) height positions- adjust toheight
thatsuits you.
• Squeeze the bottomends of lower
handle towardseach other untilthe pin
in handle can be insertedinto one of
the three height adjustment holes.
High
Low
3-position
\ a_ustment
, bracket
13
Page 14

TO ASSEMBLE GRASS CATCHER
• Put grass catcher frame intograss bag
withrigidpart of bag on the bottom.
Make sure the frame handle is outside
ofthe bag top.
• Slipvinyl bindingsover frame.
NOTE: Ifvinyl bindingsare too stiff,hold
them inwarm water for a few minutes, if
bag gets wet, let itdry before using.
_I_CAUTION: Do not runyour lawnmower
withoutclippingdeflectoror approved
grass catcher in place. Never attemptto
operate the lawn mower with the rear
doorremoved orpropped open.
ENGINE
CARBURETOR
Yourcarbu_or hasa non-adjustablefixed
mainjet formixtaracontrol.Ifyourengine
doesnotoperateproperlydue to suspected
carburetorproblems,takeyourlawnmowerto
an authorizedservicecenterforrepairor
adjustment.
IMPORTANT: Never tamper with the
engine governor, which is factory set for
proper engine speed. Overspeeding the
engine above the factory high speed
setting can be dangerous, if you think the
engine-governed high speed needs
adjusting, contact your nearest authorized
service center, which has proper equip-
ment and experience to make any
necessary adjustments.
ENGINE SPEED
Yourengine speedhasbeen factoryset. Do
not attempt to increase enginespeedor it
may resultin personalinjury. If you believe
thatthe engineis runningtoo fast ortoo slow,
take your lawn mowerto an authorized
servicecenterfor repairand adjustment.
14
Page 15

Immediatelyprepare yourlawnmower for .
storageattheandof the seasonor tftheun=t
willnotbe usedfor30 daysor more.
LAWN MOWER
Whenlawn moweristo be stored for a period
oftime cleanitthoroughly_removealldirt,
grease,leaves,etc. Store=naclean,dryarea.
• Cleanentirelawn mower(See CLEAN-
ING_in the Maintenancesection of tlY,s
manual).
• Lubricateas shown in the Maintenance
sectionoftt_s manual.
• Be surethat all nuts,belts, screws,and pins
are securelyfastened.Inspect moving
partsfor damage, breakage and wear.
Replaceif necessary.
• Touch up all rustedor chippedpaint
surfaces;sand lightlybefore painting.
HANDLE
• You can foldyour lawn mower handle
for storage.
• Loosen the two (2) handle knobs on
sidesof the upper handle and allow
handle to fold down to the rear.
• Squeeze the botfom ends of lower
handle toward each other until pins in
handleclear the brackets and pivot
entire handle assembly forward and
allowit to reston mower.
• When settingup your handle from the
storage position,the lower handle will
require manually lockinginto the
mowing position.
IMPORTANT: When folding the handle for
storageor transportation,be sure to fold
the handle as shown or you may damage
the controlcables.
Operator Presence
Control Bar
Upper
Handle
Fold Forward
For Storage
Backward
Mowing
Position
Lower
Handle
ENGINE
FUEL SYSTEM
IMPORTANT: Itis importantto prevent
gum depositsfrom forming in essential
fuel system parts such as carburetor,fuel
filter, fuel hose, or tank during storage.
Also, experience indicates that alcohol
blended fuels (called gasohof or using
ethanol or methanol) can attract moisture
which leads to separation and formation
of acids duringstorage. Acidicgas can
damage the fuel system of an engine
while in storage.
• Drain the fuel tank.
• Start the engineand let it run untilthe
fuel lines and carburetorere empty.
• Never use engine or carburetorcleaner
productsin the fuel tank or permanent
damage may occur.
• Use fresh fuel nextseason.
NOTE: Fuel stabilizeris an acceptable
alternative in minimizing the formation of
fuel gum deposits during storage. Add
stabilizerto gasolinein fuel tank or
storage container. Alwaysfollow the mix
ratiofound on stabilizer container. Run
ep_jineat least 1(} minutesafter adding
stabilizerto aflow the stabilizerto reach
the carburetor. Do notdrain the gas tank
and carburetorif using fuel stabilizer.
15
Page 16

ENGINEOIL
Drain oil (with engine warm) and replace
withclean engine oil. (See "ENGINE" in
the Maintenance sectionof this manual).
CYLINDER
• Remove spark plug.
• Pour one ounce (29 ml) of oil through
spark plug hole intocylinder.
• Pullstarter handle slowlya few times to
distributeoil.
• Replace with new spark plug.
TROUBLESHOOTING CHART
PROBLEM CAUSE
Does not start 1. Dirty airfilter,
Loss of power 1. Rear of lawn mower housinc
2. Out of fuel,
3. Stale fuel.
4. Water in fuel.
5. Spark plugwire is
disconnected,
6. Bad spark plug.
7, Loose b_adeor broken blad(
adapter,
8, Control bar in released
position.
9. Control bar defective.
or cutting blade dragging
in heavy grass,
2, Cuttingtoo much grass.
3. Didy air filter,
4, Buildupof grass, leaves,
and trash under mower.
5, Too much oil in engine,
6. Walking speed too fast,
OTHER
• Do not store gasoline from one season
to another.
• Replace your gasoline can ifyour can
stads to rust. Rustand/or dirtin your
gasoline will cause problems.
• If possible,storeyour unitindoorsand
cover it to give protectionfrom dustand
dirt,
• Cover your unitwith a suitableprotec-
tive cover that does not retain moisture.
Do not useplastic. Plastic cannot
breathe which allows condensationto
form and will cause your unitto rust.
IMPORTANT: Never cover mower while
engine and exhaust areas are stillwarm.
_I_CAUTION: Never store the lawnmower
with gasoline in the tank insidea building
where fumes may reach an open flame or
spark. Allow the engine to cool before
storingin any enclosure.
CORRECTION
1. Clean/replace air filter.
2. Fill fuel tank.
3. Drain tank and refill with
fresh cleanfuel.
4. Drain fuel tank and
carburetor and refill tank
with fresh gasoline.
5. Connect wire to plug.
6.
Replace spark plug.
7.
Tighten blade bolt or
replace blade adapter.
8.
Depresscontrolbar to
handle.
9.
Replace control bar.
1.
Set to =Higher Cut"
position.
2. Set to"Higher Cut"
position.
3. Clean/replace air filter.
4. Clean underside of mower
housing.
5. Check oil level.
6. Cut at slower walking
speed.
16
Page 17

TROUBLESHOOTING CHART
PROBLEM CAUSE CORRECTION
Poor cut- uneven 1. Replace blade. Tighten
Excessive Replace blade. Tighten
1. Worn, bent or loose blade.
2. Wheel heights uneven.
3. Buildupof grass, leaves
and trash under mower.
1. Worn, bent or loose blade.
2. Set all wheels at same
blade bolt,
height
Clean underside of
3.
mower housing.
1.
vibration blade bolt,
Contact an authorized
2.
servicecenter.
1.
Depress control bar to
upper handle before
pulling starter rope.
2.
Contact an authorized
servicecenter.
3.
Replace blade adapter.
4.
Move lawn mower to cut
Starter rope hard
topull
2. Bent engine crankshaft.
1. Engine flywheel brake is on
when controlbar is released
2. Bent engine crankshaft.
,3. Blade adapter broken.
4. Blade dragging in grass.
grass or to hard surface
to start engine
Grass catcher
inot filling (if so
equipped)
Hard to push
1. Cuttingheight too low.
2. Lifton blade worn off.
3. Catcher not venting air.
1. Grass is too highor wheel
heightis too low.
2. Rear of lawn mower
housing or blade dragging
in grass.
3. Grass catcher toofull
4. Handle height position not
1. Raise cuttingheight.
2. Replace blade.
3. Clean grass catcher.
1. Raise cutting height.
2. Raise rear of lawn mower
housingone (1) setting
higher.
3. Empty grass catcher.
4. Adjust handle heightto
rightfor you.suit.
17
Page 18

CRAFTSMAN ROTARY LAWN MOWER -- MODEL NO. 917.388020
68
67
27
1o
37
\
39
Page 19

CRAFTSMAN ROTARYLAWN MOWER -- MODEL NO. 917.388020
KEY PART
NO. NO. DESCRIPTION
1 131696 ControlBar
2 166860X479 Upper Handle
3 161105X479 LowerHandle
4 132001 RopeGuide
5 63601 Locknut 1/4-20
6 131959 Handle Bolt
7 66426 WireTie
8 74780512 Hex Bolt 5/16-18 x 3/4
9 166785 LOcknut3/16-18
10 164362 ShordderBo_t
11 156577 EngineZone ContrblCable
12 750G97 Hex Washer Head Screw #10-24 x 1/2
13 8S0733X004 Up-Stop Bracket
14 136376 HandleKnob
15 51793 HairpinCotter
17 165946X479 Support Bracket
18 176(7_406 Screw
19 167132X004
20 167133X004
21 165858
22 168360X004
23 166875
24 751153
25 164_36X479
26 166243X479
27 851856
28 63124
29 160835X007
30 19112222
31 151161
Axle Arm Assembly -LF
Axle Arm Assembly - RF
Rear Skid
Selector,_pdng
Rear Door Assembly Kit(Incl. Springs)
Locknut 5/16-18
Handle Bracket Assembly (Left)
Handle Bracket Assembty (Right)
Screw 1/4-20 x 3/8
Nut
Wheel Adjusting Bracket - Front
Spacer
Whe_
KEY PART
NO. NO. DESCRIPTION
33 87877
34 167130X004
35 57143
36 160828
37 1511_
38 7399O5OO
39 83923
4O 774CO
41 88652
42 165766
43 165767
44 165912
45 15O406
46 85463
47 161551
48 167131X004
52 166872
53 851084
54 850263
55 851074
56 165833
57 851514
67 166113
68 165755
70 ......
- - 161058
• - 175116
Selector Knob
Axle Arm Assembly -LR
Wave washer
Shoulder Bblt 5/16-18
Wheel Assembly
Nut
Ranged Locknut
Hubcap
HingeBorew
Spnng(LH)
Spdng (RH)
Dcor BOlt
Hex Head Thread RollingScrew 3/8:16 x 1
Danger Decal
AdiuStment Bolt
Axle Arm Assembly - RR
Housing Assembly (Incl, Ref #17, 18 & 46)
Hex Head Borsw 3/8-24 x 1-3/8 Grd. 8
HelicalLockwasher
Hardened Washer
21" Blade
Blnde Adapter
Grass Bag
Catcher Frame
Engine- (See Breakdown) Craftsman 143.006206
WarningDecal (NotShown)
Owner'sManual
Page 20

CRAFTSMAN 4-CYCLE ENGINE MODEL NUMBER 1_.0062_
4OO
@
9OO
135
119
416
275
125
/287
298
t301
36
Page 21

CRAFTSMAN 4-CYCLE ENGINE
MODEL NUMBER 143.006206
KEY PART
NO. NO. DESCRIPTION
1 37266 Cylinder (Incl. 220 & 180) 172 36784 Valve Cover
2 26727 Dowel Pin 174 30200 Screw, 10-24 x 9/16"
6 33734 Breather Element 178 29752 Nut & Lock Washer, 1/4-28
7 36557 Breather Ass'y. (Incl. 6 & 12A) 182 6201 Screw, 1/4-28 x 7/8"
12 36775 Breather Tube 184 26756 Carburetor TO Intake Pipe
12A 36558 Breather Cover & Tube Gasket P
12B 36694 Breather Tube Elbow " 186 32653 Govemor Link
14 28277 Washer 189 650839 Screw, 1/4-20 x 3/8"
15 30589 Governor Rod (Incl. 14) 191 36559A S,E. Brake Bracket (IncL 195)
16 34839A Governor Lever 195 610973 Terminal
17 31335 Governor Lever Clamp 207 34336 Throttle Link
18 651018 Screw, Torx T-15, 216 33086 R,P.M, Adjusting Lever
19 36281 Extension Spring 224 36786 Intake Pipe Gasket P
20 32600 Oil Seal 238 650932 Screw, 10-32 x 49/64"
30 36776 Crankshaft 239 34338 Air Cleaner Gasket P
40 40004 Piston, Pin & Ring Set (Std.) 241 35797 Air Clearer Collar
40 40005 Piston, Pin & Ring Set 245 35066 Air Cleaner Filter
41 36070 Piston & Pin Ass'y, (Std.) 260 36960 Blower Housing
41 36071 Piston & Pin Ass'y, (,010" OS) 262 650831 Screw, 1/4-20 x 1/2"
42 40006 Ring Set (Std.) 277 650996 Screw, 1/4-20 x 2-5/16"
42 40007 Ring Set (.010" OS 285 35000A Starter Cup
43 20381 Piston Pin Retaining Ring 287 650926 Screw, 8-32 x 21/64"
45 36777 Connecting Rod Ass'y. 290 29774 Fuel Line
46 32610A Connecting Rod Bolt 298 28763 Screw, 10-32 x 35/64"
48 27241 Valve Lifter 300 36916 Fuel Tank (Incl. 292 & 301)
50 37460 Camshaft (Exhaust MCR) 301 36246 Fuel Cap
52 29914 Oil Pump Ass'y. 306 36996 "O"-Ring P
69 35261 Mounting Flange Gasket P 307 35499 "O*-Ring
70 34311E Mounting Flan e
72 30572 Oil Drain Plug (IncL 73) 313 34080 Spacer
73 28833 Drain Plug Gasket 355 590701 Starter Handle (Black)
75 27897 Oil Seal 370A 36261 Identification Decal
80 30574A Governor Shaft 370C 37318 primer Decal (3 X)
81 30590A Washer 370K 36695 Starter Decal
82 30591 Governor Gear Ass'y. 370R 37317 Warning Decal
83 30588A Governor Spool 380 640262 Carburetor (Incl. 184)
86 650488 Screw, 1/4-20 x 1-1/4" 390 590737 Rewind Starter
89 611004 Flywheel Key 400 36792B Gasket Set
90 611112 Flywheel (IncL Items Marked")
92 650816 Bellevilla Washer 416 36085 Spark Arrestor Kit
93 650816 Flywbeel Nut _lncl. 417)(Optional)
100 34443C Solid State _orlnitiOnver 417 650821 Screw, 10-32x 1/2" (Optional)
101 610118 Spark Plug 900 __L-_ Replacement En ine NONE
103 651007 Screw, TorxT-15, 900 Replacement S/_ 750860,
104 37480 Cam Bushing RPM High 2900 to 3200
110 37047 Ground Wire
119 36787 Cylinder Head Gasket P NOTE: This engine could have been built with
120 36828 Cylinder Head 590694 starter.
125 37288 Exhaust Valve (Std,) NOTE: All component dimensions given in U.S.
126 37289 Intake Valve (Std,) 0ncL 151)
130 6021A Screw, 5/16-18 x 1-1/2"
135 35395 Resistor Spark Plug (RJ19LM)
150 31672 Valve Spring
151 31673 Valve Spring Cap
151A 40017 Intake Valve Seal
169 36783 Valve Cover Gasket P
(Incl. 12B) 185 36785 Intake Pipe
8-32 x 19/64" 223 650451 Screw, 1/4-20 x 1"
(.010" OS) 250 35065 Air Cleaner Cover
(Incl. 43) 261 30200 Screw, 10-24 x 9/18"
(Incl. 43) 275 36790A Muffler
_lncl. 46) 292 26460 Fuel Line Clamp
(Inc. ref 104) 305 35647 Oil Fill Tube
(Incl. 72 thru _g3 309 650562 Screw, 10-32 x 1/2"
(Incl. 81) 371 37269 6.5 H.P. Craltsman Decal
10-24 x 15/16" order from 7 1-999
(Incl. 151) inches 1 inch = 25.4 mm
,306) 310 35648 Dipstick
KEY PART
NO, NO. DESCRIPTION
37
Page 22

CRAFTSMAN 4-CYCLE ENGINE
MODEL NUMBER143.0_2_
KEY PART
NO. NO. DESCRIPTION
-- 640262 Carburetor (Incl. 184 of Engine Parts List)
1 631615 Throttle Shaft & Lever Assembly
2 631767 Thro91e Return Spring
4 631184 ° Dust Seal Washer
5 631183 " Dust Seal (Throttle)
6 640070 Throttle Shutter
7 650506 * Shutter Screw
16 631807 Fuel Fi6ing
t 7 651025 Throttle Crack Screw/Idle Speed Screw
18 630766 Tension Spring
20 640018 Idle Restriutor Screw • •
20A 640200 Idle Restrictor Scrwe Cap (Black)
25 631867 Float Bowl
27 631024 ° Float ShaB
28 632019 Float
29 631028 * Float Bowl "O" Ring
30 631021 * Inlet Needle, Seat, & Clip (Incl, 31)
31 631022 Spring Clip
35 640259 Primer Butb/Retaioer Ring
36 640080 Main Nozzle Tube
36A 632766 Carburetor Tube
37 632547 ° "O" Ring, Main Nozzle Tube
40 640175 High Speed Bowl Nut
44 27110A ° Bowl Nut Washer
47 630748 * Welch Plug, Idle Mixture Well
48 631027 * Welch Plug, Atmospheric Vent
60 632760B Repair kit (Incl. Items Marked ")
38
Page 23

CRAFTSMAN 4-CYCLE ENGINE MODEL NUMBER 143.006206
KEY PART
NO. NO. DESCRIPTION
-- 590694 Recoil Starter
1 590599A Spring Pin (Incl. 4)
2 590600 Washer
3 590696 Retainer
4 590601 Washer
5 590697 Brake S_prring
6 590698 Starter Dog
7 590699 Dog Spring
8 590700 Pulley & Rewind Spring Ass'y.
11 590695 Starter Housing ASS' .
12 590535 Starter Rope
13 590701 Starter Handle
_R5
Om2
_-- _14
(40 degree gr_nmetl
(98" X 9/64" dia.)
KEY PART
NO. NO. DESCRIPTION
-- 590737 Rewind Starter
3 590740 Retainer
6 590616 Starter Dog
7 590617 Dog Spring
8 590618A Pulley & Rewind Spring Ass'y
11 590687A Starter Housing ASS'
12 590535 Starter Rope
13 59_0701 Starter Handle
14 590760 Spring Clip
_40 degree grommetS'
_Length 98" x 9/64" dia.)
39
Page 24

Get it fixed, at your home or ourst
For repairof majorbrand apptiances in your own home...
no matterwho made it, no matterwho sold ifl
1-800-4-MY-HOME s" Anytime,dayornight
(1-800-469-4663)
www.sears.com
To bring in productssuch as vacuums,
lawn equipment and electronicsfor repair, callfor
the location of your nearest Sears Parts & Repair Center.
1-800-488-1222 _ytime,dayo,night
www.sears.com
Forthe replacementparts, accessoriesand owner'smanuals
that youneed to do-it-yourself,call Sears PartsDirect sa!
1-800-366-PART 6 a.m.- 11 p.m.CST,
(1-800-366-7278) 7 daysa week
www.sears.conVpartsdirect
To purchase or inquireabout a Sears Service Agreement:
1-800-827-6655
7 a.m. - 5 p.m. CST, Mon. - Sat.
Para pedir servicio de reparacidn a domicilio,
y para ordenar piezas con entrega a domicilio:
© Sears, Roebuck and Co
175116 07.28.00 VB Printedin U.S.A.
1-888-SU-HOGAR _'
(1-888-784-6427)
SEARS, I
HomeCentral °" J
® Registered Trademark / Trademark of Sears, Roebuck and CO
® Marca Registrada / _ Marca de Fabdca de Sears, Roebuck and Co,
Au CanadapourserviceenfrarK;ais:
1-877-LE-FOYER _
(1-877-533-6937)
IM
 Loading...