

Craftsman 917388010 Owner’s Manual

Owner's Manual
6.0 HORSEPOWER
21" REAR DISCHARGE
ROTARY LAWN MOWER
Model No.
917.388010
• Safety
• Assembly
• Operation
• Maintenance
• Espa6ol
• Repair Parts
CAUTION:
Read and follow all
Safety Rules and Instructions
before operating this equipment
Sears, Roebuck and Co., Hoffman Estates, IL 60179
visitourCraftsmanwebsite: www.sears.com/craftsman

Warranty ............................................... 2
Safety Rules ......................................... 2
Assembly .............................................. 5
Operation .............................................. 6
Maintenance Schedule ........................ 10
Maintenance ......................................... t 0
LIMITED TWO YEAR WARRANTY ON CRAFTSMAN POWER MOWER
For two years from date of purchase, when this Craftsman Lawn Mower is maintained,
lubricated, and tuned up according to the operating and maintenance instructions in
the owner's manual, Sears will repair free of charge any defect in material or workman-
ship.
Ifthis Craftsman Lawn Mower is used for commercial or rental purposes, this warranty
applies for only 90 days from the date of purchase.
This Warranty does not cover:
• Expendable items which become worn dudng normal use, such as rotary mower
blades, blade adapters, belts, air cleaners and sparkplug.
• Repairs necessary because of operator abuse or negligence, including bent
crankshafts and the failure to maintain the equipment according to the instructions
contained in the owner's manual.
Warranty service is available by returningthe Craftsman power mower to the nearest
Sears Service Center/Depadment in the United States. This warranty applies only
while this product is in use in the United States.
This Warranty gives you specific legal rights, and you may also have other rights which
vary from stateto state.
SEARS, ROEBUCKAND CO., D/817 WA, HOFFMAN ESTATES, ILLINOIS 60179
Product Specifications.......................... 11
Sewice and Adjustments...................... 13
Storage ................................................. 15
Troubleshooting ................................... 16
Repair Parts.......................................... 34
Parts Ordering ...................... Back Cover
IMPORTANT: This cutting machine is capable of amputatinghands and feet and
throwingobjects. Failure to observethe following safety instructionscould resultin
seriousinjury or death.
I.GENERAL OPERATION
• Read, understand, and follow all
instructions on the machineand in the
manual(s) before starting. Be thor-
oughly familiar with the controlsand the
proper use of the machine before
starting.
• Do not puthands or feet near orunder
rotatingparts. Keep clear of the
discharge opening at all times.
• Only allow responsible individuals,who
are familiar with the instructions,to
operate the machine.
• Clear the area ofobjects suchas rocks,
toys,wire, bones,sticks,etc., which
could be picked up and thrown by the
blade.
• Be sure the area isclear of other
people before mowing. Stop machine if
anyone enters the area.
• Do not operatethe mower when
barefoot or wearing open sandals.
Always wear substantialfoot wear.
• Do not pull mower backwards unless
absolutelynecessary. Always look
down and behind before and wh le
moving backwards.
• Do not operate the mowerwith proper
guards,plates, grass catcher or other
safety protectivedevices in place.
• See manufacturer'sinstructionsfor
proper operationand installationof
accessories.Only use accessories
approved by the manufacturer.
• Stop the blade{s) when crossinggravel
drives,walks, or roads.
• Stop the engine {motor) whenever you
leave the equipment, before cleaning
the mower or uncloggingthe chute.
• Shut the engine (motor)off and wait
untilthe blade comes to complete stop
before removinggrass catcher.
• Mow only in daylightor good artificial
light.
• Do notoperate the machine while
underthe influenceof alcohol or drugs.
• Never operate machine in wet grass.
Alwaysbe sure of your footing: keep a
firm holdon the handle and walk; never
run.
• Disengage the self-propelled mecha-
nism or driveclutchon mowers so
equipped before starting the engine
(motor).
• Ifthe equipmentshould startto vibrate
abnormally, stop the engine (motor)
and check immediatelyfor the cause.
Vibration is generally a warning of
trouble.
• Always wear safety goggles or safety
glasses with side shields when operat-
ing mower.
II. SLOPE OPERATION
Slopes are a majorfactor related toslip
and fall accidentswhich can result in
severe injury.All slopes require extra
caution. Ifyou feel uneasy on a slope, do
notmow it.
DO:
• Mow across the face of slopes:never
up and down. Exercise extreme caution
when changing directionon slopes.
• Remove obstaclessuch as rocks,tree
limbs,etc.
• Watch for holes, ruts,or bumps. Tall
grass can hide obstacles,
DO NOT:
• Do nottrim near drop-otis, ditchesor
embankments. The operatorcould lose
footingor balance.
• Do nottrim excessivelysteep slopes.
• Do not mow onwet grass. Reduced
footing could cause slipping.
III. CHILDREN
Tragic accidentscan occur if the operator
isnot aled to the presence of children.
Childrenare often attractedto the
machineand the mowing activity.Never
assume that childrenwill remain where
you lastsaw them.
• Keep children outof the trimmingarea
and underthe watchfulcare of another
responsible adult.
• Be alert and turn machine off ifchildren
enter the area.
• Before and while walking backwards,
lookbehind and down for small
children.
• Never allow children to operate the
machine.
• Use extra care when approaching blind
corners,shrubs, trees, or otherobjects
that may obscure vision.
IV. SERVICE
• Use extra care in handlinggasoline
and otherfuels. They are flammable
and vaporsare explosive.
- Use only an approvedcontainer.
- Never remove gas cap or add fuel
with the engine running.Allow
engine to cool before refueling. Do
_not smoke.
- Never refuel the machine indoors.
- Never store the machine or fue_
container inside where there is an
open flame, such as a water heater.
• Never run a machine insidea closed
area.
• Never make adjustments or repairs with
the engine (motor) running.Disconnect
the spark plug wire, and keep the wire
away from the plug to prevent acciden-
tal starting.
• Keep nuts and bolts, especially blade
attachement bolts,tight and keep
equipment in good condition.
• Never tamper with safety devices.
Check their proper operation regulady.
• Keep machine free of grass, leaves, or
other debris build-up, Clean oil or fuel
spillage. Allow machine to cool before
storing.
• Stop and inspectthe equipment if you
strike an object. Repair, if necessary,
before restarting.
• Never attempt to make wheel height
adjustr_entswhile the engine (motor) is
running.
• Grass catcher components are subject
to wear, damage, and deterioration,
which could expose moving parts or
allow objects to be thrown.Frequently
check components and repl,aoe with
manufacturer's recommended parts,
when necessary.
• Mower bladesare sharp and can cut.
Wrap the blade(s) or wear gloves, and
use extra caution when servicingthem.
• Do not change the engine governor
setting or overspeed the engine.
3
_Look for thissymbol to pointout
importantsafety precautions.It means
CAUTIONF!! BECOMEALERTI!! YOUR
SAFETY IS INVOLVED.
A CAUTION: In order to prevent
accidental startingwhen setting up,
transpoding, adjusting or making repairs,
always disconnectspark plug wire and
place wire where it cannot contact spark
• plug.
_,WARNING: Engine exhaust, some of its
constituents,and certain vehicle
componentscontain or emitchemicals
knownto the Stateof Californiatocause
cancer and birthdefects or other
reproductiveharm.
AWARNING: Battery posts, terminalsand
related accessoriescontain lead and
lead compounds,chemicals knownto the
State of California to cause cancer and
birth defectsor other reprodustiveharm.
Wash hands after handling,
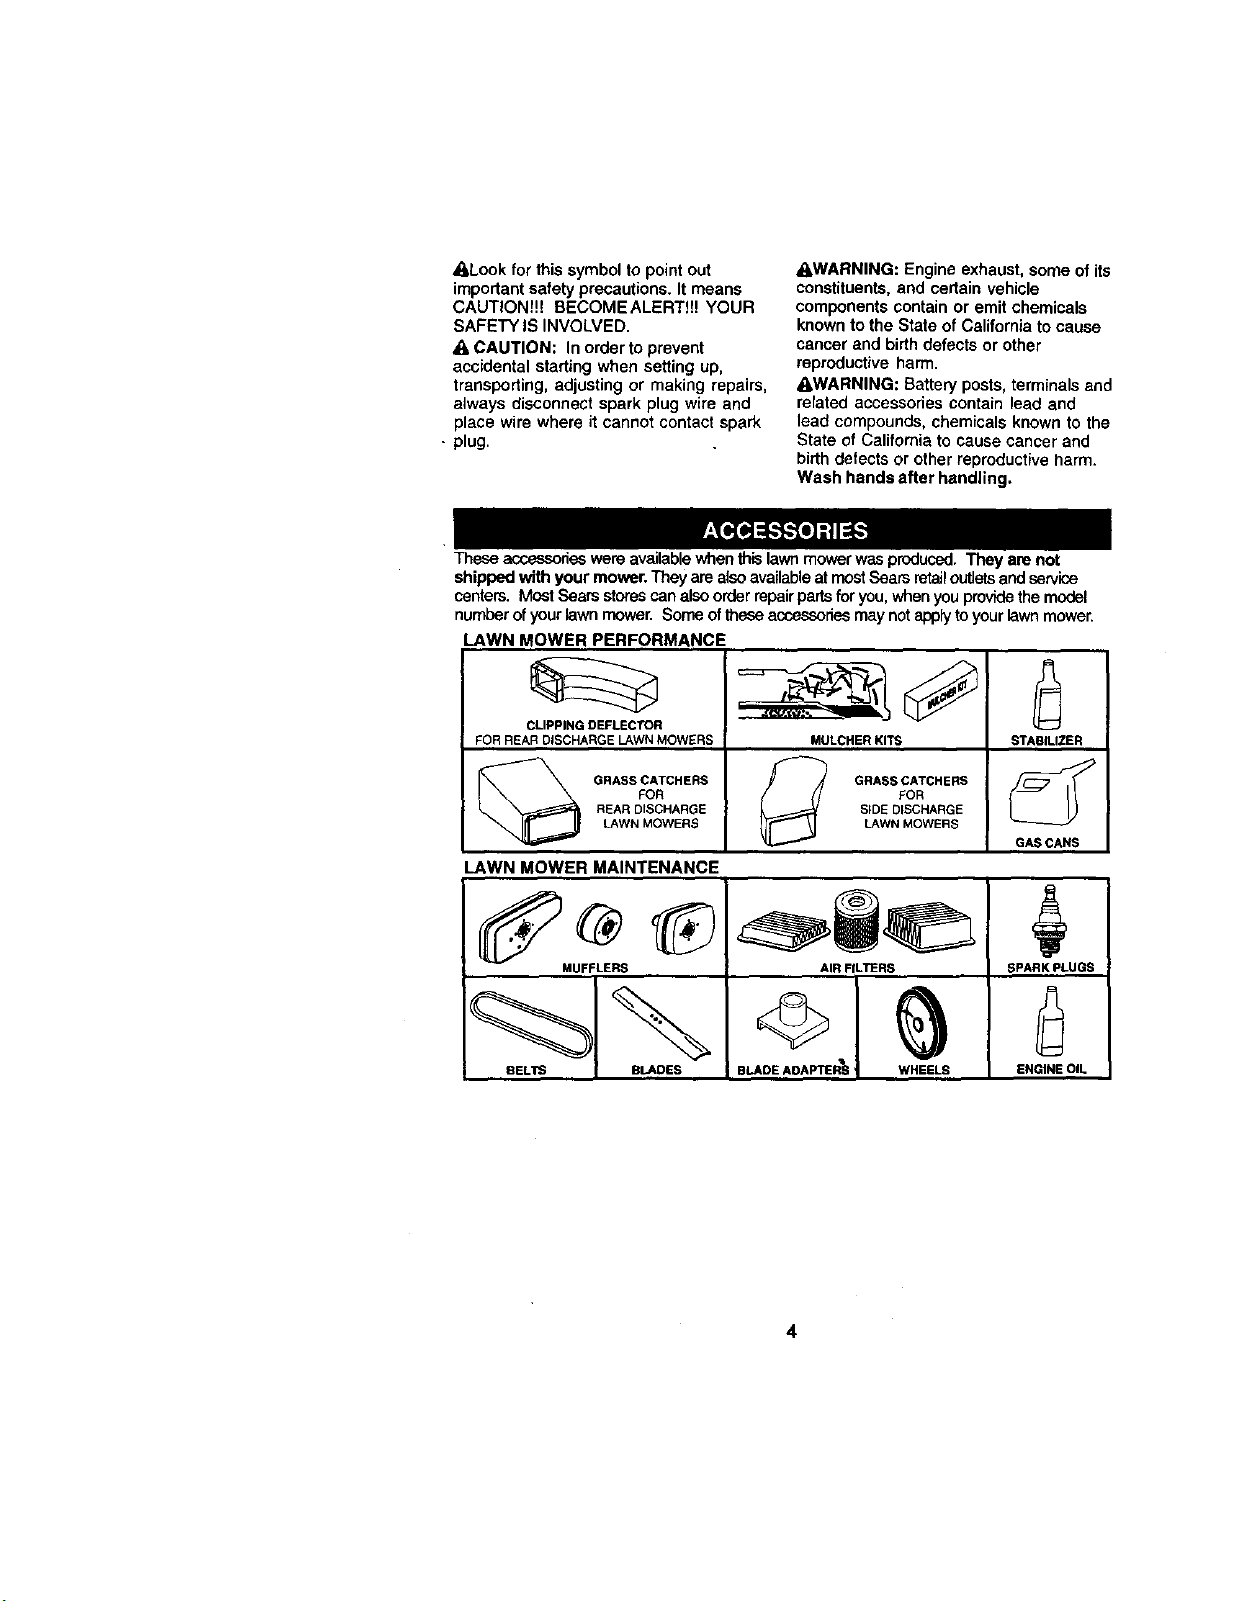
These accessorieswereavailablewhenthislawnmower wasproduced.They are not
shippedwith your mower.TheyarealsoavailableatmostSearsretsiloutletsandservice
centers.Most Searsstorescan also orderrepairpartsfor you,when youprovidethe model
numberofyour lawn mower.Someof theseaccessoriesmaynotapplytoyourlawnmower.
LAWN MOWER PERFORMANCE
CLIPPING DEFLECTOR )
FOR REAR DISCHARGE LAWN MOWERS MULCHER KITS STABILIZER
FOR FOR
REAR DISCHARGE SIDE DISCHARGE
GRASS CATCHERS _ GRASS CATCHERS
LAWN MOWERS LAWN MOWERS
GAS CANS
LAWN MOWER MAINTENANCE
MUFFLERS AIR FILTERS SPARK PLUGS
BELTS BLADES BLADE AOA PTER_J WHEELS ENGINE OIL
4
Read these instructionsand this manualin
itsentiretybeforeyou attemptto assemble
or operateyour newlawn mower.
IMPORTANT: This lawn mower isshipped
WITHOUT OILOR GASOLINE inthe
engine.
Yournew lawnmower has been as--
sembledat the factory withthe exceptionof
those partsleft unaseembledfor shipping
purposes. Toensure safe and proper
operationof your lawn mower,all partsand
hardwareyou assemble must be tightened
securely. Use the correcttoolsas neces-
saryto ensurepropertightness. Allparts
suchas nuts,washers, bolts, etc., neces-
saryto completethe assemblyhave been
placed in the partsbeg.
TO REMOVE LAWN MOWER FROM
CARTON
• Remove loose pads includedwith
mower.
• Cut downtwoend comers of carton and
lay end panel downflat.
• Remove all packingmaterials except
paddingbetween upper and lower
handle and padding holdingoperator
presence controlbarto upperhandle.
• Rolllawnmower outof cartonandcheck
carton thoroughlyfor additionalloose
parts.
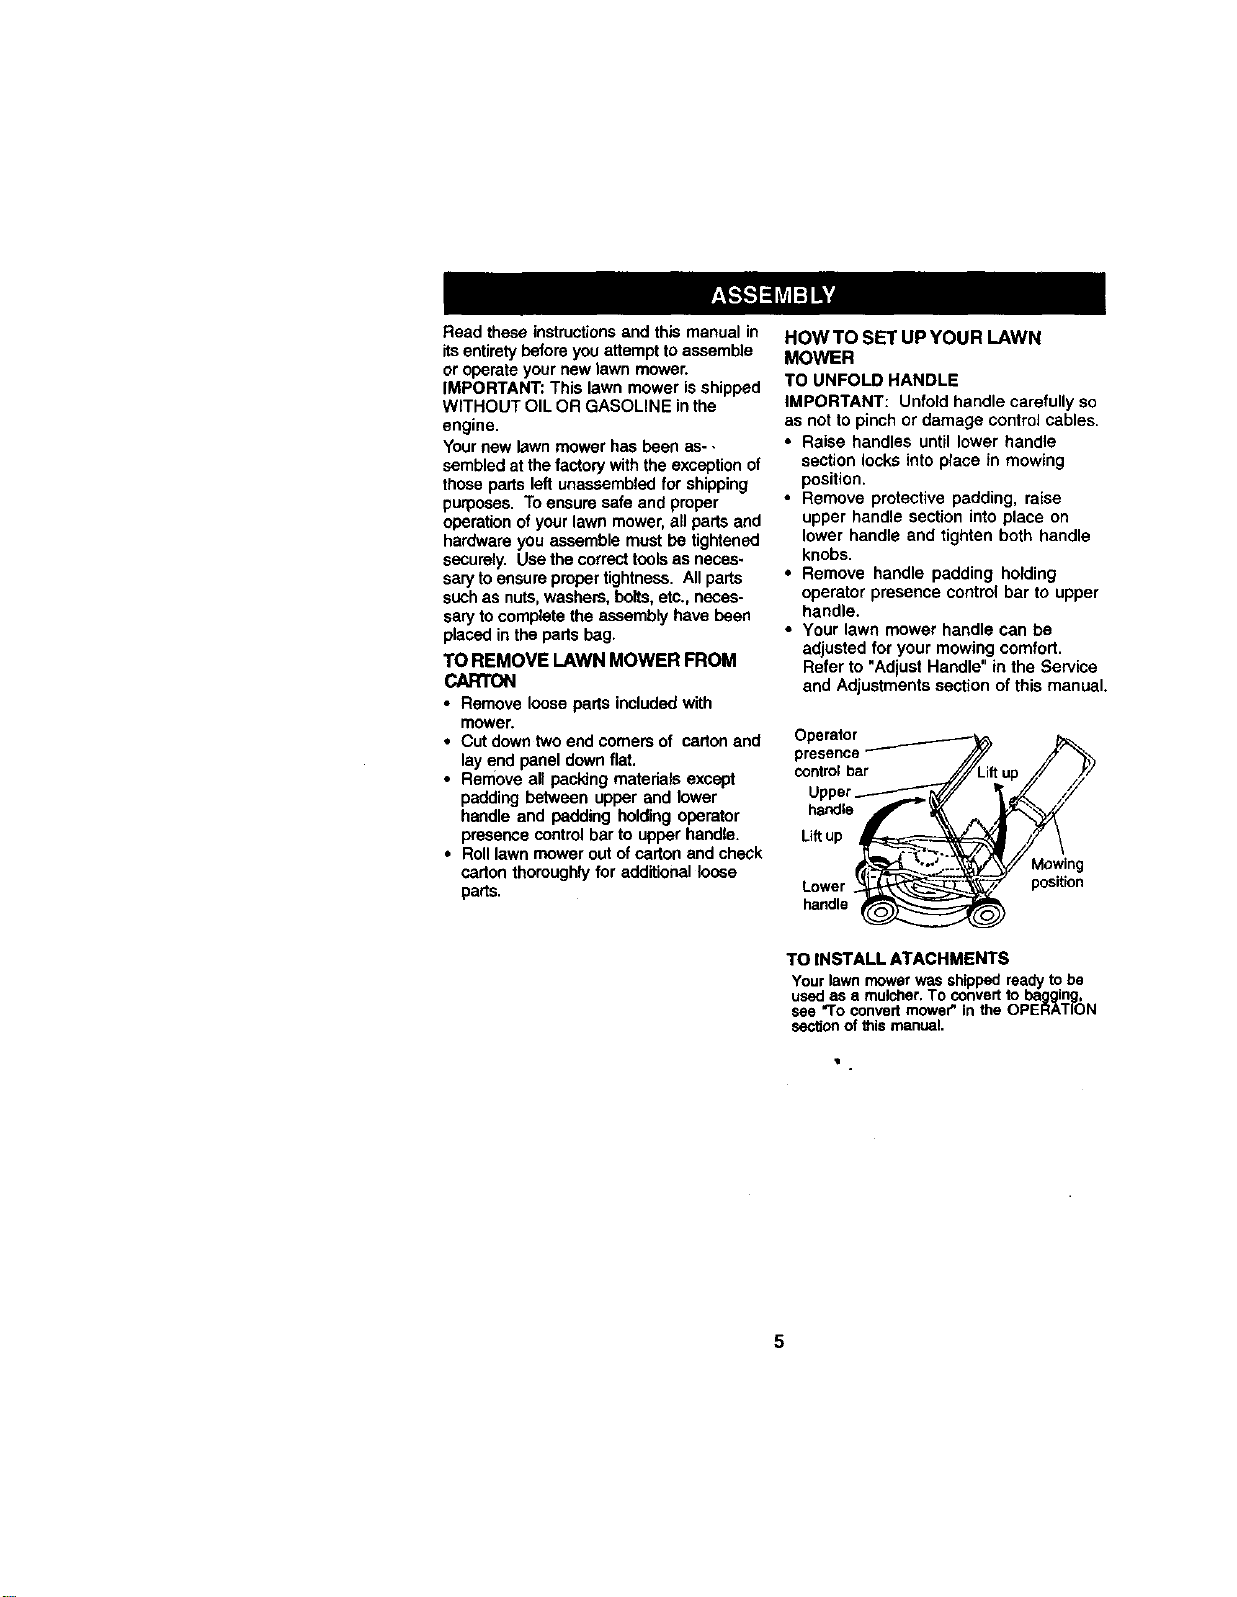
HOWTO SET UP YOUR LAWN
MOWER
TO UNFOLD HANDLE
IMPORTANT: Unfoldhandle carefully so
as net to pinch or damage control cables.
• Raise handles until lower handle
section locksinto place in mowing
position.
• Remove protective padding, raise
upper handle section into place on
lower handle and tighten both handle
knobs.
• Remove handle padding holding
operator presence controlbar to upper
handle.
• Your lawn mower handle can be
adjustedfor your mowingcomfort.
Refer to "AdjustHandle" in the Service
and Adjustmentssection of thismanual.
presence-- //7/
--,el
Operator_
Liftup _ /_
LOnWd(_re_ position
TO INSTALL ATACHMENTS
Your lawn mower was shipped ready to be
used as a mulcbar. To convert to bagging,
see "To convert mowe¢' in the OPERATION
section of this manual.
! .
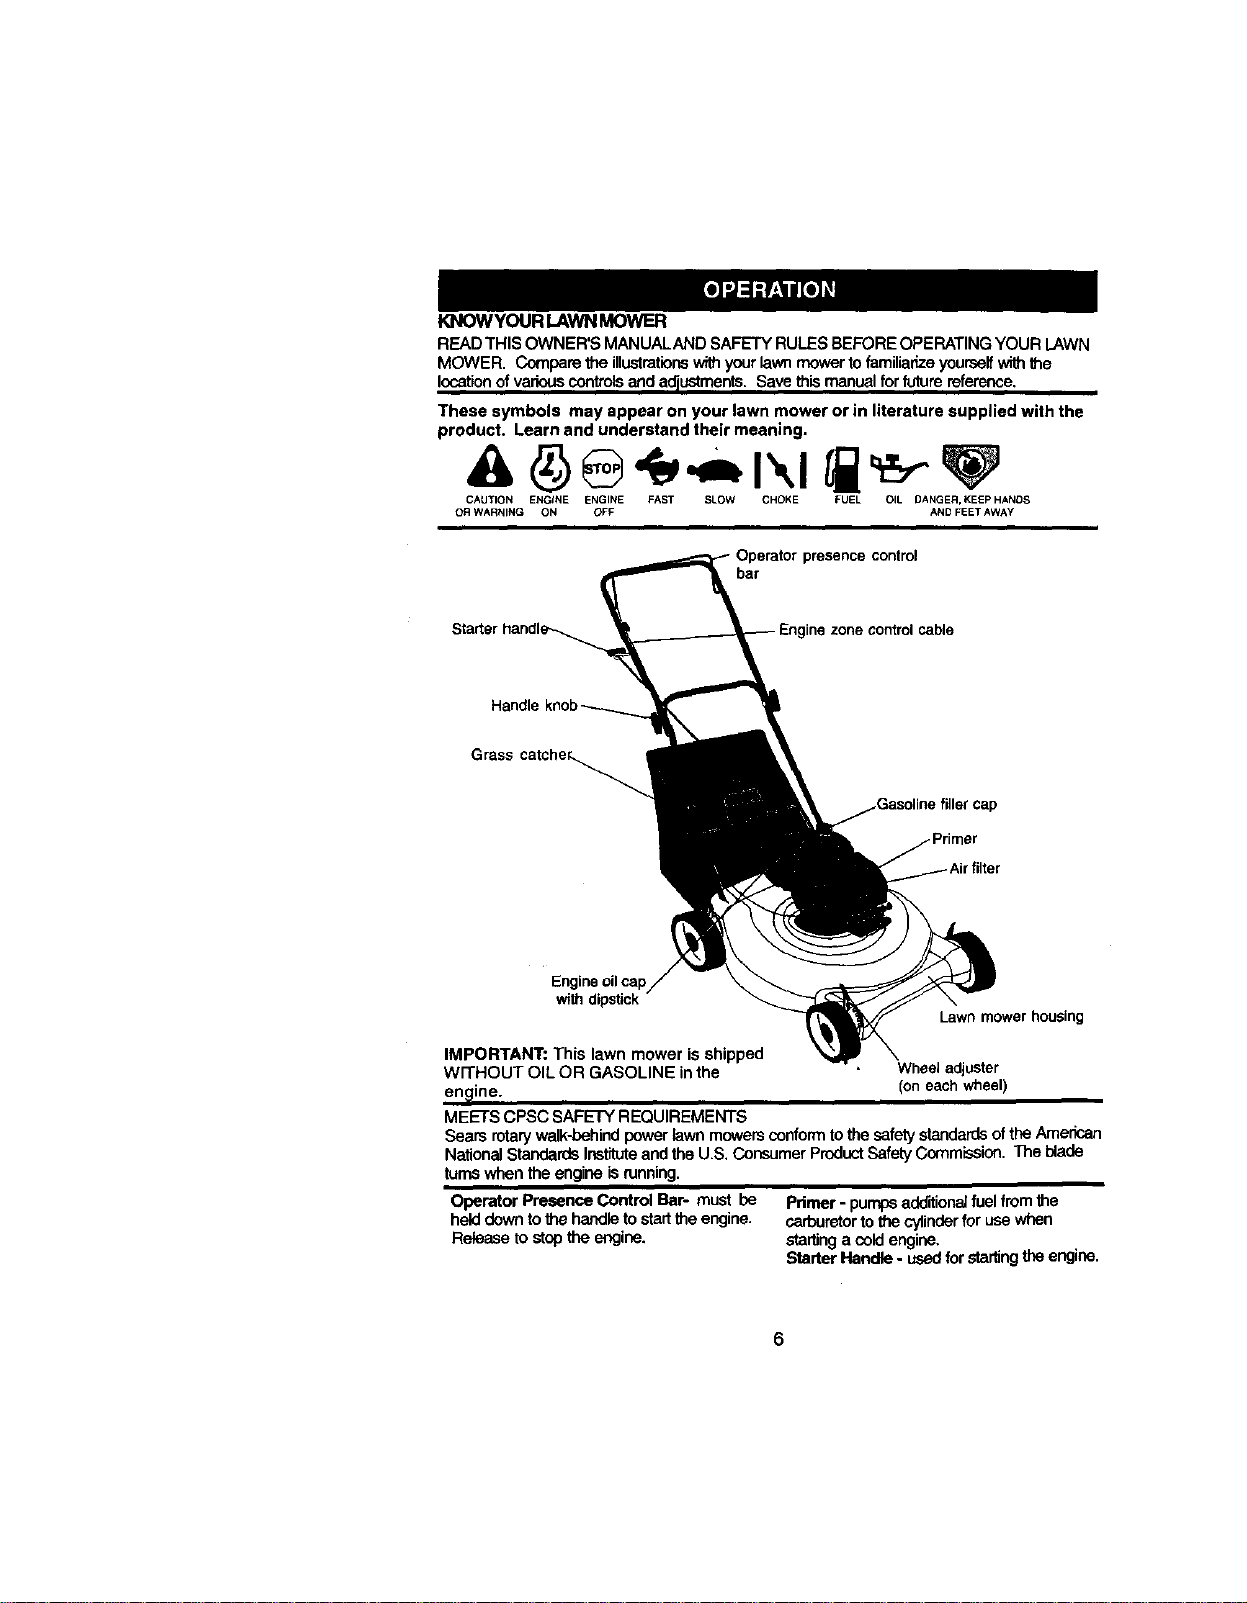
K]_OWYOUR LAWN MOWER
READ THISOWNER'S MANUALANDSAFETY RULESBEFOREOPERATINGYOUR LAWN
MOWER. Compare the illustrationswith yourlawn mowerto familianzsyourselfwiththe
locationof various controlsand a_uetments. Savethis manuelfor future reference.
These symbols may appear on your lawn mower or in literature supplied withthe
product. Learn and understand their meaning.
CAUTION ENGtNE ENGINE FAST SLOW CHOKE FUEL OIL DANGER, KEEp HANDS
OR WARNING ON OFF AND FEET AWAY
bar
Grass catche_._
control
zone control cable
rfilter
Engineoilcap
withdipsUck
Lawn mower housing
IMPORTANT: This lawn mower is shipped
Wn'HOUT OIL OR GASOLINE inthe Whealadjuster
engine. (oneachwheel)
MEETSCPSC SAFETY REQUIREMENTS
Searsrotarywalk-behindpowerlawn mowersconformto thesafetystandardsoftheAmerican
NationalStandardsInstituteandthe U.S.ConsumerproductSafetyCommission.The blade
turnswhen the engine is running.
Operator Presence Control Bar- must be Pdmer- pumpsadddiona/fuelfromthe
helddownto _ handleto stadthe engine, cad_retorto thecylinderforusewhen
Release to stop the engins, startinga cold engine,
StarterHandle- usedforstartingthe engine.
heoperationofanylawn mower
re.surfin foreignobjects
rown into the eyes,which can
Alwayswearsafety glaesesor eye shields
while operatingysur lawn moweror perform-
ingany adjustmentsor repairs. We recom-
mends wide visionsafety maskover
spectaclesor standardsafety glasses
HOWTO USEYOUR LAWI_IMOWER.
ENGINESPEEDCONTROL
The enginespeedwas setatthe factory for
optimumperformance. Speedisnot adjust-
able.
ENGINE ZONE CONTROL
_,CAUTION: Federal regulationsrequire
an engine controlto be installedon this
lawn mower in order to minimize the risk
of blade contact injury.Do not under any
circumstancesattempt to defeat the
functionof the operatorcontrol,The blade
turnswhen the engine is running,
• Your lawnmower isequippedw_ an
operatorpresencecontrolbarwhich
requirestheoperatortobe positioned
behind the lawnmower handletostartand
operatethe lawnmower.
TO ADJUST CUTI'ING HEIGHT
• Raisewheelsforlowcut and lowerwheels
for highcut
• Adjustcuttingheighttosuityourrequire-
merits.Mediumpositionisbestformost
lawns
• To change cuttingheight,squeezeadjuster
levertowardwheel. Movewheel up or
dawn tosuityour requirements.Be sureall
wheelsare inthe same setting
NOTE: Adjuster is property positioned
when plate tab inserts into hole in lever.
Also,9-position adjusters (if so equipped)
allow lever to be positionedbetween the
plate tabs.
ultinsevere eyedamage.
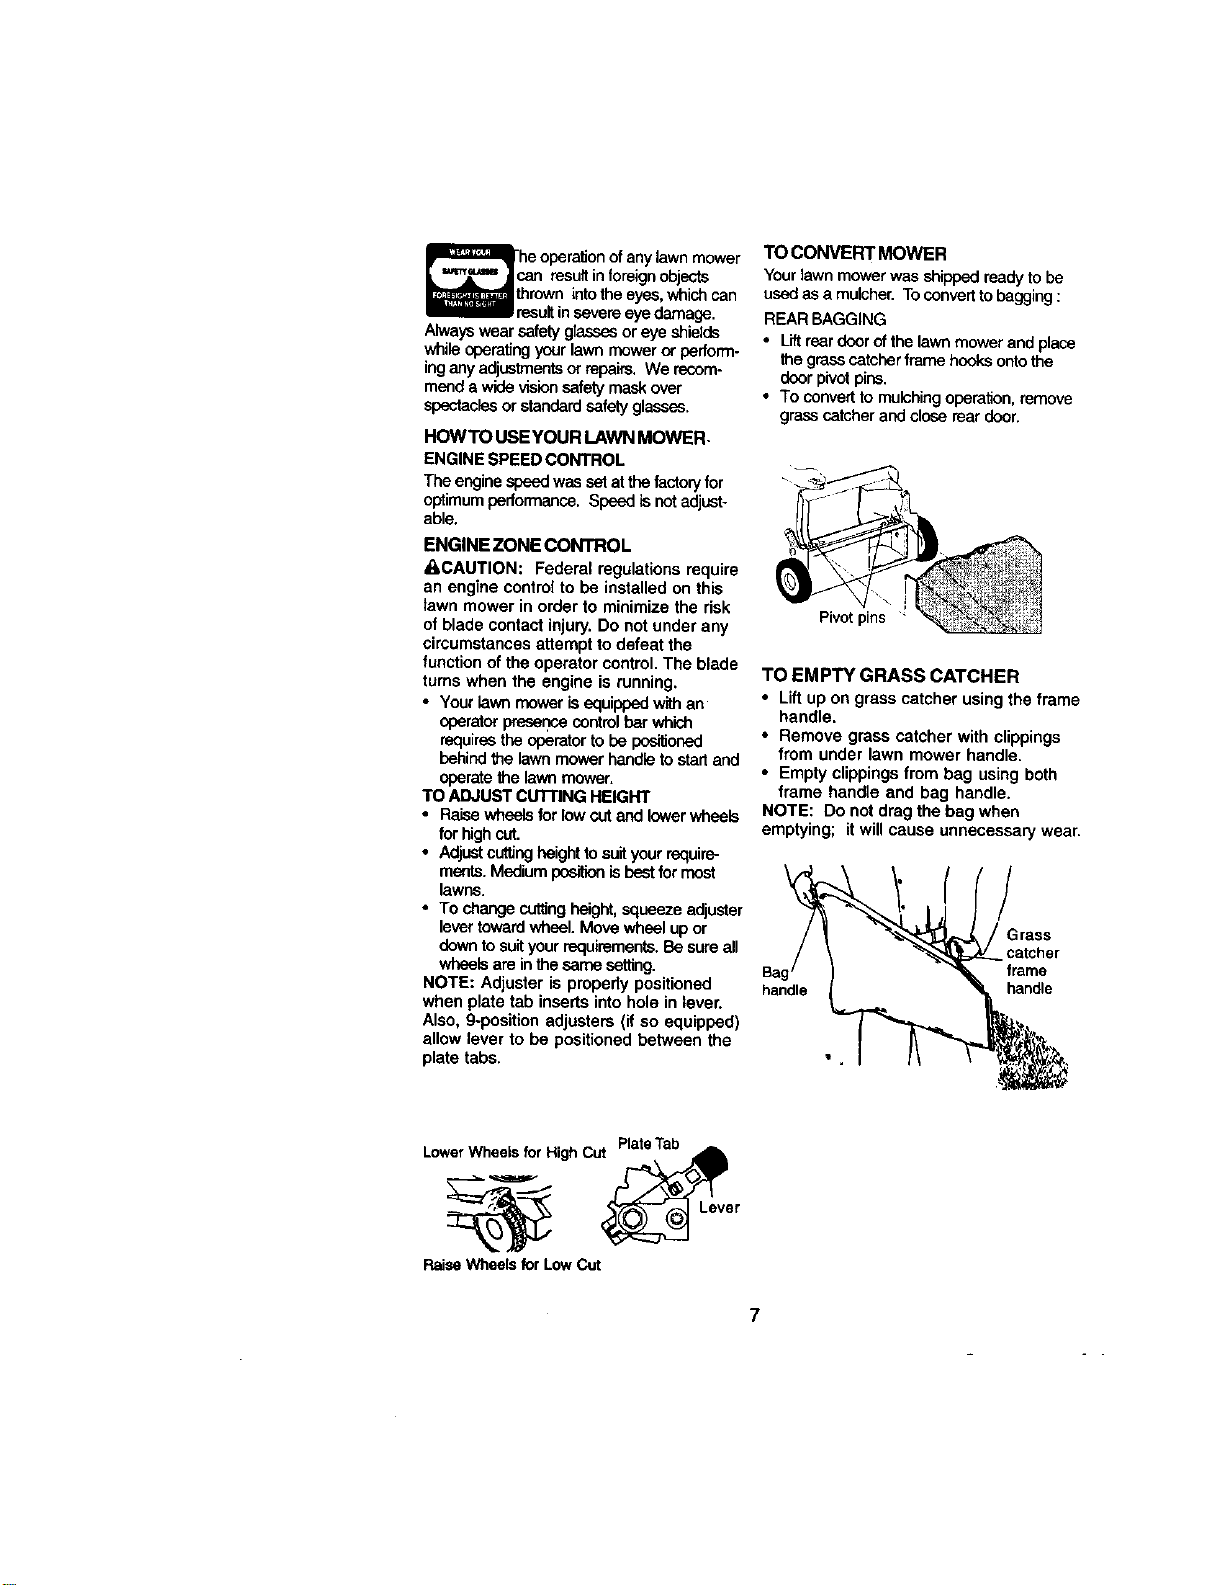
TO CONVERT MOWER
Your lawn mowerwas shipped reedyto be
used as a mulchor. Toconvertto bagging:
REAR BAGGING
• Lift reardoor of the lawnmower and place
the grasscatcherframehooksontothe
deer pivot pins.
• To convertto mulchingoperation, remove
grass ca_her and close reardoor.
Pivot pins
TO EMPTY GRASS CATCHER
• Lift up on grass catcher using the frame
handle,
• Remove grass catcher with clippings
from under lawn mower handle.
• Empty clippingsfrombag usingboth
frame handle and bag handle.
NOTE: Do not drag the bag when
emptying; it will cause unnecessary wear,
/
catcher
frame
handle
handle
..erWhaolsfo,.l,hCut
RaiseWheelsforLowCut
r

BEFORESTARTING ENGINE
OIL
Yourlawnmower isshippedwithoutoilinthe
engine.
• Be suremoweris leveland areaaroundoil
fill isdean.
• Remove engine oilcap and fillto the full
lineonthe dipetick.
NOTE: Allow oil tosettle down into
• engine for accurate dipstick reading..
• Engineholds 20ozs. of oil. Fortypeand
gradeofoilto use,see "ENGINE"in
Maintenancesectionof this manual.
• Pour oilslowly.Do netoverfill.
• Checkoillevelbefore eachuse. Addoilif
needed. Filltofull lineon dips_ck.
• To read properlevel,tightenengineoilcap
each time.
• Reinstallengineoilcap and tighten.
• Change the oil_ter every25 hoursof
operationor each season. You mayneed
tochangethe oilmore oftenunderdusty,
dirtyconditions.
ADD GASOUNE
• Fillfueltank. Usefresh,clean, regular
unleaded gasoline with a minimum of 87
octane. Do not mix oil withgasoline.
Purchasefuel inquantities thatcan he
usedwithin 30 days to assurefuel
freshness.
AWARNING: Expedenoe indicates that
alcohol blended fuels (called gasohol or
using ethanol or methanol) can attract
moisture which leads to separation and
formation of acidsduring storage. Acidic
gas can damage the fuel system of an
engine while in storage. To avoid engine
problems, the fuel system should be
emptied before storage of 30 days or
longer. Drain the gas tank, startthe
engine and let it run until the fuel lines
and carburetor are empty. Use fresh fuel
nextseason• See Storage Instructions for
additional information. Never use engine
or carburetorcleaner products in the fuel
tank or permanent damage may eccur.
A.CAUTION: Fillto bottomof gas tank
filler neck. Do notoverfill. Wipe off any
spilledoil or fuel. Do not store, spillor use
gasoline near an open flame.
TO STARTENGINE
NOTE: Due to protectivecoatingson the
engine, a small amount of smoke may be
present dudng the initial use of the
product and shouldbe considered
normal.
• TOstarta coldengine,pushprimer three
(3)times hefomtryingtostart.Useafirm
push.This step is not usuallynecessary
whenstadingan engine which has already
runfora few minutes.
• Holdoperatorpresencecontrolbar down
tothe handleandpullstarterhandle
quicldy.Do notallowstarterropetosnap
back.
• To stopengine,release operatorpresence
control bar.
NOTE: In cooler weather it may be
necessary to repeat pdming steps.In
warmer weather over priming may cause
flooding and engine will not start. If you do
flood engine, wait a few minutes before
attempting to start and do not repeat
priming steps.
Gasolinetiller
Engineoil
cap
'i
8
 Loading...