

Craftsman 917384150 Owner’s Manual
MODEL NUMBER 917.384150
\
\
\
\
oAssembly
• Operation
• Customer
Responsibilities
• Service
OWNER'S MANUAL
Convertible
Adjustments
• Repair Parts
Caution:
Read and Follow
all Safety Rules
and instructions
Before Operating
This Equipment
!
IIIIII IIII IIIIII
SAFETY RULES
CAUTION: ALWAYSDISCONNECTSPARKPLUGWIREANDPLACEWIRE WHEREiTCANNOT CONTACTSPARK
PLUG TO PREVENT ACCIDENTALSTARTING WHENSETTINGUP_TRANSPORTING,ADJUSTING OR MAKING
REPA,RS. IMPORTANT
SAFE ,STANOARDSREOU,REOPERATORPRESENCECONTROLSTO T,ER,SKOFINJURY.YOURUN,T,SEOU,PPEDW,T.
SUO.CONTROLS.00NOTA EMPTTODEFEATTNEFONCTIO.OFTHEOPERATORPRESENCECONTRO.SU.OERANYC,RCUM-
STANCES.
TRAiNiNG:
• Read this operator's manual carefully. Become familiar with
the controls and know how to operate your mower properly.
Learn how to quickly stop mower.
• Do not allow children to usa your mower. Never allow adults
to use mower without proper instructions.
• Keep the area of operation clear of al! persons, especially
small children and pets.
o Use mower only as the manufacturer intended and as de-
scribed in this manual
= Do not operate mower if ithas been dropped or damaged in
any manner_ Always have damage repaired before using
your mower.
o Do not use accessory attachments that are not recommended
by the manufacturer. Use of such attachments may be
hazardous.
Be aware that the mower blade turns when the engine is
running.
PREPARATION:
• Always thoroughly checkthe area to be mowed and clear it of
all stones, sticks, wires, bones, and other foreign objects.
These objects will be thrown by the btade and can cause
severe injury.
. Always wear safety glasses or eye shields when starting and
while using your mower.
• Dress properly. Do not operate mower when barefoot or
wearing open sandals. Wear only solid shoes with good
traction when mowing.
= Check fuel tank before starting engine. Do not fitl gas tank
indoors, when the engine is running or when the engine is hot.
Allow the engine to cool for several minutes before filling the
gas tank. Clean off any spilled gasoline before starting the
engine.
= Always make wheel height adjustments before starting your
mower, Never attempt to do this while the engine is running.
o Mow only in daylight or good artificia! light.
OPERATION:
• Keep your eyes and mind on you rmower and the area being
cut. Do not let other interests distract you.
= Do not mow wet or slippery grass. Never run while operating
your mower. Always be sure of your footing - keep a firm hold
on the handles and walk.
• Do not put hands or feet near or under rotating parts, Keep
clear of the discharge opening at all times,
* Always stop the engine whenever you leave or are not using
your mower, or before crossing driveways, walks, roads, and
any graver-covered areas.
, Never direct discharge of material toward bystanders nor
allow anyone near the mower while you are operating it.
o Before cleaning, inspecting, or repairing your mower, stop
the engine and make absolutely sure the blade and all
moving parts have stopped. Then disconnect the spark plug
wire and keep it away from the spark plug to prevent
accidental starting.
, Do not continue to run your mower if you hit aforeign object.
Follow the procedure outlined above, then repair any dam-
age before restarting and operating you mower.
Do not change the governor settings or overspeed the
engine. Engine damage or personal injury may result.
° Do not operate your mower if it vibrates abnormally. Exces-
sive vibration is an indication of damage; stop the engine,
safely check for thecause ofvibration and repair as required.
o Do not run the engine indoors, Exhaust fumes are danger-
ous.
, Never cut grass by pulling the mower towards you. Mow
across the face of slopes, never up and down oryou might
lose your footing. Do not mow excessively steep slopes.
Use caution when operating the mower on uneven terrain or
when changing directions - maintain good footing.
, Never operate your mower without proper guards, p_ates,
grass catcher or other safety devices in place.
MAINTENANCE AND STORAGE:
= Check the blade and the engine mounting bolts often to be
sure they are tightened properly.
° Check all bolts, nuts and screws at frequent intervals for
proper tightness to be sure mower is in safe working condi-
tion.
- Keep all safety devices in place and working_
• To reduce fire hazard, keep the engine free of grass, leaves
or excessive grease and oil
,, Check grass catcher often for deterioration and wear and
replace worn bags. Use only replacement bags that are
recommended by and comply with specifications of the
manufacturer of your mower.
. Always keep a sharp blade on your mower.
• Atlow engine to cool before storing in any enclosure.
° Never store mower with fuel in the tank inside a building
where fumes may reach an open flame or an ignition source
such as a hot water heater, space heater, clothes dryer, etc.
-L-O-o-K-FORTHIS S M-B-OL-TO-_ETY PRECAUTIONS.
iT MEANS - ATTENTION!! _.BE_UR SAFETY IS INVOLVED, ___J
2
CONGRATULATIONS on your purchase of a Sears
Craftsman Lawn Mower, tt has been designed, engineered
and manufactured to give you the best possible de-
pendability and performance.
Should you experience any probIems you cannot easily
remedy, please contact your nearest Sears Service Cen-
ter/Department, Sears has competent, well trained tech-
nicians and the proper tools to service or repair this unit.
Please read and retain this manual, The instructions wilt
enable you to assembte and maintain your lawn mower
properly. Always observe the "SAFETY RULES",
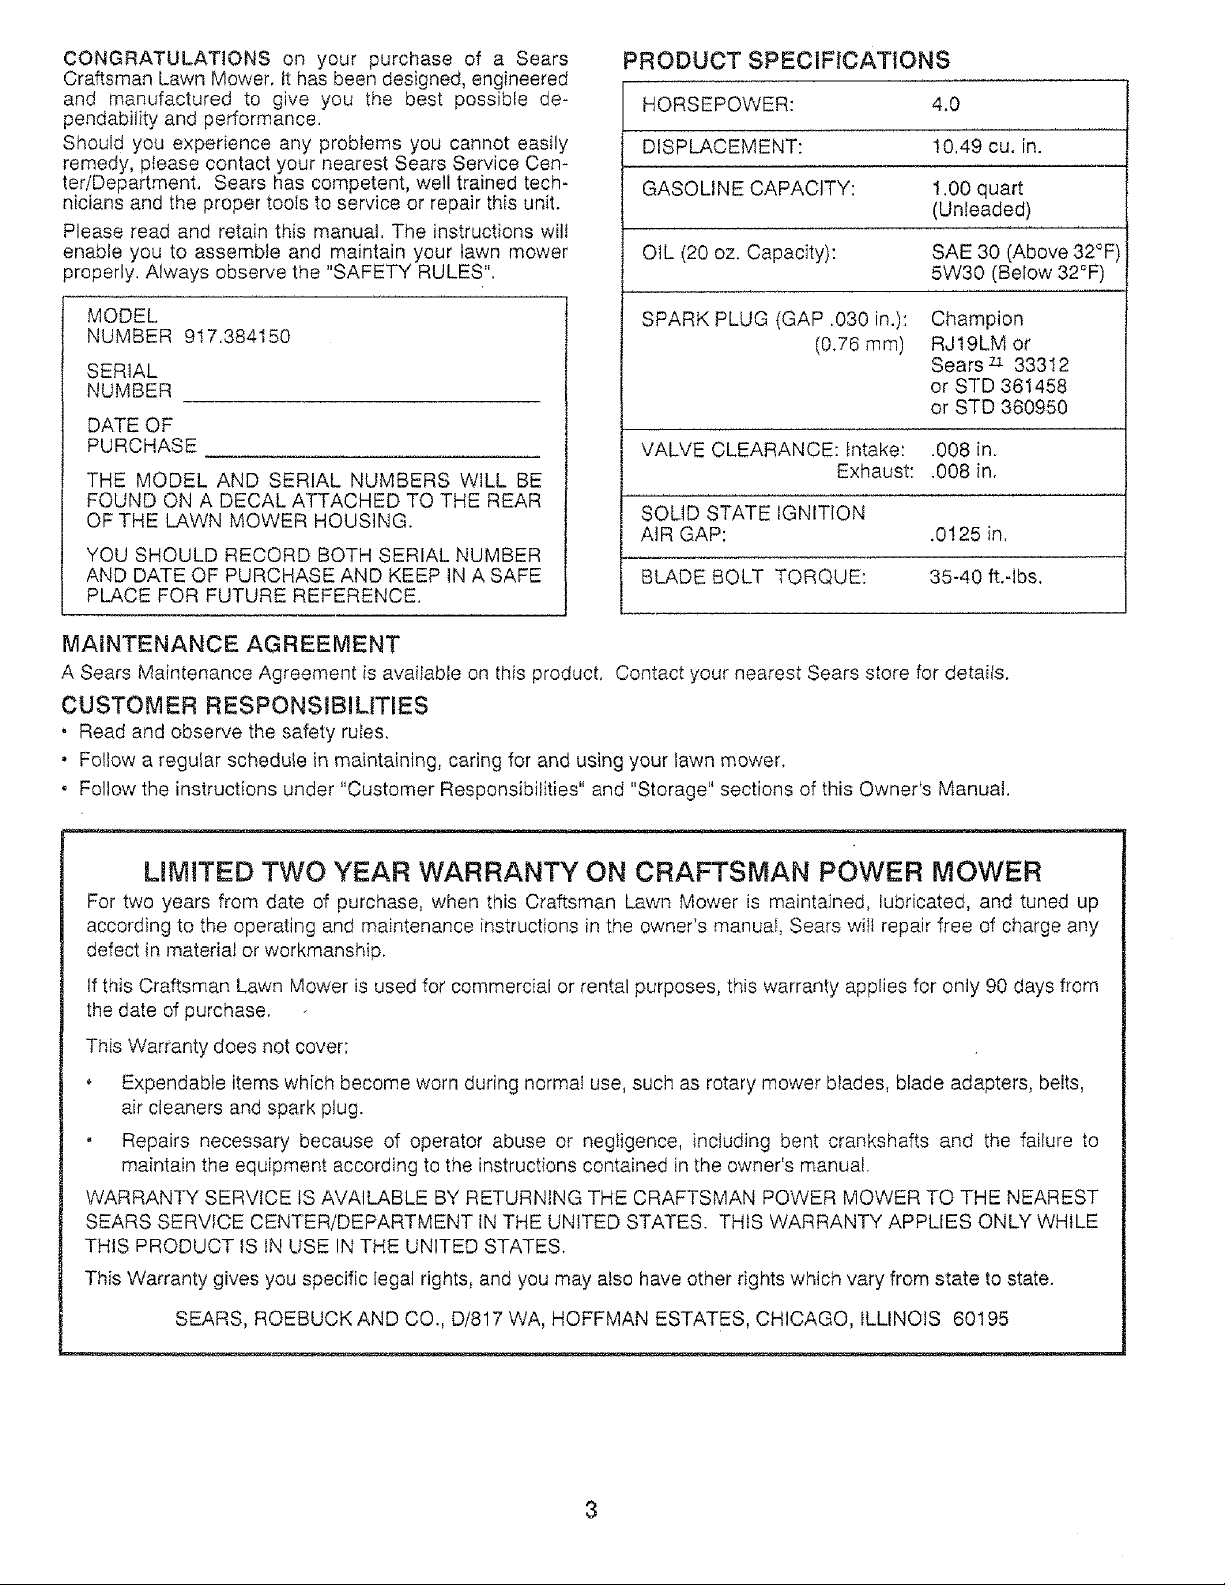
PRODUCT SPECIFICATIONS
HORSEPOWER:
DISPLACEMENT:
GASOLINE CAPACITY:
O1L (20 oz. Capacity):
4.0
10,49 cu. in.
1.00 quart
(Unleaded)
SAE 30 (Above 32°F)
5W30 (Below 32°F)
MODEL
NUMBER 917,384150
SERIAL
NUMBER
DATE OF
PURCHASE
THE MODEL AND SERIAL NUMBERS WILL BE
FOUND ON A DECAL ATTACHED TO THE REAR
OF THE LAWN MOWER HOUSING.
YOU SHOULD RECORD BOTH SERIAL NUMBER
AND DATE OF PURCHASE AND KEEP IN A SAFE
PLACE FOR FUTURE REFERENCE.
SPARK PLUG (GAP .030 in.):
(0.76 mm)
VALVE CLEARANCE: _ntake:
Exhaust:
SOLID STATE IGNITION
AIR GAP: .0125 in,
BLADE BOLT TORQUE: 35-40 ft.-Ibs.
Champion
RJ19LM or
Sears z_ 33312
or STD 361458
or STD 360950
.008 in.
.008 in.
MAINTENANCE AGREEMENT
A Sears Maintenance Agreement is avaiIable on this product. Contact your nearest Sears store for details.
CUSTOMER RESPONSIBILITIES
" Read and observe the safety rules,
• Follow a regular schedule in maintaining, caring for and using your lawn mower.
• Follow the instructions under "Customer Responsibilities" and "Storage" sections of this QwneCs Manual.
LIMITED TWO YEAR WARRANTY ON CRAFTSMAN POWER MOWER
For two years from date of purchase, when this Craftsman Lawn Mower is maintained, lubricated, and tuned up
according to the operating and maintenance instructions in the owner's manual, Sears wilt repair free of charge any
defect in material or workmanship,
If this Craftsman Lawn Mower is used for commercial or rental purposes, this warranty applies for only 90 days from
the date of purchase.
This Warranty does not cover:
• Expendable items which become worn during normal use, such as rotary mower blades, blade adapters, belts,
air cleaners and spark plug.
. Repairs necessary because of operator abuse or negligence, including bent crankshafts and the failure to
maintain the equipment according to the instructions contained in the owner's manual.
WARRANTY SERVICE USAVAILABLE BY RETURNING THE CRAFTSMAN POWER MOWER TO THE NEAREST
SEARS SERVICE CENTER/DEPARTMENT IN THE UNITED STATES. THIS WARRANTY APPLIES ONLY WHILE
THIS PRODUCT IS IN USE IN THE UNITED STATES.
This Warranty gives you specific legal rights, and you may also have other rights which vary from state to state.
SEARS, ROEBUCK AND CO., D/817 WA, HOFFMAN ESTATES, CHICAGO, fLLINO_S 60195
TABLE OF CONTENTS
SAFETY RULES ............................................. 2
PRODUCT SPECIFICATIONS ........................ 3
CUSTOMER RESPONSIBiLiTiES ...... 3, 10=12
WARRANTY ................................................... 3
LAWN MOWER ACCESSORIES ................... 5
ASSEMBLY .................................................... 5
OPERATION ................................................... 6
iNDEX
A
Accessories ............................................ 5
Adjustments:
Carburetor .............................. _...13
Handle Height ............................ 13
Height of Cut ................................ 7
Air Filter:
Service ........................................ t2
Assembly:
Handle .......................................... 5
B
Blade:
Sharpening ................................. 11
Replacement .............................. t 1
C
Controls:
Operator Presence Control Bar .6
Customer Responsibilities ..... 3, 10-12
Air Filter ...................................... 12
Blade Care/Replacement .......... 11
Engine ........................................ 12
Schedule .................................... 10
Lubrication ................................. I 0
Spark Plug ................................. !2
E
Engine:
Oil Change ................................. 12
Oi! Level ....................................... 8
Oil Type ...................................... 12
Starting .......................................... 8
Storage ....................................... 14
Fuel:
Type .............................................. 8
Storage ....................................... t 4
Handle:
Adjustment ................................. t3
Assembly ..................................... 5
Lubrication:
Engine ........................................ 10
Wheel Adjuster .......................... t0
Brake Spring Bracket ................ 10
Mulcher Door Hinge .................. I0
Maintenance Agreement .................... 3
Mowing Tips ........................................ 8
Mulching/Mowing Tips ....................... 9
Oil:
Engine ........................................ 12
Storage ....................................... 14
Operation:
Operating Lawn Mower ............... 7
Control Bar ................................... 7
Engine Control ............................ 7
Operator Presence Control Bar., ...... 6
Options:
Accessories ................................. 5
SERVICE AND ADJUSTM ENTS .................. 13
STO RAG E ..................................................... 14
TROUBLESHOOTING .................................. 15
REPAIR PARTS = LAWN MOWER. ........ 16-17
REPAIR PARTS = ENGINE ...................... 18-20
PARTS ORDERING/SERViCE. BACK COVER
F
Repair Parts
Lawn Mower .......................... 16-17
H
L
M
O
Engine ................................... 18-20
Responsibilities, Customer ...3, 10-12
Safety Rules ........................................ 2
Service and Adjustments:
Carburetor .................................. 13
Engine Speed ............................. 13
Handle ........................................ 13
Spark Plug ......................................... 12
Specifications ..................................... 3
Starting the Engine ............................. 8
Stopping the Engine ........................... 8
Storage .............................................. 14
Trouble Shooting Chart ................... 15
Warranty .............................................. 3
Wheels:
Wheel Adjusters .......................... 7
p
R
S
T
W
4
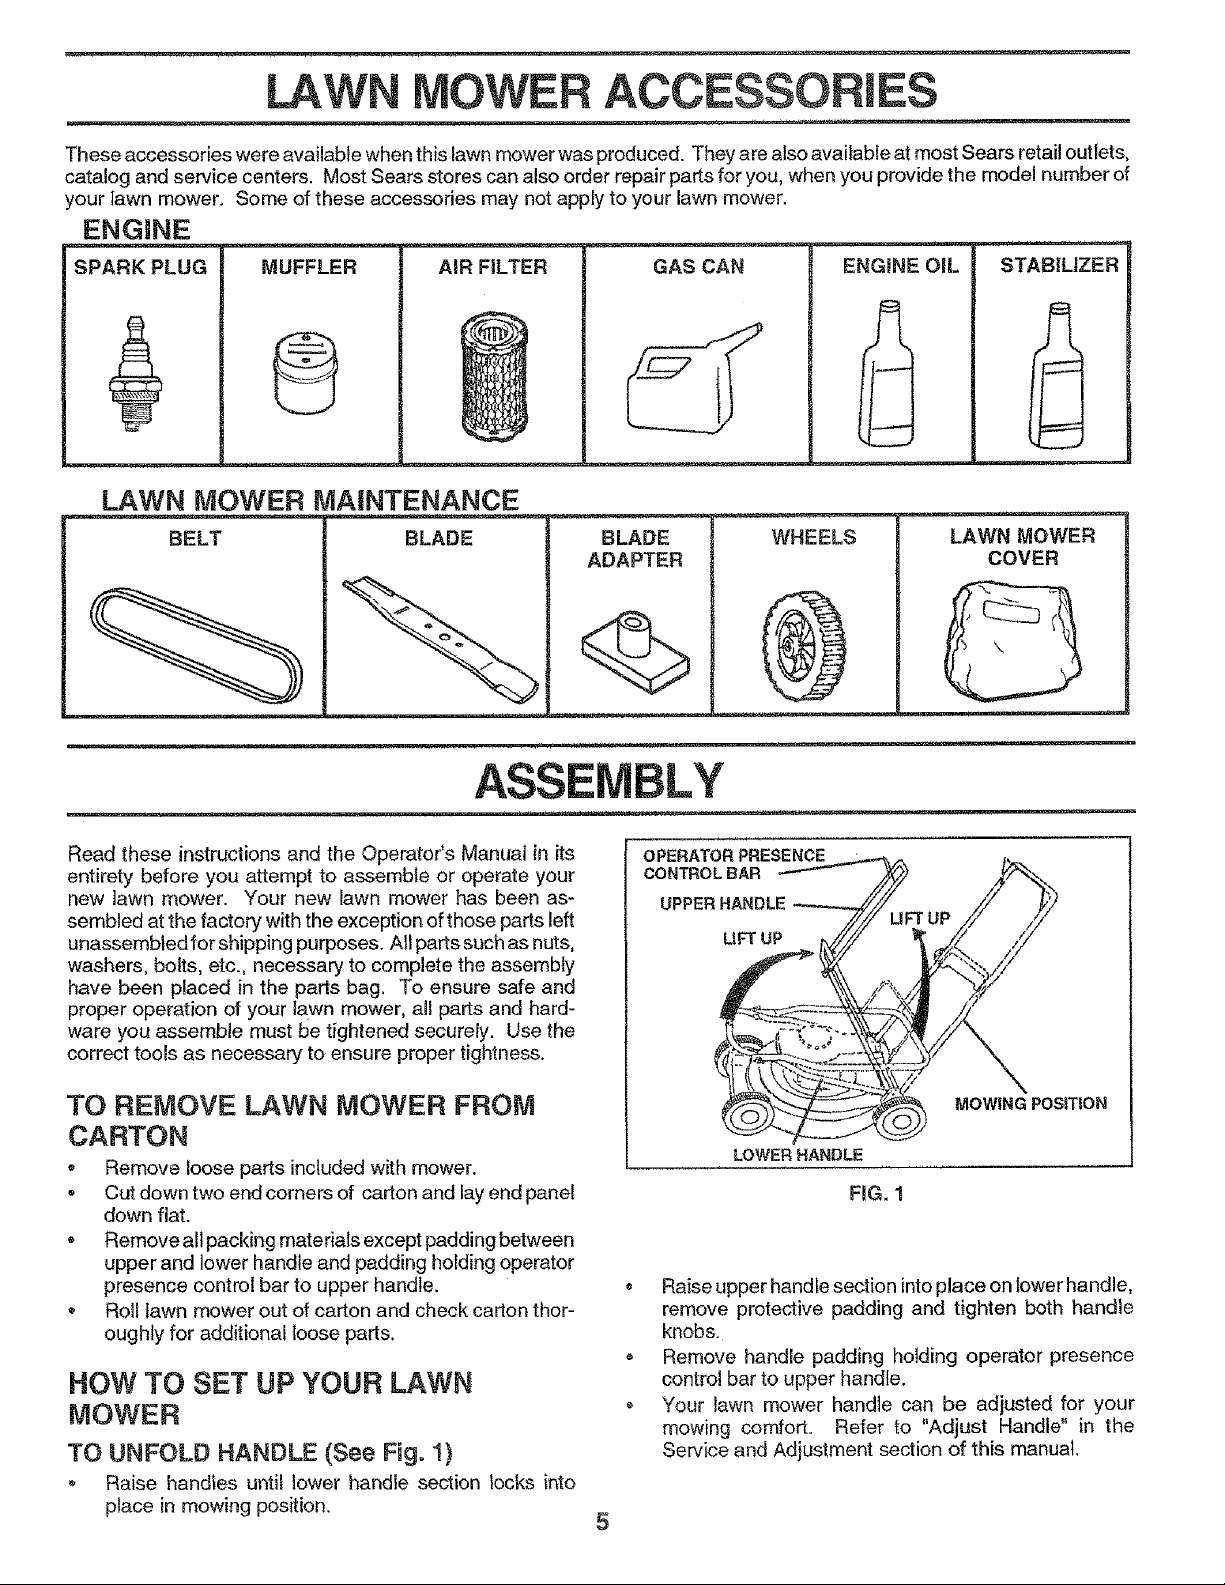
ACCESSORIES
These accessories were available when this lawn mower was produced. They are also available at most Sears retail outlets,
catalog and service centers. Most Sears stores can also order repair parts for you, when you provide the model number of
your lawn mower. Some of these accessories may not apply to your lawn mower.
ENGINE
SPARK PLUG MUFFLER AIR FILTER GAS CAN ENGINE OiL STABILIZER
LAWN MOWER MAINTENANCE
BELT
BLADE BLADE
ADAPTER
WHEELS
LAWN MOWER
COVER
ASSEMBLY
Read these instructions and the Operator's Manual in its
entirety before you attempt to assemble or operate your
new lawn mower. Your new lawn mower has been as-
sembled at the factory with the exception of those parts left
unassembted for shippingpurposes. All parts such as nuts,
washers, bolts, etc., necessary to complete the assembly
have been placed in the parts bag. To ensure safe and
proper operation of your lawn mower, all parts and hard-
ware you assemble must De tightened securely. Use the
correct tools as necessary to ensure proper tightness.
TO REMOVE LAWN MOWER FROM
CARTON
- Remove loose parts included with mower.
• Cut down two end corners of carton and lay end panel
down flat.
- Remove all packing materials except padding between
upper and lower handle and padding holding operator
presence control bar to upper handle,
• Roll lawn mower out of carton and check carton thor-
oughly for additional toose parts.
HOW TO SET UP YOUR LAWN
MOWER
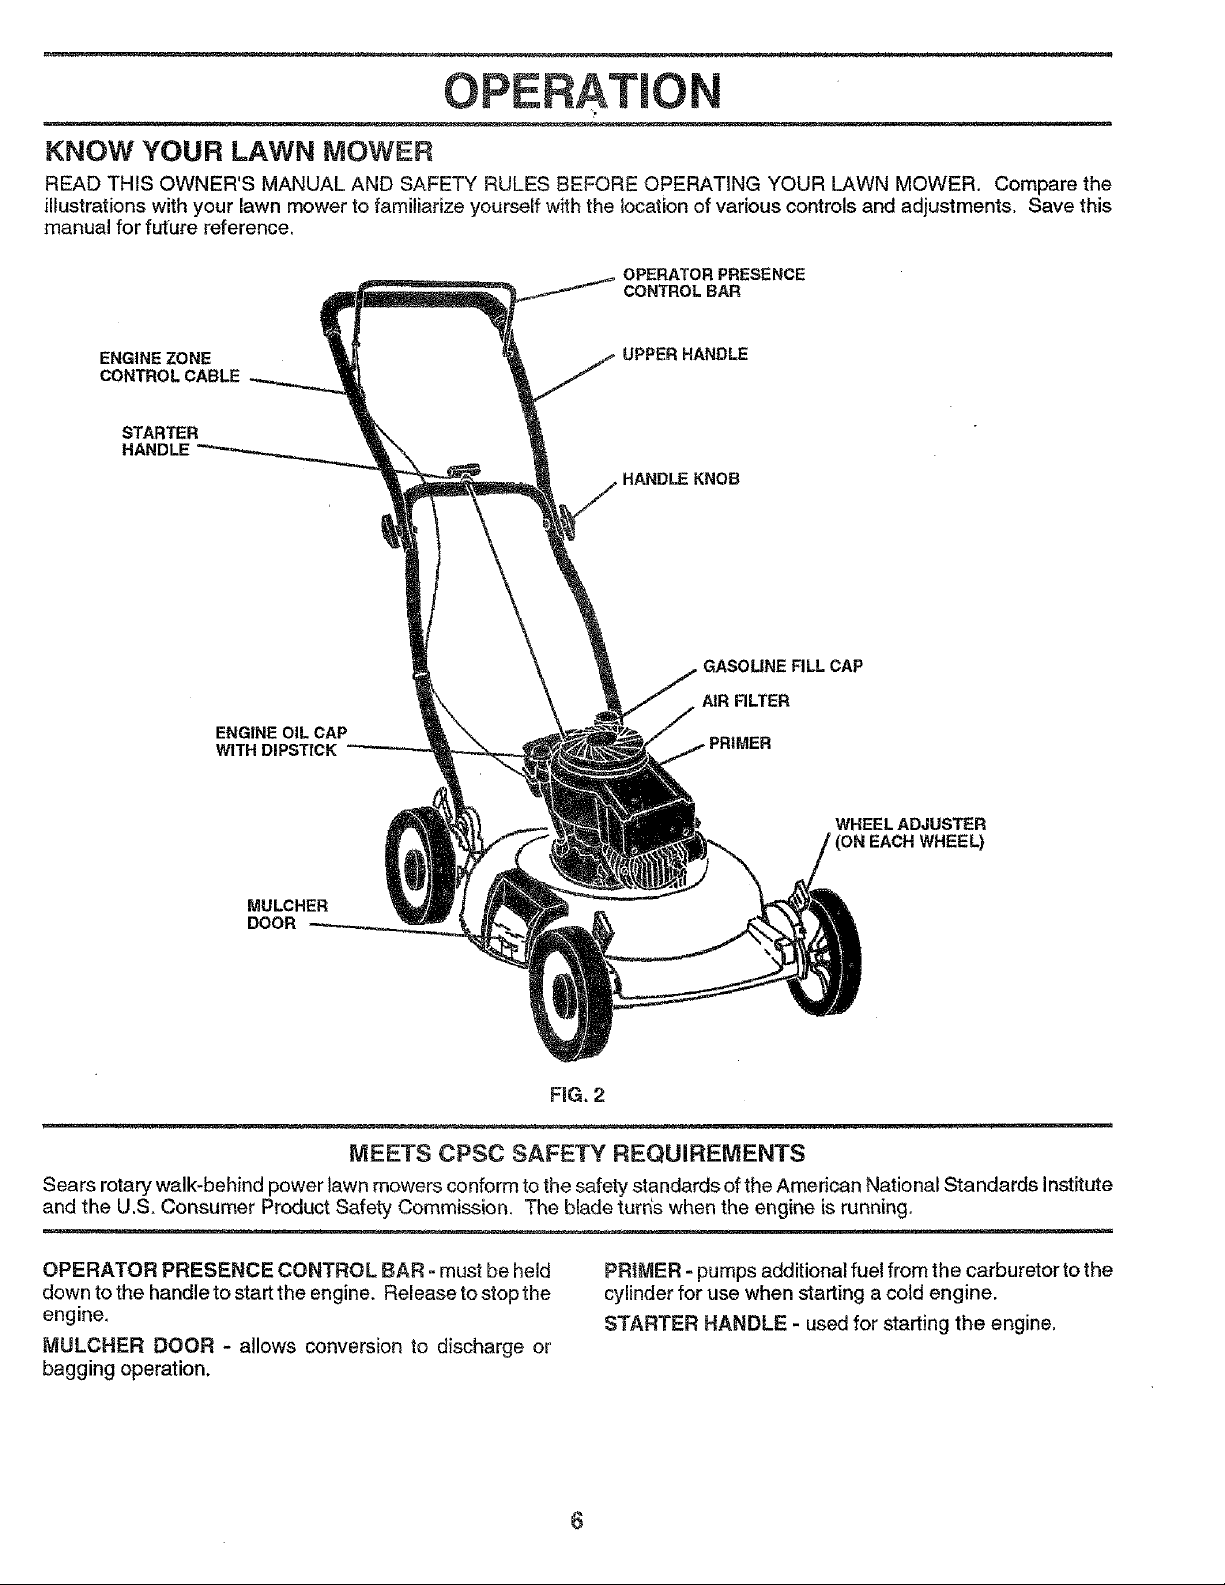
TO UNFOLD HANDLE (See Fig. 1)
Raise handles until Power handle section locks into
place in mowing position.
OPERATOR PRESENCE
CONTROLBAR
UPPER HANDLE
LIFT UP
MOWING POSITION
LOWER HANDLE
FIG. 1
Raise upper handle section intoplace on lower handle,
remove protective padding and tighten both handle
knobs.
Remove handle padding holding operator presence
control bar to upper handle.
, Your lawn mower handle can be adjusted for your
mowing comfort. Refer to "Adjust Handle" in the
Service and Adjustment section of this manual.
OPERATION
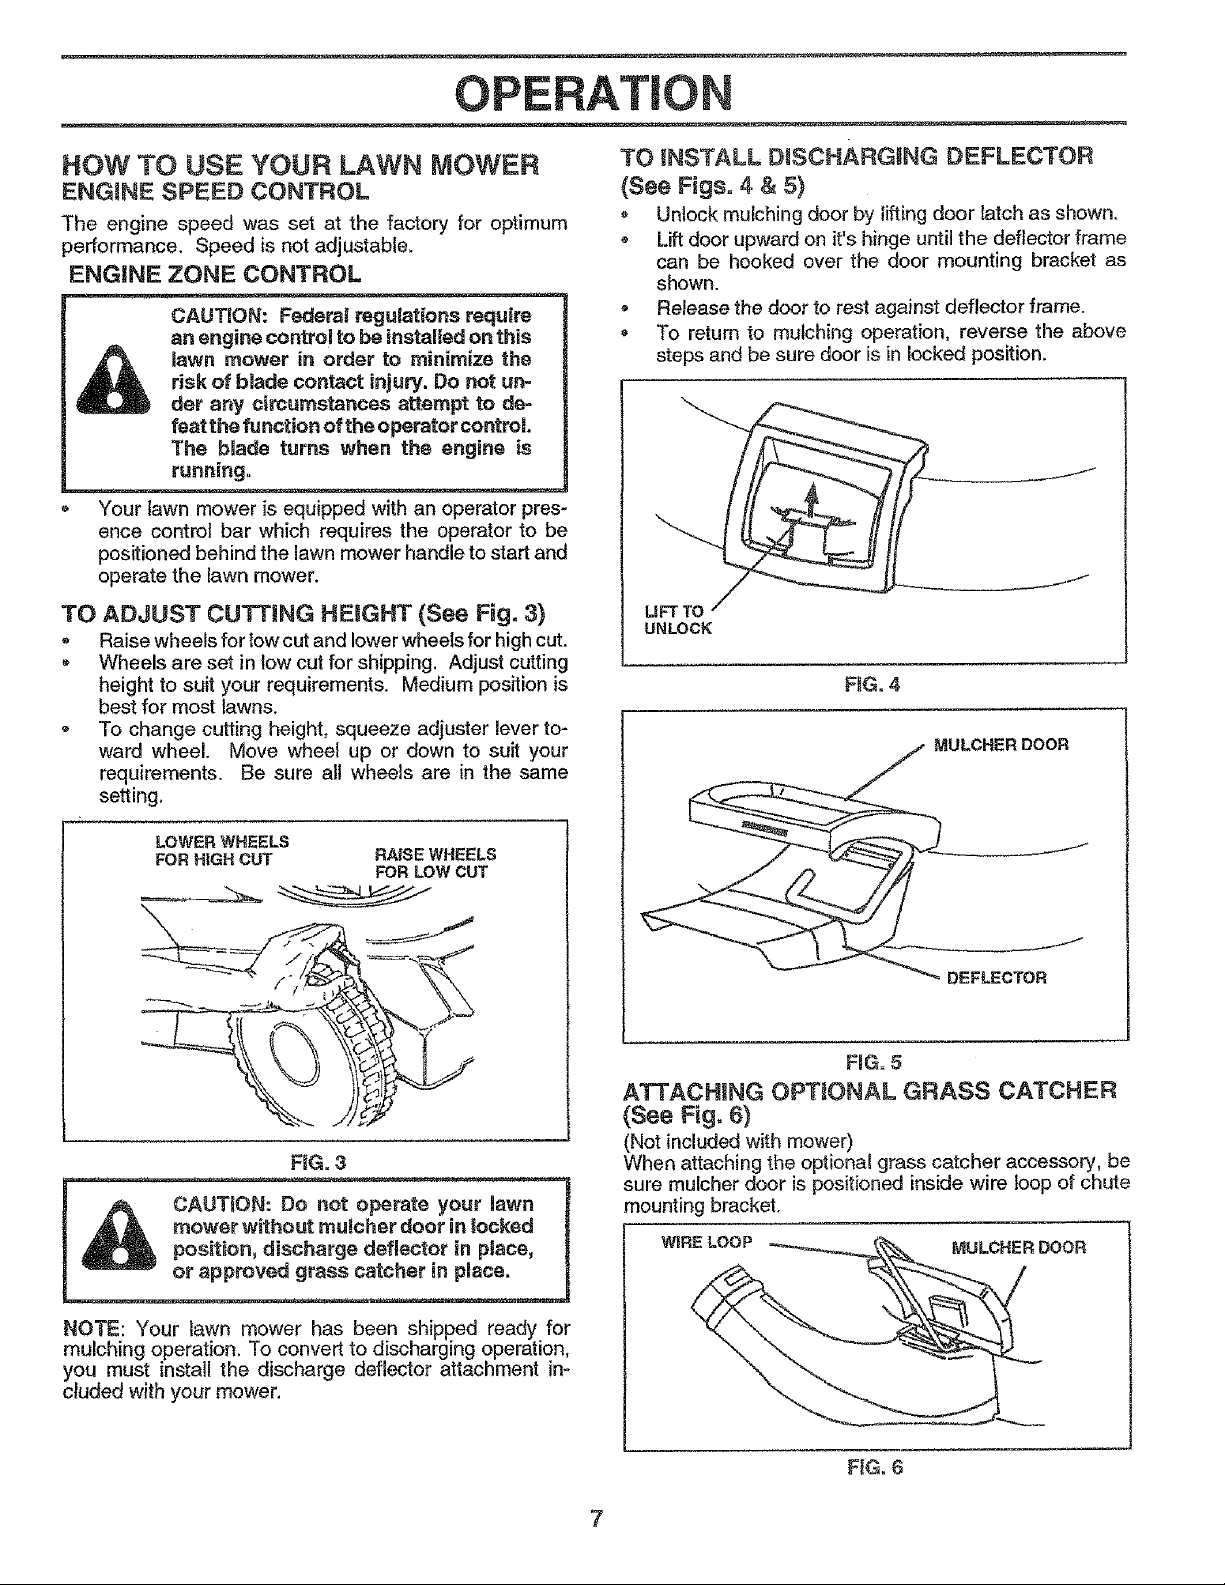
KNOW YOUR LAWN MOWER
READ THIS OWNER'S MANUAL AND SAFETY RULES BEFORE OPERATING YOUR LAWN MOWER. Compare the
illustrations with your lawn mower to familiarize yourself with the location of various controls and adjustments. Save this
manual for fut'ure reference.
OPERATOR PRESENCE
CONTROLBAR
ENGINEZONE
CONTROL CABLE
STARTER
HANDLE
ENGINE OIL CAP
WITH DIPSTICK
UPPERHANDLE
HANDLE KNOB
GASOLINE FILL CAP
AIR FILTER
WHEEL ADJUSTER
(ON EACH WHEEL}
MULCHER
DOOR
FiG. 2
MEETS CPSC SAFETY REQUIREMENTS
Sears rotary walk-behind power lawn mowers conform to the safety standards of the American National Standards Institute
and the U.S. Consumer Product Safety Commission. The blade turns when the engine isrunning.
OPERATOR PRESENCE CONTROL BAR - must be held
down to the handle to start the engine. Release to stop the
engine,
MULCHER DOOR - allows conversion to discharge or
bagging operation.
PRIMER - pumps additional fuel from the carburetor tothe
cylinder for use when starting a cold engine.
STARTER HANDLE - used for starting the engine.
6
OPERATION
HOW TO USE YOUR LAWN MOWER
ENGINE SPEED CONTROL
The engine speed was set at the factory for optimum
performance. Speed is not adjustable.
ENGINE ZONE CONTROL
CAUTION: Fede_l regulations require
an engine control to be installed on this
Jawn mower in order to minimize the
risk of blade contact injury. Do not un-
der any ci_umstances attempt to de-
feat the fu notion of the operator control
The bNade turns when the engine is
running.
Your lawn mower is equipped with an operator pres-
ence control bar which requires the operator to be
positioned behind the lawn mower handle to start and
operate the lawn mower.
TO ADJUST CUTTING HEIGHT (See Fig, 3)
Raise wheels for low cut and lower wheels for high cut.
- Wheels are set in low cut for shipping. Adjust cutting
height to suit your requirements. Medium position is
best for most lawns.
• To change cutting height, squeeze adjuster lever to-
ward wheel. Move wheei up or down to suit your
requirements. Be sure alt wheels are in the same
setting.
TO iNSTALL DiSCHARGiNG DEFLECTOR
(See Figs= 4 & 5)
Unlock mulching door by liftingdoor latch as shown.
* Lift door upward on it's hinge until the deflector frame
can be hooked over the door mounting bracket as
shown.
- Release the door to rest against deflector frame.
To return to mulching operation, reverse the above
steps and be sure door isin locked position.
LiFTTO /
UNLOCK
FItG. 4
MULCHERDOOR
LOWERWHEELS
FORHiGHCUT RAISEWHEELS
FiG. 3
CAUTION: Do not operate your lawn
mower without muicher doer in locked
position, discharge deflector in place,
or approved grass catcher in place.
NOTE: Your lawn mower has been shipped ready for
mulching operation. To convert to discharging operation,
you must install the discharge deflector attachment in-
cluded with your mower.
FORLOWCUT
J
DEFLECTOR
FiG. 5
ATTACHING OPTIONAL GRASS CATCHER
(See Fig. 6)
(Not included with mower)
When attaching the optional grass catcher accessory, be
sure mulcher door is positioned inside wire toop of chute
mounting bracket.
_RELOOP
MULCHERDOOR
FIG. 6
OPERATION
w.-_,_._
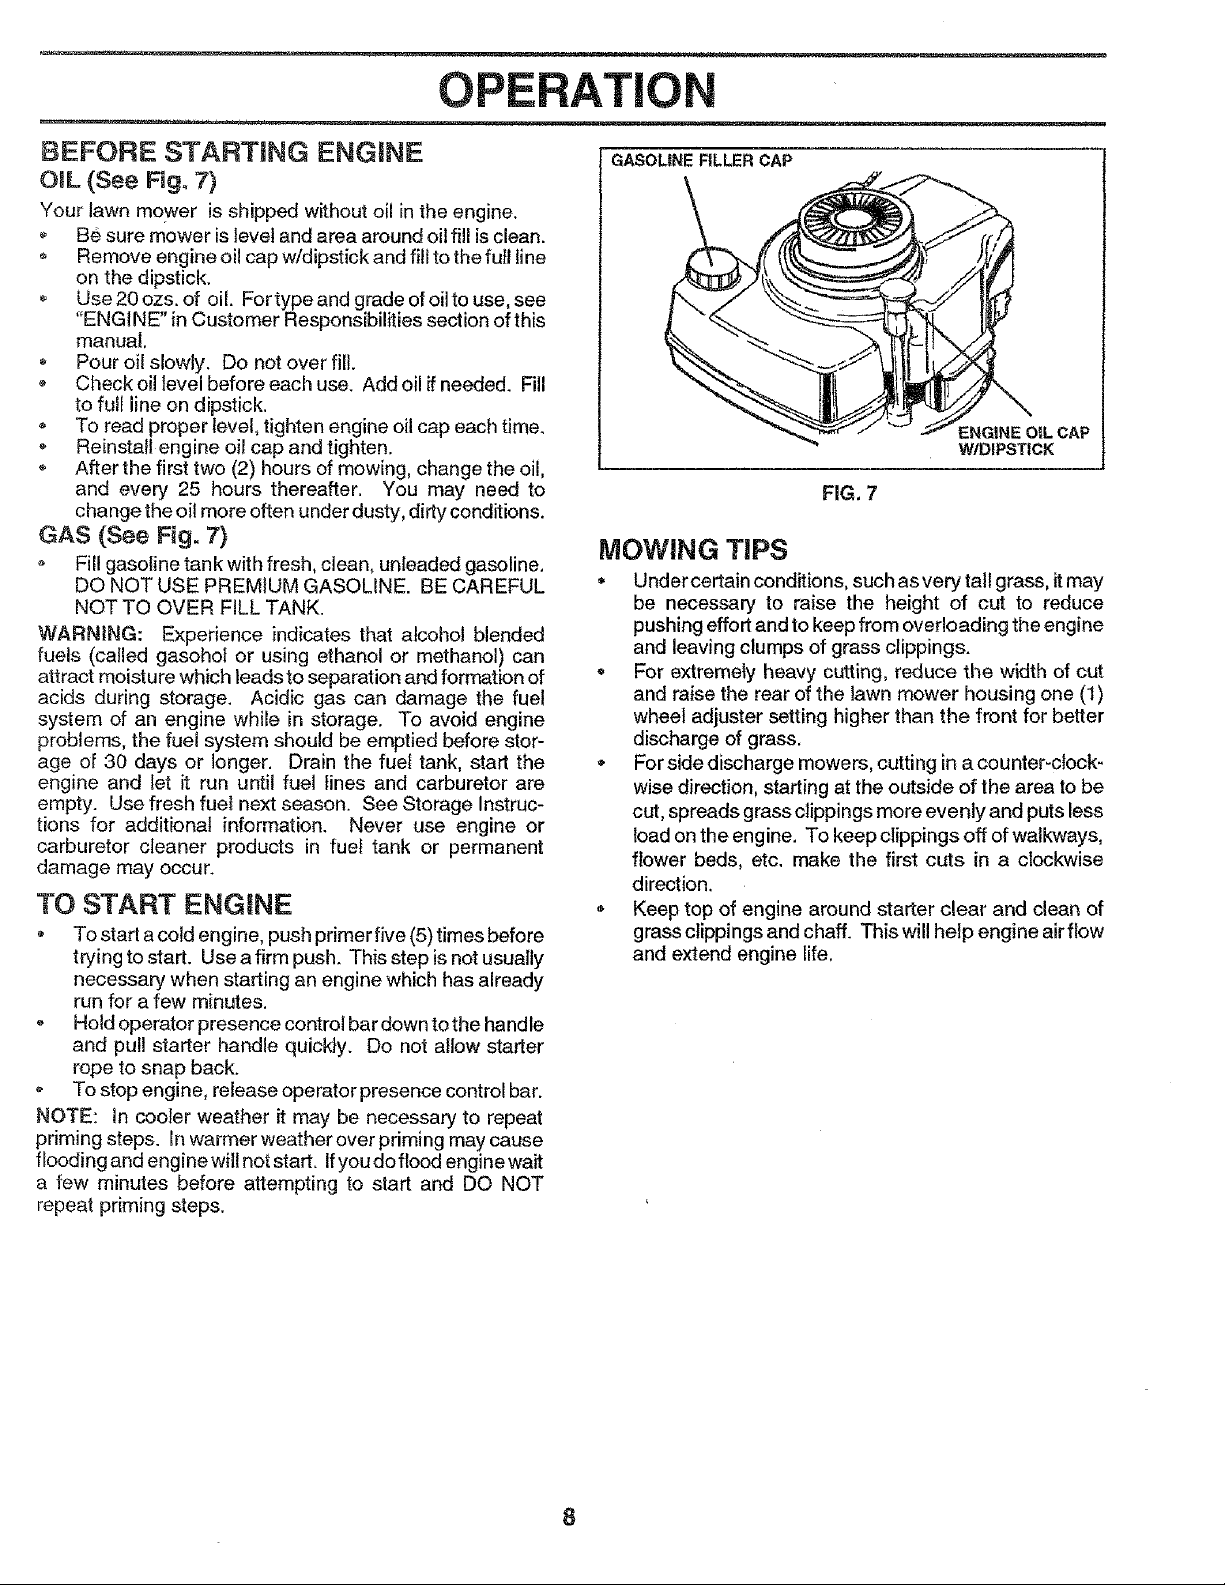
BEFORE STARTING ENGINE
OIL (See Fig_ 7)
Your lawn mower is shipped without oil in the engine.
Be sure mower is level and area around oil fill is clean.
o Remove engine oil cap w/dipstick and fill to the full line
on the dipstick.
Use 20 ozs. of oil. Fortypeandgradeofoilto use, see
"ENGINE" in Customer Responsibilities section of this
manual.
Pour oil slowly. Do not over fill.
Check oil level before each use. Add oil if needed. Fill
to full line on dipstick.
- To read proper level, tighten engine oil cap each time.
* Reinstall engine oil cap and tighten.
o After the first two (2) hours of mowing, change the oil,
and every 25 hours thereafter. You may need to
change the oil more often under dusty, dirty conditions.
GAS (See Fig. 7)
o Fill gasoline tank with fresh, clean, unleaded gasoline,
DO NOT USE PREMIUM GASOLINE. BE CAREFUL
NOT TO OVER FILL TANK.
WARNING: Experience indicates that alcohol blended
fuels (called gasohol or using ethanol or methanol) can
attract moisture which leads to separation and formation of
acids during storage, Acidic gas can damage the fuel
system of an engine while in storage. To avoid engine
problems, the fuel system should be emptied before stor-
age of 30 days or longer. Drain the fuel tank, start the
engine and let it run until fuel lines and carburetor are
empty. Use fresh fuel next season. See Storage Instruc-
tions for additional information. Never use engine or
carburetor cleaner products in fuel tank or permanent
damage may occur.
TO START ENG|NE
To start a cold engine, push primer five (5) times before
trying to start. Use afirm push. This step is not usually
necessary when starting an engine which has already
run for a few minutes.
- Hold operator presence control bar clown to the handle
and pull starter handle quickly. Do not allow starter
rope to snap back.
o To stop engine, release operator presence control bar.
NOTE: In cooler weather it may be necessary to repeat
priming steps. In warmer weather over priming may cause
ftoodingand enginewill not start. Ifyoudoflood engine wait
a few minutes before attempting to start and DO NOT
repeat priming steps.
GASOLINE FILLER CAP
ENGINE OILLCAP
WIDIPSTtCK
FIG. 7
MOWING TiPS
• Undercertain conditions,such asvery tallgrass, itmay
be necessary to raise the height of cut to reduce
pushing effort and to keep from overloading the engine
and leaving clumps of grass clippings.
• For extremely heavy cutting, reduce the width of cut
and raise the rear of the lawn mower housing one (1)
wheel adjuster setting higher than the front for better
discharge of grass,
• Forside discharge mowers, cutting in a counter-clock-
wise direction, starting at the outside of the area to be
cut, spreads grass clippings more evenly and puts less
load on the engine. To keep clippings off of walkways,
flower beds, etc. make the first cuts in a clockwise
direction.
• Keep top of engine around starter clear and clean of
grass clippings and chaff. This will help engine airflow
and extend engine life,
 Loading...