

Craftsman 917379582 Owner’s Manual
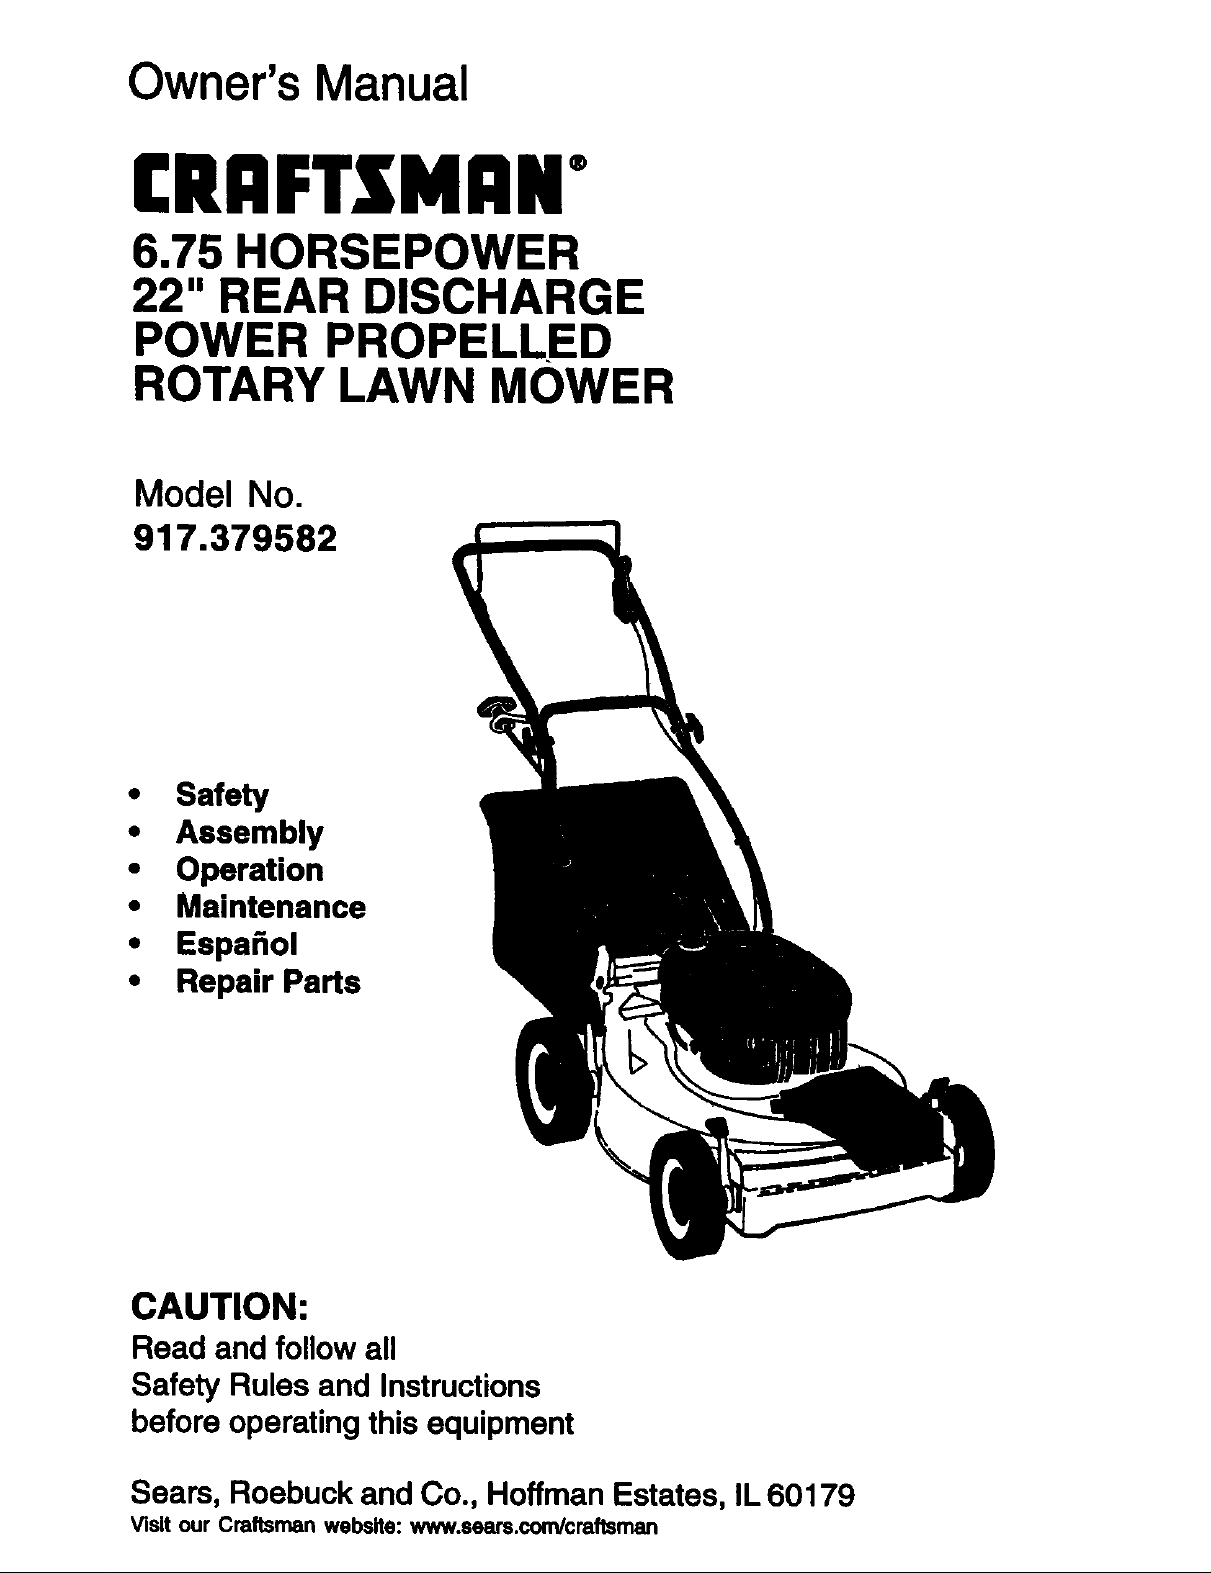
Owner's Manual
£RAFTSMAN"
6.75 HORSEPOWER
22" REAR DISCHARGE
POWER PROPELLED
ROTARY LAWN MOWER
Model No.
917.379582
• Safety
• Assembly
• Operation
• Maintenance
• EspaSol
• Repair Parts
CAUTION:
Read and follow all
Safety Rules and Instructions
before operating this equipment
Seam, Roebuck and Co., Hoffman Estates, IL 60179
Visit our Craftsman website: www.sears.com/craftsman
Warranty
Safety Rules
Assembly
Operation
Maintenance Schedule
Maintenance
LIMITED TWO YEAR WARRANTY ON CRAFTSMAN POWER MOWER
For two years from date of purchase, when this Craftsman Lawn Mower is maintained,
lubricated, and tuned up according to the operating and maintenance instructions in the
owner's manual, Sears will repair free of charge any defect in material or workmanship.
If this Craftsman Lawn Mower is used for commercial or rental purposes, this warranty
applies for only 90 days from the date of purchase.
This Warranty does not cover:
• Expendable items which become wom during normal use, such as rotary mower
blades, blade adapters, belts, air cleaners and spark plug.
• Repairs necessary because of operator abuse or negligence, including bent crank-
shafts and the failure to maintain the equipment according to the instructions con-
tained in the owner's manual.
Warranty service is available by returning the Craftsman power mower to the nearest
Sears Service Center/Department in the United States. This warranty applies only while
this product is in use in the United States.
This Warranty gives you specific legal rights, and you may also have other rights which
vary from state to state.
SEARS, ROEBUCKAND CO., D/817 WA, HOFFMAN ESTATES, ILLINOIS 60179
Product Specifications 11
Service and Adjustments 14
4 Storage 16
6 Troubleshooting 17
10 Repair Parts 37
10 Parts Ordering Back Cover
Safety standards require operator
presence controlsto minimize the
riskof injury.Your unitis equipped
withsuch controls. Do not attempt to
defeat the function of the operator
presence controls under any
circumstances.
TRAINING:
• Read this operator's manual carefully.
Become familiar with the controlsand
know how to operate your mower
properly.Leam how to quicklystop
mower.
• Do not allow childrento useyour mower.
Never allow adults to use mower without
proper instructions.
• Keep the area of operation clear of all
parsons,especially small children and
pets.
• Use mower only as the manufacturer
intendedand as describedin this
manual.
• Do not operate mower if it has been
dropped or damaged in any manner.
Always have damage repaired before
using your mower.
• Do not use accessory attachments that
are not recommended by the manufac-
turer. Use of such attachments may be
hazardous.
• The blade tums when the engine is
running.
PREPARATION:
• Always thoroughly check the area to be
mowed and clear it of all stones, sticks,
wires, bones, and other foreign objects.
These objects will be thrown by the
blade and can cause severe injury.
• Always wear safety glasses or eye
shields when starting and while using
your mower.
• Dress properly. Do not operate mower
when barefoot or wearing open sandals.
Wear only solid shoes with good trection
when mowing.
2
• Check fuel tank before starting engine.
Do not fill gas tank indoors, when the
engine is running or when the engine is
hot. Allow the engine to cool for several
minutes before filling the gas tank. Clean
off any spilled gasoline before starting
the engine.
• Always make wheel height adjustments
before starting your mower. Never
attempt to do this while the engine is
running.
• Mow only in daylight or good artificial
light.
OPERATION:
• Keep your eyes and mind on your
mower and the area being cut. Do not let
other interests distract you.
• Do not mow wet or slippery grass. Never
run while operating your mower. Always
be sure of your footing -- keep a firm
hold on the handles and walk.
• Do not put hands or feet near or under
rotating pads. Keep clear of the dis-
charge opening at all times.
• Always stop the engine whenever you
leave or are not using your mower, or
before crossing driveways, walks, roads,
and any gravel---covered areas.
• Never direct discharge of material
toward bystanders nor allow anyone
near the mower while you are operating
it.
• Before cleaning, inspecting, or repairing
your mower, stop the engine and make
absolutely sure the blade and all moving
parts have stopped. Then disconnect the
spark plug wire and keep it away from
the spark plug to prevent accidental
starting.
• Do not continue to run your mower if you
hit a foreign object. Follow the procedure
outlined above, then repair any damage
before restarting and operating you
mower.
• Do not change the govemor settings or
overspeed the engine. Engine damage
or personal injury may result.
• Do not operate your mower if it vibrates
abnormally. Excessive vibration is an
indication of damage; stop the engine,
safely check for the cause of vibration
and repair as required.
• Do not run the engine indoors. Exhaust
fumes are dangerous.
• Never cut grass by pulling the mower
towards you. Mow across the face of
slopes, never up and down or you
might lose your footing. Do not mow
excessively steep slopes. Use caution
when operating the mower on uneven
terrain or when changing directions
maintain good footing.
• Never operate your mower without
proper guards, plates, grass catcher or
other safety devices in place.
MAINTENANCE AND STORAGE:
• Check the blade and the engine
mounting bolts often to be sure they are
tightened properly.
• Check all belts, nuts and screws at
frequent intervals for proper tightness to
be sure mower is in safe working
condition.
• Keep all safety devices in place and
working.
• To reduce fire hazard, keep the engine
free of grass, leaves or excessive
grease and oil.
• Check grass catcher often for deteriora-
tion and wear and replace worn bags.
Use only replacement bags that are
recommended by and comply with
specifications of the manufacturer of
your mower.
• Always keep a sharp blade on your
mower.
• Allow engine to cool before storing in
any enclosure.
• Never store mower with fuel in the tank
inside a building where fumes may
reach an open flame or an ignition
source such as a hot water heater,
space heater, clothes dryer, etc.
_l:kLook for this symbol to point out
important safety precautions. It means
CAUTION!!! BECOMEALERTII! YOUR
SAFETY IS INVOLVED.
ACAUTION: Always d sconnect spark
plug wire and place wire where it cannot
contact spark plug in order to prevent
accidental starting when setting up,
transporting, adjusting or making repairs.
AWARNING
The engine exhaust from this product
contains chemicals known to the State of
Califomia to cause cancer, birth defects,
or other reproductive harm.
3

These accessories were availabla when _ lawn mower was produced.They am not
shipped with your mower. They are also available at most Sears retailoutletsand senlice
cerdem. Most Sears stores can aisoorder repair paris for you, when you provide the model
number of your lawn mower. Some of these accessories may notapply to your lawn mower.
LAWN MOWER PERFORMANCE
CLIPPING DEFLECTOR
FOR REAR DISCHARGE LAWN MOWERS
GRASS CATCHERS
FOR
REAR DISCHARGE
LAWN MOWERS
MULCHERKITS
SIDE DISCHARGE
GRASS CATCHERS
LAWN MOWERS
STABILIZER
FOR
GAS CANS
LAWN MOWER MAINTENANCE
MUFFLERS
BELTS BLADES
BLADE ADAPTERS WHEELS
Read these instructionsand this manual in its
entirety before you attempt to assemble or
operate your new lawn mower.
IMPORTANT:. This lawn mower is sh'_:)ed
WITHOUT OIL OR GASOUNE in the engine.
Your new lawn mower has been assembled
atthefactorywiththeexceplk)nofthoseparts
left unaseambled for sh'q_pingpurposes. All
partssuchasnuts,washem,bolts,etc.,
necessarytocomp_etheassenV_have
beenplacedinthepartsbag.Toensuresafe
and proper operation of your lawn mower, al
pads and hardware you aseald01e must be
Ik_tenedseourely.Use the correct tools as
necessarytoensurepropartightness.
AIR FILTERS
SPARK PLUGS
ENGINE OIL
TOREMOVELAWNMOWERFROM
CARTON
• Remove loose parts included with mower.
• Cut down two end cornem of carlonand
_ endpan_downnat
• Remove all packing materials except
padding between upper and lower handle
andpa,:UnghoUngoparatorpresence
control bar to uppar hande.
• Roll lawn mower out of carton and check
carton thoroughly for adddional Iooea pads.
4
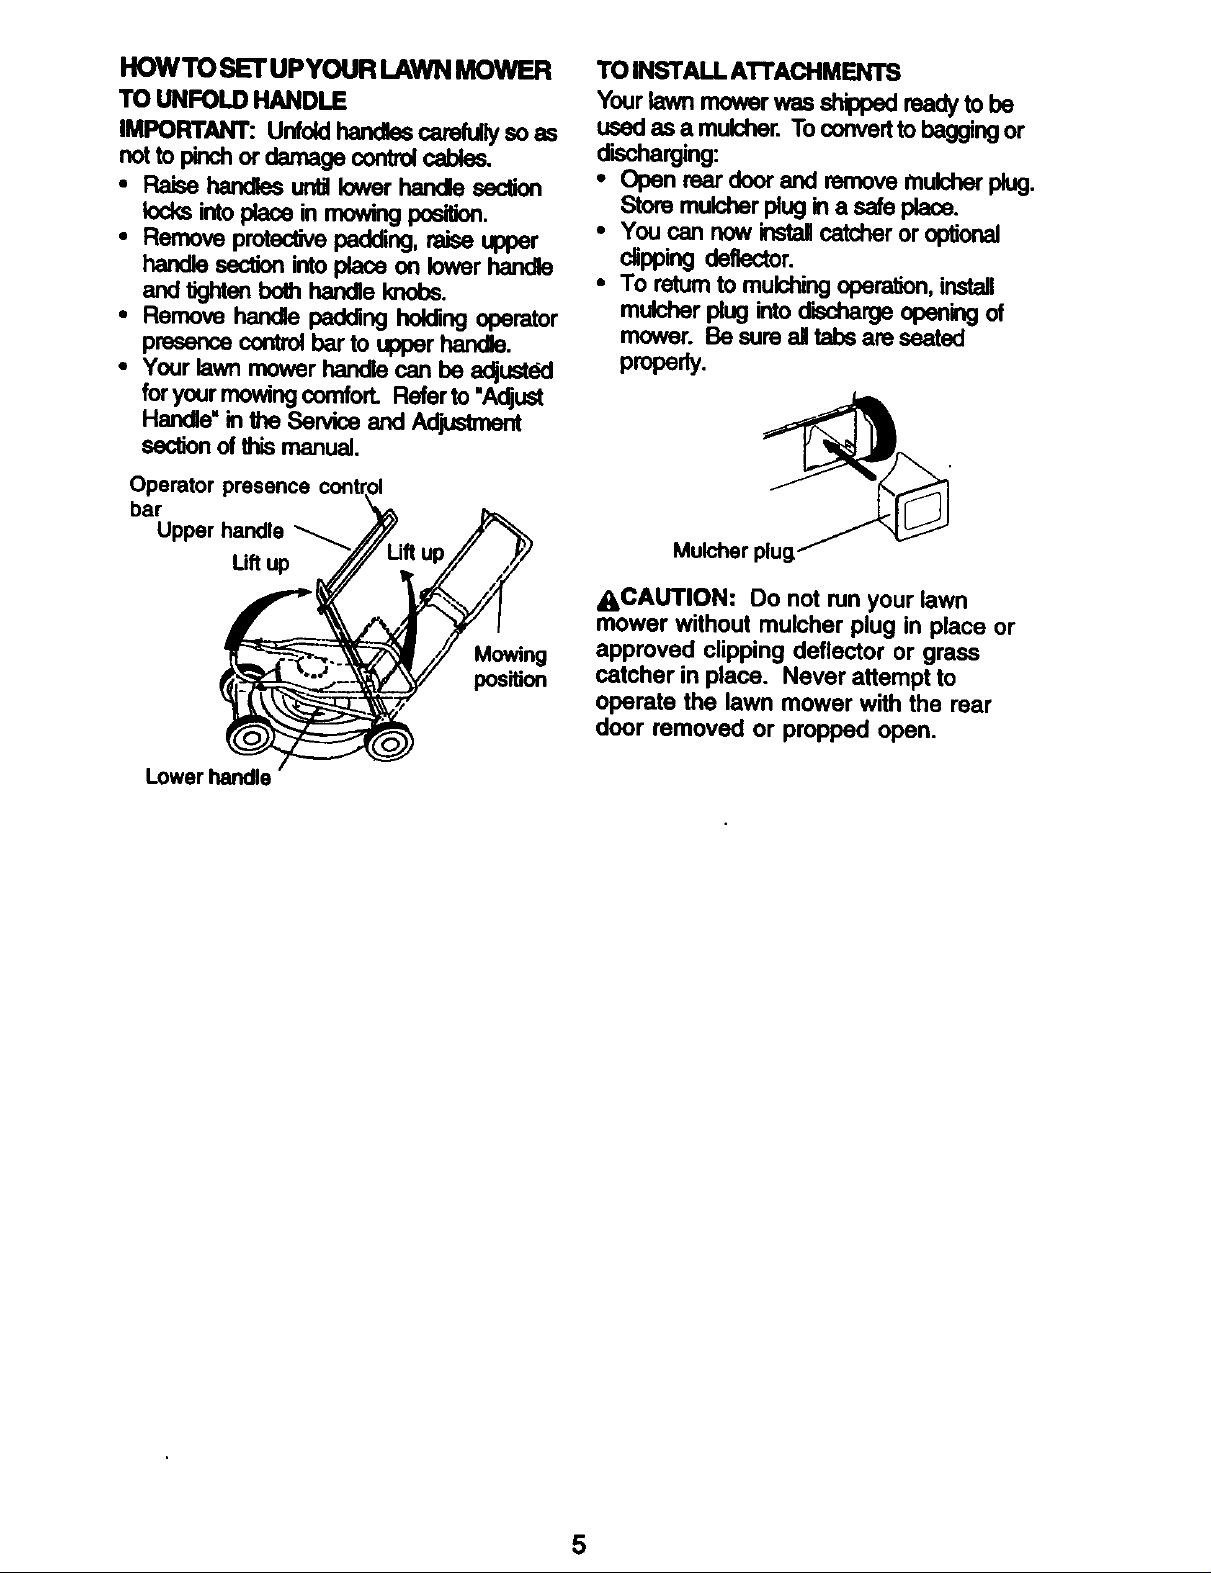
HOWTOSETUPYOUR LAWN MOWER
TO UNFOLD HANDLE
IMPORTANT: Unfold handles carefullyso as
nottopinchordemagecontrolcebl_.
• Raise handles unff lower handle section
locks into place in mowing posi_.
• Removeprotec_vepad_ng,ra_eupper
handle section into place on lower handle
and tighten both handle knobs.
• Remove handle peddngholing operator
presence control bar to upper handle.
• Your lawn mower handle can be adjusted
foryour mowing comfo_ Refer to "Ad'just
Handle"_ theServiceandAdjustment
section of this manual.
Operator presence
bar
Upper handle
Lift up
Mowing
position
TO INST ALL ATTACHMENTS
Your lawn rnower was shipped ready to be
used as a mulcher. To convert to bagging or
discharging:
• Open rear door and remove mulcher plug.
Store mulcl_r I_ug in a safe place.
• You can now install catcher or optional
_pping deflector.
• To return to mulching ope_, install
mulcherplug intodischargeopeningof
mower. Be sure all tabs are seated
prope_y.
Mulcher plug-
ACAUTION: Do not run your lawn
mower without mulcher plug in place or
approved clipping deflector or grass
catcher in place. Never attempt to
operate the lawn mower with the rear
door removed or propped open.
Lower handle
5
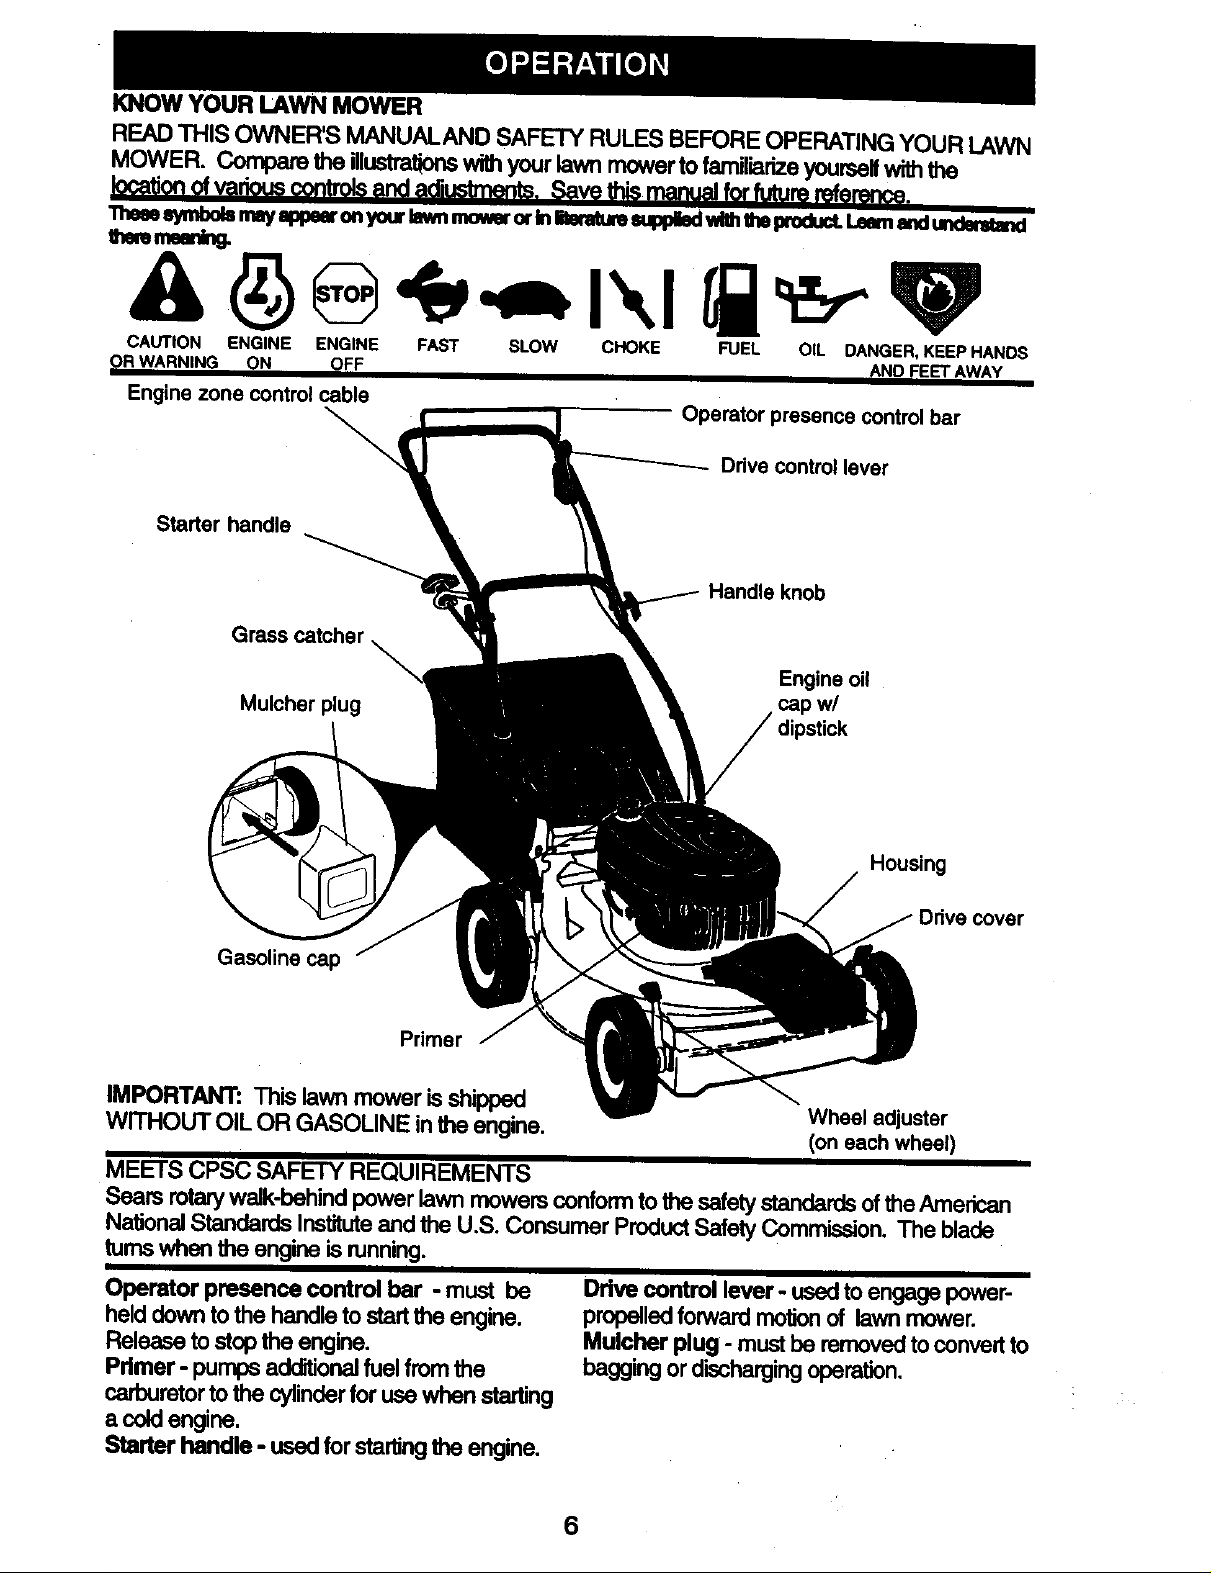
KNOW YOUR LAWN MOWER
READTHIS OWNER'S MANUALAND SAFETY RULES BEFOREOPERATINGYOUR LAWN
MOWER. Comparethe illustrationswithyourlawnmowertofamiliarizeyourselfwiththe
_ ofvadouscontrolsend _. Save _is menualforfuturereference.
_ _tmbolsmayappeeronyourIronmo_r orinligaturesupldled_ehtheixodudLI.._m_ _
t_mmmn_
CAUTION ENGINE ENGINE
(_R WARNING ON (pFF
Enginezone controlcable
Starter handle
Grass catcher
Mulcher plug cap w/
FAST SLOW CHOKE
FUEL OIL DANGER, KEEP HANDS
AND FEET AWAY
Operatorpresencecontrolbar
Drivecontrollever
Handle knob
Engine oil
Housing
Gasoline cap
Primer
IMPORTANT: This lawn mower is shipped Wheel adjuster
WITHOUT OIL OR GASOLINE in the engine. (on each wheel)
MEETS CPSC SAFETY REQUIREMENTS
I
Sears rotarywalk-behind power lawn mowers conform tothe safety standards of the American
National Standards Instituteand the U.S. Consumer Product Safety Commission. The blade
turns when the engine is running.
Operator presence control bar - must be
held down to the handle to startthe engine.
Releasetostopthe engine.
Primer- pumps additionalfuel from the
Drivecontrol lever- usedtoengagepower-
propelledforwardmotionof lawnmower.
Mulcher plug- mustbe removedtoconvertto
baggingordischargingoperation,
carburetor to the cylinder for use when starting
a cold engine.
Starter handle - used for starting the engine.
6
mower can result in foreign
The operation of any lawn
objects thrown into the eyes,
which can result in severe eye damage.
Always wear safety glasses or eye shields
while operating your lawn mower or
performing any adjustments or repairs.
We recommend a wide vision safety mask
over spectacles or standard safety
glasses.
HOWTO USEYOUR LAWN MOWER
ENGINE SPEED
The engine speed was set at the factory
for optimum performance. Speed is not
adjustable.
ENGINE ZONE CONTROL
ACAUTION: Federal regulations require
an engine control to be installed on this
lawn mower in order to minimize the risk
of blade contact injury. Do not under any
circumstances attempt to defeat the
function of the operator control. The blade
tums when the engine is running.
• Your lawn mower is equipped with an
operator presence control bar which
requires the operator to be positioned
behind the lawn mower handle to start and
operate the lawn mower.
TO ADJUST CUTTING HEIGHT
• Raise whsels for lowcut and lower wheals
for high cut.
• Adjust cuttingheight to suityour require-
ments. Medium pos_ isbest for most
lawns.
• To change cuttingheight,squeeze adjuster
lever toward wheel. Move wheel up or
down to suityour requirements. Be sure all
wheeis are in the sarne sstting.
NOTE: Adjuster is properly positioned
when plate tab inserts into hole in lever.
Also, 9-position adjusters (if so equipped)
allow lever to be positioned between the
plate tabs.
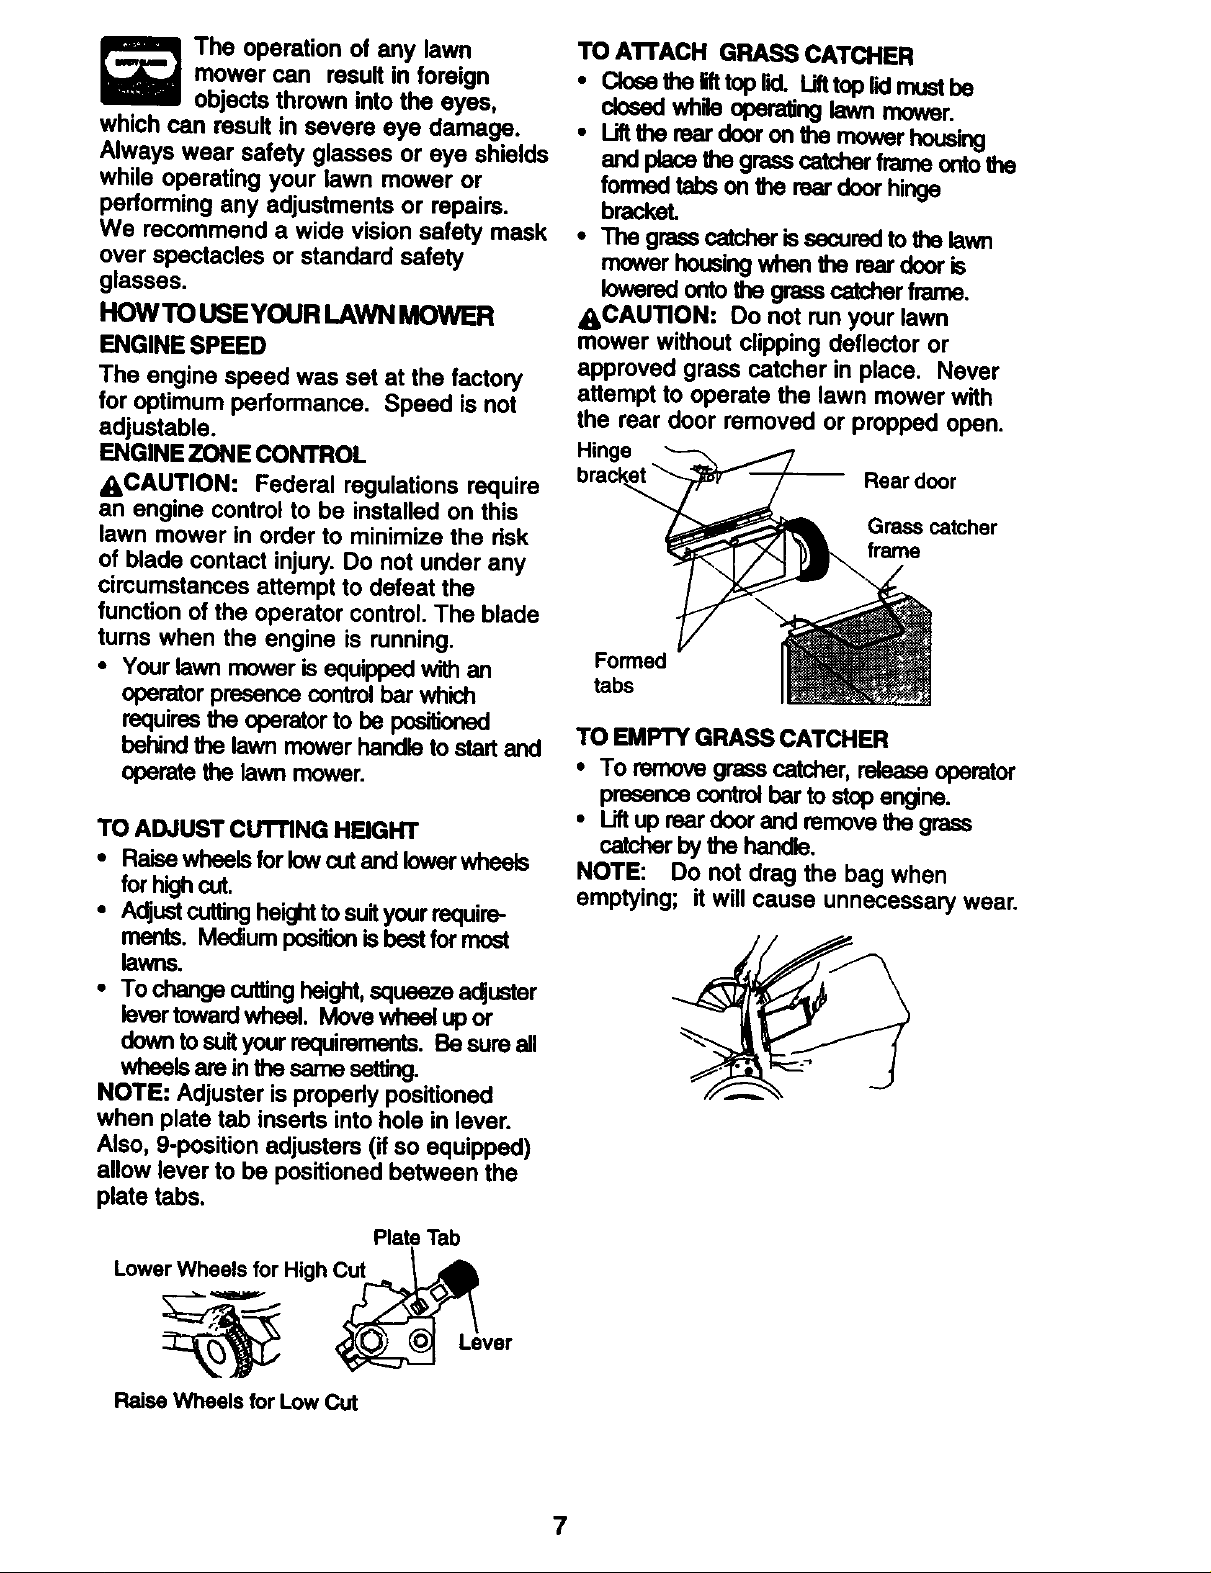
TO A'n'ACH GRASS CATCHER
• Closs the ift top lid. Lifttop lid must be
dosed while operating lawn mower.
• Lift the rear door on b_e mower housing
and place the grass catcher frame ontothe
formed tabs on ff_erser door hinge
bracket.
• The grass _r issecured to the lawn
mower housingwhen the rear door is
lowered onto the grass catcher frame.
ACAUTION: Do not run your lawn
mower without clipping deflector or
approved grass catcher in place. Never
attempt to operate the lawn mower with
the rear door removed or propped open.
Hinge
Reardoor
Grass catcher
frame
Formed
tabs
TO EMPTY GRASS CATCHER
• To remove gress catcher, raleass operator
presence control bar to stop engine.
• Lift up rear door and remove the grass
catcherbythehandle,
NOTE: Do not drag the bag when
emptying; it will cause unnecessary wear.
Raise Wheels for Low Cut
Plate Tab
7
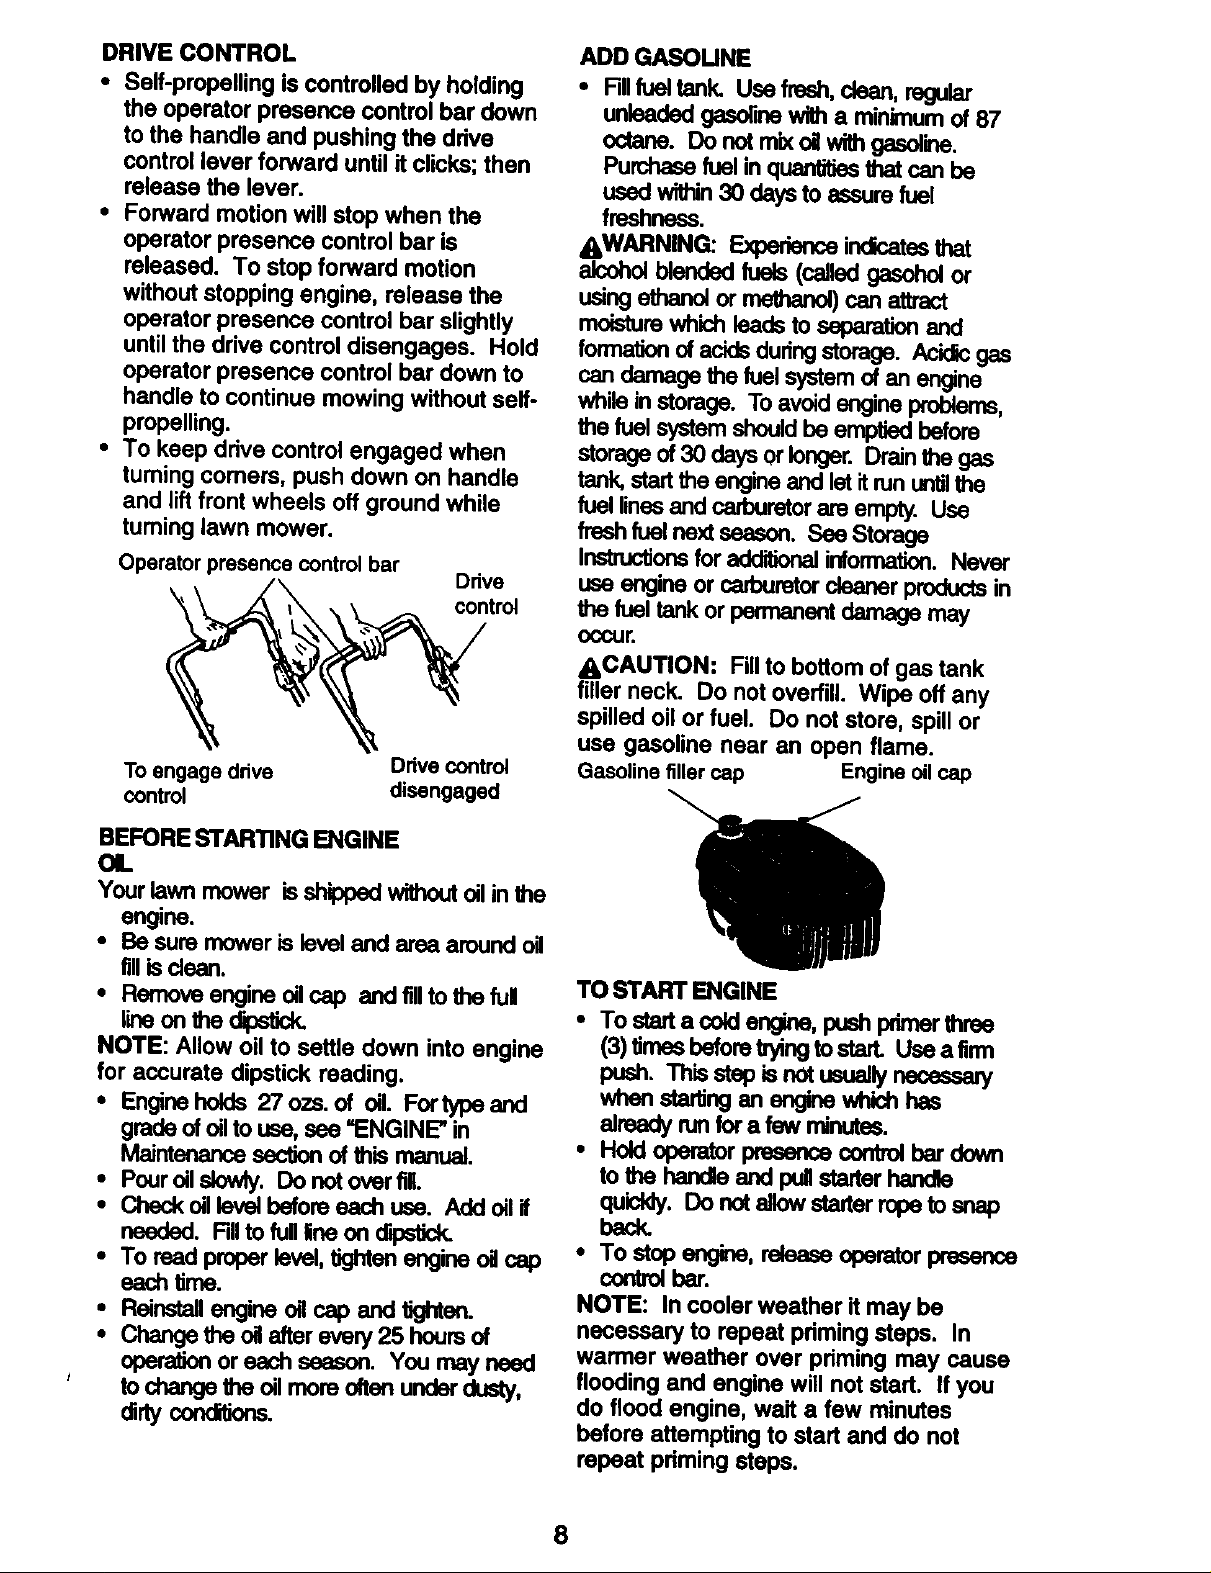
DRIVE CONTROL
• Serf-propelling is controlled by holding
the operator presence control bar down
to the handle and pushing the ddve
control lever forward until it clicks; then
release the lever.
• Forward motion will stop when the
operator presence control bar is
released. To stop forward motion
without stopping engine, release the
operator presence control bar slightly
until the drive control disengages. Hold
operator presence control bar down to
handle to continue mowing without self-
propelling.
• To keep ddvs control engaged when
turning comers, push down on handle
and liftfront wheels off ground while
turning lawn mower.
Operator presence control bar Drive
control
To engage drive
control
Drive control
disengaged
ADDGASOUNE
• RII fuel tank. Use fresh, dean, regular
unleaded gasoline with a minimum of 87
octane. Do not mix oil with gasoline.
Purchase fuel in quantitiesthat can be
used within 30 days to assure fuel
freshness.
AWARNING: Experience indicatesthat
alcoholblendedfuels(calledgasohoior
using ethanol or methanol) can attract
moisture which leads to separation and
formation of acids during storage. Acidic gas
can damage the fuel system of an engine
while in storage. To avoid engine problems,
the fuel system should be emptied before
storage of 30 days or longer. Drain the gas
tank, start the engine and let it run untilthe
fuel linesand carburetor are empty. Use
fresh fuel next season. See Storage
Ins_K_Jonefor additionelinformation. Never
use engine or cafouretor cleaner products in
the_._ tankorpermanantdemagemay
occur.
ACAUTION: Fill to bottom of gas tank
filler neck. Do not overfill. Wipe off any
spilled oil or fuel. Do not store, spill or
use gasoline near an open flame.
Gasoline filler cap Engine oil cap
BEFORE STARTING ENGINE
OL
Your lawn mower isshipped without oilin the
engine.
• Be sure mower is levoi and area around oil
fillis claan.
• Remove engine oilcap and fillto the full
tineonthedipet_
NOTE: Allow oil to settle down into engine
for accurate dipstick reading.
• Engine holds 27 ozs. of oil. Fortype and
grade of oil to use, see "ENGINE" in
Maintenance _ of _ manual.
• Pour oil aiowh/. Do not over filL
• Check oillevai bofore each use. Addoilif
needed. RII to full line on dipelJck.
• To read proper levoi, tkjhten engine oil cap
each time.
• Reinstall engine oil cap and ligt_an.
• Change the oil after evely 25 hoursof
oper-a_:)nor each season. You may need
' tochangetheoilmoreoftenunderdusty,
concaJons.
TO START ENGINE
• To sterta coldengine,pushpdmerthree
(3) Umesbeforetryingtostart. Useafirm
push. Thb step isnotusuaJyneseseery
whanstaring an angine whichhas
alreadyrunfora few minutes.
• Holdoperatorpresencecontrd bardown
to the handleand pullstarterhand,e
quickly.Do notallow sterterropetosnap
back
• To stop en_ne, releaseeperstor preesnco
controlber.
NOTE: In coolerweather itmay be
necessary to repeat primingsteps. In
warmer weather over pdming may cause
floodingand engine will not start. If you
do flood engine, wait a few minutes
before attempting to start and do not
repeat pdming steps.
8
MOWING TIPS
• Under certain conditions, such as very
tall grass, it may be necessary to raise
the height of cut to reduce pushing effort
and to keep from overloading the engine
and leaving clumps of grass clippings. It
may also be necessary to reduce
ground speed and/or run the lawn
mower over the area a second time.
• For extremely heavy cutting, reduce the
width of cut by overlapping previously
cut path and mow slowly.
• For better grass bagging and most
cuffing conditions, the engine speed
should be set in the fast position.
• When using a rear discharge lawn
mower in moist, heavy grass, clumps of
cut grass may not enter the grass
catcher. Reduce ground speed (push-
ing speed) and/or run the lawn mower
over the area a second time.
• If a trail of clippings is left on the right
side of a rear discharge mower, mow in
a clockwise direction with a small
overlap to collect the clippings on the
next pass.
• Pores in cloth grass catchers can
become filled with dirt and dust with use
and catchers will collect less grass. To
prevent this, regularly hose catcher off
with water and let dry before using.
• Keep top of engine around starter clear
and clean of grass clippings and chaff.
This will help engine air flow and extend
engine life.
MULCHING MOWING TIPS
IMPORTANT: Forbest performance, keep
mower housing free of built-up grass and
trash. See =Cleaning" in Maintenance section
of this manual.
• The special mulchingblade will recutthe
grassclippingsmanyt_s andreduce
them in size so that ss they fall onto the
lawn they willdisperse intothe grass and
notbenoticed.Also,the_ grassWIU
biodegrade quicklyto providenutrientsfor
the lawn. Always mulch withyour highest
engine (blade) speed as thiswigprovidethe
best recuttingaction of the blades.
• Avoid cuttingyour lawn when itis wet. Wet
grass tends to form clumps and interferes
with the mulching aclJon. The besttime to
mow your lawn is the early afternoon. At
this time the grsss has dried and the newly
cut area will not be e_0osed tothe direct
SUn.
• For best results, adjust the lawn mower
cuttingheightso that the lawn mower cuts
offordythe top one-third of the gress _des.
tfthe lawn isovergrown it will be necessary
to raise the heightof cut to reduce pushing
effort and to keep from ovedcading the
engine and leavingclumps of mulched
grass. For extremely heavy mulching,
reduce your widthof cut by overlapping
prev_h/cutpathandmowsk_y.
• Certain types of grass and grass condilions
may require that an area be mulched a
sscondUmetocomp_elyhidethe
clippings.Whendoingasscondcut,rnow
acrossor_ totheI_rstcutpath.
• Changeyouro_Ungpatternfromweskto
week. Mow northto scuth one wesk then
change to east to west the nextweek. This
willhelp prevent matlJngand grainingof the
lawn.
/3
9
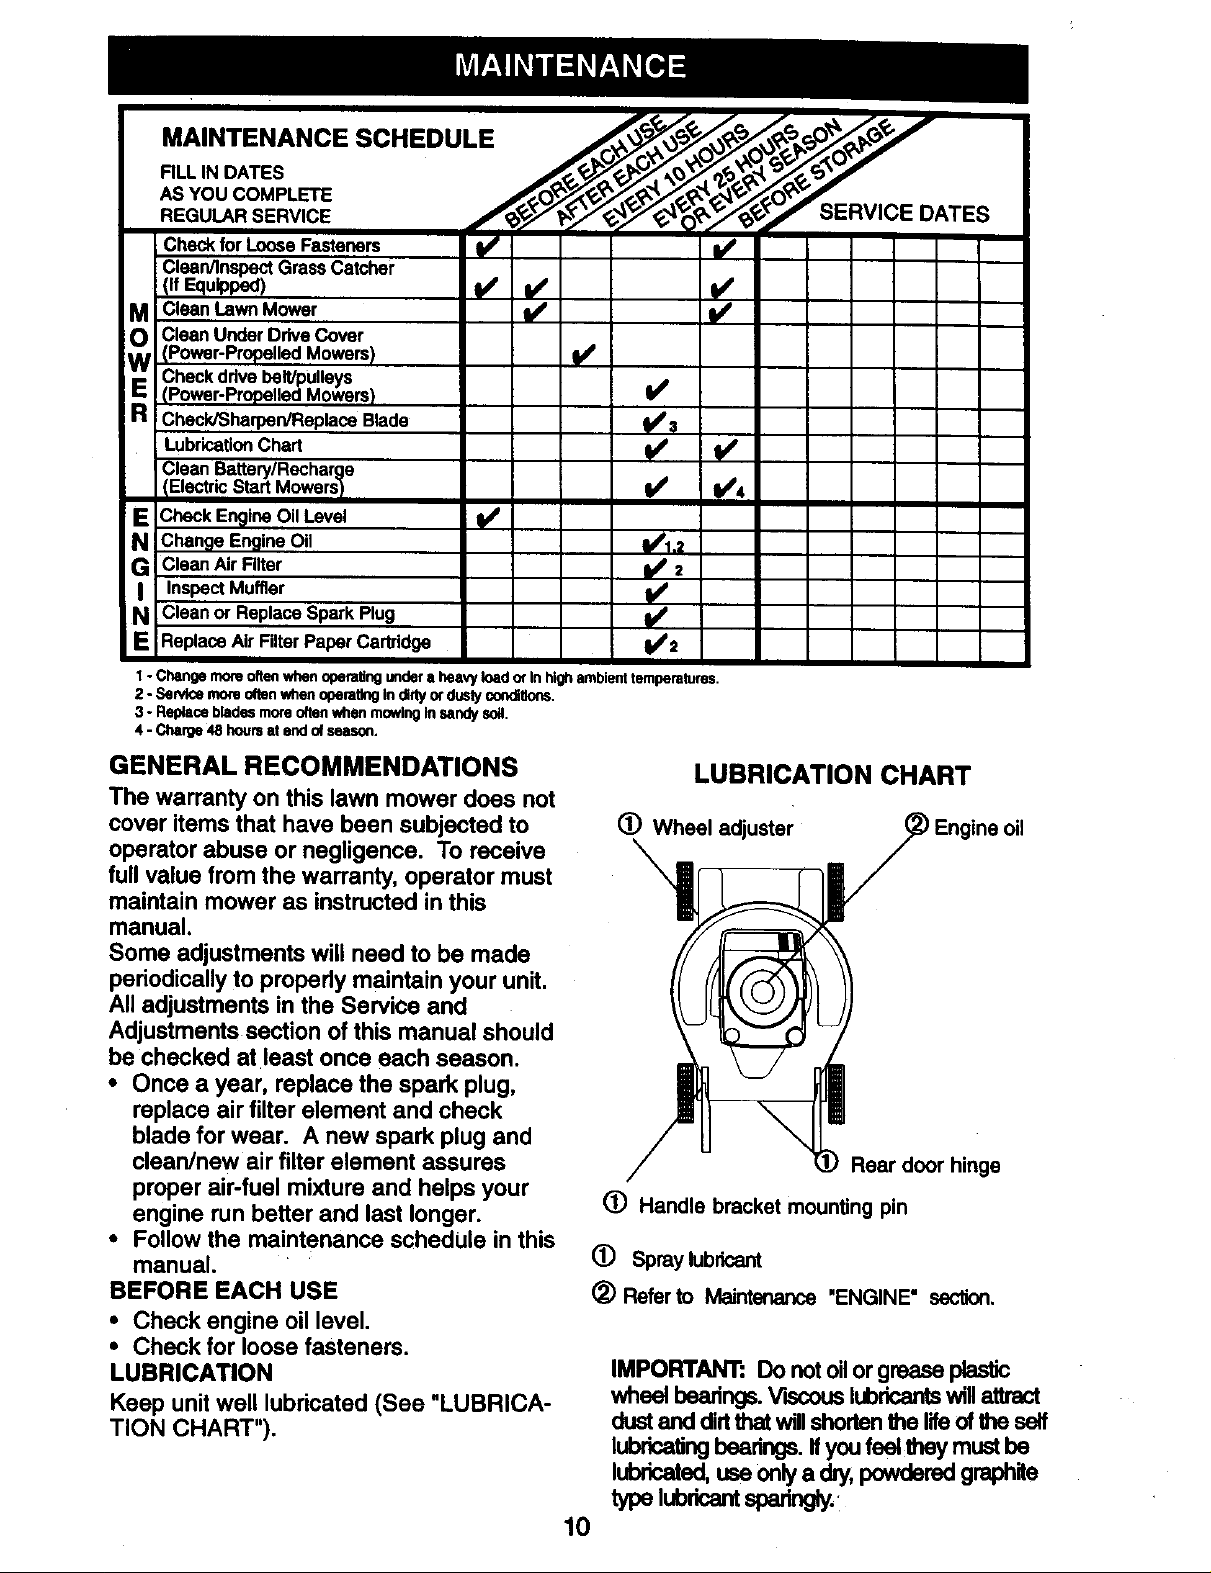
.A,NTENANC SC,EOUL
REOU ,RSSRV,CEf , p'SERV'OE O'TES
Checkfor LooseFasteners _ ll/
Clean/InspectGrass Catcher
i(If Equipped) II/'
CleanLawnMowar _
M Clean UnderDriveCover
(Power-PropelledMowers) q/
_ Check ddve I_lt/pulle_
R i Check/Sharpen/ReplaceBlade S
l(P°wer'Pr°pelledMowers)
Lubrication Chart I_
clean Battery/Recharge
IElactric Start Mowers I I/ li/4
E Check En_lice Oil Level ql/
Change Engine Oil
G CleanAirRltar _';
I Inspect Muffler I_
N Cleanor ReplaceSparkPlug
ReplaceAir FilterPaper Carlddge I/'2
1- Change more ofteewhen operatingunder a heavyload orIn high ambient temperatures.
2 -Service morn o_tenwhanogeratl_gIn dlrlyor duslycondillorts.
3 - Replacebladesmoreoften when rnowlnginsandy soil.
4 -Charge 48 houreat endof season.
GENERAL RECOMMENDATIONS
The warranty on this lawn mower does not
cover items that have been subjected to
operator abuse or negligence. To receive
full value from the warranty, operator must
maintain mower as instructed in this
manual.
Some adjustments will need to be made
periodically to properly maintain your unit.
All adjustments in the Service and
Adjustments section of this manual should
be checked at least once each season.
• Once a year, replace the spark plug,
replace air filter element and check
blade for wear. A new spark plug and
clean/new air filter element assures
proper air-fuel mixture and helps your
engine run better and last longer.
• Follow the maintenance schedUle in this
manual.
BEFORE EACH USE
• Check engine oil level.
• Check for loose fasteners.
LUBRICATION
Keep unit well lubricated (See "LUBRICA-
TION CHART").
LUBRICATION CHART
(_) Wheel adjuster
\
Rear door hinge
(_) Handle bracket mounting pin
(_) Spray lubricant
(_) Refer to Maintenance "ENGINE" section.
IMPORTANT: Do notoil or grease plastic
wheel bearings. VLscouslubricantswillattract
dustand dirtthat will shortenthe lifeofthe self
lubricatingbearings. If youfeel they must be
lubricated,use onlya dry,powdered graphite
typelubricantspa_n_y.
10
 Loading...