

Page 1
Owner's Manual
6.5 HORSEPOWER
1" DISCHARGE
POWER PROP
ROTARY LAWN
Model No.
917.377641
Safety
o Assembly
o Operation
e Maintenance
o EspafioB
Repair Parts
CAUTnON:
Read and follow all
Safety RuJes and Instructions
before operating this equipment
Sears, Roebuck and Co,, Hoffman Estates, IL 60179
Page 2

Warranty 2 Product Specifications 11
Safety Rules 2 Service and Adjustments 14
Assembly 4 Storage 14
Operation 6 Troubleshooting 16
Maintenance Schedule 10 Repair Parts 34
Maintenance 10 Parts Ordering Back Cover
LIMITED TWO YEAR WARRANTY ON CRAFTSMAN POWER MOWER
For two years from date of purchase, when this Craftsman Lawn Mower is maintained,
lubricated, and tuned up according to the operating and maintenance instructions in the
owner's manual, Sears will repair free of charge any defect in material or workmanship.
if this Craftsman Lawn Mower is used for commercial or rental purposes, this warranty
applies for only 90 days from the date of purchase.
This Warranty does not cover:
o Expendable items which become worn during normal use, such as rotary mower
blades, blade adapters, belts, air cleaners and spark plug.
• Repairs necessary because of operator abuse or negligence, including bent crank-
shafts and the failure to maintain the equipment according to the instructions con-
tained in the owner's manual.
Warranty service is available by returning the Craftsman power mower to the nearest
Sears Service Center/Department in the United States. This warranty applies only while
this product is in use in the United States.
This Warranty gives you specific legal rights, and you may also have other rights which
vary from state to state.
SEARS, ROEBUCK AND CO., D/817 WA, HOFFMAN ESTATES, ILLINOIS 60179
TRAINING:
= Read this operator's manual carefully.
Become familiar with the controls and
know how to operate your mower
properly. Learn how to quickly stop
mower.
• Do not allow children to use your mower.
Never allow adults to use mower without
proper instructions.
o Keep the area of operation clear of all
persons, especially small children and
pets.
° Use mower only as the manufacturer
intended and as described in this manual.
o Do not operate mower if it has been
dropped or damaged in any manner_
Always have damage repaired before
using your mower.
o Do not use accessory attachments that
are not recommended by the manufac-
turer. Use of such attachments may be
hazardous.
° The blade tums when the engine is
running.
PREPARATION:
° Always thoroughly check the area to be
mowed and clear it of all stones, sticks,
wires, bones, and other foreign objects.
These objects will be thrown by the blade
and can cause severe injury.
° Always wear safety glasses or eye
shields when starting and while using
your mower.
• Dress properly. Do not operate mower
when barefoot or wearing open sandals.
Wear only solid shoes with good traction
when mowing.
° Check fuel tank before starting engine.
Do not fill gas tank indoors, when the
engine is running or when the engine is
2
Page 3
hot.Allowtheengineto coolforseveral
minutesbeforefillingthegas tank.Clean
off any spilled gasoline before starting the
engine.
o Always make wheel height adjustments
before starting your mower. Never
attempt to do this while the engine is
running.
° Mow only in daylight or good artificial
light.
OPERATION:
° Keep your eyes and mind on your mower
and the area being cut. Do not let other
interests distract you.
° Do not mow wet or slippery grass. Never
run while operating your mower. Always
be sure of your footing --- keep a firm
hold on the handles and walk.
° Do not put hands or feet near or under
rotating parts. Keep clear of the discharge
opening at all times.
o Always stop the engine whenever you
leave or are not using your mower, or
before crossing driveways, walks, roads,
and any gravel--covered areas.
° Never direct discharge of material toward
bystanders nor allow anyone near the
mower while you are operating it.
• Before cleaning, inspecting, or repairing
your mower, stop the engine and make
absolutely sure the blade and all moving
parts have stopped. Then disconnect the
spark plug wire and keep it away from the
spark plug to prevent accidental starting.
o Do not continue to run your mower if you
hit a foreign object. Follow the procedure
outlined above, then repair any damage
before restarting and operating you
mower.
° Do not change the governor settings or
overspeed the engine° Engine damage or
personal injury may result.
o Do not operate your mower if it vibrates
abnormally_ Excessive vibration is an
indication of damage; stop the engine,
safely check for the cause of vibration
and repair as required.
o Do not run the engine indoors. Exhaust
fumes are dangerous.
° Never cut grass by pulling the mower
towards you. Mow across the face of
slopes, never up and down or you might
lose your footing. Do not mow exces-
sively steep slopes. Use caution when
operating the mower on uneven terrain
or when changing directions -- maintain
good footing.
• Never operate your mower without
proper guards, plates, grass catcher or
other safety devices in place.
MAINTENANCE AND STORAGE:
• Check the blade and the engine mount-
ing bolts often to be sure they are
tightened properly.
° Check all bolts, nuts and screws at
frequent intervals for proper tightness to
be sure mower is in safe working
condition.
° Keep all safety devices in place and
working.
° To reduce fire hazard, keep the engine
free of grass, leaves or excessive grease
and oil.
° Check grass catcher often for deteriora-
tion and wear and replace worn bags.
Use only replacement bags that are
recommended by and comply with
specifications of the manufacturer of your
mower.
° Always keep a sharp blade on your
mower.
• Allow engine to cool before storing in any
enclosure.
° Never store mower with fuel in the tank
inside a building where fumes may reach
an open flame or an ignition source such
as a hot water heater, space heater,
clothes dryer, etc.
CAUTION: Always disconnect spark plug
wire and place wire where it cannot
contact spark plug in order to prevent
accidental starting when setting up,
transporting, adjusting or making repairs.
WARNING
The engine exhaust from this product
contains chemicals known to the State of
California to cause cancer, birth defects,
or other reproductive harm.
Page 4
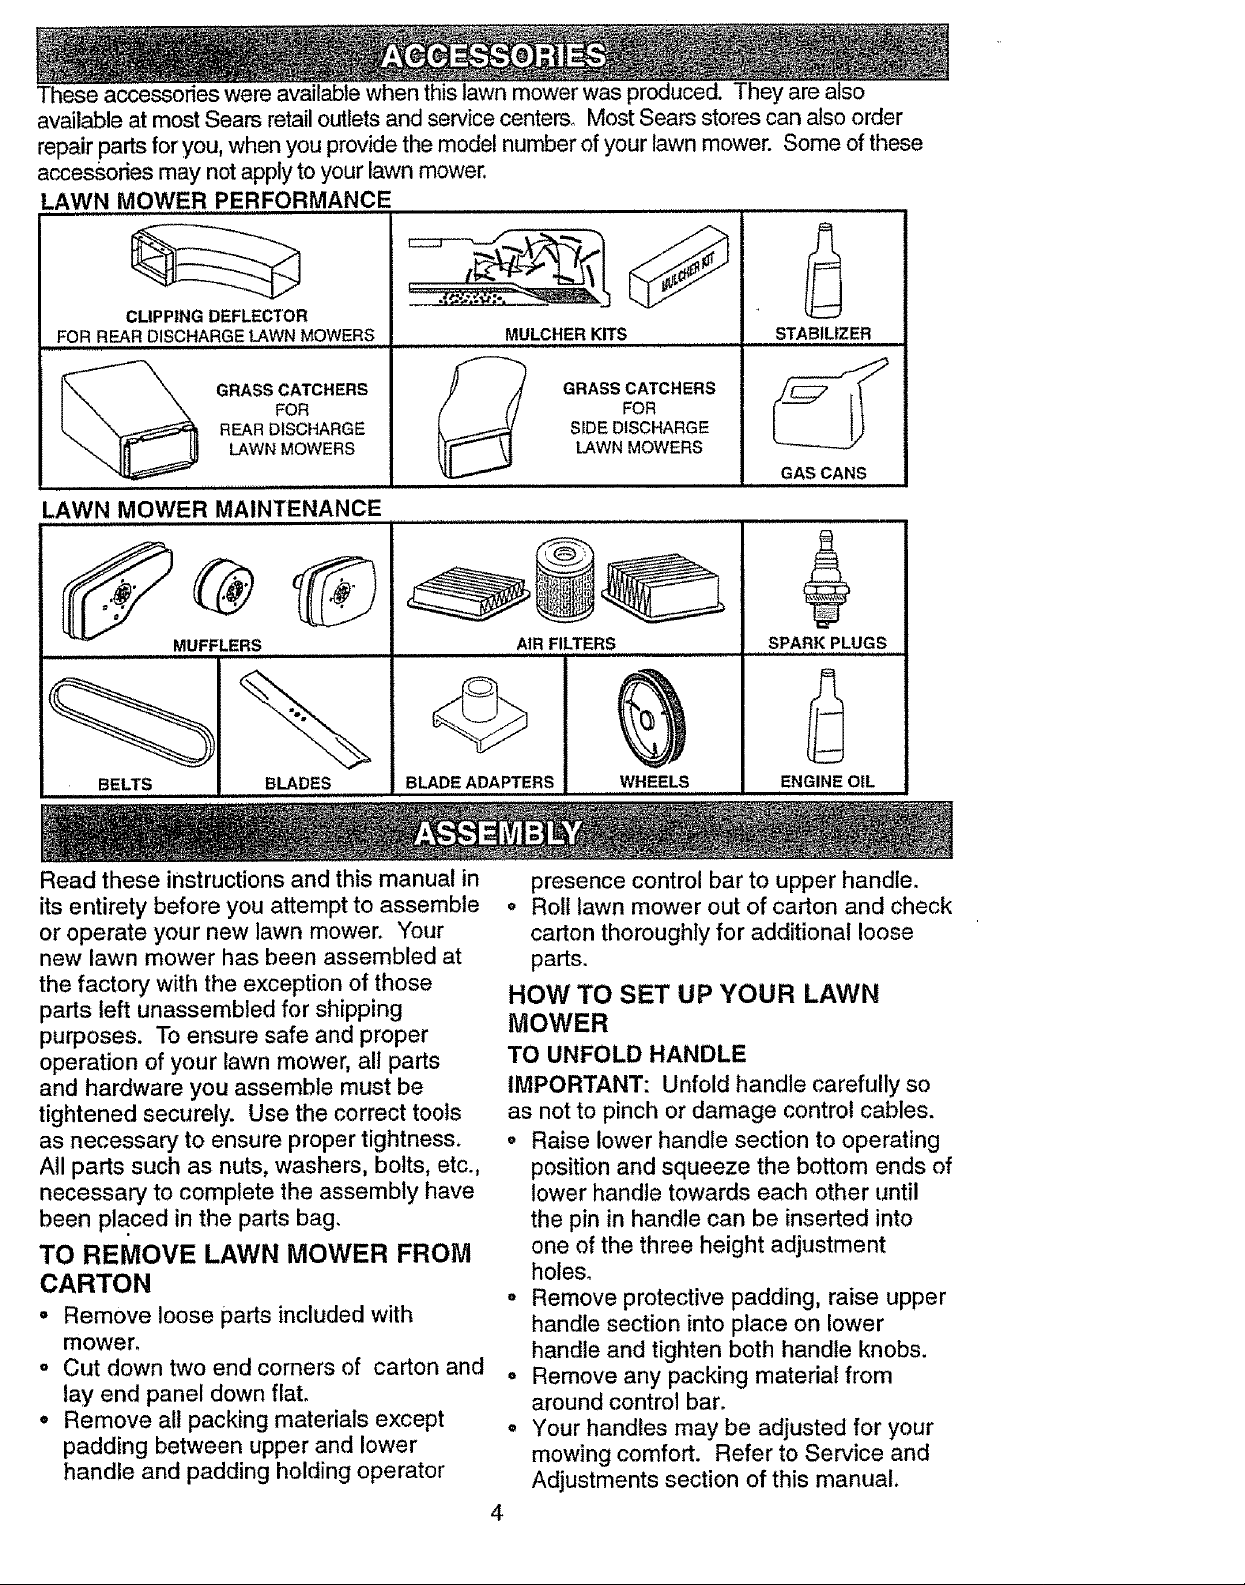
These accessories were available when this lawn mower was produced. They are also
available at most Sears retail outlets and service centers° Most Sears stores can also order
repair parts for you, when you provide the model number of your lawn mower. Some of these
accessories may not apply to your lawn mower.
LAWN MOWER PERFORMANCE
,, , ,, .........
CLIPPING DEFLECTOR
FOR REAR DISCHARGE LAWN MOWERS
GRASS CATCHERS
FOR
REAR DISCHARGE
LAWN MOWERS
LAWN MOWER MAINTENANCE
MUFFLERS
,J
BELTS BLADES
BLADE ADAPTERS WHEELS
Read these instructions and this manual in
its entirety before you attempt to assemble o
or operate your new lawn mower. Your
new lawn mower has been assembled at
the factory with the exception of those
parts left unassembled for shipping
purposes. To ensure safe and proper
operation of your lawn mower, all parts
and hardware you assemble must be
tightened securely. Use the correct tools
as necessary to ensure proper tightness.
All parts such as nuts, washers, bolts, etc.,
necessary to complete the assembly have
been placed in the parts bag.
TO REMOVE LAWN MOWER FROM
CARTON
° Remove loose parts included with
mower.
o Cut down two end corners of carton and
lay end panel down flat.
° Remove all packing materials except
padding between upper and lower
handle and padding holding operator
4
MULCHER KITS
SIDE DISCHARGE
GRASS CATCHERS
LAWN MOWERS
_71 ;'
AIR FILTERS
FOR
STABILIZER
GAS CANS
SPARK PLUGS
ENGINE OIL
presence control bar to upper handle_
Roll lawn mower out of carton and check
carton thoroughly for additional loose
parts.
HOW TO SET UP YOUR LAWN
MOWER
TO UNFOLD HANDLE
IMPORTANT: Unfold handle carefully so
as not to pinch or damage control cables.
o Raise lower handle section to operating
position and squeeze the bottom ends of
lower handle towards each other until
the pin in handle can be inserted into
one of the three height adjustment
holes.
o Remove protective padding, raise upper
handle section into place on lower
handle and tighten both handle knobs.
o Remove any packing material from
around control bar.
= Your handles may be adjusted for your
mowing comfort. Refer to Service and
Adjustments section of this manual.
Page 5
Operator presence
control bar ,_,.
Upper handle _'_,_ L.L_.
Lower __-_'_,-_," position
handle _
3-position
Handle
adjustment
bracket
J
Handle
pin
TO INSTALL ATTACHMENTS
Your lawn mower was shipped ready to be
used as a mulcher, To convert to bagging
or discharging:
• Open rear door and remove mulcher
plug, Store mulcher plug in a safe
place.
o You can now install catcher or optional
clipping deflector.
• To return to mulching operation, install
mulcher plug into discharge opening of
mower.
Mulcher Plug
/
Page 6

KNOW YOUR LAWN MOWER
READ THIS OWNER'S MANUALAND SAFETY RULES BEFORE OPERATING YOUR LAWN
MOWER. Compare the illustrations with your lawn mower to familiarize yourself with the
location of various controls and adjustments. Save this manua! for future reference,
These symbols may appear on your lawn mower or in literature supplied with the product,
Leam and understand their meaning°
CAUTION ENGJNE ENGINE FAST SLOW CHOKE
OR WARNING ON OFF
,, ....,............. J ...... L ,, ............... [
Drive control
Starter handle
Grass catcher
Wheel adjuster
lever
FUEL OiL DANGER, KEEP HANDS
AND FEET AWAY
Operator presence control
Cable clip
Engine oil cap w/dipstick
Primer
Mulcher
p{ug
Gasoline cap
Housin
MEETS CPSC SAFETY REQUIREMENTS
Sears rotary walk-behind power lawn mowers conform to the safety standards of the
American National Standards Institute and the U.S. Consumer Product Safety Commis-
sion. The blade turns when the engine is running,
Operator presence control - must be
held down to the handle to start the
engine. Release to stop the engine.
Primer - pumps additional fuel from the
carburetor to the cylinder for use when
starting a cold engine.
Drive control bar- used to engage
power-propelled foward motion of lawn
mower.
Mulcher plug - Located at the rear
discharge opening must be removed when
converting to bagging operation.
Starter handle - used for starting the
engine.
Page 7
Theoperationofanylawnmowercan resultin
foreignobjectsthrownintotheeyes,whichcan
resultinsevereeyedamage.Alwayswear
safetyglassesoreyeshieldswhileoperating
yourlawnmowerorperforminganyadjust-
mentsorrepairs,Werecommendawide
visionsafetymaskoverthespectaclesor
standardsafetyglasses.
HOW TO USE YOUR LAWN MOWER
ENGINE SPEED
The engine speed was set at the factory for
optimum performance, Speed is not adjust-
able.
ENGINE ZONE CONTROL
CAUTION: Federal regulations require an
engine control to be installed on this lawn
mower in order to minimize the risk of blade
contact injury. Do not under any circumstances
attempt to defeat the function of the operator
control The blade tums when the engine is
running,
o Your lawn mower is equipped with an
operator presence control bar which
requires the operator to be positioned
behind the lawn mower handle to start and
operate the lawn mower.
TO ADJUST CUTTING HEIGHT
• All four wheels are adjusted by a single
lever.
° Pulladjuster lever toward wheel To raise
mower, move leverforward to desired
position. To lower mower, move the lever
toward the rear.
Lower Wheels for high cut
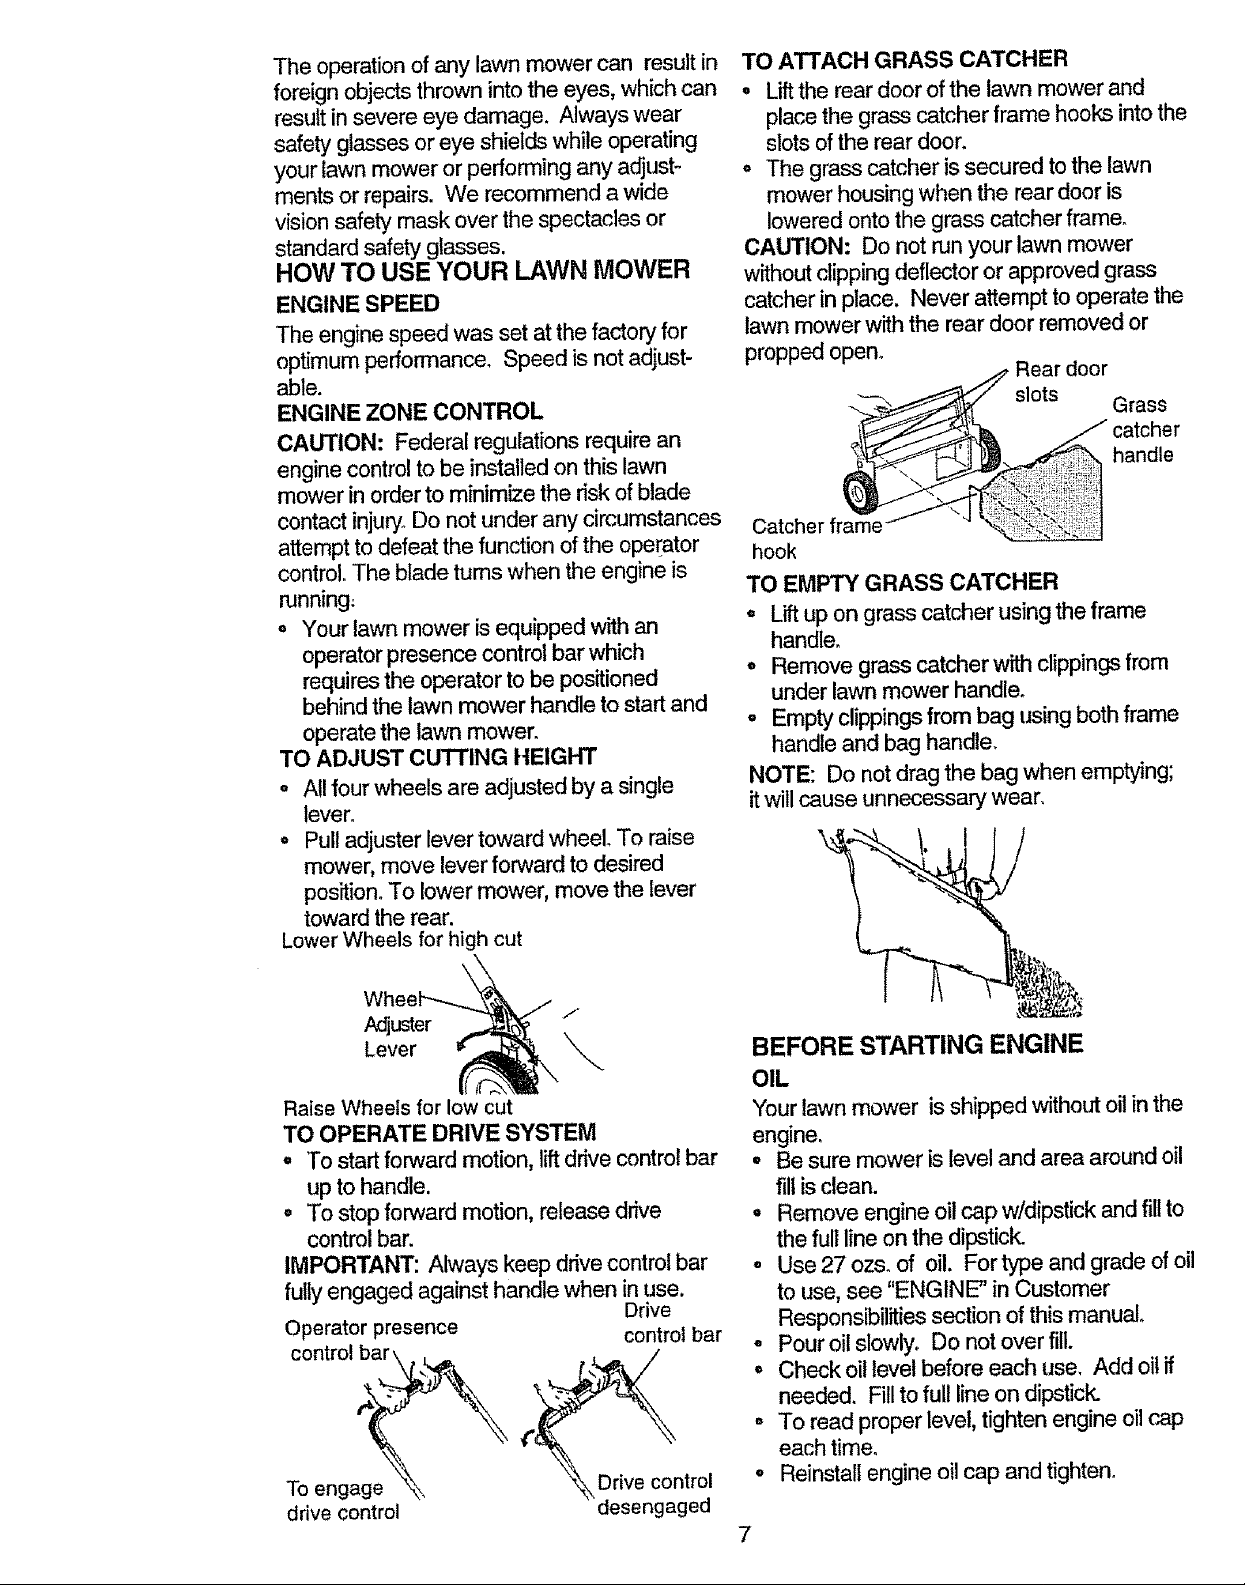
TO ATTACH GRASS CATCHER
° Lift the rear door of the lawn mower and
place the grass catcher frame hooks intothe
slots of the rear door,
• The grass catcher is secured to the lawn
mower housing when the rear door is
lowered onto the grass catcher frame_
CAUTION: Do not run your lawn mower
without clipping deflector or approved grass
catcher in place, Never attempt to operate the
lawn mower with the rear door removed or
propped open.
slots Grass
_ atcher
Rear door
Catcher fr_
hook
TO EMPTY GRASS CATCHER
° Liftup on grass catcher using the frame
handle_
° Remove grass catcher with clippings from
under lawn mower handle°
o Empty clippings from bag using both frame
handle and bag handle.
NOTE: Do not drag the bag when emptying;
it will cause unnecessary wear,
handle
/
Adjuster /
Lever
Raise Wheels for low cut
TO OPERATE DRIVE SYSTEM
° To start forward motion, lift drive control bar
up to handle.
o To stop forward motion, release drive
control bar.
IMPORTANT: Always keep drive controlbar
fully engaged against handle when in use.
Drive
Operatorpresence controlbar
control bar\ , , /
To eng , ntrol
drive control desengaged
BEFORE STARTING ENGINE
OIL
Your lawn mower isshipped without oilinthe
engine.
• Be sure mower is level and area around oil
fill is clean.
° Remove engine oil cap w/dipstick and fill to
the full line on the dipstick.
° Use 27 ozs. of oil. For type and grade of oil
to use, see "ENGINE" in Customer
Responsibilities section of this manual.
° Pour oil slowly, Do not over fill.
° Check oil level before each use, Add oil if
needed. Fill to full line on dipstick.
,, To read proper level, tighten engine oil cap
each time.
° Reinstall engine oil cap and tighten.
Page 8
, Changetheoilafterevery25hoursof
operationoreachseason.Youmayneed
tochangetheoilmoreoftenunderdusty,
dirtyconditions.
GAS
, Fillfuel tank. Usefresh,clean,regular
unleaded gasolinewith a minimumof 87
octane. (Useof leadedgasolinewill
increase carbonand leadoxide deposits
and reducevalve life). Do notmix oi!
with gasoline. Purchasefuel in quanti-
tiesthat can be usedwithin 30 days to
assurefuelfreshness.
IMPORTANT: WHEN OPERATING IN
TEMPERATURES BELOW 32°F(0°C), use
fresh, clean winter grade gasoline to help
insure good cold weather starting.
WARNING: Experience indicates that
alcohol blended fuels (called gasohol or
using ethanol or methanol) can attract
moisture which leads to separation and
formation of acids during storage. Acidic
gas can damage the fuel system of an
engine while in storage. To avoid engine
problems, the fuel system should be
emptied before storage of 30 days or
longer. Drain the gas tank, start the
engine and let it run until the fuel lines and
carburetor are empty. Use fresh fuel next
season. See Storage Instructions for
additional information. Never use engine
or carburetor cleaner products in the fuel
tank or permanent damage may occur.
CAUTION: Fill to bottom of gas tank filler
neck. Do not overfill Wipe off any spilled
oil or fuel. Do not store, spill or use
gasoline near an open flame.
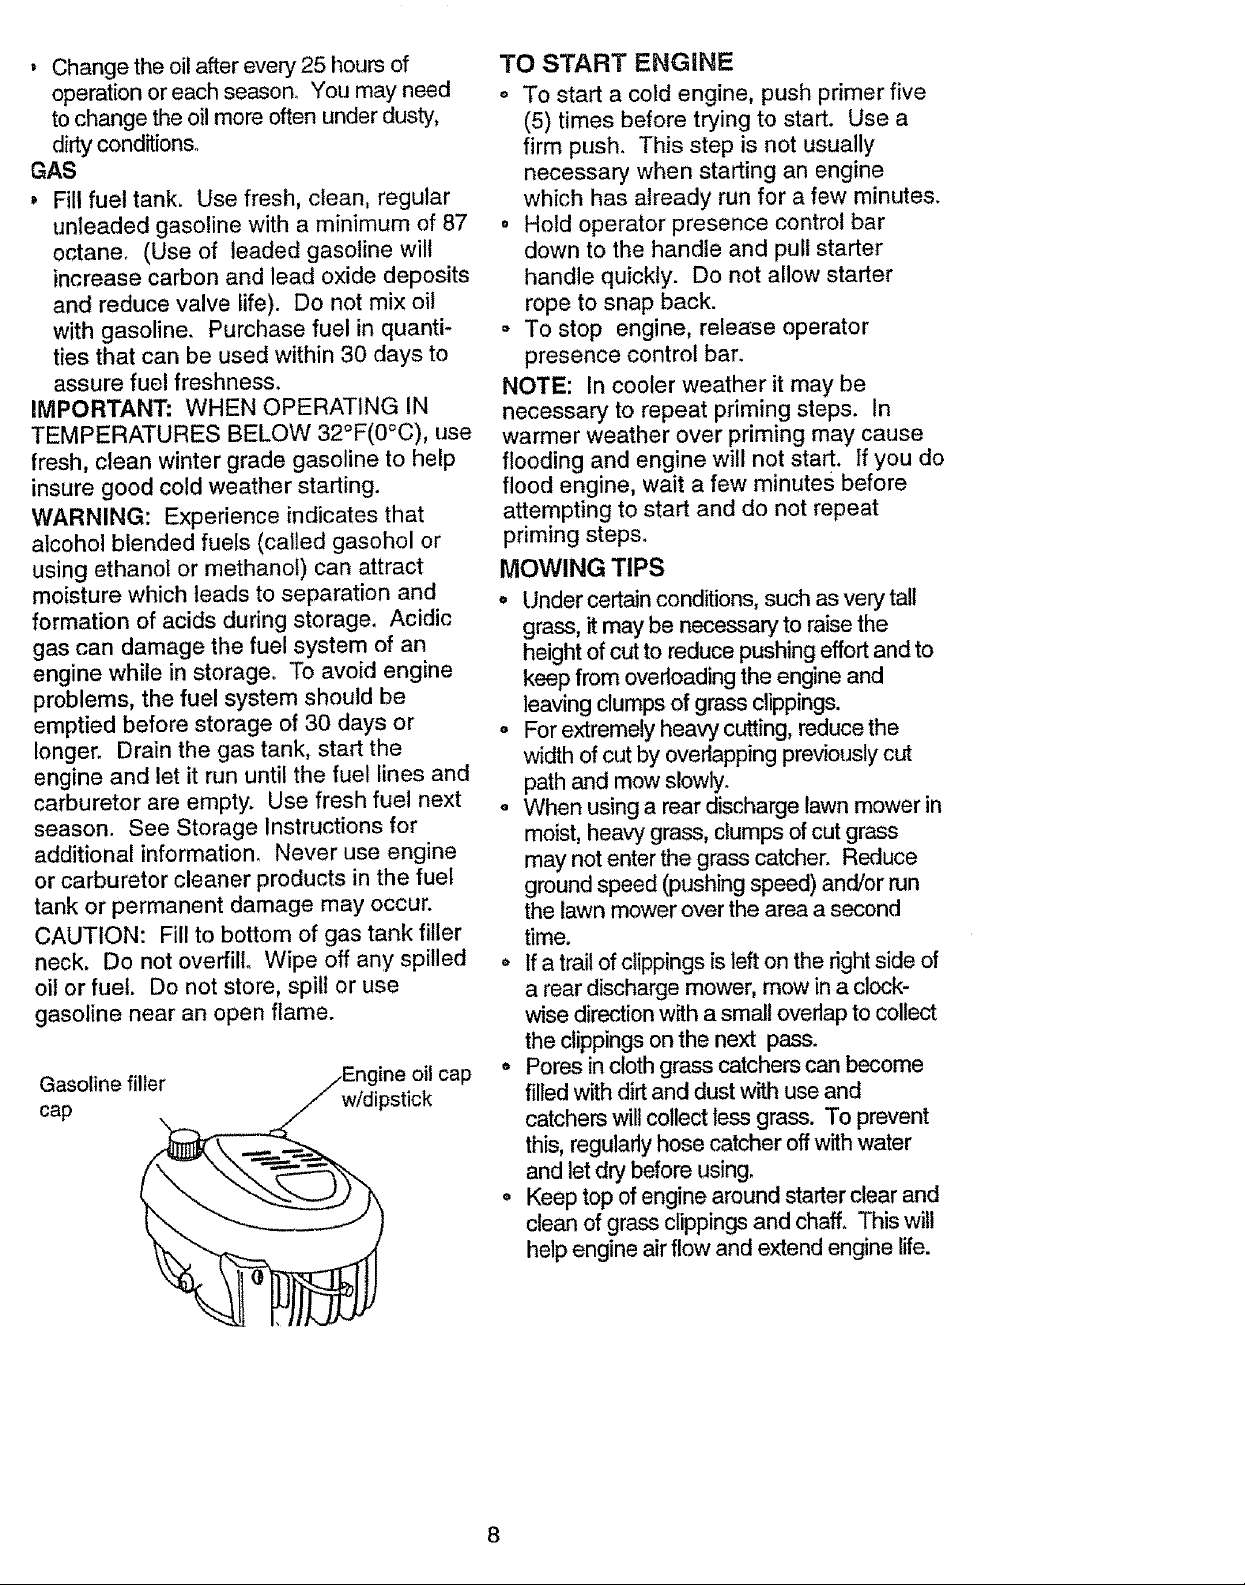
Gasoline filler oil cap
cap w/dipstick
TO START ENGINE
o To start a cold engine, push primer five
(5) times before trying to start. Use a
firm push. This step is not usually
necessary when starting an engine
which has already run for a few minutes.
• Hold operator presence control bar
down to the handle and pull starter
handle quickly. Do not allow starter
rope to snap back.
° To stop engine, release operator
presence control bar.
NOTE: In cooler weather it may be
necessary to repeat priming steps. In
warmer weather over priming may cause
flooding and engine will not start. If you do
flood engine, wait a few minutes before
attempting to start and do not repeat
priming steps.
MOWING TIPS
• Under certain conditions, such as very tall
grass, it may be necessary to raise the
height of cut to reduce pushing effort and to
keep from overloading the engine and
leaving clumps of grass clippings.
- For extremely heavy cutting, reduce the
width of cut by overlapping previously cut
path and mow slowly°
o When using a rear discharge lawn mower in
moist, heavy grass, clumps of cut grass
may not enter the grass catcher. Reduce
ground speed (pushing speed) and/or run
the lawn mower over the area a second
time.
° If a trail of clippings is left on the right side of
a rear discharge mower, mow in a clock-
wise direction with a small overlap to collect
the clippings on the next pass.
o Pores in cloth grass catchers can become
filled with dirt and dust w'rthuse and
catchers will collect less grass. To prevent
this, regularly hose catcher off with water
and let dry before using.
o Keep top of engine around starter clear and
clean of grass clippings and chaff. This will
help engine air flow and extend engine life.
8
Page 9
MULCHING MOWING TIPS
IMPORTANT: For best performance, keep
mower housing free of built-up grass and
trash. See "Cleaning" in CUSTOMER
RESPONSIBILITIES section of this manual.
• The special mulching blade will recut the
grass clippings many times and reduce
them in size so that as they fall onto the
lawn they will disperse into the grass and
not be noticed. Also, the mulched grass will
biedegrade quickly to provide nutrients for
the lawn. Always mulch with your highest
engine (blade) speed as this will provide the
best recutting action of the blades.
,, Avoid cutting your lawn when it is wet. Wet
grass tends to form clumps and interferes
with the mulching action. The best time to
mow your lawn is the early aftemoon_ At
this time the grass has dried and the newly
cut area will not be exposed to the direct
SUn.
o For best results, adjust the lawn mower
cuttingheight so thatthe lawn mower cuts
offonlythe top one-thirdof the grass blades.
Ifthe fawn is overgrown it will be necessary
to raise the height of cut to reduce pushing
effort and to keep from overloading the
engine and leaving clumps of mulched
grass. For extremely heavy mulching,
reduce your widthof cut by overlapping
previously cut path and mow slowly.
Certain types of grass and grass conditions
may require that an area be mulched a
second time to completely hide the
clippings° When doing a second cut, mow
across or perpendicular to the first cut path.
Change your cutting pattern from week to
week. Mow north to south one week then
change to east to west the next week. This
will help prevent matting and graining of the
lawn.
Max 1t3
9
Page 10
MAINTENANCE SCHEDULE __7_,_ _ ,_'_,o_ _
AS YOU COMPLETE _._ _£_'_.._.4,_:X_ _'<¢._u SERVICE DATES
, ,, ,, ,,................
Check for Loose Fasteners 6/' V'
Clean/Inspect Grass Catcher
(If Equipped) ...................... _ _
M Clean Lawn Mower
(Power-Propelled Mowers)
O Clean Under Drive Cover
' Check drive beit/Puiieys
RE (Power,Prope;led,,Mowers)
checldSharpen/Replace Blade
Lubrication Chart
iClean Battery/Recharge ........
i IElectric Sta d Mowers)
E ICheck Engine Oil Level
N ,_Change Eng[ne Oil
G clean Air Filter
i Inspect Muffler
v'
g , , _ .............. t
v'
v'
e,'3
v'
v'
v'
N Clean or Rep!,ace Spark Plug ...... 6/
E Replace Air Filter Paper Cartridge _'2
1- Change more oftenwhen operating undera heavy load or inhIgh ambient temperatures
2- SewIce more oftenwhenoperating tn didy er dusty conditions
3- Replace blades more ellen whenmowing tnsandysell
4 - Charge 48 hours at end of season
GENERAL RECOMMENDATIONS
The warranty on this lawn mower does not
cover items that have been subjected to
operator abuse or negligence. To receive full
value from the warranty, operator must
maintain mower as instructed in this manual
Some adjustments will need to be made
periodically to properly maintain your uniL
All adjustments in the Service and Adjust-
ments section of this manual should be
checked at least once each season.
• Once a year, replace the spark plug,
replace air filter element and check blade for
wear. A new spark plug and clean/new air
filter element assures proper air-fuel mixture
and helps your engine run better and last
longer.
° Follow the maintenance schedule in this
manual.
BEFORE EACH USE
= Check engine oil level.
° Check for loose fasteners.
LUBRICATION
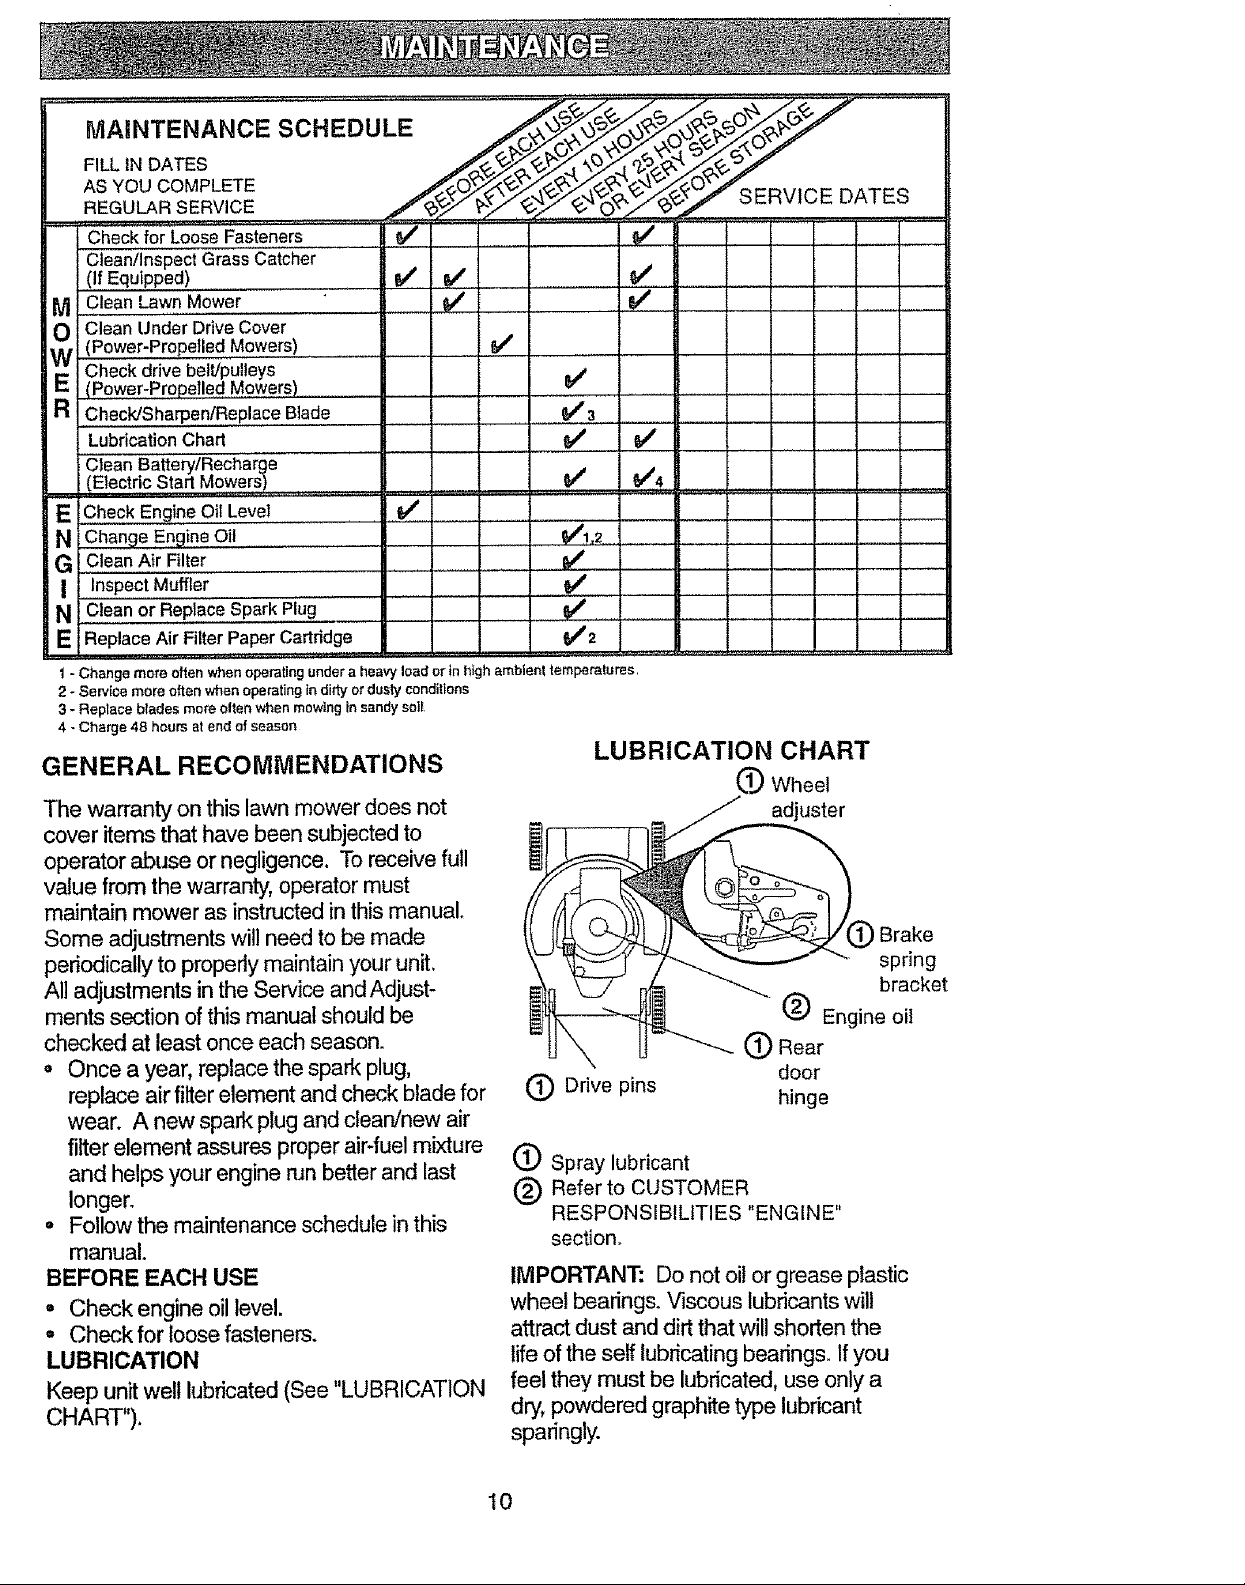
Keep unit well lubricated (See "LUBRICATION
CHART").
Drive pins
(_ Spray lubricant
('_ Refer to CUSTOMER
RESPONSIBILITIES "ENGINE"
section.
IMPORTANT: Do not oil or grease plastic
wheel bearing& Viscous lubricants will
attract dust and dirt that will shorten the
life of the self lubricating bearings. If you
feel they must be lubricated, use only a
dry, powdered graphite type lubricant
sparingly.
v'
v'4
LUBRICATION CHART
Wheel
adjuster
i Brake
spring
bracket
C) Engine oil
(_ Rear
door
hinge
t0
Page 11
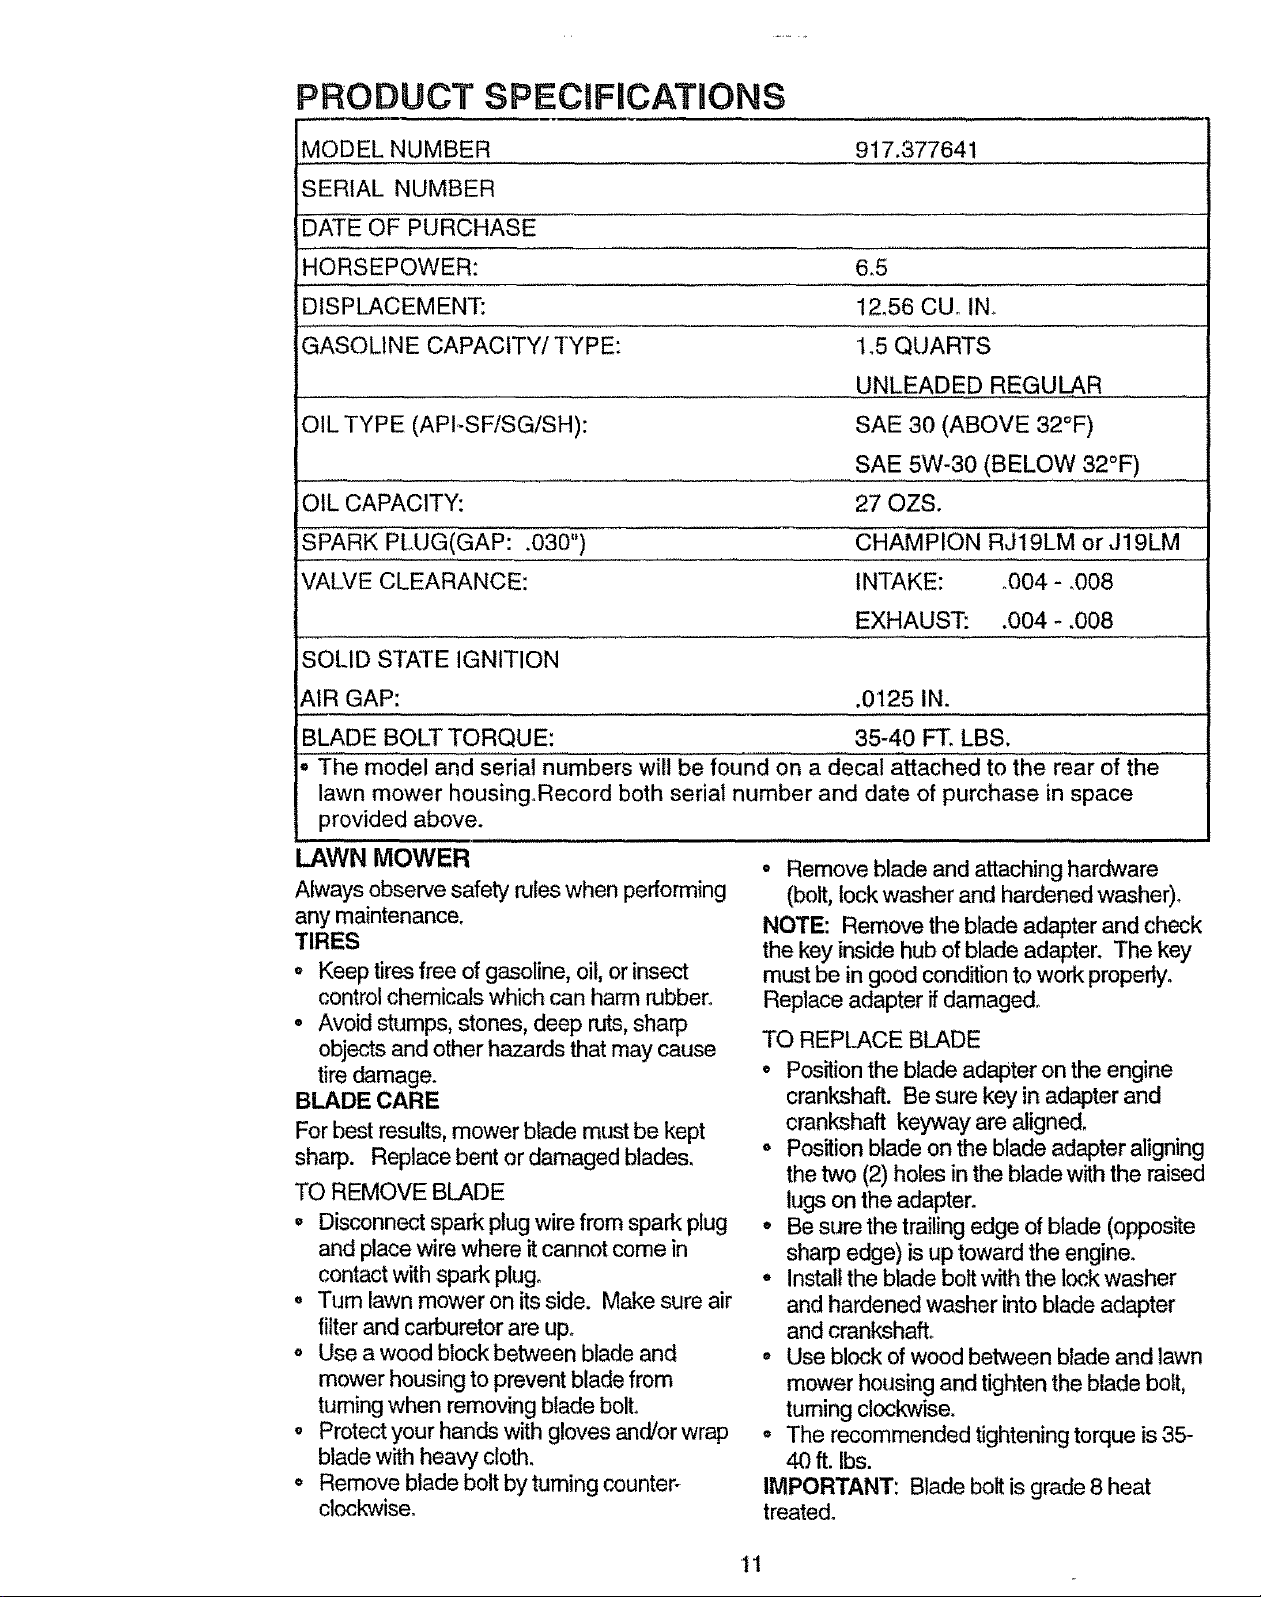
PRODUCT SPECiFiCATIONS
MODEL NUMBER 917.377641
SERIAL NUMBER
DATE OF PURCHASE
HORSEPOWER: 6,5
DISPLACEMENT: 12.56 CUo iNn
GASOLINE CAPACITY/TYPE: 1_5QUARTS
UNLEADED REGULAR
OIL TYPE (API_SF/SG/SH): SAE 30 (ABOVE 32°F)
SAE 5W-30 (BELOW 32°F)
OIL CAPACITY: 27 OZS.
SPARK PLUG(GAP: .030") CHAMPION RJ19LM or J19LM
VALVE CLEARANCE: INTAKE: .004- .008
EXHAUST: .004 - .008
SOLID STATE IGNITION
AIR GAP: .0125 IN.
BLADE BOLT TORQUE: 35-40 FT. LBS.
The model and serial numbers will be found on a decal attached to the rear of the
lawn mower housing.Record both serial number and date of purchase in space
provided above.
LAWN MOWER
Always observe safety rules when performing
any maintenance.
TIRES
• Keep tires free of gasoline, oil, or insect
control chemicals which can harm rubber.
• Avoid stumps, stones, deep ruts,sharp
objects and other hazards that may cause
tire damage.
BLADE CARE
For best results, mower blade must be kept
sharp. Replace bent or damaged blades.
TO REMOVE BLADE
o Disconnect spark plug wire from spark plug
and place wire where it cannot come in
contact with spark plug.
° Tum lawn mower on its side. Make sure air
filter and carburetor are up.
o Use a wood block between blade and
mower housing to prevent blade from
turning when removing blade bolt.
o Protect your hands with gloves and!or wrap
blade with heaW cloth.
o
Remove blade bolt by turning counter-
clockwise.
• Remove blade and attaching hardware
(bolt, lock washer and hardened washer)°
NOTE: Remove the blade adapter and check
the key inside hub of blade adapter. The key
must be in good condition to work properly.
Replace adapter ifdamaged.
TO REPLACE BLADE
o Position the blade adapter on the engine
crankshaft. Be sure key in adapter and
crankshaft keyway are aligned.
° Position blade on the blade adapter aligning
the two (2) holes in the blade with the raised
lugs on the adapter.
° Be sure the trailing edge of blade (opposite
sharp edge) is up toward the engine.
o Install the blade bolt with the lock washer
and hardened washer intoblade adapter
and crankshaft.
° Use block of wood between blade and lawn
mower housing and tighten the blade bolt,
turning clockwise.
° The recommended tightening torque is 35-
40 ft. Ibs.
IMPORTANT: Blade bolt is grade 8 heat
treated°
11
Page 12
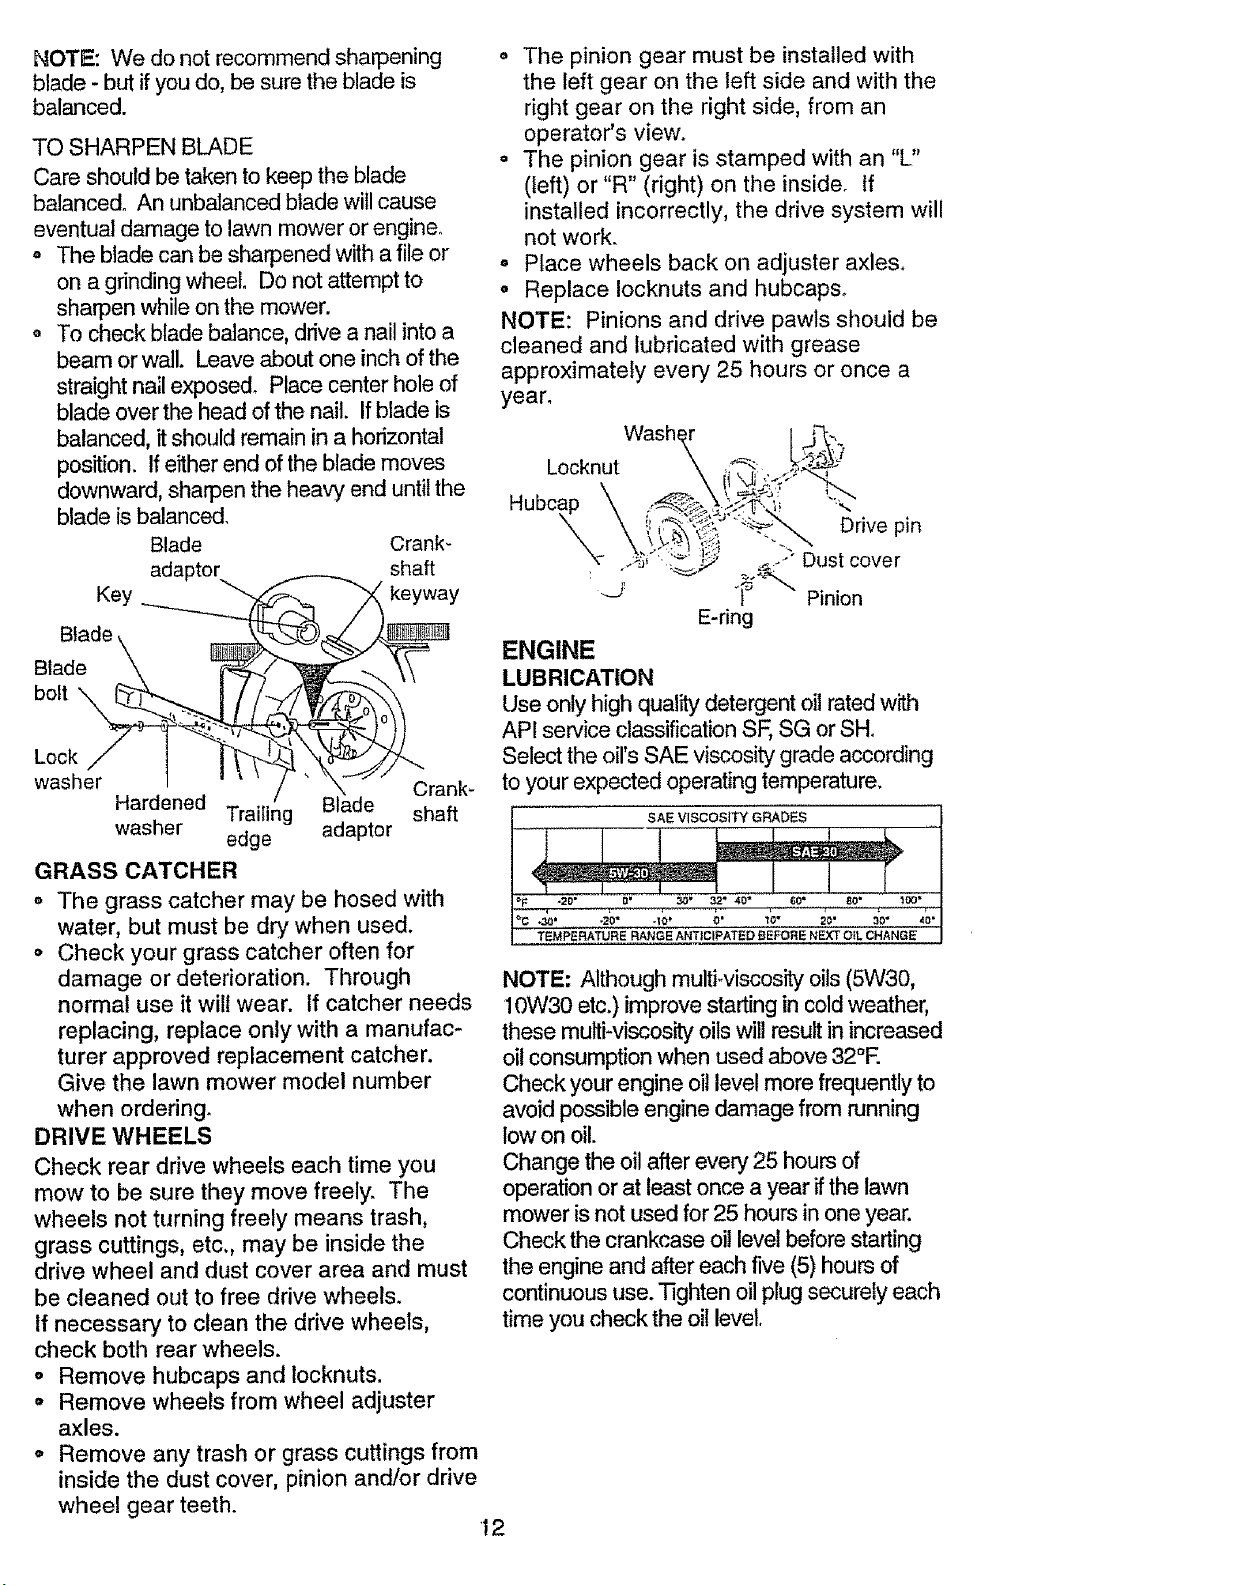
NOTE:Wedonotrecommendsharpening
blade- butifyoudo,besurethebladeis
balanced.
TOSHARPENBLADE
Careshouldbetakentokeeptheblade
balanced.Anunbalancedbladewillcause
eventualdamageto lawnmowerorengine.
o Thebladecanbesharpenedwithafileor
ona grindingwheel.Donotattemptto
sharpenwhileonthemower.
o Tocheckbladebalance,driveanailintoa
beamorwall. Leaveaboutoneinchofthe
straightna;Iexposed.Placecenterholeof
bladeovertheheadofthenail. Ifbladeis
balanced,itshouldremaininahorizontal
position.Ifeitherendoftheblademoves
downward,sharpentheheavyenduntilthe
bladeisbalanced,
Blade Crank-
adaptor shaft
Key keyway
o Tile pinion gear must be installed with
the left gear on the left side and with the
right gear on the right side, from an
operator's view.
o The pinion gear is stamped with an "L"
(left) or "R" (right) on the inside, tf
installed incorrectly, the drive system will
not work.
o Place wheels back on adjuster axles.
° Replace Iocknuts and hubcaps°
NOTE: Pinions and drive pawls should be
cleaned and lubricated with grease
approximately every 25 hours or once a
year.
Wash,
Locknut
Drive pin
Blade
bolt \\
Lock
washer Crank-
Hardened Trailing Blade shaft
washer edge adaptor
GRASS CATCHER
• The grass catcher may be hosed with
water, but must be dry when used.
o Check your grass catcher often for
damage or deterioration. Through
normal use it will wear. [f catcher needs
replacing, replace only with a manufac-
turer approved replacement catcher.
Give the lawn mower model number
when ordering°
DRIVE WHEELS
Check rear drive wheels each time you
mow to be sure they move freely. The
wheels not turning freely means trash,
grass cuttings, etc,, may be inside the
drive wheel and dust cover area and must
be cleaned out to free drive wheels.
If necessary to clean the drive wheels,
check both rear wheels.
o Remove hubcaps and locknuts.
- Remove wheels from wheel adjuster
axles.
o Remove any trash or grass cuttings from
inside the dust cover, pinion and/or drive
wheel gear teeth.
ENGINE
LUBRICATION
Use only high quality detergent oil rated with
API service classification SF, SG or SHo
Select the oil's SAE viscosity grade according
to/our expected operating temperature.
SAE VISCOS_
: ÷20" a' 30 _ _2" 4'0;' 60' 801 _" I
NOTE: Although multiwiscosity oils (5W30,
10W30 etc.) improve starting in cold weather,
these multi-viscos_ oils will result in increased
oil consumption when used above 32°E
Check your engine oi! level more frequently to
avoid possible engine damage from running
low on oil.
Change the oil after every 25 hours of
operation or at least once a year if the la_
mower is not used for 25 hours in one year.
Check the crankcase oil level before starting
the engine and after each five (5) hours of
continuous use. Tighten oil plug securely each
time you check the oil level.
12
I
Page 13

TOCHANGEENGINEOIL
NOTE:Beforetippinglawnmowertodrainoil,
drainfueltankbyrunningengineuntilfueltank
isempty.
o Disconnect spark plug wire from spark plug
and place wire where it cannot come in
contact with spark plug.
• Remove engine oil cap; lay aside on a clean
surface.
Tip lawn mower on its side as shown and
drain oil into a suitable container. Rock lawn
mower back and forth to remove any oil
trapped inside of engine.
o Wipe off any spilled oil on lawn mower and
on side of engine.
• Fill engine with oil. Fill only to the "FULL"
line on the dipstick. DO NOT OVER FILL
o Replace engine oil cap.
° Reconnect spark plug wire to spark plug.
Container
AIR FILTER
Your engine will not run properly and may
be damaged by using a dirty air filter.
Replace the air filter every year, more
often if you mow in very dusty, dirty
conditions. Do not wash air _ter.
MUFFLER
Inspect and replace corroded muffler as it
could create afire hazard and/or damage.
SPARK PLUG
Change your spark plug each year to make
your engine start easier and run better. Set
spark plug gap at .030 inch_
CLEANING
IMPORTAN"P: For best performance, keep
mower housing free of built-up grass and trash.
Clean underside of mower housing after each
use.
CAUTION: Disconnect spark plug wire from
spark plug and place wire where it cannot
come in contact with the spark plug_
- Tum lawn mower on its side. Make sure air
filter and carburetor are upoClean the
underside of your lawn mower by scraping
to remove build-up of grass and trash.
o Clean engine often to keep trash from
accumulating. A clogged engine runs hotter
and shortens engine life.
o Keep finished surfaces and wheels free of
all gasoline, oil, etc
° We do not recommend using a garden hose
to clean lawn mower unless the electrical
system, muffler, air filter and carburetor are
covered to keep water out. Water in engine
can result in shortened engine life.
TO CHANGE AIR FILTER
o Loosen cover screw.
, Swing cover down and remove from
hinge°
, Pull paper fitter out of air cleaner body.
° Clean air cleaner cover and body.
• Install a new paper filter°
• Reinstall cover to air cleaner body. Be
sure hinge is assembled properly.
° Swing cover up and tighten cover screw.
(Do not overtighten).
Hinge
Air Filter Cover
Paper Filter
Cover Knob
13
Page 14
CAUTION"BEFOREPERFORMINGANY
SERVICEORADJUSTMENTS:
o Releasecontrolbar.
• Makesurethebladeandallmoving
partshavecompletelystopped.
- Disconnectsparkplugwirefrom
sparkplugandplacewhereitcannot
comeincontactwithplugo
LAWN MOWER
TO ADJUST CUTTING HEIGHT
See "TO ADJUST CUTTING HEIGHT" in the
Operation section of this manual.
REAR DEFLECTOR
The rear deflector, attached between the rear
wheels of your lawn mower, is provided to
minimize the possibility that objects will be
thrown out the rear of the lawn mower into the
operator's mowing position. Ifthe rear
deflector becomes damaged, it should be
replaced.
TO ADJUST HANDLE
The handle on your lawn mower has three (3)
height positions - adjust to height that suits
you.
• Squeeze the bottom ends of lower handle
towards each other until the pin in handle
can be inserted into one of the three height
adjustment holes.
Handle pin
High
Med.
Low
ENGINE
ENGINE SPEED
Your engine speed has been factory seL Do
not attempt to increase engine speed or it
may result in personal injury, i!you believe
that the engine is runningtoo fast or too slow,
take your lawn mower to an authorized
service center/department for repair and
adjustment.
CARBURETOR
Your carburetor has a non-adjustable fixed
main jet for mixture control. Ifyour engine
does not operate properly due to suspected
carburetor problems, take your lawn mower to
an authorized service center/department for
repair and adjustment.
/ 3-position
Handle
adjustment
bracket
Immediately prepare your lawn mower for
storage at the end of the season or ifthe unit
will not be used for 30 days or more.
LAWN MOWER
When lawn mower is to be stored for a period
of time, clean it thoroughly, remove all dirt,
grease, leaves, etc. Store in a clean, dry area.
o Clean entire lawn mower (See "CLEANING"
in the Customer Responsibilities section of
this manual).
o Lubricate as shown in the Customer
Responsibilities section of this manual.
• Be sure that all nuts, bolts, screws, and pins
are securely fastened. Inspect moving
parts for damage, breakage and wear.
Replace if necessary.
• Touch up all rusted or chipped paint
surfaces; sand lightly before painting.
HANDLE
o You can fold your lawn mower handle for
storage.
° Loosen the two (2) handle knobs on sides of
the upper handle and allow handle to fold
down to the rear.
• Squeeze the bottom ends of lower handle
toward each other until pins in handle clear
the brackets and pivot entire handle
assembly forward and allow it to rest on
mower.
° When setting up your handle from the
storage position, the lower handle will
require manually locking into the mowing
position.
IMPORTANT: When folding the handle for
storage or transportation be sure to fold the
handle as shown or you may damage the
control cables.
14
Page 15

Operator presence
control bar
Upper handle "-.. _/ ,f_'..,,
X-.Z! ,/' ,,*"
_// ..L.Y. ,,;_
#" _.,//I
t_,_;.::'_Z'_'__r 'M Mowing
Lower _ }P position
handle __
/
ENGINE
FUEL SYSTEM
IMPORTANT: Itis importantto prevent gum
depositsfrom forming in essential fuel system
partssuch as carburetor,fuel filter, fuel hose,
or tank during storage. Also, experience
indicatesthat alcohol blended fuels (called
gasohol or using ethanol or methanol) can
attract moisture which leads to separation and
formation of acids during storage. Acidic gas
can damage the fuel system of an engine
while in storage.
• Drain the fuel tank.
• Start the engine and let it run until the fuel
lines and carburetor are empty.
• Never use engine or carburetor cleaner
products in the fuel tank or permanent
damage may occur.
, Use fresh fuel next season.
NOTE; Fuel stabilizer is an acceptable
altemative in minimizing the formation of fuel
gum deposits during storage. Add stabilizer to
gasoline in fuel tank or storage container.
Always follow the mix ratio found on stabilizer
container. Run engine at least 10 minutes
after adding stabilizer to allow the stabilizer to
reach the carburetor. Do not drain the gas
tank and carburetor if using fuel stabilizer.
ENGINE OIL
Drain oil(withengine warm) and replace with
clean engine oil. (See "ENGINE" inthe
Customer Responsibilities section of this
manual).
CYLINDER
o Remove spark plug.
° Pour one ounce (29 ml) of oilthrough spark
plug hole into cylinder.
- Pull starter handle slowly a few times to
distribute clio
= Replace with new spark plug.
OTHER
° Do not store gasoline from one season to
another.
° Replace your gasoline can if your can starts
to rust. Rust and/or dirt in your gasoline will
cause problems.
= If possible, store your unit indoors and cover
itto give protection from dust and dirt.
° Cover your unit with a suitable protective
cover that does not retain moisture. Do not
use plastic. Plastic cannot breathe which
allows condensation to form and will cause
your unit to rust.
IMPORTANT: Never cover mower while
engine and exhaust areas are still warm.
CAUTION: Never store the lawn mower
with gasoline in the tank inside a building
where fumes may reach an open flame or
spark, Allow the engine to cool before
storing in any enclosure.
15
Page 16

TROUBLESHOOTING
CHART
PROBLEM
Does not start
Loss of power
CAUSE
• Dirty air filter, "
o Out of fuel, °
• Stale fuel. •
° Water in fuel. °
• Spark plug wire is °
disconnected.
o Bad spark plug. o
° Loose blade or broken blade o
adapter.
• Control bar in released o
position,
• Control bar defective° °
° Rear of lawn mower housing o
or cutting blade dragging
in heavy grass,
° Cutting too much grass. •
o Dirty air filter, °
° Buildup of grass, leaves, °
and trash under mower.
= Too much oil in engine, o
° Walking speed too fast. o
CORRECTION
Clean/repTace air filter_
Fill fue! tank_
Drain tank and refill with
fresh clean fuel.
Drain fuel tank and
carburetor and refill tank
with fresh gasoline.
Connect wire to plug.
Replace spark plugo
Tighten blade bolt or
replace blade adapter.
Depress control bar to
handle.
Replace control bar.
Set to "Higher Cut"
position.
Set to "Higher Cut"
position.
Clean/replace air filter.
Clean underside of mower
housing°
Check oil level.
Cut at slower walldng
speed.
t6
Page 17

TROUBLESHOOTING CHART
_ROBLEM
CAUSE
CORRECTION
Poor cut- uneven
Excessive
vibration
Starter rope hard
to pull
o Worn, bent or loose blade.
° Wheel heights uneven.
o Buildup of grass, leaves
and trash under mower.
o Worn, bent or loose blade,
- Bent engine crankshaft°
o Engine flywheel brake is on
when control bar is released.
o Bent engine crankshaft.
• Blade adapter broken.
° Blade dragging in grass.
° Replace blade° Tighten
blade bolt.
o Set all wheels at same
height
o Clean underside of
mower housing.
° Replace blade. "Rghten
blade bolto
• Contact an authorized
service center.
° Depress control bar to
upper handle before
pulling starter roper
o Contact an authorized
service center.
° Replace blade adapter.
° Move lawn mower to cut
grass or to hard surface
Grass catcher
not filling (if so
equipped)
Hard to push
• Cutting height too low.
° Lift on blade worn off.
o Catcher not venting air.
o Grass is too high or wheel
height istoo low.
o Rear of lawn mower
housing or blade dragging
in grass.
° Grass catcher too full.
• Handle height position not
right for you.
° Raise cutting height,
o Replace blade.
° Clean grass catcher.
°
Raise ctAing height.
o
Raise rear of lawn mower
housing one (1) setting
higher,
o
Empty grass catcher.
o
Adjust handle height to
suiL
17
Page 18

Garantfa
Reglas de Seguridad
Montaje
Operaci6n
Mantenimiento
Programa de Mantenimiento
18 Especificaciones del Producto 27
18 Servicio y Adjustes 30
20 Almacenamiento 30
22 Identificaci6n de problemas 32
26 Partes de repuesto Vea el manual
26 ingl6s del dueSo
Orden de Partes Contratapa
GARANTfA LIMITADA DE DOS ANOS PARA LA SEGADORAA MOTOR CRAFTSMAN
Pordos (2)ar3os,a partirde lafechade compra,cuando esta SegadoraCraftsmanse mantenga,tubrique
y afine seg0n las inslrucciones para la operaci6n y el mantenimiento en el manual del duefio, Sears
reparar_, gratis todo defecto en el material y la mano de obra.
Si la Segadora Craftsman se usa para fines comerciales o de arriendo, esta garantfa s61ose aplica por
noventa (90) dfas a parlJrde la fecha de compra,.
Esta Garantia no cubre:
o Artfculos que se desgastan durante el uso normal tales como las cuchillas segadoras rotatorias, los
adaptadores de la cuchilla, las correas, los filtros de aire y las bujfa&
• Reparaciones necesarias debido al abuso o a la negligencia dal operador, incluy6ndose a los
cig_3eS,aJesdobladosy a hafalta de mantenimiento del equipo seg0n las instrucciones que se incluyen
en e! manual del duefioo
EL SERVICIO DE GARANTI'A ESTA DISPONIBLE al devolver la segadpra a motor Craftsman al centro/
departmento de servicio Sears mas cercano en los Estados Unidos, Esta garantfa se aplica solamente
mientras el producto este en uso en los Estados Unidos,
Esta Garantfa le otorga derechos legales especfficos, y puede que tambi_n tenga otros derechos que
varfan de estado a estado,
Sears, Roebuck and Co., Di817WA, Hoffman Estates, IL 60179 USA
Los estandrares de seguridad exigen la presenda
del operator en los controles para redudr a un
minimo el riesgo de lesionarse. Su unidad viene
equipada con dichos controles. Por ningun motivo
trate de/etiminar la funcfSn de los conlroles que
exigen la presencia del operadoro
ENTRENAMIENTO:
- Lea este manual del operador
cuidadosamente_Familiarfcesecon los
controles y aprenda a operar su segadora en
forma adecuadao Aprenda a parar su segadora
r_tpidamenteo
- No permita que los nidos usen su segadora.
Nunca permita que los adultos operen la
segadora sin contar con las instrucciones
adecuadaso
° Mantenga el &rea de operaci6n despejada
de gente, especialmente de niSos pequefios
y de animales dom_sticos.
* Use fa segadora solamente para losfines
propuestos por el fabricante y seg0n las
explicaciones descritas en este manual.
° No opere la sega_dorasi se ha cafdo o dafiado en
cualquiera form& Siempre repare los da,fios
antes de usada.
o No use accesorios que no hayan sido
recomendados por el fabrfcanteo El uso de dichos
accesorios puede ser peligroso.
o La cuchilla gira cuando el motor est&
funcionandoo
r
PREPARACION:
- Siempre revise cuidadosamente el &rea que se
va a segar y desp6jela de todas las piedras,
palos, alambres, huesos y otros objetos
extrafioso Estos objetos ser&n lanzados con la
.cuchilla y pueden producir lesiones graves.
o Siempre use anteojos de seguridad o protectores
de ojos cuando arranque y durante el_empo
que use la segadora,.
18
Page 19

o Vi._taseen forma adecuada. No opere la
segadora sin zapatos o con sandalias
mientras que el motor estA funcionando.
o Siegue siempre durante el dfa o con buena
luz artificial.
OPERACION:
o Mantenga sus ojos y su mente en la
segadora yen el Area que se estA cortando.
No permita que otros intereses Io distraigan,.
o No corte c_sped mojado o resbaloso. Nunca
corra mientras est_ operando su segadorao
Siempre asegOrese de mantener el equilibdo
- mantenga el mango agarrado firmemente y
camine..
o No ponga las manos o los pies cerca odebajo
de las partes rotatorias. Mant_ngase
alejado de la abertura de descarga en todo
momento.
. Siempre pare el motor cuando se vaya
ocuando no est_ usando su segadora, o
antes de atravesar las entradas para autos,
los senderos, caminos y Areas cubiertas de
dpio.
o Nunca dirija la descarga del material hacia
los espectadores ni permita a nadie cerca de
la segadora mientras ta est_ operandoo
° Antes de limpiar, inspeccionar o de reparar I
a segadora, pare el motor y est_
completamente seguro de que la cuchilla y
que todas las partes que se mueven se
hayan detenido., Luego, desconecte el
alambre de ta bujfa y mant_ngalo alejado de
_sta para evitar el arranque pot accidente.
o No continue haciendo funcionar su segadora
site pega a un objeto extrafioo Siga el
procedimiento descrito anteriormente, luego
repare cuaiquier dafio antes de volver a
arrancar y de operar su segadora.
o No cambie los ajustes del regulador o
hagaque el motor ande a una velocidad
excesiva. Se pueden producir da_os en el
motor y I esiones personales.
° No opere su segadora si vibra fuera de Io
normal. La vibraci6n excesiva es una
indicaci6n de dafio; pare el motor, revise en
forrna segura la causa de la vibraci6n y haga
las reparaciones segun sea necesarioo
o No haga funcionar el motor en
recintoscerrados. Los gases de escape son
peligrosos.
. Nunca corte el c_sped tirando la segadora
hacia usted. Siegue a trav_s de la cara de
las pendientes, nunca hacia arriba o hacia
abajo pues puede perder el equilibdoo No
siegue pendientes demasiado empinadas.
Tenga cuidado cuando opere la segadora en
terreno disparejo o cuando cambie de
direcci6n - mantenga un buen equilibrioo
- Nunca opere la segadora sin las
protecciones adecuadas, las planchas, el
recogedor de c6sped y otros dispositivos de
seguridad en su lugar.
MANTENIMIENTO Y
ALMACENAMIEN-TO:
o Revise la cuchilla y los pernos de montaje
del motor a menudo, para asegurarse que
estAn apretaclos en la forma adecuada.
° Revise todos los pernos, tuercas y tornitles a
intervalos frecuentes, para veril_carsi estAn
apretados en forrna adecuada, y
asegurarseque la segadora se encuentra en
condiciones de funcionamiento seguroo
o Mantenga todos los dispositivos de seguridad
en su lugar y listos para funcionar.
° Para reducir el peligro de incendio,
mantenga el motor sin c_sped, hojas y grasa
o aceite en exceso.
- Revise el recogedor de c_sped a menudo
para vedficar si hay deterioro y desgaste y
cambie las bolsas desgastadas_ Use
solamente las bolsas de repuesto
recomendadas por el fabdcante de su
segadora o que cumplen con tas
especificaciones de _ste.
o Siempre mantenga una cuchilta afilada en su
segadora.
• Siempre permita que el motor se enfr[e
antes de guardarla en cualquier recinto
cerrado,
o Nunca guarde la segadora con combustible
en el estanque dentro de un edificio endonde
los gases pueden alcanzar una llama
expuesta o una fuente de ignici6n, tal como el
calentador de agua, ta estufa de
calefacci6n, la secadora de ropa, etco
PRECAUClON, Siempre desconecte el
alambre de la buj[a y p6ngalo donde no pueda
entrar en contacto con ta bujfa, para evitar el
arranque por accidente, durante la preparaci6n,
el transporte, el ajuste o cuando se hacen
reparaciones.
PRECAUCI6N: Es conocido por el Estado de
California que los gases de escape del motor de
este productor contienen qu[micos los cuales a
ciertos niveles, pueden ocasionar, cancer,
defectos de nacimiento, y otros dafios at sistema
reproductivo.
19
Page 20

:stosaccesorios estaban disponibles cuando se produjo la segadora. Tambi_n est&q disponibles en la
nayorfa de las tiendas de Sears yen los centros de servicio, La mayor[a de las Uendas Sears tambi_n
)ueden mandar a pedir parses de repuesto para usted, si les proporciona el nt)mero del rnodelo de su
_egadora,,Algunos de estos accesorios _ vez no se apliquen a su segadorao
RENDIMIENTO DE LA SEGADORA
OESVIADOR DE RECORTES
PARA SEGADORAS CON DESCARGA TRASERA
JUEGOS PARA LA ACOLCHADORA
ESTABILIZADORES
PARA
SEGADORAS
CON DESCARGA
RECOREDOR
TRASERA
MANTENIMIENTO DE LA SEGADORA
SILENCIADOR ES
ADAPTADORES
DE CUCHILLA RUEDAS
..... t
CORREAS
CUCHILLAS
Lea estas instruccionesy este manual
_mpletamente antes de tratar de montar u operar
su segadora nueva. Su segadora nueva ha sido
rnontada en la f_rica con la excepci6n de aquellas
panes qua se dejaron sin montar por razones de
_nvfo. Todas las panes como las tuarcas, las
arandelas, los pemos, etc°, qua son necesarias
para completar el montaje han sido cotocadas en la
bolsa de parte& Para asegurarse qua su segadora
funcione en forma segura y adecuada, todas tas
panes y los artfculos de ferretefia qua se monten
lienen queser apretados seguramente. Use las
herramientas correctas,come sea necesario, para
asegurar que se aprieten adecuadamente.
PARA REMOVER LA SEGADORA
DE LA CAJA DE CARTON
, Remueva las partes sueltas que se induyen con
lasegadora,
= Corte las dos esquinas de los extremos de la
caja de cart6n y tienda el panel del ex_emo
piano,
• Remueva todo el material de empaque, excepto
la cuSa entre el mango supedor y 5! inferior, y la
cuSa qua sujeta la barra de los control que exige
PARA
SEGADORAS
_l RECOREDOR
FILTROS DE AfRE
CON DESCARGA
LATERAL
ENVASES
DEGASOLINA
SUJIAS
ACEITE
DEL MOTOR
la presencia dal operador junto con el mango
superior`
• Haga rodar la segadora hacia afuera de la caja
de cart6n y revfsela cuidadosamante para
verificars{toctavfa quedan partes sueltas
adicionales.
COMO PREPARAR SU
SEGADORA
PARA DESDOBLAR EL MANGO
IMPORTANTE: Despliegue el mango con mucho
cuidadopara no pellizcaro daSar loscablesde
control°
o Levante los mangos hasta que la secci6n dal
mango inferior se asegure en su lugar, en la
posici6n para segar.
- Remueva la cuSa protectora, levante la secci6n
del mango superior hasta su lugar en el mango
inferior, y apriete ambas manillas del mango.
o Remueva la cuSa del mango qua sujeta la barra
de loscontrol que exige la presencia dal
operadorjunto con el mango superior,
• El mango de la segadora puede ajustarse segun
le acomode para segar. Refi_rase a"AJUSTE
DEL MANGO" en la Secci6n de Servicio y
Ajustes de este manual.
2O
Page 21

Barra de control que exige
la presencia del operador "-%,_ _..
Man o su edor _ '/'/ _'_
%Qt Z"
Levantar __'f'# 1 Levantar
MaIlo _\
inferior ----JW _Posiin parasegar
Pinza
del mango'_ _ ajusteS°p°rtede
_ Mango de
3 posiciones
PARA INSTALAR LOS ACCESORIOS
Su segadora fue enviada tsta para usarse
como una acotchadora de capa vegetal. Para
convertirla de modo que pueda ensacar o
descargar:
, Abra la puerta trasera y remueva la tapon
acolchador& Gu&rdela en un lugar seguro.
o Ahora puede instalar el recogedor o el
desviador de recortes opcionaL
o Para volver a la operaciSn de acolchamiento
con capa vegetal, instale la tapon
acolchadora en la abertura de descarga de la
segadora.
PREOAUCION: No haga funcionar su
segadora sin la tapon acolchadora aprobada en
su lugar, o sin el desviador de recortes, o sin et
recogedor de c6sped, aprobados, en su lugar.
Nunca trate de operar la segadora cuando se
ha removido la puerta trasera o cuando estA un
poco abierta,
TapSnacolchador _'__
,xL
21
Page 22

FAIVlnLIARBCESECON SU SEGADORA
LEA ESTE MANUAL DEL DUEI_IO Y LAS REGLAS DE SEGURIDAD ANTES DE OPERAR SU
SEGADORA, Compare las ilustradones con su segadora para familiarfzarse con la ubicaci6n de los
diversos controtes y ajustes. Guarde este manual para referenda en el future.
Estos si'mbe!os pueden apareser sobre su segadera o en la literatura proporcionada con el
producto. Aprenda y comprenda sus significados.
ATTENC|6N 0 MOTOR MOTOR RAPIDO LENTO ESTRANGU COM- ACEITE PELIGRO. GUARDE LAS
ADVERTENC|A _NCENO_DO APAGADO LACt_N BUSTIBLE MANOS Y LOSRES LF-..JOS
Barra de control de la
impulsiSn
CordSnarrancador
Recogedor de c_sped
Ajustador de la rueda
TapSnde la
acolchadora
control que exige la presencia
operador
Tapa del deposito
de aceite del
motor con vadlla
indicadora de
nivel
Cebador
Caja
Tapa del
deposito de
gasolina
CUMPLE CON LOS REQUISITES DE SEGURIDAD DE LA CPSC
Las segadoras a motor, que se conducen desde la parte de atr&s, rotatofias, Sears, cumplen con los
est,#nJares de seguridad del American National Standards Institute y de la U.& Consumer Product Safety
Commission. La cuchitla gira cuando el motor es_ funcionando.
Barra de control que exige la presencia del Corder arrancador- se usa para hacer arrancar el
operador- lJeneque sujetarse abaio, junto con el
mango, para hacer arrancar el motor. Su_ttela para
parar el motor.
Cebador - bombea combustible adiciona] desde el
carburador al cilindro para use cuando se necesita
hacer arrancar un motor fri&
motor_
Barra de control de ta impulsion - se usa para
enganchar la segadora para movimiento hacia
adelante impulsada a motor.
Tapon de la acolchadora- situada en la abertura
de la descarga trasera y debe ser quitada cuando
se convierte taopracciSn de ensacado a descarga.
22
Page 23

La operaci6n de cualquier segadora puede
hacer que salten objetos extraSos dentro de sus
ojos, Io que puede producir daSos graves en
_stos. Siempre use antsojos de seguridad o
protecci6n para los ojos mientras opere su
segadora o cuando haga ajustes o
reparaciones. Recomendamos una mascara de
seguddad de visi6n amplia, para uso espejuelos
o anteojos de seguridad estandarte.
como usarsu segadora
CONTROL DE LA VELOCIDAD DEL MOTOR
La veloddad del motor se estableci6 en ta f&brica
para un rendimiento 6primo. La velocidad no se
puede ajustar.
CONTROL DE ZONA DEL MOTOR
PRECAUCION: Las regulaciones federales exigen
que se instals un control para el motor en esta
segadora para reducir a un mfnimo el riesgo de
lesionarse debido al contacto con la cuchilla. Por
ningQn motivo _'ate de eliminar la funci6n del
control de! operadoro La cuchitla gira cuando el
motor est& funcionando.
o Su segadora viene equipada con una barra de
control que exige la presenda del operador, Io
que requiere que el operador est_ detr&s del
mango de la segadora para hacerla arrancar y
operarl&
PARA AJUSTAR LA ALTURA DE CORTE
o Las cuatro ruedas son ajustadas con una
palanca unicao
o Tire de la palanca de ajustes hacia la rueda.
Levante la segadora, mueva la palanca hasta
delante a la posici6n deseadao Para bajar la
segadora, mueva ta palanca hacia la retaguardi&
Para un corte alto, baje
tas ruedas
Mango
PARA MONTAR Y ADJUNTAR EL
RECOGEDOR DE CESPED
o Levante la puerta trasera de la segadora de
c_sped y ponga el marco del recogedor de
c_sped a dentro de las ranuras de la puerta
trasera.
• El recogedor de c_sped queda asegurado en
la caja de la segadora cuando se baja la
puerta trasera para descansar en el bastidor
del recogedor de c_sped.
PRECAUCION: No haga funcionar su segadora
sin el desviador de recortes o sin el recogedor
de c6sped, aprobados, en su lugar, Nunca trate
de operar la segadora cuando se ha removido
la puerta trasera o cuando est,. un poco abierta..
Puerta trasera
Mango det
bastidor del
recogdor
Gancho del
marco del
recogedor de
c6sped
PARA VACIAR EL RECOGEDOR DE
ClaSPED
, Levante el recogedor de c_sped usando el
mango del bastidor.
• Remueva el recogedor de c_sped, con los
recortes, de debajo del mango de la
segador&
• Vacie los recortes de la bolsa usando tanto el
mango del bastidor como 61de la bols&
AVISO: No arrastre la bolsa cuando la vacfe;
se producir& un desgaste innecesarioo
Para un cottebajo, levante las ruedas
EL IMPULSION
o Para arrancar en movimtento hacia adetante, tire
la barra de control de la impulsi6n hacia el
mango.
= Para parar el rnovimiento hacia adelante, alivie fa
barra de control de la impulsi6n,
IMPORTANTE: durante la utilizaci6n, guarde
siempre la barra de control de la impulsion en
contra del mango.
Barra concontrol que exige
la presencia det operador Control
,_ , de la imputsi6n
\
Para engranchar et ControBde la impulsidn
control de la desenganchado
impulsi6n
ANTES DE HACER ARRANCAR EL
MOTOR
ACEITE
Su segadora fue enviada sin aceite en el motor.
• Aseg0rese que la segadora est6 nivetada y que
ei &rea alrededor del dep6sito de aceite est_
limpiao
o Reueva el tapa del dep6sito del aceite con la
varilla indicadora de nivet y re!lene hasta la lfnea
de Ileno en _sta.
o Use 27 oz. de aceite, Para el tipo y ta caiidad vea
"MOTOR" en la secci6n de tas
"Responsabilidades del Cliente" en este manual.
o
Vac[e el aceite lentamente. No 1ollene
demasiadoo
23
Page 24

o Reviseelniveldelaceiteantesdecadauso.
Agregueaceitesiesnecesario_LLenehastala
lineadeIlenoenlavarillaindicadoradeniveL
o Vuelvaains_arlatapadeldep6sitodeaceite
delmotoryapri_tela.
o Cambie etaceite despu_s de 25 horas de
operaci6n o por Io menos una vez al aho si la
segadora se utiliza menos 25 horas al ahoo
Puede necesitar cambiar el aceite m&s a
menudo cuando las condiciones son p61vorosas
o sucias.
GASOLINA
o Uene el estanque de combusUble. Use gasolina
regular, sin plomo, nueva y limpia con el mfnimo
de 87 octanoso (El uso de gasolina con plomo
aumentar& los dep6sitos de 6xido de plomo y
carbono y se reducirA ta duraci6n de la val,,,ula).
No mezcle el aceite con la gasoiin& Para
asegurar que la gasotina utifizada sea fresca
compre estanques los cuales puedan set
uUlizados durante los primeros 30 dias.
IMPORTANTE: Cuando se opere en temperaturas
pot debajo de 32° F (0° (3) use gasolina de calidad
de inviemo, limpia y nueva para ayudar a asegurar
un buen arranque in clima ffio.
ADVERTENClA: La experiencia ha indicado que
los combustibles mezclades con alcohol (conocidos
como gasohot, o el uso de etanol o metanol)
pueden atraer la humedad, la que conduce a la
separaci6n y formacihn de &cidos durante el
almacenamientoo La gasolina ac[dica puede dafiar
el sistema det combustible de un motor durante el
almacenamientoo Para evitar los problemas con el
motor, se debe vaciar el sistema de combustible
antes de guardarlo por un periodo de 30 dias o
m&s. Vacie el estanque de combustible, haga
arrancar e! motor y h&galo funcionar hasta que las
Ifneas del combustible y el carburador queden
vacios, La pr6xima temporada use combustible
nuevo. Vea las Insb_cciones para e!
Almacenamiento para m&s informaci6no Nunca use
productos de limpieza para el motor o para el
carburador en el estanque del combustible pues se
pueden producir dafios permanentes.
PRECAUCION: Uene hasta la parte
inferior del cuello de relleno del estanque de
gasolina. No lo Ilene demasiadoo Umpie el aceite o
el combustible derramado° No almacene, derrame o
use gasolina cerca de una llama expuesta.
Tapa del
Tapa del / rellenador de
deposito de / gasolina
aceite con
varilla
indicadora de
nivel
PARA HACER ARRANCAR EL MO-
TOR
o Para hacer arrancar un motor ffio, empuje el
cebador cinco (5) veces antes de trataflo. Use un
empuje f_rmementeoEste paso normalmente no
es necesario cuando se hace arrancar un motor
que ya ha estado funcionando por unos cuantos
minutos_
• Sujete la barrade controles que exigen la
presencia del operador abajo en el mango y tire
el mango del arrancador r#,pidamenteo No
permita que el cord6n del arrancador se
devuelva abruptamente_
• Para parar el motor, suelte Ia barra de control
que exige la presencia del operadoro
AVISO: En cfimas mAs fr[os puede que sea
necesario repetir los pasos del cebado_ En climas
m&s calurosos efcebar demasiado puede producir
el ahogo y el motor no va a arrancar,.Si se ahoga e!
motor espere unos cuantos minutos antes de tratar
de hacerlo arrancar y no repita los pasos del
cebado.
CONSEJOS PARA SEGAR
• Bajo ciertas condiciones, tal como c_sped
muy alto, puede ser necesario el elevar la
altura del corte para reducir el esfuerzo
necesario para empujar la segadora y para
evitar sobrecargar el motor, dejando
montones de recortes de c_sped.
o Para un corte muy pesado, reduzca el ancho
del corte pasando parcialmente por encima
del lugar anteriormente cortado y siegue
lentamente.
• Cuando use una segadora con descarga
trasera en c6sped ht_medo y pesado, los
montones del c6sped cortado puede que no
entren en el recogedor de c_spedo Reduzca
la velocidad del recorrido (velocidad de
empuje) y/o haga funcionar la segadora
sobre el _.rea por segunda vez.
o Si queda una huella de cortes en el lado
derecho de una segadora con descarga
trasera, siegue en la direcci6n en que giran
las manillas del reloj, solapando un poco para
recaudar los recortes en la pr6xima pasada.
° Los poros en los recogedores de c_sped de
tela pueden ilenarse con mugre y polvo con
el uso y los recogedores recaudar&n menos
c_sped. Para evitar _sto, rocie e! recogedor
con la manguera de agua regularmente y
d_jelo secarse antes de usarlo°
- Mantenga la parte superior del motor,
alrededor del arrancador, despejada y sin
recortes de c6sped y paj& Esto ayudar_, el
flujo del aire det motor y extender& su
duraci6n_
24
Page 25

CONSEJOS PARA SEGAR Y
ACOLCHAR
IMPORTANTE; Para obtener el mejor
rendimiento mantenga la caja de la segadora
sin acumulac6n de c_sped y basurao Vea
"LIMPIEZA" en la secci6n de
RESPONSABtLIDADES DEL CLIENTE de este
manual.
o La cuchilla acofchadora especial va a volver
a cortar los recortes de c_sped muchas
veces, y los reduce en tamafio, de modo que
si se caen en e! c_sped se van a dispesar
entre _ste y no se van a notan Tambi_n, el
c6sped acolchado se va a deshacer
rApidamente entregando substancias
nutritivas para el c_sped_ Siempre acolche
con la velocidad del motor (cuchilla) m&s alta,
pues asf se obtendr& la mejor acci6n de
recorte de las cuchiltas,.
o Evite cortar el c6sped cuando est_ mojado.
El c_sped mojado tiende a formar montones
e interfiere con la acci6n de acolchado. La
mejor hora para segar el c_sped es temprano
en la tarde. A esa hora _ste se ha secado y
el _rea reci_n cortada no quedar& expuesta
al sol directo,
o Para obtener los mejores resultados, ajuste
fa altura del corte de la segadora de modo
que _sta corte solamente el tercio superior de
las hojas de c_spedo En el caso de que el
c_sped haya crecido demasiado, puede ser
necesario el elevar la altura del corte para
reducir el esfuerzo necesario para empujar la
segadora y para evitar sobrecargar el motor,
dejando montones de recortes de c_sped.
Para un acolchamiento muy pesado, reduzca
el ancho del corte pasando por encima del
lugar anteriormente cortado y siegue
lentamente,
• Ciertos tipos de c_sped y sus condiciones
pueden exigir que un &rea tenga que ser
acolchada por segunda vez para esconder
completamente los recortes. Cuando se haga
et segundo corte, siegue atravesado o en
forma perpendicular a la pasada del primer
corteo
o Cambie su patr6n de corte de semana a
seman& Siegue de norte a sur una semana y
luego cambie de este a oeste la pr6xima
semana. Esto evitar_ que el cSsped se
enrede y cambie de direcci6n.
Max t/3
25
Page 26

ouECOMPLETESUS .V,C,OREGU .R
.... __" FECHAS DE SERV!C!O
Revisar si hay,suietado_es sueltos.... _" ........
Limpiar/inspeccionarel recogedorde
S c_sped (si vieneequi,p,a,do) _ _"
Mmpiar la segadora
G Umpiardebajo de la cubierta de la trans"
A mis!6n (segadoras con poder propulso!! ....
s_d8 _.(segadoras, con poder propulso,r)
D Revisar las correas y las poleas tmpuf-
Revisar olafllartcambiar la cuchilla
RA Tabla de lubricaciSn
Umpiar ta batert'a,/recargar
(segadoras conarranqueel_ct,r,iCrO)......................
Cam'biarel_ite d_Lm_to_
_1 Revisar el nivel def aceite t_
.o¢__ _ _,_
v"
v'
V',3,
v" v" ................
,_1,2
inspeccionar el silenciador
OTu_piarel_iiir0d_._e" ' ,,,
Umpiar olcamb_ar la bujfa
R
Cambiar el cartucho de papel del filtro
de aire
1 - Cambiar m_s a menudo cuando se opere bajo carga pesada o en ambienles con altas temperaluras
2 - Dar servicio m_s a menudo cuando se opere en condiciones sucias o polvorosas,
3 - Cambie las cuchillas m_s a menudo cuando siegue en lerreno arenoso
4 - Cargar pot 48 horas af fin de la temporada.
RECOMENDACBONES
GENERALES
La garantfa de esta segadora no cubre los art_culos
que han estado sujetos al abuso o a la negligencia
del operador. Para recibir todo el valor de la
garantfa, el operador tiene que mantener la
segadora seg[]n las instrucciones descritas en este
manual.
Hay algunos ajustes que se 1]enenque hacer en
forrna perid_lica para poder mantener su unidad
adecuadamente.
Todos los ajustes en la secci6n de Servicio y
Ajustes de este manual tienen que ser revisados
por Io menos un vez por cada temporada.
• Una vez al aSo, cambie la bujia, limpie o cambie
el elemento del fittrode aire y revise si la cuchilla
est_ desgastada.. Una buj_anueva y un elemento
del 1i11Tode aire limpio/nuevoaseguran la mezcla
de aire-combustible adecuada y ayudan a que
su motor funcione mejor y que dure m_s.
o Siga el programa de mantenimiento en este
manual,
ANTES DE CADA USO
• Revise el nivel de!aceite del motor.
• Revise si hay sujetadoressueltos.
LUBRICAClON
Mantenga la unidad bien lubricada (yea la "TABLA
DE LUBRICAOION").
v"
v"
v'2
TABLA DE LUBRICACION
1_) Aceite del
motor
(_)' Clavija de ta (_) Bisagra de la
transmisiSn puerta trasera
Rocei el lubricante
(_) Refierase a la secciSn de RESPONSABILIDADES
DEL CLIENTE en "MOTOR"
IMPORTANTE: No aceite o engrase los
rodamientos de la rueda de plaslJco. Los lubricantes
viscosos atraeran polve y mugre, Io que acortara la
duraci6n de Io rodamientos autolubdcanteso Si cree
que tienen que lubricarse, use solamente un
tubricante tipo grafito, de polve seco, en forma
moderada_
(_) Ajustador de
la rueda
O Support de
(_) frein
PiSon de
impulsi6n
ressort du
26
Page 27

ESPECIFICACIONES DEL PRODUCTO
i ,, ml, ,u,,, , ,,,,, ,,
NUMERO DE MODELO 917.377641
NUMERO DE SERIE
FECHA DE COMPRA
CABALLOS DE FUERZA: 6.5
DESPLAZAMIENTO:
CAPACIDAD Y TIPO
DE GASOLINA:
,,,,,,
TIPO DE ACEITE:
(API-SF/SG/SH)
12+56 CU. IN+
1.5 Cuartos
REGULAR SIN PLOMO
SAE 30 (sobre 32°F)
SAE 5W-30 (debajo 32°F)
CAPACIDAD DE ACEITE: 27oz. de capacidad
BUJ[A (ABERTURA: .030") CHAMPION RJ19LM or J19LM
TOLERANCIA DE VALVULA: ADMISION: .004 - +008
DESCARGA: .004 - .008
SENCENDIDO DE ESTADO
SOLiDO ABERTURA DE AIRE: .0125 IN.
TORSION DEL PERNO
DE LA CUCHILLA: 35-40 FT. LBS.
El num_ro del nodelo y el de serie se encuentran en la calcomania adjunta a la parte
trasera de la caja de la segadora+ Debe registrar tanto el num6ro de serie come la
fecha de compra y mantengalos en un lugar seguro para refencia en el futuro.
SEGADORA
Siempre observe las reglas de seguridad cuando
haga el rnantenimiento.
LLANTAS
o Mantenga tas llantas sin gasolina, aceite o
substancias quimicas para control de insectos
que pueden daSar la gomao
° Evite los tocones, las piedras, las gdetas
profundas, los objetos afilados y otros peligros
que pueden daSar alas Ilantas+
CUIDADO DE LA CUCHILLA
Para obtener los mejores resultados, la cuchilla de
la segadora fiene que mantenerse afiladao Carnbie
la cuchilla doblada o dafiada+
PARA REMOVER LA CUCHILLA
o Desconecte el alambre de la bujfa y p6ngalo en
donde no pueda entrar en contacto con _sta.
o Haga descansar la segadora en su lado.
Asegt]rese que el filtro de aire y que et
carburador queden mirando hacia arriba,
° Use un bloque de madera entre la cuchiila y la
caja de ta segadora para evitar que la cuchilla
gire cuando se le quite el pemo,
o Proteja sus manos con guantes y/o envuelva la
cuchitla con una tela gruesa+
o Remueva el pemo de la cuchi!la gir&qdolo en el
sentido contrario en que giran las mani!las del
reloj_
+ Remueva la cuchilla y los artfculos de ferretefia
adjuntadores (el pemo, la arandefa de seguddad
y la arandeta enduredda)°
AVlSO: Remueva el adaptador de la cuchilta y
revise el cubo interiorde la ranura del adaptador de
la cuchilla. La ranura tJeneque estar en buenas
condiciones para que funcione en forma adecuada
Cambie el adaptador si estA dadado+
PARA CAMBIAR LA CUCHILLA
o Ponga el adaptador de la cuchil}a en e! cigueSal
det motor. Asegt_rese que la ranura del
adaptador y que ei chavetero del dguefial est6n
alineado&
, Ponga la cuchil{a en ei adaptador de _sta
alineando los dos (2) agujeros en la cuchitla con
las salientes elevadas en el adaptadoro
° Asegurese de que el foorde de salida de la
cuchiUa (opuesto al borde afilado) est_ hacia
arriba hacia el motor.
o Instate el pemo de tacuchUla con la arandela de
seguridad y la arandela endurecida en el
adaptador de la cuchilla y el ciguefiaL
27
Page 28

o Use un bloque de madera entre la cuchilta y la
caja de la segadora y apriete el pemo de la
cuchilla gir_dolo en el sentido en que giran las
manil/as del raloj..
o La torsi6n para apretar recomendada es de 35 -
40 pies libras.
IMPORTANTE: EL PERNO DE LA CUCHILLA ES
CLASE 8 TRATADO A CALOR
AVISO: No recomendamos el afilar la cuchilla-
pero si Io hace, asegl3rese de que quede
balancead&
PARAAFILAR LA CUCHILLA
Se lJene que tener cuidado de mantenerla
balanceada. Una cuchilla que no est_ baJanceada
va a producir eventualmente daSo en la segadora o
en el motor°
• La cuchilla puede afilarse con una lima o en una
rueda rec_cadora. No trate de afilada mientras
se encuentra en la segadora.
o Para revisar el baJance de la cuchilla, clave un
clavo en una riga o en la pared. Deje alrededor
de una pu]gada de un clavo recto expuestoo
Ponga el agujero central de la cuchilla sobre ta
cabeza del clavo. Si la cuchi!la est#.balanceada
debe permanecer en la posici6n horizontal. Si
cuaJquiera de los extremos de la cuchitla se
mueve hacia abajo, afile el extremo pesado
hasta que 6sta quede balanceada.
Adaptador de la -_. Chavetero del
cuchHfa -_. _ ciguena/
Es necesario limpiar las ruedas de impulsi6n; revise
arnbas ruedas traseras.
• Remueva los tapacubos y las tuercas de
seguridad,
° Remueva las pJedas de los ejes de !os
ajustadores de las ruedas,
• Remueva la basura y los recodes de c_sped de
dentro de la cubierta contra el polvo, pi56n y/o de
los dientes de los engranajes de las ruedas de
impulsi6no
° El pifi6n diferencial lJeneque instalarse con el
engranaje izquierdo en el lado izquierdo y con el
engranaje derecho en el lado derecho desde et
punt{) de vista del operador_
• El pifi6n diferencial viene estampado con una "L"
(left (izquierda)) o con una "R" (right (derecha))
en la parte interior°Si se instala incorrectamente
el sistema de imputsi6n no va a funcionar.
• Ponga tas ruedas de vuelta en los ejes del
ajustador.
• Vualva a poner las tuercas de seguridad y los
tapacubos
AVlSO: Los piSones y los tdnquetes de impulsi6n
deben limpiarse y lubricarse con grasa,
aproximadamente cada 25 horas, o una vez aJaSo.
Arandela
Tu_rcade seguridad / 1_'/
Tapaoubo X _'_]_ ""-.,. Clavija de la
"--___../-_-_).¢_"_ ._.-" transmision
Arandela Borde Adaptador
de de la
endurecida salida cuchi]la
RECOGEDOR DE ClaSPED
° El recogedor de c_sped puede ser rociado con el
agua de la manguera pero tJeneque estar seco
cuando se vaya a usar.
o Revise su recogedor de c_sped a menudo para
verificar si est_ daSado o deteriorado° Se va a
desgastar con el uso normal. Si se necesita
carnbiar el recogedor, c&mbie!o sotarnente por
uno que sea aprobado por el fabricanteo D6 el
nt)mero del modelo de la segadora cuando Io
ordene.
RUEDAS DE iMPULSION
Revise las ruedas de impulsi6ntraseras cada vez
antes de segar, para asegurarse de que se mueven
libremente, Si las ruedas no giran libremente quiere
decir que hay basura, recortes de c6sped, etc,
dentro del &rea de las ruedas de imputsi6ny de la
cubierta contra el polvo y tJenenque limpiarse para
liberadas,
/ Cubierta
PiRon contra
MOTOR et polvo
LUBRICACl6N
Use solamente aceite de detergente de alta calidad
clasificado con la clasificaci6n SF, SG o SH de
servicio API. Seleccione la calidad de viscosidad
8AE segt3n su temperatura de operaci6n esperada.
_CAUOADEg DE VISCOS[DAD DE SAE RECOMENDADAS I
AVISO: A pesar de que los aceites de
multMscosidad (5W30, 10W30, etc.1)mejoran el
arranque en clima frio, estos aceites de
multJviscosidad van ha aumentar elconsumo de
aceite cuando se usan en temperaturas sobre 32o
E Revise el nivel det aceite del motor m#,sa
menudo, para evitar un posible da5o en el motor,
debido a que no tiene s_ciente aceite.
Cambie el aceite despu_s de 25 horas de
operaci6n o por Io menos una vez al a5o si la
segadora se utJ{izamenos 25 horas el aSo°
28
Page 29

Revise el nivel del aceite del carter antes de
arrancar el motor y despu_s de cada cinco (5) horas
de uso conlinuado. Apdete eltap6n del aceite en
forma segura cada vez que revise el nivel del
aceite.
PARA CAMBIAR ELACEITE DEL MOTOR
AVISO: Antes de inclinar la segadora para drenar
el aceite, drene el tanque de combustible hadendo
correr el motor hasta que el tanque est_ vacio..
• Desconecte el alambre de la bujfa y p6ngalo de
modo que no pueda entrar en contacto con _stao
,, Remueva la tapa del dep6sito del aceite; d_jela a
un lado en una superfide limpiao
o Incline la cortadora de c_sped por este costado
tal como se muestra y purgue el aceite en un
recipiente id6neo.. Mueva la segadora de atr&s
para adelante para remover todo e! aceite que se
haya quedado atrapado dentro del motor°
o Limpie todo el aceite derrarnado en tasegadora
yen el lado del motor.
o Uene el motor con aceite. Ll_nelo solamente
hasta la Iinea de Ileno (FULL) en la vadlla
indicadora de niveL NO LO LLENE
DEMASIADO.
o Vuelva a poner la tapa en el dep6sito del aceite.
° Vuelva a conectar el aiambre de la bujfa a _sta.
SlLENOIADOR
Inspeccione y cambie el silenciador siestA corrofdo
pues producir un peligro de incendio y/o dafio.
ERvBse
FILTRO DE AIRE
Su motor no funcionar& en forma adecuada y
puede sufrir dafios si se usa un filtro de aire
sucioo
Cambie el filtro de aire cada afio, y m_.s a
menudo si siega en condiciones muy
polvorosas o sucias. No lave el filtro de aire.
PARA CAMBIAR EL FILTRO DE AIRE
= Afloje los tornillos de la cubiertao
o Empuje la cubierta hacia abajo y remuevala
de la bisagra,
° Remueva el filtro de papet afuera del cuerpo
del fittro de aire,
o Limpie la cubierta y el cuerpo del filtro de
aire,
• lnstale un nuevo filtro de papel
Asegt)rese que la bisagra este bien
agregada_
o Empuje la cubierta hacia arriba y apriete los
tornillos de la cubierta. (No los priete
demaciado)
Bisagra
Acubierta del
• trode aire
Filtro de papel
Manilla
de la
cubierta
BUJ[A
Cambie su bujia cada afio para hacer que su motor
arranque mAs f&cilmente y funcione mejor. Ajuste la
abertura de la bujfa en 0.030 pulgada_
LIMPIEZA
1MPORTANTE: Para obtener el mejor remdimiento,
mantenga, la] caja de la segadora sin acumulacion
de cesped y basura. Limpie la parte de abajo de su
segadora despues de cada uso.
PRECAUCiON: Desconecte el alambre de la bujia
y p6ngalo en donde no pueda entrar en contacto
con _sta.
• Haga descansar la segadora en su lado.
AsegQrese que e! filtro de aire y que el
carburador queden mirando hacia arriba. Limpie
la parte inferior de su segadora rasp_u_dolapara
remover la acumuiaci6n de c_sped y basurao
• Limpie el motor a menudo para evitar que se
acumule la basura. Un motor tapado fundona
m&s catiente y se acorta su duraci6n.
• Mantenga tassuperficies pulidas y las ruedas sin
gasolina, aceite, etc.
o No recomendamos el uso de una manguera de
jardfn para limpiar la segadora a menos que el
sistema el_tdco, el siienciador, el filtro de aJrey
el carburador est_n tapados para evitar que les
entre el agua_ El agua en el motor puede acortar
la duraci6n de _ste.
LIMPIE DEBAJO DE LA CUBIERTA DE
LA
IMPULSION
Umpie debajo de la cubierta de la impulsi6n por 1o
menos dos veces cada temporada. Raspe debajo
de fa cubierta con un cuchillo para masilla o con una
herrarnienta parecida, para remover toda
acumulaci6n de c_sped o basura en la parte infedor
de la cubierta de la impulsi6n,
29
Page 30

PRECAUCI6N: ANTES DE DAR CUALQUIER
SERVICtO O DE HACER AJUSTES:
o Suelte la barra de control y pare el motor°
• Asegt'Jrese que la cuchilla y que todas las
partes movibles se hayan detenido
completamente,,
, Desconecte el alambre de la bujia y p6ngalo
en donde no pueda entrar en contacto con
6sta,
PARA AJUSTAR EL MANGO
E1mango de su segadora cuenta con tres (3)
posiciones de altura- ajustelo a la altura que le
acornode,
. Presione las extremidades inferiores del mando
inferior una en contra una de la otra hasta que la
pinza del mango pueda ser insertada en uno de
los tres agujeros del control de la altur&
DESVIADORTRASERO
Se proporciona un desviador trasero, adjunto
entre las ruedas traseras de su segadora, para
reducir a un m[nimo la posibilidad qua objetos
sean lanzados hacia afuera de la parte trasera
de la segadora, en la posiciSn en donde se
encuentra el operadoro Si se da_,a el desviador
debe cambiarse.
pinza del
aJta mango
Soporte de
ajuste
baja / Mango de 3
posiciones
MOTOR
VELOCIDAD DEL MOTOR
La velocidad del motor ha sido ajustada en la
fAbric.a. No trate de aumentar la velocidad del motor
puss se pueden producir lesiones personales. Si
cree que el motor est& funcionando demasiado
r_.pidoo demasiado lento, Iteve su segadora a un
centro!departamanto de servido autorizado para
reparada o ajustarl&
CARBURADOR
Su carburador 1Janeun chorroprincipal fijo no
ajustable para controlar la mezctaoSi su motor no
est_ funcionando en forma adecuada debido a
problemas que se sospecha vianen del carburador,
Ileve su segadora a un centroidepartamento de
servicio autorizado para repararla y/o ajustadao
Inmediatamente prepare su segadora para el
alrnacenamiento al finalde cada temporada o si la
unidad no se va a usar por 30 dfas o _.
SEGADORA
Cuando se va a guardar la segadora por cierto
per_odode tiempo, Ifmpiela cuidadosamente,
remueva toda ta mugre, la graea, las hojas, etc,
Gu_.rdela en un &rea limpia y sec&
• Umpie toda la segadora (Vea "LIMPtEZA" en la
secciSn de Responsabilidades del Cliente de
este manual).
o Lubrfquela segQn se muestra en la secci6n de
Responsabilidades del Cliente de este manual.
o Asegt_rese de que todas las tuercas y ctavijasy
todos los pemos y tomillos est6n apretados en
foma segur& tnspeccione las partes que se
mueven para verificar si est&n da6adas,
quebradas o desgastada& C_nbielas si es
necesario.
• Retoque todas las superficies qua est6n
oxidadas o con la pintura picada; use una lija
antes de pintar.
MANGO
. Puede doblar el mango de su segadora para el
almacenarniento.
° Suelte las dos (2) manitlas det mango en cada
lado del mango superior y permita qua el mango
se doble hada detr&so
o Apriete las extremidades del mango inferior una
en contra de la otra hasta qua la pinza en el
mando desparche los soportes y pivote el
conjunto compteto del mango hacia adelante
para que se pueda reposar encima de la
segadora.
. Cuando prepare su mango a partJrde la posiciSn
de alrnacenamiento, el mango inferior necesitar&
cerrarlo manualmente para la posici6n de sega.
IMPORTANTE: Cuando doble el mango para el
almacenamiento o el transporte, asegurese que !o
doble segun se muestra o puede danar los cables
de control.
3O
Page 31

Barrade control que exige
la presenciadel operador
Mango superior
Mango
inferior Posii6n para segar
,.i
MOTOR
SISTEMA DE COMBUSTIBLE
IMPORTANTE: Es importante evitar que se formen
depositos de goma en partes fundamentates del
sistema de combustible tales como el carburador, et
fifo del combustible, la manguera del combustible
o en el estanque durante el almacenamiento. La
experiencia tambien indica que los combustibles
mezclados con alcohol (conocido come gasohol o
que tiene etanol o metanol) pueden atraer
humedad, Ioque conduce a la separaci6n y a Is
formaci6n de acidos durante el almacenamiento. La
gasolina addica puede da,fiar el sistema de
conbustible de un motor durante el periodo de
almacenamientoo
. Drene el estanque de combustibleo
- Haga arrancar el motor y d_jelo funcionar hasta
que las Ifneas det combustible y el carburador
est6n vacfos.
- Nunca use los productos para limpieza de!
carburador o del motor en el estanque de
combustible pues se pueden producir daRos
permanente&
o Use combustible nuevo la pr6xima temporad&
AVISO: E1estabilizador de combustible es una
altemativa aceptable para reducir a un mfnimo la
formaci6n de dep6sitos de goma en el combuslJble
durante el perfodo de almacenamiento. Agregue
estabilizador a la gasolina en el estanque de
combustible o en el envase para el
almacenarniento. Siempre siga la proporci6n de
mezcla que se encuentra en el envase del
estabilizador. Haga funcionar el motor por io menos
10 minutos despu_s de agregar el estabilizador,
para permitir que este tlegue al carburador. No
drene la gasolina dal estanque de gasolina y el
carburador si se est& usando estabilizador de
combustible.
ACEITE DEL MOTOR
Drene el aceite (con el motor caliente)y cAmbielo
con aceite de motor limpioo(Vea "MOTOR" en la
secqi6n de Responsabilidades del Ctiente de este
manual.)
CILINDRO
° Remueva la bujia
° Vacfe una onza (29 ml) de aceite a trav6s del
agujero de la bujia en el cilindro.
• Tire la manilla de arranque lentamente unas
cuantas veces para distribuir el aceite.
• Vuelva a montar la nueva buji&
OTROS
° No guarde la gasolina de una temporada a la
otr&
o Cambie el envase de la gasolina si se empieza a
oxidar_ La oxidaci6n y/o la mugre en su gasolina
producir&n problemas.
• Si es posible, guarde su unidad en un recinto
cerrado y ct_brala para protegerla contra el polvo
y la mugre.
° Cubra su unidad con un forro protector adecuado
que no retenga la humedad. No use plfistico. El
pl_stico no puede respirar, Ioque permite la
formaci6n de condensaci6n, Io que produdrA la
oxidaci6n de su unidad_
IMPORTANTE: Nunca cubra tasegador a mientras
el motor y las areas de escape todavia estan
calientes..
PRECAUCION: Nunca almacene la segadora con
gasolina en el estanque dentro de un edificio en
donde los gases pueden alcanzar una llama
expuesta o una chispa.. Permita que se enfr_eel
motor antes de almacenarla en alg_n recinto
cerrado.
31
Page 32

8DENTIFICACI6N DE PROBLEMAS
PROBLEMA CAUSA
=ill H,H,, , ,,
No arranca
oFiltro de aire sucio,
oSin combustible.
° Combustible rancio,
• Agua en el combustible.
° Alambre de ta buj[a
desconectadoo
• Bujia mala.. °
° Cuchilla suelta o adaptador °
de la cuchilla quebrado,
oBarra de control en la posiciSn
suelta_
oBarra.de control defectuos.a. "
Falta de fuerza
• Parte trasera de ta cajacuchilla °
de la segadora arrastr_.ndose
en el c_sped pesado, ,°
• Est,_ cortando mucho c_sped..
• Filtro de aire sucio.
• Acumulaci6n de c_sped, hojas o
y basura debajo de la sega-
dora°
• Demasiado aceite en el motor, °
ii illlll ii,,, =,,,,,
l lll , Hll,,,,,,,,,iui, ll_
CORRECCION
• Limpieicambie el filtio de aire..
° Llene e! estanque de combustible.
• Drene el estanque y vuelva a
llenarlo con combustible limpio y
nueVOo
• Drene el estanque de combustible y
el carburador y vuelva a llenar el
estanque con gasolina nueva.
° Conecte el alambre a la buj[ao
Cambie la bujfao
Apriete el perno de fa cuchilla o
cambie el adaptador de la cuchilia.
Presione la barra de control hacia el
mango,
Cambie la barra de control.
Ajuste a la posiciSn de "Corte m&s
alto o"
Ajuste a la posici6n de "Corte m_.s
alto?
Limpie/cambie el filtro de aire.
Limpie la parte infedor de la caja de
la segadorao
Revise el nivel del aceite.
32
Page 33

PROBLEMA
CAUSA
CORRECCION
Mal corte -disparejo
Vibraci6n excesiva
Cord6n arrancador
dif_cil de tirar
o Cuchilla desgastada, doblada o
suelta.
- Altura de las ruedas dispareja.
o Acumulaci6n de c_sped, hojas o
basura debajo de la segadora.
o Cuchilla desgastada, doblada o
suelta.
o CigueSal del motor doblado_
° El freno del volante del motor
est,. aplicado cuando se suelta
la barra de control,.
° CigueSal del motor doblado.
o Adaptador de la cuchilla
quebrado.
° La cuchilla se arrastra en el
c6sped.
Cambie la cuchilla. Apriete el
perno de la cuchilla_
Ajuste todas tas ruedas a la
misma altura.
Limpie la parte inferior de la caja
de la segadora.
Cambie la cuchillao Apriete el
perno de la cuchilla,
P6ngase en contacto con su
centro de servicio autorizado
m_.s cercanoo
Presione ta barra de control
hacia el mango superior antes de
tirar el cord6n arrancador.
P6ngase en contacto con su
centro de servicio autorizado
m_.s cercanoo
Cambie el adaptador de la
cuchilta.
Mueva la segadora a un lugar en
donde el c_sped ha sido cortado
o a una superficie firme para
hacer arrancar el motor.
Recogedor de c_sped
no se Ilena (si viene
equipado)
Dif_cil de empujar
Altura de corte demasiado
baja_
Levantamiento de la cuchitla
desgastado,.
Recogedor sin ventilaci6n de
aire.
Et c_sped est,. demasiado alto
o la attura de la rueda dema*
siado baja.
Parte trasera de la caja!cuchilla
de lasegadora arrastr&ndose
en el c_sped.
Recogedor de c_sped dema-
siado lleno.
Posici6n de la altura del mango
no adecuada para usted.
Eleve la altura de corte.
Cambie la cuchillas.
Limpie el recogedor de c_sped.
Eleve la altura de corteo
Eteve la parte trasera de la caja d_
la segadora ('1) un tugar m&s alto.
Vacfe el recogedor de c_spedo
Ajuste la altura del mango de
modo que le acomode_
33
Page 34

ROTARY LAWN MOWER - - MODEL NO. 917.377641
18
4
10
34
Page 35

03
03
t
2
3
4
5
6
7
8
10
1t
12
13
!4
15
16
17
18
t9
20
21
22
23
161471X479
161105X479
131036
153638
63601
66426
131959
87692
161551
73990500
51793
162949
650733X004
750097
162085
161548
161004
164713
161568X479
161569X479
150078
163183
ROTARY LAWN MOWER -- MODEL NO. 917.377641
KEY PART
NO. NO DESCRIPTION
Handle, Upper DIx Coral. 24 63124
Handle, Lower 25 161333
Bail, Cont. Wire DIx Coral. Blk 26 163409
Guide, Rope, Side 27 161550
Nut, Hex Lcckwasher 1/4-20 28 88652
Wire, Tie 29 134612
Bolt, Handle 5/16-18 x 1.75 30 851514
Knob, Handle 31 159267
Bolt, Sq. Neck 32 851074
Nut, Hex Leckwasher Ins. 5/16-18 UNC 33 850263
Cotter, Hairpin 34 851084
Cable 35 85543
Bracket, Upstop 36 87677
Screw, Hex Washer Head Tapping 10-2 37 150406
Kit, Door Rear 38 ......
Seal, Door 39 161768
Plug, Mulcher 40 161358
Kit, Housing 41 85463
Handle, Bracket - - 161058
Handte, Bracket Asm. Right - - 165423
Screw, Hex Wshd
Bolt, Hex Head 5/t6-18 x 5/8
Available accessories not included with lawn mower:.
7133623 Gas Can (2.5 gal.)
71 33500 Fuel Stabilizer
71 33027 SAE 30W Oil (27 oz.)
7133086 Chute Deflector
Nut, Hex Lock Wshr 5/16-18
Baffle, Side
Screw 12 x 5/8
Skirt
Screw, Hinge 114-20 x 1.26
Shield, Debris Modified
Adapter, Blade w/key Longer
Blade, 21"
Washer, Hardened
Lockwasher, Helical Spring 3/8
Screw, Hex Head 3/8-24 x 1.38
Pulley, Engine
Key, Hi Pro
Bolt, Engine
Engine (See Breakdown) 143.9865!6
Grass Catcher Bag
Grass Catcher Frame
Danger Decal
Warning Decal (Not Shown)
Owner's Manual
Page 36

03
G_
ROTARY LAWN MOWER " " MODEL NO. 917.377641
Page 37

ROTARY LAWN MOWER - - MODEL NO. 917.377641
KEY
NO.
1
2
3
4
5
6
7
8
9
10
11
12
t3
14
15
16
17
18
19
20
2t
22
PART
NO
161587
161473
161478X004
83816
161537
750634
160816
132010
163939
160813X004
17541011
75192
161581
145354
57079
161584)(479
161602
160477X004
161546
12000022
163365
88060
KEY PART
DESCRIPTION NO. NO
Cable Drive 23 16t 1t8X004
Bait Control Drive 24 57808
Bracket, Downstop 25 164795
Screw Hex Wash Head Tapping 10-2 26 165096
Cover Drive 27 165097
Screw Thdro110-25 x .50 28 12000058
V-Belt 29 88080
Nut Lock Flanged 3/8-16 Zinc 30 67725
Pulley Driven 31 88446
Belt Keeper 32 150342
Screw Hex Wash Head 10-24 X .668 33 145212
Spring 34 150181
Transmission Asm. 35 160785 X004
Pin Spring Thrust 36 160786X004
Washer Hardened 37 161463
Rod Connecting 38 163409
Spring Extension 39 700279
Spnng Selector 40 150339
Knob Selector Spring 41 150182
E-Ring 7/8 42 83923
Bearing Support 43 19572216
Bearing Ball
DESCRIPTION
Retainer Drive Asm. Stmp,
Screw Hex Head Tapping 1/4-20 x .75
Drive Pawl
Pinion,Drive RH
Pinion, Drie LH
E-Ring 7/16
Cover, Dust WheeI
Washer t/2 x !-1/2 x .134
Bushing
Wheel 9x 2
Nut Hex Flange Lock
Hubcap, Mag Platinum 9"
Shaft Asm. Rear
Shaft Asm. Front
Retainer Front Shaft
Screw 12 x 5/8
Clip Retainer
Wheel 8 x 2
Hubcap, Mag Platinum 8"
Nut, Hex Flange Lock 3/8-16
Washer
Page 38

....... MODEL NUM..B.ER 143,9865!, 6
240
12 150
,J" 151A 1!
45
187A ". 45
i
416
'277
,11g
,135
38
75
Page 39

CRAFTSMAN 4-CYCLE ENGINE ................... MODEL NUMBER 143.986516
. =:.::...............
KEY PART
NO. NO, DESCRIPTION
1 36177
2 27652
6 36059
7 36005A
9 590568
10 36002
11 36003A
I2 32447
14 28277
15 36006
16 36008
17 31335
18 651O18
19 36082
20 36010
25 37149
26 650802
30 36185
40 40004
40OO5
41 36O7O
36071
42
4OOO6
40OO7
20381
43
45
36O23A
46
32610A
48
36030
5O
36031A
52
29914
69
36O32A
70
36t 94A
75
36010
8O
30574A
81
30590A
62
30591
83
36057
85
36034
86
650924
89
611154
90
611155
9t
611156
92
650815
93
650816
100
34443B
101
610118
651007
103
36054
1t0
119
36061
120
36187
125
36471
36472
29314 B
126
29315C
130
6021A
135
35395
150
31672
151
31673
151A
40016
Cylinder (Incl. 2,10,12,20 & 125) 152 37075
Dowel Pin I69 27234A
Breather Element 172 32755
Breather Cover & Gasket 174 30200
Screw, 10-24 x 3/4" 177 65O925A
Breather Valve Body 184 36183
Check Valve 186 36009
Breather Tube 187A 37148
Rat Washer 190 36013
Governor Rod (Machined) 191A 36012
Governor Lever 192 36016
Govemor Lever Clamp t93 36015
Screw, Torx 1"-15,8-32 x 19/64" 194 36014
Governor Spring 195 610973
Oil Seal 198 36017
Blower Housing Baffle 199 36018
Ass'y_(IncLI95) 239 36048
Screw, 1/4-20 x 5/8" 240 36190
Crankshaft 243B 651041
Piston,Pin,Ring Set (Std.) 245 36046
Piston,Pin,Ring Set (.010 OS) 250 36191
Piston & Pin Ass'y .(Std.) (lncL 43) 251 650928
Piston& Pin Ass'y.(.010 251A 650933
OS)(IncL43) 255 36193
Ring Set (Std.) 256 650983
Ring Set (.010 OS) 260 36188
Piston Pin Retaining Ring 261 . 650737
Connecting Rod Ass'y. (Incl 46) 263A 36192
Connecting Rod Bolt 275 36! 07
Valve Ufter 276 36043
Camshaft (MCR) 277 650927
Oil Pump Ass'y. 285 34449A
Mounting Flange Gasket 287 650926
Mounting Flange (Inc! 72 thru 85) 290 29774
Oil Seat 292 26460
Governor Shaft 300 36189
Washer 301 36246
Governor Gear Ass'y (IncL81) 305 36063
Governor Spool 307 36499
Idler Gear 308 36040
Screw, 1/4-20 x 1-9/16" 310 36064
Flywheel Key 346A 28763
Flywheel 347 650898A
Flywheet Fan 350 36045A
BeileviUeWasher 370A 36261
Flywheel Nut 370C 37199
Solid State Ignition 380 640020
Spark Plug Cover 390 590739
Screw, Torx T-15, 10-24 x t5/16" 400 36062D
Ground Wire 416 36085
Cylinder Head Gasket
Cylinder Head 417 650760
Exhaust Valve (Std.) (Incl 151) 900
Exhaust Valve (1/32" OS)
Intake Valve (Std.) (IncL 151) 900
Intake Valve (1/32" OS)
Screw, 5/16-18 x 1-1/2"
Resistor Spark Hug (RJ19tJ41)
Valve Spring
Lower Valve Spring Cap
Intake Valve Seal
KEY PART
NO. NO, DESCRIPTION
"O"-Ring
ValveSpringBoxGasket
ValveSpringBoxCover
Screw,10-24x9/16"
CarburetorMountingSkid
CarburetorGasket
GovernorLink
Air Baffle
BrakeLeverAss'y..
BrakeControlLever
BrakeControlLeverLink
BrakeSpring
RetainingRing
TerminalAss'y.
BrakeControlLoverSpring
BrakeLeverBushing
CarburetorToAir CleanerGasket
AirCleanerBody (IncL239 &350)
AirCleanerStud
AirCleanerFilter
AirCleanerCover
LockNut1/4-20
WingNut,1/4-20
ControlPlate
Screw,8-32x 21/64"
BlowerHousing
Screw,1/4-20x1/2"
StarterGdU
Muffler
LockingPlate
Screw,5/6-18x2-11/32"
StarterCup
Screw,8-32x 21/64"
FuelUne
Fue!LineCtamp
FuelTank(Incl.301)
FuelCap
OilFillTube
"(3"Ring
FillTubeClip
Dipstick
Screw,10-32x35/64"
Screw,10-32x27/32"
Primer
Lub_cationDecal
PrimerDecal
Carburetor(IncL239)
RewindStarter
GasketSet (incl.ItemsMarked* )
SparkArrestorKit
(IncL417)(Optional)
Screw,8-32x3/8"(Optional)
ReplacementEngine750819A,
orderfrom 71-999
ReplacementS/B 750797A,order
from71-999
RPMHigh3000 to3300
(NOTE: This enginecouldhave beenbuiltwilh 590702
starter).
39
Page 40

CRAFTSMAN 4-CYCLE ENGINE MODEL NUMBER 143.986516
I
KEY PART
NO. NO.
_-- 640020
1 632539
5 632593
6 632541
7 650506
25 632675A
27 632544
28 632543
29 632548
30 632709
31 632637
32 632672
33 632673
36 640022
37 632547
38 632545
39 632549
40 640021
47 632554
DESCRIPTION
Carburetor(IncL 187B &239 of Engine
Parts List)
Throttle Shaft & Lever Assembly
Dust Seal
Throttle Shutter
Throttle Shutter Screw
Float Bowl
Float Shaft
Float
Float Bowl to Body Gasket
lniet Needle, Seat & Seat Retainer (IncL
31)
Seat Retainer
Bowl Drain Screw
Bowl DrainWasher
Main NozzleTube
"O" Ring
Spring, Main Nozzle Tube
Float Bowl Retainer
Main FuelJet
Welch Plug, IdleMixing Welt
40
Page 41

CRAFTSMAN 4-CYCLE ENGINE MODEL NUMBER 143,986516
--1
KEY
PART
NO.
NO.
DESCRIPTION
C--_z
1
2
3
4
5
6
7
8
590702
590599A
590600
590696
590601
590697
590698
590699
590700
Recoil Starter
Spring Pin (lncL4)
Washer
Retainer
Washer
Brake Spring
Starter Dog
Dog Spring
Pulley & Rewind Spring
Ass'y.
11
590703
Starter Housing Ass'y
(40 degree grommet)
12
590535
--3
13
590701
Starter Rope ( 98" X 9/
64" dia,)
Starter Handle
m Et-7
KEY PART
NO, NO.
590739
3
590740
6
590616
7
590617
8
590618A
11
59O638
t2
590535
13
5907O1
14
590741
DESCRIPTION
Rewind Starter
Retainer
Starter Dog
Dog Spring
Pulley & Rewind Spring
Ass'y
Starter Housing Ass'y
(40 degree grommet)
Starter Rope (Length98"
x 9/64"dia.)
Starter Handle
Locking Tab
41
Page 42

42
Page 43

43
Page 44

For the repair or replacement parts you need
delivered directly to your home
Call 7 am - 7 pm, 7 days a week
1-800-366=PART
(1-800-366-7278)
Para ordenar piezas con entrega a
domicilio- 1-800-659-7084
For in-house major brand repair service
Call 24 hours a day, 7 days a week
1=800-4=REPAIR
(1-800-473-7274)
Para pedir servicio de reparaci6n a
domicilio- 1-800-676-5811
For the location of a Sears Parts and
Repair Center in your area
Call 24 hours a day, 7 days a week
1=800-488=1222
For information on purchasing a Sears
Maintenance Agreement or to inquire
about an existing Agreement
Call 9 am - 5 pro, Monday-Saturday
1-800o827°6655
When requesting service or ordering
parts, always provide the following
information:
o Product Type • Part Number
• Model Number . Part Description
Amenca S Repair Speciattsts
165423 05.07.98 VB Printed in U.SoA.
 Loading...