

Page 1
Owner's Manual
(9
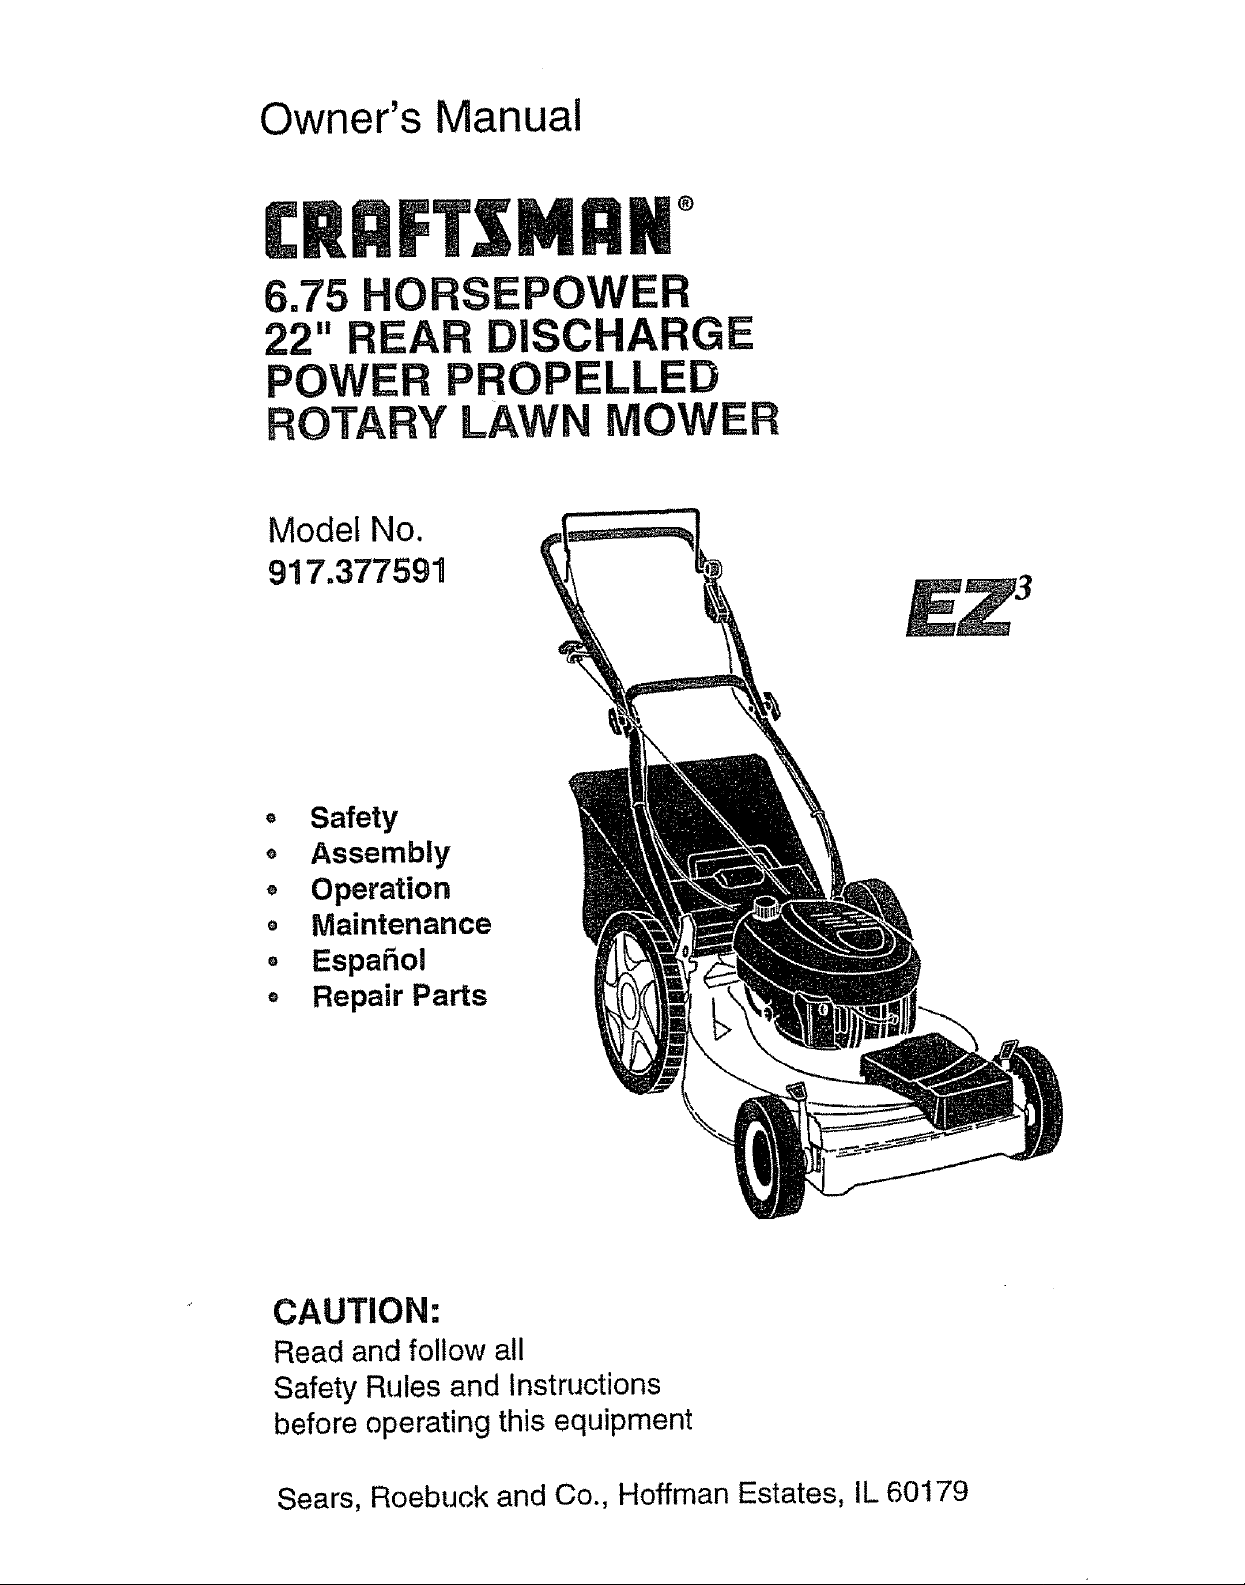
6.75 HORSEPOWER
22" REAR DISCHARGE
POWER PROPELLED
ROTARY LAWN MOWER
Model No.
917.377591
Safety
Assembly
Operation
o Maintenance
o Espa_ol
o Repair Parts
CAUTION:
Read and follow all
Safety Rules and Instructions
before operating this equipment
Sears, Roebuck and Co., Hoffman Estates, IL 60179
Page 2
Warranty 2 Product Specifications tl
Safety Rules 2 Service and Adjustments 14
Assembly 4 Storage 15
Operation 6 Troubleshooting 16
Maintenance Schedule 10 Repair Parts 35
Maintenance 10 Parts Ordering Back Cover
LIMITED TWO YEAR WARRANTY ON CRAFTSMAN POWER MOWER
For two years from date of purchase, when this Craftsman Lawn Mower is maintained,
lubricated, and tuned up according to the operating and maintenance instructions in the
owner's manual, Sears will repair free of charge any defect in material or workmanship°
If this Craftsman Lawn Mower is used for commercial or rental purposes, this warranty
applies for only 90 days from the date of purchase.
This Warranty does not cover:
o Expendable items which become worn during normal use, such as rotary mower
blades, blade adapters, belts, air cleaners and spark plug.
° Repairs necessary because of operator abuse or negligence, including bent crank-
shafts and the failure to maintain the equipment according to the instructions con-
tained in the owner's manual°
Warranty service is available by returning the Craftsman power mower to the nearest
Sears Service Center/Department in the United States. This warranty applies only whi_e
this product is in use in the United States.
This Warranty gives you specific legal rights, and you may also have other rights which
vary from state to state.
SEARS, ROEBUCK AND CO., D/817 WA, HOFFMAN ESTATES, ILLINOIS 60179
TRAINING:
o Read this operator's manual carefully.
Become familiar with the controls and
know how to operate your mower
properly. Learn how to quickly stop
mower.
° Do not allow children to use your mower.
Never allow adults to use mower without
proper instructions.
° Keep the area of operation clear of all
persons, especially small children and
pets.
o Use mower only as the manufacturer
intended and as described in this manual.
* Do not operate mower if it has been
dropped or damaged in any manner.
Always have damage repaired before
using your mower.
° Do not use accessory attachments that
are not recommended by the manufac-
turero Use of such attachments may be
hazardous.
o The blade turns when the engine is
running.
PREPARATION:
o Always thoroughly check the area to be
mowed and clear it of all stones, sticks,
wires, bones, and other foreign objects.
These objects will be thrown by the blade
and can cause severe injury.
• Always wear safety glasses or eye
shietds when starting and while using
your mower.
• Dress properly. Do not operate mower
when barefoot or wearing open sandals.
Wear only solid shoes with good traction
when mowing°
= Check fuel tank before starting engine.
Do not fill gas tank indoors,when the
engine is running or when the engine is
2
Page 3
hot.Allowthe engineto coolforseveral
minutesbeforefillingthe gastank.Clean
offanyspilledgasolinebeforestartingthe
engine.
° Alwaysmakewheelheightadjustments
beforestartingyourmower.Never
attempttodothiswhilethe engineis
running.
° Mowonlyindaylightorgoodartificial
light.
OPERATION:
o Keep your eyes and mind on your mower
and the area being cut. Do not let other
interests distract you.
° Do not mow wet or slippery grass. Never
run while operating your mower. Always
be sure of your footing -- keep a firm
hold on the handles and walk.
o Do not put hands or feet near or under
rotating parts. Keep clear of the discharge
opening at all times.
° Always stop the engine whenever you
leave or are not using your mower, or
before crossing driveways, walks, roads,
and any gravel---covered areas.
• Never direct discharge of material toward
bystanders nor allow anyone near the
mower while you are operating it.
° Before cleaning, inspecting, or repaidng
your mower, stop the engine and make
absolutely sure the blade and all moving
parts have stopped. Then disconnect the
spark plug wire and keep it away from the
spark plug to prevent accidental starting.
° Do not continue to run your mower if you
hit a foreign object. Follow the procedure
outlined above, then repair any damage
before restarting and operating you
mower.
° Do not change the govemor settings or
overspeed the engine. Engine damage or
personal injury may result.
° Do not operate your mower if it vibrates
abnormally. Excessive vibration is an
indication of damage; stop the engine,
safely check for the cause of vibration
and repair as required.
° Do not run the engine indoors. Exhaust
fumes are dangerous.
• Never cut grass by pulling the mower
towards you. Mow across the face of
slopes, never up and down or you might
lose your footing° Do not mow exces-
sively steep slopes. Use caution when
operating the mower on uneven terrain
or when changing directions -- maintain
good footing.
• Never operate your mower without
proper guards, plates, grass catcher or
other safety devices in place.
MAINTENANCE AND STORAGE:
• Check the blade and the engine mount-
ing bolts often to be sure they are
tightened properly.
° Check all bolts, nuts and screws at
frequent intervals for proper tightness to
be sure mower is in safe working
condition.
° Keep all safety devices in place and
working.
° To reduce fire hazard, keep the engine
free of grass, leaves or excessive grease
and oil.
o Check grass catcher often for deteriora-
tion and wear and replace worn bags.
Use only replacement bags that are
recommended by and comply with
specifications of the manufacturer of your
mower.
• Always keep a sharp blade on your
mower.
. Allow engine to cool before storing in any
enclosure.
° Never store mower with fuel in the tank
inside a building where fumes may reach
an open flame or an ignition source such
as a hot water heater, space heater,
clothes dryer, etc.
CAUTION: Always disconnect spark plug
wire and place wire where it cannot contact
spark plug in order to prevent accidental
starting when setting up, transporting,
adjusting or making repair&
WARNING
The engine exhaust from this product
contains chemicals known to the State of
California to cause cancer, birth defects, or
other reproductive harm.
Page 4
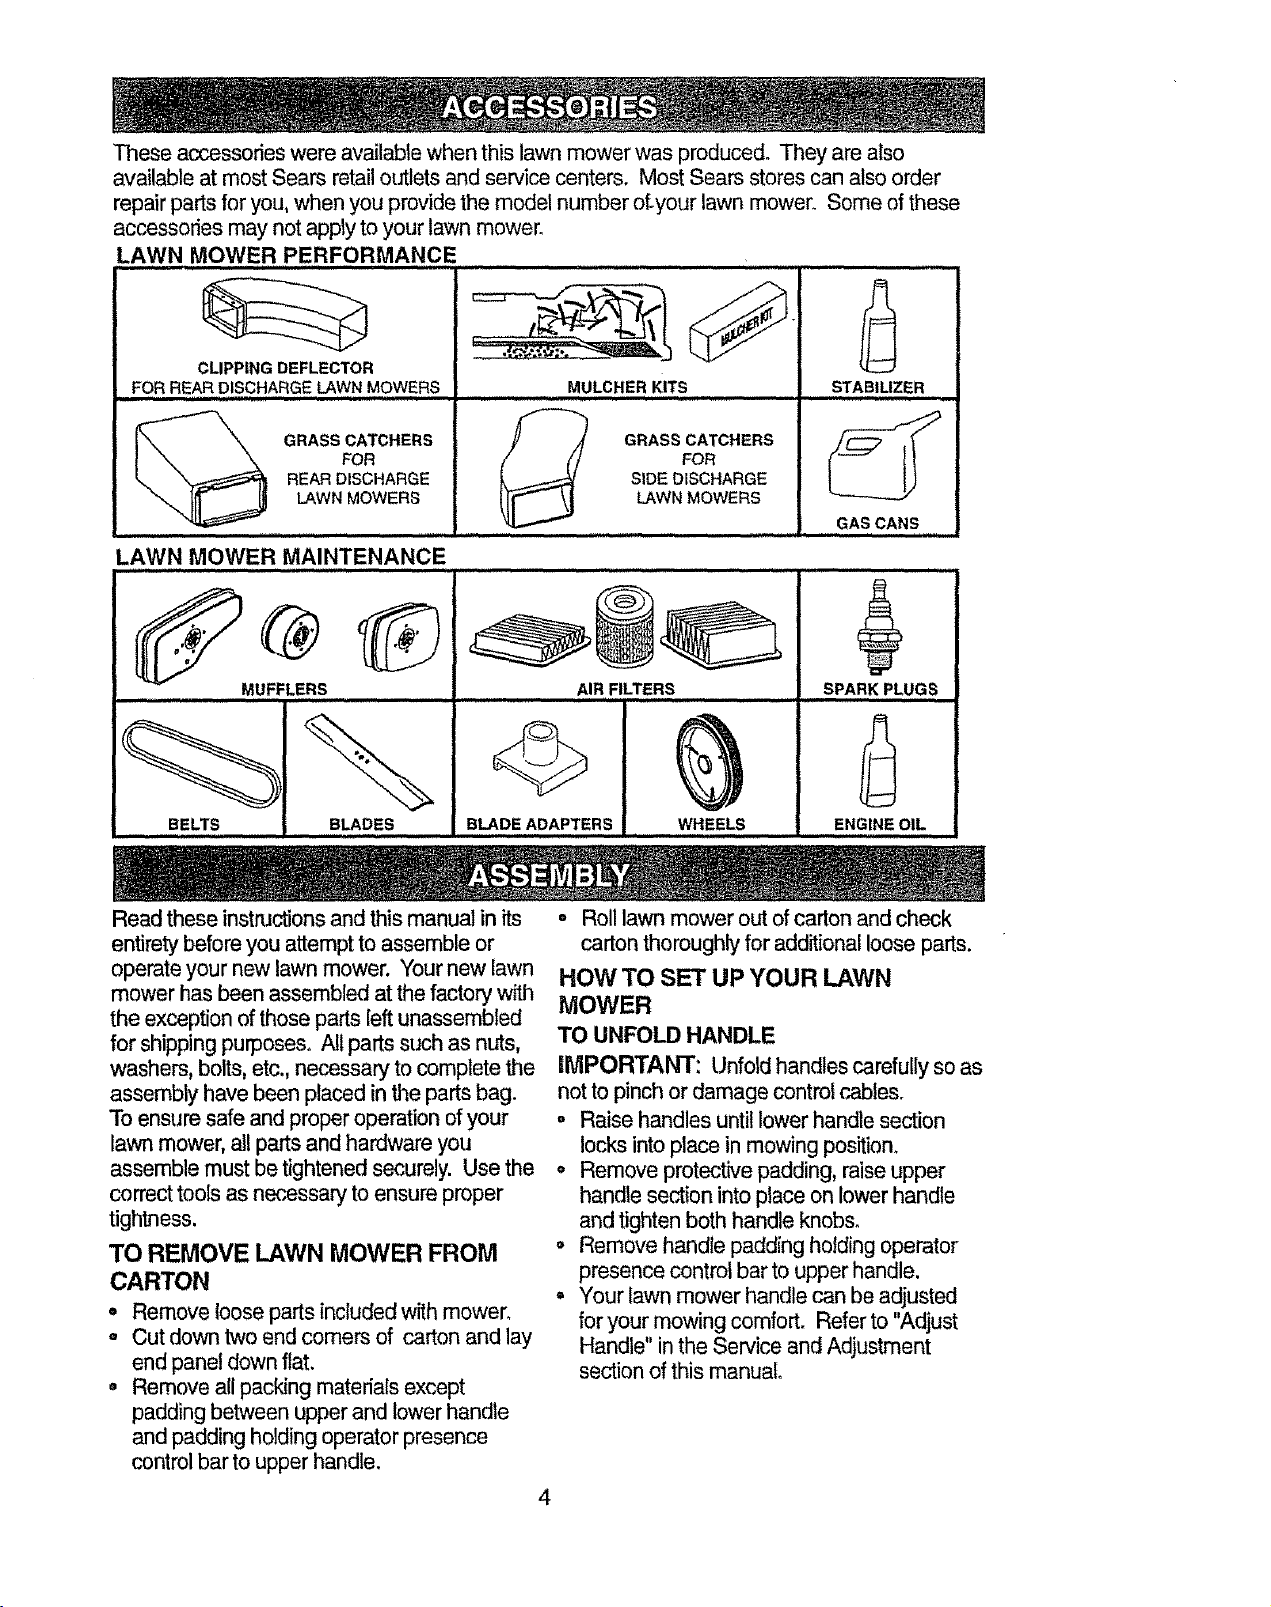
Theseaccessorieswereavailablewhenthislawnmowerwasproduced_Theyarealso
available at most Sears retail outlets and service centers. Most Sears stores can also order
repair parts for you, when you provide the model number of-your lawn mower. Some of these
accessories may not apply to your lawn mower.
LAWN MOWER PERFORMANCE
CLIPPING DEFLECTOR
FOR REAR,,DISCHARGE LAWN MOWERS
GRASS CATCHERS
FOR
REAR DISCHARGE
LAWN MOWERS
LAWN MOWER MAINTENANCE
..................... i¸ ,....................
MULCHER KITS
FOR
SIDE DISCHARGE
GRASS CATCHERS
LAWN MOWERS
STABILIZER
GAS CANS
MUFFLERS
BELTS BLADES
BLADE ADAPTERS WHEELS
Read these instructionsandthis manual in its
entirety before you attempt to assemble or
operate your new lawn mower. Your new lawn
mower has been assembled at the factory with
the exception of those parts left unassembled
for shipping purposes. Allparts such as nuts,
washers, bolts, etc.,necessary to complete the
assembly have been placed inthe parts bag.
To ensure safe and proper operation of your
lawn mower, all partsand hardware you
assemble must be tightened securely. Use the
correct tools as necessary to ensure proper
tightness.
TO REMOVE LAWN MOWER FROM
CARTON
• Remove loose parts included with mower_
- Cut down two endcomers of carton and lay
end panel downflat.
• Remove all packing materials except
padding between upper and lower handle
and padding holding operator presence
control bar to upper handle.
AIR FILTERS
SPARK PLUGS
2_
ENGINE OIL
o Roll lawn mower out of carton and check
carton thoroughly for additional loose parts.
HOW TO SET UP YOUR LAWN
MOWER
TO UNFOLD HANDLE
iMPORTANT: Unfotd handles carefullyso as
notto pinch or damage control cables.
o Raise handles until lower handle section
locks into place in mowing position_
o Remove protective padding, raise upper
handle section into place on lower handle
and tighten both handle knobs°
• Remove handle padding holding operator
presence control bar to upper handle.
° Your lawn mower handle can be adjusted
for your mowing comfort. Refer to "Adjust
Handle" in the Service and Adjustment
section of this manual°
4
Page 5
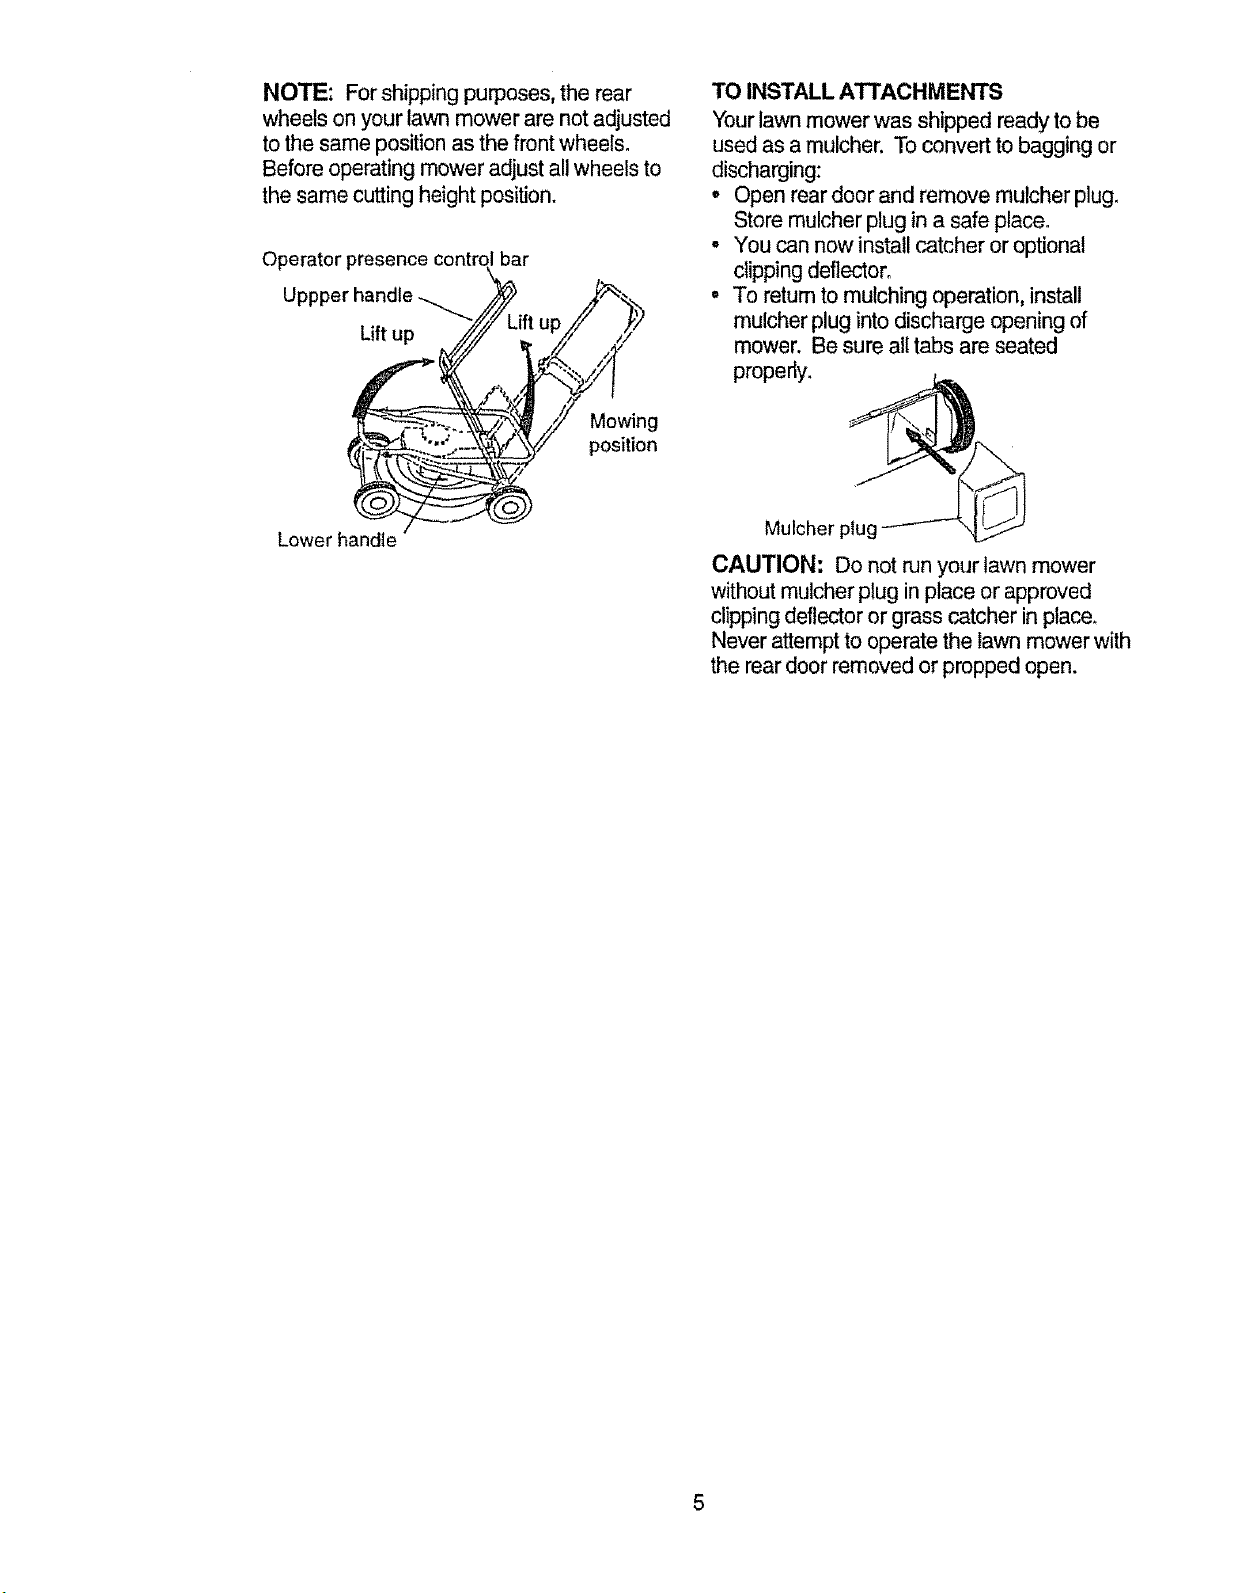
NOTE; Forshippingpurposes,therear
wheelsonyourlawnmowerarenotadjusted
tothesamepositionasthefrontwheels_
Beforeoperatingmoweradjustallwheelsto
thesamecuttingheightposition.
Operator presence contrc bar
Up[
Lift up
Lower handle
/
up
Mowing
position
TO INSTALL ATTACHMENTS
Yourlawnmower was shippedreadyto be
used as a mulcher. To convert to bagging or
discharging:
o Open rear door and remove mulcher plug_
Store mulcher plug in a safe place.
o You can now install catcher or optional
c_ippingdeflector.
• To retum to mulching operation, install
mulcher plug into discharge opening of
mower. Be sure alltabs are seated
properly.
Mulcher _
CAUTION: Do not run your lawn mower
without mulcher plug in place or approved
clipping deflector or grass catcher in place.
Never attempt to operatethe lawn mower with
the rear door removed or propped open.
Page 6
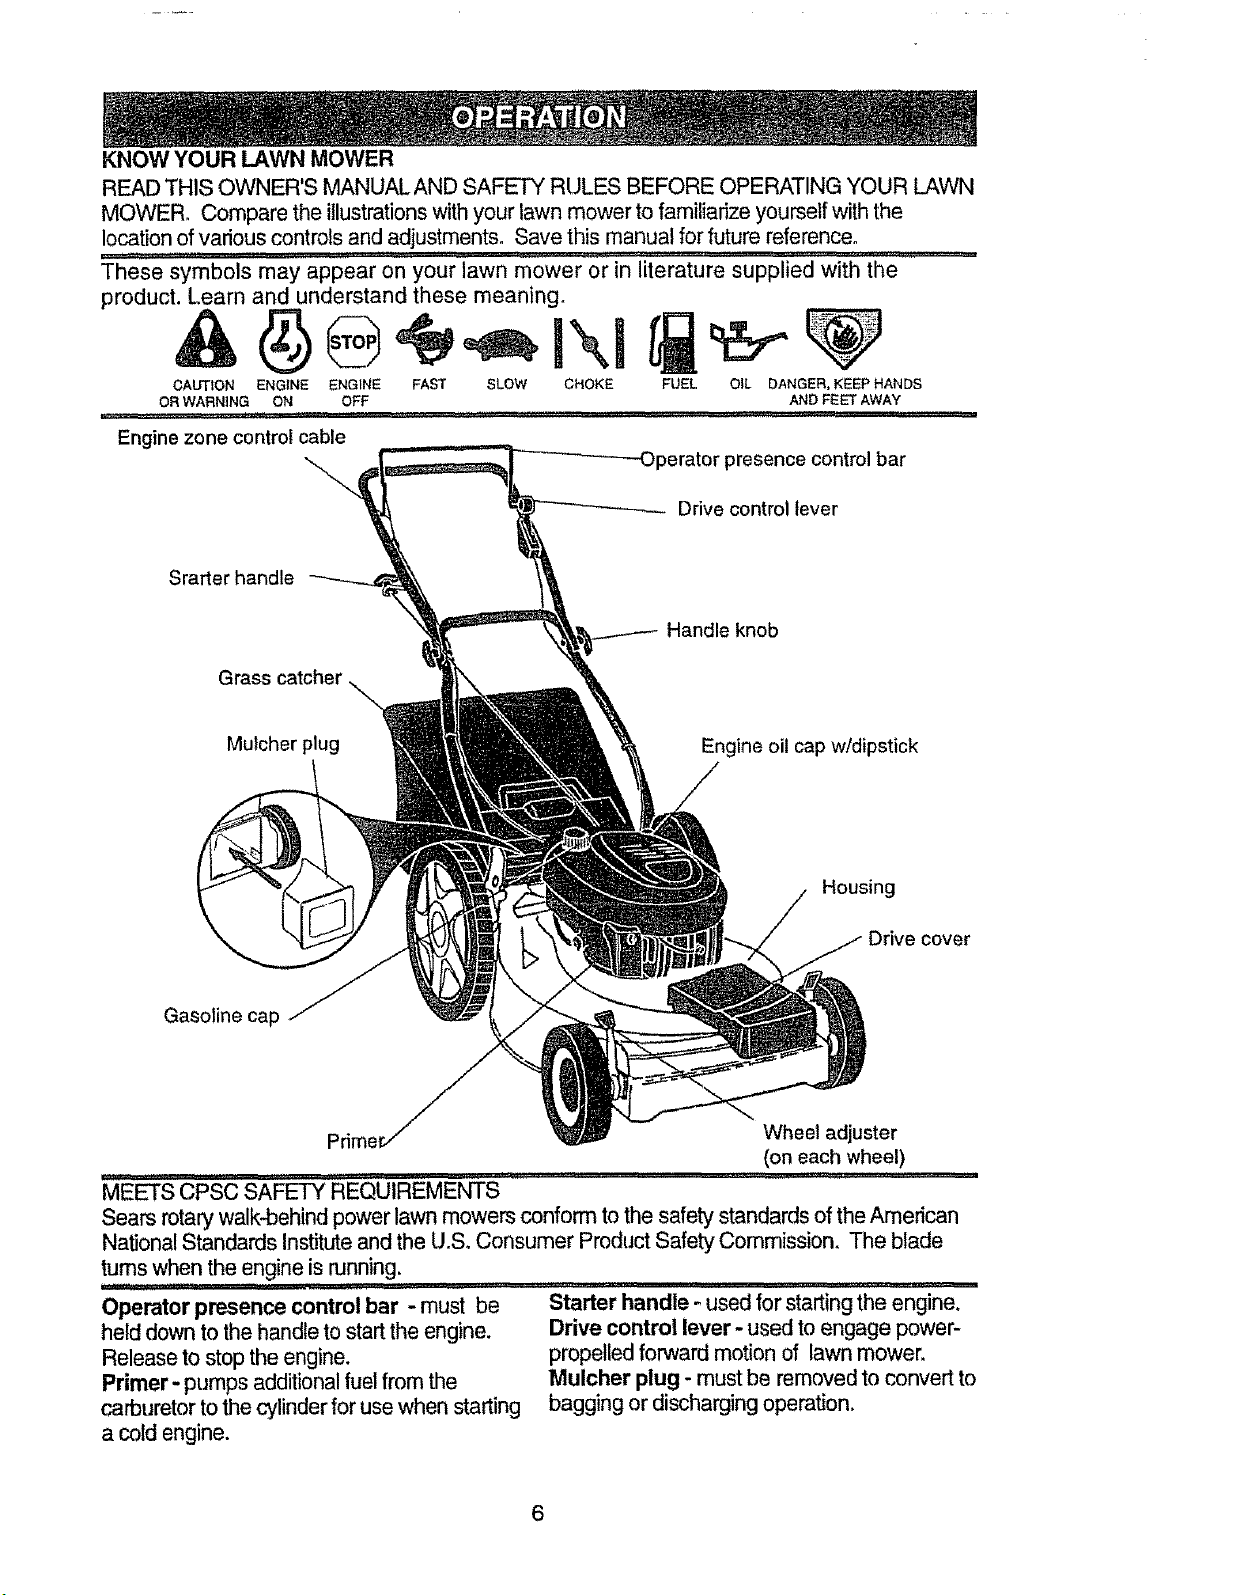
KNOWYOUR LAWN MOWER
READ THIS OWNER'S MANUALAND SAFETY RULES BEFORE OPERATING YOUR LAWN
MOWER. Compare the illustrationswith your lawn mower to familiarize yourself with the
location of various controls and adjustments° Save this manual for future reference°
.............'.......'............................ literature supplied ..............'
These symbols may appear on your lawn mower or in with the
product. Learn and understand these meaning.
CAUTION ENGINE ENGINE FAST SLOW CHOKE
OR WARNING ON OFF
Engine zone control cable
Srarter handle
Grass
Mulcher plug
FUEL OIL DANGER, KEEP HANDS
perator presence control bar
Drive control lever
Handle knob
Engine oil cap w!dipstick
AND FEET AWAY
Housing
Drive cover
Gasoline cap
Wheel adjuster
(on each wheel)
""'"MEETS................CPSC SA_ REQUIREMENTS'" ....................... ""..............
Sears rotary walk-behind power lawn mowers conform to the safety standards of theAmerican
National Standards Institute and the U.SoConsumer Product Safety Commission. The blade
turns when the engine is running.
.'_ ,/1/p"
Operator presence control bar - must be
held down to the handle to startthe engine.
Release to stop the engine.
Primer- pumps additional fuel from the
carburetor to the cylinder for use when starting
....Starter handle-used for startingtheengine.
Drive control lever- used to engage power-
propelled forward motion of lawn mower.
Mulcher plug - must be removed to convert to
bagging or discharging operation.
a cold engine.
Page 7
Theoperationof any lawnmowercan
resultin foreignobjectsthrownintothe
eyes,whichcanresultin severeeye
damage.Alwayswearsafetyglassesor
eyeshieldswhileoperatingyourlawn
mowerorperforminganyadjustmentsor
repairs. We recommendawidevision
safetymaskoverthespectaclesor
standardsafetyglasses.
HOW TO USE YOUR LAWN MOWER
CAUTION: Do not runyour lawn mower
without mulcher plate in place and door closed
or withoutan approved clipping deflector or
grasscatcher in place. Never attempt to
operate the lawn mower with the rear door
removed or propped open.
ENGINE SPEED
The engine speed was set at the factory
for optimum performance. Speed is not
adjustable°
ENGINE ZONE CONTROL
CAUTION: Federal regulations require an
engine control to be installed on this lawn
mower in order to minimize the risk of blade
contact injury. Do not under any circumstances
attempt to defeat the function of the operator
control. The blade turns when the engine is
running.
• Your lawn mower is equipped with an
operator presence control bar which
requiresthe operator to be positioned
behind the lawn mower handle to start and
operate the lawn mower.
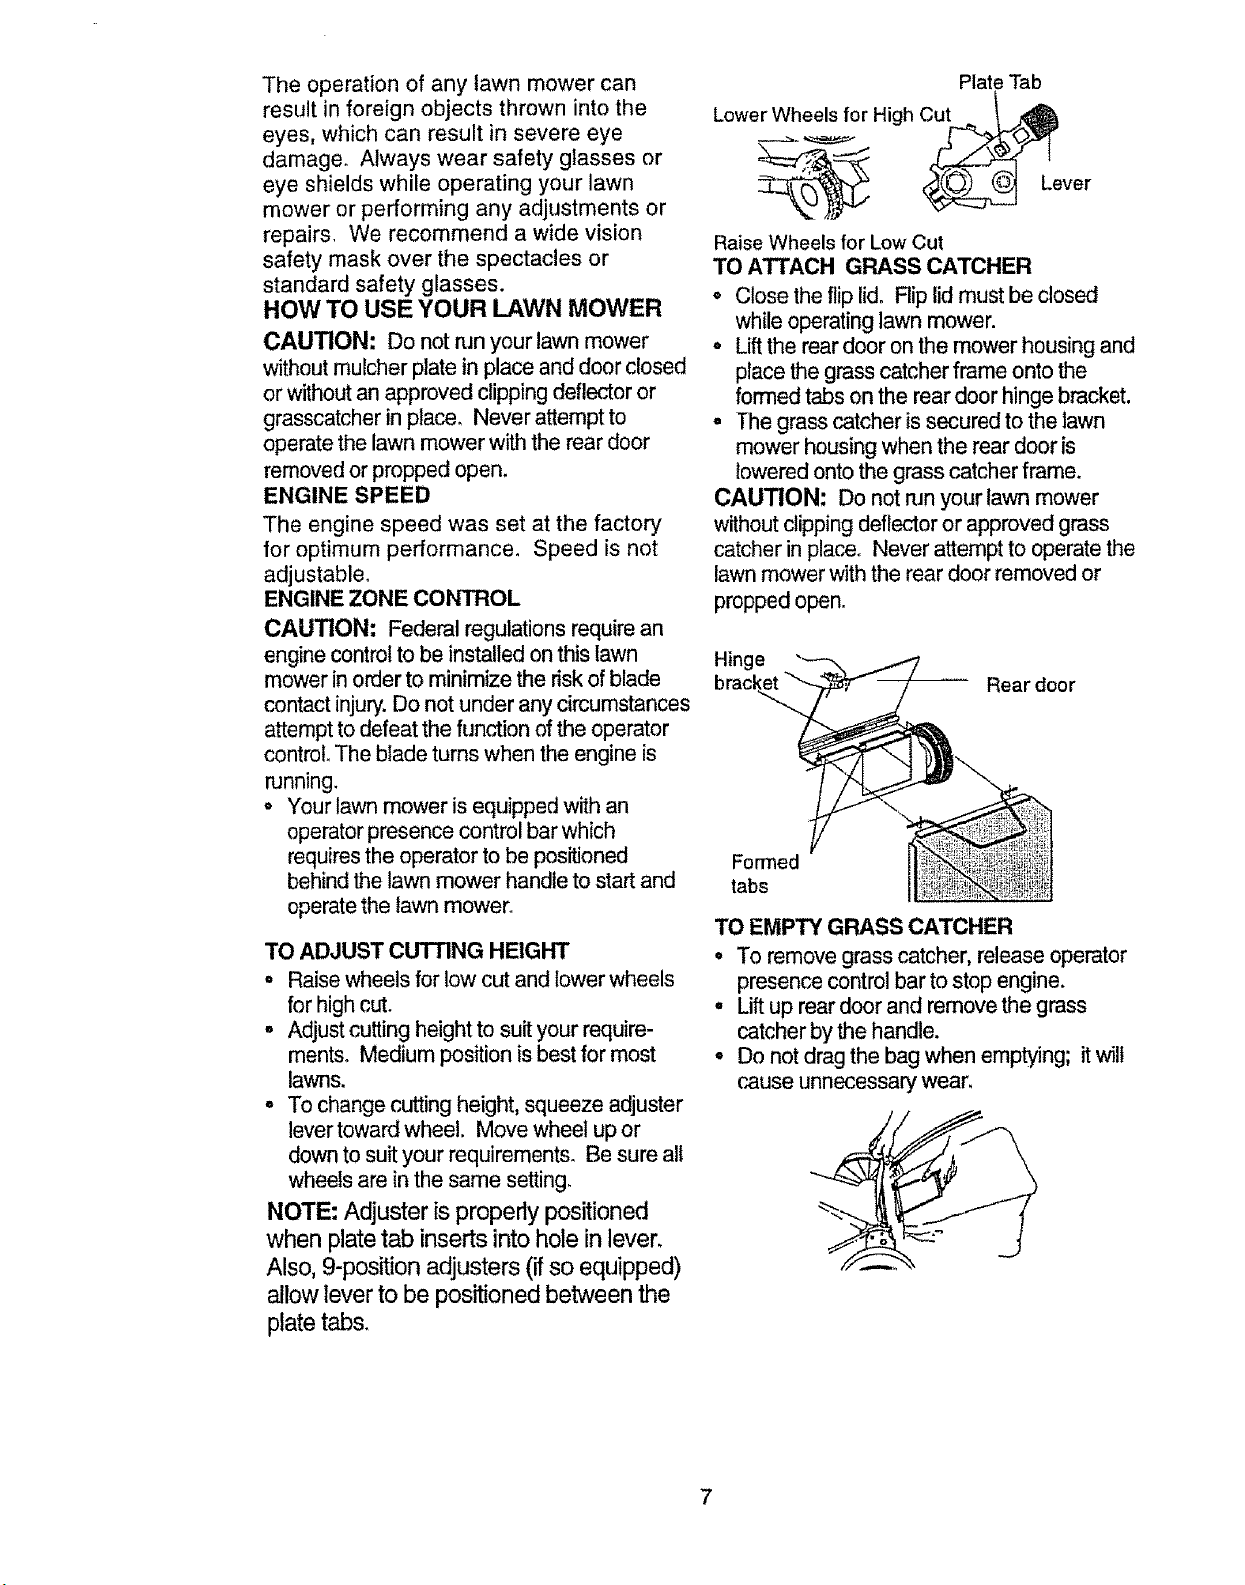
TO ADJUST CUTTING HEIGHT
= Raise wheels for low cut and lower wheels
for high cut.
, Adjust cutting height to suit your require-
mentso Medium position is best for most
lawns.
o To change cutting height, squeeze adjuster
lever toward wheel. Move wheel up or
down to suit your requirements. Be sure all
wheelsare inthe same setting_
NOTE: Adjuster is properly positioned
when plate tab inserts into hole in lever.
Also, 9-position adjusters (if so equipped)
allow lever to be positioned between the
plate tabs_
Plate Tab
Lower Wheels for High Cut
Lever
Raise Wheels for Low Cut
TO ATTACH GRASS CATCHER
• Close theflip lid. Rip lid must be closed
while operating lawn mower.
, Lift the rear door on the mower housing and
place the grass catcher frame onto the
formed tabs on the reardoor hinge bracket.
- The grass catcher issecured to the lawn
mower housing when the reardoor is
loweredonto the grass catcher frame.
CAUTION: Do not run your lawnmower
without dipping deflector or approved grass
catcher in place. Never attempt to operate the
lawn mower with the rear door removed or
propped open.
Hinge
brack._,
Formed
tabs
TO EMPTY GRASS CATCHER
" To remove grass catcher,releaseoperator
presence controlbar to stop engine.
• Liftup reardoorand removethe grass
catcherby the handle.
° Do notdragthe bag when emptying; itwill
cause unnecessary wear,
Rear door
7
Page 8
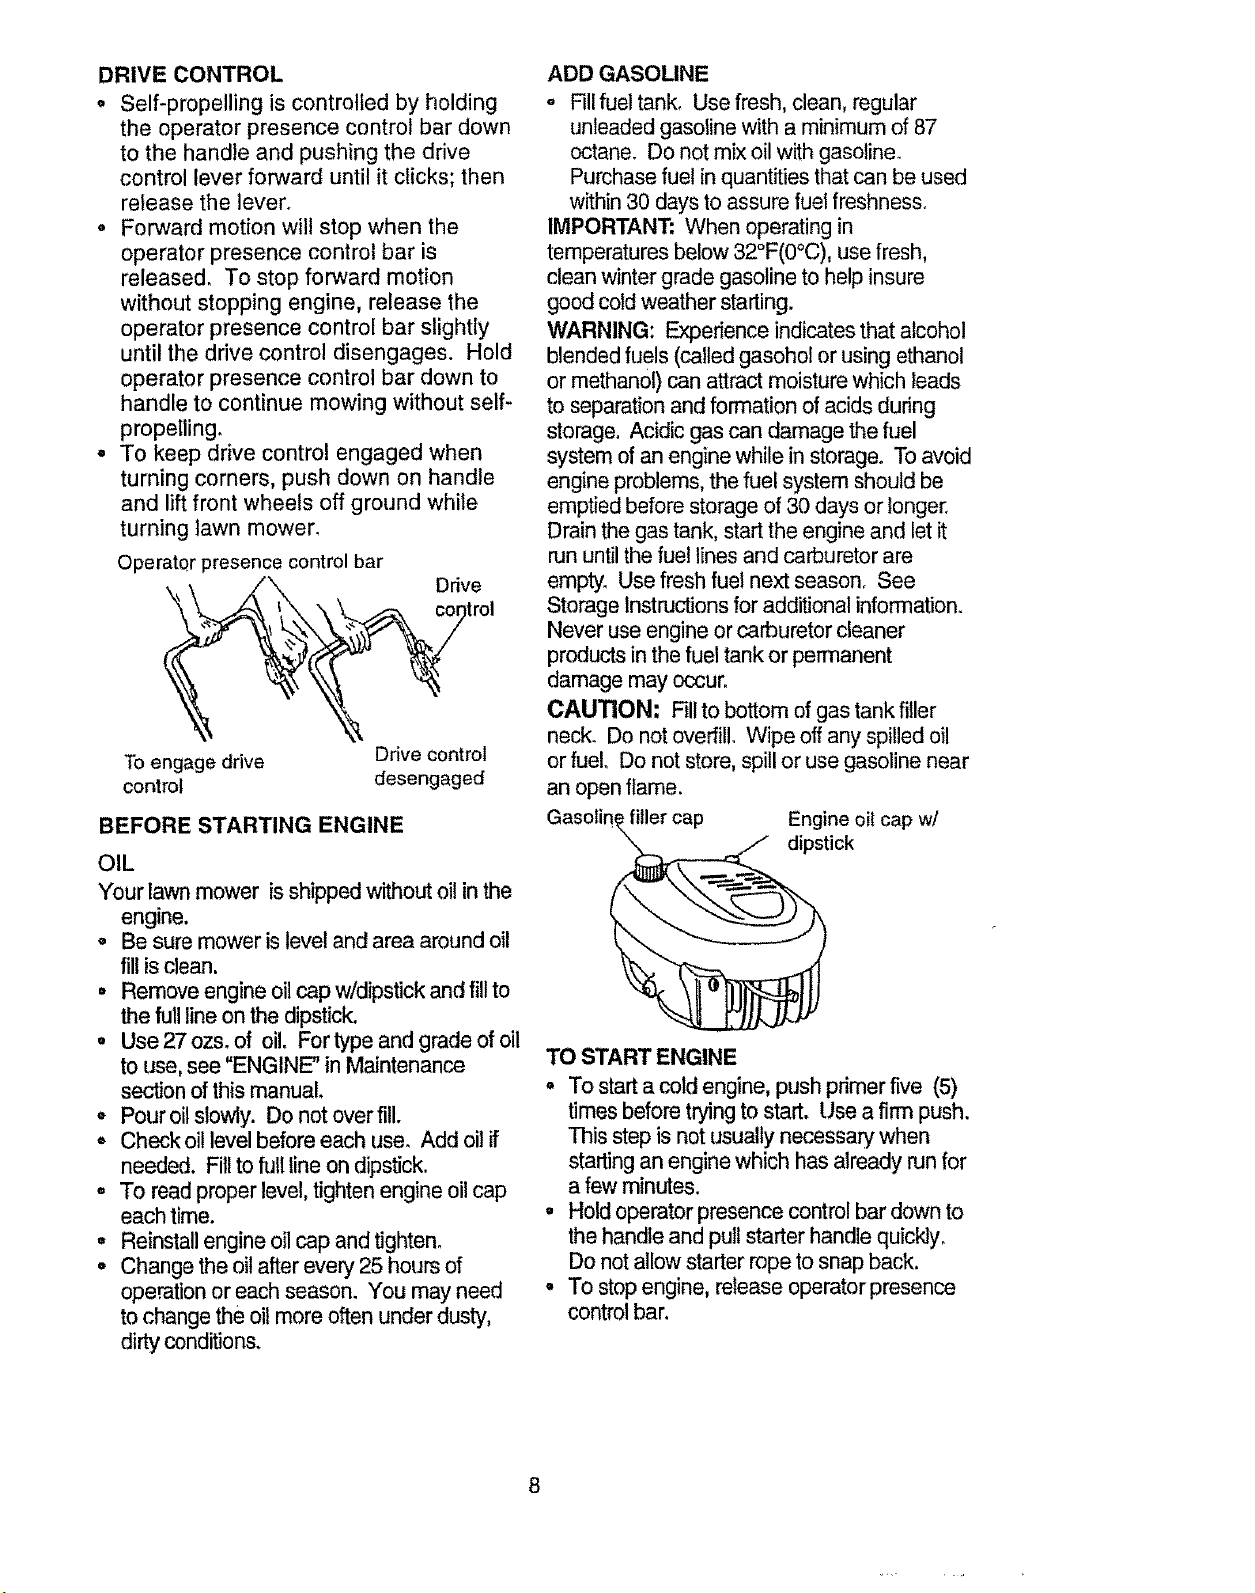
DRIVE CONTROL
o Self-propelling is controlled by holding
the operator presence control bar down
to the handle and pushing the drive
control lever forward until it clicks; then
release the lever°
° Forward motion will stop when the
operator presence control bar is
released. To stop forward motion
without stopping engine, release the
operator presence control bar slightly
until the drive control disengages. Hold
operator presence control bar down to
handle to continue mowing without self-
propelling.
° To keep drive control engaged when
turning corners, push down on handle
and lift front wheels off ground while
turning lawn mower.
Operator presence control bar
- /\ Drive
' ' ""__ _'_ \ \_ ..-->. control
To engage drive Drive control
control desengaged
BEFORE STARTING ENGINE
OIL
Your lawn mower is shipped without oil inthe
engine.
= Be sure mower islevel and area around oil
fill isclean.
• Remove engine oil cap w/dipstick and fillto
the full line on the dipstick.
° Use 27 ozs_of oil. For type and grade of oil
to use, see "ENGINE" in Maintenance
section of this manual.
o Pour oil slowly. Do not over fill.
• Check oil levelbefore each use° Add oil if
needed. Fill to full line on dipstick.
° To read proper level, tighten engine oil cap
each time.
° Reinstall engine oil cap and tighten°
° Change the oil afterevery 25 hours of
operation or each season. You may need
to change the oil more often under dusty,
dirty conditions.
ADD GASOLINE
o Fillfuel tank. Use fresh, clean, regular
unleaded gasoline with a minimum of 87
octane. Do not mix oil with gasoline.
Purchase fuel in quantities that can be used
within 30 days to assure fuel freshness.
IMPORTANT; When operating in
temperatures below 32°F(0°C), use fresh,
clean winter grade gasoline to help insure
good cold weather starting.
WARNING: Experience indicates that alcohol
blended fuels (called gasohol or using ethanol
or methanol) can attract moisture which leads
to separation andformation of acids during
storage. Addic gas can damage the fuel
system ofan engine while in storage. To avoid
engine problems, the fuel system should be
emptied before storage of 30 days or longer.
Drain the gas tank, startthe engine and let it
run untilthe fuel lines and carburetor are
empty. Use fresh fuel next season° See
Storage Instructions for additional information.
Never use engine or carburetor cleaner
products in the fuel tankor permanent
damage may occur.
CAUTION: Fillto bottom of gas tank filler
neck. Do not overfill. Wipe off any spilled oil
or fuel. Do not store, spill or use gasoline near
an open flame.
filler cap Engine oil cap w/
dipstick
TO START ENGINE
° To start a cold engine,push primer five (5)
times before trying to start. Use a firm push.
This step is not usually necessary when
starting an engine which has already run for
a few minutes.
- Hold operator presence control bar down to
the handle and puttstarter handle quick]y.
Do notallow starter rope to snap back.
• To stop engine, release operator presence
control bar.
Page 9
NOTE: Incoolerweatheritmaybeneces-
sarytorepeatpdmingsteps.Inwarmer
weatheroverprimingmaycausefloodingand
enginewillnotstart.Ifyoudofloodengine,
waitafewminutesbeforeattemptingtostart
anddonotrepeatprimingsteps.
MOWING TIPS
• Under certain conditions, such as very tall
grass, it may be necessary to raise the
height of cut to reduce pushing effort and to
keep from overloading the engine and
leaving clumps of grass ctippingso
• For extremely heavy cutting, reduce the
width of cut and raise the rear of the lawn
mower housing one (1)wheel adjuster
setting higher than the front for better
discharge of grass.
. When using a reardischarge lawn mower in
moist, heavy grass, clumps of cut grass
may not enter the grass catcher. Reduce
ground speed (pushing speed) and/or run
the lawn mower over the area a second
time,
o If a trail of grass clippings is left on the right
side of a rear discharge lawn mower, mow
in aclockwise direction with a small overlap
tocollect the clippings onthe next pass.
- Keep top of engine around starter clear and
clean of grass clippings and chaff° This will
help engine air flow and extend engine life.
o Pores in cloth grass catchers can become
filled with dirt and dust with use and
catchers will collect less grass, To prevent
this, regularly hose catchers off with water
and let dry before using.
Max 1/3
MULCHING MOWING TIPS
IMPORTANT: For best performance, keep
mower housing free of built-up grass and
trash, See "Cleaning" in Maintenance section
of this manual,
° The special mulching blade will recut the
grass clippings many times and reduce
them in size so that as they fall onto the
lawn they will disperse into the grass and
not be noticed. Also, the mulched grass will
biodegrade quickly to provide nutrients for
the lawn. Always mulch with your highest
engine (blade) speed as this will provide the
best reciting action of the blades.
° Avoid cutting your lawn when it is wet. Wet
grass tends te form clumps and interferes
with the mulching action. The best time to
mow your lawn is the early afternoon. At
this time the grass has dried and the newly
cut area will not be exposed to the direct
sun.
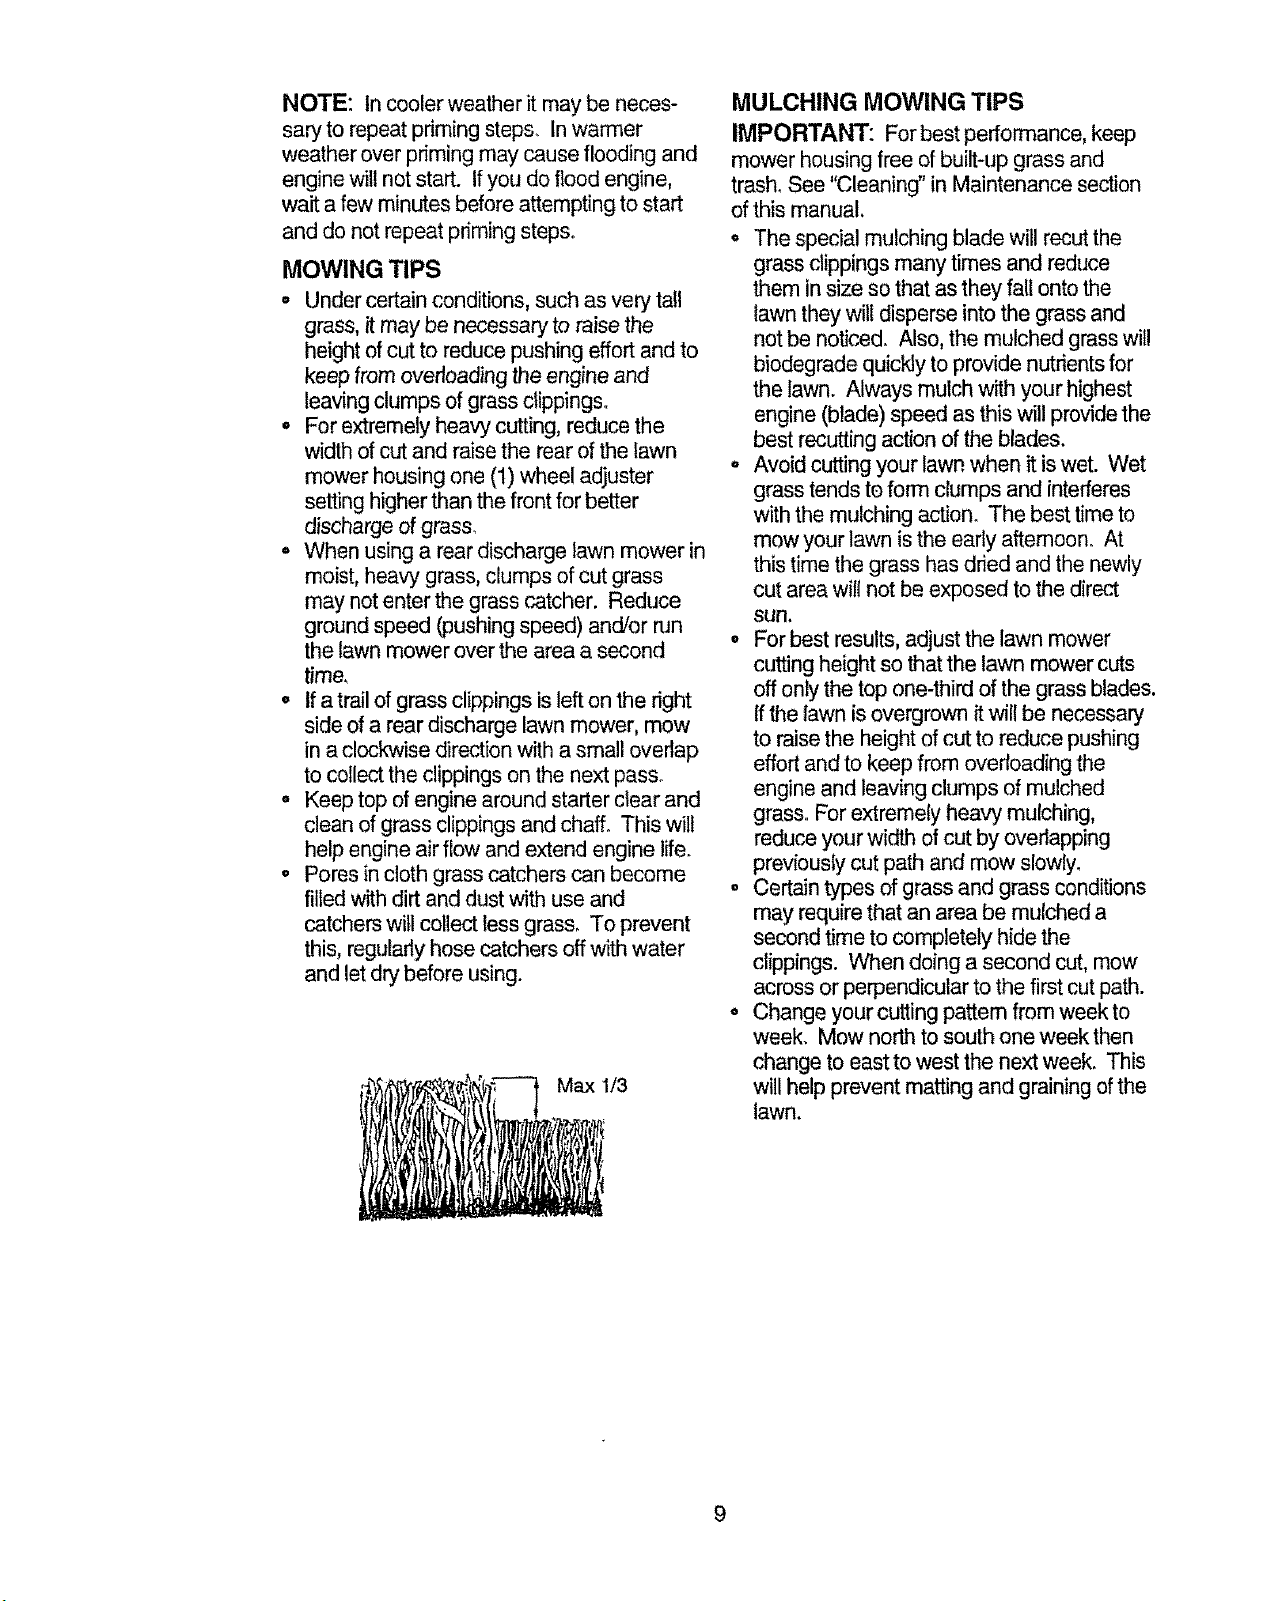
• For best results, adjust the lawn mower
cutting height so that the lawn mower cuts
off only the top one-third of the grass blades.
Ifthe lawn is overgrown it will be necessary
to raise the height of cut to reduce pushing
effort andto keep from overloading the
engine and leaving clumps of mulched
grass. For extremely heavy mulching,
reduce your width ofcut by overlapping
previously cut path and mow slowly°
. Certain types of grass and grass conditions
may require that an area be mulched a
second time to completely hide the
clippings. When doing a second cut, mow
across or perpendicular to the firstcut path.
= Change your cutting pattem from week to
week. Mow north to south one week then
change to eastto west the next week. This
will help prevent matting and graining of the
lawn.
Page 10
AsYooCOMPLETE OAT"o
REGU RSERWCE,,,, °
Check for Loose Fasteners 6/' ...._ ....
Clearv'lnspect Grass Catcher
(If Equipped) 6/ _4'
Clean Lawn MOWer _'
(Power-Prope,l!ed Mowers) ......... _
wO Clean Under Drive Cover
Check drive beWpulleys
E (Power-Propelled Mowers) 6/
.....
R ChectdSharpewRepiace Blade lY#3
Lubrication Chart
Ciean'"Battery/Rechar! e
(Electric Start Mowers ......... 6/ ..............
i E Check Engine Oil Level ..... V_'
iN Chan£ e Engine Oil .............. 6/1,2
G .c!eanAir.Filter ..... _'
I Inspect Muffler _ .........
N ciean or Replace Sp_'rkPl_,g
E Replace Air FilterPaper Cartridge 6#'2
1 - Change more often when operating under a heavy load orin high ambient temperatures
2 - Service more often when opera,rig in dirty or dusty condltions
3 - Replace blades more often when mowing in sandy soil
4 - Charge 48 houm at end o! season
J
,,,,,
v'
v',
m
m
GENERAL RECOMMENDATIONS
The warranty on this lawn mower does not
cover items that have been subjected to
operator abuse or negligence. To receive
full value from the warranty, operator must
maintain mower as instructed in this
manual,
Some adjustments will need to be made
periodically to properly maintain your unit.
All adjustments in the Service and
Adjustments section of this manual should
be checked at least once each season.
o Once a year, replace the spark plug,
replace air filter element and check
blade for wear, A new spark plug and
clean/new air filter element assures
proper air-fuel mixture and helps your
engine run better and last longer,
= Follow the maintenance schedule in this
manual.
BEFORE EACH USE
• Check engine oil level°
• Check for loose fastener&
LUBRICATION
Keep unit well lubricated (See "LUBRICA-
']'ION CHART").
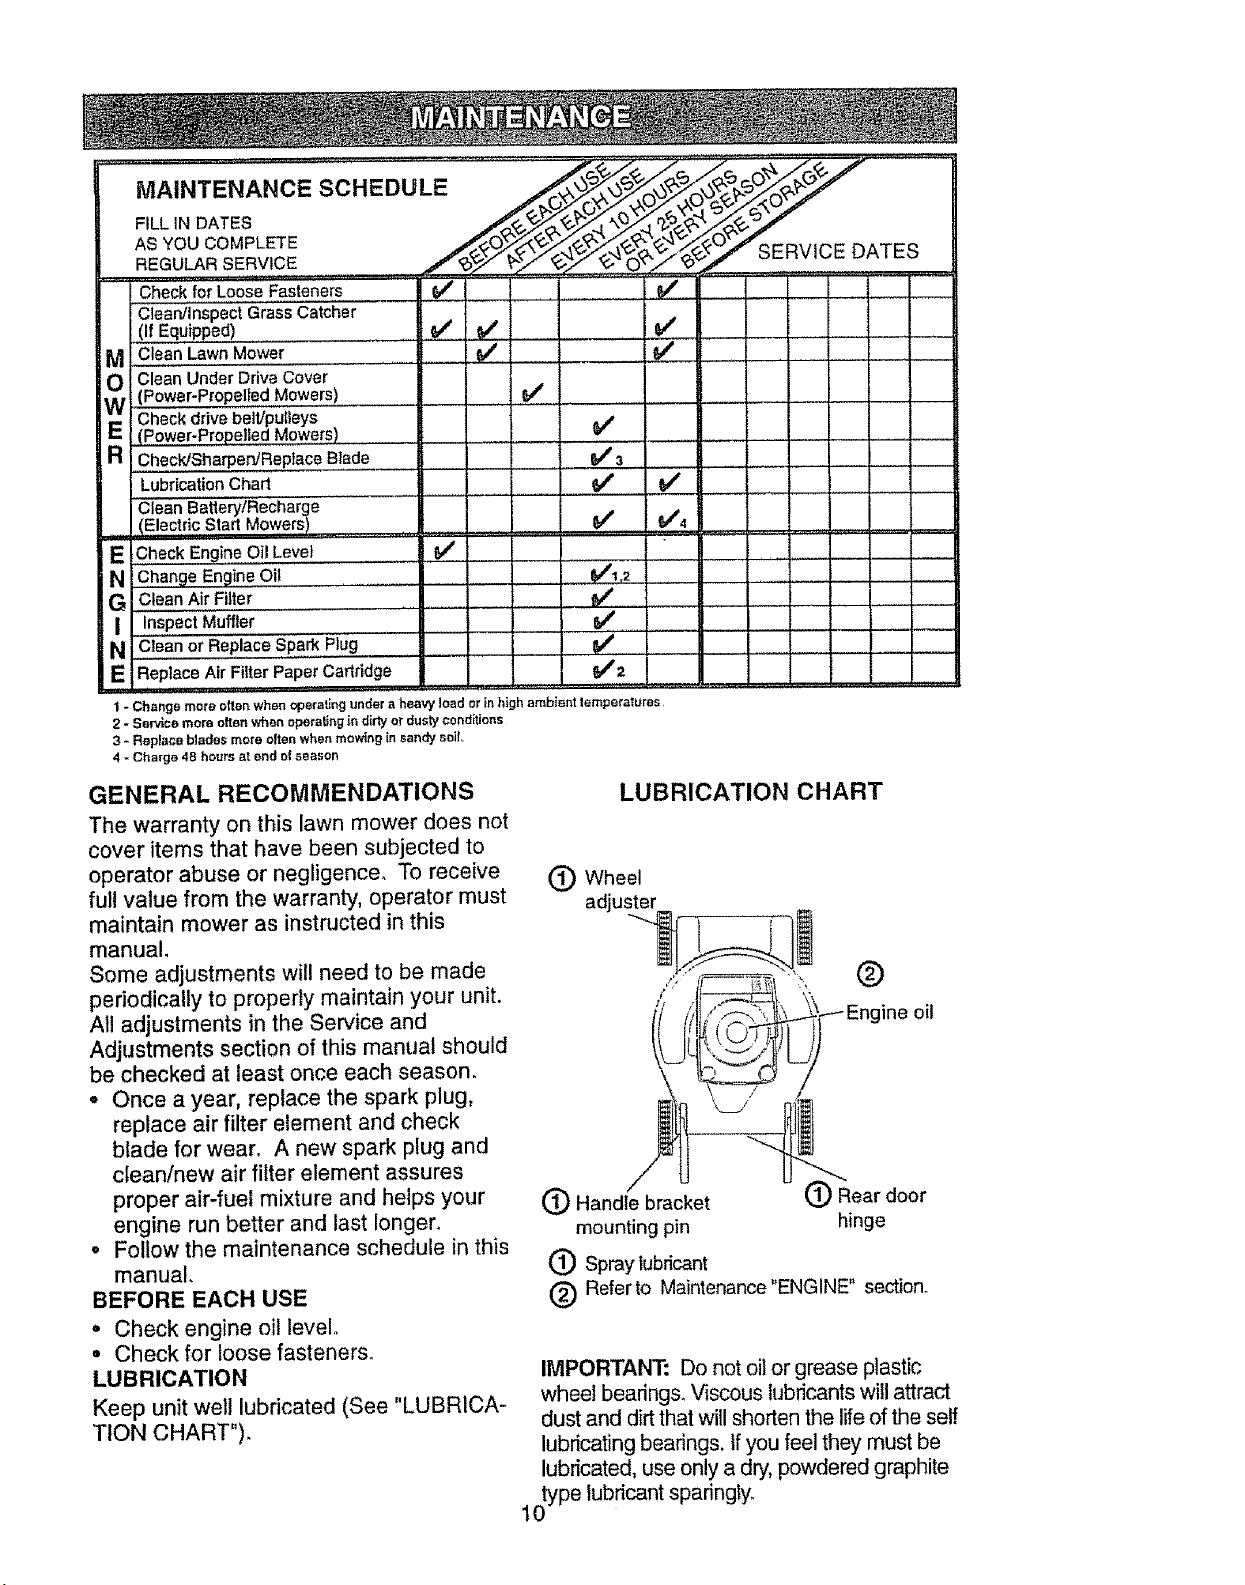
LUBRICATION CHART
Wheel
adjuster
®
ine oil
i_ Handle bracket f Rear door
mounting pin hinge
(_ Spray lubricant
® Referto Maintenance"ENGINE" section.
IMPORTANT: Do not oil or grease plastic
wheel bearings. Viscous lubricants will attract
dust and dirt that wilI shorten the lifeof the self.
lubricating bearings. Ifyou feel they must be
lubricated, use only a dry,powdered graphite
type lubricant sparingly.
1O
Page 11
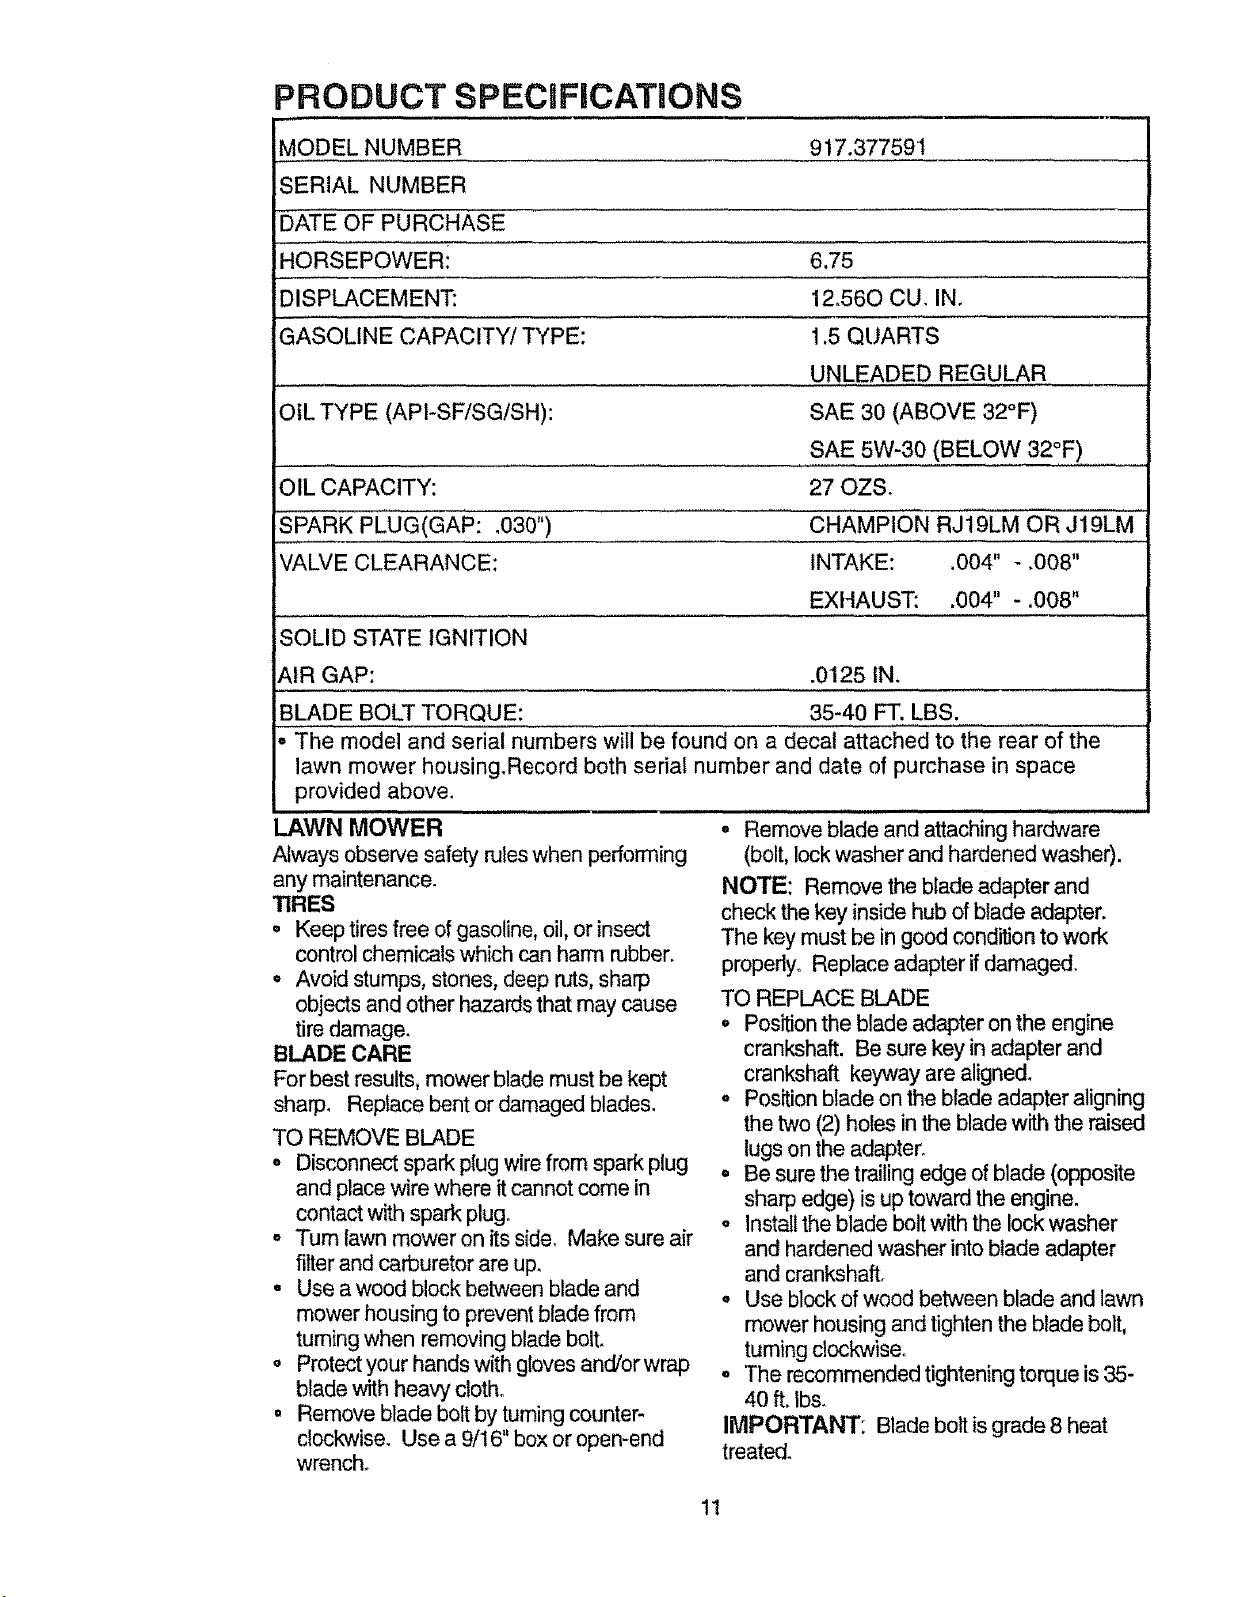
:)RODUCT SPECRFICATIONS
, H,L J ,
MODEL NUMBER 917.377591
SERIAL NUMBER
DATE OF PURCHASE
HORSEPOWERi 6,75
)ISPLACEMENT: 12_560 CU, IN.
GASOLINE CAPACITY/TYPE: 1.5 QUARTS
UNLEADED REGULAR
OIL TYPE (API-SF/SG/SH): SAE 30 (ABOVE 32°F)
SAE 5W-30 (BELOW 32°F)
OIL CAPACITY: 27 OZS.
SPARK PLUG(GAP: ,030") CHAMPION RJ19LM OR J19LM
VALVE CLEARANCE: INTAKE: ,004" - ,008"
EXHAUST: .004" - .008"
SOLID STATE IGNITION
AIR GAP: .0125 IN.
BLADE BOLT TORQUE: 35-40 FT, LBS.
The model and serial numbers will be found on a decal attached to the rear of the
lawn mower housing.Record both serial number and date of purchase in space
provided above,
LAWN MOWER
Always observe safety rules when performing
any maintenance.
TIRES
• Keep tires free of gasoline, oil, or insect
control chemicals which can harm rubber,
• Avoid stumps, stones, deep ruts, sharp
objects and other hazards that may cause
tiredamage,
BLADE CARE
For best results, mower blade must be kept
sharp° Replace bent or damaged blades.
TO REMOVE BLADE
• Disconnect spark plug wire from spark plug
and place wire where it cannot come in
contact with spark plug.
° Turn lawn mower on itsside. Make sure air
filterand carburetor are up,
• Use a wood block between blade and
mower housing to prevent blade from
turning when removing blade bolt.
o Protect your hands with gloves and/or wrap
blade with heavy cloth.
• Remove blade bolt by tuming counter-
clockwise, Use a 9/t6" box or open-end
wrench.
° Remove biadeand attaching hardware '
(bolt, lock washer and hardened washer),
NOTE: Remove the blade adapter and
check the key inside hub of blade adapter.
The key must be in good condition to work
propedyo Replace adapter ifdamaged.
TO REPLACE BLADE
• Position the blade adapter on the engine
crankshaft. Be sure key inadapter and
crankshaft keyway are aligned.
, Position blade on the blade adapter aligning
the two (2) holes in the blade with the raised
lugs on the adapter.
o Be sure the trailing edge of blade (opposite
sharp edge) is up toward the engine.
, Installthe blade bolt with the lock washer
and hardened washer into blade adapter
and crankshaft,
• Use block of wood between blade and lawn
mower housing and tighten the blade bolt,
turning clockwise,
o The recommended tightening torque is 35-
40 ft.tbs,
IMPORTANT: Blade bolt is grade 8 heat
treated.
11
Page 12
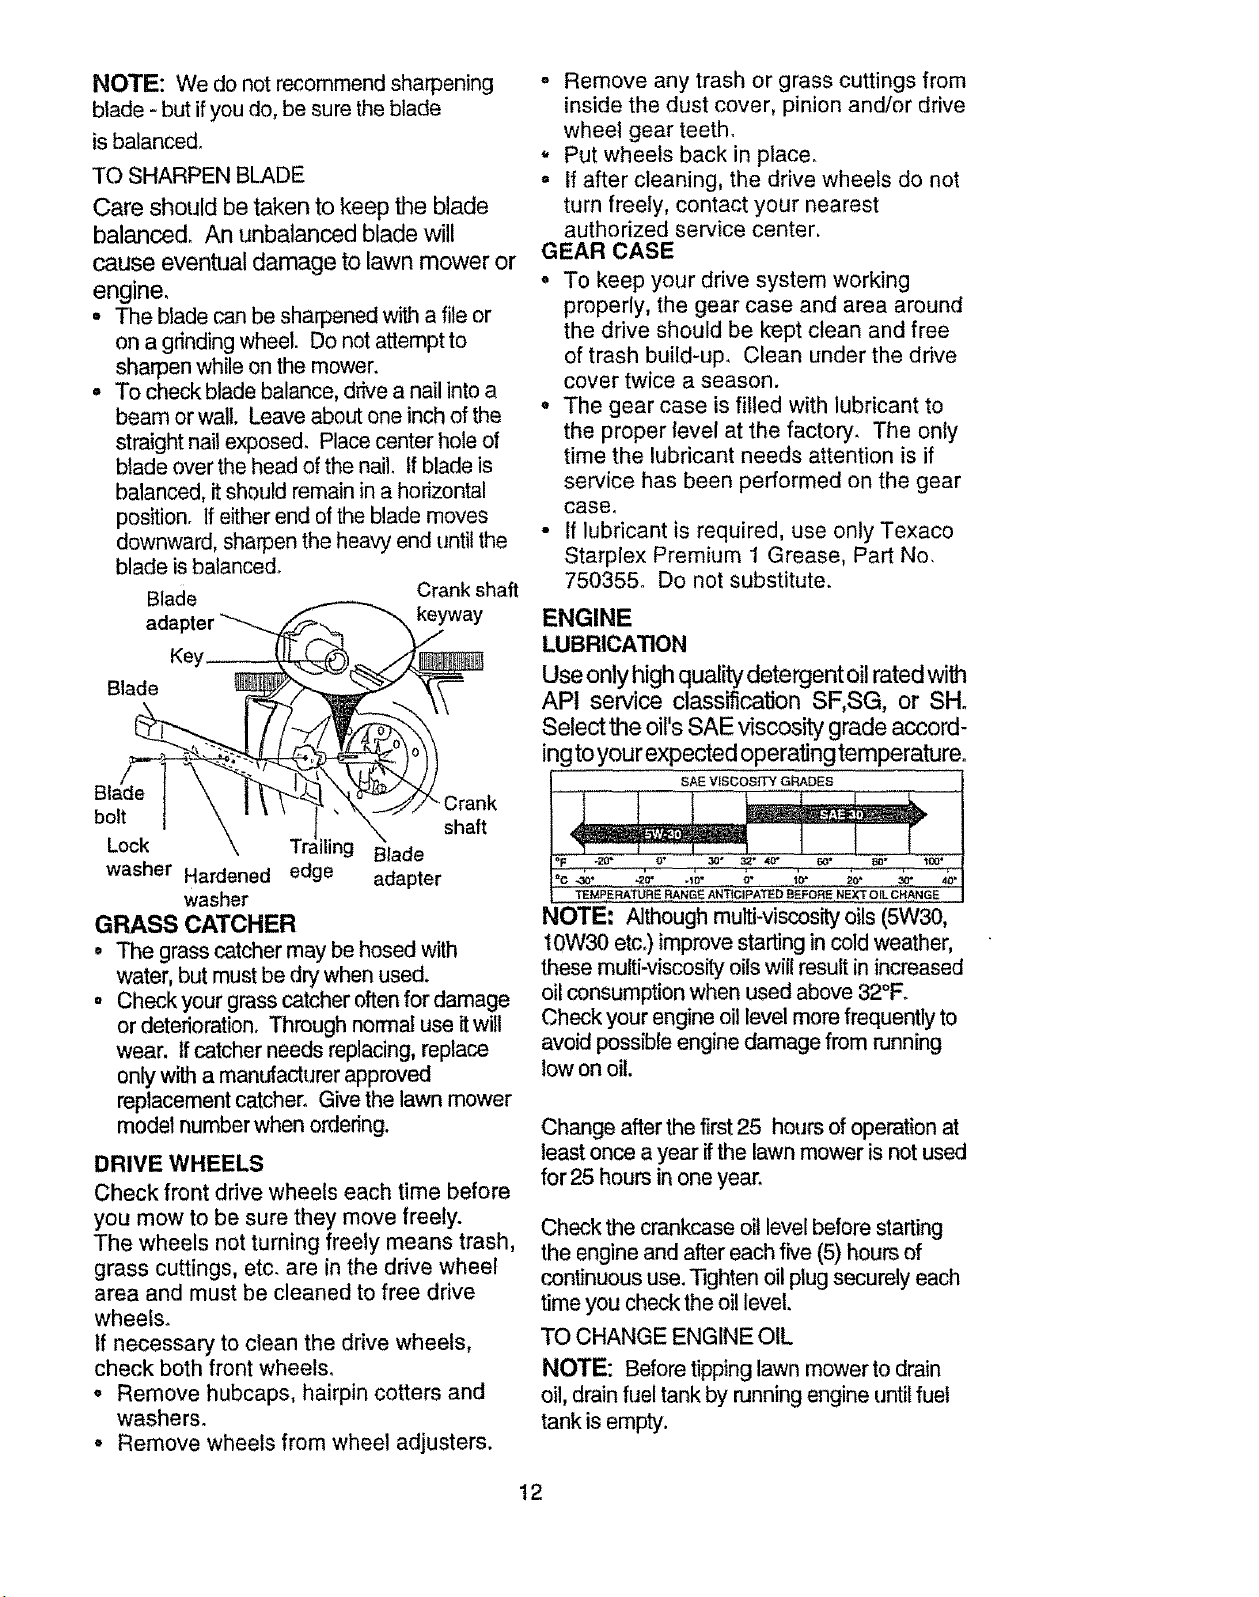
NOTE: We do not recommend sharpening
blade - but if you do, be sure the blade
is balanced,
TO SHARPEN BLADE
Care should be taken to keep the blade
balanced. An unbalanced blade will
cause eventual damage to lawn mower or
engine.
, The blade can be sharpened with a file or
on a grinding wheel. Do not attempt to
sharpen while on the mower.
• To check blade balance, drive a nail into a
beam or wall. Leave about one inch of the
straight nai! exposed. Placecenter hole of
blade over the head of the nail. If blade is
balanced, itshould remain in a horizontal
position. If either end of the blade moves
downward, sharpen the heavy end until the
blade is balanced°
Blade Crank shaft
° Remove any trash or grass cuttings from
inside the dust cover, pinion and/or drive
wheel gear teeth°
° Put wheels back in place,
° If after cleaning, the drive wheels do not
turn freely, contact your nearest
authorized service center.
GEAR CASE
° To keep your drive system working
properly, the gear case and area around
the drive should be kept clean and free
of trash build-up, Clean under the drive
cover twice a season.
° The gear case is filled with lubricant to
the proper level at the factory. The only
time the lubricant needs attention is if
service has been performed on the gear
case,
• If lubricant is required, use only Texaco
Starplex Premium 1 Grease, Part No,
750355. Do not substitute.
ENGINE
LUBRICATION
Use only high quality detergent oilrated with
APt service classificatbn SF,SG, or SH_
Setect the oil's SAE viscosity grade accord-
ing to your expected operating temperature.
s_ wscos_ GP_DEs I
bolt. I \ ' ' '_ l._.' _ shaft
Lock \ Trailin Blade
washer Hardened edge adapter
washer
GRASS CATCHER
• The grass catcher may be hosed with
water, but must be drywhen used.
° Check your grass catcher oftenfor damage
or deterioration, Through normal use it will
wear. if catcher needs replacing, replace
only with a manufacturer approved
replacementcatcher. Give the lawn mower
model number when ordering.
DRIVE WHEELS
Check front drive wheels each time before
you mow to be sure they move freely.
The wheels not turning freely means trash,
grass cuttings, etc. are in the drive wheel
area and must be cleaned to free drive
wheels.
If necessary to clean the drive wheels,
check both front wheels.
• Remove hubcaps, hairpin cotters and
washers.
• Remove wheels from wheel adjusters.
..... I............I
t TEMPERATURE RANGE ANTtGiPATED BEFORE NEXT OIL CHANGE J
NOTE; Although multi-viscosity oils(5W30,
t0W30 etc,)improvestartingincoldweather,
these multi-viscosity oils will result in increased
oilconsumption when used above 32°E
Check your engine oil level more frequently to
avoid possible engine damage from running
low on oil.
Change after thefirst 25 hours of operationat
least once a year if the lawn mower is not used
for 25 hours in one year,
Check the crankcase oit level before starting
the engine and after each five (5) hours of
continuous use. Tighten oil plug securely each
time you check the oil level.
TO CHANGE ENGINE OIL
NOTE: Before tipping lawn mower to drain
oil, drain fuel tank by running engine untilfuel
tank is empty,
12
Page 13
o Disconnectsparkplugwirefromsparkplug
andplacewirewhereitcannot come in
contact with spark plug.
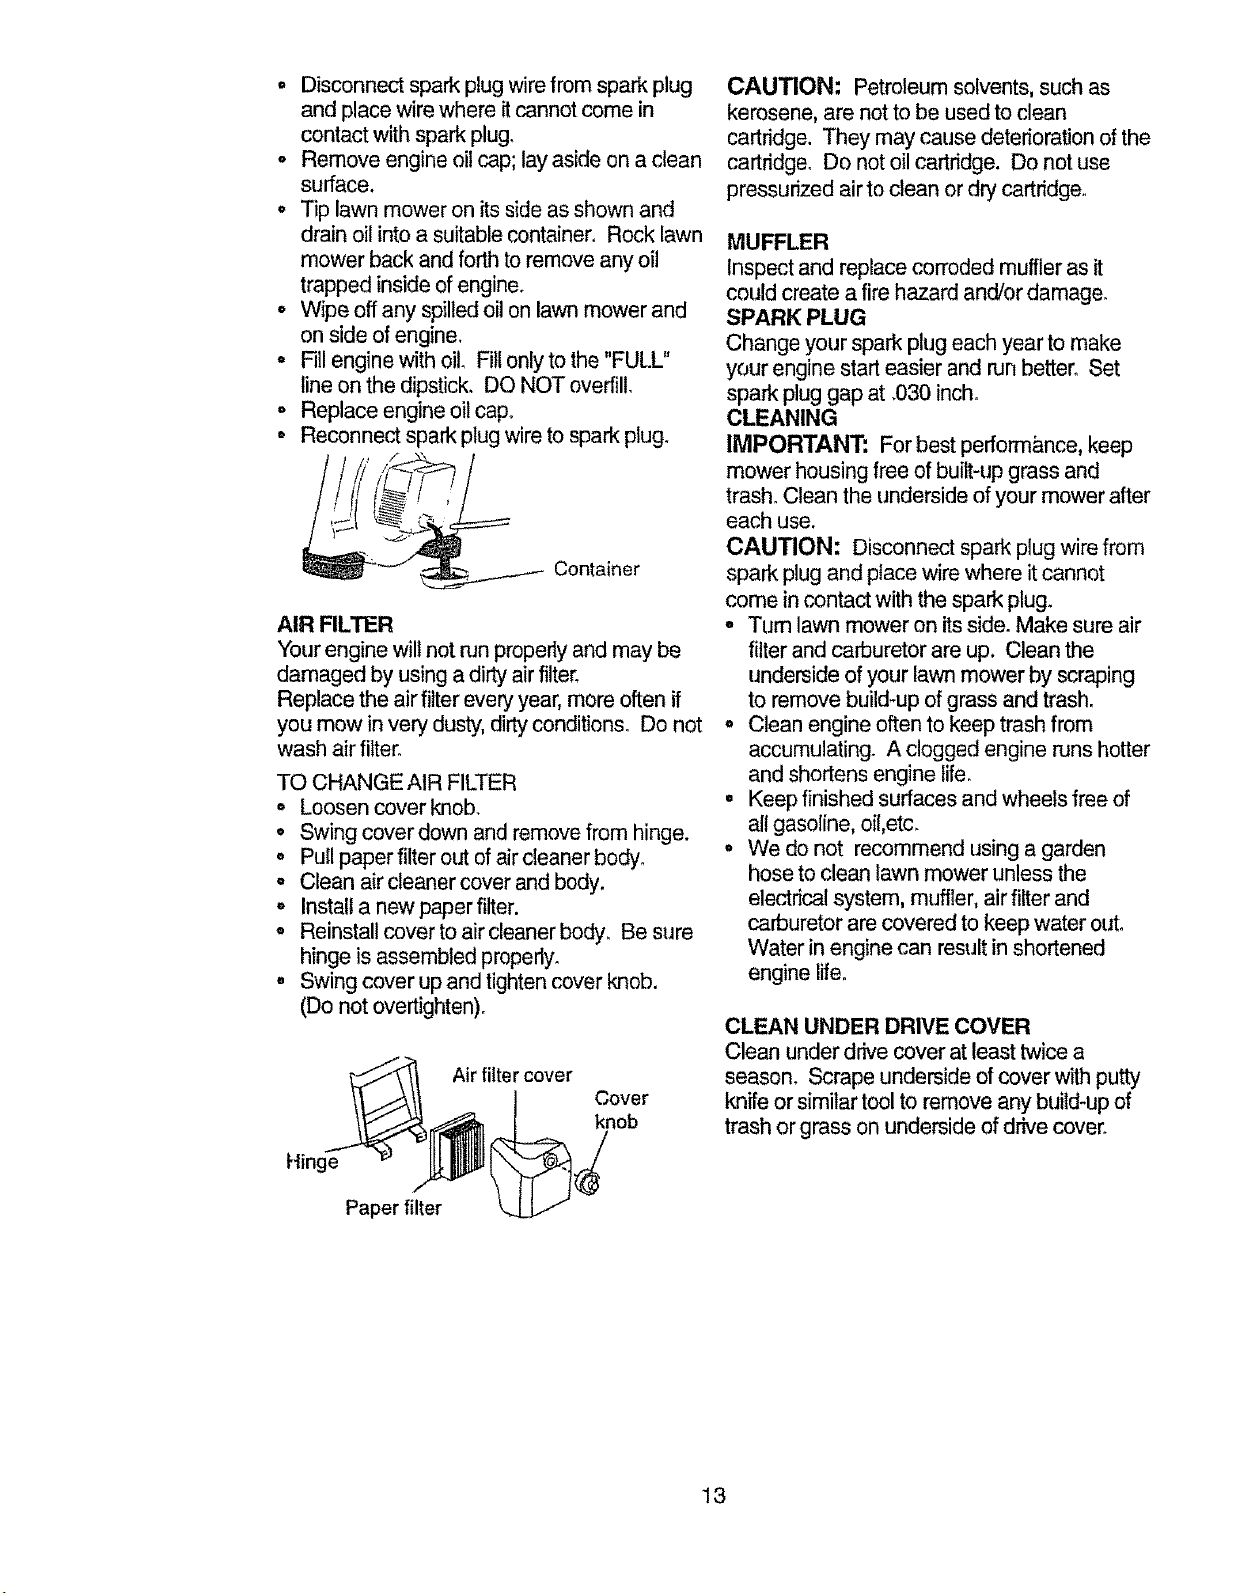
o Remove engine oil cap; lay aside on a clean
surface.
• Tip lawn mower on itsside as shown and
drain oil into a suitable container. Rock lawn
mower back and forth to remove any oil
trapped inside of engine.
° Wipe off any spilled oil on lawn mower and
on side of engine.
• RII engine with oil. Fill only to the "FULL"
line on the dipstick. DO NOT overfill.
, Replace engine oil cap°
• Reconnect spark plug wire to spark plug.
Container
AIR FILTER
Your engine will not tun properly and may be
damaged by using a dirty air filter.
Replace the air fitter every year, more often if
you mow in very dusty, dirty conditions. Do not
wash air filter.
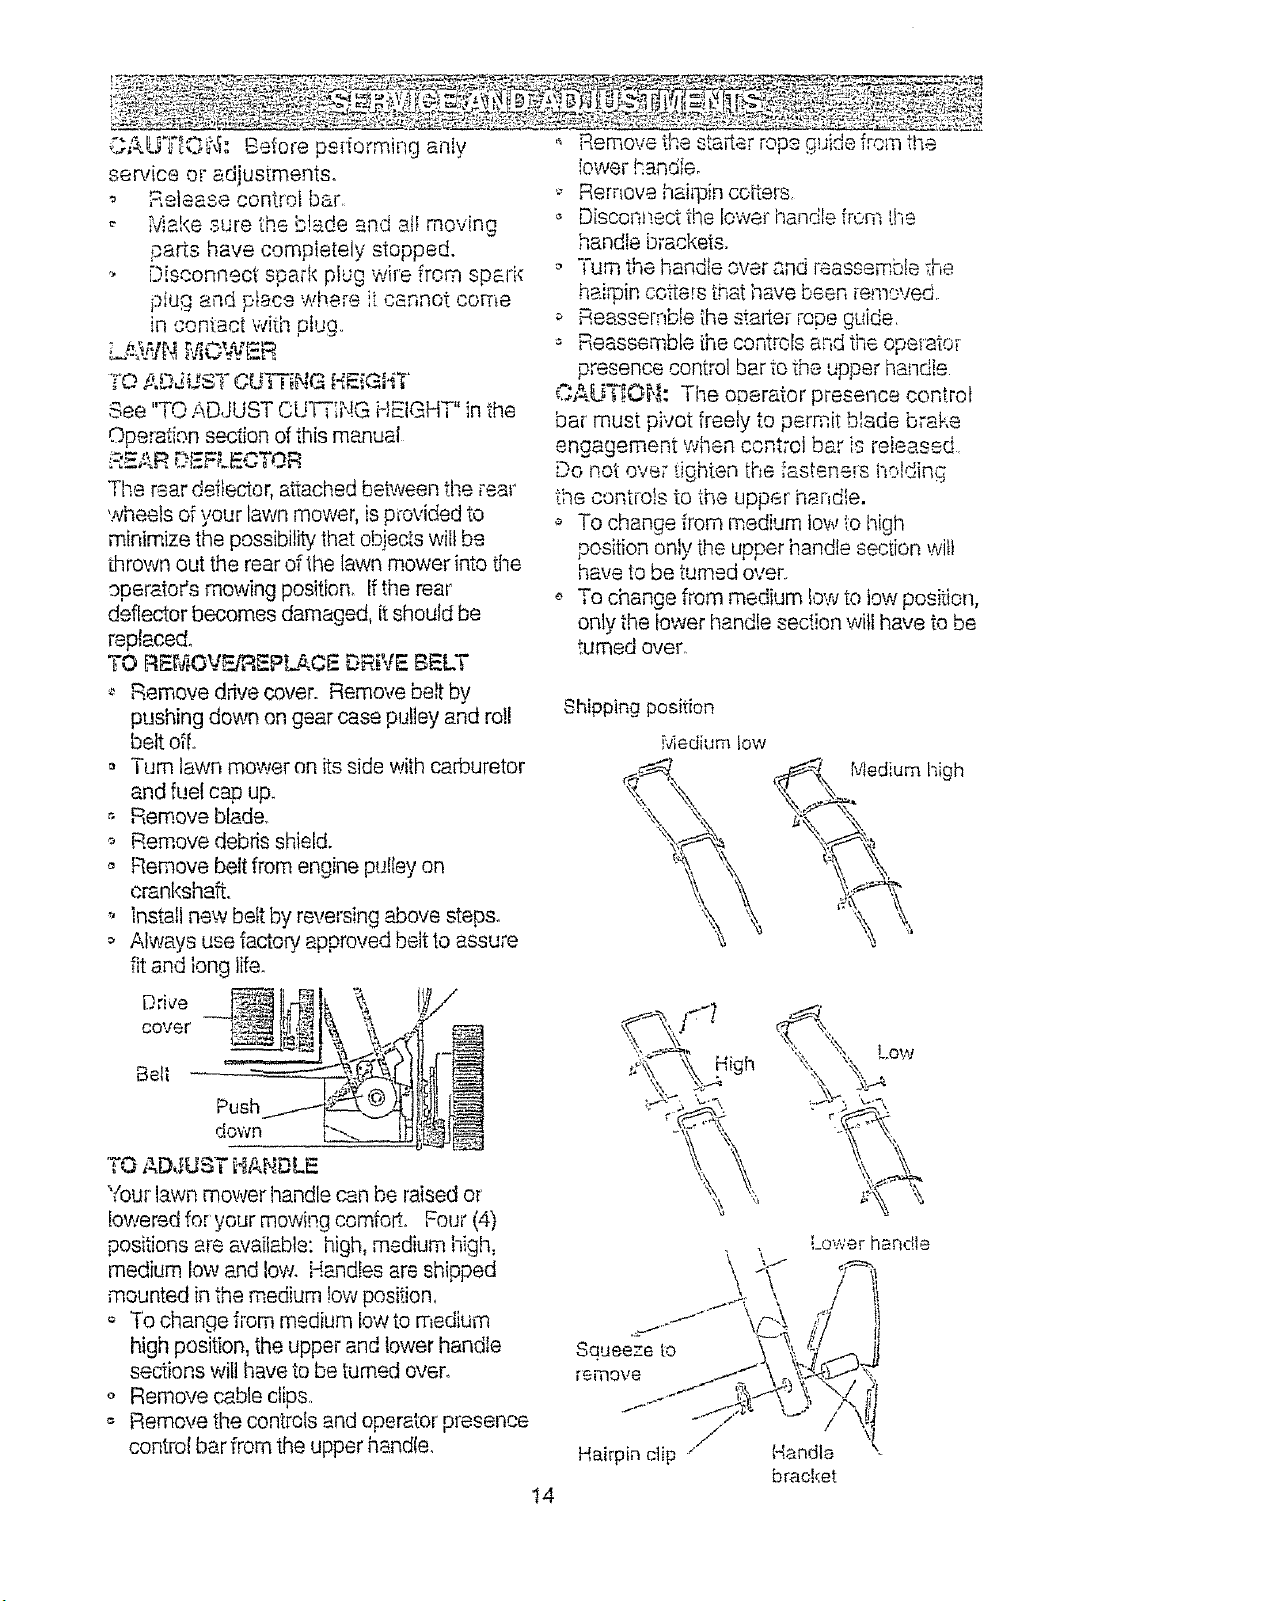
TO CHANGE AtR FILTER
° Loosen cover knob.
• Swing cover down and remove from hinge.
° Pull paper filter out ofair cleaner body_
- Clean air cleaner cover and body.
° Install a new paper filter.
- Reinstall cover to air cleaner body. Be sure
hinge is assembled properly.
° Swing cover up and tighten cover knob.
(Do not overtighten)o
_'_ Air filter cover
II .._1 I Cover
l_f_._ 1 knob
CAUTION: Petroleum solvents, such as
kerosene, are not to be used to clean
cartridge. They may cause deterioration of the
cartridge. Do not oil cartridge. Do not use
pressurized air to clean ordry cartridges
MUFFLER
Inspect and replace corroded muffler as it
could create a fire hazard and/or damage.
SPARK PLUG
Change your spark plug each year to make
your engine start easier and run better° Set
spark plug gap at ,030 inch°
CLEANING
IMPORTANT: For best performance, keep
mower housing free of built-up grass and
trash. Clean the underside of your mower after
each use.
CAUTION: Disconnect spark plug wire from
spark plug and place wire where itcannot
come in contact with the spark plug.
o Tum lawn mower on its side. Make sure air
filterand carburetor are up. Clean the
underside of your lawn mower by scraping
to remove build-up of grass and trash.
° Clean engine often to keep trash from
accumulating. A clogged engine tuns hotter
and shortens engine life.
. Keep finished surfaces and wheels free of
allgasoline, oil,etc.
° We do not recommend using a garden
hose to clean lawn mower unless the
electrical system, muffler, airfilter and
carburetor are covered to keep water out.
Water in engine can result in shortened
engine life.
CLEAN UNDER DRIVE COVER
Clean under drive cover at least twice a
season, Scrape underside of cover with putty
knife or similar tool to remove any build-up of
trash or grass on underside of dr_e cover.
Paper filter t.,.Lj..f
13
Page 14
©A_.Y_'IO'_,f; Before pedormirlg anly
sen.4ce or adjustments.
Release control bar.
Make sure the b!_de and all moving
parts have completely stopped.
', Disconnect spark piug wh"e from spark
piug and p_ace where i::c_nnot come
in contact with plug.
_:W'N MOWF-R
TO ADJ_JS_,"CUTTING _4E_;GHT'
See "TO ADJUST CUTT,;NG HF_.tGHT"in the
OpeTatfon section of this manual
R_:_R DI_F,LECTOR
The r_cardeflector, s_ached between the rear
wheels of your lawn mower, is provided to
minimize the possibil_' that objects will be
thrown out the rear of the lawn mower into the
operator's mowing position. Ifthe rear
deflector becomes damaged, it should be
replaced.
TO RE[4OVFJREPLA.CE DRIVE BELT
o Remove d,'ive cover. Remove belt by
pushing down on gear case pufley and roll
belt ofL
Turn lawn mower on ks side with carburetor
and fuel cap up.
_. Remove blade.
o Remove debris shield.
o Remove beit from engine pt._lIeyon
crankshaft.
", install new belt by reversing above step&
o Always use factory, approved belt to assure
fit and long life.
Dri,ze
cover
Belt
Push
down
,'. Remove the sta_ler rope guide frci,*nthe
lower handle.
,_ Remove haiq_in co_ers.
Disconnect the lower iqandle from [he
handle brackets.
o Turn the h_nate ,_ve, ..,na re_s._m_ t_ ,.__e
h_JL'oinco_ers that have been iemoved.
Reassernb!e the starte_ rope gL_ide.
Reassemble ihe cont.rols and the operator
presence control bar to the upper hand!e
CAUT!©_',_: The ooerator presence control
bar must pivot freely to permit blade brake
engagement when ccntroi bar is reieased.
Do not over tighten the fasteners holding
the controls to the upper iqar_d!e.
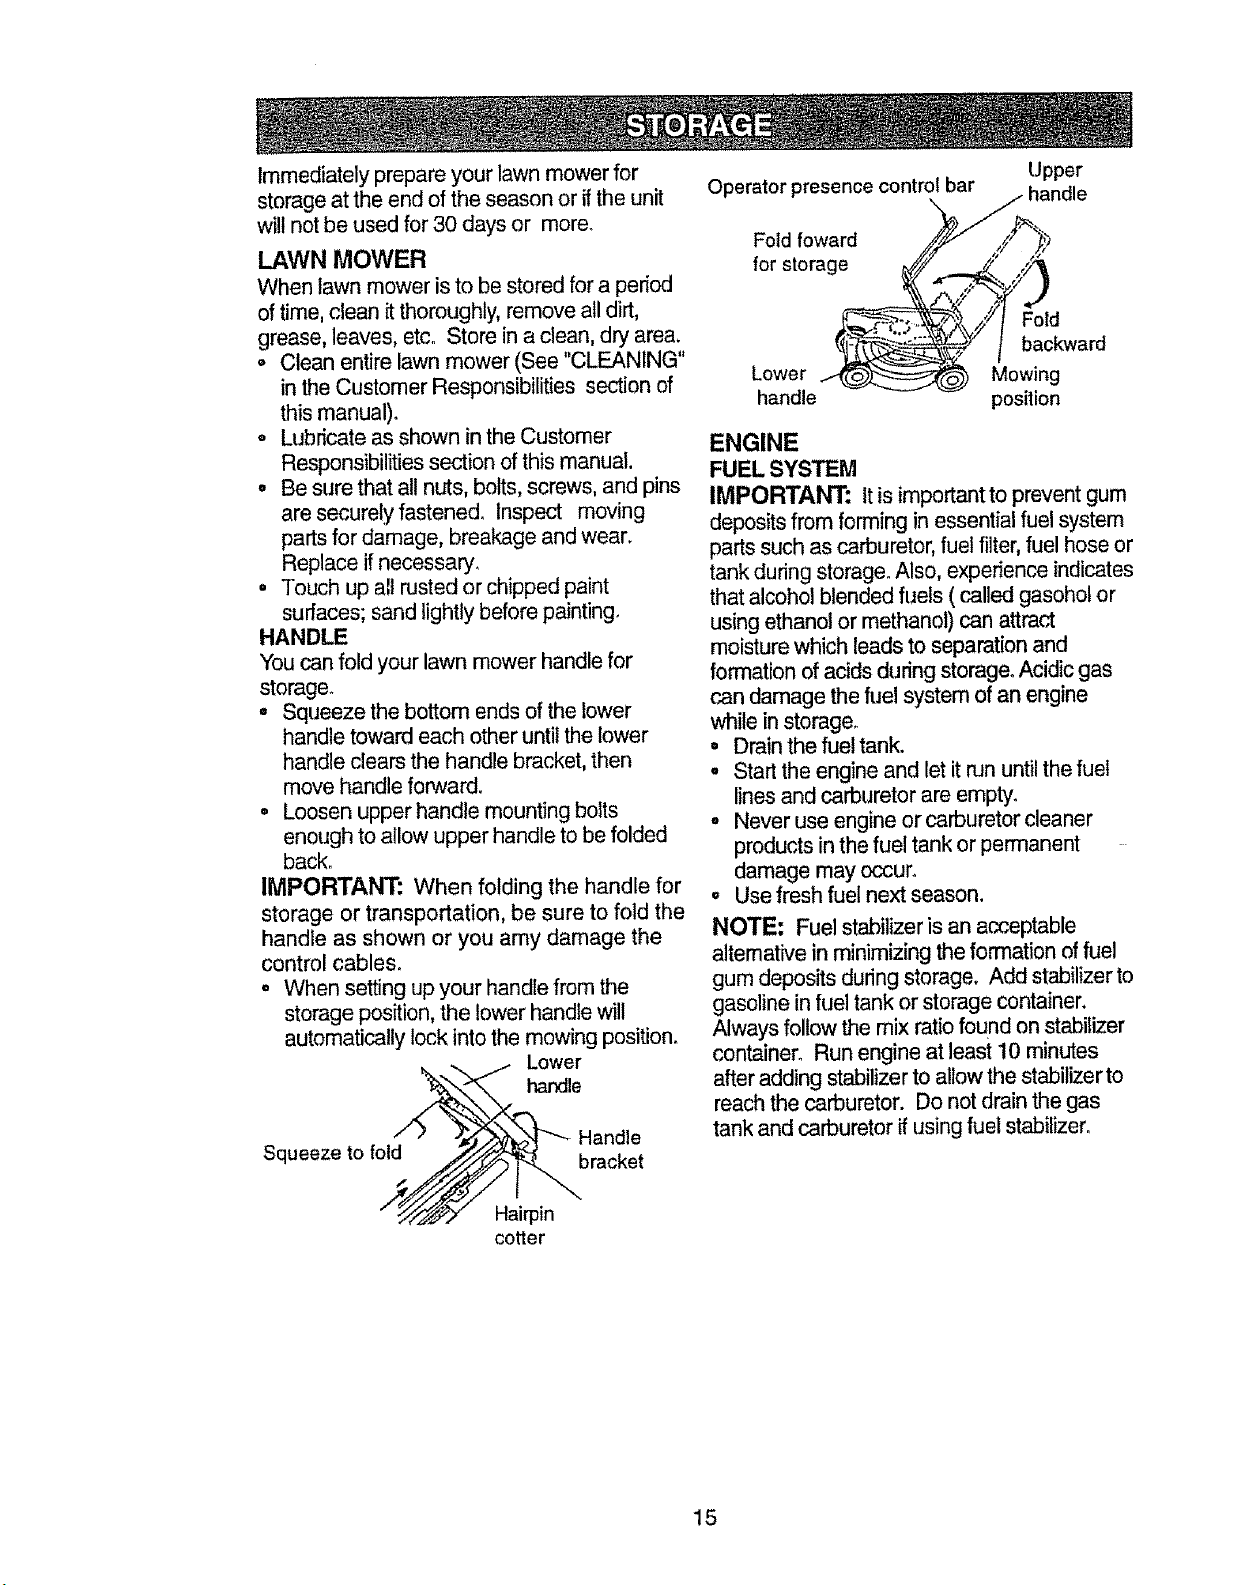
To change from medium iow to high
position only the upper handle section wit!
have to be turned over.
To change from medium low to low position,
only the lower handle section will have to be
turned over.
Shipping position
Medium low
Medium high
LOW
"70 ADJUST I4ANDLE
Your lawn mower handle can be raised or
lowered for your mowing comfort_. Four (4)
positions are s:,,sifabta: high, medium high,
medium low and low. Hand!es are shipped
mounted in the medium !ow position_
To change from medium low to medium
high position, the upper and lower handle
sections will have to be turned over.
o Remove cable clips..
o Remove the controls and operator presence
control bar from the upper handfe.
1 "/" \ ,_-.._ ¢1 It
..I. _, y i_
Hair incti- _k H.._ndl
t4
Lower handle
\ ,j" _-.-_._._
\-\ /
I. , ! }}
bracket
Page 15
Immediately prepare your lawn mower for
storage at the end of the season or ifthe unit
will notbe used for 30 days or more_
LAWN MOWER
When lawn mower is to be stored for a period
of time, clean it thoroughly, remove alldirt,
grease, leaves, etc. Store ina clean, dry area.
o Clean entire lawn mower (See "CLEANING"
in the Customer Responsibilities section of
this manual).
• Lubricate as shown inthe Customer
Responsibilities section of this manual.
° Be sure that all nuts, bolts, screws, and pins
are securely fastened. Inspect moving
parts for damage, breakage and wear.
Replace ifnecessary.
• Touch up aEtrusted or chipped paint
surfaces; sand lightly before painting.
HANDLE
You can fold your lawn mower handle for
storage°
° Squeeze the bottom ends of the lower
handle toward each otheruntil the lower
handle clears the handle bracket, then
move handle forward.
• Loosen upper handle mounting bolts
enough to allow upper handle to be folded
back.
IMPORTANT: When folding the handle for
storage or transportation, be sure to fold the
handle as shown or you amy damage the
control cables.
° When setting up your handle from the
storage position, the lower handle will
automatically lock into the mowing position.
,.. -,,. i" Lower
_.,handle
• _" ," -',L..f,>>,,X_.",I-"---Hand e
Squeeze to lold _///-_ bracket
Upper
Operator presence contr_
Fold foward
bar / handle
//' ,,1%
for storag_
Lower _'_
handle
Ii°lFo"id
Mowing
position
ENGINE
FUEL SYSTEM
IMPORTANT: Itis important to prevent gum
deposits from forming in essential fuel system
parts such as carburetor, fuel tilter,fuel hose or
tank during storage°Also, experience indicates
that alcohol blended fuels (called gasohol or
using ethanol or methanol) can attract
moisture which leads to separation and
formation of acids during storage°Acidic gas
can damage the fuel system of an engine
while in storage.
• Drain the fuel tank.
o Start the engine and let itrun untilthe fuel
lines and carburetor are empty.
° Never use engine or carburetor cleaner
products in the fuel tank or permanent
damage may occur°
o Use fresh fuel next season.
NOTE: Fuel stabilizer is an acceptable
alternative in minimizing the formation of fuel
gum deposits during storage. Add stabilizer to
gasoline infuel tank or storage container.
Always follow the mix ratiofound on stabilizer
container° Run engine at least10 minutes
after adding stabilizer to allow the stabilizer to
reachthe carburetor. Do not drain the gas
tank and carburetor if usingfuel stabilizer.
cotter
15
Page 16

ENGINE O_L
Drain oil (with engine warm) and replace with
clean engine oil. (See "ENGINE" inthe
Customer Responsibilities section of this
manual).
CYUNDER
• Remove spark plug,
Pour one ounce (29 ml) of oilthrough spark
plug hole into cylinder.
= Pultstarter handle slowly a few times to
distribute oil.
o Replace with new spark plug.
OTHER
o Do not store gasoline from one season to
another.
= Replace your gasoline can ifyour can starts
to _Jst. Rust and/or dirt in your gasoline wil!
cause problem&
. Ifpossible, store your unit indoors and cover
itto give protection from dust and dirt.
• Cover your unit with a suitable protective
cover that does not retainmoisture. Do not
use plastic. Plastic cannot breathe which
allows condensation to form and wilt cause
your unit to rust.
IMPORTANT: Never cover mower while
engine and exhaust areas are still warm.
CAUTION: Never store the lawn mower
with gasoline in the tank inside a building
where fumes may reach an open flame or
spark° Allow the engine to cool before
storing in any enclosure.
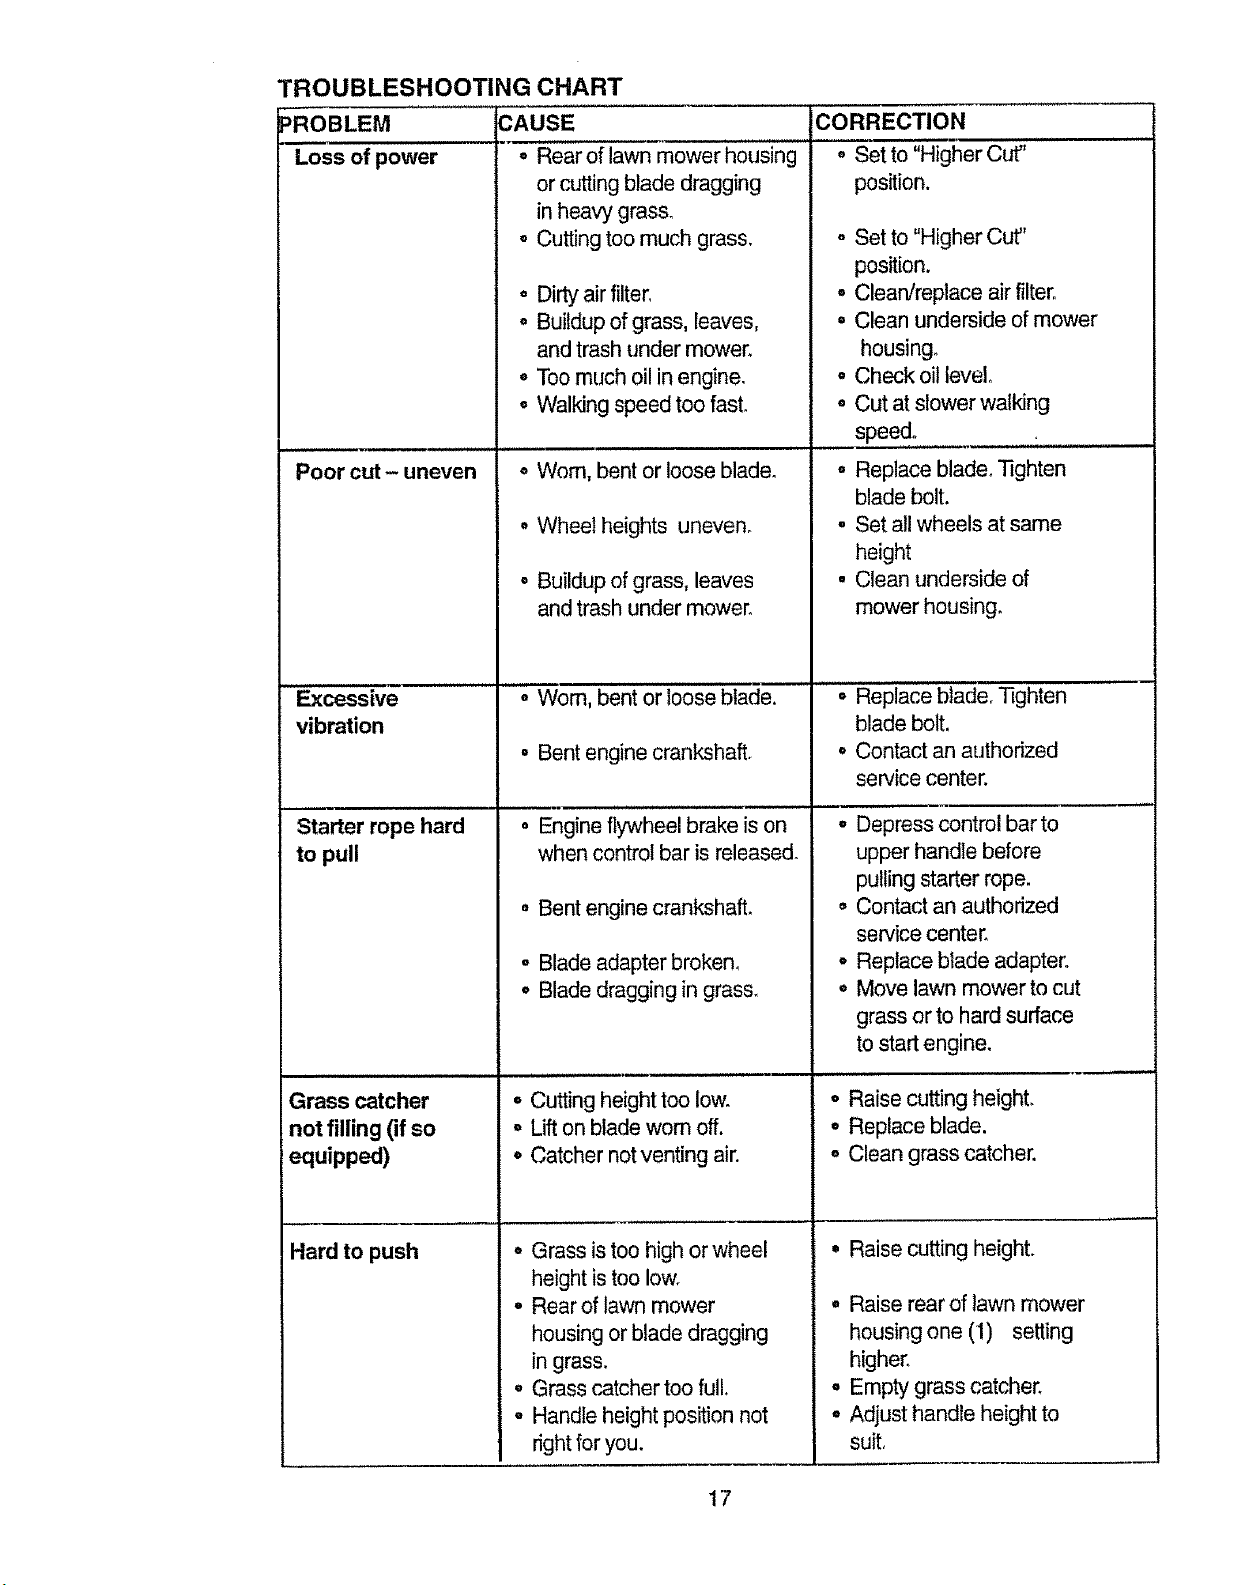
TROUBLESHOOTING CHART
PROBLEM CAUSE
Does not start ......
, Dirty air filter.
• OUt of fuel.
, Stale fuel
° Water in fuel.
= Spark plug wire is
disconnected.
, Bad spark plug.
, Loose blade orbroken blade
adapter,
• Control bar in released
position.
• Control bar defective.
CORRECTION
JJ, ,,,,, .....
• Clean/replace air filter.
o Fillfuel tank.
o Drain tank and refillwith
fresh clean fuelo
, Drain fuet tank and
carburetor and refilltank
with fresh gasoline,
• Connect wire to plug,
o Replace spark plug.
• Tighten blade bolt or
replace blade adapter.
• Depress control bar to
handle.
o Replace control bar,
1 ,, wu,,,
16
Page 17
TROUBLESHOOTING CHART
-ROBLEM
Loss of power
CAUSE
• Rear of lawn mower housing
orcutting blade dragging
in heavy grass,
o Cutting too much grass.
• Dirty air filter,
• Buildup of grass, leaves,
and trash under mower_
° Too much oil in engine,
° Walking speed too fast.
CORRECTION
o Set to "Higher Cut"
position.
- Set to "Higher Cut"
position.
° Clean/replace air filter.
o Clean underside of mower
housing.
° Check oil level°
= Cut at slower walking
speed.. ,;
i
Poor cut- uneven
Excessive
vibration
Starter rope hard
to pull
• Worn, bent or loose blade_
, Wheel heights uneven.
• Buildup of grass, leaves
and trash under mower.
L__
oWorn,bent or loose blade,
° Bent engine crankshaft.
,,,,,,,, ........ ,,
• Engine flywheel brake is on
when control bar is released.
• Bent engine crankshaft,
o Blade adapter broken_
• Blade dragging in grass,
° Replace blade. Tighten
blade bolt.
- Set all wheels at same
height
• Clean underside of
mower housing.
i u
, Replace blade. Tighten
blade bolt,
• Contact an authorized
service center.
, Depress control bar to
upper handle before
pulling starter rope.
• Contact an authorized
service center.
• Replace blade adapter°
• Move lawn mower to cut
grass or to hard sudace
to start engine.
Grass catcher
not filling (if so
equipped)
Hard to push
• Cutting height too low.
o Uft on blade wornoff.
o Catcher notventing air.
° Grass is too high or wheel
height istoo low.
° Rear of lawn mower
housing or blade dragging
in grass.
o Grass catcher too full.
° Handle height position not
rightfor you.
17
o Raise cutting height,
• Replace blade.
o Clean grass catcher.
• Raise cutting height.
° Raise rear of lawn mower
housing one (1) setting
higher.
° Empty grass catcher,
• Adjust handle height to
suit,
Page 18
Garantfa 18 Especificaciones del Producto 27
Reglas de Seguridad 18 Servicio y Adjustes 30
Montaje 20 Atmacenamiento 31
Operaci6n 22 Identificaci6n de problemas 33
Mantenimiento 26 Parles de repuesto Vea el manual
Programa de Mantenimiento 26 ingl6s del dueSo
Partes Contratapa
GARANTiA LIMITADA DE DOS AI_IOS PARA LA SE-GADORAA MOTOR CRAFTSMAN
Por des (2) afos, a partir de la techa de compra, cuando esta Segadera Craftsman se mantenga, lubrique
y afine segOnlas instrucciones para laoperad6n y el mantenimiento en el manual del due5o, Sears
repara_ gratis todo defecto enel materialy la mano de ebra.
Si la Segadora Craftsman se usa para finescomerciales ode arriendo, esta garantia s61ose aplica per
noventa (90) dias a partirde lafecha de comprao
Esta Garantfa no cubre:
o Attfculos que se desgastan durante el uso normal tales como las cuchillas segaderas rotalorias, los
adaptadores de lacuchilla, lascorreas, los filtrosde alre y las bujias,.
° Reparaciones necesarias debido alabuso o a la negligenda del operador, incluy_ndose a los
cigOefaJes doblados y a la falta de mantenimiento del equipo segt'mlas instrucciones que se incluyen
en el manual delduefioo
EL SERVICIO DE GARANTiA ESTADISPONIBLE al devolver la segadpra a motor Craftsman al centro/
departmento de servicio Sears mas cercano en los Estados UnidosEsta garantfa se aplica solamente
mientras elpmducto este enuso enlos Estades Unidos.
Esta Garantfa le otorga dereches tegales especificos, y puedeque tambi#n tonga otros derechos que
van'ande estado a estadoo
Sears, Roebuck and Co., D/817WA, Hoffman Estates, tL 60179 USA
Los estandrares de seguddad exigen la presencia
del operator en los controles para reducira un
minimo el riesgo de lesionarse. Su unidad viene
equipada con dichos contmtes. Por ningun motivo
trate del eliminar la funci6n de los controles que
exigen lapresencia del operador.
ENTRENAMIENTO:
. Lea este manual dotoperador
cuidadosamente. Familiarfcese con los
controles y aprenda a operarsu segadora en
ferma adecuadao Aprenda a parar su segadora
r_.pidamenle.
- No permita que los niSos usen su segadera.
Nunca permita que los adultes operen la
segadora sin contar con las instruccienes
adecuadas.
• Mantenga el __reade operaci0n despejada
de genre, especialmente de ni_5ospequefios
y de animales dom_sticos.
o Use la segadera solamente para losfines
propuestos pot elfabricante y segLinlas
explicacienes descritas en este manual,.
• No opere lasegadora si se ha caide o dafado en
cualquiera form&. Siempre repare los dafos
antes de usarlao
• No use accesorios que no hayan sido
recomendados por el fabficante. Eluso de dichos
accesodes puede ser peligroso.
. La cuch_la gira cuando el motor est,,
funcionando.
PFIEPARACl6N:
• Siempre revise cuidadesamente el #.rea que se
va a segar y desp_jela de todas las piedras,
..pales, alambres, huesos y otros ebjetos
extra,fios. Estos objetos ser'&nlanzados con la
cuchilla y pueden producir lesienes graves.
. Siempre use anteojos de seguddad oprotectores
de ojos cuando arranque y durante eltiempo
que use la segadera.
18
Page 19
o Vistase en fon'naadecuada. No opere la
segadora sin zapatos o con sandalias
mientras que el motor est,. funcionando.
• Siegue siempre durante el aliao con buena
luz artificial.
OPERACiON:
o Mantenga sus ojos y su mente en ta
segadora yen el &rea que se est_ cortando.
No petmita que otros intereses Io distraigan.
• No corte c_sped mojado o resbatosoo Nunca
corra mientras est_ operando su segadora.
Siempre aseg_Jrese de mantener el equilibrio
- mantenga el mango agarrado firmemente y
camine.
° No ponga las manos o los pies cerca odebajo
de las partes rotatoriaso Mant_ngase
alejado de la abertura de descarga en todo
momentoo
, Siempre pare el motor cuando se vaya
ocuando no est6 usando su segadora, o
antes de atravesar las entradas para autos,
los senderos, caminos y &reas cubiertas de
ripio.
° Nunca didja fa descarga del material hacia
los espectadores ni perrnita a nadie cerca de
la segadora mientras la est6 operando.
, Antes de limpiar, inspeccionar o de reparar I
a segadora, pare el motor y est6
completamente seguro de que la cuchilla y
que todas las partes que se mueven se
hayan detenido. Luego, desconecte el
alambre de la bujfa y mant_ngalo alejado de
6sta para evitar el arranque por accidente.
• No continue haciendo funcionar su segadora
si le pega a un objeto extrafio. Siga et
procedimiento descdto anteriormente, luego
repare cualquier dafio antes de volver a
arrancar y de operar su segadora.
° No cambie los ajustes del regulador o
hagaque el motor ande a una velocidad
excesiva. Se pueden producir dafios en el
motor y I esiones personales.
, No opere su segadora si vibra fuera de Io
normal. La vibraci6n excesiva es una
indicaci6n de dafio; pare el motor, revise en
forma segura la causa de fa vibraci6n y haga
las reparaciones seg_n sea necesado.
• No haga funcionar el motor en
recintoscerrados. Los gases de escape son
petigrosos.
• Nunca code el c6sped tirando la segadora
hacia ustedoSiegue atrav6s de la cara de
las pendfentes, nunca hacia arriba o hacia
abajo pues puede perder el equilibrio. No
siegue pendientes demasiado empinadas.
Tenga cuidado cuando opere la segadora en
terreno disparejo o cuando cambie de
direcci6n - mantenga un buen equilibrio_
° Nunca opere la segadora sin las
protecciones adecuadas, las planchas, el
recogedor de c6sped y otros dispositivos de
seguddad en su lugar.
lViANTENIMIENTO Y ALMACENAMIEN-
TO:
= Revise la cuchilla y los pemos de montaje
del motor a menudo, para asegurarse que
est_n apretados en la forma adecuada.
• Revise todos los pemos, tuercas y tomiIIos a
intervatos frecuentes, para verificar si est_n
apretados en forma adecuada, y
asegurarseque la segadora se encuentra en
condiciones de funcionamiento seguro.
• Mantenga todos los dispositivos de seguridad
en su tugar y listos para funcionar.
• Para reducir eI petigro de incendio,
mantenga el motor sin c6sped, hojas y grasa
o aceite en excesoo
° Revise el recogedor de c_sped a menudo
para vedficar si hay deterioro y desgaste y
cambie las bolsas desgastadas. Use
solamente las bolsas de repuesto
recomendadas por el fabricante de su
segadora o que eumplen con las
especificaciones de _ste.
, Siempre mantenga una cuchilla afilada en su
segadora.
- Siempre permita que el motor se enfrfe
antes de guardarla en cualquier recinto
cerrado.
° Nunca guarde la segadora con combustible
en et estanque dentro de un edificio endonde
los gases pueden alcanzar una llama
expuesta o una fuente de ignici6n, tal como el
catentador de agua, la estufa de
calefacci6n, la secadora de ropa, etc.
PRECAUCI6N: Siempre desconecte el
alambre de la bujfa y p6ngato donde no pueda
entrar en contactocon la bujia, para evitar et
arranque poraccidente, durante tapreparaci6n,
el transporte, el ajuste o cuando se hacen
reparaciones.
PRECAUCI6N: Es conocido por el Estado de
California que los gases de escape del motor de
este productor contienen qufmicos los cuales a
ciertosniveles, pueden ocasionar, cdncer,
defectos de nacimiento, y otros daSos al sistema
repmductivo.
19
Page 20
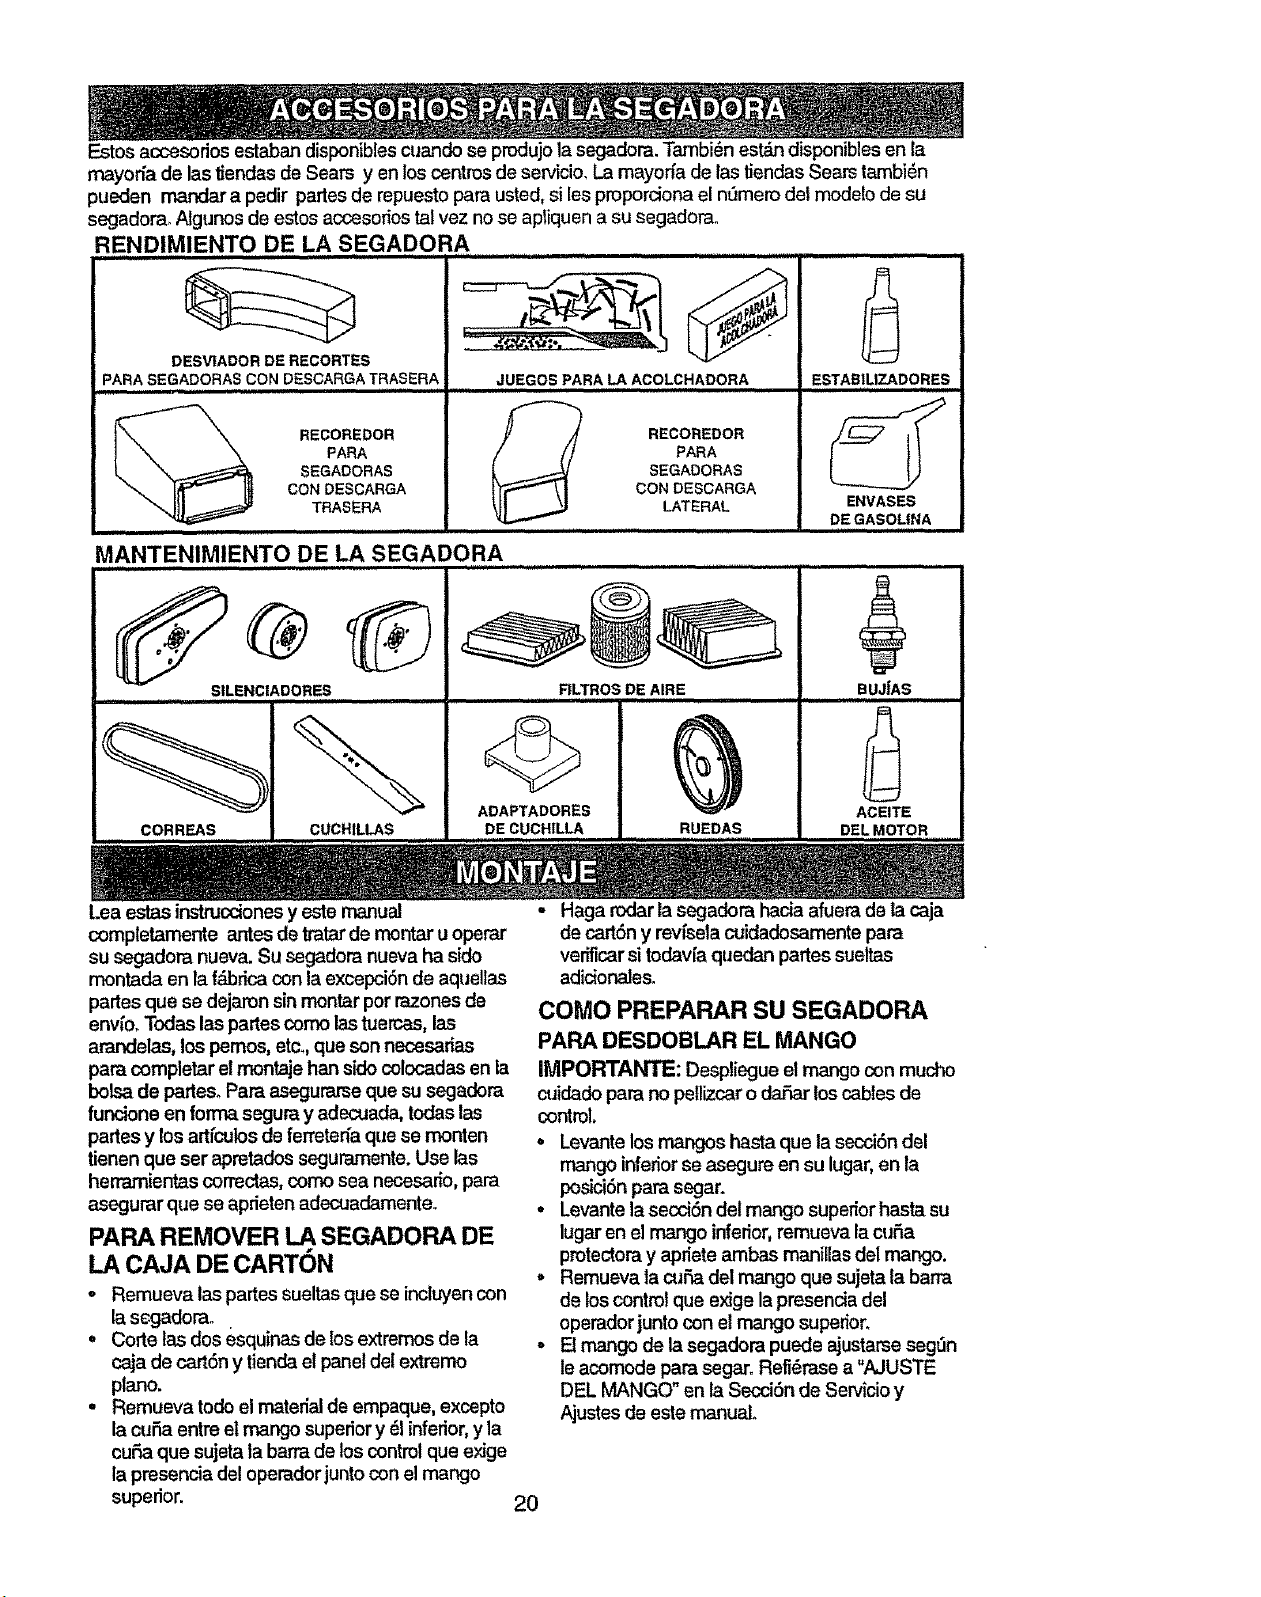
Estos acoesorios estaban disponibles cuando se produjo la segadora. Tambi_n est_ disponibles en la
mayorfa de las tiendas de Sears yen los centros de sewicio. La mayo_a de las 5endas Sears tambi6n
pueden _r a pedir partes de repuesto pare usted, si les proporciona el n_tmerodef rnodelo de su
segadora. Algunos de estos acossorios tat vez nose apliquen a su segadora..
RENDIMIENTO DE LA SEGADORA
DESVIADOR DE RECORTES
PARA SEGADORAS CON DESCARGA TRASERA JUEGOS PARA LA ACOLCHADORA
i RECOREDOR RECOREDOR
i PARA PARA
,11 i i,,,, ii IHI,IN, II U,,H,H H ,
SEGADORAS SEGADORAS
CON DESCARGA CON DESCARGA
TRASERA LATERAL
ESTAe,IL!ZADO,RES
ENVASES
DEGASOUNA
i
MANTENIMIENTO DE LA SEGADORA
Jl.lu , ............. ,
,i,1,,iiH ,I,J
CORREAS CUCHILLAS
SILENCIADORES
.................................. Ill I I
ADAPTADORES
DE CUCHILLA
Lea estas instrucoiones y este manual
completamente antes detralar de rnontar uoperar
su segadora nueva. Su segadora nuevahasido
montada en lafdbricacon la excepci6n de aqueUas
partes que se dejamn sin montar por razones de
envfo. Todaslas partes como lastuercas, las
arandelas, los pemos, etc, que son necesarias
para completar el montaje hart sidocolocadas en la
bolsa de partes.Para asegurarse que susegadora
funcione en formasegura y adecoada, todas las
partes y los artfculos de ferreten'aque se rnonten
tienen que ser apretados seguramente. Use las
herramientas correctas, como sea necesario, para
asegurar que se aprieten adecuadamente.
PARA REMOVER LA SEGADORA DE
LA CAJA DE CARTON
o Remueva las partes sueltasque se inclwen con
la scgadora° .
• Corte las dos esquinas de tos extremos de la
caja de cart6n y tienda el panel del extremo
piano.
. Remueva todo el materialde empaque, excepto
la cuSa entre el mango superior y 61inferior,y la
cuF_aque sujeta la barra de los control que exJge
la presencia del operador junto con el mango
superior.
RLTROS DE AIRE BUJ|AS
r ii,ll
RUEDAS
IllU ii
iiHII,I,,I
ACEITE
DEL MOTOR
• Haga rodar la segadorahacia afuera de la caja
de cart6ny revfsela cuidadosamente para
verificar sitodav[a quedan partes sueltas
adicionales.
COMO PREPARAR SU SEGADORA
PARA DESDOBLAR EL MANGO
iMPORTANTE: Desp!iegue el mangocon mucho
cuidadopara nopeflizcar o daSarlos cablesde
control.
, Levante los mangos hasta que la secci6n del
mango inferior se asegure en su lugar,en la
posici6npara segar.
• Levante la secoi6n del mango superior hasta su
lugar en el mango inferior,remueva la cuSa
protectora y apriete ambas manillas del mango.
• Remueva la cufa del mango que sujetala barra
de los control que exige lapresenciadel
operador junto con el mango superior.
° FJmangode la segadora puede ajustarsesegSn
le acomode parasegar. Refi6rase a"AJUSTE
DEL MANGO" en taSecci6nde Sewicioy
Ajustes de estemanual.
2O
Page 21
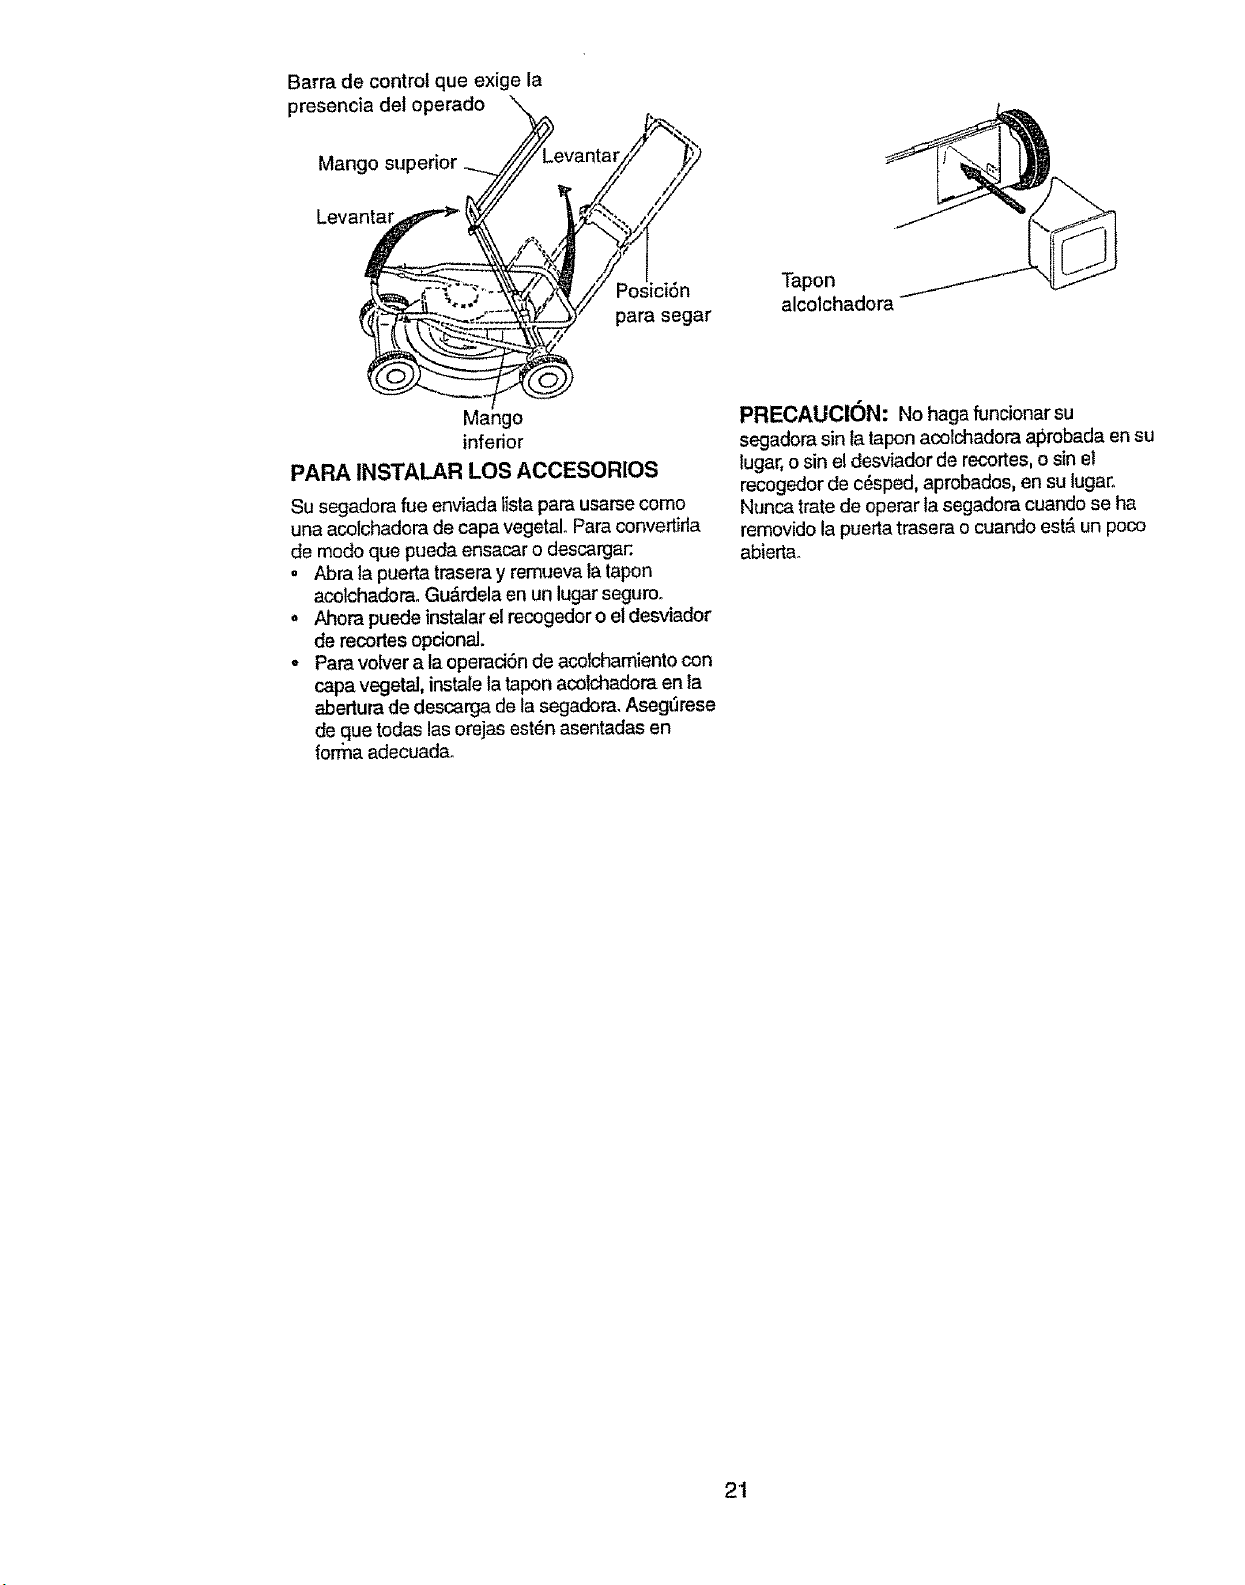
Barra de control que exige la
presencia del operado
Mango superior
parasegar
Tapon
alcolchadora
Mango
infedor
PARA INSTALAR LOS ACCESORIOS
Su segadora rue enviada listapara usarse como
una acolchadora de capa vegelaL Para conve_da
de mode clue pueda ensacar o descargar:
o Abra la puerta trasera y remueva la tapon
acolchadera. Gu_rdela en un lugar seguroo
. Ahora puede instalaral recogedoro eldesviador
de recortes optional.
,, Para volver a la operad6n de acolchamiento con
capa vegetal, instale la tapon acolchadora en la
abertuta de descarga de lasegadora. AsegL3rese
de que todas las orejas est6n asentadas en
for61aadecuada.
PRECAUClON: No haga funcionar su
segadora sin latapon acolchadora al_robada en su
lugar,o sin e! desviador de recortes, o sin el
recogedor de c6sped, aprobados, en su lugar..
Nunca trate de operar la segadora cuando se ha
removido la puerta trasera o cuando est&un poco
abierta.
21
Page 22
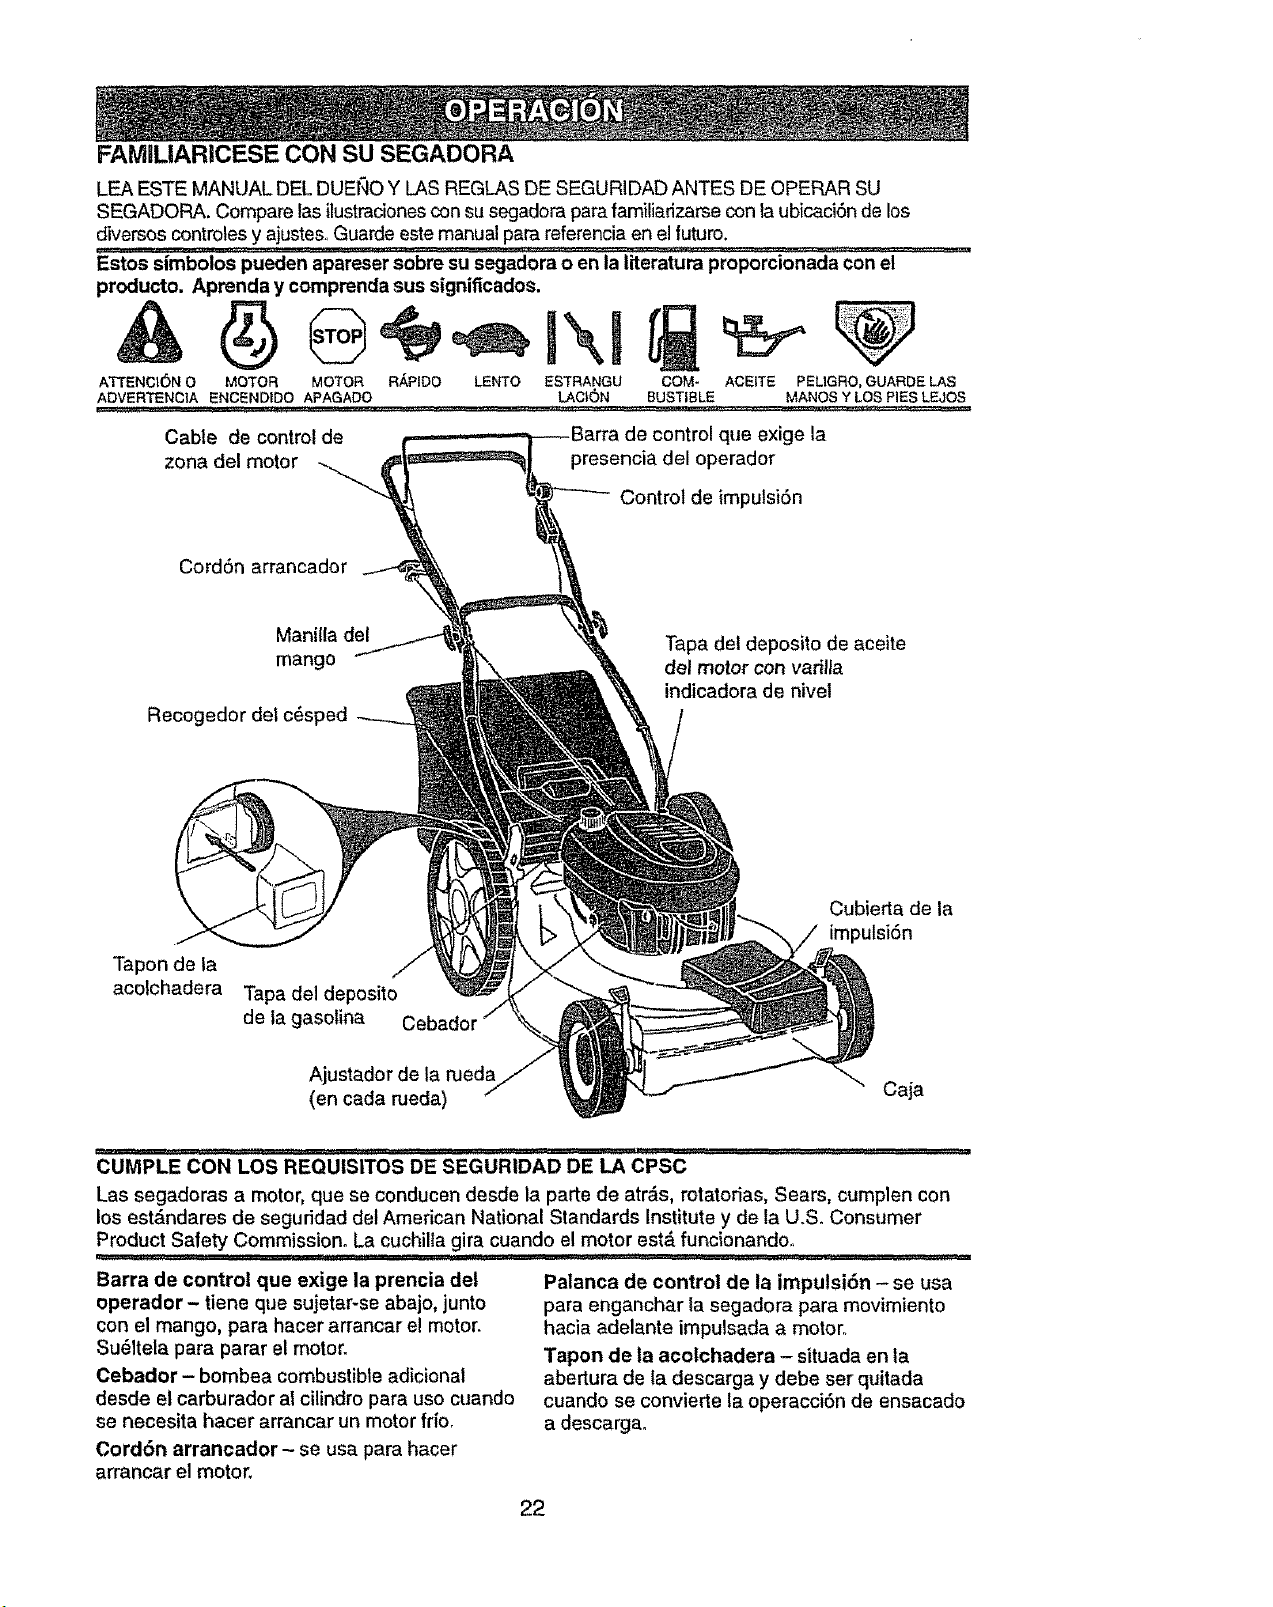
FAIViiUAR1CESE CON SU SEGADORA
LEA ESTE MANUAL DEL DUENO Y LASREGLAS DE SEGURIDAD ANTES DE OPERAR SU
SEGADORA. Compare las ilustraciones con su segadora para familiarizarse con laubicaciSn de los
diversos controles y ajustesoGuarde este manual para referencia en el futuro.
Estos simbolos pueden apareser sobre su segadora o en la literatura proporcionada con el
producto. Aprenda y comprenda sus significados.
ATTENCt6N 0 MOTOR MOTOR RAPIDO LENTO ESTRANGU COM- ACEITE PELIGRO, GUARDE LAS
AOVERTENCiAENC_Np!00,APAGAOO................... _CtON BUSTIBLE MA_OSYLO.Sp!EsLEJOS
Cable de control de
zona del motor
CordSn arrancador
Recogedor del c6sped
Tapon de la
acolchadera
Tapa del deposito
de la gasolina
Manilla del
mango
que exige la
presencia del operador
Control de imputsiSn
Tapa del deposito de aceite
del motor con varilla
indicadora de nivel
Cubierta de la
impulsi6n
Ajustador de la rueda
(en cada rueda) Caja
CUMPLE CON LOS REQUISITOS DE SEGURIDAD DE LA CPSC
Las segadoras a motor, que se conducen desde la parte de atr_s, rotatorias, Sears, cumplen con
los estdndares de seguridad del American National Standards Institute y de la U.S. Consumer
Product Safety Commission° La cuchilia gira cuando el motor est_ funcionandoo
Barra de control que exige la prencia del
operador- tiene que sujetar-se abajo, junto
con el mango, para hacer arrancar el motor.
Su61tela para parar el motor.
Cebador - bombea combustible adicional
desde el carburador al cilindro para uso cuando
se necesita hacer arrancar un motor frio.
Palanca de control de la impulsi6n - se usa
para enganchar ta segadora para movimiento
hacia adelante impulsada a motor,.
Tapon de la acotchadera - situada en la
abertura de ta descarga y debe ser quitada
cuando se convierte la operacciSn de ensacado
a descarga°
Cord6n arrancador - se usa para hacer
arrancar el motor.
22
Page 23
La operaci6n de cualquier segadora puede
hacer que salten objetos extraSos dentro de sus
ojos, to que puede producir daSos graves en
_stOSo Siempre use anteojos de seguridad o
protecci6n para los ojos mientras opere su
segadora o cuando haga ajustes o
reparaciones,, Recomendamos una mascara de
seguddad de visi6n amplia, para use espejuelos
o anteojos de seguridad estandarteo
COMe USAR SU SEGADORA
PREOAUCION: No haga funcionar su
segadora sinel desviador de recortes o sin el
recogedor de c_sped, aprobados, en su
lugar. Nunca trate de operar la segadora
cuando se ha removido la puerta trasera o
cuando est_ un poco abierta.
VELOClDAD DEL MOTOR
La velocidad del motor se estableci6 en la
f_.bdca para un rendimiento 6ptimo_ La
velocidad no se puede ajustar_
CONTROL DE ZONA DEL MOTOR
PREOAUCION: Las regulacionesfederales
exigen que se instale un control para el motor en
esta segadora para redudr a un m(nimo el ffesgo
de lesionarse debido al contacto con la cuchilla.
Per ningSn motive tratede eliminar lafunci6n det
control del operador. La cuchilla gira cuando el
motor est,. funcionando.
. Su segadora viene equipada con una barra de
control que exige la presencia del operador, Io
que requiere que el operader est_ detr'&sdel
mango de ta segadora para hacefla arrancar y
operada.
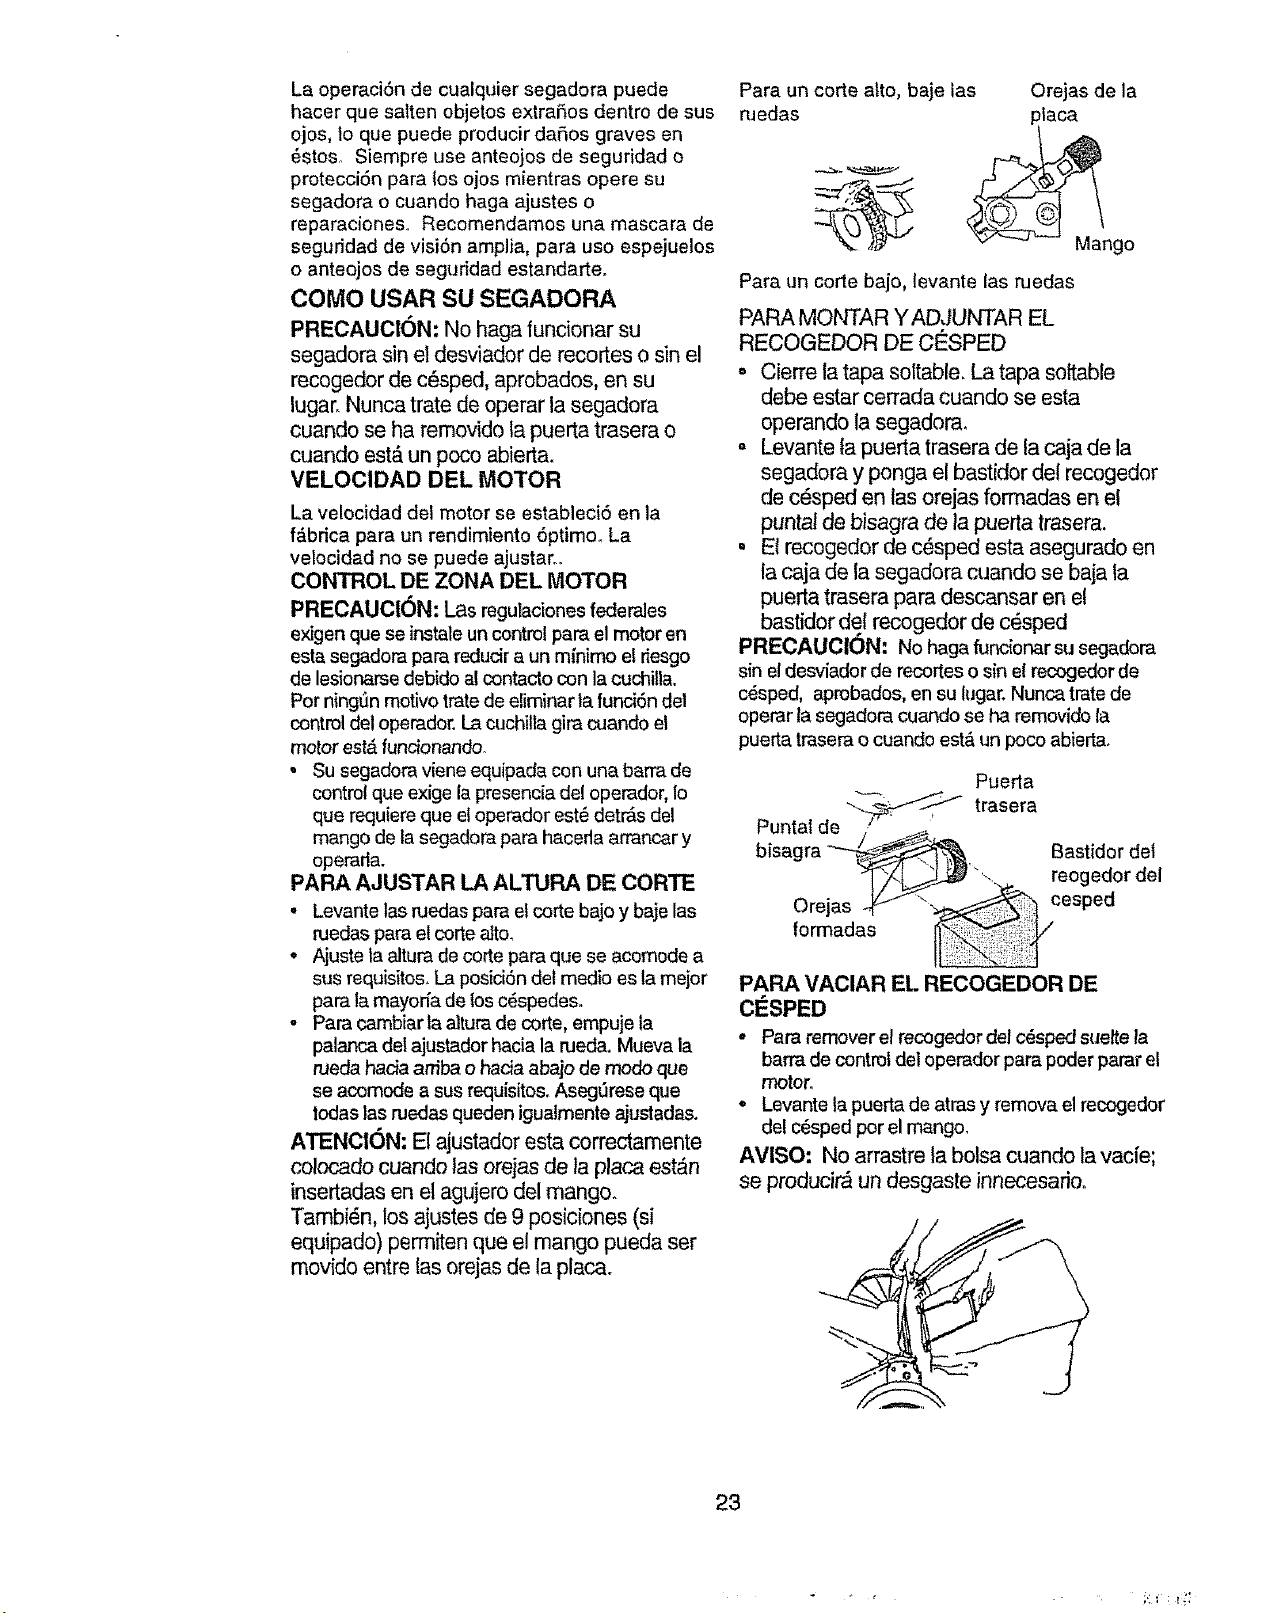
PARA AJUSTAR LA ALTURA DE CORTE
• Levante las ruedaspara elcorte bajo y baje las
ruedas para e! corte aJto_
• Ajuste la altura de corte para que se acomode a
sus requisites. La posici6n del medio es la meier
para la mayoda de los c_spedeso
o Para cambiar la alturade corte, empuje la
pal_ delajustador hacia lameda. Mueva la
rueda hada arriba o hacia abajo de mode que
se acomode a susrequisitosoAsegSrese clue
todas las ruedas queden igualmente ajustadas.
ATENClON; El ajustador esta correctamente
colocado cuando las orejas de la placa est&n
insertadas en el agujero del mango.
Tambi6n, los ajustes de 9 posiciones (si
equipado) porto{tenque el mango pueda ser
movido entre las orejas de la placa.
Para un corte alto, baje las
medas
Para un code bajo, levante las ruedas
PARA MONTAR YADJUNTAR EL
RECOGEDOR DE CE_SPED
° Cierre la tapa soltable. La tapa sortable
debe estar cerrada cuando se esta
operando la segadora.
- Levante ta puerta trasera de la caja de la
segadora y ponga el bastidor del recogedor
de c_sped en las orejas formadas en et
puntal de bisagra de la puerta trasera.
• Et recogedor de c_sped esta asegurado en
la caja de la segadora cuando se baja la
puerta trasera para descansar en e!
baslJdor dot recogedor de c_sped
PRECAUOI6N: No haga func{onar su segadora
sin e!desviador de recortes osin el recogedor de
c_sped, aprobados, en su lugar. Nunca trate de
operar la segadora cuando se ha removido la
puerta trasera o cuande est&un poco abierta.
Puntal de ! '
bisagra -"-_/_%. Bastidor del
>T"!J ._..I_"_. reogedor del
Orejas esped
formadas
PAPA VACIAR El.. RECOGEDOR DE
ClaSPED
• Para remover el recogedor del c_sped suelte la
barra de control del operador para poder parar el
motor.
° Levantela puerta de atras y remova elrecogedor
del c_sped porelmango,
Orejas de la
placa
Mango
Pueda
trasera
AVlSO: No arrastre la bolsa cuandola vacfe;
se producir_ un desgaste innecesarioo
23
Page 24

CONTROL DE LA IMPULSION
• La autoimpulsi6n se controta al sujetar la barra
de control que exige la presencia del operador
hada abajo enel mango y a!empujar la palanca
de control de la impufsi6n hacia adelante hasta
que suene "clic,"luego se suelta la palanca.
• [] movimiento hacia adetante parar_ cuando la
barra de control que exige lapresencia del
operador se suelta. Para parar el movimiento
hacia adelante sin parar el motor, suelte la barra
de control que exige la presencia del operador un
poco hasta que se desenganche el control de la
imputsi6n. Sujete la barra de control que exige la
presenciadel operador abajo en contra del
mango para continuar segando sin
autoimpulsi6n.
o Para mantener el controlde la impulsi6n
enganchado cuando se de vuelta en las
esquinas, empuje el mango hacia abajo y levante
las ruedas delanteras |uera del suelo al girar la
segadora_
control de
N\ impulsidn
control de la
para enganchar el impulsi6n
control de la desenganchado
impulsi6n
ANTES DE HACER ARRANCAR EL
MOTOR
AOEITE
Su segadora fue enviada sin aceite en el motor.
o AsegL_rese que la segadora est_ nivelada y
que el &rea alrededor del dep6sito de aceite
est_ limpia.
• Remueva la tapa de1dep6sito de aceite det
motor con la varilla indicadora de nivel y
reltene basra la lfnea de Ileno en _sta.
= Use 27 oz. de aceite. Para el tipo y la catidad
vea "MOTOR" en la secci6n de las
Mantenimento en este manual.
• Vac[e el aceite lentamente. No Io llene
demasiado.
,, Revise el nivel det aceite antes de cada uso.
Agregue aceite si es necesario. Llene hasta
la Ifnea de Ileno en la vadlla indicadora de
niveL
• Para leer el nivel adecuado, apriete la tapa
del dep6sito de aceite del motor cada vez.
° Vuelva a instalar la tapa del dep6sito del
aceite y apri_tela.
° Despu_s de las dos (2) primeras horas de
siega, cambie el aceite y cada 25 horas de
ahi"en adelante. Puede necesitar cambiar el
aceite m_.s a menudo cuando las
cendiciones son poivorosas o sucias.
GASOLINA
° Llene el estanque de combustible. Use
gasolina regular, sin plomo, nueva y limpia
con el minimo de 87 octanoso (El uso de
gasolina con plomo aumentar& los dep6sitos
de 6xido de plomo y carbono y se reducir_ la
duraci6n de la v&lvula). No mezcle el aceite
con la gasotina° Para asegurar que la
gasolina utilizada sea fresca compre
estanques los cuales puedan ser utilizados
durante los primeros 30 dfas.
IMPORTANTE: CUANDO SE OPERE EN
TEMPERATURAS POR DEBAJO DE 32 ° F
(0° C) USE GASOLtNA DE CALIDAD DE
INVIERNO, LIMPIAY NUEVA PARA AYUDAR A
ASEGURAR UN BUEN ARRANQUE EN CLIMA
FRIOo
ADVERTENCIA: La expedencia ha indicado
que los combustibles mezclados con alcohol
(conocidos como gasohol, o el uso de etanol o
metanol) pueden atraer la humedad, la que
conduce a ta separaci6n y formaci6n de _.cidos
durante el almacenamiento. La gasolina acfdica
puede dafiar el sistema del combustible de un
motor durante el almacenamiento_ Para evitar
los problemas con e! motor, se debe vaciar el
sistema de combustible antes de guardarlo por
un per[odo de 30 dias o m&s_Vacfe el estanque
de combustible, haga arrancar el motor y
h&galo funcionar hasta que las Ifneas del
combustible y el carburador queden vacfoso La
pr6xima temporada use combustible nuevo.
Vea las Instrucciones para el Almacenamiento
para m_.sinformaci6n. Nunca use productos de
limpieza para el motor o para et carburador en
el estanque del combustible pues se pueden
producir dafios permanentes.
PRECAUOION: Llene hasta la parte
inferior del cuello de relleno del estanque
de gasolina, No Io Ilene demasiado.
Limpie el aceite o el combustible
derramado. No almacene, derrame o use
gasotina cerca de una llama expuesta,
Tapa del
deposito de
Tapa del .\ ._" aceite del
aeposito de _ motor con
lagasolina//,..._'_._'_----_---_.\varilla
__j)_ indicadora de
_ nivel
24
Page 25
PARA HACER ARRANCAR EL MOTOR
, Para hacer arrancar un motor fr% empuje el
cebador cinco (5) veces antes do tratarloo
Empuje tirmemente_ Este paso normalmente no
es necesario cu_um:tose hace arrancar un motor
que ya ha estadofuncionando por unos cuantos
minutos,
o Sujete la barrade controlque exige la presencia
del operador abajo en elmango y tire el mango
del arrancador r_pidamenteoNo permita que el
cord6n arrancador so devuelva abmptamenteo
o Para parar el motor, suelte la barra de control
clue exige la presencia del operador..
AVISO: En dimas mAs fr[os puede que sea
necesario repetir los pasos del cebado° En
climas m&s calurosos el cebar demasiado
puede producir el ahogo y el motor no va a
arrancar. Si se ahoga el motor espere unos
cuantos minutos antes de tratar de hacerlo
arrancar y no repita los pasos del cebado.
CONSEJOS PAPA SEGAR
o Bajo ciertas condiciones, talcomo c6spedmuy
alto,puede ser necesarioel elevar la altura de|
corte para reducir elesfuerzonecesario para
empujar la segadora y para ev'_arsobrecargar el
motor, dejando montones de recortes de c_sped.
Puede que sea necesario reducir la vetocidad det
recorrido y/o haga funcionar la segadora sobre el
&rea por segunda vez_
o Para un corte muy pesado, reduzca el ancho del
corte pasando parcialmentepor encima del lugar
anteriormente cortado y siegue lentamenteo
o Cuando use unasegadora con descargatrasera
en c6sped h0medo y pesado, los rnontones del
c&sped cortado puede que no entrenen el
recogedorde c@sped.Reduzca la velocidad del
recorrido (velocidadde empuje) y/o haga
funcionar la segadora sobre e!_,reapor segunda
vez.
• Si queda una hue!lade cores en el lado derecho
de una segadora con descarga trasera, siegue
en ta direcci6n enque girantas manillas del reloj,
solapando un poco para recaudar los recortes en
la pr6x_rnapasada_
= Los poros en los recogedores de c_sped de tela
pueden Uenarsecon mugre y polvo con el use y
los recogedores recaudar'_n menos c_ped.
Para evitar6sto, rocfe el recogedor con la
manguera deagua regularmente y d_jelo
secarse antes de usado°
o Mantenga la parlesuperior del motor, alrededor
del arrancador, despejada y sin recortes de
c_sped y paja. Esto ayudar& el flujo del alre del
motor y extender& su duraci6no
CONSEJOS PARA SEGAR Y ACOLCHAR
IMPORTANTE: Para obtenerel mejor rendimeinto
mantenga la caja de la segador a sinacumlacion de
cesped y basura. Vea "LIMPIEZA" en seccion de
"Mantenimento" de este manual
° La cuchilta acolchadora especial va a volver a
corlar los recortes dec@spedmuchas veces, y
los reduce entamar3o,de mode que si se caen
en el c_sped se van a dispesar entre @stey no
se van a notar_Tambi@n,el c_sped acolchado se
va a deshacer r_pidamente entregando
substancias nutritivas para el c_sped. Siempre
acolche con la velocidad del motor (cuchilla) m&s
alta, pues asf se obtendr_ la meier acci6n de
recorte de las cuchillas,
, Ev'rtecortar el c_sped cuando est_ mojado. El
c_sped mojado tiende a formar montones e
interfiere con la acoi6n de acolchado. La mejor
hora para segar elc@spedes temprano en la
tardeoA esa hora @steseha secado y el_rea
reci@ncortada no quedar_ expuesta al sol
directoo
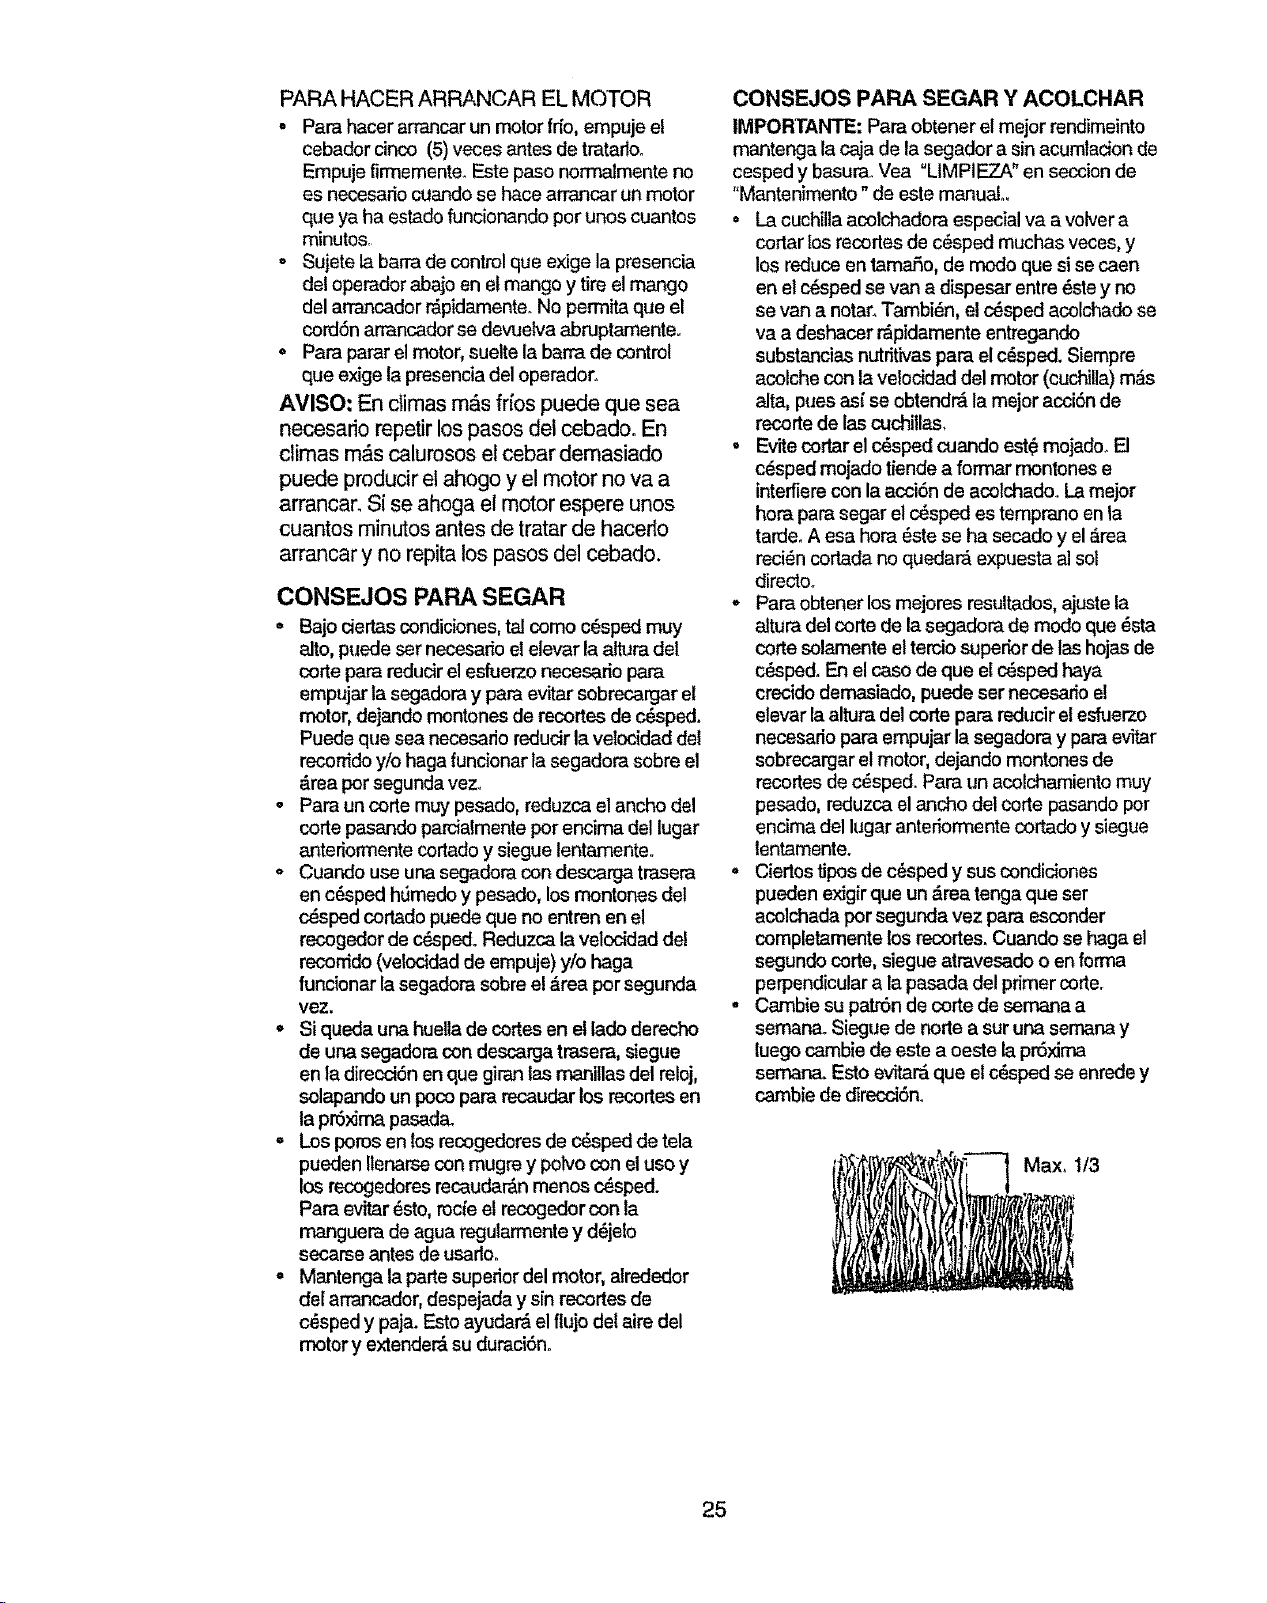
o Para obtener los mejores resultados, ajustela
altura del corte de la segadora de modo que @sta
corte solamente el tercio superior de las hojas de
c_pedo En el caso de que el c_sped haya
erecido dernasiado, puede ser necesario e!
elevarla altura del corte para reducir elesfuerzo
necesario para empujar la segadora y para evitar
sobrecargar el motor, dejando montones de
recortes dec@sped.Para un acolchamiento muy
pesado, reduzca elancho del corte pasando por
encimadel lugar anteriormente corlado ysiegue
lentamente.
o Cierlos tJposde c@spedy sus condiciones
pueden exigir que un &rea tonga que ser
acolchada por segunda vez para esconder
completamente los recortes. Cuando se haga el
segundo corte, siegue atravesado o en forma
perpendicular a la pasada del primercore.
• Cambie su patr6n de corte de semana a
semana_Siegue de norte a sur una sernana y
luego cambie de este a oeste lapr6xima
semana. Esto evitar_ que el c_sped se enrede y
cambie de direcci6n_
Max, t/3
25
Page 26
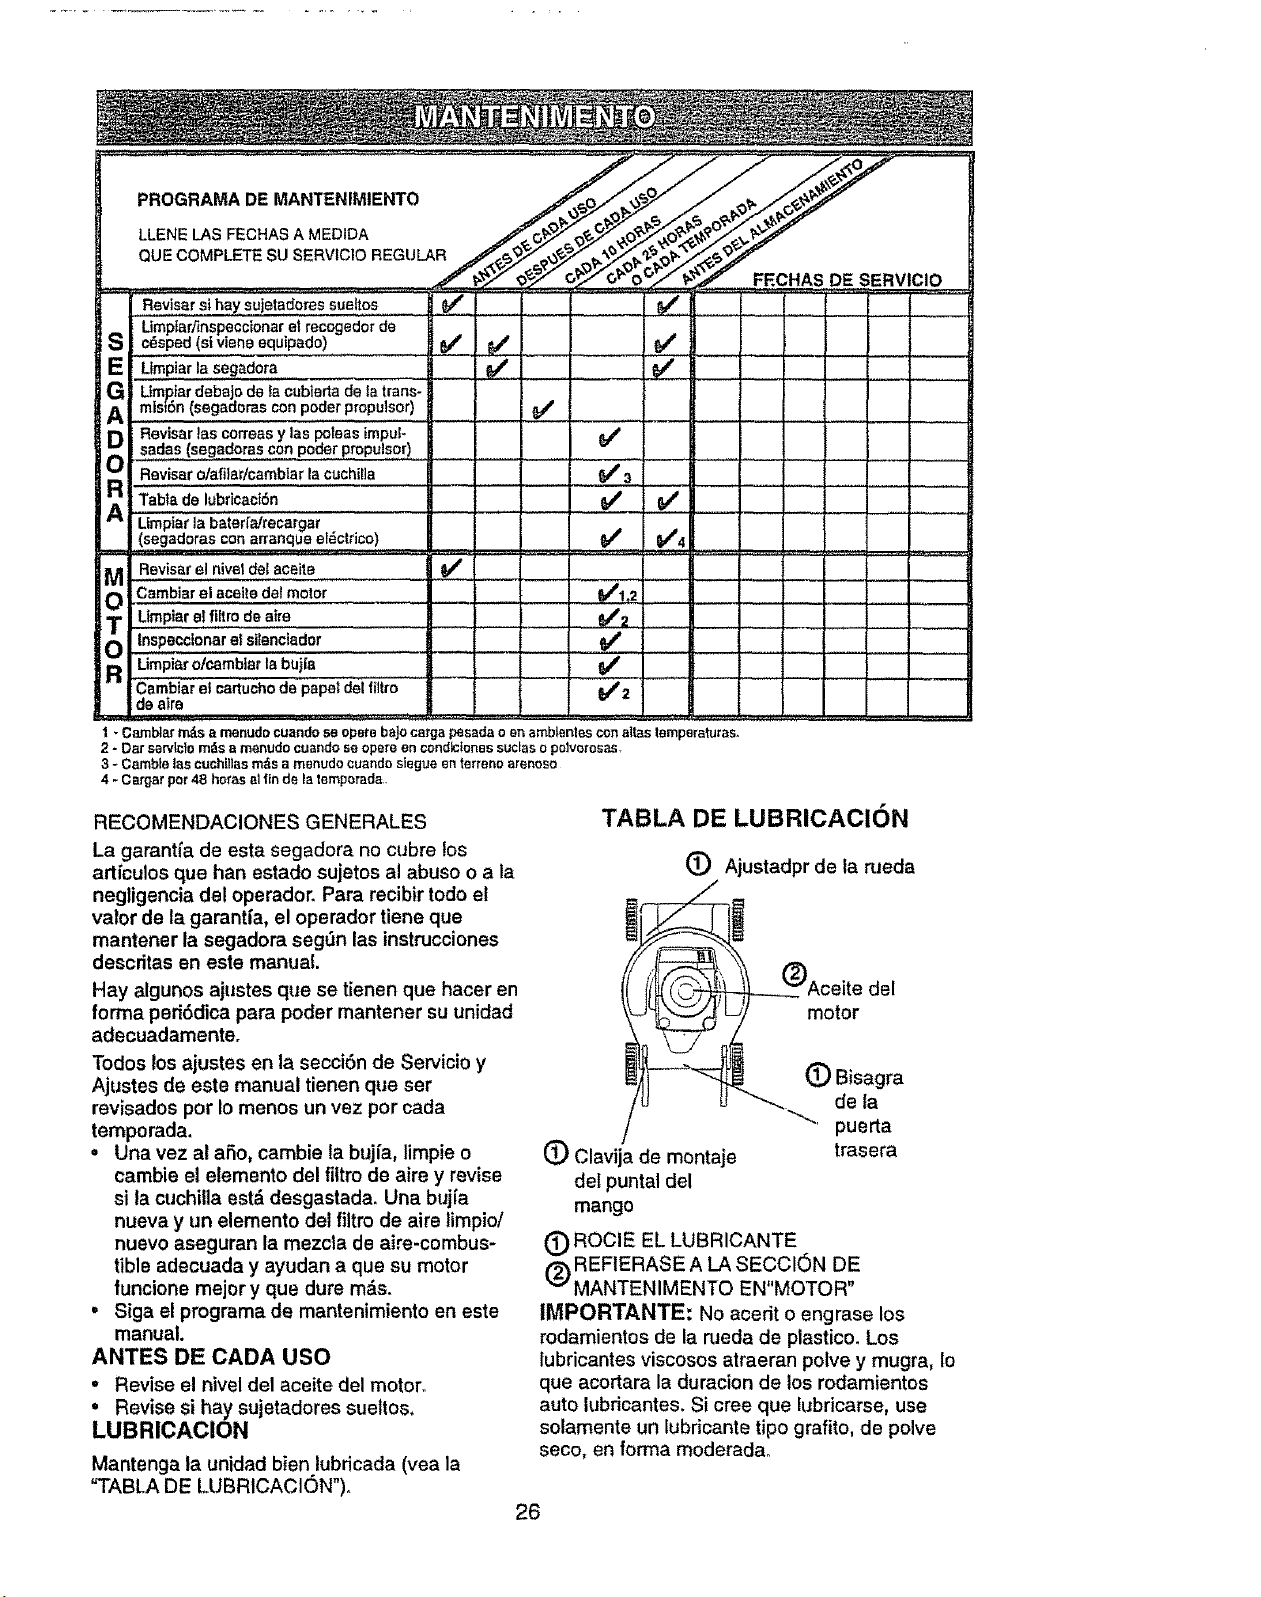
PROGRAMADE MANTENIMIENTO .O_'_ c,__ t,-_ _. o?'_ _.._
QUE COMPLETE SU SERVICIO REGULAR f_/,_q-_;t,-_'_O_ #e"
. /__.,_ FECHAS DE SERVICIO
Revisar si hay, sujeladores sue,Ires ..._#' ..... _ j
Umptar,rmspeccionar et recogedor de
S c_sped(sivieneequipado) _ _ _#
Limplar la seg_dora I _
Ltmpiardebajo de iacubterta de la trans-
.misiSn (segadoras con pod.e.!p.ropu.l.s.or!
sadas (segadorascon poder prop_lsor!
D Revtsartascorrea,sylas po_easimpuJ- _J' " "
Ravisaro/afitar/cambiarlacuchiHa _' 3 ...............
R Tabiado,'.b i aci6. ' " V"
Limptarla bater[a!recargar
(segadoras con arranque el_ctrico) _ _1_4
Revisar el nivet det aceitB " _#* "
a Cambiar el acette del motor 6/'1.2 .......
iii iii _
i i
[
Umpiare!filtrodeaire .... b#'2 :_
oT inspeccionare! ....... fp#'..........
Limpiar o/cambiarlabujt'a _/
R Camb'iar elcartuchodepaper delIll!re _#t2 ..........
deatra
1 - Camblar m_s a menudo cuando se opere baJocatga pas_,da o en amblentes con altos temperaturas.
2 - Dar sa_lcfo m_s a menudo cuando se opere en condtcfones sucLas o polvoros_.
3 - Camble las cuchLIlasm_s a menudo cuando stegue en terreno arenoso
4 - Cargar par 48 ho_'asa! fin de la temporada.
siienctador
RECOMENDAClONES GENERALES
La garanti'a de esta segadora no cubre los
art[culos que han estado sujetos al abuse o a la
negligencia del operador. Para recibir !ode el
valor de la garantia, el operador tiene que
mantener la segadora seg_n las instrucciones
descritas en este manual.
Hay algunos ajustes que se tienen que hacer en
forma periSdica para poder mantener su unidad
adecuadamente.
Todos los ajustes en la secci6n de Servicio y
Ajustes de este manual tienen que ser
revisados per Io menos un vez per cada
temporada.
• Unavez al aSo, cambie la buj[a, limpie o
cambie el elemento del filtro de aire y revise
si la cuchilla est&desgastada. Una buj{a
nueva y un elemento del filtro de aire limpio/
nuevo aseguran la mezcla de aire-combus-
tible adecuada y ayudan a que su motor
funcione mejor y que dure m&s.
= Siga el programa de mantenimiento en este
manual.
ANTES DE CADA use
• Revise el nivel del aceite del motor.
° Revise si hay sujetadores suettos.
LUBRICACION
Mantenga la unidad bien lubricada (vea la
"TABLA DE LUBRICACI(3N")o
TABLA DE LUBRICACION
(_) Ajustadpr de la nJeda
(_ Clavija de montaje trasera
del puntal del
mango
(_) ROCIE EL LUBRICANTE
(-_REFtERASE A LA SECCI_N DE
"-"MANTENIMENTO EN MOTOR"
IMPORTANTE: No acerit o engrase los
rodamientos de la rueda de plastico. Los
lubricantes viscosos atraeran polve y mugra, 1o
que acortara la duracion de los rodamientos
auto lubricantes. Si cree que lubricarse, use
solamente un lubricante tipo grafito, de polve
seco, en forma moderadao
26
Page 27
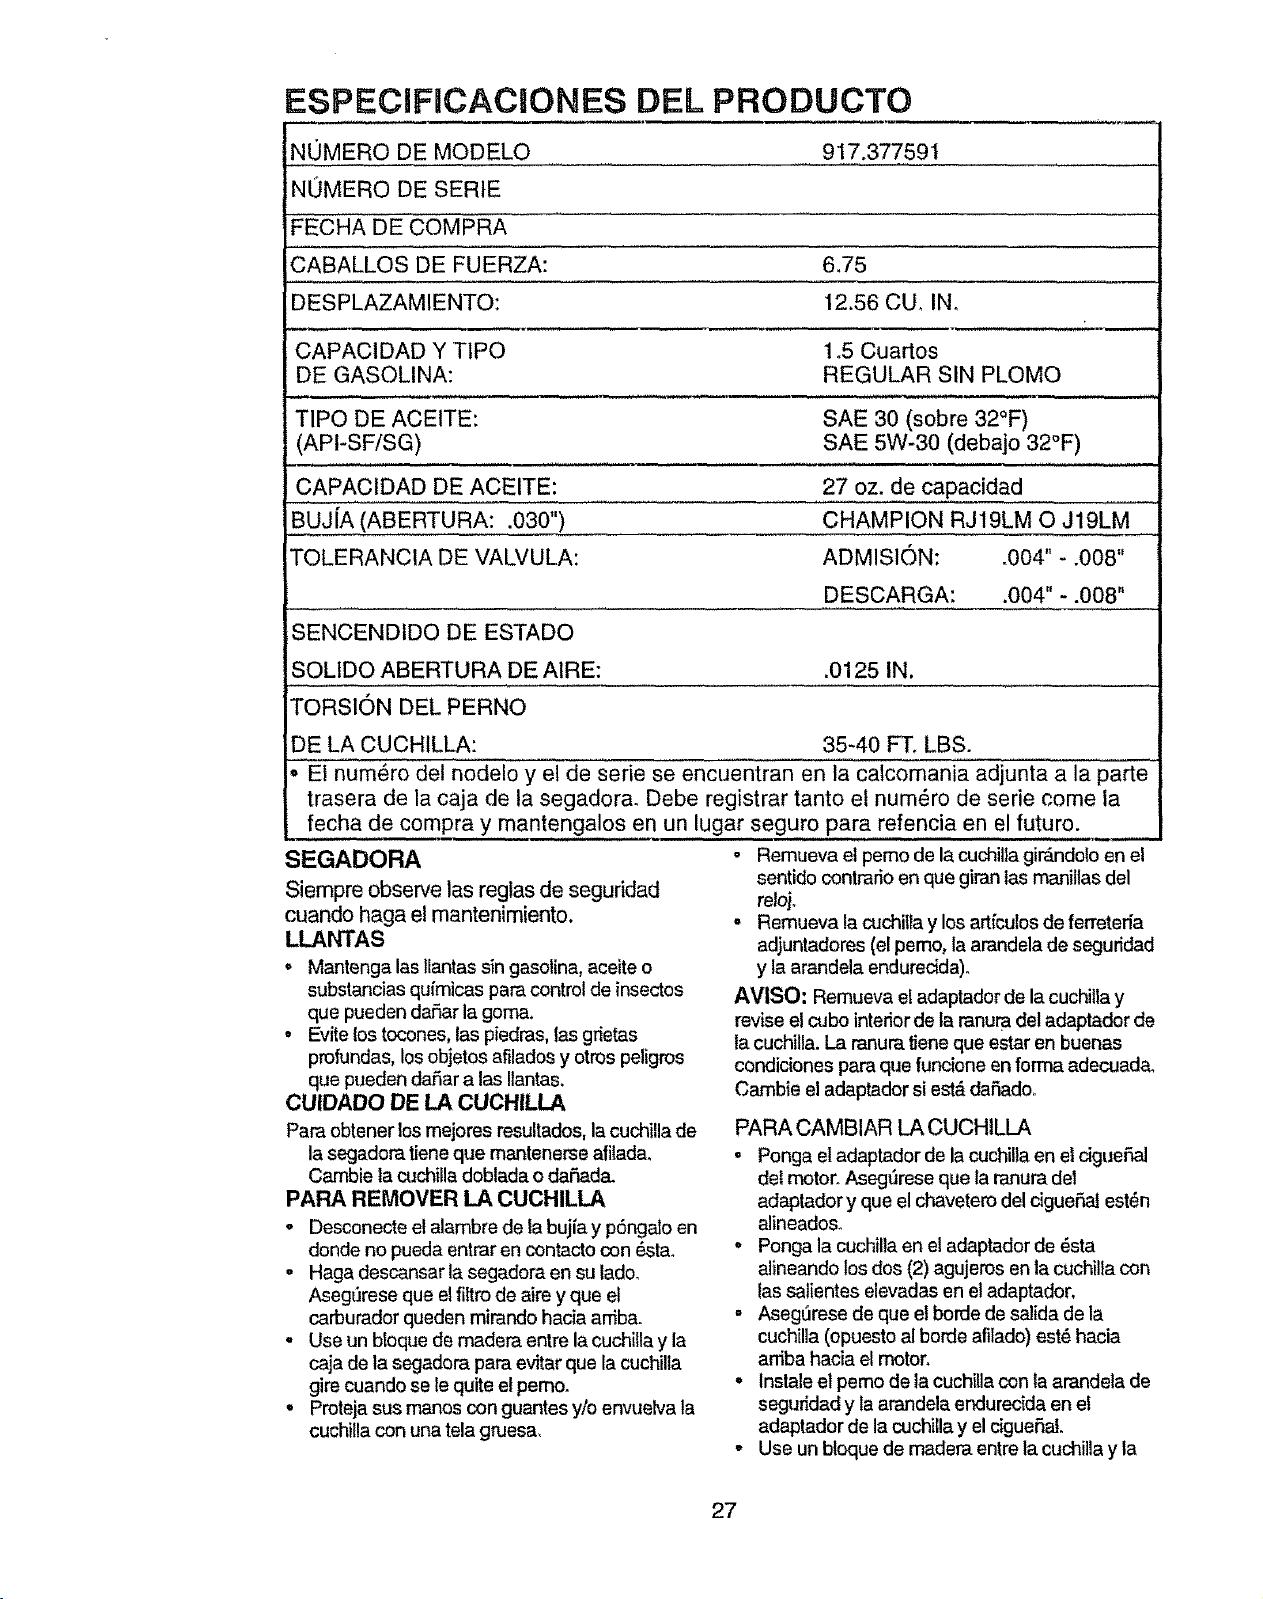
ESPECIRCACIONES DEL PRODUCTO
NOMERO DE MODELO 917.377591
NOMERO DE SERtE
FECHA DE COMPRA
CABALLOS DE FUERZA: 6.75
DESPLAZAMIENTO: 12.56 CU, IN,
_,1,,, ,
CAPACIDAD Y TIPO
DE GASOLINA:
1.5 Cuartos
REGULAR SIN PLOMO
TIPO DE ACEITE:
(API-SF/SG)
CAPACIDAD DE ACEITE:
B_UJ[A (ABERTURA: .030")
TOLERANClA DE VALVULA:
SENCENDIDO DE ESTADO
SOL1DO ABERTURA DE AIRE: .0125 IN,
TORSION DEL PERNO
DE LA CUCHILLA: 35-40 FT. LBS.
El num_ro del nodelo y el de sefie se encuentran en la calcomania adjunta a la parte
trasera de la caja de la segadora. Debe registrar tanto el num_ro de serie come la
fecha de compra y mantengalos en un lugar seguro para refencia en el future.
SEGADORA
Siempre observe las reglas de seguddad
cuando haga elmantenimiento.
LLANTAS
o Mantenga lasIIantassin gasolina, aceite o
substancias quimicas paracontrol de insectos
que pueden dafiar la gorna.
• Evite los tocones, las piedms, las grietas
profundas, losobjetos afilados y otros peligros
que pueden dafiar alas Ilantas.
CUIDADO DE LA CUCHILLA
Para obtener los mejores resultados, la cuchilla de
la segadora tiene que rnantenerse afiiada,
Cambie la cuchilla doblada odafiad&
PARA REMOVER LA CUCHILLA
- Desconecte el alambre de ia bujfay pSngatoen
donde no pueda entraren contacto con &stao
o Haga descansar lasegadora en su lade,
AsegSrese que el filtro de aire y que el
carburador queden mirando hacia arfiba.
° Use un btoque de madera entre la cuchilla y la
caja de la segadora para evitar que la cuchilia
gire cuando se le quite e!pemo,
• Proteja sus manes con guantes y/o envuek,a la
cuchitla con una tela gruesa,
- Remueva el pemo de la cJuchillagir_ndolo en el
sentido contrario en que giranlas manitlas del
reloj,
, Remueva lac_lchiltay losartfculosdeferreteffa
adjuntadores (el pemo,la arandelade seguridad
y la arandela enduredda),
AVISO: Remueva el adaptador de la cuchilla y
revise el cube interior de la ranue det adaptador de
la cuchitla. La ranura tiene que estar en buenas
condiciones para que funcione en forrna adecuad&
Cambie el adaptador si est&dafiado,
PARA CAMBIAR LA CUCHtLLA
° Ponga el adaptador de la cuchilta en et ciguefial
det motor° AsegtJrese que laranura del
adaptador y que el chavetero del cigueSaf est_n
alineadoso
= Ponga la cuchiltaen el adaptador de _sta
alineando los dos (2) agujeros en la cuchilta con
lassalientes elevadas en eladaptador,
. AsegSrese de que elhorde desalida de la
cuchilla (epuesto al horde afilado) est_ hacia
arfiba hacia el motor.
• instale el pemo de lacuchilla con taarandela de
seguridad y la arandela enduredda en el
adaptador de la cuchilla y El ciguefiaJ.
- Use un bloque de madera entre la cuchiHay la
SAE 30 (sobre 32°F)
SAE 5W-30 (debajo 32°F)
27 oz. de capacidad
CHAMPION RJ19LM O J19LM
ADMIS1ON: .004" - .008"
DESCARGA: .004" - .008"
27
Page 28

caja de la segadora y apriete elpemo de lacuchilla
girAndolo en elsentido en que giran las manillas
del reloj,.
° La torsi6n para apretar recomendada es de 35 -
40 pies libras.
IMPORTANTE: El pemo la cuchitla es clase 8
tratadoa cafor.
AVlSO: No recomendamos el afilar la cuchilla -
pero si Io hate, asegerese de que quede
balanceada,.
PARAAFILAR LA CUCHILLA
Se tiene que tener cuidado de mantenerla
balanceada. Una cuchilla que no est_ balanceada
va aproducir eventualmente da5.oen lasegadora o
en el motor.
. La cuchilla puede afilarse con una limao en una
rueda rectificadora. No trate de afilarla mientras
se encuentra en la segador&
- Para revisar el balance de la cuchilla, clave un
clavo en una viga o en la pared. Deje alrededor
de una pulgada de un clavo recto expuesto.
Ponga el agujero central de la cuchilia sobre la
cabeza del davo. Si la cuchilla est_ balanceada
debe permanecer en la posiciSnhorizont_. Si
cuaJquierade los extremos de {a cuchilfa se
mueve hacia abajo, afile el extremo pesado
hasta que _sta quede balanceadao
Adaptador de la cuchilla
Cuchilla
Perno de
de Arandela
segridad Endurecida
Borde de de la
salida cuchilla
Chavertero del
cigueSal
./
Adaptador
RECOGEDOR DECESPED
CAJA DE ENGRANAJES
* Paramantener el sistemade imputsi6n
funeionandoenforma adecuada, lacajade
engranajes y el drea alrededor de la impulsi6n
tienenque m_J_tenerselimpias y sin ecumulaci6n
de basura. Umpie debajo de la cubierta de ta
impulsi6n dosveces por temporada.
. La caja de engranajes se llena con lubdcante
hasta el hive!adecuado en la f_ibdca.La _nica
vez que el lubricante necesita atenci6n es
cuando se leha prestado ser¢icio a la caja de
engranajes.
. Si se necesita lubricante, use solamente Grasa
Texaco Starplex Premium 1, Parte Noo750355.
No use subst_Jtos.
RUEDAS DE IMPULSION
Revise las ruedas de impulsi6n delanteras cada vez
antes de segar, para asegurarse de que se mueven
librementeo
Si las ruedas no giran libremente quiere decir que
hay basura, recortes de cOsped,etcoen el &rea de
las ruedas de impulsi6n y tienen que limpiarse para
liberarlas.
Es necesario limpiar las ruedas de impulsi6n; revise
ambas medas delanteras.
- Remueva los tapacubos, las clavijas de horquilla
y lasarandela&
• Remueva las ruedasde los ajustadores de las
ruedas.
o Remueva la basura y los recortes de c_sped de
dentro de la cubierta contra el polvo, pi56ny/o de
1o8dientes de los engranajes de lasruedas de
imputsiSn.
- Ponga las ruedas de vuelta en su lugar.
. Si despu6s de limpiarlas ruedas de impulsi6n no
giran libremente, pSngase en contacto con su
centro/departamento de servido autodzado m&s
ce_,.,ano.
'
MOTOR
LUBRICAClON
Use solamente aceite dedetergente de alia calidad
clasificado con la ctasificaci6n SF, SG o SH de
servicio APL Seleccione la calidad de viscosidad
SAE segLinsu temperatura de operad6n esperad&
CALIDADES DE VISCOS]DAD DE SAE
(Si comprado como un accesorio)
- El recogedor de c_sped puede ser rociado con el
agua de la manguera pero tiene que estar seco
cuando se vaya a usaro
o Revise su recogedor de c_sped a menudo para
verificar si est&daSado odeteriorado. Se va a
desgastar con el uso normal. Si se necesita
cambiar el recogedor, c_mbielo solamente por
uno que sea aprobadoporel fabric.ante. D_ el
nQmerodel modelo de la segadora cuando to
ordene.
GAM,A DE TEMPERATURA ANTICIPADA
-20" 40 _
AVISO: A pesarde que los aeeites de
multiviscosidad (5W30, 10W30, etco)mejoran el
arranqueen climafrio0estosaceitesde
muttiviscosidad van ha aumentar elconsume de
aceitecuandose usanen temperaturassobre 32'
F, Revise elnlveldelaceite dal motor mds a
menudo, para evitarun posibledafio en elmotor,
debidoa que notiene suficienteaceite,
28
Page 29
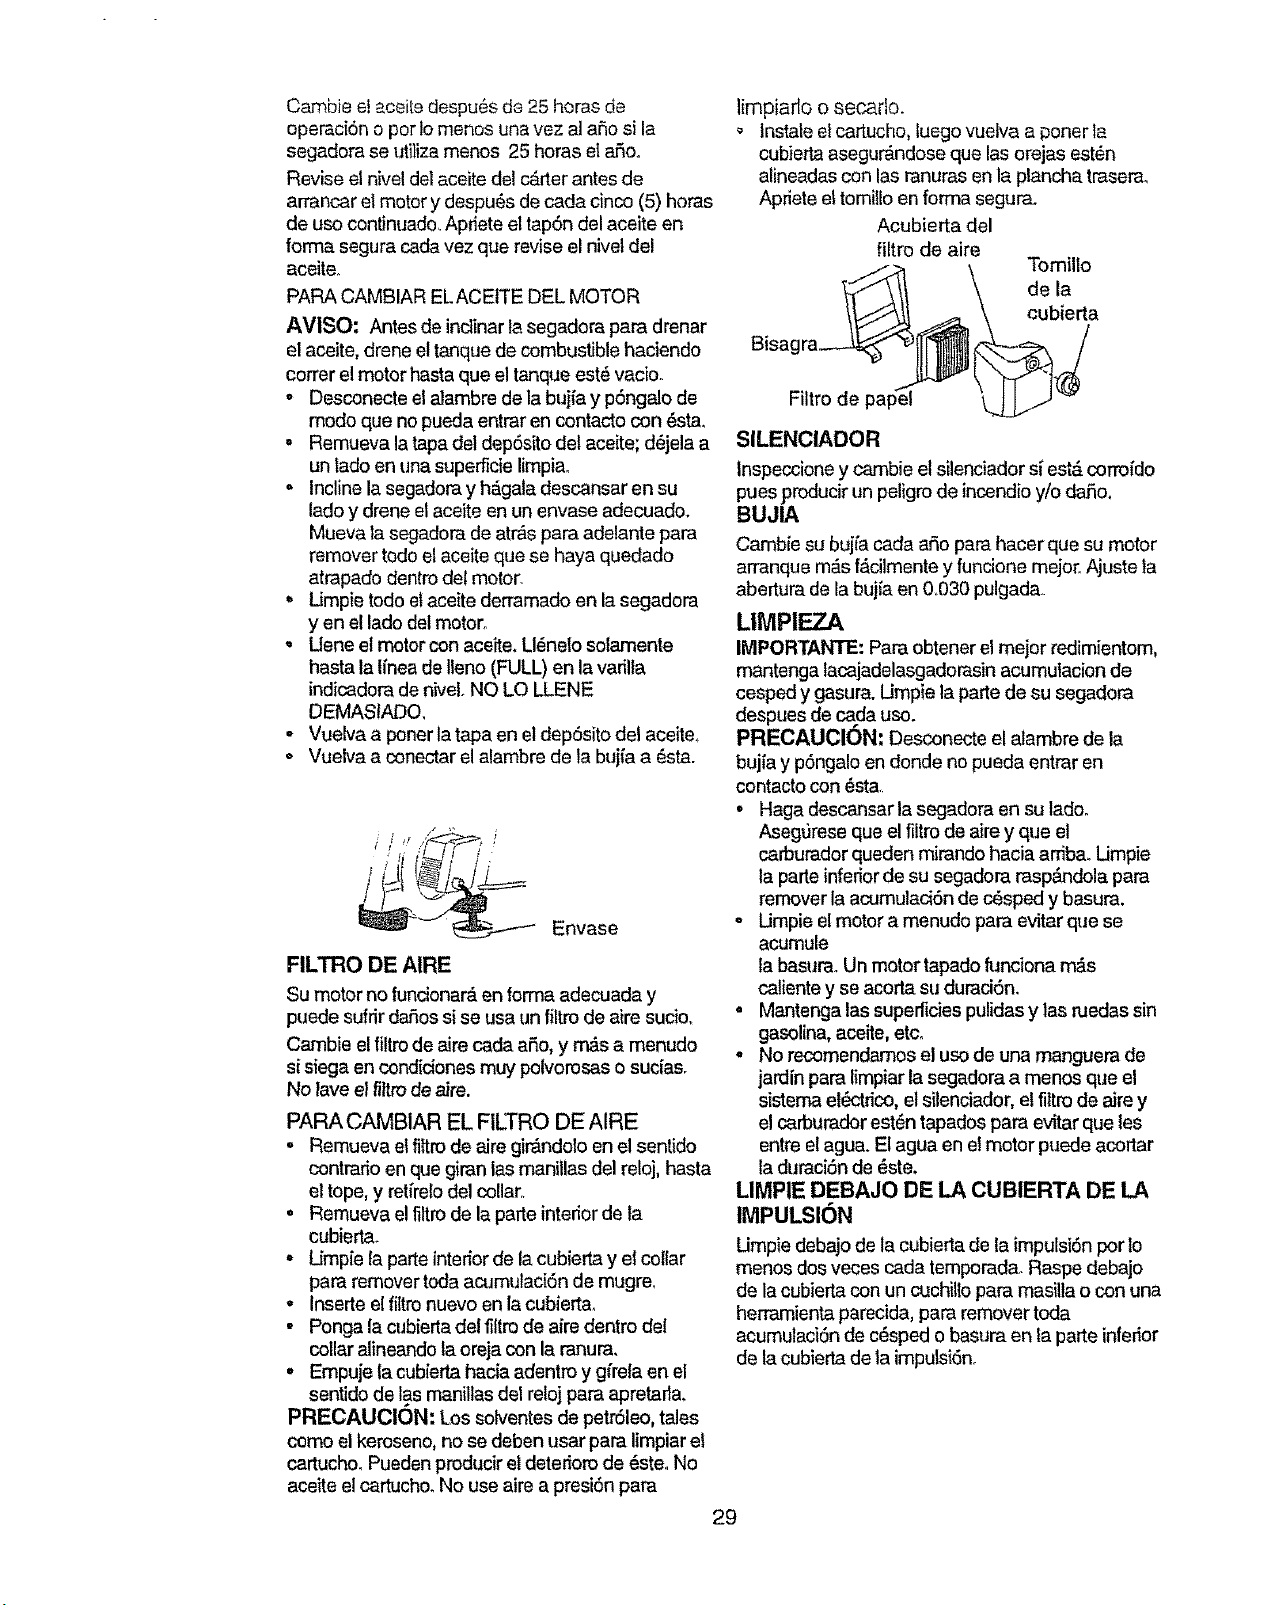
Cambie e!aceRedespu6s de25 bores de
operaci6n o per tomenos una vez al erie si la
segadora se utilize menos 25 horas el &rio°
Revise el nivel del aceite del carterantes de
arrencar elmeter y despu6s de cada cinco (5) horas
de use continuado. Apriete al tap6n del aceite en
forma segura cada vez que revise el nivet del
aceiteo
PARA CAMBIAR ELACEITE DEL MOTOR
AVISO: Antes de indinar la segadora pare drenar
el aceite, drene eltanque de combustible haciendo
correr el motor basraque el tanque est6 vacio.
o Desconecte el alambre de la buifay p6ngalo de
mode que no pueda entrar en contacto con 6sta.
. Remueva la tapa deldep6sito del aceite; d_jela a
un lade en una superfide limpiao
. Incline la segadora y hAgala descansar en su
lade y drene elaceite en un envase adecuado.
Mueva la segadera dearras para adelante para
remover todo el aceite que se haya quedado
atrapado dentro det motor,
,, Umpie todo etaceite derramado en la segadora
y en e! lade del motor.
', Uene etmotor con aceite. Ll_neto solamente
hasta la tinea de Ileno (FULL) en la varilla
indicadora deniveloNO LO LLENE
DEMAStADO,
- Vuelva a ponerla tapa en eldepSsito del aceite_
o Vuelva a conectar elalambre de la bujfa a 6sta.
Envase
FILTRO DE AIRE
Sumotornofundonar& en fermaadecuada y
puedesufrir dar3ossise usa unfiltm de aire sucio,.
Cambie el filtrode aire cadaaS.o,y m&s a menudo
si siege en condidones muy polvomsaso sucias.
No lave el filtro de aJre.
PARA CAMBIAR EL FILTRO DE AIRE
° Remueva et filtro de aire gir&ndolo en el sentido
contrado en que giran las manillas del reloj, haste
el tope, y ret{relodel collar,,
• Remueva e!filtrode laparte interior de la
cubiert&
° Ump[e laparte interior de la cubierta y el collar
para remover toda acumuladSn de mugre,
,, Inserte el filtro nuevo en la cubierta,
. Ponga la cubierta del l_ltrode aire dentro dal
collar aiineando ta oreja con la ranura.
. Empuje {a cubierta hacia adentro y gfrela en el
sentido de las manillas del relejpara apretari&
PRECAUClON: Los solventes de petrSleo, tales
come el kerosene, no se deben user pare limpiar el
cartucho_Puedenproducir el deterioro de 6SteoNo
ace_ee! cartucho. No use aire a presi(Snpara
lirnpiarlo o secede.
Instateel cartucho, luego vuelva a poner la
cubierla asegur&ndose que las orejas est_n
alineadas con las tenures en la plancha trasera.
Apriete ettomillo en forma segura.
Acubierta del
filtro de aire
Tomillo
de la
cubierta
Filtro de pap'el
SILENCIADOR
inspeccione y cambie el silendador si est&corrofdo
pues producir un peligro de incendio y/o da,5o,
BUJIA
Cambie su buj[a eada abe parehacer que su motor
arrenque m4s f4cilmente y funcione mejor, Ajuste Ia
abertura de la bujfa en 0,,030pulgada..
LIMPIEZA
IMPORTANTE: Pare obtener el meier i'edimientom,
mantenga lacajadelasgadorasin acumulacion de
cesped y gasura. Umpie la parte de su segadora
despues de cada use.
PRECAUCION: Desconecte el alambre de la
bujia y p6ngalo en donde no pueda entrar en
contacto con _st&
o Haga descansar la segadora en su lade°
AsegtJreseque el filtro de aire y que el
carburador queden mirando hacia ardba. Umpie
la parte inferior de su segadora rasp_'idola para
remover la acumulad6n de casped y basura.
- Umpie el motor a menudo para evitar que se
acumule
la basuraoUn motor tapado funciona m_,s
caliente y se acorta su duraci6n,
• Mantenga las superficies pulidas y las ruedas sin
gasolina, aceite, etco
• No recomendamos el usede una manguera de
jardin pare limpiar la segadore a menos que el
sistema ells'trice, el silenciador, etfiltm de alrey
elcarburadorest_ntapedospare evitarque les
entreelagua. Elagua en e!motorpuede acortar
laduraci6n de_ste.
LIMPIE DEBAJO DE LA CUBIERTA DE LA
IMPULSION
Umpie debajo de la cubierta de la impulsi6n per le
menes dos veces cada tempered& Raspe debajo
de la cubierta con un cuchillo pare masilla o con una
herr,:_'nientaparecida, para remover toda
acumulaciSn de c_sped obasura en laparte inferior
de la cubierta de la impuls{Sn.
29
Page 30
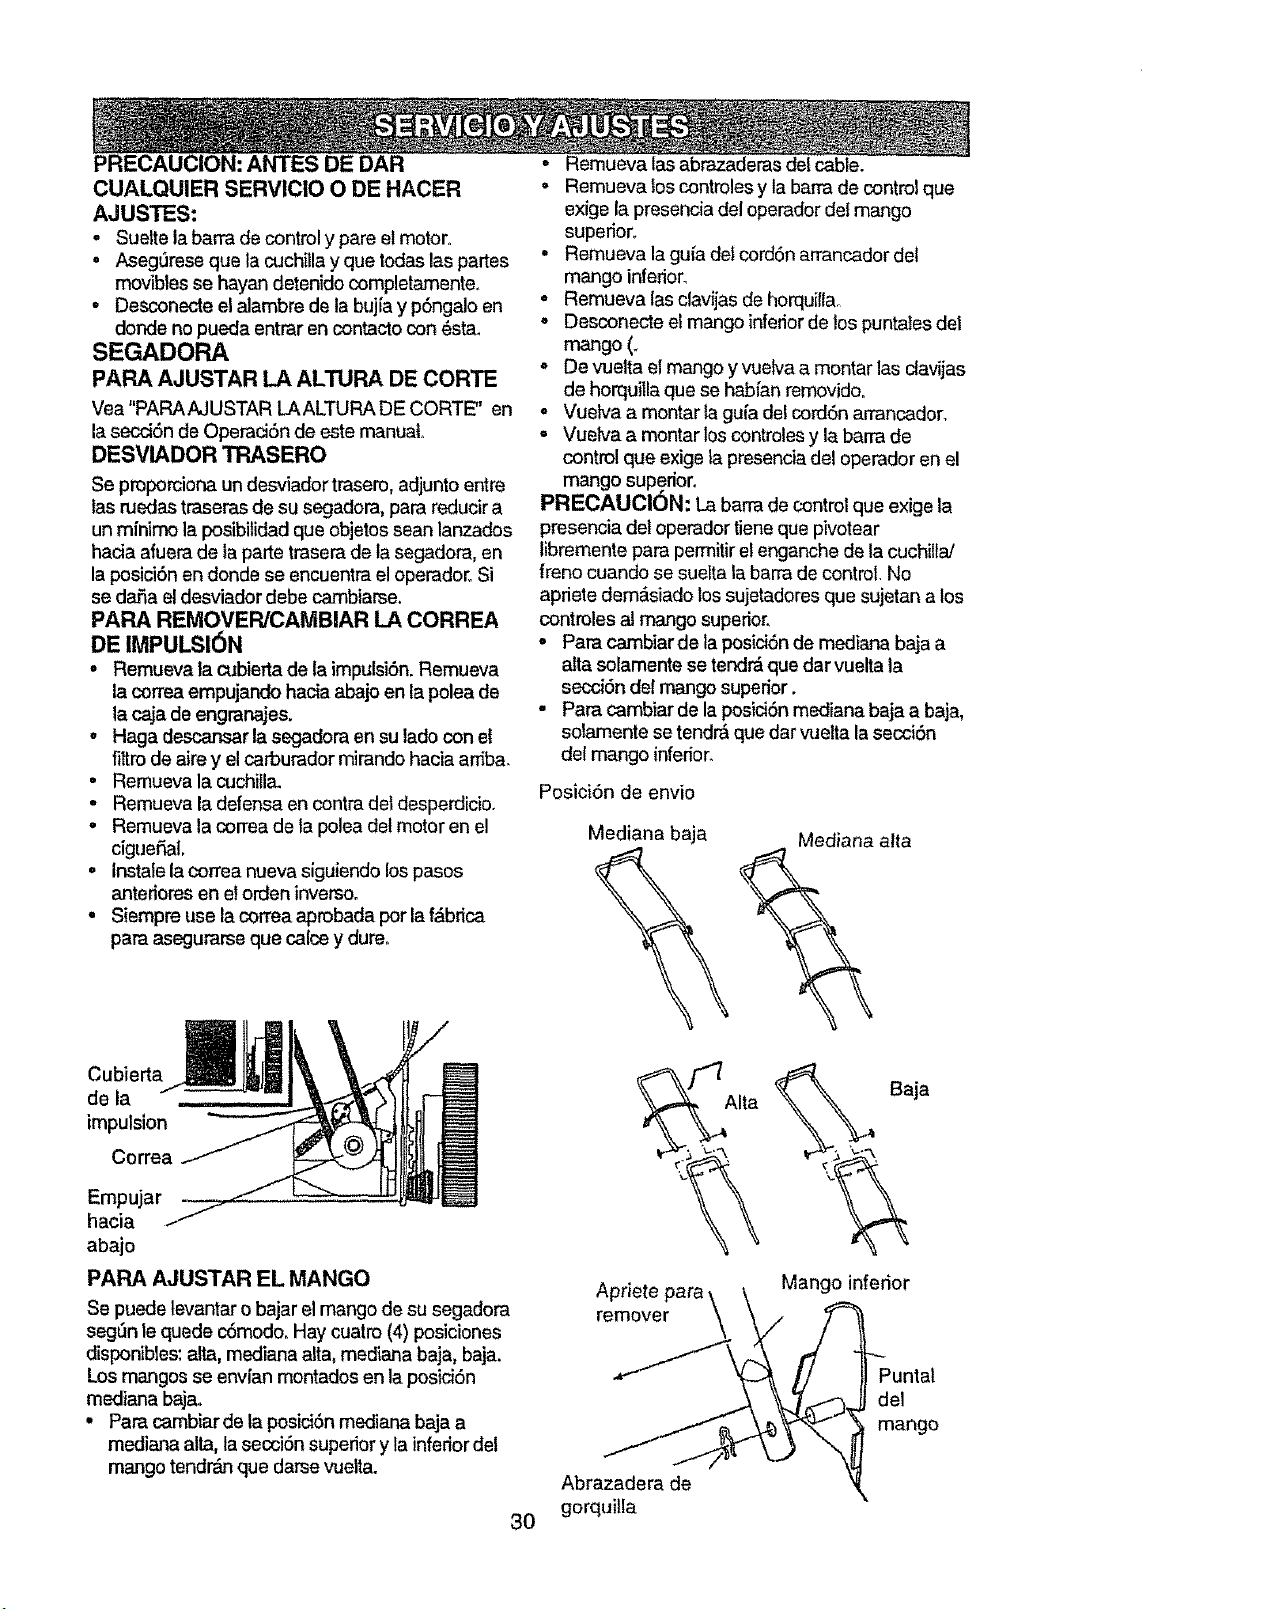
PRECAUCION: ANTES DAR
CUALQUIER SERVICIO O DE HACER
AJUSTES:
• Sue_telabarra de control y pare el motor.
o Aseg_rese qua la cuchglay que todas las partes
movibles se hayan detenido completamente.
• Desconecte etalambre de labujia y p6ngalo en
donde no pueda entraren contacto con 6stao
SEGADORA
PAPA AJUSTAR LA AL rLIRA DE CORTE
Vea "PARAAJUSTAR LAALTURA DE CORTE" en
la secci6n de Operaci6n de este manual°
DESVIADOR TRASERO
Se proporciona un desviador trasero, adjunto entre
las ruedastraseras de su segadora, para reducir a
un mfnimo la posibilidad que objetos sear=lanzados
hacia afuerade la parte trasera de la segaclora,en
la posici6n en deride se encuentra el operador..Si
se dafia el desviador debe cambiarse.
PAPA REMOVER/CAMBIAR LA CORREA
DE IMPULSI6N
• Remueva ta ct_biertade laimpulsi6n. Remueva
la correa empujando hacia abajo en la polea de
la caja de engranajes.
= Haga descansar la segadora en su lade con el
filtro de aire y el carburador mirando hacia arfiba.
• Remueva la cuc_hilla.
o Remueva la defensa en contra detdesperdicio.
o Remueva la correa de tapolea det motor en el
cigueSal,
o Instalela correa nueva siguiendo los pasos
anteriores en elorden inversoo
• Siempre use lacorrea aprobada per la f_,brica
para asegurarse que calce y dure.
• Remueva las abrazaderas del cable.
• Remueva los controles y la barrade control que
exige lapresencia del operador de! mango
superior_
= Remueva la guia deIcord6n arrancador del
mango inferior.
= Remueva lasclavijas de horquiltao
° Desconecte el mango inferiordelos puntaJesdel
mango(.
o De vuelta el mango y vuelva a montar las clavijas
de horquiUa que se habfan removidoo
o Vuelva a montar la gu{a del con:16narrancador.
• Vuelva a montar los controtes y la barra de
control que exige lapresencia del operador an el
mango superior.
PREOAUCION: La barra de control que exige la
presencia del operador tiene que pivotear
librementepara perrnitirelenganche de la cuchiliaJ
freno cuando se suelta tabarra decontrol No
apriete dem&siado los sujetadores que sujetan a los
controles al mango superior.
• Para cambiarde la posici6n de mediana baja a
atta solamente se tendr&que dar vuelta la
secciSn del mango superior.
o Para cambiar de la posici6n mediana baja a baja,
solamente se tendr-&que dar wlelta lasecd6n
del mango inferior.
Posici6n de envio
Mediana baja Mediana alta
Cubierta
de la
impulsion
Correa
Empujar - ---
hacia
abajo
PARA AJUSTAR EL MANGO
Se puede tevantar o bajar el mango de su segadora
segSnle quede c6modo, Hay cuatro (4) posiciones
disponibles: alta, mediana alta, mediana baja, baja.
Los mangos se envfan montados en la posici6n
mediana bajao
• Para cambiar de la posici6n mediana baja a
mediana alta, la secci6n superior y ta inferior del
mango tendr'_nque darse vuelta.
Abrazadera de
gorquilla
3O
Alta
Apriete para\ \ Mango inferior
Puntal
del
mango
Page 31
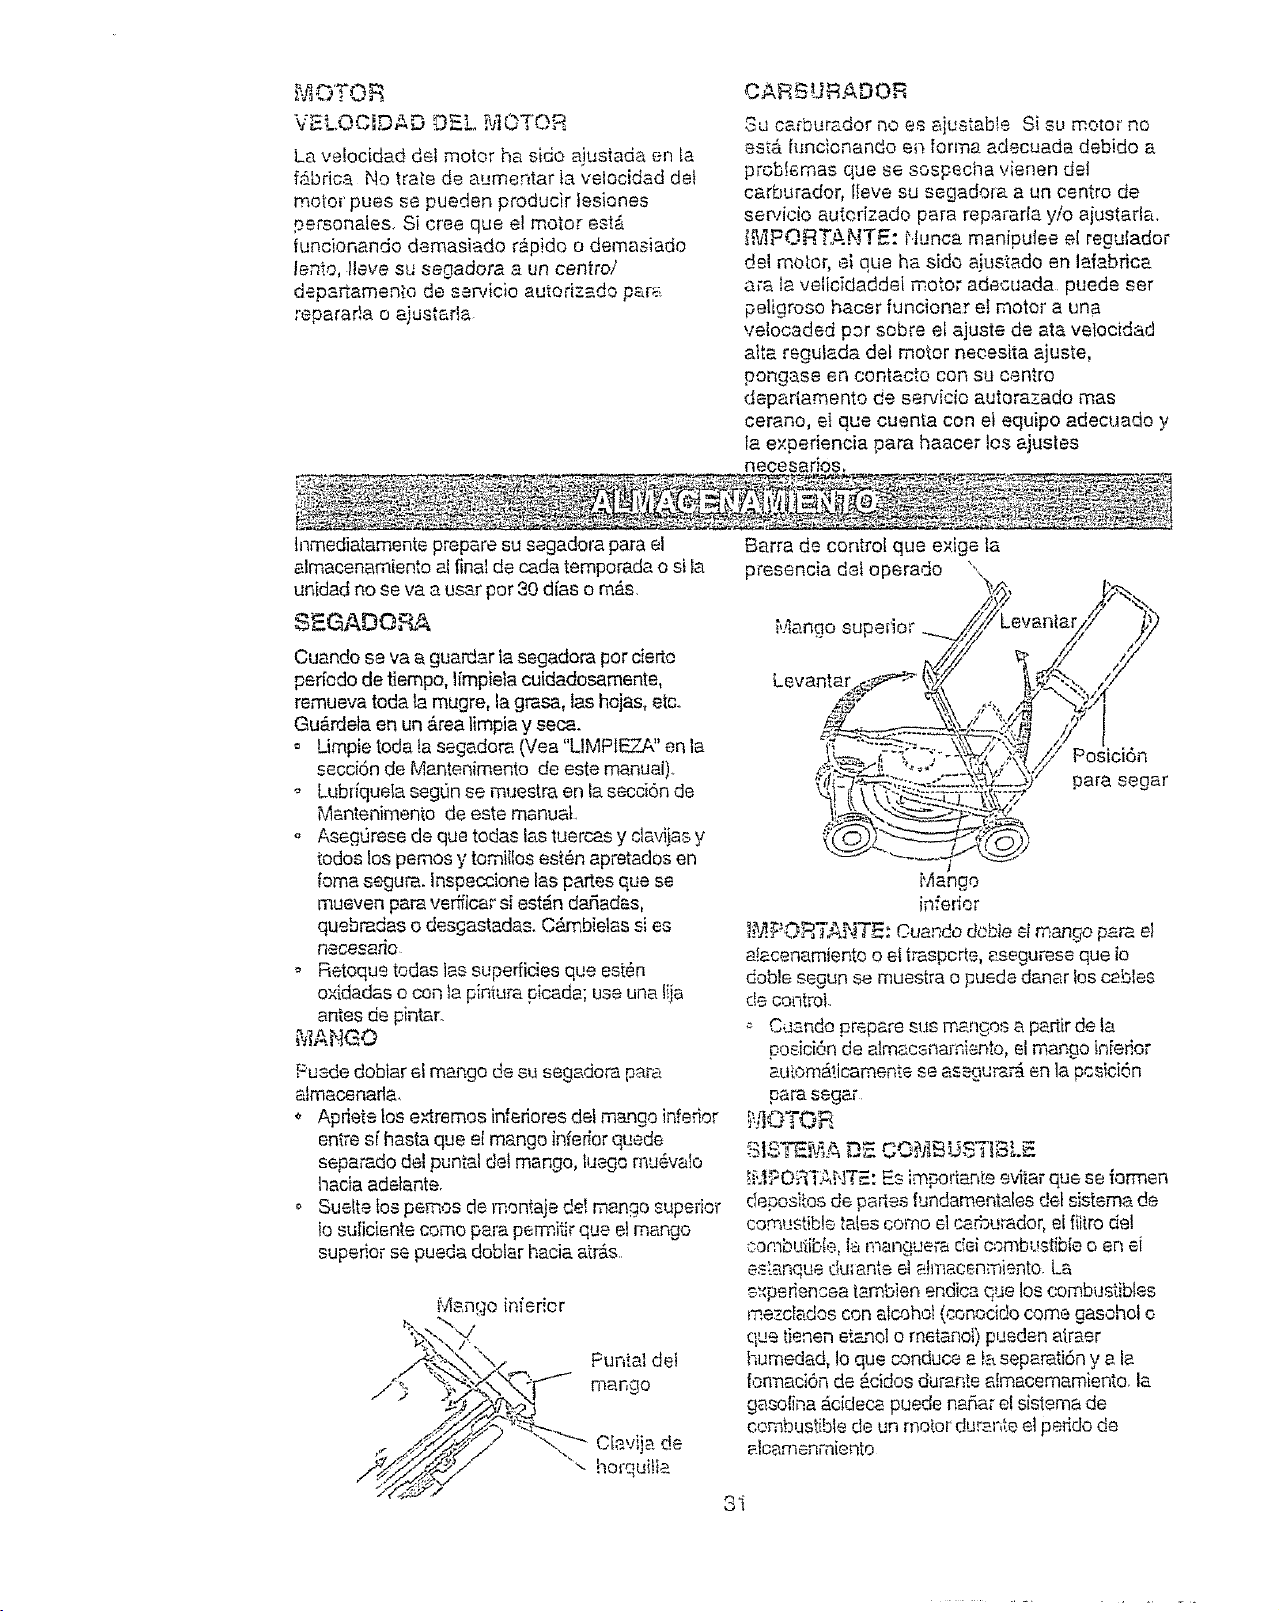
MO'TOR
VEL,OCIDAD OF_.LMOTOR
La vetocidad deI motor ha side ajustada en la
f_bdca No trate de aumentar ia vetocidad det
motor puss se pueden producir fesiones
personales. Si cree que e! motor est,.
funcionando demasiado rapido o dernasiado
lento, lleve su segadora a un central
depa_amen_o de servic}o autorizado p_'_r_._
reparada o aiustarta
CAR£URADOR
Su ca_bur_.dor no es ajustable Si su motor no
es_&R_ncionando en forma adecuada debido a
probtemas qua se sospecha vienen del
carburador, lleve su segadora a un centre de
sewicio autorizado pare repararla y/o ajustafla.
_,_IPORTANTE: Nunca manipulee el regutador
del motor, el qua hs side _ustado en Idabrica
are !a velicfdaddeI motor adecuada puede ser
peligroso hacer funcionar ei motor a una
veiocaded par sabre el ajuste de ate velocidad
atta reguieda del motor necesita ajuste,
pongase en contaeto con su centre
depariamento de servieio autorazado mas
cerano, ei qua cuenta con et equipo adecuado y
la experiencia para haacer los ajustes
necesarios,
tnmediatamente prepare su segadora pare el
almacenamiento al final de cada temporada o siia
unidad no se va a user par 30 dfas o m#.s.
S__GADO,'RA
Cuando se va aguarder la segadora par cierto
perfodo de tiempo, limpieia cuidadosamente,
remueva toda la mugre, la grasa, las hojas, etc..
GuArdela en un Area limpia y seca.
o Umpie toda !a segadora (Vea "LIMPtET_A"en la
secci6n de Mantenimento de este manual).
Lubffquela segOnse muestra en la secdan de
Mantenimento de este manual.
° Asagt)rese de que todas Isistuercas y clavijas y
todos los pemos y tomiifos estan apretados en
fame segu_, inspeccione las partes que se
mueven pare ve_'icar si est_n decades,
quebradas odesgastadas. C_mbietas sles
necesario
o Retoque redes tas superfides qua est_n
oxidadas o con ia pintura picada; use una tija
antes de pintar.
_IANGO
Puede dobiar efmango desu segadora pare
atmacenarla.
o Apriete tos e_remos infedores dot mango inferior
entre sf haste que et mango inferior quads
separado del puntal dotmango, tuego rnu_-vato
hacia adelante.
o Suelte los pernos de montaje de! mange superior
io suliciente coma pare permitlr qua etmango
superior sa pueda dobfar hacia atr_-s
Man_ooinferior
Puntal det
mango
Ciavija de
"--horqui!ie
Barra de control qua exige la
presencia det operado
Mango superior
Levantar
l
sici6n
para sager
Mango
infer'ier
_._O_T,'_,NT_: Cuando debie eimango pare et
dacenamiento oel traspc_e, e_segureseque to
doble segun se muestra o puede danar foscables
de control..
Cdando prepare sue mangos a pariir de la
posid6n de alm_cenambnto, st mango in[edor
aui:omaticamente se as_.gu_ en la pcsician
pare sega[
_'I1OTOR
!'?JgORT:t..NTE:Es importante evitar que se iormen
depositos de pa_es fundamentales del sistema de
comustibte talescoma elcamurador, ei fiitro de!
oombuiibb, I_ mangue_a dei combustible o en ei
es:.anquedu;ante el afmacenmiento. Ls
experiencea tambien endica que los combustibles
mezciados con alcoho! (eonocidocome gasohoI e
qua t_enenatonal o rnetanoi) pueden atraer
humedad, to qua conduce a !aseparati6n y e.la
fom'naci6nde Acidos durante a!macemamiento_ la
gasoline #,cidecapuede naSarel sistema de
combustible de un rno[or durante el perido de
alcamenrniento
3I
Page 32
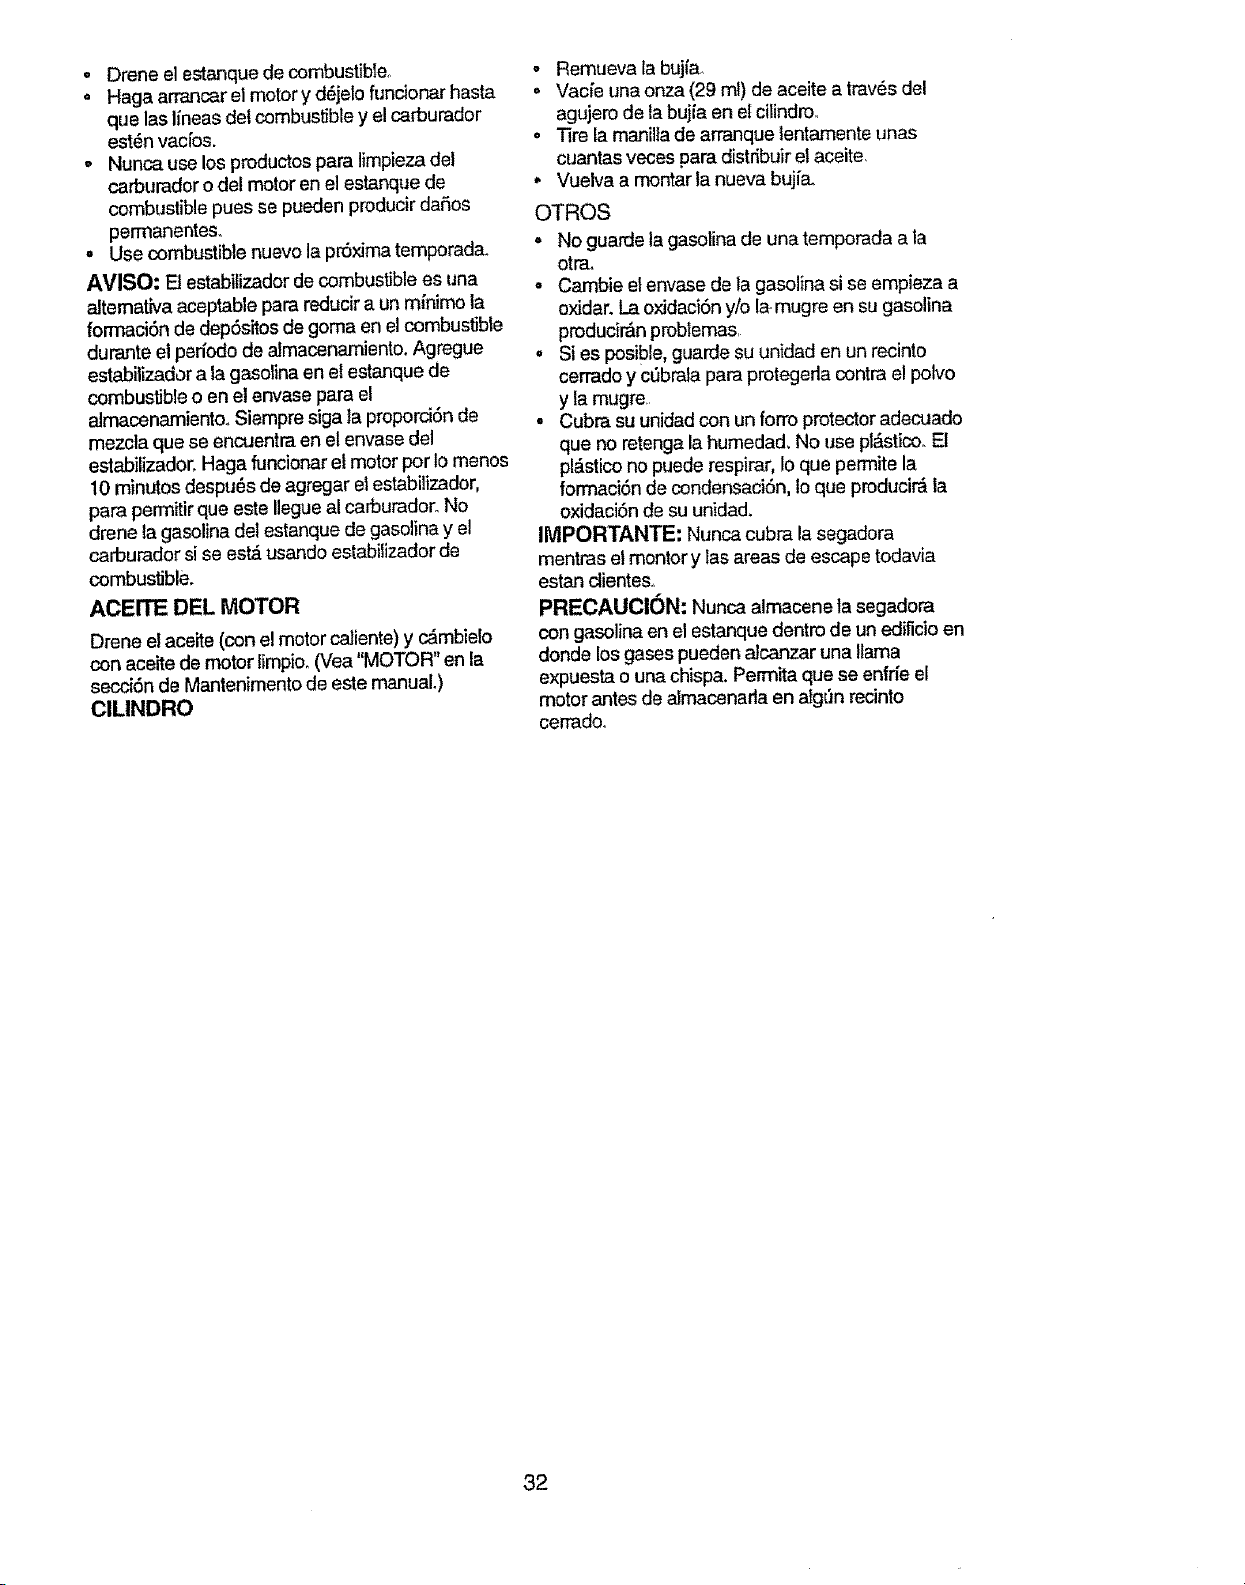
° Drene el estanque de combustible,
, Haga arrancar el motory d_jelo funcionar hasta
que las Ifneas det combustible y e!carburador
est_rl vac[os.
• Nunca use los productos para limpieza del
ca_buradoro del motor en elestanque de
combustible pues se pueden producir daF_os
perrnanentes,
• Use combustible nuevo la pr6xima temporad&
AVISO: El estabilizador de combustible es una
alternativa aceptable para reducir a un mfnimo la
forrnaci6n de dep6sitos degoma en el combustible
durante el perfodo de a}macenamiento. Agregue
estabilizador ala gasolina en el estanque de
combustible o en el envase para el
a]macenamientooSiempre siga _apropord6n de
mezcla que se encuentra en el envase del
estabilizador. Haga funcionar elmotor por 1omenos
10 minutos despu6s de agregar elestabilizador,
para permitir que este UeguealcarburadoroNo
drene la gasolina del estanque de gasolina y el
carburador si se es_ usando estabiiizador de
combustible.
ACEITE DEL MOTOR
Drene elaceite (con elmotor caliente) y c_mbielo
con aceite de motor limpio, (Vea "MOTOR" en la
secci6n de Mantenimento de este manuaL)
ClLINDRO
- Remueva ta bujfa,,
, Vacfe una onza (29 ml) de aceite a trav6sdel
agujero de labujia en e! cilindro.,
• ]]re la maniltade arranque lentamente unas
cuantas veces oara distribuirel aceite,
, Vuelva a rnontar ta nueva bujfa.
OTROS
° No guarde la gasolina de una temporada a la
otra.
• Cambie e! envase de la gasolina si se empieza a
oxidar. La oxidaciSn y/o la-mugre en su gasolina
producir'anprobtemas,
o Si es posible, guarde su unidad en un recinto
cerrado y cdbmJapara protegeda contra el polvo
y la mugre
. Cubra su unidad con un forro protector adecuado
que no retenga lahumedad, No use pl_.stico,El
pl&sticono puede respirar, Io que permite la
forrnaci6n de condensaci6n, Ioque producir'&la
oxidaci6n de su unidad.
IMPORTANTE: Nunca cubra la segadora
mentras etmontor y Easareas de escape todavia
estan diente&
PREOAUCi_N: Nunca almacene la segadora
con gasolina en el estanque dentro de unedificio en
donde los gases pueden alcanzar una llama
expuesta o una chispa. Perrnita que se enffie el
motor antes de almacenada en algt'Jnrecinto
cerradoo
32
Page 33

IDENTIFICACION DE PROBLEMAS
PROBLEMA ...... CAusA
No arranca
• FUtro de aire sucio.
• Sin combustible.
oCombustible rancio_
• Agua en el combustible, •
. Alambre de la bujia •
desconectadoo
• Bujia mala_
° Cuchilla suelta o adaptador •
de la cuchilla quebrado.
• Barra de control en la posiciOn •
suelta.
. Barra de control defectuosa, •
I
Falta de fuerza
• Parle trasera d'e la Cajacuchi!la "" • Ajuste a ta posici'o'n de''"C0rte m_,s
de ta segadora arrastr_ndose
en et c_sped pesado.
• Est_ cortando mucho c_sped.
• Filtro de aim sucioo
•Acumulaci6n de c_sped, hojas
y basura debajo de la sega-
dora°
° Demasiado aceite en et motor.
i ,,,,, i HH ,,,
CORRECCiON ..........
° Limpie/cambie el filtro de aire.
• Llene el estanque de combustible.
o Drene el estanque y vuelva a
Ilenarlo con combustible limpio y
nuevo.
Drene el estanque de combustible y
et carburador y vuelva a llenar el
estanque con gasolina nueva.
Conecte el alambre a la buj{a.
Cambie la bujia.
Apriete el perno de la cuchilla o
cambie el adaptador de la cuchilla.
Presione la barra de control hacia el
mango_
Cambie la barra de control.
alto."
• Ajuste a la posici6n de "Corte m&s
alto."
° Limpie/cambie el filtro de aire.
• Limpie la parle inferior de la caja de
la segadora,,
• Revise et nivel del aceite.
33
Page 34
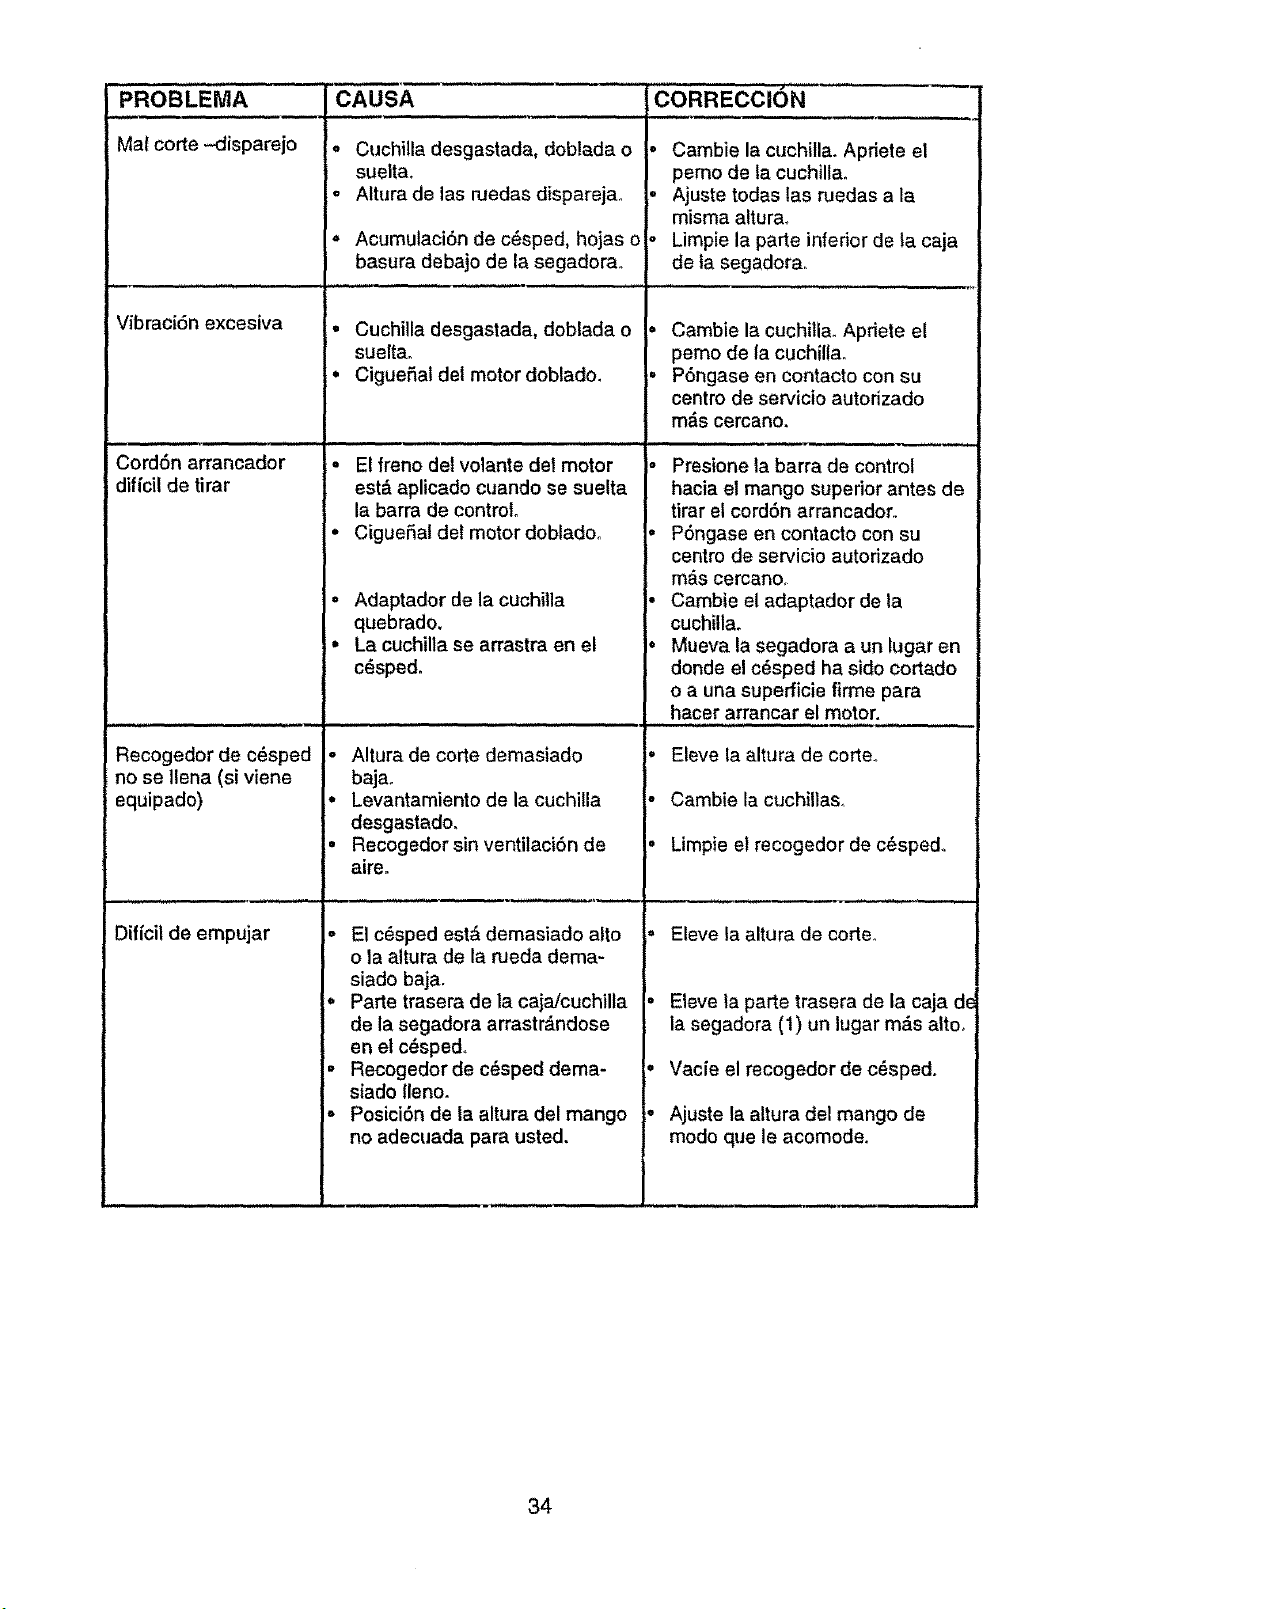
PROBLEMA
CAUSA
CORRECCION
i
Ma[ corte -disparejo
Vibraci6n excesiva
Cord6n arrancador
diffcil de tirar
o
Cuchilla desgastada, doblada o
suelta
o
Altura de las ruedas disparejao
o
Acumutaci6n de c_sped, hojas o
basura debajo de la segadora°
• Cuchilla desgastada, doblada o
sueltao
• Ciguefial del motor doblado
Elfreno del volante det motor
est& aplicado cuando se suelta
la barra de control
Ciguefial dot motor doblado
, Adaptador de la cuchitla
quebrado
• La cuchilla se arrastra en el
c_spedo
Cambie la cuchilla Apriete el
pemo de la cuchilla
Ajuste todas las ruedas a la
misma altura
Limpie la parte infedor de la caja
de ta segadora
Cambie la cuchitla Apriete el
pemo de la cuchill&
P6ngase en contacto con su
centro de servicio autorizado
m_s cercano
Presione la barra de control
hacia el mango superior antes de
tirar el cord6n arrancador
PSngase en contacto con su
centro de servicio autorizado
m_s cercano
Cambie el adaptador de la
cuchilla
Mueva la segadora a un lugar en
donde el c_sped ha sido cortado
o a una supefficie firme para
hacer arrancar el motor
Recogedor de c6sped
no se Ilena (si viene
equipado)
Diflcil de empujar
Altura de corte demasiado
baja
Levantamiento de la cuchilla
desgastado
Recogedor sin ventilaciSn de
aire
El c_sped est& demasiado alto
o la altura de la rueda dema-
siado baja
Parle trasera de la cajaicuchilla
de la segadora arrastr_ndose
en el c_spedo
Recogedor de c_sped dema-
s[ado lleno
Posici6n de la altura del mango
no adecuada para usted
Eleve la altura de code,
Cambie la cuchillas
Limpie el recogedor de c6spedo
Eleve la altura de code°
Eleve ta parte trasera de la caja dE
la segadora (1) un lugar m_.s alto,
Vacie el recogedor de c6sped.
Ajuste la altura del mango de
modo que le acomode,
34
Page 35
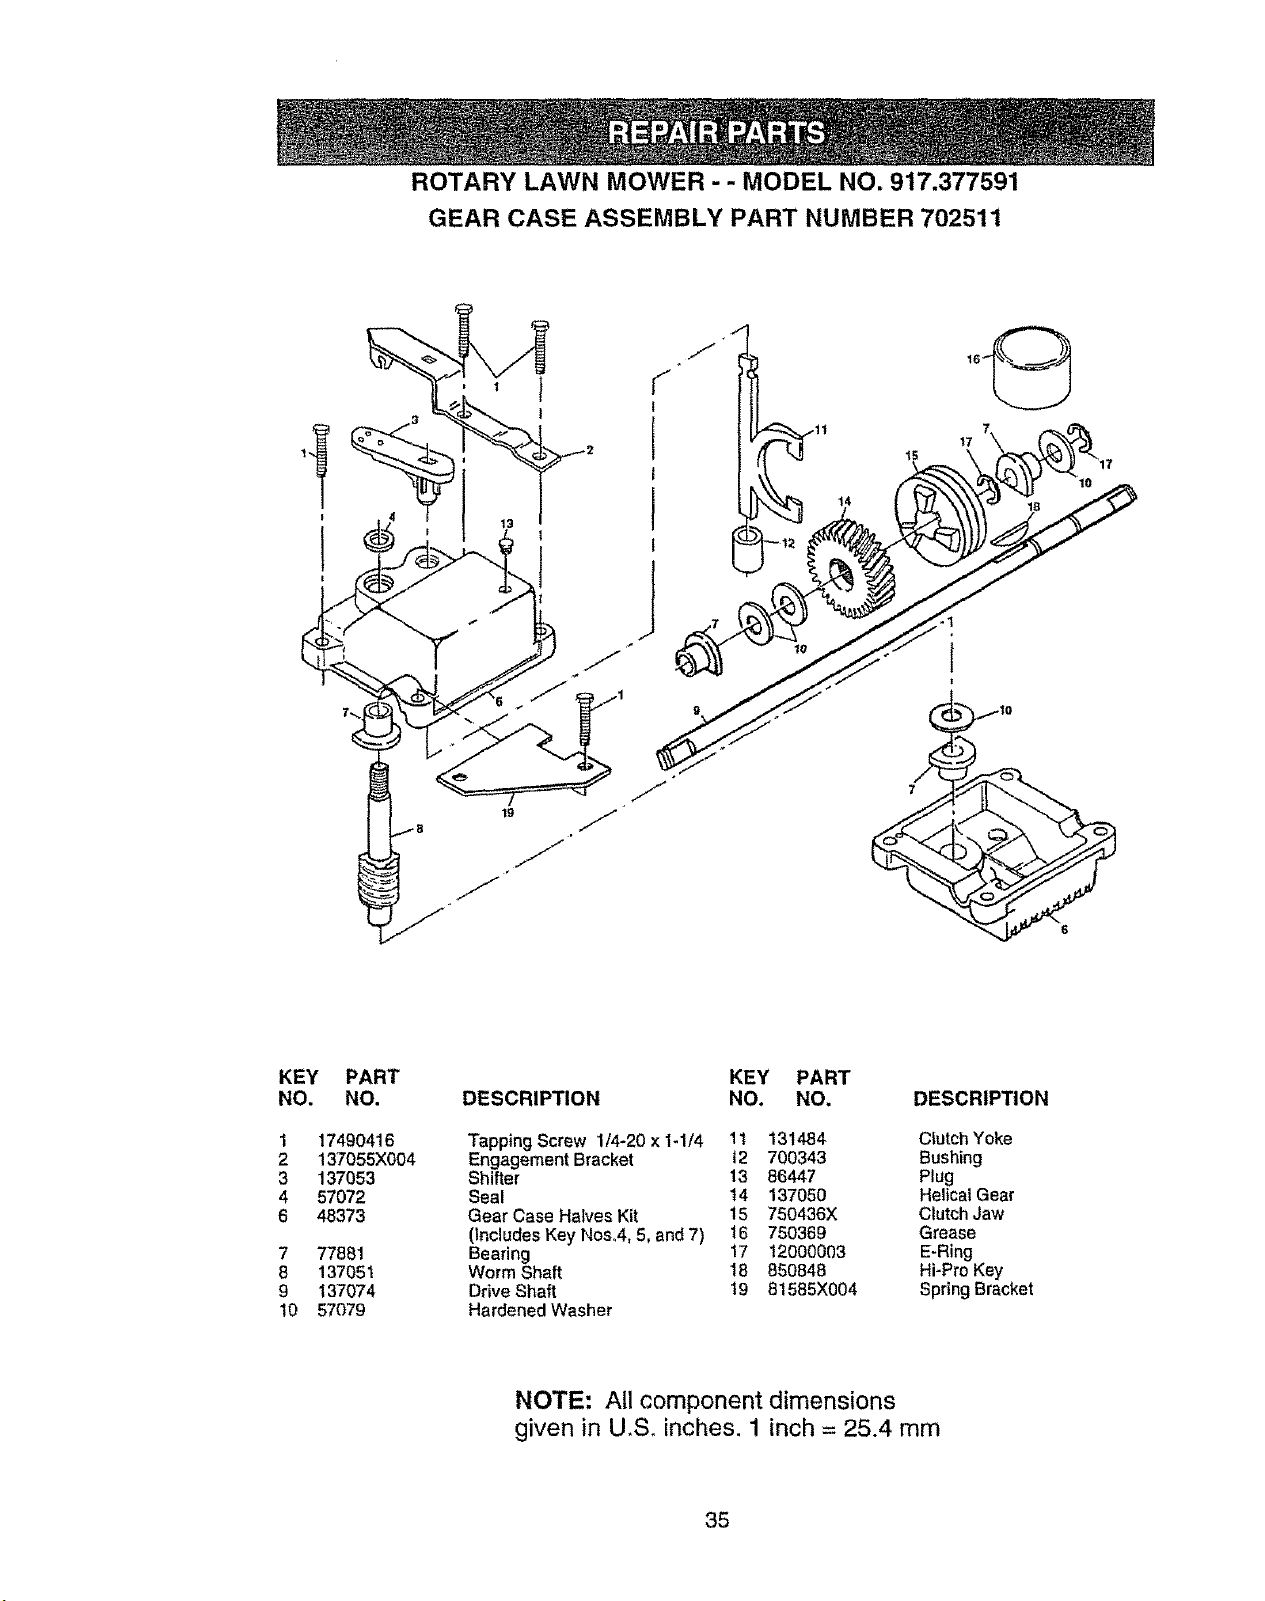
ROTARY LAWN MOWER - - MODEL NO. 917.377591
GEAR CASE ASSEMBLY PART NUMBER 702511
!
KEY PART
NO. NO.
1 17490416
2 137055X004
3 137053
4 57072
6 48373
7 77881
8 137051
9 137074
10 57o79
KEY PART
DESCRIPTION NO. NO.
Tapping Screw 1/4-20 x 1-1/4 11 131484
Engagement Bracket t2 700343
Shifter 13 86447
Seal 14 137050
Gear Case Halves Kit 15 750436X
(includes Key Nos°4, 5, and 7) 16 750369
Bearing 17 12000003
Worm Shaft 18 850848
Drive Shaft 19 81585X004
Hardened Washer
7
6
DESCRIPTION
Ciutch Yoke
Bushing
Plug
Helical Gear
Clutch Jaw
Grease
E-Ring
Hi-Pro Key
Spring Bracket
NOTE: All component dimensions
given in U.S. inches. 1 inch = 25.4 mm
35
Page 36

ROTARY LAWN MOWER MODEL NUMBER 917.377591
27
Co
o3
26
I
53
74
29
28
4O
10
32
75
Page 37

ROTARY LAWN MOWER MODEL NUMBER 917,377591
KEY
NO.
1
2
3
6
9
10
I1
12
!4
15
16
17
20
O)
21
22
23
25
26
27
28
29
30
3!
32
34
35
37
38
39
40
41
PART
NO.
145646X479
158152
63601
136376
151023
128415
150050
STD512505
156374X479
700365)(479
133190X479
140661)(479
1405'10
150425
85543
87677
83923
57143
t51138
142748
61651
750913)(004
701037
700331X004
146630
750085)(007
150078
88348
161814)(479
161812)(479
150406
DESCRIPTION NO. NO.
Upper Handle 44 161769
EngineZone Control Cable 46 851514
Nylon LockNut 47 157101
Handle Knob 48 851074
Rear Door Kit 49 850263
Pop Rivet 50 851084
SerfTapping Screw#10-24 51 700869X479
Hex Tapping Screw 114-20x 1/2 52 85463
Back Rate 53 74760612
SideBaffle 55 751592
DischargeBaffle 56 88652
Rear Baffle 57 51793
Rear Skirt 58 157081X479
Mulcher Plug 59 131959
Engine Pulley 61 132001
Hi-ProKey #505 62 134612
Nut 64 ......
Washer
Wheel &TTreAssembly 74 66426
Shoulder Bolt 3/8-16 75 151440
Bellev_leWasher -- 161058
AxleArm Assembly -- 165466
Selector Knob
Selector Spring
Spacer
Wheel Adjusting Bracket
Thread Cuing Screw 5't6-!8 x 3/4
Washer
HandieBracket Assembly (Left)
Handle Bracket Assembly.(Right)
Hex Head Thread RoilingScrew 3/6-16 x t-1/8
KEY PART
DESCRIPTION
LawnMower Housing (lncL Key #t4,15, 17, 51 & 52)
Blade Adapter
Blade22"
Hardened Washer
Helical Washer 3/8-24 x !-3/8 Grd, 8
Hex Head Machine Screw3/8-24 x 1-3/8 Grd. 6
Front Baffle
Danger Decal
Bolt
Locknut3/8-16
Hinge Screw
Hairpin Cotter
Lower Handte
HandleBelt
RopeGuide
Debns Shield
Engine - (See Breakdown)Craftsman
Model 143.986700
W_retie
Hub Cap
Warning Decal (Not Shown)
Owner's Manual (English/Spanish)
Availableaccessories not inctudedwith lawnmower.
71 33623 Gas Can (2.5 gel3
71 33500 FuelStabilizer
71 33027 SAE 30W Oi! (27 ozJ
71 33417 Dust Shield
71 33316 Mower Cover
71 33303 Chute Deflector
Page 38
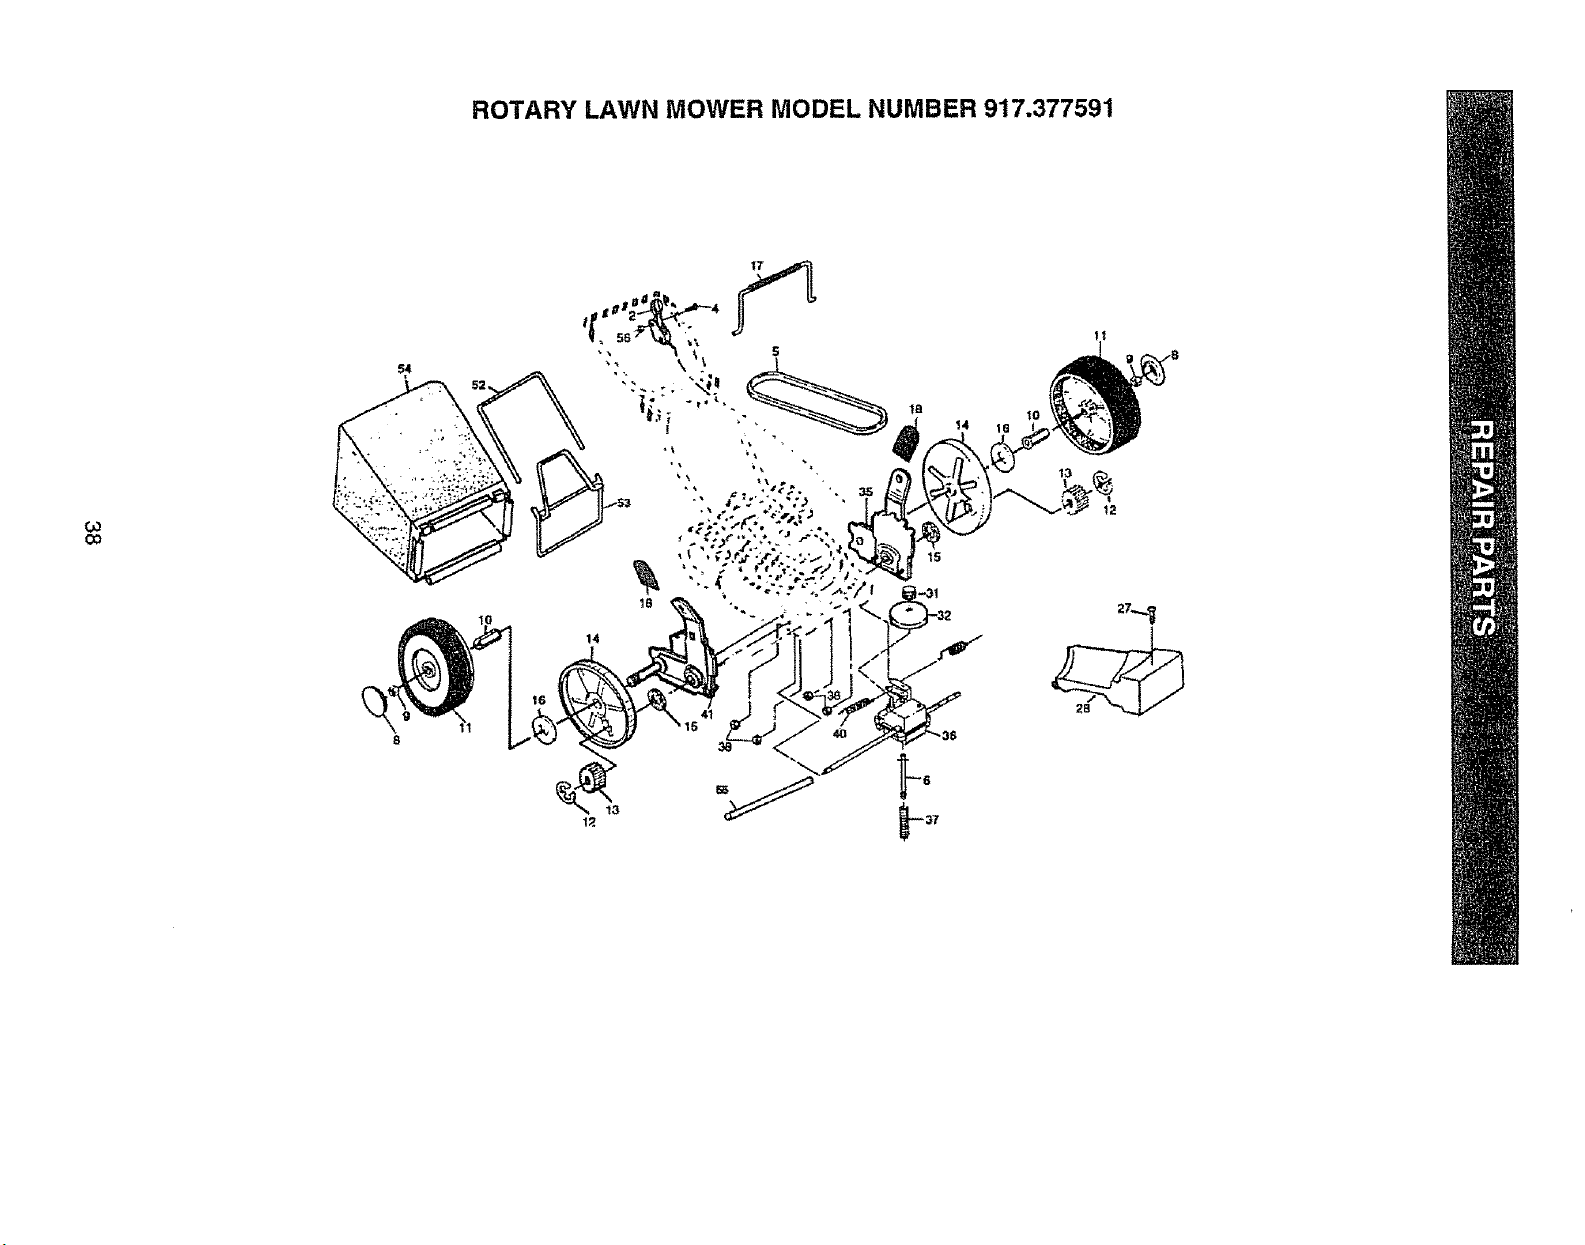
co
ROTARY LAWN MOWER MODEL NUMBER 917.377591
; \ }
!
18
Page 39
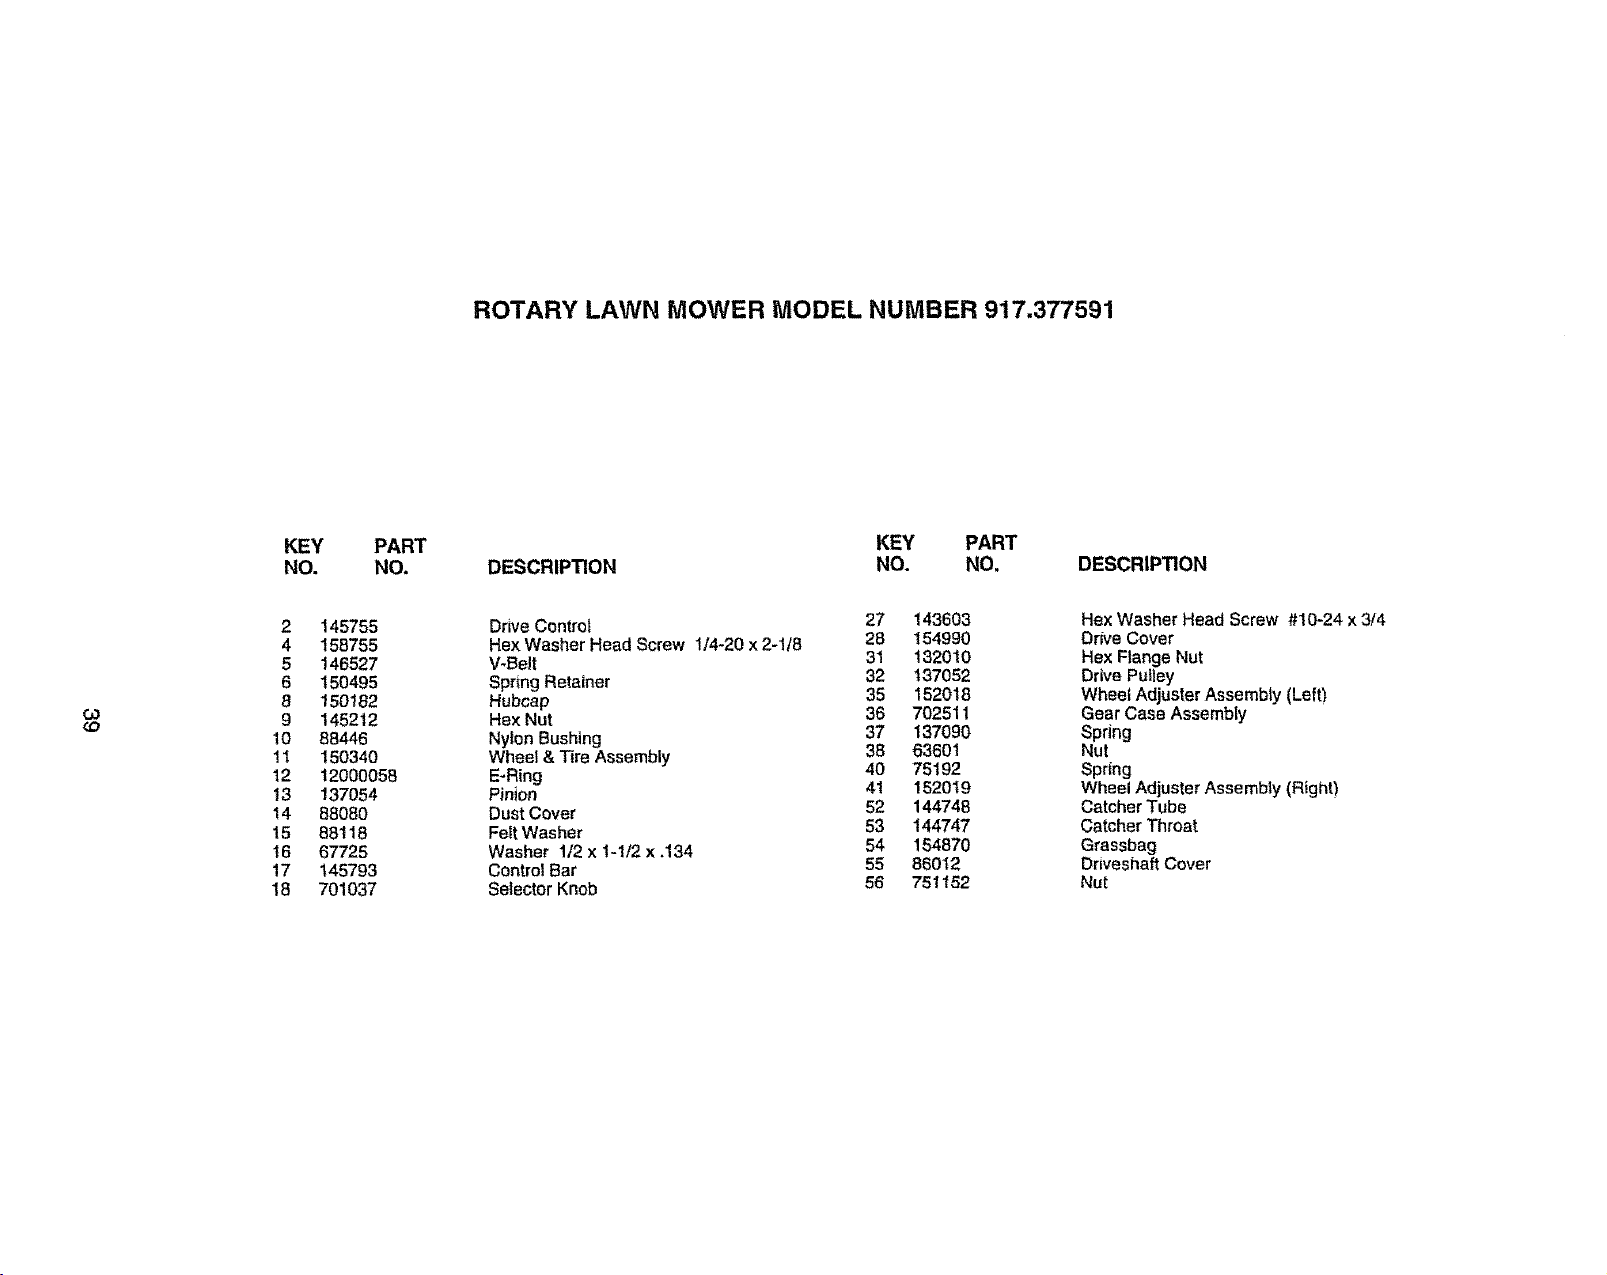
ROTARY LAWN MOWER MODEL NUMBER 917.377591
Co
(D
10
11
12
13
14
15
t6
17
18
KEY
NO.
2
4
5
6
8
9
145755
158755
146527
150495
150162
145212
88446
150340
12000058
137054
88080
88118
67725
145793
701037
PART
NO.
KEY PART
DESCRIPTION NO. NO.
Drive Control 27 143603
Hex Washer Head Screw 1/4-20 x 2-118 28 154990
V-Belt 31 ! 32010
Spring Retainer 32 137052
Hubcap 35 I52018
Hex Nut 36 702511
Nylon Bushing 37 137090
Wheel & Tire Assembly 38 63601
E-Ring 40 75192
Pinion 41 !520I 9
Dust Cover 52 144748
Felt Washer 53 144747
Washer 1/2 x t-1/2 x .134 54 154870
Control Bar 55 86012
Selector Knob 56 751152
DESCRIPTION
Hex Washer Head Screw #I0-24 x 3/4
Drive Cover
Hex Flange Nut
Drive Pulley
Wheel Adjuster Assembly (Left)
Gear Case Assembly
Spring
Nut
Spring
Wheel Adjuster Assembly (Right)
Catcher Tube
Catcher Throat
Grassbag
Driveshaft Cover
Nut
Page 40

CRAFTSMAN 4-CYCLE ENGINE MODEL NUMBER 143.986700
_2 g3
g2
85
-, .IN 9° "-,,
198 _-.._ t"110
25
417
240
416 .J
'277
12
40
Page 41
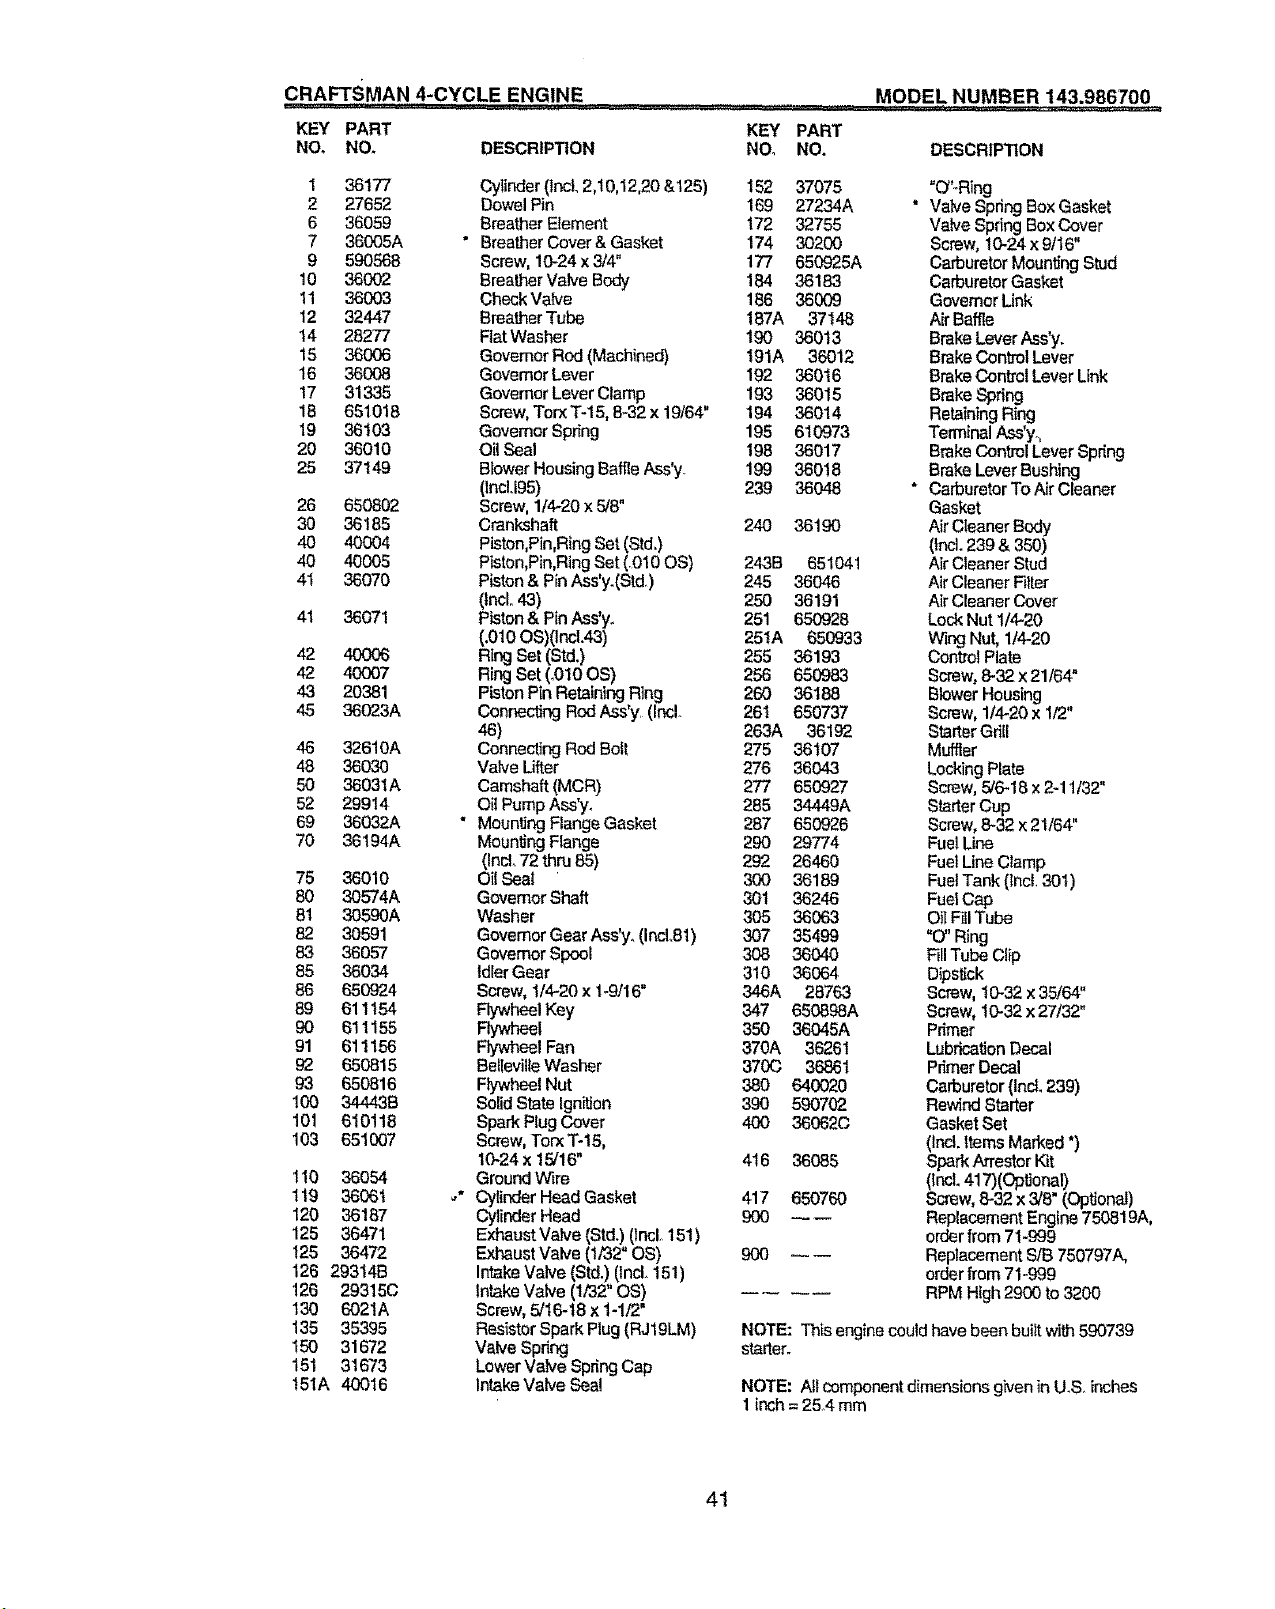
CRAFT_MAN.4-CYCLE ENGINE .......
KEY PART
NO_ NOr DESCRIPTION
1 36177
2 27652
6 36059
7 36005A
9 590568
10 36002
11 36003
12 32447
t 4 28277
15 36006
16 36008
17 31335
18 651018
19 36103
20 36010
25 37149
26 650802
30 36185
40 4OOO4
40 40005
41 36070
41 36071
42 40006
42 4O0O7
43 20381
45 36023A
Cylinder (lncL 2,10,12,20 &125) 152 37075
Dowel Pin 169 27234A
Breather Element 172 32755
Breather Cover & Gasket 174 30200
Screw, 10-24 x 3/4" 177 650925A
Breather Valve Body 184 36183
Check Vak,e 186 36009
Breather Tube 187A 37148
Rat Washer 190 38013
Governor Rod (Machined) 191A 36012
GovemorLever 192 360t6
Governor Lever Clamp 193 36015
Screw, Torx T-15, 8-32 x 19164" 194 36014
Govemor Spring 195 610973
Oil Seal 198 36017
Blower Housing Baffle Ass'y. 199 36018
(tncLI95) 239 36048
Screw,1t4_20x ,5/6"
Crankshaft 240 36190
Piston,Pin,RingSet (Std,)
Piston,Pin,Ring Set (010 OS) 243B 651041
Piston & Pin Ass'y.(Std) 245 36046
0ncL43) 250 38191
Piston & Pin Ass'y. 251 650928
(.010 OS)(Incl.43) 25tA 650933
Ring Set (Std.) 255 36193
RingSet (_010OS) 256 650983
PistonPinRetainingRing 260 38188
Connecting Rod Ass'y. (tacL 26t 650737
46) 263A 36192
46 32610A
48 36030
56 36031A
52 29914
69 36032A
70 36t94A
75 36010
80 30574A
81 30590A
82 30591
83 36057
8-5 36034
86 650924
89 611t54
90 611155
91 611156
92 650815
93 650816
100 344430
101 610118
103 651007
Connecting Rod Bolt 275 36107
Valve Lifter 276 36043
Camshaft (MCR) 277 650927
OBPump Ass'y, 285 34449A
Mounting Flange Gasket 287 650926
Mounting Flange 290 29774
(Ind. 72 th[u 85) 292 26460
Oil Seal 300 36189
Governor Shaft 301 36246
Washer 305 38063
GovernorGear Ass'y_ (IncL81) 307 38499
GovemorSpool 308 36040
IdlerGear 310 36064
Screw, 1/420 x 1-9/16" 346A 26763
Flywheel Key 347 65O6gOA
Flywheel 350 36045A
FlywheelFan 370A 36261
BetlevilleWasher 370(3 36861
F_wheel Nut 380 640020
Solid State Ignffion 390 590702
Spark Plug Cover 400 36062(3
Screw,Torx T-15,
1024 x 15/16" 416 36085
110 36054
1t9 56O61
120 36187
125 36471
!25 36472
126 2931413
126 29315C
130 6021A
135 35395
150 31672
151 31673
151A 40016
Ground Wire
t
Cylinder Head Gasket 417 650760
Cylinder Head 900 ---
Exhaust Valve (Std.)(lncl, 151)
Exhaust Valve (t/32" OS) 900 ---
IntakeValve (Std.) 0nct 151)
Intake Valve (1/32" OS) ....
Screw, 5/t6-t8 x 1-1/2"
Resistor Spark Rug (RJ19LM)
Valve Spring
Lower Valve SpringCap
Intake Valve Sea!
MODEL NUMBER 143.986700
KEY PART
NO_ NO.
DESCRIPTION
"O':Ring
Valve Spring Box Gasket
Valve Spring Box Cover
Screw,t0-24 x9/t6"
Carburetor Mounting Stud
Carburetor Gasket
Governor Link
Air Baffle
Brake Lever Ass'y.
Brake Control Lever
Brake Control Lever Link
Brake Spring
Retaining Ring
Terminal Ass'y.,
Brake Control Lever Spring
Brake Lever Bushing
Carburetor To Air Cleaner
Gasket
Air Cleaner Body
(Incl.239 & 350)
Air Cleaner Stud
Air Cleaner Filter
Air Cleaner Cover
Lock Nut 1/4-20
Wing Nut, 1/4-20
Control Plate
Screw, 8-32 x 21/64"
Blower Housing
Screw, 1/4-20 x I/2"
Starter Gri[t
Muffler
Locking Plate
Screw,5/6-18 x 2-11/32"
Starter Cup
Screw, 6-32 x 21/64"
FuelLine
FuelLine Clamp
FuelTank (lncL 30t)
FuelCap
Oil FiEITube
"O" Ring
FillTube Clip
Dipstick
Screw, t0-32 x 35/64"
Screw, 10-32x 27/32"
Primer
Lubrication Decal
Primer Decal
Carburetor(IncL239)
RewindStarter
GasketSet
(Incl.ItemsMarked *)
SparkArrestor Kit
(IncL417)(Optiona!)
Screw, 8-32 x 3/8"(Optiona!)
ReplacementEngine750819A,
order from 71-999
Replacement SiB 750797A,
order from 71-999
RPM H_gh2900 to 3200
NOTE: This engine could havebeen buiit with 590739
starter.
NOTE: All component dimensions given inU.Soinches
1inch= 25,4 mm
41
Page 42

CRAFTSMAN 4-CYCLE ENGINE MODEL NUMBER 143.986700
>.
I
t-f .=
!
!
,
KEY
NO.
25
27
28
29
30
31
32
33
36
37
37A
38
3BA
39
40
47
PART
NO. DESCRIPTION
t
5
6
7
640020
632539
632593
632541
650506
632675A
632544
632543
632548
632709
632637
632672
632673
640022
632547
632547
632545
632545
632549
640021
632554
Carburetor (incl. 187B & 239
of Engine Parts List)
Throttle Shaft & Lever Assembly
Dust Seal
Throttle Shutter
Throttle Shutter Screw
Float Bowl
Float Shaft
Float
Float Bowl to Body Gasket
Inlet Needle, Seat & Seat
Retainer (IncL 31)
Seat Retainer
Bowl Drain Screw
Bowl Drain Washer
Main Nozzle Tube
"O" Ring
"O" Ring, Main Nozzle Tube
Spring, Main Nozzle Tube
Spring
Float Bowl Retainer
Main Fuel Jet
Welch Plug, Idle Mixing Well
42
Page 43
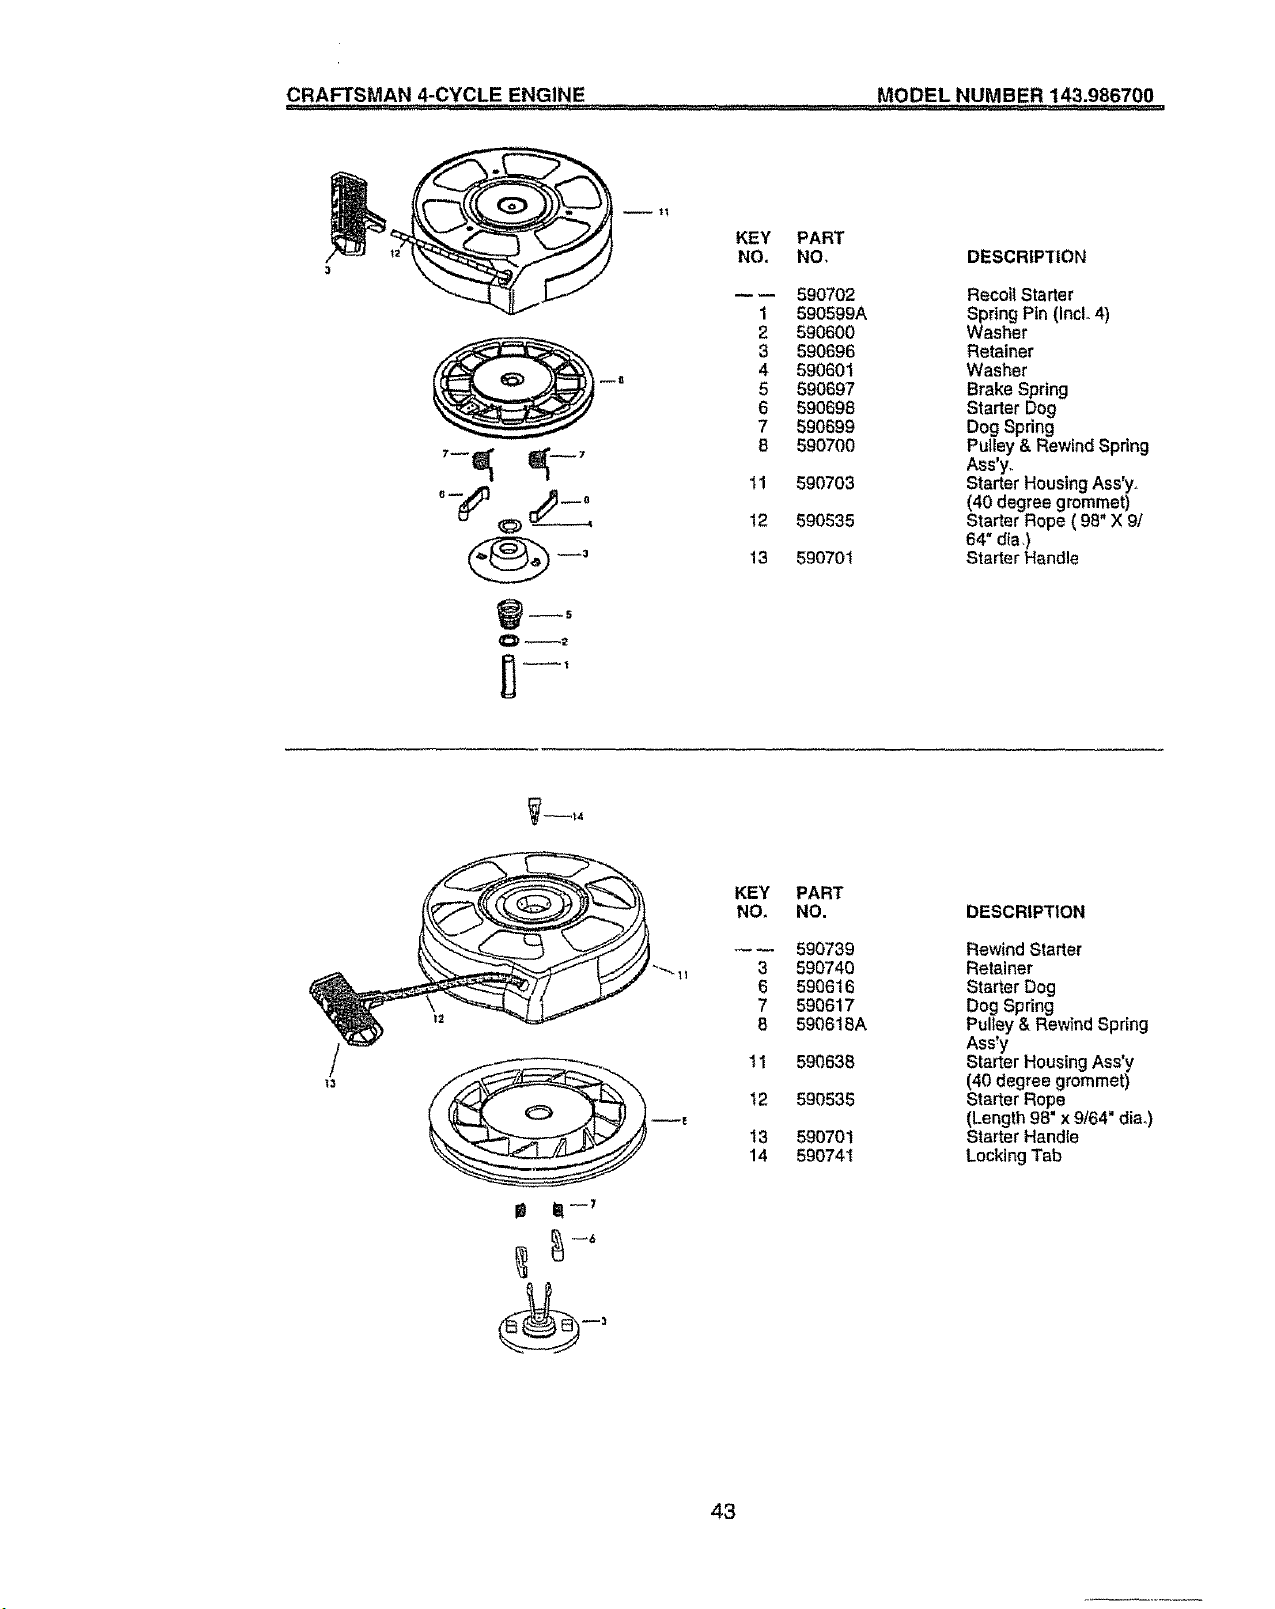
CRAFTSMAN 4-CYCLE ENGINE MODEL NUMBER 143.986700
KEY PART
NO. NO, DESCRIPTION
-- 590702 Recoil Starter
1 590599A Spring Pin (IncL 4)
2 590600 Washer
3 590696 Retainer
w_
4 590601 Washer
5 590697 Brake Spring
6 590698 Starter Dog
7 590699 Dog Spring
6 590700 Pulley & Rewind Spring
Ass'y
11 590703 Starter Housing Ass'y,
(40 degree grommet)
12 590535 Starter Rope ( 98" X 9/
64" dia,)
13 590701 Starter Handle
5
O_2
_t4
KEY PART
NO, NO. DESCRIPTION
-- 590739 Rewind Starter
3 590740 Retainer
6 590616 Starter Dog
7 590617 Dog Spring
8 590616A Pulley & Rewind Spring
Assay
11 590638 Starter Housing Ass'y
(40 degree grommet)
t2 590535 Starter Rope
(Length 98" x 9/64" dia.)
13 590701 Starter Handle
14 590741 Locking Tab
43
Page 44

For the repair or replacement parts you need
delivered directly to your home
Call 7 am _ 7 pm, 7 days a week
1-800-366-PART
(1-800-366-7278)
Para ordenar piezas con entrega a
domicilio - 1-800-659-7084
For in-house major brand repair service
Call 24 hours a day, 7 days a week
1-800-4-REPAIR
(1-800-473-7274)
Para pedir servicio de reparaci6n a
domicilio - 1-800-676-5811
For the location of a Sears Parts and
Repair Center in your area
Call 24 hours a day, 7 days a week
1-800-488-1222
For information on purchasing a Sears
Maintenance Agreement or to inquire
about an existing Agreement
Call 9 am - 5 pm, Monday-Saturday
1-800-827-6655
When requesting service or ordering
parts, always provide the following
information:
=Product Type o Part Number
° Model Number o Part Description
Wl
,$m/A/R,$
America's Repair Specialtsts
165466 05.11.98 VB Printed in U.S.A.
 Loading...