

Craftsman 917377171 Owner’s Manual
Owner's Manual
ICRIIFTSMRN'J
6.0 HORSEPOWER
22" REAR DISCHARGE
ROTARY LAWN MOWER
Model No.
917.377171
• Safety
• Assembly
• Operation
• Maintenance
• Espa5ol
• Repair Parts
CAUTION:
Read and follow all
Safety Rules and Instructions
before operating this equipment
Seam, Roebuck and Co., Hoffman Estates, IL 60179
VisitourCraftsmanweb_te:www.sears.comlcraltsman
Warranty ............................................... 2
Safety Rules ......................................... 2
Assembly .............................................. 5
Operation .............................................. 6
Maintenance Schedule ...................... 11
Maintenance ....................................... 11
LIMITED TWO YEAR WARRANTY ON CRAFTSMAN POWER MOWER
For two years from date of purchase, when this Craftsman Lawn Mower is maintained,
lubricated, and tuned up according to the operating and maintenance instructions in
the owner's manual, Sears will repair free of charge any defect in material or workman-
ship.
If this Craftsman Lawn Mower is used for commercial or rental purposes, this warranty
applies for only 90 days from the date of purchase.
Product Specifications ........................ 12
Service and Adjustments .................... 14
Storage ............................................... 16
Troubleshooting ................................. 17
Repair Parts ........................................ 37
Parts Ordering ..................... Back Cover
ThisWarrantydoesnotcover:
• Expendableitemswhich becomewornduringnormaluse, suchas rotary mower
blades,bladeadapters,belts, air cleanersand sparkplug.
• Repairs necessarybecauseof operatorabuse ornegligence,includingbent
crankshaftsand the failure tomaintainthe equipmentaccordingto the instructions
containedin the owner'smanual.
Warranty service is available by returning the Craftsman power mower to the nearest
Sears Service Center/Department in the United States. This warranty applies only
while this product is in use inthe United States.
This Warranty gives you specific legal rights, and you may also have other rights which
vary from state to state.
SEARS, ROEBUCK AND CO., D/817 WA, HOFFMAN ESTATES, ILLINOIS 60179
IMPORTANT: This cuffingmachineis capable of amputatinghands andfeet and
throwingobjects.Failureto observethe following safetyinstructionscouldresultin
serious injury or death,
I.GI=NERAL OPERATION
• Read, understand, and follow all
instructions on the machine and in the
manual(s) before starting. Be thor-
oughly familiar with the controls and
the proper use of the machine before
starting.
• DO not put hands or feet near or under
rotating pads. Keep clear of the
discharge opening at all times.
• Only allow responsible individuals,
who are familiar with the instructions, to
operate the machine.
• Clear the area of objects such as
rocks, toys, wire, bones, sticks, etc.,
which could be picked up and thrown
by the blade.
• Be sure the area is clear of other
people before mowing. Stop machine if
anyone enters the area.
• Do not operate the mower when
barefoot or wearing open sandals.
Always wear substantial foot wear.
• Do not pull mower backwards unless
absolutely necessary, Always look
down and behind before and while
moving backwards.
• Do not operate the mower without
proper guards, plates, grass catcher or
other safety protective devices in place.
• See manufacturer's instructions for
proper operation and installation of
accessories. Only use accessories
approved by the manufacturer.
2

• Stoptheblade(s)whencrossinggravel
drives,walks,orroads.
• Stop the engine (motor) whenever you
leave the equipment, before cleaning
the mower or unclogging the chute.
• Shut the engine (motor) off and wait
until the blade comes to complete stop
before removing grass catcher.
• Mow only in daylight or good artificial
light.
• Do not operate the machine while
under the influence of alcohol or drugs.
• Never operate machine in wet grass.
Always be sure of your footing: keep a
firm hold on the handle and walk;
never run.
• Disengage the self-propelled mecha-
nism or drive clutch on mowers so
equipped before starting the engine
(motor).
• It the equipment should start to vibrate
abnormally, stop the engine (motor)
and check immediately for the cause.
Vibration is generally a waming of
trouble.
• Always wear safety goggles or safety
glasses with side shields when
operating mower.
I1. SLOPE OPERATION
Slopes are a major factor related to slip
and fall accidents which can result in
severe injury. All slopes require extra
caution, If you feel uneasy on a slope, do
not mow it.
DO:
• Mow across the face of slopes: never
up and down. Exemise extreme
caution when changing direction on
slopes.
• Remove obstacles such as rocks, tree
limbs, etc.
• Watch for holes, ruts, or bumps. Tall
grass can hide obstacles.
DO NOT:
• Do not trim near drop-offs, ditches or
embankments. The operator could lose
footing or balance.
• Do not tdm excessively steep slopes.
• Do not mow on wet grass. Reduced
footing could cause slipping.
III. CHILDREN
Tragic accidents can occur if the operator
is not alert to the presence of children.
Children are often attracted to the
machine and the mowing activity. Never
assume that children will remain where
you last saw them.
• Keep children out of the trimming area
and under the watchful care of another
responsible adult.
• Be aled and turn machine off if children
enter the area.
• Before and while walking backwards,
look behind and down for small
children.
• Never allow children to operate the
machine.
• Use extra care when approaching blind
corners, shrubs, trees, or other objects
that may obscure vision.
IV. SERVICE
• Use extra care in handling gasoline
and other fuels. They are flammable
and vapors are explosive.
-Use only an approved container.
- Never remove gas cap or add fuel
with the engine running. Allow engine
to cool before refueling. Do not
smoke.
-Never refuel the machine indoors.
-Never store the machine or fuelcon
tainer inside where there is an open
flame, such as a water heater.
• Never run a machine inside a closed
area.
• Never make adjustments or repairs
with the engine (motor) running.
Disconnect the spark plug wire, and
keep the wire away from the plug to
prevent accidental starting.
• Keep nuts and bolts, especially blade
attachment belts, tight and keep
equipment in good condition.
• Never tamper with safety devices.
Check their proper operation regularly.
• Keep machine free of grass, leaves, or
other debris build-up. Clean oil or fuel
spillage. Allow machine to cool before
storing.
• Stop and inspect the equipment ifyou
strike an object. Repair, if necessary,
before restarting.
• Never attempt to make wheel height
adjustments while the engine (motor) is
running.
• Grass catcher components are subject
to wear, damage, and detedoration,
which could expose moving parts or
allow objects to be thrown. Frequently
check components and replace with
manufacturer's recommended parts,
when necessary.
• Mower blades are sharp and can cut.
Wrap the blade(s) or wear gloves, and
use extra caution when servicing them.
• Do not change the engine governor
3 setting or overspeed the engine.
_Look for this symbol to point out
important safety precautions. It means
CAUTION!!! BECOMEALERT!!T YOUR
SAFETY IS INVOLVED.
_, WARNING: In order to prevent
accidental starting when setting up,
transporting, adjusting or making repairs,
always disconnect spark plug wire and
place wire where it cannot contact spark
plug.
AWARNING: Engine exhaust, some of its
constituents, and certain vehicle compo-
nents contain or emit chemicals known to
the State of California to cause cancer
and birth defects or other reproductive
harm.
AWARNING: Battery posts, terminals and
related accessories contain lead and
lead compounds, chemicals known to the
State of California to cause cancer and
birth defects or other reproductive harm.
Wash hands after handling.
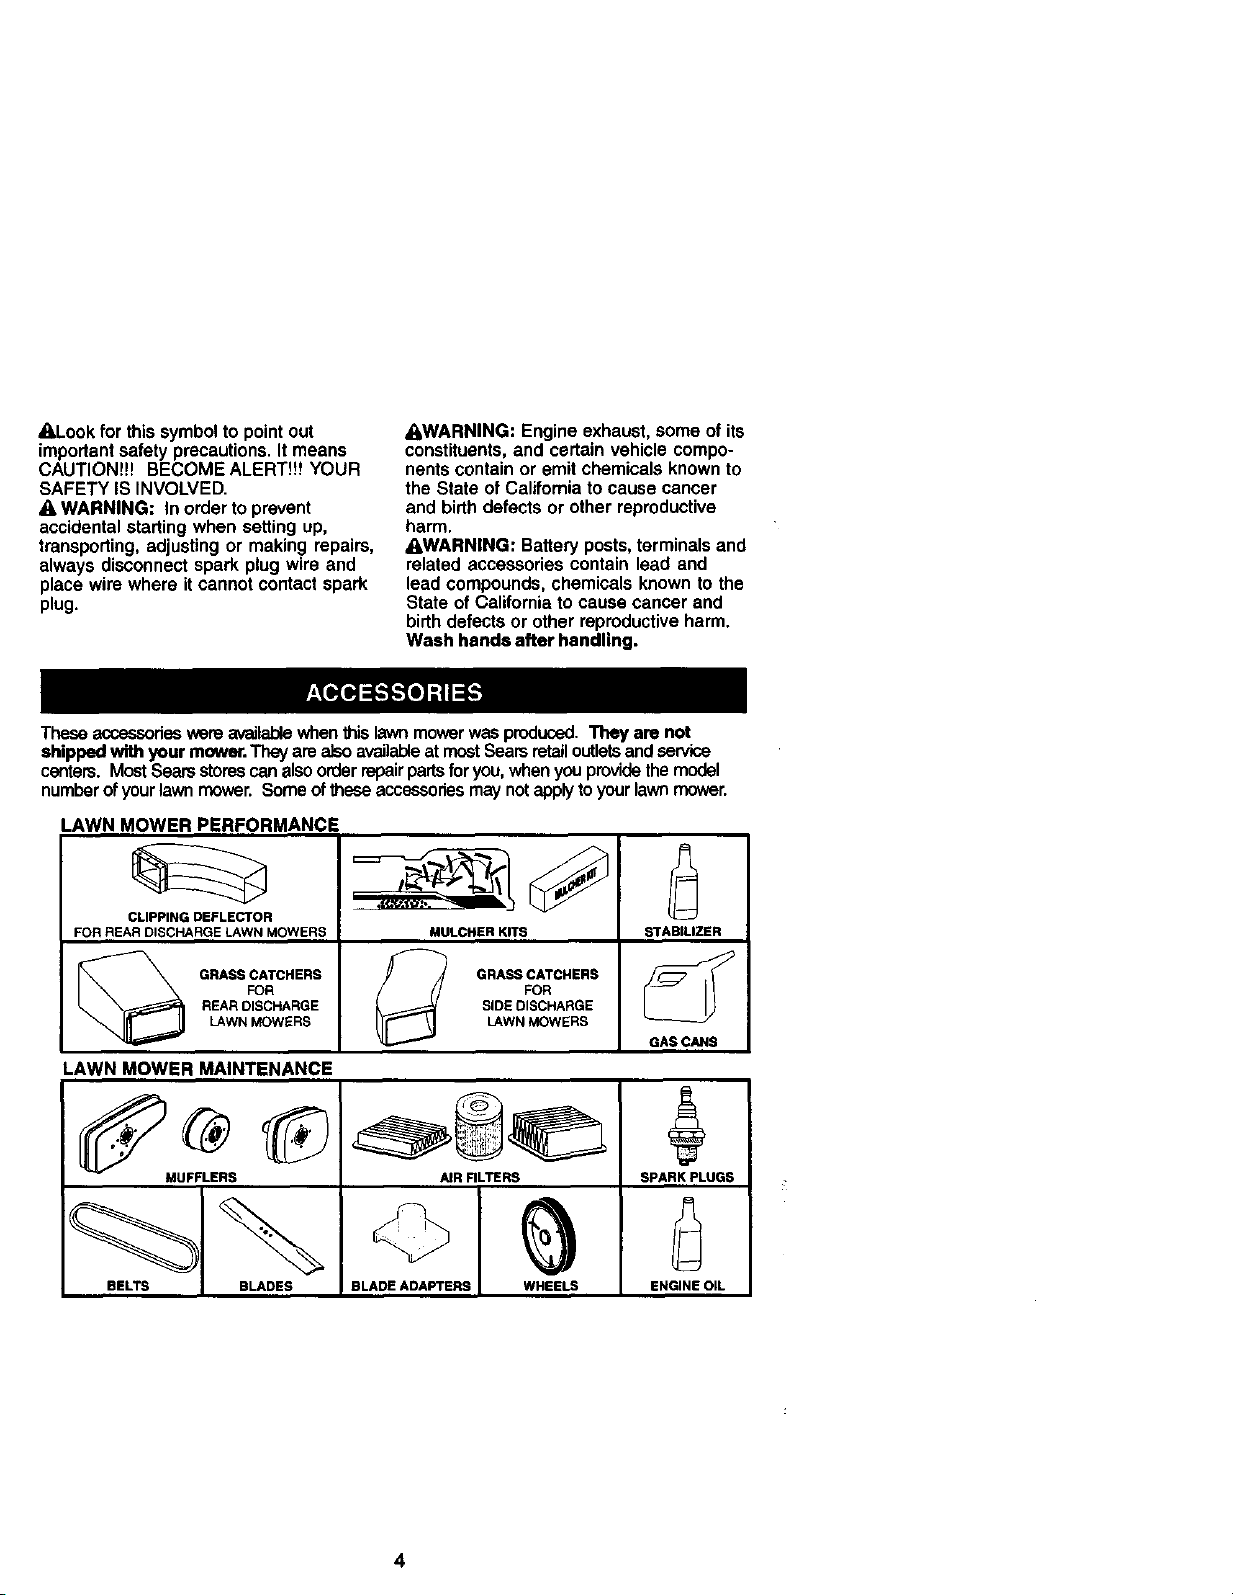
Theseaccaasodeswereavailablewhenthislawnmowerwasproduced.Theyare not
shippedwithyourmower.TheyarealsoavailableatmostSearsretailoutletsandservice
centers.MostSearsstorescanalsoorderrepairpartsfor you,whenyouprovidethemodel
numberofyourlawnmower.Someofthsseaccessoriesmaynotapplytoyourlawnmower.
LAWN MOWER PERFORMANCE
CLIPPING DEFLECTOR
FOR REAR DISCHARGE LAWN MOWERS
FOR
REAR DISCHARGE
GRASS CATCHERS
LAWN MOWERS
LAWN MOWER MAINTENANCE
MUFFLERS
BELTS BLADES
MULCHER K_S
FOR
SIDE OISCHARGE
GRASS CATCHERS
LAWN MOWERS
NR RLTERS
BLADE ADAPTERS WHEELS
STABILIZER
GAS CANS
SPARK PLUGS
ENGINE OIL
4
Read these instructions and this manual
in its entirety before you attempt to
assemble or operate your new lawn
mower.
IMPORTANT: This lawn mower is
shipped WITHOUT OIL OR GASOLINE in
the engine.
Your new lawn mower has been as-
sembled at the factory with the exception
of those parts left unassembled for
shipping purposes. All parts such as nuts,
washers, bolts, etc., necessary to com-
plete the assembly have been placed in
the parts bag. To ensure safe and proper
operation of your lawn mower, all parts
and hardware you assemble must be
tightened securely. Use the correct tools
as necessary to ensure proper tightness.
TO REMOVE LAWN MOWER FROM
CARTON
1. Remove loose parts included with
mower.
2. Cut down two end comers of carton
and lay end panel down flat.
3. Remove all packing materials except
padding between upper and lower
handle and padding holding operator
presence control bar to upper handle.
4. Roll lawn mower out of carton and
check carton thorougly for additional
loose pads.
HOWTO SET UPYOUR LAWN
MOWER
TO UNFOLD HANDLE
IMPORTANT: Unfold handle carefully so
as not to pinch or damage control cables.
1. Raise handles until lower handle
section locks into place in mowing
position.
2. Remove protective padding, raise
upper handle section into place on
lower handle and tighten both handle
knobs.
3. Remove handle padding holding
operator presence control bar to
upper handle.
Your lawn mower handle can be adjusted
for your mowing comfort. Refer to "Adjust
Handle" in the Service and Adjustments
section of this manual.
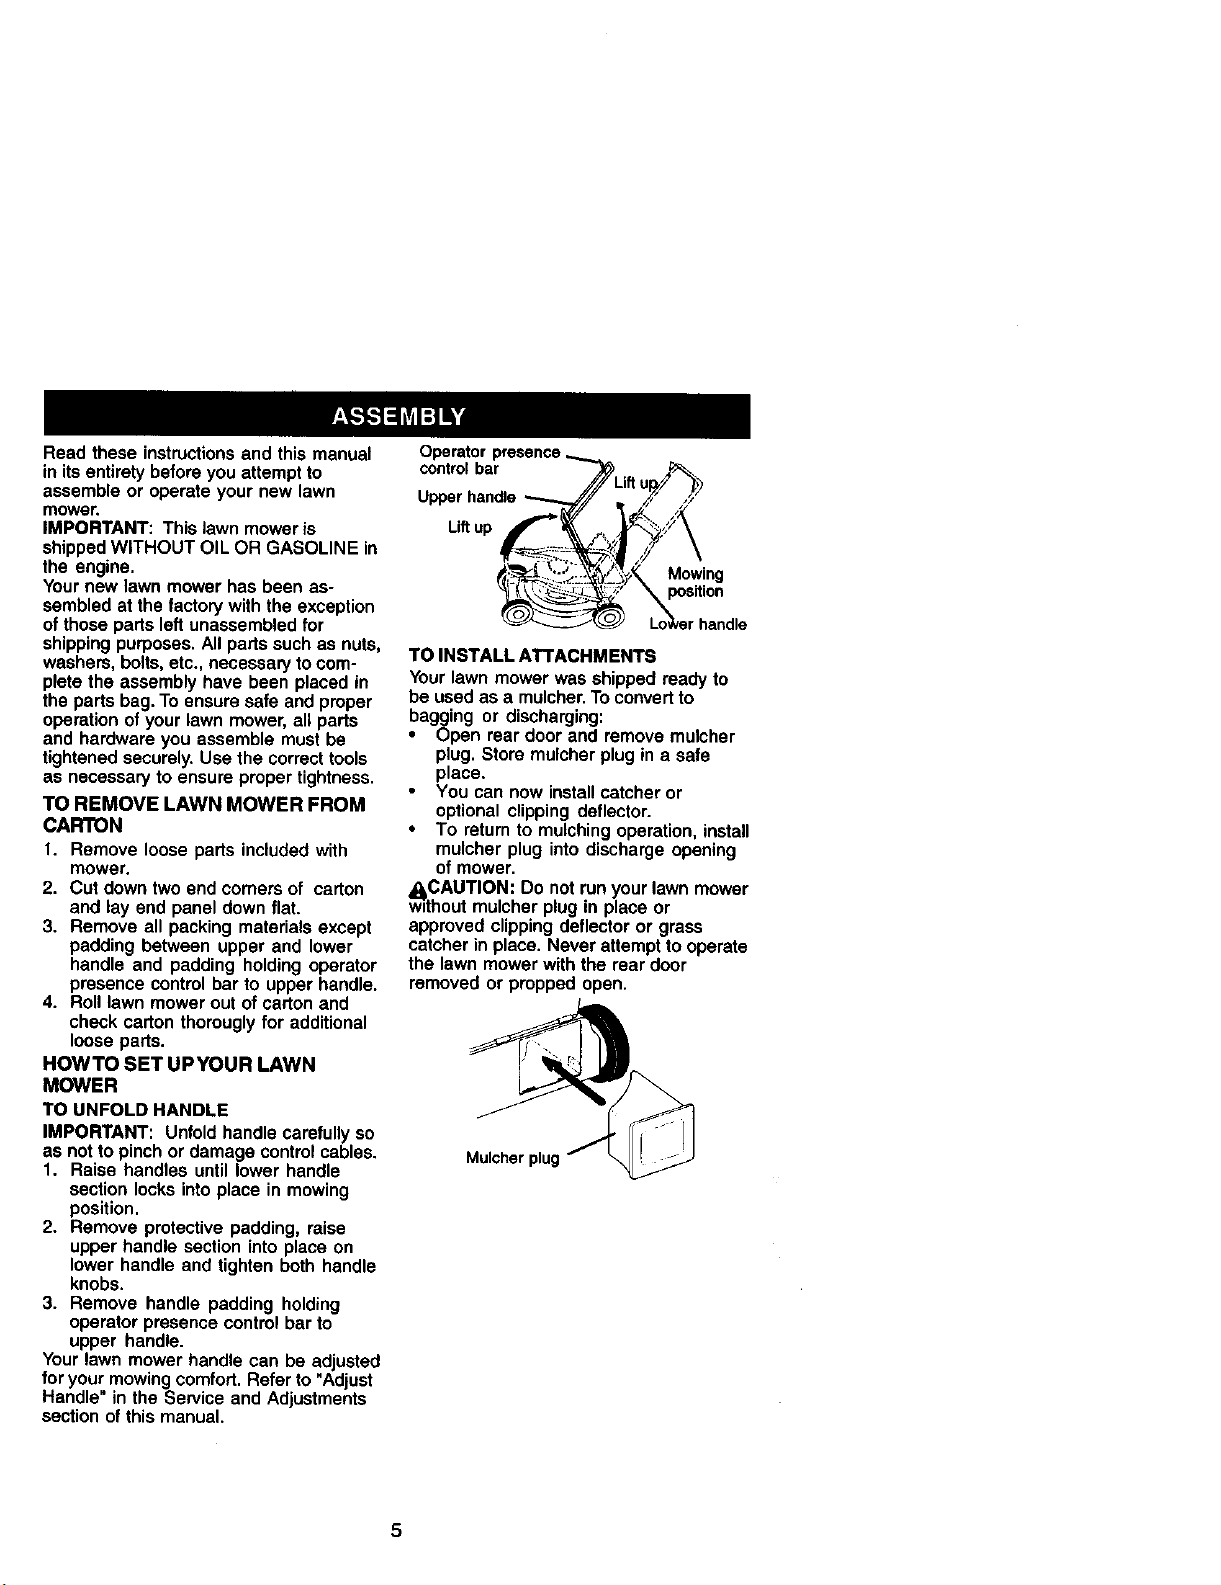
Operator presence__.
COntrolbar _ ,_.
up/
Upper handle __J// //" /7
\pps,,on
_r_.____j_ LoNerhandle
TO INSTALL ATTACHMENTS
Your lawn mower was shipped ready to
be used as a mulcher. To convert to
bagging or discharging:
• Open rear door and remove mulcher
plug. Store mulcher plug in a safe
place.
You can now install catcher or
optional clipping deflector.
• To return to mulching operation, install
mulchar plug into discharge opening
of mower.
w_itCAUTION:Do not run your lawn mower
hout mulcher plug in place or
approved clipping deflector or grass
catcher in place. Never attempt to operate
the lawn mower with the rear door
removed or propped open.
Mulcher plug
5
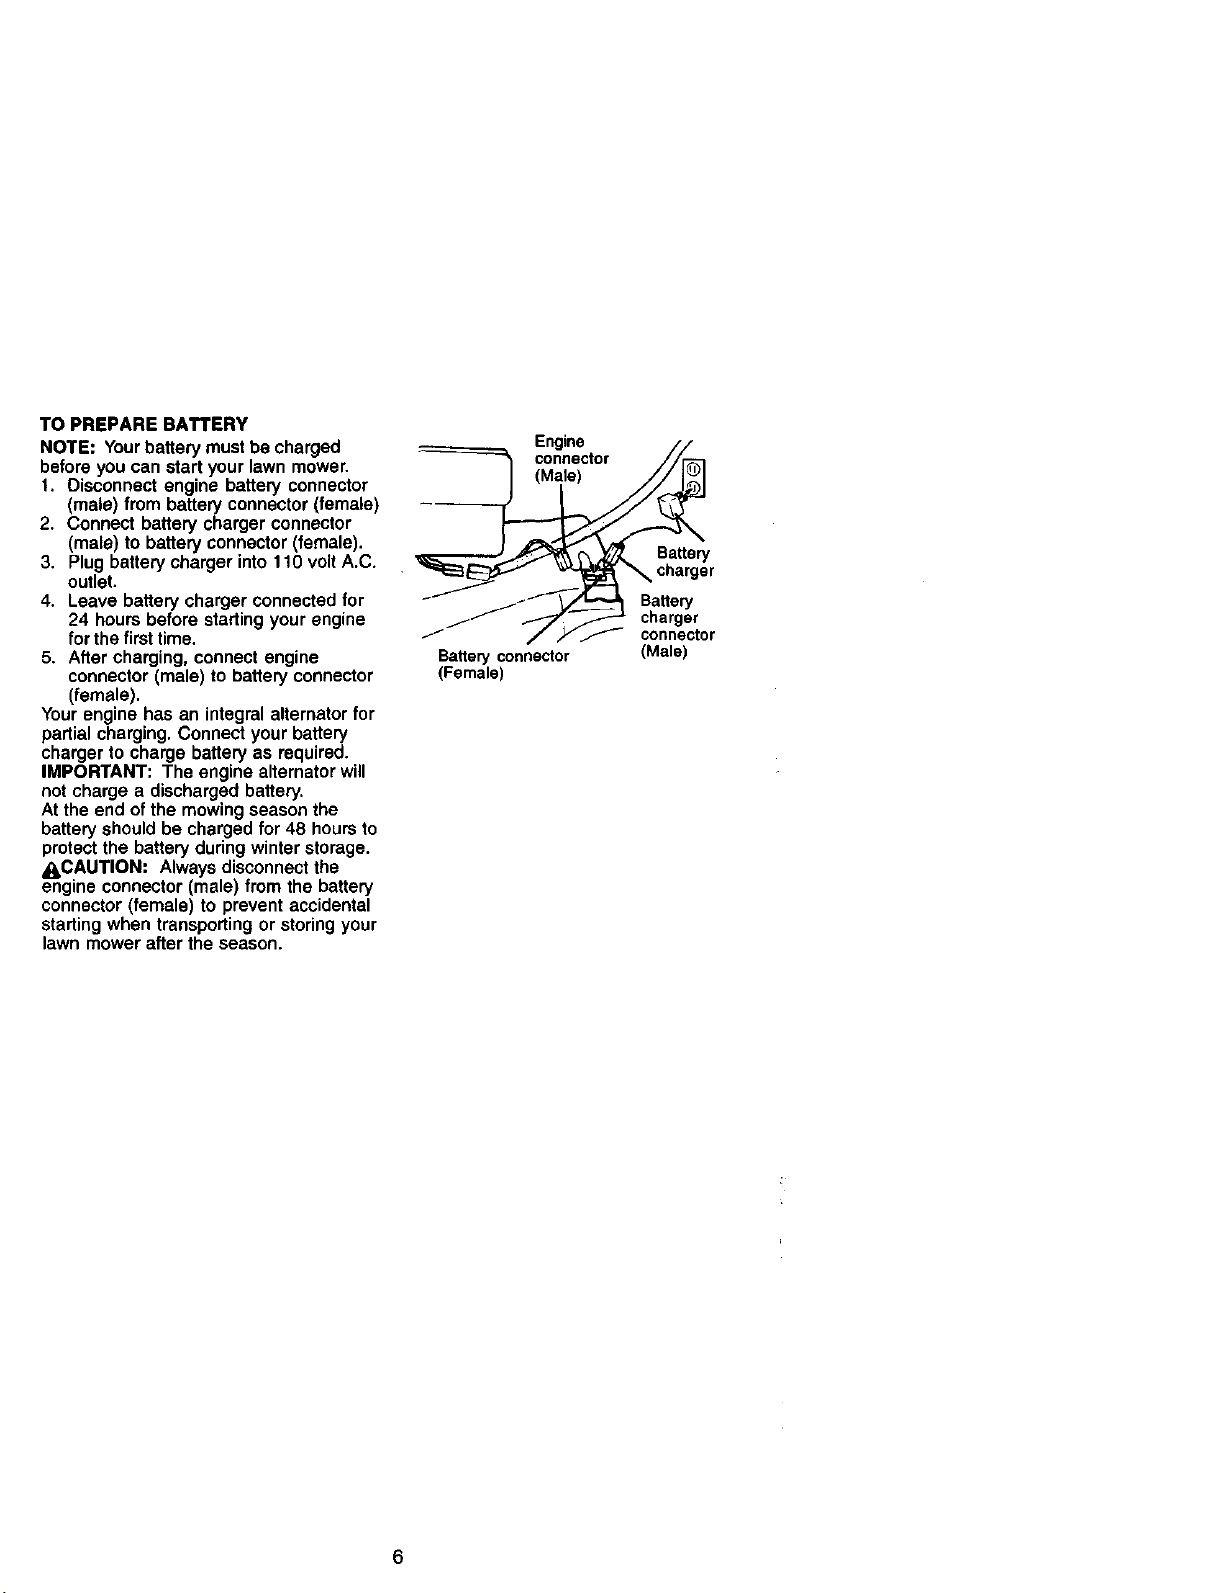
TO PREPARE BATTERY
NOTE: Yourbattery must be charged
before you can start your lawn mower.
t. Disconnect engine battery connector
(male) from battery connector (female)
2. Connect battery charger connector
(male) to battery connector (female).
3. Plug battery charger into 110 volt A.C.
outlet.
4. Leave batterychargerconnected for
24 hours beforestartingyourengine
forthefirsttime.
5. Aftercharging,connect engine
connector (male) to battery connector
(female).
Your engine has an integral alternator for
partial charging. Connect your battery
charger to charge battery as required.
IMPORTANT: The engine alternator will
not charge a discharged battery.
At the end of the mowing season the
battery should be charged for 48 hours to
protect the battery during winter storage.
_kCAUTION: Always disconnect the
engine connector (male) from the battery
connector (female) to prevent accidental
starting when transporting or storing your
lawn mower after the season.
Engine //
connector
j_ ._'JJ--_" charger
/ / / y_ connector
Batteryconnector (Male)
(Female)
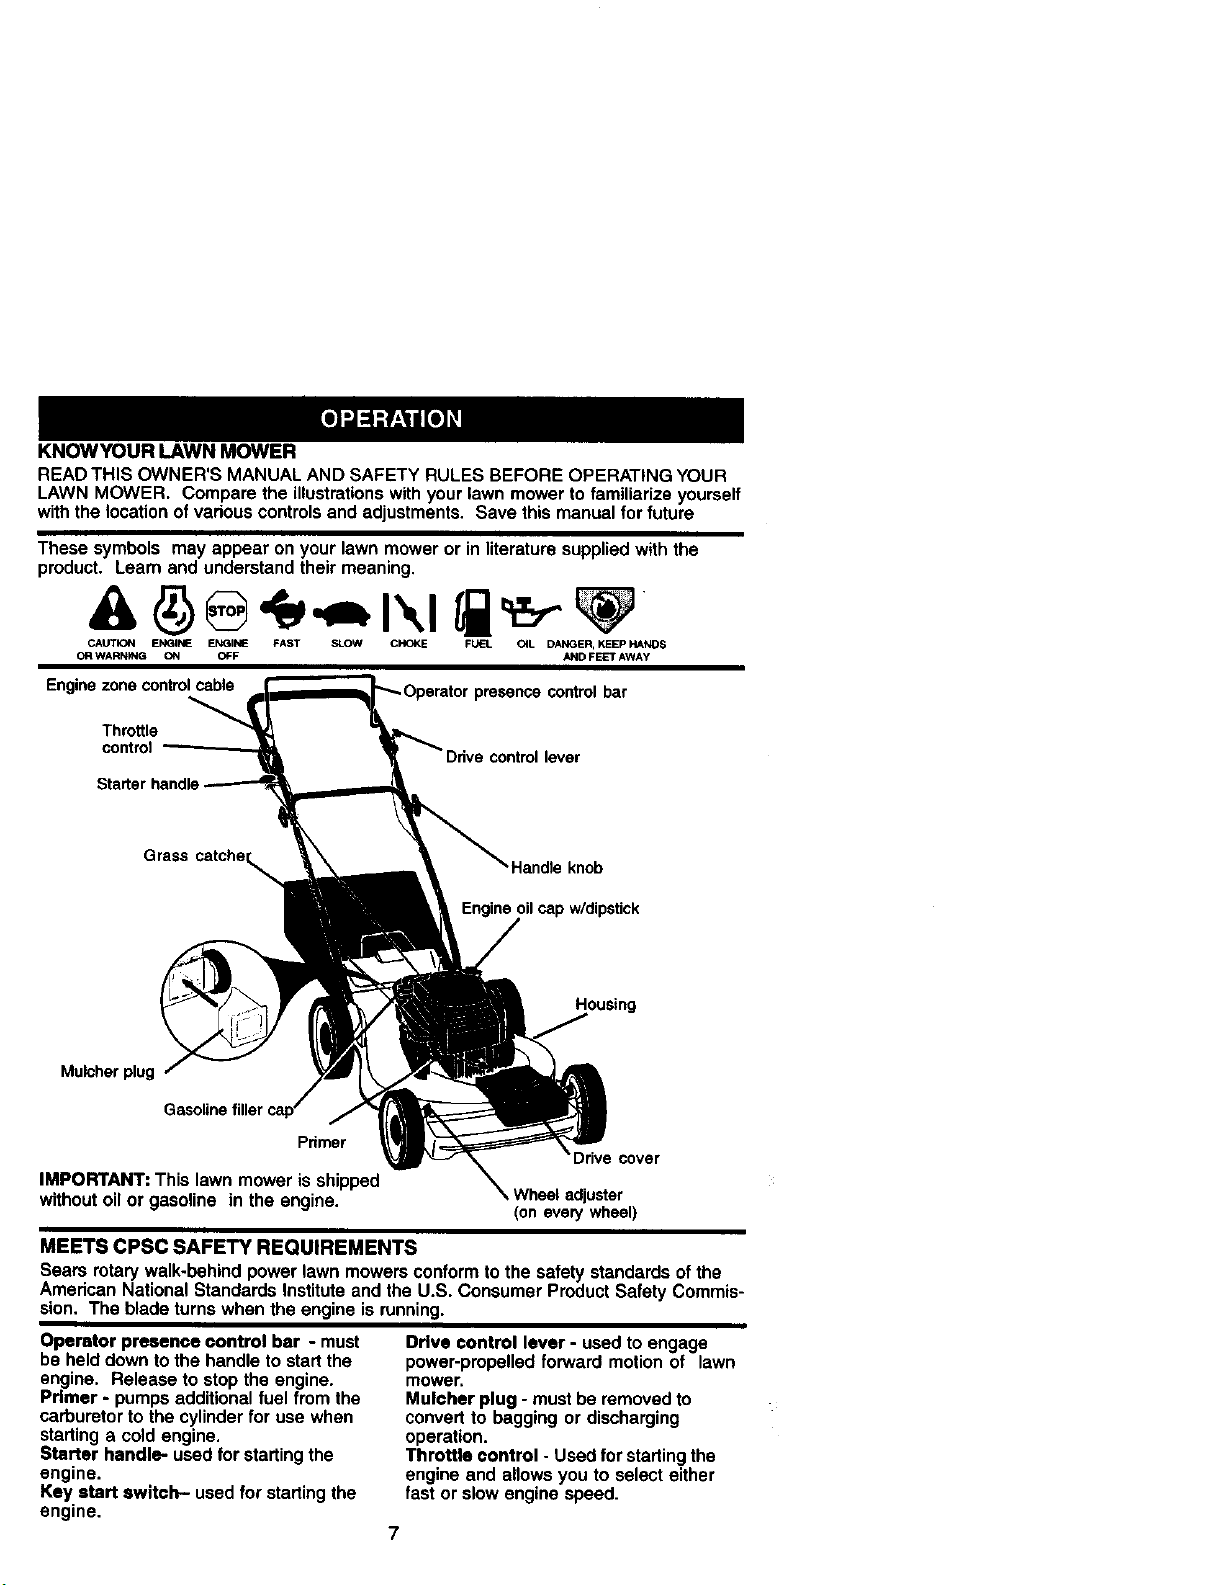
KNOWYOURLAWNMOWER
READ THIS OWNER'S MANUAL AND SAFETY RULES BEFORE OPERATING YOUR
LAWN MOWER. Compare the illustrations with your lawn mower to familiarize yourself
with the location of vadous controls and adjustments. Save this manual for future
These symbols may appear on your lawn mower or in literature supplied with the
product. Learn and understand their meaning.
CAUTION ENGINE ENGI_ FAST SLOW CHOKE FU_'L O_L DANGER, KEEp HANDS
OR WARNING ON OFF AND FEET AWAY
Enginezone controlcable controlbar
Throttle
control
Grass
eontrollever
Housing
Mulcher plug
Primer
cover
IMPORTANT: This lawn mower is shipped
without oil or gasoline in the engine.
adjuster
(on every wheel)
MEETS CPSC SAFETY REQUIREMENTS
Sears rotary walk-behind power lawn mowers conform to the safety standards of the
American National Standards Institute and the U.S. Consumer Product Safety Commis-
sion, The blade turns when the engine is running.
Operator presence control bar - must
be held down to the handle to start the
engine. Release to stop the engine.
Primer - pumps additional fuel from the
carburetor to the cylinder for use when
starting a cold engine.
Starter handle- used for starting the
engine.
Key start switch- used for starting the
Ddve control lever - used to engage
power-propelled forward motion of lawn
mower,
Mulcher plug - must be removed to
convert to bagging or discharging
operation.
Throttle control - Used for starting the
engine and allows you to select either
fast or slow engine speed.
engine.
7
The operation of any lawn
mower can result in
foreign objects thrown into
the eyes, which can result
in severe eye damage.
Always wear safety glasses or eye
shields while operating your lawn mower
or performing any adjustments or repairs.
We recommend a wide vision safety
mask over spectacles or standard safety
glasses.
HOWTO USEYOUR LAWN MOWER
ENGINE SPEED
The engine speed is controlled by a
throttle located on the side of the upper
handle. Fast positionis for starting,
normal cutting, trimming and better grass
bagging. Slow position is for light cutting,
trimming and fuel economy.
s!ow
ENGINE ZONE CONTROL
_iLCAUTION: Federal regulations require
an engine control to be installed on this
lawn mower in order to minimize the risk
of blade contact injury. Do not under any
circumstances attempt to defeat the
function of the operator control. The blade
tums when the engine is running,
• Your lawn mower is equipped with an
operator presence control bar which
requires the operator to be positioned
behind the lawn mower handle to start
and operate the lawn mower.
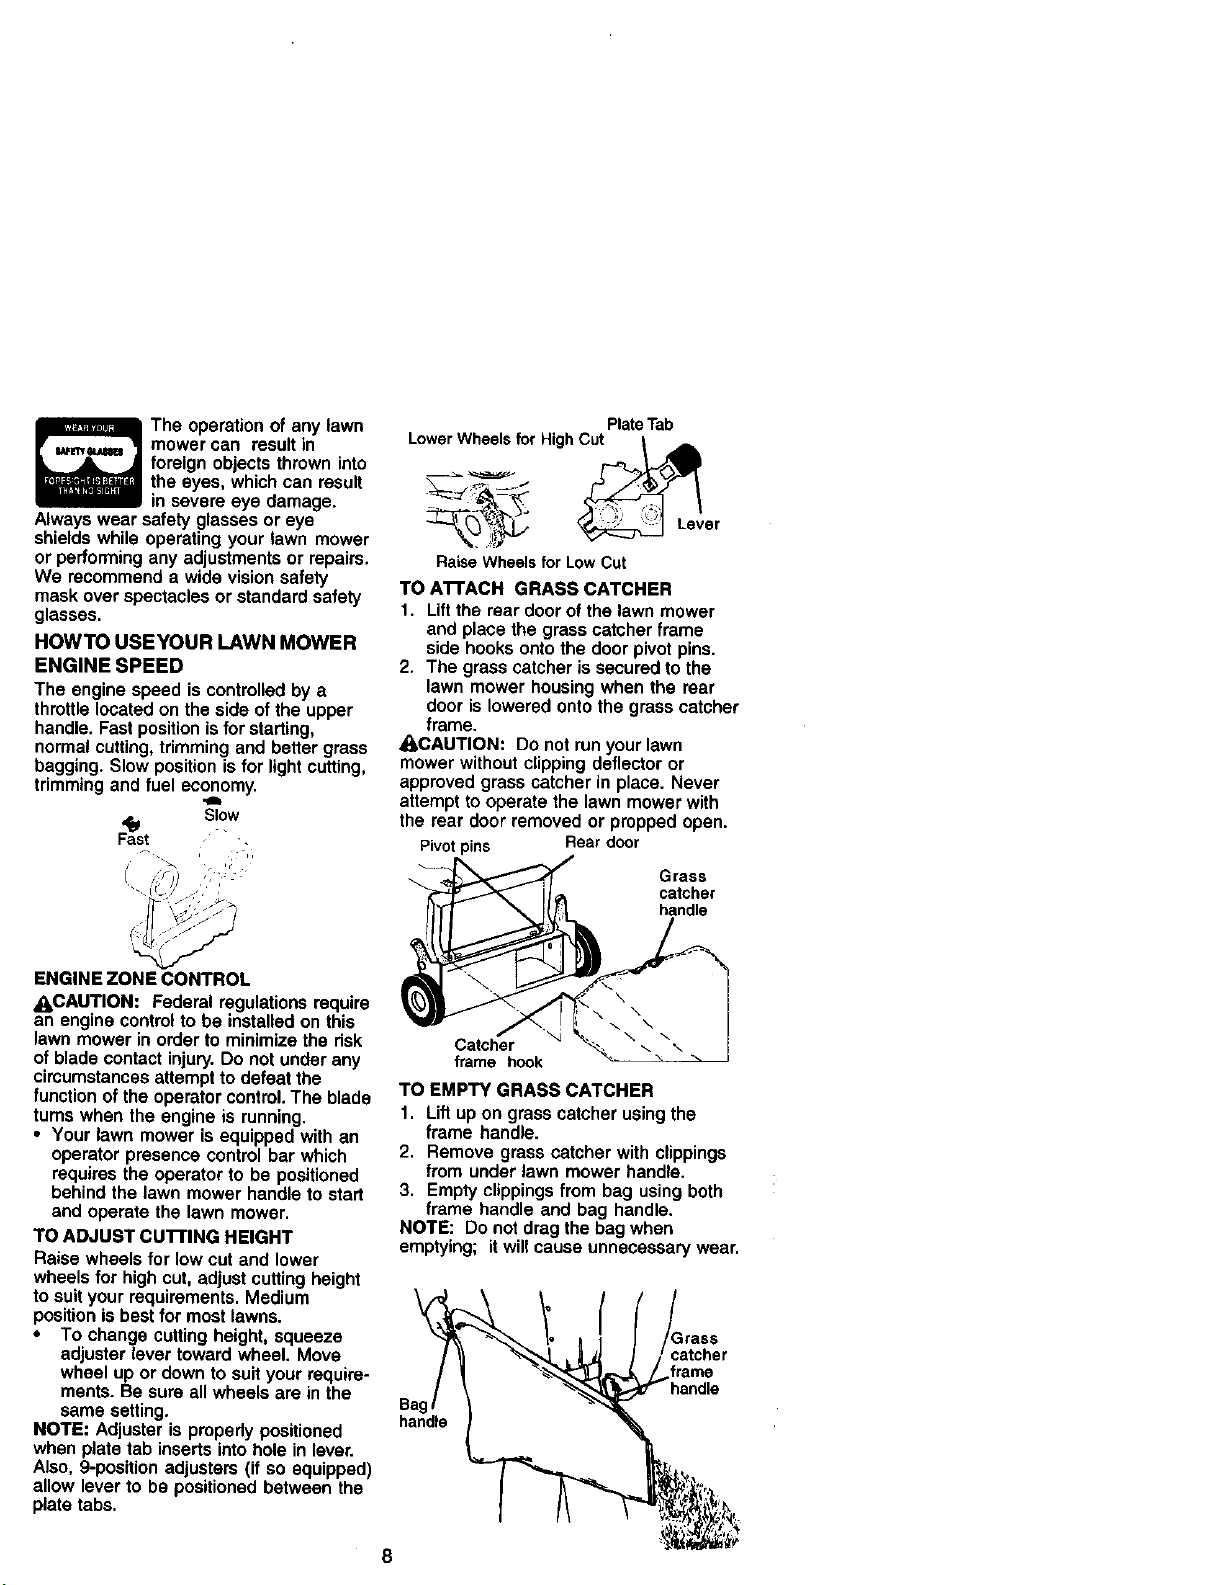
TO ADJUST cu'rrlNG HEIGHT
Raise wheels for low cut and lower
wheels for high cut, adjust cutting height
to suityour requirements. Medium
position is best for most lawns.
• To change cutting height, squeeze
adjuster lever toward wheel. Move
wheel up or down to suit your require-
ments. Be sure all wheels are in the
same setting.
NOTE: Adjuster is propedy positioned
when plate tab inserts into hole in lever.
Also, 9-position adjusters (if so equipped)
allow lever to be positioned between the
plate tabs.
PlateTab
LowerWheels forHighCut i _
_(_._ _ Lever
Raise Wheelsfor Low Cut
TO ATFACH GRASS CATCHER
1. Liftthe rear door of the lawn mower
and place the grass catcher frame
side hooks onto the door pivot pins.
2. The grass catcher is secured to the
lawn mower housing when the rear
door is lowered onto the grass catcher
frame.
_CAUTION: Do not run your lawn
mower without clipping deflector or
approved grass catcher in place. Never
attempt to operate the lawn mower with
the rear door removed or propped open.
Pivotpins Rear door
Grass
catcher
handle
Catcher
frame hook
TO EMPTY GRASS CATCHER
1. Liftupon grasscatcherusingthe
frame handle.
2. Remove grasscatcherwithclippings
from under lawn mower handle.
3. Emptyclippingsfrom bag usingboth
framehandle and bag handle.
NOTE: Do notdrag the bag when
emptying; it will cause unnecessarywear.
handle

DRIVE CONTROL
• Self-propelling is controlled by holding
the operator presence control bar down
to the handle and pushing the drive
control lever forward until it clicks; then
releasing the lever.
• Forward motion will stop when the
operator presence control bar is
released. To stop forward motion
without stopping engine, release the
operator presence control bar slightly
until the drive control disengages. Hold
operator presence control bar down
against handle to continue mowing
without self-propelling.
• To keep ddve control engaged when
turning corners, push down on handle
and lift front wheels off ground while
turning lawn mower.
Operatorpresence controlbar
Toengage
drivecontrol Drive control
BEFORE STARTING ENGINE
ADD OIL
Your lawnmower is shipped without oil in
the engine. Engine holds 20 oz, of oil.
For type and grade of oil to use, see
"ENGINE" in Maintenance section of this
manual.
1. Be sure lawnmower is level and area
2. Remove engine oil cap and fill to the
NOTE: Allow oil to settle down into engine
for accurate dipstick reading. To read
proper level, tighten engine oil cap, then
remove it to read the dipstick.
3. Reinstall engine oil cap and tighten.
• Check oil level before each use. Add
• Change the oil after every 25 hours of
ADD GASOLINE
NOTE: Before filling fuel tank, remove
and discard the debris plug that is inside
the tank.
\' control _,_ control
disengaged
around oil fill is clean.
full line on the dipstick. Pour oil slowly.
Do not over fill.
oil if needed. Fill to full line on dipstick.
operation or each season. You may
need to change the oil more often
under dusty, dirty conditions.
• Fill fuel tank. Use fresh, clean, regular
unleaded gasoline with a minimum of
87 octane. Do not mix oil with gaso-
line. Purchase fuel in quantities that
can be used within 30 days to assure
fuel freshness.
AWARNING: Experience indicates that
alcohol blended fuels (called gasohol or
using ethanol or methanol) can attract
moisture which leads to separation and
formation of acids during storage. Acidic
gas can damage the fuel system of an
engine while in storage. To avoid engine
problems, the fuel system should be
emptied before storage of 30 days or
longer. Drain the gas tank, start the
engine and let it run until the fuel lines
and carburetor are empty. Use fresh fuel
next season. See Storage Instructions for
additional information. Never use engine
or carburetor cleaner products in the fuel
tank or permanent damage may occur.
A CAUTION: Fill to bottom ofgas tank
filler neck. Do not overfill. Wipe off any
spilled oil or fuel. Do not store, spill or
use gasoline near an open flame.
Gasolinefillercap
(Discard
debdsplug
inside)
TO START ENGINE
NOTE: Dueto protectivecoatingsonthe
engine,a smallamountofsmokemay be
presentduringthe initialuseof the
productand shouldbe considered
normal.
1. To start a coldengine,pushprimer
three(3) timesbeforetryingtostart.
Use afirmpush.Thisstepis not
usuallynecessarywhen startingan
enginewhichhasalreadyrunfor a
few minutes.
2. Move handlemountedthrottlecontrol
levertofast position.
3. Holdoperatorpresencecontrolbar
downto the handleand pushstart
button.
IMPORTANT: Do notcrankenginemore
thanfive(5) seconds, Wait5 to10
secondsbetweeneach time youtry to
start.
9
• To start engine using the rope starter,
follow the steps above. Exchange the
use of the start button for starter rope.
Do not allow starter rope to snap back.
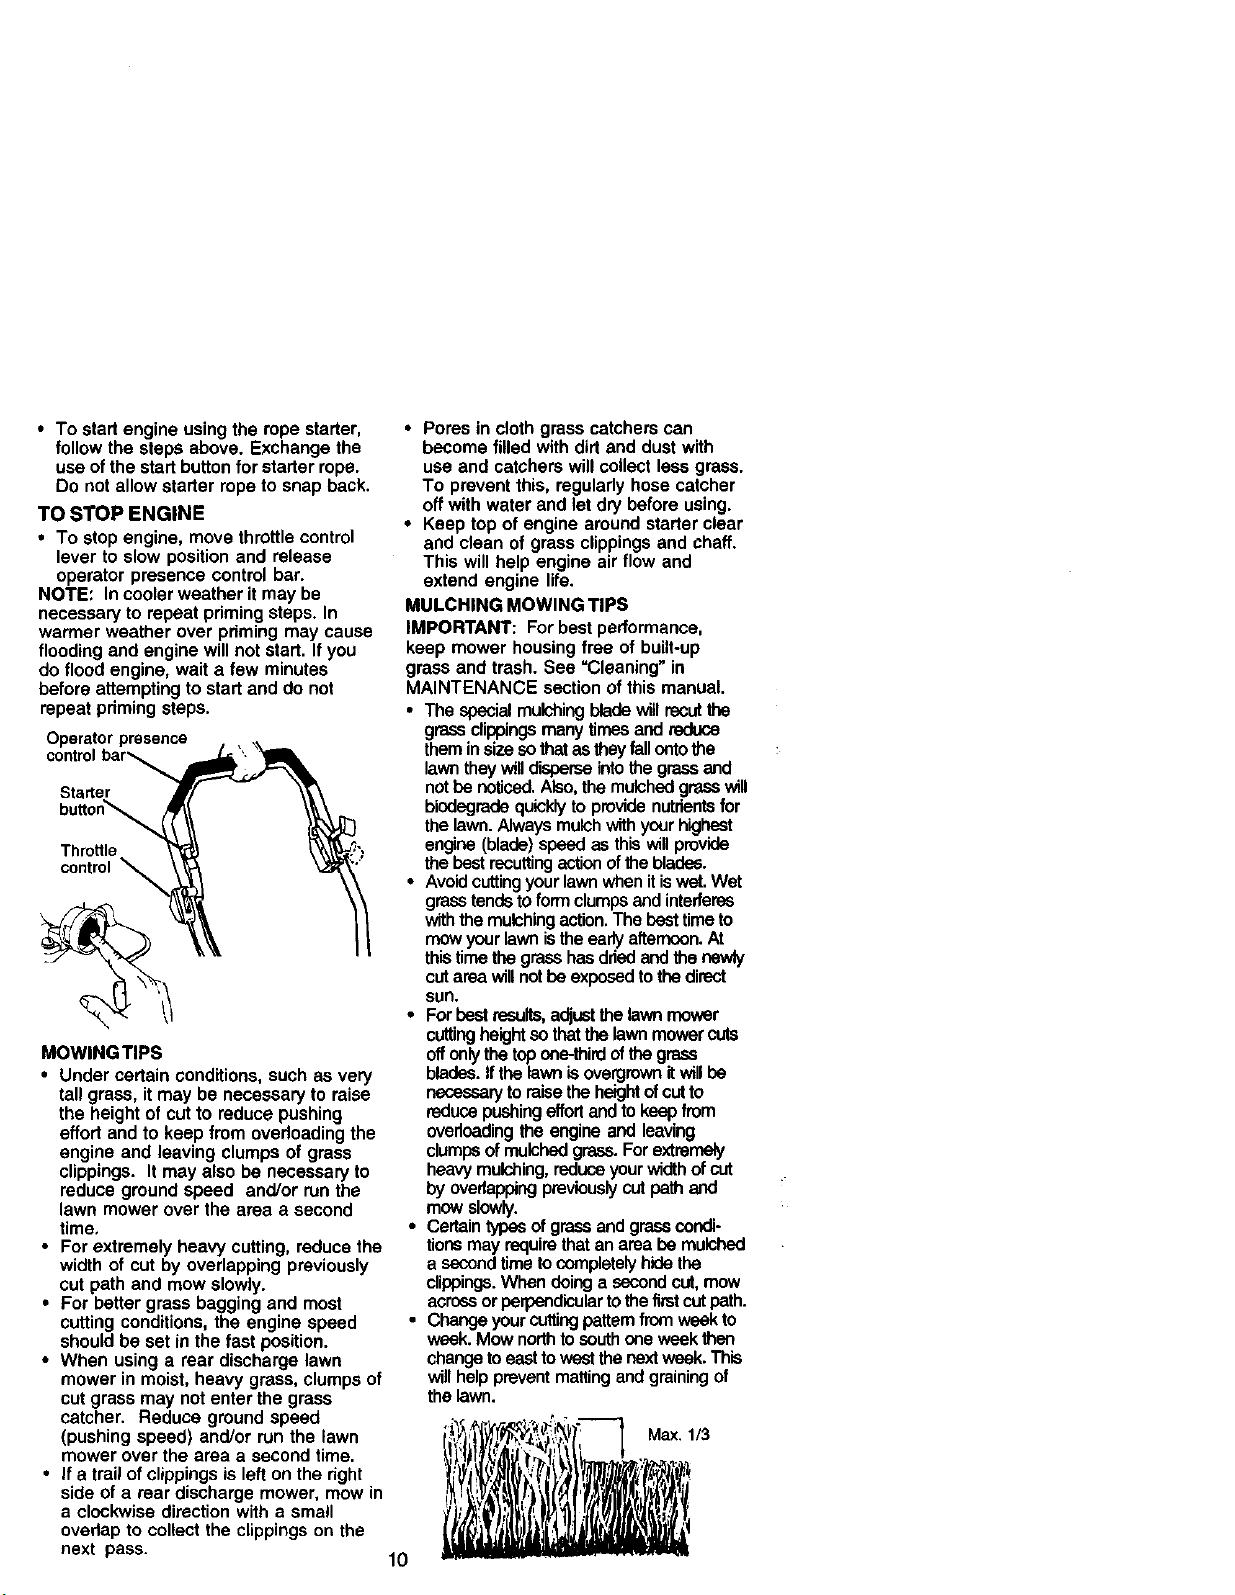
TO STOP ENGINE
• To stop engine, move throttle control
lever to slow position and release
operator presence control bar.
NOTE: In cooler weather it may be
necessary to repeat priming steps. In
warmer weather over priming may cause
flooding and engine will not start. If you
do flood engine, wait a few minutes
before attempting to start and do not
repeat pdming steps.
Operator presence
controlbar_
Throttle
control _
MOWING TIPS
• Under certain conditions, such as very
tall grass, it may be necessary to raise
the height of cut to reduce pushing
effort and to keep from ovedoading the
engine and leaving clumps of grass
clippings. It may also be necessary to
reduce ground speed and/or run the
lawn mower over the area a second
time,
• For extremely heavy cutting, reduce the
width of cut by overlapping previously
cut path and mow slowly.
• For better grass bagging and most
cutting conditions, the engine speed
should be set in the fast position.
• When using a rear discharge lawn
mower in moist, heavy grass, clumps of
cut grass may not enter the grass
catcher. Reduce ground speed
(pushing speed) and/or run the lawn
mower over the area a second time.
• if a trail of clippings is left on the right
side of a rear discharge mower, mow in
a clockwise direction with a small
ovedap to collect the clippings on the
next pass. 10
• Pores in cloth grass catchers can
become filled with dirt and dust with
use and catchers will collect less grass.
To prevent this, regulady hose catcher
off with water and let dry before using.
• Keep top of engine around starter clear
and clean of grass clippings and chaff.
This will help engine air flow and
extend engine life.
MULCHING MOWING TIPS
IMPORTANT: For best performance,
keep mower housing free of built-up
grass and trash. See =Cleaning" in
MAINTENANCE section of this manual.
• The special mulching blade will recurthe
grass clippingsmany timesand reduce
them insize sothat as they fallontothe
lawnthey willdisperse intothe grass and
notbe noticed.Also,the mulched grasswill
biodegrade quicklyto providenutrientsfor
the lawn. Always mulchwith your highest
engine (blade) speed as thiswillprovide
the best recuttingactionofthe blades.
• Avoidcuttingyour lawn when itis wet. W_
grass tends to form clumps andinterferes
withthe mulchingaction.The besttime to
mow your lawnis the earlyafternoon.At
this time the gra_ has driedand the newly
cut area will not be exposed to the direct
sun.
• Forbest results,adjustthe lawn mower
cuttingheight so thatthe lawn mower cuts
offonlythe top one-thirdof the grass
blades. If the lawn is overgrownit will he
necessaryto raisethe heightof cut to
reduce pushingeffort and to kasp from
overloadingthe engine and leaving
clumpsof mulchedgrass. For extremely
heavy mulching,reduceyour width ofcut
by overlappingpreviouslycutpathand
mow slowly.
• Certain types of grass and grass condi-
Uonsmay requirethat an area be mulched
a second time to completelyhidethe
clippings.When doinga secondcut, mow
acrossor peq:Jendlculartothefirstcutpath.
• Change your cuttingpatternfrom week to
wsek. Mow northto south one week then
change to east to_ the next week. This
will helpprevent matting and grainingof
the lawn.
Max, 1/3
 Loading...