

Craftsman 917286710 Owner’s Manual

Operator's Manual
LAW TRACTO
24.0 HR*42" Mower
Electric Start
Automatic Transmission
Model No.
917.28671
• Espa[_ol, p, 34
This product iias a low emission engine which operates
differently from previously built engines, Before you start the
engine, read and understand this Owner's Manual,
IMPORTANT:
Read and follow all Safety
Rules and Instructions before
operating this equipment.
SEARS, ROEBUCK AND COn, HOFFMAN ESTATES, 1L60179 UoS,Ao
Visit our Craftsman website:www, sears,com/craftsman *As rated by lhe engine manufacturer
For answers to your questions
about this product, Ca]i;
1-800-659-5917
Sears Craftsman Help Line
5 am - 5 pm, Mon - Sat
Warranty ................................................. 2
Safety Rules ........................................................3
Product Specifications .................................6
Assembly/Pre-Operation ....................... 7
Operation ................................................. 9
Maintenance Schedule ........................ 16
CRAFTSMAN PROFESSIONAL, LIMITED WARRANTY
TWO YEARS ON TRACTOR
When operated and maintained according to all supplied instructions, if this tractor fails
due to a defect in material or workmanship within two years from the date or purchase,
call 1-800-4-MY-HOME® to arrange for free repair.
This warranty applies for only one year from the date of purchase if this tractor is ever
used for commercial or rental purposes.
During the first year of purchase, there wilt be no charge for warranty service in your home.
For your convenience, in-home warranty service will still be available after the first year
of purchase, but a trip charge will apply. This charge will be waived if you transport the
tractor to an authorized Craftsman drop-off location., For the nearest authorized location,
call 1-800-4-MY-HO ME®
90 DAYS ON BATTERY
For ninety (90) days from date of purchase, if the battery included with this tractor is
defective in material or workmanship (our testing proves it will not hold a charge), it will be
replaced free of charge in your home
This warranty covers ONLY defects in material and workmanship Sears will NOT pay for:
. Expendable items that become worn during normal use, including but not limited to
blades, spark plugs, air cleaners, belts, and oil filters
• Standard maintenance servicing, oil changes, or tune-ups
. Tire replacement or repair caused by punctures from outside objects, such as nails,
thorns, stumps, or glass.
. Tire or wheel replacement or repair resulting from normal wear, accident or improper
operation or maintenance
. Repairs necessary because of operator abuse, including but not limited to damage
caused by towing objects beyond the capability of the tractor impacting objects that
bend the frame or crankshaft, or over-speeding the engine.
• Repairs necessary because of operator negligence, including but not limited to, electrical
and mechanical damage caused by improper storage, failure to use the proper grade
and amount of engine oil, failure to keep the deck clear of flammable debris, or failure to
maintain timeequipment according to the instructions contained inthe operator's manual°
• Engine (fuel system) cleaning or repairs caused by fuel determined to be contaminated or
oxidized (stale) In general, fuel should be used within 30 days of its purchase date
• Normal deterioration and wear of the exterior finishes, or product label replacement_
This warranty applies only while this product is within the United States.
Maintenance ........................................ 16
Service and Adjustments ........................ 20
Storage ................................................. 26
Troubleshooting .................................... 27
Sears Service ........................ Back Cover
This warranty gives you specific legal rights, and you may also have other rights which
vary from state to state.
Sears, Roebuck and Co., Hoffman Estates, IL 60179
_DANGER: This cutting machine is capable of amputating hands and feet and
throwing objects. Failure to observe the following safety instructions could result
in serious injury or death.
_WARNING: In order to prevent acciden-
tal starting when setting up, transporting,
adjusting or making repairs, always discon-
nect spark plug wire and place wire where
it cannot contact spark plugo
_WARNING: Do not coast down a hill in
neutral, you may lose control of the tractor.
_WARNING: Tow only the attachments
that are recommended by and comply with
specifications of the manufacturer of your
tractor. Use common sense when towing.
Operate only at the lowest possible speed
when on a slope. Too heavy of a load, while
on a slope, is dangerous. Tires can lose
traction with the ground and cause you to
lose control of your tractor.
,_WARNING: Engine exhaust, some of
its constituents, and certain vehicle compo-
nents contain or emit chemicals known to the
State of California to cause cancer and birth
defects or other reproductive harm.
_WARNING: Battery posts, terminals and
related accessories contain lead and lead
compounds, chemicals known to the State of
California to cause cancer and birth defects
or other reproductive harm. Wash hands
after handling.
!. GENERAL OPERATION
. Read, understand, andfotlow allinstruc-
tions on the machine and in the manual
before starting.
• Do not put hands or feet near rotating
parts or under the machine, Keep clear
of the discharge opening at all times.
• Only allow responsible adults, who are
familiar with the instructions, to operate
the machine,
• Clear the area of objects such as rocks,
toys, wire, etc. which could be picked
up and thrown by the blades.
. Be sure the area is clear of bystanders
before operating. Stop machine if anyone
enters the are&.
, Never carry passengers.
, Do not mow in reverse unless absolutely
necessary. Always look down and behind
before and while backing.
• Never direct discharged materialtoward
anyone. Avoid discharging material
against a wall or obstruction° Material
may ricochet back toward the operator,,
Stop the blades when crossing gravel
surfaces
• Do not operate machinewithoutthe entire
grass catcher, discharge guard, or other
safety devices in place and working°
• Slow down before turning
• Never leave a running machine unat-
tended° Always turn off blades, set park-
ing brake, stop engine, and remove keys
before dismounting.
• Disengage blades when not mowing.
Shut off engine and wait for all parts to
come to a complete stop before cleaning
the machine, removing the grass catcher,
or unclogging the discharge guard.
• Operate machine only in daylight or good
artificial light.
• Do not operate the machine while under
the influence of alcohol or drugs.
, Watch for traffic when operating near or
crossing roadways_
. Use extra care when loading or unloading
the machine into a trailer or truck.
. Always wear eye protection when operat-
ing machine,
• Data indicates that operators, age 60
years and above, are involved in a large
percentage of riding mower-related inju-
ries. These operators should evaluate
their ability to operate the riding mower
safely enough to protect themselves and
others from serious injury.
. Follow the manufacturer's recommen-
dation for wheel weights or counter-
weights.
o Keep machine free of grass , leaves
or other debris build-up which can
touch hot exhaust / engine parts and
burn. Do not allow the mower to plow
leaves or other debris which can cause
build-up to occur. Clean any oil or fuel
spillage before operating or storing the
machine, Allow machine to cool before
storage_
3
Ii. SLOPE OPERATION
Slopes are a major factor related to loss of
control and tip-over accidents, which can
result in severe injury or death° Operation
on all slopes requires extra caution, tf you
cannot back up the slope or if you feel uneasy
on it, do not mow it.
. Mow up and down slopes, not across.
. Watch for holes, ruts, bumps, rocks, or
other hidden objects_ Uneven terrain
could overturn the machine. Tall grass
can hide obstacles.
• Choose a low ground speed so that you
will not have to stop or shift while on the
slope_
• Do not mow on wet grass. Tires may lose
traction.
Always keep the machine in gear when
going down slopes. Do not shift to neutral
and coast downhill°
• Avoid starting, stopping, or turning on a
slope. Ifthe tires lose traction, disengage
the blades and proceed slowly straight
down the slope_
• Keep all movement on the slopes slow
and gradual° Do not make sudden
changes in speed or direction, which
could cause the machine to roll over.
• Use extra care while operating machine
with grass catchers or other attachments;
they can affect the stability of the ma-
chine. Do no use on steep slopes.
, Do not try to stabilize the machine by
putting your foot on the ground.
• Do not mow near drop-offs, ditches, or
embankments. The machine could sud-
denly roll over if a wheel is over the edge
or if the edge caves in.
Iil. CHILDREN
Tragic accidents can occur if the operator
is not alert to the presence of children°
Children are often attracted to the machine
and the mowing activity. Never assume
that children wilt remain where you last
saw them.
• Keep children out of the mowing area
and in the watchful care of a responsible
adult other than the operator_
• Be alert and turn machine off if a child
enters the area.
• Before and while backing, look behind
and down for small children.
Never carry children, even with the
blades shut off. They may fall off and
be seriously injured or interfere with
safe machine operation. Children who
have been given rides in the past may
suddenly appear in the mowing area for
another ride and be run over or backed
over by the machine.
o
Never allow children to operate the ma-
chine.
Use extra care when approaching blind
corners, shrubs, trees, or other objects
that may block your view of a child
IV, TOWING
• Tow only with a machine that has a hitch
designed for towing. Do not attach towed
equipment except at the hitch poinL
• Followthemanufacturer'srecommenda-
tion forweight limits for towed equipment
and towing on slopes.
• Never allow children or others in or on
towed equipment.
• On slopes,theweightofthetowedequip-
ment may cause loss of traction and loss
of control.
• Travel slowly and allow extra distance to
stop°
V. SERVICE
SAFE HANDLING OF GASOLINE
To avoid personal injury or property dam-
age, use extreme care in handling gasoline_
Gasoline is extremely flammable and the
vapors are explosive°
. Extinguish all cigarettes, cigars, pipes,
and other sources of ignition.
• Use only approved gasoline container.
• Never remove gas cap or add fuel with
the engine running_ Allow engine to cool
before refueling.
• Neverfuel the machine indoors.
• Neverstorethemachineorfuetcontainer
where there is an open flame, spark, or
pilot light such as on a water heater or
other appliances.
• Never fill containers inside a vehicle or
on a truck or trailer bed with plastic liner.
Always place containers on the ground
away from your vehicle when filling.
• Remove gas-powered equipment from
the truck or trailer and refuel it on the
ground. If this is not possible, then refuel
such equipment with a portable container,
rather than from a gasoline dispenser
nozzle._
IDENTIFICACI
Vea la secci6r
Sears.
PROBLEM,_
Las cuchi]las
segadoras n(
Vlala descarg
c6sped
Las luz (ces)
delantera(s) _
est&
funcionando
(si equipadat
La bateria nc
P6rdida de
imputsi6n
El motor tien
"contraexp-
osiones"cu_
se "APAGA"
4

Jeservicio
or de la caja
o de aire.
:eite/cambie el
Jstar la
bujia.
3mbustible.
e combustible
)n gasolina
e combustible
va a ltenar el
na nueva y
Imbustible.
alambre de la
as de aire det
,mciador.
)radon
Carburador"
icio yAjustes.
3 con un
_,O COR UFI
:iocualificado.
. Keep the nozzle in contact with the rim •
of the fuel tank or container opening at
all times until fueling is complete° Do not
use a nozzle lock-open device°
o
If fuel is spilled on clothing, change cloth-
ing immediately.
i1
Never overfill fuel tank, Replace gas cap
and tighten securely.
GENERAL SERVICE
• Never operate machine in a closed
area,
" Keep all nuts and bolts tightto be surethe
equipment is in safe working condition_
° NevertamperwithsafetydevicesoCheck
their proper operation regularly.
• Keep machine free of grass, leaves, or
other debris build-up. Clean oil or fuel
spillage and remove any fuel-soaked de-
brisoAllow machine to cool before storing_
If you strike a foreign object, stop and
inspectthe machine, Repair, if necessary,
before restarting.
Never make any adjustments or repairs
with the engine running.
Check grass catcher components andthe
discharge guard frequently and replace
with manufacturer's recommended parts,
when necessary,
, Mower blades are sharp.Wrap the blade
or wear gloves, and use extra caution
when servicing them
• Checkbrakeoperationfrequently.Adjust
and service as required.
• Maintainor replace safety and instruction
labels, as necessary.
o Be sure the area is clear of bystanders
before operating. Stop machine ifanyone
enters the area.
• Never carry' passengers.
\priete el
3con uncentro
;on un otto
talificado,.
. Cambie las
osici6n "ON".
_eraci6n
,, ios
lexioneso
s, pongase
;entro de
un otro del
lalificadoo
\priete el
,,gador.,
or de fa caja
3 COI3 un
.=ars o coR url
:io cualificado°
los manddles
_tilaci6m
. Do not mowin reverse unless absolutely
necessary. Always look down and behind
before and while backing.
. Never carry children, even with the
blades shut off, They may fall off and
be seriously injured or interfere with
safe machine operation. Children who
have been given rides in the past may
suddenly appear in the mowing area for
another ride and be run over or backed
over by the machine.
• Keep children out of the mowing area
and in the watchful care of a responsible
adult other than the operator.
, Be alert and turn machine off if a child
enters the area,
. Before and while backing, look behind
and down for small children.
• Mow up and down slopes (15 ° Max), not
across.
° Choose a low ground speed so that you
wilt not have to stop or shift while on the
slope,.
• Avoid starting, stopping, or turning on a
slope, lfthe tires lose traction, disengage
the blades and proceed slowly straight
down the slope.
. tf machine stops while going uphill,
disengage blades, shift into reverse and
back down slowly.
. Do not turn on slopes unless necessary,
and then, turn slowly and gradually
downhill, if possible..
5
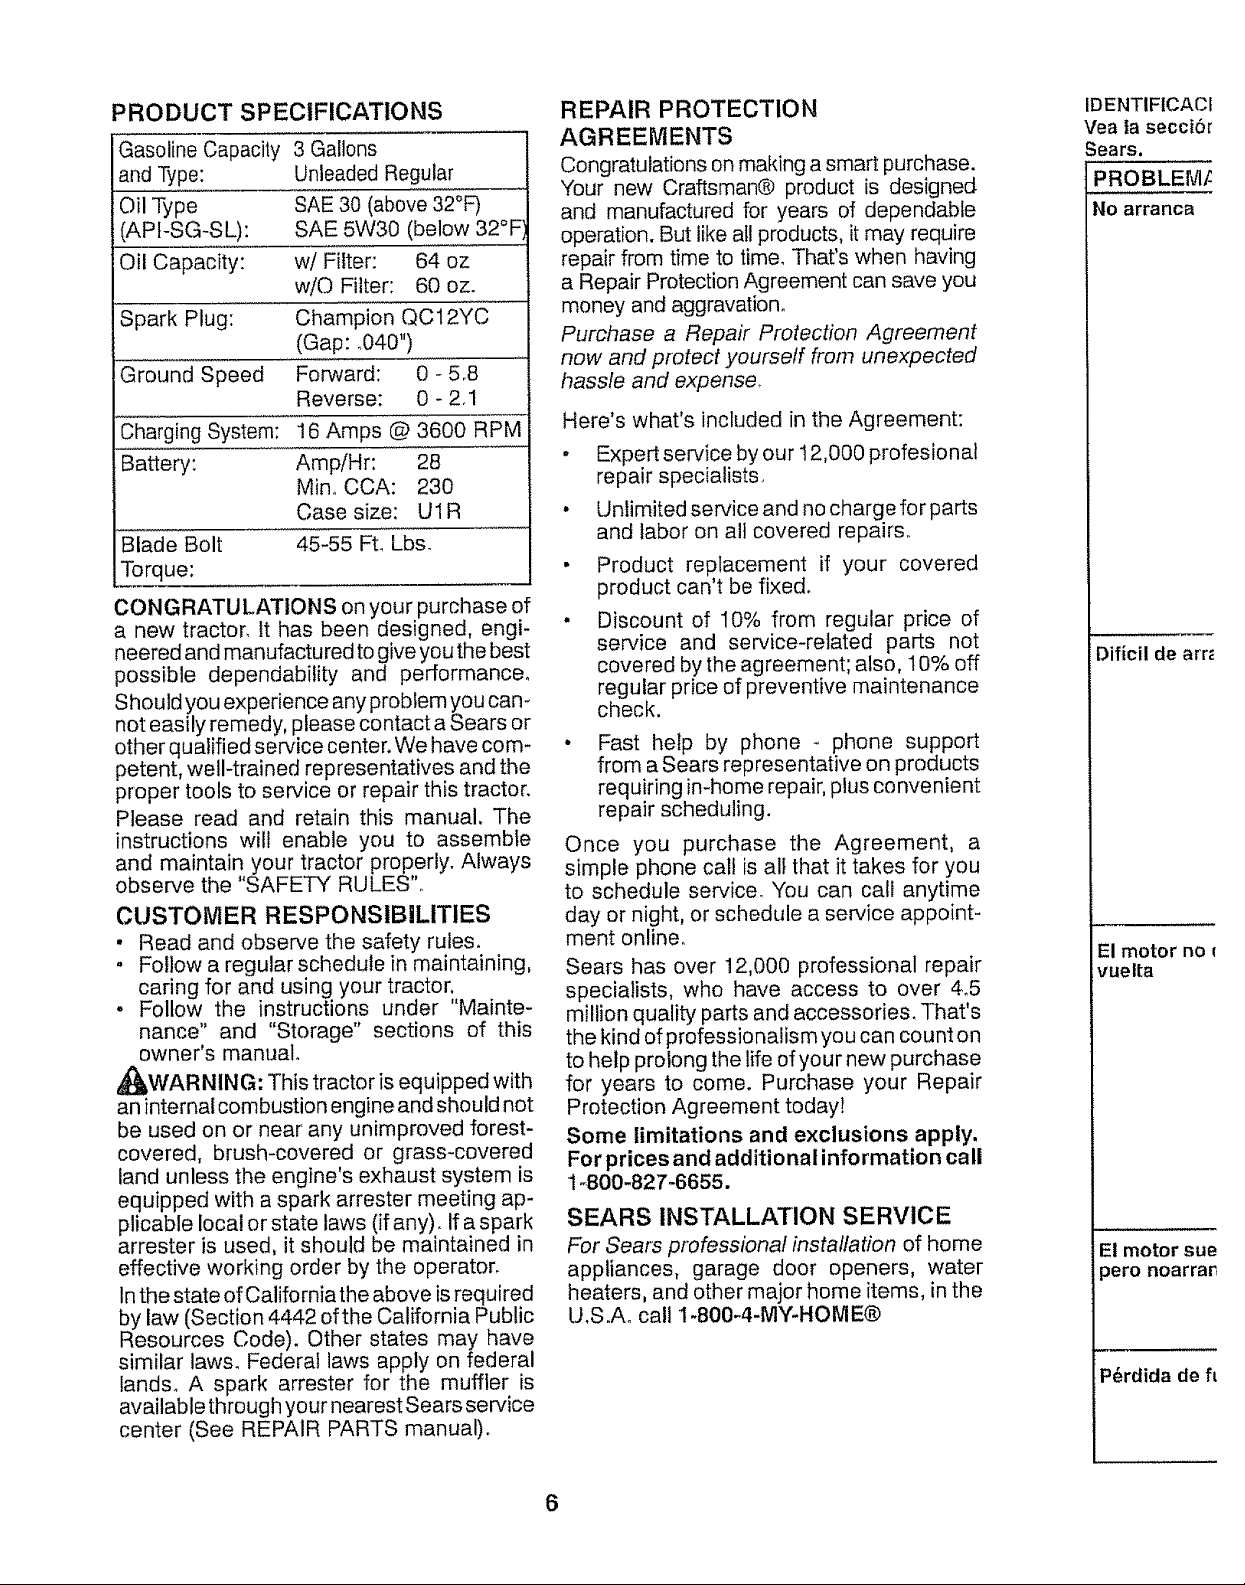
PRODUCT SPECIFICATIONS
Gasoline Capacity 3 Gallons
and Type: Unleaded Regular
Oil Type SAE 30 (above 32°F)
(API-SG-SL): SAE 5W30 (below 32°F
Oil Capacity: w/Filter: 64 oz
w/Q Filter: 60 oz.
Spark Plug: Champion QC12YC
(Gap: °040")
Ground Speed Forward: 0 - 5.8
Reverse: 0 - 2.1
Charging System: 16 Amps @ 3600 RPM
Battery: AmpiHr: 28
Mino CCA: 230
Case size: U1R
Blade Bolt 45-55 FL Lbs.
Torque:
CONGRATULATIONS on your purchase of
a new tractor_ tt has been designed, engi-
neered and manufactured to give you the best
possible dependability and performance°
Should you experience any problem you can
not easily remedy, please contact a Sears or
other qualified service center. We have com-
petent, well-trained representatives and the
proper tools to service or repair this tractor.
Please read and retain this manual. The
instructions will enable you to assemble
and maintain your tractor properly. Always
observe the "SAFETY RULES"°
CUSTOMER RESPONSIBILITIES
• Read and observe the safety rules.
. Follow a regular schedule in maintaining,
caring for and using your tractor,
. Follow the instructions under "Mainte-
nance" and "Storage" sections of this
owner's manual
_I_WARNING: This tractor is equipped with
an internal combustion engine and should not
be used on or near any unimproved forest-
covered, brush-covered or grass-covered
land unless the engine's exhaust system is
equipped with a spark arrester meeting ap-
plicable local or state laws (if any). Ifa spark
arrester is used, it should be maintained in
effective working order by the operator.
in the state of California the above is required
by law (Section 4442 of the California Public
Resources Code). Other states may have
similar laws. Federal laws apply on federal
lands_ A spark arrester for the muffler is
available through your nearest Sears service
center (See REPAIR PARTS manual).
REPAIR PROTECTION
AGREEMENTS
Congratulations on making a smart purchase.
Your new Craftsman@ product is designed
and manufactured for years of dependable
operation. But like all products, it may require
repair from time to time. That's when having
a Repair Protection Agreement can save you
money and aggravation.
Purchase a Repair Protection Agreement
now and protect yourself from unexpected
hassle and expense,
Here's what's included in the Agreement:
• Expert service by our 12,000 profesionat
repair specialists,,
• Unlimited service and no chargefor parts
and labor on all covered repairs,,
Product replacement if your covered
product can't be fixed.
Discount of 10% from regular price of
service and service-related parts not
covered by the agreement; also, 10% off
regular price of preventive maintenance
check.
Fast help by phone - phone support
from a Sears representative on products
requiring in-home repair, plus convenient
repair scheduling.
Once you purchase the Agreement, a
simple phone cal! is all that it takes for you
to schedule service. You can call anytime
day or night, or schedule a service appoint-
ment online,,
Sears has over 12,000 professional repair
specialists, who have access to over 4_5
million quality parts and accessories, That's
the kind of professionalism you can count on
to help prolong the life of your new purchase
for years to come. Purchase your Repair
Protection Agreement today!
Some limitations and exclusions apply.
For prices and additional information call
1_800-827-6655.
SEARS INSTALLATION SERVICE
For Sears professional installation of home
appliances, garage door openers, water
heaters, and other major home items, inthe
U.S.Ao call 1-800_4-MY-HOME®
IDENTIFICACE
Vea |a secci6r
Sears.
PROBLEM[
No arranca
Dificil de arr_
El motor no
vueita
El motor sue
)ero noarra_
P6rdida de fl
6
sistema de
el periodo de
nte poniendo
_1ofuncionar
ne el carbura-
t limpieza de!
_stanque de
producir daSos
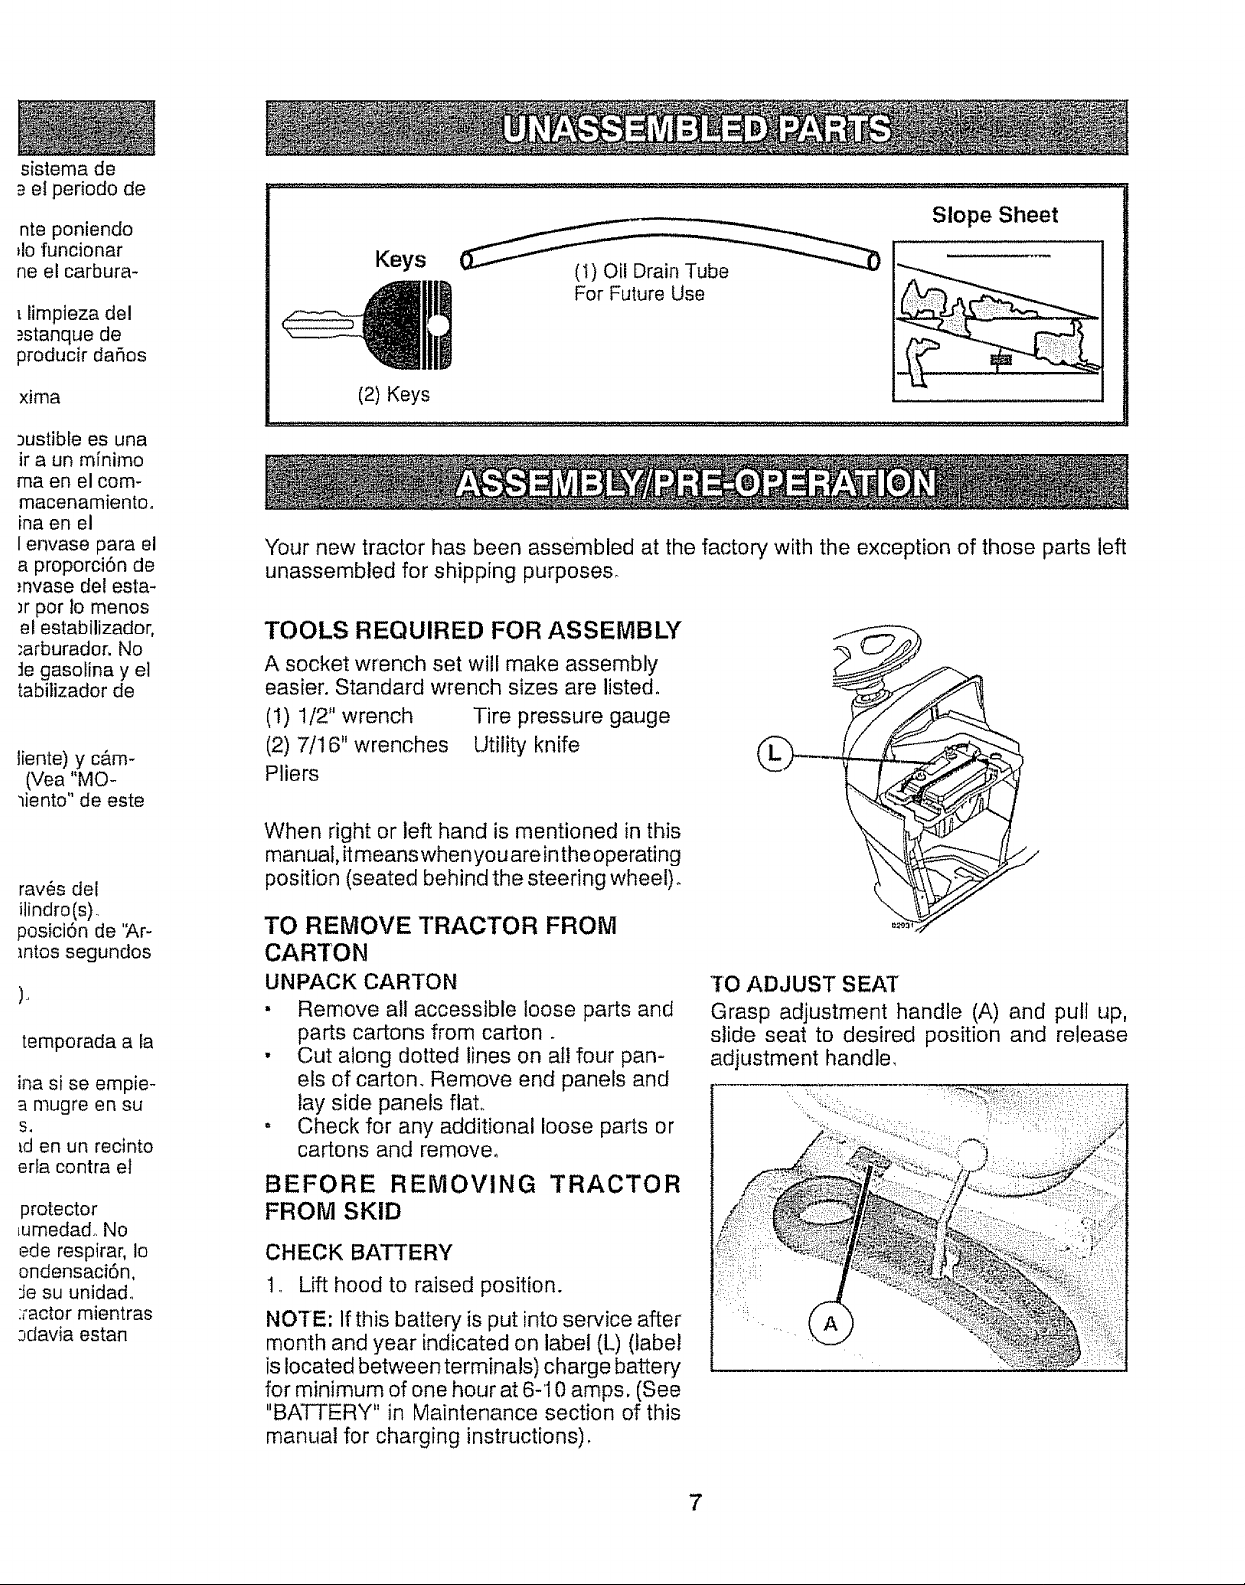
Slope Sheet
Keys (I) Oil Drain Tube
xima
3ustible es una
ira un minimo
ma en el com-
macenarniento.
ina en el
I envase para el
a proporci6n de
mvase del esta-
)r por Io menos
el estabilizador,
,'arburador. No
Je gasolina y el
tabilizador de
tiente) y c&m-
(Vea "MO-
_iento" de este
rav6s del
itindro(s).
posici6n de 'Ar-
lntos segundos
temporada a ta
ina si se empie-
a mugre en su
S,
td en un recinto
erfa contra et
protector
_umedad..No
ede respirar, Io
ondensaci6n,
:Jesu unidad..
:,-actormientras
:Jdavia estan
(2) Keys
"Your new tractor has been assembled at the factory' with the exception of those parts left
unassembled for shipping purposes.
TOOLS REQUIRED FOR ASSEMBLY
A socket wrench set will make assembly
easier. Standard wrench sizes are listed.
(I) 112" wrench Tire pressure gauge
(2) 7/16" wrenches Utility knife
Pliers
When right or left hand is mentioned in this
man ual, itmeans when you are in the operating
position (seated behind the steering wheel).
TO REMOVE TRACTOR FROM
CARTON
UNPACK CARTON
" Remove all accessible loose parts and
parts cartons from carton.
• Cut along dotted lines on all four pan-
els of carton. Remove end panels and
lay side panels flat.
. Check for any additional loose parts or
cartons and remove°
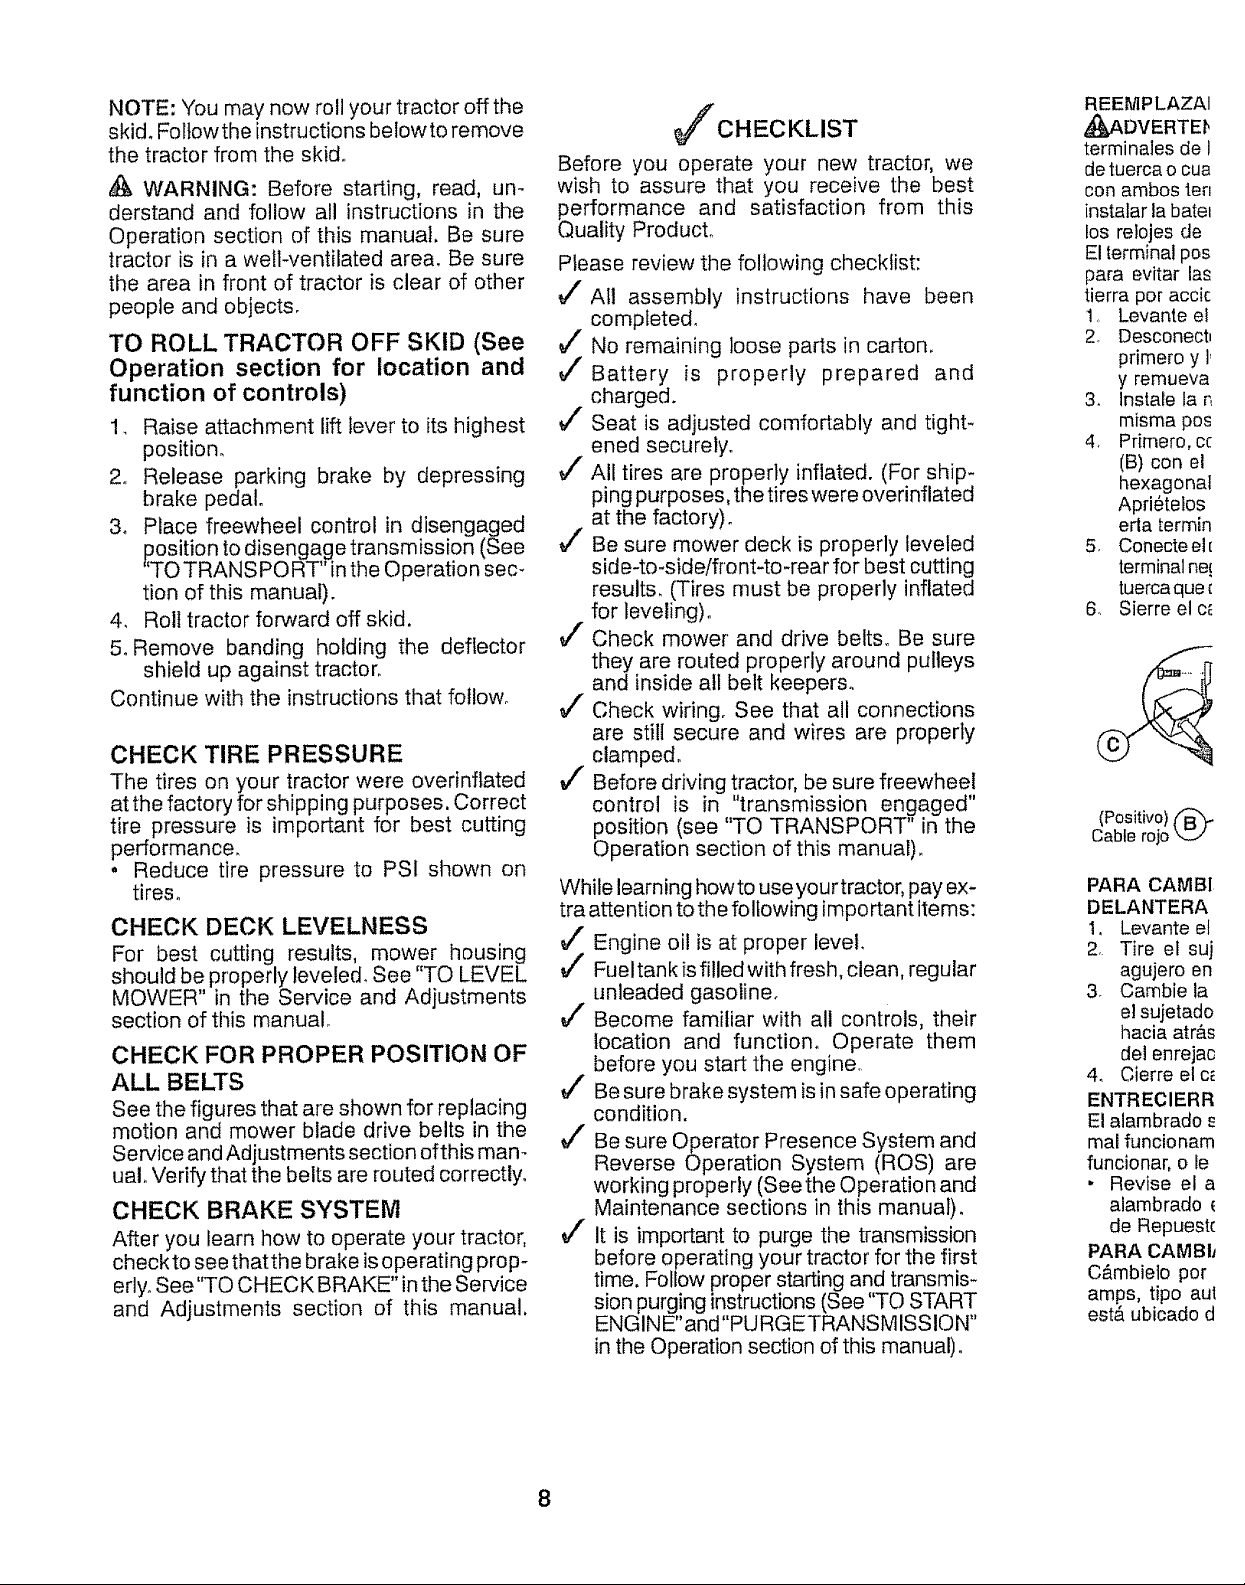
TO ADJUST SEAT
Grasp adjustment handle (A) and pull up,
slide seat to desired position and release
adjustment handle,
BEFORE REMOVING TRACTOR
FROM SKID
CHECK BATTERY
t., Lift hood to raised position.
NOTE: If this battery is put into service after
month and year indicated on label (L) (label
is located between terminals) charge battery
for minimum of one hour at 6-10 amps, (See
"BATTERY" in Maintenance section of this
manual for charging instructions),
7
NOTE: "You may now roll your tractor off the
skid. Follow the instructions belowto remove
the tractor from the skid.
WARNING: Before starting, read, um
derstand and follow all instructions in the
Operation section of this manual. Be sure
tractor is in a well-ventilated area. Be sure
the area in front of tractor is clear of other
people and objects.
TO ROLL TRACTOR OFF SKID (See
Operation section for location and
function of controls)
1_ Raise attachment lift lever to its highest
position,
2o Release parking brake by depressing
brake pedal.
3_ Place freewheel control in disengaged
position to disengage transmission (See
"TO TRANS PORT" inthe Operation sect
tion of this manual).
4, Roll tractor forward off skid.
5. Remove banding holding the deflector
shield up against tractor_
Continue with the instructions that follow_
CHECK TIRE PRESSURE
The tires on your tractor were overinflated
at the factory for shipping purposes, Correct
tire pressure is important for best cutting
performance.
, Reduce tire pressure to PSI shown on
tires.
CHECK DECK LEVELNESS
For best cutting results, mower housing
should be properly leveled, See "TO LEVEL
MOWER" in tile Service and Adjustments
section of this manual°
CHECK FOR PROPER POSITION OF
ALL BELTS
See the figures that are shown for replacing
motion and mower blade drive belts in the
Service and Adjustments section ofthis man_
uaL Verify that the belts are routed correctly°
CHECK BRAKE SYSTEM
After you learn how to operate your tractor,
check to see that the brake is operating prop-
erlyoSee "TO CHECK BRAKE" in the Service
and Adjustments section of this manual,
CHECKLIST
Before you operate your new tractor, we
wish to assure that you receive the best
performance and satisfaction from this
Quality ProducL
Please review the following checklist:
_' All assembly instructions have been
compteted_
#z No remaining loose parts in carton.
Vf Battery is properly prepared and
charged.
J" Seat is adjusted comfortably and tight-
ened securely.
Vf All tires are properly inflated. (For ship-
ping purposes, the tires were overinflated
at the factory),
#f Be sure mower deck is properly leveled
sid e-to-side/fro nt4o-rear for best cutting
results. (Tires must be properly inflated
for leveling).
vf Check mower and drive belts. Be sure
they are routed properly around pulleys
and inside all belt keepers°
J" Check wiring. See that all connections
are still secure and wires are properly
clamped.
vf Before driving tractor, be sure freewheel
control is in "transmission engaged"
position (see "TO TRANSPORT" in the
Operation section of this manual).
While learning howto use your tractor, pay ex-
tra attention to the following important items:
/" Engine oil is at proper level.
v/' Fuel tank is filled with fresh, clean, regular
unleaded gasoline.
J" Become familiar with all controls, their
location and functiom Operate them
before you start the engine
_/" Be sure brake system is in safe operating
condition.
_" Be sure Operator Presence System and
Reverse Operation System (ROS) are
working properly (See the Operation and
Maintenance sections in this manual).
V/ It is important to purge the transmission
before operating your tractor for the first
time, Follow proper starting and transmis-
sion purging instructions (See "TO START
ENGINE"and"PURGETRANSMISSlON"
in the Operation section of this manual).
REEMPLAZAI
_,DVERTEI,
terminales de I
detuerca o cue
con ambos ter_
instalar labate1
los relojes de
El terminal pos
para evitar las
tierra por accic
1, Levante ef
2_ Desconectm
primero y I,
y remueva
3, Instale la n
misma pos
4. Primero, cc
(B) con el
hexagonal
Apri_telos
erla terrain
5, Conecte eli
terminal ne!
tuerca que [
6_ Sierre el c_
(Positivo) ('_
Cable rojo
PARA CAMBI
DELANTERA
1, Levante et
2, Tire el suj
agujero en
3, Cambie la
el sujetado
hacia atr&s
del enrejao
4, Cierre el c_
ENTREClERR
El alambrado
real funcionam
funcionar, o le
. Revise el a
alambrado €
de Repuestc
PARA CAMBlJ
C&mbie]o pot
amps, tipo aut
est& ubicado d
8

_famente: alinee
da trasera en el
einserte elanillo
llaranuradeteje+
el eje+
erforadas y pCra
_dasa causa de
Jcommerciante
Elsello previene
i_n lacorrosiCn.
! LAS RUEDAS
These symbols may appear on your tractor or in literature supplied with the product,
Learn and understand their meaning.
R N H L IX!i @
REVERSE NEUTRAL HIGH LOW CHOKE FAST SLOW
IGNITION SWtl"CH
s ruedas delan-
1 asi de f&brica
y la inclinaciCn
+regutables. En
_oque afecte la
ruedas delan-
sa, pCngase en
los Sears u otro
MOTOR CON
s de _cido-plo-
Mantenga las
_les para fumar
re use una pro-
de las baterias+
mja cored para
que volverse a
;iCn de Manten-
_e" para un ar-
,procedimiento:
quipado con un
_1otambi_n tiene
qo use labateria
otros vehiculos.
DE EMPALME-
ROJO conel [er-
_dabated& preo+
suitoen elchasis+
,te NEGRO con
de una bateria
_bte(D) NEGRO
_,TIERRA DEL
ue de combus-
ENGINE OFF REVERSE ENGINE ON ENGINE START PARKING BRAKE MOWER HEIGHT
%
OPERATION
SYSTEM (ROS)
+ ;8; _!2
LIGHTS ON FUEL BA'f'FERY REVERSE FORWARD CRUISE CONTROL
@@@@@
ATTACHMENT ATTACHMENT
CLUTCH DISENGAGED CLUTCH ENGAGED
FREE WHEEL
(Automatic Models o_ty)
&
Failure to follow instructions
could result in serious injury or
death, The safety alert symbol
is used to identify safety inform-
ation about hazards whicll can
result in death, serious injury
and/or property damage.
DANGER, KEEP HANDS
AND FEET AWAY
DANGER indicates a hazard which, if not avoided,
&
will result in death or serious injury.
WARNING indicates a hazard which, if not avoided
&
could result in death or serious injury°
CAUTION indicates a hazard which, if not avoided
&
might result in minor or moderate injury.
CAUTION when used without the aled symbol,
indicates a situation that could result in damage
to the tractor and/or engine.
HOT SURFACES indicates a hazard which,
if not avoided, could result in death, serious injury
,_I_!+ttlShm,
and/or property damage.
FIRE indicates a hazard which, if not avoided,
could result in death, serious Injury andter
property damage.
KEEP AREA CLEAR SLOPE HAZARDS
(SEE SAFETY RULES SECTION)
MOWER LIFT
CLUTCH/BRAKE
PEDAL
;, INVIERTA EL
chasis y luego
;argadao
nbas baterias+
Completamente
a
9
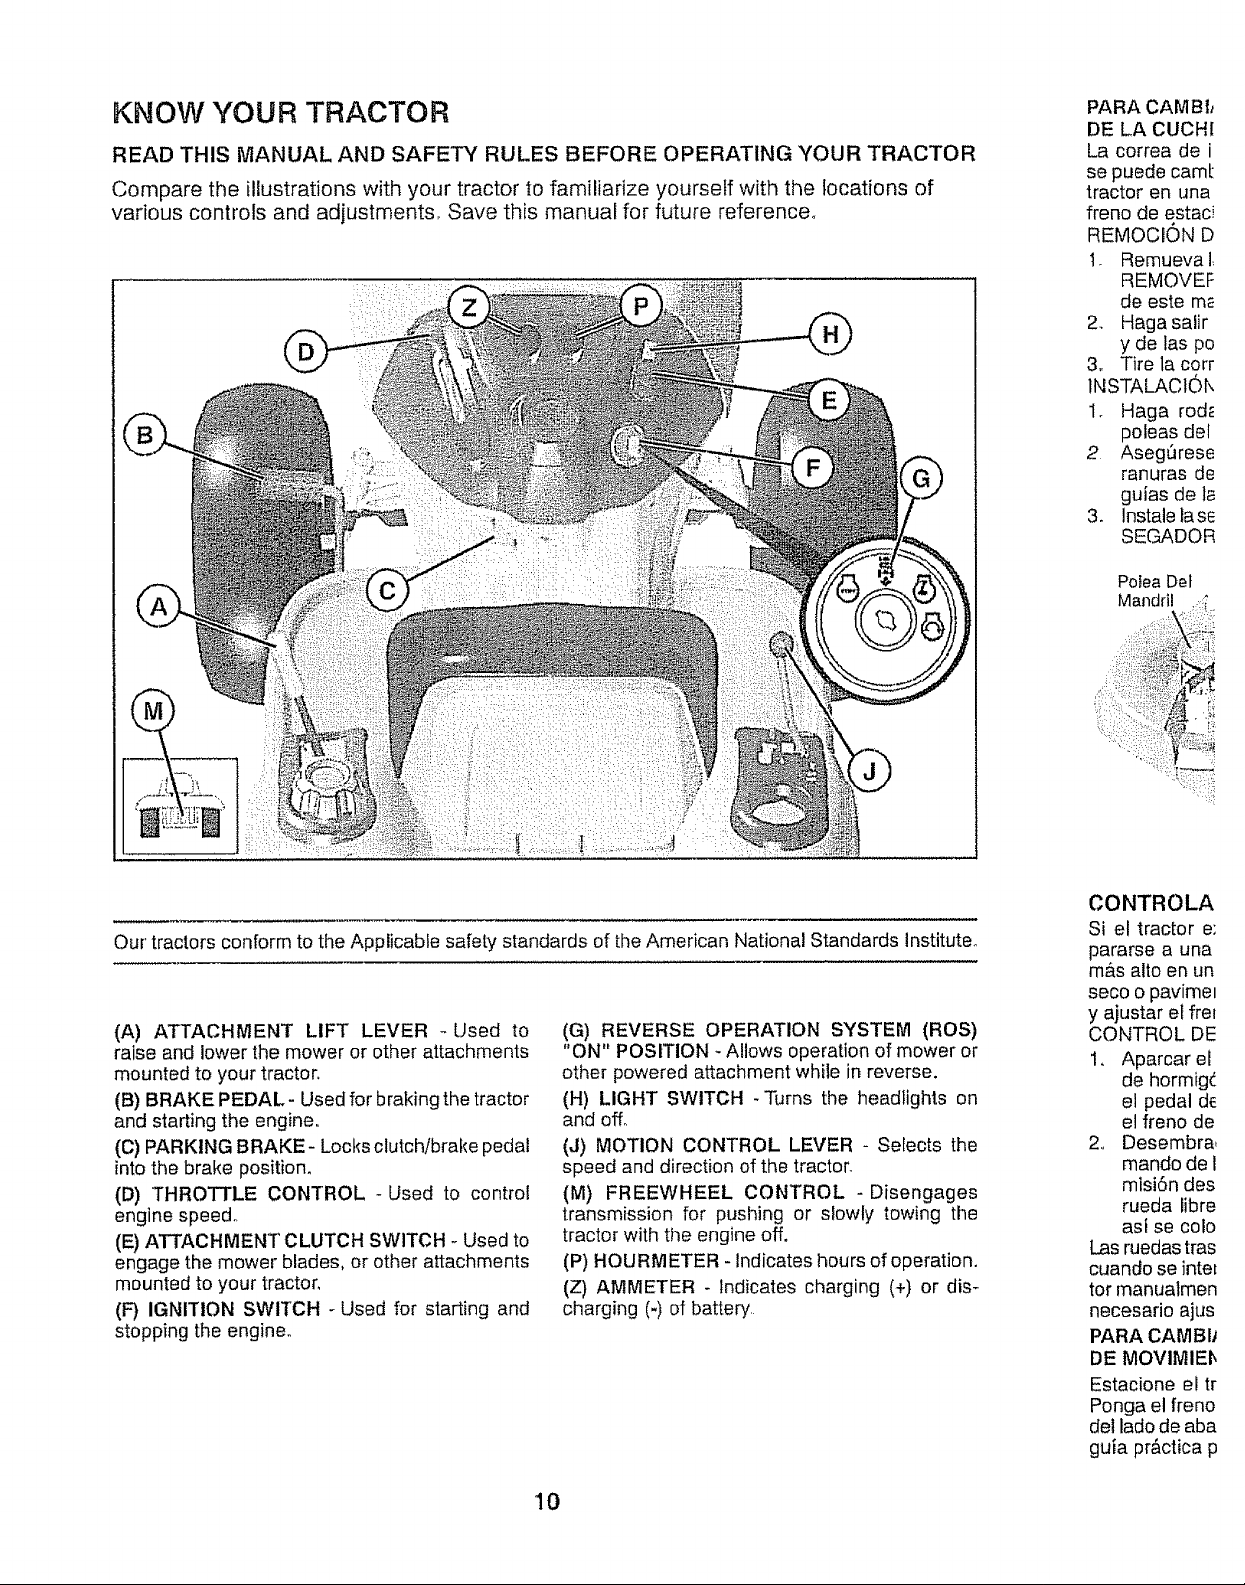
KNOW YOUR TRACTOR
READ THIS MANUAL AND SAFETY RUL.ES BEFORE OPERATING YOUR TRACTOR
Compare the illustrations with your tractor to familiarize yourself with the locations of
various controls and adjustments. Save this manual for future reference°
PARA CAMBtl
DE LA CUCH[
La correa de i
se puede carol
tractor en una
frenode estaci
REMOCION D
1. Remueva I:
REMOVEF
de este ms
2. Haga salir
y de las pc
3o Tire la corr
1NSTALACIOK
1. Haga rod_
poleas del
2 Aseg0rese
ranuras de
guias de la
3. Instale la se
SEC_DOR
PoieaDef
Our'tractors conform to the Applicable safety standards of the American National Standards Institute°
(A) ATTACHMENT LIFT LEVER -Used to
raise and lower the mower or other attachments
mounted to your tractor.
(B) BRAKE PEDAL- Used for braking the tractor
and starting the engine,,
(C) PARKING BRAKE - Locks clutch/brake pedal
into the brake position.
(D) THROTTLE CONTROL -Used to control
engine speed°
(E) ATTACHMENT CLUTCH SWITCH - Used to
engage the mower blades, or other attachments
mounted to your tractor,
(F) IGNITION SWITCH -Used for starting and
stopping the engine.,
(G) REVERSE OPERATION SYSTEM (ROS)
"ON" POSITION - Allows operation of mower or
other powered attachment while in reverse.
(H) LIGHT SWITCH -Turns the headlights on
and off.
(J) MOTION CONTROL LEVER - Selects the
speed and direction of the tractor.
(M) FREEWHEEL CONTROL - Disengages
transmission for pushing or slowly towing the
tractor with the engine off,
(P) HOURMETER - Indicates hours of operation.
(Z) AMMETER - Indicates charging (+) or dis-
charging (-) of battery,
CONTROLA
Si el tractor e:
pararse a una
m&s alto en un
seco o pavimel
y ajustar el frel
CONTROL DE
1. Aparcarel
de hormig_.
el pedal de
el freno de
2. Desembra,
mando de i
misi6n des
rueda libre
asi se colo
Las ruedas tras
cuando se inter
tor rnanualmen
necesario ajus
PARA CAMBI_
DE MOVIMIEI_
Estacione el tr
Ponga el freno
del lado de aba
gula pr&ctica p
10
;y ajuste nueva-
asta que ambos
S
_edar bien hive-
perfectamente
_rtadora deben
punta anterior
te la punta pos-
ncuentre en su
afiladas, Prot_-
,uelva lascuchil-
ambas cosaso
ici6n rn&s alta.
_sde la cuchilla
iede apuntando
vlida la distancia
eriory el suelo y
JelO,
a de la cuchilla
jo que la punta
de adelante det
16" o de calibre
d&ndole varias
.,ade ajuste Bo
4" o de calibre
de ajuste de la
tsentido horario
de adelante de
[ido antihorario
, ,,,, ,,,, ,,,,,, ,,,........................ ................ ::
The operation of any tractor can result in foreign objects thrown into
the eyes, which can result in severe eye damage, Always wear safety
glasses or eye shields while operating your tractor or performing any
adjustments or repairs, We recommend standard safety glasses or a
wide vision safety mask worn over spectacles,
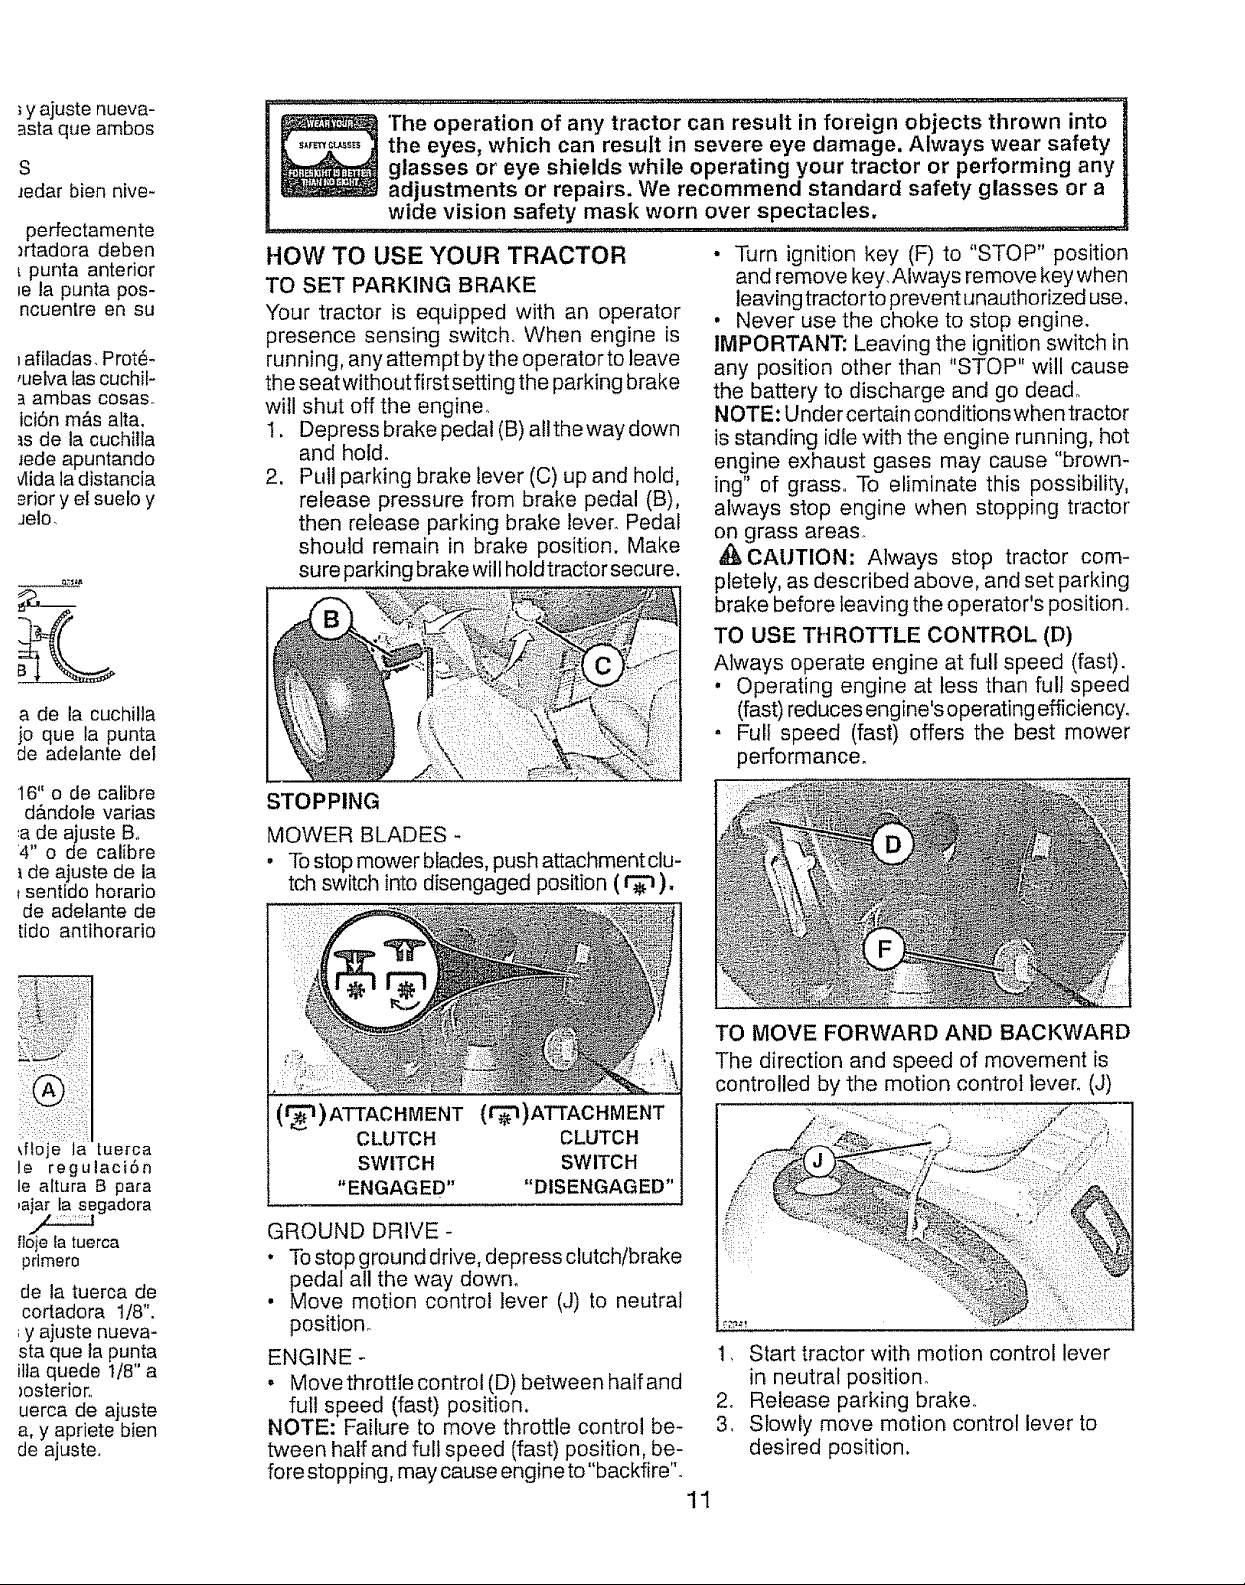
HOW TO USE YOUR TRACTOR
TO SET PARKING BRAKE
"four tractor is equipped with an operator
presence sensing switch. When engine is
running, any attempt bythe operator to leave
the seat without first setting the parking brake
will shut off the engine
!. Depress brake pedal (B) allthe way down
and hold.
2. Pull parldng brake lever (C) up and hold,
release pressure from brake pedal (B),
then release parking brake lever. Pedal
should remain in brake position. Make
sure parking brake will holdtractor secure.
STOPPING
MOWER BLADES -
. Tostop mower blades, push attachmentclu-
tch switch into disengaged position ( r_ ),
.=..::.==..... , ,,, ,,
• Turn ignition key (F) to "STOP" position
and remove key, Always remove key when
leaving tractorto prevent unauthorized use,
, Never use the choke to stop engine.
IMPORTANT: Leaving the ignition switch in
any position other than "STOP" will cause
the battery to discharge and go dead_
NOTE: Under certain conditions when tractor
is standing idle with the engine running, hot
engine exhaust gases may cause "brown-
ing" of grass,. To eliminate this possibility,
always stop engine when stopping tractor
on grass areas_
&CAUTION: Always stop tractor com-
pletely, as described above, and set parking
brake before leaving the operator's position°
TO USE THROTTLE CONTROL (D)
Always operate engine at full speed (fast).
, Operating engine at tess than full speed
(fast) reduces engine's operating efficiency.
, Full speed (fast) offers the best mower
performance.
i'ftoieia' tueroa
le regulaci6n
le altura B para
,ajar ta segadora
flo_rca
primero
de la tuerca de
codadora 1/8".
y ajuste nueva-
sta que la punta
ilia quede 1/8" a
)osterior.
uerca de ajuste
a. y apriete bien
de ajuste.
; '21:;
(r_'l) ATTACHMENT
CLUTCH
SWITCH
"ENGAGED"
(r_)ATTACHMENT
CLUTCH
SWITCH
"DISENGAGED"
GROUND DRIVE-
• To stop ground drive, depress clutch/brake
pedal all the way dowm
• Move motion control lever (J) to neutral
position°
ENGINE -
. Move throttle control (D) between half and
full speed (fast) position.
NOTE: Failure to move throttle control be-
tween half and full speed (fast) position, be-
fore stopping, may cause engine to "backfire".
TO MOVE FORWARD AND BACKWARD
The direction and speed of movement is
controlled by the motion control lever. (J)
1, Start tractor with motion control lever
in neutral position.
2o Release parking brake..
3, Slowly move motion control lever to
desired position.
11
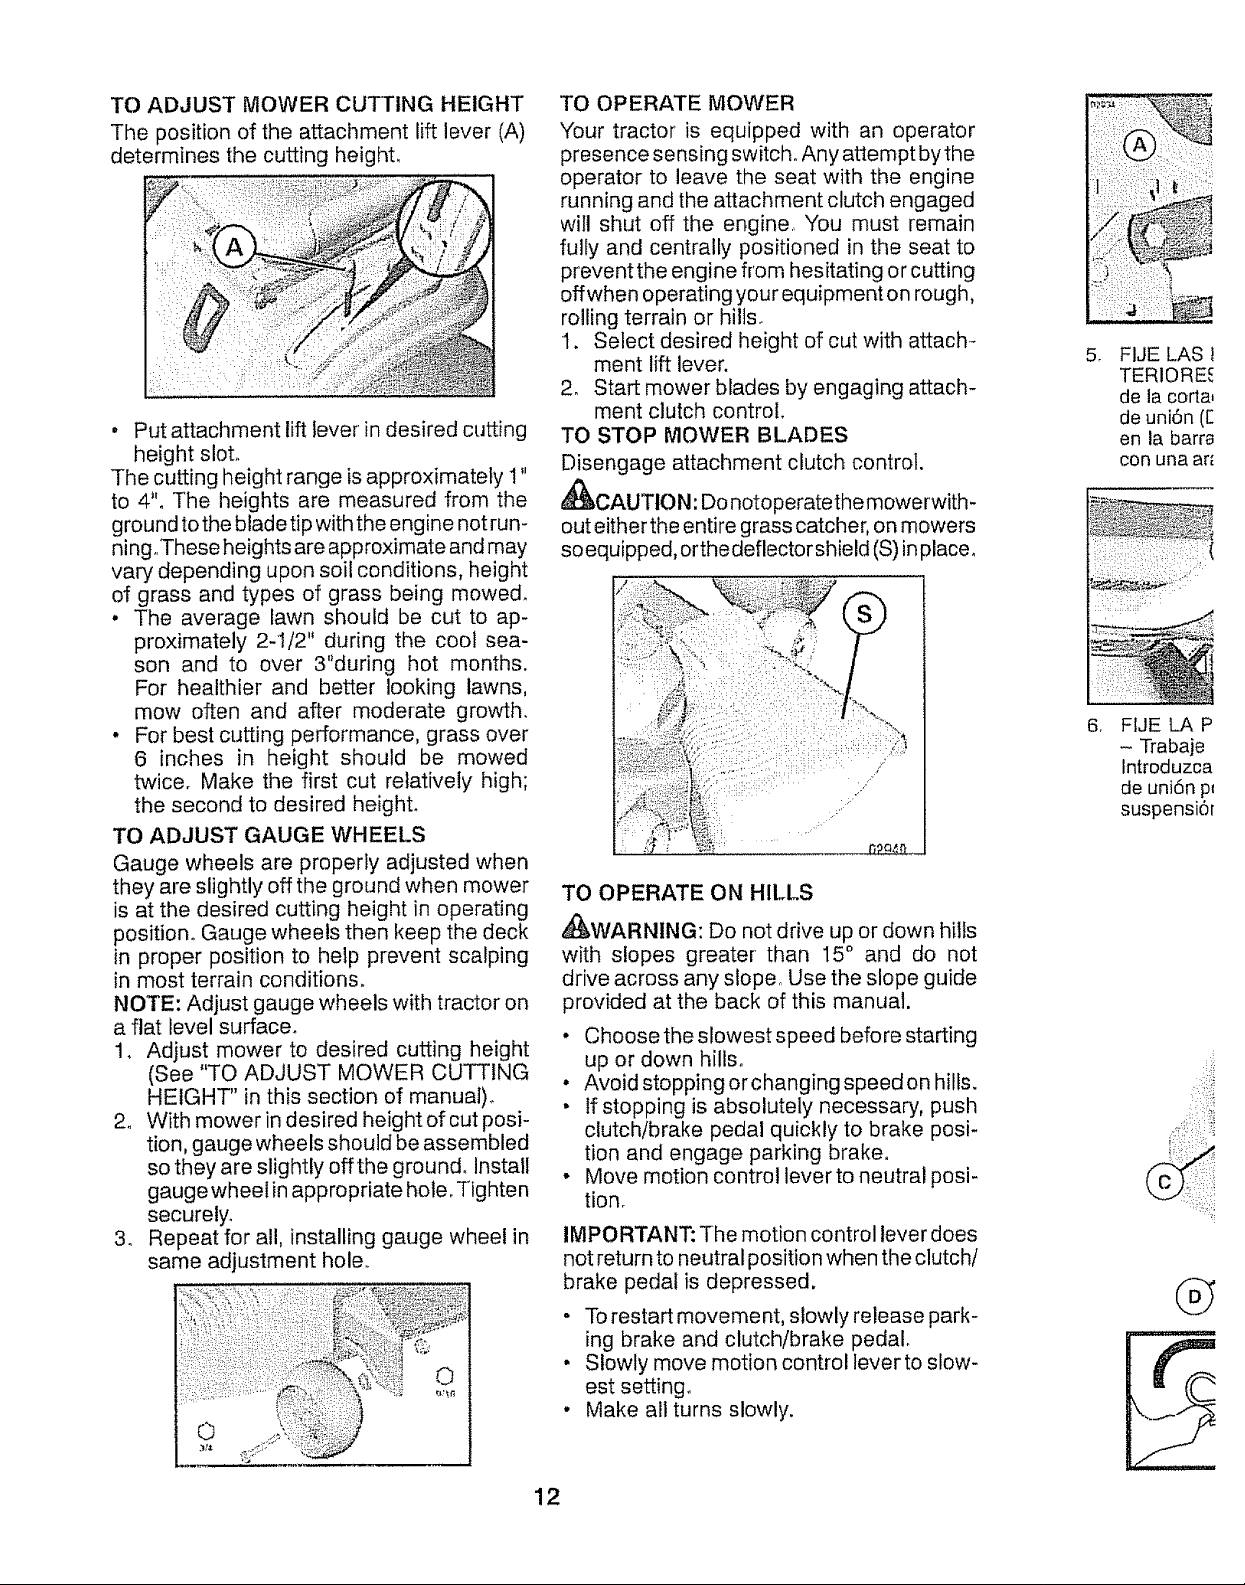
TOADJUSTMOWER CUTTING HEIGHT
The position of the attachment lift lever (A)
determines the cutting height,
. Put attachment lift lever in desired cutting
height slot.
The cutting height range is approximately 1'
to 4". The heights are measured from the
ground to the blade tip with the engine not run-
ning These heights are approximate and may
vary depending upon soil conditions, height
of grass and types of grass being mowed.
• The average lawn should be cut to ap-
proximately 2-1/2" during the cool sea-
son and to over 3"during hot months.
For healthier and better looking lawns,
mow often and after moderate growth
• For best cutting performance, grass over
6 inches in height should be mowed
twice. Make the first cut relatively high;
the second to desired heighL
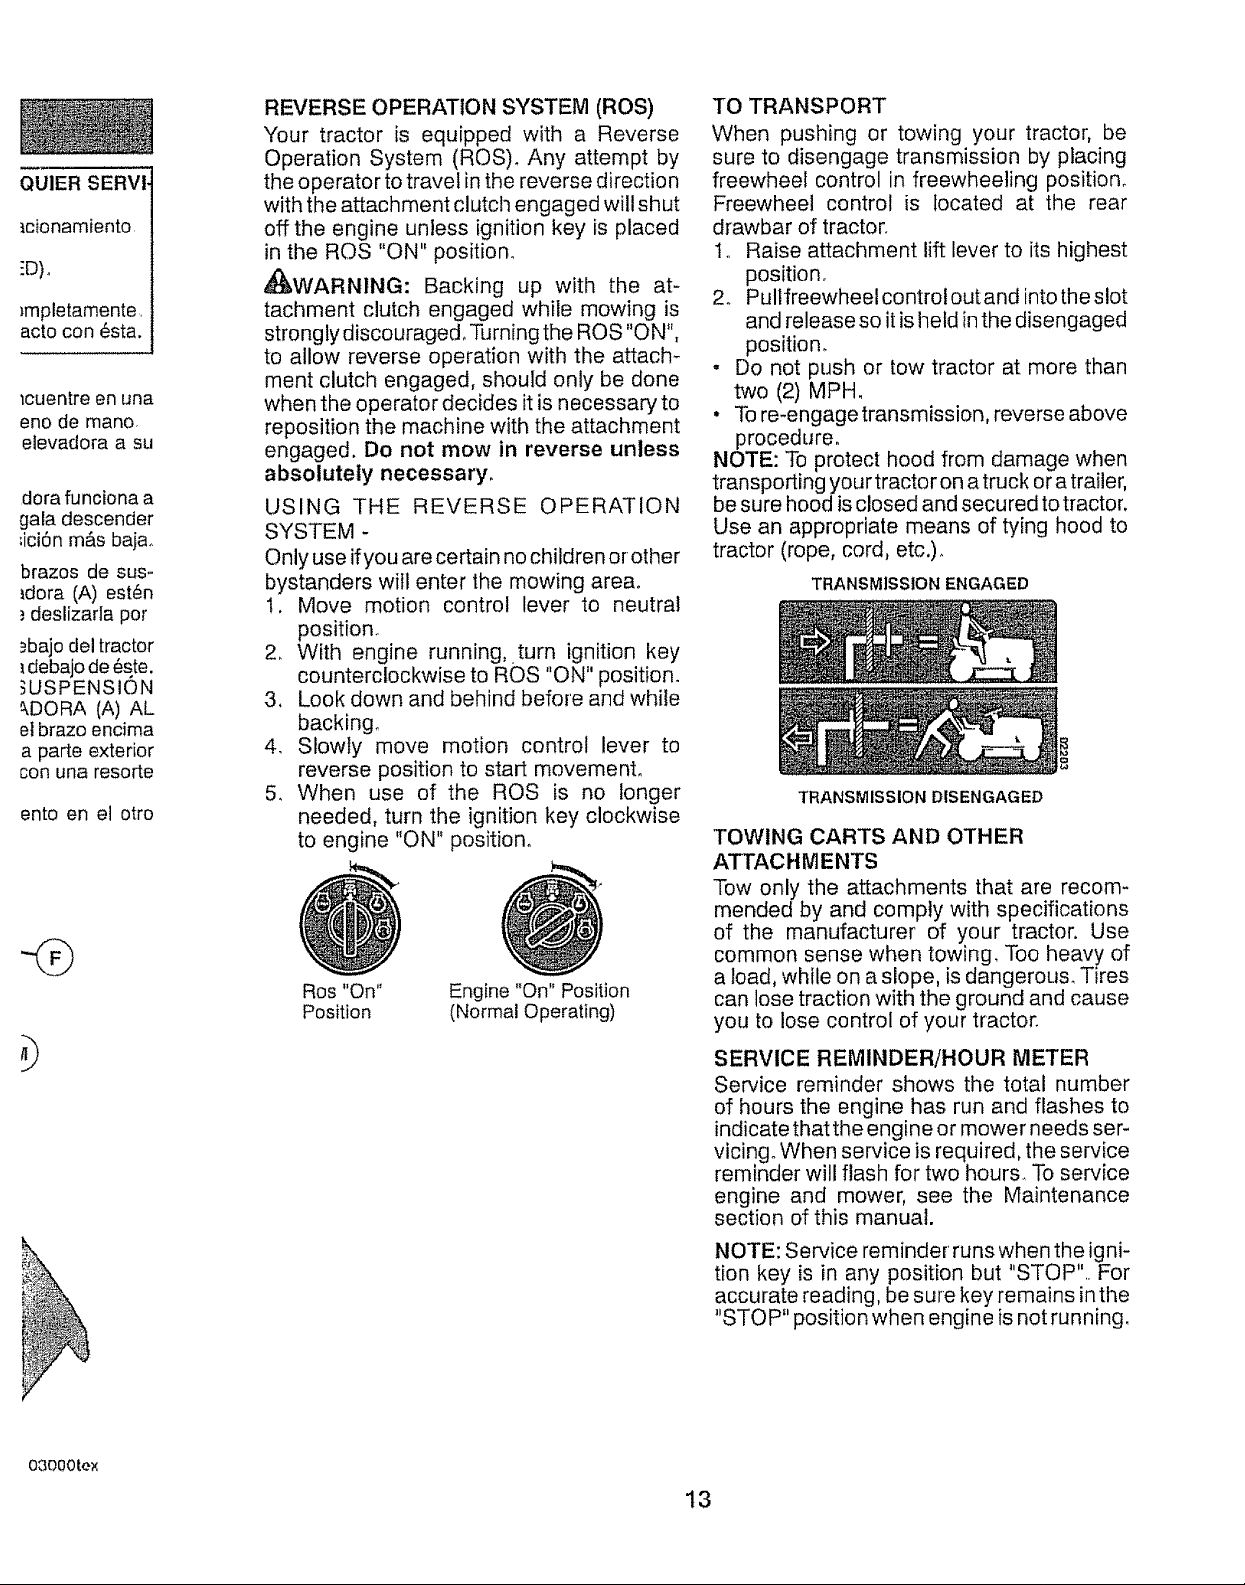
TO ADJUST GAUGE WHEELS
Gauge wheels are properly adjusted when
they are slightly off the ground when mower
is at the desired cutting height in operating
positiono Gauge wheels then keep the deck
in proper position to help prevent scalping
in most terrain conditions.
NOTE: Adjust gauge wheels with tractor on
a flat level surfacer
1. Adjust mower to desired cutting height
(See "TO ADJUST MOWER CUTTING
HEIGHT" in this section of manual).
2. With mower in desired height of cut posi-
tion, gauge wheels should be assembled
so they are slightly offthe ground. Install
gauge wheel inappropriate hoteo Tighten
securely.
3. Repeat for all, installing gauge wheel in
same adjustment hole.,
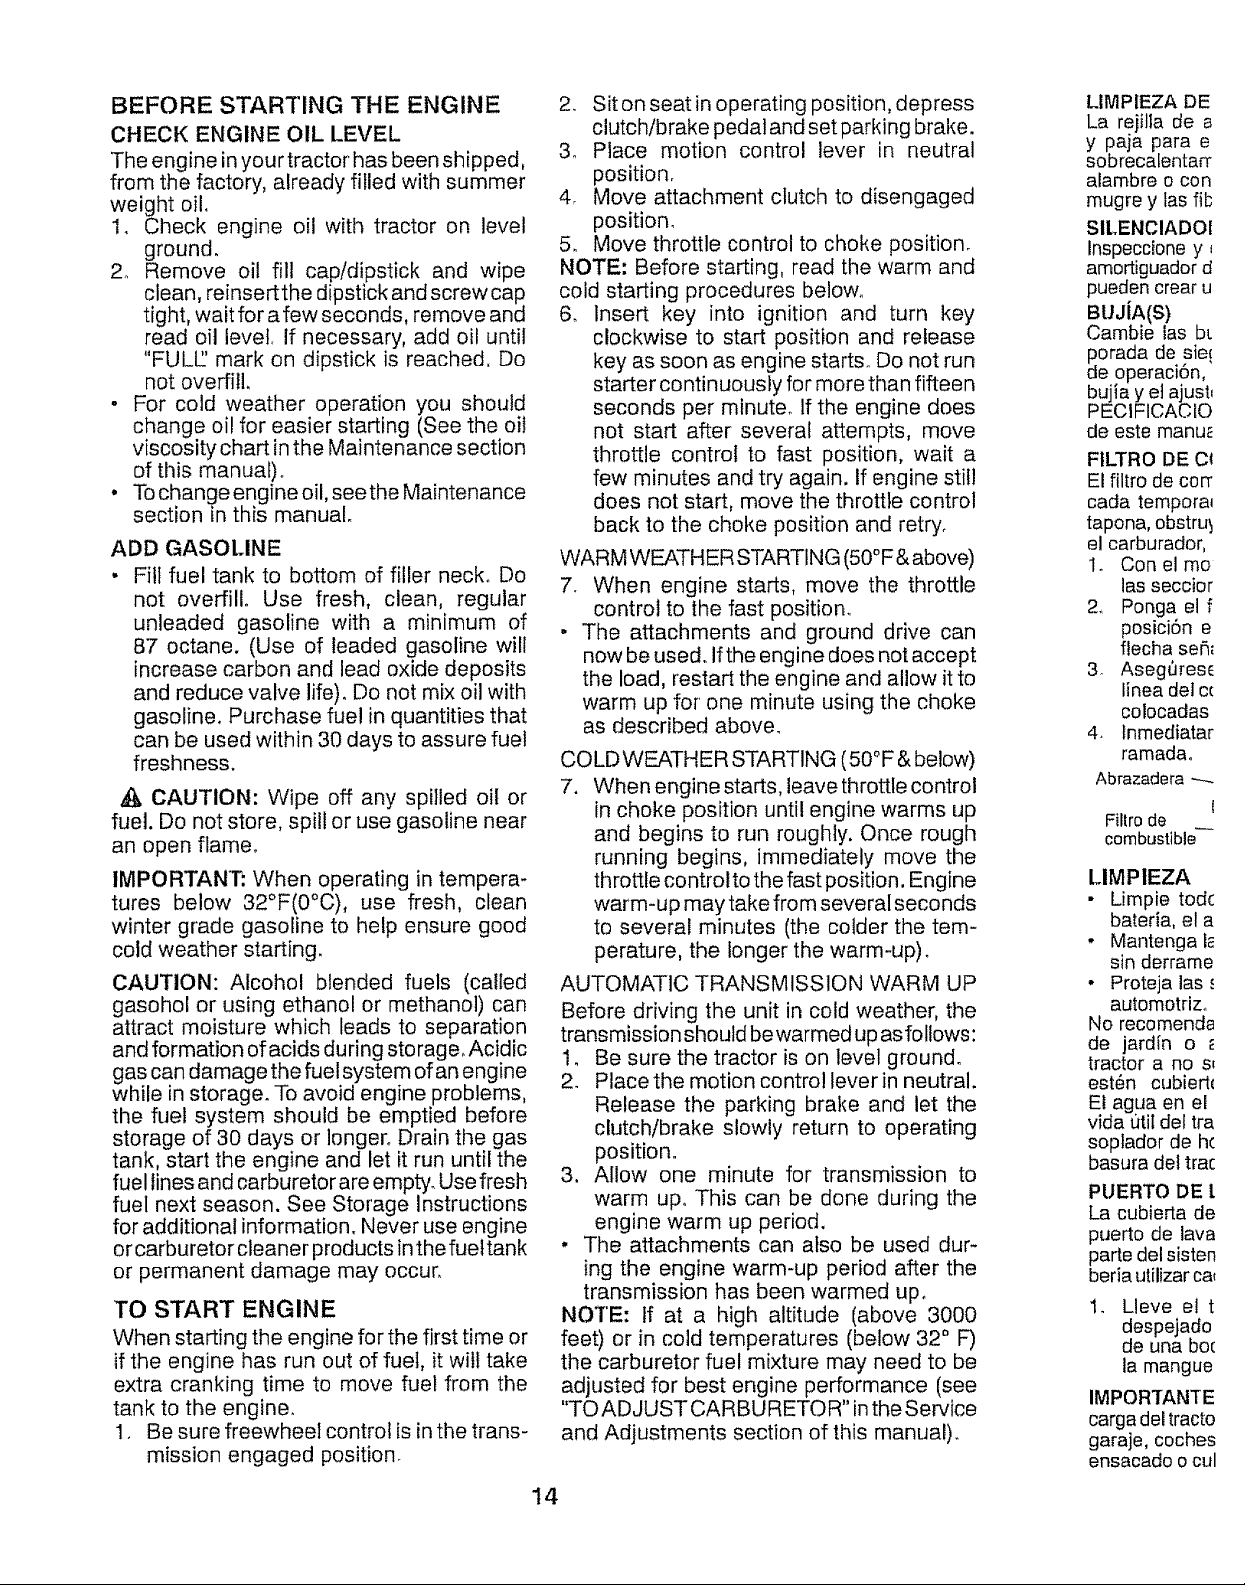
TO OPERATE MOWER
Your tractor is equipped with an operator
presence sensing switch. Any attempt by the
operator to leave the seat with the engine
running and the attachment clutch engaged
will shut off the engine_ You must remain
fully and centrally positioned in the seat to
prevent the engine from hesitating or cutting
offwhen operating your equipment on rough,
rolling terrain or hills.
1. Select desired height of cut with attach-
ment lift lever.
2. Start mower blades by engaging attach-
ment clutch control.
TO STOP MOWER BLADES
Disengage attachment clutch control.
_CAUTION: Do not operate the mowerwith-
out either the entire grass catcher, on mowers
so equipped, orthe deflector shield (S) in place.
TO OPERATE ON HILLS
_WARNING: Do not drive up or down hills
with slopes greater than 15° and do not
drive across any slope, Use the slope guide
provided at the back of this manual.
• Choosethe slowest speed before starting
up or down hills.
• Avoid stopping orchanging speed on hills
• If stopping is absolutely necessary, push
clutch/brake pedal quickly to brake posi-
tion and engage parking brake
• Move motion control lever to neutral posi-
tiono
IMPORTANT: The motion control lever does
not return to neutral position when the clutch/
brake pedal is depressed.
. To restart movement, slowly release park-
ing brake and clutch/brake pedal.
• Slowly move motion control lever to slow-
est setting.
. Make all turns slowly.
5, FIJE LAS t
TERIORE,c
de la corta,
de uni6n (E
en la barra
con una arl
6 FIJE LA P
- Trabaje
Introduzca
de uniSn .pt
suspenslor
::::
®
12
QUIER SERVI.
_cionamiento,
-'D)o
_mpletamente,
acto con 6sta.
_ouentreen una
ere de mane.
eievadora a su
dora funciona a
gala descender
;ici6n m&s baja.
brazos de sus-
_dora (A) est6n
; deslizarla por
.=bajodel tractor
tdebajo de 6ste.
_USPENSlON
&DORA (A) AL
etbrazo encima
a parte exterior
con una resorte
ento en el otro
,b
REVERSE OPERATION SYSTEM (ROS)
Your tractor is equipped with a Reverse
Operation System (ROS), Any attempt by
the operator to travel in the reverse direction
with the attachment clutch engaged will shut
off the engine unless ignition key is placed
in the ROS "ON" position,
_WARNING: Backing up with the at-
tachment clutch engaged while mowing is
strongly discouraged° "PJrning the ROS "ON".
to allow reverse operation with the attach-
ment clutch engaged, should only be done
when the operator decides it is necessary to
reposition the machine with the attachment
engaged. Do not mow in reverse unless
absolutely necessary,
USING THE REVERSE OPERATION
SYSTEM -
Only use if you are certain no children or other
bystanders will enter the mowing area_
1. Move motion control lever to neutral
position.
2. With engine running,.turn ignition key
counterclockwise to ROS "ON" position.
3. Look down and behind before and while
backing_
4. Slowly move motion control lever to
reverse position to start movemenL
5_ When use of the ROS is no longer
needed, turn the ignition key clockwise
to engine "ON" position.
Ros "On"
Position
Engine "On" Position
(Normal Operating)
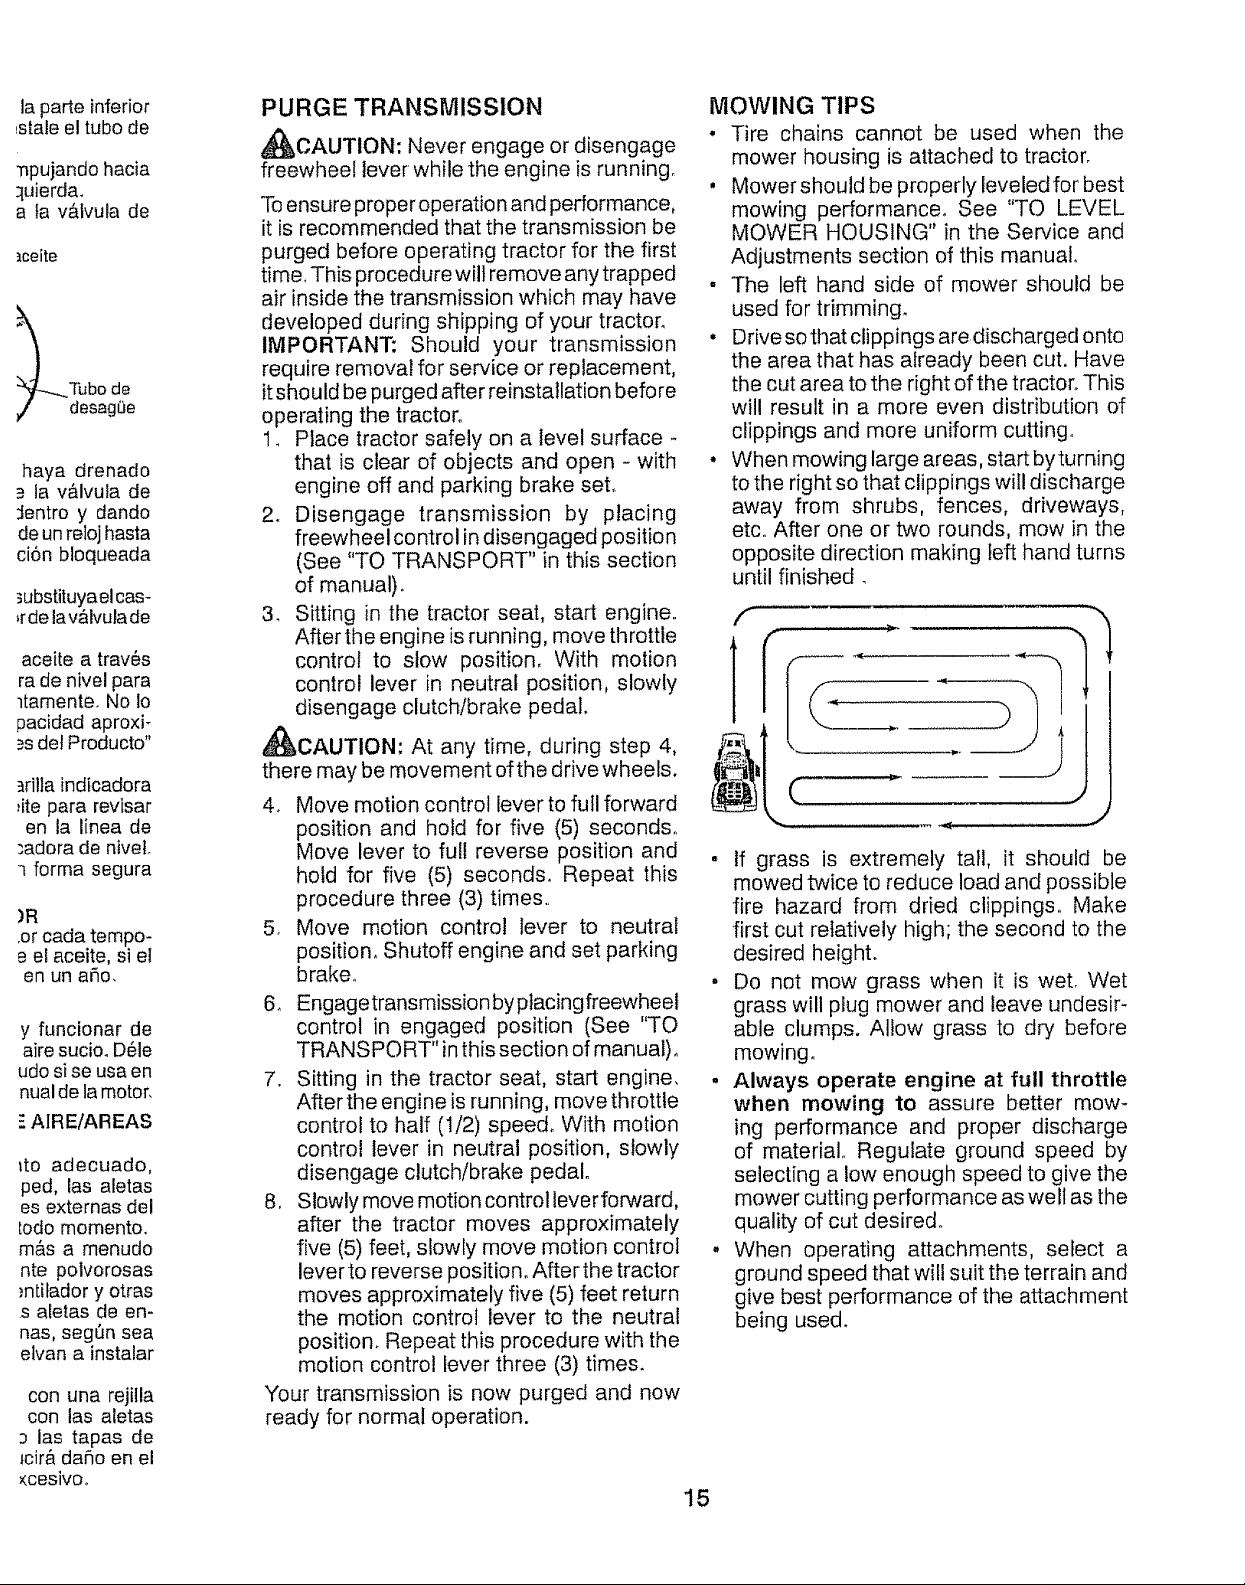
TO TRANSPORT
When pushing or towing your tractor, be
sure to disengage transmission by placing
freewheel control in freewheeling position°
Freewheel control is located at the rear
drawbar of tractor.
1, Raise attachment lift lever to its highest
position_
2. Pullfreewheel control out and into the slot
and release so it is held in the disengaged
position.
• Do not push or tow tractor at more than
two (2) MPH,
• To re-engagetransmission, reverse above
procedure,
NOTE: To protect hood from damage when
transporting your tractor on a truck or a trailer,
be sure hood is closed and secured to tractor,
Use an appropriate means of tying hood to
tractor (rope, cord, etc.),
TRANSMISSION ENGAGED
TRANSMISSION DISENGAGED
TOWING CARTS AND OTHER
ATTACHMENTS
Tow only the attachments that are recom-
mended by and comply with specifications
of the manufacturer of your tractor. Use
common sense when towing, Too heavy of
a load, while on a slope, is dangerous. Tires
can lose traction with the ground and cause
you to lose control of your tractor.
SERVICE REMINDER!HOUR METER
Service reminder shows the total number
of hours the engine has run and flashes to
indicate that the engine or mower needs ser-
vicingo When service is required, the service
reminder will flash for two hours, To service
engine and mower, see the Maintenance
section of this manual.
03000tex
NOTE: Service reminder runs when the igni-
tion key is in any position but "STOP",. For
accurate reading, be sure key remains in the
"STOP" position when engine is not running.
13
BEFORE STARTING THE ENGINE
CHECK ENGINE OIL LEVEL
The engine in your tractor has been shipped,
from the factory, already filled with summer
weight oil,
1. Check engine oil with tractor on level
ground.
2o Remove oil fill cap!dipstick and wipe
clean, reinsertthe dipstick and screw cap
tight, wait for afew seconds, remove and
read oil level, If necessary, add oil until
"FULE' mark on dipstick is reached, Do
not overfill.
. For cold weather operation you should
change oil for easier starting (See the oil
viscosity chart in the Maintenance section
of this manual)°
• To change engine oil, see the Maintenance
section in this manual°
ADD GASOLINE
• Fill fuel tank to bottom of filler neck. Do
not overfill. Use fresh, clean, regular
unleaded gasoline with a minimum of
87 octane. (Use of leaded gasoline will
increase carbon and lead oxide deposits
and reduce valve life). Do not mix oil with
gasoline. Purchase fuel in quantities that
can be used within 30 days to assure fuel
freshness.
,& CAUTION: Wipe off any spilled oil or
fuel. Do not store, spill or use gasoline near
an open flame°
IMPORTANT: When operating in tempera-
tures below 32°F(0°C), use fresh, clean
winter grade gasoline to help ensure good
cold weather starting.
CAUTION: Alcohol blended fuels (called
gasohol or using ethanol or methanol) can
attract moisture which leads to separation
and formation of acids during storage. Acidic
gas can damage the fuel system of an engine
while in storage_ To avoid engine problems,
the fuel system should be emptied before
storage of 30 days or longer. Drain the gas
tank, start the engine and let it run until the
fuel lines and carburetor are empty. Use fresh
fuel next season. See Storage Instructions
for additional information. Never use engine
or carburetor cleaner products in the fueltank
or permanent damage may occur.
TO START ENGINE
When starting the engine for the first time or
if the engine has run out of fuel, it wilt take
extra cranking time to move fuel from the
tank to the engine.
1. Be sure freewheel control is in the trans-
mission engaged position
2. Siton seat in operating position, depress
clutch/brake pedal and set parking brake.
3. Place motion control lever in neutral
position.
4_ Move attachment clutch to disengaged
position.
5. Move throttle control to choke position.
NOTE: Before starting, read the warm and
cold starting procedures below.
6. Insert key into ignition and turn key
clockwise to start position and release
key as soon as engine starts_ Do not run
starter continuously for more than fifteen
seconds per minute° If the engine does
not start after several attempts, move
throttle control to fast position, wait a
few minutes and try again. If engine still
does not start, move the throttle control
back to the choke position and retry°
WARM WEATHER STARTING (50 °F & above)
7. When engine starts, move the throttle
control to the fast position.
. The attachments and ground drive can
now be used. Ifthe engine does not accept
the load, restart the engine and allow it to
warm up for one minute using the choke
as described above.
COLD WEATHER STARTING (50°F & below)
7. When engine starts, leave throttle control
in choke position until engine warms up
and begins to run roughly. Once rough
running begins, immediately move the
throttle control to the fast position. Engine
warm-up may take from several seconds
to several minutes (the colder the tem-
perature, the longer the warm-up).
AUTOMATIC TRANSMISSION WARM UP
Before driving the unit in cold weather, the
transmission should be warmed up as follows:
1, Be sure the tractor is on level ground.
2_ Place the motion control lever in neutral.
Release the parking brake and let the
clutch/brake slowly return to operating
position.
3, Allow one minute for transmission to
warm up. This can be done during the
engine warm up period.
• The attachments can also be used dur-
ing the engine warm-up period after the
transmission has been warmed up.
NOTE: If at a high altitude (above 3000
feet) or in cold temperatures (below 32 ° F)
the carburetor fuel mixture may need to be
adjusted for best engine performance (see
"TO ADJUST CARBURETOR" in the Service
and Adjustments section of this manual).
LtMPIEZA DE
La rejilla de a
y paja para e
sobrecaLentarr
alambre o con
mugre y las fib
SILENCIADOI
lnspeccione y_
amortiguador d
pueden crearu
BUJiA(S)
Cambie las bt
porada de sie!
de operaci6n,
bujia y et ajusb
PECIFICACIQ
de este manu_
FILTRO DE C_
El filtro de corr
cada tempora_
tapona, obstru_
el carburador,
1o Con el me
las seccier
2, Ponga el f
posici6n e
flecha se[_
3 Asegt_resE
linea det c_
colocadas
4. Inmediatar
ramada.
Abrazadera -----
Filtro de
combustible
LIMPIEZA
• Limpie todc
bateria, el a
• Mantenga I_
sin derrame
, Proteja las ,,
automotriz,
No recomenda
de jard[n o
tractor a no st
est6n cubiert_
Et agua en el
vida t]til del tra
soplador de h(
basura del trac
PUERTO DE [
La cubierta de
puerto de lava
parte del sisten
beria utilizar ca_
1. Lleve el t
despejado
de una be(
la mangue
IMPORTANTE
carga del tracto
garaje, coches
ensacado o cul
1
I4
laparteinferior
,staleeltubode
T_pujandohacia
:luierda.
alav&Ivulade
_ceite
l--.-.._Tubo de
desag5e
haya drenado
la v&lvuia de
:fentro y dando
de un reloj hasta
ci6n bloqueada
_ubstituyaelcas-
,rde lav&lvulade
aceite a trav6s
ra de nivel para
ltamente. No Io
pacidad aproxi-
asdet Producto"
_rilia indicadora
:ite para revisar
en la linea de
-.adora de hive!°
forma segura
)R
.or cada tempo-
e el aceite, si el
en un aSo.
y funcionar de
aire sucio. D61e
udo si se usa en
nual de la motor,
-"AIRE/AREAS
tto adecuado,
ped, las aletas
es externas del
[odo momentoo
m&s a menudo
nte polvorosas
mtilador y otras
s aletas de en-
nas, seg_n sea
etvan a instalar
con una rejiila
con las aletas
D las tapas de
tcir& daSo en el
_cesivo,,
PURGE TRANSMISSION
_CAUTION: Never engage or disengage
freewhee! lever while the engine is running,
To ensure proper operation and performance,
it is recommended that the transmission be
purged before operating tractor for the first
time, This procedure will remove any trapped
air inside the transmission which may have
developed during shipping of your tractor°
IMPORTANT: Should your transmission
require removal for service or replacement,
itshould be purged after reinstallation before
operating the tractor.
1_ Place tractor safely on a level surface -
that is clear of objects and open - with
engine off and parking brake set,
2. Disengage transmission by placing
freewheel control in disengaged position
(See "TO TRANSPORT" in this section
of manual).
3. Sitting in the tractor seat, start engine,
After the engine is running, move throttle
control to slow position, With motion
control lever in neutral position, slowly
disengage clutchlbrake pedal.
_CAUTION: At any time, during step 4,
there may be movement ofthe drive wheels.
4o Move motion control lever to full forward
position and hold for five (5) seconds°
Move lever to full reverse position and
hold for five (5) seconds, Repeat this
procedure three (3) times,
5 Move motion control lever to neutral
position. Shutoff engine and set parking
brake°
6. Engagetransmission by placingfreewheel
control in engaged position (See "TO
TRANSPORT" inthis section of manual)°
7. Sitting in the tractor seat, start engine,
After the engine is running, move throttle
control to half (1/2) spee& With motion
control lever in neutral position, slowly
disengage clutch/brake pedal°
8, Slowly move motion control leverforward,
after the tractor moves approximately
five (5) feet, slowly move motion control
lever to reverse position. After the tractor
moves approximately five (5) feet return
the motion control lever to the neutral
position. Repeat this procedure with the
motion control lever three (3) times.
Your transmission is now purged and now
ready for normal operation.
MOWING TIPS
• Tire chains cannot be used when the
mower housing is attached to tractor°
, Mower should be properly leveled for best
mowing performance. See "TO LEVEL
MOWER HOUSING" in the Service and
Adjustments section of this manual°
, The left hand side of mower should be
used for trimming.
. Drive sothat clippings are discharged onto
the area that has already been cut, Have
the cut area to the right of the tractor,. This
will result in a more even distribution of
clippings and more uniform cutting..
• When mowing large areas, startbyturning
to the right so that clippings will discharge
away from shrubs, fences, driveways,
etc.. After one or two rounds, mow in the
opposite direction making left hand turns
until finished.
(-
. If grass is extremely tall, it should be
mowed twice to reduce load and possible
fire hazard from dried clippings. Make
first cut relatively high; the second to the
desired height.
. Do not mow grass when it is wet, Wet
grass will plug mower and leave undesir-
able clumps. Allow grass to dry before
mowing.
. Always operate engine at full throttle
when mowing to assure better mow-
ing performance and proper discharge
of material, Regulate ground speed by
selecting a low enough speed to give the
mower cutting performance as well as the
quality of cut desired°
. When operating attachments, select a
ground speed that will suit the terrain and
give best performance of the attachment
being used.
15
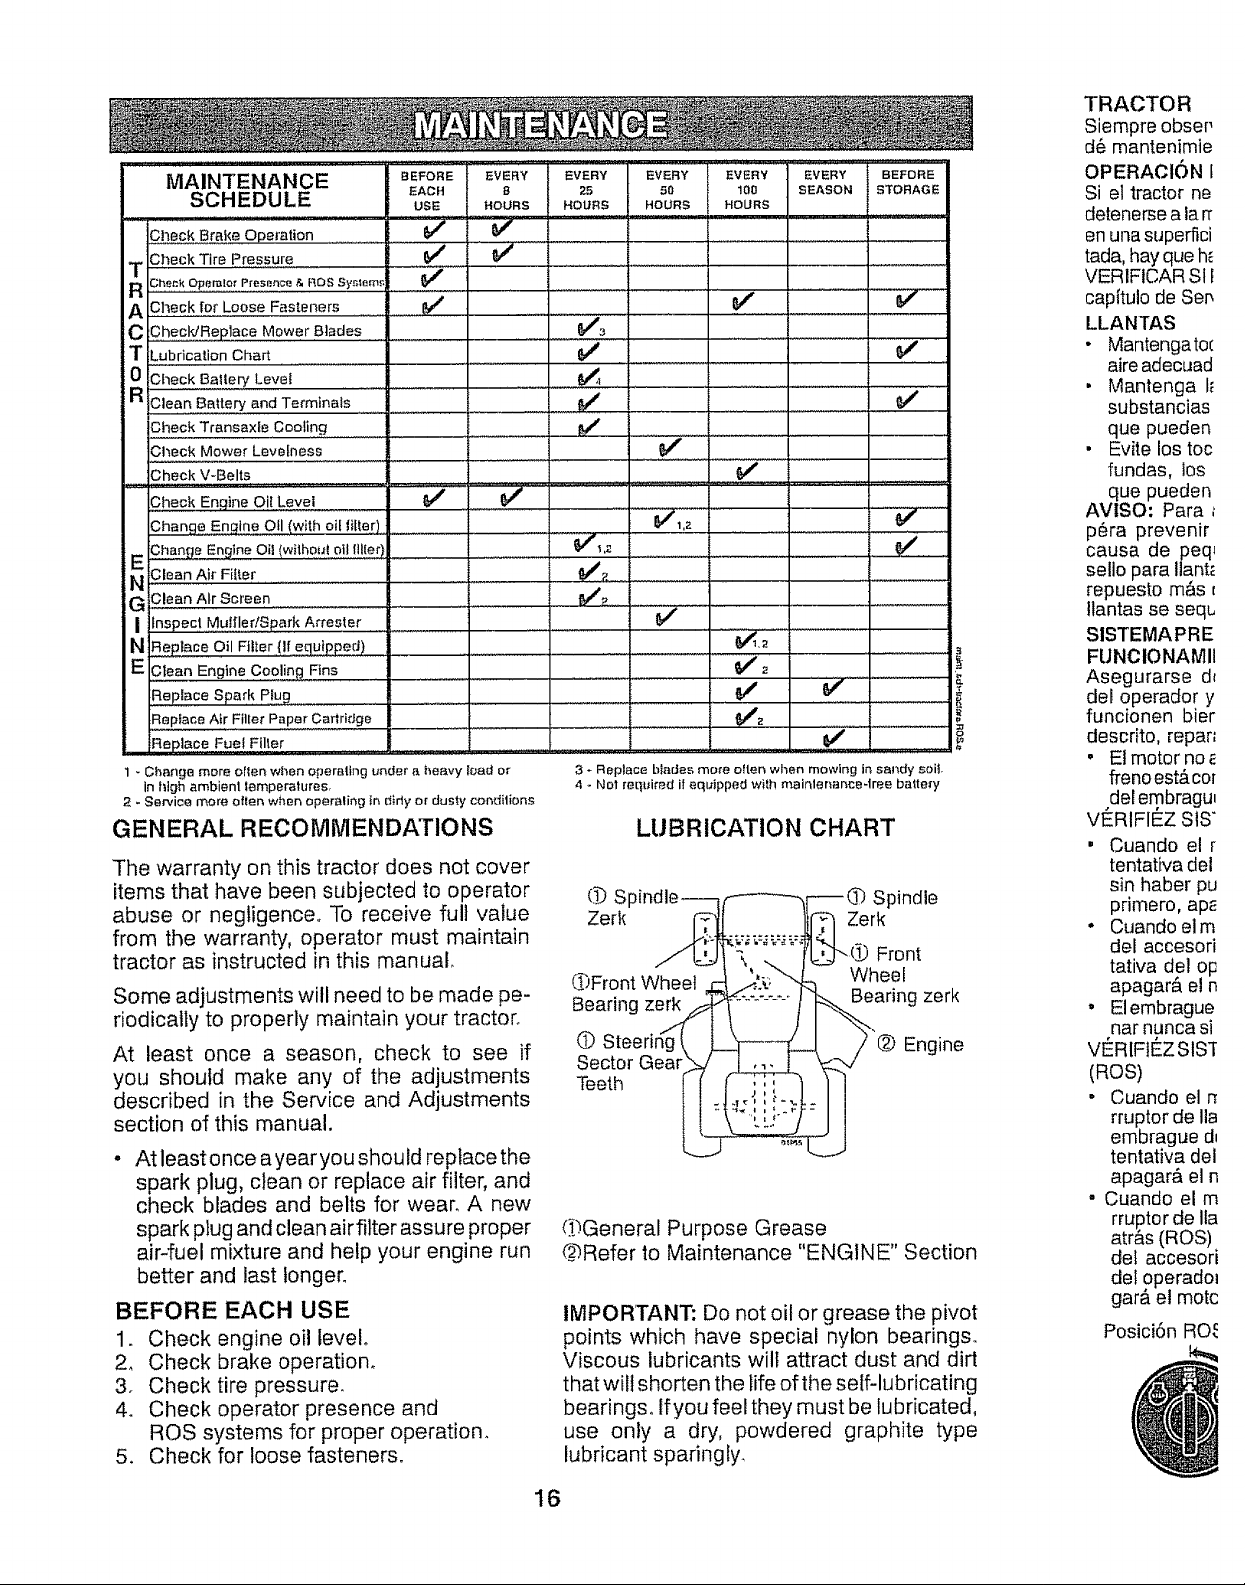
MAINTENAN CE BEFORE
SCHEDULE use
......Check Brake Operation 6,/
f Check Tire P,r,e,esu,re ............
R Check Operalo, Presence & RO£ Syntem_ . _'
A Check for Loose Fasteners ............. 6#4
C =ChecWReplace Mower Blade s
T Lubrication Chart
0 Check Batlery Level
EACH
EVERY EVERY EVERY EVERY EVERY BEFORE
8 25 50 100 SEASON STORAGE
HOURS HOURS HOURS HOURS
v"
v"
.................,...........J,, ........ I 1
R Clean Battery and Terminals
Check Transaxle Cooling ................................
Check Mower Levelness
Check V-Belts
Check Engine Qi!...l_evel
Change Entwine 0fl (with oil filler)
HE,Change Engine Oil (wilhout oil tiller
............... _,,: .............................. ei
Ai,Fiii r.....................
G Clean Air Screen ..............................
I Inspect Muifler!Spark Arrester
N _,#P!aceO il Ftt_er..{!f equipped)
E Clean Engine C0o!!ng Fins
:Replace Spark Piu
iR,epface A!r Filler Paper Cartridge
Rep!a£e Fue! Filter
1 - Change more oflen when operating under a heavy lead or
In Idgh arabian1 lemperatures.
2 - Service more ellen when operalir_g tn didy of dusty con_.fitions
GENERAL RECOMMENDATIONS
The warranty on this tractor does not cover
items that have been subjected to operator
abuse or negligence,, To receive full value
from the warrant,i, operator must maintain
tractor as instructed in this manua!_
Some adjustments will need to be made pe-
riodically to properly maintain your tractor.
At least once a season, check to see if
you should make any of the adjustments
described in the Service and Adjustments
section of this manual.
At least once ayear you should replace the
spark plug, clean or replace air filter, and
check blades and belts for wear. A new
spark plug and clean airfilter assure proper
air-fuel mixture and help your engine run
better and last longer.
BEFORE EACH USE
1. Check engine oil level.
2. Check brake operation.
3. Check tire pressure.
4. Check operator presence and
ROS systems for proper operation.
5. Check for loose fasteners.
....... i ............................
v",., .....I
J ............. _,'
_,._ ......_ ...............
......._.._.
................. v" v" ...........
e,"
3 * Replace blades mole often when mowing in sandy soil,
4 - No1 required if equipped with mainlenance-tree battery
LUBRICATION CHART
(t_ Spindle----l_F-_ O Spindle
Zerk ._,._.. ........ ]_ Zerk
__' '_"_" '_.'_ O Front
(!_Front Wheel ! _.-:_:;"_ Wheel ,
Bearingze_ _::-G: .....j ._anngzerK
O Steering "@ En ine
{'_.General Purpose Grease
@bRefer to Maintenance "ENGINE" Section
IMPORTANT: Do not oil or grease the pivot
points which have special nylon bearings.
Viscous lubricants will attract dust and dirt
that wilI shorten the life of the self-lubricating
bearings° If you feel they must be lubricated,
use only a dry, powdered graphite type
lubricant sparingly_
TRACTOR
Siempre obser,
d_ mantenimie
OPERACION I
Si el tractor ne
detenerse alarr
en una superfici
tada, hay qua h_
VERIFICAR Sll
capitulo de Sen
LLANTAS
- Mantengatoc
aire adecuad
• Mantenga I_
substancias
que pueden
• Evite los toc
fundas, los
que pueden
AVISO: Pare
p_ra prevenir
cause de peq_
sello pare Ilant_
repuesto mas
tlantas se seqt,
SISTEMAPRE
FUNCIONAMII
Asegurarse d_
del operador y
funcionen bier
descrito, repar=
• Etmotorno
ffenoest&cor
del embragu,
VERIFIEZ SIS"
, Cuando el r
tentative del
sin haber pu
primate, ap_
• Cuandoelm
del accesori
tativa del o1:
apagara el n
• Elembrague
nar nunca si
VERIFtI_Z SIS'[
(ROS)
• Cuando el r_
rruptor de lie
embrague d,
tentative del
apagar& el n
• Cuando el m
rruptor de lie
atr&s (ROS)
del acceson
del operadol
gar& el motc
Posici6n Re,_
16
ACION
_., 1-)Accesorio
de Grasa der
rbol
(_) Accesorio
de Grasa del
Rodarniento
e la Rueda
Delantera
Motor
OTOR" en Man-
_elos puntos piv-
le nil6n especiaF
._r,_npolvo y mu-
losrodamientos
nteun lubricante
rma moderada.
TRACTOR
Always observe safety rules when performing
any maintenance°
BRAKE OPERATION
If tractor requires more than five (5) feet to
stop at highest speed in highest gear on a
level, dry concrete or paved surface, then
brake must be serviced. (See "TO CHECK
BRAKE" in the Service and Adjustments
section of this manual).
TIRES
• Maintain proper air pressure in all tires
(See PSt on tires).
, Keep tires free of gasoline, oil, or insect
control chemicals which can harm rubber.
, Avoid stumps, stones, deep ruts, sharp
objects and other hazards that may cause
tire damage°
NOTE: To sealtire punctures and preventfiat
tires due to slow leaks, tire sealant may be pu r-
chased fro myour local parts dealer. Tire seal-
ant also prevents tire dry rot and corrosion.
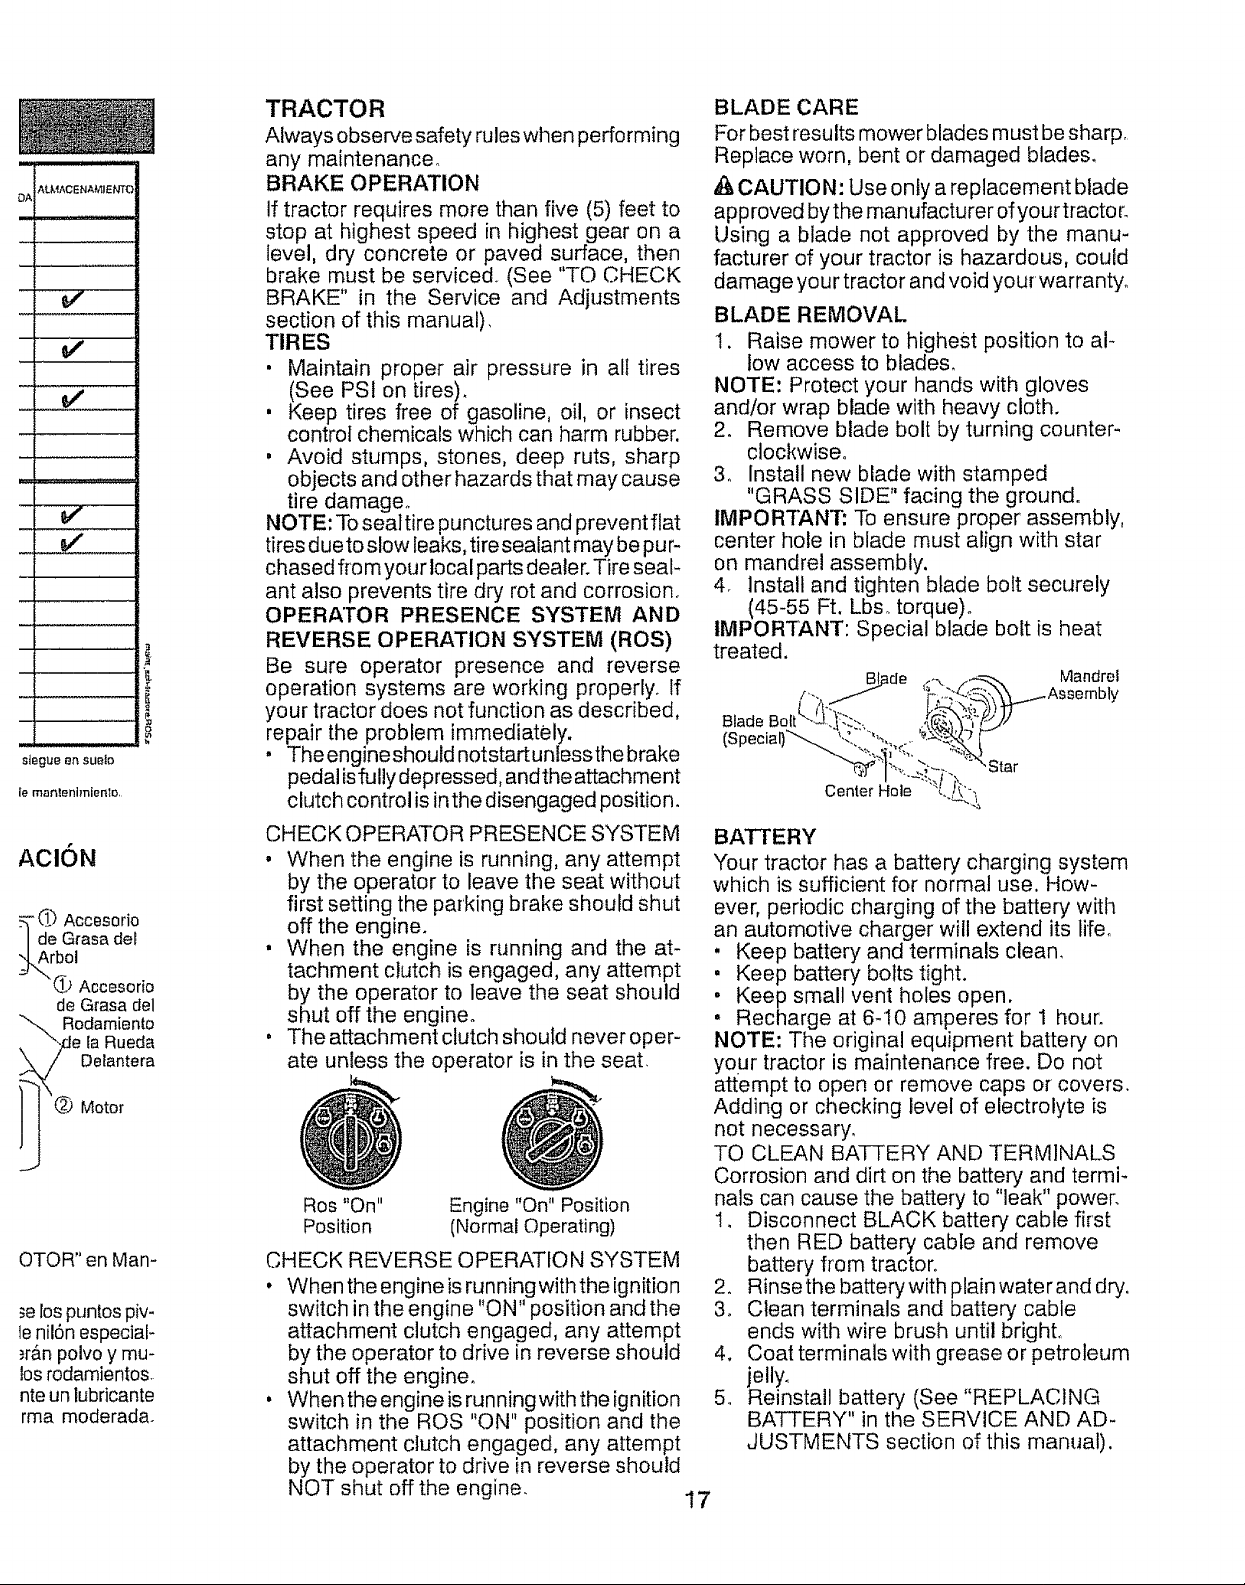
OPERATOR PRESENCE SYSTEM AND
REVERSE OPERATION SYSTEM (ROS)
Be sure operator presence and reverse
operation systems are working properly° If
your tractor does not function as described,
repair the problem immediately.
. Theengineshould notstartunlessthe brake
pedal isfully depressed, andthe attachment
clutch control is inthe disengaged position.
CHECK OPERATOR PRESENCE SYSTEM
• When the engine is running, any attempt
by the operator to leave the seat without
first setting the parking brake should shut
off the engine.
• When the engine is running and the at-
tachment clutch is engaged, any attempt
by the operator to leave the seat should
shut off the engine.
o The attachment clutch should never oper-
ate unless the operator is in the seat.
Ros "On"
Position
Engine "On" Position
(Normal Operating)
CHECK REVERSE OPERATION SYSTEM
° When the engine is runningwiththe ignition
switch in the engine "ON" position and the
attachment clutch engaged, any attempt
by the operator to drive in reverse should
shut off the engine.
. When the engine is running with the ignition
switch in the ROS "ON" position and the
attachment clutch engaged, any attempt
by the operator to drive in reverse should
NOT shut off the engine.
BLADE CARE
For best results mower blades must be sharp,
Replace worn, bent or damaged blades.
,& CAUTION: Use only a replacement blade
app roved by the manufacturer of your tractor.
Using a blade not approved by the manu-
facturer of your tractor is hazardous, could
damage your tractor and void your warranty_
BLADE REMOVAL
1. Raise mower to highest position to al-
low access to blades°
NOTE: Protect your hands with gloves
and/or wrap blade with heavy cloth.
2. Remove blade bolt by turning counter-
clockwise°
3o Install new blade with stamped
"GRASS SIDE" facing the ground°
IMPORTANT: To ensure proper assembly,
center hole in blade must align with star
on mandrel assembly.
4r Install and tighten blade bolt securely
(45-55 Ft. Lbs. torque)°
IMPORTANT: Special blade bolt is heat
treated.
Mandrel
Blade
Center Hole
BATTERY
Your tractor has a battery charging system
which is sufficient for normal use, How-
ever, periodic charging of the battery with
an automotive charger will extend its life_
, Keep battery and terminals clean_
, Keep battery bolts tight.
. Keep small vent holes open.
• Recharge at 6-!0 amperes for 1 hour:
NOTE: The original equipment battery on
your tractor is maintenance free. Do not
attempt to open or remove caps or covers.
Adding or checking level of electrolyte is
not necessary,
TO CLEAN BATTERY AND TERMINALS
Corrosion and dirt on the battery and termi_
nals can cause the battery to "leak" power.
1. Disconnect BLACK battery cable first
then RED battery cable and remove
battery from tractor,
2. Rinse the battery with plain water and dry,
3o Clean terminals and battery cable
ends with wire brush until bright°
4. Coat terminals with grease or petroleum
jelly°
5. Reinstall battery (See "REPLACING
BATTERY" in the SERVICE AND AD-
JUSTMENTS section of this manual).
17
TRANSAXLE COOLING
The transmission fan and cooling fins should
be kept clean to assure proper cooling.
Do not attempt to clean fan or transmission
while engine is running or while the trans-
mission is hot. To prevent possible damage
to seals, do not use high pressure water or
steam to clean transaxle.
• inspect cooling fan to be sure fan blades
are intact and clean,
o Inspect cooling fins fordirt, grass clippings
and other materials. To prevent damage to
seals, do not use compressed air or high
pressure sprayer to clean cooling fins_
TRANSAXLE PUMP FLUID
The transaxle was sealed at the factory and
fluid maintenance is not required for the life of
the transaxle. Should the transaxte ever leak
or require servicing, contact your nearest
Sears or other qualified service center.
V-BELTS
Check V-betts for deterioration and wear after
100 hours of operation and replace if neces-
sary. The belts are not adjustable° Replace
belts if they begin to slip from wear.
ENGINE
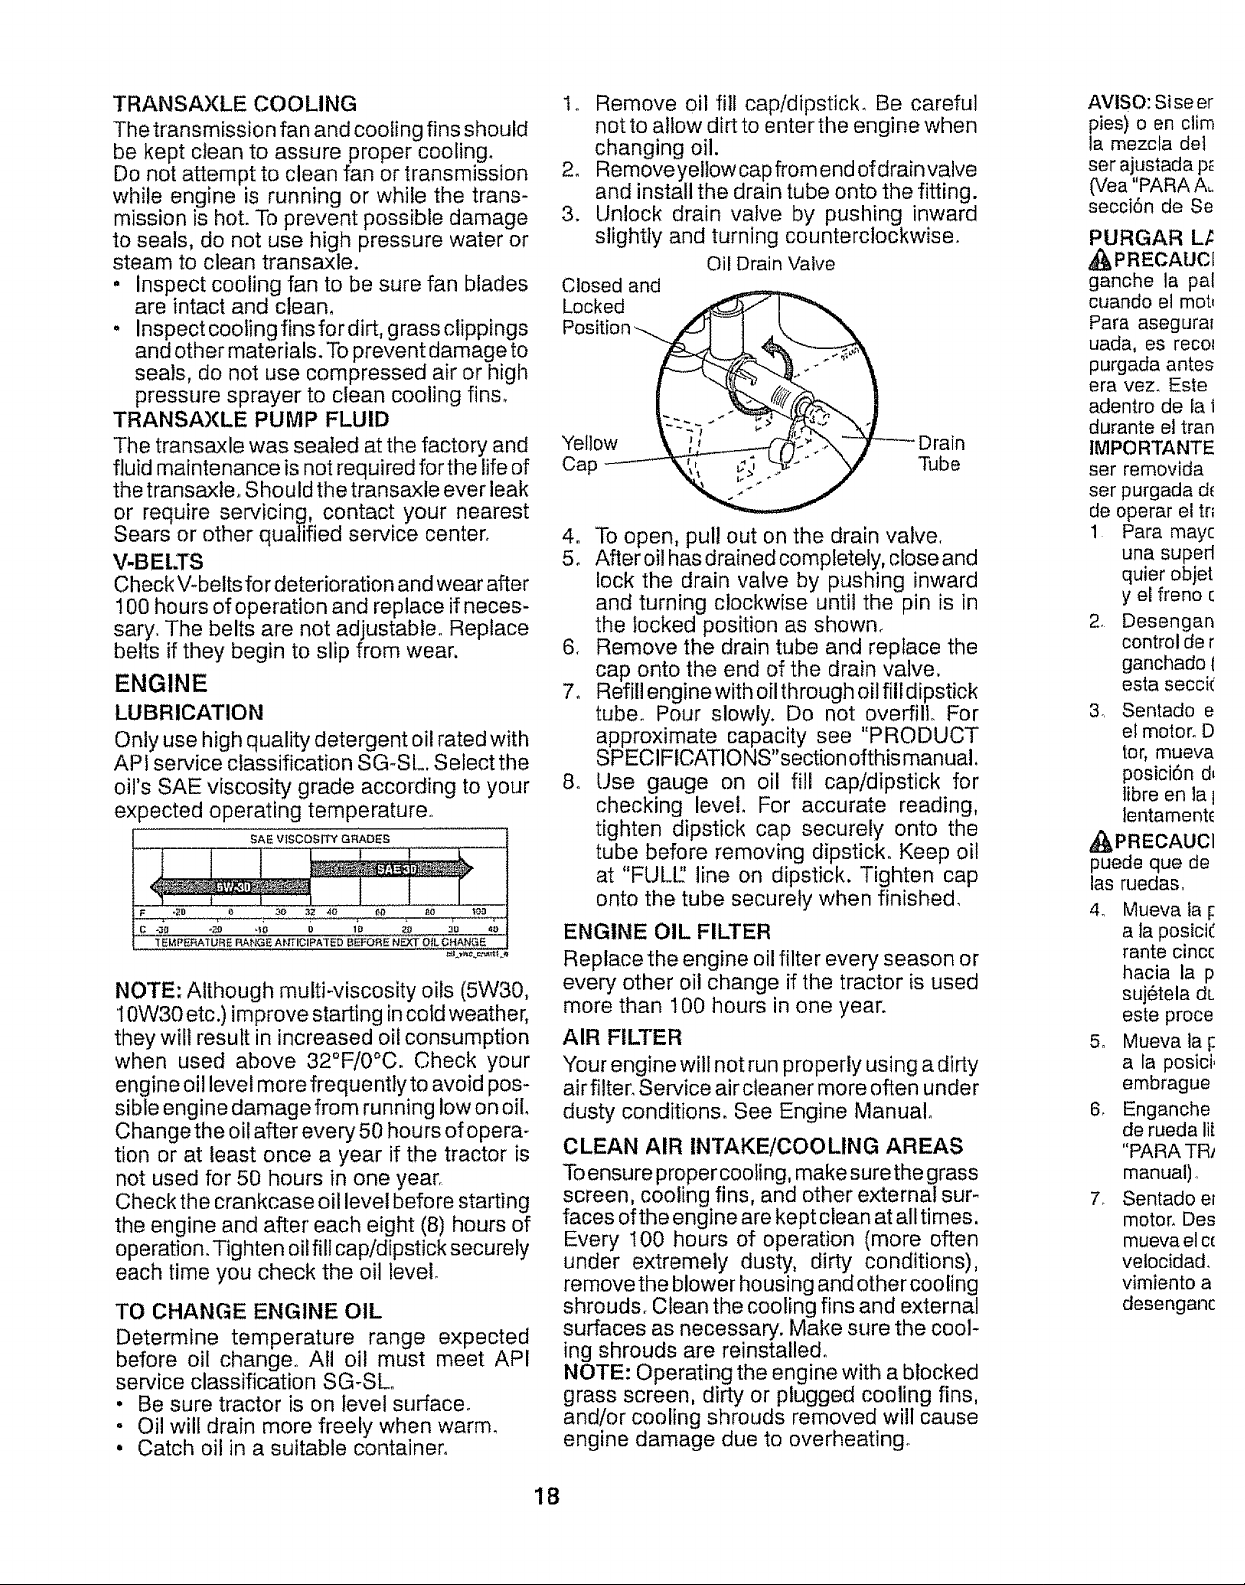
LUBRICATION
Only use high quality detergent oil rated with
API service classification SG-SL. Select the
oil's SAE viscosity grade according to your
expected operating temperature.
NOTE: Although multi-viscosity oils (5W30,
10W30 etc.) improve starting in cold weather,
they wilt result in increased oil consumption
when used above 32°F/0°C. Check your
engine oil level more frequently to avoid pos-
sible engine damage from running low on oil.
Change the oil after every 50 hou rs of opera-
tion or at least once a year if the tractor is
not used for 50 hours in one year.
Check the crankcase oil level before starting
the engine and after each eight (8) hours of
operation. Tighten oil fill cap/dipstick securely
each time you check the oil level.
TO CHANGE ENGINE OIL
Determine temperature range expected
before oil change° All oil must meet API
service classification SG-SL.
• Be sure tractor is on level surface.
o Oil will drain more freely when warm.
° Catch oi! in a suitable container.
1. Remove oil fill cap/dipstick. Be careful
not to allow dirt to enter the engine when
changing oil.
2o Removeyeltow cap from end of drainvalve
and install the drain tube onto the fitting.
3. Unlock drain valve by pushing inward
slightly and turning counterclockwise.
Oil Drain Valve
Closed and
Drain
Tube
4. To open, pul! out on the drain valve.
5o After oil has drained completely, close and
lock the drain valve by pushing inward
and turning clockwise until the pin is in
the locked position as shown,
6. Remove the drain tube and replace the
cap onto the end of the drain valve.
7o Refill engine with oil through oil fill dipstick
tube. Pour slowly. Do not overfill. For
approximate capacity see "PRODUCT
SPECIFtCAT1ONS"section ofthis manual.
8o Use gauge on oil fill cap/dipstick for
checking level. For accurate reading,
tighten dipstick cap securely onto the
tube before removing dipstick. Keep oil
at "FULL.' line on dipstick. Tighten cap
onto the tube securely when finished,
ENGINE OIL FILTER
Replace the engine oil filter every season or
every other oil change if the tractor is used
more than 100 hours in one year.
AIR FILTER
Your engine will not run properly using a dirty
air filter. Service air cleaner more often under
dusty conditions. See Engine Manual.
CLEAN AIR INTAKE/COOLING AREAS
Toensure proper cooling, make sure the grass
screen, cooling fins, and other external sur-
faces ofthe engine are kept clean at all times.
Every 100 hours of operation (more often
under extremely dusty, dirty conditions),
remove the blower housing and other cooling
shrouds. Clean the cooling fins and external
surfaces as necessary. Make sure the cool-
ing shrouds are reinstalled°
NOTE: Operating the engine with a blocked
grass screen, dirty or plugged cooling fins,
and/or cooling shrouds removed will cause
engine damage due to overheating°
AVISO: Si seer
pies) o en clim
la mezcla de]
ser ajustada p_
(Vea "PARA A=
secci6n de Se
PURGAR L[
&PRECAUCE
ganche la pal
cuando el mot_
Pare asegural
uada, es reco_
purgada antes
era vez. Este
adentro de la 1
durante el tran
]MPORTANTE
ser removida
ser purgada d_
de operar el tr_
1 Pare mayo
una suped
quier objet
y el freno c
2. Desengan
control de r
ganchado t
esta secci(
3. Sentado e
el motor. D
tor, mueva
posici6n d,
libre en lal
lentament_
&PRECAUCl
puede que de
las ruedas,
4, Mueva Ia I:
ala posick:
rante cincc
hacia la p
suj6tela dL
este proce
5. Mueva ]a I:
ala posici.
embrague
6, Enganche
de rueda li_
"PARA TRz
manual) ,,
7, Sentado er
motor, Des
mueva el cc
velocidad,
vimiento a
desenganc
18
rueda libre este
)sici6n de oper-
tbrague/freno y
niento.
de movimiento
tccesorio a la
engaged.
le la aceleraci6n
6n.
instrucciones si-
tfrio ytemplado.
/ gire la ilave en
Ilas del reloj a la
ueite la llave tan
or.No haga fun-
lmente pot m&s
:o.Si el motor no
entarlos, mueva
la posici6n de
minutos y trate
sin funcionar,
',eleraci6n a la
ltente de nuevo.
ilPLADO
_ueva el control
in de r&pidoo
._ahora pueden
epta esta carga,
a permitirle que
:ando el estran-
a,,
O
r, mantenga et
la posici6n de
]otor se caliente
_avez que emp-
nmediatamente
a la posici6n
._Imotor puede
lundos a varios
la temperatura,
_o)_
TRANSMISlON
_ntiempo frio, la
omo tas instruc-
._situado en una
_n neutro. Alivie
deje que el em-
6nde operaci6n.
se caliente du-
perecho durante
iel motor°
zados durante el
,1motor despu6s
;alentad&
CLEAN AIR SCREEN
Air screen must be kept free of dirt and chaff
to prevent engine damage from overheating°
Clean with awire brush or compressed airto
remove dirt and stubborn dried gum fibers.
MUFFLER
Inspect and replace corroded muffler and
spark arrestor (if equipped) as it could create
a fire hazard and!or damage,
SPARK PLUG(S)
Replace spark plug(s) at the beginning of
each mowing season or after every !00
hours of operation, whichever occurs first.
Spark plug type and gap setting are shown
in "PRODUCT SPECIFICATIONS" section
of this manual.
IN-LINE FUEL FILTER
The fuel filter should be replaced once each
season. If fuel filter becomes clogged, ob-
structing fuelflow to carburetor, replacement
is required.
1. With engine cool, remove filter and plug
fuel line sections.
2_ Place newfuelfilter in position in fuel line
with arrow pointing towards carburetor,
3o Be sure there are no fuel line leaks and
clamps are properly positioned.
4. Immediately wipe up any spilled gasoline.
Clam_)'__ amp
Fue! Filter -------V_j _:-_--J
CLEANING
• Clean engine, battery, seat, finish, etc.
of all foreign matter,
• Keep finished surfaces and wheels free
of all gasoline, oil, etc_
• Protect painted surfaces with automo-
tive type wax,
We do not recommend using a garden hose
or pressure washer to clean your tractor
unless the engine and transmission are
covered to keep water out. Water in engine
or transmission will shorten the useful life of
your tractor. Use compressed air or a leaf
blower to remove grass, leaves and trash
from tractor and mower,
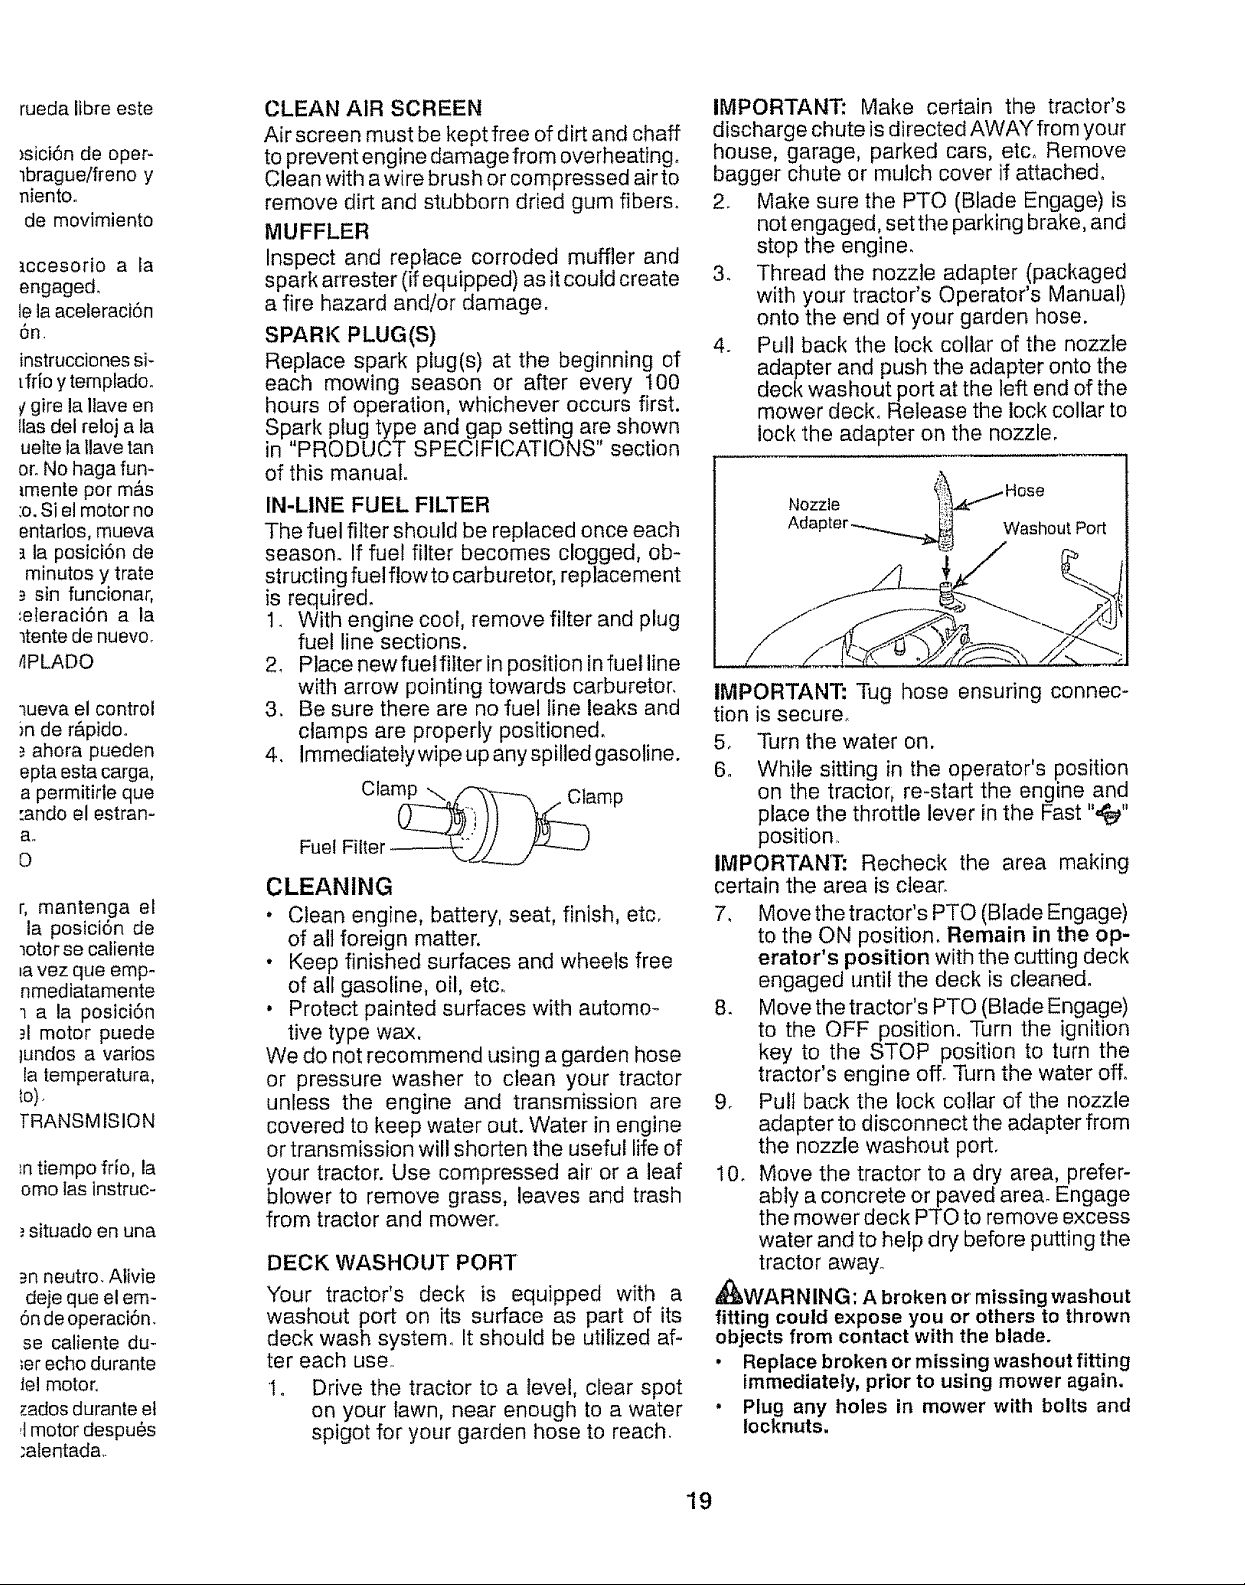
DECK WASHOUT PORT
"four tractor's deck is equipped with a
washout port on its surface as part of its
deck wash system° It should be utilized af-
ter each use,
I. Drive the tractor to a level, clear spot
on your lawn, near enough to a water
spigot for your garden hose to reach.
IMPORTANT: Make certain the tractor's
discharge chute is directed AWAY from your
house, garage, parked cars, etco Remove
bagger chute or mulch cover if attached°
2. Make sure the PTO (Blade Engage) is
not engaged, set the parking brake, and
stop the engine.
3. Thread the nozzle adapter (packaged
with your tractor's Operator's Manual)
onto the end of your garden hose.
4. Pull back the lock collar of the nozzle
adapter and push the adapter onto the
deck washout port at the left end of the
mower deck. Release the lock collar to
lock the adapter on the nozzle,
Nozzle i!_!._ "tHOse
Adapter _.__ Washout Port
IMPORTANT: Tug hose ensuring connec-
tion is secure_
5, Turn the water on.
6. While sitting in the operator's position
on the tractor, re-start the engine and
place the throttle lever in the Fast ",_"
position_
IMPORTANT: Recheck the area making
certain the area is clear,
7, Movethetractor's PTO (Blade Engage)
to the ON position. Remain in the op-
erator's position with the cutting deck
engaged until the deck is cleaned.
8. Move the tractor's PTO (Blade Engage)
to the OFF position, Turn the ignition
key to the STOP position to turn the
tractor's engine off. Turn the water off.
9. Pull back the lock collar of the nozzle
adapter to disconnect the adapter from
the nozzle washout port.
10. Move the tractor to a dry area, prefer-
ably a concrete or paved area. Engage
the mower deck PTO to remove excess
water and to help dry before putting the
tractor away.
_!_WARNING: A broken or missing washout
fitting could expose you or others to thrown
objects from contact with the blade.
• Replace broken or missing washout fitting
immediately, prior to using mower again.
• Plug any holes in mower with bolts and
Iocknuts.
19
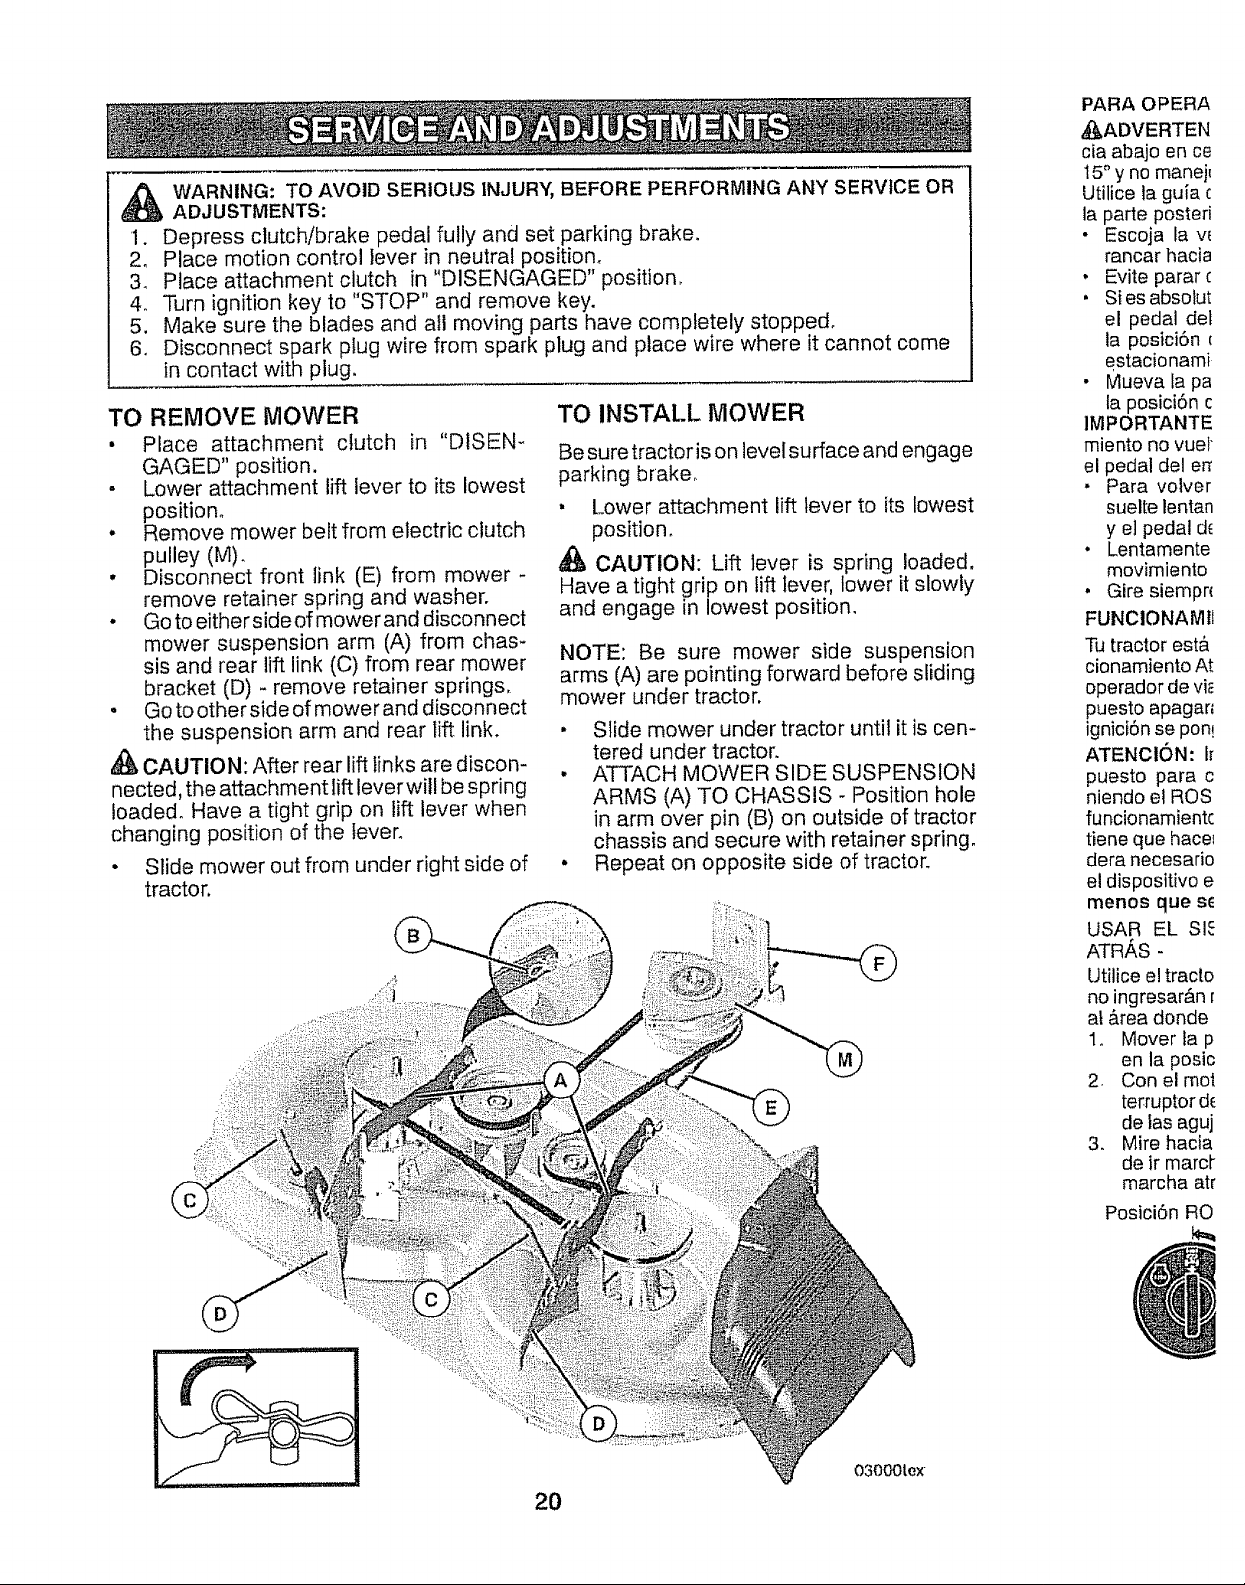
WARNING"- TO AVOID SERIOUS INJURY, BEFORE PERFORMING ANY SERVICE OR
ADJUSTMENTS:
1. Depress clutch/brake pedal fully and set parking brake.
2, Place motion control lever in neutral position.
3. Place attachment clutch in "DISENGAGED" position.
4. Pdrn ignition key to "STOP" and remove key.
5, Make sure the blades and all moving parts have completely stopped.
6o Disconnect spark plug wire from spark plug and place wire where it cannot come
in contact with plug.
TO REMOVE MOWER
• Place attachment cIutch in "DISEN_
GAGED" position.
, Lower attachment lift lever to its lowest
position°
, Remove mower belt from electric clutch
pulley (M).
, Disconnect front link (E) from mower -
remove retainer spring and washer.
• Go to either sideof mower and disconnect
mower suspension arm (A) from chasm
sis and rear lift link (C) from rear mower
bracket (D) - remove retainer springs,
, Go to otherside of mower and disconnect
the suspension arm and rear lift link.
CAUTION: After rear lift links are discon-
nected, the attachment lift lever witl be spring
loaded° Have a tight grip on lift lever when
changing position of the lever.
• Slide mower out from under right side of
tractor,
TO INSTALL MOWER
Be sure tractor is on levelsurface and engage
parking brake°
• Lower attachment lift lever to its lowest
positiono
CAUTION: Lift lever is spring loaded,
Have a tight grip on lift lever, lower it slowly
and engage in lowest position.
NOTE: Be sure mower side suspension
arms (A) are pointing forward before sliding
mower under tractor.
, Slide mower under tractor until it is cen-
tered under tractor.
• ATTACH MOWER SIDE SUSPENSION
ARMS (A) TO CHASSIS - Position hole
in arm over pin (B) on outside of tractor
chassis and secure with retainer spring.
• Repeat on opposite side of tractor.
PARA OPERA
,_ADVERTEN
cia abajo en ce
15° y no manej_
Utilice la guia c
la parte posteri
• Escoja la v_
rancar hacia
• Evite parar c
• Si es absotut
el pedal det
la posici6n c
estacionami
• Muevalapa
la posici6n c
IMPORTANTE
miento no vuel
el pedal del err
, Para volver
suelte lentan
y el pedal d_
• Lentamente
movimiento
• Gire siempr_
FUNCIONAMtl
Tu tractor est&
cionamiento At
operador de vi_
puesto apagar;
ignici6n se pon!
ATENCION: Ir
puesto para c
niendo el ROS
funcionamientc
tiene que hace_
dera necesario
el dispositivo e
menos que s_
USAR EL SI5
ATR_,S -
Utilice el tracto
no ingresar&n r
al &tea donde
1_ Mover tap
en la posic
2. Con el rno_
terruptor dE
de fas aguj
3. Mire hacia
de ir marcl"
marcha atr
Posici6n RO
2O
03000tex
 Loading...