

Craftsman 917272953 Owner’s Manual
Owner's Manual
ICRAFTSMAN'I
20 HP
ELECTRIC START
46" MOWER
6 SPEED
GARDEN TRACTOR
Model No.
917.272953
• Safety
• Assembly
• Operation
• Maintenance
• Repair Parts
This product has a low emission engine which operates
differently from previously built engines. Before you start the en-
glne, read and understand this Owner's Manual.
CAUTION:
Read and follow all Safety
Rules and Instructions before
operating this equipment,
SEARS, ROEBUCK AND CO., HOFFMAN ESTATES, IL 60179
VisitourCraftsmanwebsita:www.sears.condcraftsman
For answers to yoUrquestions
about this product,Call:
1-800-659-5917
Sear• Craftsman Help Line
5 am- 5 pro,Man- Sat
Warranty ............................................... 2
Safety Rules ......................................... 3
Product Specifications .......................... 6
Assembly .............................................. 8
Operation ............................................ 12
Maintenance Schedule ...................... 18
LIMITED TWO YEAR WARRANTY ON CRAFTSMAN RIDING EQUIPMENT PARTS
For two (2) years from the date of pumhase, if this Craftsman Riding Equipment is
maintained, lubricated and tuned up according to the instructions in the owner's
manual, Sears will repair or replace, free of charge, any parts found to be defective in
material or workmanship. Warranty service is available free of charge by taking your
Craftsman riding equipment to your nearest Sears Service Center. In-home warranty
service is available but a trip charge will apply. This warranty applies only while this
product is in the United States.
Maintenance ....................................... 18
Service and Adjustments .................... 22
Storage ............................................... 29
Troubleshooting ................................. 30
Repair Parts ........................................ 34
Parts Ordedng ..................... Back Cover
ThisWarrantydoesnotcover:
• Expendableitemswhich becomewornduringnormaluse,such as blades, spark
plugs,air cleaners,beltsand oilfilters.
• Tire replacementorrepaircausedby puncturesfrom outsideobjects,suchas nails,
thorns,stumps,or glass.
• Repairsnecessarybecauseof operatorabuse, includingbutnot limitedto, damage
caused bytowingobjectsbeyondthe capabilityof the ddingequipment,impacting
objectsthatbendthe frame or crankshaft,or overspeedingthe engine.
• Repairs necessarybecauseof operatornegligence,includingbutnotlimitedto,
electricaland mechanicaldamage causedby improperstorage,failure to use the
propergrade and amount ofengineoil,failure to keep thedeckclear of flammable
debris,or the failure to maintainthe equipmentaccordingto the instructionscon-
tainedin the owner'smanual.
• Engine(fuelsystem)cleaningor repairscausedby fuel determinedto be contami-
nated or oxidized(stale). In general,fuel shouldbe usedwithinthirty(30) daysof its
pumhasedate.
• Ridingequipmentusedfor commercialor rentalpurposes.
LIMITED 90 DAY WARRANTY ON BATTERY
For ninety (90) days from date of pumhase, if any battery included with this dding
equipment proves defective in material or workmanship and our testing determines the
battery will not hold a charge, Sears will replace the battery at no charge. Warranty
service is available free of charge by taking your Craftsman dding equipment to your
nearest Sears Service Center. In-home warranty service is available but a tdp charge
will apply. This warranty applies only while this product is in the United States.
TO LOCATE THE NEAREST SEARS SERVICE CENTER OR TO SCHEDULE IN-HOME
WARRANTY SERVICE, SIMPLY CONTACT SEARS AT t-800-4-MY-HOME
This Warrantygivesyou specificlegaldghts,and you may alsohaveother rightswhich
mayvaryfrom statetostate.
Sears, Roebuck and Co., D/817 WA, Hoffman Estates, IL 60179
IMPORTANT:Thiscuttingmachineiscapableofamputatinghandsandfeet and
throwinq objects. Failure to observe the following safety instructions could result in
senous injury or death.
I. GENERAL OPERATION
• Read, understand,and followall
instructionsinthemanual and on the
machinebefore starting.
, Only allowresponsibleadults,who are
familiar withthe instructions,tooperate
the machine.
• Clear the area of objectssuchas
rocks,toys,wire,etc., whichcouldbe
pickedup and thrownbytheblade.
• Be surethe area isclear ofother
peoplebeforemowing. Stopmachine
ifanyone entersthe area.
• Never carry passengers.
• Do not mowin reverseunlessabso-
lutelynecessary. Alwayslook down
and behind before and while backing.
• Be aware of the mowerdischarge
directionand do notpointit at anyone.
Do not operatethe mowerwithout
eitherthe entiregrasscatcheror the
guard in place.
• Slow down beforeturning.
• Never leave a runningmachine
unattended. Alwaysturnoffblades,set
parkingbrake, stop engine,and
remove keysbefore dismounting.
• Turn off bladeswhennot mowing.
• Stopengine before removinggrass
catcheror uncloggingchute.
• Mow only in daylightor goodartificial
light.
• Do not operatethe machinewhile
undertheinfluenceof alcoholor drugs.
• Watch for trafficwhenoperatingnearor
crossingroadways.
• Use extra care when loadingor
unloadingthe machineintoa traileror
truck.
• Data indicatesthatoperators,age 60
yearsand above,are involvedina
largepercentageOfddingmower-
relatedinjuries. These operators
shouldevaluatetheir abilityto operate
the ridingmowersafelyenoughto
protectthemselvesandothersfrom
seriousinjury.
II. SLOPE OPERATION
Slopesam a majorfactor relatedtoloss-of-
controland tipover accidents,which can
resultin severeinjuryor death. Allslopes
requireextracaution.Ifyoucannotbackup
thestopeor ifyoufeel uneasyon it,do not
mowit.
DO:
• Mow up and down slopes, not across.
• Remove obstacles such as rocks, tree
limbs, etc.
• Watch for holes, ruts, or bumps.
Uneven terrain,could overturn the
machine. Ta/I grass can hide ob-
stacles.
• Use slow speed. Choose a low gear
so that you will not have to stop or shift
while on the slope.
• Follow the manufacturer's recommen-
dations for wheel weights or counter-
weights to improve stability.
• Use extra cam with grass catchers or
other attachments. These can change
the stability of the machine.
• Keep all movement on the slopes s/ow
and gradual Do not make sudden
changes in speed or direction.
• Avoid starting or stopping on a slope, if
tires lose traction, disengage the
blades and proceed slowly straight
downithe slope.
DO NOT:
• Do not turn on slopes unless neceS-
sary, and then, tum slowly and gradu-
ally downhill, if possible.
Do not mow near. drep-offs, ditches, or
embankments. The mower could
suddenly turn over if a wheel is over
the edge of a cliff or ditch, or if an edge
caves in.
• Do not mow on wet grass. Reduced
traction could cause sliding.
• Do not try to stabilize the machine by
putting your foot on the ground.
• Do not use grass catcher on steep
slopes.
3
III. CHILDREN
Tragic accidents can occur if the operator
is not alert to the presence of children.
Children are often attracted to the
machine and the mowing activity. Never
assume that children will remain where
you last saw them ....
Keep children out Ofthe mowing area
and under the watchful care of'.another
responsible adutt.
• Be alert and rum machine off if children
enter the area.
• Before and when backing, look behind
and down for small children.
• Never carry children. They maY fair off
and be seriously injured or interfere
with safe machine operation:
• Never allow children to operate the
machine.
• Use extra care when approaching blind
corners, shrubs, trees, or other objects
that may obscure vision.
IV, SERVICE
• Use extra care in handling gasotine
and other fuels. They are flammable
and vapors are explosive.
-Use only an approved container.
-Never remove gas cap or add fuel
with the engine running. Allow
engine to cool before refueling. Do
not smoke.
-Never refuel the machine indoors.
- Never store the machine or fuel
container inside where there is an
open flame, such as a water heater.
• Never run a machine inside a closed
area.
• Keep nuts and bolts, especially blade
attachment bolts, tight and keep
equipment in good condition.
• Never tamper with safety devices.
Check their proper operatlori reguiar_J.
• Keep machine free of grass, leaves, or
other debris build-up. Clean oil or fuel
spillage. Allow machine to cool before
storing.
• Stop and inspect the equipment if you
strike an object. Repair, if necessary,
before restarting.
• Never make adjustments or repairs
with the engine running.
• Grass catcher components are subject
to wear, damage, and deterioration.
which coutd expose moving parts or
allow objects to be thrown. Frequently
check components and replace with
manufacturer's recommended parts,
when necessary.
• Mower blades are sharp and can cut.
Wrap the blade(s) or wear gloves, and
use extra caution when servicing them.
• Check brake operation frequently.
Adjust and service as required.
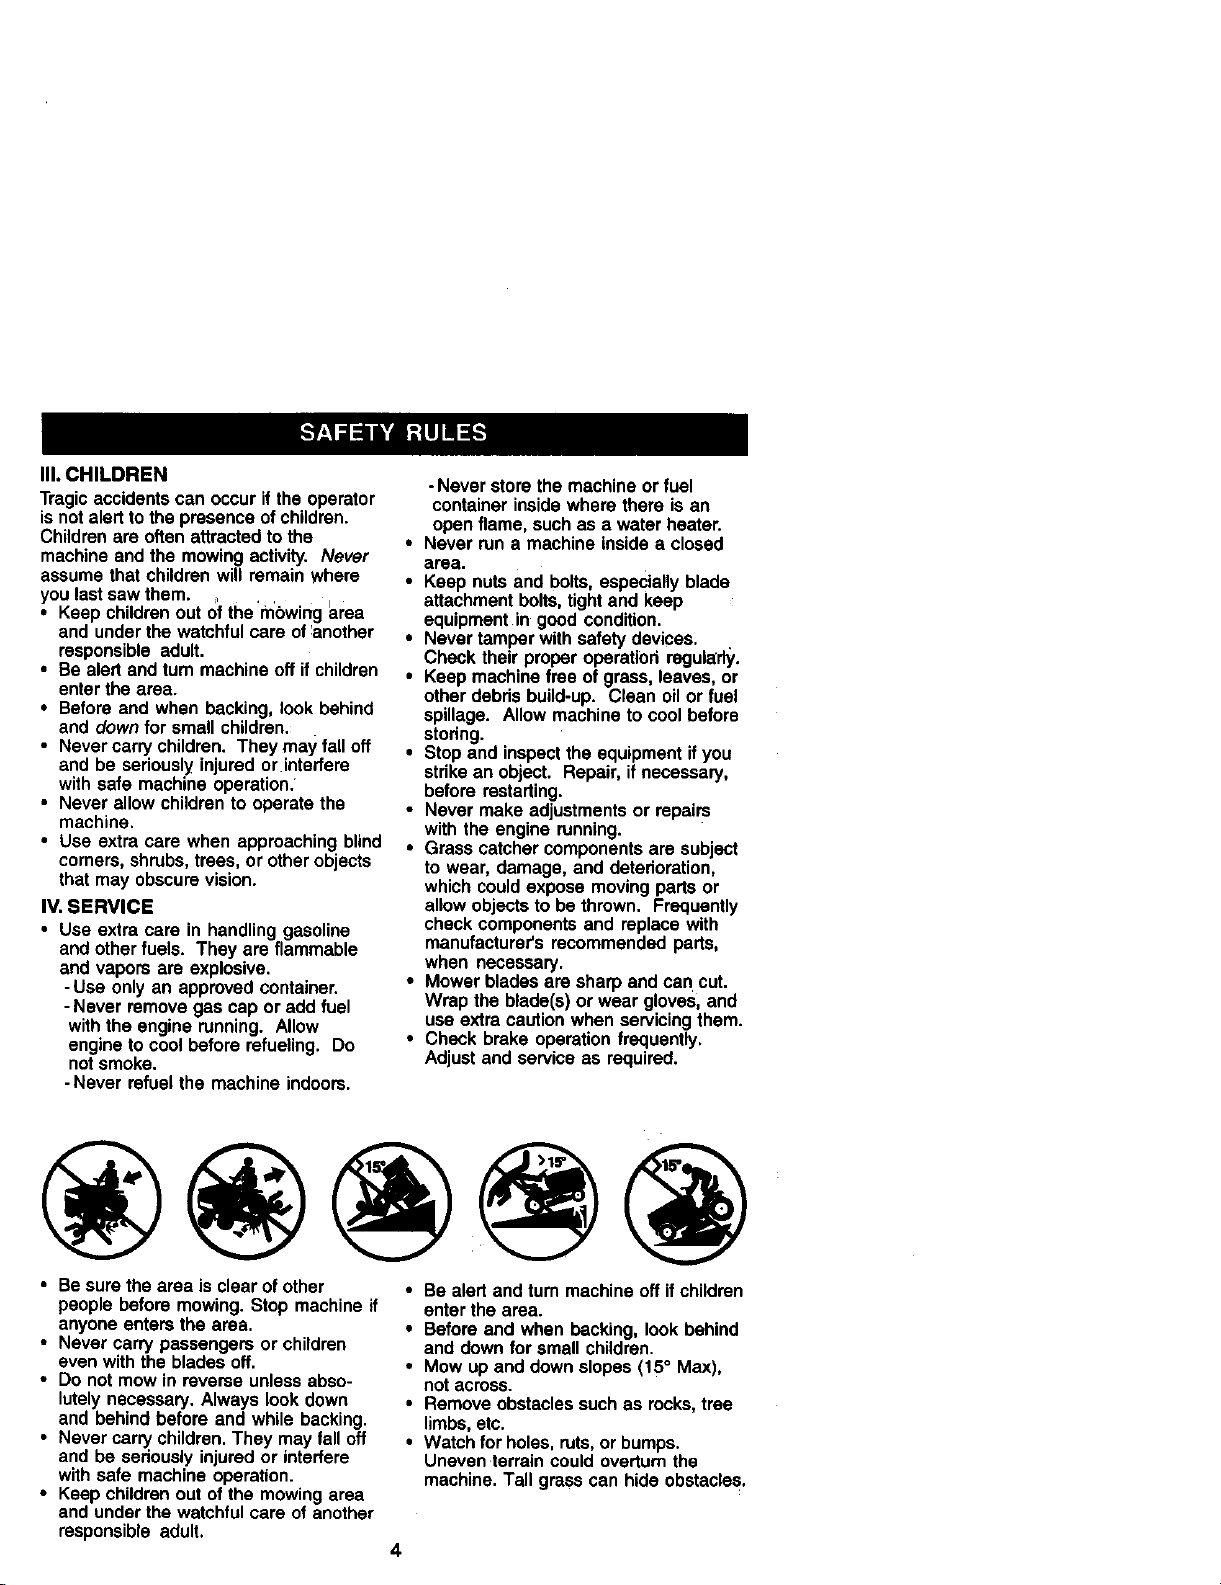
• Be sure the area is clear of other
people before mowing. Stop machine if
anyone enters the area,
• Never carry passengers or chitdren
even with the blades off.
• Do not mow in reverse unless abso-
lutely necessary. Always look down
and behind before and while backing.
• Never carry children. They may tall off
and be seriously injured or interfere
with safe machine operation.
• Keep children out of the mowing area
end under the watchful care of another
responsible adult.
• Be alert and tum machine off if children
enter the area.
• Before and when backing, look behind
and down for small children.
• Mow up and down slopes (15 ° Max),
not across.
• Remove obstacles such as rocks, tree
limbs, etc.
• Watch for holes, ruts, or bumps.
Uneven terrain could overturn the
machine. Tall grass can hide obstacles.
4

• Use slow speed. Choose a low gear so
that you will not have to stop or shift
while on the slope.
• Avoid starting or stopping on a slope. If
tiros lose traction, disengage the
blades and proceed slowly straight
down the slope.
• If machine stops while going uphill,
disengage blades, shift into reverse
and back down slowly.
• Do not turn on slopes unless neces-
sary, and then, turn slowly and gradu-
ally downhill, if possible.
,_Look for this symbol to point out
important safety precautions. It means
CAUTION!!! BECOME ALERT!!! YOUR
SAFETY IS INVOLVED.
,_ CAUTION: In order to prevent
accidental starting when setting up,
transporting, adjusting or making repairs,
always disconnect spark plug wire and
place wire where it cannot contact spark
plug.
_, CAUTION: Do not coast down a hill
in neutral, you may lose control of the
tractor.
_. CAUTION: Towonlytheattachments
thatare recommendedby and comply
withspecificationsof the manufacturerof
yourtractor.Use commonsensewhen
towing. Operateonlyatthe towest
possiblespeedwhen on a slope. Too
heavyof a load, while on a slope,is
dangerous.Tires can losetractionwith
the groundand causeyouto !ose control
ofyourtractor.
_WARNING: Engineexhaust,someof
itsconstituents,andcertainvehicle
componentscontainor emitchemicals
knowntothe State OfCaliforniatocause
cancer and birthdefectsor other repro*
ductive harm.
_WARNING: Batteryposts,terminals
and relatedaccessoriescontainlead and
lead compounds,chemicalsknowntothe
State ofCaliforniato causecancerand
birthdefectsor otherreproductive harm.
Wash handsafter handling.
5
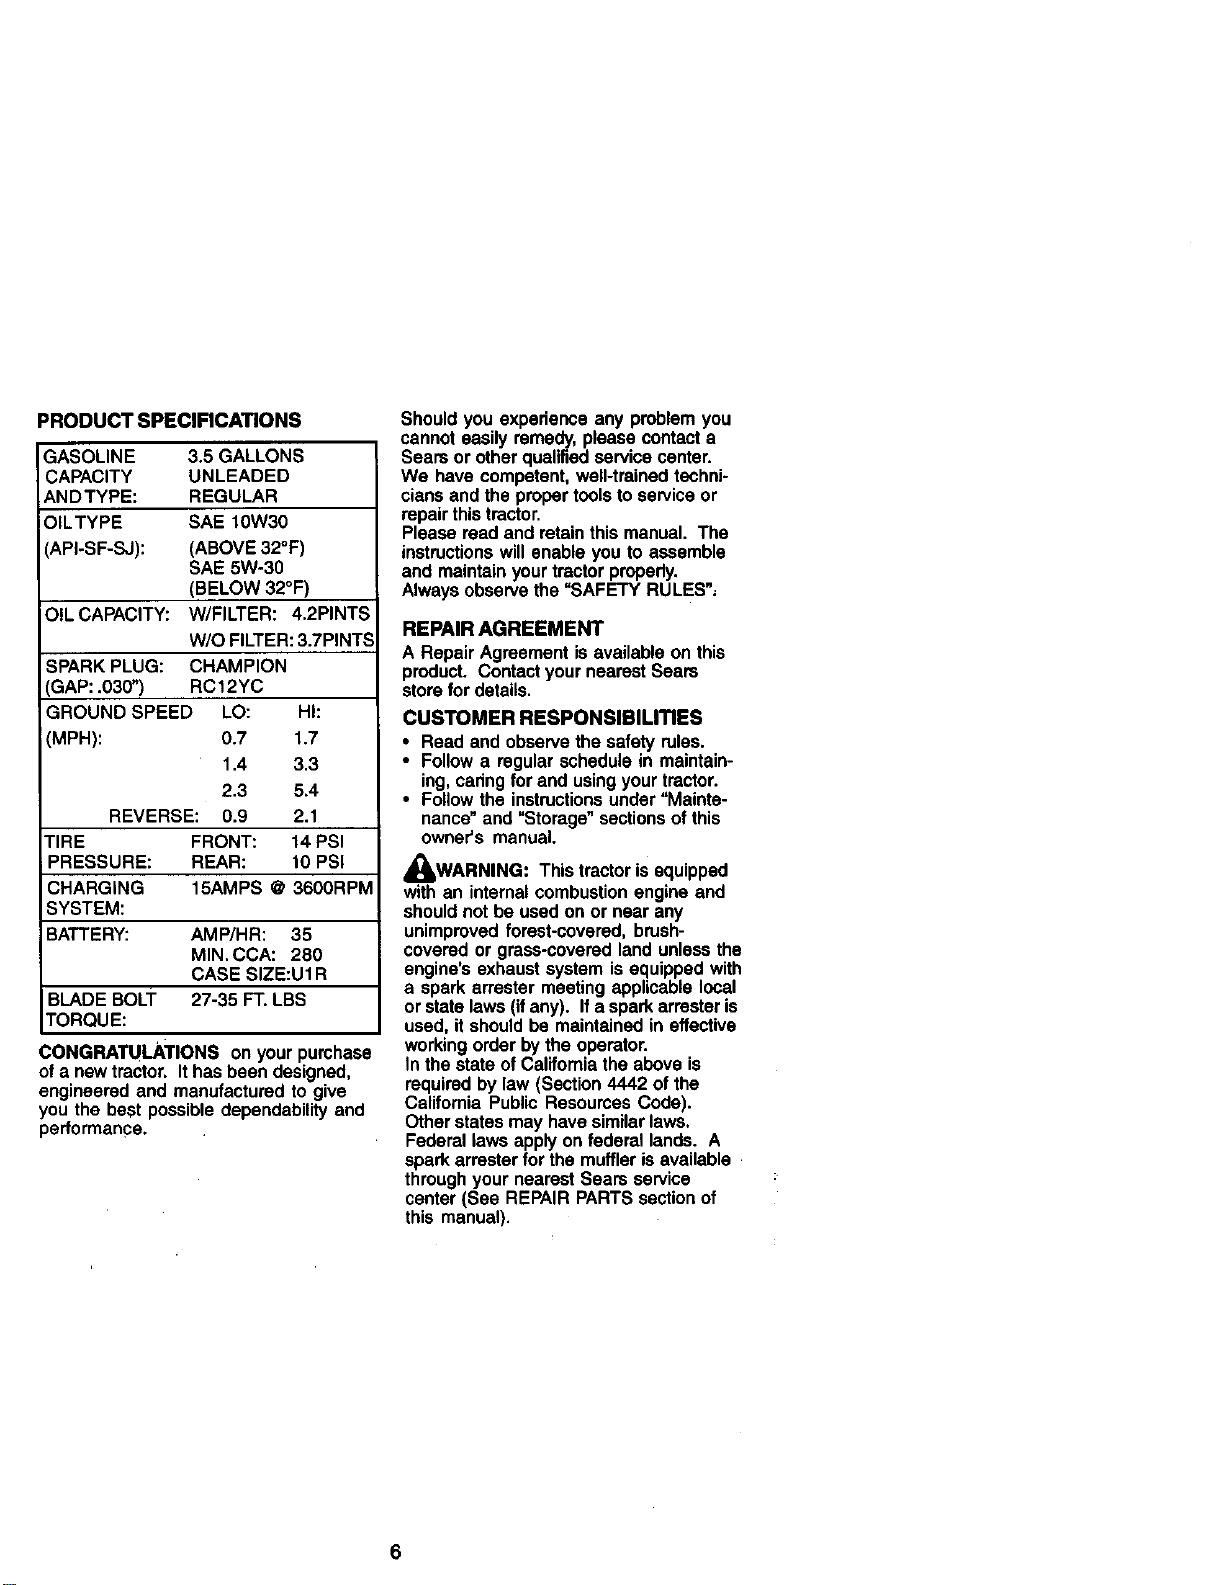
PRODUCT SPECIFICATIONS
GASOLINE 3.5 GALLONS
CAPACITY UNLEADED
ANDTYPE: REGULAR
OtLTYPE SAE 10W30
_,PI-SF-SJ): (ABOVE 32°F)
SAE 5W-30
(BELOW 32°F)
OIL CAPACITY: W/FILTER: 4.2PINTS
W/O FILTER: 3.7PINTS
SPARK PLUG: CHAMPION
GAP: .030") RC12YC
GROUND SPEED LO: HI:
(MPH): 0.7 1.7
1.4 3.3
2.3 5.4
REVERSE: 0.9 2.1
TIRE FRONT: 14 PSI
PRESSURE: REAR: 10 PSI
CHARGING 15AMPS @ 3600RPM
SYSTEM:
BATTERY: AMP/HR: 35
MIN. CCA: 280
CASE SIZE:U1R
BLADE BOLT 27-35 FT. LBS
TORQUE:
CONGRATULATIONS on your purchase
of a new tractor, It has been designed,
engineered and manufactured to give
you the best possible dependability and
performance.
Should you experience any problem you
cannot easily remedy, please contact a
Sears or other qualified service center.
We have competent, well-trained techni-
cians and the proper tools to service or
repair this tractor.
Please read and retain this manual. The
instructions will enable you to assemble
and maintain your tractor properly.
Always observe the "SAFETY RULES",
REPAIR AGREEMENT
A RepairAgreementis availableon this
product. ContactyournearestSeam
storefor details.
CUSTOMER RESPONSIBILITIES
• Read and observethe safetyrules.
• Follow a regularschedulein maintain-
ing,cadngforand usingyourtractor.
• Followthe instructionsunder"Mainte-
nance"and"Storage" sectionsofthis
owner's manual.
,_WARNING: This tractoris equipped
with an internalcombustionengineand
shouldnotbe used on or near any
unimprovedforest-covered, brush-
coveredor grass-ooveradlandunlessthe
engine'sexhaustsystem isequippedwith
a spark arrestermeetingapplicable local
orstatelaws(ifany). If a sparkarresteris
used,it shouldbe maintainedin effective
workingorderby the operator.
In thestate ofCalitomiatheabove is
requiredby law (Section4442 of the
CalifomiaPublicResourcesCode).
Otherstatesmay havesimilarlaws,
Federallawsapplyon federal lands. A
sparkarresterfor the muffleris available
throughyournearestSears service
center(See REPAIRPARTSsectionof
this manual).
6
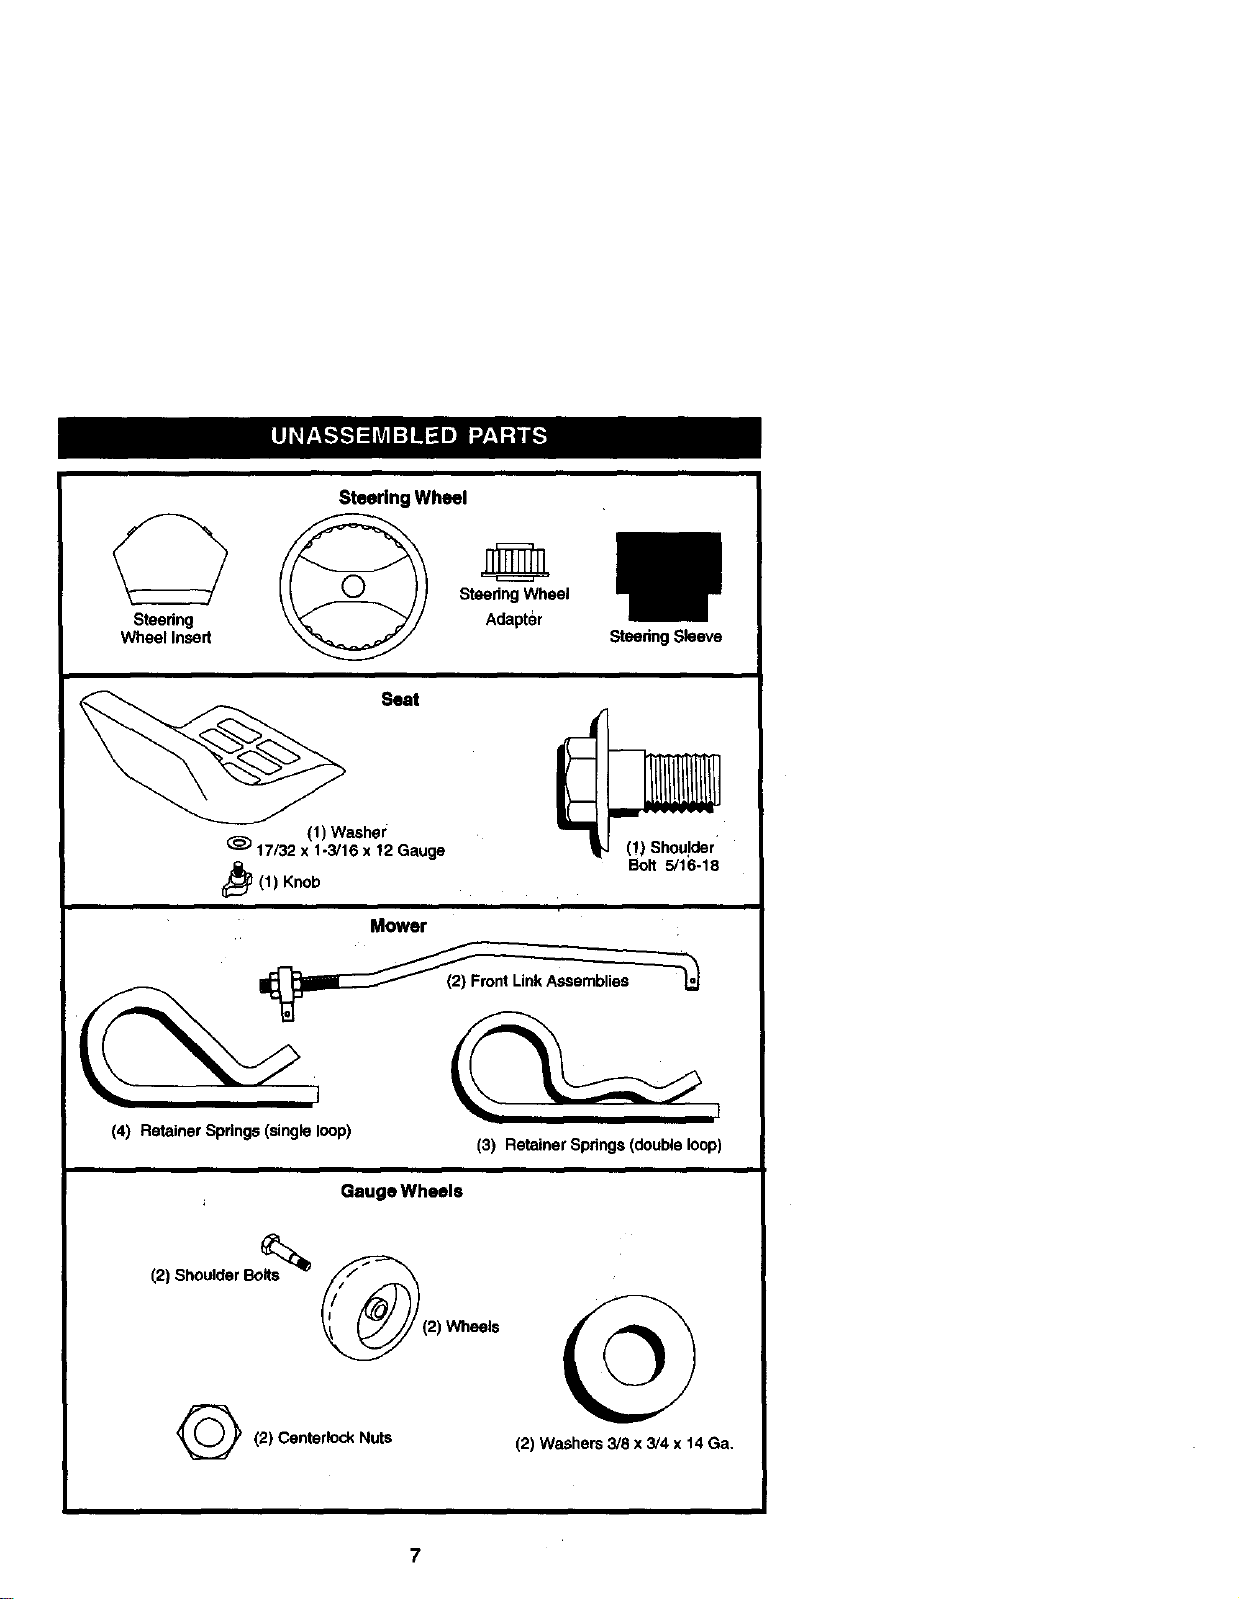
Steering
Wheel Insed
Steering Wheel
(1) Washer
17/32 x 1-3/16 x 12 Gauge
_(1) Knob
Seat
Mower
Steering Wheel
Adapter
SteeringSleeve
(!) Shou!der
Bolt 5/16-18
(4) Retainer Springs (single loop)
(2) Shoulder Bolts
Q (2) Centarlock Nuts
(3) Retainer Springs (double loop)
Gauge Wheels
Wheels
(2) Washers 3/8 x 3/4 x 14 Ga.

Video Cassette
Slope Sheet
D
Keys
(2) Keys
Yournewtractorhas been assembledat the factory withexceptionofthosepartsleft
unassembledfor shippingpuqooses.Toensuresafe and properoperationof your
tractorallpartsand hardwareyouassemblemustbe tightenedsecurely. Usethe
correcttoolsas necessaryto insurepropertightness.
TOOLS REQUIRED FOR ASSEMBLY
A socket wrench set will make assembly
easier. Standard wrench sizes you need
are listed below.
(I) 9/16" wrench (I) Pliers
(1) 1/2"wrench (!) Utility knife
(1) 3/4" socket with
drive ratchet
(1) Tire pressure gauge
When dght or left hand is mentioned in
this manual, it means, from your point of
view, when you are in the operating
position (seated behind the steering
wheel).
TO REMOVETRACTOR FROM
CARTON
UNPACK CARTON
I. Remove all accessibleloose partsand
partscartons fromcarton.
2. Cut,fromtopto bottom,alonglineson
allfourcomersof carton,and lay
panelsflat.
3. Remove mowerand packingmated-
als.
4. Checkfor any additionalloosepartsor
cartonsand remove.
,
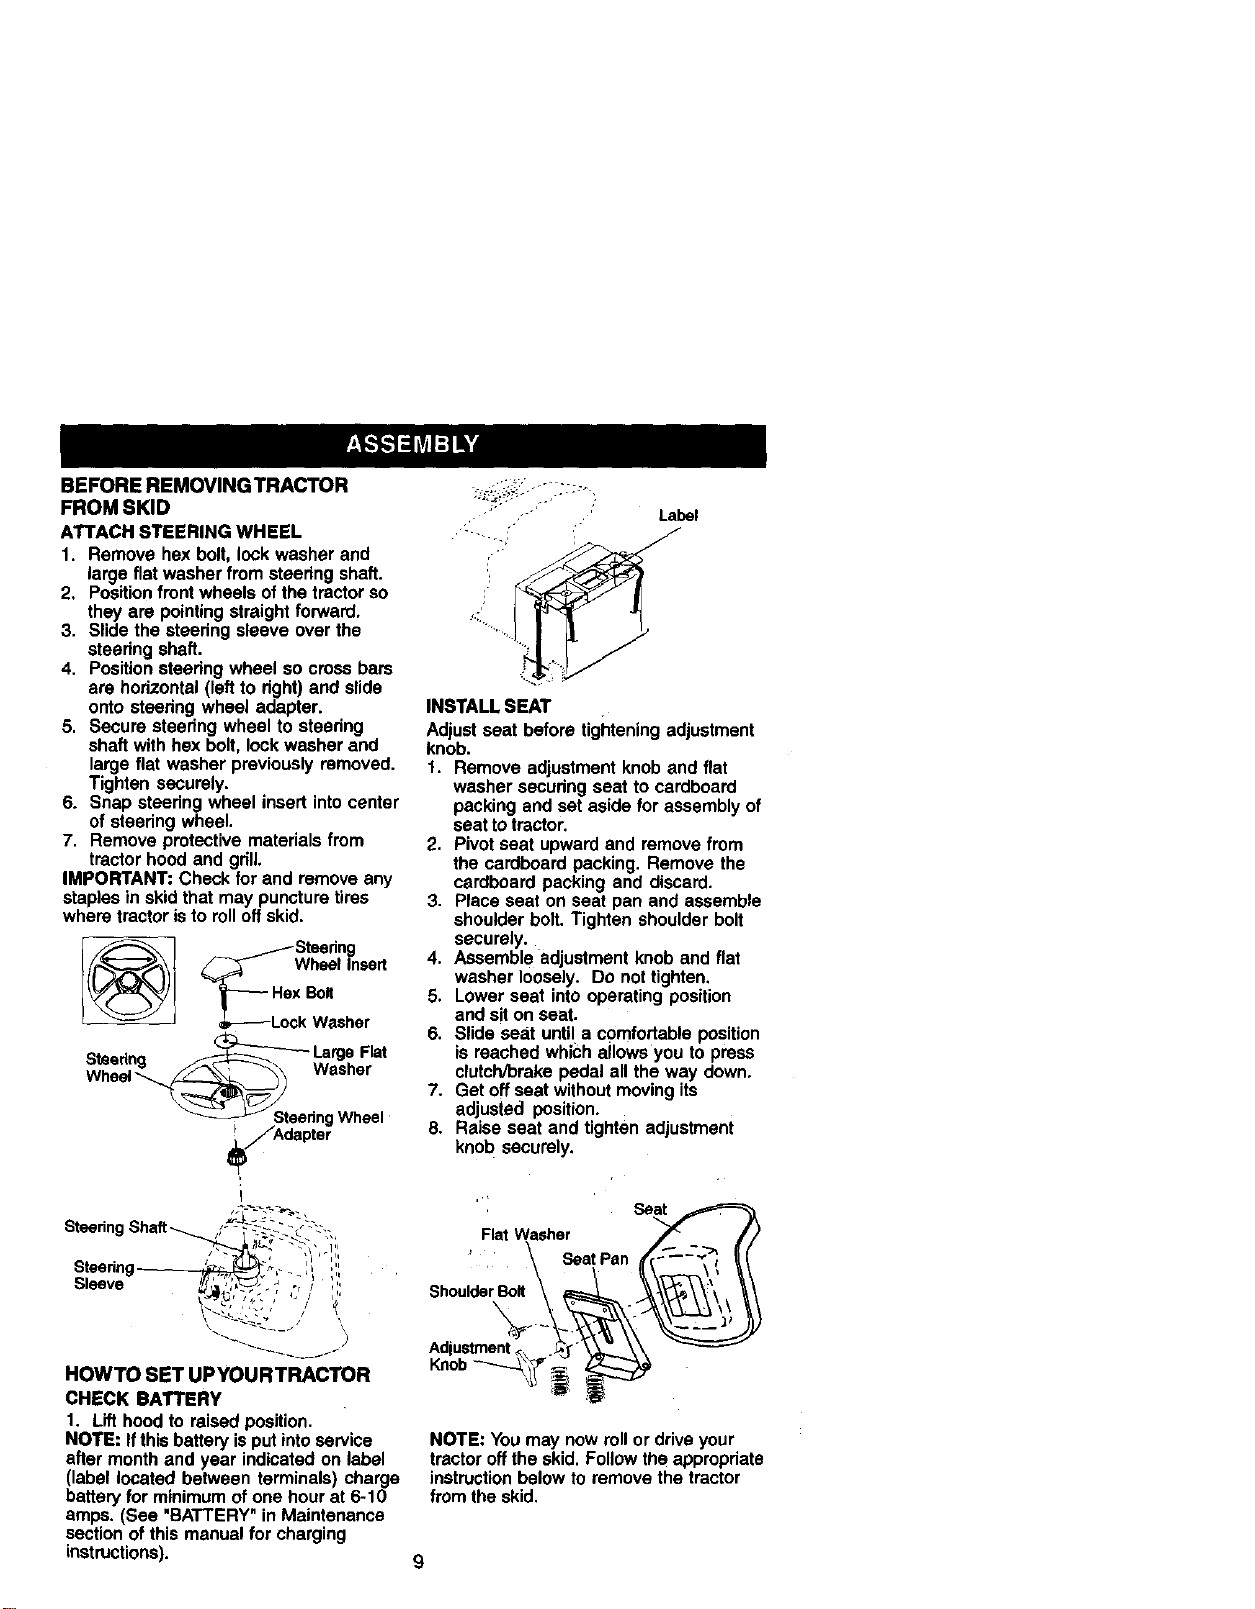
BEFORE REMOVING TRACTOR
FROM SKID
ATTACH STEERING WHEEL
1. Remove hexbolt,lockwasherand
largeflat washerfrom steedngshaft.
2, Positionfront wheelsofthe tractorso
they are pointingstraightforward,
3. Slidethe steedng sleeveoverthe
steedngshaft.
4. Positionsteedngwheel so crossbars
are horizontal(leftto dght)and slide
ontosteedngwheel adapter.
5. Securesteedngwheel to steedng
shaftwithhex bolt, lockwasherand
largefiat washerpreviouslyremoved.
Tightensecurely.
6, Snapsteedngwheel insertintocenter
of steedngwheel.
7. Removeprotectivematerialsfrom
tractorhoodand gdll.
IMPORTANT:Checkfor and removeany
staplesin skidthatmay puncturetires
wheretractoristo rolloffskid.
_Wheel Insert
_ /Steering
_-Hex Bolt
&,------Lock Washer
Large Flat
_SSteering Wheel
/,_,dapt er
Label
INSTALL SEAT
Adjust seat before tightening adjustment
knob.
1. Remove adjustment knob and fiat
washer secudng seat to cardboard
packing and set aside for assembly of
seat to tractor.
2. Pivot seat upward and remove from
the cardboard packing. Remove the
cardboard packing and discard.
3. Place seat on seat pan and assemble
shoulder bolt. Tighten shoulder bolt
securely.
4. Assemble adjustment knob and flat
washer loosely. Do not tighten.
5. Lower seat into operating position
and sit on seat.
6. Slide seat until a comfortable position
is reached whrch allows you to press
clutch/brake pedal all the way down.
7. Get off seat without moving its
adjusted position.
8. Raise seat and tighten adjustment
knob securely.
Steerin
Sleeve
\ \
HOWTO SET UPYOURTRACTOR
CHECK BATTERY
1. Lift hood to raised position.
NOTE: If this battery isput into service
after month and year indicated on label
(label located between terminals) charge
battery for minimum of one hour at 6-10
amps. (See "BATTERY" in Maintenance
section of this manual for charging
instructions).
'i Seat F _
, Flat Washer _ //
r _ .SeatPan d_(-"'--"-_'-_l ((I
Shou,derBolt ___
NOTE: You may now roll or drive your
tractor off the skid. Follow the appropriate
instruction below to remove the tractor
from the skid.
9
TO ROLLTRACTOR OFFSKID (See
Operation section for location and
function of controls)
1, Pressliftlever plungerand raise
attachmentliftleverto itshighest
position.
2. Release parkingbrakeby depressing
clutch/brakepedal.
3. Placegearshiftlever in neutral(N)
position.
4. Rolltractorforwardoffskid.
TO DRIVETRACTOR OFF SKID (See
Operation section for location and
function of controls)
_.WARNING: Before starting read
undemtand and follow all instruct ons in
the Operation section of this manual. Be
sure tractor is in a well-ventilated area. Be
sure the area in front oftractor is clear of
other people and objects.
1. Be sure all the above assembly steps
have been completed.
2. Check engine oil level and fill fuel
tank with gasoline.
3. Sit on seat in operating position,
depress clutch/brake pedal and set
the parking brake.
4. Place gear shift lever in neutral (N)
position.
5. Press lift lever plunger and raise
attachment lift lever to its highest
position.
6. Start the engine. After angine has
started, move throttle control to idle
position.
7. Depress clutch/brake pedal into full
"BRAKE" position and hold. Move
gearshift lever to 1st gear.
8. Slowly release clutch/brake pedal and
slowly drive tractor off skid.
9. Apply brake to stop tractor, set parking
brake and place gearshift lever in
neutral position.
10.Turn ignition key to "OFF" position.
Continue with the instructions that follow.
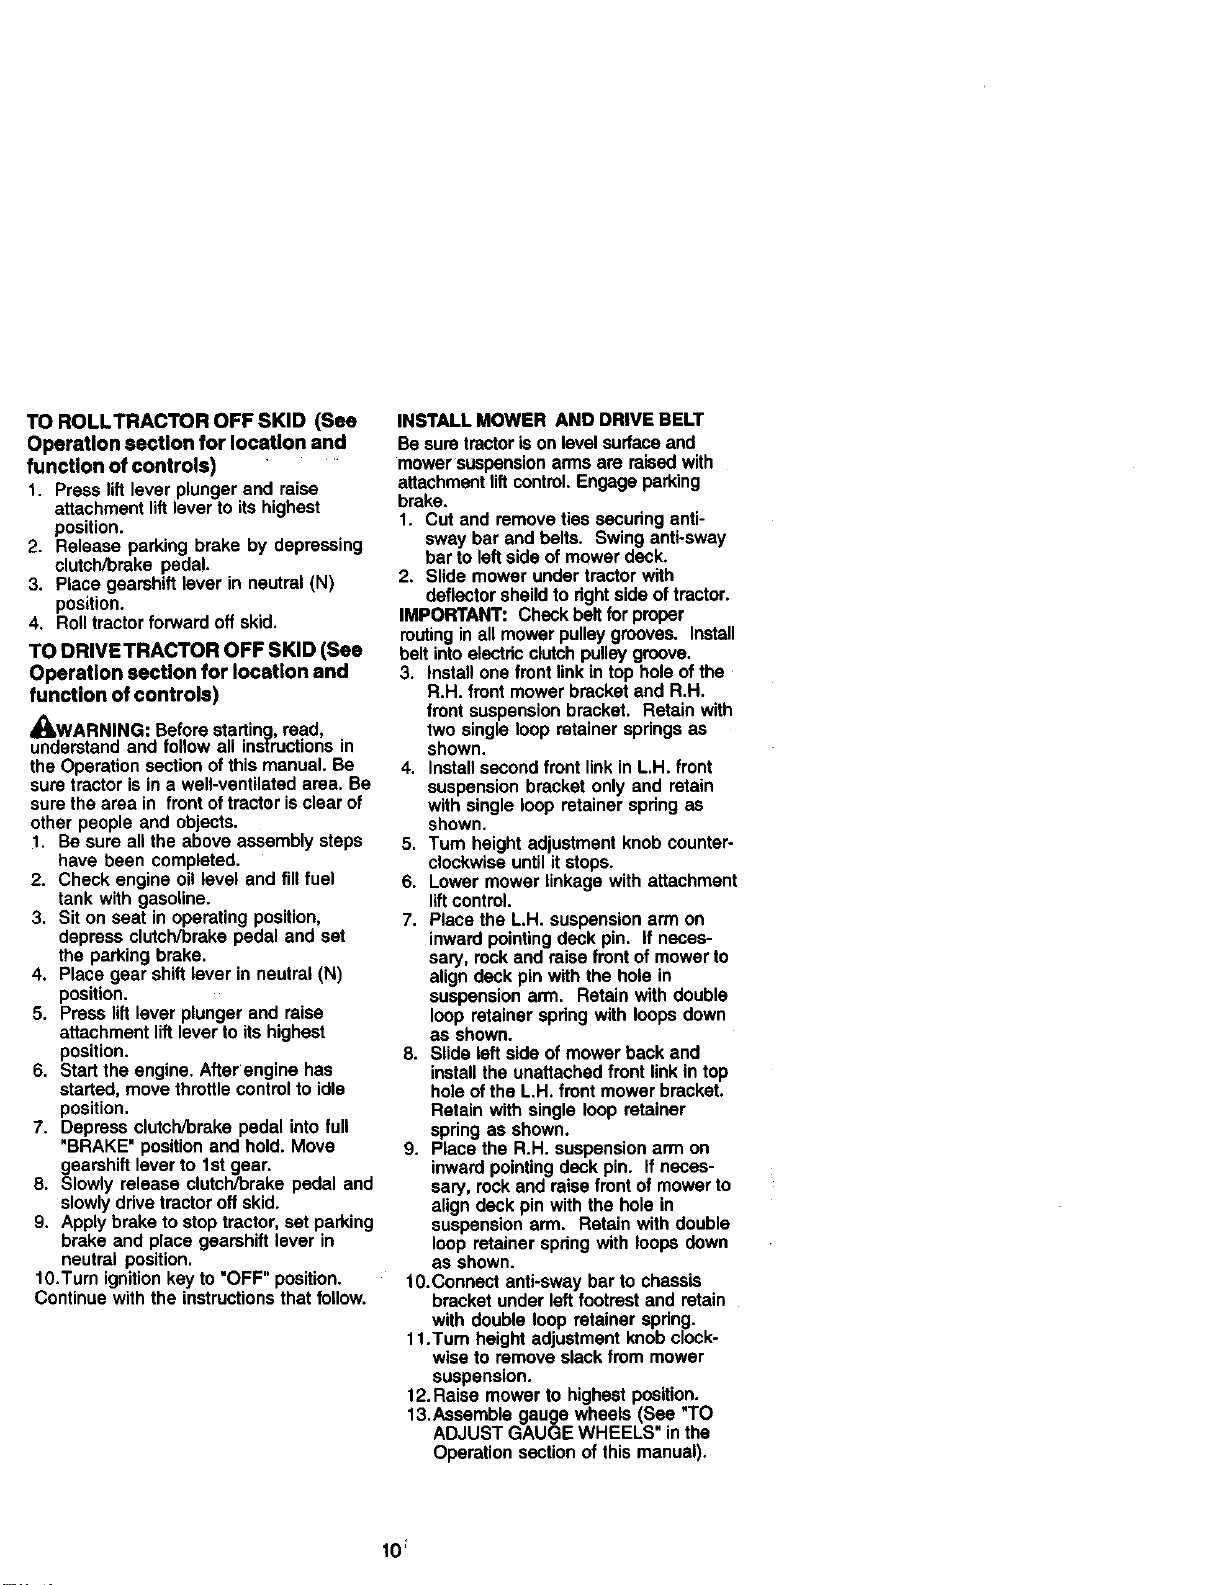
INSTALL MOWER AND DRIVE BELT
Be sure tractor is on level surface and
mower suspension arms are raised with
attachment liftcontrol. Engage parking
brake.
1. Cut and remove ties securing anti-
sway bar and belts. Swing anti-sway
bar to left side of mower deck.
2. Slide mower under tractor with
deflector sheild to right side of tractor.
IMPORTANT: Check belt for proper
routingin all mower pulley grooves. Install
belt into elactric clutch pulley groove.
3. Install one front link in top hole of the
R.H. front mower bracket and R.H.
front suspension bracket. Retain with
two single loop retainer springs as
shown.
4. Install second front link in L.H. front
suspension bracket only and retain
with single loop retainer spring as
shown.
5. Turn height adjustment knob counter-
clockwise until it stops.
6. Lower mower linkage with attachment
lift control.
7. Place the L.H. suspension arm on
inward pointing deck pin. If neces-
sary, rock and raise front of mower to
align deck pin with the hole in
suspension arm. Retain with double
loop retainer spring with loops down
as shown.
8. Slide left side of mower back and
install the unattached front link in top
hole ofthe L.H. front mower bracket.
Retain with single loop retainer
spring as shown.
9. Place the R.H. suspension arm on
inward pointing deck pin. If neces-
sary, rock and raise front of mower to
align deck pin with the hole in
suspension arm. Retain with double
loop retainer spring with loops down
as shown.
10.Connect anti-sway bar to chassis
bracket under left footrest and retain
with double loop retainer spring.
11.Turn height adjustment knob clock-
wise to remove slack from mower
suspension.
12. Raise mower to highest position.
13.Assemble gauge wheels (See "TO
ADJUST GAUGE WHEELS" in the
Operation section of this manual).
10;
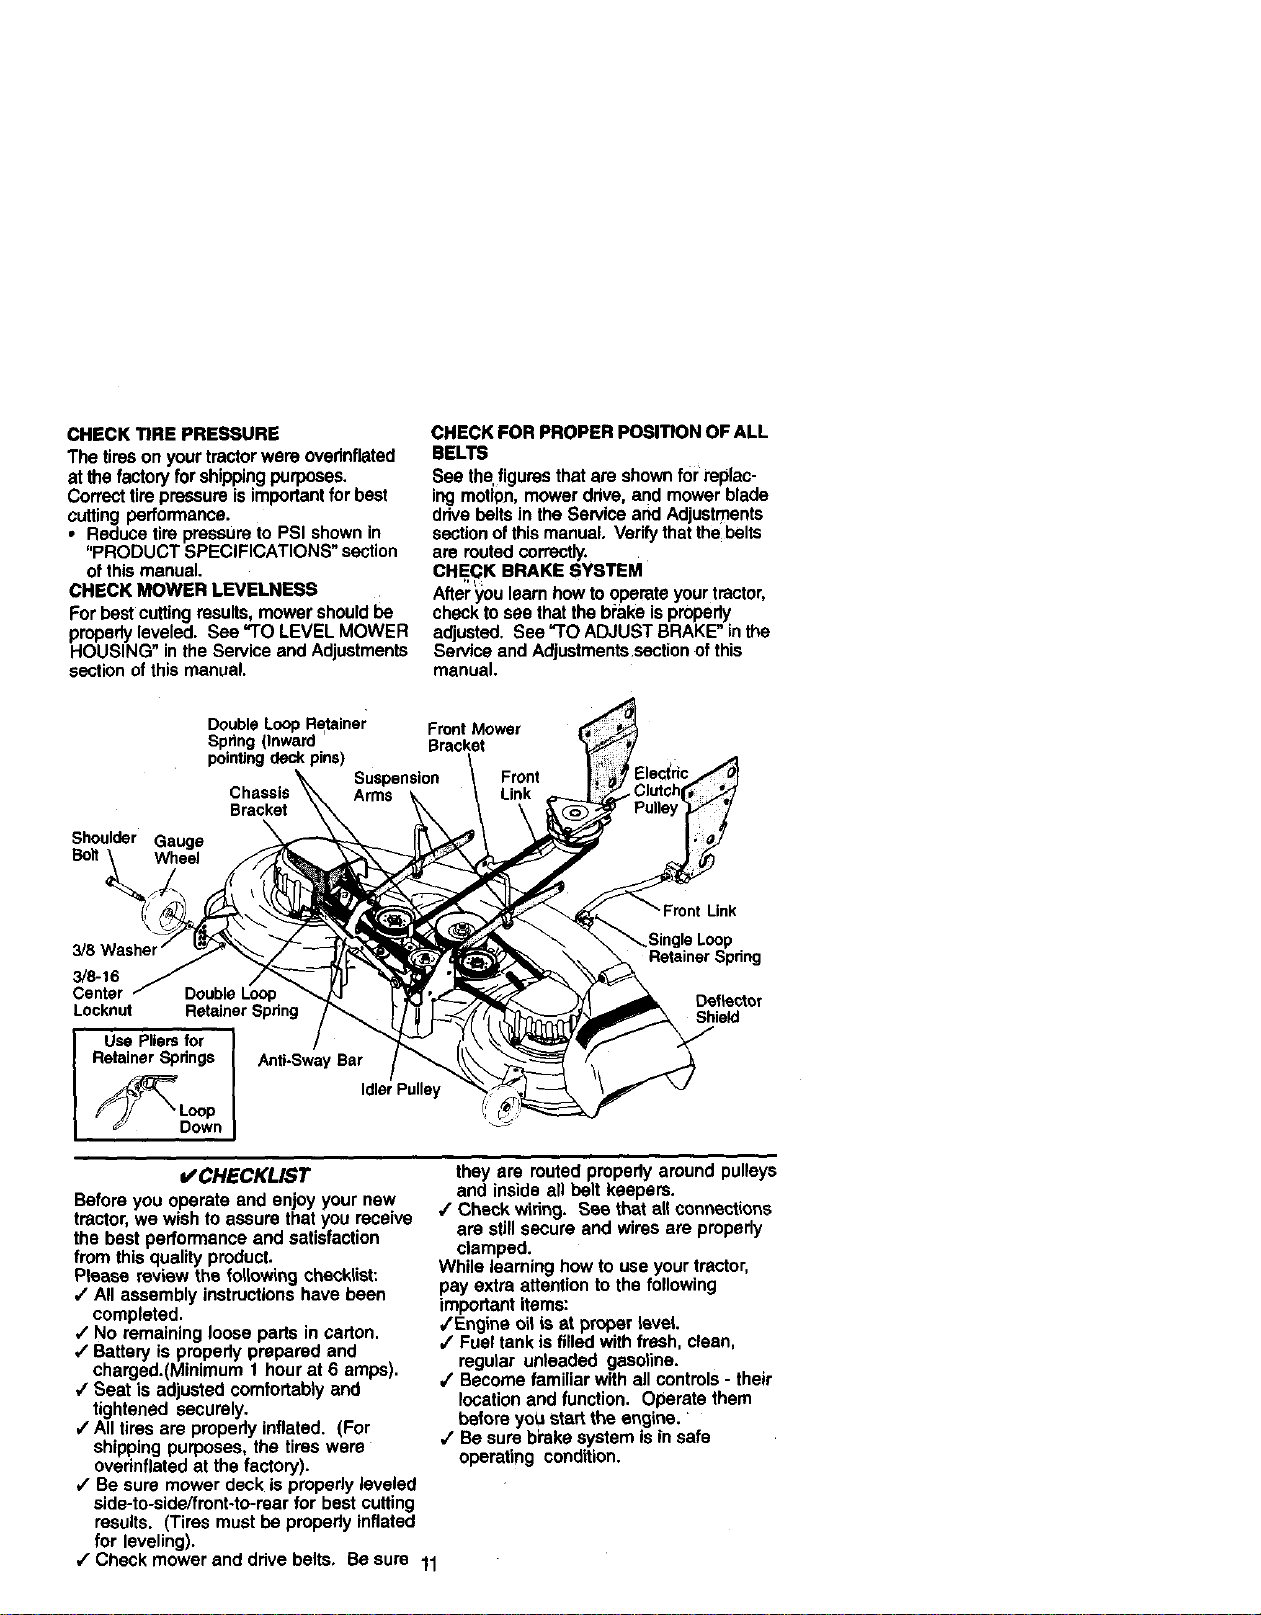
CHECK TIRE PRESSURE
The tires on your tractor were overinflated
at the factory for shipping purposes.
Correct tire pressure is important for best
cutting performance.
• Reduce tire pressure to PSI shown in
"PRODUCT SPECIFICATIONS" section
of this manual.
CHECK MOWER LEVELNESS
For best cutting results, mower should be
properly leveled. See "1"O LEVEL MOWER
HOUSING" in the Service and Adjustments
section of this manual.
DoubleLoopRetainer FrontMower
Spring(Inward Bracket
pointingdeckpins)
Suspension Front
Sracket
Shoulder Gauge
BoltL Wheel
3/8-16
Center
Locknut Retainer Spring
Arms
CHECK FOR PROPER POSITION OF ALL
BELTS
See the.f gurus that are shown for replac-
ing motion, mower drive, and mower blade
drive belts in the Service and Adjustments
sectionof this manual. Verify that the belts
are routed correctly.
CHECK BRAKE SYSTEM
After you learn how to operate your tractor,
check to see that the brake ispropedy
adjusted. See "TO ADJUST BRAKE" in the
Service and Adjustments section of this
manual.
Link
Loop
RetainerSpring
Deflector
Shield
RetainerSprings Anti-Sway Bar
I Use Plis_ for
Before you operate and enjoy your new
tractor, we wish to assure that you receive
the best performance and satisfaction
from this quality product.
Please review the following checklist:
/ All assembly instructions have been
completed.
/ No remaining loose parts in carton.
,/Battery is properly prepared and
charged.(Minimum 1 hour at 6 amps).
/ Seat is adjusted comfortably and
tightened securely.
/ All tires are properly inflated. (For
shipping purposes, the tires were
overinflated at the factory).
V" Be sure mower deck is properly leveled
side-to-side/frunt-to-ruar for best cutting
results. (Tires must be properly inflated
for leveling).
,/Check mower and drive belts. Be sure 11
ooow"n
V CHECKLIST
IdlerPulley
they are routed properly around pulleys
and inside all belt keepers.
/ Check wiring. See that all connections
are stJllsecure and wires are properly
clamped.
While learning how to use your tractor,
pay extra attention to the following
important items:
/Engine oil is at proper level.
/ Fuel tank is filled with fresh, clean,
regular unleaded gasoline.
/ Become familiar with all controls - their
location and function. Operate them
before you start the engine.
/ Be sure bi'ake system is in safe
operating condition.
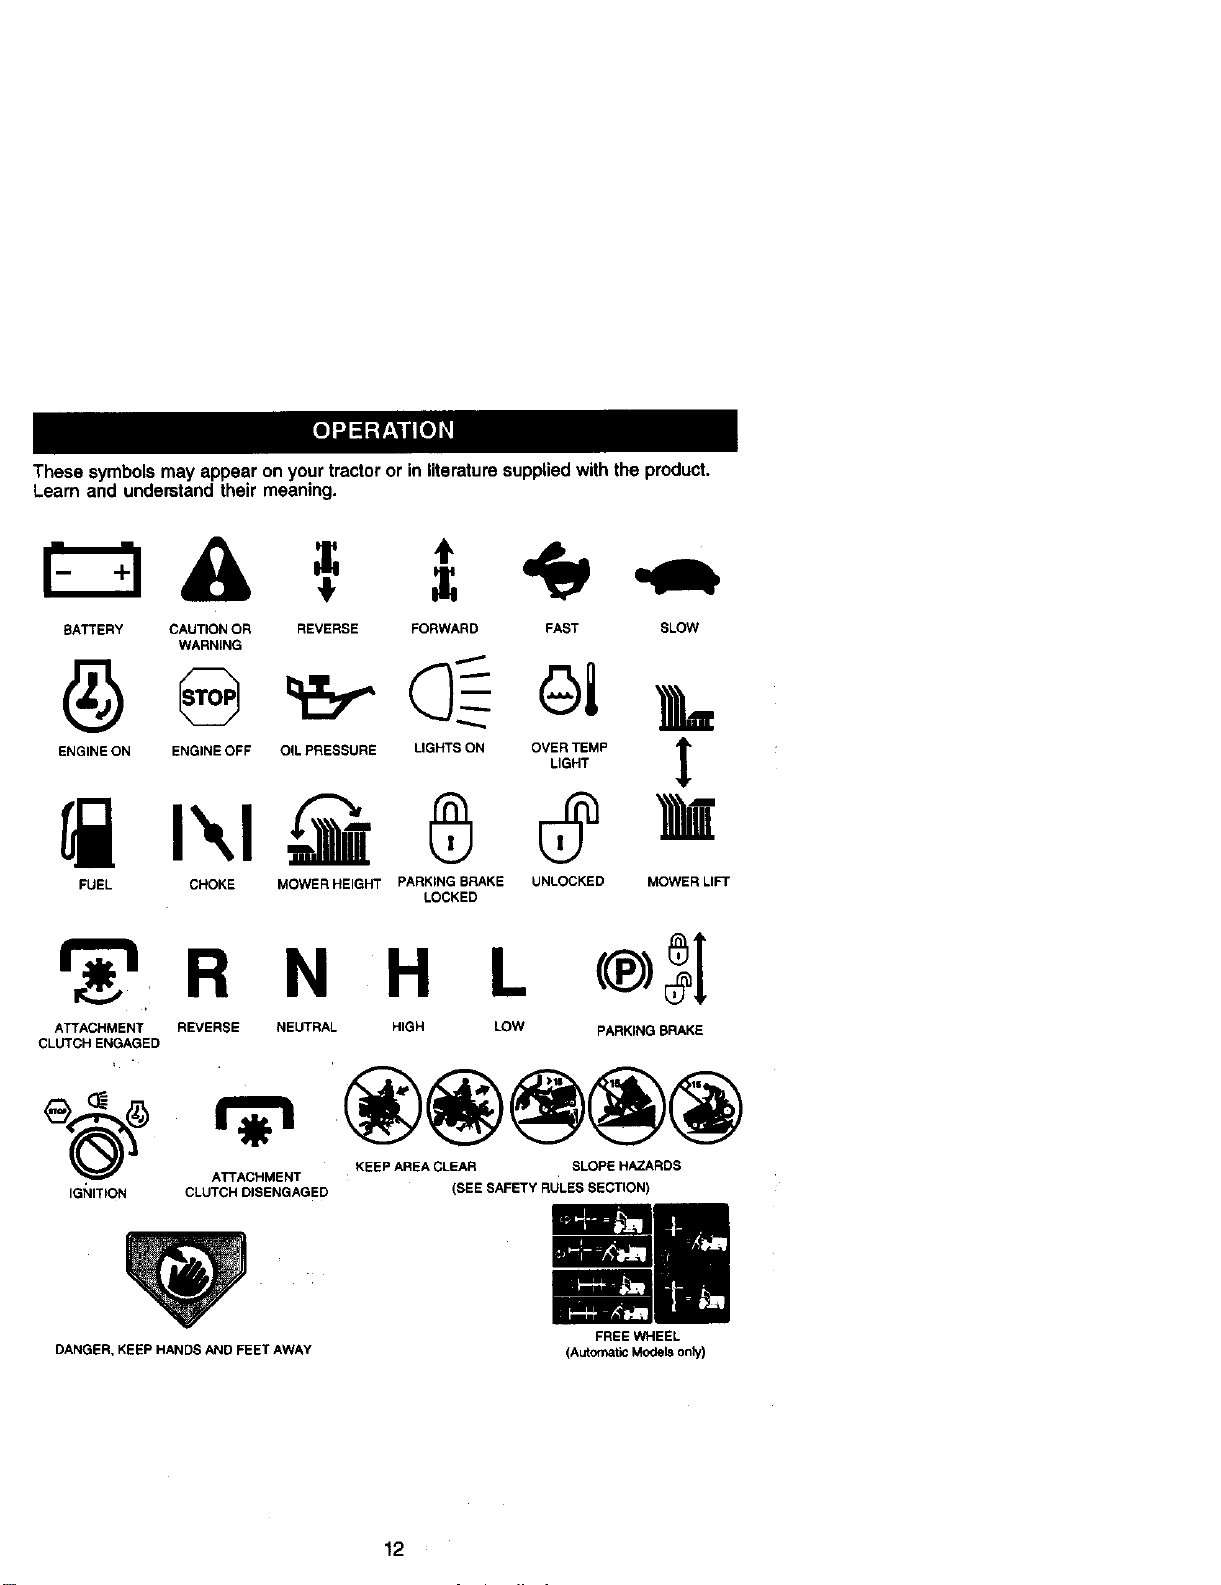
These symbolsmayappear on yourtractoror inliteraturesuppliedwiththe product.
Learn and understandtheirmeaning.
A, =
BATTERY CAUTION OR REVERSE FORWARD FAST SLOW
WARNING
ENG,NOONENG,NEOFFOILPREBSUREL,GHTSONO%T_MP]_
FUEL CHOKE MOWER HEIGHT PARKING BRAKE UNLOCKED MOWER LIFT
LOCKED
_r_RN H L
ATTACHMENT REVERSE NEUTRAL HIGH LOW PARKING BRAKE
CLUTCH ENGAGED
KEEP AREA CLEAR SLOPE HAZARDS
IG_,IITION
ATTACHMENT
CLUTCH DISENGAGED (SEE SAFETY RULES SECTION)
DANGER, KEEP HANDS AND FEET AWAY
FREE WHEEL
(Automatic Models only)
12
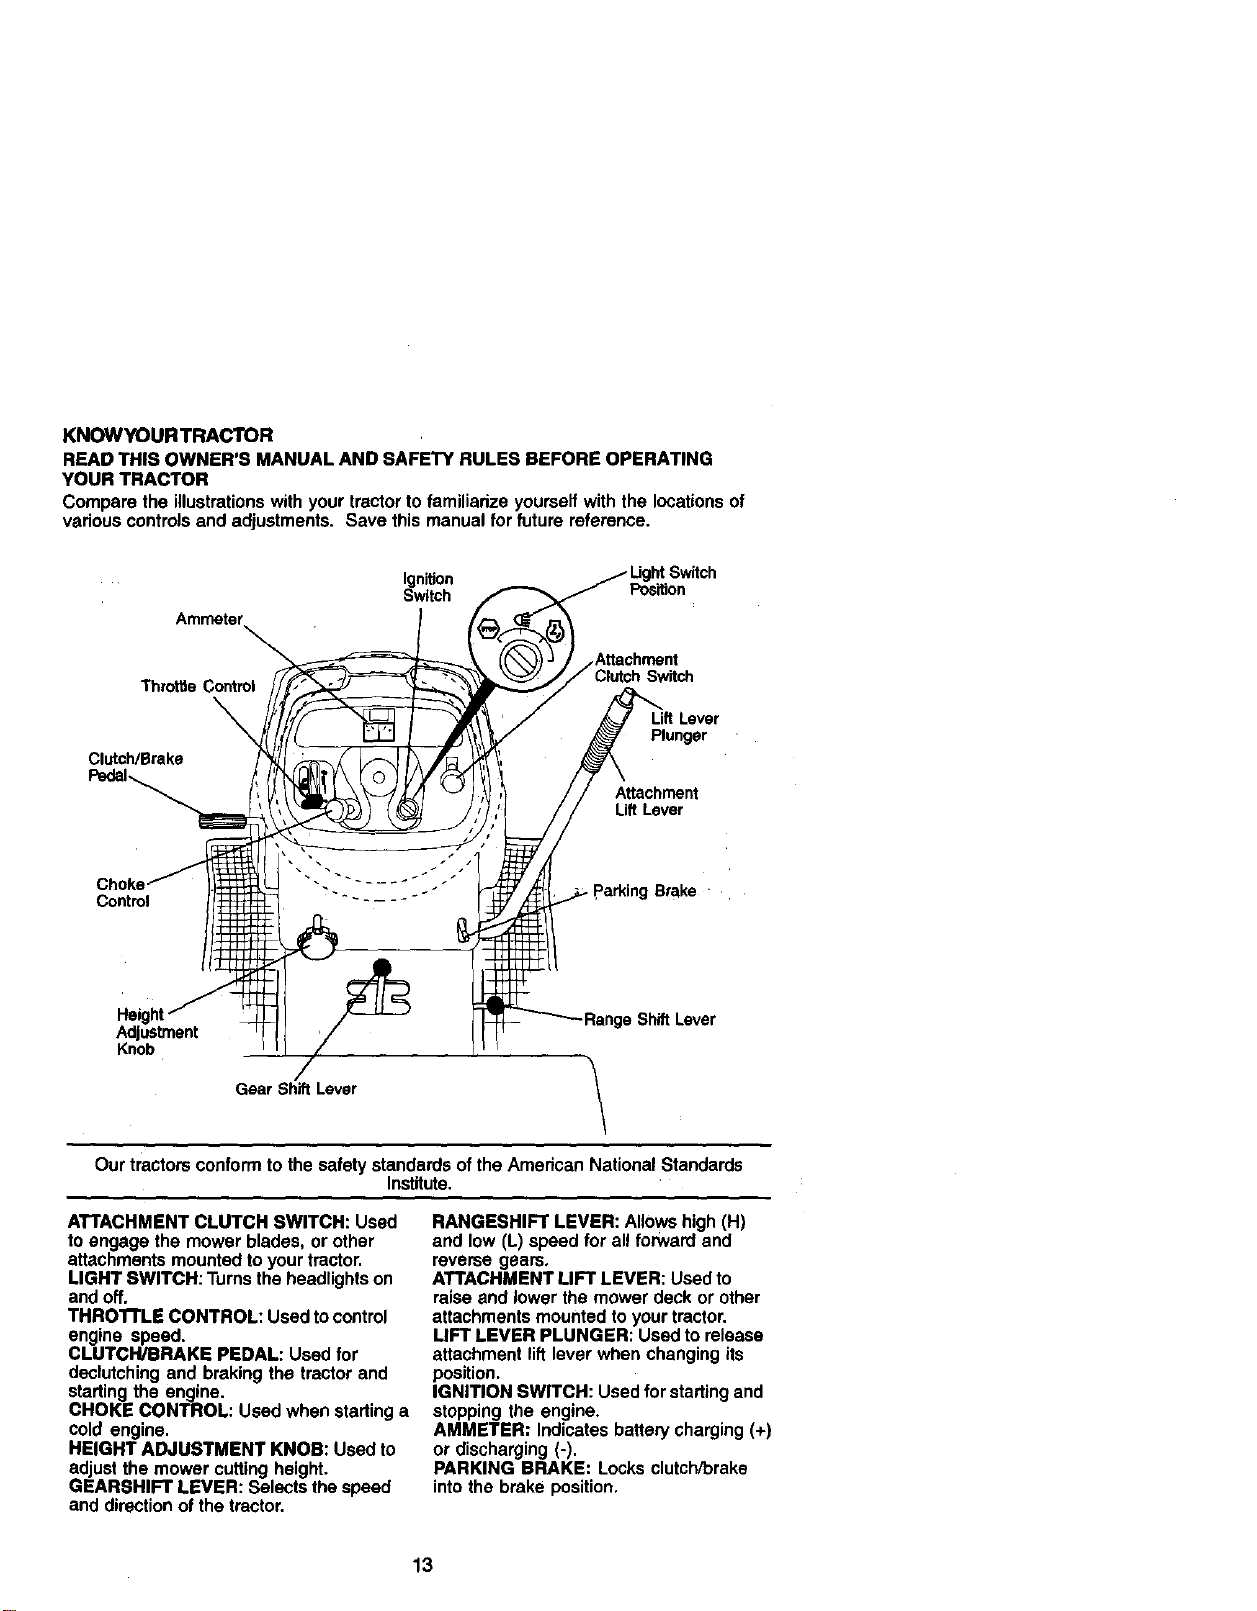
KNOWYOURTRACTOR
READ THIS OWNER'S MANUAL AND SAFETY RULES BEFORE OPERATING
YOUR TRACTOR
Compare the illustrations with your tractor to familiarize yourself with the locations of
various controls and adjustments, Save this manual for future reference.
Ignition
Switch PosRion
Ammeter
ThrottJe Control
Clutch/Brake
Control
Heigl"
Adjustment
Knob
Gear Shift Lever
Switch
Plunger
Attachment
Lift Lever
parking Broke '
e Shift Lever
Ourtractorsconformtothe safetystandardsofthe AmericanNationalStandards
Institute.
ATTACHMENT CLUTCH SWITCH: Used
to engage the mower blades, or other
attachments mounted to your tractor.
LIGHT SWITCH: Turns the headlights on
and off,
THRO'I'FLE CONTROL: Used to control
engine speed.
CLUTCH/BRAKE PEDAL: Used for
declutching and braking the tractor and
starting the engine.
CHOKE CONTROL: Used when starting a
cold engine.
HEIGHT ADJUSTMENT KNOB: Used to
adjust the mower cutting height.
GEARSHIFT LEVER: Selects the speed
and direction of the tractor.
RANGESHIFT LEVER: Allows high (H)
and low (L) speed for all forward and
reverse gears,
ATTACHMENT LIFT LEVER: Used to
raise and lower the mower deck or other
attachments mounted to your tractor.
LIFT LEVER PLUNGER: Used to release
attachment lifl lever when changing its
position.
IGNITION SWITCH: Used for starting and
stopping the engine.
AMMETER: Indicates battery charging (+)
or discharging (-).
PARKING BRAKE: Locks clutch/brake
into the brake position,
13
The operationof anytractorcan resultinforeign objectsthrowninto
theeyes, whichcan resultinsevere eye damage. Alwayswear safety
glassesor eye shieldswhile operatingyour tractoror performingany
adjustmentsor repairs. We recommenda widevisionsafetymask
over spectaclesor standardsafetyglasses.
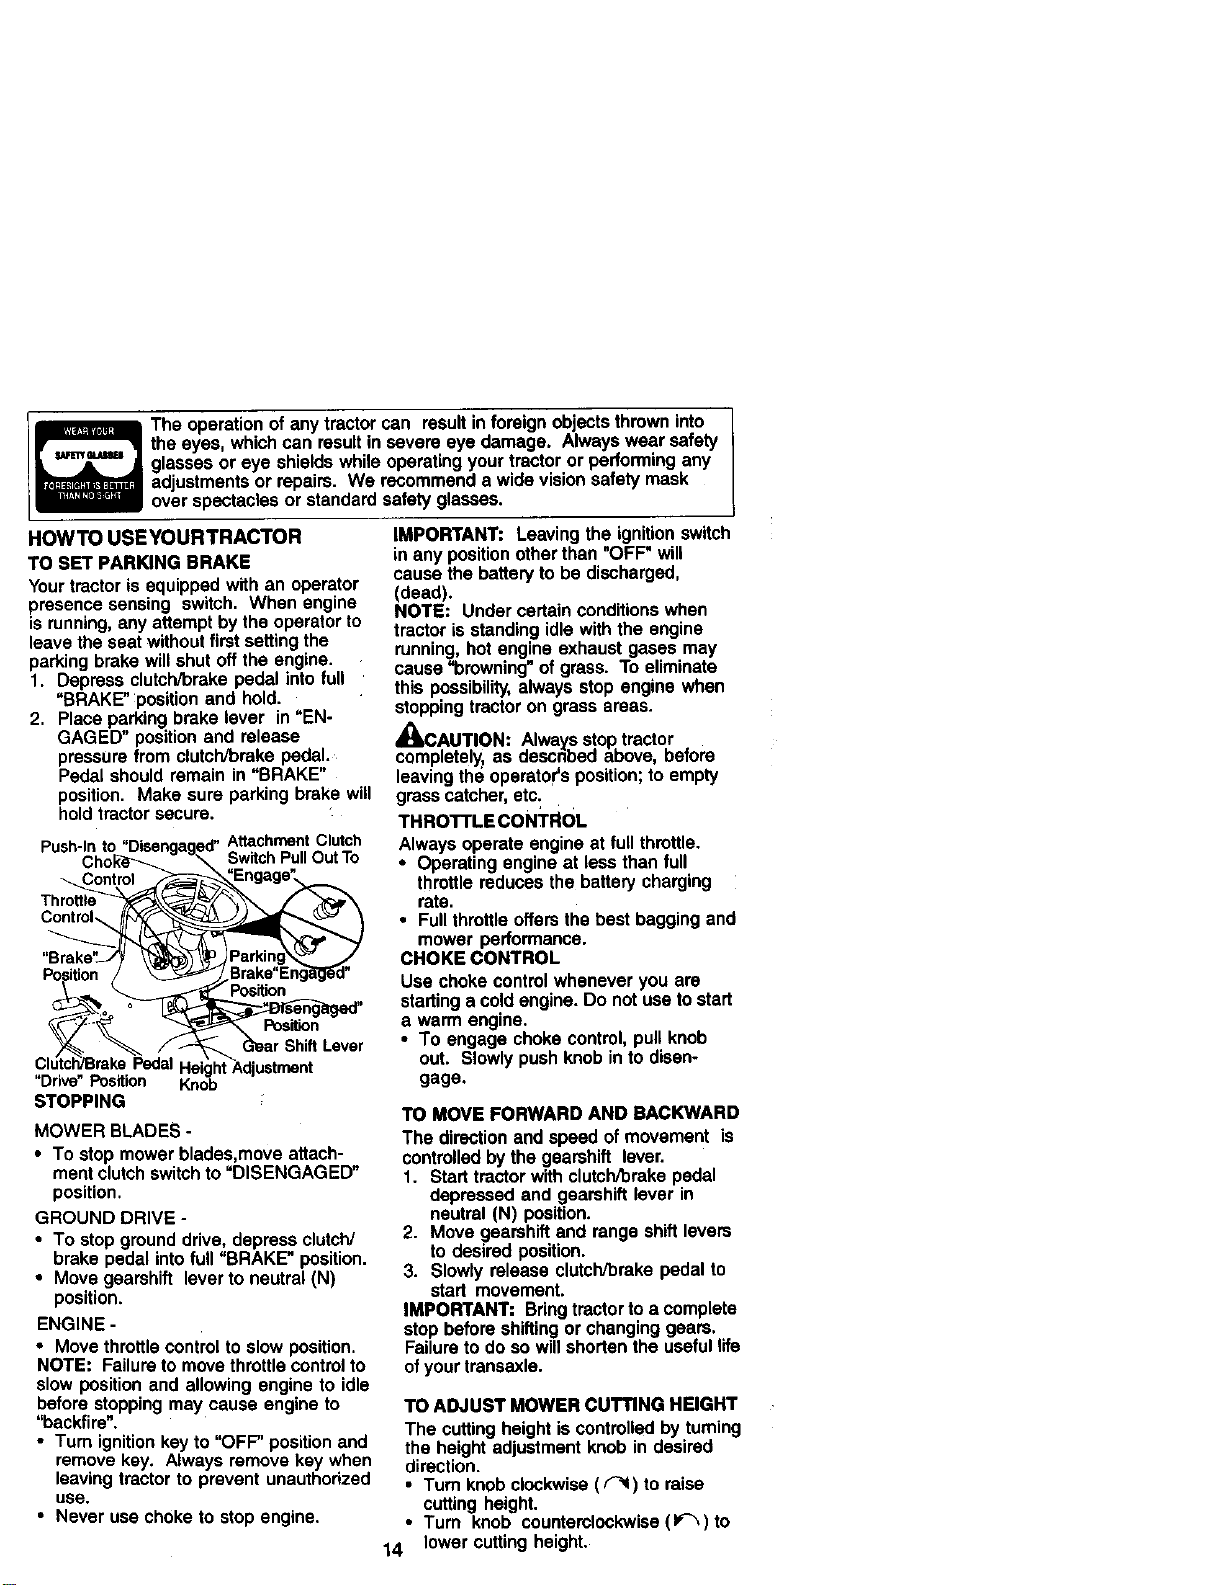
HOWTO USEYOURTRACTOR
TO SET PARKING BRAKE
Your tractor is equipped with an operator
presence sensing switch. When engine
is running, any attempt by the operator to
leave the seat without first setting the
parking brake will shut off the engine.
1. Depress clutch/brake pedal into full
"BRAKE" position and hold.
2. Place parking brake lever in "EN-
GAGED" position and release
pressure from clutch'brake pedal.
Pedal should remain in "BRAKE"
position. Make sure parking brake will
hold tractor secure.
Push-In to "Disengaged
Chok_- -_
"Braka_"_ \_)/V
Clutch/Brake Pedal Hei
"Drive"Position Knob
STOPPING
MOWER BLADES -
• To stop mower blades,move attach-
ment clutch switch to "DISENGAGED"
position.
GROUND DRIVE -
• To stop ground drive, depress clutch/
brake pedal into full "BRAKE" position.
• Move gearshift lever to neutral (N)
position.
ENGINE -
• Move throttle control to slow position.
NOTE: Failure to move throttle control to
slow position and allowing engine to idle
before stopping may cause engine to
"backfire".
• Tum ignition key to "OFF" position and
remove key. Always remove key when
leaving tractor to prevent unauthorized
use,
• Never use choke to stop engine.
Attachment Clutch
SwitchPullOut To
Position
:Adjustment
IMPORTANT: Leavingthe ignition switch
in any positionotherthan "OFF" will
causethe batteryto be discharged,
(dead).
NOTE: Undercertainconditionswhen
tractoris standingidlewiththe engine
running,hotengine exhaustgasesmay
cause"browning" of grass. To eliminate
this possibility,alwaysstop enginewhen
stoppingtractoron grassareas.
_CAUTION: Alwaysstoptractor
completely,as descnbedabove,before
leavingtheoperators position;toempty
grasscatcher,etc.
THROTTLEcoNTRoL
Alwaysoperateengineat fullthrottle.
• Operatingengineat less thanfull
throttlereducesthe batterycharging
rate.
• Fullthrottleoffersthe bestbaggingand
mower performance.
CHOKE CONTROL
Use chokecontrolwheneveryou are
startinga coldengine.Do notuseto start
a warm engine.
• To engagechokecontrol,pull knob
out. Slowlypushknobinto disen-
gage.
TO MOVE FORWARD AND BACKWARD
The directionandspeed ofmovement is
controlledbythegearshift lever.
1. Starttractorwithclutch/brakepedal
depressedand gearshiftlever in
neutral(N) position.
2. Move gearshiftand rangeshiftlevers
to desiredposition.
3. Slowlyreleaseclutch/brakepedal to
start movement.
IMPORTANT: Bringtractorto a complete
stop beforeshittingor changinggears.
Failureto do so willshortenthe usefullife
ofyourtransaxle.
TO ADJUST MOWER CUTTING HEIGHT
The cutting height is controlled by turning
the height adjustment knob in desired
direction.
• Turn knob clockwise ( _ ) to raise
cutting height.
• Turn knob countemlockwise (1,-_) to
14 lower cutting height.
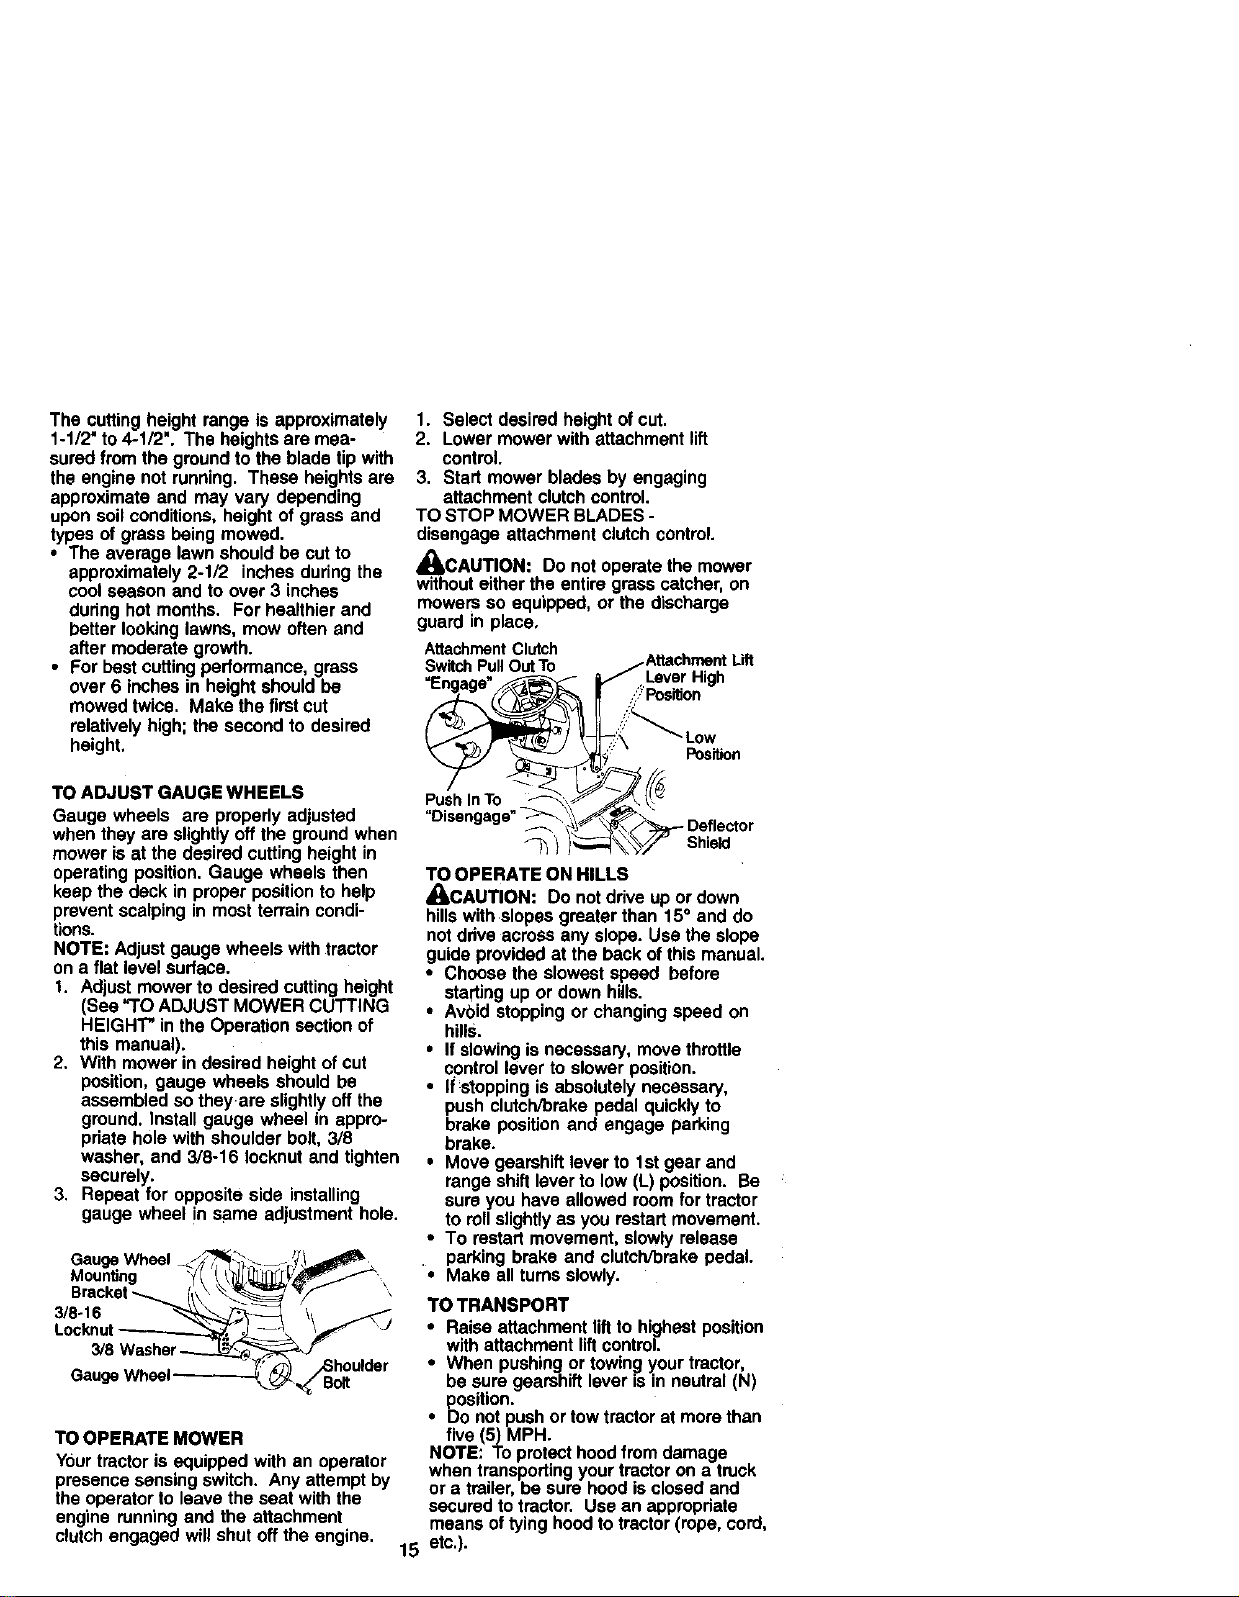
The cuttingheightrange is approximately
1-1/2"to4-1/2". The heightsare mea-
suredfrom the groundtothe blade tipwith
theenginenot running.These heightsare
approximateand may vary depending
uponsoilconditions,heightof grass and
typesof grassbeingmowed.
• The average lawnshouldbe cut to
approximately2-1/2 inchesduringthe
coolseason endto over 3 inches
dudnghotmonths. Forhealthierand
betterlookinglawns,mow oftenand
aftermoderategrowth.
• For best cuttingperformance,grass
over 6 inchesin heightshouldbe
mowedtwice. Make the flintcut
relativelyhigh;thesecond to desired
height,
TO ADJUST GAUGE WHEELS
Gauge wheels are properly adjusted
when they are slightly off the ground when
mower is at the desired cutting height in
operating position. Gauge wheels then
keep the deck in proper position to help
prevent scalping in most terrain condi-
tions.
NOTE: Adjust gauge wheels with tractor
on a flat level surface.
1. Adjust mower to desired cutting height
(See "TO ADJUST MOWER CUTTING
HEIGHT" in the Operation section of
this manual).
2. With mower in desired height of cut
position, gauge wheels should be
assembled so they are slightly off the
ground. Install gauge wheel in appro-
priate hole with shoulder bolt, 3/8
washer, and 3/8-16 Iocknut and tighten
securely.
3. Repeat for opposite side installing
gauge wheel in same adjustment hole.
Oau .Wh ,, _-
Bracket_ (_\\ _ _ ,
J
Gau3/8_,_ahe_:_i,_l hhouldeJ r
TO OPERATE MOWER
Your tractor is equipped with an operator
presence sensing switch. Any attempt by
the operator to leave the seat with the
engine running and the attachment
clutch engaged will shut off the engine.
1. Select desired height of cut.
2. Lower mower with attachment lift
control.
3. Start mower blades by engaging
attachment clutch control.
TO STOP MOWER BLADES -
disengage attachment clutch control.
_IbCAUTION: Do not operate the mower
without either the entire grass catcher, on
mowers so equipped, or the discharge
guard in place,
AttachmentClutch
SwitchPullOutTo
TO OPERATE ON HILLS
_CAUTION: Do not drive up or down
hills with slopes greater than 15° and do
not ddvs across any slope. Use the slope
guide provided at the back of this manual.
• Choose the slowest speed before
starting up or down hills.
• AvOid stopping or changing speed on
hills.
• If slowing is necessary, move throttle
control lever to slower position.
• II_stopping is absolutely necessary,
push clutch/brake pedal quickly to
brake position and engage parking
brake.
• Move gearshift lever to 1st gear and
range shift lever to low (L) position. Be
sure you have allowed room for tractor
to rollslightly as you restart movement.
• To restart movement, slowly release
parking brake and clutcWbrake pedal.
'• Make ell turns slowly.
TO TRANSPORT
• Raise attachment lift to highest position
with attachment liftcontrol.
• When pushing or towin_ your tractor,
be sure gearshift lover is in neutral (N)
position.
• Do not push or tow tractor at more than
five (5) MPH.
NOTE: To protect hood from damage
when transporting your tractor on a truck
or a trailer, be sure hood is closed and
secured to tractor. Use an appropdate
means of tying hood to tractor (rope, cord,
etc.).
15
jAttachment Lift
Lever High
_ Low
_,_- Deflector
_ Shield
TOWINGCARTSANDOTHERAT-
TACHMENTS
Towonlytheattachmentsthatare
recommended by and comply with
specifications of the manufacturer of your
tractor, Use common sense when towing.
Too heavy of a load, while on a slope, is
dangerous. Tires can lose traction with
the ground and cause you to lose control
of your tractor.
BEFORE STARTINGTHE ENGINE
CHECK ENGINE OIL LEVEL
The engine in your tractor has been
shipped, from the factory, already filled
with summer weight oil.
1. Check engine oil with tractor on'level
ground.
2. Remove oil fill cap/dipstick and wipe
clean, reinsert the dipstick and push it
all the way down into the tube, wait for
a few seconds, remove and read oil
level. If necessary, add oil until
=FULL" mark on dipstick is reached.
Do not overfill.
• For cold weather operation you should
change oil for easier starting (See "OIL
VISCOSITY CHART" in the Mainte-
nance section of this manual).
• To change engine oil, see the Mainte-
nance section in this manual.
ADD GASOLINE
• Fillfueltank. Use fresh,clean regular
uneaded gasolinewitha minimumof
87 octane. (Use of leadedgasoline
will increasecarbonand Jead oxide
depositsand reducevalve life). Do not
mixoil withgasoline. Purchasefuel in
quantitiesthatcanbe usedwithin30
daysto assurefuel freshness.
IMPORTANT: When operatingin
temperaturesbelow32°F(0°C), use fresh,
clean wintergradegasolineto help
insuregoodcoldweatherstarting.
_,WARNING: Experienceindicatesthat
alcoholblended fuels (called gasoholor
usingethanolor methanol)can attract
moisturewhichleadsto separationand
formation ofacidsduringstorage. Acidic
gascan damagethe fuel systemofan
enginewhilein storage. To avoidengine
problems,the fuel systemshouldbe
emptiedbeforestorageof 30 daysor
longer. Drainthegastank,startthe
engineand let itrununtilthe fuel lines
andcarburetorare empty. Use fresh fuel
nextseason. See StorageInstructionsfor
additionalinformation.Never useengine
or carburetorcleaner productsin thefuel
tank orpermanentdamagemay occur.
_QLCAUTION: Fill to bottom of gas tank
filler neck. Do not overfill. Wipe off any
spilled oil or fuel. Do not store, spill or
use gasoline near an open flame.
TO START ENGINE
When starlingthe enginefortheflint time or if
the engine has run out offuet, itwil take extra
crankincjtimeto move fuel fromthe tank to
the engine.
1. Sit on seat in operating position,
depress clutch/breke pedal and set
parking brake.
2. Place gear shift lever in neutral (N)
position.
3. Move attachment clutch to "OISEN-
GAGED" position.
4. Move throttle control to fast position
5. Pull choke control out for a cold
engine start attempt. For a warm
engine start attempt the choke control
may not be needed.
NOTE: Before starling,read the warm and
cold startingprocedures below.
6. Insert key into ignition and turn key
clockwise to "START" position and
release key as soon as engine starts.
Do not run starter continuously for
more than fifteen seconds per minute.
If the engine does not starf after
several attempts, push choke control
in, wait a few minutes and try again. If
engine still does not start, pull the
choke control out and retry, o
WARMWEATHER STARTING (50 Fand
above)
7. When engine starts, slowly push
choke control in until the engine
begins to run smoothly. If the engine
starts to run roughly, pullthe choke
control out slightly for a few seconds
and then continue to push the control
in slowly.
• The attachments and ground drive can
now be used. If the engine does not
accept the load, restart the engine and
allow it to warm up for one minute
using the choke as described above.
COLD WEATHER STARTING (50° F and
below)
7. When engine starts, slowly push
choke control in until the engine
begins to run smoothly. Continue to
push the choke control in small steps
allowing the engine to accept small
changes in speed and load, until the
choke control is fully in. If the engine
starts to run roughly, pull the choke
control out slightly for a few seconds
and then continue to push the control
in slowly. This may require an engine
16

warm-upperiodfrom severalseconds
to severalminutes,dependingonthe
temperature.
• The attachments can be used dudng
the enginewarm-upperiodand may
requirethe choke controlbe pulledout
. ht,y
; ffat a highaltitude(above3000feet)
orincoldtemperatures(below32 F)the
carburetorfuelmixturemayneedtobe
adjustedfor bestangineperformance.See
"TOADJUSTCARBURETOR"intheService
andAdjustmentssectionofthismanual.
MOWING TIPS
• Tire chainscannot be usedwhen the
mowerhousingisattachedto tractor.
• Mower shouldbe properlyleveledfor
bestmowingperformance. See "TO
LEVEL MOWER HOUSING" inthe
ServiceandAdjustmentssectionofthis
manual.
• Use the runneron therightsideof the
moweras a guide.The bladecuts
approximatelyan inchoutsidethe
runner.
• The left hand sideof mowershouldbe
usedfor trimming.
• Drive sothat clippingsare discharged
ontothe area that hasbeen cut. Have
thecut areatothe dghtofthe tractor.
This willresultin a moreeven distribu-
tionof clippingsand more uniform
cutting.
• When mowinglargeareas, startby
tumingtothe dghtso thatclippingswill
dischargeawayfrom shrubs,fences,
driveways,etc. Afteroneor two
rounds,mow inthe oppositedirection
makingleft handturnsuntilfinished.
• If grassis extremelytall, itshouldbe
mowedtwiceto reduce load and
possiblefire hazard fromdriedclip-
pings. Makefirst cut relativelyhigh;the
second to the desired height.
• Do not mowgrasswhen itis wet. Wet
grass willplugmowerand leave
undesirableclumps. Allowgrasstodry
before mowing.
• Always operate englne at full throttle
when mowing to assure better mowing
performance and proper discharge of
material. Regulate ground speed by
selecting a low enough gear to give the
mower cutting performance as well as
the quality of cut desired.
• When operating attachments, select a
ground speed that will suit the terrain
and give best performance of the
attachment being used.
17
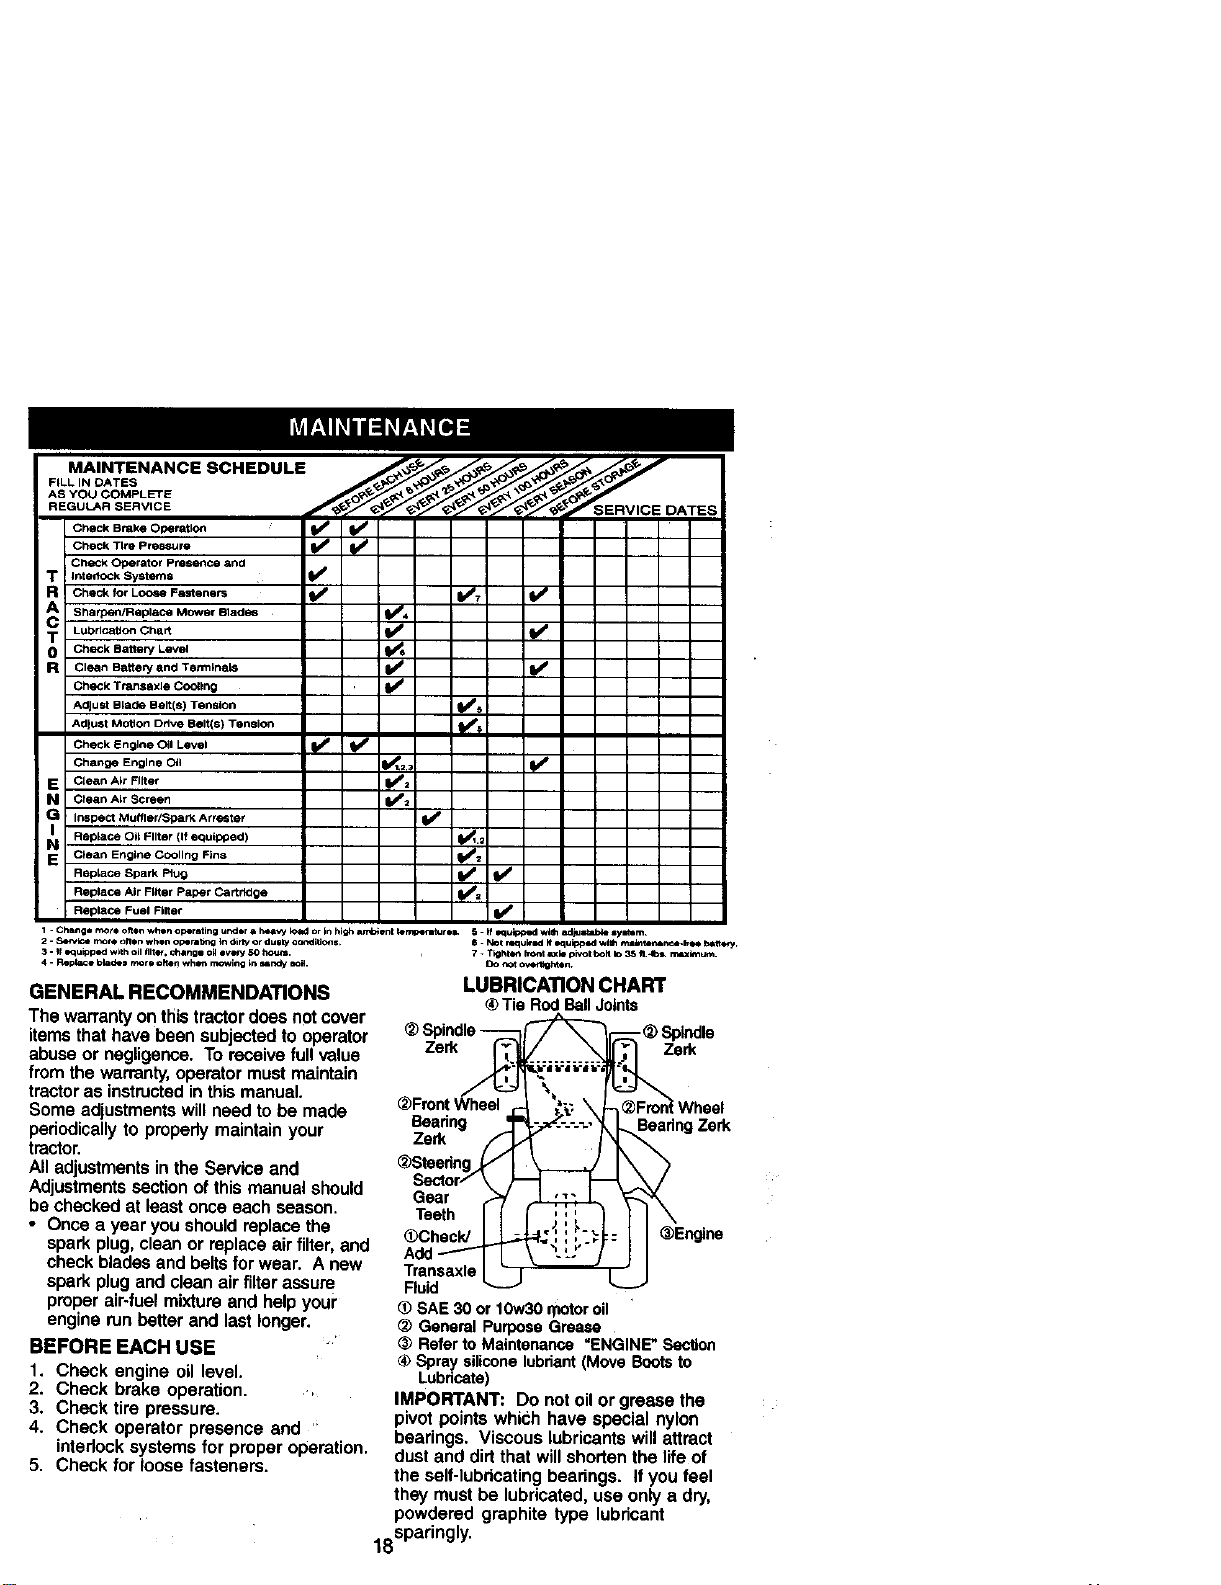
MAINTENANCE SCHEDULE __._J_j,_ ____.,J_
AsYouCOMPLETE f__"X_.
Check Tire Pr_56ure
Check Operator Presence and
T InterlOCkSystems I1_
R CheCkforLOO_eFasteners _ ii,/7 k#'
cA Sharpen/Replace MOwerBlades S/'4
T Lub_caUOnCha_ I/' t/
0 CheCkBatten/Level 1_6
R Clean Battery and Ten_lna_ 11_ I_
CheCk Trarl$SXle Oo_lng I_
A_ust Blade Belt(s) Tension _ld_
AdJust Motion Ddve Belt(s) Tension i1_
CheCkEngine Olt Level _
Change Engine Oil (l_t =_:
E Clean A& Filter I1_=
N Otean ALr Screen _=
Inspect Mt_flerlSpark Arr_ter I_
Replace Oil Filter (If equiPtOed) I1_1.=
a Clean EngLne C_llng Flne _z
Replace Spark PlUg _
Replace Air Filter Paper Cartr;dge _=
Replace Fuel Filter V t
1 -Changemoleo_enwhenoperatingundersheaWto_lorlnhlgharr4mentk_mo_m_ute_. 5.ff_<luippedw4_adlustsb_lymrn.
2. Service mote ofte_ when ope ra_,g _n dirty or du0ly o¢_di_ons, $. NOt requkld ff _quipped wH_ ma_ma_b_ b=tterf,
3. _ =qu_oped w_lh oil #lte_. r_langl og avery 5O hour=.
4. Reldace bkad_ mote open wh_ mowing in undy cog.
GENERAL RECOMMENDATIONS
The warrantyonthistractordoesnotcover
itemsthathavebeen subjectedto operator
_) Spindle_
7. Tight _r= Iron4 _le pivot bolt to 35 fl.4_k rr_xk_u_.
Do not over_hten.
LUBRICATION CHART
® Tie Rod BallJoints
abuseor negligence.Toreceivefullvalue
fromthe warranty,operatormustmaintain
tractoras instructedinthismanual.
Someadjustmentswill needtobe made
periodicallyto properlymaintainyour
tractor.
Alladjustmentsin theServiceand
Adjustmentssectionofthismanualshould
be checkedat leastonceeach season.
• Once a year youshouldreplacethe
sparkplug,cleanor replaceairfilter,and
Zerk_
_Front Wheel r-
Besring _=
Zerk
_)Steedng_,/ I
Sector/\ )-
Gear ,_
TeethII
_)ChecW
checkbladesandbeltsforwear. A new
sparkplugand cleanairfilterassure
properair-fuelmixture and helpyour
enginerunpetter and lastlonger.
BEFORE EACH USE '
I. Check engine oillevel.
2. Check brake operation.
3. Checktire pressure.
4. Check operatorpresenceand
interlocksystemsfor proper operation.
5. Checkfor loosefasteners.
Fluid _--j
(_ SAE 30 or 10w30 motor oil
(_ General PurposeGrease
_) Refer toMaintenance "ENGINE" Sec_oo
@ Spray siliconelubriant(Move Bootsto
Lubricate)
IMPORTANT: Do not oil or grease the
pivot points which have special nylon
bearings. Viscous lubricants will attract
dust and dirt that will shorten the life of
the self-lubricating bearings, If you feel
they must be lubricated, use only a dry,
powdered graphite type lubricant
18sparingly.
 Loading...