

Craftsman 917270623 Owner’s Manual
Owner's Manu_
£RRFTSMRW
15.5 HP
ELECTRIC START
42,'MOWER
AUTOMATIC _
LAWN TRA t'OR
Model NO.
917.270623
• Safety
• Assembly
• Operation
• Maintenance
; Repair P-arts
CAUTION:
Read and follow all
Safety Rules and Instructions
before operating this equip
ment.
Seam, Roebuck and Co., Hoffman Estates, IL 60179
F<_ranswersto yourquestions _
about this product, Call:
1-800-659-5917
Sears Craftsman HelpUne
5 am - 5 pro, Mon- Sat

Warr_anty....__.............................................2
SafetyRules...........................................2
ProductSpecifications...........................5
Assembly......._................_.......................8
Operation..............................................11
MaintenanceSchodule.........................18
Maintenance.............," ...................:._18
Se_ce andAdjustments......................22
Storage.................................................28
Troubleshooting.....................;..............30
RepairParts.........................................34
PartsOrdering.......................BackCover
LIMITEDTWO YEARWARRANTY ON CRAFTSMANRIDING EQUIPMENT
Fortwo (2) yearsfromthedateofpumhase,ifthisCraftsmanRidingEquipmentismain-
tained,lubricatedandtunedupaccordingtothe instructionsinthe owner'smanual,
Searswill repairor replace,freeof charge,anypartsfoundto be defectiveinmaterialor
workmanship.
ThisWarrantydoes notcoven
• Expandableitem,swhichbecomewomduringnormaluse,suchas blades,spark
plugs,air cleaners,belts, etc.
• Tire replacementor repaircausedby puncturesfrom outsideobjects,suchas nails,
thoms,stumps, orglass.
• Repairsnecessarybecauseofoperatorabuse,negligence,improperstorage oracci-
dent orthe failure tomaintainthe equipmentaccordingtotheinstructionscontainedin
the owner'smanual.
• Ridingequipmentusedfor commercial orrentalpurposes.
LIMITED 90 DAYWARRANTYON BA'N'ERY
Forninety(90) daysfromdateof purchase,ifanybatteryincludedwiththisridingequip-
mentprovesdefectiveinmaterialorworkmanshipand ourtestingdeterminesthebat-
tsrywill notholda charge,Searswillreplacethe batteryat no charge.In-homewarranty
serviceon yourCraftsmenridingequipment isavailableat no chargefor30 daysfrom
thedate ofpurchase. Pleasecontact your nearestservicecenter.After30 daysfrom the
dateof purchase,warrantyservice is availablebytakingyourCraftsmanridingequip-
m_ntto yournearestSears ServiceCenter.(In-homewarrantyservicewillstill beavail-
able after30 daysfromthe date ofpurchasebuta standardtripchargewillapply).This
warrantyappliesonlywhilethisproductis inthe UnitedStates.ThisWarrantygivesyou
specificlegaldghts,andyou mayalsohaveotherrightswhichmayvary fromstateto
state:
Sears, RoebuckandCo., D/817 WA, HoffmenEstates,IL 60179
GENERAL OPERATION"
• Read, understand, and follow all instruc-
tions inthe manual and on the machine
before starting.
• Only allow responsible adults, who are
familiar with the instructions, to operate
the machine.
• Clear the area of objects such as rocks,
toys, wire, etc., which could be picked
up and thrown by the blade.
• .Be,,sW_the__areais clear of other people
before mowing. Stop machine if anyone
enters the area.
• Never carry p&_sengers.
, Do not mow in reverse unless absolute-
ly necessary. Always look down and
behind before and while backing.
• Be aware of the mower discharge direc-
tion and do not point it at anyone. Do
notoperate the mower without either
the entire grass catcher or the guard in
place.
• Slow down before turning.
• Never leave a running machine unat-
tended; Always turn off blades, set park-
ing brake, stop engine, and remove
keys before dismounting.
2

Tumblrbladas when not mowing.
Stop engine before removing grass
catcher or unclogging chute.
Mow only in daylight or good artifloial
light.
Do not operate the machine while under
the influence of alcohol or drugs.
Watch for traffic when operating near or
crossing roadways.
Use extra care when loading or unload-
ing the machine into a trailer or truck.
;LOPE OPERATION
;lopes are a major factor related to loss-
,f-controland tipover accidents, which
:anresult in severe injury or death. All
lopes reqhim-eXtPacaution. If you cannot
up the slope or if you feel uneasy on
:,do not mow if.
)0:
Mow up and down slopes, not across.
Remove obstacles such as rocks, tree
limbs, etc.
Watch for holes, ruts, or bumps. Uneven
terrain could overturn the machine. Tall
grass can hide obstacles.
Use slow speed. Choose a low gear so
that you will not have to stop or shift
while on the slope.
Follow the manufacturer's recommen-
dations for wheel weights or counter-
wel'ghtsto improv_ .stal:)ilify.
Use extra care with grass catchers or
other attachments. These can change
the stability of the machine.
Keep all movement on the slopes slow
and gradual. Do not make sudden
changes in speed or direction.
"Avoid starting or stopping on a slope. If
tires lose traction, disengage the blades
and proceed slowly straight do'_'n the
slope.
,O NOT:
Do nottum on slopes unless necessary,
and then, tum slowly and gradually
downhill, if possible.
Do not mow near drop-offs, ditches, or
embankments. The mower could sud-
denly tum over if a wheel is over the
edge of a cliff or ditch, or if an edge
caves in.
Do not'i_IB_ on_l_etgrass. Reduced
traction could cause sliding.
• Do nottry to stabilize the machine by
putting your foot on the ground.
• Do not use grass catcher on steep
slopes.
CHILDREN
Tragic accidents can occur if the operator
is not alert to the presence of children.
Children are often attracted to the
machine and the mowing activity. Never
assume that children will remain where
you last saw them.
• Keep children out of the mowing area
•and under the watchful care of another
responsible adult.
• Be alert and tum machine off if children
enter the area.
• Before and when backing, look behind
and down for smell children.
• Never carry children. They may fag off
and be: seriously injured or interfere with
safe machine operation.
• Never allow children to operate the
machine.
• Use extra care when approaching blind
comers, shrubs, trees, or other objects
that may obscure vision.
SERVICE
• Use extra care in handling gasoline and
other fuels. They are flammable and
vapors are explosive.
- Use only an approved container.
- Never remove gas cap or add fuel
with the engine running. Allow en-
gine to cool before refueling. Do not
smoke.
- Never refuel the machine indoors.
- Never store the machine or fuel
container inside where there is an
open flame, such as a water heater.
• Never run a machine inside a closed
area.
attachment bolts, tight and keep equip
mant in good condition.
Never tamper with safety devices.
Check their proper operation regularly.
Keep machine free of grass, leaves, or
other debris build-up. Clean oilor fuel
Keep nuts and belts, especially blade
spillage. Allow machine to cool before
stodng.
Stop and inspect the equipment if you
stdke an object. Repair, if necessary,
before restarting.
Neyer make adjustmentsorrepairswith
the enginerunning.
Grasscatchercomponentsaresubject
towear, damage, and deterioration,
whichcouldexposemovingpartsor
allowobjectsto be thrown.Frequently
checkcomponents andreplacewith
manufacturer'srecommendedparts,
when necessary.
• Mower bladesare sharpandcan cut.
Wrapthe blade(s) orwear gloves,and
use extracaution whenservicing them.
• Check brakeoperationfrequently.
Adjustand serviceas required.
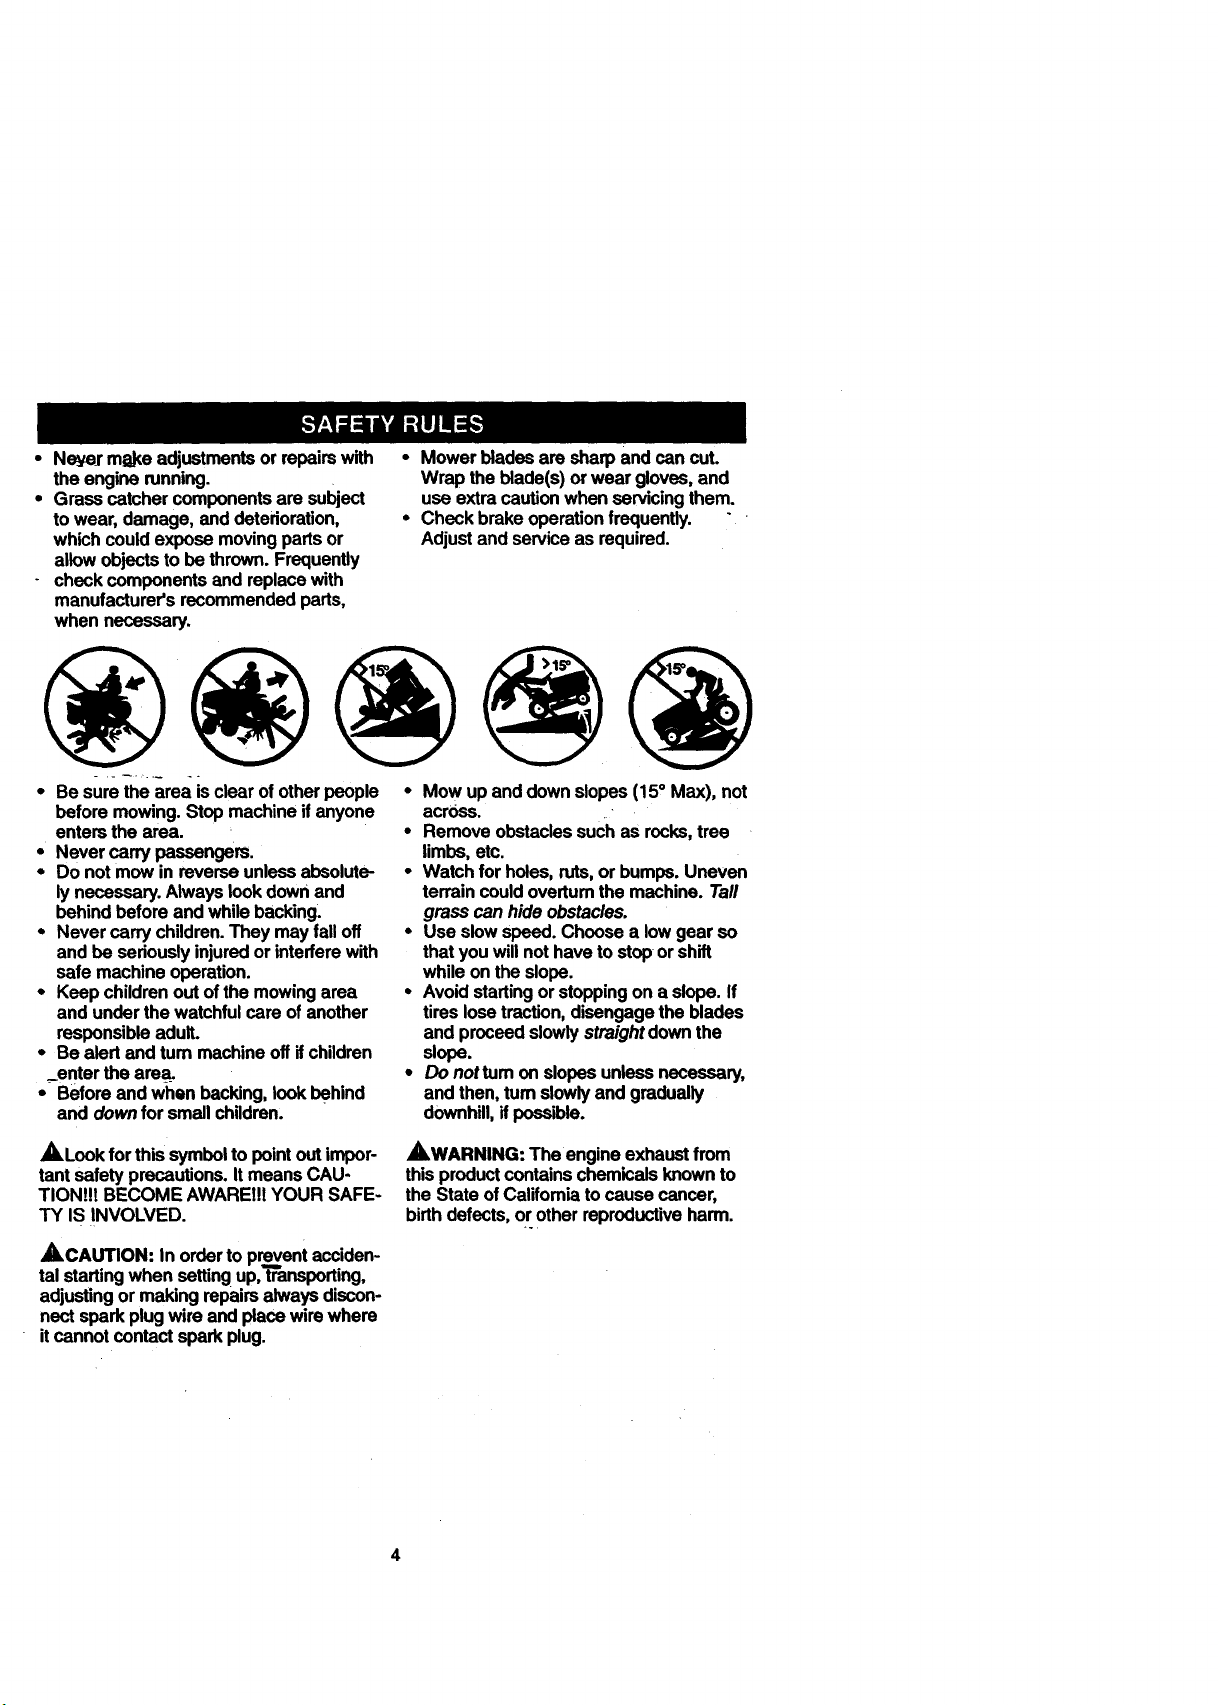
• Besurethe area isclearof otherpeople • Mow up anddownslopes(15° Max), not
before mowing.Stopmachineifanyone
entersthe area.
• Nevercarry passengers.
• Do notmow in reverseunlessabsolute-
lynecessary.Alwayslookdownand
behindbefore andwhile backing.
• Nevercarry children.They mayfalloff
and be seriously injuredor interferewith
safe machineoperation.
• Keepchildrenoutofthemowingarea
and underthewatchfulcare of another
responsibleadult.
• Be alertand tum machineoffifchildren
_enterthe area
• Before andwhen backing,lookbehind
and downfor smallchildren.
_Look for this symbol to point out impor-
tant safety precautions. It means CAU-
TION!!! BECOME AWAREI!I YOUR SAFE-
TY IS INVOLVED.
_CAUTION:
tal starting when setting up, transporting,
adjusting or making repairs always discon-
nect spark plug wire and place wire where
itcannot contact spark plug.
In order to prevent acciden-
across.
• Removeobstaclessuchas rocks,tree
limbs,etc.
• Watchfor holes,ruts,or bumps.Uneven
terraincould overtumthemachine.Tall
grasscanhide obstacles.
• Use slowspeed.Choosea lowgearso
thatyouwillnothaveto stoporshift
whileonthe slope.
• Avoidstartingorstoppingona slope.If
tireslosetraction,disengagetheblades
and proceedslowlystraightdownthe
slope.
• Do nottum onslopesunlessnecessary,
and then,turnslowlyandgradually
downhill,if possible.
_WARNING: The engineexhaustfrom
thisproductcontainschemicalsknownto
the Stateof Califomiato causecancer,
birthdefects,or otherreproductiveharm.
o..
4

PRODUCTSPECIFICATIONS
GASOUNE 1.25GALLONS
CAPACITY UNLEADED
AND'PiPE:- REGULAR
)ILTYPE SAE30
_,PI-SF/SG/SH): (above 32°F)
SAE 5W-30
(below 32°F)
OIL CAPACITY: 3.0 PINTS
SPARK PLUG: Champion RC12YC
SAP:.030")
VALVE INTAKE: .003"-.005"
CLEARANCE: EXHAUST: .005"-.007"
GROUND SPEED .FORWARD: 0 - 5.7
MPH): REVERSE: 0- 2.7
TIRE PRESSURE: FRONT: 14 PSI
REAR: 12 PSI
CHARGING 3AMPS BA'n'ERY
SYSTEM: 5AMPS HEADLIGHTS
BATTERY: AMP/HR: 25
MIN. CCA:190
CASE SIZE: UIR
BLADE BOLT 27-35 FT. LBS.
TORQUE:
CONGRATULATIONS on your purchase
of a Craftsman Tractor. It has been
designed, engineered and manufactured
to clive you the best possible dependability
and performance.- _
Should you experience any problem you
cannot easily remedy, please contact your
nearest Sears Authorized Service Center.
We have competent, well-trained techni-
cians and the proper tools to service or
repair this tractor.
"Please fead and retain tllis manual. The
instructions will enable you to assemble
and maintain your tractor prope'rly.Always
observe the "SAFETY RULES".
MAINTENANCE AGREEMENT
A Seam MaintenanceAgreementis avail-
able onthis product.Contactyournearest
Searsstore fordetails.
CUSTOMER RESPONSlBILmES
• Read and observe the safety rules.
• Follow a regular schedule in maintain-
ing, caring for and using your tractor.
• Follow the instructions under "Mainte-
nance" and •'Storage" sections of this
owner's manual.
,_,WARNING: This tractor is equipped
with an internal combustion engine and
should not be used on or near any unim-
proved forest-covered, brush-covered or
grass-covered land unless the engine's
exhaust system is equipped with a spark
attester meeting applicable local or state
laws (if any). ifa spark arrester is used, it
should be maintained in effective working
order by the operator.
In the state of California the above is
required by law (Section 4442 of the
California Public Resources Code). Other
states may have similar laws. Federal
laws apply on federal lands. A spark
attester for the muffler is available through
your nearest Sears Authorized Service
Center (See REPAIR PARTS section of
this manual).
5
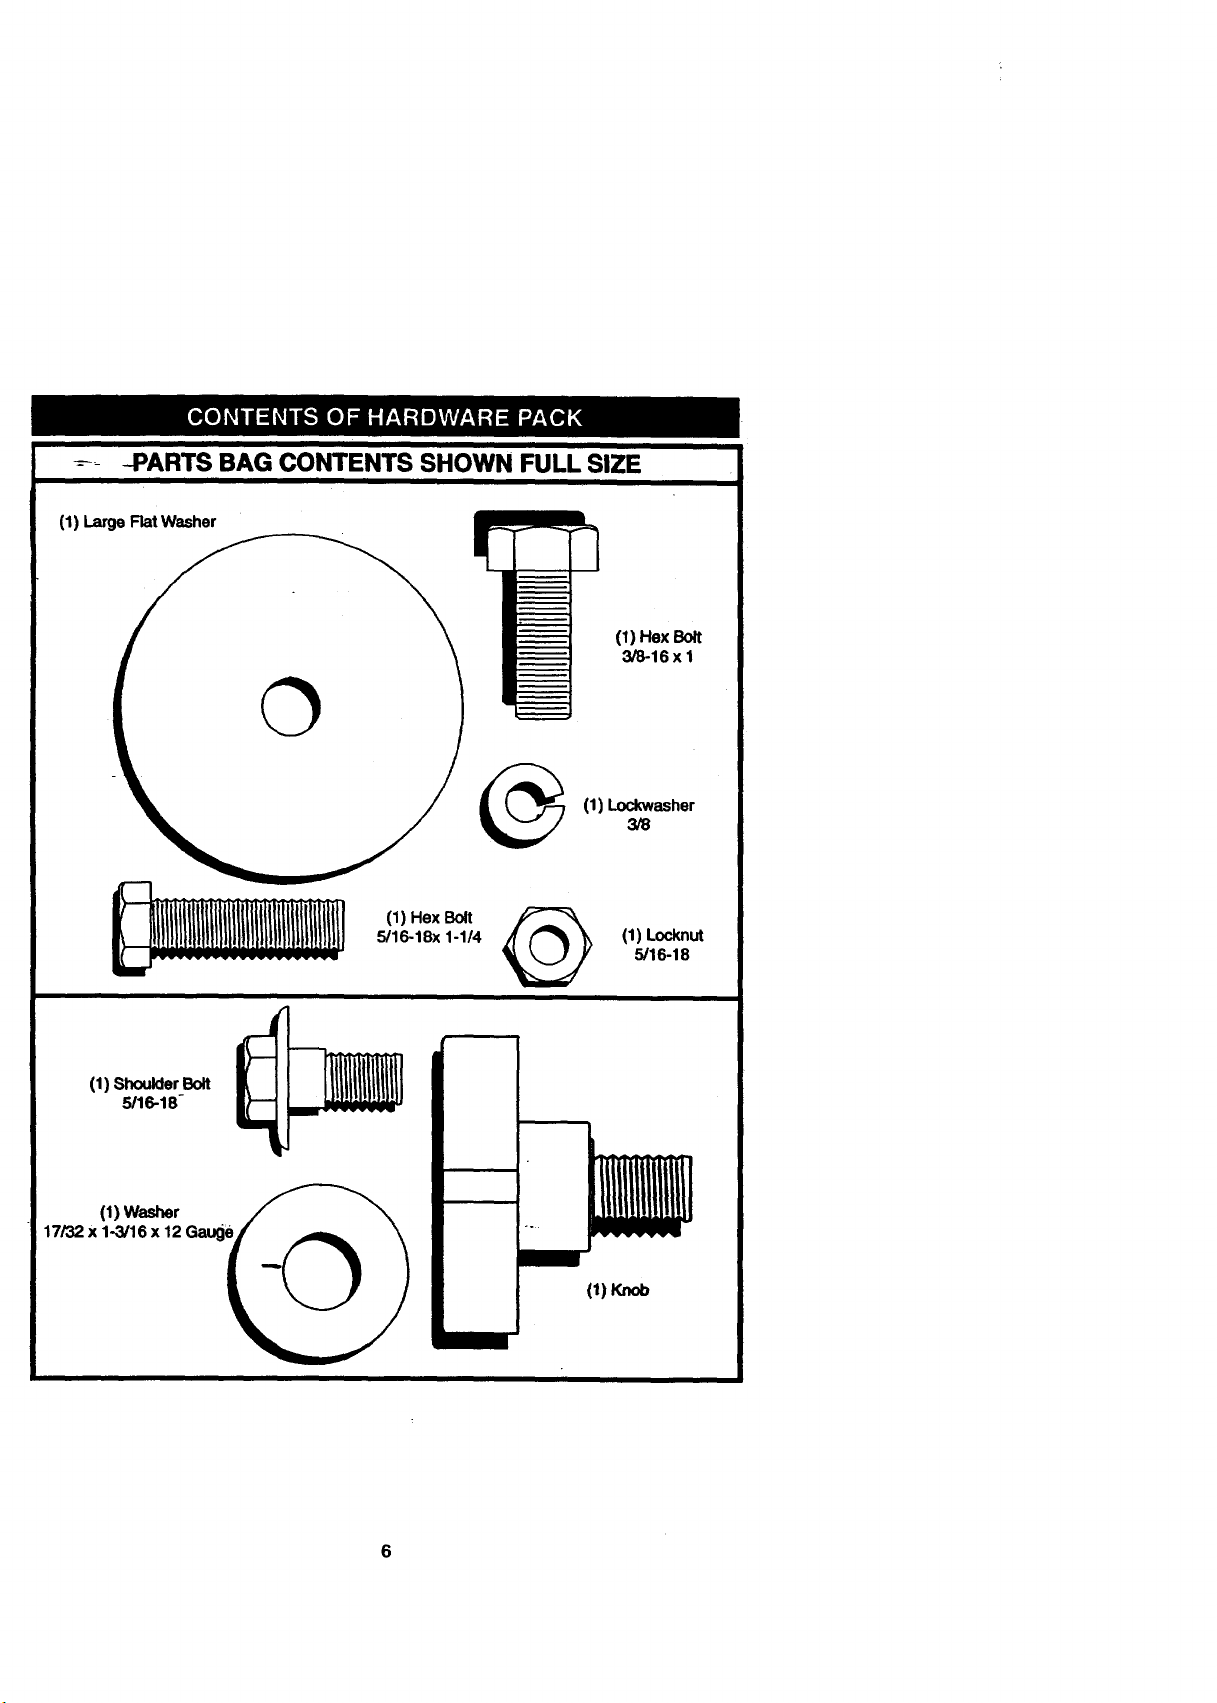
---_ -PARTS BAG CONTENTS SHOWN FULL SIZE
(1) Large Flat Washer
O
(1) Lockwasher
(1) Hex Bolt
5/16-18x 1-1/4
@
(1) Hex Bolt
3/8-16 x I
3/8
(1) Locknut
5/16-18
(1) Shoulder Bolt
5/16-18-
(I) Knob

- - P-ARTS BAG CONTENTS SHOWN FULL SIZE
(2)Screws _ (2) Lock
#10 x5/8 _ Washers#10
(2)Weld Nuts I_ I
#10
-tJ
Partspacketseparatelyincarton PartsBagcontentsnotshownfullsize
3/16 (2)3/Wxl_auge_
Seat
SteermgWheel
Manual
Mulcher
St_o_tg
Plate_
Video
Cassette
Parts Bag
,,
(2).LatchHook
Assemblies
._ Wheel Insert
SteedngWheel <:_
Adapter
(2) Keys
Steedng ='
Extendon
SlopeSheet
Steer=ng
Shaft
O
7
Your-new-tractorhasbeenassembledatthefactorywithexceptionofthosepartsleft
unassembledforshippingpurposes.Toensuresafe_nd proper operation of your tractor
all parts and hardware you assemble must be tightened securely. Use the correct tools
as necessary to insure proper tightness. Review the video cassette before you begin.
TOOLS REQUIRED FOR
. ASSEMBLY
Asocketwrenchset willmakeassembly
easier.Standardwrenchsizesyouneed
are listed below.
(1) 9/16" wronch
(1) 3/4" wrench
(2) 1/2" wrench
(1) Utilityknife
(1)Pliers
........ gauge
When rightor left hand is mentioned in
this manual, it means, from your point of
view, when you are in the operating posio
tion (seated behind the steedng wheel).
TO REMOVE TRACTOR FROM
CARTON
UNPACK CARTON
• Remove all accessible loose parts and
parts boxes from shipping carton (See
page 6).
• Cut, from top to bottom, along lines on
all four comers of shipping carton, and
lay panels flak
--.-Check for any additional loose parts or
boxes and remove.
BEFORE ROLLING TRACTOR OFF
SKID
ATTACH STEERING WHEEL
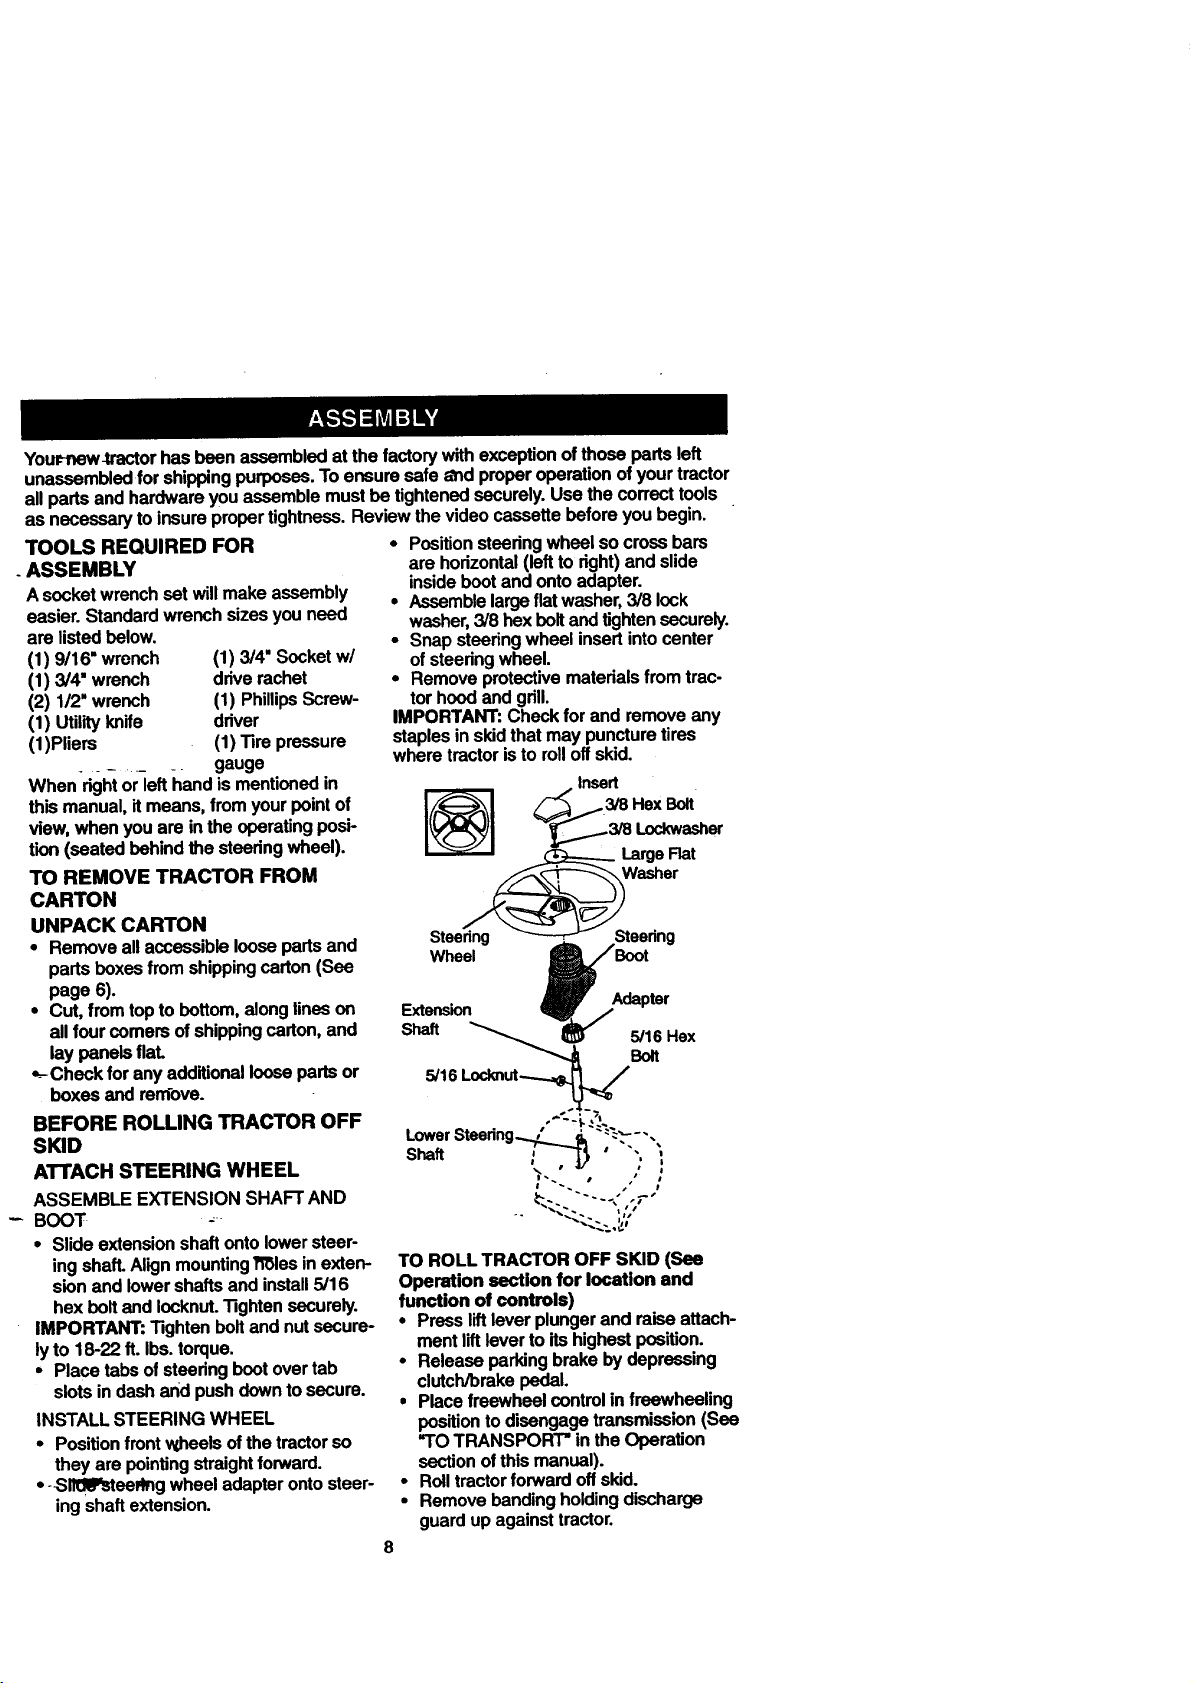
ASSEMBLE EXTENSION SHAFT AND
-- BOOT _
• Slide extension shaft onto lower steer-
ing shaft. Align mounting l_les inexten-
sion and lower shafts and install 5/16
hex belt and Iocknut. "l]ghten securely.
IMPORTANT: "r_jhten bolt and nutsecure-
ly to 18-22 ft. Ibs. torque.
• Place tabs of steering boot over tab
slots in dash and push down to secure.
INSTALL STEERING WHEEL
• Position front wheels of the tractor so
they are pointing straight forward.
• -Slll_z_eel_ng wheel adapter onto steer-
ing shaft extension.
(1) 3/4" Socket w/
ddve rachet
(1) Phillips Screw-
driver
(1) "tire pressure
• Position steering wheel so cross bars
are horizontal (left to fight) and slide
inside boot and onto adapter.
• Assemble large flat washer, 3/8 lock
washer, 3/8 hex bolt and tighten securely.
• Snap steering wheel insert into center
of steering wheel.
• Remove protective materials from trac-
tor hood and grill.
IMPORTANT: Check for and remove any
staples in skid that may puncture tires
where tractor is to roll off skid.
. Inseam/8Hex Bolt
._3/8 Lockwasher
_Large Rat
5/16 Locknut.__//
LowerSteedng_ S, "_._--.
Shaft ; -"'t'{ • "., ;
-,..""..% ,,'!
TO ROLL TRACTOR OFF SKID (See
Operation section for location and
function of controls)
• Press lift lever plunger and raise attach-
ment lift lever to its highest position.
• Release parking brake by depressing
clutch/Drake pedal.
• Place freewheel control in freewheeling
position to disengage transmission (See
"TO TRANSPORT" in the Operation
section of this manual).
• Roll tractor forward offskid.
• Remove banding holding discharge
guard up against tractor.
8
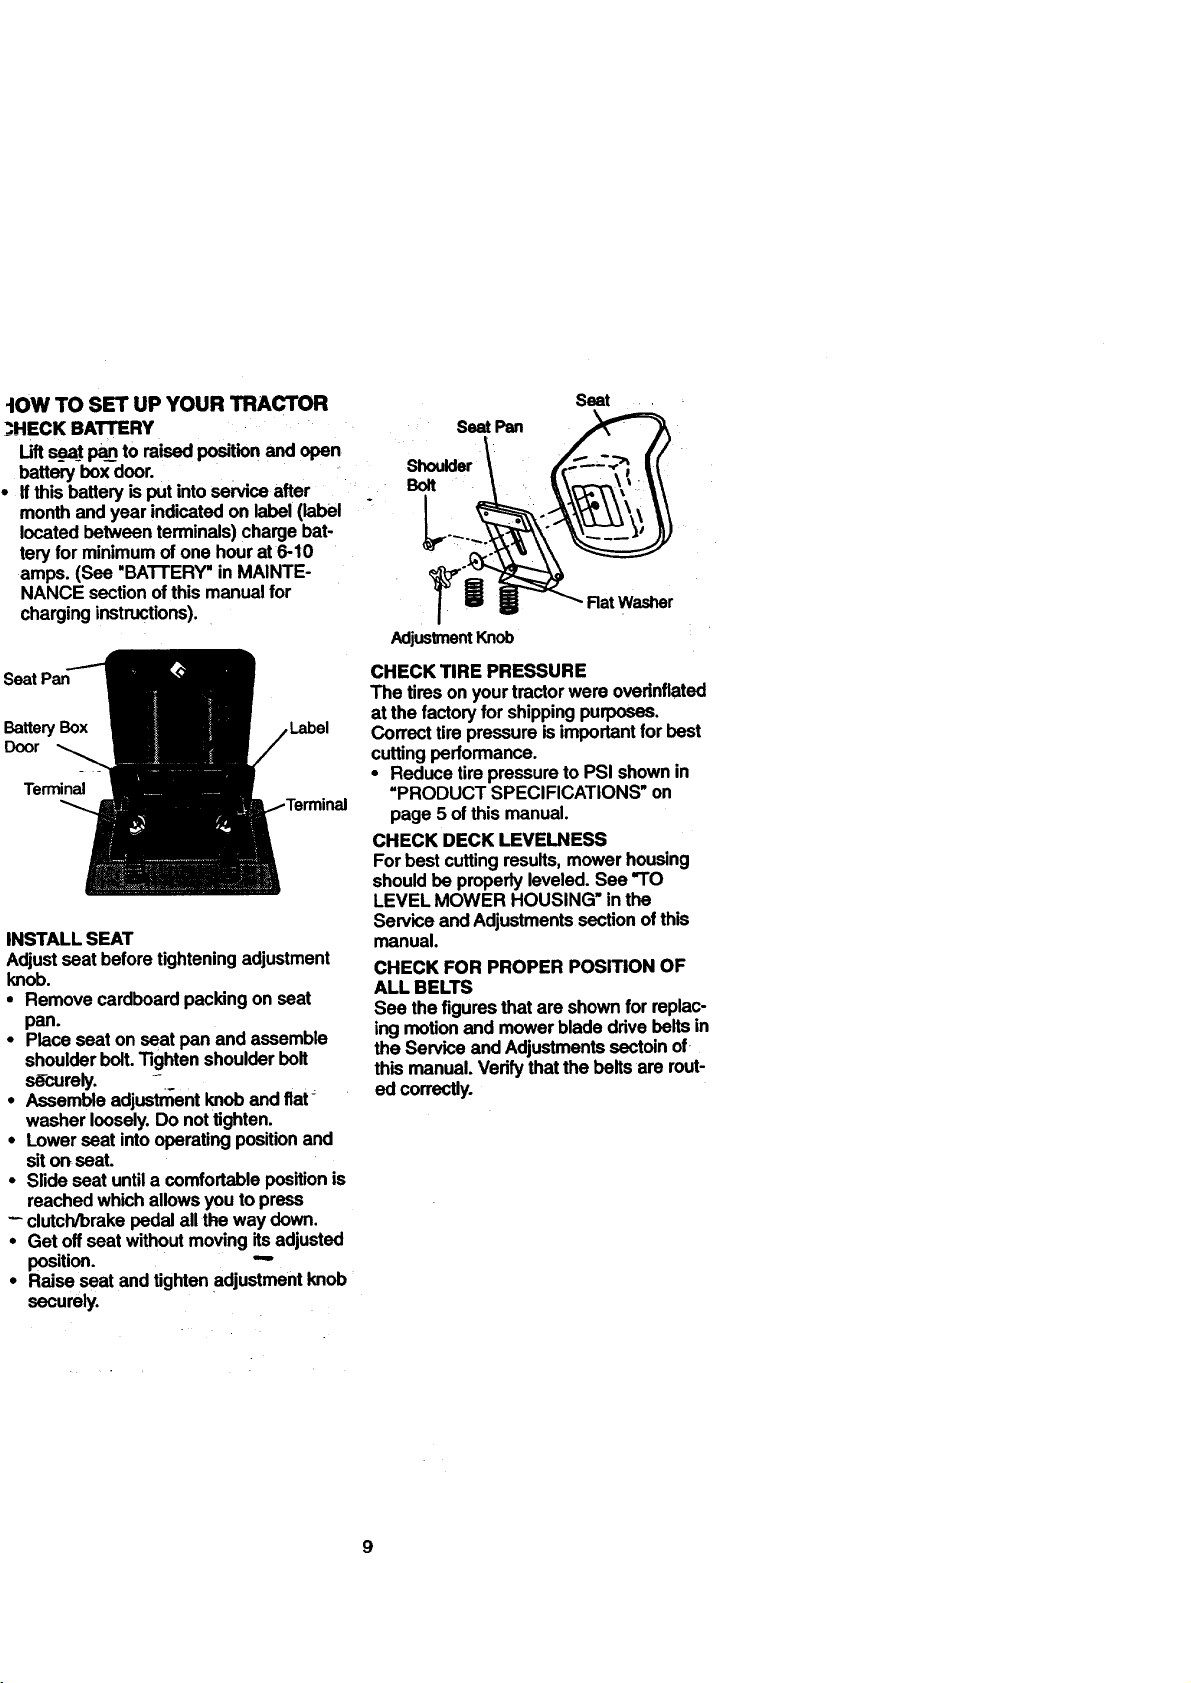
lOWTOSETUPYOURTRACTOR
_'-HECKBATTERY
Liftssss_t_ to raised position and open
battery box door.
• If this battery is put into service after
month and year indicated on label (label
located between terminals) charge bat-
tery for minimum of one hour at 6-10
amps. (See "BA'I-I'ERY" in MAINTE-
NANCE section of this manual for
charging instructions).
Seat Pan
BatteryBox
Door
Terminal
INSTALL SEAT
Adjustseat beforetighteningadjustment
knob.
• Removecardboardpackingonseat
pan.
• Placeseatonseatpanandassemble
shoulderbolt.Tightenshoulderbolt
,_rely. .....
• Assembleadjustmentknob andfiat:
washer loosely.Do nottighten.
• Lowerseat intooperatingpositionand
siton seat.
• Slide seatuntila comfortablepositionis
reachedwhichallowsyouto press
clutch/brakepedalall the way down.
• Get off seatwithoutmovingitsadjusted
position. -"
• Raiseseat andtighten adjustmentknob
securely.
Seat
SeatPan
i •
Shoulder
Bolt
L,r--_.,
Washer
Adjusl_nant Knob
CHECK TIRE PRESSURE
The tiresonyourtractorwere ovednflated
at thefactory for shippingpurposes.
Correcttire pressureisimportantfor best
cuttingperformance.
• Reducetirepressureto PSIshownin
=PRODUCTSPECIFICATIONS"on
page 5 ofthis manual.
CHECK DECK LEVELNESS
Forbest cuttingresults,mowerhousing
shouldbe properlyleveled.See "TO
LEVEL MOWER HOUSING" inthe
ServiceandAdjustmentssectionof this
manual.
CHECK FOR PROPER POSITION OF
ALL BELTS
See the figures that are shown for replac-
ing motion and mower blade drive belts in
the Service and Adjustments sectoin of.
this manual. Verify that the belts are rout-
ed correctly.
CHECK BRAKESYSTEM
6,fter you learn how to operate your trac-
:or,check to see that the brake is propedy
adjusted. See "TO ADJUST BRAKE" in
_heService and Adjustments section of
this manual.
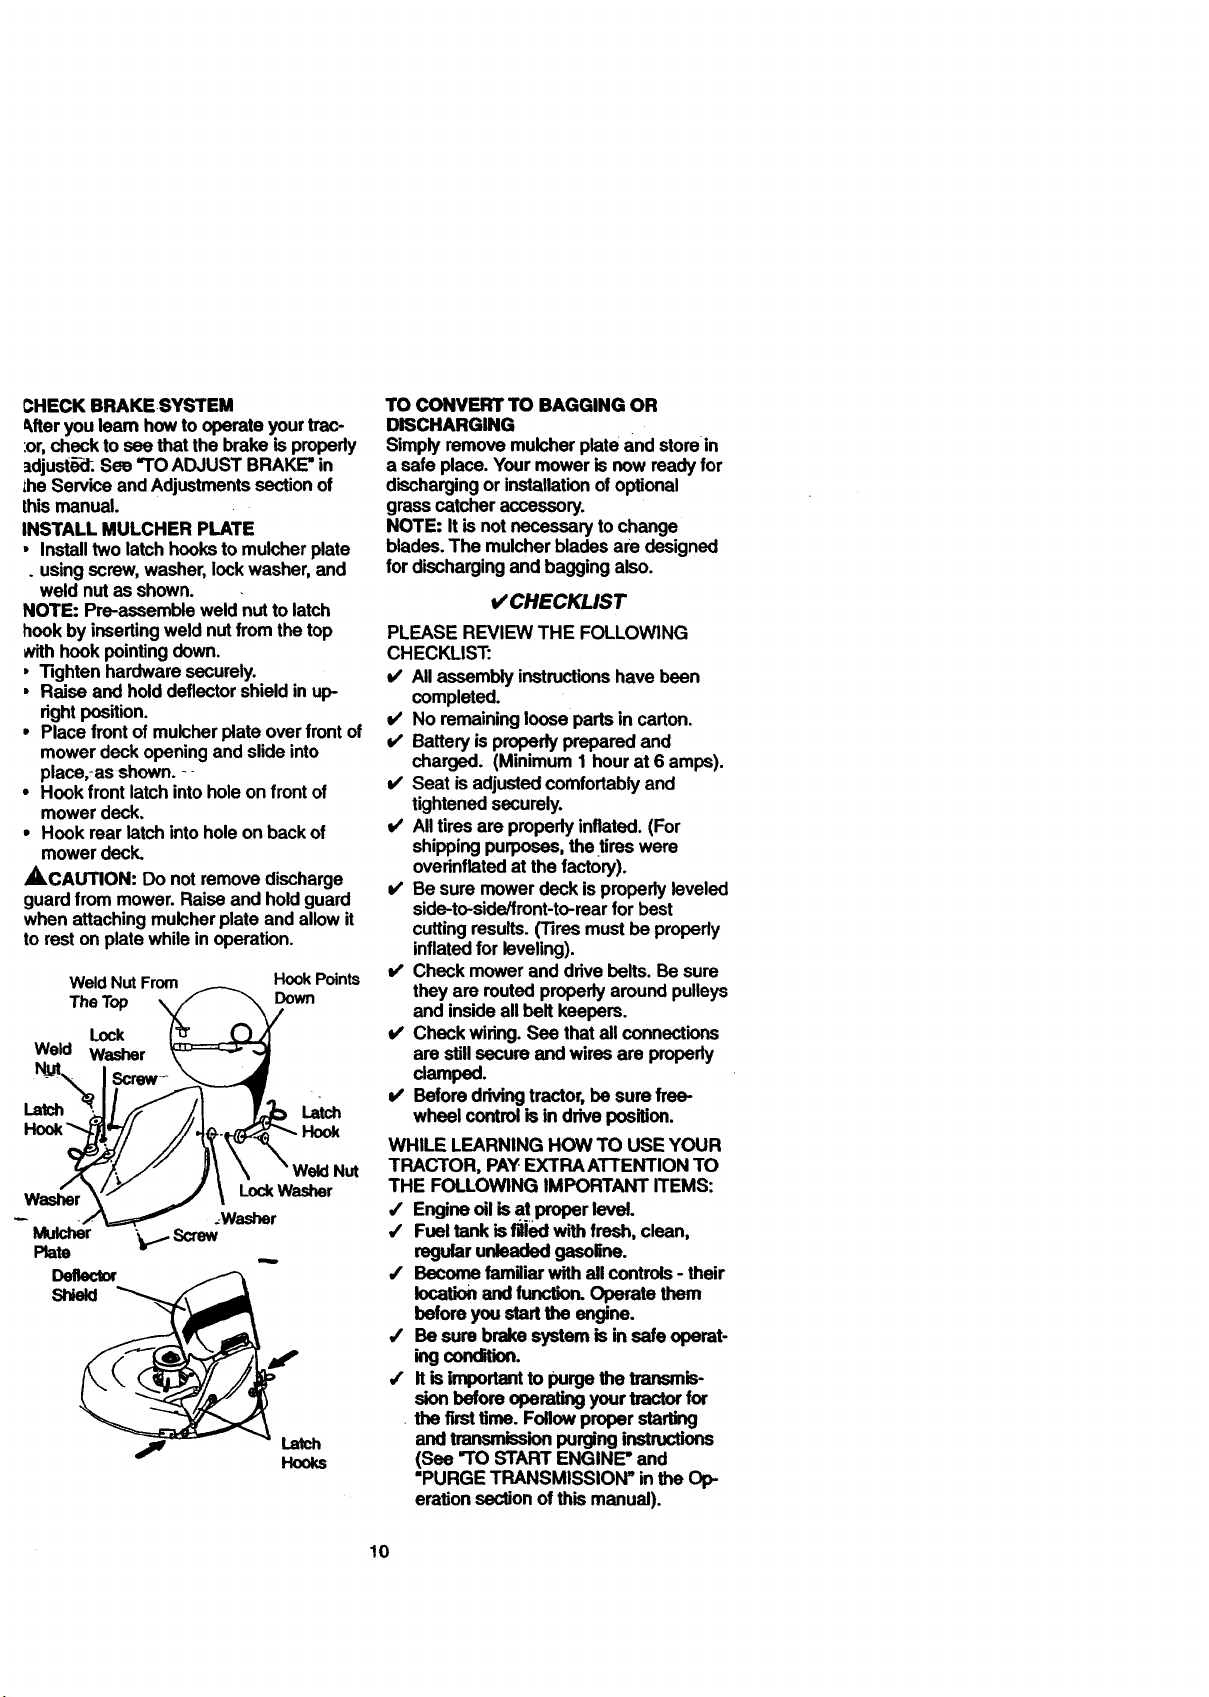
INSTALL MULCHER PLATE
• Install two latch hooks to mulcher plate
. using screw, washer, lock washer, and
weld nut as shown.
NOTE: Pre-assemble weld nut to latch
hook by inserting weld nut from the top
with hook pointing down.
, Tighten hardware securely.
• Raise and hold deflector shield in up-
right position.
• Place front of mulcher plate over front of
mower deck opening and slide into
place,-as shown. --
• Hook front latch into hole on front of
mower deck.
• Hook rear latch into hole on back of
mower deck.
_,CAUTION: Do not remove discharge
guard from mower. Raise and hold guard
when attaching mulcher plate and allow it
to rest on plate while in operation.
Weld Nut From Hook Points
The Top Down
Lock
Weld Washer
Latch Latch
WeldNut
Washer
Mulcher
Rate
Deflecto¢
Shield
"_._.Screw
LockWasher
_Washer
Latch
Hooks
TO CONVERT TO BAGGING OR
DISCHARGING
Simply remove mulcher plate and storein
a safe place. Your mower is now ready for
discharging or installation of optional
grass catcher accessory.
NOTE: It is not necessary to change
blades. The mulcher blades are designed
for discharging and bagging also.
v' CHECKLIST
PLEASE REVIEW THE FOLLOWING
CHECKLIST:
v' All assembly instructions have been
completed.
v' No remaining loose parts in carton.
v" Battery is properly prepared and
charged. (Minimum I hour at 6 amps).
v' Seat is adjusted comfortably and
tightened securely.
v' All tires are properly inflated. (For
shipping purposes, the tires were
overinflated at the factory).
v' Be sure mower deck is properly leveled
side-to-side/front-to-rear for best
cutting results. (Tires must be properly
inflated for leveling).
v' Check mower and drive belts. Be sure
they are routed properly around pulleys
and inside all belt keepers.
v' Check wiring. See that all connections
are stillsecure and wires are propedy
damped.
v' Before driving tractor, be sure free-
wheel control is in drive position.
WHILE LEARNING HOW TO USE YOUR
TRACTOR, PAYEXTRAATTENTION TO
THE FOLLOWINGIMPORTANT ITEMS:
/ Engineoil isatproper level.
,/ Fueltank isfilledwithfresh, clean,
regularunleadedgasoline.
/ Becomefamiliarwithall controls- their
locationand function.Operate them
before youstarttheengine.
,/ Besurebrakesystemis insafe operat-
ingconditi_.
,/ Itis importantto purgethe_is-
sionbeforeoperatingyourtractorfor
. the firsttime.Followproperstarting
_,an,_r_ion purginginstructions
(See "TO START ENGINE"and
"PURGETRANSMISSION" inthe C)p-
erationsectionofthis manual).
10
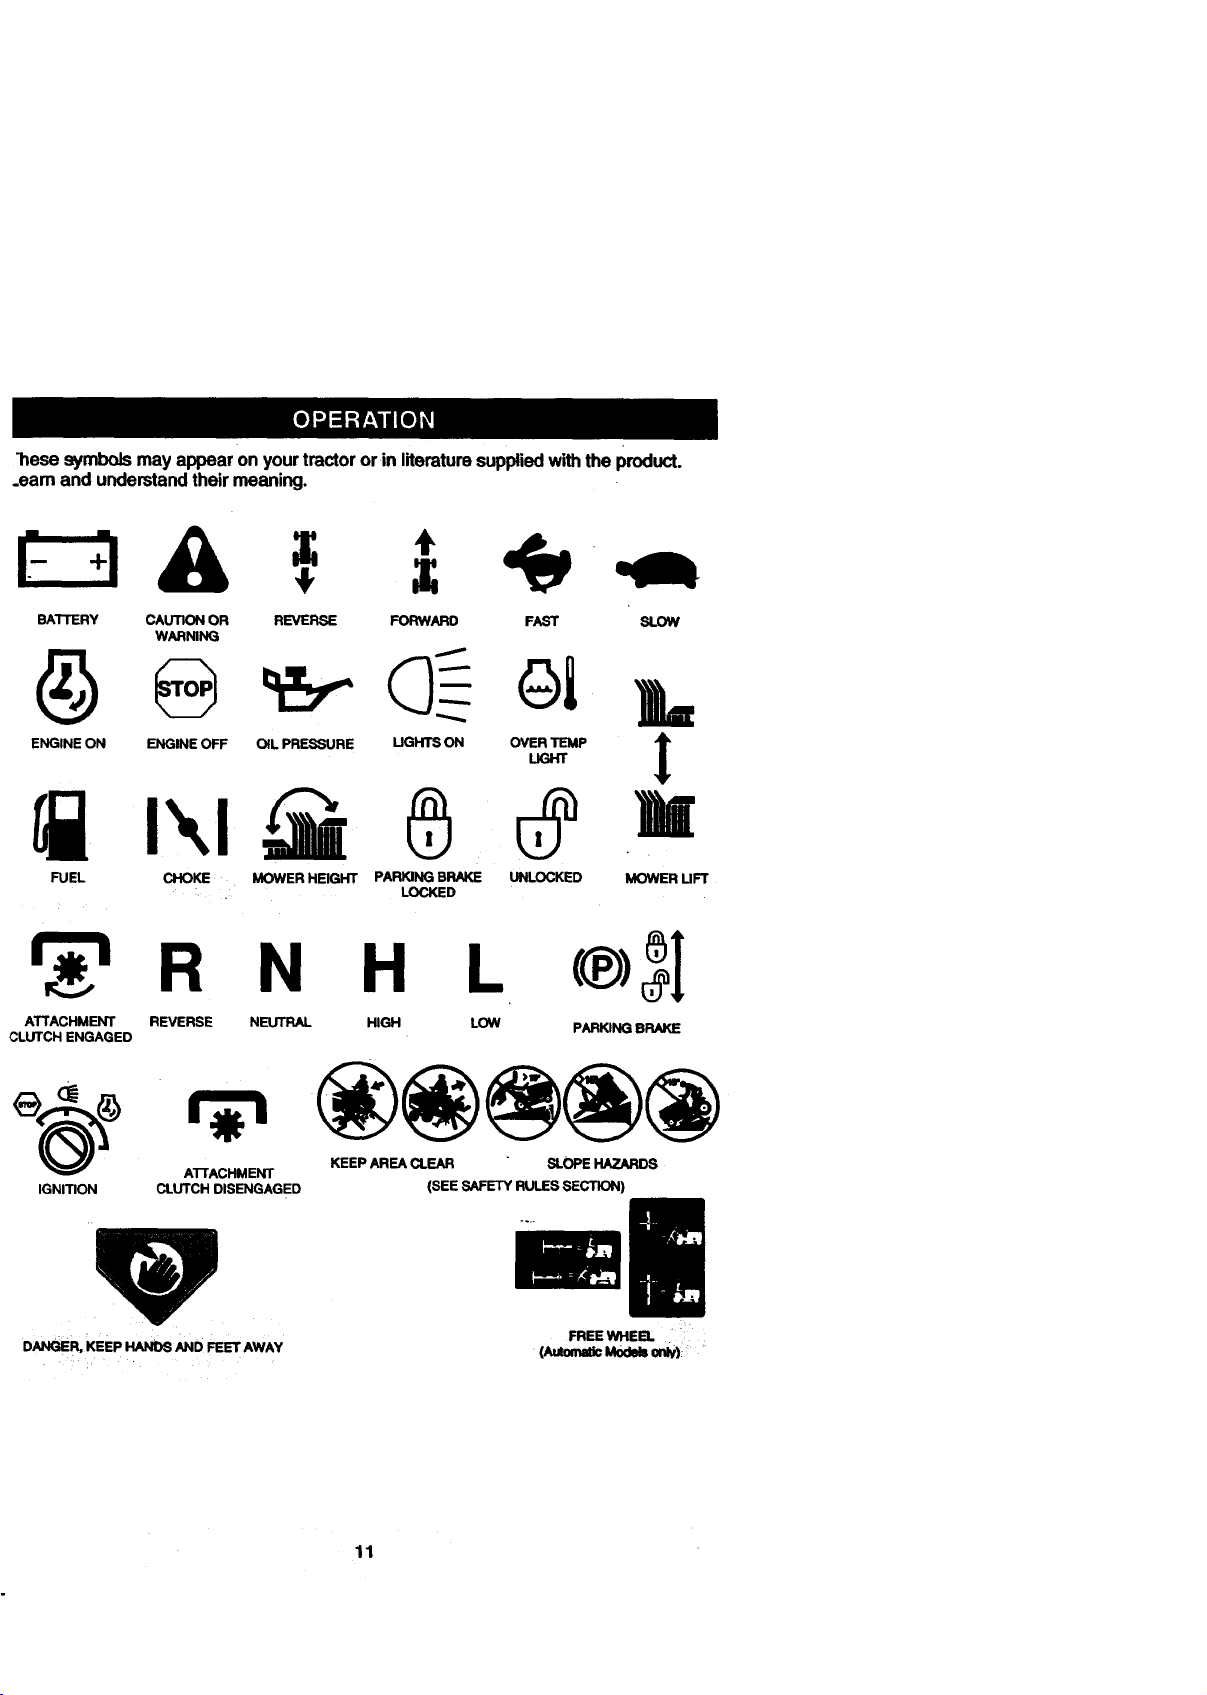
"hesesymbolsmayappearon yourtractororin literaturesuppliedwiththeproduct.
.eam and understandtheirmeaning.
BAI'rlERY CAUTION OR
WARNING
ENGINE ON ENGINE OFF OIL PRESSURE UGHTS ON
REVERSE FORWARD FAST SLOW
!'.,i ®
FUEL
ATTACHMENT REVERSE NEUTRAL
CLUTCH ENGAGED
IGNITION
CHOKE MOWER HEIGHT PARKING BRAKE UNLOCKED
H L (®>_I
HIGH LOW
ATTACHMENT
CLUTCH DISENGAGED (SEE SAFETY RULES SECTION)
KEEP AREA CLEAR SLOPE HAZARDS
LOCKED
MOWER UFT
PARKING BRAKE
D_V_E_,KEEP_ _O FEETAWAY
FREEWHEEL
11
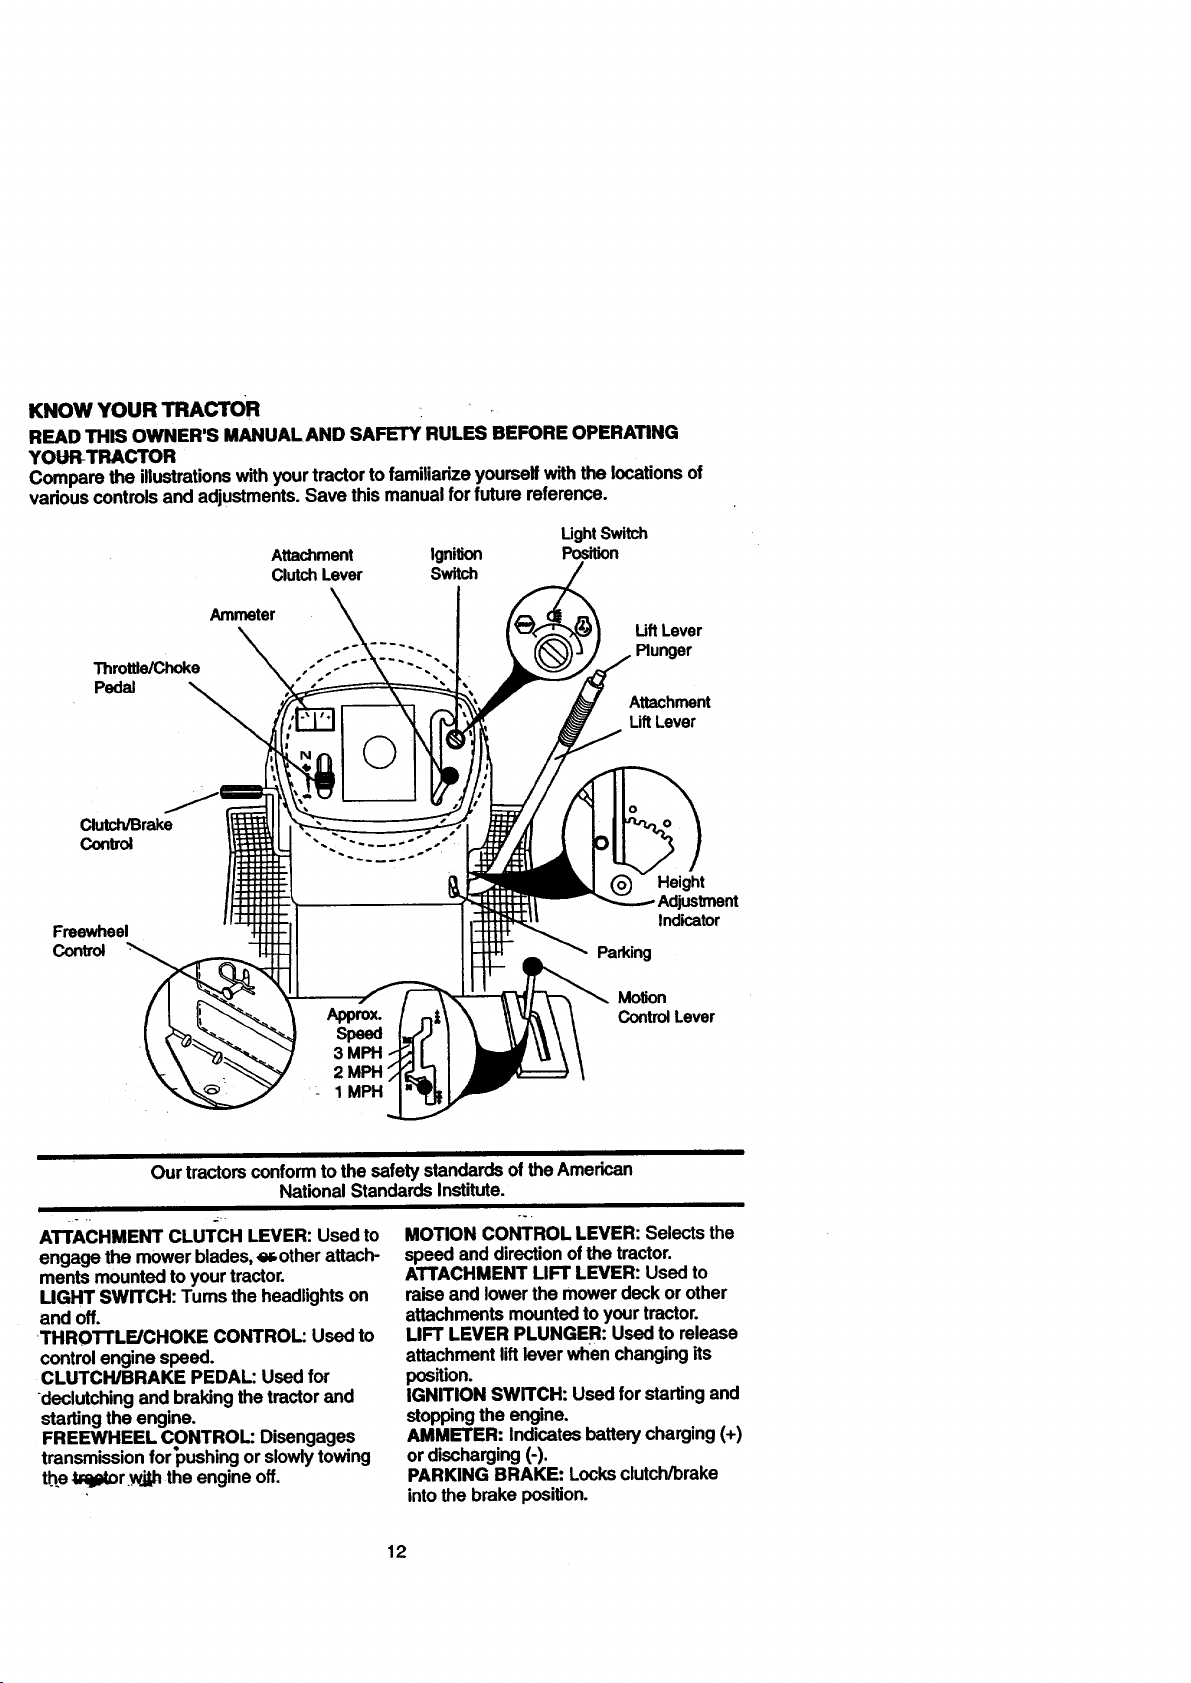
KNOWYOURTRACTOR
READTHISOWNER'SMANUALANDSAFETYRULESBEFOREOPERATING
YOUR-TRACTOR
Comparetheillustrationswithyourtractortofamiliadzeyourselfwiththe locations of
various controls and adjustments. Save this manual for future reference.
Ught Switch
Attachment Ignition
ClutchLever Switch
Position
Throttle/Choke
Pedal
Clutch/Brake
Contro;
Freewheel
Control
Ammeter
Uft Lever
Attachment
Uft Lever
I
Height
Adjustment
Indicator
Parking
Motion
Control Lever
Ourtractorsconformto thesafetystandardsof theAmerican
NationalStandardsInstitute.
ATTACHMENT CLUI:CH LEVER: Used to
engage the mower blades, e_other attach-
ments mounted to your tractor.
MGHT SWITCH: Turns the headlights on
and off.
THROI"rLE/CHOKE CONTROL: Used to
control engine speed.
CLUTCH/BRAKE PEDAL: Used for
declutching and braking the tractor and
starting the engine.
FREEWHEEL CONTROL: Disengages
transmission for_)ushing or slowly towing
t.hetL_W_orw._hthe engine off.
MOTION CONTROL LEVER: Selects the
speed and direction of the tractor.
ATTACHMENT LIFT LEVER: Used to
raise and lower the mower deck or other
attachments mounted to your tractor.
LIFT LEVER PLUNGER: Used to release
attachment lift lever when changing its
position.
IGNITION SWITCH: Used for starting and
stopping the engine,
AMMETER: Indicates battery charging (+)
or discharging (-).
PARKING BRAKE: Locks clutch/brake
into the brake position.
12

The operationofanytractorcanresultinforeignobjectsthrownintothe l
eyes,whichcan resultinsevereeye damage.Alwayswearsafetyglasses
oreye shieldswhileoperatingyourtractororperforming any adjustmentsor
rL_pairs.We recommenda widevisionsafetymaskoverspectacles,orstan-
dardsafety glasses.
I
HOW TO USE YOUR TRACTOR
Yourtractoris equippedwithan oporator
presencesensingswitch.Whenengineis
r0nning,any attempt bythe operatorto
leavethe seatwithoutfirstsettingthe
parkingbrakewillshutoffthe engine.
TO SET PARKING BRAKE
• Depressclutch/brakepedal intofull
"BRAKE" positionand hold.
Placeparkingbrake leverin "EN-
GAGED"position,and releasepressure
fromclutch/brakepedal. Pedalshould
remainin"BRAKE" position.Makesure
parkingbrakewill holdtractorsecure.
Throttle/Choke Attachment Clutch
Control Position
"Brake"
Position
Clutch/Brake *Disengaged" Control
PedaL*Drive" Position Lever
Position_ -
STOPPING
MOWER BLADES
• To stop mower blades, move attach-
ment clutch Lever to "DISENGAGED"
position.
_ROUND DRIVE _'
• To stop ground drive, depres_,,.
clutch/brake pedal into full "BRAKE" po.
sition.
• Move motion control lever to neutral (N)
position.
IMPORTANT: The motion control lever
does not retum to neutral (N) position
when the clutcl'Ubrake pedal is depressed.
ENGINE
• Move throttle control to slow position.
NOTE: Failure to move throttle control to
slow p_ an_-allowing engine to idle
before stopping may cause engine to
"backfire".
Lever=Engaged"
"Disengaged"
I Position
Motion
• Tumignr_ionkeyto"OFF"positionand
rernovekey.Always_ keywhen
leavingtractortopreventunauthorizeduse.
• Neverusechoketo stopengine.
IMPORTANT:Leavingthe ignitionswitch
inanypositionotherthan "OFF' willcause
the batteryto bedischarged(dead).
NOTE: Undercertainconditionswhen
tractoris standingidle withtheenginerun-
ning,hotengineexhaustgases may
cause"browning" ofgrass.Toeliminate
this possibility,alwaysstopenginewhen
stoppingtractorongrassareas.
•,CAUTION: Alwaysstoptractorcom-
pletely,as describedabove,beforeleaving
theoperator'sposition,toemptygrass
catcher,etc.
THROTTLE CONTROL
Alwaysoperateengineatfull throttle.
• Operatingengineat lessthanfull throt-
tlereducesthebatterychargingrate.
• Fullthrottle offersthebestbaggingand
mowerperformance.
TO MOVE FORWARDAND BACKWARD
The directionandspeedofmovementis
controlledby themotioncontrollever.
• Start tractorwithmotioncontrolleverin
neutral(N) position.
• Releaseparkingbrakeandclutch/brake
p_lal.
• Slowlymovemotioncontrolleverto
desiredposition.
NOTE: The effortto movethe motioncon-
trolleverwill reduceafterthefirst few
hoursofuse.This;S normal.
TO ADJUST MOWERCUTTING HEIGHT
The positionofthe attachmentliftlever
determinesthecuttingheight.
• Grasp lilt lever.
• Pressplungerwiththumband move
leverto desiredposition.
The cuttingheightrangeisapproximately
1-1/2 to 4".The heightsare measured
from the groundtothe bladetipwiththe
enginenotrunning.These heightsare
approximateand mayvery depending
uponsoilconditions, heightofgrassand
typesof grassbeingmowed.
13
• The average lawn should be cut to
approximately 2-1/2 inches dudng the
cool season and to over 3 inches during
hot:months. For healthier and better
looking lawns, mow often and after
moderate growth.
• For best cutting performance, grass
over 6 inches in height should be
mowed twice. Make the first cut relative-
. ly high; the second to desired height.
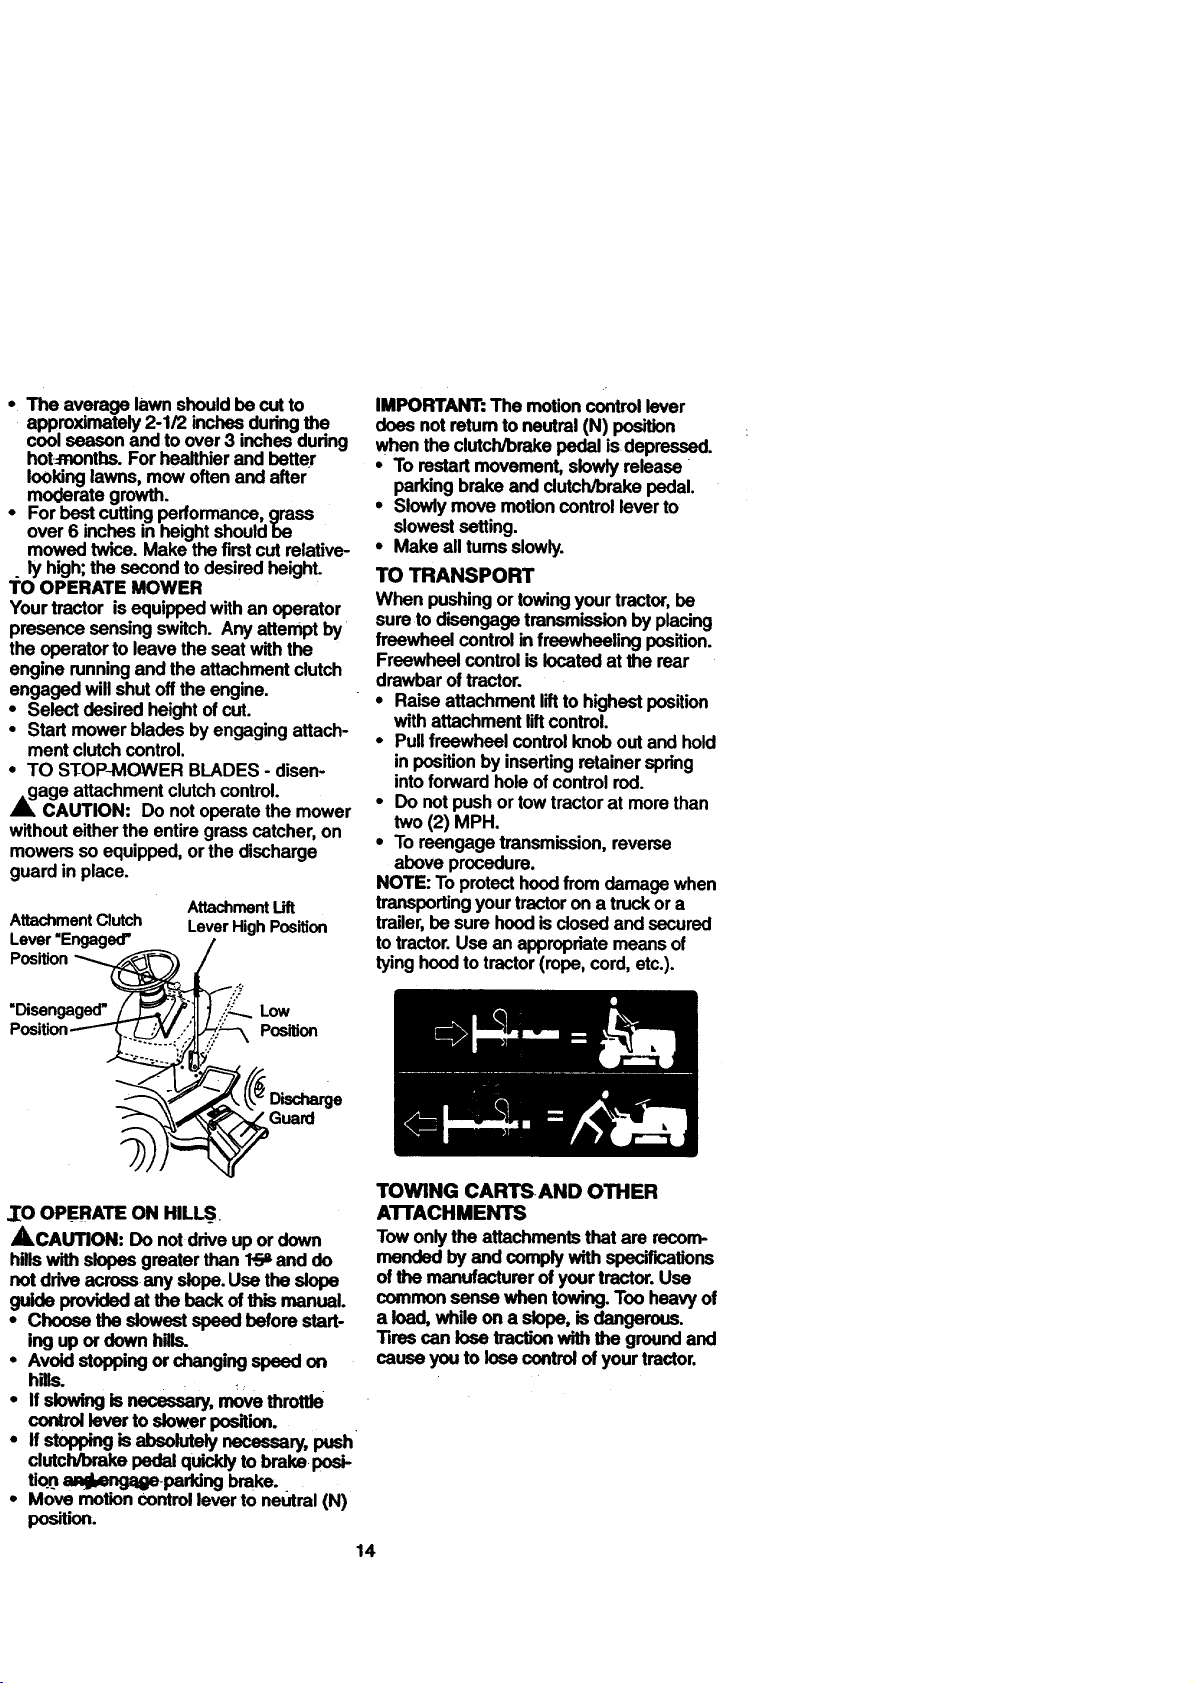
TO OPERATE MOWER
Your tractor is equipped with an operator
presence sensing switch. Any attempt by
the operator to leave the seat with the
engine running and the attachment clutch
engaged will shut off the engine.
• Select desired height of cut.
• Start mower blades by engaging attach-
ment clutch control.
• TO STOP-MOWER BLADES - disen-
,_age attachment clutch control.
CAUTION: Do not operate the mower
without either the entire grass catcher, on
mowers so equipped, or the discharge
guard in place.
AttachmentLilt
AttachmentClutch LeverHighPosition
Position_
Lever'Engaged' /
"Disengaged'_/" ll_ _ LOW
P on
IMPORTANT: The motion control lever
does not return to neutral (N) position
when the clutch/brake pedal is depressed.
• To restart movement, slowly release
parking brake and dutch/brake pedal.
• Slowly move motion control lever to
slowest setting.
• Make all rums slowly.
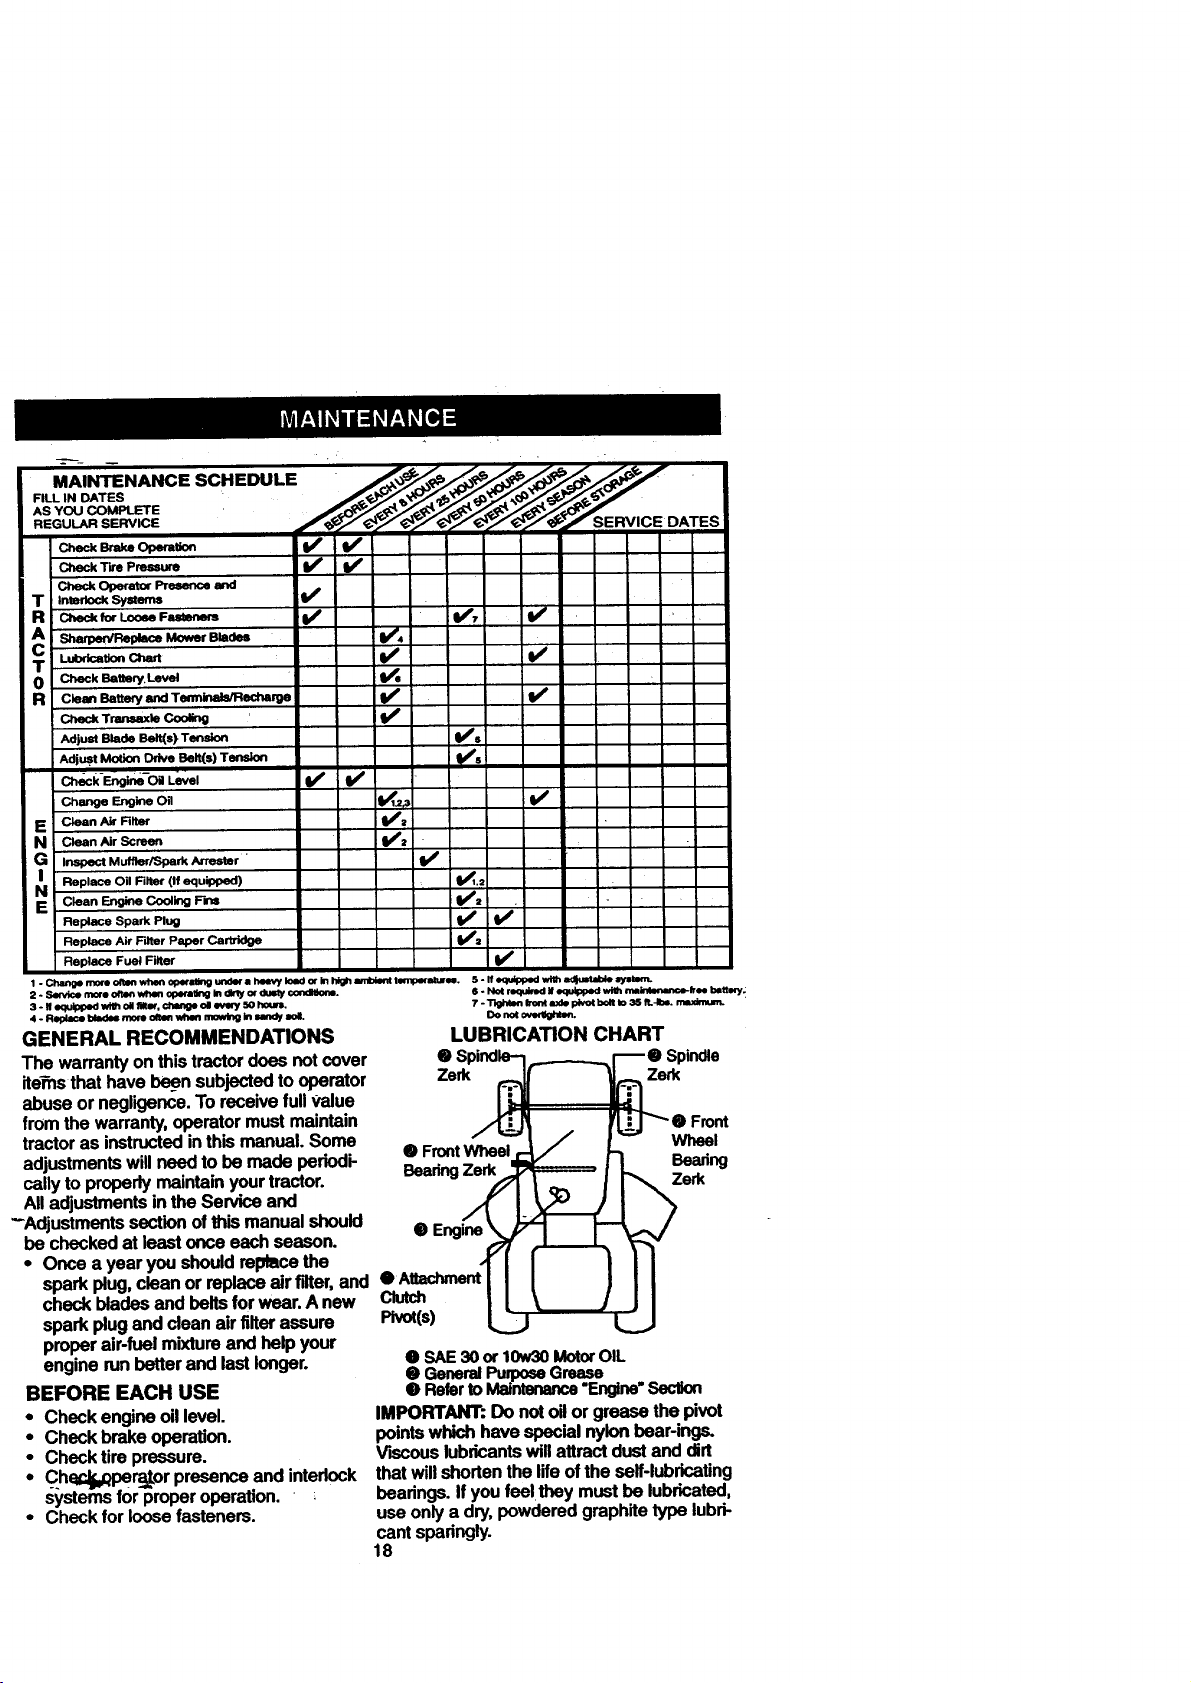
TO TRANSPORT
When pushing or towing your tractor, be
sure to disengage transmission by placing
freewheel control in freewheeling position.
Freewheel control is located at the rear
drawbar of tractor.
• Raise attachment lift to highest position
with attachment liftcontrol.
• Pull freewheel control knob out and hold
in position by inserting retainer spring
into forward hole of control rod.
• Do not push or tow tractor at more than
two (2) aPR.
• To reengage transmission, reverse
above procedure.
NOTE: To protect hood from damage when
transporting your tractor on a truckor a
trailer, be sure hood is dosed and secured
to tractor. Use an appropriate means of
tying hood to tractor (rope, cord, etc.).
_TOOPERATE ON HILLS
ACAUTION: Do not ddve up or down
hillswith slopes greater than 1'_ and do
not drive across any slope. Use the slope
guide provided at the beck of this manual.
• Choose the slowest speed before start-
ing up or down hills.
• Avoid stopping or changing speed on
hills.
• If slow isnecessary,movethro.Je
control lever to slower position.
• If stopping is absolutely necessary, push
clutch/brake pedal quickly to brake posi-
tio.nad_bengageparking brake.
• Move motion control lever to neural (N)
position.
TOWING CARTSAND OTHER
A'I'rACHMENTS
Towonlythe attachmentsthatare recom-
mended by and complywithspecif'_,ations
ofthe manufacturerofyourtractor.Use
commonsensewhentowing.Tooheavyof
a load, while on a slope, is dangerous.
"nrescan lose tractionwith the ground and
cause you to lose control of your tractor.
14

BEFORE STARTING THE ENGINE
3HECK ENGINE OIL LEVEL
, The _engineinyourtractorhasbeen
shipped,fromthefactory,alreadyfilled
withsummerweighto,.
, Checkengineoilwithtractoron level
_round.
emoveoil fillcap/dipstickandwipe
clean,reinsertthedipstickand screw
captight,wait fora few seconds,
removeand readoillevel. Ifnecessary,
add oiluntil"FULL"markondipstickis
reached.Do notoverfill.
Forcoldweatheroperationyou should
changeoilforeasierstarting(See "OIL
VISCOSITY CHART"inthe Mainte-
nancesectionofthis manual).
Tochangeengineoil,see the Mainte-
nancesectioninthis manual.
_,DDGASOLINE -
RIIfuel tank. Use fresh, clean, regular
unleadedgasolinewitha minimumof 87
octane.(Use ofleaded gasolinewill
increasecarbon and lead oxide
depositsand reducevalvelife).Do not
mixoil withgasoline.Purchasefuel in
_uantitiesthat can be usedwithin30
aystoassurefuel freshness.
MPORTANT:Whenoperatingintempera-
uresbelow32°F(0°C), use fresh, clean
vintergradegasolinetohelpinsuregood
•oldweatherstarting.
_WARNING: Experienceindicatesthat
dcoholblendedfuels(calledgasoholor
=singethanolor methanol)can attract
nois_re whichlead_;.toseparationand
ormationof acidsduringstorage.Acidic
lascan damagethefuelsystemof an
:nginewhileinstorage.Toavoidengine
)roblems,the fuelsystemshouldbe emp-
ed beforestorage of 30 daysorlonger.
)rainthe gas tank,starttheengineand let
Tun untilthe fuel linesandcarburetorare
mpty.Usefreshfuel next season. See
;torageInstructionsfor additiona'rinforma-
'on. Neveruseengineorcarburetor
:leanerproductsin the fueltankorperma-
=entdamagemay occur.
_CAUTION: Fillto bottomof gas tank
Ilerneck.Do notoverfill.Wipe offany
pilledoilorfuel. DOnotstore; spilloruse
iasolinenear an open flame.
O STARTENGINE
Vhenstartingthe engineforthe first time
rif the..e;)_q"e -;hasrun.outoffuel, it will
lke extracrankingtimeto movefuel from
le tank tothe engine.
• Besure freewheelcontroliS.in the
transmissionengagedposition.
• saonsset. opsra_ poal_ dsp_=
du=h',xa_ps_ and_ palm t_
• Placemotion controlleverin neutral (N)
position.
• Move attachmentdutchto"DISEN-
GAGED"position.
• Move throttlecontroltochokeposition.
NOTE: Beforestarting,readthe warmand
coldstartingproceduresbelow.
• Insertkeyintoignition and turnkey
clockwiseto "START"positionand
release keyas soonas enginestarts.
Do not runstarter continuouslyformore
thanf'dteensedondsper minute.Ifthe
enginedoesnotstartafter several
attempts,movethrottle controltofast
position,wait a few minutesand try
again. Ifenginestilldoes notstart,
movethe throttle controlbackto the
chokepositionand retry.
WARM WEATHERSTARTING (,50_ F and
above)
• When enginestarts, move the throttle
controltothefast position.
• The attachmentsand groundddvecan
nowbe used. Ifthe enginedoes not
acceptthe load,restartthe engineand
allowit towarm upfor one minute using
thechokeas describedabove.
COLD WEATHER STARTING( 50° F and
below)
When enginestarts,allowenginetorun
withthethrottlecontrolin thechoke
positionuntilthe engine runsroughly,
then movethrottle control tofast posi-
tion.This may requirean enginewarm-
uppedodfromseveralsecondsto sev-
eral minutes,dependingonthe temper-
ature.
AUTOMATICTRANSMISSION WARM UP
• Beforedrivingthe unitin coldweather,
thetransmissionshouldbe warmedup
as follows:
Be surethe tractorison level(jround.
•" Place the motion controllever,n neutral.
Releasethe parkingbrakeand letthe
clutch/brakeslowlyreturnto operating
position.
• Allowone minutefor transmissionto
warmup.Thiscan be done dudngthe
enginewarmup period.
• The attachmentscanalsobe used dur-
ingthe enginewarm-upperiod afterthe
transmissionhas been warmedup.
15

NOTE:At a high altitude (above 3000
feet) or in cold temperatures (below 32 F)
the carburetor fuel mixture may need to be
adjusted for_bestengine performance.
See "TO ADJUST CARBURETOR" in the
Service and Adjustments section of this
manual.
PURGE TRANSMISSION
,_CAUTION: Never engage or disen-
gage freewheel lever while the engine is
running.
To ensure proper operation and perfor-
mance, it is recommended that the trans-
mission be purged before operating tractor
for the first time. This procedure will
remove any trapped air inside the trans-
mission which may have developed during
shipping of your tractor.
IMPORTANT: Should your transmission
require removal for service or replace-
ment, itshould be purged after reinstalla-
tion before operating the tractor.
• Place tractor safely on level surface with
engine offand parking brake set.
• Disengage transmission by placing free-
wheel control in freewheeling position
(See "TO TRANSPORT" in this section
of manual).
• Sitting in the tractor seat, start engine.
After the engine is running, move throt-
tle control to slow position. With motion
control lever in neutral (N) position,
slowly disengage clutch/brake pedal.
• Move motion control lever to full forward
position and hold for five (5) seconds.
Move lever to full reverse position and
hold for five (5) seconds. Repeat this
procedure three (3) times.
NOTE: During this procedure there will be
no movement of drive wheels. The air is
..being removed from hyd_mulicdrive sys-
tem.
• Move motion control lever tjp,,.neutral(N)
position. Shut off engine and set parking
brake.
• Engage transmission by placing free-
wheel control in driving position (See
"TO TRANSPORT" in this section of
manual).
• Sitting in the tractor seat, start engine.
After the engine is running, move throt-
tle control to half (1/2) speed. With
motion control lever in neutral (N) posi-
tions_lowly d_engage clutch/brake
pedal =---
• Slowly move motion control lever for-
ward; after the tractor moves approxi-
mately five (5) feet, slowly move motion
control lever to reverse position. After
the tractor moves approximately five (5)
feet retum the motion control lever to
the neutral (N) position. Repeat this pro-
cedure with the motion control lever
three (3) times.
• Your tractor is now purged and ready for
normal operation.
MOWING TIPS
• Tire chains cannot be used when the
mower housingis attached to tractor.
• Mower shouldbe properly leveled for
best mowing performance. See =TO
LEVEL MOWER HOUSING" in the
Service and Adjustm.ents section of this
manual.
• The left hand side of mower should be
used for trimming.
• Drivesoth_ are_ onto
theareathathasbeencULHave lhe cutarea
tothe dghtd the baclor.Thiswillresultina
moreevendislrbul_ oicippir_ and mue
uniformcuta_
• When mowing large areas, start by turn-
ing to the right so that clippings will dis-
charge away from shrubs, fences, drive-
ways, etc. After one or two rounds, mow
in the opposite direction making left
hand tums untilfinished.
• If grass is extremely tall, it should be
mowed twice to reduce load and possi-
ble fire hazard from dried clippings.
Make firstcut relatively high; the second
to the desired height.
• Do not mew grass when it is wet. Wet
grass will plug mower and leave unde-
sirable clumps. Allow grass to dry
before mowing.
• Always operate engine at full throttle
when mowing to assure better mowing
performance and proper discharge of
material. Regulate ground speed by se-
lecting a low enough gear to give the
mower the best cutting performance as
well as the quality of cut desired.
• When operating attachments, select a
ground speed that will suit the terrain
and give best performance of the at-
tachment being used.
JJ
16

AULCHING MOWING TIPS
MPORTAN'P...For bestperformance, keep
nowerhoo_ing free of built'up grass and
rash. Clean after each use..
The special mulching blade will recut
the grass clippings many times and.
reduce them in size so that as they fall
onto the lawn they will disperse intothe
grass and not be noticed. Also, the
dlulched grass will biodegrade quickly
to provide nutrients for the lawn. Always
mulch with your highest engine (blade)
speed as this will provide the best recut-
ting action of the blades,
Avoid cutting your lawn when it is wet.
Wet grass tends to form clumps and
interferes with the mulching action. The
best time to mow your lawn is the early
afternoqn. At_thj_Stime the grass has
dried and the newly cut area will not be
exposed to the direct sun.
For best results, adjust the mower cut-
ting height so that the mower cuts off
only the top one-third of the grass
blades: For extremely heavy mulching,
reduce your width of cut on each pass
and mow slowly.
• Certain types of grass and grass condi-
tions may require that an areabe
" mulched a second time to completely
hide the clippings. When doing a sec-
ond cut, mow across or perpendicular to
the first cut path.
• Change your cutting pattem from week
to week. Mow north to south one week
then change to east to west the next
week. This will help prevent matting and
graining of the lawn.
17
• • • • . .
sc.E u E
AS YOU COMPLETE
c_.k Sr_, Opm_o, V' V_
T_epressure l/ I/
Chack Operator Presence and
T In_1o_s_m I/
R C_ck _=b_o_Fu_,, I/ V', V _
cA Shs_ Mower Blades V t,
T Lu_'k_on_ I/ I/
R c_m BatteryandTewninals/Recharge I_ I_
CheckTr_,_=k_Coo_ I/'
Adjust Blade Belt(s) Tension Ks
Adjust Molion Drive Belt(s) Ter-_n I K s
Ch_k-Engine-oil L_el I _ i t_
E Clean Air Alter I/2
N Clean Air Screen _2
G inspect Muffler/Spark Arres_r "
IN Replace Oil Rlter (tf equipped) t_l.=
E Clean Engine CooJing Fins _2
Replace Spark Plug I_ [ t_
Replace Air Filter Paper CartTidge I_=
Replace Fuel Filter I/p
1 .Changemoreoftmwhenop_underal_mvyload_lnhighamblentt_nl_mre, Zurm- S-lfequlpp_wlthadJu_dab_wsWn.
2 oSe,rvk_ n_r. o_n w_m opem_g in dl_y or du_y condl_.
3. # equippedw_ oilS_tw,chenOeol ev_y SOhours.
GENERAL RECOMMENDATIONS
The warranty on this tractor does not cover
items that have been subjected to operator
abuse or negligence. To receive full value
from the warranty, operator must maintain
tractor as instructed inthis manual. Some
adjustments will need to be made pedodi-
caily to properly maintain your tractor.
Q FrontWheel
BearingZerk
All adjustments in the Service and
--Adjustments section of this manual should
be checked at least once each season.
• Once a year you should replace the
sparkplug,cleanor replaceairfilter,and _1
checkbladesandbelts for wear.A new Clutch
sparkplug anddean air fitterassure
properair-fuelmixtureand helpyour
engine runbetterand last longer.
BEFORE EACH USE
• Checkengineoillevel.
• Checkbrakeoperation.
• Checktire pressure.
• Ch_.g_per-_or presenceand interlock
systemsforproperoperation.
• Checkfor loosefasteners.
O SAE 30 or 10w30MotorOIL
• _Ge. r Grease
@ Referto Maintenance"Engine"Section
IMPORTANT: Do not oil or grease the pivot
points which have special nylon bear-ings.
VLscous lubricants will attract dust and dirt
that will shorten the life of the seif-lubricating
bearings. If you feelthey must be lubricated,
use only a dry, powdered graphite type lubri-
cant sparingly.
18
6. Not requiredVequ_oed wire me_eMnce-lme batmy._
7 - _ hm ax_ id_o_ belt ID _ IL-Im. nmalmum.
LUBRICATION CHART
Zerk Zerk
Engine
Wheel
Bearing
Zerk
 Loading...