

Craftsman 917254661 Owner’s Manual

OWNERS
MANUAL
MODEL NO.
917.254661
Caution:
Read and Follow
All Safety Rules
And instructions
Before Operating
This Equipment
LT 12 HP ELECTRIC START
6 SPEED o 38" MOWER
LA WN TRA CTOR
® Assembly
® Operation
o Maintenance
• Repair and Adjustment
® Repair Parts
......... i i, i i i ii i ,i ii,ll,,i i,, ,ll i i i i,i i,l,,,
Sears, Roebuck and Co., Chicago, IL 60684 U S.A.
inlll illll
LOOK FOR THIS SYMBOL TO POINT
TIONS. IT MEANS - ATTENTION! BE-
OUT IMPORTANT SAFETY PRECAU-
COME ALERT! YOUR SAFETY IS IN-
VOLVED.
CAUTION: LOOK FOR THIS WORD TO POINT OUT
IMPORTANT EQUIPMENT PRECAUTIONS,,
RULES FOR
1_ Know the controls and how to stop quickly. READ THIS
OPERATOR'S MANUAL and instructions furnished with
attachments,
2_ Do not allow children to operate the machine. Do not allow/
adults to operate it without proper instruction, ./"
3._ Do not carry passengers_ Do not mow when childreqiand
others are around. ,/
4. Always wear substantial footwear. Do not wear Ioos_ fitting
clothing that could get caught in moving parts.
5. Keep your eyes and mind on your tractor, mower/and the
area being cut.. Do not let other interests distract YibUo .
6. Do not attempt to operate your tractor or mower wi_en not in
the drivers seat.,
7o Always get on or off your tractor from the operator's_,left hand
side, '\ "
8. Clear the work area of objects (wire, rocks,etc_) which might
be picked up and thrown..
9. Disengage allattachment clutches before attempting t_start
the engine.
I 0.. Disengage powerto attachments and stop the engine befo'_
leaving the operator's position.. "
1t Disengage power to mower, stopthe engine, and disconnect
spark plug wire(s) from spark plug(s) before cleaning, making
an adjustment, or repair, Be careful to avoid touching hot!
muffler or' engine components.. /
12. Disengage power to attachments when transporting or no/t4n
use, t
t3.. Take all possible precautions when leaving the v_(hicle
unattended, Disengage the power-take-off, lower the,zittaci!-
ments, return drive control lever to neutral,(shift into4eutral),
set the parking brake, stop the engine, and remov/_ the key..
t4,. Do not stop or start suddenly when going uphill_fr downhill.
Mow up and down the face of slopes (not great/ar than 15°);
never across the face. ,/
15_ Reduce speed on slopes and make turns gradually to prevent
tipping or loss of control. Exercise extrgfne caution when
changing direction on slopes, ./
16. While going up or down slopes, choos_ a speed low enough
to negotiate the slope without stop,4alng,.
17. Never mow in wet or slippery gra,s_, when traction is unsure,
or at a speed which could caus_ a Skid,
Stay alert for holes in the terrain'and other hidden hazards°
Keep away from drolmoffs..
not drive too close to creeks, ditches, and public high-
;e special care when mowing around fixed objects in
orevent the blades from striking them. Never delib-
! tractor or mower into or over any foreign objects..
"_ears untiltractor comes to a stop..
ands or feet under the mower, in discharge
any moving parts while tractor or mower are
keep clear of discharge chute.
'lling loads or using heavy equipment..
ved drawbar hitch points
_se you can safely control
SAFE OPERATION
c. Do not turn sharply. Use care when backing.
d. Use counterweight or wheelweights when suggested in
owner's manuals.
__4,Watch out for traffic when crossing or near roadways.
_.5_"_Whenusing any attachments, never direct discharge of
_0aterial toward bystanders nor allow anyone near the ve-
hicle while in operation..
26. Hiandle gasoline with care - it is highly flammable.
Never remove the fuel cap of the fuel tank or add
gasoline to arun'ningor hot engine or an engine that has
i se approved gasoline containers.
not been allowed to cool for several minutes after run-
ning., Never fill tank indoors, always clean up spilled
gasoline
c. Open doors ifthe engine is run in the garage - exhaust
_7,. Keep the vehicle and attachments in good operating condi-
2& Keep all nuts, bolts, and screws tight to be sure the equip-
29.. Never store the equipment with gasoline in the tank inside a
30. To reduce fire hazard keepthe engine free of arass, leaves,
",Nor excessive grease,. Do not clean product wT_ileengine is
31_ 'Except for adjustments, DO NOT operate Engine if air
32_Do fkotoperate without a muffler, or tamper with exhaust
33. The vel_cle and attachments should be stopped and in-
34. Do not change'the engine governor settings or overspeed the
35.. When using the vehicle with mower, proceed as follows:
36. Do not operate the mower without either the entire grass
37,, Disengage power to mower before backing up_ Do not mow
3& Under normal usage the grass catcher bag material issubject
fumes are dangerou& Do not run the engine indoors.
tion, and keep safety devices in place and working_
ment is in safe working condition.
building where fumes may reach an open flame or spark
Mow the engine to cool before storing in any enctosur&
\running.
cl'e.aner or cover directly over carburetor air intake is re-
mo'_ed, Removal of such part cou[d create a fire hazard..
syste_ Damaged mufflers or spark attesters could create a
fii'e hair& inspect periodically and replace if necessary.
spected f&,rdamage after striking a foreign object, and the
damage sh'_,uldbe repaired before restarting and operating
the equipme_.
engine; severe damage or injury may result.
a,, Mow only in daylight or in good artificial light,
b, Shut the Engine off when unclogging chute°
c,, Check the blade mounting bolts for proper tightness at
frequent intervals1,
catcher, on mowers so equipped, or the deflector shield in
place,.
in reverse unless absolutely necessary and then only after
careful observation of the entire area behind the mower.
to deterioration and wear. Itshould be checked frequently for
bag replacement Replacement bags should be checked to
ensure compliance with the original manufacturer's recom-
mendations or specifications_
the above is requited by law (Section 4442 of the Cafifomia Public Resources Code),
miliar laws, Federal laws apply on federal lands.. Refer to the Repair Parts Section,,
2
CONGRATULATIONS on your purchase of a Sears Lawn
Tractor it has been designed, engineered and manufactured
to give you the best possible dependability and performance
Should you experience any problem you cannot easily rem-
edy, please contact your nearest Sears Service Department,
We have competent, well-trained technicians and the proper
tools to service or repair this unit.
MAIN TENA NCE AGREEMEN T
A Sears Maintenance Agreement is available on this product°
See the nearest Sears store or service center for details
SERIAL
NUMBER
DATE OF PURCHASE
THE SERIAL NUMBER WILL BE FOUND ON
THE MODEL PLATE UNDER THE SEAT._
YOU SHOULD RECORD THESE NUMBERS
AND KEEP FOR FUTURE REFERENCE.
CUSTOMER RESPONSIBILITIES
Read and retatn thls manual Study and observe the safet_rofes. Always use"care when using your tractor Always keep you
tractor and mower clean.. Foflow a regular schedule in maintaining, caring for, )qd using your iractor. A well cared for tractor
will run better and last longer.
A TTA CHMENTS
This unit can use many attac/_ments now available at your Seat's store It cat, not use attachments that engage the
ground like a plow, l_arrow culhvator_ or" tilter/ See page 26 for a hst of a/aila_le attachments
• , .4 • ["
,/ 1
dable and become worn during normal use
Thrs warranty does not cover
Tire replacement or repair caused by punc VOres from outssde (,blects _such as nails thorns stumps
or glass), and /
repairs necessary because of operator/abuse or neghgence _ncludmg the failure ro matnta_n the
equipment according to instructions c/ontatned Jn the own s manual and
ndlng equipment used for commercial or rental purposes
FULL 90-DAY WARRANTY ON B _,TTERY
For 90 days from the date of purchase, if any battery _ncfuded w_th 'his nd_ng equtpment proves defectwe
m material or workmanship and our testing determines the battery writ not hold a charge Sears will replace
the battery at no charcle
WARRANTY SERVICE fS AVAILABLE BY CONTACTING THE NEAREST SEARS SERVICE CENTER/DEPART.
MENT IN THE UNITED STATES This warranty applies only while this product is tn use in the United States
This warranty g_ves you specihc legal rights and you may aJso have other rights which may vary from state
to state
SEARS, ROEBUCK AND CO., D/731CR-W SEARS TOWER, CHICAGO, ILL. 60684

iNDEX
A
Adjustments..
Brake ..................................................................14
Carburetor. .............................................18
Mower Drive Belt ................................22
Mower
Front-to- Rear ............................23
Side-to-Side ...............................22
Throttle Control Cable ....................18
Air Filter
Cleaning ...................................................16
Element .................................................16
Air Intake Screen, Engine ..................16
Assembly ........................................ 5-8
Attachments 26
B
Battery
Charging ..............................................7
Cleaning ......................................15
Installation ................................... 8
Levels .............................................7
Preparation ................................. 7
Starting with Weak Battery ....... 17
Storage .........................................23
Terminals ......................................15
Belt:
Motion Drive Replacement .........19
Mower Ddve Adjustment ...........22
Mower Drive,
Remove Replace ....................22
Blade:
Sharpening .........................................14
Replacement .............................. 14
Brake Adjustment ..................................14
C
Carburetor Adjustment ..........................18
Controls, Tractor ...............................................9
Cutting Level, Mower .............................22
E
Engine.:
A# Screen .......................................17
Oil Change .........................................!6
Oil Level ...............................................16
Oil Type ...................................................16
Starting ..........................................................10
Storage .........................................................23
F
Filter ..........................................................................16
Fuel."
Type ....................................................................10
Storage ..........................................................23
Fuse .........................................................................20
H
Hood Removal ...........................................20
L
Levelling Mower Deck .............................22
Lubrication.:
Chart ...................................................17
Tractor Pivot Points ..............................17
M
Maintenance ...................................................13
Air Filter. ..............................................16
Air Filter Element ...............................16
Air Screen ......................................16
Battery ...............................................15
Blade Sharpening .................................14
Brake Adjustment .............................14
Engine Oil...................................................16
Lubrication Chart ...............................17
Spark Plugs ................................................18
Tire Care ...............................................14
Mower.:
Adjustment, Front.to-Rear ..........23
Adjustment, Side-to-Side ..........22
Blade Sharpening ...........................14
Blade Replacement .........................!4
Cutting Level ...........................................22
Installation .............................................21
Operation ......................................................,11
Removal ................................................20
Muffler,...........................................................................17
Spark Arrestor ........................................2
0
Oil
Cold Weather Conditions ................16
Engine .................................................................16
Storage .................................................23
Operation ......................................................9-12
Operating Your Mower. ..............11
Operating Your Tractor ...................11
Starting the Engine ...................................10
Stopping Your Tractor, .....................10
Tractor Operation on Hills ............12
Options
Attachments 26
Spark Arre.ster 2
P
Parking Brake .........................................10
Parts Bag ...............................................5-6
R
Repa# and Adjustments ............ 14-23
Blade ....................................................15
Carburetor .....................................t8
Fuse ..................................................20
Hood Removal ..................... 20
Motion Drive Belt
Replacement ................. 19
Mower Drive Belt
Replacement ................ 22
Mower Adjustment
Side-to-Side .................. 22
Mower Removal ....................... 20
S
Safety Rules .............................................2
Seat .......................................................................7
Service Record ........................................!3
Slope Guide Sheet ..................................47
Spark Plugs ..................................................t8
Speed Control Chart ...................... I2
Starting the Engine ............................t0
Steering Wheel .................................. 5
Stopping the Tractor ..........................10
Storage .......................................................23
T
Throttle Control Cable
Adjustment .......................... I8
Tires ..............................................................14
Trouble Shooting Chart ...............24-25
W
Warranty ........................................................3
4
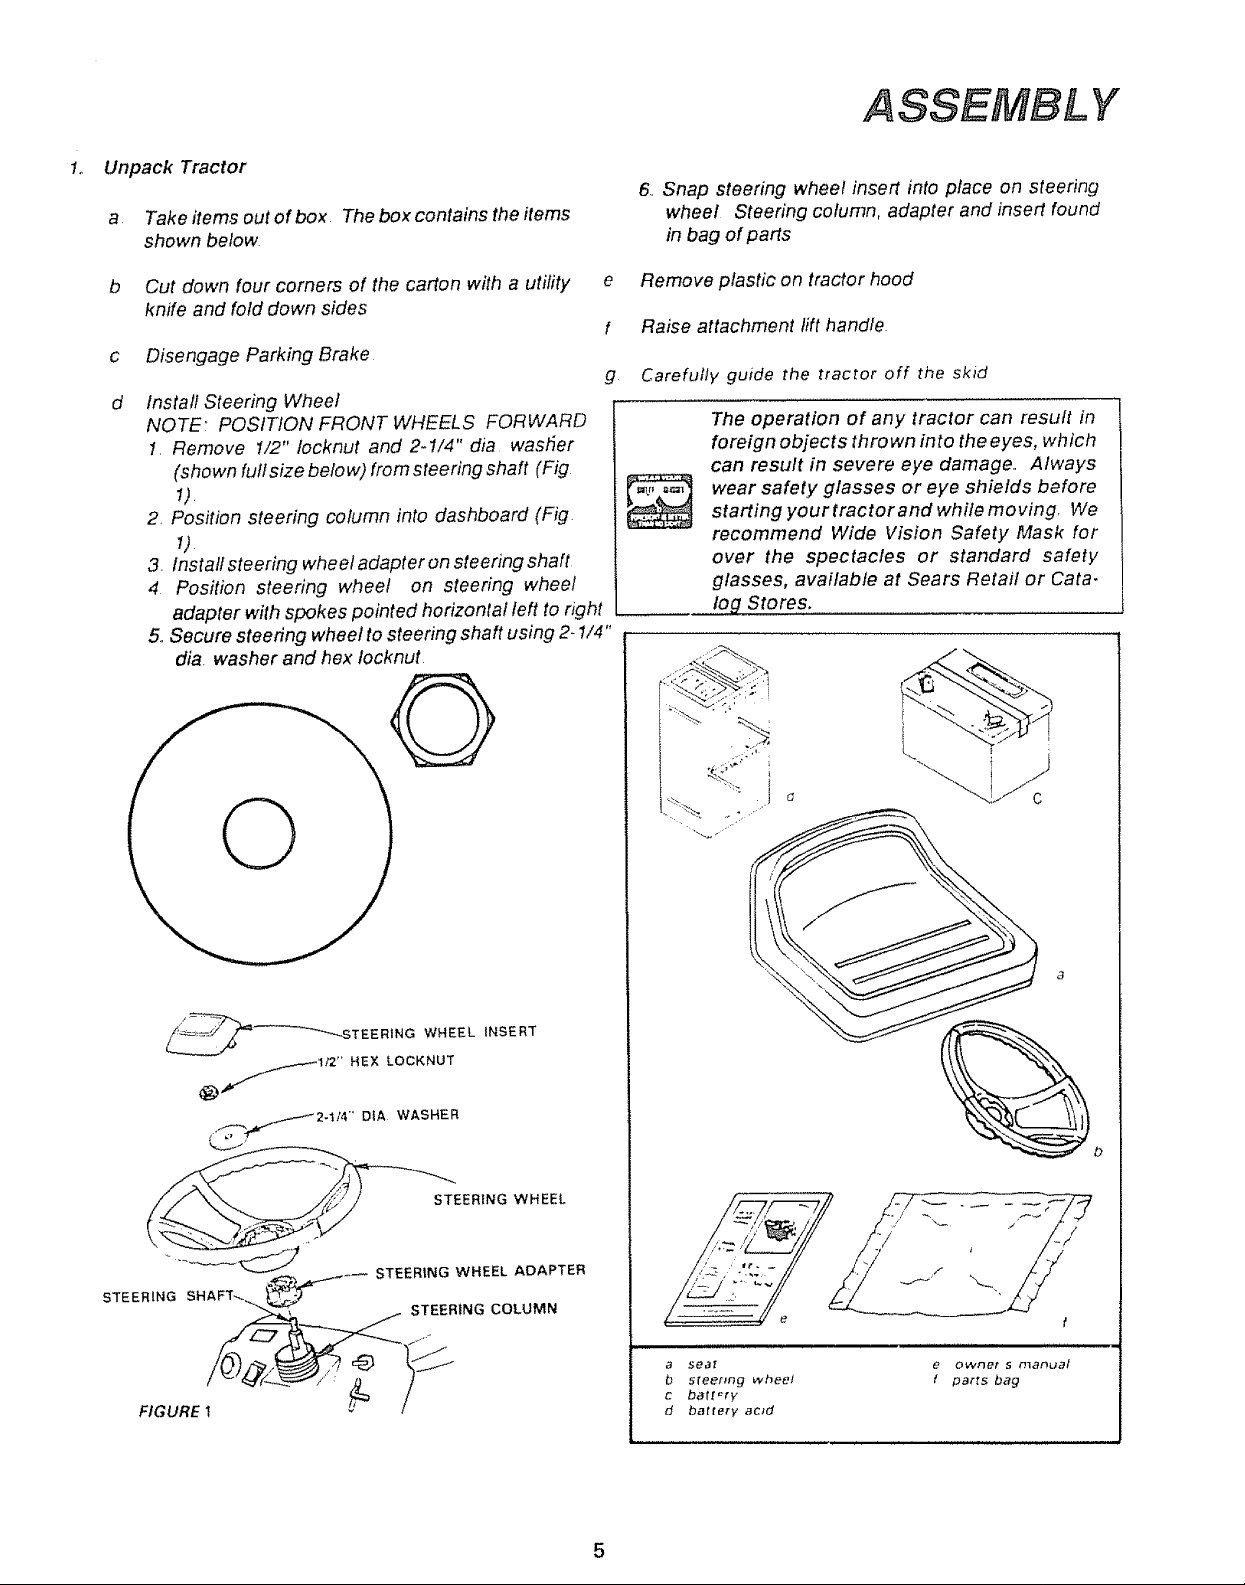
1o Unpack Tractor
a. Take items out of box The box contains the items
shown below
ASSEMBLY
6 Snap steering wheel insert into place on steering
wheel Steering column, adapter and insert found
in bag of parts
b Cut down four corners of the carton with a utility
knife and fold down sides
c Disengage Parking Brake
Install Steering Wheel
NOTE: POSITION FRONT WHEELS FORWARD
1. Remove 1/2" focknut and 2-1/4" die washer
(shown futlsize belo w) from steering shaft (Fig
1).
2. Position steering column into dashboard (Fig
1).
3. Install steering wheel adapter on steering shaft
4 Position steering wheel on steering wheel
adapter with spokes pointed horizontal left to right
5oSecure steenng wheel to steering shaft using 2-1/4"
die. washer and hex Iocknut
e Remove plastic on tractor hood
f Raise attachment lift handle
g Carefully guide the tractor off the skid
The operation of any tractor can result in
foreign objects thrown into the eyes, which
can result in severe eye damage.. Always
wear safety glasses or eye shields beforestarting your tractorand while moving, We
recommend Wide Vision Safety Mask for
over the spectacles or standard safety
glasses, available at Sears Retail or Cata.
..............................log Stores.
_-_=_ _---"__"_TEERING WHEEL INSERT
STEERING SHAFT_
..-._1/2" HEX LOCKNUT
,._.,.-_2-ti4"" DtA WASHER
EER1NG WHEEL
._._, ._._..._--- STEERING WHEEL ADAPTER
j___ STEERING COLUMN
/
a seat
b sreef_ng wheel
c batt_'ry
d battery acid
e owner s manual
! parts bag
5
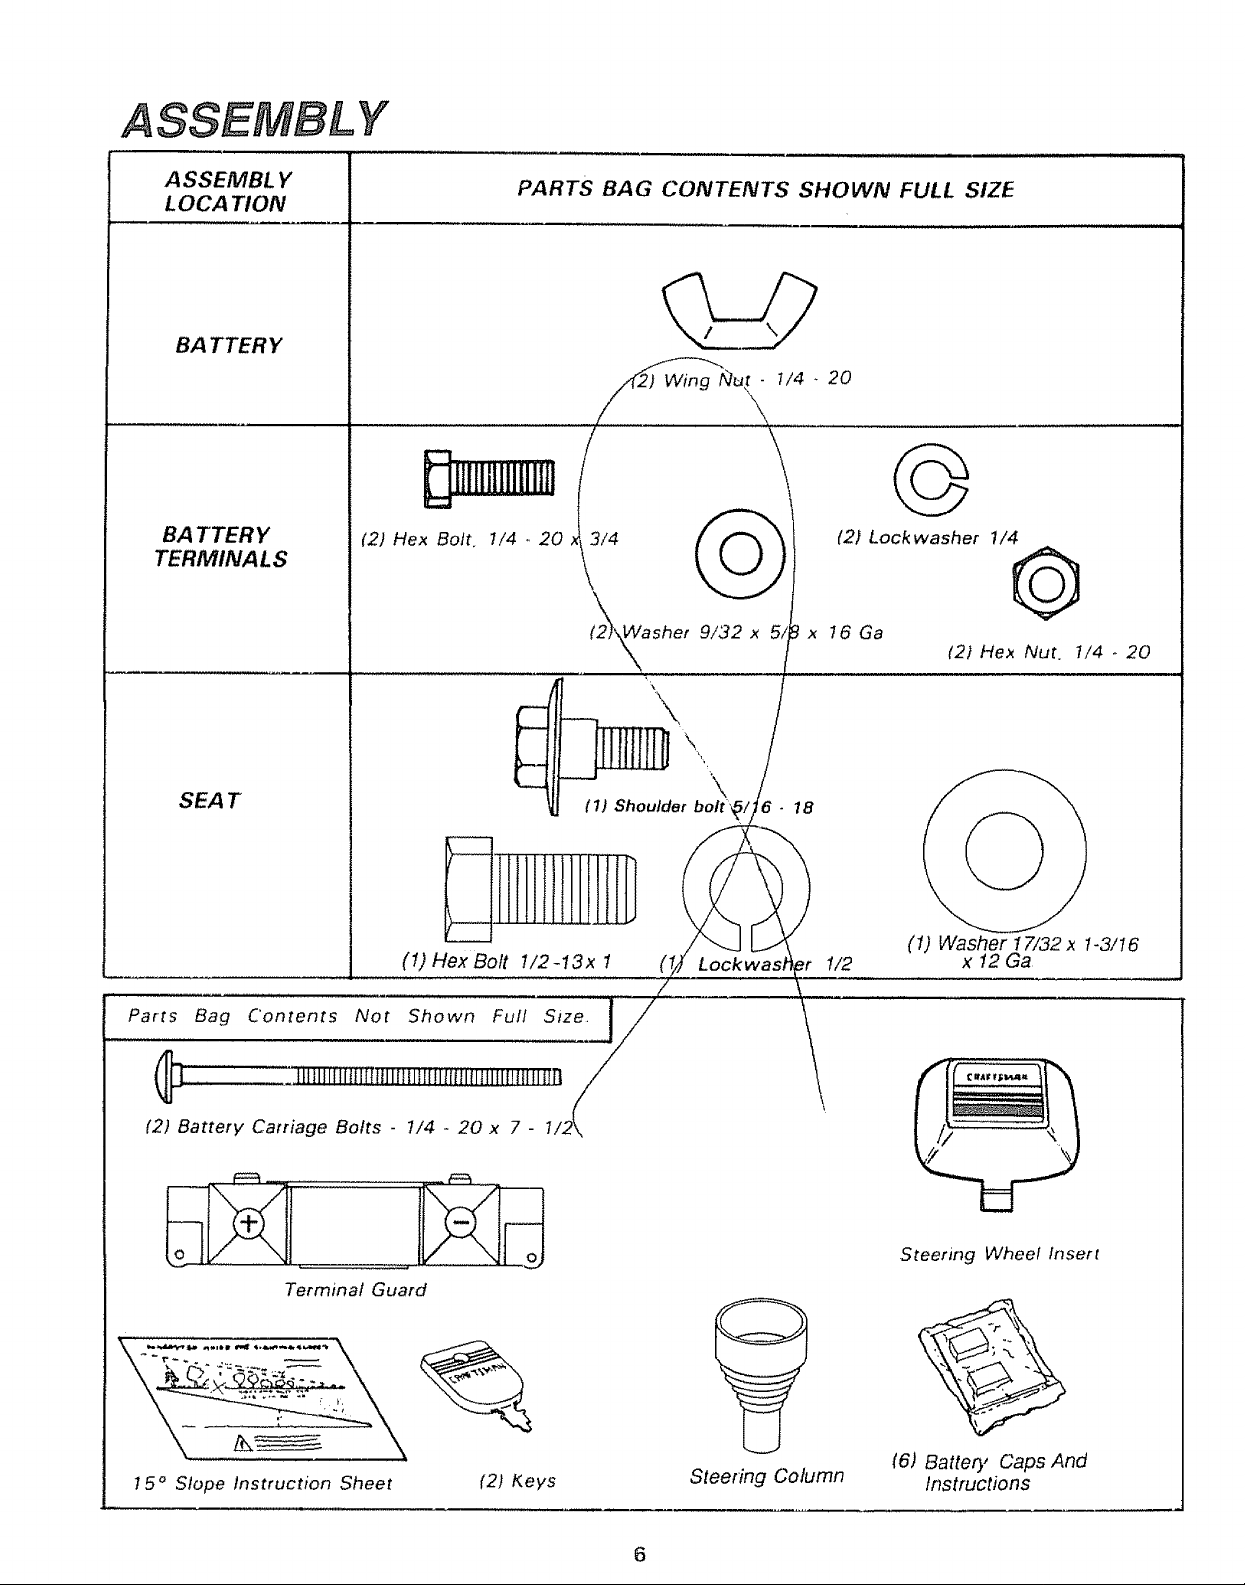
A SSEMBL Y
LOCATION
BA TTER Y
PARTS BAG CONTENTS SHOWN FULL SIZE
_ut\_ I/4 _ 20
BA TTERY
TERMINALS
SEA T
m
/
i
(2) Hex Bolt. 1/4 . 20 x13/4
\
(_2)'_a;het 9/32x 5,_ x t6 Ga (2)Hex
,,,,,,,,,,, ,_ _w
'/ \ / _
11) Shoulder bolt'_//6 . 18
(2) Lockwasher 1/4
(1)
Washer 17/32 x t-3/I6
t/2
x 12 Ga
Nut. t/4 - 20
Parts Bag Content.______sNot Shown Full S iz F
Terminal Guard
15 o Slope Instruction Sheet
(2) Keys
!
Steering Column
Steering Wheel Insert
(6) Batter}, Caps And
Instructions
ASSEMBLY
To assemble tractor you will need:'
(2) 7/16" Wrenches
(I) 1/2" Wrench
(1) 3/4" Wrench
NOTE:
RIGHT HAND (R,H) AND LEFT HAND Hi_"ARE
DETERMINED FROM OPERATORS P(_SITION I!t :[-7! i_ b ',_,-'_
WHILE SEATED O 1_ t!! !_R _ iJ _-;J_-'_'!
WEAR EYE AND FACE SHtELI_
WASH HANDS
MEDIATELY ACClDENTALLY_IN
CONTACT ACID_
IF OR CLOTHING\IM- a_ding baking soda until the addition of more soda
WITH BATTERY c_uses no more foaming
DO NOT SMOKE; FUMES _mmendedthat the batterybe charged
CHARGED BATTERY ACID ARE
EXPLOSIVE
READ THE INSTRUCTIONS INCLUD-
ED WITH THE BATTERY VENT
CAPS IN THE BAG OF PARTS AL-
WAYS WEAR GLOVES, CLOTHING
AND GOGGLES TO PROTECT YOUR
HANDS, SKIN AND EYES,
Tire Pressure Gauge
Screwdriver
Knife
Utility
\
FROM",, f,
CAP
/
.,,,,
I"" i' 'i......... " __"F_IGURE
c_ntainer Stir with a wooden or plastic paddle while
,,,,. flare use. Use .a 12 voft batfery char ge_
.,, t_attery a_ a ra_e of 6 amperes tar 7
\,
\
\
h . after, the battery is charge,d. If the acid
as fallen t_etow the correct le vet, add dis tilled
OBSER VE SA FETY PRECA U-
;TED tN BI _, REQUIRED
Check the acid
or iron free water.
stall Seat°
2
2. Prepare Battery
Fill and charge battery (before installing),, NOTE,, SEE
DETAILED INSTRUCTIONS PACKAGED WITH BATTERY
VENT CAPS FOUND IN BAG OF PARTS
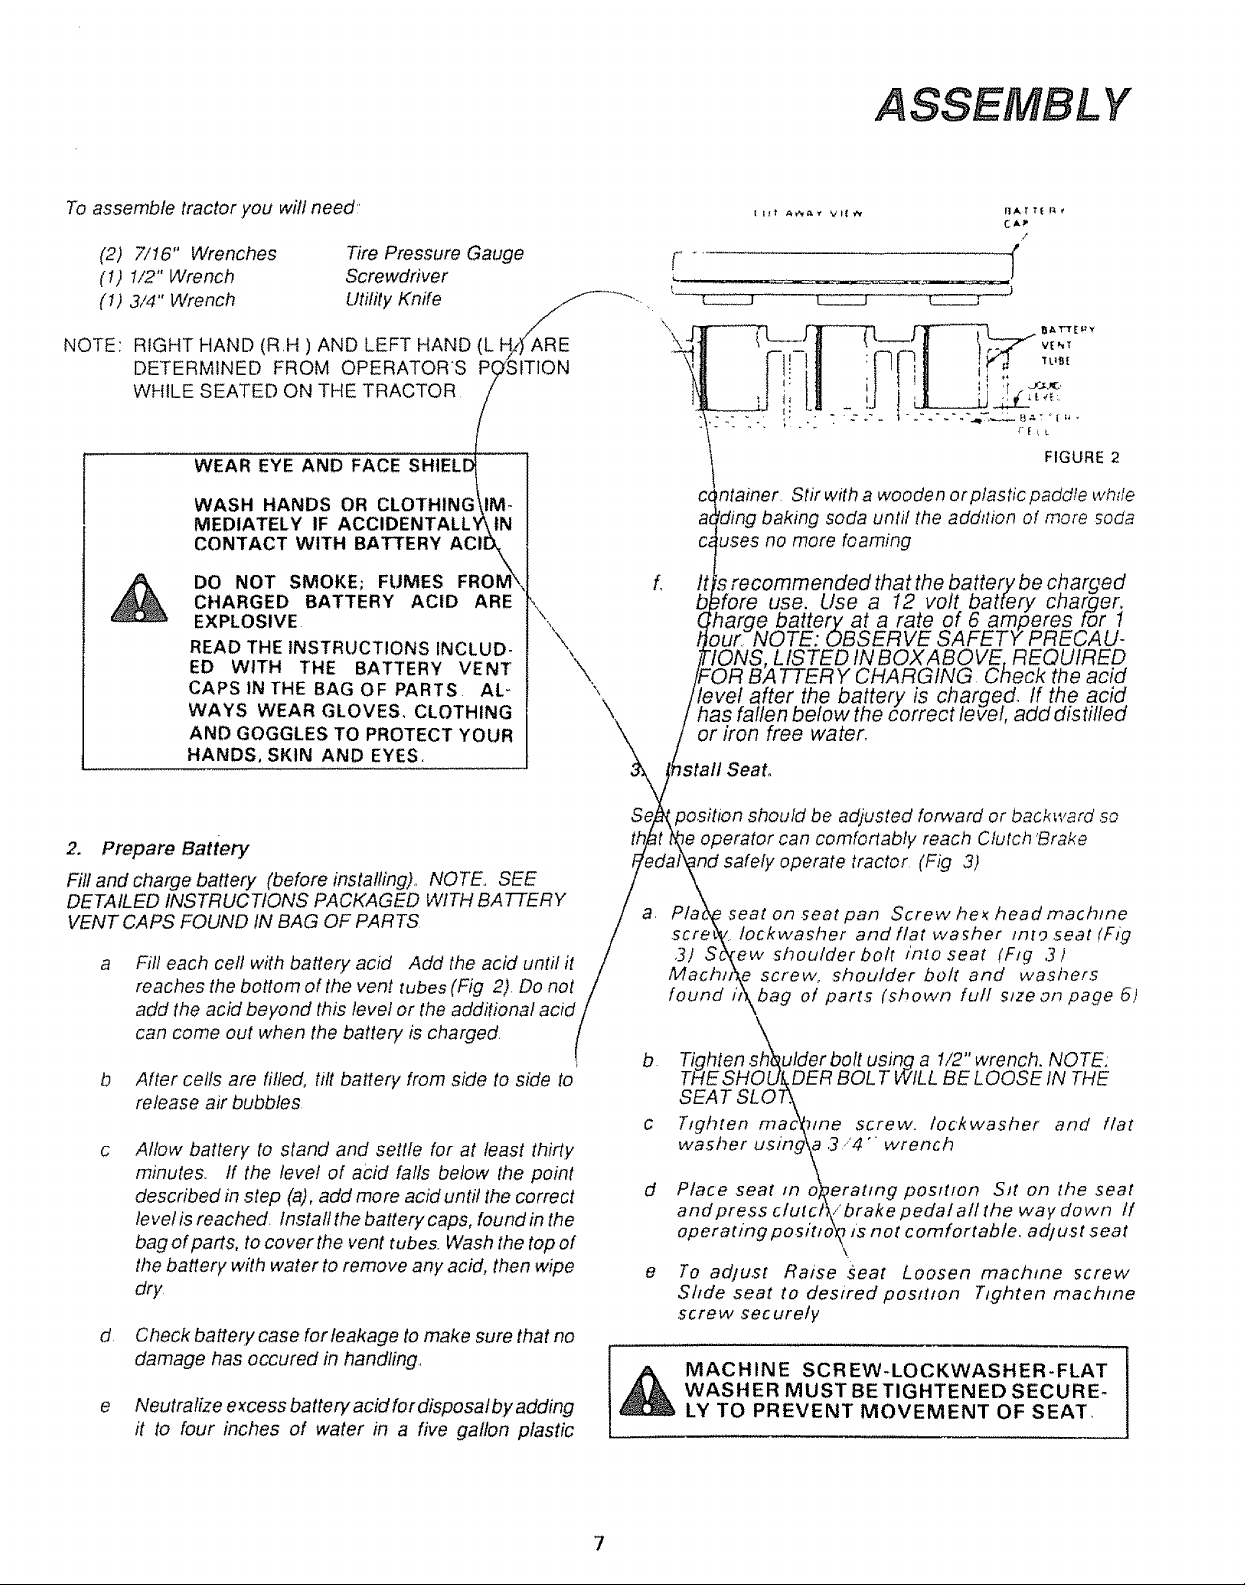
a Fill each ceil with battery acid Add the acid until it
reaches the bottom of the vent tubes (Fig 2) Do not
add the acid beyond this level or the additional acid
can come out when the battery is charged
b After cells are filled, tilt battery from side to side to
release air bubbles
Allow battery to stand and settle for at least thirty
minutes. If the level of acid falls below the point
described in step (a), add more acid untif the correct
leve! is reached Install the battery caps, found in the
bag of parts, to co ver the vent tubes. Wash the top of
the battery with water to remove any acid, then wipe
dry
d Ct_eck battery case for leakage to make sure that no
damage has occured in handling,
e Neutralize e_cess batteryacidfordisposafbyadding
it to four inches of water in a five gallon plastic
be adjusted forward or backward .so
operator can comfortably reach Clutch 'Brake
safely operate tractor (Fig 3)
seat on seat pan Screw he_ head machme
tockwasher and flat washer ln_o .seat (Fig
3) S ew shoulder bolt into seat (F!g ,3)
MachH\e screw, shoulder bolt and washers
found h\ bag of parts s_zean
(shown futf page 6)
\
r
F
b Tighten shoulder bolt using a I/2" wrench. NOTE:
THE SHOU_DER BOL T WILL BE LOOSE IN THE
SEAT SLOT_
c Tighten ma_Jme screw, tockwasher and flat
washer using\a3 ,"4" wrench
d Place seat in o_erattngposltfon Sit on the seat
and press ctutct\/ brake pedal all the way do wn If
operating positio_ ls__not comfortable, adjust seat
e To adjust Raise seat Loosen machme screw
Shde seat to desired posltmn hghten machtne
screw securely
WASHER MUST BE TIGHTENED SECURE-
MACHINE SCREW-LOCKWASHER-FLAT
LY TO PREVENT MOVEMENT OF SEAT,
7
ASSEMBLY
4. Check Tires
Check the air pressure in the tires Tires with too much air
pressure will cause the unit to ride rough. The wrong air
pressure wifl also keep the mower from cutting level The
correct air pressure is shown on the side of the tires ff the air
pressure is not shown, set to pressures shown in the REPAIR
AND ADJUSTMENT section. (page 14).
5. Install Battery
BEFORE INSTALLING BATTERY,
REMOVE METAL BRACELETS,
WRISTWATCH BANDS, RINGS, ETC_
FROM YOUR PERSON° TOUCHING
THESE ITEMS TO BATTERY TERMI-
NALS COULD RESULT IN BURNS,
a
Lift seat (Fig 3)
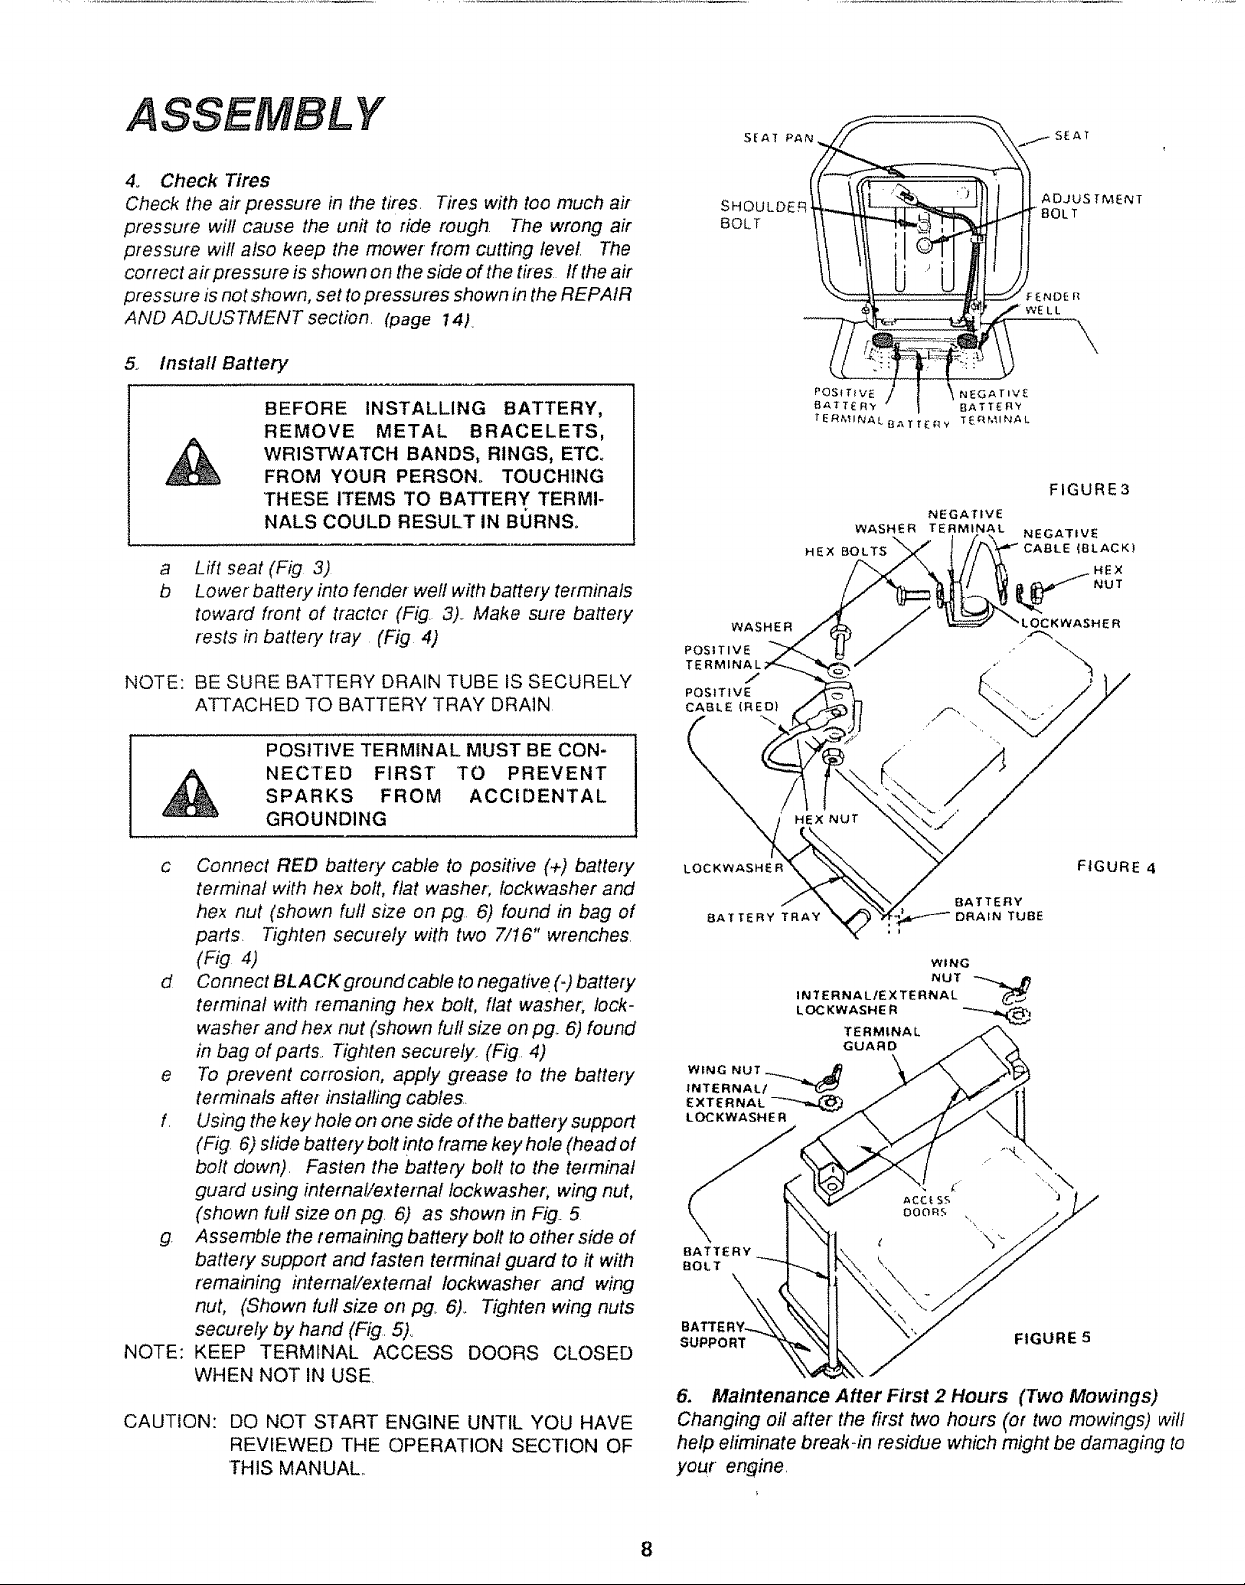
b
Lower battery into fender weft with battery terminals
toward front of tractor (Fig. 3),. Make sure battery
rests in battery tray (Fig 4)
NOTE: BE SURE BATTERY DRAIN TUBE IS SECURELY
ATTACHED TO BATTERY TRAY DRAIN
POStTIVETERMINALMUSTBECON-
NECTED FIRST TO PREVENT
SPARKS FROM ACCIDENTAL
GROUNDING
c Connect RED battery cable to positive (+) battery
terminal with hex bolt, flat washer, lockwasher and
hex nut (shown full size on pg 6) found in bag of
parts. Tighten securely with two 7/t6" wrenches.
(Fig. 4)
d Connect BLACKgroundcable to negativ e(-) battery
terminal with remaning hex bolt, flat washer, lock-
washer and hex nut (shown ful! size on pg. 6) found
in bag of pails.. Tighten securely. (Fig 4)
e To prevent corrosion, apply grease to the battery
terminals after installing cables..
f. Using the key hole on one side of the battery support
(Fig 6) slide battery bolt into frame key hole (head of
bolt down). Fasten the battery bolt to the terminal
guard using internal/externa! iockwasher; wing nut,
(shown full size on pg. 6) as shown in Fig..5
g. Assemble the remaining battery bolt to other side of
battery support and fasten terminal guard to it with
remaining internal/externa! Iockwasher and wing
nut, (Shown full size oft pg. 6).. Tighten wing nuts
securely by hand (Fig. 5)..
NOTE:
KEEP TERMINAL ACCESS DOORS CLOSED
WHEN NOT IN USE,
CAUTION: DO NOT START ENGINE UNTIL YOU HAVE
REVIEWED THE OPERATION SECTION OF
THIS MANUAL
1
WASHER TERMINAL
NEGATIVE
\
FIGURE3
NEGATIVE
CABLE(BLACK)
NUT
ER
WASHER
POStTIVE
/
POSITIVE
CABLE (RED)
POSITIVE / I \ NEGATIV_
B,_T T_: Ry -- j BATTERY
HEX BOLTS
HE,x Nut _ _ ,
FIGURE 4
WING
LOCKWASHER
TERMINAL
GUARD
WING NUT _ .,_
INTERNAL/
EXTERNAL
LOCKWASHE R
BATTERY
BOLT
SUPPORT FIGURE 5
NUTINTERNALIEXTERNAL
6. Maintenance After First 2 Hours (Two Mowings)
Changing oil after the first two hours (or two mowings) wi!f
help eliminate break-in residue which might be damaging to
your engine.
8
 Loading...