


Operator's Manual
40v Max* Lithium Hedge Trimmer
iVlodel" 98022
z_CAUTION: Read, understand and follow
all Safety Rules and Operating Instructions
in this manual before using this product.
,, SAFETY
,, OPERATION
,, MAINTENANCE
,, TROUBLESHOOTING
Sears Brands Management Corporation,
,, ESPANOL PG. 12
Hoffman Estates, IL 60179 U.S.A.
*Maximum initial battery pack voltage (measured
See the full line of Craftsman ®products
at craftsman.corn
Pa_ No. 90616327 January 2015
without a workload) is 40 volts. Measured under a
workload, nominal voltage is 36.
*El maximo voltaje inicial del paquete de baterias
(medido sin una carga de trabajo) es 40 voltios. Si se
mide con una carga de trabajo, el voltaje nominal es 36.
CRAFTSMAN LIMITED WARRANTY
FOR FOUR YEARS from the date of sale, this product is warranted against defects
in material or workmanship.
FOR TWO YEARS from the sale date, a supplied battery pack or charger is
warranted against material or workmanship defects.
WiTH PROOF OF SALE, a defective product will be replaced free of charge.
For warranty coverage details to obtain free replacement, visit the web page:
www.craftsman.com/warranty
This warranty is void if this product is ever used while providing commercial
services or if rented to another person.
This warranty gives you specific legal rights, and you may also have other rights
which vary from state to state.
Sears Brands Management Corporation, Hoffman Estates, IL 60179
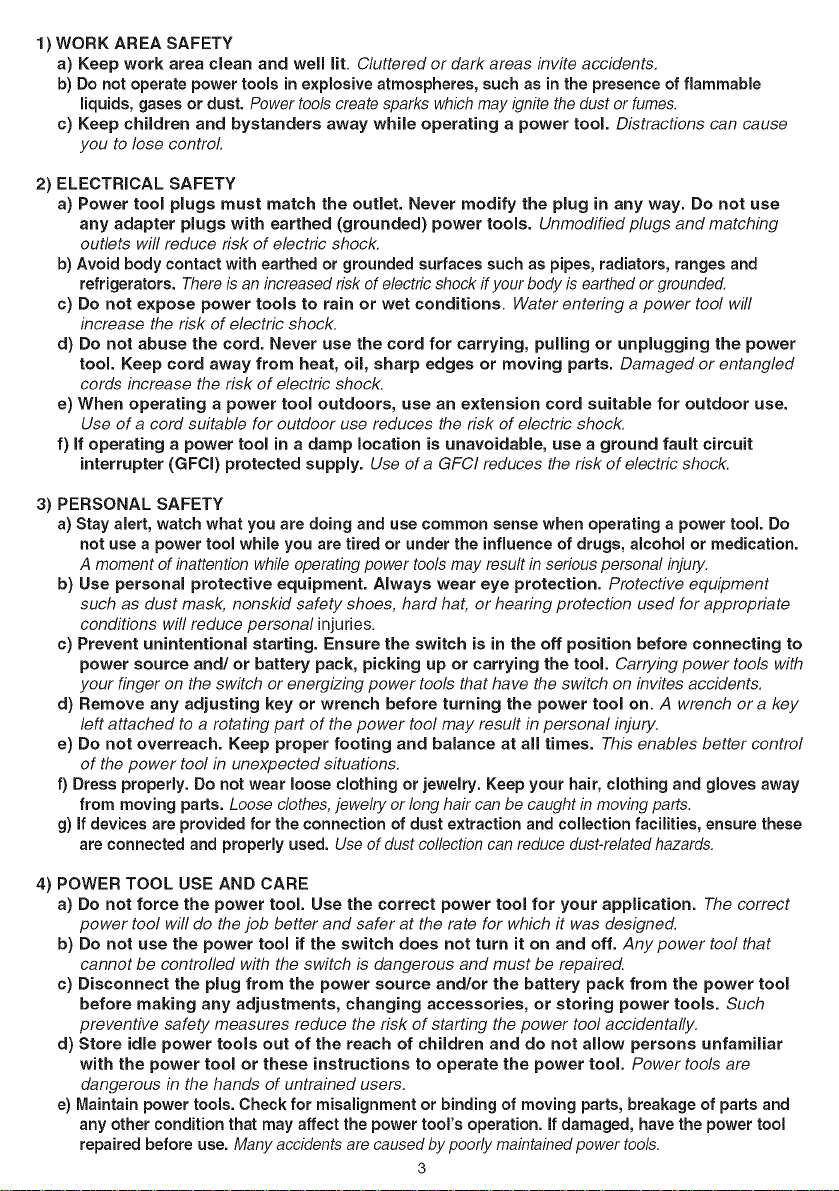
SYMBOL SIGNAL MEANING
/_SAFETY ALERT SYMBOL: IndicatesDANGER, WARNING, OR CAUTION.
May be used in conjunction with other symbols or pictographs.
DANGER: Indicates hazardous situation which, if not avoided, will result in death or serious injury.
/_WARNING: Indicates hazardous situation which, if not avoided, could result in death or
serious injury.
z_ CAUTION: Indicates a hazardous situation which, if not avoided, could result in minor or
moderate injury or property damage.
General Power Tool Safety Warnings
z_WARNING: Read all safety warnings and all instructions. Failure to
follo,w th.e.wamings and instructions may result in electric shock, fire and/or
serious injury.
/_WARNING: Some dust created by power sanding, sawing, grinding, drilling, and other
construction activities contains chemicals known to the State of California to cause cancer,
birth defects or other reproductive harm. Some examples of these chemicals are:
* lead from lead-based paints,
* crystalline silica from bricks and cement and other masonry products, and
. arsenic and chromium from chemically-treated lumber.
Your risk from these exposures varies, depending on how often you do this type of work. To reduce
your exposure to these chemicals: work in a well ventilated area, and work with approved safety
equipment, such as those dust masks that are specially designed to filter out microscopic particles.
* Avoid prolonged contact with dust from power sanding, sawing, grinding, drilling, and other
construction activities. Wear protective clothing and wash exposed areas with soap and
water. Allowing dust to get into your mouth, eyes, or lay on the skin may promote absorption of
harmful chemicals.
SAVE ALL WARNINGS AND iNSTRUCTiONS FOR FUTURE REFERENCE
The term "power tool" in the warnings refers to your mains-operated (corded)
power too/or battery-operated (cordless) power tool
SAVE THESE INSTRUCTIONS
2
1)WORKAREA SAFETY
a) Keep work area clean and well lit. Cluttered or dark areas invite accidents.
b) Do not operate power tools in explosive atmospheres, such as in the presence of flammable
liquids, gases or dust. Power tools create sparks which may ignite the dust or fumes.
c) Keep children and bystanders away while operating a power tool. Distractions can cause
you to lose control
2) ELECTRICAL SAFETY
a) Power tool plugs must match the outlet. Never modify the plug in any way. Do not use
any adapter plugs with earthed (grounded) power tools. Unmodified plugs and matching
outlets will reduce risk of electric shock.
b) Avoid body contact with earthed or grounded surfaces such as pipes, radiators, ranges and
refrigerators. There is an increased risk of electric shock if your body is earthed or grounded,
c) Do not expose power tools to rain or wet conditions. Water entering a power tool will
increase the risk of electric shock.
d) Do not abuse the cord. Never use the cord for carrying, pulling or unplugging the power
tool. Keep cord away from heat, oil, sharp edges or moving parts. Damaged or entangled
cords increase the risk of electric shock.
e) When operating a power tool outdoors, use an extension cord suitable for outdoor use.
Use of a cord suitable for outdoor use reduces the risk of electric shock,
f) if operating a power tool in a damp location is unavoidable, use a ground fault circuit
interrupter (GFCI) protected supply. Use of a GFCI reduces the risk of electric shock.
3) PERSONAL SAFETY
a) Stay alert, watch what you are doing and use common sense when operating a power tool. Do
not use a power tool while you are tired or under the influence of drugs, alcohol or medication.
A moment of inattention while operating power tools may result in serious personal injury,
b) Use personal protective equipment. Always wear eye protection. Protective equipment
such as dust mask, nonskid safety shoes, hard hat, or hearing protection used for appropriate
conditions will reduce personal injuries.
c) Prevent unintentional starting. Ensure the switch is in the off position before connecting to
power source and/or battery pack, picking up or carrying the tool. Carrying power tools with
your finger on the switch or energizing power tools that have the switch on invites accidents.
d) Remove any adjusting key or wrench before turning the power tool on. A wrench or a key
left attached to a rotating part of the power tool may result in personal injury.
e) Do not overreach. Keep proper footing and balance at all times. This enables better control
of the power tool in unexpected situations.
f) Dress properly. Do not wear loose clothing or jewelry. Keep your hair, clothing and gloves away
from moving parts. Loose clothes, jewelry or long hair can be caught in moving parts.
g) If devices are provided for the connection of dust extraction and collection facilities, ensure these
are connected and properly used. Use of dust collection can reduce dust-related hazards,
4) POWER TOOL USE AND CARE
a) Do not force the power tool. Use the correct power tool for your application. The correct
power tool will do the job better and safer at the rate for which it was designed.
b) Do not use the power tool if the switch does not turn it on and off. Anypower tool that
cannot be controlled with the switch is dangerous and must be repaired.
c) Disconnect the plug from the power source and/or the battery pack from the power tool
before making any adjustments, changing accessories, or storing power tools. Such
preventive safety measures reduce the risk of starting the power tool accidentally.
d) Store idle power tools out of the reach of children and do not allow persons unfamiliar
with the power tool or these instructions to operate the power tool. Power tools are
dangerous in the hands of untrained users.
e) Maintain power tools. Check for misalignment or binding of moving parts, breakage of parts and
any other condition that may affect the power tool's operation, if damaged, have the power tool
repaired before use. Many accidents are caused by poorly maintained power tools,
3
f)Keepcuttingtoolssharp and clean. Properly maintained cutting tools with sharp cutting
edges are less likely to bind and are easier to control.
g) Use the power tool, accessories and tool bits, etc. in accordance with these instructions,
taking into account the working conditions and the work to be performed. Use of the power tool
for operations different from those intended could result in a hazardous situation.
5) BATTERY TOOL USE AND CARE
a) Recharge only with the charger specified by the manufacturer. A charger that is suitable for
one type of battery pack may create a risk of fire when used with another battery pack.
b) Use power tools only with specifically designated battery packs. Use of any other battery
packs may create a risk of injury and fire.
c) When battery pack is not in use, keep it away from other metal objects like paper clips,
coins, keys, nails, screws, or other small metal objects that can make a connection from
one terminal to another. Shorting the battery terminals together may cause burns or a fire.
d) Under abusive conditions, liquid may be ejected from the battery, avoid contact, if
contact accidentally occurs, flush with water, if liquid contacts eyes, additionally seek
medical help. Liquid ejected from the battery may cause irritation or burns.
6) SERVICE
a) Have your power tool serviced by a qualified repair person using only identical
replacement parts. This will ensure that the safety of the power tool is maintained,
HEDGE TRIMMER SAFETY WARNINGS
• Keep all parts of the body away from the cutter blade. Do not remove cut material or hold
material to be cut when blades are moving. Make sure the switch is off when clearing jammed
material. Blades coast after turn off. A moment of inattention while operating the hedge trimmer
may result in serious personal injury.
z_ DAN G E R: Keep hands away from blade. Contact with blade will result in serious personal injury.
Use both hands when operating the hedge trimmer. Using one hand could cause loss of control
and result in serious personal injury.
Carry the hedge trimmer by the handle with the cutter blade stopped. When transporting or
storing the hedge trimmer always fit the cutting device cover. Proper handling of the hedge trimmer
will reduce possible personal injury from the cutter blades.
o Hold the power tool by insulated gripping surfaces only, because the cutter blade may contact
hidden wiring or its own cord. Cutter blades contacting a "live" wire may make exposed metal parts
of the power tool "live" and could give the operator an electric shock.
• Keep extension cord away from cutting area. During operation the extension cord may be
hidden in shrubs and can be accidentally cut by the blade.
o Check the hedge for foreign objects, e.g. wire fences.
%CAUTION: Do not expose to rain.
/LWARNING: Remove plug from the outlet immediately if the extension cord becomes
damaged or cut.
/_WARN_NG: Some dust created by this product contains chemicals known to the State of California to
cause cancer, birth defects or other reproductive harm. Some examples of these chemicals are:
• compounds in fertilizers
• compounds in insecticides, herbicides and pesticides
• arsenic and chromium from chemically treated lumber
To reduce your exposure to these chemicals, wear approved safety equipment such as dust masks
that are specially designed to filter out microscopic particles.
SYMBOLS
The label on your tool may includethe following symbols. The symbols and their definitions are as follows:
V,................. volts
Hz ................ hertz
min .............. minutes
- - =or DC,,, direct current
(_) ................ Class I Construction
(grounded)
[_ ................ Class II Construction
(double insulated)
............ Read instruction manual before use
................ Use proper eye protection
A ................... amperes
W .................. watts
r_Jor AC ....... alternating current
no .................. no load speed
_, .................. earthing terminal
/_ ................ safety alert symbol
,,,/min or rpm,,,revolutions or
reciprocation per minute
.................. Use proper respiratory protection
0 .................. Use proper hearing protection
iMPORTANT SAFETY iNSTRUCTiONS FOR BATTERY CHARGERS
SAVE THESE iNSTRUCTiONS: THiS MANUAL CONTAINS iMPORTANT SAFETY
iNSTRUCTiONS FOR BATTERY CHARGERS.
• Before using charger, read all instructions and cautionary markings on charger, battery pack, and
product using battery pack.
z_WARN_NG: SHOCK HAZARD. Do not allow any liquid to get inside charger.
z_OAUT_ON: BURN HAZARD. To reduce the risk of injury, charge only designated Craftsman C_
batteries. Other types of batteries may burst causing personal injury and damage.
z_OAUT_ON: Under certain conditions, with the charger plugged in to the power supply, the
charger can be shorted by foreign material. Foreign materials of a conductive nature such as, but not
limited to, steel wool, aluminum foil, or any buildup of metallic particles should be kept away from
charger cavities. Always unplug the charger from the power supply when there is no battery pack in
the cavity. Unplug charger before attempting to clean.
z_WARNING: THE CHARGER SUPPLIED WiTH THiS PRODUCT iS iNTENDED TO BE
PLUGGED IN SUCH THAT iT iS CORRECTLY ORIENTATED iN A VERTICAL OR FLOOR
MOUNT POSiTiON.
• DO NOT attempt to charge the battery pack with any chargers other than the ones in this
manual. The charger and battery pack are specifically designed to work together,
• These chargers are not intended for any uses other than charging designated Craftsman ®
rechargeable batteries. Any other uses may result in risk of fire, electric shock or electrocution,
• Do not expose charger to rain or snow.
• Pull by plug rather than cord when disconnecting charger. This willreduce risk of damage to
electric plug and cord,
• Make sure that cord is located so that it will not be stepped on, tripped over, or otherwise
subjected to damage or stress.
• Do not use an extension cord unless it is absolutely necessary. Use of improper extension cord
could result in risk of fire, electric shock, or electrocution,
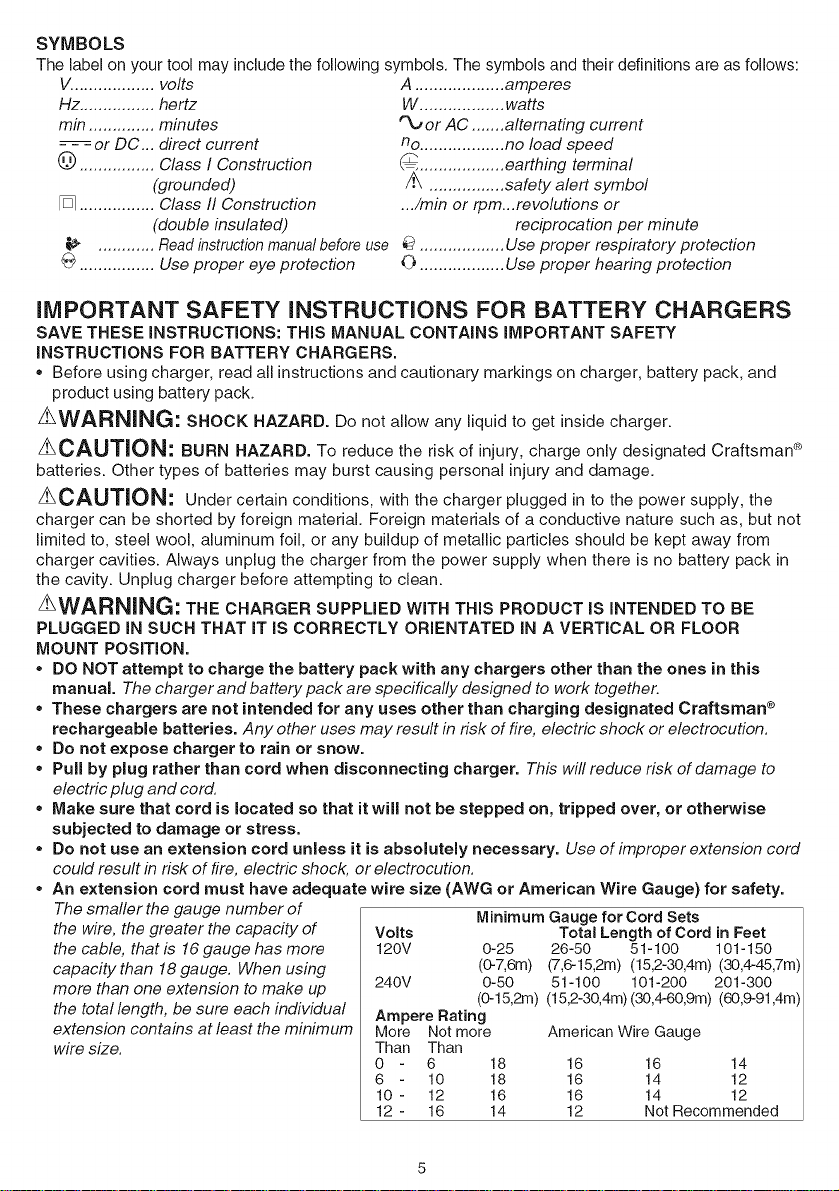
• An extension cord must have adequate wire size (AWG or American Wire Gauge) for safety.
The smaller the gauge number of
the wire, the greater the capacity of
the cable, that is 16 gauge has more
capacity than 18 gauge. When using
more than one extension to make up
the total length, be sure each individual
extension contains at least the minimum
wire size.
Volts Total Length of Cord in Feet
120V 0-25 26-50 51-100 101-150
240V 0-50 51-100 101-200 201-300
Ampere Rating
More Not more American Wire Gauge
Than Than
0 6 18 16 16 14
6 10 18 16 14 12
10 - 12 16 16 14 12
12 - 16 14 12 Not Recommended
Minimum Gauge for Cord Sets
(0-7,6m) (7,6-15,2m) (15,2-30,4m)(30,4-45,7m)
(0-15,2m) (15,2-30,4m)(30,4-60,9m)(60,9-91,4m)
* Do not place any object on top of charger or place the charger on a soft surface that might
block the ventilation slots and result in excessive internal heat. Place the charger in a
position away from any heat source. The charger is ventilated through slots in the top and the
bottom of the housing.
* Do not mount charger on wail or perrnanentJy affix charger to any surface. The charger is
intended to use on a flat, stable surface (i.e., table top, bench top).
* Do not operate charger with damaged cord or plug -- have them replaced immediately.
* Do not operate charger if it has received a sharp blow, been dropped, or otherwise damaged
in any way. Take it to an authodzed service center.
* Do not disassemble charger; take it to an authorized service center when service or repair is
required. Incorrect reassembly may result in a risk of electric shock, electrocution or fire.
* Disconnect the charger from the outlet before attempting any cleaning. This will reduce the risk
of electric shock. Removing the battery pack will not reduce this risk.
* NEVER attempt to connect 2 chargers together.
* The charger is designed to operate on standard household electrical power (120 Volts). Do
not attempt to use it on any other voltage.
iMPORTANT SAFETY iNSTRUCTiONS FOR BATTERY PACKS
!_WARNING: For safe operation, read this manual and manuals originally supplied with tool
before using the charger.
The battery pack is not fully charged out of the carton. Before using the battery pack and charger,
read the safety instructions below. Then follow charging procedures outlined.
READ ALL INSTRUCTIONS
* Do not incinerate the battery pack even if it is severely damaged or is completely worn out.
The battery pack can explode in a fire. Toxic fumes and materials are created when battery packs
are burned.
* Do not charge or use battery in explosive atmospheres, such as in the presence of flammable
liquids, gases or dust. Inserting or removing the battery from the charger may ignite the dust or fumes.
* if battery contents come into contact with the skin, immediately wash area with mild soap
and water. If battery liquid gets into the eye, rinse water over the open eye for 15 minutes or
until irritation ceases. If medical attention is needed, the battery electrolyte for Li-ion batteries is
composed of a mixture of liquid organic carbonates and fithium salts.
* Contents of opened battery cells may cause respiratory irritation. Provide fresh air. If symptoms
persist, seek medical attention.
_WARNING: BURN HAZARD. BATTERY LIQUID MAY BE FLAMMABLE IF EXPOSED TO
SPARK OR FLAME.
* Charge the battery packs only in Craftsman C_chargers.
* DO NOT splash or immerse in water or other liquids. This may cause premature cell failure.
* Do not store or use the tool and battery pack in locations where the temperature may reach
or exceed 105°F (40°C) (such as outside sheds or metal buildings in summer).
!_WARNING: Never attempt to open the battery pack for any reason. If battery pack case is
cracked or damaged, do not insert into charger. Do not crush, drop or damage battery pack. Do not
use a battery pack or charger that has received a sharp blow, been dropped, run over or damaged in
any way (i.e., pierced with a nail, hit with a hammer, stepped on). Damaged battery packs should be
returned to service center for recycling.
_WARNING: Fire hazard. Do not store or carry battery so that rnetaJ objects can contact
exposed battery terrninaJs. For example, do not place battery in aprons, pockets, tool boxes,
product kit boxes, drawers, etc., with loose nails, screws, keys, etc. Transporting batteries can
possibly cause fires if the battery terrninals inadvertently come in contact with conductive
rnaterials such as keys, coins, hand tools and the like. The US Department of Transportation
Hazardous Material Regulations (HMR) actually prohibit transporting batteries in commerce or on
airplanes (i.e., packed in suitcases and carry-on luggage) UNLESS they are properly protected from
short circuits. So when transporting individual batteries, make sure that the battery terminals are
protectedandweftinsulatedfrommaterialsthatcouldcontactthemandcauseashortcircuiLNOTE:
LI-IONbatteriesshould not be put in checked baggage.
STORAGE RECOMMENDATIONS
1. The best storage place is one that is cool and dry away from direct sunlight and excess heat or
cold.
2. Long-term storage will not harm the battery pack or charger, unless the battery is depleted.
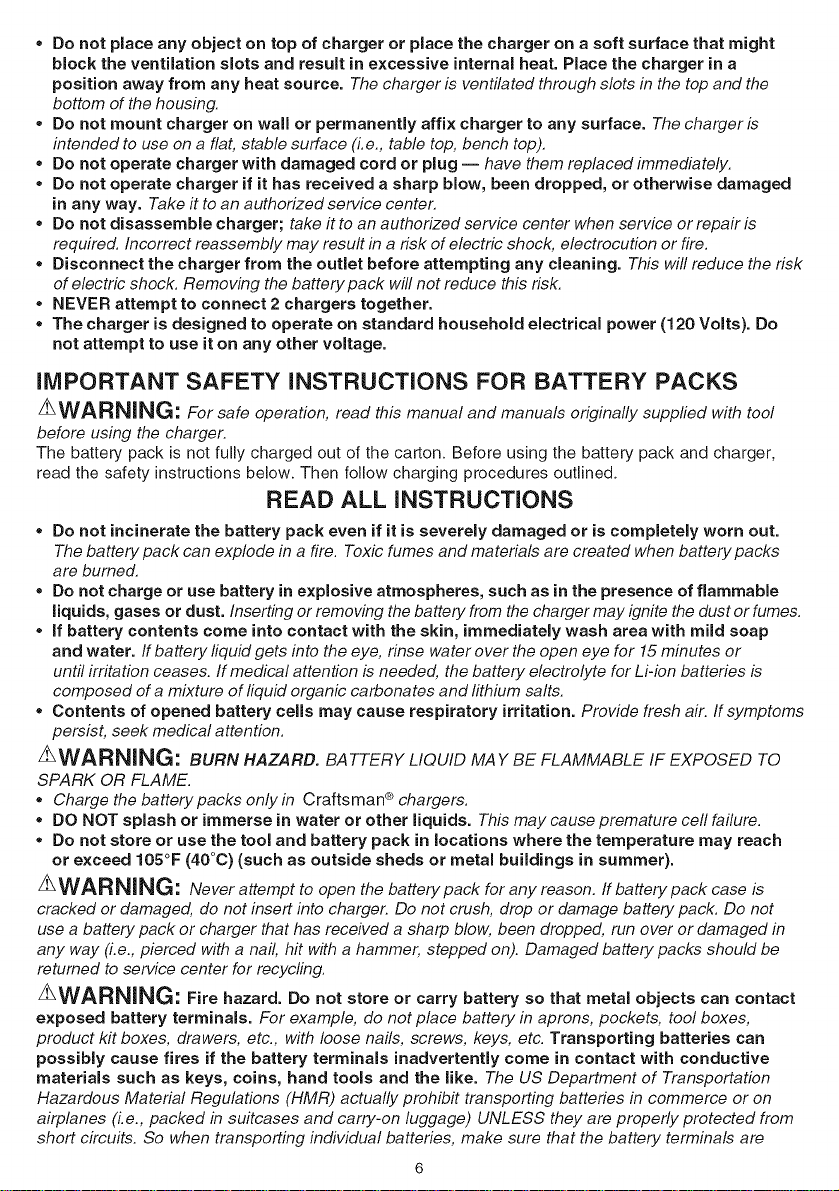
PARTS AND FEATURES
1. Trigger Switch
2. Lock Button
3. Switch Handle
4. Blade Guard
5. Bail Handle
6. Battery
7. Blade
CHARGING PROCEDURE
Craftsman _ chargers are designed to charge Craftsman C_battery packs.
1. Plug the charger into an appropriate outlet before inserting the battery pack.
2. Insert the battery pack into the charger.
_3. The green LED will flash indicating that the battery is being charged.
#_llrRl 4. The completion of charge is indicated by the green LED remaining on continuously. The
pack is fully charged and may be used at this time or left on the charger.
Recharge discharged batteries as soon as possible after use or battery life may be greatly diminished.
CHARGER DiAGNOSTiCS
This charger is designed to detect certain problems that can arise with the battery packs or the
power source. Problems are indicated by one LED (figure la) flashing in different patterns.
BAD BATTERY
_The charger can detect a weak or damaged battery. The red LED flashes in the pattern
indicated on the label, if you see this bad battery blink pattern, do not continue to charge the
battery. Return it to a service center or a collection site for recycling.
HOT/COLD PACK DELAY
When the charger detects a battery that is excessively hot or excessively cold, it automatically
starts a Hot/Cold Pack Delay, suspending charging until the battery has normalized.
After this happens, the charger automatically switches to the Pack Charging mode. This
feature ensures maximum battery life. The red LED flashes in the pattern indicated on the
label when the hot / cold pack delay is detected.
LEAVING THE BATTERY IN THE CHARGER
The charger and battery pack can be left connected with the green LED glowing indefinitely. The
charger will keep the battery pack fresh and fully charged.
IMPORTANT CHARGING NOTES
1. Longest life and best performance can be obtained if the battery pack is charged when the air
temperature is between 60°F and 80°F (16 °- 27°C). DO NOT charge the battery pack in an air
temperature below +40°F (+4.5°C), or above +105°F (+40.5°C). This is important and will prevent
serious damage to the battery pack.
2. The charger and battery pack may become warm to touch while charging. This is a normal
condition, and does not indicate a problem. To facilitate the cooling of the battery pack after use,
avoid placing the charger or battery pack in a warm environment such as in a metal shed, or an
uninsulated trailer.
3. If the battery pack does not charge properly:
a. Check current at receptacle by plugging in a lamp or other appliance
b. Check to see if receptacle is connected to a light switch which turns power off when you turn
out the lights.
c. Move charger and battery pack to a location where the surrounding air temperature is
approximately 60°F and 80°F (16 °- 27°C).
d. If charging problems persist, take the tool, battery pack and charger to your local service center.
4. The battery pack should be recharged when it fails to produce sufficient power on jobs which were
easily done previously. DO NOT CONTINUE to use under these conditions. Follow the charging
procedure. You may also charge a partially used pack whenever you desire with no adverse affect
on the battery pack.
5. Foreign materials of a conductive nature such as, but not limited to, steel wool, aluminum foil,
or any buildup of metallic particles should be kept away from charger cavities. Always unplug the
charger from the power supply when there is no battery pack in the cavity. Unplug charger before
attempting to clean.
6. Do not freeze or immerse charger in water or any other liquid.
z_WARNING: SHOCK HAZARD. Do not allow any liquid to get inside charger. NEVER ATTEMPT
TO OPEN THE BATTERY PACK FOR ANY REASON. tF THE PLASTIC HOUSING OF THE BATTERY
PACK BREAKS OR CRACKS, RETURN TO A SERVICE CENTER FOR RECYCLING.
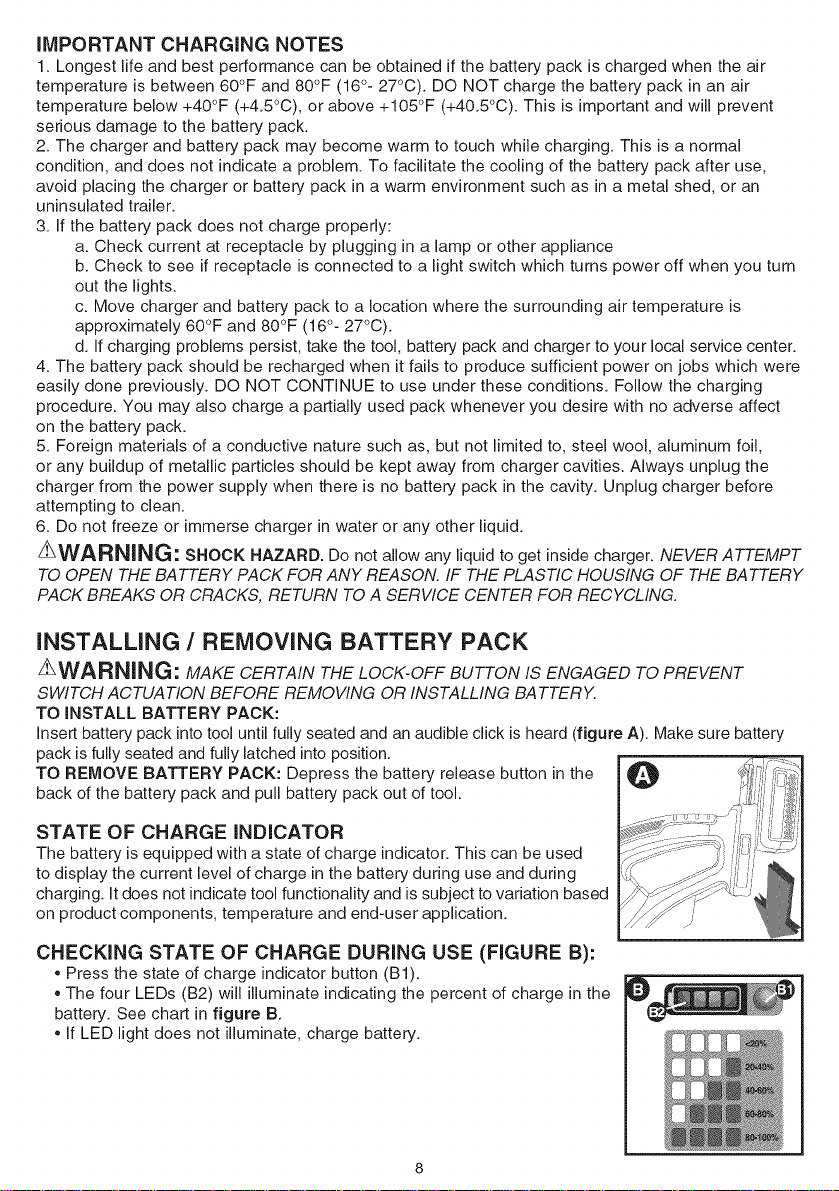
INSTALLING / REMOVING BATTERY PACK
z_WARNING: MAKE CERTAIN THE LOCK-OFF BUTTON IS ENGAGED TO PREVENT
SWITCH ACTUATION BEFORE REMOVING OR INSTALLING BATTERY.
TO INSTALL BATTERY PACK:
insert battery pack into tool until fully seated and an audible click is heard (figure A). Make sure battery
pack is fully seated and fully latched into position.
TO REMOVE BATTERY PACK: Depress the battery release button in the O
back of the battery pack and pull battery pack out of tool.
STATE OF CHARGE INDICATOR
The battery is equipped with a state of charge indicator. This can be used
to display the current level of charge in the battery during use and during
charging. It does not indicate tool functionality and is subject to variation based
on product components, temperature and end-user application.
CHECKING STATE OF CHARGE DURING USE (FIGURE B):
• Press the state of charge indicator button (B1).
• The four LEDs (B2) will illuminate indicating the percent of charge in the
battery. See chart in figure B.
• if LED light does not illuminate, charge battery.

OPERATION
SWITCH
To turn the unit "ON", slide the lock off button, shown in figure C, backward
and squeeze the trigger switch. Once the unit is running, you may release the
lock off button.
In order to keep the unit running you must continue to squeeze the trigger. To
turn the unit "OFF", release the trigger.
_WARNING: NEVERATTEMPTTO LOCKA SWITCH iN THEON POSiTiON.
TRIMMING INSTRUCTIONS
1. WORKING POSiTiON - Maintain proper footing and balance and do not
overreach. Wear safety goggles, non-skid footwear when trimming. Hold
the unit firmly in both hands and turn the unit ON. Always hold the trimmer
as shown in the illustrations in this manual, with one hand on the switch
handle and one hand on the bail handle. (figure D) Never hold the unit by
the blade guard.
2. TRIMMING NEW GROWTH - (Figure E) A wide, sweeping motion, feeding
the blade teeth through the twigs is most effective. A slight downward tilt of the
blade, in the direction of motion gives the best cutting.
z_CAUTION: DO NOT CUT STEMS GREATER THAN 3/4 INCH
(19MM). USE THE TRIMMER ONLY FOR CUTTING NORMAL
SHRUBBERY AROUND HOUSES AND BUiLDiNGS.
3. LEVEL HEDGES (Figure F) - To obtain exceptionally level hedges a
piece of string can be stretched along the length of the hedge as a guide.
m
°fi
4. SIDE TRiMMiNG HEDGES (Figure G) - Hold the trimmer as shown and
begin at the bottom and sweep up.
z_WARNING: TO GUARD AGAINST iNJURY, OBSERVE THE
FOLLOWING:
• READ iNSTRUCTiON MANUAL BEFORE USING. SAVE
iNSTRUCTiON MANUAL.
• CHECK THE HEDGE FOR FOREIGN OBJECTS SUCH AS WiRE OR
FENCES BEFORE EACH USE.
• KEEP HANDS ON HANDLES. DON'T OVERREACH.
, DO NOT USE UNDER WET CONDiTiONS.
z_CAUTION: BLADE MAY COAST AFTER TURN OFF.
Z_DANGER: KEEP HANDS AWAY FROM BLADES.

MAINTENANCE
!_WARNING: REMOVE BATTERY PACK BEFORE SERViCiNG, CLEANING OR REMOVING
MATERIAL FROM THE GARDENING APPLIANCE.
The cutting blades are made from high quality, hardened steel and with normal
usage, they will not require resharpening. However, if you accidentally hit a wire
fence (figure H), stones, glass or other hard objects, you may put a nick in the
blade. There is no need to remove this nick as long as it does not interfere with
the movement of the blade. If it does interfere, remove the battery and use a fine
toothed file or sharpening stone to remove the nick. If you drop the trimmer, carefully
inspect it for damage. If the blade is bent, housing cracked, handles broken or if you
see any other condition that may affect the trimmer's operation contact your local
Craftsman _ Service Center for repairs before putting it back into use.
Fertilizers and other garden chemicals contain agents which greatly accelerate the corrosion of metals.
Do not store the unit on or adjacent to fertilizers or chemicals.
With the battery removed, use only mild soap and a damp cloth to clean the unit. Never let any liquid
get inside the unit; never immerse any part of the unit into a liquid. Prevent the blades from rusting by
applying a film of light machine oil after cleaning.
This device complies with part 15 of the FCC rules. Operation is subject to the following two
conditions: (1) This device may not cause harmful interference, and (2) this device must accept any
interference received, including interference that may cause undesired operation.
NOTE: This equipment has been tested and found to comply with the limits for a Class B digital device,
pursuant to Part 15 of the FCC Rules. These limits are designed to provide reasonable protection
against harmful interference in a residential installation. This equipment generates, uses and can
radiate radio frequency energy and, if not installed and used in accordance with the instructions, may
cause harmful interference to radio communications. However, there is no guarantee that interference
will not occur in a particular installation.
If this equipment does cause harmful interference to radio or television reception, which can
be determined by turning the equipment off and on, the user is encouraged to try to correct the
interference by one or more of the following measures:
• Reorient or relocate the receiving antenna.
Increase the separation between the equipment and receiver.
Connect the equipment into an outlet on a circuit different from that to which the receiver is
connected.
Consult the dealer or an experienced radio/TV technician for help.
Changes or modifications to this unit not expressly approved by the party responsible for compliance
could void the user's authority to operate the equipment. This Class B digital apparatus complies with
Canadian ICES-003.
z_CCESSORIES
ARNING: DO NOT USE THE HEDGE TRIMMER WiTH ANY TYPE OF ACCESSORY OR
ATTACHMENT. SUCH USAGE MIGHT BE HAZARDOUS.
THE RBRC TM SEAL
The RBRC TM (Rechargeable Battery Recycling Corporation) Seal on the Ll-ION battery
(or battery pack) indicates that the costs to recycle the battery (or battery pack) at the
end of its useful life have already been paid by Craftsman _.
RBRC TM in cooperation with Craftsman C_and other battery users, has established
programs in the United States to facilitate the collection of spent LI-ION batteries. Help protect our
environment and conserve natural resources by returning the spent Ll-ION battery to an authorized
Craftsman _ service center or to your local retailer for recycling. You may also contact your local
recycling center for information on where to drop off the spent battery. RBRC TM is a registered
trademark of the Rechargeable Battery Recycling Corporation.
10

Problem
• Slow running,
noisy or hot
blades.
• Unit will not start.
• Battery won't
charge.
TROUBLESHOOTING
Possible Cause
• Dry, corroded blades.
• Blades or blade support bent.
• Bent or damaged teeth.
• Loose blade bolts.
• Battery not installed properly.
• Battery not charged.
• Lock off not fully operated.
• Battery not inserted into charger.
• Charger not plugged in.
• Surrounding air temperature too
hot or too cold.
Possible Solution
• Lubricate blades.
• Straighten blade or blade
support.
• Straighten teeth.
• Tighten blade bolts.
• Check battery installation.
• Check battery charging
requirements.
Check that lock off is fully pulled
back prior to moving main
trigger.
• Insertbattery intocharger untilgreen
LED appears. Charge up to 8
hours if battery totally drained.
• Plug charger into a working
outlet. Refer to "Important
Charging Notes" for more
details.
• Check current at receptacle
by plugging in a lamp or other
appliance.
• Check to see if receptacle is
connected to a light switch which
turns power off when you turn
out the lights.
• Move charger and tool to a
surrounding air temperature of
above 40 degree F (4.5°C) or
below 105 degree F (40.5°C).
11

UNAhIO DE GARANTJA LIMITADA PARA LOS PRODUCTOS CRAFTSMAN
Este producto est& garantizado contra defectos de material o mano de obra
DURANTE UN Al_lO a partir de la fecha de compra. Se reemplazar& un producto
defectuoso sin cargo al presentar el comprobante de compra.
Para conocer detalles sobre la cobertura de la garantia para obtener un reemplazo
gratuito, visite el sitio web: www.craftsman.com
Esta garantJa no cubre la hoja, que es una pieza consumible que puede
desgastarse con el uso normal dentro del perJodo de garantJa.
Esta garantia queda nula si el producto se utiliza alguna vez para proporcionar
servicios comerciaJes o si se alquila a otra persona.
Esta garantia le concede derechos legales especificos yes posible que adem&s
usted tenga otros derechos que varien de un estado a otto.
Sears Brands Management Corporation, Hoffman Estates, IL 60179
SIGNIFICADO DE SllViBOLO SENAL
SJMBOLO DE ALERTA DE SEGURIDAD: IndicaPELIGRO, ADVERTENCIA
O ATENCION. Se puede utilizan en conjunto con otros simbolos o pictografias.
/_ PELIGRO: Indica una situaci6n de peligro, que de no evitarse, podria provocar la
muerte o lesiones graves.
/_ ADVERTENCIA: Indica una situaci6n de peligro, que de no evitarse, podria provocar
la muerte o lesiones graves.
/k ATENCION: Indica una situaci6n de peligro, que de no evitarse, podria provocar
lesiones menores o moderadas o daSos a la propiedad.
ADVERTENCIAS GENERALES DE SEGURIDAD PARA
z_ADVERTENCJA: Lea todas Jas advertencias de seguridad e instrucciones El
incumplimiento de las advertencias e instrucciones puede provocar descargas el6ctricas,
incendios o lesiones graves.
Conserve todas las advertencias e instrucciones para futuras consultas.
El t6rmino "herramienta el6ctrica" incluido en las advertencias hace referencia alas
herramientas el6ctricas operadas con corriente (con cable el6ctrico) o alas herramientas
el6ctricas operadas con baterias (inal&mbricas).
1) Seguridad en el _rea de trabajo
a) Mantenga el _rea de trabajo limpia y bien iluminada. Las areas abarrotadas y oscuras
propician accidentes.
b) No opere herramientas el6ctricas en atm6sferas explosivas, como ambientes donde
se encuentran liquidos, gases o polvo inflamables. Las herramientas el6ctricas
originan chispas que pueden encender el polvo o los vapores.
c) Mantenga a Jos niSos y espectadores aJejados de Ja herramienta el_ctrica en
funcionamiento. Las distracciones pueden provocar la pdrdida de control.
2) Seguridad el6ctrica
a) Los enchufes de Ja herramienta el6ctrica deben adaptarse aJ tomacorriente. Nunca
modifique el enchufe de ninguna manera. No utilice ning_n enchufe adaptador con
herramientas el6ctricas con cone×i6n a tierra. Los enchufes no modificados y que se
adaptan a los tomacorrientes reduciran el riesgo de descarga electrica.
b) Evite el contacto corporaJ con superficies puestas a tierra, como pot ejemplo
tuberias, radiadores, rangos y refrigeradores. Existe mayor riesgo de descarga
electrica si su cuerpo esta puesto a tierra.
c) No exponga Jas herramientas el6ctricas a la JJuvia o a condiciones de humedad. Si
ingresa agua a una herramienta el6ctrica, aumentara el riesgo de descarga el6ctrica.
d) No maltrate al cable. Nunca utilice el cable para transportar, tirar o desenchufar
HERRAMIENTAS ELECTRICAS
12

la herrarnienta el6ctrica. Mantenga el cable lejos del calor, aceite, bordes afilados
o piezas m6viles. Los cables dahados o enredados aumentan el riesgo de descarga
el6ctrica.
e) AI operar una herramienta el6ctrica en el exterior, utiJice un cable prolongador
adecuado para tal uso. Utilice un cable adecuado para uso en exteriores a fin de reducir
el riesgo de descarga el6ctrica.
f) Si el uso de una herramienta el6ctrica en un Jugar h_medo es imposible de evitar,
utiJice un suministro protegido con un interruptor de circuito pot falla a tierra
(GFCl). El uso de un GFCI reduce el riesgo de descargas eldctricas.
3) Seguridad personal
a) Permanezca alerta, controle Io que est_ haciendo y utiJice el sentido com_n cuando
emplee una herramienta el6ctrica. No utilice una herramienta el6ctrica siesta cansado
o bajo el efecto de drogas, alcohol o medicamentos. Un momento de descuido mientras
se opera una herramienta el#ctrica puede provocar lesiones personales graves.
b) Utilice equipos de protecci6n personal. Siempre utilice protecci6n para Jos ojos. En
las condiciones adecuadas, el uso de equipos de proteccidn, como mascaras para polvo,
ca/zado de seguridad antides/izante, cascos o proteccidn auditiva, reducira /as lesiones
personales.
c) Evite el encendido pot accidente. Aseg_rese de que el interruptor est6 en la
posici6n de apagado antes de conectarJo a Jafuente de energJa o paquete de
baterias, o antes de levantar o transportar la herramienta. Transportar herramientas
el#ctricas con el dedo apoyado en el interruptor o enchufar herramientas eldctricas con el
interruptor en la posici6n de encendido puede propiciar accidentes.
d) Retire las cJavijas de ajuste o Haves de tuercas antes de encender la herramienta
el6ctrica. Una flave de tuercas o una clavija de ajuste que se deje conectada a una pieza
giratoria de la herramienta el4ctrica pueden provocar lesiones personales.
e) No se estire. Conserve el equiJibrio adecuado y mant6ngase parado correctamente
en todo momento. Esto permite un mejor control de la herramienta eldctrica en
situaciones inesperadas.
f) Use la vestimenta adecuada. No use ropas hoigadas ni joyas. IVlantenga el cabello,
la ropa y los guantes aiejados de las piezas en movimiento. Las ropas holgadas, las
joyas o el cabello largo pueden quedar atrapados en las piezas en movimiento.
g) Si se suministran dispositivos para Jaconexi6n de accesorios con fines de
recolecci6n y extracci6n de poivo, aseg_rese de que est6n conectados y que se
utilicen correctamente. El uso de dispositivos de recoleccidn de polvo puede reducir los
peligros relacionados con el polvo.
4) Uso y mantenimiento de la herramienta el6ctrica
a) No fuerce la herramienta el6ctrica. UtiJice Ja herramienta el6ctrica correcta para
el trabajo que realizar& La herramienta eldctrica correcta hard el trabajo mejor y mas
seguro a la velocidad para la que fue disefiada.
b) No utiJice la herramienta el6ctrica si no puede encenderJa o apagarla con el
interruptor. Toda herramienta el4ctrica que no puede ser controlada mediante el
interruptor es peligrosa y debe set reparada.
c) Desconecte el enchufe de la fuente de energia y/o el paquete de batedas de la
herramienta el6ctrica antes de reaJizar ajustes, cambiar accesorios o almacenar
herramientas el6ctricas. Estas medidas de seguridad preventivas reducen el riesgo de
encender la herramienta el#ctrica en forma accidental
d) Guarde Jas herramientas el6ctricas que no est_n en uso fuera del aJcance de Jos
niSos y no permite que otras personas no familiarizadas con ella o con estas
instrucciones operen la herramienta. Las herramientas eldctricas son peligrosas en las
manos de usuarios no entrenados.
e) Mantenimiento de las herramientas el6ctricas. Controle que no haya piezas m6viles
maJ alineadas o trabadas, piezas rotas y toda otra situaci6n que pueda afectar el
funcionamiento de las herramientas el6ctricas. Si encuentra daSos, haga reparar Ja
herramienta el6ctrica antes de utiJizaria. Se producen muchos accidentes a causa de
las herramientas el#ctricas que carecen de un mantenimiento adecuado.
f) Mantenga las herramientas de corte afiladas y Jimpias. Las herramientas de corte
con mantenimiento adecuado, con los hordes de corte afilados son menos propensas a
trabarse y son mas facfles de controlar.
g) Utilice la herramienta el6ctrica, los accesorios y las brocas de la herramienta,
13

etc. de acuerdo con estas instrucciones y teniendo en cuenta las condiciones
de trabajo y el trabajo que debe realizarse. El uso de la herramienta el@ctrica para
operaciones diferentes de aqu@llaspara /as que fue disehada podrfa originar una
situacidn peligrosa.
5) Uso y mantenimiento de la herramienta con baterias
a) Recargue solamente con el cargador especificado por el fabricante. Un cargador
adecuado para un tipo de paquete de baterfas puede originar riesgo de incendio si se
utiliza con otto paquete de baterfas.
b) Utilice herramientas el_ctricas s61o con paquetes de baterias especificamente
disehados. El uso de cualquier otto paquete de baterfas puede producir riesgo de
incendio y lesiones.
c) Cuando no utilice el paquete de baterias, mant_ngalo lejos de otros objetos
met_licos como sujetapapeles, monedas, Ilaves, clavos, tornillos u otros objetos
met_licos peque_os que puedan realizar una conexibn desde un terminal al
otro. Los cortocircuitos en los terminales de la baterfa pueden provocar quemaduras o
incendio.
d) En cond[ciones abusivas, el liquido puede ser e×pulsado de la bateria. Evite su
contacto. Si entra en contacto accidentalmente, enjuague con agua. Si el liquido
entra en contacto con sus ojos, busque atenci6n m_dica. El ffquido expulsado de la
baterfa puede provocar irritacidn o quemaduras.
6) IVlantenimiento
a) Haga que una persona de reparaciones calificada realice el mantenimiento de
su herramienta el_ctrica y utilice piezas de repuesto id_nticas solamente. Esto
garantizara la seguridad de la herramienta el@ctrica.
ADVERTENClAS DE SEGURIDAD PARA CORTASETOS
•Utilice ambas manos al operar el cortasetos. Si utiliza una sola mano podria pettier el
control y provocar graves lesiones personales.
•lVlantenga todas las partes del cuerpo alejadas de la hoja cortadora. No retire el
material cortado ni sostenga el material que va a cortar mientras las hojas est_n
en movimiento. Aseg_rese de que el interruptor est_ apagado al retirar material
atascado. Despu_s de apagar la herramienta las hojas contin_an movi_ndose
durante unos momentos. Un momento de descuido al operar el cortasetos podrfa
provocar graves lesiones personales.
•Transporte el cortasetos sosteni_ndolo pot el mango con la hoja cortadora inm6vil.
Coloque siempre la cubierta del dispositivo de corte al transportar o guardar el
cortasetos. Una correcta manipulacidn del cortasetos reducira la posibilidad de lesiones
personales provocadas pot las hojas cortadoras.
•Sostenga la herramienta el_ctrica _nicamente pot las superficies de agarre aisladas,
ya que la hoja de corte podr[a entrar en contacto con cables el_ctricos ocultos
o con su propio cable. El contacto de las hojas de corte con un cable con corriente
electrica puede provocar que las partes metalicas expuestas de la herramienta el@ctrica
tambi@n conduzcan la corriente y que el operador sufra una descarga el@ctrica.
/_ PELIGRO: Mantenga las manos alejadas de la hoja. El contacto con la hoja provocara
graves lesiones personales.
ADVERTENClA: El polvo creado por este producto contiene sustancias quimicas
reconocidas por el Estado de California como causantes de c&ncer, defectos de nacimiento
u otros problemas reproductivos. Algunos ejemplos de estas sustancias quimicas son:
Para reducir su exposici6n a estos productos quimicos, use equipo de seguridad aprobado,
como m&scaras para polvo que est&n diseSadas especialmente para filtrar las particulas
microsc6picas.
• compuestos en fertilizantes
• compuestos en insecticidas, herbicidas y pesticidas
• ars@nico y cromo de madera con tratamiento quimico
14

SilVIBOLOS
La etiqueta de su herramienta puede incluir los siguientes simbolos. Los simbolos y
sus definiciones son los siguientes:
V.................. voltios
Hz................ hertz
min .............. minutos
- - - o DC .... corriente directa
@ ................ Construccidn Clase I
(mis a la terre)
[] Construccidn de clase II
,,,/min .......... revoluciones ominuto seguridad
....... Lea el manual de instrucciones antes del uso
............ Use proteccidn adecuada para las vfas respiratorias
_ ............ Use proteccidn adecuada para los ojos
0 ............ Use proteccidn adecuada para los ofdos
A ................ amperios
W ............... vatios
'%,o AC ..... corriente alterna
no ............... no velocidad sin carga
............... terminal a tierra
z_ ............. simbolo de alerta
CONSERVE ESTAS INSTRUCCIONES
INSTRUCC|ONES DE SEGURIDAD IMPORTANTES PARA CARGADORES
DE BATERIAS
CONSERVE ESTAS INSTRUCClONES: Este manual contiene instrucciones de seguridad
importantes para los cargadores de baterias.
• Antes de utilizar el cargador, lea todas las instrucciones y las prevenciones en el cargador, en
el paquete de baterias yen el producto que utiliza el paquete de baterias.
/_ ADVERTENCIA: Riesgo de descarga el_ctrica. No permita que ning_n liquido entre
en el cargador.
PRECAUCI(_N: Riesgo de quemadura. Para reducir el riesgo de lesiones, cargue
solamente baterias Craftsman@.. Otros tipos de baterias pueden estallar y provocar daSos
personales y materiales.
PREOAUCI()N: En determinadas circunstancias, con el cargador enchufado en el
tomacorriente, algunos materiales extraSos pueden provocar un cortocircuito en el cargador.
Se deben mantener lejos de las cavidades del cargador los materiales extraSos de naturaleza
conductora, entre los que se incluyen !a lana de acero, el papel de aluminio o cualquier
acumulaci6n de particulas metalicas. Estos son s61o algunos ejemplos y no constituyen una
lista taxativa. Siempre desenchufe el cargador del tomacorriente cuando no haya un paquete
de baterias en la cavidad. Desenchufe el cargador antes de intentar limpiarlo.
• El cargador suministrado con este producto debe enchufarse de manera que quede
correctamente orientado en posici6n de montaje vertical o en el piso.
• NO intente cargar el paquete de baterias con cargadores distintos de los que se listan
en este manual. El cargador y el paquete de baterfas estan especfficamente disehados
para funcionar en conjunto.
• Estos cargadores no est_n dise_ados para otto uso que no sea la carga de hater{as
recargables Craftsman@.. Otros usos pueden provocar riesgo de incendio, descarga
el#ctrica o electrocucidn.
• No exponga el cargador a la Iluvia ni a la nieve.
• Tire del enchufe en lugar del cable al desconectar el cargador. Esto reducir& el riesgo
de daSar el enchufe y el cable.
• Aseg_rese de que el cable est_ ubicado de modo que no Io pise o se tropiece con _l,
y que no est_ sujeto a daSos o tensiones de alguna otra forma.
• No utilice un cable prolongador a menos que sea absolutamente necesario. El uso de
un cable prolongador incorrecto puede provocar riesgo de incendio, descarga el#ctrica o
electrocucidn.
• Para garantizar la seguridad, un cable prolongador debe tenet un tama_o de cable
adecuado (AWG o Calibre de conductor de Estados Unidos). Cuanto mas pequedo sea
el nElmero de calibre del conductor, mayor sera la capacidad del cable; es decir, un calibre 16
tiene mas capacidad que un calibre 18. Cuando se utiliza mas de una prolongacidn para Iograr
la Iongitud total, aseg#rese de que cada prolongacidn tenga la medida mfnima del conductor.
15

Tension
120V
240V
Intensite (A)
Au Au
moins plus
0 6
6 10
10 - 12
12 - 16
Calibre minimal des cordons de rallonge
Longueur totale du cordon en pieds
0-25 26-50 51-100 101-150
(0-7,6m) (7,6-15,2m) (15,2-30,4m)(30,4-45,7m)
0-50 51-100 101-200 201-300
(0-15,2m) (15,2-30,4m)(30,4-60,9m)(60,9-91,4m)
Calibre moyen des fils (AWG)
18 16 16 14
18 16 14 12
16 16 14 12
14 12 Nonrecommande
• No coloque objetos en la parte superior del cargador ni coloque el cargador en una
superficie blanda que pueda bloquear las ranuras de ventilaci6n y provocar un calor
interno excesivo. Coloque el cargador en una posicidn alejada de cualquier fuente de calor.
El cargador se ventila a trav#s de ranuras en la parte superior y en los lados de la cubierta.
• No monte el cargador en la pared ni Io instale en forma permanente sobre ninguna
superficie. El cargador esta disehado para ser utilizado sobre una superficie plana y estable
(por ej., un banco o una mesa).
• No opere el cargador con un cable o enchufe daSados: reemplacelos de inmediato.
• No opere el cargador si _ste ha recibido un golpe fuerte, se cay6 o presenta alg_n
daSo. LI6velo a un centro de mantenimiento autorizado.
• No desarme el cargador; cuando deba realizar un mantenimiento o reparaciones,
II_velo a un centro de mantenimiento autorizado. El armado incorrecto puede implicar un
riesgo de descarga el#ctrica, electrocucidn o incendio.
• Antes de limpiarlo, desconecte el cargador del tomacorriente. Esto reducir_ el riesgo
de descarga el6ctrica. Quitar el paquete de baterfas no reducira este riesgo.
• NUNCA intente conectar 2 cargadores juntos.
• El cargador esta diseSado para operar con corriente electrica domestica estandar (120
voltios). No intente utilizarlo con otto voltaje.
CONSERVE ESTAS INSTRUCCIONES
Instrucciones de seguridad importantes para los paquetes de baterias
/_ ADVERTENClA: Para un funcionamiento seguro, lea #ste y todos los manuales de
instrucciones incluidos con la herramienta antes de usar el cargador.
El paquete de baterias incluido en la caja no estA completamente cargado. Antes de utilizar el
paquete de baterias y el cargador, lea las instrucciones de seguridad a continuaci6n. Luego siga
los procedimientos de carga descritos.
LEA TODAS LAS INSTRUCClONES
• No incinere el paquete de batedas, aun si tiene da_os importantes o est_ completamente
desgastado. El paquete de baterfas puede explotar en el fuego. Cuando se queman paquetes
de baterfas, se generan vapores y materiales t6xicos.
• No cargue ni use la bater{a en atm6sferas explosivas, como ambientes en los que hay
I{quidos, gases o polvo inflamables. Insertar o retirar la baterfa del cargador puede encender
el polvo o los vapores.
• Si el contenido de las bater{as entra en contacto con la piel, lave el _rea de inmediato
con agua y jab6n suave. Si el Ifquido de labaterfa entra en contacto con los ojos, enjuague
con agua manteniendo los ojos abiertos durante 15 minutos o hasta que la irritacidn cese. Si
se necesita atencidn m#dica, el electrofito de las baterfas de M-ION contiene una mezcla de
carbonatos organicos Ifquidos y sales de fitio.
• El contenido de las c_lulas de la bater{a abierta puede generar irritaci6n respiratoria.
Respire aire fresco. Si los sfntomas persisten, busque atencidn m#dica.
ADVERTENClA: Peligro de quemaduras.
El Ifquidode la baterfa puede encenderse si se expone a chispas o llamas.
• El cargador suministrado con este producto est_ diseSado para set enchufado
correctamente en posici6n vertical u horizontal.
16

• Cargue los paquetes de baterfas sdlo con cargadores de
Craftsman@..
• NO salpique o sumerja en agua u otros liquidos. Estopuede causaruna fallaprematura de
las c61ulas.
• No almacene ni utilice la herramienta y el paquete de baterias en lugares en los que la
temperatura pueda alcanzar o superar los 40 °C (105 °F) (como en toldos al aire libre o
construcciones de metal en verano).
ADVERTENCIA: Nunca intente abrir elpaquete de baterfas pot ningEinmotivo. Si la caja de/
paquete de baterfas esta agrietada o dahada, no la introduzca en el cargador. No compfima, deje caer
ni dahe el paquete de baterfas. No utilice un paquete de bateffas o un cargador que haya recibido un
golpe fuerte, se haya cafdo, est6 agotado o dahado de alguna forma (pot ejemplo, pefforado con un
clavo, golpeado con un martillo,pisado). Los paquetes de bateffas dahados deben devolverse al centro de
mantenimiento para su reciclado.
/_ ADVERTENCIA:Riesgo de incendio. No guarde o transporte la bateda de ninguna
manera que permita que los terminales expuestos de la bateria entren en contacto con
objetos met_iicos. Pot ejemplo, no coloque la bater[a en de/antales, bolsillos, cajas de
herramientas, cajas de juegos de productos, cajones, etc. con clavos, /laves, tomillos sueltos,
etc.
Transportar baterias puede provocar incendios si los terminales de la bateria entran en
contacto accidentalmente con materiales
conductores como Ilaves, monedas, herramientas de mano u objetos similares. Las
Normas para Materia/es Peligrosos de/Departamento de Transporte de los EE.UU. (HMR)
concretamente proh[ben transportar bater[as comercia/mente o en aviones (es decir, empacadas
en ma/etas y equipaje de mano) A MENOS que est6n debidamente protegidas de cortocircuitos.
Pot/o tanto, cuando transporte bater[as individua/es, asegEirese de que los termina/es de/a
bater[a est6n protegidos y bien ais/ados de materia/es que puedan
hacer contacto y causar un cortocircuito. NOTA: Las hater[as de Jones de LHON no deben
colocarse dentro del equipaje registrado.
RECOMENDACIONES CON RESPECTO AL ALMACENAIVliENTO
1. El mejor lugar de almacenamiento es uno que sea fresco y seco fuera de la luz solar directa
y de un exceso de calor o frio.
2. El almacenamiento prolongado no da_ar& el paquete de baterias o el cargador, a no ser que
se agote la bateria.
DESCRiPCI(_N
FUNCIONAL
1. Interruptorde gatillo
2. Bot6n de bloqueo
3. Mango interruptor
4. Protector de la hoja
5. Palanca del interruptor
6. Bateria
7. Hoja
17

PROCEDIIVllENTO DE CARGA
Los cargadores Craftsman@ estAn dise_ados para cargar paquetes de baterias Craftsman@.
1. Enchufe el cargador en un tomacorriente adecuado antes de insertar el paquete de baterias.
2. Introduzca el paquete de baterias en el cargador.
_3. La luz LED verde titilara para indicar
que la bateria se estacargando.
1_4. Lafinalizaci6n de la carga se indica mediante la luz LED verde que permanece encendida de
manera continua.
El paquete estAcompletamente cargado y puede utilizarse en este momento odejarse en el
cargador.
Despu_s del uso, recargue las baterias descargadas a la brevedad posible o de Io contrario la
vida _til de las baterias podria acortarse en gran medida. Para obtener la m_xima vida _til
de las baterias, no permita que 6stas se descarguen completamente.
DIAGNOSTICO DEL CARGADOR
Este cargador esta dise_ado para detectar ciertos problemas que pueden surgir con los
paquetes de baterias o la fuente de alimentaci6n. Los problemas se indican mediante una luz
LED que titila en diferentes patrones.
BATERJA EN MAL ESTADO
_EI cargador puede detectar una bateria d6bil o da_ada. La luz LED rojo titila en el patr6n
indicado en la etiqueta. Si observa este patr6n intermitente de bateria en mal estado,
interrumpa la carga de la bateria. Devu61vala a un centro de mantenimiento o a un lugar
de recolecci6n para reciclado.
RETRASO POR PAQUETE CALIENTE/FRJO
_[_Cuando el cargador detecta una bateria excesivamente caliente o excesivamente fria,
enciende automAticamente un Retraso por paquete caliente/frio que suspende la carga
hasta que la bateria se normaliza. Despu6s de esto, el cargador cambia automaticamente
al modo de Paquete cargando. Esta funci6n garantiza la duraci6n maxima de la bateria.
La luz rojo titila en el patr6n indicado en la etiqueta.
DEJAR LA BATER|A EN EL CARGADOR
El cargador y el paquete de baterias pueden dejarse conectados indefinidamente con la
luz LED verde encendida. El cargador mantendra el paquete de baterias como nuevo y
completamente cargado.
NOTAS IMPORTANTES SOBRE LA CARGA
1. Obtendra una duraci6n mas prolongada y un mejor rendimiento si el paquete de baterias se
carga cuando la temperatura ambiente esta entre 16 °C y 27 °C (60 °F y 80 °F). NO cargue el
paquete de bateria con una temperatura ambiental por debajo de +4.5 °C
(+40 °F) o por encima de +40.5 °C (+105 °F). Esto es importante y evitara da_os graves en el
paquete de baterias.
2. El cargador y el paquete de baterias pueden estar calientes al tacto durante la carga. Esto
es una condici6n normal y no indica un problema. Para facilitar el enfriado del paquete de
baterias despu6s de su uso, evite colocar el cargador o el paquete de baterias en un ambiente
calido, como debajo de un toldo de metal o en un remolque sin aislamiento.
3. Si el paquete de baterias no se carga adecuadamente:
a. Revise el tomacorriente enchufando una lampara u otto aparato
b. Verifique si el tomacorriente esta conectado a un interruptor
que corta la energia cuando usted apaga las luces.
c. Mueva el cargador y el paquete de baterias a un lugar donde
la temperatura ambiental sea de aproximadamente 16 °C a 27 °C
(60 °F a 80 °F).
d. Si los problemas de carga persisten, Ileve la herramienta, el paquete de baterias y el
cargador al centro de mantenimiento local.
4. Se debe recargar el paquete de baterias cuando no.produce energia suficiente para tareas
que previamente realizaba con facilidad. NO CONTINUE utilizando la herramienta en estas
condiciones. Siga el procedimiento de carga. Tambi6n se puede cargar un paquete de baterias
parcialmente usado cuando se desee, sin ningt_n efecto negativo sobre 6stas.
5. Se deben mantener lejos de las cavidades del cargador los materiales extra_os de
naturaleza conductora, entre los que se incluyen la lana de acero, el papel de aluminio
o cualquier acumulaci6n de particulas metalicas. ¢:stos son s61o algunos ejemplos y no
constituyen una lista taxativa. Siempre desenchufe el cargador del tomacorriente cuando no
18

haya un paquete de baterias en la cavidad. Desenchufe el cargador antes de intentar limpiarlo.
6. No congele ni sumerja el cargador en agua ni en ning0n otro liquido.
ADVERTENCIA: Riesgo de descarga el6ctrica. No permita que ning0n liquido entre
en el cargador.
Nunca intente abrir el paquete de baterfas por ning_n motivo. Si la caja protectora de plastico
del paquete de baterfas se rompe o agrieta, devuelvala a un centro de mantenimiento para su
reciclado.
INSTALACI()N Y EXTRACCI()N DEL PAQUETE DE BATERJAS DE LA
EARRAIVllENTA
DVERTENCIA: AsegOrese de que el botdn de bloqueo est# trabado para evitar el
accionamiento del interruptor antes de extraer o instalar la baterfa.
PARA INSTALAR EL PAQUETE DE BATERJAS:
Inserte el paquete de baterias en la herramienta hasta que est6
completamente asentado y se oiga un clic (Figura A). AsegOrese de que
el paquete de baterias est6 bien colocado y completamente asegurado
en su lugar.
PARA EXTRAER EL PAQUETE DE BATERJAS: Presione el bot6n de
liberaci6n de la bateria, como se muestra, y tire del paquete de baterias
hasta extraerlo de la herramienta.
INDICADOR DEL ESTADO DE LA CARGA
La bateria esta equipada con un indicador de estado de la carga. Esto se puede utilizar para
visualizar el nivel actual de carga de la bateria durante el uso y durante la carga. No indica el
nivel de funcionalidad de la herramienta y puede variar de acuerdo a las piezas del producto, la
temperatura y la aplicaci6n que el usuario le d6.
Verificaci6n del estado de carga durante el uso (FIGURA B):
• Oprima el bot6n del indicador de estado de la carga (B1).
• Los cuatro LED (B2) se encenderan para indicar el porcentaje de
carga de la bateria. Consulte el recuadro en la Figura B.
• Si la luz LED no enciende, cargue la bateria.
INSTRUCCIONES DE OPERACI()N
INTERRUPTOR
Para encender la herramienta, deslice hacia atras el bot6n de bloqueo
como se muestra en la Figura C y oprima el interruptor de gatillo. Una
vez que la unidad est6 funcionando, puede soltar el bot6n de bloqueo.
Para mantener la unidad funcionando, debe mantener oprimido el gatillo.
Para apagar la herramienta, suelte el gatillo.
ADVERTENClA:Nunca intente bloquear un interruptor en la
posici6n de encendido.
INSTRUCClONES DE PODADO
1. POSlCl0N DE TRABAJO - Conserve los pies apoyados
adecuadamente. Trate de no perder el equilibrio. Utilice anteojos
de seguridad, calzado antiderrapante y guantes siempre que
pode..Sostenga la herramienta firmemente con ambas manos y
ENCIENDALA. Sostenga siempre la unidad como se muestra en las
ilustraciones, con una mano en la empuSadura del interruptor y la
otra en el asa. Nunca sostenga la herramienta de la guarda. (Figura
D)
m

2. PODADO DE PLANTAS JOVENES (Figura E) -
Un movimiento amplio, en forma de barrido, alimentando la hoja
a trav6s de las ramas es la manera m&s efectiva. Incline la hoja
ligeramente en la misma direcci6n en que hace los movimientos.
Z_ PRECAUCK_N: No utilice la podadora para cortar tallos con
dib,metro mayor a 19 mm (3/4 pulg.). Use la podadora para cortar
setos normales, del tipo de los que se encuentran afuera de casas y
edificios.
3. NIVELADO DE SETOS
(Figura F) -
Para obtener setos excepcionalmente nivelados, se puede colgar
una cuerda a Io largo del seto y a la altura deseada para que sirva
como guia.
4.
CORTE LATERAL DE SETOS (Figura G) -
Sostenga la podadora como se
observa en la figura y comience
el corte desde la base hacia arriba.
ADVERTENCIA: PARA PROTEGERSE DE LESIONES, OBSERVE LO SIGUIENTE:
• LEA EL MANUAL DE INSTRUCCIONES ANTES DE USAR LA PODADORA,
CONSERVE EL MANUAL.
• Compruebe si existen objetos extraSos en el seto como cables o cercos antes de cada
USO.
• CONSERVE LAS MANOS EN LOS MANGOS. NO SE SOBRE EXTIENDA.
• NO SE UTILICE EN CONDICIONES DE MUCHA HUMEDAD.
/_ PRECAUCI(_N: LA CUCHILLA GIRA DESPUES DE APAGAR.
/_ PELIGRO: MANTENGA LAS MANOS ALEJADAS DE LAS HOJAS.
2O

IViANTENliVllENTO
ADVERTENCIA: Retire el paquete de baterias antes del efectuar el mantenimiento,
limpiar o retirar material del artefacto para jardineria.
Las hojas de corte estan hechas de acero templado de gran calidad y no
requieren ser afiladas si se les da un empleo normal. Sin embargo, si golpea
accidentalmente una cerca de alambre, piedras, vidrios u otros objetos de
dureza similar, la hojas pueden resultar con mellas (Fig. H). No hay necesidac
de eliminar las melladuras mientras no interfieran con el movimiento de las
hojas; si Io hacen, desconecte la bateria y utilice una lima o una piedra de
afilar para eliminar la o las melladuras.
Si accidentalmente suelta la podadora, revisela con cuidado en busca de
daSos. Si la hoja se dobla, se cuartea la cubierta o se rompen el asa o la
empuSadura, o si encuentra alguna otra condici6n que afecte la operaci6n de la podadora,
Ileve la unidad a su Centro de Servicio Craftsman®. para que la reparen antes de volverla
a utilizar. Los fertilizantes y otros productos quimicos para jardineria contienen agentes que
aceleran la corrosi6n en los metales. No guarde la herramienta en lugares adyacentes a
fertilizantes u otros productos quimicos.
Despu6s de quitar la bateria, utilice _nicamente jab6n suave y un trapo h_medo para limpiar la
herramienta. Nunca permita que se introduzcan liquidos en la herramienta, ni sumerja ninguna
parte de ella en ningOn liquido.
Este mecanismo cumple con la parte 15 de las normas de la Comisi6n Federal de
Comunicaciones de Estados Unidos (FCC). La operaci6n estb, sujeta a las dos condiciones
siguientes: (1) Este mecanismo posiblemente no cause interferencia perjudicial; y (2) este
mecanismo puede aceptar cualquier interferencia recibida, incluso interferencia que podria
provocar una operaci6n no deseada.
NOTA: Este equipo ha sido probado y se encontr6 que cumple con los limites para dispositivo
digital Clase B, segOn la parte 15 de las normas de la FCC. Estos limites estan diseSados
para brindar protecci6n razonable contra interferencia perjudicial en una instalaci6n residencial.
Este equipo genera, usa y puede irradiar energia en frecuencia de radio y, si no se instala
y se usa de acuerdo con las instrucciones, puede provocar interferencia perjudicial en las
comunicaciones de radio. Sin embargo, no hay garantia de que la interferencia no ocurra en
una instalaci6n en particular. Si este equipo provoca interferencia perjudicial en la recepci6n de
radio o televisi6n, Io que se puede determinar al apagar y encender el equipo, el usuario debe
tratar de corregir la interferencia mediante una o mb,s de las siguientes medidas:
• Cambiar la orientaci6n o la ubicaci6n de la antena de recepci6n.
• Aumentar la separaci6n entre el equipo y el receptor.
• Conectar el equipo a un tomacorriente sobre un circuito diferente de aquel al que esta
conectado el receptor.
• Consultar al vendedor o pedir la ayuda de un t6cnico en radio y televisi6n con experiencia.
Los cambios o las modificaciones que se le realicen a esta unidad sin aprobaci6n expresa del
tercero responsable del cumplimiento pueden anular la autorizaci6n del usuario para operar el
equipo. Este aparato digital de la clase B se conforma con ICES-003 canadiense.
EL SELLO RBRC TM
El sello RBRC TM (Corporaci6n de reciclado de baterias recargables) que se
encuentra en la bateria de iones de litio (o paquete de baterias) indica que los
costos de reciclar la bateria (o el paquete de baterias) al final de su vida Otil ya
fueron pagados pot Craftsman@.
RBRC TM en cooperaci6n con Craftsman@. y otros usuarios de baterias, ha
establecido programas en los Estados Unidos para facilitar la recolecci6n de
baterias de iones de litio agotadas. Ayude a proteger nuestro medio ambiente y a
conservar los recursos naturales: devuelva las baterias de iones de litio agotadas a un centro
de mantenimiento autorizado de Craftsman@. o a un comerciante minorista local para que se
reciclen. Tambi_n puede comunicarse con el centro local de reciclado para obtener informaci6n
sobre d6nde dejar las baterias agotadas. RBRC TM es una marca comercial registrada de la
Corporaci6n de reciclado de baterias recargables.
21

Problema
• Funcionamiento
lento y ruidoso u
hojas calientes.
• La unidad no
funciona
• La bateria no
carga.
DETECCION DE PROBLEMAS
Causa Posible
• Hojas secas/oxidadas.
• Hojas o soporte de la hoja doblados.
• Dientes doblados o daSados.
• Pernos de la hoja sueltos.
• La bateria no esta bien
instalada.
• La bateria no carga
• El bloqueador no funciona en
forma completa.
• La bateria no esta insertada en el
cargador.
• El cargador no esta enchufado.
• Temperatura ambiental
demasiado caliente o
demasiado fria.
Soluci6n Posible
• Lubrique las hojas.
• Ender6celos.
• Enderece los dientes.
• Ajuste los pernos de la hoja
• Verifique la instalaci6n de la
bateria.
• Verifique los requisitos de carga
de la bateria
• Revise que el bloqueo est6
completamente atras antes de
mover el gatillo principal.
• Inserte la bateria en el cargador
hasta que seencienda la luz
verde (LED).
• Enchufe el cargador en un
tomacorriente que funcione.
Para conocer mas detalles,
consulte.
"Notas importantes sobre la
carga".
• Controle la corriente del
tomacorriente enchufando una
lampara u otro artefacto.
• Verifique si el tomacorriente
esta conectado a un interruptor
que corta la energia cuando
usted apaga la luz.
• Mueva el cargador y la
herramienta a un ambiente con
una temperatura superior a 4.5
°C (40 °F) o inferior a 40.5 °C
(105 °F).
22

23

®
Product questions or problems?
1-888-3 1-45
Customer Care Hot Line
Get answers to questions, troubleshoot problems,
order parts, or schedule repair service.
Para respuestas a preguntas o problemas, y ordenar
(R_Registered Trademark / Trademark of KCD tP, LLC in the United States, or Sears Brands, LLC inother countries
(R)Marca Registrada / Marca de Fabrica de KCD IP, LLC en Estados Unidos, o Sears Brands, LLC in otros paises
TM
TM
24
 Loading...