

Page 1
Operator’s Manual
CRRFTSMRN.
CORDLESS
24VOLTir
CONVERTIBLE MULCHING
MOWER
Model No. 900.370520
CAUTION:
Before using this product, read
this manual and follow all its
Safety Rules and Operating
instructions.
Sears, Roebuck and Co., Hoffman Estates, IL 6017
• Safety
• Assembly
• Operation
• Maintenance
• Parts
• Español
264774-01
Page 2

TABLE OF CONTENTS
Warranty
Safety Instructions
Assembly
Operation
Maintenance Schedule
Product Specifications
LIMITED TWO YEAR WARRANTY ON CRAFTSMAN POWER MOWER
For two years from date of purchase, when this Craftsman Lawn Mower is maintained,
lubricated, and tuned up according to the operating and maintenance instructions in the
owner’s manual, Sears will repair free of charge any defect in material or workmanship.
If this Craftsman Lawn Mower is used for commercial or rental purposes, this warranty
applies for only 90 days from the date of purchase.
This Warranty does not cover:
• Expendable items which become worn during normal use, such as rotary mower
blades, blade adapters, and belts.
• Repairs necessary because of operator abuse or negligence, including bent crank
shafts and the failure to maintain the equipment according to the instructions contained
in the owner’s manual.
WARRANTY SERVICE IS AVAILABLE BY returning the Craftsman power mower to the
nearest Sears Service Center in the United States. This warranty applies only while this
product is in use in the United States.
This Warranty gives you specific legal rights, and you may also have other rights which
vary from state to state.
Sears, Roebuck and Co., Hoffman Estates, 11 60179 USA.
2
Maintenance 16
2
Service and Adjustments 17
5 Storage
8
Troubleshooting
16
16 Parts Ordering
WARRANTY
Illustrated Parts List
17
18
19
20
SAFETY INSTRUCTIONS
WARNING: Do not attempt to operate this mower until you thoroughly read and com
pletely understand all instructions, safety rules, etc. contained in this manual. Failure to
comply can result in accidents Involving fire, electric shock, or serious personal injury.
Save Owner's Manual and review frequently for continuing safe operation and instructing
others who may use this mulching mower.
Safety standards require an Operator
Presence Control Switch to minimize the
risk of injury. Your unit is equipped with
such a Control Switch. Do not attempt to
defeat its function under any circum
stances.
TRAINING:
• Read this operator’s manual carefully.
Become familiar with the controls and
know how to operate your mower prop
erly. Learn how to quickly stop mower.
• Avoid dangerous environments. Do not
use your mower in the rain or in damp or
wet locations. Do not operate it in
gaseous or explosive atmospheres.
Motors normally spark and sparks may
Ignite fumes,
• Do not allow children to use your mower.
Never allow adults to use mower without
proper instructions. _
• Keep the area of operation clear of all
persons, especially small children and
pets.
Page 3

• Usé'mower only as described in this
manual.
• Do not operate mower if it has been
dropped or damaged in any manner.
Always have damage repaired before
using your mower.
• Do not use accessory attachments that
are not recommended in this manual.
Use of such attachments^may be haz
ardous.
• The blade always turns when the motor
is running.
• Avoid accidental starting. Do not play
with the Operator Presence Control
switch when mower is not in use.
PREPARATION:
• Always thoroughly check the area to be
mowed and clear it of all stones, sticks,
wires, bones, and other foreign objects.
These objects will be thrown by the
blade and can cause severe injury.
• Always wear safety glasses or eye
shields when starting and while using
your mower.
• Dress properly. Do not operate mower
when barefoot or wearing open sandals.
Wear only solid shoes with good traction
when mowing.
• Always make wheel height adjustments
before starting your mower. Do not
attempt to do this while the mower is
running.
• Mow only in daylight or good artificial
light.
• Do not plug mower in until it is ready to
be used.
• Protect your lungs. Wear a face or dust
mask if mowing operation is dusty.
• Remove all adjusting wrenches from
mower before turning it on.
OPERATION:
The operation of any lawn mower
can result in foreign objects
thrown into the eyes, which can
result in severe eye damage. Always wear
safety glasses or eye shields while operat
ing your lawn mower or performing any
adjustments or repairs. We recommend a
wide vision safety mask over the specta
cles or standard safety glasses with side
shields, available at Sears.
• CAUTION; Frequently check gasscatcher bag for deterioration or wear. Replace,
if necessary, with identical Craftsman
bag. Failure to do so may result in Injuiy
from mower discharge of grass and
debris.
• Keep your eyes and mind on your
mower and the area being cut. Do not fet
other interests distract you.
• Do not mow wet or slippery grass. Never
run while operating your mower. Always
be sure of your footing - keep a firm
hold on the handles and walk.
• Do not put hands or feet near or under
rotating parts. Keep clear of the dis
charge opening at all times.
• Always stop the motor whenever you
leave or are not using your mower, or
before crossing driveways, walks, roads,
and any gravel-covered areas.
• Never direct discharge of material toward
bystanders or allow anyone near the
mower while you are operating it.
• Guard against electric shock. Repair or
replace damaged mower cord or exten
sion cord immediately.
• Don’t abuse the cord. Never pull lawnmower by the cord. Disconnect by gently
pulling the plug, not the cord,
• Before cleaning, inspecting, or repairing
your mower, stop the motor and make
absolutely sure the blade and all moving
parts have stopped. Then unplug the
cord to prevent accidental starting.
• If lawn mower strikes a foreign object,
follow these steps: ■
i) Stop lawn mower. Release the switch.
ii) Remove safety key.
iii) Inspect for damage.
iv) Repair any damage before restarting
and operating the lawn mower.
• Do not operate your mower if it vibrates
abnormally. Excessive vibration is an
indication of damage; stop the motor and
safely check for the cause of vibration.
Repair as required.
• Do not run the motor indoors.
• Never cut grass by pulling the mower
towards you. Mow across the face of
slopes, never up and down or you might
lose your footing. Do not mow exces
sively steep slopes. Use caution when
Page 4

operating the mower on uneven terrain
or when changing directions - maintain
good footing.
• Never operate your mower without prop
er guards, plates or other safety devices
in place.
• Don't force the mower. It will do the job
better and safer at the rate for which it is
designed. When mowing on rough sur
faces or in high grass, select a higher
cutting position.
• Don’t overreach. Keep proper footing
and balance at all time.
• Stay alert. Watch what you are doing
and use common sense. Do not operate
mower when you are tired. Do not run or
rush when mowing.
• Do not operate mower while under the
influence of drugs, alcohol, or any med
ication. Attempting to do so can result in
serious injury.
• Keep away from blade area. Be aware of
the risk of injury. Keep hands and feet
away from the blade.
• DANGER: DO NOT attempt to remove
cut material or unclog debris from under
mower deck while blade is moving, or
you will be seriously injured.
• If mower stalls, release operator pres
ence control switch and wait for blade to
stop rotating. Remove safety key before
attempting to remove anything from
under mower deck. Thoroughly inspect
and have any damage repaired before
restarting and operating mower.
BATTERY OPERATION & CARE
CAUTION: Use only identical replacement
battery. Take mower to a Sears Service
Center for Battery Replacement.
The battery in your cordless mower is a
24-volt sealed lead acid system. Since
there is no liquid contained within the bat
tery, the mower can be stored in any posi
tion without fear of leakage.
• To get maximum battery life, fully
charge battery prior to initial use.
• It may take 2 or 3 initial charging cycles
to achieve maxiumum run time capacity.
• The battery should be charged after
every use, even if not fully discharged.
• For optimum performance the battery
should be kept on constant charge when
not in use.
• The battery charges best in a cool, dry
place.
• The battery does not need to be fully dis
charged before recharging.
• The battery can be safely stored down to
-40“C (-40T).
• The battery is maintenance free.
• Off-season storage
i. In warmer climates to ensure optimum
performance, the battery should be
maintained on constant charge.
ii. The mower may be stored with the
charger disconnected If all of the fol
lowing conditions are met.
-the mower is fully charged before stor
ing.
-the average temperature of the stor
age location is below 10°C (50“F)
-Storage duration is less than 6 months
CHARGER SAFETY RULES
• Plug charger directly into an electrical
outlet. DO NOT ABUSE THE CORD.
Never carry charger by cord. Do not
■ disconnect the charger from the outlet
or mower by pulling it by the cord.
• CAUTION; To reduce the risk of fire,
electrical shock, or personal injury do
not attempt to use this charger with any
other product. Likewise, do not attempt
to charge the mower with any other
charger.
• Do not service mower with charger or
safety key installed. •
• Do not operate a damaged charger.
Replace damaged cords or charger
immediately at a Sears Service Center.
• Always charge the mower in a dry area
protected from the weather. Do not
expose the mower or charger to rain.
Do not charge in wet locations. Do not
charge mower when temperature is
above 40”C (104T) or below 5“C
(41 “F).
• Keep the mower and charger away
from water and heat sources, (such as
radiators, heaters, stoves etc.), flames
or chemicals. Be careful not to damage
the charger cord. Keep cord away from
sharp edges.
Page 5
CAUTION: Unplug charger from wall out
let before unplugging charger cord from
mower. Failure to do so may result in per
sonal injury or damage to charger. Always
unplug charger before attempting to clean
mower.
MAINTENANCE AND STORAGE:
• Check the blade and the motor mounting
bolts often to be sure they are tightened
properly. .
• Check all bolts, nuts and screws at fre
quent intervals for proper tightness to be
sure mower is in safe working condition.
• Keep all safety devices in piace and
working.
• To reduce fire hazard, keep the motor
free of grass, leaves or excessive grease
and oil.
• Always keep the blade on your mower
sharp.
• Allow motor to cool before storing in any
enclosure.
• Keep mower dry and clean. Always use
a clean damp cloth when cleaning.
Never use brake fluids, gasoline, petrole
um-based products, solvents, or water to
clean mower.
• Do not mow if switch does not turn
mower on and off. Have defective switch
replaced at Sears Service Center.
• Check damaged parts. Before further
use of the mower, a guard or other part
that Is damaged should be carefully
checked to determine that It will operate
properly and perform its Intended func
tion, Check for alignment of moving
parts, binding of moving parts, breakage
of parts, and any other conditions that
may affect mower operation. A guard or
other part that is damaged should be
properly repaired or replaced by a quali
fied service technician.
• When servicing use only identical
Craftsman replacement parts. Servicing
of this mower should be performed only
by a qualified service technician. For
repair service we suggest you return
mower to your nearest Sears Service
Center.
• When replacing blade, uea only Identical
Craftsman replacement blade. Use of
any other blade may result In serious
personal injury or damage to mower.
Store mower inside. When not in use,
mower should be stored indoors in a
garage, basement, etc. Storage area
should be a dry, locked-up place - out of
reach of children.
Maintain mower with care. Keep blade
sharp and clean for best and safest per
formance. Follow instructions for lubricat
ing and changing accessories.
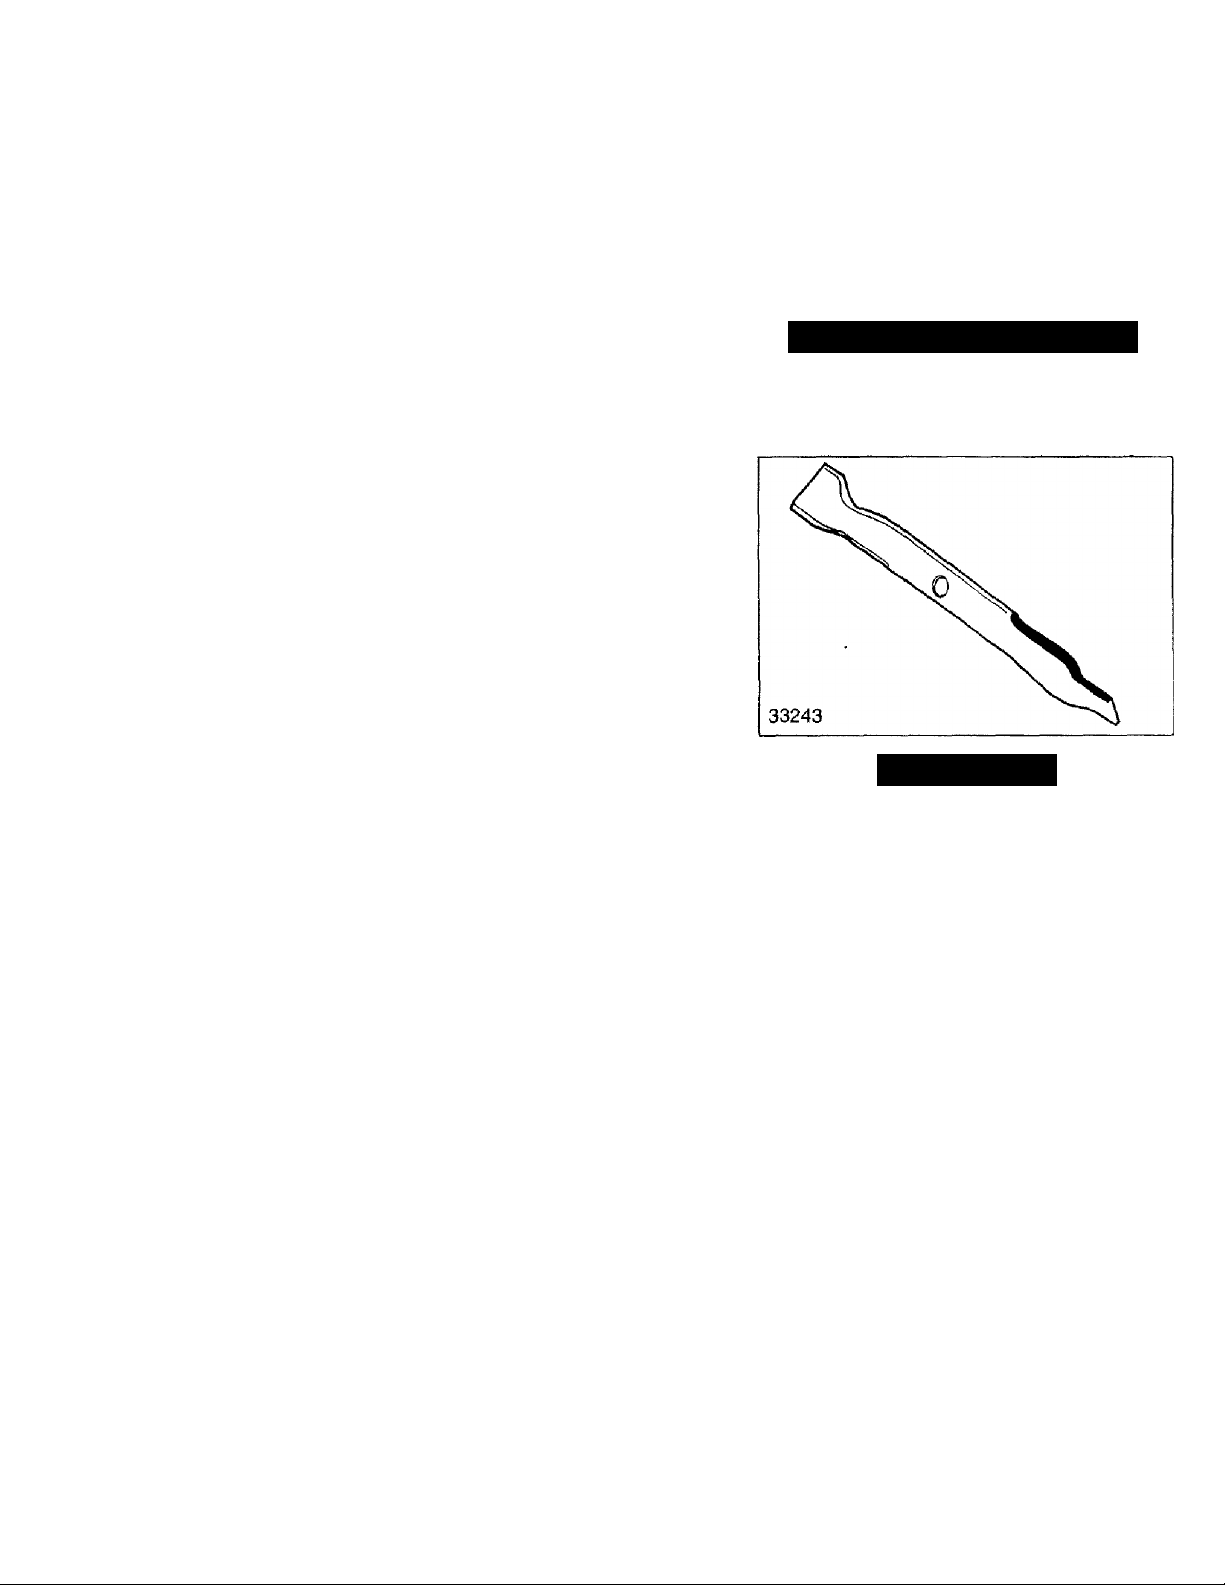
REPLACEMENT BLADE
The replacement blade is stock # 33243
and is available at Sears Retail Stores and
Service Centers.
ASSEMBLY
CARTON CONTENTS
• Mulching Mower (Shipped with Mulch
Insert installed)
• Side discharge chute
• Grassbag
• Graascatcher frame
• Charger
TO REMOVE MOWER FROM CARTON
Your mulching mower has been complete
ly assembled at the factory except for the
Grasscatcher.
CAUTION: Do not lift the mower off the
ground by holding the height adjustment
finger grip.
• Remove the Grasscatcher frame,
Grassbag, Side discharge chute, charger
and cardboard fillers.
• Remove the mower from the carton and
place all four wheels on the ground or
floor.
• Check the carton thoroughly and make
sure there are no loose parts remaining
inside.
Page 6
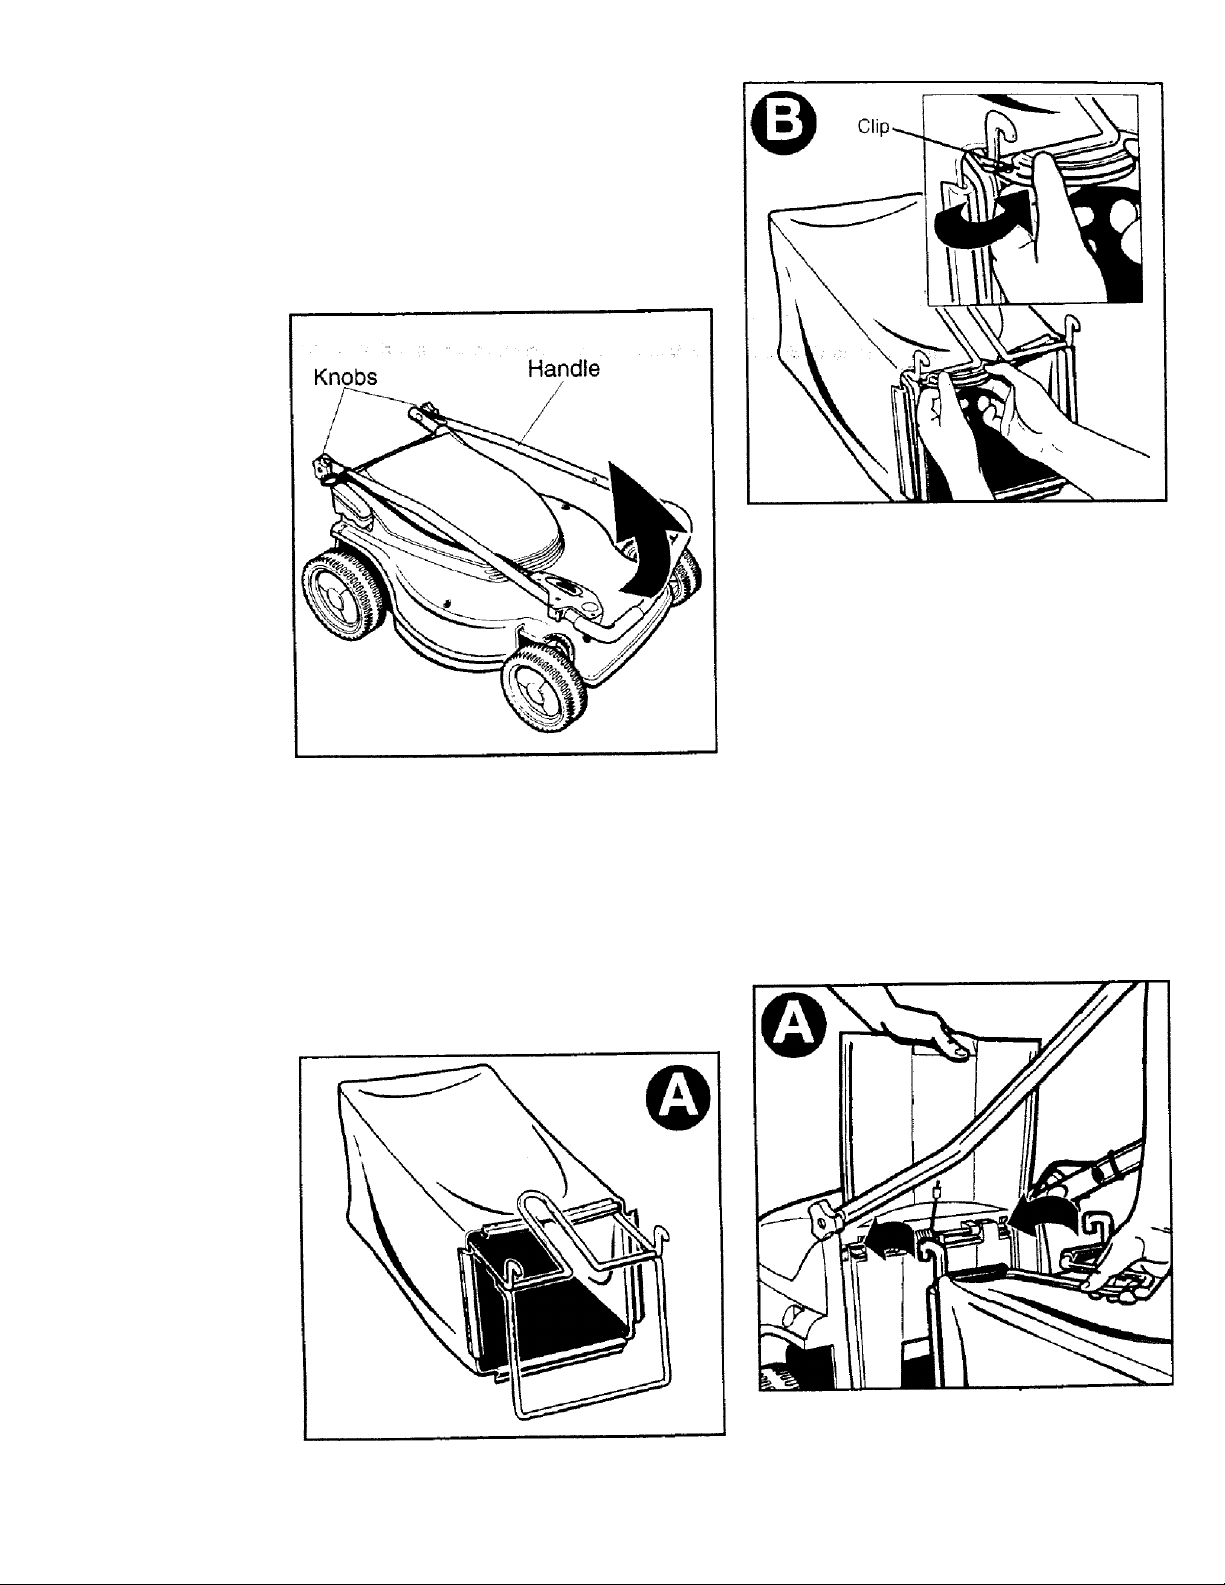
To Unfold Handle
Raise the handle section into place and
secure by tightening the two knobs. See
figure below.
WARNING: For your own safety DO NOT
use this mower without either the
Grasscatcher or Mulch Insert in operating
position.
QRASSCATCHER ASSEMBLY
• Slide the grassbag onto the grasscatcher
frame. (See Fig. A)
• The grassbag has attachment dips sewn
around the bag opening.
• Attach the two top clips to the frame,
then attach the side clips, and lastly the
bottom dip. (See Fig. B)
• Refer to “To Install Grasscatcher” instruc
tion before attaching to mower.
TO INSTALL GRASSCATCHER
• Reach down between the mower handle
and raise the rear door to a vertical posi
tion. (See Fig. A)
• Remove the mulch insert. See page 12
“To Remove Mulch Insert”,
• Pick up the grasscatcher by the handle
and lower the grasscatcher between the
lawnmower handles. Position the grass
catcher hanger hooks on the metal rod
under the rear door. (See Fig. B).
• Release the rear door.
WARNING: Never operate the mower
unless the hanger hooks on the grass
catcher are seated properly, and the rear
discharge door rests firmly against the top
of the grasscatcher.
Page 7
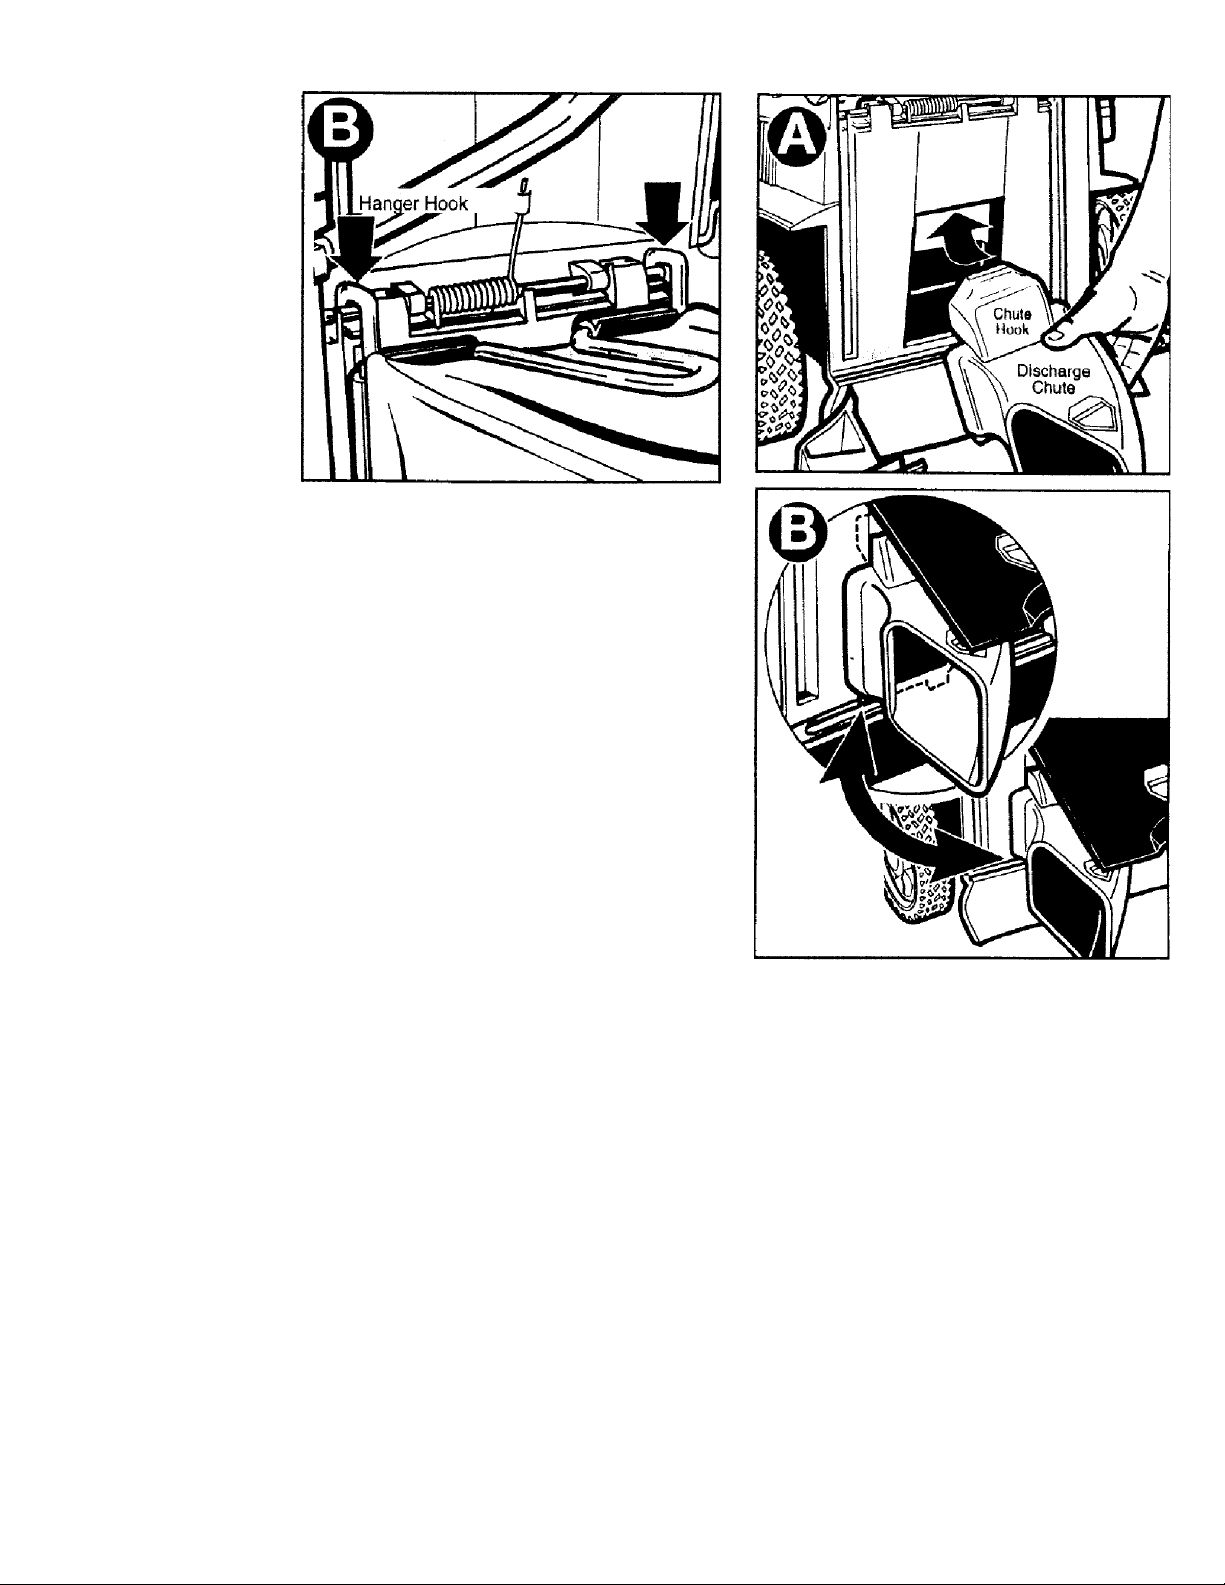
TO INSTALL SIDE
DISCHARGE CHUTE
• Shut the mower off, wait until the blade
stops, and unplug power cord.
• Reach down between the mower han
dles, raise the rear door and hold it up
with one hand. Ensure that the mulch
insert has been removed. See page 12,
'To Remove Mulch Insert",
• Grasp the discharge chute with the other
hand and while tilting It downwards Insert
its hook into the mower’s discharge
opening. (See Fig. A)
• Rotate the chute until it is in flat contact
with the deck, and the bottom ribs fit into
the deck grooves. (See Fig. B)
• Lower the rear door until it rests on top
of the discharge chute.
WARNING:
• Do not use the discharge chute if it is
damaged.
• For your own safety, DO NOT use the
mower without either the grasscatcher,
mulch insert, or the discharge chute in
operating position.
Page 8
OPERATION
KNOW YOUR MULCHING MOWER
READ THIS OWNER’S MANUAL AND SAFETY RULES BEFORE OPERATING YOUR
MOWER. See diagram below to familiarize yourself with the location of various controls
and adjustments. Save this manual for future reference.
These symbols may appear on your mower or in literature supplied with the product.
Learn and understand their meaning.
CAUTION
OR WARNING
PAWOBira
DANGER, KEEP HANDS
AND FEET AWAY
MEETS UL 1447 SAFETY REQUIREMENTS
Sears rotary, walk-behind, electrically powered lawn mowers conform to the safety
requirements of Underwriters Laboratories (UL) Standard 1447.
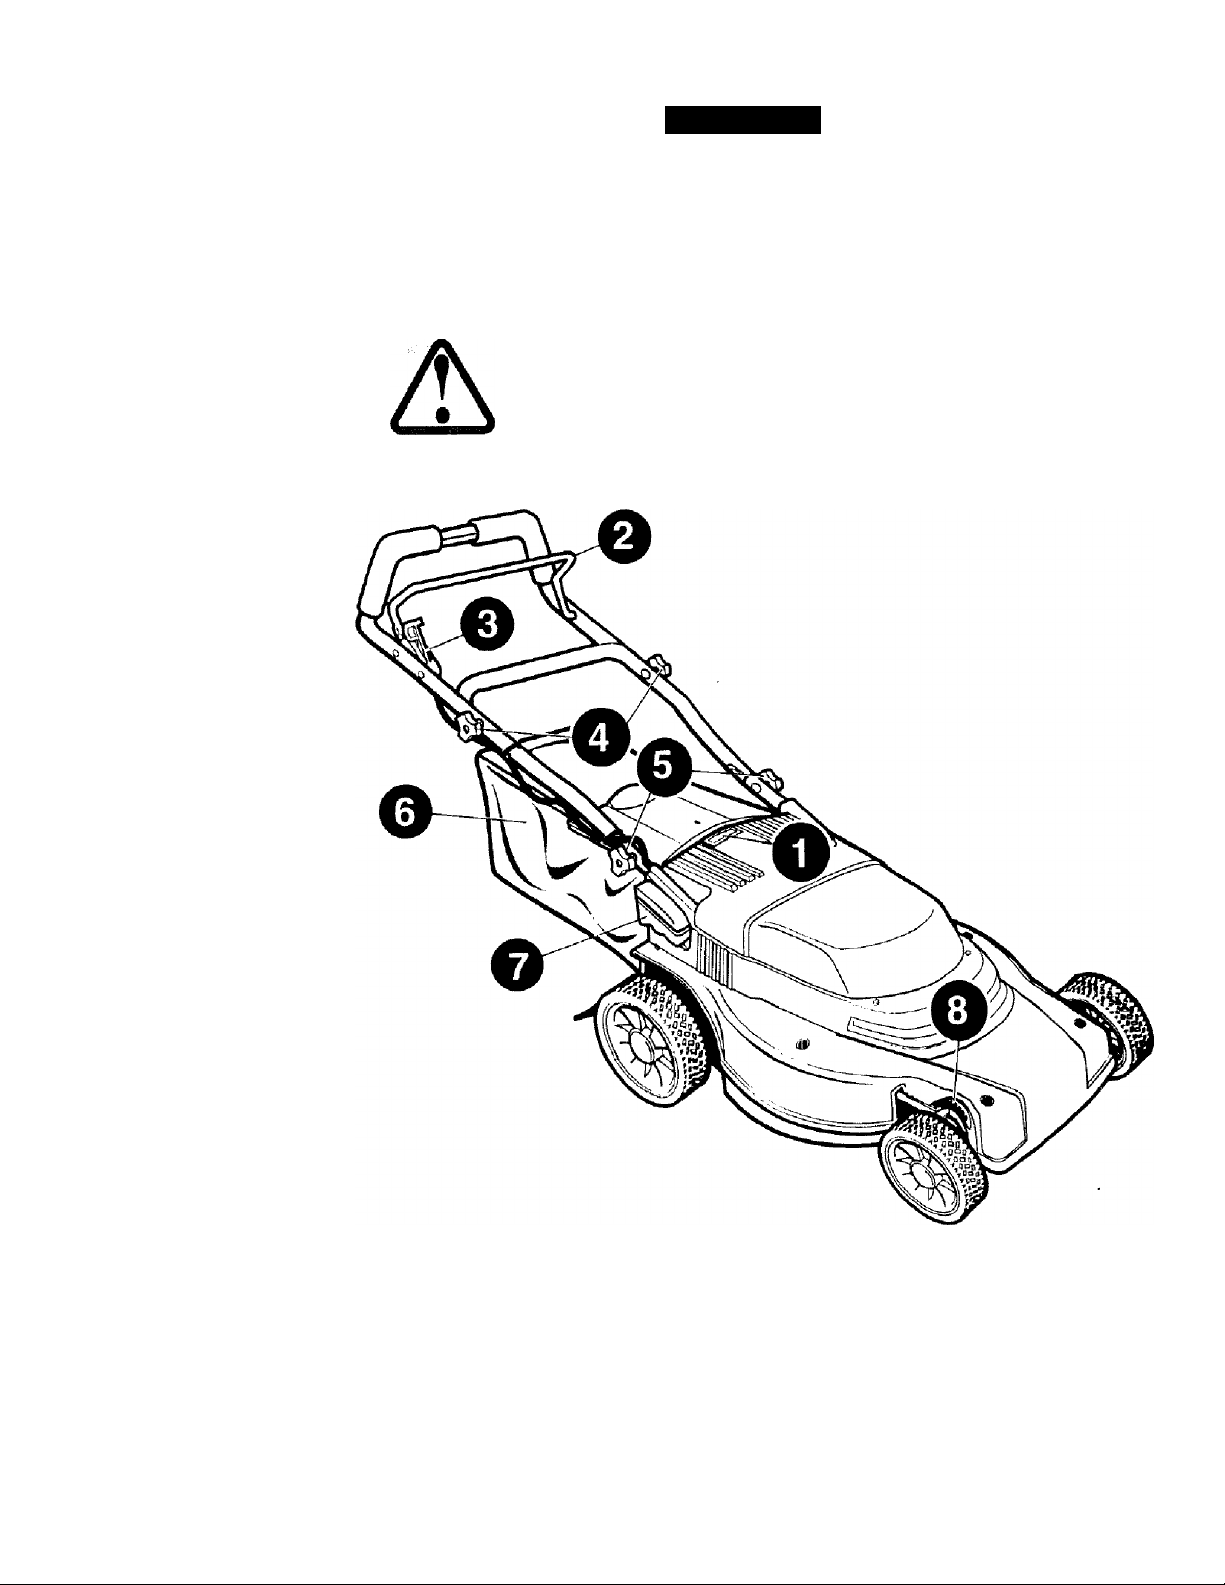
WARNING: Blade always turns when motor is running.
Safety key (1)
Operator Presence Control Switch consists
of Bail handle (2) and Switch lever (3)
Handle adjustment knobs (4)
Handle storage knobs (5)
Grassbag (6)
Cutting Height Adjustment Release (7)
Cutting height indicator (8)
Page 9
CHARGING BATTERY
Although your mower battery was fully
charged when it left the factory, it is nec
essary to recharge it before initial use.
This will ensure that the battery operates
at full performance capability.
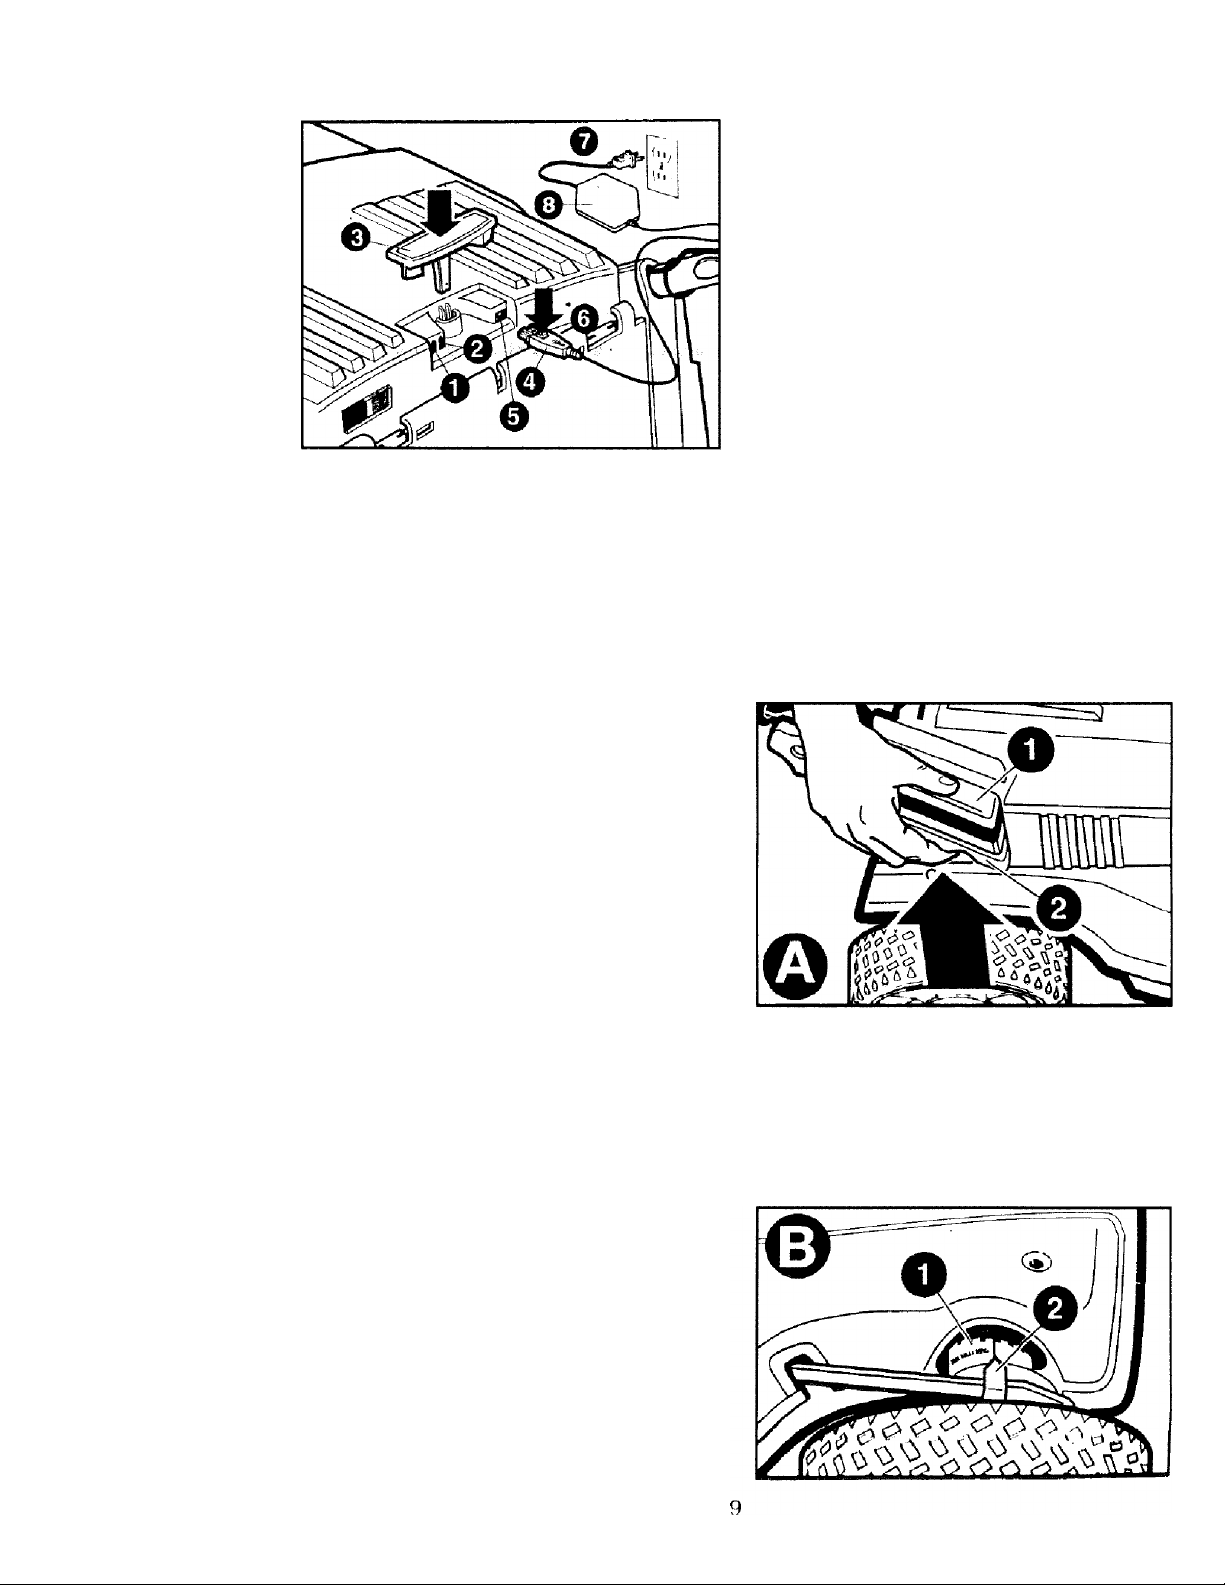
There are two charge Indicator lights on
your mower. The red light (1) glows while
the battery is charging. The green light (2)
glows when the battery is fully charged.
During the mowing season, plug the
charger into mower whenever mower is
not being used.
Safety Key
To prevent accidental start-up or unautho
rized use, your mower has a removable
Safety Key (3). The mower will not oper
ate when the Safety Key is removed. The
Safety Key has a hole In its center to allow
for storage on a nail, out of the reach of
children.
CAUTION! Always ramove Safety Key
from mower when leaving mower unat
tended, even for a short period of lime.
To Charge Battery
• Remove safety key (3).
• Plug the charger cord (4) into the recep
tacle (5) on the mower. The charger
cord plug has a retaining clip (6) which
will lock the plug into the mower while
charging to avoid accidental removal.
• insert the 120 volt plug (7) of the charg
er (8) into the wall receptacle.
• The red light on the mower should come
on Indicating you have power and the
battery Is being charged. The red light
should extinguish and the green light
com© on when charging is complete. It
takes approximately 24 hours to charge
B fully dlicherged battery,
• l-or opilmum pGrloinumce during Ihe
mowing season, always connect the
mower to the charger when mower is
not in use.
• To remove the plug from the mower,
press retaining clip (6) firmly in the
direction of the arrow and pull plug from
charging receptacle on mower.
TO ADJUST CUTTING HEIGHT
(1-1/2" TO 3-1/2")
CAUTION: Before making any adjust
ments, release switch to turn mower off,
wait for blade to stop, and remove safety
key.
• Your mower features a "one touch”
wheel height adjustment system. This
system adjusts all four wheels at the
same time.
• To raise or lower the cutting height, place
the palm of your hand on the palm rest
(1) and with your fingers squeeze
upward on the finger grip (2) and hold.
(See Fig. A)
While holding the finger grip up, you can
raise or lower the cutting height. The
mower has seven cutting height posi
tions. They are indicated by the scale
(1) and pointer (2) at the front of the
mower. (See Fig. B)
When you have the mower at the height
Page 10
you want, hold it in place by gripping the
mower’s lower right handle bar with
your left hand. Then release your right
hand from the finger grip to lock the cut
ting height into place.
NOTE: To ensure that the deck is securely
locked in one of the seven cutting posi
tions, press down on the palm rest after
releasing the finger grip.
HANDLE ADJUSTMENT
TO START MOWER
• Make sure that charger cord is
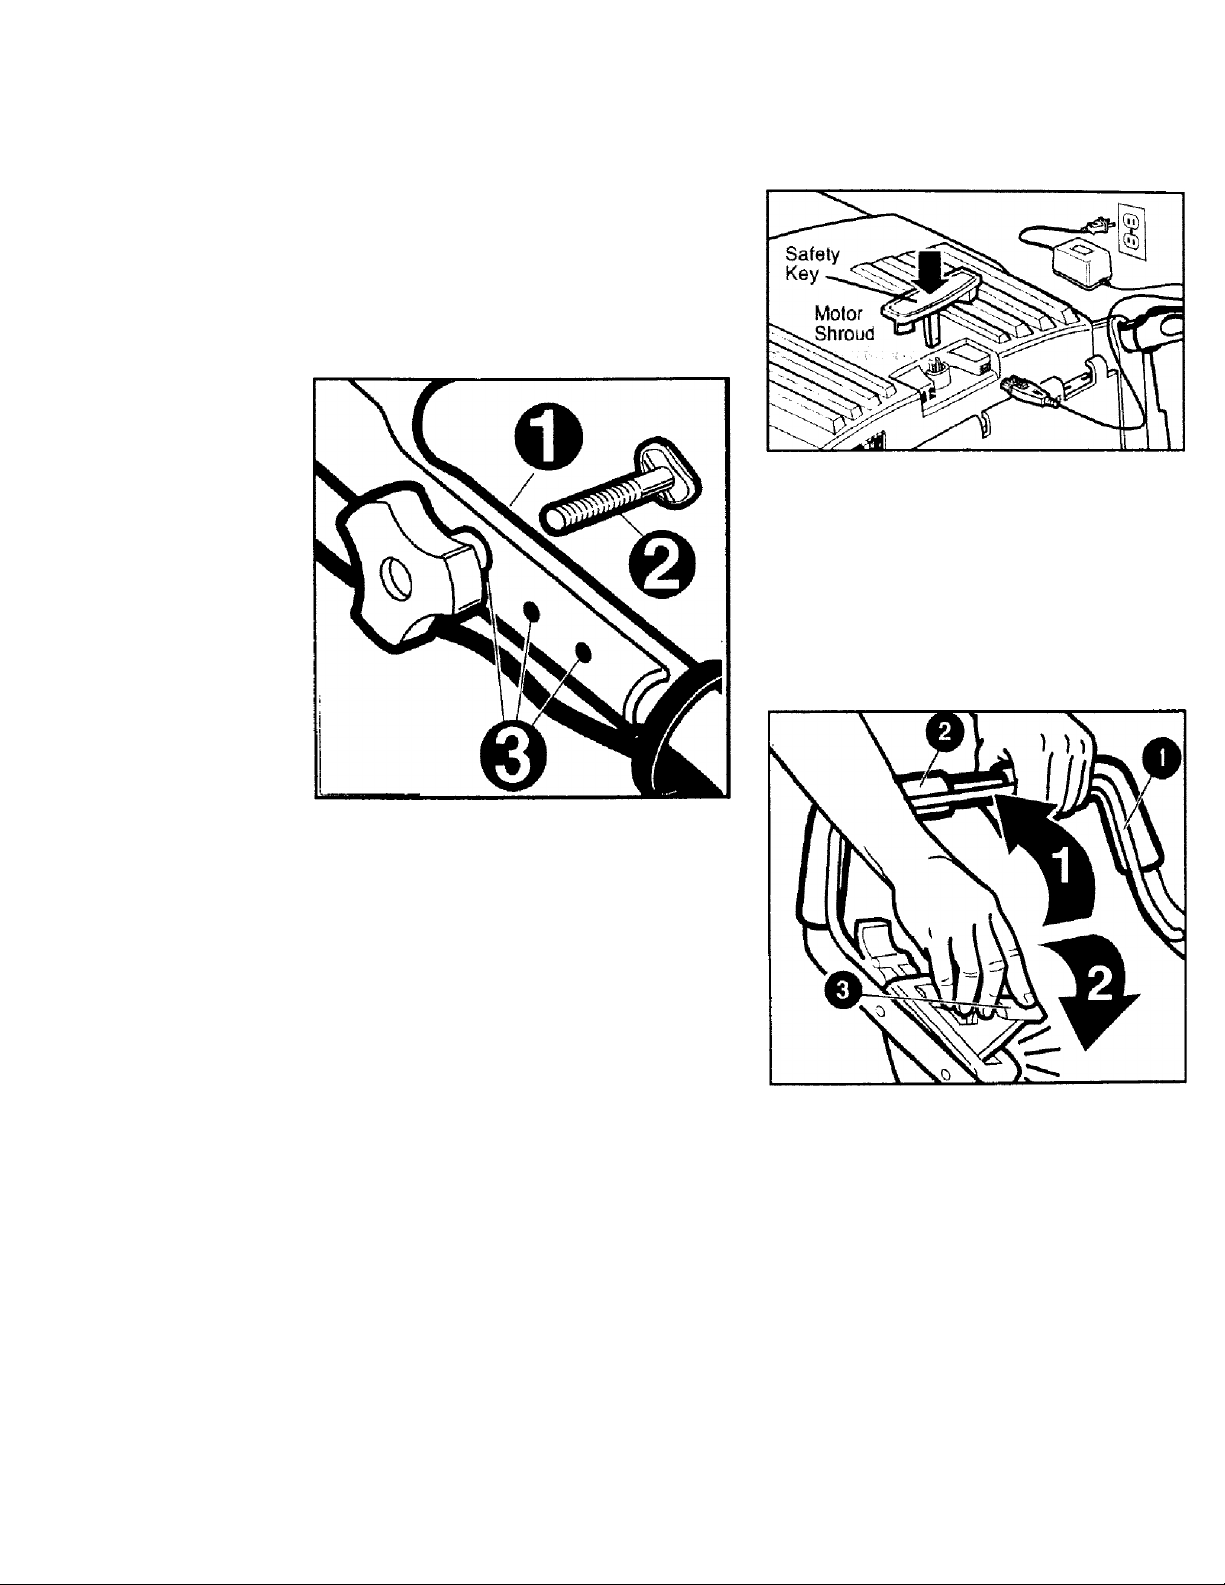
unplugged from the mower.
• Insert Safety Key into place on motor
shroud. Push key down until it is seated.
The mower is now operational and can
be started by activating the switch sys
tem.
CAUTION: Never attempt to override the
operation of this switch and key system.
OPERATOR PRESENCE CONTROL SWITCH
Your mower has a variable height handle
adjustment feature. To adjust the handle
position, use the following procedure:
• Remove both knobs (1) on the middle
part of the handlebars and remove the
bolts (2).
• Slide the upper handle Into one of the 3
adjustment positions (3), aligning the
holes in the upper and lower handles.
• Insert the bolts and install the knobs,
tightening securely. The knobs should
always be on the outside of the handles
to avoid interference with the rear door
and grass bag,
TO STOP MOWER
To stop mower fully release your grip on the operator presence control switch.
CAUTION; Federal regulations require an
Operator Presence Control Switch to be
installed on lawn mowers in order to mini
mize the risk of blade contact injury. DO
NOT under any circumstances attempt to
defeat the function of this switch. Remem
ber that the blade always turns when the
motor is running.
To operate the operator presence control
switch, first grasp the bail handle (1} and
pull it to the handlebar (2). Then firmly
push the switch lever (3) forward until it
snaps into the “on" position. To turn the
mower off, just release the bail handle.
in
Page 11
BATTERY GAUGE
1
B ■
Highly Charged
2
B JH
Charge Depleted
Your Cordless Mulching mower has a
gauge to provide you with information on
your battery state of charge. While oper
ating the mower, the gauge constantly
senses and displays the battery condition
as follows:
• When the needle is pointing in the
green area (1), the battery is in a highly
charged condition.
• When the needle is pointing in the red
area (2), the battery charge is depleted.
• Before using your mower for the first
time, charge the battery overnight to
ensure that it is fully charged. When
you first start your mower, the battery
gauge ihould point In the green area,
Indicating a fully charged battery.
• As you use your mower, you will notice
that the needle in the battery gauge
drops slowly as the battery discharges.
• While cutting grass with your cordless
mower, it is normal for the battery gauge
needle to fluctuate somewhat as the
cutting conditions change.
• When your battery gauge needle points
consistently in the red area, your battery
is now discharged, even though the
mower may still be capable of cutting
grass. Continuing to operate your
mulching mower with the battery in this
discharged condition may reduce the life
and performance of your battery,
Tha following sugoMtlona will help you to obtain optimum run time from your cordteae mower;
• Slow down in areas where the grass is
especially long or thick, or raise the cut
height.
• When mulching, avoid cutting more than
1-1/2 inches off the grass.
• Avoid mowing when the grass is wet
from rain or dew-soaked.
• Cut your lawn frequently, especially dur
ing high growth periods.
NOTE: You should recharge your mower
after each use, regardless of the position
of the battery gauge needle. Frequent
charging will not harm your battery, and
will ensure that the battery is fully charged
and ratdy for its next use.
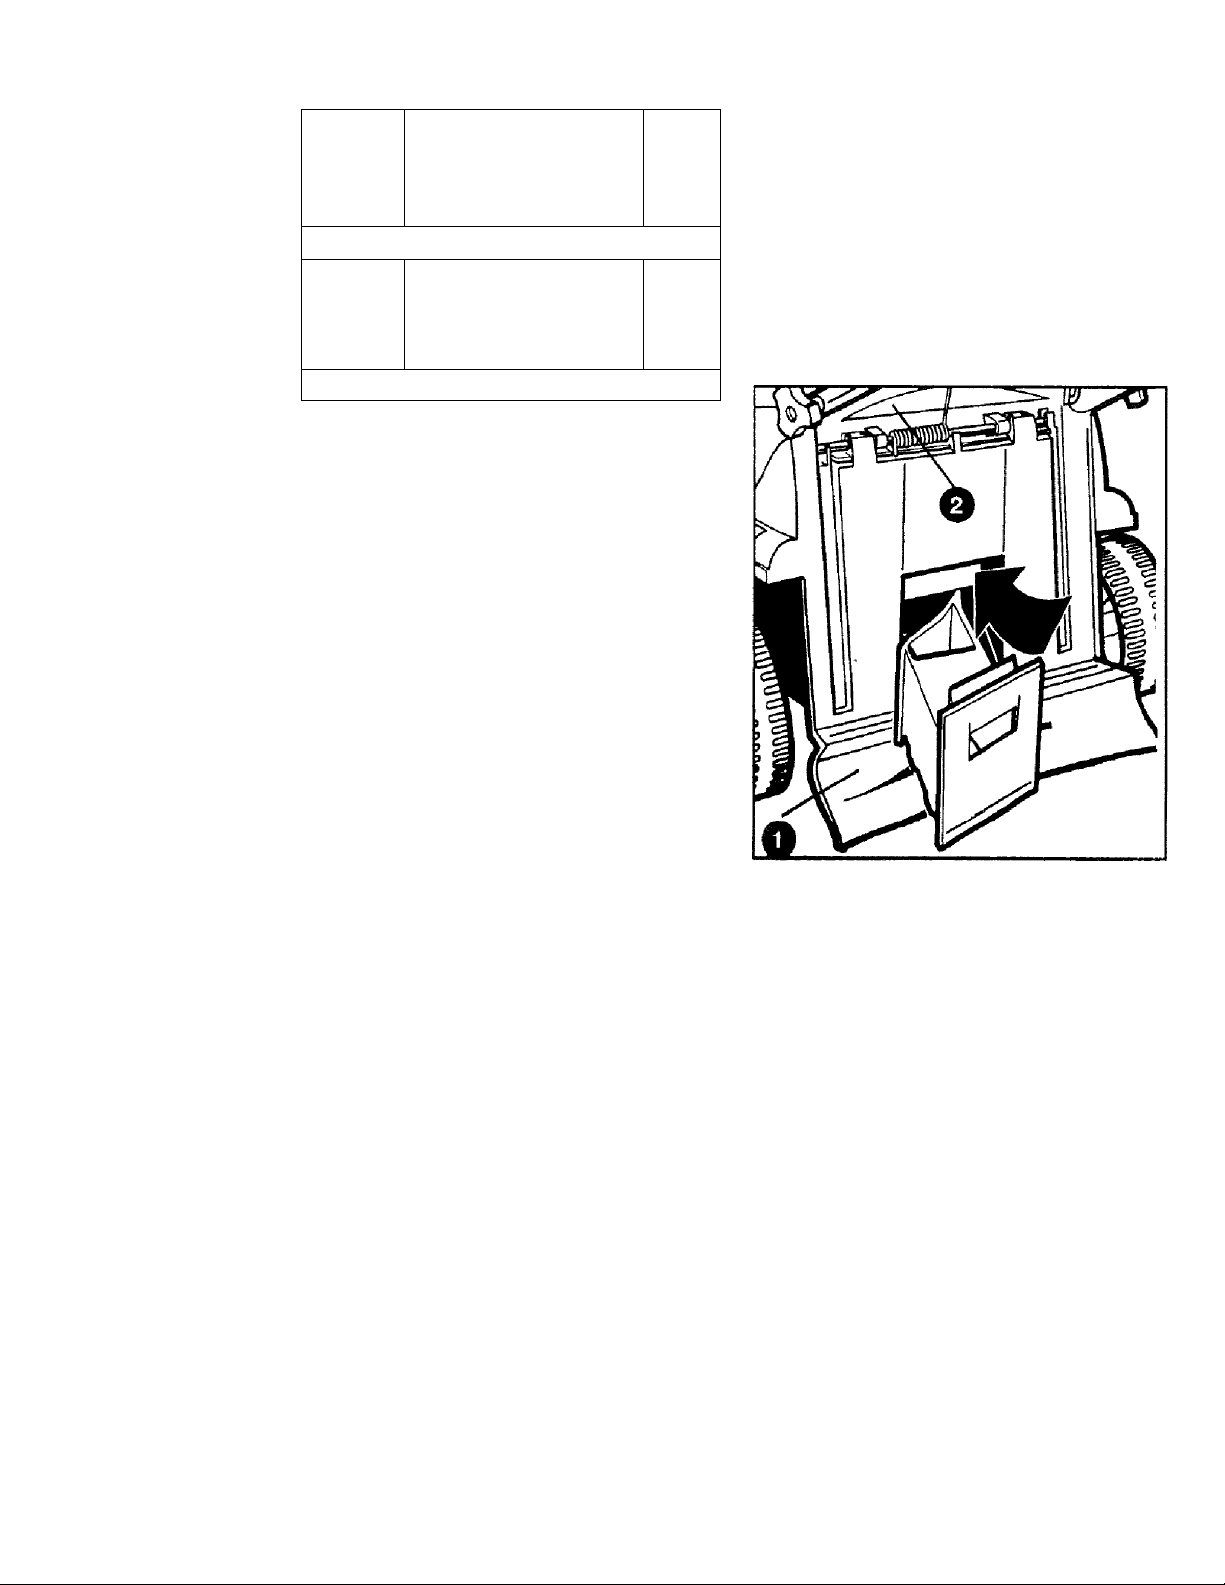
SAFETY SHIELD AND REAR DOOR
This safety shield (1) is designed to mini
mize the throwing of stones or other
objects by the mower blade backward
from under the mower deck. The shield,
along with the rear door (2), minimizes the
possibility of accidental foot contact with
the blade. DO NOT operate mower with
out the safety shield and rear door in
place.
WARNING;
• For your own safety DO NOT use this
mower without either the grasscatcher or
mulch insert in operating position.
* Do nol oparata the mower if the spring in
the rear door loses Its tension. Take your
iawnmower to the nearest Sears Service
center for repair.
11
Page 12

MOWING TIPS
• Mow across the face of slopes, never
up-and-down. Exercise extreme caution
when changing direction on slopes. Do
not mow excessively steep slopes.
Always maintain good footing.
• Release switch to turn mower "OFF"
when crossing any graveled area (stones
can be thrown by the blade).
• Set mower at highest cutting height,
when mowing in rough ground or in tall
weeds.
• From time to time turn off mower and
wait for the blade to come to a complete
stop. Then remove the safety key and
turn mower on its side. Using an object
such as a stick, wipe out any accumula
tion of grass in the biade area. Be care
ful of the sharp edges of the blade.
• If grasscatcher is used during the fast
growing season, the grass may tend to
clog up at the discharge opening. Turn
the switch “OFF and remove the safety
key. Remove the catcher and shake the
grass down to the back end of the bag.
Also clean out any grass or debris which
may be packed around the discharge
opening, Replace the grass catcher,
Clean often in wet, spring grass.
• If mower should start to vibrate abnor
mally, turn mower “OFF" and remove
safety key. Check immediately for cause.
Vibration is a warning of trouble. Do not
operate mower until a service check has
been made.
• ALWAYS turn the switch “OFF" and
remove safety key when leaving
mower unattended even for a short
period of time.
MULCHING
• Your mower is designed to re-cut the
grass clippings many times and reduce
them in size so that, as they fall Into the
lawn, they will disperse into the grass
and not be noticed. Also, the mulched
grass will biodegrade quickly to provide
nutrients to the lawn.
• Your mower was shipped with the Mulch
Insert installed.
the maintenance section of this manual.
• Avoid cutting the lawn when it is wet.
Wet grass tends to form clumps which
interfere with the mulching action. The
best time to mow your lawn is in the late
afternoon. At this time the grass is dried
and the newly cut area will not be
exposed to the direct sun.
• For best results, adjust the mower cut
ting height so that the mower cuts off
only the top one-thirdof the grass blades.
If the lawn is overgrown it will be neces
sary to increase the cutting height to
reduce the pushing effect and reduce
overloading the motor. For extremely
heavy mulching make narrower cuts and
mow slowly.
• Certain types of grass and grass condi
tions may require that an area be
mulched a second time to completely
hide the clippings. When doing a second
cut, mow across or perpendicular to the
first cut path. DO NOT mow perpendic
ular to the first path if It would cause
. mowing across a hiii.
• Change your cutting pattern from week
to week. Mow north to south one week
and east to west the next week. This will
help prevent matting and graining of the
lawn.
TO REMOVE MULCH INSERT
• Shut the mower off, wait until the blade
stops and remove safety+:ey.
• Raise the rear door and hold it up.
• Locate your hand in the handle pocket of
the mulch insert, lift and pull out the
mulch insert completely.
• The rear discharge door is spring
loaded. When you release it the door will
return to the closed position.
TO INSTALL MULCH INSERT
• Shut the mower off, wait until the blade
stops, and remove safety key.
• Raise the rear door and slide the mulch
insert into the discharge opening until it
is firmly in contact with the deck.
• Release the rear door.
MULCHING MOWING TIPS
• For best performance, keep the mower
housing free of built-up grass and trash.
Clean after each use. See CLEANING in
12
Page 13

TO REMOVE BLADE
• Release Operator Presence Control
Switch to turn mower off, wait for the
blade to stop, and remove safety key.
• Cut a two foot length of 2x4 wood and
use it to keep blade from turning while
removing blade nut.
• Wear gloves, position wood, and loosen
nut counterclockwise as shown. Remove
nut.
• Remove square steel washer, plastic
insulator washer and blade.
TO REPLACE BLADE
• Place blade on shaft so that the blade
edges are parallel with the flat sides of
the shaft. Make sure you place the blade
so that its cutting edges will face the
ground when the mower is running.
• Place plastic insulator washer on shaft
so that two of the washer’s raised edges
fit over the edges of the blade.
• Place square steel washer on shaft so
that flat sides of hole in washer are par
allel with flat sides of shaft.
• Place blade nut on shaft. Make sure all
parts stay aligned. Position wood to keep
shaft from turning. Securely tighten blade
nut clockwise to 20-30 ft. lbs.
TO SHARPEN BLADE
• Keep blade sharp for best mower perfor
mance. A dull blade does not cut grass
evenly.
* Wear proper eye protection.
13
Page 14

• Sharpening the blade twice during a
mowing season is usually sufficient
under normal circumstances. Sand caus
es the blade to dull fast. If your lawn has
sandy soil, more frequent sharpenings
are required.
• Replace bent or damaged blade immedi
ately.
• To sharpen blade:
• Make sure blade remains balanced.
• Sharpen blade at the original cutting
angle.
• Sharpen cutting edges on both ends of
blade, removing equal amounts of
material from both ends.
• Secure blade in a vise as shown in fig
ure below,
• Wear safety glasses and be careful not
to cut yourself.
• Carefully file the cutting edges of the
blade with a fine tooth file or sharpen
ing stone.
• Check balance of blade. See instructions
for blade balancing.
• After blade is sharpened and balanced
replace blade on mower and tighten
securely.
TO BALANCE BLADE
Check balance of blade by placing cen
ter hole in blade over a nail or screwdriv
er shank, clamped horizontally in a vise.
If either end of the blade rotates down
ward, file that end. Blade is properly bal
anced when neither end drops.
GENERAL MOWING TIPS
During the spring when the grass is lush,
your mower may cut less than in mid-sum
mer when the grass is light and dry.
Here are some helpful hints to get the
most from your Craftsman cordless
power mower and to keep your lawn
looking beautiful
• Lawns should first be mowed in the
spring when the grass is about 2 1/2 to 3
inches high. Mowing too early restricts
the grass root systems which renew
themselves every spring. New grass
should be clipped when it is about 2 1/2
inches high.
• Do not remove too much grass blade
surface at one time - never more than
1/3 of the leaf height during each cutting.
Cutting too close "shocks" sensitive
grass blades, resulting in a shallow root
system and making it more difficult for
your lawn to reach water in the soil.
• Lawncare experts say that excessively
close cutting Is responsible for much of
the difficulty experienced on many lawns.
The depth and strength of the roots of
grass are almost exactly proportional to
its growth. Grasses of mature lawns
often are seriously injured when mowed
shorter than 1 1/2 inches, and a height
of 1 1/2 to 2 inches is preferred on large
lawns.
• Mow your lawn when it Is dry to avoid
clumping of wet grass. If you have a
choice, late afternoon is the ideal time
for mowing, not only because the grass
is dry, but also because the sensitive
new cut area of the grass will not be
exposed to intense sunlight.
• Keep the mowing blade sharp for a nice
clean cut. This Improves the mower’s
psrfoimance and anhanoai the look of
your lawn. A dull blade bruises and shat
ters the tips of the grass. This impairs
the healthy growth of your lawn and
increases susceptibility to turf diseases.
If the grass tips are bruised it causes a
brownish color and gives your lawn an
unhealthy appearance. A dull blade may
also pull up young seedlings.
■ Try to mow your lawn at the same (con
sistent) cutting height. While there are
times when you should vary the cutting
height with the changing seasons, a con
sistent cutting height produces a healthi-
14
Page 15

er. lovelier lawn with generally fewer
weeds. Mow more frequently during peri
ods of fast growth. Frequent cutting
ensures that the lower, less attractive
portion of the grass will not show.
If your lawn has grown too long, (a vaca
tion, for example, may interrupt your cut
ting schedule) mow at a cutting height
one or two positions higher than normal.
A second pass at “normal” cutting height
a few days later will put your lawn back
on schedule. Changing the cutting height
Is a simple matter with the One Touch
Wheel Height Adjustment, which simulta
neously adjusts all four wheels at once.
During the spring and fall, (or after an
interruption to the cutting schedule) the
grass will be longer and thicker. If the
motor continually slows down while cut
ting, try setting the wheels for a higher
cutting height. Excessive motor loading
can result in uneven cutting, quicker dis
charge of the battery, and can cause the
circuit breaker to trip, which stops the
motor.
• Three good ideas to enhance your
lawn's appearance; Vary the mowing
direction frequently; mow horizontally on
hillsides; (this is also a good safety prac
tice) and do not forget to overlap the
mowing path on each pass.
•.Always mow grass so that clippings are
discharged onto cut lawn. This will keep
your lawn looking fresh by avoiding “Cut
Grass" build-up which will eventually
brown and appear ugly. This method
also preserves your battery charge,
ensuring you get the most from your
Craftsman Cordless Power Mower.
• During the spring and fall seasons when
the grass is longer and thicker, you can
use your mower without it being fully
recharged, (i.e. green charge indication
light is on). This will enable you to per
form short cutting tasks, but we don’t
recommend this be done frequently. The
battery and mower perform much better
if charged fully.
15
Page 16

MAINTENANCE
CUSTOMER RESPONSIBILITIES TABLE
MAINTENANCE SCHEDULE A /¿? /¿? //
AS YOU COMPLETE
REGULAR SERVICE /# /S' /# / SERVICE DATES
Check for Loose Fasteners
Clean Lawn Mower
Check/Sharpen/Replace Blade
Recharge Battery
GENERAL RECOMMENDATIONS
• Always observe safety rules when per
forming any maintenance.
• The warranty on this lawn mower does
not cover items that have been subject
ed to operator abuse or negligence. To
receive full value from the warranty,
operator must maintain mower as
instructed in this manual.
• Once a year check blade for wear.
• Follow the maintenance schedule in this
manual.
• Before each user
• Check for loose fasteners.
LUBRICATION
No lubrication is required.
IMPORTANT: Do not oil or grease plastic
wheel bearings. Viscous lubricants will
attract dust and dirt and will shorten the
life of the self-lubricating bearings. If you
feel they must be lubricated, use only a
dry, powdered graphite tube lubricant
sparingly.
TIRES
• Keep tires free of gasoline, oil or Insect
control chemicals which can harm rub
ber.
/ ^ / 'O / ^ / ¿^ / ^ /
FILL IN DATES / ^ /
✓
✓
✓ ✓
• Avoid stumps, stones, deep ruts, sharp
BLADE CARE
For best results, mower blade must be
kept sharp. Replace bent or damaged
blades.
CLEANING
• TURN MOWER OFF, let the blade
• Use only mild soap and a damp cloth to
PREVENTING CORROSION
• Fertilizers and other garden chemicals
• CAUTION: DO NOT pour or spray water
• Do not store the tool on or adjacent to
✓
✓
✓
objects and other hazards that may
cause tire damage.
come to a stop and then remove safe
ty keyl
clean the mower. Clean out any clippings
which may have accumulated on the
underside of the deck.
contain agents which greatly accelerate
the corrosion of metals. If you mow in
areas where fertilizers or chemicals have
been used, the mower should be
cleaned immediately after use.
on the mower.
fertilizers or chemicals. Such storage can
cause rapid corrosion.
PRODUCT SPECIFICATIONS
MODEL NUMBER
POWER
BLADE SPEED
CUTTING WIDTH
BLADE BOLT TORQUE:
900,370520
24 V DC 17 AMP-HOUR
3600 RPM •
19"
20-30 FT, LBS.
Page 17

SERVICE AND ADJUSTMENTS
CAUTION: Before performing any service
or adjustments;
• Release operator presence control
switch and stop motor.
• Make sure the blade and all moving
parts have completely stopped.
• Remove Safety Key.
BATTERY
The battery in your mower is a recharge
able 24 volt sealed lead acid battery. To
get the maximum battery life, we rec
ommend the following;
• Fully recharge battery prior to initial use.
• Recharge battery immediately after each
use,
• Recharge battery continuously when
mower is not in use.
• Always charge battery indoors in a dry,
protected place
• DO NOT charge in extreme hot or cold
temperatures. Charge mower battery in a
location where temperature is more than
41“F(5®C) but less than 104®F {40®C}
REAR DEFLECTOR
The rear deflector, attached between the
rear wheels of your mower, is provided to
minimize the possibility that objects will be
thrown out of the rear of the mower into
the operator mowing position. If the
deflector becomes damaged, it should be
replaced.
BATTERY REPLACEMENT
If property maintained, the expected bat
tery life is 4-7 years. If battery replace
ment becomes necessary, take your
mower to a Sears Service Center for
replacement.
HANDLE ADJUSTMENT
To adjust handle refer to “Handle
Adjustmenr in Operation section of this
manual.
TO ADJUST CUTTING HEIGHT
To adjust cutting height refer to “Adjust
Cutting Height” in Operation section of this
manual.
Immediately prepare your lawn mower for
storage at the end of the season or if the
unit will not be used for 30 days or more.
LAWN MOWER
When lawn mower is to be stored for a
period of time, clean it thoroughly, remove
all dirt, grease, leaves, etc. Store in a
clean, dry area.
• Clean entire lawn mower (See “CLEAN
ING” In the Maintenance section of this
manual).
• Be sure that all nuts, bolts, screws, and
pins are securely fastened. Inspect mov
ing parts for damage, breakage and
wear. Replace If necessary.
BATTERY
• Recharge the battery to a full charyo. Do
not store mower with a discharged bat
tery. Battery failure will occur in a very
short time if mower is stored without hav
ing a full charge. We recommend that
you charge battery continuously while in
storage and during off season.
STORAGE
HANDLE
You can fold your lawn mower handle for
storage.
• Ensure that the power cord has been
unplugged.
• Loosen both handle knobs.
• Carefully fold the handle forward over
the mower.
CAUTION: DO NOT pinch cable
between handle and moter shroud.
i 1
Page 18

TROUBLESHOOTING GUIDE
PROBLEM SOLUTION
Mower doesn’t run when switch
lever Is activated.
Motor stops while mowing.
Mower runs but cutting perfor
mance Is unsatisfactory,or does
not cut your entire lawn.
1, Check to make sure safety key has been
Installed and Is fully seated.
2, Remove safety key, turn mower over and
check that blade is free to turn.
3, Has battery been fuily charged? Plug in
charger and wait for green light to come on.
1. Remove Safety Key. Turn mower over and
check that blade is free to turn.
2. Raise cutting height of wheels to highest
position and start mower.
3. Has battery been fully charged? Plug in
charger and wait for green light to come on.
4. Circuit breaker may have tripped. It resets
automatically. Re-set time could be as long
as 1 minute. Slow down or raise cut height.
1. Has battery been fully charged? Plug in
charger and wait for green light to come on.
2. Remove Safety Key. Turn mower over and
check:
‘Blade for sharpness
‘Deck and discharge chute for clogging.
3. Wheel height adjustment may be set too low
for grass condition. Raise cutting height.
Mower is too hard to push.
Mower is abnormally noisy and
vibrates.
1. Raise cutting height to reduce deck drag on
grass. Check each wheel for free rotation.
1. Remove Safety Key. Turn mower on side
and check blade to ensure It has not been
bent or damaged. If blade is damaged,
replace with a Craftsman replacement
blade. If the underside of the deck is dam
aged return mower to a Seara Service
Center.
2. If there Is no visible damage to the blade
and the mower still vibrates, return the
mower to a Sears Service Center.
^8
Page 19

so
CRAFTSMAN LAWN MOWER - MODEL NUMBER 900.370520
Engr; RWA
Page 20

гтем PART
NO. NO. DESCRIPTION
242592-01
1
133042-00
«Z
242614-00
3
86964-00
♦+
99298-32
♦5
242644-01
6
242681-00
T
242723-00
a
400240-00
9
10 242593-01
It 242494-02
12 242738-01
13 243103-00
14 239715-04
15 242357-01
IS 241658-03
IT 242495-01
18 242352-00
19 242380-00
20 242064-01
♦2T 72954-00
22 241524-02
23 242363-00
24 242484-08
25 242379-00
2S 242381-00
27 242382-04
2S 680812-00
29 241381-01
30 241646-00
t3t 239487-00
32 92715-00
33 241594-02
34 681548-01
35 264773-00
36 242600-00
37 242618-00
38 241658-01
39 239540-04
40 242488-00
41 242364-03
Upper Handle
Screw
Jumper Lead
Screw
Screw
Switch
Battery Strap
Spring
Washer
Middle Handle
Lower Shroud
Battery
Transfonner
Tie Wap
Connecbng Rod
Push Ring
Upper Shroud
Rear Door
Torsion Spring
Rod
Screw
Flap
Strap
Deck (lnd.47,52.98)
Bottom Plate
Blade
Mulch Plate
Upper Blade Spacer
Blade Insidator
Spacer
Hex Nut
Spacer
Spacer
Screw
Label
r Wieet
9* Wheel
Push Raig
Wheel Cover
Washer
Front Axle
CRAFTSMAN LAWN MüWfcK - MOÜtL NUMbtK auu.J^ua^u
The Model Nunter wi be lound on the Nameplate. Always mention
the Model Numlier n an correspondence regarding your tool.
SEE BACK PAGE FOR PARTS ORDERING INSTRUCTIONS
__________
PARTS LIST
ITEM PART
QTY
1 42
2
1 46 242350411 Handle
25
4
1
1
1 51
1
1
1
1
1
2
1
2
1
1
1
1
1
1 68
4
1
1
1
NO. HO. DESCRIPTION
45
47 242351-01 Support
48
49
50
52
54
55
56
57
58
60
61
62
»63
64
65
67
69
70
71
1 73
1
1
1
1
1
3
3
1
2
2 92
4
4
4 96
1
72
74
78
80
81
82
83
87
89
♦90
97 242781-00 Front Foam
24236S4J7 Rear Axle
242362-01 Lever Lock
24165600 Spring
2423534)1 Indicator
243102-01 Grass Bag
24250002 Bag Frame
242887-01 Lower Handle
2427354)0 End Cap & Bearing
24227001 Magnet Ring
2422544)1 Insulator
241SGNM)7 Lower Stamping
700554)0 Ban Bearing
2422534)1 Brush Cap
24278303 Conduit
2420064)0 Shunted Brush
32B9»4)0 Slop Nut
' 90361-10 VWsher
2426044)0 Screw
242207-00 Brush Spring
70162-00 Terminal
2422744K) Brush Insert
2424814)1 Grip
242028-05 Armature
241947-01 Curved Head Screw
2397234)9 Gasket
137203-00 Retaining Ring
2415454)3 Knob Assembly
2647564)0 Label
242^04)1 Ban Handle
241871-08 KeyAssembty
242695-03 Electronic Module
2426064)0 Battery Guage
2391154)6 Tie Whap
2423734)0 Screw
2430964)0 Hardware Bag (bid. (2) bolts,
2427804)0 Rear Foam
(2) nuts, (2) Lock washers,
(2) flat washers
QTY
1
1
1
1
1
1
1
1
2
1
1
1
1
1
2
1
2
6
4 ■
2
2
2
2
2
1
4
1
1
4
1
1
1
1
1
2
1
1
1
1
ITEM PART
NO. NO. DESCRIPTION
98 242601-00 Spring
99 242867-00 Discharge Chute
199 264766-00 Wenllficatiort Label
201 264767-00 CwJtion Label
202 264775-00 Height Adjustment Ubel
203 264776-01 Nameplate
214 284776-00 Upper Label
PARTS NOT ILLUSTRATED: (Supp»«> wth unit)
264774-00 InstnKiion Manual 1
24127(W>0 Foam Pads (between batteries) 3
QTY
1
1
1
1
1
1
1
OPTIONAL ACCESSORIES:
(Not Supplied WHh Unit)
242604-00 Connection Diagram
242776-01 Motor Assembly (Ind. 54,55.56,57,58,
63.64.65,71,74)
!j) NOTES:
2,5,21 Torque to 9-15 in./lbs.
4 Torque to 9-12 in./lbs.
5,90 Torque to 18-22 in./lbs.
31 Torque to 20-30 ft./ibs.
63 Tab and slot must male at each end of magnet
ring before tightening screws.
IMPORTANT! To assure product SAFETY and REUABIUTY, repairs, maintenance and adpustment
should be perromied by Sears Service Centers or
other qualified sarace organizations, Mwsys using
Sears replacemert parts.
Model No. Volts
900.370520 24.0 DC
Engr F!WA
lesTS
Page 21

CONTENIDO
Lista de partes ilustrada
Orden de partes
Garantía
Instrucciones de seguridad
Ensamblaje
Operación
19
20 Mantenimiento
21 Itinerario de mantenimiento
21 Servicio y ajustes
24 Almacenaje
27 Solución a problemas frecuentes 36
garantía
Especificaciones del producto 34
34
34
35
35
GARANTIA LIMITADA POR DOS AÑOS EN LA RODADORA CRAFTSMAN
Sears reparará sin cargos cualquier defecto que se presente en materiales o mano de obra de esta
podadera Craftsman, durante dos años a partir de la fecha de compra, siempre y cuando se le pro
porcione el mantenimiento, la lubricación y ajustes necesarios, de conformidad con las instrucciones
de mantenimiento y operación señaladas en el manual del propietario.
Si la podadera Craftsman se utilizase con fines comerciales o de renta, esta garantía se aplica úni
camente durante 90 días a partir de la fecha de compra.
Esta garantía no cubre;
• Piezas que sufran desgaste con el uso normal, como las cuchillas, los adaptadores de cuchillas y
las bandas. -
• Las reparaciones necesarias debidas a maltrato o negligencia del operador, incluyendo los árboles
de las bandas y la falta de mantenimiento al equipo de acuerdo a las instrucciones señaladas en el
manual del propietario.
EL SERVICIO EN GARANTÍA ESTA A SU DISPOSICION llevando la podadera Craftsman al Centro
o Departamento de Servicio Sears más cercano dentro de los Estados Unidos. Esta garantía se apli
ca únicamente mientras se utilice el producto en los Estados Unidos.
Esta garantía le otorga ciertos derechos específicos, y usted puede tener otros derechos que varíen
de estado a estado.
Sears, Rosbúok and Co., Norman Estfites, IL 60179 USA.
INSTRUCCIONES DE SEGURIDAD
PRECAUCION: No Intente operar esta podadera hasta que haya leído este manual completamente
y comprendido todas las Instrucciones, reglas de seguridad, etc., contenidas en este manual. La falta
de cumplimiento puede resultar en accidentes que involucren incendio, choque elécWco- o lesiones
personales de gravedad. Conserve el manual del propietario y revíselo con frecuencia para continuar
con la operación segura y para instruir a terceras personas que pudiesen utilizar esta podadera.
Los estándares de seguridad requieren de la
presencia de un interruptor de control con pres
encia del operador para minimizar la posibilidad
de riesgos. Su unidad está equipada con tal
dispositivo. No Intente anular su función por
ningún motivo.
ENTRENAMIENTO
• Lea cuidadosamente este manual del oper
ador. Familiarícese con los controles y sepa a
operar.SU poóadora apropiadamente. Aprenda
s ipagkr'iu.podidora rápldimenta.
• Evite amblantes peligrosos. No utilice su
podadora bajo la lluvia ni en lugares mojados.
No la opere en atmósferas gaseosas o explo
sivas. Los motores producen chispas en
condiciones normales, y estas chispas
pueden originar la ignición de los vapores.
• No permita que los niños utilicen su podado-
ra. Nunca permita que un adulto use la
podadora sin las instrucciones apropiadas.
• Conserve el área de operación libre de per
sonas, particularmente niños pequeños y ,
mascotas.
• Utilice la podadora únicamente como se
describe en este manual.
• No opere la podadora si se ha caído o daña
do en alguna forma. Hágala repara siempre
§nl§i d@ uiáfia.
• No opere la podadora sin la extensión
recomendada. Asegúrese que la extensión
esté en buenas condiciones antes de encen
der la podadora. '
• No utilice accesorios que no estén recomen-
21
Page 22

dados en este manual. El uso de dichos acce
sorios puede ser peligroso.
• La cuchilla siempre gira cuando el motor está
en funcionamiento.
• Evite el encendido accidental. No juegue con
el interruptor de control en presencia del
operador cuando no se emplee.
PREPARACION;
• Inspeccione a conciencia el área donde se
usará el equipo y elimíne todas tas piedras,
varas, alambres, huesos y otros objetos
extraños. Estos objetos serán lanzados por la
cuchilla y pueden ocasionar lesiones graves.
• Utilice siempre gafas o protectores oculares
de seguridad cuando emplee la podadera.
• Vístase de manera adecuada. No opere el
equipo con los pies descalzos o cuando util
ice calzado abierto. Utilice siempre calzado
cerrado con buena tracción.
• Haga tos ajustes necesarios a las ruedas
antes de encender la podadera. Nunca
intente hacer ajustes a la altura de las ruedas
mientras el motor está en funcionamiento.
• Pode solamente a la luz del día o con buena
iluminación artificial.
• No conecte la podadera hasta que esté lista
para usarse.
• Proteja sus pulmones. Utilice una mascarilla o
filtro contra polvo si la operación que va a
efectuar lo produce.
• Retire las herramientas de ajuste antes de
encender la podadera.
OPERACION
La operación de cualquier podadera
puede ocasionar que objetos
extraños salgan despedidos hacia los
ojos, con el consiguiente riesgo de
daño ocular. Utilice siempre gafas o protectores
oculares de seguridad al operar su podadora o
al hacerle ajustes o reparaciones. Le recomen
damos utilizar una máscara de visión amplia
sobre las gafas, a su disposición en Sears.
• PRECAUCION: Revise con frecuencia la
bolsa para pasto en busca de deterioro o des
gaste. Reemplácela, en caso necesario, con
una bolsa Craftsman Idéntica. No hacerlo
puede ocasionarle lesiones originadas por las
descarga del pasto.
• Conserve sus ojos y su mente en su podado
ra y en el área que piense podar. No permita
que lo distraiga nada.
• Nunca opere el equipo en pasto húmedo o
resbaladizo. Asegure siempre el apoyo de sus
pies; conserve bien sujeto el mango y
camine.
• No ponga las manos o los pies cerca de las
piezas giratorias. Conserve siempre limpia la
abertura de descarga.
• Apague siempre la podadora cuando la deje o
cuando no la utilice, y cuando atraviese
caminos de grava, paseos o andadores.
• Nunca dirija la descarga del material hacia
observadores, ni permita que nadie se
acerque a la podadora cuando la esté
operando.
• Protéjase contra el choque eléctrico. Repare
o reemplace de inmediato los cables y las
extensiones dañadas.
• No maltrate el cable. Nunca tire de la podado
ra por el cable. Desconéctela tirando suave
mente de la clavija, no del cable.
• Antes de limpiar, inspeccionar o reparar su
podadora, apague el motor y asegúrese per
fectamente que la cuchilla y todas las partes
móviles se hayan detenido. A continuación
desconecte el cable para evitar el encendido
accidental.
• Si la podadora hace contacto con algún obje
to extraño, siga estos pasos:
i) Apague la podadora. Libere el interruptor,
il) Desconecte el cable de alimentación,
íii) Inspeccione en busca de daños
iv) Repare cualquier daño antes de encender
la podadora de nuevo y operarla.
• No opere la podadora si vibra anormalmente,
apague y desconecte la podadora y busque
inmediatamente la causa. Las vibraciones son
generalmente aviso de problemas. Repare
cualquier daño antes de encender la podado
ra de nuevo.
• No encienda el motor bajo techo.
■ Nunca corte el pasto tirando de la podadora
hacia usted. Pode en sentido perpendicular a
las pendientes; nurica hacia arriba y hacia
abajo. Tenga precaución extrema cuando
cambie de dirección en las pendientes. No
pode en pendientes muy pronunciadas - con
serve bien apoyados los pies.
• Nunca opere la podadera sin que las guardas
apropiadas, las placas u otros dispositivos de
seguridad estén en su sitio.
• No fuerce la podadora. Esta hará el trabajo
mejor y de manera más segura bajo las
especificaciones para las que ha sido diseña
da. Cuando pode en superficies irregulares o
en pasto alto, elija una posición de corte más
alta.
• No se sobre extienda. Conserve siempre el
equilibrio y los pies bien apoyados.
• Esté alerta. Concéntrese en lo que esté
haciendo y use el sentido común. No opere la
podadora si está cansado. No corra cuando
pode.
• No opere la podadora bajo la influencia de
22
Page 23

drogas, alcohol o medicamentos. Hacerlo así
puede originarle lesiones de gravedad,
• Aléjese del área de la cuchilla. Esté con
sciente acerca del riesgo de lesiones.
Conserve las manos y los pies alejados de la
cuchilla.
• PELIGRO: NO intente remover el material
cortado o destapar la salida cuando la
cuchilla esté en movimiento, existe riesgo de
lesionarse gravemente. '
» Si la podadora-se atasca, asegúrese de apa
gar la podadera, espere a que la cuchilla se
detenga y desconecte el cordón eléctrico
antes de intentar destapar el canal de salida o
de remover cualquier objeto de debajo de la
cubierta. Revise cuidadosamente y haga
reparar cualquier daño antes de volver a
encender la podadera.
OPERACION Y CUIDADOS
A LA BATERIA
PRECAUCION: Utilice únicamente una batería
de repuesto idéntica. Lleve su podadera a un
centro de servicio Sears para que la reempla
cen.
La batería de su podadera Inalámbrica es un
sistema de 24 volts de ácido de plomo sellado.
No contiene ningún líquido, por lo tanto puede
guardarse en cualquier posición si temor a que
haya tugas.
• Para obtener el rendimiento óptimo, cargue la
batería completamente antes de utilizarla por
primera vez.
• Es preferible cargar la batería en un sitio fres
co y seco.
• La batería no necesita descargarse completa
mente antes de recargarse.
• La batería se puede guardar con seguridad
hasta en temperaturas de -40°C (-40°F).
• La batería no necesita mantenimiento.
• Almacenaje fuera de temporada
i. En climas cálidos, para asegurar el
rendimiento óptimo, se recomienda que la
batería st coniarve en carga constante.
II.La podadera se puede guardar con el car
gador desconectado si se encuentra bajo
todas las siguientes condiciones.
-la podadera está completamente cargada
antes de guardarla.
-la temperatura promedio en el lugar de
guardado es inferior a 10“C (50°F)
-el periodo de almacenaje será menor a 6
meses
REGLAS DE SEGURIDAD PARA EL CARGADOR
■ Conecte el cargador directamente a una toma
de corriente. NO MALTRATE EL CABLE.
Nunca acarree el cargador por el cable. No
desconecte el cargador de la toma de corri
ente o de la podadora tirando del cable.
• PRECAUCION: No intente usar este cargador
con ningún otro producto para evitar riesgos
de dioque eléctrico, Incendio y lesiones per
sonales, De la misma manera, no intente
recargar su podadora con otro cargador.
• No haga servicio a la podadora con el car
gador o con la llave de seguridad instalados..
• No opere un cargador dañado. Haga cambiar
el cable o el cargador dañado inmediata
mente por un centro de servicio autorizado
Black & Decker.
• Siempre cargue la podadora en un lugar seco
protegido del mal tiempo. No exponga el car
gador o la podadora a la lluvia. No cargue la
podadora cuando la temperatura se superior
a 40“C (104“F) o Inferior a 5°C (41“F).
• Aleje la podadora y el cargador de agua y
fuentes de calor (radiadores, calentadores,
estutas, etc.), flamas y productos químicos.
Tenga cuidado de no dañar el cable del car
gador, aléjelo de bordes cortantes.
PRECAUCION: Siempre desconecte el car
gador de la toma de corriente (contacto de
pared) antes de quitar el conector. Bajo ciertas
condiciones, con el cargador conectado a la
toma de corriente, el conector al quedar
expuesto, puede hacer cortocircuito con algún
material extraño y puede ocasionar un incen
dio. Los materiales extraños de naturaleza con
ductora, como, pero no limitados a alambre de
acero, papel aluminio, o cualesquiera otras
partículas metálicas, deben conservarse aleja
dos del conector. Desconecte siempre el car
gador antes de limpiarlo.
MANTENIMIENTO Y ALMACENAJE
• Revisa a menudo los tornillos de montaje de
la cuchilla y el motor para asegurarse que
estén bien apretados.
• Revise a intervalos frecuentes todos que
todos los tornillos, tuercas y pijas estén bien
aprtUidoi para asegurara« que la podadora
esté en condiciones seguras de trabajo.
• Conserve todos los dispositivos de seguridad
en su sitio y listos para trabajar.
• Conserve el motor libre de pasto, hojas y
grasa o aceite excesivos para reducir el ries
go de incendios.
• Corserve siempre afilada la cuchilla de su
podadora.
• Permita que el motor se enfríe antes de
guardar ia podadora.
• Conserve la podadora limpia y seca. Utilice
sienrpre un trapo húmedo para limpiarla.
Nunca utilice líquido de frenos, gasolina, pro
ductos con base de petróleo, solventes, ni
23
Page 24

agua para limpiar la podadera.
• No pode si el interruptor no funciona. Haga
reemplazar un Interruptor defectuoso por un
técnico de servicio calificado de un centro o
departamento de servicio autorizado.
• Revise las partes dañadas. Antes de seguir
utilizando la podadora, una guarda u otras
parles dañadas deben ser revisadas cuida
dosamente para determinar si cumplirán con
su función adecuadamente. Revise la alin
eación de las piezas móviles, la ruptura en
piezas, la unión de piezas móviles, el monta
je, y cualesquiera otras condiciones que pud
iesen afectar su operación. Una guarda u otra
pieza dañadas deberán ser reparadas correc
tamente defectuoso por un técnico de servicio
calificado de un centro o departamento de
servicio autorizado.
• Cuando efectúe servicio asegúrese que se
empleen únicamente refacciones Craftsman
idénticas. El servicio a esta podadora debe
efectuarlo únicamente un técnico calificado.
Le sugerimos que envíe la unidad al centro o
departamento de servicio más cercano.
• Cuando cambie la cuchilla, utilice únicamente
las piezas recomendadas por el fabricante. El
uso de cualquier otra cuchilla puede ocasion
ar lesiones personales de gravedad o daños
a su podadora.
• Guarde la podadora bajo techo. Cuando no la
utilice, guárdela en la cochera, en el sótano,
etc. El área en donde la guarde deberá estar
bajo llave, fuera del alcance de los niños.
• Cuide BU podadora, Conserve la cuchilla
limpia y afilada para obtener un rendimiento
mejor y más seguro. Siga las instrucciones de
lubricación y cambio de accesorios.
ENSAMBLAJE
CONTENIDO DE LA CAJA
• Podadora (viene con el inserto de recorte
instalado).
• Canal de descarga lateral.
• Bolsa para pasto
• Estructura de la bolsa para pasto.
• Cargador
PARA SACAR LA PODADORA DE SU CAJA
Su podadora se ha ensamblado completamente
en la fábrica, con excepción de la bolsa para
pasto.
PRECAUCION: No levante la podadora
sujetándola del ajuste de altura de
accionamiento con los dedos.
• Quite la estructura de la bolsa para pasto, las
instrucciones de ensamblaje de la bolsa y los
rellenadores de cartón.
• Saque la podadora de la caja y coloque las
cuatro ruedas en el piso.
■ Revise la caja cuidadosamente y asegúrese
que no hay piezas sueltas.
Para desplegar el mango
Levante la sección del mango hasta su posición
y asegúrela apretando las dos perillas.
Consulte la figura a continuación.
ADVERTENCIA: Por su propia seguridad, NO
use esta podadora sin la bolsa para pasto o el
inserto recortadof en posición de operación.
CUCHILLA DE REPUESTO
La cuchilla de repuesto es la parte #33243 y
está a su disposición en las tiendas y centros
de servicio Sears.
24
Page 25

ENSAMBLAJE DE LA BOLSA
PARA PASTO
• Deslice la bolsa para pasto en el armazón.
(Observe la Fig. A.)
• La bolsa para pasto tiene unas presillas cosi
das alrededor de la abertura.
• Ensamble las dos presillas superiores al
armazón, continúe con las dos presillas lat
erales y deje para el final la presilla inferior.
(Observe la Fig. B)
• Consulte la sección "instalación de la bolsa
para pasto" antes de colocarla en la podade
ra.
podadera. Coloque los ganchos de la bolsa
en la podadera en la varilla metálica, bajo la
puerta trasera. (Observe la Fig. B)
♦ Suelte la puerta trasera,
ADVERTENCIA: Nunca opere la podadera a
menos que los ganchos de la bolsa estén cor
rectamente asentados en la podadora y la
puerta de descarga esté firme contra la parte
superior de la bolsa para pasto.
INSTALACION DE LA
BOLSA PARA PASTO
• Por debajo y en medio de los mangos de la
podadera, levante la puerta trasera de
descarga hasta que quede en posición verti
cal y sujétela. (Observe la Fig. A)
• Saque el Inserto de recorte. Consulte la pági
na ?? “Remoción del inserto de recorte”.
• Levante la bolsa para pasto por el mango y a
continuación bájela entre los mangos de la
25
INSTALACION DEL CANAL DE
DESCARGA LATERAL
• Apague la podadora, espere a que la cuchilla
se detenga y desconecte el cable de la toma
de corriente.
• Levante la puerta trasera por entre los man
gos, sujétela con una mano. Asegúrese de
haber retirado el inserto de recorte. Consulte
la página ?? "Remoción del Inserto de
recorte".
• Tome el canal de descarga con la otra mano
y mientras lo inclina hacia abajo, inserte el
gancho en la abertura de descarga de la
podadora. (Observe la Fig. A)
Page 26

• Gire el canal hasta que haga contacto com
pleto con la cubierta, y las costillas Inferiores
queden en los canales de la cubierta (Figura
B.)
• Baje la puerta hasta que descanse sobre el
canal de descarga.
ADVERTENCIA:
• No utilice el canai de descarga si está daña
do.
Por su propia seguridad, NO utilice la
podadora sin que tenga instalada la bolsa
para pasto, el inserto de recorte, o el canal de
descarga en posición de operación.
26
Page 27

CONOZCA SU RODADORA
LEA ESTE MANUAL DEL PROPIETARIO Y US REGLAS DE SEGURIDAD ANTES DE OPERAR
SU RODADORA. Compare las ilustraciones con su podadora para familiarizarse con la localización
de Ipe diferentes controles y ajustes. Conserve este manual para referencias futuras.
Estos símbolos pueden aparecer en su podadora o en la literatura que se proporciona con el pro
ducto. Aprenda y comprenda su significado.
PRECAUCION 0
ADVERTENCIA
PELIGRO, CONSERVE
ALEJADOS MANOS Y PIES
CUMPLE CON LOS REQUERIMIENTOS DE SEGURIDAD CPSC
La podaderas eléctricas rotativas Sears cumplen con los estándares de seguridad del American
National Standards Institute y del U.S. Consumer Product Safely Comission,
ADVERTENCIA: La cuchilla gira cuando el motor está en funcionamiento.
Llave de seguridad (1)
El interruptor de control con presencia del oper
ador consta de Mango en arco (2) y Palanca del
interruptor (3)
Perillas de ajuste del mango (4)
Perillas para guardar el mango (5)
Bolsa para pasto (6)
Liberador del ajuste de altura de corte (7)
Indicador de altura de corte (8)
27
Page 28

CARGA DE LA BATERIA
Aunque la balería de su podadera estaba com
pletamente cargada al dejar la fábrica, es nece
sario recargarla antes de usarla por primera
vez. Esl asegurará que funcione a su máxima
capacidad operativa.
Hay dos luces indicadoras de carga en su
podadera. La luz roja (1) se enciende cuando la
batería está cargando. La luz verde (2) se
enciende cuando la batería está completa
mente cargada. Durante la temporada de poda
do, deje la podadera conectada siempre excep
to cuando la utilice.
Llave de segundad
A fin de evitar el encendido accidental o no
autorizado de su podadera Inalámbrica, se ha
incorporado una llave de seguridad (7) en el
diseño de ésta. La podadora quedará comple
tamente inoperable cuando se quite la llave de
seguridad. La llave de seguridad tiene un orifi
cio en el centro para poder guardarla en un
clavo, fuera del alcance de los niños.
PRECAUCION: Siempre quite la llave de
seguridad de la podadera cuando !a deje desa
tendida, aun pw un perlado corto.
PARA CARGAR LA BATERIA
• Retire la llave de seguridad (7).
• Conecte e! cabe del cargador (3) ai recep
táculo (9) de la podadora. La ciavija del cable
del cargador tiene una pinza (6) que la asegu
ra a la podadora durante la carga para evitar
la remoción accidental.
• Inserté la clavija para 120 volts del cargador a
un contacto de pared.
• La luz roja en la podadora deberá encenderse
Indicándole que la batería se está cargando.
La luz roja se apagará y la verde se encen
derá cuando la carga se haya completado. Le
toma aproximadamente 24 horas cargarse a
una batería totalmente descargada.
• Para obtener el rendimiento óptimo durante la
temporada de podado, conecte la podadora al
cargador siempre que no la utilice.
• Para retirar la clavija de la podadora, oprima
la pinza con firmeza en dirección de la flecha
y tire de la clavija del receptáculo de carga de
la podadora.
AJUSTE DE ALTURA DE LAS RUEDAS
(38 mm A 89 mm [1-1/2" A 3-1/2"])
PRECAUCION: Antes de hacer cualquier
ajuste, libere el interruptor para apagar la
podadora, espera a que se detenga la cuchilla
y quita la llave de seguridad.
• Su podadora cuenta con un sistema de ajuste
de altura de un toque. Este sistema le permite
ajustar la altura de las cuatro ruedas al mismo
tiempo.
• Para subir o bajar la altura de corte, coloque
la palma de su mano en el apoyo (1) y con
sus dedos, oprima hacia arriba en la palanca
(2) y sujete. (Observe la figura A.)
Al mismo tiempo que sujeta la palanca con
los dedos, puede subir o bajar la altura de
■corte. La podadora tiene siete posiciones para
ajustar la altura de !a cuchilla. Consulte la
escala (1) y el indicador (2) en el frente de la
podadora. (Observe la figura B.)
• Cuando haya ajustado la podadora a la altura
que quiera, sujétela en posición oprimiendo la
barra inferior derecha de la podadora con su
mano izquierda. A continuación quite su mano
derecha del asa para dedos para consen/ar
asegurada la altura de corte.
NOTA: Para confirmar que la cubierta esté ase
gurada en alguna de las siete posiciones, pre
siones hacia abajo en el apoyo después de lib
erar la palanca para los dedos.
28
Page 29

AJUSTES AL MANGO
Su podadora cuanta con un sistema que le per
mite ajusta la altura del mango. Para ajustar la
posición del mango para acomodarse a sus
necesidades, utilice el siguiente procedimiento:
• Quite las dos perillas (1) de la parte media de
las barras del mango y saque los dos tornillos
(2).
• Deslice la parte superior del mango hacia
cualquiera de las 3 posiciones de ajuste (3),
alineando los orificios de las partes Inferior y
superior del mango.
• Inserte los tomillos e Instale las perillas, apre
tando con firmeza. Las perillas deben quedar
siempre en las partee exteriores del mango
para evitar que Interfieran con la puerta
trasera y con la bolsa para pasto.
PARA APAGAR LA PODADORA
Para apagar la podadora, suelte completa
mente el interruptor de control en presencia del
operador.
PARA ENCENDER LA PODADORA
mente en el interior de la carcaza. La podado
ra es operaclonal ahora y puede encenderse
activando la palanca del interruptor.
PRECAUCION: Nunca intente anular la
operación de este interruptor ni de ¡a llave de
seguridad.
INTERRUPTOR DE CONTROL CON
PRESENCIA DEL OPERADOR
PRECAUCION: Los reglamentos federales
requieren de la instalación de un control para el
motor en la podadora, a fin de minimizar el ries
go de lesiones por contacto con la cuchilla. Por
NINGUNA circunstancia trate de anular el fun
cionamiento del control de operación. La
cuchilla gira cuando ei motor está en fun
cionamiento.
Para operar el interruptor, tome el mango en
arco (1) y tire de éste hacia la barra del mango
(2). Empuje con firmeza la palanca del interrup
tor (3) hacia adelante hasta que asiente en la
posición de "encendido". Para apagar la
podadora, simplemente suelte el mango en
arco. '
MEDIDOR DE BATERIA
Su podadora inalámbrica tiene un medidor para
proporcionarle información sobre el estado de
carga de su batería. Al operar la podadora, el
medidor toma lectura y despliega la condición
de la batería de la siguiente manera:
Asegúrese que el cable del cargador esté
desconectado da la podadora.
Inserte la llave de seguridad en la carcaza de
la cubierta del motor y empuje hacía abajo,
huta que la llave haya asantado completa
1 m n
Carga alta
2
Carga Baja
29
Page 30

• Cuando la aguja apunte a la zona verde (1),
la batería está en condición de carga alta.
• Cuando la aguja apunte a la zona roja (2). la
batería estará descargada.
• Antes de utilizar su podadera nueva por vez
primera, le recomendamos cargar la unidad
durante toda ia noche para asegurarse que la
batería esté compielamente cargada. Cuando
encienda la podadora, el indicador debe
apuntar a la zona verde, señalando que la
bitería cuanta con carga completa,
• Al usar la podadora, notará que la aguja del
medidor bajará lentamente al descargarse la
batería.
• Al podar el pasto con su podadora inalámbri
ca, será normal que la aguja del medidor fluc
túe ya que las condiciones de corte cambian.
• Cuando la aguja del medidor apunte consis
tentemente a la zona roja, su batería estará
descargada, aún cuando la podadora sea
capaz de podar. Si continúa operando ia
podadora con la batería en estas condiciones,
reducirá la vida útil y el rendimiento de ésta.
Las siguientes sugerencias le ayudaran a
obtener el máximo tiempo de operación con
su podadora inalámbrica:
• Baje la velocidad en áreas en las que ei
césped sea especialmente largo o grueso.
• Cuando daebroce, evite cortar más da 37 mm
(1-1/2'*) de la longitud en una sola pasada.
• Evite podar ouando el césped esté mojado
por la lluvia o por la brisa.
• Corte el césped frecuentemente, especial
mente durante los periodos de gran crec
imiento.
NOTA: Se recomienda recargar la podadora
después de usarla, sin importar la posición de
la aguja del medidor. La carga frecuente no
dañara su batería, y le asegurara que la sigu
iente ocasión que desee usar la podadora la
batería esté completamente cargada,
ESCUDO DE SEGURIDAD Y
PUERTA TRASERA
Este escudo de seguridad (1) está diseñado
para minimizar el lanzamiento de piedras u
otros objetos por la cuchilla de la podadora
hacia atrás por debajo de la cubierta. El escu
do, junto con la puiiía traiera (2), mlnimiian la
poelbllldad de contacto accidental del píe con la
cuchilla, NO opera la podadora iln que el escu
do de seguridad y la puerta trasera estén en su
sitio.
ADVERTENCIA:
• Por su propia seguridad, NO utilice esta
podadora sin que la bolsa para pasto o el
inserto para desbrozar estén en posición de
operación.
No opere la podadora si la puerta trasera no
se encuentra bajo presión del resorte. Lleve
su podadora al centro de servicio más cer
cano para que la reparen.
RECOMENDACIONES DE PODADO
• Pode en sentido perpendicular a las pendi
entes, nunca hacia arriba y hacia abajo.
Tenga cuidado extremo cuando cambie de
dirección en las pendientes. No potte pendi
entes demasiado pronunciadas. Siempre
apoye bien los pies.
• Siempre libere el Interruptor para APAGAR la
podadera cuando atraviese zonas con grava
(la cuchilla puede arrojar piedras).
• Coloque la podadora en la posición de corte
más aita cuando pode en tierra o donde haya
hierbas altas.
• Apague la podadora de cuando en cuando y
espere a que la cuchilla se detenga por com
pleto. Desconecte el cordón eléctrico y gire la
podadora de lado. Elimine el pasto acumula
do en la zona de la cuchilla con un objeto
similar a una vara. Tenga cuidado con los filos
de la cuchilla.
• Si utiliza una bolsa para pasto durante la tem
porada de crecimiento rápido, el pasto puede
tender a tapar el canal de descarga. Apague
8l Interruptor y deioontots el cordón ilóotrico.
Quite BÍ depósito de pasto y haga qua el
pasto se vaya hada el extremo de la bolsa.
Limpie también el pasto y cualquier otro dese
cho que se haya acumulado alrededor del
canal de descarga. Vuelva a colocar el
depósito de pasto. Limpie a menudo cuando
pode pasto húmedo, en primavera.
• SI ia podadora vibra anormattnente,
APAGUELA y desconecte el cordón eléctrico.
Busque la causa inmediatamente. Las vibra-
30
Page 31

ciorfés son aviso de problemas. No opere la
podadera hasta que le hayan efectuado una
revisión de servicio.
• SIEMPRE APAGUE y desconecte la podadera
cuando la deje desatendida, aun cuando sea
por un periodo corto,
RECORTE
• Su nueva podadera está diseñada para re
cortar los desechos del pastp varias veces y
reducir su tamaño, para que, al caer al
césped se disperse y no se note.,El pasto se
degradará rápidamente y proporcionará nutri
entes al césped.
• Su podadera viene de fábrica con el inserto
recortador instalado.
RECOMENDACIONES PARA
PODADO CON RECORTE
• Para obtener mejores resultados, conserve la
cubierta de la podadera libre de pasto acumu
lado y otros desechos. Limpíela después de
usarla cada vez. Vea LIMPIEZA en la sección
de mantenimiento de este manual.
• Evite cortar el césped cuando esté húmedo.
El pasto mojado tiende a agruparse y esto
interfiere con la acción de reoirte. El mejor
momento para podar su césped es poco
después del mediodía. A esta hora, el pasto
estará completamente seco, y el área recién
podada no estará expuesta a la luz directa del
sol.
• Para obtener mejores resultados, ajuste la
altura de corte de la podadera para que
recorte únicamente la tercera parte superior
de las hojas de pasto. Si el césped está
demasiado crecido, será necesario aumentar
la altura de corte para reducir el efecto de
empuje y disminuir la sobrecarga del motor.
Para podados extremadamente pesados haga
corles angostos y haga movimientos lentos.
• Ciertos tipos y algunas condiciones de pasto
pueden requerir un segundo podado para dis
imular las irregularidades. Cuando haga e!
segundo corte, realice el movimiento en forma
perpendicular al primero. Si está podando en
una pendiente, no realice el segundo corte en
forma perpendicular si esto lo obliga cortar
paralelamente a la colina.
• Cambie el patrón de corte de semana a sem
ana. Pode de norte a sur una semana y de
este a oeste la siguiente, esto le ayudará a
evitar que el corte quede disparejo.
REMOCION DEL INSERTO
DE RECORTE
• Apague la podadera, espere a que la cuchilla
se detenga y desconéctela.
• Levante la puerta trasera y sujétela.
• Coloque su mano en la abertura, levante y
tire completamente del Inserto recortador.
• La puerta trasera para descarga funciona con
un resorte. Cuando libere el resorte la puerta
regresará a la posición cerrada.
INSTALACION DEL INSERTO
RECORTADOR
• Apague la portadora.
• Levante la puerta trasera y deslice el inserto
recortador por la abertura de descarga hasta
que haga contacto firme con la cubierta.
• Suelte la puerta trasera.
REMOCION DE LA CUCHILLA
• ¡Libere la palanca del Interruptor para apagar
la podadera, espera a que la cuchilla se
detenga y desconecte la podadera!
• Corte una pieza de madera de 10 cm de
ancho por 60 cm de longitud para evitar que
la cuchilla gire cuancto quite la tuerca.
• Emplee guantes. Coloque la tabla y quite la
tuerca como se ilustra.
• Quite el la roldana cuadrada de acero, el ais
lador de plástico y la cuchilla. ’
31
Page 32

CAMBIO DE LA CUCHILLA
• Coloque la cuchilla en el eje de manera que
los bordes queden paralelos a los lados
planos del eje. Asegúrese de colocar la
cuchilla de manera que los filos queden de
cara al suelo aJ funcionar la podadera.
• Coloque el aislador de plástico en el eje da
manera que los dos bordes en relieve de la
roldana queden sobre los bordes de la
cuchilla.
• Coloque la roldana cuadrada de acero en el
eje de manera que los lados rectos de la
roldana queden paralelos a los lados planos
del eje.
■ Coloque la tuerca de la cuchilla en el eje.
Asegúrese que todas las partes estén alin
eadas. Coloque la madera de manera que
evite que la flecha gire y apriete la tuerca a
20-30 ft. Ibs.
• Conserve la cuchilla afilada para obtener
mejor rendimiento de la podadera. Una
cuchilla desafilada no corta el pasto en forma
uniforme.
• Utilice siempre protección para los ojos.
• Afilar la cuchilla dos veces durante la tenpo-
rada de podado es suficiente bajo circunstan
cias normales. La arena desafila la cuchBa
rápidamente. Si su suelo tiene tierra arenosa,
afile la cuchilla con mayor frecuencia.
• Reemplace las cuchillas dañadas o dobladas
inmediatamente.
Para afilar la cuchilla:
•.Asegúrese que la cuchilla está balanceada.
• Afile la cuchilla en el ángulo de corte origmal.
• Afile los bordes cortantes en ambos extremos
de la cuchilla, removiendo la misma cantidad
de materíal de ambos.
• Asegure la cuchilla en una prenia como le
Ilustra. .
• Utilice gafas de seguridad y tenga cuidado de
no cortarse.
• Afile cuidadosamente los bordes cortantes de
la cuchilla con una lima de dientes finos o con
una piedra de afilar.
• Verifique el balance de la cuchilla. Vea las
Instrucciones para balancear la cuchilla.
• Vuelva a colocar la cuchilla en la podadera y
apriete con firmeza.
32
Page 33

BALANCEO DE LA CUCHILLA
• Verifique el balance de la cuchilla colocando
la perforación central sobre un clavo o sobre
el vástago de un destornillador sujetado en
una prensa. Si cualquiera de los extremos
gira hacia abajo, afile ese extremo. La
cuchilla está balanceada correctamente cuan
do ninguno de los extremos cae.
RECOMENDACIONES
GENERALES DE PODADO
• El césped debe podarse primero en !a pri
mavera cuando el pasto tenga de 62 a 75 mm
de longitud. Podar antes de tiempo restringe
el sistema de raíces que se renueva cada pri
mavera. El pasto nuevo debe podarse cuando
tenga alrededor de 62 mm de altura.
• No corte demasiada altura del pasto de una
sola pasada... nunca más de 1/3 de la altura
de la hoja. Cortar demasiado impactará las
hojas de pasto sensibles, ocasionando un sis
tema de raíces débil y dificultando el acceso
del pasto al agua en el suelo.
• Los expertos en jardinería están de acuerdo
al decir que el corte de una parte grande de
las hojas de pasto es responsable de muchas
de las dificultadas expaiimantadas con
muchos céspedes. La profundidad y la fuerza
de las raíces del pasto es casi exactamente
proporcional a su crecimiento. Las hojas de
los céspedes maduros se ven gravemente
lesionadas cuando se podan a menos de 37
mm, y se prefiere una longitud de 37 a 50 mm
en céspedes grandes.
■ Pode su césped cuando esté seco para evitar
la formación de bolas de pasto húmedo. Si
puede elegir, las últimas horas de la tarde son
el tiempo ideal para podar, no solamente
porque el pasto estará seco, sino porque la
zona recién descubierta de las hojas después
de ser cortadas no quedaran expuestas a luz
intensa del sol.
• Conserve la cuchilla afilada para obtener un
corte limpio. Esto mejorará el rendimiento de
la podadora y la apariencia da su césped.
Una cuchilla sin filo arruina las puntas de las
hojas de pasto. Esto va contra el crecimiento
saludable de su césped y aumenta la posibili
dad de plagas. SI las puntas de las hojas de
pasto están quemadas, tendrán un color ter
roso, y le darán a su césped una apariencia
poco saludable. Una cuchilla sin filo también
podrán tirar hacia arriba los germinados.
• Trate de podar su césped a la misma altura
(consistentemente). Aún cuando cambie la
altura de corte en temporadas cambiantes,
una altura de corte consistente produce un
césped más saludable y con mejor apariencia
con generaímente menos plantas. Pode fre
cuentemente durante los periodos de crec
imiento rápido. El corte frecuente asegura que
la parte inferior del pasto, menos atractiva, no
se verá.
• Si su césped ha crecido demasiado (las vaca
ciones, por ejemplo, pueden interrumpir su
calendario de podado) corte a una altura una
o dos posiciones más altas que to normal.
Una segunda pasada a la altura de corte “nor
mal'’ unos cuantos días después devolverán
su césped dentro del calendario.
• Durante.la primavera y el otoño, (o después
de una interrupción a su caJendark) de poda
do) el pasto estará más grueso y más largo.
Si el motor baja su velocidad contìnuamente
durante el podado, trate ajustando las ruedas
en una posición más alta. La cai^a excesiva
al motor puede ocasionar un podado dispare
jo, y que la batería de su podadora se descar
gue, o que el interruptor de círcuilo se dis
pare, deteniendo al motor.
• Tres buenas ideas para mejorar la apariencia
de su césped; Varíe la direoiión de podado
con frecuencia; pode horizontalmente en las
laderas de las pendientes (esto ^ también
una práctica de seguridad); y no envide hacer
la segunda pasada en torma perpendicular
(cuando lo haga).
• Siempre pode el césped de manera que los
recortes se descarguen en el césped podado.
Esto conservará su césped con una aparien
cia fresca al evitar que los recortes se acu
mulen, los que eventualmente se pondrán
cafés y se verán mal. Este métocto también
preserva la carga de su batería, asegurando
que usted obtenga el máximo de su podadora
inalámbrica Craftsman.
• Durante las estaciones de primavera y otoño
en que las hojas de pasto son más gruesa y
largas, usted puede usar su podadora sin que
la batería esté completamente cargada. (Por
ejemplo, cuando la luz verde esté encendida).
Esto le permitirá realizar pequeñas tareas de
podado, pero no le recomendamos hacer esto
con frecuencia, la batería y la podadora se
desempeñan mucho mejor con carga comple
ta.
33
Page 34

MANTENIMIENTO
CUADRO DE RESPONSABILIDADES DEL USUARIO
ITINERARIO DE MANTENIMIENTO /#/^/ / /#/
LLENE LAS FECHAS EN /^ /S" / £ /^ /
QUE EFECTUA EL /^ /^ /
SERVICIO REQUUR / Ì / W / / i / FECHAS DE SERVICIO
Revisión de lomillos flojos
Limpieza de la podadera
Revisar/Afilar/Cambiar cuchilla
Recarga de la batería
✓
RECOMENDACIONES GENERALES
• Observe siempre las reglas de seguridad
cuando efectúe cualquier tipo de manten
imiento.
• La garantía de esta podadera no cubre partes
que hayan sufrido maltrato o abuso por parte
del operador. Para recibir el valor completo de
la garantía, el operador debe dar manten
imiento a la podadera como se indica en este
manual.
• Revise el desgaste en la cuchilla una vez al año.
• Siga el itinerario de mantenimiento de este manual.
Antes de cada uso:
• Revise en busca de tornillos y tuercas flojos.
LUBRICACION
No se requiere lubricación.
IMPORTANTE: No aceite ni engrase los
baleros de tas ruedas de plástico. Los lubri
cantes viscosos atraen el polvo y la mugre y
acortarán la vida de los baleros auto lubri
cantes. Si usted piensa que deben ser lubrica
dos, utilice únicamente lubricante de grafito pul
verizado,
LLANTAS
• Conserve las llantas libres de gasolina, aceite
o pesticidas que puedan dañar el hule.
✓
✓
✓
• Evite baches, piedras, agujeros profundos,
objetos afilados y otros peligros que puedan
dañar las llantas.
✓
✓
✓
CUIDADO DE LA CUCHILLA
Para obtener mejores resultados, la cuchilla de
la podadera debe estar afilada. Reemplace las
cuchillas dobladas o dañadas.
LIMPIEZA
• [APAGUE la podadera, permita que la cuchilla se detenga y retira la llave da aeguridadl
• Utilice únicamente jabón suave y un trapo
húmedo para limpiar la podadera. Limpia las
ranuras en donde se hayan acumulado dese-
.chos en la parte interior de la cubierta.
Después de varfos usos, verifique que todos
los tornillos estén apretados.
EVITE LA CORROSION
• Los fertilizantes y otros productos químicos
para jardinería contienen agentes que aceieran la corrosión de los metales. Si poda en
áreas en donde se han utilizado fertilizantes u
otros químicos, la podadera deberá ser
limpiada Inmedlatemente.
• 6NO vacíe o rocié agua sobre la podadera
para limpiarla.
• No guarde la herramienta en donde hay fertil
izantes o agenta químicos ni cerca de ellos,
pues esto causa corrosión acelerada.
ESPECIFICACIONES DEL PRODUCTO
NUMERO DE MODELO
ALIMENTACION
VELOCIDAD DE LA CUCHILLA
CORTE
PAR DEL TORNILLO DE LA CUCHILLA
900.370520
24 VCD, 17A/H
3600 RPM
482,6 mm (19”)
20-30 FT.LBS.
34
Page 35

SERVICIO Y AJUSTES
PRECAUCION: Antes de realizar cualquier ser
vicio o ajustes:
• Libere el interruptor de control en presencia
del operador y pare el motor.
• Asegúrese que la cuchilla y todas las piezas
móviles se hayan detenido.
• Retire la llave de seguridad. '
BATERIA ,
• La batería de su podadora es una batería
recargable sellada de ácido de plomo de 24
volts. Para obtener la máxima vida útil de la
batería, le recomendamos lo siguiente:
• Cargue la batería completamente antes de
utilizarla por primera vez,
• Recargue la batería inmediatamente después
de cada uso.
• Recargue la batería continuamente cuando la
podadora no se use.
• Siempre recargue la batería bajo techo, en un
sitio seco y protegido.
• NO cargue ia batería en temperaturas
extremadamente altas o bajas. Cargue la
batería en un sitio en el que la temperatura
sea mayor a 5°C (41 °F) y menor a 40"C
(104”F).
DEFLECTOR TRASERO
El deflector trasero, Instalado entre las ruedas
posteriores de su podadora, se proporciona
para minimizar la posibilidad de que salgan
objetos despedidos por la parte trasera de la
podadora hacia el operador. Si el dellector se
daña, debe ser reemplazado.
CAMBIO DE LA BATERIA
SI la batería recibe el mantenimiento adecuado,
la vida útil esperada es de 4 a 7 años. Si se
llega a requerir cambiarla, lleve su podadora a
un centro de servicio Sears para que la reem-
plæen.
AJUSTE DEL MANGO
Para ajustar el mango consulte "Ajustes al
mango" en la sección de operación de este
manual.
PARA AJUSTAR LA ALTURA DE CORTE
Para ajustar la altura de corte, consulte ‘Ajuste
de la altura de corte” en la sección de
operación de este manual.
ALMACENAJE
Prepare su podadora para almacenarla Inmedi
atamente al término de la temporada si no se
usará durante 30 días o más.
PODADORA
Cuando la podadora deba guardarse por cierto
tiempo, limpíela a conciencia, elimine toda la
mugre, grasa, hojas, etc. Guárdela en un lugar
limpio y seco.
• Limpie la podadora completa (Véase
“LIMPIEZA” en la sección de mantenimiento
de este тш1иа1).
• Asegúrese que todos los tornillos, tuercas y
pijas estén apretados. Inspeccione las piezas
móviles en busca de daños, rupturas y des
gaste. Cambie en caso necesario.
BATERIA
• Recargue completamente la batería. No
guarde la podadora con la balería descarga
da. La batería dejará de funcionar rápida
mente en muy poco tiempo si guarda la
podadora con la batería descargada. Le
recomendamos cargar la batería continua
mente cuando la podadora esté almacenada
y fuera de temporada.
MANGO
Usted puede plegar su podadora para guardar
la.
• Asegúrese que el cable esté desconectado.
• Afloje ambas perillas del mango.
• Doble cuidadosamente el mango hacia
delante sobre la podadora. ‘
PRECAUCION: NO machuque el cable entre
el mango y la cubierta de la podadora.
35
Page 36

GUIA PARA LA SOLUCION DE PROBLEMAS FRECUENTES
PROBLEMA SOLUCION
La podadera rra funciona cuando el
interruptor está activado,
El motor se detiene durante el podado.
La podadera funciona pero no lo hace
de manera satisfactoria, o no poda su
prado por completo.
1. Asegúrese de haber insertado la llave de seguri
dad y que esté bien asentada.
2. Quite la llave de seguridad, voltee de cabeza la
podadera y revise que la cuchilla esté libre para
girar.
3. ¿Se ha cargado completamente la batería?
Conecte el cargador y espere a que parezca la
luz verde.
1. Quite ia llave de seguridad, voltee de cabeza la
podadera y revise que ia cuchilla esté libre para
girar.
2. Eleve la altura de corte de las ruedas a la posición
más alta y encienda la podadera.
3. ¿Se ha cargado completamente la batería?
Conecte el cargador y espere a que aparezca la
luz verde.
4. Se puede haber disparado el interruptor do cir
cuito. El tiempo de restablecimiento puede ser
hasta de 1 minuto. Baje la velocidad o eleve la
altura de corte.
1. ¿Se ha cargado completamente la batería?
Conecte el cargador y espere a que aparezca la
luz verde.
2. Quite la llave de seguridad . Gire la podadera de
cabeza y revise:
‘Que la cucNlla tenga filo
‘Que la cubierta y el canal de descarga no e^én
atascados
3. La altura de las ruedas puede estar muy b^a para
las condicionas dsl césped. Eleve la altura d corte.
Es muy difícil «mpular la podadera, 1. Suba la altura de corte pare reducir la fricción de
la cubierta con el césped. Verifique que tod^ las
ruedas giren libremente.
La podadera hace mucho ruido y vibra.
1. Quite la llave de seguridad. Coloque la podadera
de lado y revise la cuchilla para asegurarse que
no se ha dañado ni se ha doblado. Si la cuchilla
se ha dañado, reemplácela con una cuchilla de
repuesto Craftsman. Si la parte inferior de la
cubierta se ha dañado envfe la podadera a un
centro de servicio Sears.
2. Si no hay daños visibles en la cuchilla y la
podadera aún vibra, envfe ia podadera a un centro
de servicio Sears.
36
Page 37

37
Page 38

38
Page 39

39
Page 40

For in-home major brand repair service:
Call 24 hours a day, 7 days a week
1-800-4-MY-HOME®“
Para pedir servicio de reparación a domicilio -1-800-676-5811
In Canada for all your service and parts needs call
Au Canada pour tout le service ou les pièces
For the repair or replacement parts you need:
Call 7 am - 7 pm, 7 days a week
(1 aoo-
469-4663
)
1-800-665-4455
1-800-366-PART (1-800-366-7278)
Para ordenar piezas con entrega a domicilio -1-800-659-7084
For the location of a Sears Parts and Repair Center in your area:
Call 24 hours a day, 7 days a week
1-800-488-1222
For information on purchasing a Sears Maintenance Agreement
or to inquire about an existing Agreement:
Call 9 am - 5 pm, Monday - Saturday
1-800-827-6655
The Service Side of Sears’
Part No. 264774-01
 Loading...