


Instruction Manual
CRRFTSMRH
3" X 21"
BELT SANDER
Model 900.11722
• Safety
-_ WARNING:
Before using this product,
read this manual and follow
all its Safety Rules and
Operating Instructions.
Sears, Roebuck and Co., Hoffman Estates, IL 60179 USA
www.sears,com/craftsman
Form No. 478940-00 APR-05 Printed in China
• Operation
• Maintenance
• Parts List
• Espa_ol Pag. 11

_'.,] kVlVl*!.-t.-_.!_i ik'd
ONE YEAR FULL WARRANTY ON CRAFTSMAN TOOL
If this Craftsman tool fails to give complete satisfaction within one year from date of
)urchase, RETURN IT TO THE NEAREST SEARS STORE IN THE UNITED STATES,
and Sears will replace it, free of charge.
If this Craftsman tool is used for commercial or rental purposes, this warranty applies
for only 90 days from the date of purchase.
This warranty gives you specific legal rights, and you may also have other rights which
vary from state to state.
SEARS, ROEBUCK AND CO., DEPT. 817WA, HOFFMAN ESTATES, IL 60179
_,WARNING! Read and understand all
instructions. Failure to follow all instructions
listed below may result in electric shock,
fire and/or serious personal injury.
SAVE THESE INSTRUCTIONS
Work Area
• Keep your work area clean and well lit.
Cluttered benches and dark areas invite
accidents.
• Do not operate power tools in
explosive atmospheres, such as in the
presence of flammable liquids, gases,
or dust. Power tools create sparks which
may ignite the dust or fumes. Use in well
ventilated areas only.
• Keep bystanders, children, and visitors
away while operating a power tool.
Distractions can cause you to lose control.
Electrical Safety
• Double insulated tools are equipped
with a polarized plug (one blade is
wider than the other.) This plug will fit
in a polarized outlet only one way. If
the plug does not fit fully in the outlet,
reverse the plug. If it still does not fit,
contact a qualified electrician to install
a polarized outlet. Do not change the
plug in any way. Double Insulation []
eliminates the need for the three wire
grounded power cord and grounded
power supply system.
• Avoid body contact with grounded
surfaces such as pipes, radiators,
ranges and refrigerators. There is an
increased risk of electric shock if your
body is grounded.
• Don't expose power tools to rain or
wet conditions. Water entering a power
tool will increase the risk of electric shock.
• Do not abuse the cord. Never use the
cord to carry the tools or pull the plug
from an outlet. Keep cord away from
heat, oil, sharp edges or moving parts.
Replace damaged cords immediately.
Damaged cords increase the risk of
electric shock.
• When operating a power tool outside,
use an outdoor extension cord marked
"W-A" or "W." These cords are rated for
outdoor use and reduce the risk of electric
shock.
Personal Safety
• Stay alert, watch what you are doing
and use common sense when
operating a power tool. Do not use tool
while tired or under the influence of
drugs, alcohol, or medication. A
moment of inattention while operating
power tools may result in serious personal
injury,
• Dress properly. Do not wear loose
clothing or jewelry. Contain long hair.
Keep your hair, clothing, and gloves
away from moving parts. Loose clothes,
jewelry, or long hair can be caught in
moving parts. Air vents cover moving
parts and should be avoided.
• Avoid accidental starting. Be sure
switch is off before plugging in.
Carrying tools with your finger on the
switch or plugging in tools that have the
switch on invites accidents.
• Remove adjusting keys or wrenches
before turning the tool on. A wrench or
a key that is left attached to a rotating part
of the tool may result in personal injury.
• Do not overreach. Keep proper footing
and balance at all times. Proper footing
andbalanceenablesbettercontrolofthe
toolinunexpectedsituations.
• Use safety equipment. Always wear
eye protection. Dust mask, non-skid
safety shoes, hard hat, or hearing
protection must be used for appropriate
conditions.
Tool Use and Care
• Use clamps or other practical way to
secure and support the workpiece to a
stable platform. Holding the work by
hand or against your body is unstable and
may lead to loss of control.
• Do not force tool. Use the correct tool
for your application. The correct tool will
do the job better and safer at the rate for
which it is designed.
• Do not use tool if switch does not turn
it on or off. Any tool that cannot be
controlled with the switch is dangerous
and must be repaired.
• Disconnect the plug from the power
source before making any
adjustments, changing accessories, or
storing the tool. Such preventive safety
measures reduce the risk of starting the
tool accidentally.
• Store idle tools out of reach of children
and other untrained persons. Tools are
dangerous in the hands of untrained
users.
• Maintain tools with care. Keep cutting
tools sharp and clean. Properly
maintained tools, with sharp cutting
edges are less likely to bind and are
easier to control.
• Check for misalignment or binding of
moving parts, breakage of parts, and
any other condition that may affect the
tools operation. If damaged, have the
tool serviced before using. Many
accidents are caused by poorly
maintained tools.
• Use only accessories that are
recommended by the manufacturer for
your model. Accessories that may be
suitable for one tool, may become
hazardous when used on another tool.
• Use only accessories recommended
for this tool that are sold by Sears or a
Craftsman outlet. Use of any
accessories purchased elsewhere may
be hazardous, and will also void your
warranty.
Service
• Tool service must be performed only by
qualified repair personnel. Service or
maintenance performed by unqualified
personnel could result in a risk of injury.
• When servicing a tool, use only
identical replacement parts. Follow
instructions in the Maintenance section
of this manual. Use of unauthorized parts
or failure to follow Maintenance
Instructions may create a risk of electric
shock or injury.
_ecific Safety Rules
WARNING: Some dust created by
power sanding, sawing, grinding,
drilling, and other construction
activities contains chemicals known to
cause cancer, birth defects or other
reproductive harm. Some examples of
these chemicals are:
lead from lead-based paints,
crystalline silica from bricks and
cement and other masonry products, and
arsenic and chromium from
chemically-treated lumber. (CCA)
Your risk from these exposures varies,
depending on how often you do this type
of work. To reduce your exposure to
these chemicals: work in a well
ventilated area, and work with approved
safety equipment, such as those dust
masks that are specially designed to filter
out microscopic particles.
• Avoid prolonged contact with dust
from power sanding, sawing,
grinding, drilling, and other
construction activities. Wear
protective clothing and wash
exposed areas with soap and water.
Allowing dust to get into your mouth,
eyes, or lay on the skin may promote
absorption of harmful chemicals.
-_ WARNING: Use of this tool can
generate and/or disburse dust, which
may cause serious and permanent
respiratory or other injury. Always use
NIOSH/OSHA approved respiratory
protection appropriate for the dust
exposure. Direct particles away from face
and body.
_, CAUTION: Wear appropriate hearing
protection during use. Under some
conditions and duration of use, noise from
this product may contribute to hearing
loss.
• Thelabelonyourtoolmayincludethe
followingsymbols.
V..............volts
A..............amperes
Hz............hertz
W............watts
min..........minutes
"_ ..........alternatingcurrent
............directcurrent
no............noloadspeed
[] ............ClassIIConstruction
.../min ...... revolutions or reciprocation
per minute
(_'............ earthing terminal
................ safety alert symbol
_, Safety Warnings and Instructions:
Sanders
• ALWAYS WEAR EYE and respiratory
PROTECTION.
• Clean your tool out periodically.
• ,Other Important Safety
Warnings and Instructions
Sanding Lead Base Paint
Sanding of lead based paint is NOT
RECOMMENDED due to the difficulty
of controlling the contaminated dust.
The greatest danger of lead poisoning
is to children and pregnant women.
Since it is difficult to identify whether
or not a paint contains lead without a
chemical analysis, we recommend the
following precautions when sanding
any paint:
Personal Safety
• No children or pregnant women should
enter the work area where the paint
sanding is being done until all clean up is
completed.
• A dust mask or respirator should be worn
by all persons entering the work area.
The filter should be replaced daily or
whenever the wearer has difficulty
breathing.
NOTE: Only those dust masks suitable
for working with lead paint dust and
fumes should be used. Ordinary painting
masks do not offer this protection. See
your hardware dealer for the proper
(NIOSH approved) mask.
• NO EATING, DRINKING or SMOKING
should be done in the work area to
prevent ingesting contaminated paint
particles. Workers should wash and clean
up BEFORE eating, drinking or smoking.
Articles of food, drink, or smoking should
not be left in the work area where dust
would settle on them.
Environmental Safety
• Paint should be removed in such a
manner as to minimize the amount of
dust generated.
• Areas where paint removal is occurring
should be sealed with plastic sheeting of
4 mils thickness.
• Sanding should be done in a manner to
reduce tracking of paint dust outside the
work area.
Cleaning And Disposal
• All surfaces in the work area should be
vacuumed and thoroughly cleaned daily
for the duration of the sanding project.
Vacuum filter bags should be changed
frequently.
• Plastic drop cloths should be gathered up
and disposed of along with any dust
chips or other removal debris. They
should be placed in sealed refuse
receptacles and disposed of through
regular trash pick-up procedures. During
clean up, children and pregnant women
should be kept away from the immediate
work area.
• All toys, washable furniture and utensils
used by children should be washed
thoroughly before being used again.
Motor
Be sure your power supply agrees with
nameplate marking. 120 Volts AC only
means your tool will operate on standard
60 Hz household power. Do not operate
AC tools on DC. A rating of 120 volts
AC/DC means that your tool will operate
on standard 60 Hz AC or DC power. This
information is printed on the nameplate.
Lower voltage will cause loss of power
and can result in over-heating. All
Craftsman tools are factory-tested; if this
tool does not operate, check the power
supply.
Extension Cords
Make sure the extension cord is in good
condition before using. Always use the
proper size extension cord with the tool -
that is, proper wire size for various lengths
of cord and heavy enough to carry the
current the tool will draw. Use of an
undersized cord will cause a drop in line
voltage resulting in loss of power and
overheating. For proper size cords see
chart below.
Minimum Gage for Extension Cords (AWG)
120 VAC Tools
Total Cord Length 0-25 26-50 51-100 105-150
Amp Rating AWG AWG AWG AWG
More than 0 18 16 16 14
Not More than 6
More than 6 18 16 14 12
Not More than 10
More than 10 16 16 14 12
Not more than 12
More than 12 14 12 Not
Not more than 16 Recommended
r:! I]f[llJ_"}l i krj1:1_i Lr,,._
WARNING: To prevent accidental
operation, turn off and unplug sander
before performing the following
operations. Failure to do this could result
in serious personal injury.
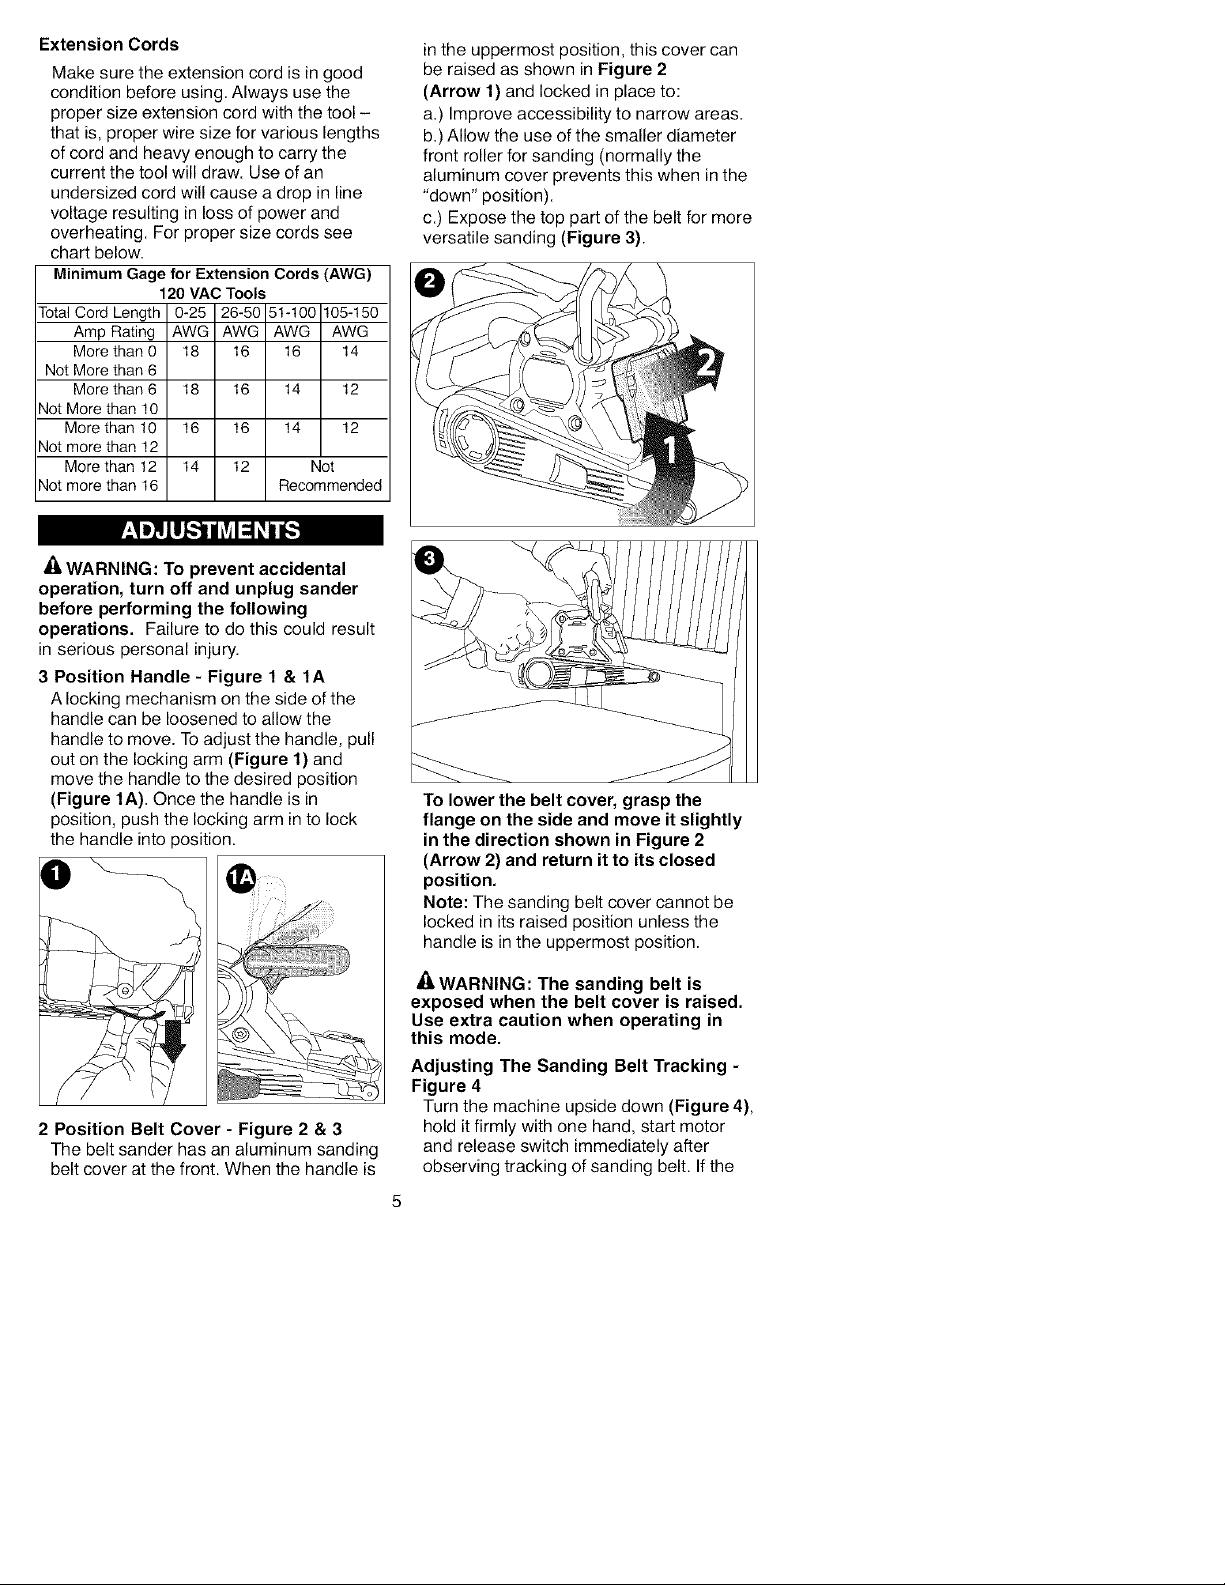
3 Position Handle - Figure 1 & 1A
A locking mechanism on the side of the
handle can be loosened to allow the
handle to move. Toadjust the handle, pull
out on the locking arm (Figure 1) and
move the handle to the desired position
(Figure 1A). Once the handle is in
position, push the locking arm into lock
the handle into position.
in the uppermost position, this cover can
be raised as shown in Figure 2
(Arrow 1)and locked in place to:
a.) Improve accessibility to narrow areas.
b.) Allow the use of the smaller diameter
front roller for sanding (normally the
aluminum cover prevents this when in the
"down" position).
c.) Expose the top part of the belt for more
versatile sanding (Figure 3).
To lower the belt cover, grasp the
flange on the side and move it slightly
in the direction shown in Figure 2
(Arrow 2) and return it to its closed
position.
Note: The sanding belt cover cannot be
locked in its raised position unless the
handle is in the uppermost position.
2 Position Belt Cover - Figure 2 & 3
The belt sander has an aluminum sanding
belt cover at the front. When the handle is
=4,WARNING: The sanding belt is
exposed when the belt cover is raised.
Use extra caution when operating in
this mode.
Adjusting The Sanding Belt Tracking -
Figure 4
Turn the machine upside down (Figure 4),
hold it firmly with one hand, start motor
and release switch immediately after
observing tracking of sanding belt. Ifthe
sandingbeltrunsoutward,turnthe
trackingadjustmentknobclockwiseto
correct.Ifbeltrunsinwardturnadjustment
knobcounterclockwise.
Beltlifewillbegreatlyincreasedby
keepingthetrackingadjustmentset
properly.Topreventthesandingbeltfrom
rubbingagainstthesanderhousing,keep
theedgeofthebeltabout7/64"(2.7mm)
to13/64"(5.1mm)fromthehousingas
showninfigure4.
-_-dgeofhousingEdgeofbelt]
about
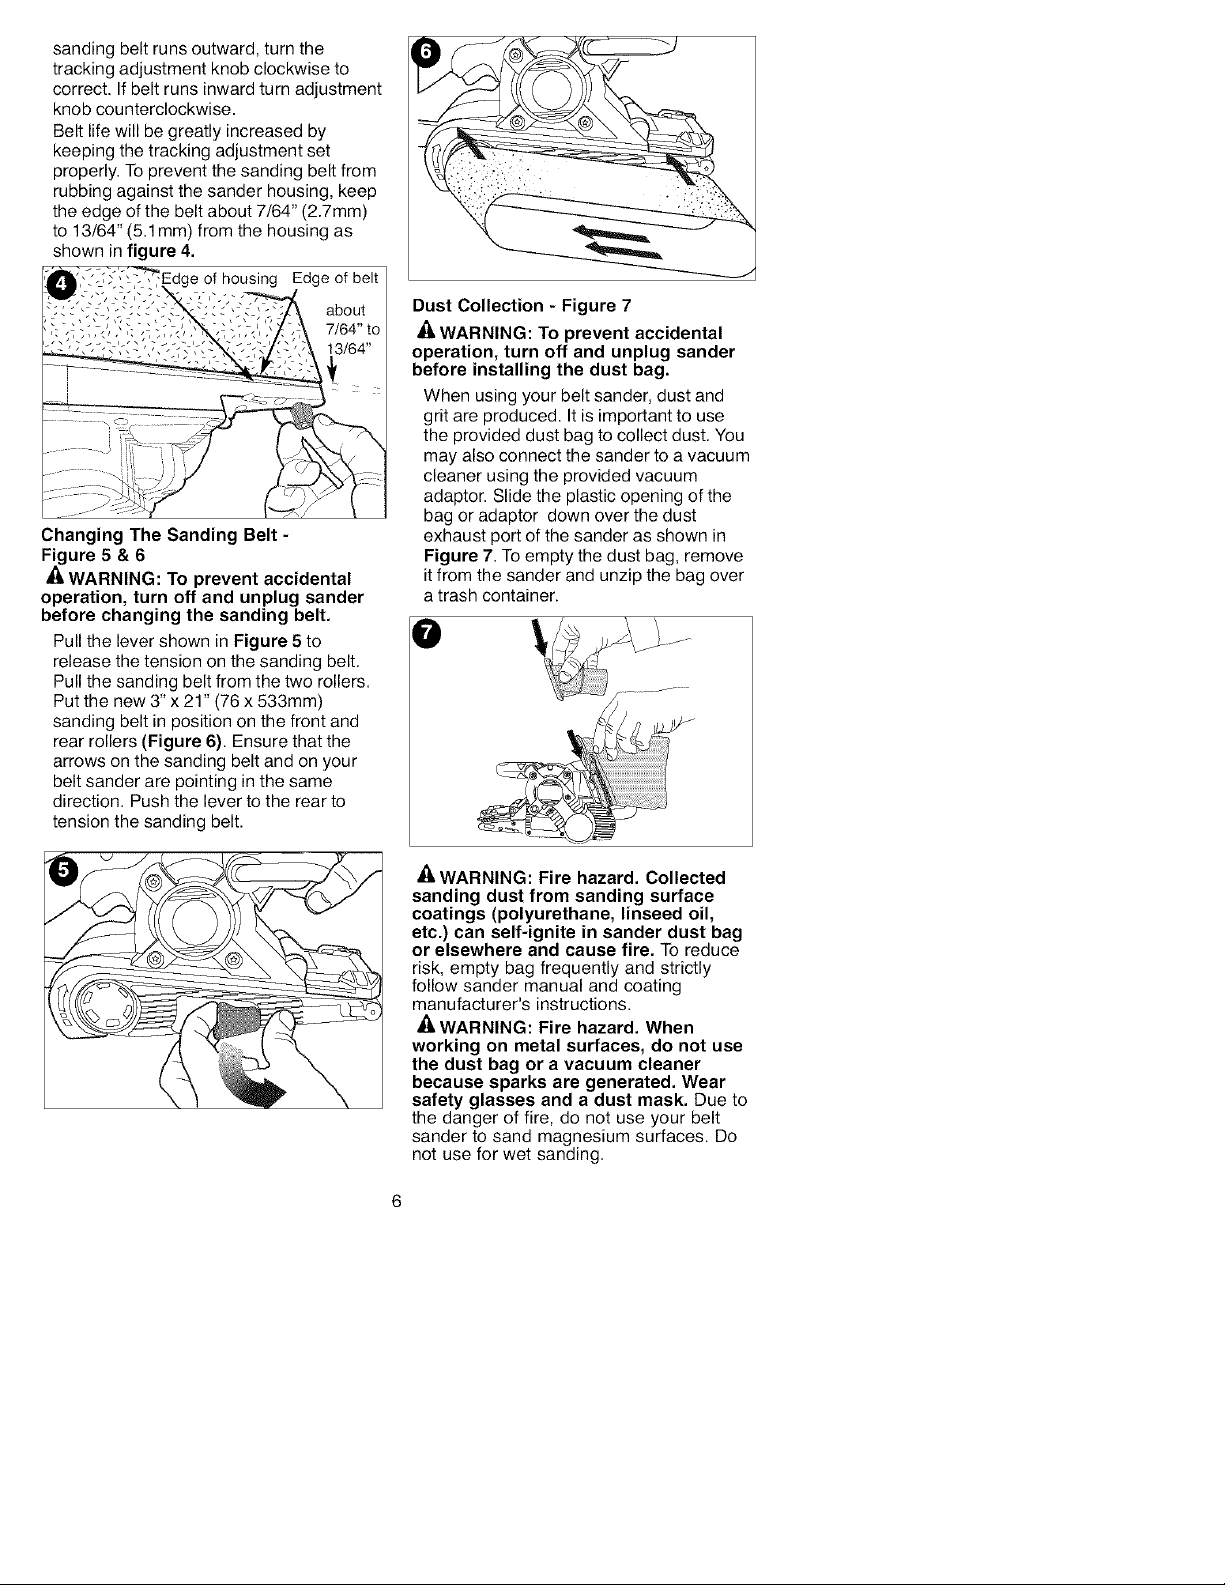
Changing The Sanding Belt -
Figure 5 & 6
_, WARNING: To prevent accidental
operation, turn off and unplug sander
before changing the sanding belt.
Pull the lever shown in Figure 5to
release the tension on the sanding belt.
Pull the sanding belt from the two rollers.
Put the new 3" x 21" (76 x 533mm)
sanding belt in position on the front and
rear rollers (Figure 6). Ensure that the
arrows on the sanding belt and on your
belt sander are pointing in the same
direction. Push the lever to the rear to
tension the sanding belt.
Dust Collection - Figure 7
/
WARNING: To prevent accidental
operation, turn off and unplug sander
before installing the dust bag.
When using your belt sander, dust and
grit are produced. It is important to use
the provided dust bag to collect dust. You
may also connect the sander to a vacuum
cleaner using the provided vacuum
adaptor. Slide the plastic opening of the
bag or adaptor down over the dust
exhaust port of the sander as shown in
Figure 7. To empty the dust bag, remove
it from the sander and unzip the bag over
a trash container.
O
WARNING: Fire hazard. Collected
sanding dust from sanding surface
coatings (polyurethane, linseed oil,
etc.) can self-ignite in sander dust bag
or elsewhere and cause fire. To reduce
risk, empty bag frequently and strictly
follow sander manual and coating
manufacturer's instructions.
.4, WARNING: Fire hazard. When
working on metal surfaces, do not use
the dust bag or a vacuum cleaner
because sparks are generated. Wear
safety glasses and a dust mask. Due to
the danger of fire, do not use your belt
sander to sand magnesium surfaces. Do
not use for wet sanding.

[o]:,1:1:_:_i [o]_l
Operating Position- Figure 8
Always hold belt sander firmly with both
hands while sanding as shown in
Figure 8.
Starting and Stopping - Figures 9,10
Tostart your belt sander, depress the
on/off switch as shown in Figure 9. To
stop belt sander release the on/off switch.
On/off
For continuous operation, depress the
on/off switch then depress the lock-on
button (Figure 1O)and release the on/off
switch. Tostop belt sander, depress the
on/off switch to release the lock-on button.
Release the on/off switch.
Lock-on
button
Variable Speed Switch - Figure 11
The variable speed feature of your belt
sander allows you to increase or
decrease the speed of the belt by turning
the speed wheel as shown in Figure 11.
_) Variable speed switch
Operation Requirements
• Always start your belt sander before it is
in contact with the workpiece and do not
switch it off until after it has been lifted
from the workpiece.
• Always hold your belt sander with two
hands.
• Where possible, clamp the workpiece to
a work bench or similar sturdy surface.
• Use the correct grit sanding belt for your
application. The following is a suggested
list of belt grits to use with different
materials.
MATERIAL BELT GRIT
Solid Wood 80
Veneer 150
Chipboard 60/80
Plastics 100
Steel 80 (remove
dust bag)
Paint Removal 40/60
Balsa Wood 100
Acrylic 100
Tool Maintenance and Care
Never apply excessive force when you
use your belt sander. Too much force can
result inan overload and cause damage
to the motor orthe workpiece. Ifyour belt
sander becomes too hot, operate it
without load for 2 minutes. Always keep
the air cooling vents clear. To clean your
belt sander, proceed as follows:
WARNING: To prevent accidental
operation, turn off and unplug sander
before performing the following
operations. Failure to do this could result
in serious personal injury.

•Use a clean dry paint brush to clear
vents and ducts.
•Clean the sander housing using a clean
damp cloth (do not use solvents, gas or
turpentine.)
IMPORTANT: To assure product SAFETY
and RELIABILITY, repairs, maintenance
and adjustments should be performed by
Sears or other qualified service
technicians, always using identical
replacement parts.
Accessories
Use only 3" x 21" (76 x 533mm) sanding
belts. Use only Craftsman accessories
with your tool. These accessories are
available at extra cost from your local
Sears store or Sears Parts and Repair
Center.
,4, CAUTION: The use of any other
accessory not recommended for use with
this tool could be hazardous.

PARTS PAGE & DIAGRAM

PARTSPAGE & DIAGRAM
lO

Manual de instrucciones
CRAFTSMIIN°
LIJADORA DE BANDA
DE 76 X 533 aM (3"x 21")
Modelo 900.11722
_,ADVERTENCIA:
Antes de utilizar el producto,
lea este manual y cumpla
con todas sus normas de
seguridad e instrucciones de
operacion.
Sears, Roebuck y Co., Hoffman Estates, IL 60179 EE.UU.
www.sears.com/craftsman
• Seguridad
• Operacion
• Mantenimiento
• Lista de piezas
11

UN AI_IO DE GARANTJA COMPLETA SOBRE LAS HERRAMIENTAS CRAFTSMAN
Siesta herramienta Craftsman no le ofrece satisfacci6n completa dentro del aSo
a partir de la fecha de compra, DEVUE_LVALAA LA SUCURSAL DE SEARS M,_S
CERCANA EN ESTADOS UNIDOS, y Sears la reemplazara_ sin cargo.
Siesta herramienta Craftsman se utiliza con fines comerciales o de alquiler, esta
garantia se aplica s61o por 90 dias a partir de la fecha de compra.
Esta garantia le concede derechos legales especificos; pueden existir otros derechos
que varian segQn el estado.
SEARS, ROEBUCK Y CO., DEPT. 817WA, HOFFMAN ESTATES, IL 60179
I_e]_T,.',] [_ ::1_I::1;_.,!III::(,:,]I.] ::1[,.']_ctlJ;11.7.,!.]
_,ADVERTENCIA: Lea y comprenda
todas las instrucciones. El
incumplimiento de todas y cada una de las
instrucciones enumeradas debajo puede
provocar descarga el6ctrica, incendio o
daSos personales serios.
CONSERVE ESTAS INSTRUCCIONES
Area de trabajo
• Mantenga el area de trabajo limpia y
bien iluminada. Los bancos de trabajo
abarrotados y las areas oscuras
propician accidentes.
• No opere herramientas electricas en
atmosferas explosivas, como
ambientes donde se encuentran
liquidos, gases o polvo inflamables.
Las herramientas electricas originan
chispas que pueden encender el polvo o
los vapores. Utilicelas s61oen lugares
bien ventilados.
• Mantenga a espectadores, niSos y
visitantes alejados de la herramienta
electrica en funcionamiento. Las
distracciones pueden provocar la perdida
de control.
Seguridad electrica
• Las herramientas con doble
aislamiento estan equipadas con un
enchufe polarizado (una hoja es mas
ancha que la otra). Este enchufe se
ajustara en un tomacorriente
polarizado de una sola manera. Si el
enchufe no se ajusta totalmente al
tomacorriente, invierta el enchufe. Si
aun asi no se ajusta bien, busque un
electricista experto para que instale
un tomacorriente polarizado. No
cambie el enchufe de ninguna
manera. El doble aislamiento [] elimina
la necesidad de un cable de
alimentaci6n trifilar de puesta a tierra y
de un sistema de puesta a tierra.
• Evite el contacto corporal con
superficies puestas a tierra, como por
ejemplo tuberias, radiadores, rangos y
refrigeradores. Existe mayor riesgo de
descarga el6ctrica si su cuerpo esta_
puesto a tierra.
• No exponga las herramientas
electricas a la Iluvia o a condiciones
de humedad. Si ingresa agua a una
herramienta el6ctrica, aumentara_ el
riesgo de descarga el6ctrica.
• No maltrate al cable. Nunca use el
cable para transportar las
herramientas ni tire del enchufe para
sacarlo del tomacorriente. Mantenga
el cable lejos del calor, aceite, bordes
afilados o piezas moviles. Reemplace
los cables daSados en forma
inmediata. Los cables da_ados
aumentan el riesgo de descarga
electrica.
• Cuando opere una herramienta
electrica a la intemperie, utilice un
cable prolongador marcado "W-A" o
'°W". Estos prolongadores esta_n
clasificados para ser usados a la
intemperie y reducen el riesgo de
descarga el6ctrica.
Seguridad personal
• Permanezca alerta, controle Io que
esta haciendo y utilice el sentido
comun cuando emplee una
herramienta electrica. No utilice
herramientas si esta cansado o bajo
el efecto de drogas, alcohol o
medicamentos. Un momento de
descuido mientras se opera una
herramienta el6ctrica podria provocar
da_os personales graves.
12

• Vistase apropiadamente. No use
ropas sueltas ni joyas. Sujete el
cabello largo. Mantenga el cabello,
ropas y guantes alejados de las
piezas moviles. Las ropas sueltas,
joyas o el cabello largo pueden quedar
atrapados en las piezas m6viles. Se
deben evitar los orificios de ventilaci6n,
que cubren piezas m6viles.
• Evite el encendido pot accidente.
Asegurese de que el interruptor este
apagado antes de enchufar la
herramienta. Si transporta herramientas
con su dedo apoyado sobre el
interruptor o conecta una herramienta
con el interruptor en posici6n de
encendido, puede propiciar accidentes.
• Retire las Ilaves de ajuste o de
tuercas antes de encender la
herramienta. Una Ilave de tuercas o de
ajuste que se deje conectada a una
pieza giratoria de la herramienta podria
provocar lesiones personales.
• No se estire. Conserve el equilibrio
adecuado y mantengase parado
correctamente en todo momento. El
equilibrio adecuado mientras se esta_de
pie permite un mejor control de la
herramienta en situaciones inesperadas.
• Use equipo de seguridad. Siempre
utilice proteccion para los ojos. Se
debe usar ma_scara para polvo, calzado
de seguridad antideslizante, casco, o
protecci6n auditiva segQn corresponda
en cada caso.
Uso y cuidados de la herramienta
• Utilice abrazaderas u otra forma
practica para asegurar y sostener la
pieza de trabajo en una plataforma
estable. Sostener el trabajo con la
mano o contra el cuerpo no brinda la
estabilidad requerida y puede conducir
a la p6rdida del control.
• No fuerce la herramienta. Utilice la
herramienta correcta para el trabajo
que realizara. La herramienta correcta
hara_el trabajo mejor y ma_sseguro a la
velocidad para la que fue diseSada.
• No utilice la herramienta si no puede
encenderla o apagarla con el
interruptor. Toda herramienta que no
puede ser controlada mediante el
interruptor es peligrosa y debe ser
reparada.
• Desconecte el enchufe de la fuente
de energia antes de realizar algun
ajuste, cambiar accesorios o guardar
la herramienta. Estas medidas de
seguridad preventivas reducen el riesgo
de encender la herramienta en forma
accidental.
• Guarde las herramientas que no
estan en uso fuera del alcance de los
ni_os y de personas no entrenadas.
Las herramientas son peligrosas en las
manos de usuarios no entrenados.
Realice un mantenimiento cuidadoso
de las herramientas. Mantenga las
herramientas de corte afiladas y
limpias. Las herramientas con
mantenimiento adecuado, con los
hordes de corte afilados son menos
propensas a trabarse y son ma_sfa_ciles
de controlar.
• Controle que no haya piezas moviles
mal alineadas o trabadas, piezas
rotas y toda otra situacion que
pueda afectar el funcionamiento de
la herramienta. Si encuentra daSos,
haga reparar la herramienta antes de
utilizarla. Se producen muchos
accidentes a causa de las herramientas
que carecen de un mantenimiento
adecuado.
Utilice solo accesorios
recomendados pot el fabricante para
el modelo que posee. Los accesorios
que pueden ser aptos para una
herramienta, pueden convertirse en un
factor de riesgo cuando se los utiliza en
otra herramienta.
Utilice solo accesorios
recomendados para esta herramienta
que puedan adquirirse en una
sucursal de Sears o de Craftsman. El
uso de cualquier accesorio adquirido en
otro lugar puede ser peligroso, y
tambi6n anulara_ su garantia.
Mantenimiento
El mantenimiento de la herramienta
debe set realizado unicamente pot
personal de reparaciones calificado.
El mantenimiento realizado por
personal no calificado puede provocar
riesgo de lesiones personales.
• AI reparar una herramienta, solo
utilice piezas de repuesto identicas.
Siga las instrucciones de la seccion
Mantenimiento de este manual. El uso
de piezas no autorizadas o el
incumplimiento de las instrucciones de
mantenimiento pueden crear un riesgo
de descarga el6ctrica o lesiones.
13

Normas de seguridad especificas
ADVERTENCIA: Algunas particulas
originadas al lijar, aserrar, amolar,
taladrar y realizar otras actividades de
construccion contienen productos
quimicos que producen cancer, defectos
de nacimiento y otros problemas
reproductivos. Algunos ejemplos de
estos productos quimicos son:
• el plomo de las pinturas de base
plomo,
• la silice cristalina de ladrillos, cemento
y otros productos de mamposteria y
• el ars6nico y cromo de la madera con
tratamiento quimico. (CCA)
El riesgo derivado de estas exposiciones
varia segOn la frecuencia con la que se
realice este tipo de trabajo. Para reducir
la exposici6n a estos productos
quimicos: se recomienda trabajar en
a_reasbien ventiladas y usar equipos de
seguridad aprobados, como las
ma_scaras para polvo especialmente
dise_adas para filtrar las particulas
microsc6picas.
• Evite el contacto prolongado con las
particulas de polvo originadas al lijar,
aserrar, esmerilar, taladrar y realizar
demas actividades de la
construccion. Use indumentaria
protectora y lave las areas expuestas
con agua y jabon. Evite que el polvo
entre en la boca yen los ojos o se
deposite en la piel, para impedir la
absorci6n de productos quimicos
Anocivos.
ADVERTENCIA: El uso de esta
herramienta puede generar o dispersar
particulas de polvo, que pueden causar
lesiones respiratorias permanentes y
graves u otras lesiones. Use siempre
protecci6n respiratoria aprobada por
NIOSH/OSHA (Instituto Nacional de Salud
yESeguridad Ocupacional de
E.UU./Administraci6n de la Salud y
Seguridad Ocupacional de EE.UU.)
apropiada para la exposici6n al polvo. Aleje
las particulas de la cara y el cuerpo.
_PRECAUCION: Utilice la proteccion
auditiva apropiada durante el uso. Bajo
ciertas condiciones y seg_n el periodo de
uso, el ruido provocado por este producto
puede contribuir a la perdida de audici6n.
La etiqueta de su herramienta puede
incluir los siguientes simbolos.
_Z..................voltios
A ................ amperios
Hz................hertz
W ................vatios
min .............. minutos
"b .............. corriente alterna
.... ............ corriente continua
no ................ velocidad sin carga
[] ................ Construccion Clase II
G ................ terminal a fierra
.............. simbolo de alerta
.../min .......... revotuciones o
_, Instrucciones y advertencias de
seguridad: Lijadoras
• SIEMPRE UTILICE PROTECCI(_N para
los OJOS y vias respiratorias.
• Limpie su herramienta peri6dicamente.
seguridad
reciprocaciones por
minuto
_, Otras instrucciones y advertencias de
seguridad importantes
Lijado de pintura de base plomo
NO SE RECOMIENDA lijar pintura de
base plomo debido a la dificultad para
controlar el polvo contaminado. El
peligro mayor de envenenamiento por
plomo es para los ni_os y las mujeres
embarazadas.
Como es dificil identificar si una
pintura contiene o no plomo sin
realizar ana_lisis quimicos,
recomendamos tomar las siguientes
precauciones al lijar cualquier pintura:
Seguridad personal
• NingOn niSo o mujer embarazada debe
ingresar al a_reade trabajo donde se
esta_lijando la pintura hasta que se haya
terminado la limpieza final.
• Todas las personas que ingresan al a_rea
de trabajo deben usar una ma_scara
para polvo o una mascarilla de
respiraci6n. El filtro se debe cambiar
diariamente o toda vez que el usuario
tenga dificultad para respirar.
NOTA: S61ose deben usar aquellas
ma_scaraspara polvo apropiadas para
trabajar con polvo y vapores de pintura
de base plomo. Las ma_scarascomunes
para pintar no ofrecen esta protecci6n.
Consulte a su comerciante local sobre la
ma_scaraapropiada (aprobada por
NIOSH).
• NO SE DEBE COMER, BEBER O
FUMAR en el a_reade trabajo para
evitar ingerir particulas de pintura
contaminada. Los trabajadores se
deben lavar y limpiar ANTES de comer,
beber o fumar. No se deben dejar
articulos para comer, beber o fumar en
14

ela_readetrabajodondesepodria
depositarpolvosobreellos.
Seguridadambiental
• Lapinturadebeserretiradadeformatal
dereduciralminimolacantidadde
polvogenerado.
• Lasa_reasdondeserealizaremoci6nde
pinturadebenestarselladasconhojas
depla_sticode4milesimasdepulgada
deespesor.
• Ellijadosedeberiarealizardemanera
dereducirlosvestigiosdepolvode
pinturafueradela_readetrabajo.
Limpieza y eliminacion
• Todas las superficies del a_reade trabajo
deben ser limpiadas cuidadosamente y
repasadas con aspiradora todos los dias
mientras dure el proyecto de lijado. Se
deben cambiar con frecuencia las
bolsas de filtro de la aspiradora.
• Las telas pla_sticasdel piso se deben
recoger y eliminar junto con cualquier
resto de polvo u otros residues del
lijado. Deben colocarse en recipientes
de desperdicios sellados y eliminarse
por medio de los procedimientos
normales de recolecci6n de residuos.
Durante la limpieza, los nifios y las
mujeres embarazadas deben
mantenerse lejos del a_reade trabajo
inmediata.
• Todos los juguetes, muebles lavables y
utensilios utilizados por los nifios deben
ser lavados cuidadosamente antes de
ser utilizados nuevamente.
Motor
AsegQrese de que su suministro de
energia concuerde con Io marcado en la
placa. CA 120 voltios significa que su
herramienta funcionara_ con la energia
domestica esta_ndarde 60 Hz. No haga
funcionar herramientas para corriente
alterna (CA) con corriente continua (CC).
Una capacidad nominal de 120 voltios
CA/CC significa que su herramienta
funcionara_con energia esta_ndar de 60 HZ
CA o CC. Esta informaci6n esta_impresa
en la placa. Un voltaje menor producira_
perdida de potencia y puede provocar
sobrecalentamiento. Todas las
herramientas Craftsman son probadas en
fa_brica;siesta herramienta no funciona,
controle el suministro electrico.
utilizarlo. Utilice siempre con la
herramienta el cable prolongador de las
dimensiones apropiadas - es decir, la
medida de conductor adecuada para
diversas longitudes de cable y un
conductor Io suficientemente robusto para
transportar la corriente que exigir& la
herramienta. El uso de un cable de menor
capacidad provocara_ una caida en el
voltaje de la linea que producira_perdida de
potencia y sobrecalentamiento. En la
siguiente tabla podra_consultar los cables
de dimensiones adecuadas.
Calibre minimo para cables prolongadores (AWG) en
Lonqitud total del cabt_ 0-25 26,-50 51-100 105-150
Capacidad nominal en AWG AWG AWG AWG
amperios
Masde 0 18 16 16 14
No mas de 6
Masde 6 18 16 14 12
No mas de 10
Masde 10 16 16 14 12
No mas de 12
Masde 12 14 12 No
No mas de 16 Recomendado
herramientas de 120 VCA
Eyl[l 1iiI .',]
_, ADVERTENCIA: Para evitar el
funcionamiento accidental, apague y
desenchufe la lijadora antes de realizar
las operaciones siguientes. El
incumplimiento de esta instrucci6n puede
provocar graves lesiones personales.
Agarradera de 3 posiciones - Figura 1
ylA
Un mecanismo de fijaci6n que se
encuentra al costado de la agarradera
puede liberarse para permitir que 6sta se
mueva. Para ajustar la agarradera tire del
brazo con resorte (Figura 1) y mueva la
agarradera hasta la posici6n deseada
(Figura 1A). Una vez que la agarradera
est6 en laposici6n deseada, empuje el
brazo con resorte para fijarla.
_i!_';i)!ii_,_ d_i_iii(i)iii_,
Cables prolongadotes
Aseg_rese de que el cable prolongador
est6 en buenas condiciones antes de
15

Cubierta de la banda de 2 posiciones -
Figuras 2 y 3
La lijadora de banda posee al frente una
cubierta de la banda de lijado fabricada en
aluminio. Cuando la agarradera se
encuentra en la posici6n ma_selevada, la
cubierta puede levantarse, tal como se
muestra en la Figura 2
(Flecha 1) y fijarse en esa posici6n para:
a) Mejorar el acceso alas a_reasangostas.
b) Permitir el uso del rodillo frontal para
lijado de menor dia_metro(generalmente la
cubierta de aluminio no permite dicho uso
cuando se encuentra en la posici6n
"baja").
c.) Exponer la parte superior de la banda
para un lijado ma_sversa_til(Figura 3).
Ajuste de la banda de lijado - Figura 4
Invierta la m&quina (Figura 4), sostengala
firmemente con una mano, encienda el
motor y suelte el interruptor
inmediatamente luego de observar el
desplazamiento de la banda de lijado. Si la
banda se desliza hacia afuera, gire la
perilla de ajuste en sentido horario para
corregirla. Si se desliza hacia adentro gire
la perilla de ajuste en sentido contrario.
La vida 5til de la banda se incrementara_ si
se mantiene el ajuste adecuado. Para
evitar que la banda de lijado roce la
cubierta, mantenga el borde de la banda a
una distancia entre 2,7 mm (7/64") y 5,1
mm (13/64") de la misma, tal como se
muestra en lafigura 4.
Borde de la
Borde de la banda
_entre 2,7 mm
Para bajar la cubierta de la correa,
tome la brida que se encuentra al
costado y muevala levemente en la
direccion que muestra la Figura 2
(Flecha 2) y coloquela nuevamente en
la posicion cerrada.
Nota: La cubierta de la correa de lijado no
puede fijarse en su posici6n elevada salvo
que la agarradera se encuentre en la
posici6n m&s alta.
A ADVERTENClA: La banda de lijado
queda expuesta cuando la cubierta esta
levantada. Tenga mucho cuidado al
operar la herramienta de este modo.
Cambio de la banda de lijado - Figuras 5
y6
-& ADVERTENCIA: Para evitar el
funcionamiento accidental, apague y
desenchufe la lijadora antes de cambiar
la banda de lijado.
]]re de la palanca que muestra la Figura 5
para liberar la tensi6n de la banda de lijado.
Retire la banda de lijado de los dos rodillos.
Coloque la nueva banda de lijado de 76
mm x 533 mm (3" x 21") en posici6n sobre
los rodillos frontal y posterior (Figura 6).
AsegSrese de que las flechas que se
encuentran sobre la banda de lijado y
sobre la lijadora apunten en la misma
direcci6n. Empuje la palanca hacia atra_s
para tensar la banda de lijado.
16

Recolector de polvo - Figura 7
ADVERTENCIA: Para evitar el
funcionamiento accidental, apague y
desenchufe la lijadora antes de instalar
la bolsa colectora de polvo.
AI utilizar la lijadora de banda, se origina
polvo y suciedad. Es importante utilizar la
bolsa provista para recoger el polvo.
Tambi6n puede conectar la lijadora a una
aspiradora utilizando eladaptador
provisto. Deslice hacia abajo la abertura
pla_sticade la bolsa o adaptador sobre el
conducto de salida de polvo de la lijadora,
tal como se muestra en la Figura 7. Para
vaciar la bolsa colectora de polvo, quitela
de la lijadora y vuelquela en un recipiente
para residuos.
O
A ADVERTENCIA: Riesgo de incendio,
El polvo acumulado que se produce al
lijar los revestimientos de las
superficies (poliuretano, aceite de lino,
etc.) puede iniciar una combustion
espontanea dentro de la bolsa colectora
de la lijadora o en algt_n otro lugar y
ocasionar un incendio. Para reducir este
riesgo, vade la bolsa regularmente y siga
estrictamente las instrucciones del manual
de la lijadora y del fabricante del
revestimiento.
A ADVERTENCIA: Riesgo de incendio.
AI trabajar sobre superficies de metal,
no utilice la bolsa colectora de polvo ni
una aspiradora debido a que se
originan chispas. Utilice gafas de
seguridad y una mascara para polvo.
Debido al riesgo de incendio, no utilice la
lijadora de banda para lijar superficies de
magnesio. No utilice la herramienta para
lijar superficies hOmedas.
Posicion de operacion - Figura 8
Sostenga siempre la lijadora de banda
firmemente con ambas manos al lijar, tal
como se muestra en la Figura 8.
Encendido y apagado - Figuras 9, 10
Para encender la lijadora de banda,
presione el interruptor de
encendido/apagado, tal como se muestra
en la Figura 9. Para apagarla, suelte el
interruptor.
17

Interruptor de
Encendido/Apagad_
Para una operaci6n continua, oprima el
interruptor de encendido/apagado, luego
oprima el bot6n de bloqueo (Figura 10) y
suelte el interruptor. Para apagar la
lijadora de banda, oprima el interruptor de
encendido/apagado para liberar el bot6n
de bloqueo. Suelte el interruptor de
encendido/apagado.
Boton
Interruptor de velocidad variable -
Figura 11
La funci6n de velocidad variable de la
lijadora de banda le permite incrementar o
disminuir la velocidad de la banda girando
el disco de velocidad, tal como se muestra
en la Figura 11.
Interruptor de velocidad
variable
Requerimientos de operacion
• Siempre encienda la lijadora de banda
antes de ponerla en contacto con la
superficie de trabajo y no la apague
hasta haberla levantado de la misma.
• Sostenga siempre la lijadora de banda
con ambas manos.
• Cuando sea posible, sujete la pieza de
trabajo a un banco de trabajo u otra
superficie firme similar.
• Utilice la banda de lijado adecuada para
el trabajo que realizara_.A continuaci6n
se detalla una lista de granos de lija de
banda sugeridos para utilizar con
diferentes materiales.
MATERIAL GRANO DE LIJA
DE BANDA
Madera solida 80
Enchapado 150
Madera prensada 60/80
Pla_sticos 100
Acero 80 (sin saco
de polvo)
Para quitar 100
Mantenimiento y cuidados de la
herramienta
Nunca aplique fuerza excesiva al utilizar la
lijadora de banda. Demasiada fuerza
puede resultar en una sobrecarga y
provocar da_os en el motor o la pieza de
trabajo. Si la lijadora de banda se
recalienta demasiado, acci6nela sin carga
durante 2 minutos. Mantenga siempre los
conductos de ventilaci6n limpios. Para
limpiar la lijadora de banda, realice el
siguiente procedimiento:
A ADVERTENCIA: Para evitar el
funcionamiento accidental, apague y
desenchufe la lijadora antes de realizar
las operaciones siguientes. El
incumplimiento de esta instrucci6n puede
provocar graves lesiones personales.
•Utilice un pincel limpio y seco para
limpiar los conductos y aberturas.
•Limpie la cubierta de la lijadora utilizando
un paso hOmedo y limpio (no use
solventes, gasolina ni aguarra_s).
IMPORTANTE: Para asegurar la
SEGURIDAD y la CONFIABILIDAD del
producto, las reparaciones, el
mantenimiento y los ajustes deben ser
realizados por Sears u otros tecnicos de
servicio calificados, utilizando siempre
piezas de repuesto id6nticas.
18

Accesorios
Utilice s61obandas de lijado de 76 mm x
533 mm (3" x 21"). Utilice s61oaccesorios
Craftsman con su herramienta. Estos
accesorios esta_ndisponibles a un costo
adicional en la sucursal o Centro de
Repuestos y Reparaciones Sears local.
_, PRECAUCION: El uso de otros
accesorios no recomendados para utilizar
con esta herramienta puede resultar
peligroso.
Epecificaciones
Tensi6n de alimentaci6n: 120V
Potencia nominal: 720W
Consumo de corriente: 6,0A
Frecuencia de operaci6n: 60Hz
19

YourHome
Forrepair-inyourhome-of allmajorbrandappliances,
lawnandgardenequipment,orheatingandcoolingsystems,
nomatterwhomadeit,nomatterwhosoldit!
Forthereplacementparts,accessoriesand
owner'smanualsthatyouneedtodo-it-yourself.
ForSearsprofessionalinstallationofhomeappliances
anditemslikegaragedooropenersandwaterheaters.
1-800-4-MY-HOME® (1-800-469-4663)
Callanytime,dayornight(U.S.A.andCanada)
www.sears.com www.sears.ca
Our Home
For repair of carry-in items like vacuums, lawn equipment,
and electronics, call or go on-line for the location of your nearest
Sears Parts & Repair Center.
1-800-488-1222
Call anytime, day or night (U.S.A. only)
www.sears.com
To purchase a protection agreement (U.S.A.)
or maintenance agreement (Canada) on a product serviced by Sears:
1-800-827-6655 (U.S.A.) 1-800-361-6665 (Canada)
Au Canada pour service en frangais:
1-800-LE-FOYER Mc
1-800-888-8987)
www.sears.ca
® Registered Trademark / Trademark / Service Mark of Sears, Roebuck and Co
® Marca Registrada / Marca de F_brica / Marca de Servicio de Sears, Roebuck and Co
MC Mr)
Marque de commerce / Marque d6pos6e de Sears, Roebuck and Co ® Sears, Roebuckand Co
rM s-M
M SM
2O
 Loading...