

Page 1
Form No. 479727-01 JULY ‘05 Printed in China
WARNING:
Before using this product,
read this manual and follow
all its Safety Rules and
Operating Instructions.
Sears, Roebuck and Co., Hoffman Estates, IL 60179 USA
www.sears.com/craftsman
• Safety
• Operation
• Maintenance
• Parts List
• Español Pág. 11
CYCLONETM4 IN 1 SANDER
Instruction Manual
Model 900.11684
479727-01,11684 sander 7/15/05 7:40 AM Page 1
Page 2
WARNING: Read all instructions.
Failure to follow all instructions listed below
may result in electric shock, fire and/or
serious injury. The term “power tool” in all of
the warnings listed below refers to your
mains-operated (corded) power tool or
battery-operated (cordless) power tool.
SAVE THESE INSTRUCTIONS
1) WORK AREA SAFETY
a) Keep work area clean and well lit.
Cluttered or dark areas invite
accidents.
b) Do not operate power tools in
explosive atmospheres, such as in
the presence of flammable liquids,
gases or dust. Power tools create
sparks which may ignite the dust or
fumes.
c) Keep children and bystanders away
while operating a power tool.
Distractions can cause you to lose
control.
2) ELECTRICAL SAFETY
a) Power tool plugs must match the
outlet. Never modify the plug in any
way. Do not use any adapter plugs
with earthed (grounded) power
tools. Unmodified plugs and matching
outlets will reduce risk of electric
shock
b) Avoid body contact with earthed or
grounded surfaces such as pipes,
radiators, ranges and refrigerators.
There is an increased risk of electric
shock if your body is earthed or
grounded.
c) Do not expose power tools to rain
or wet conditions. Water entering a
power tool will increase the risk of
electric shock
d) Do not abuse the cord. Never use
the cord for carrying, pulling or
unplugging the power tool. Keep
cord away from heat, oil, sharp
edges or moving parts. Damaged or
entangled cords increase the risk of
electric shock. Replace or repair
damaged cords. Make sure your
extension cord is in good condition.
Use only 3-wire extension cords that
have 3-prong grounding-type plugs
2
GENERAL SAFETY RULES
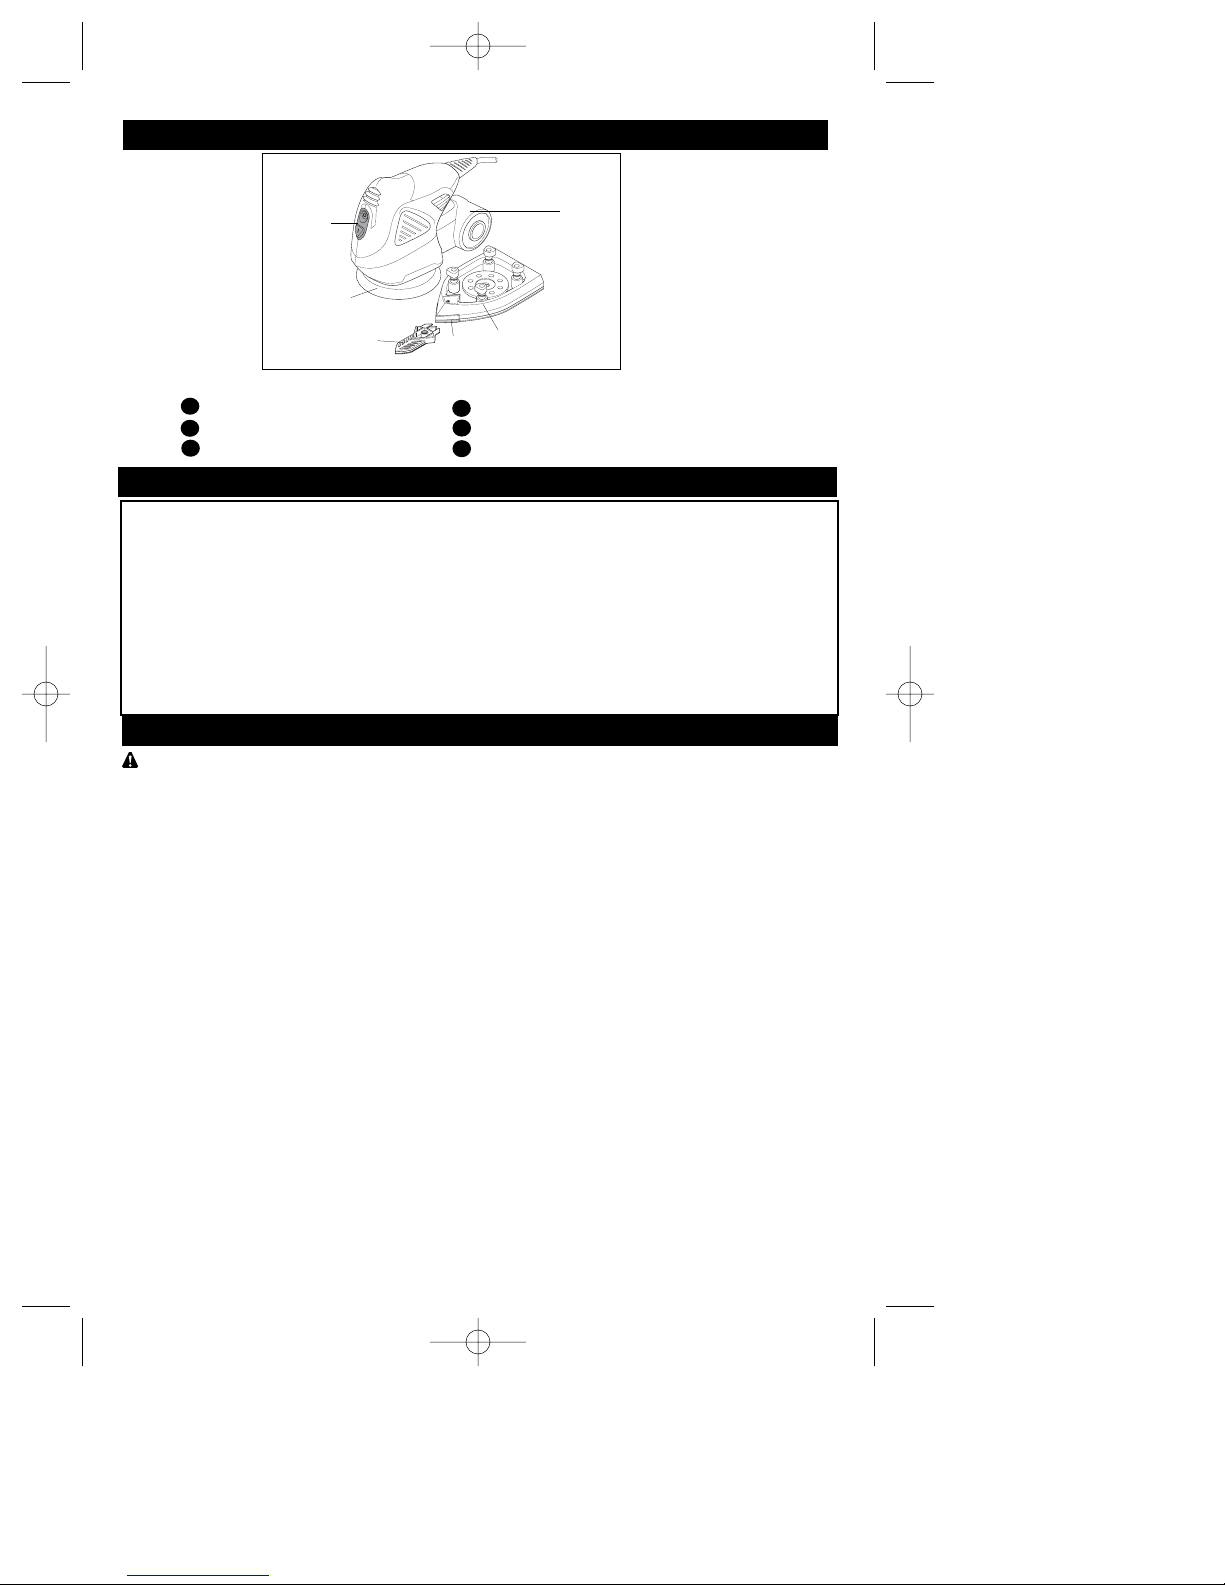
FEATURES
On/off switch Large detail sanding base
Dust canister Sanding base tip
Random orbit sanding base Detail finger attachment
1
2
3
4
4 IN 1 SANDER DIAGRAM
ONE YEAR FULL WARRANTY ON CRAFTSMAN TOOL
If this Craftsman tool fails to give complete satisfaction within one year from date of
purchase, RETURN IT TO ANY SEARS STORE OR OTHER CRAFTSMAN OUTLET
IN THE UNITED STATES FOR FREE REPLACEMENT.
If this Craftsman tool is used for commercial or rental purposes, this warranty applies
for only 90 days from the date of purchase.
This warranty gives you specific legal rights, and you may also have other rights which
vary from state to state.
Sears, Roebuck and Co., Dept. 817WA, Hoffman Estates, IL 60179
CRAFTSMAN WARRANTY
5
6
1
2
3
4
5
6
479727-01,11684 sander 7/15/05 7:40 AM Page 2
Page 3

3
and 3-pole receptacles that accept the
tool’s plug.
e) When operating a power tool
outdoors, use an extension cord
suitable for outdoor use. Use of a
cord suitable for outdoor use reduces
the risk of electric shock. When using
an extension cord, be sure to use one
heavy enough to carry the current your
product will draw. An undersized cord
will cause a drop in line voltage
resulting in loss of power and
overheating. The following table shows
the correct size to use depending on
cord length and nameplate ampere
rating. If in doubt, use the next heavier
gage. The smaller the gage number,
the heavier the cord.
3) PERSONAL SAFETY
a) Stay alert, watch what you are
doing and use common sense when
operating a power tool. Do not use
a power tool while you are tired or
under the influence of drugs,
alcohol or medication. A moment of
inattention while operating power tool
may result in serious personal injury.
b) Use safety equipment. Always wear
eye protection. Safety equipment
such as dust mask, non-skid safety
shoes, hard hat, or hearing protection
used for appropriate conditions will
reduce personal injuries.
c) Avoid accidental starting. Ensure
the switch is in the off-position
before plugging in. Carrying power
tools with your finger on the switch or
plugging in power tools that have the
switch on invites accidents.
d) Remove any adjusting key or
wrench before turning the power
tool on. A wrench or a key left
attached to a rotating part of the power
tool may result in personal injury.
e) Do not overreach. Keep proper
footing and balance at all times.
This enables better control of the
power tool in unexpected situations.
f) Dress properly. Do not wear loose
clothing or jewelry. Keep your hair,
clothing and gloves away from
moving parts. Loose clothes, jewelry
or long hair can be caught in moving
parts. Air vents often cover moving
parts and should also be avoided.
g) If devices are provided for the
connection of dust extraction and
collection facilities, ensure these
are connected and properly used.
Use of these devices can reduce
dust-related hazards.
4) POWER TOOL USE AND CARE
a) Do not force the power tool. Use
the correct power tool for your
application. The correct power tool
will do the job better and safer at the
rate for which it was designed.
b) Do not use the power tool if the
switch does not turn it on and off.
Any power tool that cannot be
controlled with the switch is dangerous
and must be repaired.
c) Disconnect the plug from the power
source and/or the battery pack from
the power tool before making any
adjustments, changing accessories,
or storing power tools. Such
preventive safety measures reduce
the risk of starting the power tool
accidentally.
d) Store idle power tools out of the
reach of children and do not allow
persons unfamiliar with the power
tool or these instructions to operate
the power tool. Power tools are
dangerous in the hands of untrained
users.
e) Maintain power tools. Check for
misalignment or binding of moving
parts, breakage of parts and any
other condition that may affect the
power tools operation. If damaged,
have the power tool repaired before
use. Many accidents are caused by
poorly maintained power tools.
f) Keep cutting tools sharp and clean.
Properly maintained cutting tools with
sharp cutting edges are less likely to
bind and are easier to control.
g) Use the power tool, accessories
and tool bits etc., in accordance
with these instructions and in the
manner intended for the particular
Minimum Gage for Extension Cords (AWG)
120 VAC Tools
Total Cord Length 0-25 26-50 51-100 105-150
Amp Rating AWG AWG AWG AWG
More than 0 18 16 16 14
Not More than 6
More than 6 18 16 14 12
Not More than 10
More than 10 16 16 14 12
Not more than 12
More than 12 14 12 Not
Not more than 16 Recommended
479727-01,11684 sander 7/15/05 7:40 AM Page 3
Page 4

4
W ............watts
min ..........minutes
..........alternating current
........direct current
no ............no load speed
............Class II Construction
............earthing terminal
............safety alert symbol
…/min......revolutions or reciprocation
................per minute
Motor
Be sure your power supply agrees with
nameplate marking. 120 Volts AC only
means your tool will operate on standard
60 Hz household power. Do not operate
AC tools on DC. Arating of 120 volts
AC/DC means that your tool will operate
on standard 60 Hz AC or DC power. This
information is printed on the nameplate.
Lower voltage will cause loss of power
and can result in over-heating. All Black &
Decker tools are factory-tested; if this tool
does not operate, check the power supply.
Sanding
Lead based Paint
Sanding of lead based paint is NOT
RECOMMENDED due to the difficulty of
controlling the contaminated dust. The
greatest danger of lead poisoning is to
children and pregnant women.
Since it is difficult to identify whether or not
a paint contains lead without a chemical
analysis, we recommend the following
precautions when sanding any paint:
Personal Safety
• No children or pregnant women should
enter the work area where the paint
sanding is being done until all clean up is
completed.
• A dust mask or respirator should be worn
by all persons entering the work area.
The filter should be replaced daily or
whenever the wearer has difficulty
breathing.
NOTE: Only those dust masks suitable for
working with lead paint dust and fumes
should be used. Ordinary painting masks do
not offer this protection. See your local
hardware dealer for the proper (NIOSH
approved) mask.
• NO EATING, DRINKING or SMOKING
should be done in the work area to
prevent ingesting contaminated paint
particles. Workers should wash and clean
up BEFORE eating, drinking or smoking.
Articles of food, drink, or smoking should
not be left in the work area where dust
would settle on them.
type of power tool, taking into
account the working conditions and
the work to be performed. Use of the
power tool for operations different from
those intended could result in a
hazardous situation.
5) SERVICE
a) Have your power tool serviced by a
qualified repair person using only
identical replacement parts. This will
ensure that the safety of the power tool
is maintained.
b) If the replacement of the supply cord
is necessary, this has to be done by
the manufacturer or his agent in order
to avoid a safety hazard.
WARNING: Some dust created by
power sanding, sawing, grinding,
drilling, and other construction
activities contains chemicals known to
cause cancer, birth defects or other
reproductive harm. Some examples of
these chemicals are:
• lead from lead-based paints,
• crystalline silica from bricks and cement
and other masonry products,
• arsenic and chromium from chemically-
treated lumber (CCA).
Your risk from these exposures varies,
depending on how often you do this type of
work. To reduce your exposure to these
chemicals: work in a well ventilated area,
and work with approved safety equipment,
such as those dust masks that are specially
designed to filter out microscopic particles.
• Avoid prolonged contact with dust from
power sanding, sawing, grinding,
drilling, and other construction
activities. Wear protective clothing and
wash exposed areas with soap and
water. Allowing dust to get into your
mouth, eyes, or lay on the skin may
promote absorption of harmful chemicals.
WARNING: Use of this tool can generate
and/or disburse dust, which may cause
serious and permanent respiratory or other
injury. Always use NIOSH/OSHA approved
respiratory protection appropriate for the
dust exposure. Direct particles away from
face and body.
CAUTION: Wear appropriate personal
hearing protection during use. Under
some conditions and duration of use,
noise from this product may contribute
to hearing loss.
The label on your tool may include the
following symbols.
V..............volts
A..............amperes
Hz............hertz
479727-01,11684 sander 7/15/05 7:40 AM Page 4
Page 5
5
Environmental Safety
• Paint should be removed in such a manner
as to minimize the amount of dust generated.
• Areas where paint removal is occurring
should be sealed with plastic sheeting of 4
mils thickness.
• Sanding should be done in a manner to
reduce tracking of paint dust outside the
work area.
Cleaning and Disposal
• All surfaces in the work area should be
vacuumed and thoroughly cleaned daily for
the duration of the sanding project. Vacuum
filter bags should be changed frequently.
• Plastic drop cloths should be gathered up
and disposed of along with any dust chips
or other removal debris. They should be
placed in sealed refuse receptacles and
disposed of through regular trash pick-up
procedures. During clean up, children and
pregnant women should be kept away from
the immediate work area.
• All toys, washable furniture and utensils
used by children should be washed
thoroughly before being used again.
Assembly
Warning: Before assembly, make sure
that the tool is switched off and
unplugged.
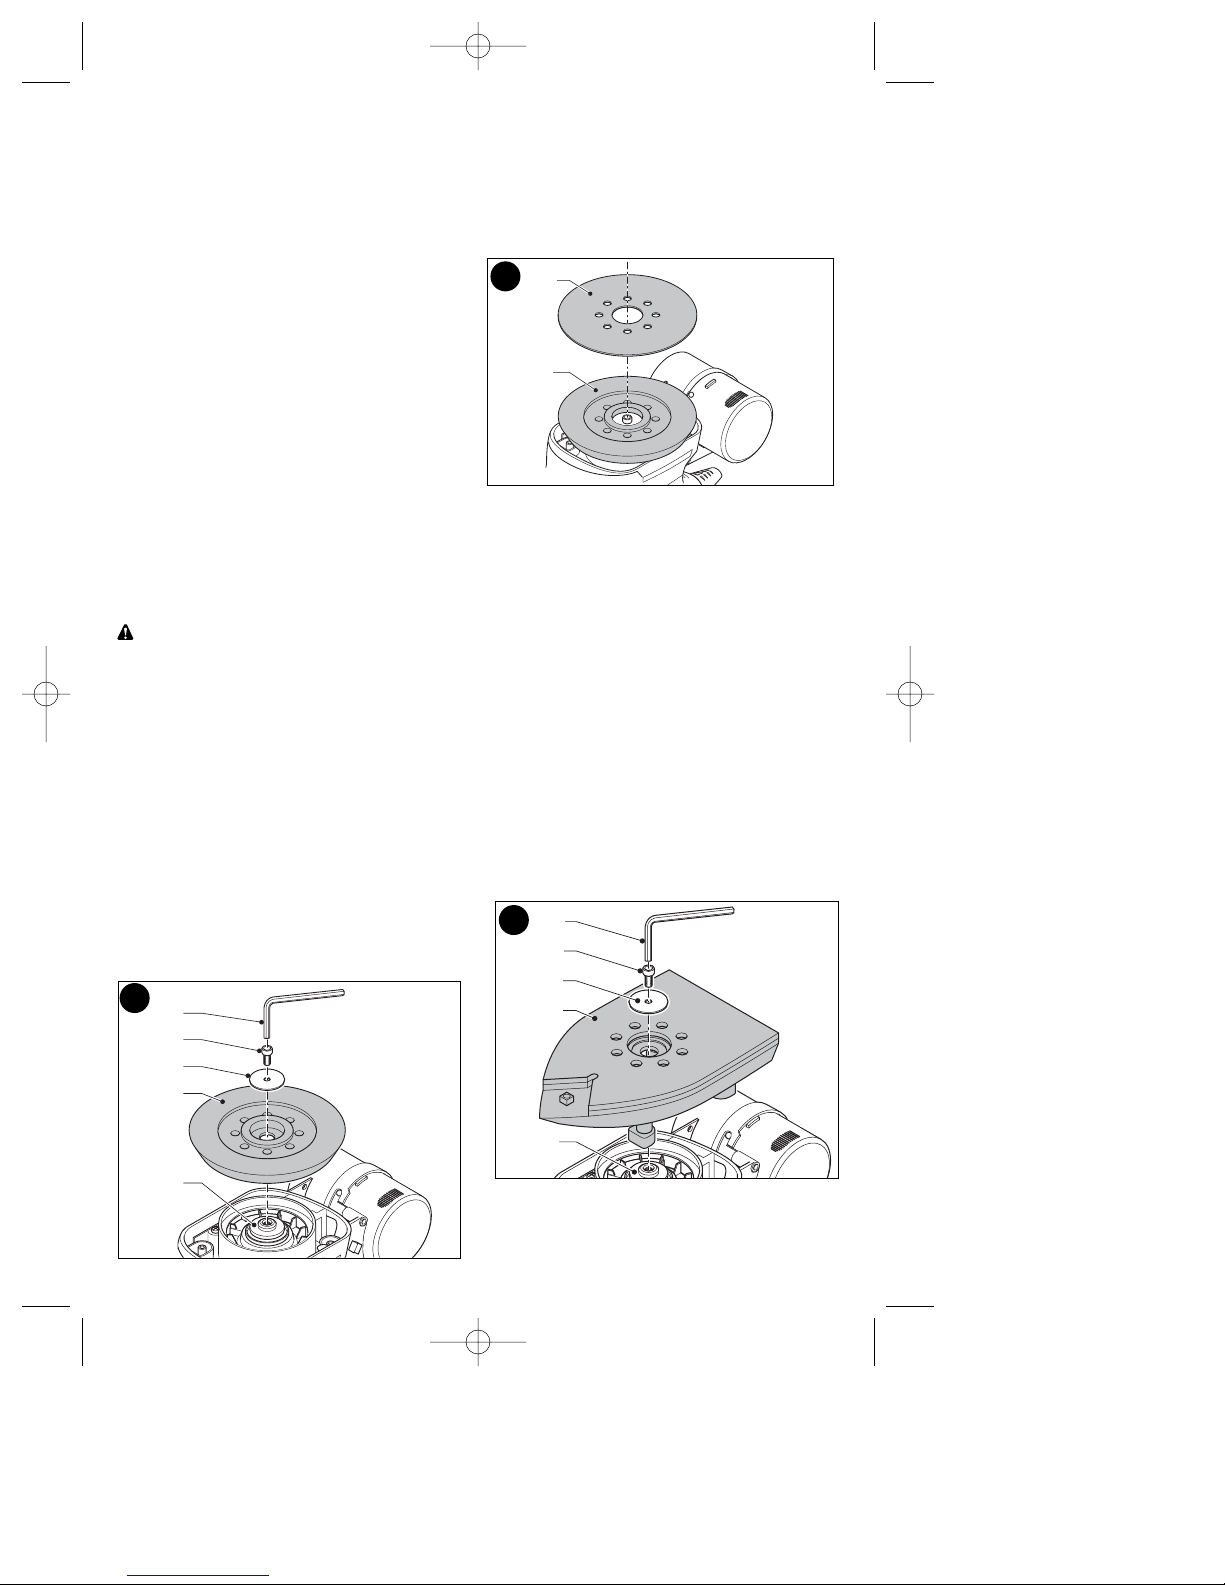
Random Orbit Sanding Base
With this sanding base, you can use the tool
as a random orbit sander.
Fitting and removing the sanding
base (fig. B)
• Place the sanding base (3) onto the spindle
(10).
• Place the washer (7) onto the spindle.
• Insert the hex screw (8) into the screw hole
in the spindle.
• Tighten the hex screw using the Hex key (9)
supplied.
• To remove the sanding base, remove the
hex screw (8) and washer (7).
Fitting sanding sheets (fig. C)
• Hold the tool with the sanding base (3)
facing upwards.
• Place the sanding sheet (11) onto the
sanding base (3). The holes in the sheet
do not need to line up with the holes in the
base.
Large Detail Sanding Base
With this sanding base, you can use the
tool as a detail sander, a finish sander or a
flush finish sander.
Fitting and removing the sanding
base (fig. D & E)
For detail sanding, the pointed end should
face forward as in fig. D. For sanding large
areas, the pointed end should face to the
back as in fig. E.
• Place the sanding base (12) onto the
spindle (10). Make sure that the legs of
the base locate into the tool.
• Place the washer (7) onto the spindle.
• Insert the hex screw (8) into the screw
hole in the spindle.
• Tighten the Hex screw using the Hex key
(9) supplied.
• To remove the sanding base, remove the
hex screw (8) and washer (7).
B
7
3
8
9
10
C
11
3
D
7
12
8
9
10
479727-01,11684 sander 7/15/05 7:40 AM Page 5
Page 6
6
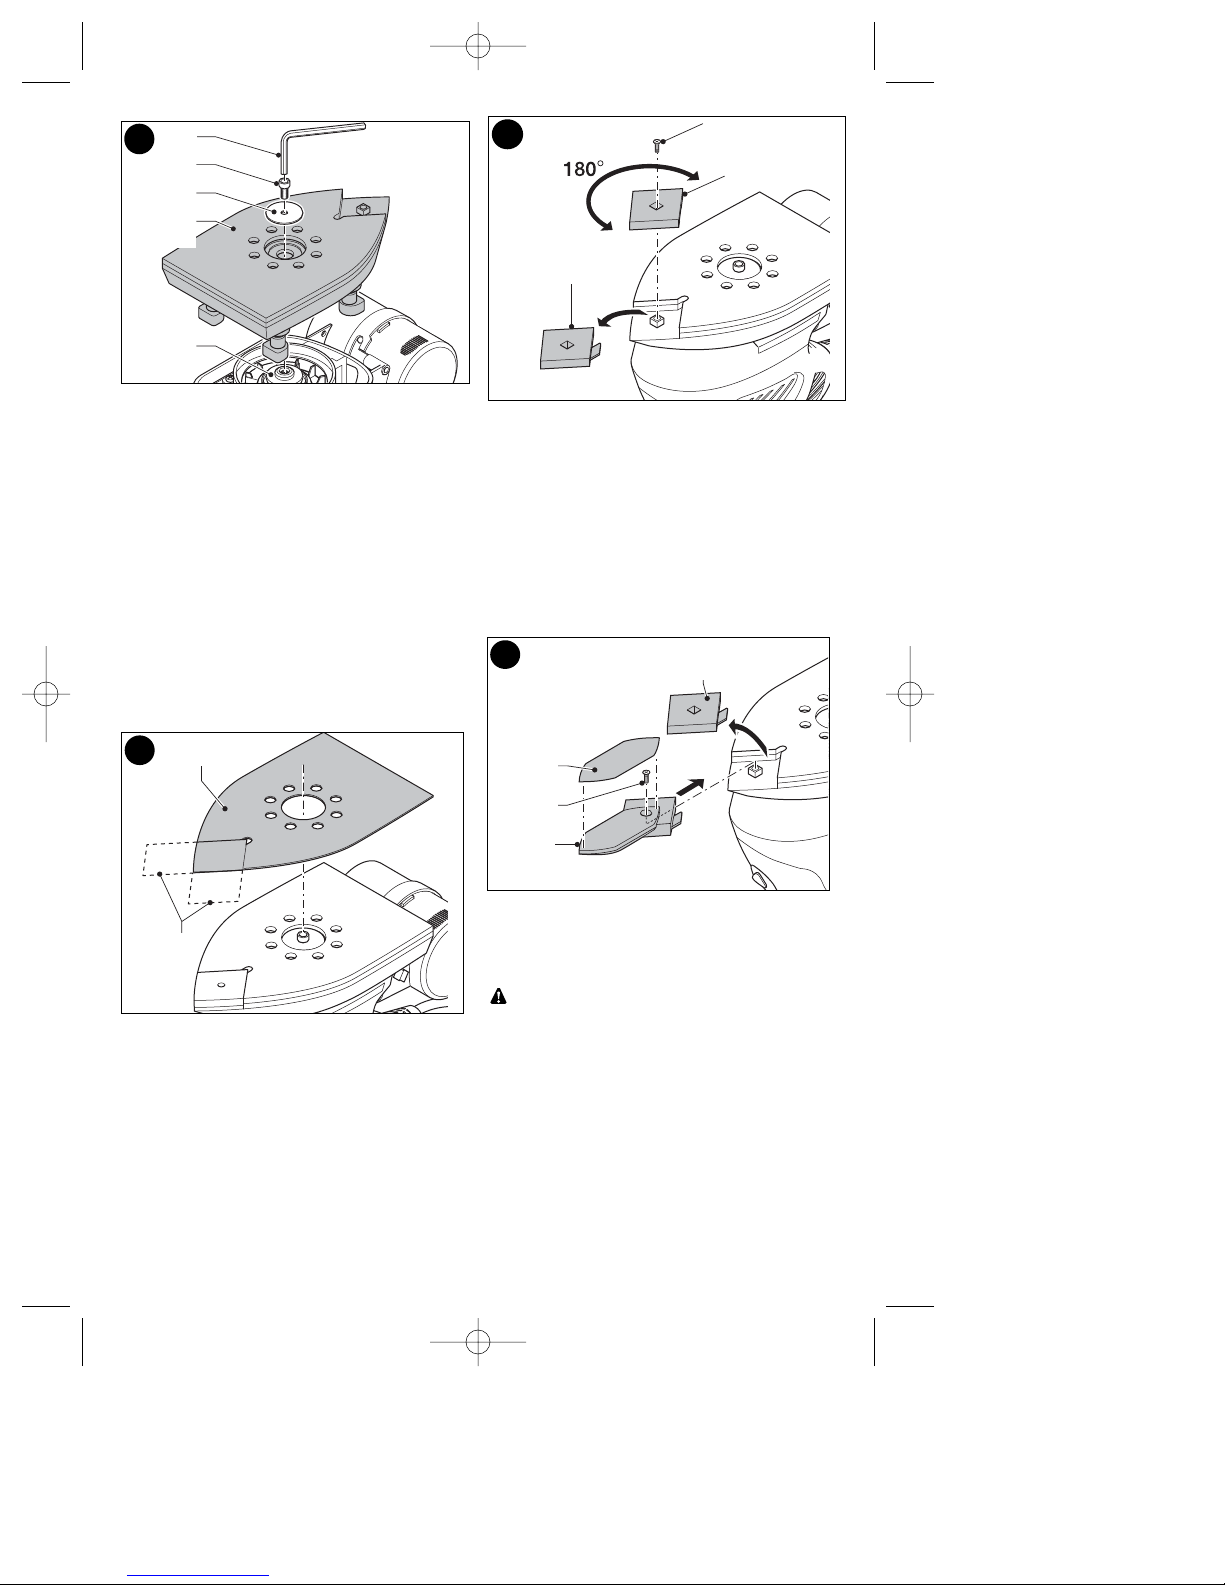
Fitting sanding sheets (fig. F)
• Detach the two diamond-shaped tips (13)
from the sanding sheet (14).
• Hold the tool with the sanding base facing
upwards.
• Place the sanding sheet (14) onto the
sanding base, making sure that the holes
in the sheet line up with the holes in the
base.
The diamond-shaped tip (13) can be
reversed and replaced when worn.
• When the front part of the tip is worn,
detach it from the sheet, reverse it and
press it onto the sanding base again.
• When the whole tip is worn, remove it from
the sanding base and fit a new tip.
Tip of the sanding base (fig. G)
When the sanding base tip (5) or tip holder
(16) is worn, it can be reversed or replaced.
• Remove the screw (15).
• Reverse or replace the worn part.
• Fit and tighten the screw.
Finger attachment (fig. H)
The finger attachment is used for fine detail
sanding.
• Remove the screw (15).
• Remove the diamond-shaped tip holder (5)
from the sanding base.
• Fit the finger attachment (6) onto the
sanding base.
• Fit and tighten the screw.
• Fit the finger sanding sheet (17) onto the
finger attachment.
Operation
Let the tool work at its own pace. Do not
overload.
Warning: Do not cover the ventilation slots
when using the tool. Hold the tool as
shown in fig. L & M. Make sure that the
sanding base is flat on the workpiece.
Switching on and off (fig. I)
• To switch the tool on, set the on/off switch
(1) to position I.
• To switch the tool off, set the on/off switch to
position O.
F
13
G
15
14
5
16
H
5
17
15
6
E
7
12
8
9
10
479727-01,11684 sander 7/15/05 7:40 AM Page 6
Page 7

7
Automatic brake system (ABS)
This tool has an automatic brake system.
When the tool is not on the work surface, this
feature keeps the speed of the disc below the
speed of the motor. When the tool is switched
off, the disc will stop very quickly.
Dust Collection
WARNING: Collected sanding dust from
sanding surface coatings (polyurethane,
linseed oil, etc.) can self-ignite in sander dust
canister or elsewhere and cause fire. To
reduce risk, empty canister frequently and
strictly follow sander manual and coating
manufacturer's instructions.
CAUTION: When working on metal
surfaces, do not use the dust canister or a
vacuum cleaner because sparks are
generated. Wear safety glasses and a
dustmask. Due to the danger of fire, do not
use your sander to sand magnesium
surfaces. Do not use for wet sanding.
Emptying the dust canister (fig. J )
The dust canister should be emptied every 10
minutes of use.
• Remove the cover (18) by twisting it
counterclockwise and pulling it straight off.
• Hold the sander with the filter (19) facing
down and shake the canister to empty the
contents. Shake the cover to empty the
contents.
• Refit the cover (18) onto the dust canister,
twisting it clockwise until it locks into place.
Cleaning the dust canister filter
(fig. K)
The dust canister filter prevents dust and dirt
from entering the motor housing. The filter is
re-usable and should be cleaned regularly.
• Empty the dust canister (2) as described
above.
• Pull the filter (19) off the dust canister.
• Shake off excess dust by tapping the filter
into a wastebasket.
Warning: Do not brush or use
compressed air to clean the filter. Do not
wash the inside of the filter.
• Replace the filter.
• Refit the cover.
• Refit the dust canister onto the tool.
Hints for optimum use
• For user comfort, the tool can be operated
with two hands or one (figs. L & M). Do not
place your hands over the ventilation slots.
• Do not exert too much pressure on the tool.
• Regularly check the condition of the
sanding sheet. Replace when necessary.
• Always sand with the grain of the wood.
• When sanding new layers of paint before
applying another layer, use extra fine grit.
• On very uneven surfaces, or when
removing layers of paint, start with a coarse
grit. On other surfaces, start with a medium
grit. In both cases, gradually change to a
fine grit for a smooth finish.
I
J
K
18
19
L
1
479727-01,11684 sander 7/15/05 7:40 AM Page 7
Page 8

Your tool has been designed to operate
over a long period of time with a minimum
of maintenance.
If the replacement of the supply cord is
necessary, this has to be done by the
manufacturer or his agent in order to avoid
a safety hazard.
Continuous satisfactory operation depends
upon proper tool care and regular cleaning.
• Clear the cooling vents and slots with a
clean, dry paint brush.
• Clean the housing with a clean, damp
cloth. Do not use solvents.
Accessories
Most recommended accessories for use
with your tool are available at extra cost
from your Craftsman outlet.
CAUTION: The use of any
non-recommended accessory may be
hazardous.
8
MAINTENANCE
M
479727-01,11684 sander 7/15/05 7:40 AM Page 8
Page 9

9
parts page and diagram
479727-01,11684 sander 7/15/05 7:40 AM Page 9
Page 10

10
parts page and diagram
479727-01,11684 sander 7/15/05 7:40 AM Page 10
Page 11

11
NORMAS GENERALES DE SEGURIDAD
ADVERTENCIA: Lea todas las
instrucciones. El incumplimiento de
todas y cada una de las instrucciones
enumeradas a continuación puede
provocar descarga eléctrica, incendio o
lesiones graves. El término “herramienta
eléctrica” incluido en todas las
advertencias enumeradas a continuación
hace referencia a su herramienta eléctrica
operada con corriente (cable eléctrico) o a
su herramienta eléctrica operada con
baterías (inalámbrica).
CONSERVE ESTAS
INSTRUCCIONES
1) SEGURIDAD EN EL ÁREA DE
TRABAJO
a) Mantenga el área de trabajo limpia
y bien iluminada. Las áreas
abarrotadas y oscuras propician
accidentes.
b) No opere herramientas eléctricas
en atmósferas explosivas, como
ambientes donde se encuentran
líquidos, gases o polvo
inflamables. Las herramientas
eléctricas originan chispas que
pueden encender el polvo o los
vapores.
c) Mantenga a los niños y
espectadores alejados de la
herramienta eléctrica en
funcionamiento. Las distracciones
pueden provocar la pérdida de
control.
2) SEGURIDAD ELÉCTRICA
a) Los enchufes de la herramienta
eléctrica deben adaptarse al
tomacorriente. Nunca modifique el
enchufe de ninguna manera. No
utilice ningún enchufe adaptador
con herramientas eléctricas con
conexión a tierra. Los enchufes no
modificados y que se adaptan a los
tomacorrientes reducirán el riesgo de
descarga eléctrica.
b) Evite el contacto corporal con
superficies puestas a tierra, como
por ejemplo tuberías, radiadores,
DIAGRAMA DE LA LIJADORA 4 EN 1
CARACTERÍSTICAS
Interruptor de Encendido/Apagado Base para lijar detalles finos
Depósito de aserrín Punta del cabezal lijador
Base para lijar de órbita aleatoria Dispositivo para detalles finos
1
2
3
4
5
6
1
2
3
4
5
6
GARANTÍA DE CRAFTSMAN
UN AÑO DE GARANTÍA COMPLETA PARA LAS HERRAMIENTAS CRAFTSMAN
Si esta herramienta Craftsman no le brinda una satisfacción total dentro del año de la
fecha de compra, DEVUÉLVALAA CUALQUIER TIENDA DE SEARS O A OTRO
PUNTO DE VENTA DE CRAFSTMAN EN LOS ESTADOS UNIDOS PARA QUE SE LA
CAMBIEN SIN CARGO.
Si esta herramienta Craftsman se utiliza con fines comerciales o de alquiler, esta
garantía se aplica sólo durante 90 días a partir de la fecha de compra.
Esta garantía le concede derechos legales específicos; pueden existir otros derechos
que varían según el estado.
SEARS, ROEBUCK AND CO., DEPT. 817WA, HOFFMAN ESTATES, IL 60179
479727-01,11684 sander 7/15/05 7:40 AM Page 11
Page 12

12
estufas y refrigeradores. Existe
mayor riesgo de descarga eléctrica si
su cuerpo está puesto a tierra.
c) No exponga las herramientas
eléctricas a la lluvia o a
condiciones de humedad. Si le
entra agua a la herramienta eléctrica,
aumentará el riesgo de descarga
eléctrica.
d) No maltrate el cable. Nunca utilice
el cable para transportar, tirar o
desenchufar la herramienta
eléctrica. Mantenga el cable lejos del
calor, aceite, bordes filosos o piezas
en movimiento. Los cables dañados o
enredados aumentan el riesgo de
descarga eléctrica. Repare o
reemplace los cables dañados.
Asegúrese de que el cable
prolongador esté en buenas
condiciones. Utilice solamente cables
prolongadores de 3 conductores que
tengan enchufes a tierra de 3 patas y
receptáculos tripolares que se
adapten al enchufe de la herramienta.
e) Al operar una herramienta eléctrica
en el exterior, utilice un cable
prolongador adecuado para tal uso.
Utilice un cable adecuado para uso
en exteriores a fin de reducir el riesgo
de descarga eléctrica. Cuando utilice
un cable prolongador, asegúrese de
que tenga la capacidad para conducir
la corriente que su producto exige. Un
cable de menor capacidad provocará
una disminución en el voltaje de la
línea que producirá pérdida de
potencia y sobrecalentamiento. La
siguiente tabla muestra la medida
correcta que debe utilizar según la
longitud del cable y la capacidad
nominal en amperios indicada en la
placa. En caso de duda, utilice el
calibre inmediatamente superior.
Cuanto menor es el número de
calibre, más grueso es el cable.
3) SEGURIDAD PERSONAL
a) Permanezca alerta, concéntrese en
lo que está haciendo y utilice el
sentido común cuando emplee una
herramienta eléctrica. No utilice
una herramienta eléctrica si está
cansado, o bajo el efecto de
drogas, alcohol o medicamentos.
Un momento de descuido mientras se
opera una herramienta eléctrica
podría provocar daños personales
graves.
b) Use equipo de seguridad. Siempre
utilice protección para los ojos. El
uso del equipo de seguridad, como
las máscaras para polvo, el calzado
de seguridad antideslizante, los
cascos o la protección auditiva, en las
condiciones adecuadas reducirá las
lesiones personales.
c) Evite el encendido por accidente.
Asegúrese de que el interruptor
esté en la posición de apagado
antes de enchufar la herramienta.
Transportar herramientas eléctricas
con el dedo apoyado sobre el
interruptor o enchufar herramientas
eléctricas con el interruptor en
posición de encendido puede
propiciar accidentes.
d) Retire las clavijas de ajuste o llaves
de tuercas antes de encender la
herramienta eléctrica. Una llave de
tuercas o una clavija de ajuste que
quede conectada a una pieza
giratoria de la herramienta eléctrica
puede provocar lesiones personales.
e) No se estire. Conserve el equilibrio
adecuado y manténgase parado
correctamente en todo momento.
Esto permite un mejor control de la
herramienta eléctrica en situaciones
inesperadas.
f) Use la vestimenta adecuada. No
use ropas holgadas ni joyas.
Mantenga el cabello, la ropa y los
guantes alejados de las piezas en
movimiento. Las ropas holgadas,
las joyas o el cabello largo pueden
quedar atrapados en las piezas
móviles. Los orificios de ventilación
suelen cubrir piezas en movimiento,
por lo que también se deben evitar.
g) Si se suministran dispositivos para
la conexión de accesorios para la
recolección y extracción de polvo,
asegúrese de que estén
conectados y se utilicen
correctamente. El uso de estos
Calibre mínimo para cables prolongadores (AWG) en
herramientas de 120 VCA
Longitud total del cable 0-25 26-50 51-100 105-150
Capacidad nominal en AWG AWG AWG AWG
amperios
Más de 018 16 16 14
No más de 6
Más de 618 16 14 12
No más de 10
Más de 10 16 16 14 12
No más de 12
Más de 12 14 12 No
No más de 16 Recomendado
479727-01,11684 sander 7/15/05 7:40 AM Page 12
Page 13

13
dispositivos puede reducir los
peligros relacionados con el polvo.
4) USO Y MANTENIMIENTO DE LA
HERRAMIENTAELÉCTRICA
a) No fuerce la herramienta eléctrica.
Utilice la herramienta eléctrica
correcta para el trabajo que
realizará. La herramienta eléctrica
correcta hará el trabajo mejor y más
seguro a la velocidad para la que fue
diseñada.
b) No utilice la herramienta eléctrica
si no puede encenderla o apagarla
con el interruptor. Toda herramienta
eléctrica que no pueda ser controlada
mediante el interruptor es peligrosa y
debe repararse.
c) Desconecte el enchufe de la fuente
de energía y/o el paquete de
batería de la herramienta eléctrica
antes de realizar ajustes, cambiar
accesorios o almacenar
herramientas eléctricas. Estas
medidas de seguridad preventivas
reducen el riesgo de encender la
herramienta eléctrica en forma
accidental.
d) Guarde las herramientas eléctricas
que no están en uso fuera del
alcance de los niños y no permita
que otras personas no
familiarizadas con ella o con estas
instrucciones operen la
herramienta. Las herramientas
eléctricas son peligrosas en las
manos de usuarios no entrenados.
e) Realice el mantenimiento de las
herramientas eléctricas. Revise
que no haya piezas en movimiento
mal alineadas o trabadas, piezas
rotas y toda otra situación que
pueda afectar el funcionamiento de
las herramientas eléctricas. Si
encuentra daños, haga reparar la
herramienta eléctrica antes de
utilizarla. Se producen muchos
accidentes a causa de las
herramientas eléctricas que carecen
de un mantenimiento adecuado.
f) Mantenga las herramientas de
corte afiladas y limpias. Las
herramientas de corte con
mantenimiento adecuado y con los
bordes de corte afilados son menos
propensas a trabarse y son más
fáciles de controlar.
g) Utilice la herramienta eléctrica, los
accesorios y las brocas de la
herramienta, etc. de acuerdo con
estas instrucciones y de la forma
prevista para el tipo de herramienta
eléctrica en particular; además,
tenga en cuenta las condiciones de
trabajo y el trabajo que debe
realizarse. El uso de la herramienta
eléctrica para operaciones diferentes
de aquéllas para las que fue diseñada
podría originar una situación
peligrosa.
5) MANTENIMIENTO
a) Solicite a una persona calificada en
reparaciones que realice el
mantenimiento de su herramienta
eléctrica y utilice sólo piezas de
repuesto idénticas. Esto garantizará
la seguridad de la herramienta
eléctrica.
b) En caso de que sea necesario
reemplazar el cable de
alimentación, deberá realizarlo el
fabricante o su agente a fin de evitar
un riesgo de seguridad.
ADVERTENCIA: Algunas partículas
originadas al lijar, aserrar, amolar,
taladrar y realizar otras actividades de
construcción contienen productos
químicos que producen cáncer,
defectos de nacimiento y otros
problemas reproductivos. Algunos
ejemplos de estos productos químicos
son:
• el plomo de las pinturas de base plomo;
• la sílice cristalina de ladrillos, cemento y
otros productos de mampostería;
• el arsénico y el cromo de la madera con
tratamiento químico (CCA).
El riesgo derivado de estas exposiciones
varía según la frecuencia con la que se
realice este tipo de trabajo. Para reducir la
exposición a estos productos químicos: se
recomienda trabajar en áreas bien
ventiladas y usar equipos de seguridad
aprobados, como las máscaras para polvo
especialmente diseñadas para filtrar las
partículas microscópicas.
• Evite el contacto prolongado con las
partículas de polvo originadas al lijar,
aserrar, esmerilar, taladrar y realizar
demás actividades de la construcción.
Use indumentaria protectora y lave las
áreas expuestas con agua y jabón.
Evite que el polvo entre en la boca, los
ojos o se deposite en la piel, para impedir
la absorción de productos químicos
nocivos.
ADVERTENCIA: El uso de esta
herramienta puede generar o dispersar
partículas de polvo, que pueden causar
479727-01,11684 sander 7/15/05 7:40 AM Page 13
Page 14

14
lesiones respiratorias permanentes y
graves u otras lesiones. Use siempre
protección respiratoria aprobada por
NIOSH/OSHA (Instituto Nacional de Salud
y Seguridad Ocupacional de
EE.UU./Administración de la Salud y
Seguridad Ocupacional de EE.UU.)
apropiada para la exposición al polvo.
Aleje las partículas de la cara y el cuerpo.
PRECAUCIÓN: Utilice la protección
auditiva apropiada mientras usa la
herramienta. En determinadas
condiciones y según el período de uso, el
ruido provocado por este producto puede
originar pérdida de audición.
La etiqueta de su herramienta puede
incluir los siguientes símbolos.
V................voltiios
A................amperios
Hz..............hertz
W ..............vatios
min ............minutos
............corriente alterna
..........corriente directa
n
o ..............velocidad sin carga
..............Construcción Clase II
.../min ........revoluciones u
oscilaciones por minuto
..............terminal a tierra
............
símbolo de alerta de
seguridad
Motor
Asegúrese de que el suministro de
energía concuerde con lo marcado en la
placa. CA de 120 voltios solamente
significa que su herramienta funcionará
con la energía doméstica estándar de 60
Hz. No haga funcionar herramientas para
corriente alterna (CA) con corriente
directa (CD). Una capacidad nominal de
120 voltios CA/CD significa que su
herramienta funcionará con energía
estándar de 60 Hz CA o CD. Esta
información está impresa en la placa. Un
voltaje menor producirá pérdida de
potencia y puede provocar
sobrecalentamiento. Todas las
herramientas Black & Decker se prueban
en fábrica. Si esta herramienta no
funciona, revise el suministro eléctrico.
Lijado de pintura de base plomo
NO SE RECOMIENDA lijar pintura de
base plomo debido a la dificultad para
controlar el polvo contaminado. El peligro
mayor de envenenamiento por plomo es
para los niños y las mujeres
embarazadas.
Como es difícil identificar si una pintura
contiene o no plomo sin realizar análisis
químicos, recomendamos tomar las
siguientes precauciones al lijar cualquier
pintura:
Seguridad personal
• Ningún niño o mujer embarazada debe
ingresar al área de trabajo donde se lija
la pintura hasta que se haya terminado la
limpieza final.
• Todas las personas que ingresan al área
de trabajo deben usar una máscara para
polvo o una mascarilla de respiración. El
filtro se debe cambiar diariamente o cada
vez que el usuario tenga dificultad para
respirar.
NOTA: Sólo se deben usar máscaras para
polvo apropiadas para trabajar con polvo y
vapores de pintura a base de plomo. Las
máscaras comunes para pintar no ofrecen
esta protección. Consulte a su comerciante
local sobre la máscara apropiada
(aprobada por NIOSH).
• NO SE DEBE COMER, BEBER O
FUMAR en el área de trabajo para evitar
ingerir partículas de pintura
contaminada. Los trabajadores se deben
lavar y limpiar ANTES de comer, beber o
fumar. No se deben dejar artículos para
comer, beber o fumar en el área de
trabajo donde se podría depositar polvo
sobre ellos.
Seguridad ambiental
• La pintura debe ser retirada de forma tal
de reducir al mínimo la cantidad de polvo
generado.
• Las áreas donde se realiza remoción de
pintura deben estar selladas con hojas
de plástico de 0,102 mm (4 milésimas de
pulgada) de espesor.
• El lijado se debe realizar de manera de
reducir los vestigios de polvo de pintura
fuera del área de trabajo.
Limpieza y eliminación
• Todas las superficies del área de trabajo
deben ser limpiadas cuidadosamente y
repasadas con aspiradora todos los días
mientras dure el proyecto de lijado. Se
deben cambiar con frecuencia las bolsas
de filtro de la aspiradora.
• Las telas plásticas del piso se deben
recoger y eliminar junto con cualquier
resto de polvo u otros residuos del lijado.
Deben colocarse en recipientes de
479727-01,11684 sander 7/15/05 7:40 AM Page 14
Page 15

15
desperdicios sellados y eliminarse por
medio de los procedimientos normales de
recolección de residuos. Durante la
limpieza, los niños y las mujeres
embarazadas deben mantenerse lejos del
área de trabajo inmediata.
• Todos los juguetes, muebles lavables y
utensilios utilizados por los niños deben
ser lavados cuidadosamente antes de ser
utilizados nuevamente.
Armado
ADVERTENCIA: Antes de armar la
herramienta, asegúrese de que el
interruptor esté en la posición de
apagado y que esté desenchufada.
Base para lijar de órbita aleatoria
Con esta base para lijar, puede utilizar la
herramienta como una lijadora de órbita
aleatoria.
Ajuste y retiro de la base para
lijar (Fig. B)
• Coloque la base para lijar (3) en el eje
(10).
• Coloque la arandela (7) en el eje.
• Inserte el tornillo hexagonal (8) en el
orificio para tornillo en el eje.
• Ajuste el tornillo hexagonal con la llave
hexagonal (9) proporcionada.
• Para retirar la base para lijar, retire el
tornillo hexagonal (8) y la arandela (7).
Ajuste de las hojas de lija (Fig. C)
• Sujete la herramienta con la base para
lijar (3) hacia arriba.
• Coloque la hoja de lija (11) en la base
para lijar (3). Los orificios en la hoja no
deben alinearse con los orificios en la
base.
Base para lijar detalles finos
Con esta base para lijar, puede utilizar la
herramienta como una lijadora para
detalles finos, para acabado o para
acabado al ras.
Ajuste y retiro de la base para
lijar (Fig. D y E)
Para lijar detalles finos, el extremo de
punta debe mirar hacia arriba como en la
figura D. Para lijar áreas más grandes, el
extremo de punta debe mirar la parte
posterior como en la figura E.
• Coloque la base para lijar (12) en el eje
(10). Asegúrese de que las patas de la
base se ubiquen en la herramienta.
• Coloque la arandela (7) en el eje.
• Inserte el tornillo hexagonal (8) en el
orificio para tornillo en el eje.
• Ajuste el tornillo hexagonal con la llave
hexagonal (9) proporcionada.
• Para retirar la base para lijar, retire el
tornillo hexagonal (8) y la arandela (7).
B
7
3
8
9
10
C
11
3
D
7
12
8
9
10
479727-01,11684 sander 7/15/05 7:40 AM Page 15
Page 16

16
Ajuste de las hojas de lija (Fig. F)
• Retire las dos puntas romboidales (13)
de la hoja de lija (14).
• Sostenga la herramienta con la base
lijadora hacia arriba.
• Coloque la hoja de lija (14) sobre la base
lijadora y asegúrese de que los agujeros
en la hoja se alineen con los agujeros en
la base.
La punta romboidal (13) se puede invertir y
reemplazar cuando se gasta.
• Cuando la parte delantera de la punta se
gasta, retírela de la hoja, inviértala y
presiónela nuevamente sobre la base
lijadora.
• Cuando toda la punta se haya
desgastado, retírela de la base lijadora y
coloque una punta nueva.
Punta de la base lijadora (Fig. G)
Cuando se gasta la punta de la base
lijadora (5) o el sujetador de puntas (16),
se puede invertir o reemplazar.
• Retire el tornillo (15).
• Invierta o reemplace la pieza gastada.
• Coloque y ajuste el tornillo.
Dispositivo para detalles finos
(Fig. H)
El dispositivo para detalles finos se usa
para lijar detalles delicados.
• Retire el tornillo (15).
• Retire el soporte romboidal de la punta
(5) de la base lijadora.
• Coloque el dispositivo para detalles finos
(6) en la base para lijar.
• Coloque y ajuste el tornillo.
• Coloque la hoja de lija para detalles finos
(17) en el dispositivo para detalles finos.
Operación
Permita que la herramienta trabaje a su
propio ritmo. No la sobrecargue.
ADVERTENCIA: No cubra las ranuras
de ventilación cuando usa la
herramienta. Sujete la herramienta como
se muestra en las figuras L y M.
Asegúrese de que la base para lijar esté
en posición horizontal sobre la pieza de
trabajo.
Encendido y apagado (Fig. I)
• Para encender la herramienta, coloque el
interruptor de encendido/apagado (1) en
la posición I.
E
7
12
8
9
10
F
13
14
G
15
5
16
H
5
17
15
6
479727-01,11684 sander 7/15/05 7:40 AM Page 16
Page 17

17
• Para apagar la herramienta, coloque el
interruptor de encendido/apagado en la
posición O.
Sistema de freno automático
(ABS)
Esta herramienta posee un sistema de
freno automático. Cuando la herramienta
no está apoyada sobre la superficie de
trabajo, esta función conserva la
velocidad del disco por debajo de la
velocidad del motor. Cuando la
herramienta se apague, el disco se
detendrá muy rápidamente.
Recolección de aserrín
ADVERTENCIA: El polvo acumulado
que se produce al lijar los revestimientos
de las superficies (poliuretano, aceite de
lino, etc.) puede iniciar una combustión
espontánea dentro del depósito de
aserrín de la lijadora o en algún otro lugar
y ocasionar un incendio. Para reducir
este riesgo, vacíe el depósito
regularmente y siga estrictamente las
instrucciones del manual de la lijadora y
del fabricante del revestimiento.
PRECAUCIÓN: Al trabajar sobre
superficies de metal, no utilice el depósito
de aserrín ni una aspiradora debido a que
se originan chispas. Utilice anteojos de
seguridad y una máscara para polvo.
Debido al riesgo de incendio, no utilice la
lijadora para lijar superficies de magnesio.
No utilice la herramienta para lijar
superficies húmedas.
Vaciado del depósito de aserrín
(Fig. J)
El depósito de aserrín debe vaciarse
cada 10 minutos de uso.
• Retire la tapa (18) girándola en el
sentido contrario a las agujas del reloj y
tirándola hacia afuera.
• Sujete la lijadora con el filtro (19) hacia
abajo y sacuda el depósito para vaciar
I
1
su contenido. Sacuda la tapa para vaciar
el contenido.
• Vuelva a colocar la tapa (18) sobre el
depósito de aserrín: gírela en el sentido
de las agujas del reloj hasta que se
ajuste en su lugar.
Limpieza del filtro del depósito
de aserrín (Fig. K)
El filtro del depósito de aserrín evita que
el polvo y la suciedad ingresen en la caja
del motor. El filtro es reutilizable y debe
limpiarse periódicamente.
• Vacíe el depósito de aserrín (2) como se
describió anteriormente.
• Tire el filtro (19) hacia afuera del
depósito de aserrín.
• Sacuda el exceso de polvo al golpear
suavemente el filtro en un cesto.
ADVERTENCIA:No utilice un cepillo o
aire comprimido para limpiar el filtro. No
lave el interior del filtro.
• Reemplace el filtro.
• Vuelva a colocar la tapa.
• Vuelva a colocar el depósito de aserrín
en la herramienta.
J
K
18
19
479727-01,11684 sander 7/15/05 7:40 AM Page 17
Page 18

Consejos para un uso óptimo
• Para la comodidad del usuario, se puede
utilizar la herramienta con una o ambas
manos (figuras L y M). No coloque las
manos sobre las ranuras de ventilación.
• No ejerza demasiada presión sobre la
herramienta.
• Revise el estado del papel de lija
periódicamente. Reemplácelo cuando
sea necesario.
• Siempre lije con la veta de la madera.
• Cuando lije capas nuevas de pintura
antes de aplicar otra capa, utilice grano
extra fino.
• Sobre superficies muy disparejas o
cuando retira capas de pintura, comience
con un grano grueso. En otras
superficies, comience con un grano
mediano. En ambos casos, cambie
gradualmente a un grano fino para un
acabado liso.
18
Su herramienta ha sido diseñada para
funcionar durante un largo período con un
mínimo de mantenimiento.
En caso de que sea necesario reemplazar
el cable de alimentación, deberá realizarlo
el fabricante o su agente a fin de evitar un
riesgo de seguridad.
El funcionamiento continuo satisfactorio
depende del cuidado adecuado de la
herramienta y de una limpieza periódica.
• Despeje los conductos y las ranuras de
ventilación con un pincel limpio y seco.
• Limpie la caja con un paño húmedo y
limpio. No utilice solventes.
Accesorios
La mayoría de los accesorios que se
recomiendan para utilizar con su
herramienta están disponibles a un costo
adicional en el punto de venta de
Craftsman.
PRECAUCIÓN: La utilización de
cualquier accesorio no recomendado
puede ser peligrosa.
L
M
MANTENIMIENTO
ESPECIFICACIONES
Cargador:
INPUT: 120 V AC 60 HZ 3W
OUTPUT: 9VAC 100mA
479727-01,11684 sander 7/15/05 7:40 AM Page 18
Page 19

19
479727-01,11684 sander 7/15/05 7:40 AM Page 19
 Loading...