

Page 1
Instruction Manual
Form No. 5147391-00 Rev. 1 Jan. ‘06 Printed in China
CAUTION:
Before using this product,
read this manual and follow
all its Safety Rules and
Operating Instructions.
IMPACT SCREWDRIVER
Sears, Roebuck and Co., Hoffman Estates, IL 60179 U.S.A.
www.sears.com/craftsman
• Safety
• Operation
• Maintenance
• Español, p. 8
Model 900.11458
5147391-00,01,11458 Revised 1/31/06 2:24 PM Page 1
Page 2
WARNING: READ AND
UNDERSTAND ALL INSTRUCTIONS.
Failure to follow all instructions listed
below, may result in electric shock, fire
and/or serious personal injury.
SAVE THESE INSTRUCTIONS
Work Area
• Keep your work area clean and well
lit. Cluttered benches and dark areas
invite accidents.
• Do not operate power tools in
explosive atmospheres, such as in
the presence of flammable liquids,
gases, or dust. Power tools create
sparks which may ignite the dust or
fumes.
• Keep bystanders, children, and
visitors away while operating a power
tool. Distractions can cause you to lose
control.
2
TO REDUCE RISK OF INJURY:
• Before any use, be sure everyone using
this tool reads and understands all safety
instructions and other information
contained in this manual.
• Save these instructions and review
frequently prior to use and in instructing
others.
WARNING: When using electric tools,
basic safety precautions should always
be followed to reduce risk of fire, electric
shock, and personal injury, including the
following:
READ ALL INSTRUCTIONS.
ONE YEAR FULL WARRANTY ON CRAFTSMAN TOOL
If this Craftsman tool fails to give complete satisfaction within one year from date of
purchase, RETURN IT TO ANY SEARS STORE OR OTHER CRAFTSMAN OUTLET
IN THE UNITED STATES FOR FREE REPLACEMENT.
If this Craftsman tool is used for commercial or rental purposes, this warranty applies
for only 90 days from thae date of purchase.
This warranty gives you specific legal rights, and you may also have other rights which
vary from state to state.
Sears, Roebuck and Co., Dept. 817WA, Hoffman Estates, IL 60179
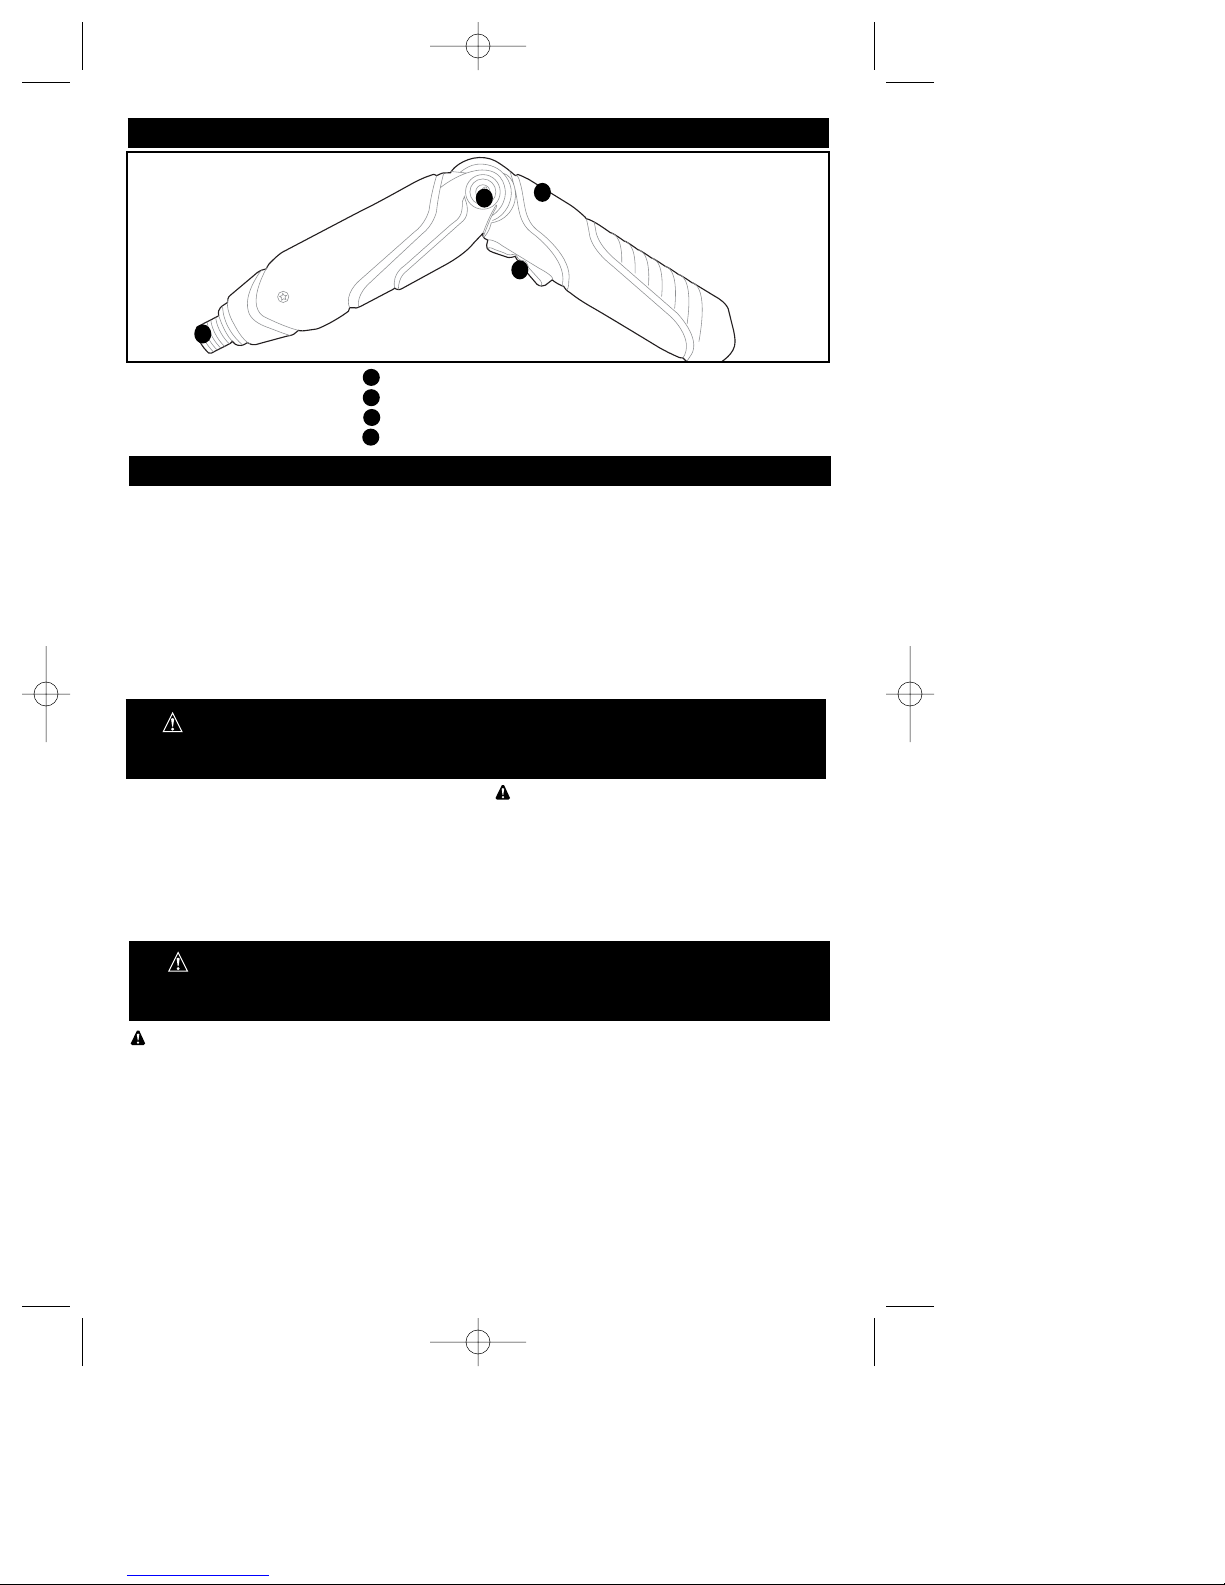
IMPACT SCREWDRIVER DIAGRAM
CRAFTSMAN WARRANTY
WARNING: IMPORTANT SAFETY WARNINGS AND
INSTRUCTIONS
GENERAL SAFETY RULES AND - FOR ALL BATTERY
OPERATED TOOLS
A
C
B
D
- Quick Release Collar
- Pivot Button
- Charging Port
- Forward / Reverse Switch
A
B
C
D
5147391-00,01,11458 Revised 1/31/06 2:24 PM Page 2
Page 3

Electrical Safety
• A battery operated tool with integral
batteries or a separate battery pack
must be recharged only with the
specified charger for the battery. A
charger that may be suitable for one type
of battery may create a risk of fire when
used with another battery.
• Use battery operated tool only with
specifically designated battery pack.
Use of any other batteries may create a
risk of fire.
Personal Safety
• Stay alert, watch what you are doing
and use common sense when
operating a power tool. Do not use tool
while tired or under the influence of
drugs, alcohol, or medication. A
moment of inattention while operating
power tools may result in serious
personal injury.
• Dress properly. Do not wear loose
clothing or jewelry. Contain long hair.
Keep your hair, clothing, and gloves
away from moving parts. Loose
clothes, jewelry, or long hair can be
caught in moving parts.
• Avoid accidental starting. Be sure
switch is in the locked or off position
before inserting battery pack. Carrying
tools with your finger on the switch or
inserting the battery pack into a tool with
the switch on invites accidents.
• Remove adjusting keys or wrenches
before turning the tool on. Awrench or
a key that is left attached to a rotating part
of the tool may result in personal injury.
• Do not overreach. Keep proper footing
and balance at all times. Proper footing
and balance enable better control of the
tool in unexpected situations.
• Use safety equipment. Always wear
eye protection. Dust mask, non-skid
safety shoes, hard hat, or hearing
protection must be used for appropriate
conditions.
Tool Use and Care
• Use clamps or other practical ways to
secure and support the workpiece to a
stable platform. Holding the work by
hand or against your body is unstable and
may lead to loss of control.
• Do not force tool. Use the correct tool
for your application. The correct tool will
do the job better and safer at the rate for
which it is designed.
• Do not use tool if switch does not turn
it on or off. Atool that cannot be
controlled with the switch is dangerous
and must be repaired.
• Disconnect battery pack from tool or
place the switch in the locked or off
position before making any
adjustments, changing accessories,
or storing the tool. Such preventive
safety measures reduce the risk of
starting the tool accidentally.
• Store idle tools out of reach of
children and other untrained persons.
Tools are dangerous in the hands of
untrained users.
• When battery pack is not in use, keep
it away from other metal objects like:
paper clips, coins, keys, nails, screws
or other small metal objects that can
make a connection from one terminal
to another. Shorting the battery terminals
together may cause sparks, burns, or a
fire.
• Maintain tools with care. Keep cutting
tools sharp and clean. Properly
maintained tools, with sharp cutting
edges are less likely to bind and are
easier to control.
• Check for misalignment or binding of
moving parts, breakage of parts, and
any other condition that may affect the
tool’s operation. If damaged, have the
tool serviced before using. Many
accidents are caused by poorly
maintained tools.
• Use only accessories that are
recommended by the manufacturer for
your model. Accessories that may be
suitable for one tool may create a risk of
injury when used on another tool.
Service
• Tool service must be performed only
by qualified repair personnel. Service
or maintenance performed by unqualified
personnel may result in a risk of injury.
• When servicing a tool, use only
identical replacement parts. Follow
instructions in the Maintenance
section of this manual. Use of
unauthorized parts or failure to follow
Maintenance Instructions may create a
risk of shock or injury.
3
5147391-00,01,11458 Revised 1/31/06 2:24 PM Page 3
Page 4

4
1. This manual contains important safety
and operating instructions.
2. Before using battery charger, read all
instructions and cautionary warnings
on battery charger and product using
battery.
CAUTION: To reduce the risk of
injury, use charger only with this
product. Batteries in other products
may burst causing personal injury or
damage.
3. Do not expose charger to rain or snow.
4. Use of an attachment not
recommended or sold by Sears may
result in a risk of fire, electric shock, or
injury to persons.
5. To reduce risk of damage to electric
plug and cord, pull by plug rather than
cord when disconnecting charger.
6. Make sure cord is located so that it
will not be stepped on, tripped over, or
otherwise subjected to damage or
stress.
7. An extension cord should not be used
unless absolutely necessary. Use of
improper extension cord could result
in a risk of fire, electric shock or
electrocution.
a. Two-wire cords can be used with
2-wire or 3-wire extension cords. Only
round jacketed extension cords should
be used, and we recommend that they
be listed by Underwriters Laboratories
(U.L.). If the extension is to be used
outside, the cord must be suitable for
outdoor use. Any cord marked for
outdoor use can also be used for
indoor work. The letters "W" or "WA"
on the cord jacket indicate that the
cord is suitable for outdoor use.
b. An extension cord must have
adequate wire size (AWG or American
Wire Gauge) for safety, and to prevent
loss of power and overheating. The
smaller the gauge number of the wire,
the greater the capacity of the cable;
Specific Safety Rules
• Hold tool by insulated gripping
surfaces when performing an
operation where the cutting tool may
WARNING: Some dust created by
power sanding, sawing, grinding,
drilling, and other construction
activities contains chemicals known to
cause cancer, birth defects or other
reproductive harm. Some examples of
these chemicals are:
• lead from lead-based paints,
• crystalline silica from bricks and cement
and other masonry products, and
• arsenic and chromium from
chemically-treated lumber (CCA).
Your risk from these exposures varies,
depending on how often you do this type of
work. To reduce your exposure to these
chemicals: work in a well ventilated area,
and work with approved safety equipment,
such as those dust masks that are
specially designed to filter out
microscopic particles.
• Avoid prolonged contact with dust
from power sanding, sawing,
grinding, drilling, and other
construction activities. Wear
protective clothing and wash
exposed areas with soap and water.
Allowing dust to get into your mouth,
eyes, or lay on the skin may promote
absorption of harmful chemicals.
WARNING: Use of this tool can
generate and/or disburse dust, which
may cause serious and permanent
respiratory or other injury. Always use
NIOSH/OSHA approved respiratory
protection appropriate for the dust
exposure. Direct particles away from face
and body.
SAFETY WARNINGS AND INSTRUCTIONS: CHARGING
contact hidden wiring. Contact with a
"live" wire will also make exposed metal
parts of the tool "live" and shock the
operator.
The label on your tool may include the following symbols.
V ..........................volts A ......................amperes
Hz ........................hertz W ....................watts
min ........................minutes ....................alternating
current
......................direct current
n
o ....................no load speed
..........................
Class II Construction
....................
earthing terminal
..............................safety alert symbol .../min ..............revolutions or
reciprocations per minute
5147391-00,01,11458 Revised 1/31/06 2:24 PM Page 4
Page 5

total length, be sure each extension
contains at least the minimum wire
size for the total length.
that is, 16 gauge has more capacity
than 18 gauge. When using more
than one extension to make up the
5
Minimum Gage for Cord Sets
Volts Total Length of Cord in Feet
120V 0-25 26-50 51-100 101-150
240V 0-50 51-100 101-200 201-300
Ampere Rating
More Not more American Wire Gage
Than Than
0-6 18 16 16 14
6 - 10 18 16 14 12
10 - 12 16 16 14 12
12 - 16 14 12 Not Recommended
8. Use only the supplied charger when
charging your tool. The use of any
other charger could damage the
screwdriver or create a hazardous
condition.
9. Use only one charger when charging.
10. Do not attempt to open the charger.
There are no customer serviceable
parts inside. Return to any authorized
Sears service center.
11. DO NOT incinerate the tool or
batteries even if they are severely
damaged or completely worn out. The
batteries can explode in a fire.
12. A small leakage of liquid from the
battery cells may occur under extreme
usage, charging or temperature
conditions. This does not indicate a
failure. However, if the outer seal is
broken and this leakage gets on your
skin:
a. Wash quickly with soap and water.
b. Neutralize with a mild acid such as
lemon juice or vinegar.
c. If the battery liquid gets in your eyes,
flush them with clean water for a
minimum of 10 minutes and seek
immediate medical attention.
MEDICAL NOTE: The liquid is a
25-35% solution of potassium
hydroxide.
IMPORTANT: The batteries in your
tool are not fully charged at the
factory. Before attempting to charge
them, thoroughly read all of the safety
instructions.
To charge your screwdriver, follow the
steps below:
1. Plug the output
cord of the charger
into the socket in
the bottom half of
the screwdriver
handle as shown in
Figure 1.
2. Plug the charger
into any standard
120 Volt 60 Hz
electrical outlet.
3. Let the tool charge
initially for 9 hours. After the initial
charge, under normal usage, your
tool should be fully charged in 3 to 6
hours.
WARNING: When disconnecting the
tool from the charger, be sure to
unplug the charger from the outlet first,
then disconnect the charger cord from
the tool. Do not use the tool while it is
CHARGING PROCEDURE
connected to the charger.
Important Charging Notes
1. After normal usage, your tool should
be fully charged in 3 to 6 hours. If the
batteries are run down completely, it
may take up to 6 hours to become
fully charged. Your tool was sent from
the factory in an uncharged condition.
Before attempting to use it, it must be
charged for at least 9 hours.
2. DO NOT charge the batteries in an air
temperature below 40°F (4,5 °C) or
above 105°F (+40,5 °C). This is
important and will prevent serious
damage to the batteries. Longest life
and best performance can be
obtained if batteries are charged
when air temperature is about 75°F.
3. While charging, the charger may hum
and become warm to touch. This is a
normal condition and does not
indicate a problem.
4. If the batteries do not charge properly:
(1) Check current at receptacle by
plugging in a lamp or other
appliance.
(2) Check to see if receptacle is
connected to a light switch which
turns power off when you turn out
the lights.
1
5147391-00,01,11458 Revised 1/31/06 2:24 PM Page 5
Page 6

6
OPERATING INSTRUCTIONS
(3) Move charger and tool to a
surrounding air temperature of
above 40 degree F (4,5°C) or
below 105 degree F (+40,5°C).
(4) If the receptacle and temperature
are okay, and you do not get
proper charging, refer to your
Craftsman warranty.
5. The tool should be recharged when it
fails to produce sufficient power on
jobs which were easily done
previously. DO NOT CONTINUE
using product with its batteries in a
depleted condition.
6. To prolong battery life, avoid leaving
on charge for extended periods of time
(over 30 days without use). Although
overcharging is not a safety concern, it
can significantly reduce overall battery
life.
7. The batteries will reach optimum
performance after being recharged 5
times during normal usage. There is
no need to run the batteries down
completely before recharging.
Safety Warnings and
Instructions: Drilling
• Hold tool firmly to control its twisting
action.
WARNING: Tool may stall (if
overloaded or improperly used) causing a
twist. Always expect the stall. Grip the
screwdriver firmly to control the twisting
action and prevent loss of control which
could cause personal injury. If a stall does
occur, release the trigger immediately and
determine the reason for the stall before
re-starting.
Quick Release Chuck
To install an accessory:
• Hold the
screwdriver as
shown in
Figure 2
and push the
chuck collar
away from the
tool.
• Insert a hex shank accessory and
release the collar.
• The accessory is locked in place.
NOTE: Do not insert a bit tip into the
tool without using a bit tip holder (not
provided). Bit tip holders are available
at any Craftsman outlet.
To remove an accessory:
• Hold the screwdriver as shown in
Figure 2 and push the chuck collar
away from the tool.
• Remove the accesory and release the
collar.
Switch
To turn the tool ON in a forward
direction, press the top section of the
rocker switch and the tool will run.
Release pressure from the switch and
the tool will stop. To operate in reverse,
press the bottom section of the rocker
switch.
Angling the screwdriver
To convert the tool to an angled
screwdriver, push in on the release
button shown in Figure 3 and rotate the
top portion of the tool until it locks into
position.
Angled Screwdriver Warnings:
• To avoid being pinched, hold the
screwdriver as shown in Figure 3 when
changing positions.
• Do not use screwdriver as a pry bar in
any position.
• To avoid screwdriver being turned on
accidentally, do not carry in your pocket.
Drilling
• This tool is not recommended for drilling
in metal or masonry.
• Use sharp drill bits only.
• Drill bits for metal can be used for
drilling holes in wood. These bits must
be sharp and should be pulled out
frequently when drilling to clear chips
from the flutes.
• Support and secure work properly, as
instructed in the safety Instructions.
• Use appropriate and required safety
equipment, as instructed in the safety
instructions.
• Secure and maintain work area, as
instructed in the safety instructions.
• Run the drill very slowly, using light
pressure, until the hole is started
enough to keep the drill bit from slipping
out of it.
• Apply pressure in a straight line with the
2
3
5147391-00,01,11458 Revised 1/31/06 2:24 PM Page 6
Page 7

7
MAINTENANCE
bit. Use enough pressure to keep the bit
biting but not so much as to stall the
motor or deflect the bit.
• Hold the tool firmly with two hands to
control its twisting action.
• DO NOT CLICK THE TRIGGER OF A
STALLED DRILLOFF AND ON IN AN
ATTEMPTTO START IT. DAMAGE TO
THE DRILL CAN RESULT. To remove
twist the bit back and forth and straight
out.
• Minimize stalling on breakthrough by
reducing pressure and slowly drilling
through last part of hole.
• Keep the motor running while pulling the
bit out of a drilled hole This will help
reduce jamming.
• Make sure switch turns drill on and off.
WARNING: It is important to support
work properly and to hold the drill firmly to
prevent loss of control which could cause
personal injury.
Use only mild soap and damp cloth to
clean the tool. Never let any liquid get
inside the tool; never immerse any part
of the tool into a liquid.
IMPORTANT: To assure product
SAFETY and RELIABILITY, repairs,
maintenance and adjustment (other than
those listed in this manual) should be
performed by authorized service centers
or other qualified service organizations,
always using identical replacement
parts.
Lubrication
Craftsman tools are properly lubricated
at the factory and are ready for use.
No further lubrication is necessary.
Accessories
Recommended accessories for use with
your tool are available from your
Craftsman outlet.
CAUTION: The use of any accessory
or attachment not recommended may
be hazardous.
The RBRC™ Seal
The RBRC™ (Rechargeable
Battery Recycling
Corporation) Seal on the
nickel-cadmium battery (or
battery pack) indicates that
the costs to recycle the
battery (or battery pack) at the end of its
useful life have already been paid by
Sears. In some areas, it is illegal to
place spent nickel-cadmium batteries in
the trash or municipal solid waste
stream and the RBRC program provides
an environmentally conscious
alternative.
RBRC in cooperation with Sears and
other battery users, has established
programs in the United States and
Canada to facilitate the collection of
spent nickel-cadmium batteries. Help
protect our environment and conserve
natural resources by returning the spent
nickel-cadmium battery to a Sears Parts
and Repair Center or to your local
retailer for recycling. You may also
contact your local recycling center for
information on where to drop off the
spent battery, or call 1-800-8-BATTERY.
Battery Removal
When the tool no longer accepts
adequate charge the batteries are
depleted. Batteries should be disposed
of properly. Refer to RBRC section for
proper disposal information.
Before attempting to disassemble this
tool, turn it on and run it in either
direction until it stops to ensure a
complete discharge of the batteries.
Using a phillips screwdriver, remove the
screws in the product housing and lift the
plastic housing half off of the tool. Lift the
batteries out and pull off the terminal
clips.
5147391-00,01,11458 Revised 1/31/06 2:24 PM Page 7
Page 8

8
DIAGRAMA DEL DESTORNILLADOR DE IMPACTO
- Anillo de liberación rápida
- Botón de rotación
- Puerto de carga
- Interruptor de avance/reversa e interruptor de encendido/apagado
A
B
C
D
C
B
D
GARANTÍA DE CRAFTSMAN
UN AÑO DE GARANTÍA COMPLETA SOBRE LAS HERRAMIENTAS CRAFTSMAN
Si esta herramienta Craftsman no le brinda una satisfacción total dentro del año de la
fecha de compra, DEVUÉLVALA A CUALQUIER TIENDA DE SEARS O A OTRO
PUNTO DE VENTA DE CRAFSTMAN EN LOS ESTADOS UNIDOS PARA QUE SE LA
CAMBIEN SIN CARGO.
Si esta herramienta Craftsman se utiliza con fines comerciales o de alquiler, esta
garantía se aplica sólo durante 90 días a partir de la fecha de compra.
Esta garantía le concede derechos legales específicos; pueden existir otros derechos
que varían según el estado.
Sears, Roebuck and Co., Dept. 817WA, Hoffman Estates, IL 60179
ADVERTENCIA: ADVERTENCIAS E INSTRUCCIONES
IMPORTANTES SOBRE LA SEGURIDAD
PARAREDUCIR EL RIESGO DE LESIONES:
• Antes de utilizar, asegúrese de que todas
las personas que usen esta herramienta
hayan leído y comprendido todas las
instrucciones de seguridad y cualquier
otra información incluida en este manual.
• Guarde estas instrucciones y revíselas
con frecuencia antes de usar y al
enseñarles a los demás.
ADVERTENCIA: Al utilizar herramientas
eléctricas, siempre se deben tomar
ciertas precauciones básicas de
seguridad para minimizar el riesgo de
incendio, descarga eléctrica y lesiones
personales.
LEA TODAS LAS INSTRUCCIONES.
ADVERTENCIAS E INSTRUCCIONES GENERALES
DE SEGURIDAD PARA TODAS LAS HERRAMIENTAS
ADVERTENCIA: Lea y comprenda
todas las instrucciones. El
incumplimiento de todas y cada una de
las instrucciones enumeradas debajo
puede provocar descarga eléctrica,
incendio o lesiones personales graves.
GUARDE ESTAS INSTRUCCIONES
Área de trabajo
• Mantenga el área de trabajo limpia y
bien iluminada. Los bancos de trabajo
abarrotados y las áreas oscuras
propician accidentes.
• No opere herramientas eléctricas en
atmósferas explosivas, como
ambientes donde se encuentran
líquidos, gases o polvo inflamables.
Las herramientas eléctricas originan
chispas que pueden encender el polvo o
los vapores.
• Mantenga a espectadores, niños y
visitantes alejados de la herramienta
eléctrica en funcionamiento. Las
distracciones pueden provocar la
pérdida de control.
A
5147391-00,01,11458 Revised 1/31/06 2:24 PM Page 8
Page 9

9
Seguridad eléctrica
• Una herramienta accionada a
baterías con baterías integrales o un
paquete de baterías separado debe
recargarse sólo con el cargador
especificado para la batería. Un
cargador adecuado para un tipo de
batería puede crear un riesgo de
incendio si se utiliza con otra batería.
• Utilice la herramienta operada por
batería sólo con el paquete de
baterías diseñado específicamente.
El uso de otro tipo de batería puede
producir riesgo de incendio.
Seguridad personal
• Permanezca alerta, concéntrese en lo
que está haciendo y utilice el sentido
común cuando emplee una
herramienta eléctrica. No utilice
herramientas si está cansado o bajo
el efecto de drogas, alcohol o
medicamentos. Un momento de
descuido mientras se opera una
herramienta eléctrica podría provocar
daños personales graves.
• Use la vestimenta adecuada. No use
ropas holgadas ni joyas. Sujete el
cabello largo. Mantenga el cabello, la
ropa y los guantes alejados de las
piezas en movimiento. Las ropas
holgadas, las joyas o el cabello largo
pueden quedar atrapados en las piezas
móviles.
• Evite el encendido por accidente.
Asegúrese de que el interruptor esté
bloqueado o en la posición de
apagado antes de insertar el paquete
de baterías. Transportar la herramienta
con el dedo en el interruptor o insertar el
paquete de baterías en una herramienta
con el interruptor encendido puede
provocar accidentes.
• Retire las llaves de ajuste o de
tuercas antes de encender la
herramienta. Una llave de tuercas o de
ajuste que se deje conectada a una
pieza giratoria de la herramienta puede
provocar lesiones personales.
• No se estire. Conserve el equilibrio
adecuado y manténgase parado
correctamente en todo momento. El
equilibrio adecuado mientras se está de
pie permite un mejor control de la
herramienta en situaciones inesperadas.
• Use equipo de seguridad. Siempre
utilice protección para los ojos. Se
debe usar máscara para polvo, calzado
de seguridad antideslizante, casco o
protección auditiva según corresponda
en cada caso.
Uso y cuidado de la herramienta
• Utilice abrazaderas u otros medios
prácticos para asegurar y sostener la
pieza de trabajo en una plataforma
estable. Sostener el trabajo con la
mano o contra el cuerpo no brinda la
estabilidad requerida y puede llevar a la
pérdida del control.
• No fuerce la herramienta. Utilice la
herramienta correcta para el trabajo
que realizará. La herramienta correcta
hará el trabajo mejor y más seguro a la
velocidad para la que fue diseñada.
• No utilice la herramienta si no se
puede encender o apagar con el
interruptor. Toda herramienta que no
puede ser controlada mediante el
interruptor es peligrosa y debe
repararse.
• Desconecte el paquete de baterías de
la herramienta o bloquee el
interruptor, o colóquelo en la
posición de apagado antes realizar
ajustes, cambiar accesorios o
almacenar la herramienta. Estas
medidas de seguridad preventivas
reducen el riesgo de encender la
herramienta en forma accidental.
• Guarde las herramientas que no
están en uso fuera del alcance de los
niños y de personas no entrenadas.
Las herramientas son peligrosas en las
manos de usuarios no entrenados.
• Cuando el paquete de baterías no se
utilice, manténgalo lejos de otros
objetos metálicos como: clips para
papel, monedas, llaves, clavos,
tornillos u otros objetos metálicos
pequeños que puedan realizar una
conexión de un terminal a otro. Los
cortocircuitos en los terminales de la
batería pueden provocar chispas,
quemaduras o un incendio.
• Realice un mantenimiento cuidadoso
de las herramientas. Mantenga las
herramientas de corte afiladas y
limpias. Las herramientas que tienen
un mantenimiento adecuado, con los
bordes de corte afilados, son menos
propensas a trabarse y son más fáciles
de controlar.
• Controle que no haya piezas en
movimiento mal alineadas o
trabadas, piezas rotas y cualquier
otra situación que pueda afectar el
funcionamiento de la herramienta. Si
5147391-00,01,11458 Revised 1/31/06 2:24 PM Page 9
Page 10

10
encuentra daños, haga reparar la
herramienta antes de utilizarla.
Muchos accidentes se producen a
causa de las herramientas que carecen
de un mantenimiento adecuado.
• Utilice sólo accesorios
recomendados por el fabricante para
el modelo que posee. Los accesorios
correctos para una herramienta pueden
crear un riesgo de lesiones si se utilizan
con otra herramienta.
Mantenimiento
• El mantenimiento de la herramienta
debe ser realizado únicamente por
personal de reparaciones calificado.
El mantenimiento realizado por personal
no calificado puede provocar riesgo de
lesiones personales.
• Al reparar una herramienta, sólo
utilice piezas de repuesto idénticas.
Siga las instrucciones de la sección
de Mantenimiento de este manual. El
uso de piezas no autorizadas o el
incumplimiento de las instrucciones de
mantenimiento pueden crear un riesgo
de descarga eléctrica o lesiones.
Normas de seguridad específicas
• Sostenga la herramienta por las
superficies de agarre aisladas
cuando realice una operación donde
la herramienta de corte puede tocar
cables eléctricos escondidos. El
contacto con un cable con "corriente
eléctrica" también hará que las partes
metálicas expuestas de la herramienta
tengan "corriente eléctrica" y el
operador sufra una descarga eléctrica.
La etiqueta de su herramienta puede incluir los siguientes símbolos.
V ..........................voltios A..........................amperios
Hz ........................hertz W ........................vatios
min ........................minutos ......................corriente alterna
......................corriente directa
n
o ........................velocidad sin
carga
..........................construcción clase II
........................terminal a tierra
........................símbolo de alerta seguridad .../min ..................revoluciones u
oscilaciones por minuto
ADVERTENCIA: Algunas partículas
originadas al lijar, aserrar, amolar,
taladrar y realizar otras actividades de
construcción contienen productos
químicos que producen cáncer,
defectos de nacimiento y otros
problemas reproductivos. Algunos
ejemplos de estos productos químicos
son:
• el plomo de las pinturas de base
plomo,
• la sílice cristalina de ladrillos, cemento
y otros productos de mampostería, y
• arsénico y cromo de madera con
tratamiento químico (CCA).
El riesgo derivado de estas exposiciones
varía según la frecuencia con la que se
realice este tipo de trabajo. Para reducir
la exposición a estos productos químicos:
se recomienda trabajar en áreas bien
ventiladas y usar equipos de seguridad
aprobados, como las máscaras para
polvo especialmente diseñadas para
filtrar las partículas microscópicas.
• Evite el contacto prolongado con las
partículas de polvo originadas al lijar,
aserrar, esmerilar, taladrar y realizar
demás actividades de la
construcción. Use indumentaria
protectora y lave las áreas expuestas
con agua y jabón. Evite que el polvo
entre en la boca y en los ojos o se
deposite en la piel, para impedir la
absorción de productos químicos
nocivos.
ADVERTENCIA: El uso de esta
herramienta puede generar o
dispersar partículas de polvo
capaces de ocasionar lesiones
respiratorias permanentes y graves u
otras lesiones. Use siempre protección
respiratoria aprobada por NIOSH/OSHA
(Instituto Nacional de Salud y Seguridad
Ocupacional de EE.UU./Administración
de la Salud y Seguridad Ocupacional de
EE.UU.) apropiada para la exposición al
polvo. Aleje las partículas de la cara y el
cuerpo.
5147391-00,01,11458 Revised 1/31/06 2:24 PM Page 10
Page 11

11
1. Este manual contiene instrucciones de
operación y seguridad importantes.
2. Antes de utilizar el cargador de la
batería, lea todas las instrucciones y
las advertencias preventivas en el
cargador de la batería y en el producto
que utiliza la batería.
PRECAUCIÓN: Para reducir el
riesgo de lesión, utilice el cargador
solamente con este producto. Las
baterías en otros productos pueden
estallar y provocar daños personales
o materiales.
3. No exponga el cargador a la lluvia ni a
la nieve.
4. El uso de un accesorio no
recomendado o no vendido por Sears
puede provocar riesgos de incendio,
descarga eléctrica o daños personales.
5. Para reducir el riesgo de avería en los
enchufes y cable eléctricos, tire del
enchufe y no del cable al desconectar
el cargador.
6. Asegúrese de que el cable esté
ubicado de manera que no lo pise o se
tropiece con él y que no esté sujeto a
daños o tensiones de alguna otra
manera.
7. No se debe utilizar un cable
prolongador a menos que sea
absolutamente necesario. El uso de un
cable prolongador incorrecto puede
provocar riesgo de incendio, descarga
eléctrica o electrocución.
a. Se pueden usar cables de dos
conductores con cables prolongadores
de dos o tres conductores. Sólo se
deben utilizar cables prolongadores
con cubierta redonda, y
recomendamos que estén en la lista
de Underwriters Laboratories (U.L.). Si
la prolongación se va a utilizar en el
exterior, el cable debe ser apropiado
para usar en exteriores. Cualquier
cable indicado para uso en exteriores
también se puede utilizar en interiores.
Las letras "W" o "WA" en la cubierta
del cable indican que el cable es
apropiado para uso en el exterior.
b. Un cable prolongador debe tener una
medida de conductor adecuada (AWG
o Medida de conductor
estadounidense) por seguridad y para
evitar pérdida de energía y
recalentamiento. A menor número de
calibre del conductor, mayor será la
capacidad del cable; es decir, un
calibre 16 tiene más capacidad que un
calibre 18. Cuando se utiliza más de
una prolongación para lograr la
longitud total, asegúrese de que cada
prolongación tenga la medida mínima
de conductor para el largo total.
INSTRUCCIONES Y ADVERTENCIAS DE SEGURIDAD: CARGA
Calibre mínimo para cables prolongadores
Voltios Largo total del cable en pies
120V 0-25 26-50 51-100 101-150
240V 0-50 51-100 101-200 201-300
Capacidad nominal en amperios
Más No más AWG
0-6 18 16 16 14
6 - 10 18 16 14 12
10 - 12 16 16 14 12
12 - 16 14 12 Not Recommended
8. Utilice únicamente el cargador
provisto cuando carga su
herramienta. El uso de cualquier otro
cargador puede dañar el destornillador
u originar una condición riesgosa.
9. Utilice un solo cargador cuando carga.
10. No intente abrir el cargador. No
contiene elementos que el cliente
pueda reparar. Devuelva a cualquier
centro de mantenimiento Sears
autorizado.
11. NO incinere la herramienta o las
baterías aunque estén muy averiadas
o completamente gastadas. Las
baterías pueden explotar en el fuego.
12. En condiciones de uso, de carga o de
temperaturas extremas, podría
producirse una pequeña pérdida de
líquido en las celdas de la batería.
Esto no indica una falla. Sin embargo,
si el sello externo está roto y esta
pérdida toca su piel:
a. Lave rápidamente con agua y jabón.
b. Neutralice con un ácido suave como
jugo de limón o vinagre.
c. Si el líquido de la batería entra en
contacto con sus ojos, lávelos con
agua limpia durante al menos 10
minutos y busque atención médica
inmediatamente. NOTA MÉDICA: El
líquido es una solución de hidróxido
de potasio al 25%-35%.
5147391-00,01,11458 Revised 1/31/06 2:24 PM Page 11
Page 12

12
IMPORTANTE: Las baterías de la
herramienta no vienen totalmente
cargadas de fábrica. Antes de intentar
cargarlas, lea atentamente todas las
instrucciones de seguridad.
Para cargar el destornillador,
siga los pasos que se detallan a
continuación:
1. Enchufe el cable
de energía del
cargador en el
enchufe en la
parte inferior
media del mango
del destornillador,
como se muestra
en la Figura 1.
2. Enchufe el
cargador en
cualquier
tomacorriente eléctrico estándar de
120 V, 60 Hz.
3. Espere que la herramienta se cargue
inicialmente durante 9 horas. Después
de la carga inicial, en condiciones de
uso normales, la herramienta debería
cargarse completamente en un plazo
de 3 a 6 horas.
ADVERTENCIA: Al desconectar la
herramienta del cargador, asegúrese
de desenchufar el cargador del
tomacorriente primero y desconectar el
cable del cargador de la herramienta.
No use la herramienta mientras está
conectada al cargador.
Notas importantes sobre la
carga
1. Después de un uso normal, la
herramienta debería quedar
completamente cargada en 3 a 6
horas. Si las baterías están
completamente agotadas, la carga
completa podría demorar hasta 6
horas. La herramienta no viene con
carga completa de fábrica. Antes de
intentar utilizarla, se debe cargar al
menos durante 9 horas.
2. NO cargue las baterías con una
temperatura ambiental por debajo de
4,5 °C (40 °F) o por encima de +40,
5 °C (105 °F). Esto es importante y
evitará daños graves en las baterías.
Se pueden obtener la mayor duración
y el mejor rendimiento si se cargan las
baterías cuando la temperatura está
en unos 24 °C (75 °F).
3. Mientras carga, el cargador puede
zumbar y ponerse caliente al tacto.
Esto es una condición normal y no
indica un problema.
4. Si las baterías no se cargan
adecuadamente:
(1) Enchufe una lámpara u otro
artefacto para comprobar el
tomacorriente.
(2) Verifique si el tomacorriente está
conectado a un interruptor que
corta la energía cuando usted
apaga la luz.
(3) Lleve el cargador y la herramienta
a un ambiente con una temperatura
superior a 4,5 °C (40 °F) o inferior
a +40,5 °C (105 °F).
(4) Si el tomacorriente y la temperatura
están bien y usted no consigue
una carga correcta, consulte la
garantía de Craftsman.
5. Se debe recargar la herramienta
cuando no produce energía suficiente
para tareas que previamente realizaba
con facilidad. NO CONTINÚE
utilizando el producto con sus baterías
agotadas.
6. Para prolongar la duración de la
batería, evite dejarla cargando durante
períodos prolongados (más de 30 días
sin uso). Aunque sobrecargarla no es
una cuestión de seguridad, puede
reducir significativamente la duración
total de la batería.
7. Las baterías alcanzarán su
rendimiento óptimo después de 5
recargas durante un uso normal. No
hay necesidad de agotar las baterías
completamente antes de recargarlas.
Advertencias e instrucciones
de seguridad: Taladrado
• Sostenga la herramienta con firmeza
para controlar la torsión.
ADVERTENCIA: La herramienta puede
atascarse (si se sobrecarga o se usa
inadecuadamente) y provocar una torsión.
Siempre espere el atascamiento. Sujete
el destornillador con firmeza para
controlar la torsión y evitar la pérdida de
control que podría ocasionar lesiones
personales. En caso de que se atasque la
herramienta, suelte el gatillo
inmediatamente y determine la causa del
atascamiento antes de encenderla
nuevamente.
PROCEDIMIENTO DE CARGA
1
5147391-00,01,11458 Revised 1/31/06 2:24 PM Page 12
Page 13

13
Portabrocas de rápida liberación
Para instalar un accesorio:
• Sostenga el
destornillador como
se muestra en la
Figura 2 y hale del
anillo del
portabrocas para
separarlo de la
herramienta.
• Inserte un vástago hexagonal y libere el
anillo.
• El accesorio está fijo en su lugar.
NOTA: No inserte una punta de broca
en la herramienta sin un portabrocas
(no incluido). Los portabrocas están
disponibles en cualquier punto de
venta de Craftsman.
Para retirar un accesorio:
• Sostenga el destornillador como se
muestra en la Figura 2 y hale del anillo
del portabrocas para separarlo de la
herramienta.
• Quite el accesorio y libere el anillo.
Interruptor
Para encender la herramienta en una
posición de avance, presione la sección
superior del interruptor oscilante y la
herramienta se pondrá en
funcionamiento. Libere presión del
interruptor y la herramienta se detendrá.
Para hacerla funcionar en reversa,
presione la sección inferior del
interruptor oscilante.
Angulación del destornillador
Para convertir la herramienta en un
destornillador angular, presione el botón
de liberación que se muestra en la
figura 3 y rote la parte superior de la
herramienta hasta que quede fija en su
lugar.
Advertencias sobre el destornillador
angular:
• Para evitar pellizcos, sostenga el
destornillador como se muestra en la
Figura 3 al cambiar posiciones.
• No use el destornillador para hacer
palanca en ninguna posición.
• Para evitar que el destornillador se
encienda accidentalmente, no lo lleve
en el bolsillo.
Taladrado
• No se recomienda el uso de esta
herramienta para taladrar en metal o
mampostería.
• Utilice solamente brocas de taladro
afiladas.
• Las brocas de taladro para metal se
pueden usar para perforar orificios en
madera. Estas brocas deben estar
afiladas y se deben retirar con
frecuencia mientras se taladra para
limpiar las virutas de las ranuras.
• Sostenga y asegure el trabajo
adecuadamente, según se indica en las
instrucciones de seguridad.
• Utilice equipos de seguridad adecuados
y necesarios, como se indica en las
instrucciones de seguridad.
• Asegure y mantenga el área de trabajo,
según se indica en las instrucciones de
seguridad.
• Haga funcionar el taladro muy
lentamente, con poca presión, hasta
que el orificio producido sea tal que
contenga la broca y evite que se deslice
del mismo.
• Aplique presión en línea recta con la
broca. Utilice presión suficiente para
mantener la broca funcionando, pero no
tanto como para ahogar el motor o
ladear la broca.
• Sostenga firmemente la herramienta
con las dos manos para controlar la
torsión.
• SI EL TALADRO SE PARÓ, NO
INSISTAEN MOVER EL DISPARADOR
DE ENCENDIDO Y APAGADO DEL
TALADRO. SE PODRÍADAÑAR EL
TALADRO. Para retirarla, mueva la
broca de un lado a otro hasta sacarla.
• Reduzca la presión y taladre lentamente
hasta la última parte del orificio a fin de
minimizar atascos al perforar.
• Mantenga el motor en funcionamiento
mientras retira la broca de un orificio
taladrado. Esto ayudará a reducir los
atascos.
INSTRUCCIONES DE OPERACIÓN
2
3
5147391-00,01,11458 Revised 1/31/06 2:24 PM Page 13
Page 14

• Asegúrese de que el taladro se
encienda y apague con el interruptor.
ADVERTENCIA: Es importante apoyar
bien la pieza sobre la que se trabaja y
sostener el taladro firmemente para
evitar la pérdida de control, que podría
provocar daños personales.
14
MANTENIMIENTO
Para limpiar la herramienta, sólo utilice
jabón suave y un paño húmedo. Nunca
permita que penetre líquido dentro de la
herramienta y nunca sumerja ninguna
de las piezas en un medio líquido.
IMPORTANTE: Para garantizar la
SEGURIDAD y CONFIABILIDAD del
producto, las reparaciones, el
mantenimiento y los ajustes (los que no
estén enumerados en este manual) se
deben realizar en los centros de
mantenimiento autorizados o en otras
organizaciones de mantenimiento
calificadas, y siempre se deben utilizar
piezas de repuesto idénticas.
Lubricación
Las herramientas Craftsman son
lubricadas apropiadamente en fábrica y
están listas para usar.
No se requiere lubricación adicional.
Accesorios
Los accesorios que se recomiendan
para utilizar con su herramienta están
disponibles en su punto de venta de
Craftsman.
PRECAUCIÓN: El uso de cualquier
accesorio o anexo no recomendado
puede ser peligroso.
El sello RBRC™
El sello RBRC™
(Corporación de reciclado de
baterías recargables) que se
encuentra sobre la batería
de níquel-cadmio (o paquete
de baterías) indica que los costos para
reciclar la batería (o el paquete de
baterías) al final de su vida útil ya han
sido pagados por Sears. En algunas
zonas, es ilegal arrojar las baterías
usadas de níquel-cadmio en la basura o
en el flujo de desechos sólidos del
municipio. El programa RBRC
proporciona una alternativa de
conciencia sobre el cuidado del medio
ambiente.
RBRC, en cooperación con Sears y
otros usuarios de baterías, estableció
programas en los Estados Unidos y
Canadá para facilitar la recolección de
baterías de níquel-cadmio usadas.
Ayude a proteger nuestro medio
ambiente y a conservar los recursos
naturales: devuelva las baterías de
níquel-cadmio usadas a un Centro de
reparaciones y piezas de Sears o a un
comerciante minorista para que sean
recicladas. También puede comunicarse
con el centro de reciclado para
informarse sobre dónde dejar las
baterías, o llame al 1-800-8-BATTERY.
Retiro de la batería
Cuando la herramienta ya no acepte la
carga adecuada, significa que las
baterías están agotadas. Las baterías
deben desecharse de manera correcta.
Consulte la sección RBRC para obtener
información sobre cómo desechar las
baterías de manera correcta.
Antes de intentar desarmarla, encienda
y opere la herramienta en cualquier
dirección hasta que se detenga para
asegurarse de que las baterías se
descarguen completamente. Con un
destornillador Phillips, retire los tornillos
en la cubierta del producto y levante la
parte plástica de la cubierta de la
herramienta. Levante las baterías para
sacarlas y desconecte las pinzas de los
terminales.
5147391-00,01,11458 Revised 1/31/06 2:24 PM Page 14
Page 15

15
5147391-00,01,11458 Revised 1/31/06 2:24 PM Page 15
 Loading...