

Page 1
Owner's Manual
PNEUMATIC
AIR HAMMER
Model No.
875.191190
WARNING:
Before operating too!, read this
manual and follow all
Safety Recommendations and
Operating instructions.
♦ Safety
♦ Warranty
♦ Features & Operation
♦ Maintenance
♦ Español
Sears, Roebuck and Co., Hoffman Estates, IL 60179 USA
www.sears.com
Page 2

SAFETY INSTRUCTIONS
WARRANTY
Read Operating Instructions
Please become familiar with all the instructions and
warnings before operating any pneumatic tool.
Always Wear Approved Eye Protection
Impact resistant eye protection should meet or exceed
the standards set forth in ANSI Z87.1, Occupational and
Educational Eye and Face Protection. Look for marking
Z87.1 on your eye protection to ensure that it is an
approved style.
Hearing Protection is Recommended
Hearing protection should be used when the noise level
exposure equals or exceeds an 8 hour time-weighted
average sound level of 85dBA. Process noise> reflective
surfaces, other tools being operated nearby, all add to the
noise level in a given work area. If you are unable to
determine your noise level exposure, we recommend the
use of hearing protection.
Avoid Prolonged Exposure to Vibration
Pneumatic tools can vibrate during use. Prolonged
exposure to vibration or very repetitive hand and arm
movements, can cause injury. Discontinue the use of any
tool if you experience tingling, numbness, discomfort or
pain in your hands or arms. You should consult your
physician before resuming use of tool.
90 PSI Maximum
This tool is designed to operate at an air pressure of 90
pounds per square inch gauge pressure {90 PSI)
maximum, at the tool. Use of higher air pressure can, and
may cause injury. Also, the use of higher air pressure
places the internal components under loads and
stresses they were not designed for, causing premature
tool failure.
NOTE: THE AIR SUPPLY SHOULD BE CLEAN AND DRY,
PREFERABLY LUBRICATED. FOR BEST RESULTS
DRAIN THE MOISTURE FROM YOUR COMPRESSOR
DAILY.
Use May Produce Flying Objects
Care should be taken when using any percussion tool.
Keep the point of the chisel in contact with the work
surface. Inspect all accessories carefully for damage
before use. Chisels and chisel retainers should be kept
in good condition and replaced as needed. Discard any
accessory that has been damaged to prevent anyone
from using it.
Some dust created by power sanding, sawing, grinding,
drilling, and other construction activities contains chemi
cals known to cause cancer, birth defects or reproductive
harm. Some examples of these chemicals are:
• Lead from lead-based paint
• Cystalline silica from bricks, cement and other
masonry products
• Arsenic and chromium from chemically treated
lumber
Your risk from these exposures varies, depending on how
often you do this type of work. To reduce your exposure to
these chemicals, work in a well-ventilated area and work
with approved safety equipment such as dust masks that
are specially designed to filter out microscopic particles.
FULL TWO YEAR WARRANTY ON
CRAFTSMAN AIR-DRtVE TOOLS
If this Craftsman tool fails to give complete satisfaction
within two years from the date of purchase, RETURN IT
TO THE NEAREST SEARS STORE IN THE UNITED
STATES, and Sears will repair it free of charge. If this
Craftsman tool is used for commercial or rental
purposes, this warranty applies for only 90 days from the
date of purchase. This warranty gives you specific legal
rights, and you may also have other rights which vary
from state to state.
Seai^, Roebuck and Co., Dept. 817WA, Hoffman
Estates, IL 60179.
FEATURES/SPECIFICATIONS
The Craftsman Model 875.191190 Air Hammer is
designed for chipping, trimming, riveting, cutting, piercing
and peening.
Features
• Uses standard .401 inch shank chisels.
• Alloy steel barrel and heat-treated piston for long life.
• Produces 4,000 powerful blows per minute with
a 1 -5/8" stroke.
Specifications
Blows per minute............................................ ....4,000
Stroke length
Bore diameter......
Overall Length
Weight
Recommended hose size
............................................................
.............................................. 3/4"
........................................................
....................................................... 2.3 ibs.
................................
3/8” I.D.
IW
6.1"
Air Inlet.............................................................1/4" NPT
Average Air Consumption...............................
...4 CFM
Maximum Operating Pressure.............................90 psi
INSTALLATION / PRE-OP
Pre-Operation
Before the tool is connected to the air supply, clear the air
hose of accumulated dust and moisture by running air
freely through the air hose for 5-10 seconds. Before
removing a tool for service or changing chisels, make
sure the air line is shut-off at the compressor. This will
prevent the tool from operating if the throttle is accidently
engaged.
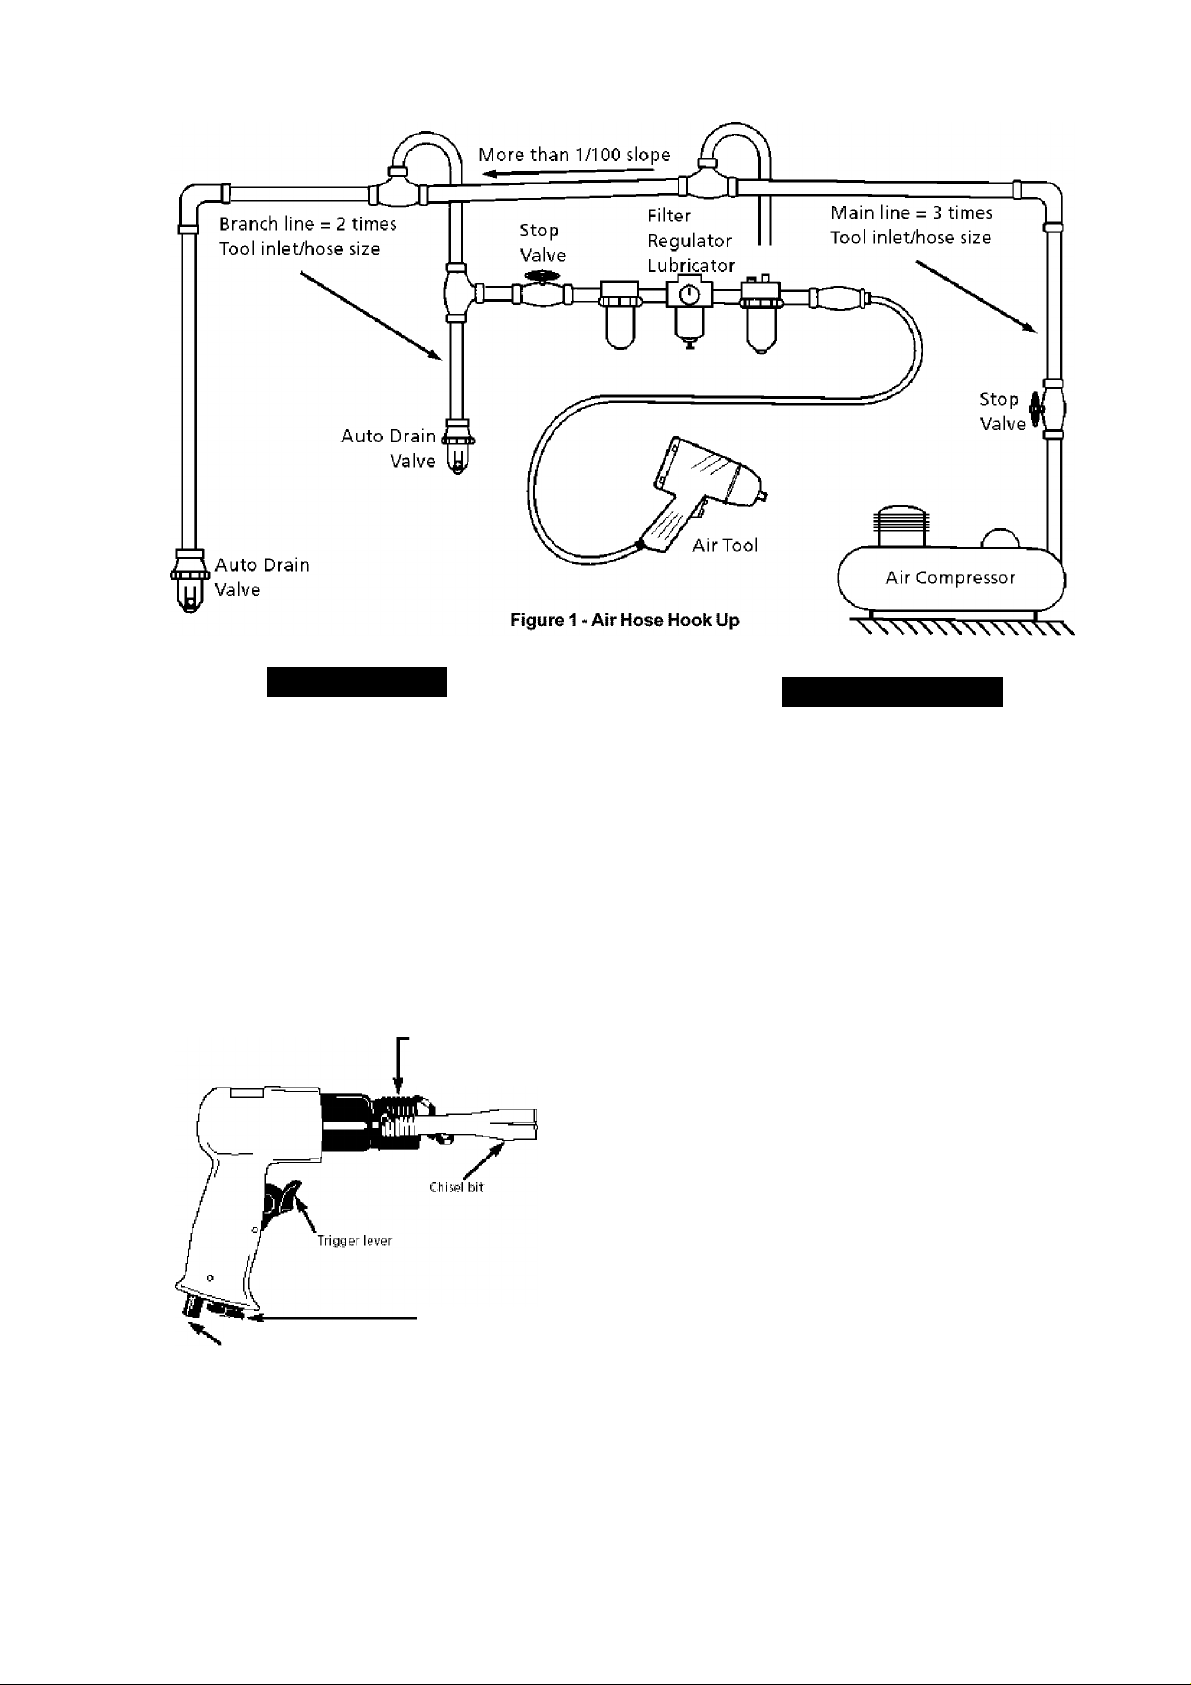
Installation (See figure 1)
This tool Is designed to operate at 90 psi. Lower pres
sure (below 90 psi) will reduce performance of the tool
while higher air pressure (over 90 psi) raises the perfor
mance of the tool beyond its rated capacity and could
cause serious damage to tool and user.
Always use clean dry air. Excessive moisture and dirt will
greatly reduce the life of any air motor. We recommend
the installation of an in-line filter-regulator-lubricator as
dose to the tool as possible. {Fig 1)
A 3/8" air hose is required up to a length of 8 ft. If more
length is required a 1/2" air hose should be used at the
compressor. Attach a 3/8" whip hose for the remaining 4 8 ft. for flexibility. Be sure all hoses and fittings are the
correct size and tightly secured before using air tool.
(2)
Page 3
OPERATION
MAINTENANCE
USING QUICK CHANGE RETAINER
1. Disconnect air supply and remove all accessories.
2. Thread quick change chisel retainer onto end of
barrel.
3. While pushing end of spring to side of the tool, insert
a standard .401" taper shank chisel into barrel and
allow spring tension to rest against chisel. Make sure
chisel collar is between barrel and retaining part of
spring.
4. Remove chisel by pushing spring to side of tool and
pull chisel out of barrel.
5. Always hold chisel to work surface before operating
tool.
’ Regulator
'Spring Retainer
Air inlet
Figure 2 - Tool Diagram
Place chisel against work surface and pull trigger in
short bursts until chisel sets in work. Use both hands to
hold hammer for better control.
Lubrication
An in-iinefiiter-reguiator-lubricator{fig 1) is
recommended as it increases too! life and keeps the
tool in sustained operation. The in-iine lubricator should
be regulariy checked and filled with air tool oil. Proper
adjustment of the indine lubricator is performed by
placing a sheet of paper next to the tools exhaust
ports and holding the throttle open approximately 30
seconds. The lubricator is properly set when a light
stain of oil collects on the paper. Excessive amounts of
oil should be avoided.
In the event that it becomes necessary to store the
tool for an extended period of time (overnight, weekend,
etc.), it should receive a generous amount of
lubrication through the air inlet (fig 2). The tool should
be run for approximately 30 seconds to ensure oil has
been evenly distributed throughout the tool. The tool
should be stored in a dean and dry environment.
Recommended lubricants: Use air tool oil or any
other high grade turbine oil containing moisture
absorbent, rust inhibitors, metal wetting agents and an
EP (extreme pressure) additive. (See Fig. 2 for
iocation/air inlet).
ACAUTION
Never operate hammer without a chisel installed and
placed against the work surface. Doing so may result in
personal Injury or damage to the tool.
Sears offers a variety of chisels for this hammer.
(3)
Page 4

Sears CRAFTSMAN Model 875.191190 Pneumatic Air Hammer
Exploded View and Parts List
Ref. Description
1 Handle
2 Spring Pin (2) 9AH-15002
3
4
5 Air Regulator
6 Trigger
7 Coil Spring 9AH-15007
8
9
Steel Washer
Coil Spring
Valve Stem
Valve
Part No.
9AH-15001
9AH-15003
9AH-15004
9AH-15005
9AH-15006
9AH-15008
9AH-15009
Ref.
10
11
12
13
14 Lower Valve 9AH-15014
15
16
17 Spring Retainer 9AH-15017
Description
Spring
Air Inlet
Upper Valve
Valve Disc
Piston
Cylinder 9AH-15016
Part No.
9AH-15010
9AH-15011
9AH-15012
9AH-15013
9AH-15015
(4)
Page 5

Troubleshooting
Symptom Possible Cause Corrective Action I
Tool runs slowly or will not operate
Moisture blowing out of tool exahust
1. Grit or gum in tool
2. No oi! in tool
3. Low air pressure
4. Air hose leaks
5. Pressure drops
1. Water in tank
1, Flush the tool with air tool oil or gum
solvent.
2, Lubricate the tool according to the lubrication
instructions in this manual
3- a. Adjust the regulator on the tool to the maxL
mum setting
b. Adjust the compressor regulator to too!
maximum of 90 psi.
4, Tighten and seal hose fittings if leaks are found.
Use teflon tape.
5- a. Be sure the hose is the proper size. Long
hoses or tools using large volumes of air may
require a hose with an I.D, of 1/2” or larger
depending on the total length of the hose,
b. Do not use a multiple number of hoses
connected together with quick connect fittings.
This causes additional pressure drops and
reduces the tool power. Directly connect the
hoses together
1. Drain tank. (See air compressor manual). Oil tool
and run until no water is evident. Oil tool again and
run 1-2 seconds
(5)
Page 6

INSTRUCCIONES DE OPERACION
Lea las instrticciones de operación
Por favor familiarícese con todas las instrucciones y
advertencias antes de operar cualquier herramienta
neumática.
Siempre use protección aprobada para la vista
La protección a la vista resistente al impacto debe
satisfacer o exceder las normas establecidas en ANSI
Z87.1, Protección Educativa y Ocupacional de los Ojos y
el Rostro. Busque la marca Z87.1 en su protección de la
vista para asegurarse que es un estilo aprobado.
Se recomienda protección del oído
La protección del oído debe usarse cuando la exposición
al nivel del ruido iguala o excede un nivel promedio de
sonido ponderado de tiempo en 8 horas, de 85dBA.
Ruido del proceso, superficies reflectoras, otras
herramientas que se operan en la cercanía, todos
agregan al nivel del ruido en una área de trabajo dada. Si
usted no puede determinar su exposición al nivel de
ruido, recomendamos el use de protección de oído.
Evite exposición prolongada a la vibración
Las herramientas neumáticas pueden vibrar durante el
uso. Una exposición prolongada a la vibración o
movimientos muy repetitivos de la mano y el brazo
pueden causar lesiones. Discontinúe el uso de
cualquiera herramienta si usted experimenta cosquilleo,
entumecimiento, incomodidad o dolor en sus manos o
brazos. Usted debe consultar con su médico antes de
reanudar el uso de herramienta.
90 PSI máximas
Esta herramienta está diseñada para operar a una
presión atmosférica máxima de 90 libras por puigada
cuadrada de medidor de presión (90 PSI), en la
herramienta. El uso de presiones atmosféricas más
altas puede causar lesiones. También, el uso de
presiones atmosféricas más altas coloca a los
componentes interiores bajo cargas y tensiones para las
que no fueron diseñados, causando una falla prematura
de la herramienta.
GARANTIA
DOS AÑOS COMPLETOS DE GARjlU^TIA DE LAS
HERRAMIENTAS DE OPERACION NEUMATICA CRM=TSM>^
Si esta herramienta Craftsman no le proporciona una satisfacción
completa dentro de los dos años de la fecha de compra,
DEVUÉLVALA A LA TIENDA MAS CERCW^A DE SEARS EN LOS
ESTADOS UNIDOS, y Sears la reparación libre de cargo. Si esta
herramienta Craftsman se usa para lines comerciales o de alquiler,
esta garantía sólo se aplica durante 90 días desde la fecha de
compra. Esta garantía le proporciona derechos legales
específicos, y usted también puede tener otros derechos que
varían de estado a estado.
Sears, Roebuck y Cía., Dept. 817WA, Hoffman
Estates, IL 60179.
CARACTERISTiCAS/ESPECIFICACIONE
El martillo de aire modelo 875.191190 Craftsman está
diseñado para cincelar, recortar, remachar, perforar y
martillar.
Características
• Usa cinceles de vástago estándar de .401 de pulgada.
• Tambor de aleación de acero y pistón térmicamente
tratado para una larga duración,
• Produce 4000 golpes potentes por minuto con una
carrera de 1-5/8”.
Especificaciones
Golpes por minuto
Largo de la carrera
Diámetro del hueco
Largo total..............................................6.1"
Peso
......................................................
Tamaño recomendado de
la manguera
Entrada de aire.................................................1/4” NPT
Consumo neumático promedio.................4 PCM
Presión máxima operativa
.................................
................................
...............................
...........................................
.......................
4000
1-5/8”
3/4”
2.3 Ibs.
3/8” D.l.
90 psi
g
NOTA: EL SUMINISTRO NEUMATICO DEBE ESTAR
LIMPIO, SECO Y PREFERENTEMENTE LUBRIFICADO.
PARA OBTENER LOS MEJORES RESULTADOS, DRENE
DIARIAMENTE LA HUMEDAD DE SU COMPRESOR.
ADVERTBÍCIA
Algo del polvo creado por lijado, aserrado, desgastado
mecánico, y otras actividades de construcción, contienen
químicos conocidos como causantes de cáncer,
defectos congénitos o otras lesiones al sistema
reproductivo. Algunos ejemplos de estos químicos son;
• El plomo en la pintura basada en plomo.
• La sílice cristalina de los ladrillos y cemento
y otros productos de albañilería, y el arsénico y
cromo de la madera químicamente tratada.
Su riesgo de esas exposiciones varía, dependiendo de
cuán a menudo usted hace este tipo de trabajo. Para
reducir su exposición a estos químicos: trabaje en una
área bien ventilada, y con un equipo de seguridad
aprobado, como máscaras protectoras contra el polvo
que se diseñan específicamente para filtrar partículas
microscópicas-
!NSTALAC!ON/PRE-OP
Pre-Operación
Antes que la herramienta se conecte al suministro neumático,
limpie la manguera neumática de polvo y humedad acumulados,
haciendo circular aire a través de la manguera neumática durante
5-10 segundos. Antes de extraer una herramienta para prestar
servicio o cambiar cubos, asegúrese que ta tubería neumática esté
cerrada en el compresor. Esto evitará que ía herramienta funcione
si el acelerador se activa accidentalmente.
Instalación {Vea la figura 1)
Esta herramienta está diseñada para operar a 90 psí, una presión
menor (menor de 90 psi) reduce el rendimiento de la herramienta,
mientras que una presión neumática mayor (mayor de 90 psi)
eleva el rendimiento de la herramienta más allá de su capacidad
nomina! y puede causar lesiones graves y daños extensos al
usuario y a la herramienta.
Use siempre aire limpio seco. Una humedad y suciedad excesivos
reducirá substanciaimente la duración de cualquier motor
neumático. Recomendamos la instalación de un flltro-reguladorlubricador en línea tan cerca como sea posible de la herramienta.
Se requiere una manguera neumática de 3/8" hasta un largo de 8
pies. Si se requiere una largo mayor debe usarse una manguera
neumática de 1/2" en el compresor. Fije una manguera de tipo
“látigo” de 3/8" para los 4-8 pies restante, por flexibilidad. Antes
de usar la herramienta neumática, asegúrese que todas las
mangueras y adaptadores sean del tamaño correcto y estén bien
asegurados
(6)
Page 7

OPERACION
MANTENIMIENTO
uso DE UN RETENEDOR DE CAMBIO RAPIDO
1. Desconecte el suministro neumático y extraiga todos ios
accesorios.
2. Enrosque ei retenedor del cincel de cambio rápido sobre el
extremo dei barril.
3. A! empujar el extremo del resorte al lado de !a herramienta,
inserte un cincel de vástago cónico de .401 de pulgada dentro
del tambor y permita que ei resorte tensionado se apoye sobre
ei cincel. Asegúrese que el collar del cincel esté entre el tambor
y la parte retenedora dei resorte.
4. Extraiga ei cincel empujando ei resorte al lado de la
herramienta y tire de! cincel fuera de! tambor.
5. Coloque siempre el cincel sobre la superficie de trabajo, antes
de operar la herramienta.
Hém«*íéí'*íi: ewiási«
X
Figura 2 - Diagrama de ta herramienta
Lubricación
Se recomienda usar un filtro-regulador-lubricador en linea (fig 1)
ya que incrementa la duración de la herramienta y mantiene la
misma en una operación sostenida. El lubricadoren línea debe
inspeccionarse regularmente y llenarse con aceite para
herramientas neumáticas. Un ajuste apropiado del lubricadoren
línea se efectúa colocando una hoja de papel cerca de ios
orificios de escape neumáticos de la herramienta y manteniendo
el acelerador abierto por 30 segundos aproximadamente. El
iubricador está apropiadamente regulado cuando una mancha
leve de aceite se deposita sobre el papel. Deben evitarse
cantidades excesivas de aceite.
En ei caso que se haga necesario almacenar la herramienta por
un período prolongado (durante ta noche, fin de semana, etc.), la
misma debe recibir una gran cantidad de lubricación a través de
ia entrada neumática (fig 3). La herramienta debe hacerse
funcionar por 30 segundos aproximadamente para asegurar que
el aceite se haya distribuido uniformemente a través de la
herramienta. La herramienta debe almacenarse en un ambiente
limpio y seco.
Lubricantes recomendados: Use aceite de herramienta
neumática o cualquier otro aceite de turbina de grado elevado
que contenga un absorbente de humedad, inhibidores de óxido,
agentes humectantes de metal y un aditivo EDP (presión
extrema). (Vea la Fig, 3 por la ubicación/entrada neumática).
PRECAUCION
Nunca opere el cincel sin un cincel instalado y coiocado contra la
superficie de trabajo. Ei hacerlo puede resultar en lesiones
personales o daños a la herramienta.Martillo neumático Modelo
875.191190 CRAFTSMAN Sears
Coloque el cincel sobre la superficie de trabajo y accione el
gatillo en disparos rápidos hasta que el cincel se asiente sobre
el trabajo. Use ambas manos para sujetar el martillo para un
mejor control.
Sears ofrece una variedad de cinceles para este martillo
(7)
Page 8

Martillo neumático Modelo 875.191190 CRAFTSMAN Sears Vista desplegada y lista de piezas
Ref.
1
2
3 Arandela de acero 9AH-15003
4
5
6 Activador 9AH-15006
7
8 Vastago de la válvula 9AH-15008
9 Válvula
Descripción No. de pieza
Mango 9AH-15001 10 Resorte 9AH-15010
Clavija riel resorte (2)
Muelle
Regulador neumático
Muelle
9AH-15002 11
9AH-15004
9AH-15005
9AH-15007
9AH-15009
Ref. Descripción
12 Válvula superior 9AH-15012
13 Disco de válvula 9AH-15013
14
15
16 Cilindro
17 Retenedor del resorte 9AH-15017
(8)
Entrada neumática
Válvula inferior
Pistón 9AH-15015
No. de pieza
9AH-15011
9AH-15014
9AH-15016
Page 9

Localización de falias
La herramienta funciona con lentitud o no funciona
1. Suciedad o goma en la herramienta
2. No hay aceite en la herramienta
3. Presión neumática baja
4. Pedida de la manguera neumática
5. Baja de presión
1. Limpie la herramienta con aceite de herramienta
neumática o solvente para goma.
2. Lubrique la herramienta de acuerdo con las
instrucciones de lubricación en este manual
3. a. Ajuste el regulador en la herramienta a la
graduación máxima
b. Ajuste el regulador del compresor a la máxima de
la herramienta de 90 psi.
4. Ajuste y selle los adaptadores de la manguera si
se hallan pérdidas. En ese caso use cinta de teflón.
5. a. Asegúrese que la manguera tenga el tamaño
apropiado. Mangueras largas o herramientas que
usan un gran volumen de aire pueden requerir una
manguera con un diámetro interno de 1/2” o mayor
dependiendo de la longitud total de la manguera,
b. No use una cantidad múltiple de mangueras
conectadas juntas con adaptadores de conexión
rápida. Esto causa caidas de presión adicionales y
reduce la potencia de la herramienta. Conecte
directamente las mangueras juntas
Escape húmedo de la
herramienta
1. Agua en el tanque
1. Drene el tanque. (Vea el manual del compresor
neumático). Aceite la herramienta y haga funcionar
hasta que no sea evidente la presencia de agua.
Aceite nuevamente la herramienta y haga funcionar
por 1-2 segundos
(9)
Page 10

Get it fixed, at your home or ours!
Your Home
For repair - in your home - of all major brand appliances,
lawn and garden equipment, or heating and cooling systems,
no matter who made it, no matter who sold it!
For the replacement parts, accessories and
owner’s manuals that you need to do-it-yourself.
For Sears professional instailation of home appliances
and items like garage door openers and water heaters.
1-800-MY-HOME® (1-800-469-4663)
Cali anytime, day or night (U.S.A. and Canada)
www.sears.comwww.sears.ca
Our Home
For repair of carry-in items like vacuums, lawn equipment,
and electronics, call or go on-line for the location of your nearest
Sears Parts & Repair Center.
.......
1-800-488-1222
Call anytime, day or night (U.S.A. only)
www.sears.com
To purchase a protection agreement on a product serviced by Sears:
1-600-827-6655 {U.S.A.) 1-800-361-6665 (Canada)
For after sale
support and assistance
1-800-290-9054
®> Registered Trademark / ™ Trademark / Service Mark of Sears, Roebuck and Co.
®> Marca Registrada / ™ Marca de Fábrica / Marca de Servicio de Sears, Roebuck and Co.
Marque de commerce / Marque déposée de Sears, Roebuck and Co.
© Sears, Roebuck and Co.
 Loading...