

Page 1
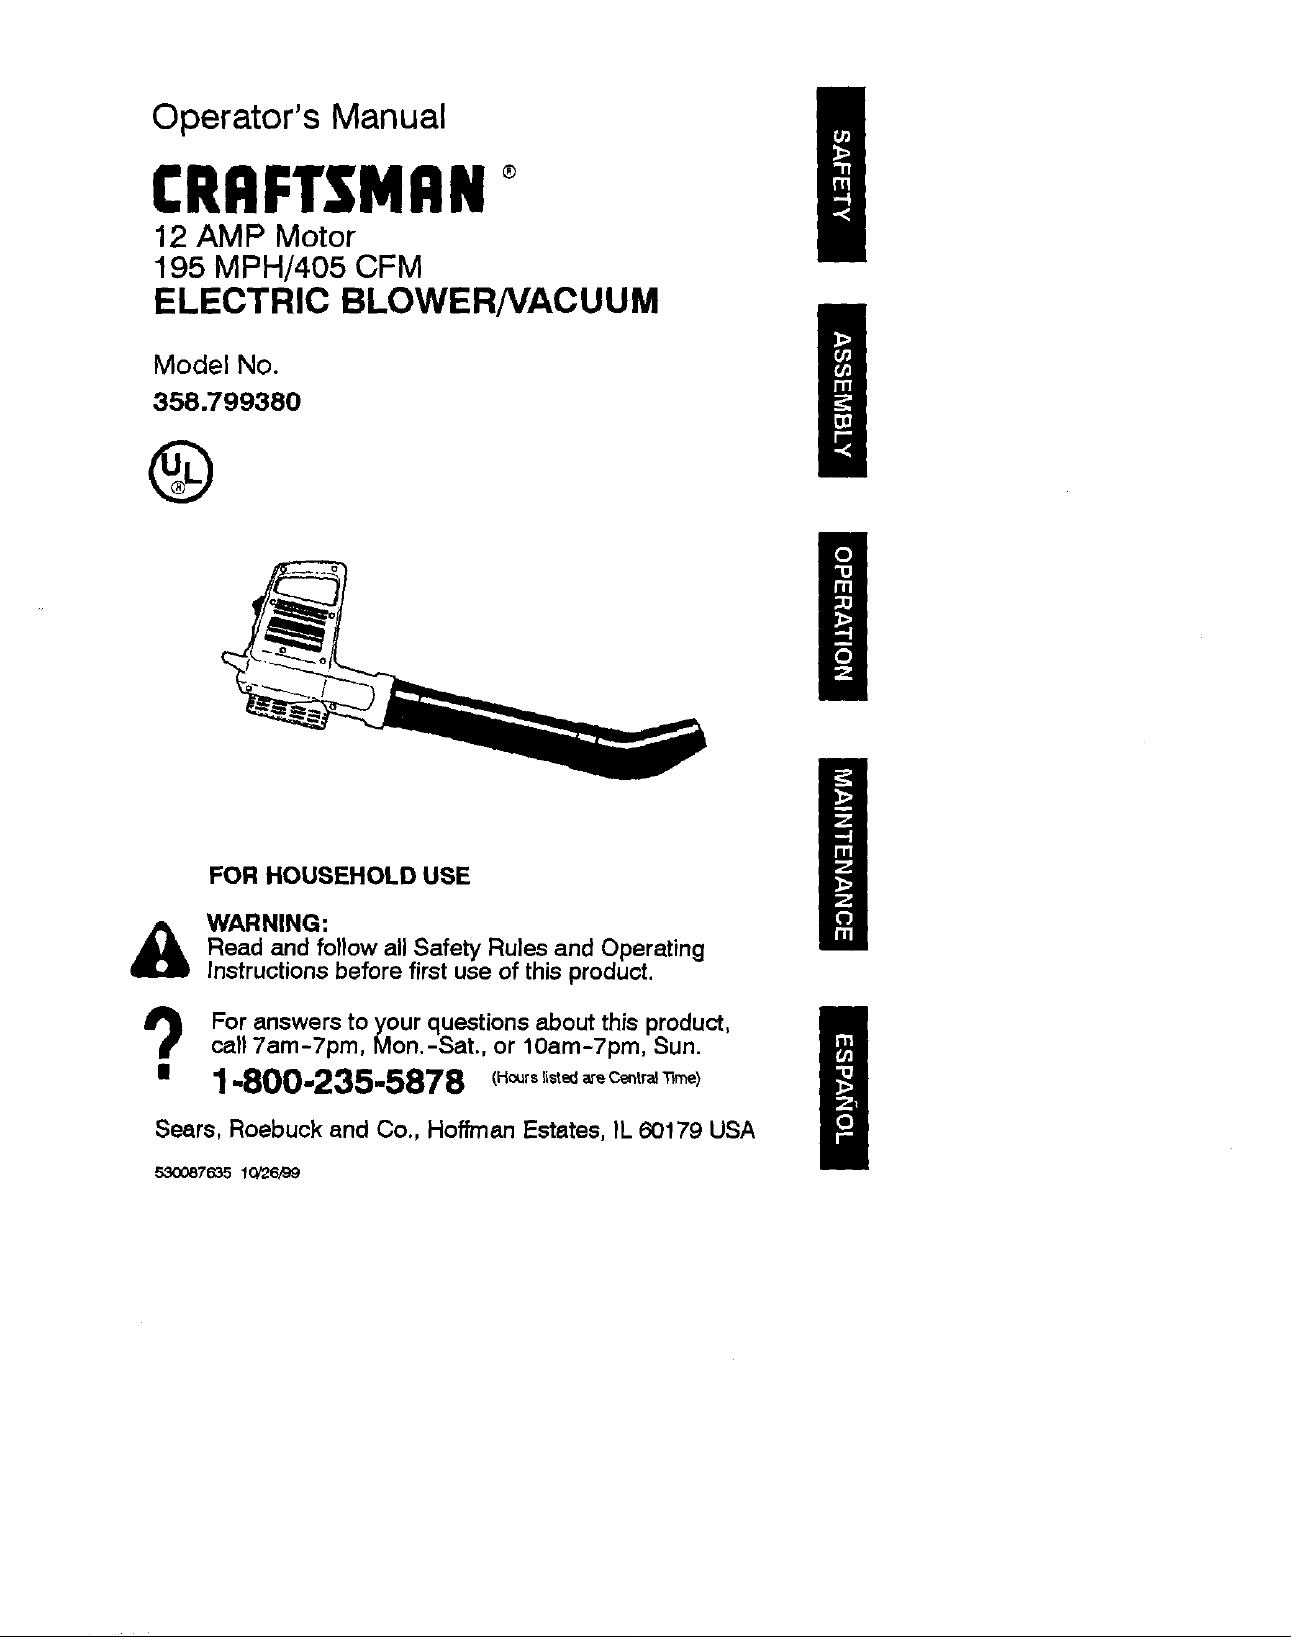
CRAFTSMAN°
Operator's Manual I
12 AMP Motor
195 MPH/405 CFM
ELECTRIC BLOWER/VACUUM
Model No.
358.799380
@
FOR HOUSEHOLD USE
_ ARNING:
Read and follow all Safety Rules and Operating
Instructions before first use of this product.
For answers to your questions about this product,
call 7am-7pm, Mon.-Sat., or 10am-7pm, Sun.
Sears, Roebuck end Co., Hoffman Estates, IL 60179 USA
53(3087635 1Q/26/99
Page 2
Warranty Statement 2 Storage 10
Safety Rules 2 Troubleshooting Chart 10
Assembly 5 Parts Available 10
Operation 8
Maintenance 9 Spanish 11
Service & Adjustments 10 Parts Ordering Back Cover
FULL ONE YEAR WARRANTY ON SEARS CRAFTSMAN ELECTRIC BLOWER
Ifthis Craftsman Electric Blower fails to perform properly due to a detect in materi-
al or workmanship within (1) one year from the date of purchase, Sears will repair
or replace it, free of charge.
WARF_NTY SERVICE IS AVAILABLEBY RETURNINGTHE CRAFTSMANELECTRIC
BLOWERTO THE NEARESTSEARSSTOREINTHEUNITEDSTATES.
This warranty gives you specific legal rights, and you may also have other rights
which vary from state to state.
Sears, Roebuck and Co. D/817WA Hoffman Estates, IL 60179
IMPORTANT WARNINGS AND
SAFETY INSTRUCTIONS
A'WARNING: When
using electric gardening appliances,
basic safety precautions should always
be followed to reduce the risk offire,
electric shock, and serious injury.
_WARNING: The warnings and
safety instructions in this manual must
be followed to reduce the risk of fire,
electric shock, or injury,and to provide
reasonable safety and efficiency in us-
ing this unit. The operator is responsible
for following the warnings and instruc-
tions in this manual and on the unit,
Read the entire Operator's Manual be.
fore assembling and using the unit! Re-
strictthe use of this unitto persons who
read, understand, and follow the warn-
ingsand instructions inthis manual and
on the unit.Never allow children to use
this unit. Close attention is necessary
when used near children.
OPERATOR SAFETY
• Always wear safety glasses or similar
eye protectionwhen operating, servic-
ing, or performing maintenance on
your unit. Wearing eye protectioncan
help to prevent rocks or debris from
being blown or ricocheting into eyes
and face which can result inblindness
or serious injury.
• Always wear a respirator orfacemas k
when workingwiththe unit industy en-
vironments.
• Dress safely in long pants, Do not go
barefoot or wear short pants or san-
dals.
• Do not operate the unit when you are
tired, ill, upset, or it you are under the
influenceofalcohol,drugs, ormedica-
tion.
• Secure hair so it is above shoulder
length. Keep loose hair, loose cloth-
ing, fingers, and all other parts of the
bodyaway from openings and moving
parts. Hair, jewelry, loose clothing, or
clothing with loosely hanging straps,
ties, tassels, etc., can be caught in
moving parts.
ELECTRICAL SAFETY
• Use only a voltage supply as shown
on the name plate of the unit.
• Avoid dangerous situations. Do not
use in presence of flammable liquids
or gases to avoid creating a fire or ex-
plosion and/or causing damage to
unit.
• Avoid dangerous environments. Do
notuse in unventilated areas orwhere
dust or explceivevapors can buildup.
Page 3
• TO REDUCE THE RISK OF ELEC-
TRICAL SHOCK--Do not use in
damp or wet locations or around swim-
ming pools, hot tubs, etc. Do not ex-
pose to snow, rein, or water. Do not
handle extension cord plug or unit with
wet hands.
• To reduce the risk of electrical shock,
use extension cords speciticaIly
marked as suitable for outdoor ap-
pliances having electrical rating not
less than the rating of the unit. The
cord must be marked with the suffix
"W-A" (in Canada, "W"). Use a polar-
ized cord. Make sure your extension
cord is ingood condition. If damaged,
have the cord replaced. An under-
sized extension cord willcause a drop
in linevoltage resulting in loss of pow-
erandoverhesting, Ifindoubt,usethe
next heavier gauge, The smaller the
gauge number, the heavier the cord.
(NOTE: The correct size to be used
depending on the cordlength isshown
inthis manual).
• To reduce the risk of electricalshock,
this equipment has a polarized plug
(one bladeis widerthan the other). This
plugwill fit only one way in a polarized
outlet ofthe extension cord. Ensure you
have a polarized extension cord. The
plugof the polarized extension cord will
fit into the outlet only one wey. Ifthe plug
does not fit fully inthe outlet, reverse the
plug.Ifitstilldoes not tit,contact a quali-
fied electrician to installproper outlet. Do
not change the plug in any way.
• Inspact the insulation and connectors
on the unit and extension cord before
each use. If there isany damage, do
not use until damage is repaired by
your Sears Service Center. Do not
pull or carry bycord; do not use cord
as a handle, close a door on cord, or
pull cord around sharp edges or cor-
ners. Keep cord away from heated
surfaces. Do not unplug by pulling on
cord. To unplug, grasp the plug, not
the cord.
• To reduce the possibilityof the exten-
sioncord disconnecting from the unit
during operation, tie cord to cord re-
tainer and connect to recessed plug
as shown in this manual.
• Don'tuse the unitifthe switchdoes not
turnthe uniton and offproperly, Have
the unit repaired by your Sears Ser-
vice Center,
• Keep the extension cord clearof oper-
atorand obstacles at alltimes. Do not
expose cords to heat, oil, water, or
sharp edges.
• Avoid any body contact with any
grounded conductor, such as matel
fences, or pipes, toavoid the possibil-
ity ofelectdc shock. Don't handle plug
or unit with wet hands.
• Donot usewith damaged cordorplug.
If unit is not working as it should, has
been dropped, damaged, left out-
doors, or dropped intowater, return it
to your Sears Service Center for re-
pair.
• Ground Fault Circuit Interrupter
(GFCI) protectionshould be provided
on the circuitor outlet to be used for
this unit. Receptacles are available
having built-in GFCI protection and
may be used for this measure of safe-
ty,
• Keep others including children, ani-
mals, bystanders, and helpers a mini-
mum of 30feet (10 meters) away. Stop
the motor immediately it you are ap-
prcached. Do not allow the unitto be
used as a toy.
DOUBLE INSULATION
CONSTRUCTION
This unit is Double Insulated to help
protect against electricshock. Double
insulation construction consists of two
separate "layers" of electrical insula-
tion instead of grounding.Tools and ap-
pliances builtwith a double insulation
system are not intended to be
grounded. No grounding means is pro-
vided on this unit, nor should a means
of grounding be added to this unit.As
a result,the extension cord used with
your unitcan be plugged into any stan-
dard 120 volt electrical outlet.Safety
precautions must be observed when
operating any electrical tool.The
double insulationsystem only provides
added protection against injury result-
ing from an internal electrical insulation
faiture.
All electrical repairs to this unit, includ-
ing housing, switch, motor, etc,, must
be diagnosed and repaired by qualified
service personnel. Replacement parts
for a double insulated appliance must
be identical to the parts they replace, A
double insulated appliance is marked
with the words DOUBLEINSULATIONor
DOUBLEINSULATED.The symbol []
(square within a square) may also be
marked on the appliance. Failure to
have the unitrepaired by Sears ser-
vice personnel can cause the double
Page 4

insulationconstructiontobecome inef-
fective and result insedous injury,
UNIT/MAINTENANCE SAFETY
• Turn off all controls and allow the mo-
tor to stop before disconnecting the
unitfrom the power source.
• Disconnect the unit from the power
source when not in use. Do notleave
the unit when itis plugged into outlet,
• Do not set the unit on any surface ex-
ceptaclean, hard area while the unitis
running. Debris such as gravel, sand,
dust, grass, etc,, could be picked up
by the air intake and thrown out
through the discharge opening, dam-
aging the unit, property, orcausing se-
rious injuryto bystanders or operator,
• Do not overreach or use from unstable
surfaces suoh as ladders, trees, steep
slopes, rooftops, etc. Use extra care
when oleanlng on stairways, Keep
firm footing and balance at all times,
Keep hands out of tubes.
• Inspect theentire unit before each use
for worn, loose, missing, or damaged
parts. Do not use until the unit is in
proper working order.
• Disconnect unit from power source
before servicing,cleaning, performing
maintenance, or storing,
This unit is Double Insulated, Seethe
"DOUBLE INSULATION"section. Have
all internal service performed by quali-
fied service repair personnel to avoid
creating a hazard or voiding yourwar-
ranty.
• Have all maintenance other than the
recommended procedures described
in the Operator's Manual performed
by your Sears Service Center.
• Always see your Sears Service Cen-
ter to replace a damaged impeller.
Parts that are chipped, cracked, bro-
ken, or damaged in any other way can
fiy apart and cause serious injury. Re-
place damaged parts before using the
unit
• Never placeany object Intheair intake
opening as this couJd restrict proper
airflow and cause damage to the unit.
• Never douse the unitwith water or oth-
er liquids or squirt with a water hose
Clean with a damp sponge and mi_d
soap. See "STORAGE."
• Check air intake openings and tubes
frequently, always with the unit
stopped and power source disoon-
nested. Keep vents and tubes free ol
debris which can accumulate and re-
strictproper air flow,
• Do notbum, incinerate, or expose this
unitto extreme heat.
• Store the unit unplugged in a high,
cool, dry, indoor area out of the reach
of children.
• Use only recommended attachments
and replacement parts to avoid creat-
ing a hazard and]or voiding warranty.
• Maintain the unitacoording to recom-
mended procedures,
• Use only for jobs explained in this
manual.
BLOWER SAFETY
• Use only in daylight or in good artificial
light.
• Inspect the area before using the unit,
Remove all debris and hard objects
suoh as rocks, glass, wire, etc,, that
can ricochet, bethrown, or otherwise
cause injury or damage.
• Avoidaccidental starting. Be sure the
switch isinthe OFF positionand keep
your hand and fingers away from the
switch while connecting the unit tothe
power source or when carrying a unit
connected to the power source.
• Never run the unitwithout the proper
equipment attaohed, When used as a
blower, always install a blower tube,
Use only recommended attachments.
Do not use with any opening blocked,
Keep free of dust, lint, hair and any-
thing that may reduce airflow,
• To avoid spreading fire, do not use
blower near leaf or brush fires, fire-
places, barbecue pits, ashtrays, etc.
• Never place objects inside the blower
tubes; aN_ays direct the blowing de-
bris away from people, animals, glass,
and solid objects such as trees, auto-
mobiles, walls, etc. The force of air
can cause rooks, dirt, or sticks to be
thrown or to ricochet which can hurt
people or animals, break glass, or
cause other damage.
• Never use for spreading chemicals,
fertilizers, or any other substances
which may contain toxic materials.
VACUUM SAFETY
• Stop the motor and disconnect the
power source before opening the air
inletdoor or attempting to insert or re-
move the vacuum tubes, The motor
must be stopped and the impeller
blades no longer turning to avoid seri-
ous injury from the rotating blades.
• Hard objects can be thrown through
the coIJectionbag or the housing and
become dangerous missiles which
can cause serious Injury to the opera-
tor or others.
• When using the vacuum attachment,
the unit isdesigned to pick updry ma-
terial such as leaves, grass, smell
4
Page 5

twigs, and bits ol paper. Do not vacu-
um stones, gravel, metal, broken
glass, etc., to avoid severe damage to
the impeller. To avoidthe possibilityof
electrical shock, do notattempt to vac-
uum water or other liquids.
• Never run the unit without the proper
equipment attached. When used asa
vacuum, ak,/ays install vacuumtubes
and collection bag assembly, Make
sure the collection bag assembly is
completely zipped when unit is run-
ning to avoid flying debris, Use only
recommended attachments,
• Avoid situations which could set the
collection bag on fire. Do notvacuum
discarded matches, cigars, cigarettes,
or ash from fireplaces, barbecue pits,
brush piles, etc. To avoid spreading
fire, do not use blower near leaf or
brush fires, fireplaces, barbecue pits,
ashtrays, etc.
• Always use the ¢oUestionbag shoul-
der strap when vacuuming to avoid
lossof control.
SAVE THESE INSTRUCTIONS
• Check air intake openings, elbow
tube, and vacuumtubes frequently, al-
ways with the unit stopped and the
power source disconnected. Keep
vents and tubes free of debris which
can accumu[ste and restrictproperair
flow. Do not use with any opening
blocked, Keep free of dust, lint, hair
and anything that may reduce airflow.
STANDARDS
This productis listed by Underwriters
Laboratories, Inc., in accordance with
UL Standard 1017.
tfsituations occurwhich are not cov-
ered inthis manual, use care and
goodjudgment. Ifyou need assis-
tance, contact your Sears Service
Center or call 1-800-235-5878. Fail-
ure tofollow all Safety Rules and Pre-
cautions can result in serious injury.
CARTON CONTENTS
Model 358.799380
Blower
Blower Tu be
Nozzle
2Vacuum Tubes
Co[lection Bag
Examine parts for damage, Do not use
damaged parts.
NOTE: Ifyou need assistance orflnd
parts missing or damaged, call
1-800-235-5878.
ASSEMBLY
,_WARN|NG: If received as-
sembled, repeat all steps to ensure
your unit is properly assembled and all
fasteners are secure.
ASSEMBLY INSTRUCTIONS FOR
USING YOUR UNIT AS A BLOWER
NOTE: Assembly Instructions for using
your unit as a vacuum follow this sec-
t{on.
ATTACHING THE BLOWER TUBE
AND NOZZLE
Ifyou have already assembled your
unitfor use as a Vacuum, remove the
vacuum tubes and the collection bag,
• Insertthe blower tube into the blower
outlet.
• Twist the blower tube clockwise until
it is firmly seated inthe blower outlet.
• Twist the nozzle intothe end of the
bidwartubeuntilitis firmly seated.
Make sure the nozzle points upward.
B_ov_rOutlet
BlowarTube
Nozzle
5
Page 6

ASSEMBLY INSTRUCTIONS FOR
USING YOUR UNIT AS A VACUUM
NOTE: Assembly instructionsfor using
your unitas a blower is explained in
the previous section.
4_kWARNING: Stop the unit and dis-
connect from the power source before
opening the inlet cover or attempting to
insert or remove the inlet restriotoror
vacuum tubes, The motor must be
stopped and the impeller blades no
longer turningto avoid serious injury
from the rotating blades.
NOTE: Ifyou have already assembled
your unitfor use as a blower, remove
the blower tube and nozzle.
REMOVE THE INLET RESTRICTOR
An inletrestrictoris used when using
your unitas a blower, This restitctoris
notused dudng vacuum use, and must
be removed dudng essembly for vacu-
um use,
NOTE: Be sure to keep the inlet re-
strictor for usingyour unit as a blower.
• Open the inlet cover byinsertingthe
tip of a sorewddver intothe inletcover
latcharea, and twistingthe screwdriver
while pullingthe inletcover open.
Bottom view
of unit
angled end will point toward the
ground during vacuum use.
• Locate the arrows on the upper vac-
uumtube and on the vaouum inlet
area ofthe unit,
UpperVacuumTube
• While holding the inlet cover open,
align the arrows and insert the vacu-
um tube into the opening. Twist the
tube clockwise until it is seated. A
second arrow on the vacuum tube
will align with the arrow on the unit
once the tube twisted completely in
piaea,
Alignarrowsan tube&unit
• Attach the lower vacuum tube to the
upper vacuum tube by aligningthe
arrows on the two tubes. Press the
tubes together until the lower tube is
fully seated in the upper tube. (About
3 inches)
• Turn the inlet restrictorcountercrock-
wise and remove it from the unit.
Do not close the inlet door. You will
next attach the vacuum tubes.
ATTACHING THE VACUUM TUBES
There are 2 vacuum tubes, an upper
and lower tube, The upper tube iscut
straight on both ends, and attaches to
the blower unit.The second tube is cut
an at angle on the lower end. This
Upper Tube
Lower Tube
ATTACH THE COLLECTION BAG
Slide the opening of the collection bag
over the blower outlet. Pull the strap
with veloro tightlythrough the buckle
and secure with velcro tabs.
NOTE: Make sure the strap with velcro
is located on the blower outlet as
shown,Also, make sure the zipper on
the bag iscompletely closed,
Strap withV_cro I'i
Cdl_
Bag y Newer Outlet
6
Page 7

ADJUSTING THE SHOULDER STRAP
ON THE COLLECTION BAG
• Carefully loop the shoulder strap
through the buckle as shown in the
illustration below.
• Positionthe unit on your right.hand
side, blower outlet and bag pointing
toward the rear, Hold the unit in an
upright position, and support the low-
er vacuum tube on the ground,
• Place the shoulder strap over your
head and onto your left shoulder.
• Adiust the strap to aitow a tree flow
of air from the blower. If the collection
bag is kinked, the unitwill not oper-
ate properly.
NOTE: The strap is designedto position
the collectionbeg on your shoulderwith-
out kinks.The strap is not intendedto
supportthe weight of the unit.
Shoulder strap
on [eft shouldel"
Nokinksinba
_JI
f_ow
HOW TO CONVERT UNIT FROM
VACUUM USE TO BLOWER USE.
• Stop unit and unplug the extension
cord.
• Remove the vacuum tubes and
collection bag.
• Install the inlet restrictorthat was re-
moved when assembling for vacuum
use.
NOTE: Ifyou are unable to locate the
inlet restrictor,the unitwill still operate.
This restrtctor improves the blower
function.
• Close the inlet cover and make sure
it is latched closed.
• Re-install the blower tubes. Reter to
the section ATTACHINGTHE BLOWER
TUBEAND NOZZLEfor instructionson
how to attach these items.
EXTENSION CORD
Use only a 120 A.C. voltage supply as
shown on nameplate ofthe unit to
power your edger.
The extension cord used to reach the
power source must be:
• Specifically marked as suitable for
outdoor use, The cord must be
marked with the suffix '_/-A."
• Heavy enough to carry ourrent from
the power source the full length of
extension cord to the unit. Otherwise,
lossof power and overheating can
occur causing damage to unit. Refer
to chert for minimum wire gauge rec-
ommendalions. The cord must be
marked with the proper wire gauge.
(Appropriate extension cords are
available.) Do not use multiple cords.
• In good condition. Cord Insulation
must be intact with no cracks or
deterioration, Plug connectors must
be undamaged.
MINIMUMWIRE GAUGE
RECOMMENDATIONS
/VOL'rSI 25FT. 50FT. 100FT,
/f
120 16 16 * 14
/ I A'W'G'* A'W'G" A'W'G'*
• American Wire Gauge
Securetheextensioncordto theunitby
tyingthecordontothecordretainer,In-
sertthecord receptacleintothere-
cessedp_j.
Page 8

KNOWYOURELECTRICBLOWER
READTHIS OPERATOR'SMANUALAND SAFETYRULESBEFOREOPERATINGYOUR
UNIT,Compare the illustrationsto your unitto familiarize yourself with the location
of the various controlsand adjustments, Save this manual for future reference,
Top Handle
On/Off X_
Switch
Rear Handle
Cord Retainer
AirVents Cdlectian Bag
InletC_er Latch
BlowerTube
f
UpperVacuumTube LowerVacuumTube
The ON/OFFSWITCH is used to acti- open and close the inlet cover.
vate the motor. The NOZZLE is designed to direct the
The INLET COVER LATCH isused to flow ofair.
OPERATING INSTRUCTIONS
STOPPING YOUR UNIT
Slide the ON/OFF switch to the OFF
position.
STARTING YOUR UNIT
Your unit has two run positions,LOW
and HIGH. Slide the switchto one of
these positions to turn on the unit.
'_ WARNING : Do not use the unit
withoutthe blower tubes, or collection
bag properly attached to avoid flying
debris and/or impeller contact which
can cause serious injury. Always wear
eye protection to prevent rocks or de-
brisfrom being blown or ricocheting
from corners, around joints, or be-
tween bricks.
Direct air flow by directing the nozzle
down otto one side. Always work
away from solid objects such as walks,
large stones, vehicles, and fences.
Clean corners bystarting incomers
and moving outward. This will help
prevent an accumulation of debris
which could fly intoyour face.
Be careful when working near plants,
The force ofthe air Could damage
tender plants.
E_ower Operating
Position
intothe eyes and face which can result
in blindness or serious injury,
USING YOUR UNIT AS A BLOWER
Use your unit as a blower for:
• Sweeping debris or grass clippings
from driveways, sidewalks, patios,
etc.
• Blowinggrass clippings, straw, or
leaves into piles, or removing debris
8
Page 9

USING YOUR UNIT AS A VACUUM
Use your unit as a vacuum to pick up
dry material such as leaves, grass,
smalltwigs, and bitsof paper.
• For best results during vacuum use,
operate your unitat high speed.
• Move slowly back and forth over the
material as you vacuum, Avoid forc-
ingthe unitinto a pile of debris as
this can clog the unit.
• Keep the vacuum tube about an inch
above the groundfor best results.
• You must properly empty and main-
tain the collection bag to avoid dete-
riorationand obstructionof air flow.
• Remove the collection bag from the
unitand empty after each use. Do
not store bag containingleaves,
grass, etc.
• Wash the bag once a year. Remove
the bag from the blower and turn the
bag inside out. Wash the bag with a
water hose. AllOWthe bag to hang
and dry before you reuse the bag,
NOTE: Ifthe unit becomes clogged,
stop the unitand disconnect the exten-
sion cord.Wait untilthe impeller has
VacuumOperating
Position
completely stopped turning, then re-
move the vacuum tubes. Carefully
reach into the vacuum opening and
clear outthe clogged debris.
CLEANING THE COLLECTION
BAG
IMPORTANT: THE COLLECTION BAG
MUST BE PROPERLY EMPTIED.
CUSTOMER RESPONSIBILITIES
CARE & MAINTENANCE TASK WHEN TO PERFORM
Check for Loose fasteners and parts Before each use
Check for damaged or worn parts Before each use
Clean unitand labels After each use
Clean Collection Bag Yearly
G EN ERAL RECOMME NDATIONS
The warranty on this unit does not cov-
er items that have been subjected to
operator abuse or negligence. To re-
osive fultvalue from thewarranty, the
operator must maintain unitas instruct-
ed in this manual. Various adjustments
will need to be made periodically to
properly maintain your unit.
BEFORE EACH USE
CHECK FOR LOOSE
FASTENERS AND PARTS
• Inlet Cover
• Blower Tube
• Nozzle
• Vacuum Tubes
• Collection Bag
CHECK FOR DAMAGED OR
WORN PARTS
Refer replacement of damaged/worn
parts to your Sears Service Center.
• ON/OFFSwitch - Ensure switch func-
tions properly by moving the switch
to the Off position. Make sure motor
stops; then restart motor and contin-
ue.
AFTER EACH USE
CLEAN UNIT & LABELS
• Clean the unit using a damp cloth
with a mild detergent.
• Wipe oft unitwitha clean dry cloth.
YEARLY
CLEAN COLLECTION BAG
• Remove the bag and empty after
each use. Do not store bag without
emptying the bag of all contents.
• Wash the bag once a year by turning
inside out and washing with a water
hose, Be sure to let bag dry com-
pletely before re-using the unit.
Page 10

HOWTOREMOVEANOBJECT
FROMTHEAIRINTAKE
NOTE:Iftheunitbecomesclogged,or
anobjectisdrawnintotheair intake,
stopthe unitand disconnect the exten-
sioncord. Wait untilthe impeller has
completely stopped turning, then re-
move the vacuum tubes. Caretuily
reach into the vacuum opening and
clear out the air intake area.
Inspect the impeller for cracks. If
cracked or damaged, do not use the
unit. have parts replaced by your
Sears Service Center. Do not attempt
to replace them yourself,
PARTS AVAILABLE
Blower Tube .........
Vacuum Tube Bet ....
InletRestnctor .......
Nozzle ..............
Collection Bag .......
Gutter Kit ............
Safety Glasses .......
Extension Cord .......
534852705
530402490
530402045
530402461
530402583
.. 71-79997
.. 71-85707
.. 71-5702
Prepare unit for storage at the end of
the season or if itwill not be used for
30 days or more.
_bWARNING:
• Secure the unitbefore storing or
transporting.
• Store unit with all guards in place.
Position unit so that any sharp object
cannot accidentally cause injury.
• Store unitwell outof the reach of
children.
BLOWER STORAGE
• Disconnectfrom the power source.
• Clean the entire unit.
• Open inletcover and clean any dirt,
TROUBLESHOOTING CHART
SYMPTOM CAUSE REMEDY
Unit fails to . Switch inthe OFF position. =Slide switchto ON position.
operate. • Extension Cord Disconnected •Reconnect extension cord.
. Circuit breaker tripped, or fuse •Reset circuit breaker or fuse.
blown
• Mechanical failure .Contact your Sears Service
Unit . Mechanical failure •Contact your Sears Service
vibrates Center
abnormally.
Impeller will •Debris in air intake area. •Clean unit. Remove any
notturn . Mechanical failure debris.
freely. •Contact your Sears Service
grass, or debris that has cctlected,
Inspect the blower and all tubes.
Close and make sure the cover is
latched.
• Clean air vents and air inletof debris,
• Store your unit and extension cord in
a well ventilated area and covered, if
possible, to prevent dust and dirtac-
cumulation, Do not cover with plastic.
Plastic cannot breathe and may
cause condensation and eventual
rust or corrosion.
• Check entire unit for loose screws,
nuts, and bolts. Replace any darn-
aged, worn, or broken parts.
Center.
Center
10
 Loading...