

Page 1
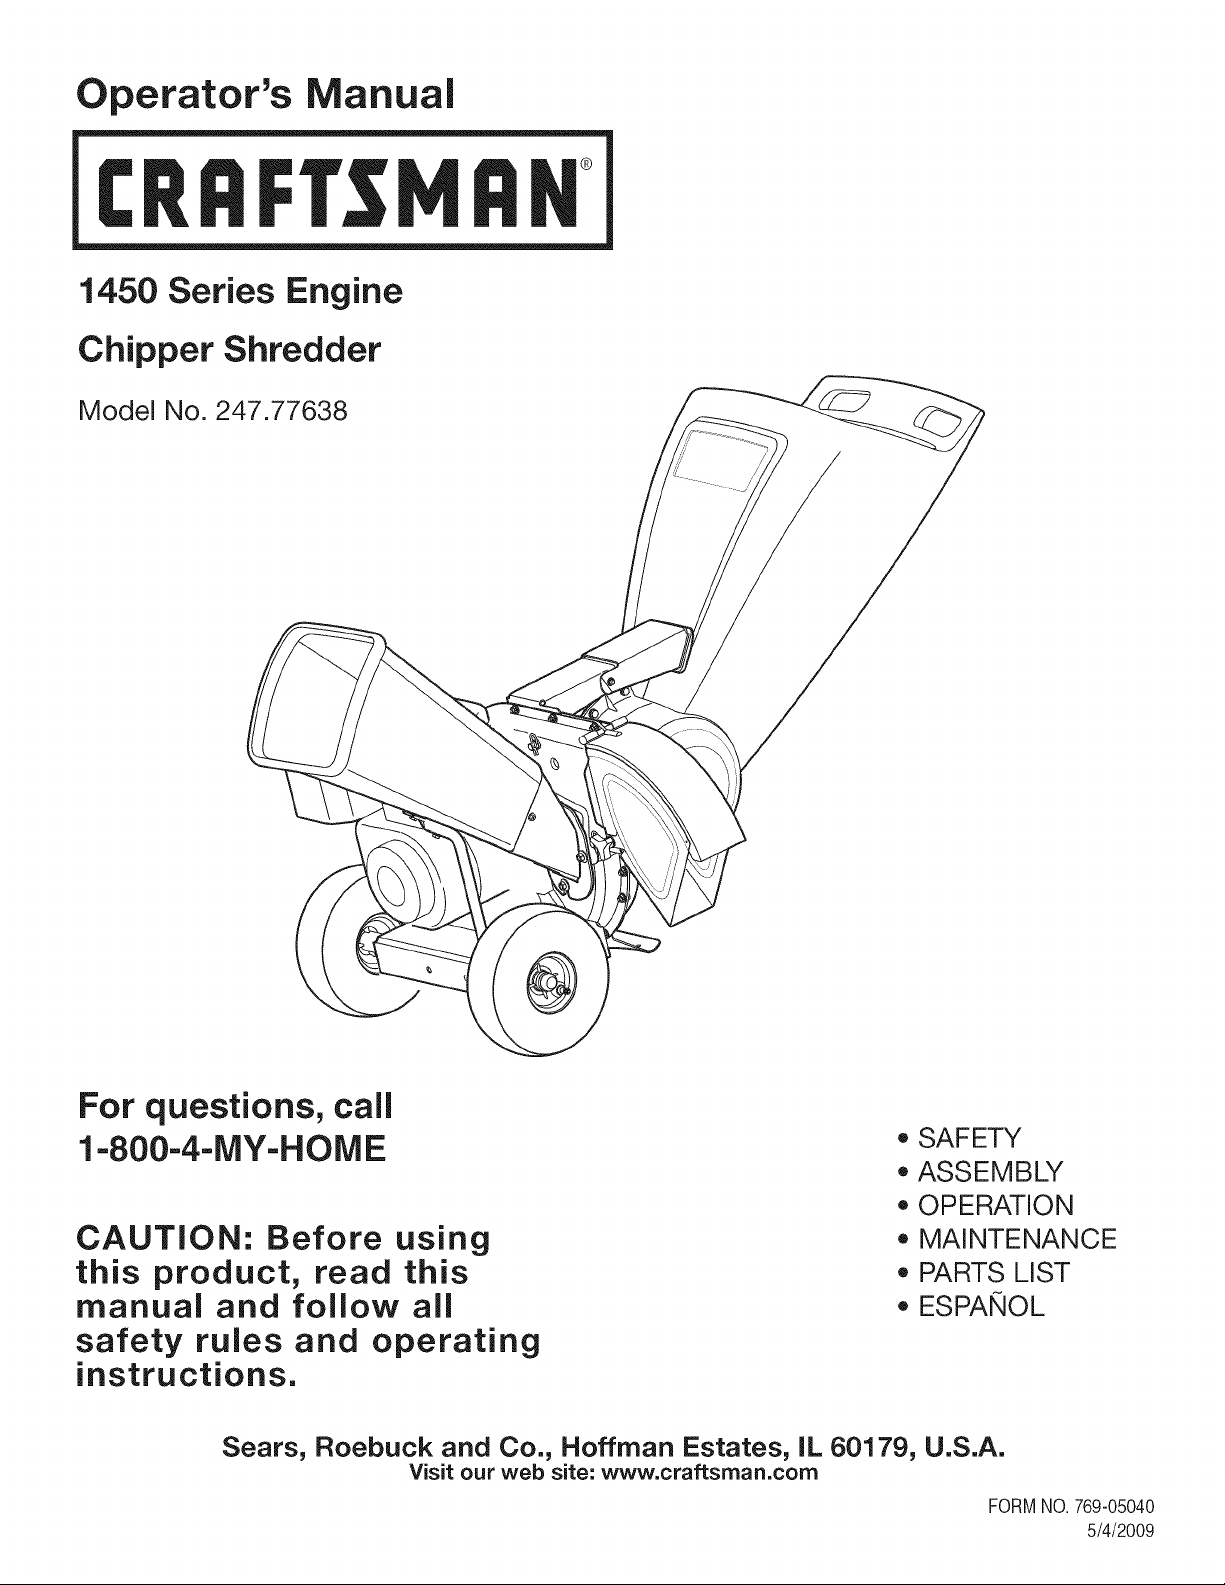
Operator's Manual
I:Rl FI'SlVl N
1450 Series Engine
Chipper Shredder
Model No. 247.77638
For questions, call
1-800-4-MY-HOME
CAUTION: Before using
this product, read this
manual and follow all
safety rules and operating
instructions.
Sears, Roebuck and Co., Hoffman Estates, IL 60179, U.S.A.
Visit our web site: www.craftsman.com
,, SAFETY
* ASSEMBLY
* OPERATION
* MAINTENANCE
* PARTS LIST
. ES PAI'i,IOL
FORM1/O.769-05040
5/4/2009
Page 2
WarrantyStatement..................................Pac
SafeOperationPractices..........................Pac
SafetyLabels............................................Pac
Assembly..................................................Pac
Operation..................................................Pac
ServiceandMaintenance.........................Pac
Off-SeasonStorage..................................Pac
Whenoperatedand maintainedaccordingtoallsuppliedinstructions,ifthischippershredderfailsdueto a defectin materialorworkmanship
withintwoyearsfromthedate ofpurchase,returnittoany Searsstore,SearsParts&RepairServiceCenter,or otherCraftsmanoutletinthe
UnitedStatesforfreerepair(or replacementif repairprovesimpossible).
Thiswarrantyappliesfor only90daysfromthedateof purchaseif thischippershredderiseverusedfor commercialor rentalpurposes.
ThiswarrantycoversONLYdefectsin materialandworkmanship.SearswillNOTpayfor:
• Expendableitemsthatbecomewornduringnormaluse,includingbutnotlimitedtoblades, sparkplug,aircleaner,flail screenand catcher
bag.
• Standardmaintenanceservicing,oilchanges,ortune-ups.
• Tirereplacementor repaircausedby puncturesfromoutsideobjects,suchasnails,thorns,stumps,or glass.
• Tireor wheelreplacementor repairresultingfromnormalwear,accident,orimproperoperationormaintenance.
• Repairsnecessarybecauseofoperatorabuse,includingbutnot limitedtodamagecausedbyimpactingobjectsthat bendtheframeor
crankshaft,orover-speedingtheengine.
• Repairsnecessarybecauseofoperatornegligence,includingbutnotlimitedto,electricalandmechanicaldamagecausedbyimproper
storage,failureto usethepropergradeand amountofengineoil,or failureto maintaintheequipmentaccordingtothe instructions
containedin theoperator'smanual.
• Engine(fuelsystem)cleaningorrepairscausedbyfuel determinedto becontaminatedor oxidized(stale).Ingeneral,fuelshouldbeused
within30 daysof itspurchasedate.
• Normaldeteriorationandwearoftheexteriorfinishes,or productlabelreplacement.
e2
es3-6
e7
es8-11
es12-13
es14-17
TroubleShooting.......................................Page19
PartsList...................................................Page20-30
LabelMap.................................................Page31
RepairProtectionAgreement...................Page34
Espa_ol.....................................................Page35
ServiceNumbers......................................BackCover
e18
CRAFTSMAN FULLWARRANTY
Thiswarrantyappliesonlywhilethisproductiswithinthe UnitedStates.
Thiswarrantygivesyouspecificlegalrights,andyou mayalsohaveotherrightswhichvaryfromstatetostate.
Sears, Roebuckand Co.,Hoffman Estates,IL60179
EngineSeries: 1450
EngineOilType: SAE30
EngineOilCapacity: 28ounces
Fuel: UnleadedGasoline
SparkPlug: Champion®RC-12YC
SparkPlugGap: .030"
©SearsBrands,LLC 2
Model Number.................................................................
Serial Number .................................................................
Dateof Purchase.............................................................
Recordthemodelnumber,serialnumber
anddateof purchaseabove
Page 3
Thissymbolpointsout importantsafetyinstructionswhich,if not
followed,couldendangerthe personalsafetyand/orpropertyof
yourselfandothers. Readandfollowall instructionsin thismanual
beforeattemptingtooperatethismachine.Failuretocomplywith
theseinstructionsmayresultin personalinjury.Whenyouseethis
symbol,HEEDITSWARNING!
Thismachinewasbuilttobeoperatedaccordingtothe safeopera-
tionpracticesinthismanual.Aswithanytypeof powerequipment,
carelessnessorerroronthepart oftheoperatorcan resultin
seriousinjury.Thismachineis capableofamputatingfingers,hands,
toesandfeetandthrowingdebris.Failureto observethefollowing
safetyinstructionscouldresultin seriousinjuryordeath.
CALIFORNIA PROPOSITION 65
EngineExhaust,someof itsconstituents,andcertainvehicle
componentscontainoremitchemicalsknownto StateofCalifornia
tocausecancerandbirthdefectsorotherreproductiveharm.
TRAINING
• Read,understand,andfollowall instructionson the machineand
in themanual(s)beforeattemptingtoassembleandoperate.
Keepthis manualina safeplacefor futureand regularreference
andfororderingreplacementparts.
• ReadtheOperator'sManualand followallwarningsand safety
instructions.Failuretodosocanresultin seriousinjurytothe
operatorand/orbystanders.Forquestions,call 1-800-659-5917.
• Befamiliarwithallcontrolsandtheir properoperation.Knowhow
tostopthe machineanddisengagethemquickly.
• Neverallowchildrenunder16yearsofagetooperatethis
machine.Children16andovershouldreadandunderstandthe
instructionsandsafeoperationpracticesin thismanualandon
themachineandbe trainedandsupervisedbyanadult.
• Neverallowadultstooperatethismachinewithoutproper
instruction.
• Keepbystanders,pets,andchildrenatleast75feetfromthe
machinewhileitisin operation.Stopmachineifanyoneenters
thearea.
• Neverrunanengineindoorsor ina poorlyventilatedarea.Engine
exhaustcontainscarbonmonoxide,anodorlessanddeadlygas.
• Donotputhandsandfeetnearrotatingpartsor inthefeeding
chambersanddischargeopening.Contactwiththe rotating
impellercanamputatefingers,hands,andfeet.
• Neverattempttounclogeitherthefeedintakeordischarge
opening,removeor emptybag,or inspectand repairthemachine
whilethe engineisrunning.Shutthe engineoff andwaituntilall
movingpartshavecometo a completestop.Disconnectthe spark
plugwireandgroundit againsttheengine.
Your Responsibility=Restrict theuseofthis powermachineto
personswhoread,understandandfollowthewarningsand instruc-
tionsin thismanualandon themachine.
SAVETHESEINSTRUCTIONS!
PREPARATION
• Thoroughlyinspecttheareawheretheequipmentistobeused.
Removeall rocks,bottles,cans,orotherforeignobjectswhich
couldbepickedupor thrownandcausepersonalinjuryor
damageto themachine.
• Alwayswearsafetyglassesorsafetygogglesduringoperation
andwhileperformingan adjustmentor repair,to protectyour
eyes.Thrownobjectswhichricochetcancauseseriousinjuryto
theeyes.
• Wearsturdy,rough-soledworkshoesandclose-fittingslacksand
shirts.Loosefittingclothesorjewelrycan becaughtin movable
parts.Neveroperatethismachineinbarefeetorsandals.Wear
leatherworkgloveswhenfeedingmaterialinthe chipperchute.
• Beforestarting,checkallboltsandscrewsfor propertightnessto
besurethe machineisinsafeworkingcondition.Also,visually
inspectmachineforany damageatfrequentintervals.
• Maintainor replacesafetyandinstructionslabels,asnecessary.
3
Page 4
SafeHandling of Gasoline:
Toavoidpersonalinjuryor propertydamageuseextremecarein
handlinggasoline.Gasolineisextremelyflammableandthe vaporsare
explosive.Seriouspersonalinjurycanoccurwhengasolineis spilled
onyourselforyourclotheswhichcan ignite.Washyourskinand
changeclothesimmediately.
• Useonlyan approvedgasolinecontainer.
• Neverfillcontainersinsidea vehicleor ona truckor trailerbed
witha plasticliner.Alwaysplacecontainersonthe groundaway
fromyourvehiclebeforefilling.
• Whenpractical,removegas-poweredequipmentfromthetruck
ortrailerand refuelitontheground.Ifthisisnotpossible,then
refuelsuchequipmentona trailerwitha portablecontainer,rather
thanfroma gasolinedispensernozzle.
• Keepthenozzleincontactwiththerimof thefueltankor
containeropeningatalltimesuntilfuelingiscomplete.Donotuse
a nozzlelock-opendevice.
• Extinguishallcigarettes,cigars,pipesandothersourcesof
ignition.
• Neverfuelmachineindoors.
• Neverremovegas caporaddfuelwhiletheengineishotor run-
ning.Allowenginetocool atleasttwo minutesbeforerefueling.
• Neveroverfillfueltank. Filltankto nomorethan1/2inchbelow
bottomoffillerneckto allowspacefor fuelexpansion.
• Replacegasolinecapandtightensecurely.
• Ifgasolineisspilled,wipeitofftheengineandequipment.Move
unitto anotherarea.Wait5 minutesbeforestartingtheengine.
• Toreducefirehazards,keepmachinefreeof grass,leaves,or
otherdebrisbuild-up.Cleanupoil orfuelspillageand removeany
fuelsoakeddebris.
• Neverstorethemachineorfuelcontainerinsidewherethereisan
openflame,sparkor pilotlightas on awaterheater,spaceheater,
furnace,clothesdryer orothergasappliances.
OPERATION
• Donotputhandsandfeetnearrotatingpartsor in thefeeding
chambersanddischargeopening.Contactwiththe rotating
impellercanamputatefingers,hands,andfeet.
• Beforestartingthemachine,makesurethechipperchute,feed
intake,andcuttingchamberare emptyandfreeofall debris.
• Thoroughlyinspectall materialtobe shreddedandremoveany
metal,rocks,bottles,cans,or otherforeignobjectswhichcould
causepersonalinjuryor damagetothemachine.
• Ifitbecomesnecessaryto pushmaterialthroughtheshredder
hopper,usea smalldiameterstick.Donotuseyourhandsor feet.
• Iftheimpellerstrikesaforeignobjector ifyourmachineshould
startmakinganunusualnoiseorvibration,immediatelyshut
theengineoff. Allowthe impellertocometoa completestop.
Disconnectthesparkplugwire,grounditagainsttheengineand
performthefollowingsteps:
a. Inspectfordamage.
b. Repairorreplaceanydamagedparts.
c. Checkforanyloosepartsandtightento assurecontinued
safeoperation.
• Donotallowanaccumulationof processedmaterialto buildupin
thedischargearea.Thiscanpreventproperdischargeandresult
inkickbackof materialthroughthefeedopening.
• Donotattempttoshredorchipmateriallargerthanspecified
on themachineor inthismanual.Personalinjuryormachine
damagecouldresult.
• Neverattemptto unclogeitherthefeedintakeor discharge
openingwhilethe engineisrunning.Shuttheengineoff,waituntil
all movingpartshavestopped,disconnectthe sparkplugwireand
grounditagainsttheenginebeforeclearingdebris.
• Neveroperatewithoutthe shredderhopper,chipperchute,or
chutedeflectorproperlyattachedtothe machine.Neveremptyor
changedischargebagwhiletheengineis running.
• Keepallguards,deflectorsand safetydevicesin placeand
operatingproperly.
• Keepyourfaceandbodybackandtothesideof thechipper
chutewhilefeedingmaterialintothemachineto avoidaccidental
kickbackinjuries.
• Neveroperatethis machinewithoutgoodvisibilityorlight.
• Donotoperatethismachineona paved,gravelor non-level
surface.
• Donotoperatethismachinewhileundertheinfluenceof alcohol
or drugs.
• Mufflerandenginebecomehotandcancausea burn.Donot
touch.
• Neverpick uporcarrymachinewhiletheengineisrunning.
• Ifsituationsoccurwhichare notcoveredinthis manual,usecare
andgoodjudgement.ContactCustomerSupportforassistance
andthenameofthe nearestservicedealer.
MAINTENANCE & STORAGE
• Nevertamperwith safetydevices.Checktheirproperoperation
regularly.
• Checkboltsandscrewsforpropertightnessatfrequentintervals
to keepthemachineinsafeworkingcondition.Also,visually
inspectmachinefor anydamageandrepair,ifneeded.
• Beforecleaning,repairing,or inspecting,stoptheengineand
makecertaintheimpellerandall movingpartshavestopped.
Disconnectthesparkplugwireandgrounditagainsttheengine
to preventunintendedstarting.
• Donotchangetheenginegovernorsettingsoroverspeedthe
engine.Thegovernorcontrolsthe maximumsafeoperatingspeed
ofthe engine.
4
Page 5
• Maintainor replacesafetyandinstructionlabels,asnecessary.
Followthismanualforsafeloading,unloading,transporting,and
storageof thismachine.
Neverstorethemachineorfuel containerinsidewherethereis an
openflame,sparkorpilot lightsuchas a waterheater,furnace,
clothesdryer,etc.
Allowmachinetocoolat least5 minutesbeforestoring.
• Alwaysrefertotheoperator'smanualforproperinstructionson
off-seasonstorage.
• Ifthefuel tankhasto bedrained,dothisoutdoors.
• Observeproperdisposallawsandregulationsforgas,oil,etc. to
protecttheenvironment.
• Accordingto theConsumerProductsSafetyCommission(CPSC)
andtheU.S.EnvironmentalProtectionAgency(EPA),thisproduct
hasan Average UsefulLifeofseven(7)years,or 60hoursof
operation.At theendoftheAverage UsefulLife havethemachine
inspectedannuallybyan authorizedservicedealerto ensurethat
allmechanicalandsafetysystemsareworkingproperlyand not
wornexcessively.Failuretodo socanresultinaccidents,injuries
ordeath.
DO NOT MODIFY ENGINE
Toavoidseriousinjuryordeath,donot modifyenginein anyway.
Tamperingwiththegovernorsettingcanleadto a runawayengineand
causeitto operateat unsafespeeds.Nevertamperwithfactorysetting
ofenginegovernor.
NOTICE REGARDING EMISSIONS
EngineswhicharecertifiedtocomplywithCaliforniaandfederal
EPAemissionregulationsforSORE(SmallOffRoadEquipment)are
certifiedto operateonregularunleadedgasoline,and mayinclude
thefollowingemissioncontrolsystems:EngineModification(EM),
OxidizingCatalyst(CO),SecondaryAirInjection(SAI)and ThreeWay
Catalyst(TWO)if soequipped.
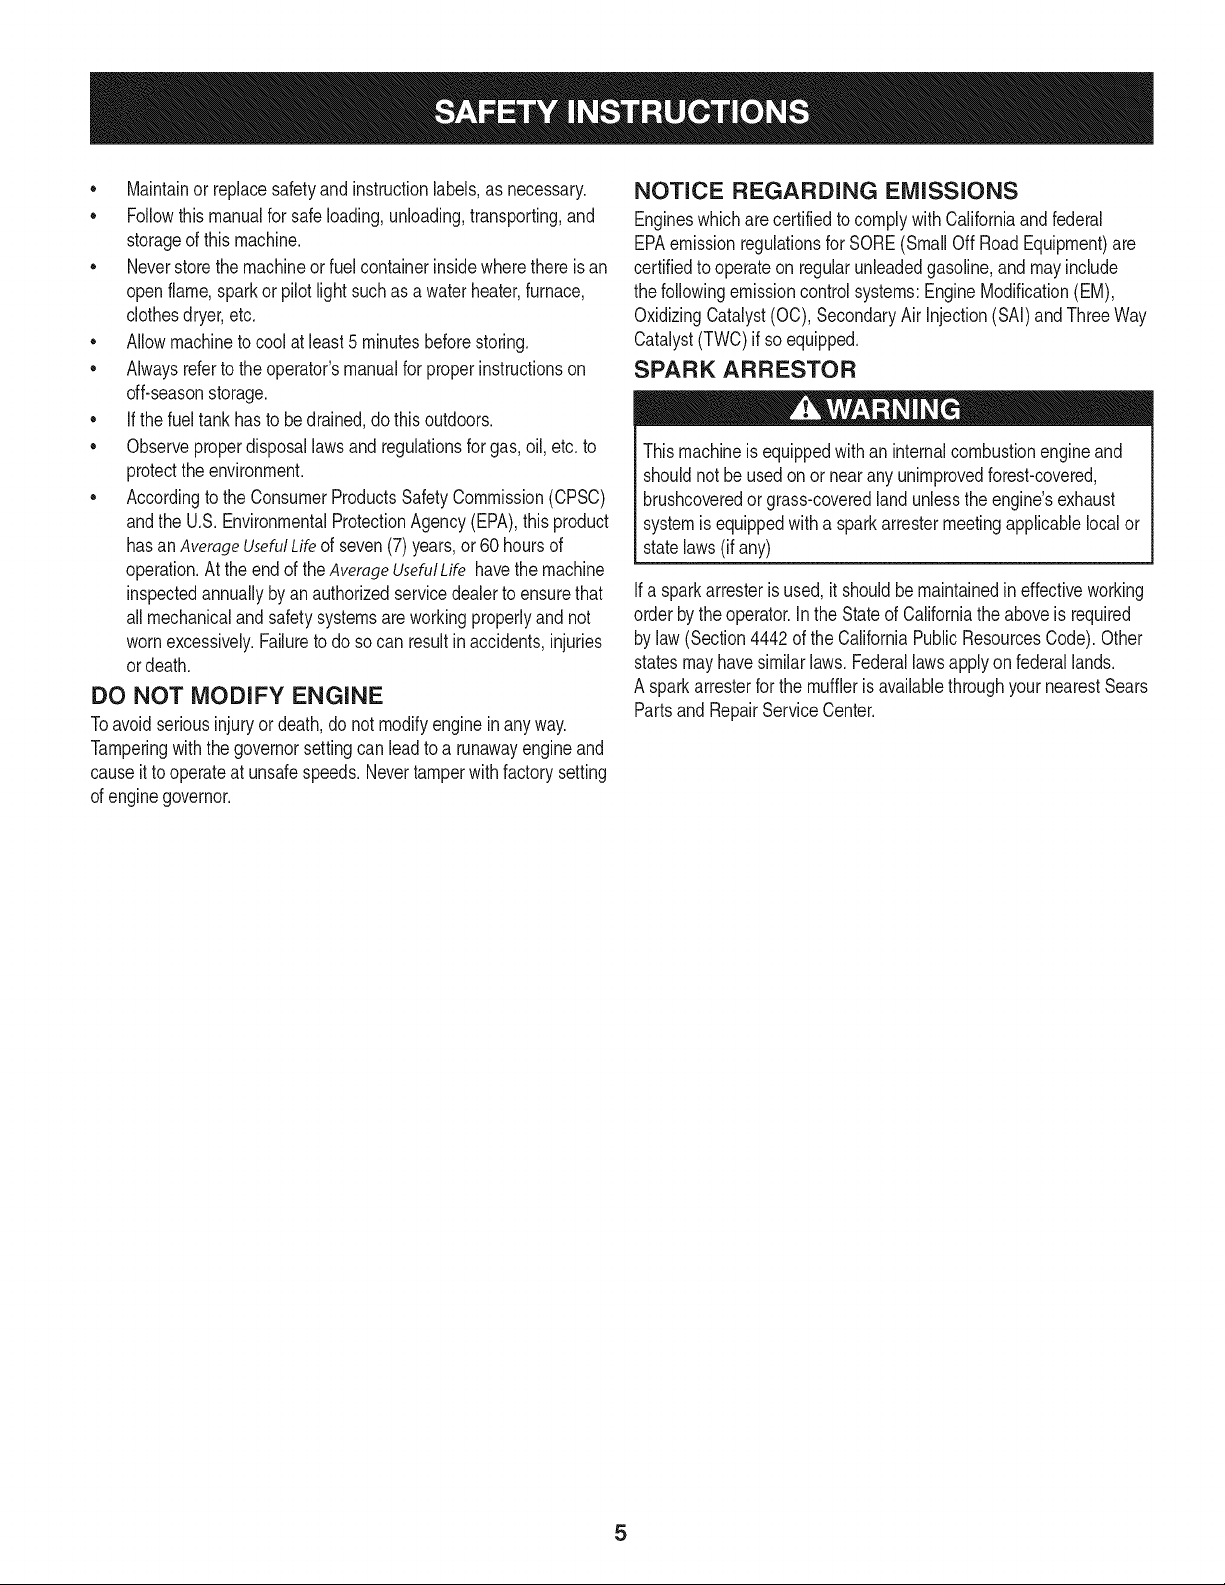
SPARK ARRESTOR
Thismachineis equippedwithan internalcombustionengineand
shouldnotbe usedonor nearanyunimprovedforest-covered,
brushcoveredorgrass-coveredlandunlesstheengine'sexhaust
systemisequippedwitha sparkarrestermeetingapplicablelocalor
statelaws(if any)
Ifa sparkarresterisused,itshouldbemaintainedin effectiveworking
orderbytheoperator.Inthe StateofCaliforniatheaboveis required
bylaw (Section4442ofthe CaliforniaPublicResourcesCode).Other
statesmayhavesimilarlaws. Federallawsapplyonfederallands.
A sparkarresterforthe mufflerisavailablethroughyournearestSears
PartsandRepairServiceCenter.
Page 6
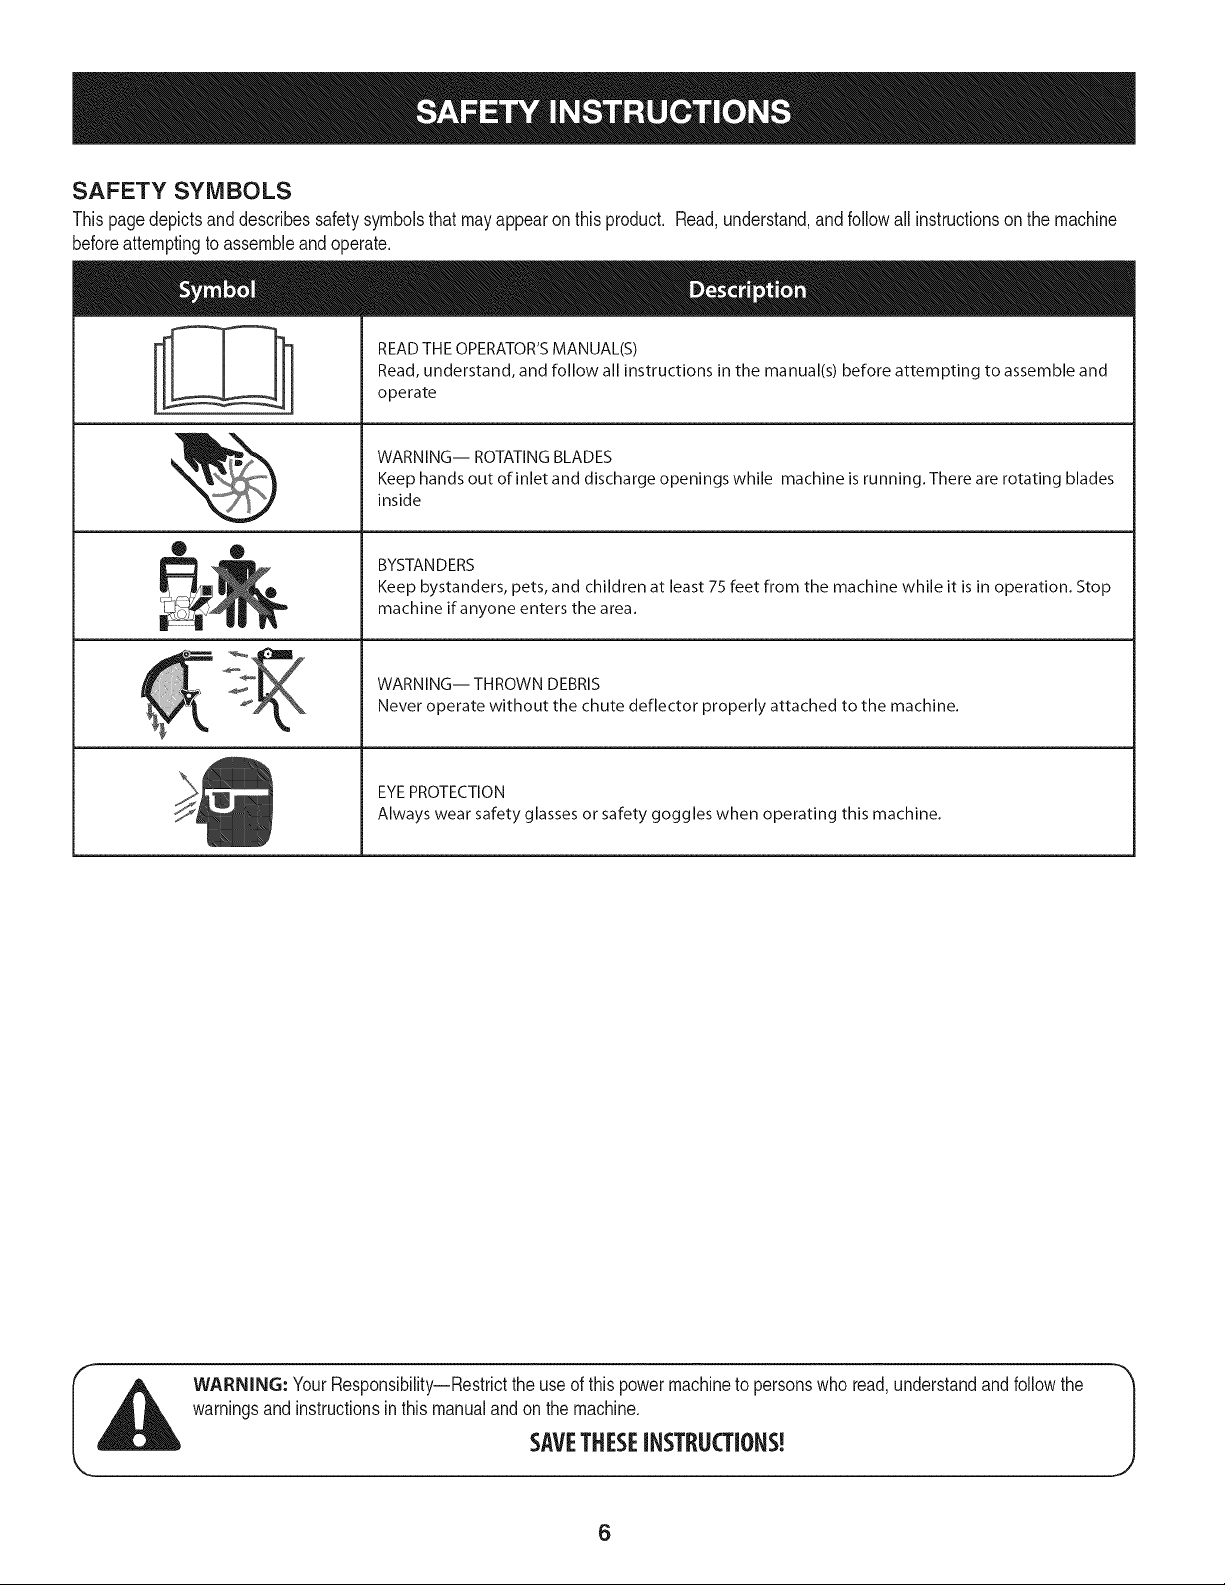
SAFETY SYMBOLS
Thispagedepictsanddescribessafetysymbolsthatmayappearonthisproduct. Read,understand,andfollowallinstructionson themachine
beforeattemptingtoassembleandoperate.
READ THE OPERATOR'S MANUAL(S)
i
i
Read, understand, and follow all instructions in the manual(s) before attempting to assemble and
operate
WARNING-- ROTATING BLADES
Keep hands out of inlet and discharge openings while machine is running. There are rotating blades
inside
• ®
il
BYSTANDERS
Keep bystanders, pets, and children at least 75 feet from the machine while it is in operation. Stop
machine if anyone enters the area.
WARNING-- THROWN DEBRIS
Never operate without the chute deflector properly attached to the machine.
EYEPROTECTION
Always wear safety glasses or safety goggles when operating this machine.
warningsandinstructionsinthis manualandonthemachine.
I_ ARNING: YourResponsibility--Restricttheuseof thispowermachinetopersonswhoread,understandandfollowthe
SAVETHESEINSTRUCTIONS!
6
J
Page 7
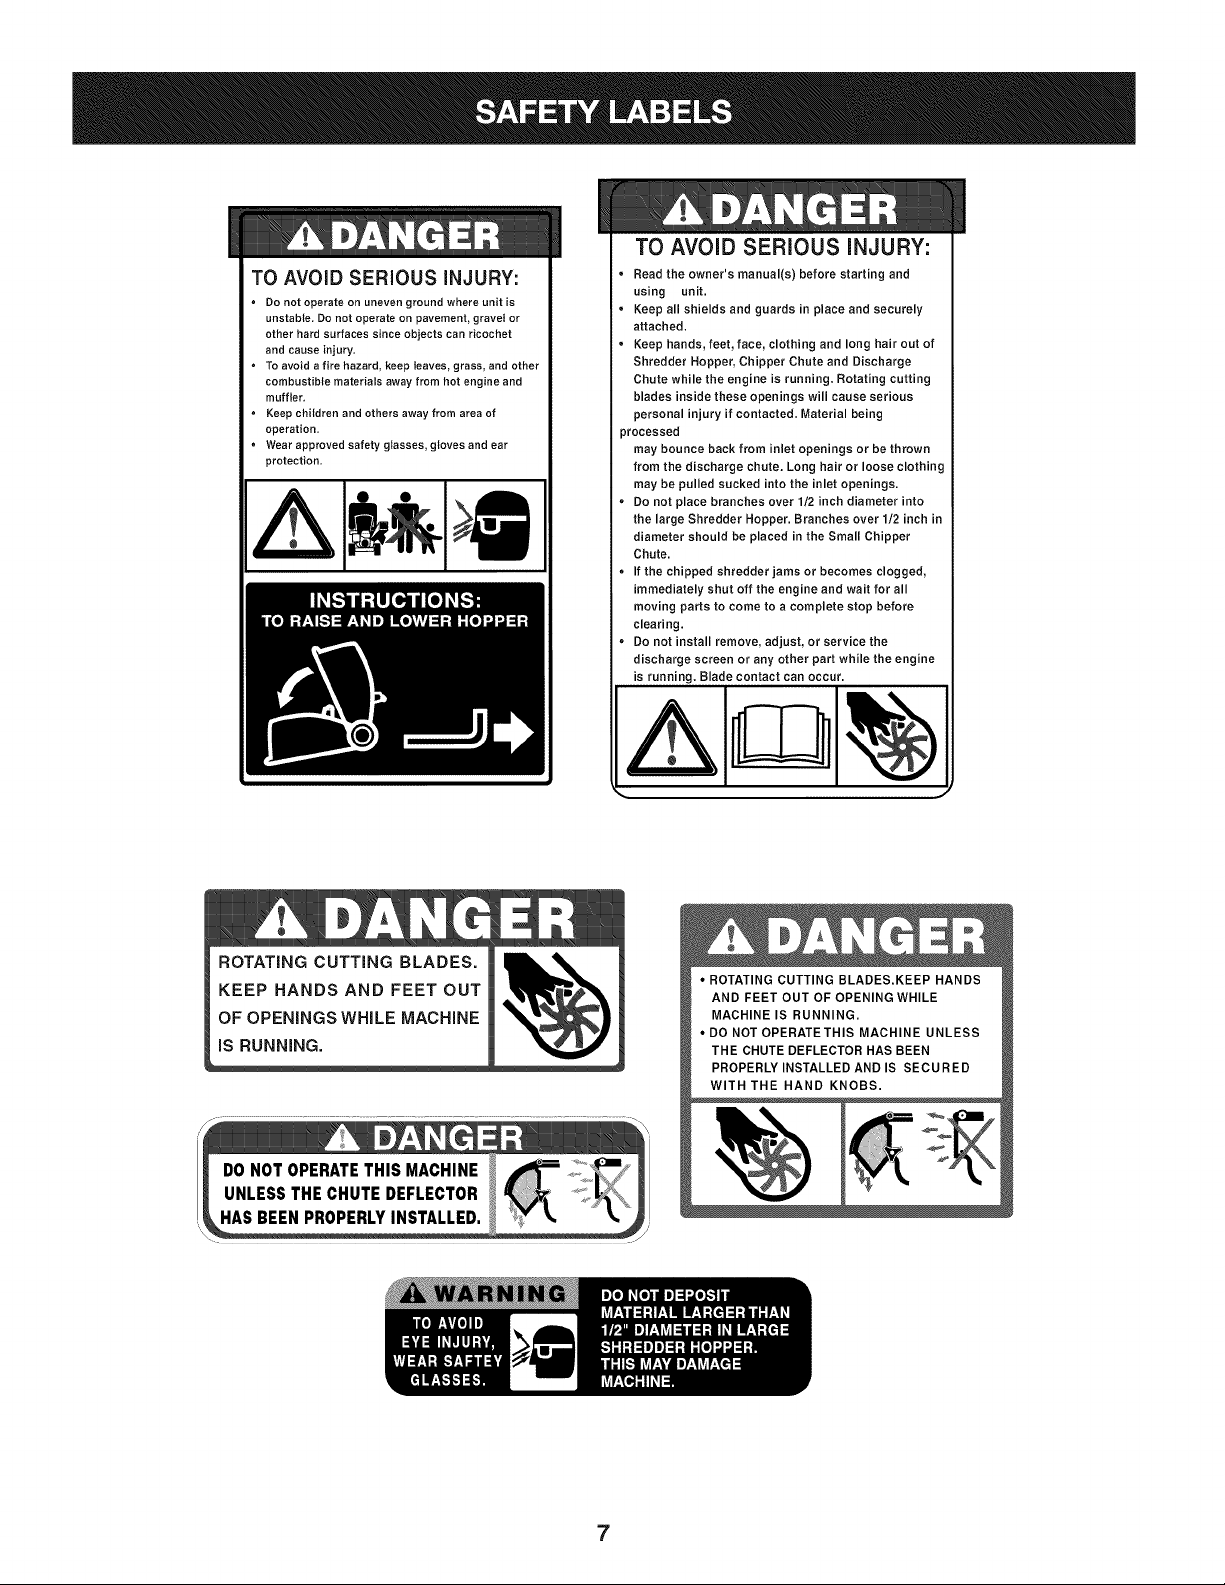
TO AVOID SERIOUS iNJURY:
• Do not operate on uneven ground where unit is
unstable, Do not operate on pavement, gravel or
other hard surfaces since objects can ricochet
and cause injury,
• To avoid a fire hazard, keep leaves, grass, and other
combustible materials away from hot engine and
muffler,
• Keep children and others away from area of
operation,
• Wear approved safety glasses, gloves and ear
protection.
TO AVOID SERIOUS iNJURY:
Read the owner's manual(s) before starting and
using unit.
Keep all shields and guards in place and securely
attached.
Keep hands, feet, face, clothing and long hair out of
Shredder Hopper, Chipper Chute and Discharge
Chute while the engine is running. Rotating cutting
blades inside these openings will cause serious
personal injury if contacted. Material being
)rocessed
may bounce back from inlet openings or be thrown
from the discharge chute. Long hair or loose clothing
may be pulled sucked into the inlet openings.
• Do not place branches over 1/2 inch diameter into
the large Shredder Hopper. Branches over 1/2 inch in
diameter should be placed in the Small Chipper
Chute.
• If the chipped shredder jams or becomes clogged,
immediately shut off the engine and wait for all
moving parts to come to a complete stop before
clearing.
• Do not install remove, adjust, or service the
discharge screen or any other part while the engine
is running, Blade contact can occur.
ROTATING CUTTING BLADES.
KEEP HANDS AND FEET OUT
OF OPENINGS WHILE MACHINE
iS RUNNING.
4
7
Page 8
IMPORTANT:Thisunitisshippedwithoutgasolineoroil intheengine.
Becertaintoserviceenginewithgasolineandoilas instructedinthe
Operationsectionof this manualbeforeoperatingyourmachine.
NOTE:Referenceto rightand lefthandsideof theChipperShredder
isobservedfromthe operatingposition.
OPENING CARTON
1. Cuteachcornerof thecartonverticallyfromtopto bottom.
2. Removeall looseparts.
3. Removeloosepackingmaterial.
REMOVING UNiT FROM CARTON
1. Liftunit fromthereartodetachit fromunderlyingcartonmaterial
androllunitout ofcarton.
2. Checkcartonthoroughlyforanyotherlooseparts.
LOOSE PARTS IN CARTON
• HopperAssembly
• Bag
• ChuteDeflector
• ChipperChute
• Tamper
• SafetyGlasses
• EngineOil
• Owner'sManual
f
J
Figure1
f
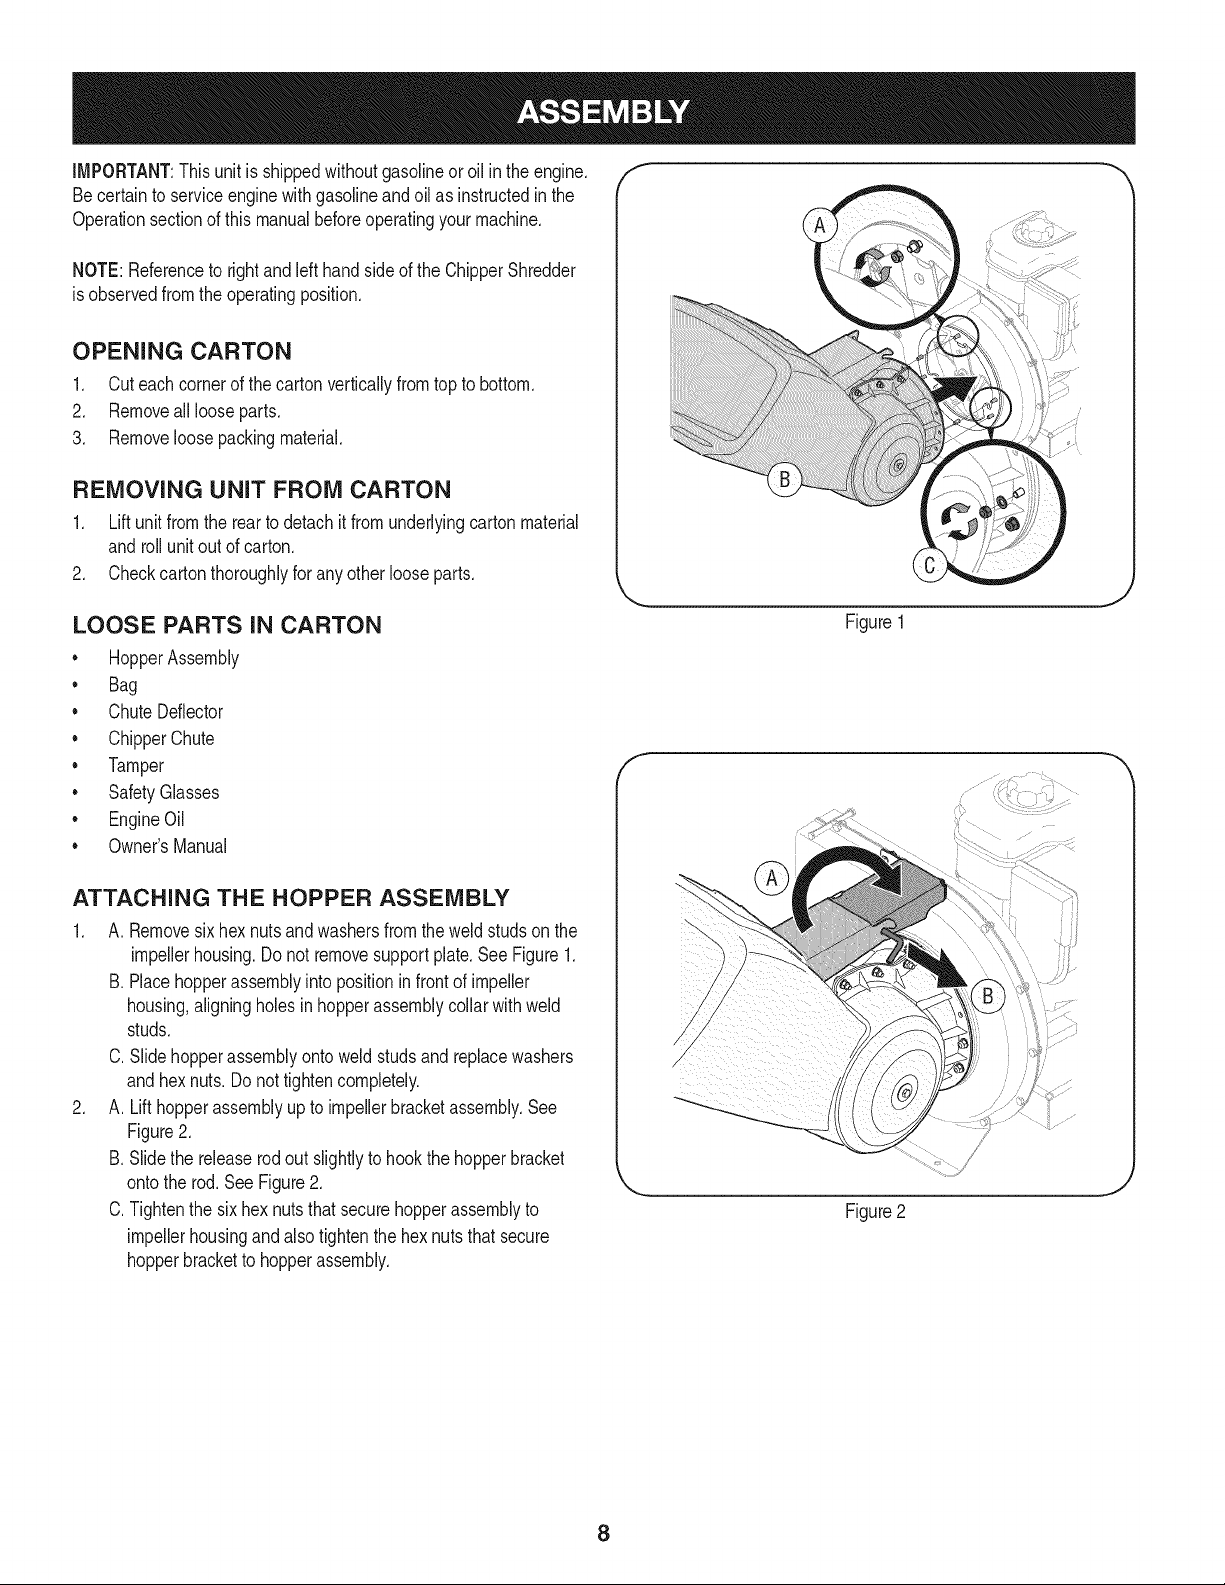
ATTACHING THE HOPPER ASSEMBLY
1. A. Removesixhexnutsandwashersfromtheweldstudson the
impellerhousing.Donotremovesupportplate.SeeFigure1.
B. Placehopperassemblyintopositioninfrontof impeller
housing,aligningholesinhopperassemblycollarwithweld
studs.
C. Slidehopperassemblyontoweldstudsand replacewashers
andhexnuts.Donottightencompletely.
2. A. Lifthopperassemblyupto impellerbracketassembly.See
Figure2.
B.Slidethe releaserodout slightlytohookthehopperbracket
ontothe rod.SeeFigure2.
C.Tightenthesixhex nutsthatsecurehopperassemblyto
impellerhousingandalsotightenthe hexnutsthat secure
hopperbracketto hopperassembly.
Figure2
8
Page 9

ATTACHING THE CHUTE DEFLECTOR
A.Removethewingknobsfromeachside ofthe lowerimpeller
housing.SeeFigure3.
B.Removethehexlocknut,spacers,andhexboltfromthetopof
theimpellerhousing.
.
A.Alignthe chutedeflectorinpositiononthe dischargeopening
andinserthexbolt withspacerthroughhingeonchute
deflector(spacersfit insideof hinges).SeeFigure4.
B.Placesecondspaceroverhex boltinsideotherhingeand
securewithhexlocknut.
C. Securebothsidesofchutedeflectorto impellerhousingusing
wingknobspreviouslyremoved.
ATTACHING THE CHIPPER CHUTE
A.Removethethreecuppedwashersandhex nutsfromweld
studsaroundthe openingonthesideofthe impellerhousing.
SeeFigure5.
B.Removethehexbolts,flatwashers,andlocknutsfromthe two
holeson theupperendofthesupportbrace.
i
Figure3
f
Figure4
Figure5
9
Page 10
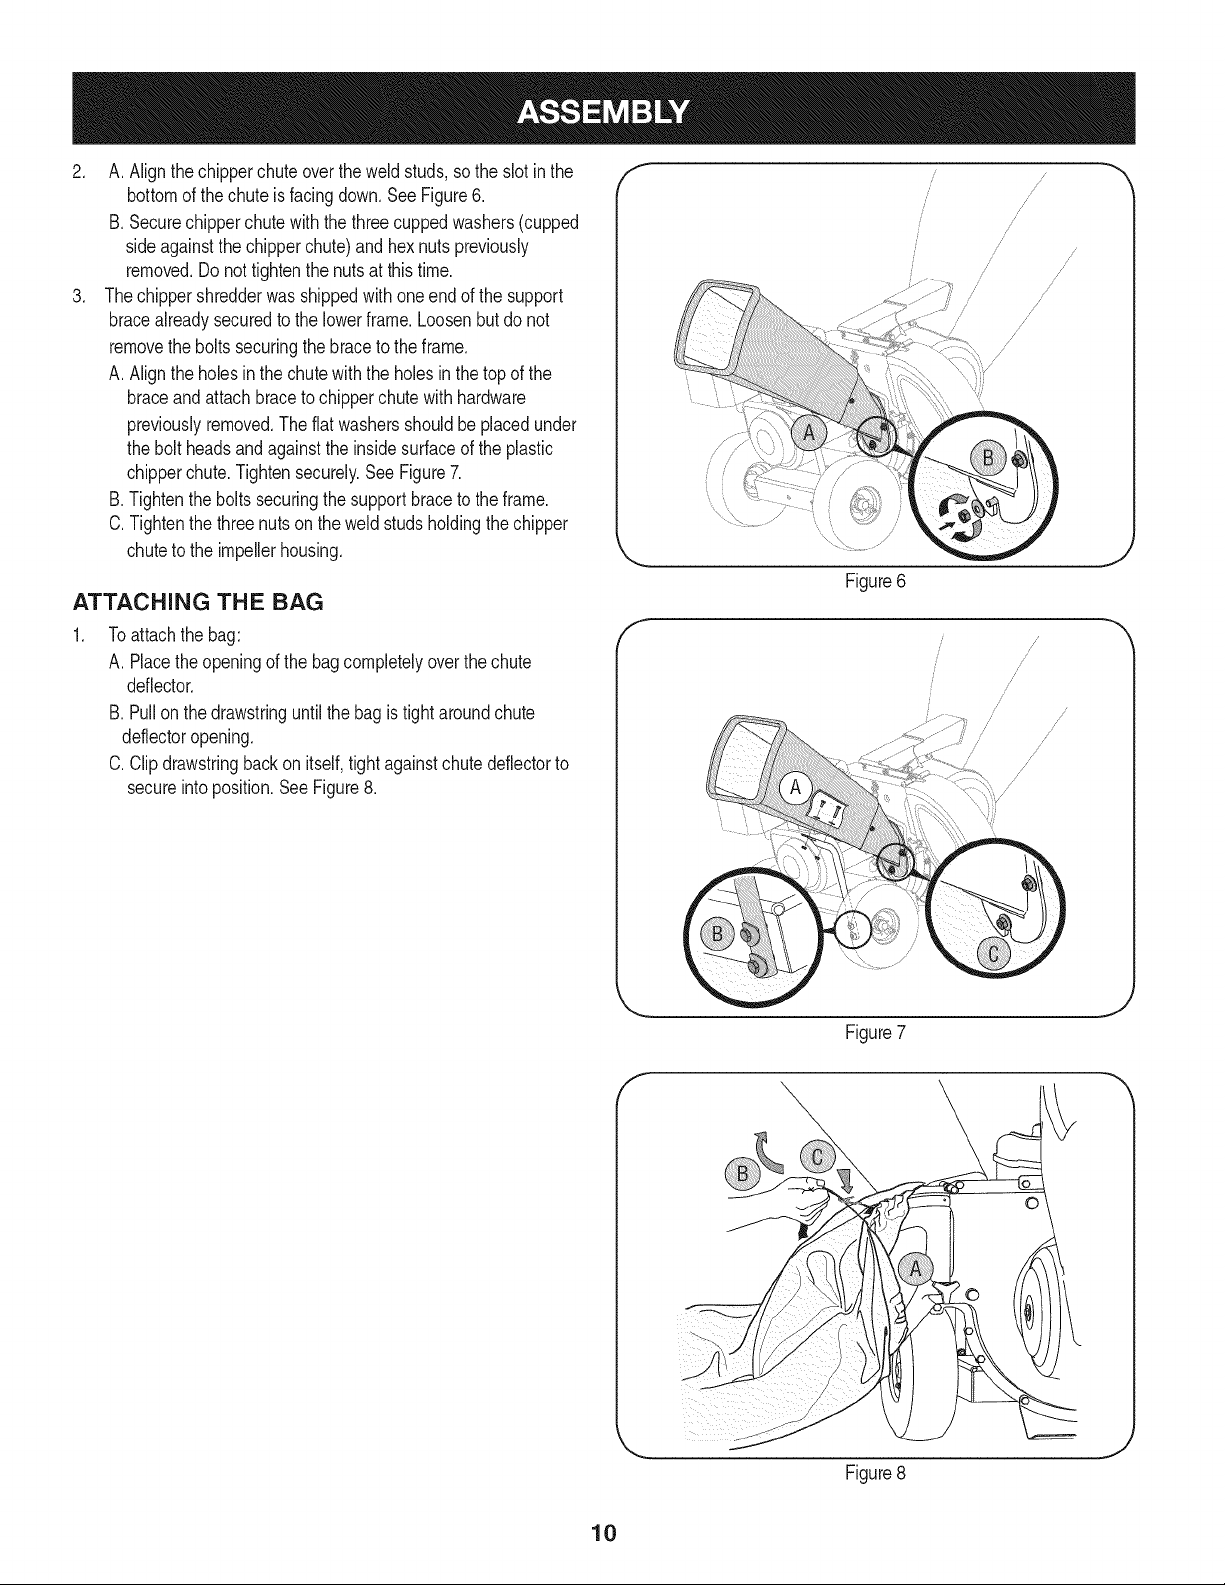
A,Alignthe chipperchuteovertheweld studs,sotheslotin the
bottomof thechuteis facingdown.SeeFigure6.
B.Securechipperchutewith thethreecuppedwashers(cupped
sideagainstthe chipperchute)andhexnutspreviously
removed.Donottightenthenutsatthistime.
.
Thechippershredderwasshippedwithoneendofthesupport
bracealreadysecuredto thelowerframe.Loosenbutdo not
removetheboltssecuringthe braceto theframe.
A.Alignthe holesinthe chutewiththeholesinthe topof the
braceandattachbraceto chipperchutewithhardware
previouslyremoved,Theflatwashersshouldbeplacedunder
thebolt headsandagainstthe insidesurfaceoftheplastic
chipperchute.Tightensecurely.SeeFigure7.
B.Tightenthe boltssecuringthesupportbracetothe frame.
C.Tightenthethreenutsontheweld studsholdingthechipper
chuteto theimpellerhousing.
ATTACHING THE BAG
1. Toattachthe bag:
A. Placetheopeningof thebagcompletelyoverthechute
deflector,
B. Pullonthedrawstringuntilthebagistightaroundchute
deflectoropening.
C. Clipdrawstringbackon itself,tightagainstchutedeflectorto
secureintoposition.SeeFigure8.
/
/
/
/
/ ,,
/'
/
,/
/
',\ ,//
\,\ ,/
/
/ /
/ / ,,/
i /
/
J
Figure6
f
i /
/
/
/
/
/
/
/
/
/ /
/ /
10
Figure7
f
Figure8
Page 11
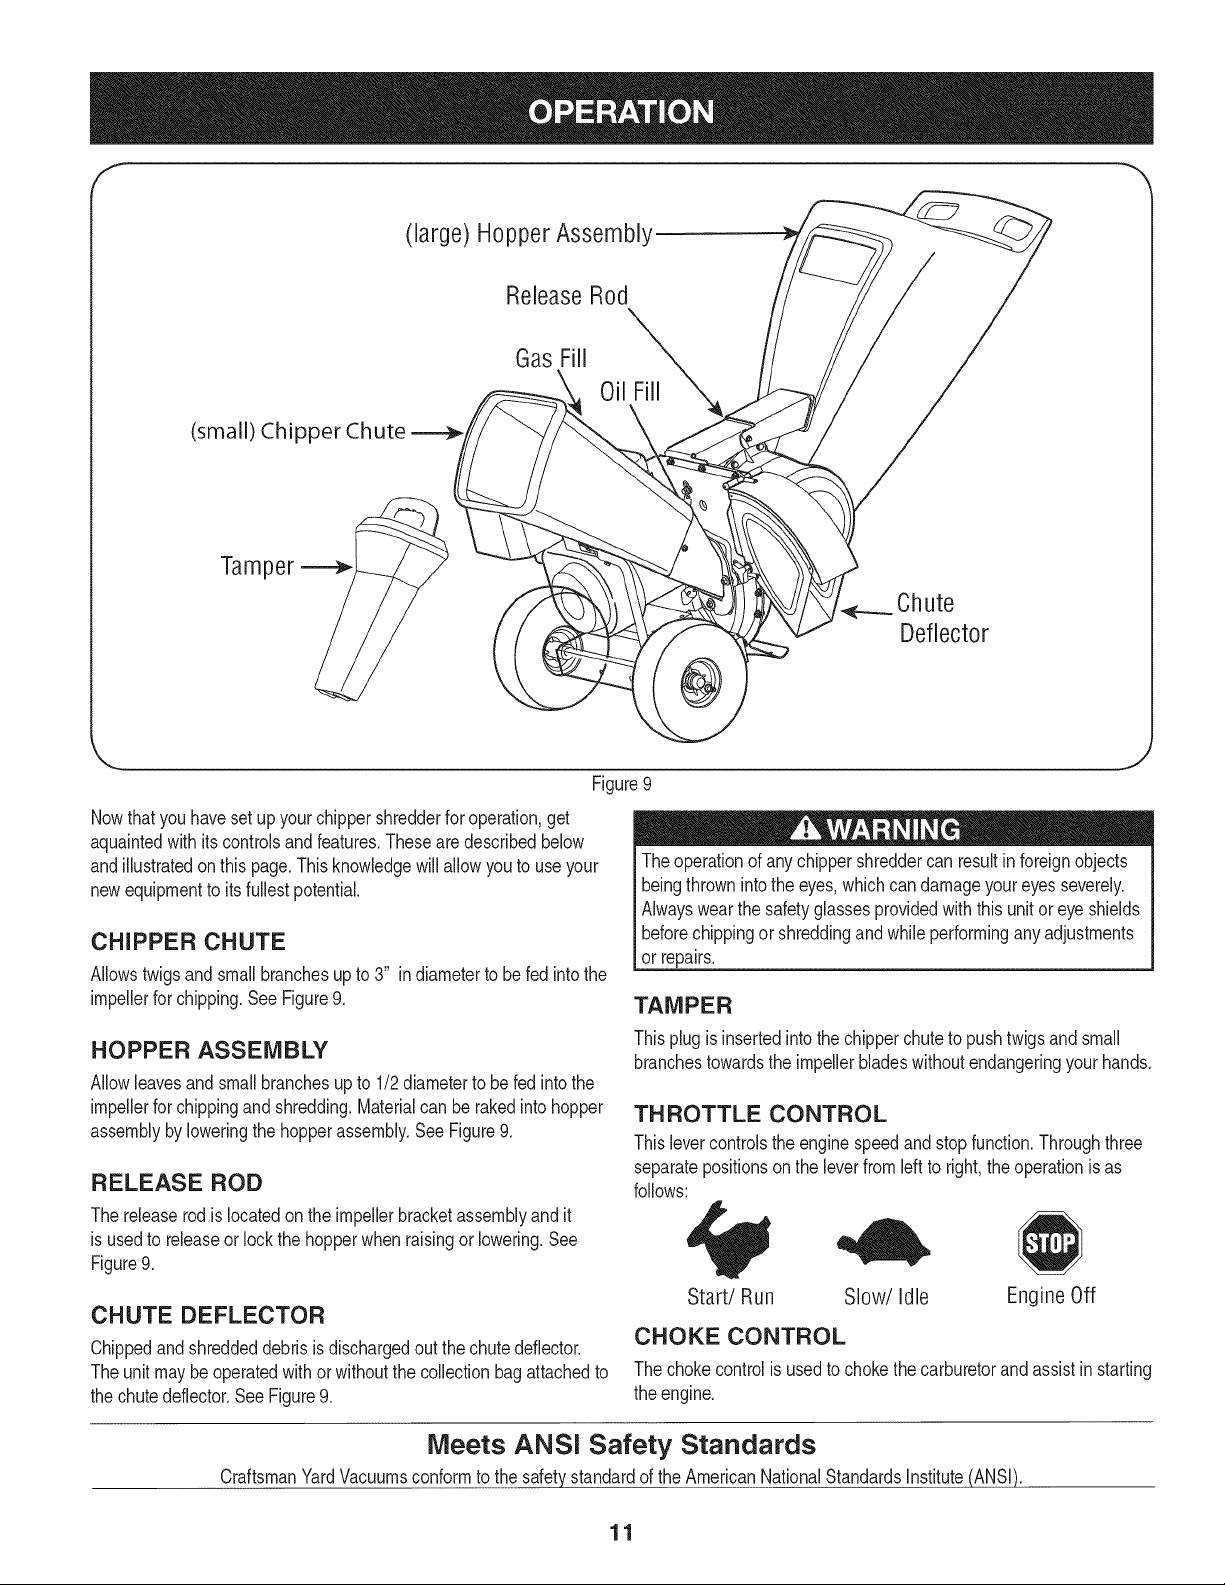
(large) HopperAssembly
ReleaseRod
GasFill
(small) Chipper Chute
Tamper===--_
Figure9
Nowthatyouhavesetupyourchippershredderforoperation,get
aquaintedwith itscontrolsandfeatures.Theseare describedbelow
andillustratedon thispage.Thisknowledgewillallowyou touseyour
newequipmenttoits fullestpotential.
CHIPPER CHUTE
Allowstwigsandsmallbranchesupto 3" indiametertobefedintothe
impellerforchipping.SeeFigure9.
HOPPER ASSEMBLY
Allowleavesandsmallbranchesupto 1/2diameterto befedintothe
impellerforchippingandshredding.Materialcanberakedintohopper
assemblybyloweringthehopperassembly.SeeFigure9.
RELEASE ROD
Thereleaserodislocatedon the impellerbracketassemblyandit
isusedto releaseorlockthehopperwhen raisingorlowering.See
Figure9.
CHUTE DEFLECTOR
Chippedandshreddeddebrisis dischargedoutthechutedeflector.
Theunit maybeoperatedwithorwithoutthecollectionbagattachedto
thechutedeflector.SeeFigure9.
Chute
Deflector
@
Theoperationof anychippershreddercan resultinforeignobjects
beingthrownintothe eyes,whichcan damageyoureyesseverely.
Alwayswearthesafetyglassesprovidedwiththisunitor eyeshields
beforechippingor shreddingandwhileperformingany adjustments
or repairs.
TAMPER
Thisplugisinsertedinto thechipperchuteto pushtwigsandsmall
branchestowardstheimpellerbladeswithoutendangeringyour hands.
TH ROTTLE CONTROL
Thislevercontrolstheenginespeedandstopfunction.Throughthree
separatepositionsontheleverfromleftto right,theoperationisas
follows:
Start/Run Slow/Idle Engine Off
CHOKE CONTROL
Thechokecontrolis usedto chokethecarburetorand assistinstarting
theengine.
Meets ANSI Safety Standards
CraftsmanYardVacuumsconformtothesafetystandardof theAmericanNationalStandardsInstitute(ANSI).
11
Page 12
GAS AND OIL FILL-UP
Oil (one bottle shipped with unit)
FirstTimeUse
1. Removeoil filldipstick.
2. Withthe chippershredderonlevelground,usea funnelto empty
entirecontentsofoil bottleprovidedintotheengine.
3. Replaceoilfill dipstickandtighten.
Subsequent Uses
Onlyuse highqualitydetergentoil ratedwithAPIserviceclassification
SF,SG,or SH.Selecttheoil'sSAEviscositygradeaccordingtothe
expectedoperatingtemperature.Followthechartbelow.
_older _ 32°F _Warmer'_
OilViscosity Chart
Althoughmulti-viscosityoils(5W30,10W30,etc.)improvestarting
incoldweather,theywill resultinincreasedoil consumptionwhen
usedabove32°E Checkyourengineoillevel morefrequentlytoavoid
possibleenginedamagefromrunninglowon oil.
1. Checktheoil levelmakingcertainnotto rubthe dipstickalongthe
insidewallsof theoilfilltube.Thiswouldresultina falsedipstick
reading.Wipedipstickcleanwithcloth. Replaceandtighten
dipstick.Removeandcheckoil level.Refillto FULLmarkon
dipstick,if necessary.Capacityisapproximately28oz. Overfilling
willcausethe enginetosmokeprofuselyandwill resultinpoor
engineperformance.
2. Replaceoilfill dipstickandtighten.
J
Alcoholblendedfuels(calledgasoholorusingethanolormethanol)
canattractmoisturewhichleadsto separationand formationofacids
duringstorage.Acidicgascandamagethefuel systemofanengine
whilein storage.
Toavoidengineproblems,thefuelsystemshouldbeemptiedbefore
storagefor30daysorlonger.Drainthegastank,starttheengine
andletit rununtilthefuellinesandcarburetorare empty.Use
freshfuelnextseason.See STORAGEInstructionsforadditional
information.
Neveruseengineorcarburetorcleanerproductsinthefuel tankor
permanentdamagemayoccur.
NOTE:Checkthefuel levelperiodicallytoavoidrunningoutofgaso-
linewhileoperatingthe chippershredder.Ifthe unitrunsoutof gasas
itis chipping,itmaybenecessarytounclogthedischargeareabefore
itcan be restarted.RefertoSERVICEANDMAINTENANCEsection.
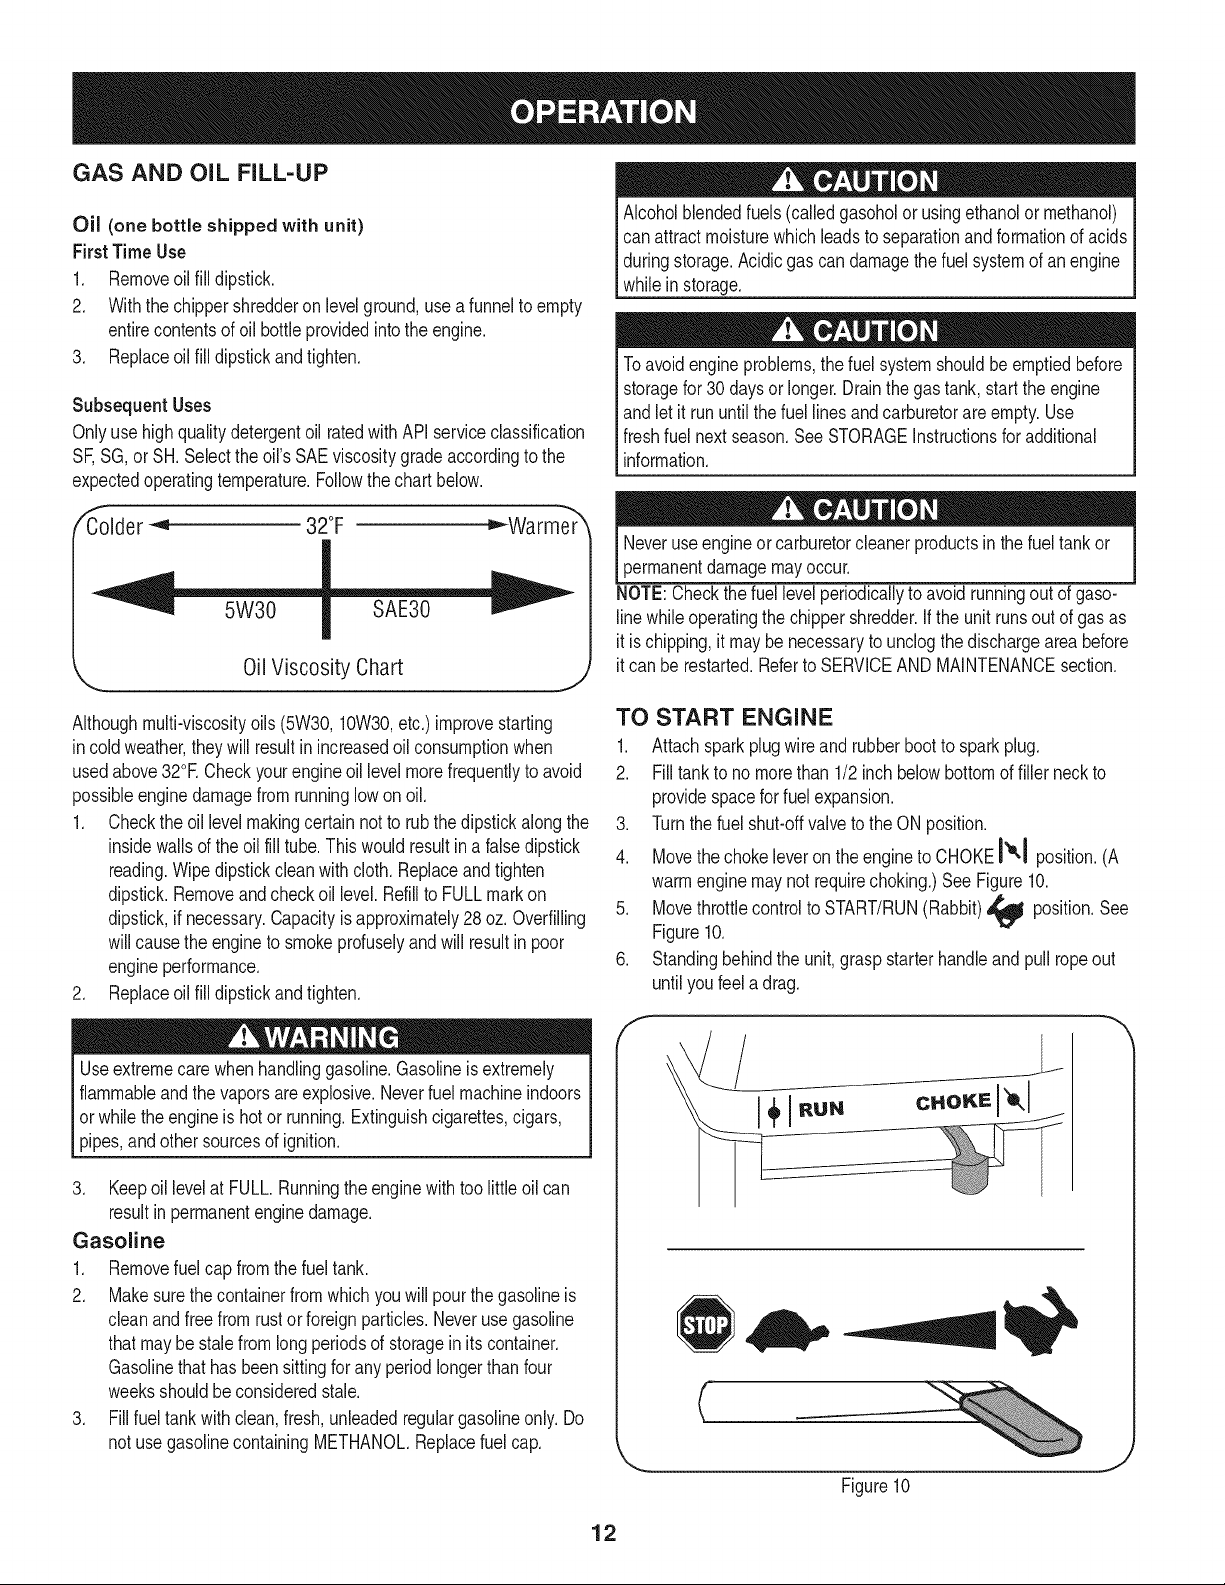
TO START ENGINE
1. Attach sparkplugwireandrubberboottosparkplug.
2. Filltankto nomorethan1/2inchbelowbottomoffillerneckto
providespaceforfuelexpansion.
3. Turnthefuel shut-offvalvetothe ONposition.
4. Movethechokeleverontheengineto CHOKEI'i,I position.(A
warmenginemaynotrequirechoking.)See Figure10.
5. Movethrottlecontrolto START/RUN(Rabbit),_ position.See
Figure10.
6. Standingbehindtheunit,graspstarterhandleand pullropeout
untilyoufeela drag.
f
l Useextremecarewhenhandlinggasoline.Gasolineisextremely
flammableandthe vaporsareexplosive.Neverfuelmachineindoors
or whiletheengineis hotor running.Extinguishcigarettes,cigars,
pipes,andothersourcesofignition.
3. Keepoil levelat FULL.Runningtheenginewithtoo littleoil can
resultinpermanentenginedamage.
Gasoline
1. Removefuelcap fromthefuel tank.
2. Makesurethecontainerfromwhichyouwillpourthegasolineis
cleanandfreefromrustor foreignparticles.Neverusegasoline
thatmaybestalefromlongperiodsofstoragein itscontainer.
Gasolinethathasbeensittingfor anyperiodlongerthanfour
weeksshouldbeconsideredstale.
3. Fillfueltankwithclean,fresh,unleadedregulargasolineonly.Do
notusegasolinecontainingMETHANOL.Replacefuelcap.
J
Figure10
12
Page 13
NOTE:A noisewillbeheardwhenfindingthestartofthe compression
cycle.Thisnoiseis causedbythe flailsandfingers,whicharepartof
theshreddingmechanism,andit shouldbe expecteduntiltheimpeller
reachesfull speed.
7. Pullthe ropewitha rapid,continuous,fullarmstroke.Keepa firm
griponthestarterhandle.Lettheroperewindslowly.
8. Repeat,if necessary,untilenginestarts.Whenenginestarts,
movechokecontrolgraduallytowardtheRUNI JtIposition..
9. If enginefalters,movechokecontrolbacktowardtheCHOKE
I'o,I positionandrepeatsteps5 though8.
10. ALWAYSkeepthe throttlecontrolinthe START/RUNposition
whenoperatingthe chippershredder.
TO STOP ENGINE
1. Movethrottlecontrolleverto slow(turtle)'_ position.
Wheneverpossible,graduallyreduceenginespeedbefore
stoppingengine.
2. Movethrottlecontrolleverto STOPI or OFFposition.
3. Turnthefuel shut-offvalvetotheOFFposition.
4. Disconnectsparkplugwireandgrounditagainsttheengineto
preventaccidentalstartingwhiletheequipmentisunattended.
SHREDDING
Yardwastesuchas leavesandpineneedlescanbe placedinthe
hopperforshredding.Aftermaterialhasbeenprocessedbythe shred-
derbladeandflails,it willbeforcedout ofthechutedeflector,and,if
attached,into adebriscollectionbag.
Observethefollowingguidelineswhenshreddingyarddebris:
• Neverattempttoshredmaterialotherthannormalyarddebris
(leaves,twigs,pinecones,etc.).
• Avoidshreddingfibrousplantssuchas tomatovines,palmfronds,
etc.,untiltheyare thoroughlydriedout.Freshvinesdo notshred
wellandtend towrapthemselvesaroundtheimpellerandflails.
• Placereasonableamountsofdebrisintothe hopperata time.Do
notoverloadthe hopper.
• Allowthematerialinthehopperto bedrawnintothebladesand
shreddedbeforeaddingadditionaldebristo thehopper.Failureto
duesomayresultin acloggedhopper,cloggedchutedeflectoror
a stalledengine.
CHIPPING
Branchesupto3" in diametercanbefedintothechipperchute.
Observethefollowingguidelineswhenchippingbranches:
• Keepbothhandsfirmlyonthebranchas youfeed itintothe
chipperchute.
• Neverfeed morethanonebranchintothechipperchuteata time.
• Neverfeed anythingotherthan branches(orwood)intothe
chipperchute.
• Applyintermittentpressure(force,inshortpulses)whilefeeding
larger(3-inchdiameter)branchesintothechipperchute,toavoid
boggingor stallingtheengine.
IMPORTANT:Neverfeed brancheswitha diametergreaterthan
three(3)inchesintothechipperchute.Doingsocan resultin serious
damageto yourunit'schipperblades,flailsor impeller.
NOTE:Forbestperformance,alwaysoperatetheunitwith sharp
chipperblades.If a noticeablelossinperformanceisencountered
whilechippingbranches,thechipperbladesshouldbe replaced.
LOWERING THE HOPPER ASSEMBLY
1. Withonehandgraspthehandleat thetopofthe hopperassem-
blyandlift slightly.
2. Withthe otherhandpulloutonthereleaserodandlowerthe
hopperassemblytotheground.
TO EMPTY BAG
1. Un-clipdrawstringandloosenbagfromchutedeflectoropening.
2. Emptybagandreattachtothe dischargechuteopening.Pullon
thedrawstringuntilthe bagistightaroundthe chuteopeningand
clipthe drawstringtightagainstthechutedeflector.
IMPORTANT:Theflailscreenislocatedinsidethehousingin the
dischargearea.Iftheflailscreenbecomesclogged,removeand
cleanas instructedintheServiceand Maintenancesection.Forbest
performance,itisalso importanttokeepthechipperbladessharp.
13
Page 14
MAINTENANCE SCHEDULE
Beforeperforminganytypeofmaintenance/service,disengageall
controlsandstoptheengine.Waituntilallmovingpartshavecometo
acompletestop.Disconnectsparkplugwireandgrounditagainstthe
enginetopreventunintendedstarting.Alwayswearsafetyglassesduring
operationorwhileperforminganyadjustmentsorrepairs.
EachUse
1st5 - 8 hours
25 hours
Annuallyor50hours
Annuallyor100hours
BeforeStorage 1. Fuelsystem
Underheavyloador inhightemperatures
.
Engineoillevel
2.
Looseormissinghardware
3.
Unitandengine.
1.
Engineoil
1.
Engineoill-
2.
Aircleaner
3.
Controllinkagesand pivots
1.
Engineoil
2.
Muffler
1.
Sparkplug
1. Check
2. Tightenor replace
3. Clean
1. Change
1. Change
2. Replace
3. Lubewithlightoil
1. Change
2. Inspect
1. Clean,checkand resetgap,or
1. Runengineuntilit stopsfromlackof
Followthemaintenanceschedulegivenbelow.Thischartdescribes
serviceguidelinesonly.UsetheServiceLogcolumnto keeptrackof
completedmaintenancetasks.Tolocatethe nearest SearsService
Centeror toscheduleservice,simplycontactSearsat
1-800-4-MY-HOME®.
replacesparkplug.
fueloradda gasolineadditivetothe
gasin thetank.
Alwaysstopengineanddisconnectsparkplugwire beforeperforming
Ianymaintenanceoradjustments.Alwayswearsafetyglassesduring
[operationor whileperforminganyadjustmentsor repairs.
GENERAL RECOMMENDATIONS
• Alwaysobserveallsafetyrulesfoundonproductlabelsandin
thisoperator'smanualwhenperforminganymaintenance.Safety
rulescan befoundonthe productlabelsandin thisOperator's
Manualbeginningon page3.
• Thewarrantyonthischippershredderdoesnotcoveritemsthat
havebeensubjectedto operatorabuseor negligence.Toreceive
fullvalue fromwarranty,operatormustmaintaintheequipmentas
instructedhere.
• Someadjustmentswillhaveto be madeperiodicallyto maintain
yourunit properly.
• Periodicallycheckallfastenersand makesurethesearetight.
ENGINE MAINTENANCE
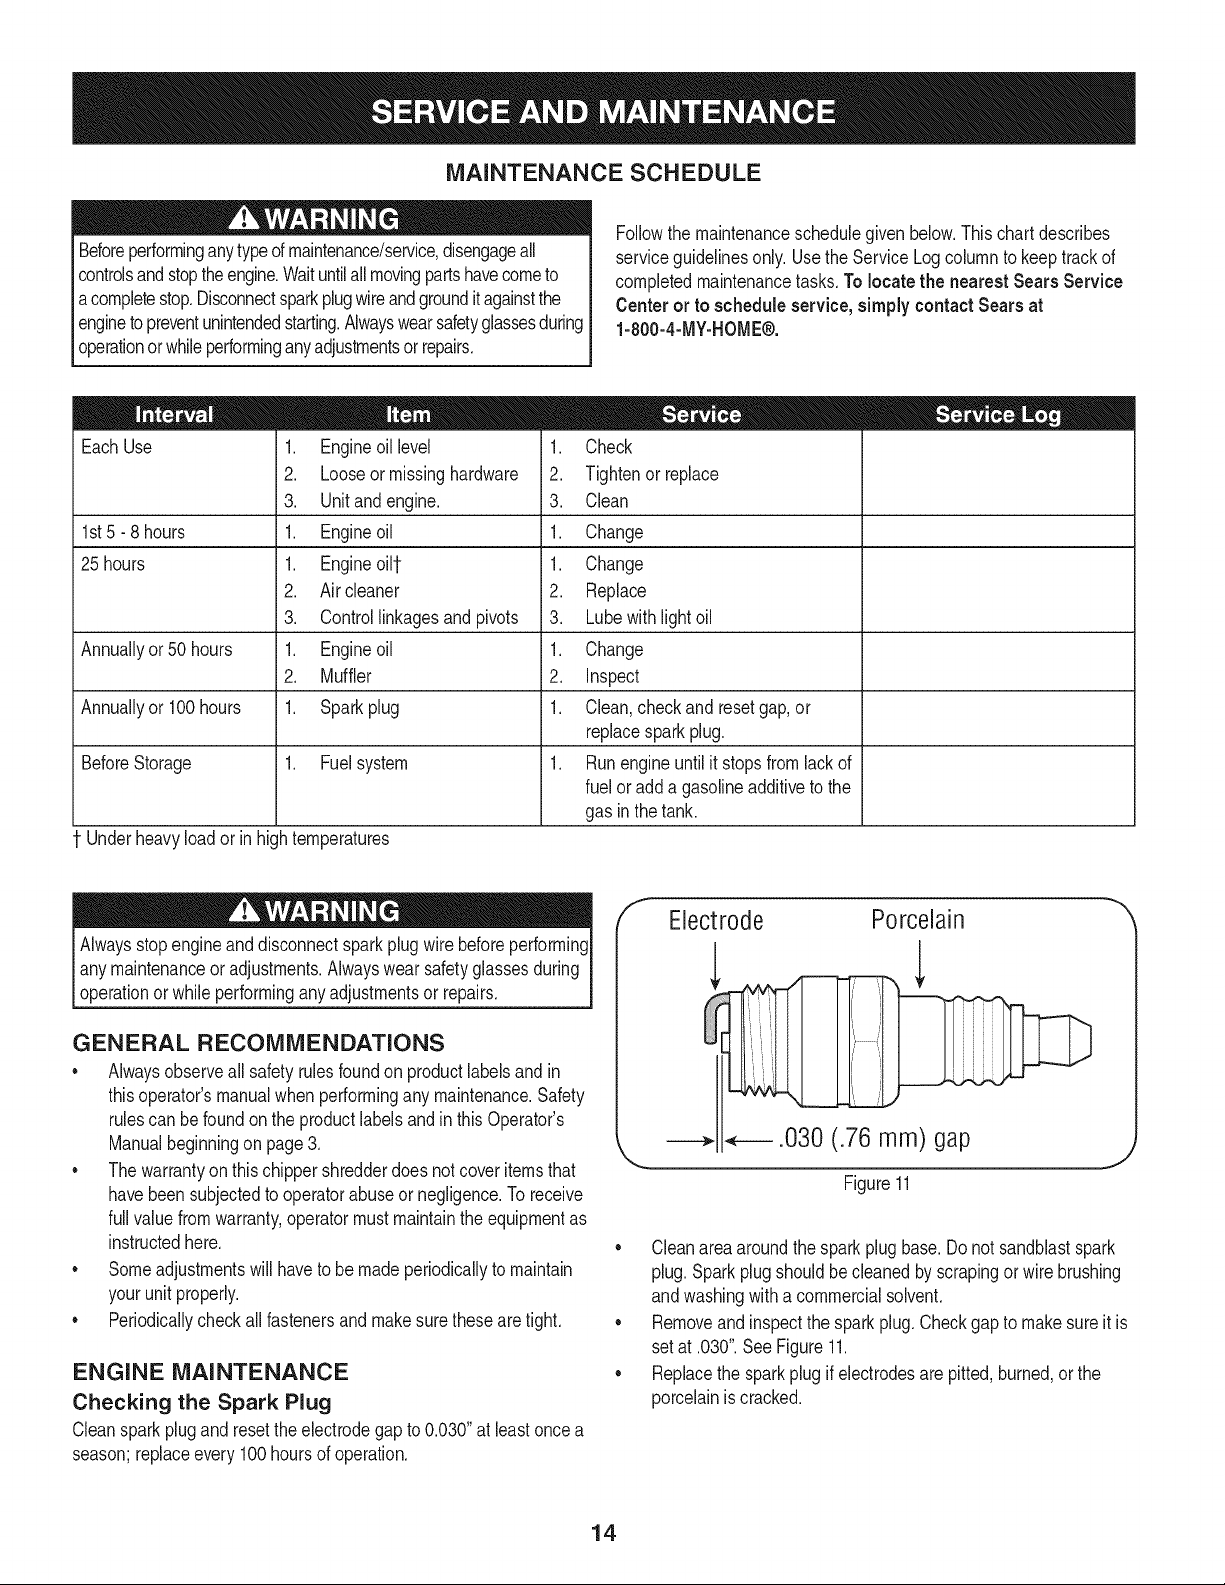
Checking the Spark Plug
Cleansparkplugandresettheelectrodegapto0.030"atleastoncea
season;replaceevery100hoursof operation.
f
Electrode
Porcelain
,L
.030 (.76 mm) gap
Figure 11
• Cleanareaaroundthesparkplugbase.Donot sandblastspark
plug.Sparkplugshouldbecleanedbyscrapingorwirebrushing
andwashingwitha commercialsolvent.
• Removeandinspectthe sparkplug.Checkgaptomakesureitis
setat .030".SeeFigure11.
• Replacethe sparkplugif electrodesare pitted,burned,orthe
porcelainiscracked.
14
Page 15
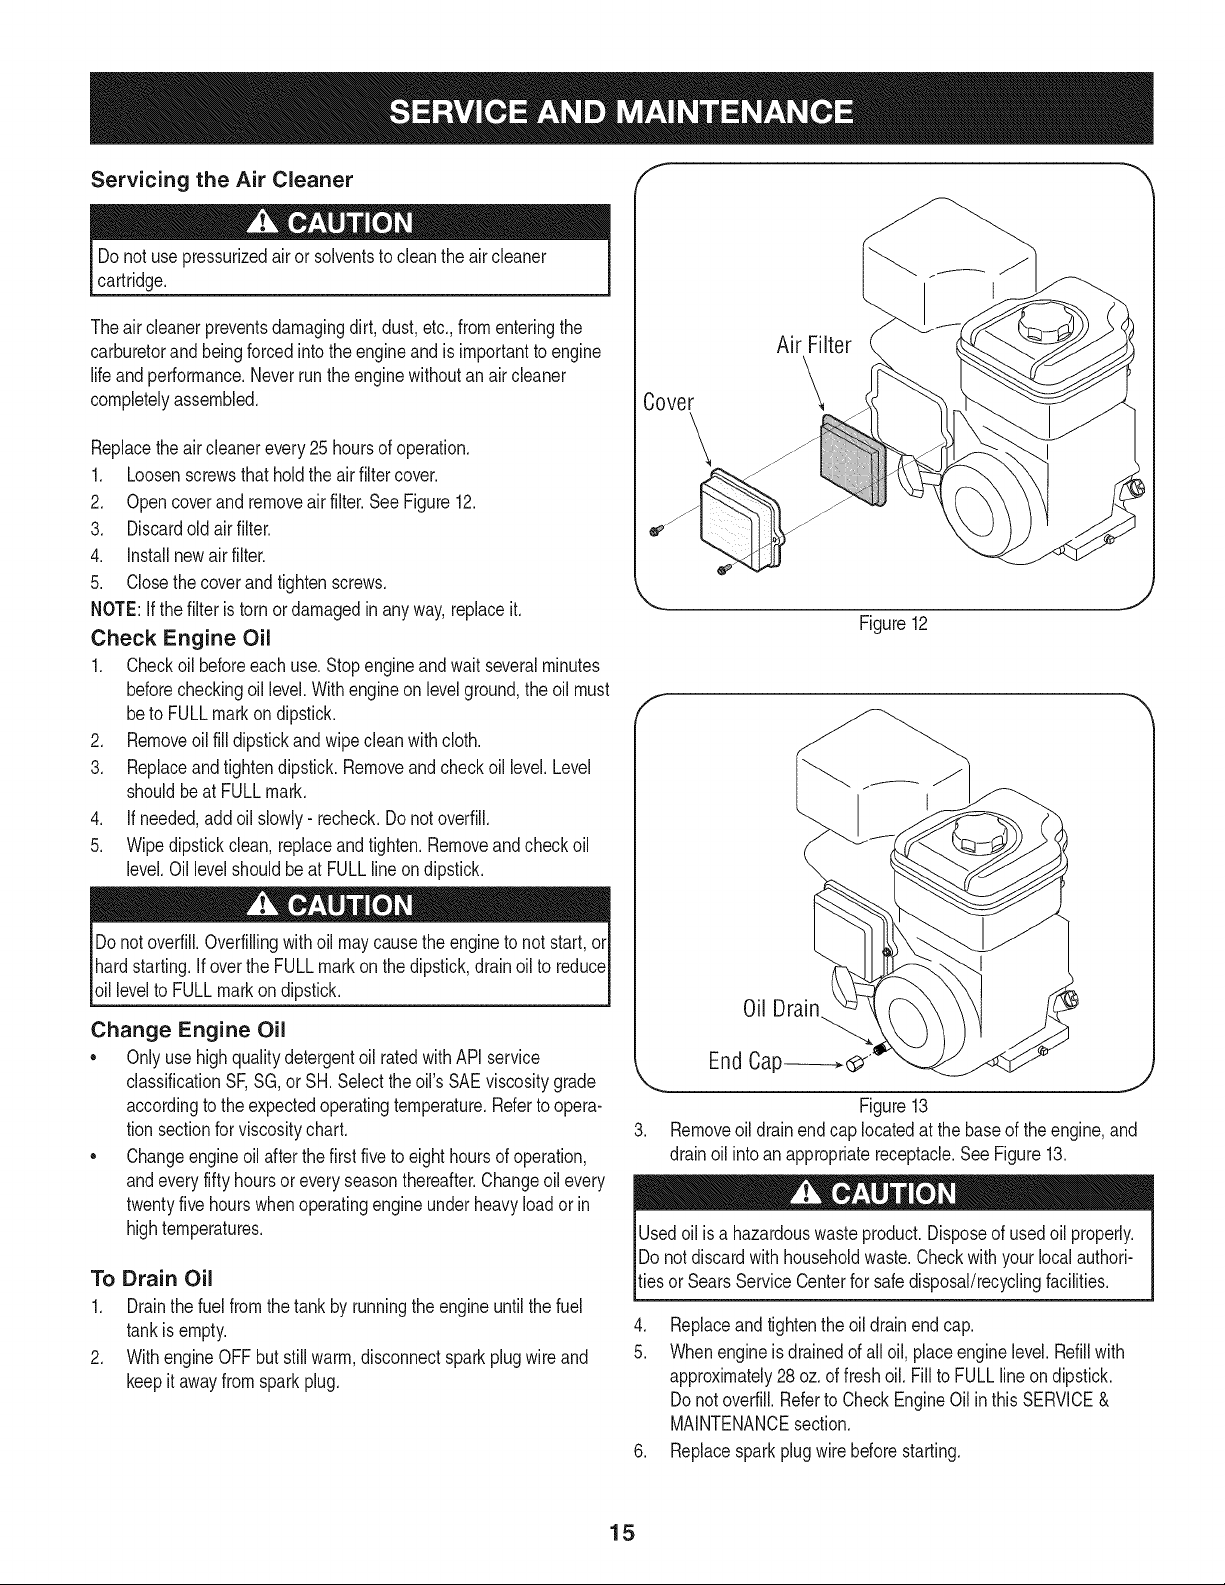
Servicing the Air Cleaner f
Donotusepressurizedairor solventstocleantheaircleaner
cartridge.
Theair cleanerpreventsdamagingdirt,dust,etc.,fromenteringthe
carburetorand beingforcedintotheengineandis importanttoengine
lifeandperformance.Neverruntheenginewithoutan aircleaner
completelyassembled.
Replacetheaircleanerevery25 hoursof operation.
1. Loosenscrewsthatholdtheairfiltercover.
2. Opencoverandremoveairfilter.See Figure12.
3. Discardold airfilter.
4. Installnewairfilter.
5. Closethe coverandtightenscrews.
NOTE:Ifthe filteristorn ordamagedinanyway,replaceit.
Check Engine Oil
1. Checkoilbeforeeachuse.Stopengineandwaitseveralminutes
beforecheckingoil level.Withengineon levelground,theoil must
beto FULLmarkondipstick.
2. Removeoilfilldipstickandwipecleanwithcloth.
3. Replaceandtightendipstick.Removeandcheckoil level.Level
shouldbeat FULLmark.
4. If needed,addoil slowly- recheck.Donotoverfill.
5. Wipedipstickclean,replaceandtighten.Removeandcheckoil
level.Oil levelshouldbe atFULLlineondipstick.
3over
_ J
Figure12
Donotoverfill.Overfillingwithoil maycausetheenginetonotstart,or
hardstarting.If overthe FULLmarkon thedipstick,drainoilto reduce
oil leveltoFULLmarkondipstick.
Change Engine Oil
* OnlyusehighqualitydetergentoilratedwithAPIservice
classificationSF,SG, orSH.Selecttheoil'sSAEviscositygrade
accordingtotheexpectedoperatingtemperature.Refertoopera-
tionsectionforviscositychart.
, Changeengineoil afterthefirst fivetoeighthoursofoperation,
andeveryfifty hoursoreveryseasonthereafter.Changeoilevery
twentyfivehourswhenoperatingengineunderheavyloadorin
hightemperatures.
To Drain Oil
1. Drainthefuelfromthetankby runningtheengineuntil thefuel
tankisempty.
2. WithengineOFFbutstillwarm,disconnectsparkplugwire and
keepitawayfromsparkplug.
End Cap----_d_ _
J
Figure13
3. Removeoil drainendcap locatedatthebaseoftheengine,and
drainoil intoanappropriatereceptacle.SeeFigure13.
Usedoil isahazardouswasteproduct.Disposeofusedoil properly.
IDo notdiscardwithhouseholdwaste.Checkwithyour localauthori-
_tiesorSearsServiceCenterforsafedisposal/recyclingfacilities.
.
Replaceandtightentheoildrainendcap.
5.
Whenengineis drainedofall oil,placeenginelevel.Refillwith
approximately28oz.offreshoil.Fill toFULLlineondipstick.
Donot overfill.Referto CheckEngineOil inthis SERVICE&
MAINTENANCEsection.
6. Replacesparkplugwirebeforestarting.
15
Page 16

Service IVluffler f
Temperatureof mufflerandnearbyareasmayexceed150°F(65°C).
Avoidtheseareas.
• Inspectmufflerevery50 hours,andreplaceif necessary.
Replacementpartsforthemufflermustbethe sameandinstalled
inthe samepositionastheoriginalparts.
Clean Engine
Dailyor beforeeveryuse,cleangrass,chaffor accumulated
debrisfromengine.Keeplinkage,spring,andcontrolsclean.
Keepareaaroundandbehindmufflerfreeofanycombustible
debris.
• Keepingenginecleanallowsairmovementaroundengine.
• Enginepartsshouldbe keptcleanto reducetheriskof overheat-
ingandignitionofaccumulateddebris.
Donot usewatertocleanengineparts.Watercouldcontaminatefuel
system.Usea brushordrycloth.
Carburetor Adjustment
Thecarburetoronthis engineis notadjustable.
Donot,attempttoaltertheenginespeedbytamperingwiththe
engines governorlinkage.Doingsocouldresultin seriouspersonal
Iinjuryanddamagetotheengine.TheengineRPMhasbeensetat
thefactory.
Engine Speed
LUBRICATION
• HopperAssembly-Lubricatethe pivotpointson thehopper
assemblywithlightoilonceaseason.
• DischargeChute- Lubricatethepivotpointsonthedischarge
chutewithlightoilonce a season.
• ReleaseRod-Lubricatethereleaserodand springwith lightoil
oncea season.
CLEAN EQUIPMENT
• Cleanthechippershredderthoroughlyaftereachuse.
• Washbagperiodicallywithwater.Allowto drythoroughlyin
shade.
• Iftheflailscreenbecomesclogged,removeandcleanas
instructedbelow.
NOTE:Cleaningwitha forcefulsprayof waterisnotrecommendedas
itcouldcontaminatethefuelsystem.
//
/
i
/
/
Figure14
Beforeperforminganytypeof maintenanceonthe machine,waitfor
all partsto stopmovinganddisconnectthesparkplugwire.Failure
tofollowthis instructioncouldresultin personalinjuryor property
damage.
REMOVING THE FLAIL SCREEN
Ifthedischargeareabecomesclogged,removethe flailscreenand
cleanareaas follows:
1. Stoptheengine.Makecertainthechippershredderhascometo
a completestop.
2. Disconnectsparkplugwirefromsparkplugandgroundagainst
theengine.
3. A. Removethebagandtwowingknobsoneachsideofthechute
deflector.SeeFigure14.
B.Liftthe chutedeflectorupto keepitoutofthe way.
C.Removethetwo hairpinclipsfromeachclevispinwhich
extendthroughthehousingandremovepins.
D.Removetheflailscreenfrominsidethehousingandcleanthe
screenbyscrapingorwashingwithwater.SeeFigure14.
4. Reinstallthescreen,makingcertainto reassembletheflailscreen
withthecurvesidedown.
5. Reattachthechutedeflectorwiththehardwarepreviouslyremoved
andconnectthe bagto unit.
SHARPENING OR REPLACING CHIPPER
BLADES
1. Disconnectthesparkplugwireandgroundagainsttheengine.
2. Removetheflailscreenas instructedinthe previoussection.
3. Removethechipperchuteby removingthreehexnutsand
washers.
16
Page 17
4, Removethechipperchutesupportbracefromthe frameby
removingthehexbolts.
5. Rotateimpellerassemblybyhanduntilyoulocateoneoftwo
chipperbladesin thechipperchuteopening.
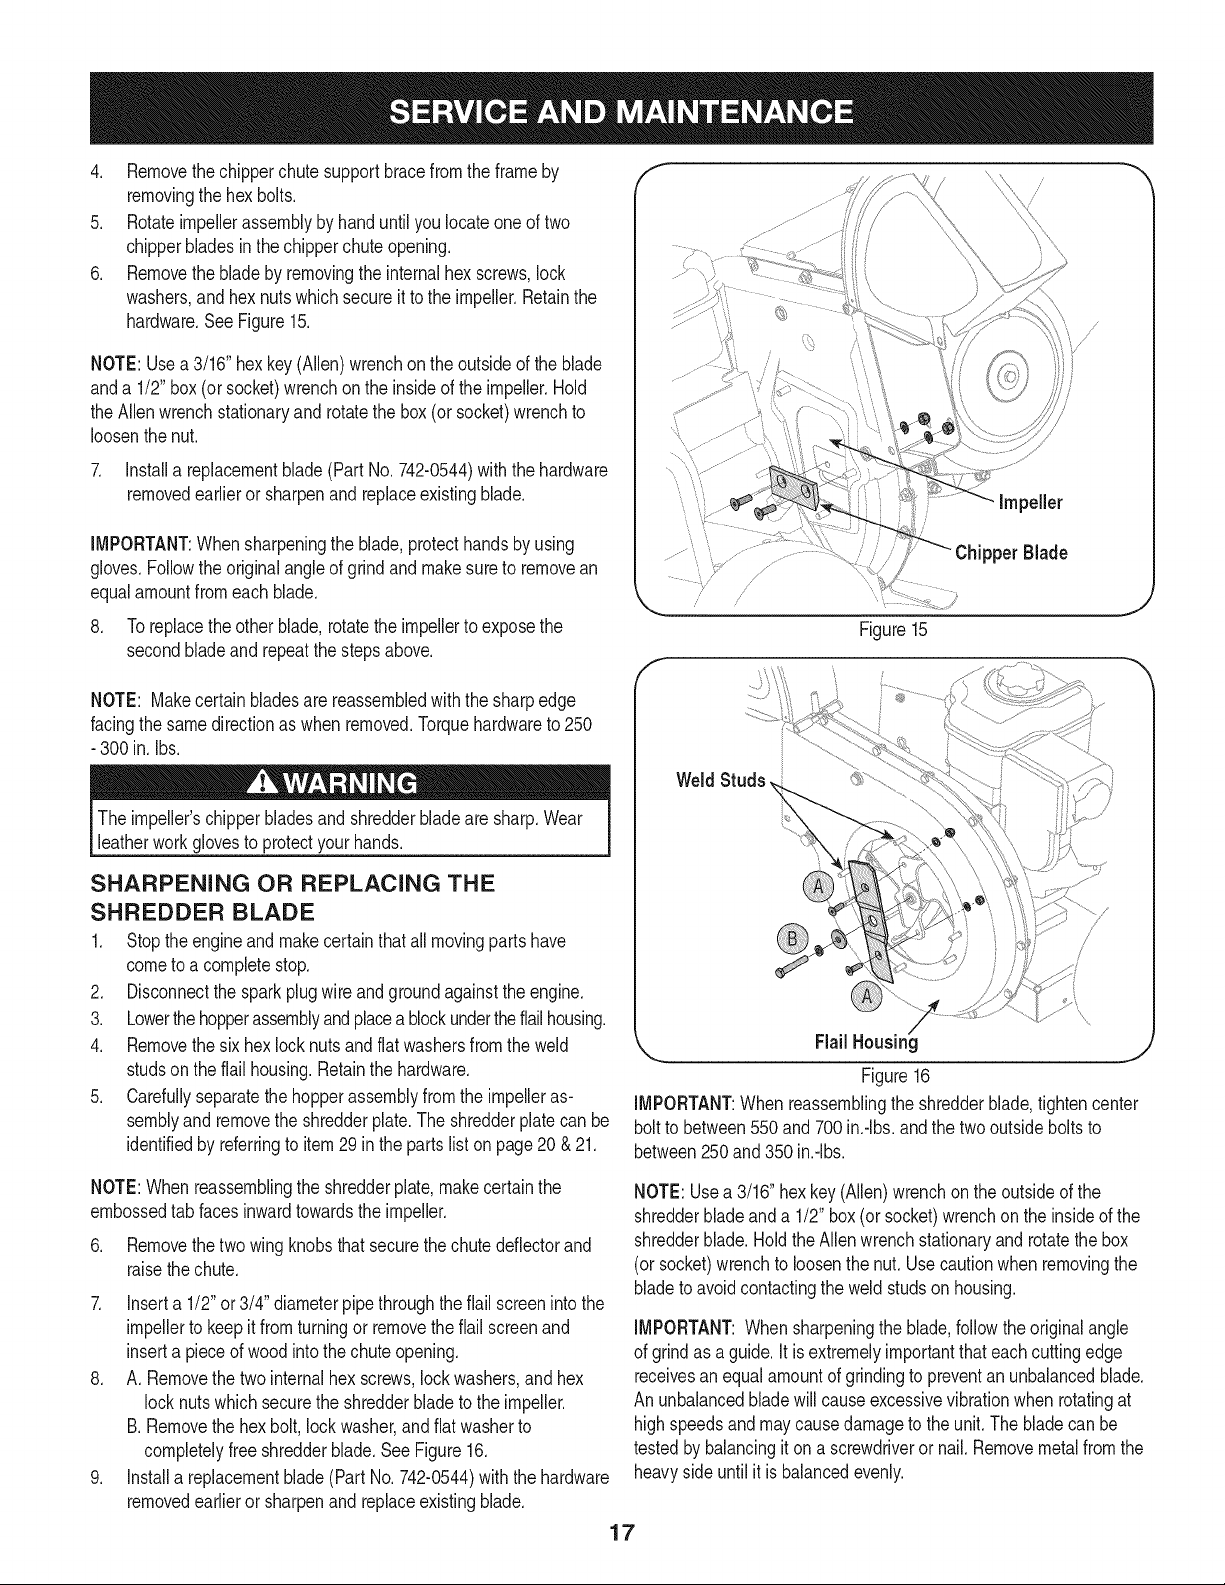
6, Removethebladeby removingtheinternalhexscrews,lock
washers,andhexnutswhichsecureittothe impeller.Retainthe
hardware,SeeFigure15,
NOTE:Usea3/16"hexkey(Allen)wrenchon theoutsideofthe blade
anda 1/2"box(or socket)wrenchontheinsideofthe impeller.Hold
theAllenwrenchstationaryandrotatethe box(or socket)wrenchto
loosenthenut.
7. Installa replacementblade(Part No.742-0544)withthe hardware
removedearlierorsharpenandreplaceexistingblade.
Impeller
IMPORTANT:Whensharpeningthe blade,protecthandsby using
gloves.Followtheoriginalangleofgrindandmakesuretoremovean
equalamountfromeachblade.
8. To replacetheotherblade,rotatetheimpellertoexposethe
secondbladeand repeatthestepsabove.
NOTE: Makecertainbladesare reassembledwiththesharpedge
facingthesamedirectionas whenremoved.Torquehardwareto250
- 300in.Ibs.
Theimpeller'schipperbladesandshredderbladearesharp.Wear
leatherworkglovesto protectyourhands.
SHARPENING OR REPLACING THE
SHREDDER BLADE
1. Stoptheengineandmakecertainthatallmovingpartshave
cometoa completestop.
2. Disconnectthesparkplugwire andgroundagainsttheengine.
3. Lowerthehopperassemblyandplacea blockundertheflailhousing.
4. Removethesix hexlocknutsandflatwashersfromtheweld
studsonthe flailhousing.Retainthehardware.
5. Carefullyseparatethehopperassemblyfromthe impelleras-
semblyandremovetheshredderplate.Theshredderplatecan be
identifiedby referringtoitem29in the partsliston page20 &21.
Blade
J
Figure15
Weld Studs,
/
Flail Housing
Figure16
IMPORTANT:Whenreassemblingtheshredderblade,tightencenter
boltto between550and700in.-Ibs,andthetwooutsideboltsto
between250and350in.-Ibs.
NOTE:Whenreassemblingtheshredderplate,makecertainthe
embossedtabfacesinwardtowardstheimpeller.
6. Removethetwo wingknobsthatsecurethe chutedeflectorand
raisethe chute.
7. Inserta 1/2"or3/4" diameterpipethroughtheflailscreenintothe
impellertokeepit fromturningorremovetheflailscreenand
inserta pieceof woodintothe chuteopening.
8. A. Removethetwointernalhexscrews,lockwashers,andhex
locknutswhichsecurethe shredderbladetotheimpeller.
B.Removethehexbolt,lockwasher,andflat washerto
completelyfreeshredderblade.SeeFigure16.
9. Installa replacementblade(Part No.742-0544)withthehardware
removedearlierorsharpenandreplaceexistingblade.
NOTE:Usea 3/16"hexkey(Allen)wrenchonthe outsideofthe
shredderbladeanda 1/2"box(or socket)wrenchon theinsideof the
shredderblade.HoldtheAllenwrenchstationaryandrotatethebox
(orsocket)wrenchtoloosenthenut. Usecautionwhen removingthe
bladetoavoidcontactingthe weldstudson housing.
IMPORTANT:Whensharpeningtheblade,followtheoriginalangle
ofgrindas a guide.Itisextremelyimportantthateachcuttingedge
receivesan equalamountofgrindingtopreventanunbalancedblade.
An unbalancedbladewillcauseexcessivevibrationwhenrotatingat
highspeedsandmaycausedamagetotheunit.Thebladecanbe
testedby balancingiton ascrewdriverornail.Removemetalfromthe
heavysideuntil itisbalancedevenly.
17
Page 18

Neverstorechippershredderwithfuel in tankindoorsor in poorly
ventilatedareaswherefuelfumesmayreachan openflame,spark,
or pilotlightasona furnace,waterheater,clothesdryer,orgas
appliance.
PREPARING THE ENGINE
Forenginesstoredover30 days:
1. To preventgumfromforminginfuel systemoroncarburetor
parts,runengineuntilit stopsfromlackof fuelor addagasoline
additivetothe gasinthe tank.Ifyouusea gasadditive,runthe
engineforseveralminutestocirculatetheadditivethroughthe
carburetor--afterwhichtheengineandfuel canbestoredup to
six months.
2. Whileengineis stillwarm,changetheoil. SeeChangeEngineOil
in SERVICEANDMAINTENANCEsection.
3. Removesparkplugand pourapproximately1oz. (30ml)ofclean
engineoil intothe cylinder.Pulltherecoilstarterseveraltimesto
distributetheoil,andreinstallthe sparkplug.
4. Cleanengineofsurfacedebris.
PREPARING THE CHIPPER SHREDDER
* Whenstoringthechippershredderinan unventilatedor metal
storageshed,careshouldbetakento rustproofthenon-painted
surfaces.Usinga lightoil orsilicone,coattheequipment,
especiallyanysprings,bearings,andcables.
, Removealldirt fromexteriorof engineandequipment.
, Followlubricationrecommendations.
o Storeequipmentina clean,dry area.Donotstorenextto
corrosivematerials,suchasfertilizer.Donotstoreinan area
whereequipmentispresentthatmayusea pilot lightorhasa
componentthatcancreatea spark.
18
Page 19

Beforeperforminganytypeofmaintenance/service,disengageall
controlsandstoptheengine.Waituntilallmovingpartshavecometo
acompletestop.Disconnectsparkplugwireandgrounditagainstthe
enginetopreventunintendedstarting.Alwayswearsafetyglassesduring
operationorwhileperforminganyadjustmentsorrepairs.
Enginefailstostart
Enginerunserratically
Engineoverheats
Enginehesitatesat highRPMs 1. Sparkpluggapsettooclose
Engineidlespoorly 1. Fouledsparkplug
Excessivevibration 1. Loosepartsor damagedimpeller
Unitdoesnotdischarge 1. Chuteddlectorclogged
Rateofdischargeslows
considerablyorcompositionof
dischargedmaterialchanges
1. Throttlelevernot incorrectstartingposition
2. Chokenot intheCHOKEposition
3. Sparkplugwiredisconnected
4. Faultysparkplug
5. Fueltankemptyorstalefuel
6. Cannotpullrecoilcord
7. Engineflooded
1. UnitrunningonCHOKE
2. Sparkplugwireloose
3. Stalefuel
4. Waterordirt in fuel system
5. Dirtyair cleaner
6. LowengineRPM
7. Carburetoroutofadjustment
1. Engineoillevellow
2. Airflowrestricted
2. Dirtyair cleaner
2. Foreignobjectlodgedin impeller
3. Lowengine RPM
1. LowengineRPM
2. Chipperbladedull
1. Movethrottleleverto START/RUNposition.
2. MoveCHOKEto theCHOKEposition.
3. Connectwireto sparkplug.
4. Clean,adjustgap,or replace.
5. Filltankwithclean,freshgasoline.
6. Obstructionlodgedinimpeller.Disconnectspark
plugwireandremovelodgedobject.
7. Waita fewminutesto restart.
1. Movechokelevertothe RUNposition.
2. Connectandtightensparkplugwire.
3. Filltankwithfreshgasoline.
4. Refillwithfreshfuel.
5. Cleanor replaceair cleanerfilter.
6. Alwaysrunengineatfull throttle.
7. ContactyourSearsParts& RepairCenter.
1. Fillenginewithproperamountand typeofoil.
2. Cleandebrisfromaroundthe engine'scoolingfins
andblowerhousing.
1. Removesparkplugandadjustgap.
1. Replacesparkplugandadjustgap.
2. Replaceaircleanercartridge.
1. Stopengineimmediatelyanddisconnectsparkplug
wire.ContactyourSearsParts& RepairCenter.
1. Stopengineimmediatelyanddisconnectspark
plugwire.Cleanflail screenandinsideof discharge
opening.
2. Stopengineanddisconnectsparkplugwire.
Removelodgedobject.
3. Alwaysrunengineatfull throttle.
1. Alwaysrunengineatfull throttle.
2. Replaceorsharpenchipperbladeor contactyour
SearsParts& RepairCenter.
Page 20

Craftsman Chipper Shredder -- Model No. 247.77638
/ ;/
/ /
; /
/
_ ....
/
2O
Page 21

Craftsman Chipper Shredder B IViodel No. 247.77638
936-0217 LockWasher,3/8
2. 914-0149B CotterPin 23.
3. 720-0170 Wing Knob5/16-18 24.
4. 681-0094-0721 ChuteDeflectorAssembly 25.
5. 911-0835 ClevisPin 26.
6. 781-0457-0637 ShredderScreen 27.
7. 926-0211 U-Nut5/16-18 28.
8. 950-0793 Spacer 29.
9. 912-3027 HexLockNut,1/4-20 30.
10. 712-3004A HexLockNut5/16-18 31.
11. 936-0119 LockWasher5/16 32.
12. 681-0117-0721 InnerImpellerHousingAssembly 33.
13. 710-3025 HexCapScrew5/16-18x.625 34.
14. 710-0157 HexCapScrew5/16-24x.75 35.
15. 942-0544 ChipperBlade 36.
16. 710-1054 HexCapScrew5/16-24x1.0 37.
17. 681-04095 ImpellerAssembly 38.
18. 912-0411 HexLockNut5/16-24 39.
19. 712-0266A Nut,JamLock,3/8-16 40.
20. 719-04308 FlailBlade 41.
21. 738-04286 ShoulderPin, .5x 2.625
710-3008
736-0247
942-0571
710-1254
681-0004A-0721
710-0825
781-0515-0637
781-0574-0637
681-0104-0721
932-0306A
936-0117
914-0104
936-0264
710-0376
748-0453
731-1707A
912-0429
731-1710A
681-0123-0721
711-1128
HexCapScrew5/16-18x .75
FiatWasher3/8 x 1.25
ShredderBlade
HexCapScrew3/8-24x 2.25
OuterImpellerHousingAssembly
HexCapScrew1/4-20x3.75
FrontSupportBracket
ShredderPlate
RearHopperBracketAssembly
CompressionSpring1.75
FlatWasher
CotterPin
FlatWasher.330IDx .630OD
HexCapScrew5/16-18x 1.0
Spacer,.375IDx2.50LG
HopperAssembly
HexLockNut5/16-18
HopperCollar
FrontHopperBracketAssembly
LockRod
21
Page 22

Craftsman Chipper Shredder B IViodel No. 247.77638
22
Page 23

Craftsman Chipper Shredder B IViodel No. 247.77638
728-0175 PopRivet
2 753-05094 ChipperShredderChute 16
3 735-0249A ChuteFlap 17
4 781-0633 ChuteFlapStrip 18
5 681-0068A-0637 ChipperChuteAssembly 19
6 710-0751 HexCapScrew1/4-20x.620 20
7 712-04064 HexLockNut 1/4-20 21
8 710-0106 HexCapScrew1/4-20x 1.25 22
9 736-0173 FlatWasher.28IDx .74OD 23
10 736-0242 BellWasher.340IDx .872OD 24
11 912-3010 HexNut5/16-18 25
12 749-1004-0721 SupportBrace 26
13 712-3004A HexLockNut5/16-18 27
14 710-3180 HexCapScrew5/16-18x 1.75
936-0170 BellWasher5/16x 1.0
950-0786 Spacer
738-0813 AxleAssembly
737-0298 Pipe,Oil Drain
634-04009 WheelComplete,10.0x4.0 Gray
726-0214 PushCap
681-0183B-0721 Frame
936-0451 Washer,.320IDx.93 OD
710-0502A Screw,3/8-16x 1.250
723-0400 SafetyGlasses(NotShown)
964-04024 ChipperBagAss'y(NotShown)
737-0132 Oil DrainEndCap
731-1617 Tamper
23
Page 24

Craftsman Engine Model 204312=0529 For Chipper Shredder Model No. 247.77638
110_8OPERATORSMA,0A']I 48S,OmB.OOKI I1329_EP.AOEMENTENG,NEII 13_9_E_A'_A"0A']
529 _,
396
615 _)
616
5o5 _
397
24_j
746
742 _
12
'Y 718 __b
J
...."_ 718A
1427 _
1194
22
32
30
358 ENGINE GASKET SET
2O
12
163
12
868
24
51A
1022
Page 25

Craftsman Engine IViodel 204312-0529 For Chipper Shredder IViodel No. 247.77638
632
_o9_
1095 VALVE GASKET SET
51A
_22
1O22
188 (_
25
Page 26

Craftsman Engine IViodel 204312-0529 For Chipper Shredder IViodel No. 247.77638
121 CARBURETOR OVERHAUL KiT
633 3 C:-._
130
95@
127°
117@
118 _@
51A(
127 0
163
633 (o_
51A(
369 i_
137
1127 _
105 0
\
53
_%_.. 967
I _ 445
161I'i_'_s
957 _,."'t_,_- _"s
613
i_72A]
24O
190 _?'
26
Page 27

Craftsman Engine IViodel 204312=0529 For Chipper Shredder IViodel No. 247.77638
356
37
78 _ 306
363
1005
1070
334
332
774
635
356A ........... C_
12
1211
592 @) 55
65
27
Page 28

Craftsman Engine IViodel 204312=0529 For Chipper Shredder IViodel No. 247.77638
D = O
1
2
3
5
7
11
12
794849
698340
391086s.
794870
694872.+
696796
694953.
CylinderAssembly
Kit-Bushing/Seal(MagnetoSide)
Seal-Oil(MagnetoSide)
Head-Cylinder
Gasket-CylinderHead
Tube-Breather
Gasket-Crankcase
13 794829 Screw(CylinderHead)
15 697757 Plug-OilDrain
16 794874 Crankshaft
18 791965 Cover-Crankcase
19 698340 Kit-Bushing/Seal(PTOSide)
20 391086s• Seal-Oil(PTOSide)
21 281658s Cap-OilFill
22 794825 Screw(CrankcaseCover/Sump)
23 794814 Flywheel
24 222698s Key-Flywheel
25 792117 PistonAssembly(Standard)
792144 PistonAssembly(.020"Oversize)
26 793561 RingSet (Standard)
792073 RingSet(.020"Oversize)
27 690975 Lock-PistonPin
28 696581 Pin-Piston
29 691691 Rod-Connecting
30 694692 Dipper-ConnectingRod
32 690976 Screw(ConnectingRod)
33 499596 Valve-Exhaust
34 792200 Valve-Intake
35 694865 Spring-Valve(Intake)
36 694865 Spring-Valve(Exhaust)
37 790730 Guard-Flywheel
42 499586 Keeper-Valve
45 690977 Tappet-Valve
46 790958 Camshaft
48 N/A Short Block
D = O I
51
51A
53
55
58
59
6948740.+
6948750.+
794830
695288
693389
805957
Gasket-Intake
Gasket-Intake
Stud(Carburetor)
Housing-RewindStarter
Rope-Starter
Insert-Grip
60 490652 Grip-StarterRope
65 699228 Screw(RewindStarter)
78 795026 Screw(FlywheelGuard)
81 794817 Lock-MufflerScrew
95 690718 Screw(ThrottleValve)
97 696387 Shaft-Throttle
98 6954080 KiNdleSpeed
104 6949180 Pin-FloatHinge
105 6961360 Valve-FloatNeedle
108 696143 Valve-Choke
109 790149 Shaft-Choke
117 696134 Jet-Main(Std.)(InclO-RingSeal)
118 696135 Jet-Main(HighAIt.)(InclO-RingSeal)
121 696146 Kit-CarburetorOverhaul
122 694876 Spacer-Carburetor
125 699966 Carburetor
127 6907270 Plug-Welch
130 696139 Valve-Throttle
133 694914 Float-Carburetor
135 696142 Tube-FuelTransfer
137 6954260 Gasket-FloatBowl
141 696145 Kit-ChokeShaft
146 690979 Key-Timing
161 794768 Base-AirCleaner
163 6922770. Gasket-AirCleaner
187 791766 Line-Fuel(CutTo RequiredLength)
188 699479 Screw(ControlBracket)
190 699220 Screw(FuelTank)
192 690083 Adjuster-RockerArm
28
Page 29

Craftsman Engine IViodel 204312=0529 For Chipper Shredder IViodel No. 247.77638
D = I! II
209
211
219
220
694867
695307
693578
691724
Spring-Governor(Red)
Spring-GovernedIdle
Gear-Governor
Washer(GovernorGear)
222 794799 Bracket-Control
227 694864 Lever-GovernorControl
240 298090s Filter-Fuel
265 691024 Clamp-Casing
267 699492 Screw(CasingClamp)
271 695381 Lever-Control
278 792008 Washer(GovernorControlLever)
281 697268 Panel-Control
300 794806 Muffler
304 791478 Housing-Blower
305 699480 Screw(BlowerHousing)
306 697240 Shield-Cylinder
307 794822 Screw(CylinderShield)
332 794824 Nut(Flywheel)
333 492341 Armature-Magneto
334 699477 Screw(MagnetoArmature)
337 491055s Plug-Spark
356 692603 Wire-Stop
356A 692390 Wire-Stop
356B 695815 Wire-Stop
356C 695295 Wire-Stop
358 695438 GasketSet-Engine
363 19203 Puller-Flywheel
369 695422 Spring-FloatBowl
383 19374s Wrench-SparkPlug
410 695382 Link-Control
415 691363 Plug(Cylinder)
425 794835 Screw(AirCleanerCover)
445 491588s Filter-AirCleanerCartridge
446 794941 Spring-Retainer
455 794867 Cup-Flywheel
D = I! It
456
459
493
5O4
5O5
529
692299
281505s
691177
695383
691251
791822
Plate-PawlFriction
PawI-Ratchet
Bracket-Mounting
WasherSet-Friction
Nut(GovernorControlLever)
Grommet(Cylinder)
552 694674 Bushing-GovernorCrank
562 793216 Bolt(GovernorControlLever)
592 690800 Nut(RewindStarter)
597 691696 Screw(PawlFrictionPlate)
601 791850 Hose-Clamp
608 695287 Starter-Rewind
613 794846 Screw(Muffler)
613A 794848 Screw(Muffler)
615 694676 Retainer-GovernorShaft
616 694675 Crank-Governor
621 692310 Switch-Stop
632 695917 Spring/Link-MechanicalGovernor
633O 690998 Seal-Choke/ThrottleShaft
635 691909 Boot-SparkPlug
663 699492 Screw(ControlPanel)
663A 795026 Screw(ControlPanel)
668 694257 Spacer(ControlBracket)
689 691855 Spring-Friction
718 690959 Pin-Locating(Cylinder)
718A 695178 Pin-Locating(CylinderHead)
741 691288 Gear-Timing
742 692564 Retainer-ERing
746 694679 Gear-Idler
773 694258 Retainer
774 695447 Screw(StopWire)
798 697890 Screw(RockerArm)
832 795035 Guard-Muffler
836 794845 Screw(MufflerGuard)
836A 710023 Screw(MufflerGuard)
29
Page 30

Craftsman Engine IViodel 204312=0529 For Chipper Shredder IViodel No. 247.77638
I = O O
851
868
883
914
951
957
967
968
692424
690968.+
794818.
794827
699961
792647
491435s
794785
Terminal-SparkPlug
Seal-Valve
Gasket-Exhaust
Screw(RockerCover)
Lever-Choke
Cap-FuelTank
Filter-PreCleaner
Cover-AirCleaner
972 694260 Tank-Fuel
975 696138 Bowl-Float
998 696683 Pipe-Oil
1005 794815 Fan-Flywheel
1022 690971.+ Gasket-RockerCover
1023 697691 Cover-Rocker
1026 695177 Rod-Push
1029 690972 Arm-Rocker
1036 Label-Emissions
1058 MS3797 Operator'sManual
1070 794821 Screw(FlywheelFan)
1095 695440 GasketSet-Valve
1100 791959 Pivot-RockerArm
1127 695407 Screw(FloatBowl)
1138 694255 Nut(ControlBracket)
• 1194 691876 Seal-ORing(Plug)
1210 498144 Pulley/SpringAssembly(Pulley)
1211 498144 Pulley/SpringAssembly(Spring)
1329 2043120536e9 ReplacementEngine
1330 272147 RepairManual
1427 695757 Cap-Pipe
• IncludedinEngineGasketSet,KeyNumber358
0 IncludedinCarburetorOverhaulKit,KeyNumber121
+ IncludedinValveGasketSet,KeyNumber1095
3O
Page 31

Craftsman Chipper Shredder Model No. 247.77638
777333113 777333200 777332036
®ROTATING CUTTING BLADES. KEEP HANDS AND
FEET OUT OF OPENING WHILE MACHINE mS
RUNNING.
=DO NOT OPERATE THiS MACHINE UNLESS THE
CHUTE DEFLECTOR HAS BEEN PROPERLY
iNSTALLED ANDJS SECURED WiTH THE HAND
KNOBS.
777S30185
777S30181
ROTATING CUTTING BLADES.
KEEP HANDS AND FEET OUT
OF OPENINGS WHILE MACHINE
iS RUNNING.
777S32282
DONOTOPERATETHISMACHINE
UNLESSTHECHUTEDEFLECTOR
Operatien Of This Equipment May Create
Sparks That Can Start Fires Around Dry
Vegetation. A Spark Arrestor May Be
Required. The Operator Should Contact
Local Fire Agencies For Laws Or ReguJa=
ionsTo Fire Prevention Requirements.
777X43688
.................DOHOT................
USEE85 ORFUEL...............
CUHTAiNiNGMORE
THAH10% ETHAHOL
TO AVOID SERIOUS iNJURY:
• Read the operator's msnaaJ(s) before starting and
using unit.
• Keep aiJ shieJds and guards in place and secureJy
attached.
• Keep hands, feet, face, cJothing and Jong hair out of
Shredder Hopper, Chipper Chute and Discharge
Chute wbge the engine is running. Rotating cutting
bJades inside these openings wiJJcause serious
persanaJ injury if contacted. Material being processed
may bounce back from inJet openings or be thrown
from the discharge chute. Long hair or Jooseclothing
may be puJJedor sucked into the inlet openings.
• Do not place branches over 1/2 inch diameter into
the large Shredder Hopper. Branches over 1/2 inch in
diameter shouJd be pJaeed in the SmaJJChipper
Chute.
• if the chipped shredder jams or becomes clogged,
immediately shut off the engine and wait for aJJ
moving parts to come to a compJete stop before
cJearing.
• Do not instaJJ,remove, adjust, or service the
discharge screen or any other part whiJe the engine
is running. Blade contact can occur.
$32O36 AC
777S32037
TO AVOID SERIOUS INJURY:
* DO not operate on uneven ground where unit is
unstable. Do net operate on pavement, gravel or
other hard surfaces since objects can ricochet
and cause injury.
To avoid a fire hazard, keep Jeaves, grass, and other
combustible materials away from hot engine and
muffler.
o Keep children and others away from area of
operation.
, Wear approved safety glasses, gloves and ear
protection.
777D12676
31
Page 32

(Thispageapplicableinthe U.S.A.and Canadaonly.)
Sears, Roebuck and Co., U.S.A. (Sears), the California Air Resources Board (CARD)
and the United States Environmental Protection Agency (U.S. EPA)
Emission Control System Warranty Statement (Owner's Defect Warranty Rights and Obligations)
EMISSIONCONTROLWARRANTYCOVERAGEISAPPLICABLETOCERTI-
FIEDENGINESPURCHASEDINCALIFORNIAIN1995ANDTHEREAF-
TER,WHICHAREUSEDINCALIFORNIA,ANDTOCERTIFIEDMODEL
California and United States Emission
TheCaliforniaAirResourcesBoard(CARD),U.S.EPAand Searsare pleased
toexplainthe EmissionControlSystemWarrantyonyour modelyear2000and
latersmalloff-roadengine(SORE).InCalifornia,newsmall off-roadengines
mustbe designed,builtand equippedto meettheState'sstringentanti-smog
standards.ElsewhereintheUnitedStates,newnon-road,spark-ignition
enginescertifiedformodelyear1997and latermustmeetsimilarstandardsset
forthbythe U.S.EPA.Searsmustwarranttheemissioncontrolsystemonyour
YEAR1997ANDLATERENGINESWHICHAREPURCHASEDANDUSED
ELSEWHEREINTHEUNITEDSTATES(ANDAFTERJANUARY1,2001 IN
CANADA).
Control Defects Warranty Statement
enginefortheperiodsoftime listedbelow,providedtherehasbeennoabuse,
neglector impropermaintenanceofyour smalloff-roadengine.Youremis-
sioncontrolsystemincludespartssuchasthecarburetor,aircleaner,ignition
system,mufflerandcatalyticconverter.Also includedmaybeconnectorsand
otheremissionrelatedassemblies.Wherea warrantableconditionexists,Sears
will repairyoursmalloff-roadengineatnocostto youincludingdiagnosis,parts
andlabor.
Sears Emission Control Defects Warranty Coverage
Smalloff-roadenginesarewarrantedrelativetoemissioncontrolpartsdefects
fora periodofone year,subjecttoprovisionssetforthbelow.Ifanycovered
Owner's Warranty
Asthe smalloff-roadengineowner,youareresponsiblefor theperformanceof
therequiredmaintenancelistedinyourOperatingand MaintenanceInstruc-
tions.Searsrecommendsthatyouretainallyourreceiptscoveringmaintenance
onyoursmalloff-roadengine,butSearscannotdenywarrantysolelyforthe
lackofreceiptsorforyourfailuretoensuretheperformanceof allscheduled
maintenance.As the smalloff-roadengineowner,youshouldhoweverbe
awarethat Searsmaydenyyouwarrantycoverageifyoursmalloff-roadengine
ora part hasfaileddueto abuse,neglect,impropermaintenanceor unap-
parton yourengineis defective,the part willbe repairedorreplacedbySears.
Responsibilities
provedmodifications.Youareresponsiblefor presentingyour smalloff-road
engineto anAuthorizedSearsServiceDealeras soonas a problemexists.The
undisputedwarrantyrepairsshouldbecompletedina reasonableamountof
time,notto exceed30days.Ifyouhaveanyquestionsregardingyourwarranty
rightsandresponsibilities,youshouldcontacta SearsServiceRepresentative
at 1-800-469-4663.Theemissionwarrantyisa defectswarranty.Defectsare
judgedonnormalengineperformance.Thewarrantyis notrelatedtoan in-use
emissiontest.
Sears Emission Control Defects Warranty Provisions
ThefollowingarespecificprovisionsrelativetoyourEmissionControlDefectsWarrantyCoverage.ItisinadditiontotheSearsenginewarrantyfornon-regulated
enginesfoundintheOperatingandMaintenanceInstructions.
1. WarrantedParts
Coverageunderthiswarrantyextendsonly tothe parts listedbelow(the
emissioncontrolsystemsparts)to the extentthese partswere presenton
theenginepurchased.
a. FueIMeteringSystem
•Cold startenrichmentsystem
•Carburetorandinternalparts
• FuelPump
b. AirlnductionSystem
•Aircleaner
• Intakemanifold
c. IgnitionSystem
•Sparkplug(s)
• Magnetoignitionsystem
d. CatalystSystem
•Catalyticconverter
• Exhaustmanifold
•Air injectionsystemor pulsevalve
e. MiscellaneousItemsUsedin AboveSystems
•Vacuum,temperature,position,timesensitivevalves
andswitches
•Connectorsandassemblies
2. Lengthof Coverage
Searswarrantsto the initialownerandeachsubsequentpurchaserthat
theWarrantedPartsshallbefree fromdefectsin materialsandworkman-
shipwhich causedthefailureof the WarrantedPartsfora periodofone
yearfromthe datethe engineis deliveredtoa retailpurchaser.
Inthe USAandCanada,a 24hourhotline,1-800-469-4663,hasa menuofpre-recordedmessagesofferingyouenginemaintenanceinformation.
3. NoCharge
Repairorreplacementof anyWarrantedPartwill beperformedat no
chargeto the owner,includingdiagnosticlabor whichleadsto the
determinationthata WarrantedPartisdefective,ifthe diagnosticworkis
performedatanAuthorizedSearsServiceDealer.Foremissionswarranty
servicecontact yournearestAuthorizedSearsServiceDealeras listedin
the "YellowPages"under"Engines,Gasoline,""GasolineEngines,""Lawn
Mowers,"orsimilarcategory.
4. Claimsand CoverageExclusions
Warrantyclaimsshallbefiled in accordancewiththe provisionsofthe
SearsEngineWarrantyPolicy.Warrantycoverageshallbeexcludedfor
failuresof WarrantedPartswhichare notoriginalSearspartsor because
ofabuse,neglector impropermaintenanceassetforth inthe Sears
EngineWarrantyPolicy.Searsisnotliableto coverfailuresof Warranted
Partscausedby theuseof add-on,non-original,or modifiedparts.
5. Maintenance
AnyWarrantedPartwhichis notscheduledforreplacementasrequired
maintenanceor whichis scheduledonlyfor regularinspectionto the effect
of"repairor replaceasnecessary"shallbe warrantedastodefectsfor the
warrantyperiod.AnyWarrantedPartwhichis scheduledfor replacement
asrequiredmaintenanceshallbewarrantedas todefectsonlyforthe
periodoftime uptothe firstscheduledreplacementfor thatpart.Any
replacementpartthat isequivalentinperformanceanddurabilitymay
beusedinthe performanceofanymaintenanceorrepairs.The owneris
responsibleforthe performanceof all requiredmaintenance,asdefinedin
the SearsOperatingand MaintenanceInstructions.
6. ConsequentialCoverage
Coveragehereundershallextendto thefailureofanyenginecomponents
causedbythefailureofanyWarrantedPartstill underwarranty.
GDOC-100188Rev.A
32
Page 33

Look For Relevant Emissions Durability Period and
Air index information On Your Engine Emissions Label
Engines that are certified to meet the California Air Resources Board (CARB) Tier 2 Emission Standards must
display information regarding the Emissions Durability Period and the Air Index. Sears, Roebuck and Co., U.S.A.
makes this information available to the consumer on our emission labels.
The Emissions Durability Period describes the number of hours of actual running time for which the engine is
certified to be emissions compliant, assuming proper maintenance in accordance with the Operating & Mainte-
nance Instructions. The following categories are used:
Moderate: Engine is certified to be emission compliant for 125 hours of actual engine running time.
Intermediate: Engine is certified to be emission compliant for 250 hours of actual engine running time.
Extended: Engine is certified to be emission compliant for 500 hours of actual engine running time.
For example, a typical walk-behind lawn mower is used 20 to 25 hours per year. Therefore, the Emissions
Durability Period of an engine with an intermediate rating would equate to 10 to 12 years.
The Air Index is a calculated number describing the relative level of emissions for a specific engine family. The
lower the Air Index, the cleaner the engine. This information is displayed in graphical form on the emissions label.
After July 1,2000, Look For Emissions Compliance Period
On Engine Emissions Compliance Label
After July 1, 2000 certain Sears, Roebuck and Co., U.S.A. engines will be certified to meet the United States
Environmental Protection Agency (USEPA) Phase 2 emission standards. For Phase 2 certified engines, the Emis-
sions Compliance Period referred to on the Emissions Compliance label indicates the number of operating hours
for which the engine has been shown to meet Federal emission requirements.
For engines less than 225 cc displacement, Category C = 125 hours, B = 250 hours and A = 500 hours.
For engines of 225 cc or more, Category C = 250 hours, B = 500 hours and A = 1000 hours.
This is a generic representation of the emission label typically found on a certified engine.
FAMILYYBSXS.3192VA 274812
33
GDOC-100182Rev.A
Page 34

Congratulationsonmakingasmartpurchase.YournewCraftsman®
productisdesignedandmanufacturedforyearsofdependableopera-
tion.Butlikeallproducts,itmayrequirerepairfromtimetotime.That's
whenhavingaRepairProtectionAgreementcansaveyoumoneyand
aggravation.
Here'swhattheRepairProtectionAgreement*includes:
* Expertservicebyour10,000professionalrepairspecialists
* Unlimitedserviceandnochargeforpartsandlaboronall
coveredrepairs
* Productreplacementupto$1500ifyourcoveredproductcan'tbe
fixed
* Discountof 10%fromregularpriceof serviceandrelatedinstalled
partsnotcoveredby theagreement;also,10%off regularpriceof
preventivemaintenancecheck
* Fast help by phone- wecallitRapidResolution- phonesupport
froma Searsrepresentative.Thinkof usasa "talkingowner's
manual."
Onceyoupurchasethe Agreement,a simplephonecallisallthatit
takesfor youto scheduleservice.Youcancall anytimedayor night,or
schedulea serviceappointmentonline.
TheRepairProtectionAgreementisa risk-freepurchase.Ifyoucancel
forany reasonduringtheproductwarrantyperiod,wewill provideafull
refund.Or,aproratedrefundanytimeafterthe productwarrantyperiod
expires.PurchaseyourRepairProtectionAgreementtoday!
Somelimitations and exclusionsapply. Forprices andadditional
informationin the U.S.A.call 1-800-827-8855.
*CoverageinCanadavaries on some items.For full details call
SearsCanada at 1-800-381-8665.
SearsInstallation Service
ForSearsprofessionalinstallationofhomeappliances,garagedoor
openers,waterheaters,andothermajorhomeitems,intheU.S.A.or
Canadacall 1-800-4-MY-HOME®.
34
Page 35

Declaraci6n de garant[a ....................... Pagina 35
Practicas operaci6n seguras ............... Paginas 36-39
Montaje ................................................ Paginas 40-43
Operaci6n ............................................ Paginas 44-45
Servicio y Mantenimiento .................... Paginas 46-49
Almacenamiento fuera de temporada ....Pagina 50
Soluci6n de problemas ...................... Pagina 51-52
Etiquetas de seguridad ....................... Pagina 7
Lista de piezas ..................................... Pagina 20
Acuerdo de Protecci6n Para
Reparaciones ....................................... Pagina 55
Labels .................................................. Pagina 31
NOmero de servicio ..................... Cubierta posterior
CRAFTSMANTOTAL GARANTIA
Cuandosonoperadosy mantenidosdeacuerdoconlasinstruccionessuministradasen sutotalidad,si estonoastilladoradefragmentaci6n
debidoa undefectodematerialo manodeobradentrodedosaSosa partirde lafechadecompra,el retornoa cualquiertiendaSears,Sears
partesdel CentrodeServicioy Reparaci6n,uotrosArtesanosalidaenlos EstadosUnidosparala reparaci6ngratuita(sila reparaci6no la
sustituci6nresulteimposible.
Estagarantiase aplicas61opara90 diasa partirdela fechadecomprasiestaastilladoradefragmentaci6ncadavezes utilizadoparaprop6si-
toscomercialesodealquiler.
Estagaranfias61ocubredefectosdematerialy manodeobra.Searsnopagar&por:
• Estagaranfias61ocubredefectosdematerialy manodeobra.SearsNO• Loselementosque sedesgastanduranteel usonormal,
incluyendoperonolimitadoalas hojas,labujia,elaire limpio,mayalpantallayreceptorbolsa.
• Normade serviciosde mantenimiento,cambiosdeaceite,o afinaci6n.
• Cambiodeneum&ticosdesustituci6noreparaci6nde pinchazoscausadosporobjetosdesdeelexterior,talescomoclavos,espinas,
tocones,o de vidrio.
• Cambiodeneum&ticoso ruedasde reemplazoo la reparaci6ncomoconsecuenciadedesgastenormal,accidente,o delamalaoper-
aci6no mantenimiento.
Lasreparacionesnecesariasdebidoa los abusosdeloperador,incluyendoperono limitadoa losda_oscausadosporobjetosque
impactandoblarelmarcoo cig(Je_al,o situaci6nde excesodevelocidaddelmotor.
Lasreparacionesnecesariasdebidoa la negligenciadel operador,incluyendoperonolimitadoa,productosel6ctricosy rnec_.nicosde
losda_oscausadosporalmacenamientoinadecuado,faltade utilizaci6ndelacategoriaapropiaday lacantidadde aceitede motor,o el
fracasoparamantenerelequipodeacuerdoconlas instruccionescontenidasen elmanualdeloperador.
• Motor(sistemadecombustible),la limpiezao reparacionescausadasporloscombustiblesdecididaasercontaminadoso oxidado(ran-
cio). Engeneral,elcombustibledebeserutilizadodentrodelos 30diassiguientesasufechadecompra.Normaldesgastey deteriorode
losacabadosexteriores,o laetiquetadelproductode reemplazo
Estagarantias61oseaplicamientrasqueesteproductoest,.dentrodelosEstadosUnidos.
Estagaranfiale otorgaderechoslegalesespecificos,y ustedtambi6npuedetenerotrosderechosquevariandeestadoa estado.
Sears, Roebuck and Co., Hoffman Estates, IL 60179
Serie: 1450
Tipodeaceitedelmotor: SAE30
Capacidadde aceitedel motor: 28onzas
Elcombustible: GasolinasinPIomo
Bujias: Champion®RC-12YC
Separaci6ndelasbujias: .030"
©SearsBrands,LLC 3,5
NSrnerode modelo ..........................................................
N_mero de serie..............................................................
Fechadecompra .............................................................
RegistrearribaelnOmerodel modelo,elnOmerode serieyla fecha
de compra
Page 36

Lapresenciade estesirnboloindicaquesetratadeinstrucciones
irnportantesdeseguridadque sedebenrespetarparaevitar
poneren peligrosuseguridadpersonaly/omaterialy la deotras
personas.Leay sigatodaslas instruccionesde estemanualantes
deponeren funcionarnientoestarn_.quina.Sino respetaestas
instruccionespodriaprovocarlesionespersonales.Cuandoveaeste
sirnbolo,ipresteatenci6nalaadvertencia!
Estarn_.quinarueconstruidaparaseroperadade acuerdocon
lasreglasdeseguridadcontenidaseneste manual.AIigualque
concualquiertipo de equipornotorizado,undescuidoo errorpor
partedel operadorpuedeproducirlesionesgraves.Estarn_.quina
escapazde arnputarrnanosypiesy dearrojarobjetoscon gran
fuerza.De norespetarlasinstruccionesdeseguridadsiguientesse
puedenproducirlesionesgraveso larnuerte.
PROPOSICION 65 DE CALIFORNIA
Elescapedel motorde esteproducto,algunosdesuscornponentes
y algunoscornponentesdelvehiculocontieneno liberansustancias
quirnicasqueelestadode Californiaconsideraque puedenproducir
c_.ncer,defectosde nacirnientouotrosproblernasreproductivos.
CAPACITACiON
• Lea,entienday curnplatodaslasinstruccionesincluidasen
la rnAquinayen los rnanualesantesde rnontarlayutilizarla.
Guardeestemanualenun lugarseguroparaconsultasfuturasy
regulares,asicornoparasolicitarrepuestos.
• LeaelManualdelOperadory sigatodaslasadvertenciase
instruccionesdeseguridad.El fracasodehacerasi puedecausar
la heridaseriaaloperadory/o personaspresentes.ParaIlarnada,
de preguntas,1-800-659-5917.
• Farniliaricesecontodosloscontrolesysuoperaci6nadecuada.
Sepac6rnodetenerla rn_.quinayc6rnodesengranarloscontroles
r_.pidarnente.
• Noperrnitanuncaquelosni_osrnenoresde 16a_os utilicen
estarn_.quina.Los ni_osde 16a_osy rn_.srnayoresdeben
leerycornprenderlas instruccionesde operaci6nylasreglas
de seguridadcontenidasen estemanual,y tarnbi_ndebenser
capacitadosy estarsupervisadosporunode lospadres.
• Nuncaperrnitaquelosadultosoperenestarn_.quinasinrecibir
antesla instrucci6napropiada.
• Mantengaa lostranseQntes,ayudantes,rnascotasy ni_osal
rnenosa75piesde la rn_.quinarnientrasest,.operando.Detenga
la rn_.quinasialguienentraenla zona.
• Nuncaenciendaun motorenespacioscerradosoenunazona
conpocaventilaci6n.Elescapedel motorcontienernon6xidode
carbono,un gasinodoroy letal.
• Nopongalasrnanosolos piescercadelaspiezasrotatoriaso
en lasc_.rnarasdealirnentaci6nnien laaberturadedescarga.El
contactocon el motorrotatoriopuedeproducirla arnputaci6nde
dedos,rnanosopies.
• Nuncatratededestaparlatornade alirnentaci6nola aberturade
descarga,nitratede sacaro vaciarla bolsadelaaspiradora,ni
de revisary repararlarn_.quinarnientrasel motorest,.enrnarcha.
Apagueel motory esperehastaquetodaslaspiezasrn6vilesse
hayandetenidoporcornpleto.Desconecteel cablede la bujiay
p6ngalodernaneraque hagarnasacontrael motor.
Su responsabilidad--Restrinja el usodeestarn_.quina
rnotorizadaalas personasque lean,cornprendany respetenlas
advertenciase instruccionesqueaparecenenestemanualyen la
rn_.quina.
iGUARDEESTASINSTRUCCIONES!
PREPARATIVOS
• Inspeccionerninuciosarnenteel _.readondeutilizar_,el equipo.
Retiretodaslaspiedras,botellas,latasuotrosobjetosextra_os
que puedanserlevantadoso arrojadoscausandolesiones
personaleso da_osa larn_.quina.
• Paraprotegerselosojosutilicesiernpreanteojoso antiparras
de seguridadrnientrasoperala rn_.quinao rnientraslaajusta
o repara.Losobjetosarrojadosquerebotanpuedenlesionar
gravernentelavista.
• Utilicezapatosde trabajoresistentes,desuelafuerte,asicorno
pantalonesy carnisasajustados.Lasprendassueltaso las
alhajaspuedenquedaratrapadasen laspiezasrn6viles.Nunca
utilicela rn_.quinadescalzooconsandalias.Utiliceguantesde
trabajodecuerocuandoalirnentematerialporelcanal dela
cortadora.
• Antesdeencenderlarn_.quinacontrolequetodoslos pernosy
tornillosest_nbienajustadosparacornprobarquela rn_.quinase
encuentraen condicionessegurasdeoperaci6n.Adern_.s,realice
una inspecci6nvisualde la rn_.quinaaintervalosfrecuentespara
controlarsila rnisrnaest,.da_ada.
• Mantengao reernplacelasetiquetasdeseguridade instrucciones
segQnseanecesario.
36
Page 37

Manejoseguro dela gasolina
Paraevitarlesionespersonaleso daSosrnaterialesseasurnarnente
cuidadosoal rnanipularla gasolina.Lagasolinaesaltarnenteinflarno
ableysusvaporespuedencausarexplosiones.Se puedelesionar
gravernentesiderrarnagasolinasobreustedo sobrela ropayaquese
puedeencender.L_veselapiely c&rnbiesederopadeinrnediato.
• Utilices61orecipientesparagasolinaautorizados.
• NuncaIleneloscontenedoresenelinteriordeun vehiculo
o carni6nocajadecarnionetaconrecubrirnientospl&sticos.
Coloquesiernprelos recipientesenel pisoy lejosdelvehiculo
antesde Ilenarlos.
• Retireelequipoa gasolinadelcarni6no rernolqueyII_neloen
el piso.Si estonoesposible,entoncesIlenedichoequipoenun
rernolqueconun recipienteport&til,en vezdedesdeun dispen-
sadordegasolina.
• Mantengala boquillade Ilenadoencontactoconelbordedela
entradadeltanquedegasolinao contenedorentodornornento
hastaqueest_Ileno.Noutiliceundispositivoparaabrir/cerrarla
boquilla.
• Apaguetodosloscigarrillos,cigarros,pipasy otrasfuentesde
cornbusti6n.
• Nuncacarguecornbustibbenla rn&quinaen unespaciocerrado.
• Nuncasaquelatapadelgasni agreguecombustiblernientrasel
motorest&calienteo enrnarcha.Dejequeel motorseenfrie por
Iornenosdosrninutosantesdevolvera cargarcombustible.
• Nuncarecargueel tanquedecombustible.Lleneel tanqueno
rn&sde1/2 pulgadapordebajode la basedelcuellodelfiltro
paradejarespacioparala dilatacbndelcornbustibb.
• Vuebaacolocarla tapadelagasolinayaj_steb bien.
• Lirnpielagasolinaderrarnadasobreelmotory elequipo.Trasbde
la rn&quinaa otrazona.Espere5rninutosantesdeencenderel
motor.
• Nuncaalrnacenela rn&quinao elrecipientede combustibleen
unespaciocerradodondehayafuego,chispasoluzpiloto(por
ejernplo,hornos,calentadoresdeagua,calefactores,secadores
de ropa,etc.)
• Parareducirelriesgodeincendiornantengalarn_.quinalirnpia
depasto,hojasyde acurnulaci6nde otrosdesechos.Lirnpielos
derrarnesdeaceiteo combustibley saquetodoslosdesechos
ernbebidosconcombustible.
OPERACION
• Nopongalasrnanosolos piescercadelaspiezasrotatoriaso
enlasc_.rnarasdealirnentaci6nni en laaberturadedescarga.El
contactocon el motorrotatoriopuedeproducirla arnputaci6nde
dedos,rnanosopies.
• Antesdeencenderlarn_.quinacornpruebequeel canaldela
cortadora,latornade alirnentaci6ny lac_.rnarade corteest_.n
vacbs ysindesechos.
• Inspeccionerninuciosarnentetodoel materialquedeseatriturar
ysaquelosobjetosrnet_.licos,piedras,botellas,latasuotros
objetosextraSosquepuedenocasionarlesionesodaSarla
rn_.quina.
• Siesnecesarioernpujarel materialporlatolvade latrituradora
useunpalode di_.rnetropequeSo.Noutilicelas rnanosnilos
pies.
• SielmotorgolpeaunobjetoextraSoosi la rn_.quinaernpieza
a producirunsonidopococornQno unavibraci6n,apagueel
motordeinrnediato.Dejequeel motorsedetengaporcornpleto.
Desconecteelcablede labujia,p6ngalodernaneraquehaga
rnasacontraelmotory sigaestospasos:
a. Inspeccionela rn_.quinaparaversiest,.daSada.
b. Repareo reernplacelaspiezasdaSadas.
c. Controlesihaypiezasflojasy ajQstelasparaasegurarquela
rn_.quinafuncionede rnaneraseguray continua.
• Noperrnitaqueseacurnulematerialprocesadoenlazonade
descarga.Elrnisrnopuedeobstaculizarladescargaadecuada
y provocarel retornodelmaterialatravesdelaaberturade
alirnentaci6n.
• Nointentetriturarni picarmaterialdemayortarnaSoal espe-
cificadoen larn_.quinaoenestemanual.Sepodrianproducir
lesionesodaSos.
• Nuncatratede destaparla tornadealirnentaci6no laabertura
de descargarnientraselmotorest,.en rnarcha.Apagueelmotor
y esperehastaquetodaslaspiezasquesernuevensehayan
detenidoporcornpleto,desconecteel cabledelabujiay p6ngalo
de rnaneraquehagarnasacontraelmotorantesde sacarlos
escornbros.
• Nuncaoperela rn_.quinasinque latolvadela trituradora,elcanal
de lacortadorao el canaldeflectorest_ncorrectarnenteconecta-
dosa larn_.quina.Nuncavacienicarnbielabolsade descarga
rnientrasel motorest,.en rnarcha.
• Mantengatodoslosprotectores,desviadoresy dispositivosde
seguridadensu lugaryen buenascondiciones.
• Mientrasalirnentamaterialdentrodelarn_.quinarnantengasu
rostroysu cuerpodetr_.sy haciauncostadodelcanalde la
cortadoraparaevitarlesionesporretrocesosaccidentales.
• Nuncaopereestarn_.quinasinbuenavisibilidadoilurninaci6n.
• Noopereestarn_.quinaen superficiescongrava.
• Noopereestarn_.quinaestandobajolos efectosdelalcoholo de
drogas.
• Elsilenciadory el motorsecalientany puedenproducirquerna-
duras.Nolos toque.
• Nuncalevanteo transportelarn_.quinacuandoel motorest,.
encendido.
• Sisepresentansituacionesquenoest_.nprevistaseneste
manualseacuidadosoy useel sentidocornQn.Marquepara
contactareldepartarnentodeatenci6nalclienteyobtenerel
nornbredesudistribuidorrn_.scercano.
37
Page 38

MANTENIMIENTO Y ALMACENAMIENTO
• Nuncarnanipulelos dispositivosde seguridaddernanera
irnprudente.Controleperi6dicarnentequefuncionendeforrna
adecuada.
• Controlefrecuenternentequetodoslospernosytornillosest_n
bienajustadosparacornprobarquela rn_.quinaseencuentraen
condicionessegurasdefuncionarniento.Adern_.s,realiceuna
inspecci6nvisualdelarn_.quinaparacontrolarsi larnisrnaest,.
da_adayrep_.reladesernecesario.
• Antesdelirnpiar,repararo inspeccionarla rn_.quina,detengael
motorycornpruebequeel rnisrnoyquetodaslaspiezasrn6viles
sehallandetenido.Desconecteel cablede labujiay p6ngalo
de rnaneraquehagarnasacontrael motorparaevitarquese
enciendadernaneraaccidental.
• Nocarnbielaconfiguraci6ndel reguladordel motorniacelere
dernasiadoel rnisrno.El reguladorcontrolalavelocidadrn_.xirna
seguradeoperaci6ndelmotor.
• Mantengao reernplacelasetiquetasde seguridade instrucciones
segQnseanecesario.
• Sigalasinstruccionesde estemanualparacargar,descargar,
transportary alrnacenardernaneraseguraestarn_.quina.
• Nuncaalrnacenela rn_.quinao el recipientedecombustibleenun
espaciocerradodondehayafuego,chispaso luzpilotocornopor
ejernplo,calentadoresdeagua,hornos,secadoresde ropa,etc.
• Dejequela rn_.quinaseenfriepot Iornenos5rninutosantesde
guardarla.
• Consultesiernpreel manualdeloperadorparaconocerlas
instruccionesadecuadasparael alrnacenarnientofuerade
ternporada.
• Seg_nlaCornisi6ndeSeguridadde Productosparael Consu-
rnidorde losEstadosUnidos(CPSC)y laAgenciade Proteccidn
Arnbientalde losEstadosUnidos(EPA),esteproductotieneuna
vidaOtilmediade siete(7)a_os,6 60horasde funcionarniento.
AI finalizarla vidaOtilmedia,adquieraunarn_.quinanuevao
hagainspeccionaranualrnente_staporundistribuidorde servicio
autorizadoparacerciorarsede quetodoslossisternasrnec_.nicos
yde seguridadfuncionancorrectarnenteyno tienenexcesivo
desgaste.Si noIohace,puedenproducirseaccidentes,lesiones
o rnuerte
• Sidebevaciareltanquedecombustible,h_.galoal airelibre.
• Respetelasnorrnasreferentesa ladisposici6ncorrectay las
reglarnentacionessobregas,combustible,etc.paraprotegerel
medicarnbiente.
NO MODIFIQUE EL MOTOR
Paraevitarlesionesgraveso larnuerte,nornodifiqueel motorbajo
ningunacircunstancia.Si carnbialaconfiguracidndel reguladorel
motorpuededescontrolarseyoperara velocidadesinseguras.Nunca
carnbielaconfiguraci6ndef_.bricadel reguladordelmotor.
AVISO REFERIDO A EMISIONES
Losrnotoresqueest&ncertificadosy curnplenconlasregulaciones
de ernisionesfederalesEPAy de CaliforniaparaSORE(Equipos
peque_ostodoterreno)est_.ncertificadosparaoperarcongasolina
cornOnsinplornoy puedenincluirlossiguientessisternasde control
de ernisiones:Modificacidnde motor(EM)ycatalizadorde tresvias
(TWO)siest_.nequipadosde esarnanera.
GUARDACHISPAS
Estarn_.quinaest,.equipadaconunmotordecornbusti6ninternay
nodebeserutilizadaenocercade unterrenoagrestecubiertopor
bosque,rnalezaso hierbaexceptosielsisternadeescapedelmotor
est,.equipadocon unarnortiguadorde chispasquecurnplaconlas
leyeslocaleso estatalescorrespondientes,encasodehabedas.
Si seutilizaunarnortiguadordechispaseloperadorIodebernantener
en condicionesde usoadecuadas.EnelEstadode Californialas
rnedidasanteriorrnenternencionadassonexigidasporIcy (Arficulo
4442del C6digodeRecursosPt_blicosdeCalifornia).Esposible
queexistanleyessirnilaresenotrosestados.Lasleyesfederalesse
aplicanenterritoriosfederales.
Puedeconseguirelarnortiguadordechispasparael silenciadora
travesdesu distribuidorautorizadodernotoreso poni_ndoseen
contactoconel departarnentodeservicios,RO.Box361131Cleve-
land,Ohio44136-0019.
38
Page 39

SilVIBOLOS DE SEGURIDAD
Estap&ginarepresentay describelaseguridadlossimbolosquepuedenpareceren esteproducto.Lea,comprenda,y sigatodasinstrucciones
enla m_quinaantesprocurarparareuniry operar.
LEA EL MANUAL(S) DEL OPERADOR
Lea, comprenda, y siga todas instrucciones en el manual (manuales) antes procurar para
reunir y operar
ADVERTENClA-- GIRANDO HOJAS
Mantenga manos fuera de aperturas de cala y descarga mientras m_iquina corre. Alli giran
hojas adentro
ESPECTADORES
Mantenga a espectadores, los animales favoritos, y los ni_os por Io menos 75 pies de la
m_iquina mientras est,1 en la operaci6n. Pare m_iquina si cualquiera entra el _irea.
ADVERTENCIA-- ESCOMBROS TIRADOS
Nunca operar sin el deflector de tobog_in conect6 apropiadamente a la m_iquina.
PROTECCION DE OJO
Siempre Ileve gafas de seguridad o gafas de seguridad al operar esta m_iquina.
39
Page 40

IMPORTANTE:Estaunidadseentregasingasolinao aceiteenel
motor.AsegQresede servMoconmotordegasolinay aceitesegQn
lasinstrucdonesenla operad6nde estemanualantesdeoperarsu
rn_.quina.
NOTA:Referenciaa la derechaylaizquierdadela TrituradoraChip-
perseobservadesdelaposici6nde funcionarniento.
APERTURA DE LA CAJA DE CARTON
1. Cortecada unade lasesquinasde la cajaverticalrnente,de la
partesuperiora la base.
2. Saquetodaslaspiezassueltas.
3. Quiteel materialdeempaquesuelto.
COIVIO SACAR LA UNIDAD DE LA CAJA
1. Elevelaunidaddesdela parteposteriorparasepararladel
materialdela cajaquequededebajo,yhagarodarla unidad
fuerade lacaja.
2. Verifiquecuidadosarnentesi enla cajaquedaalgunapartesuelta.
PIEZAS SUELTAS DENTRO DE LA CAJA
• Montajede tolva
• Bolsa
• Canaldeflector
• Pis6n
• Anteojosde seguridad
• Canaldela cortadora
• Aceitedemotor
• ManualdeOperador
INSTALACION DE LA TOLVA IVIONTAJE
/
.......
Figura1
1. A. Saqueseistuercashexagonalesy arandelasde losesp_.r
ragosdela soldadurade lacajadelmotor.Nosaquela placa
de sost_n.Veala Figura1.
B.Coloqueel rnontajedela tolvaen posici6ndelantedelacaja
del motor,alineandolosagujerosdel rnontajedelarcde la
tolvaconlosesp_.rragosdelasoldadura.
C. Desliceelrnontajede latolvasobrelosesp_.rragosde la
soldadurayvuelvaa colocarlasarandelasylas tuercas
hexagonales.Nolas ajustepor cornpleto.
2. A. Levanteelrnontajede latolvahastael rnontajedelsoportede
motor.Wase lafigura2.
B. Deslicelavarilladeliberaci6nhaciaafueralevernentepara
engancharelsoportedetolvaen la varilla.Veaia Figura2.
C.Ajustelasseistuercashexagonalesqueunenel rnontajede la
tolvaa lacajadelmotory ajustetarnbi_nlasarandelas
hexagonalesqueunenel soportedela tolvaal rnontajedela
rnisrna.
J
Figura2
40
Page 41

COLOCACl6N DEL CANAL DEFLECTOR r'
A.Saquelas perillasamariposadelos costadosde la caja
inferiordelmotor.
B.Saquela tuercade seguridadhexagonal,losseparadoresyel
bul6nhexagonalde lapartesuperiordela cajadel motor.Vea
la Figura313.
.
A. Pongaen Ifneaelcanaldeflectoren suposici6nenla abertura
de descargae inserteel bul6nhexagonalconel separadora
travesdela bisagradel canaldeflector(losseparadoresvan
dentrodelas bisagras).Veala Figura314.
B.Coloqueel segundoseparadorsobreelbul6nhexagonal
dentrode laotrabisagray ajOsteloconla tuercadeseguridad
hexagonal.
C.Ajusteamboscostadosdel canaldeflectora a lacajadel
motorutiNzandolasperiNasa mariposaque habfasacado
anteriormente.
COLOCACl6N DEL CANAL
DE LA CORTADORA
A. Saquelastresarandelascurvasylastuercashexagonales
delosesp_.rragosdela soldaduraqueest_.nalrededorde la
aberturaenel costadode lacajadelmotor.Veala Figura5.
B.Saquelos buloneshexagonales,las arandelasplanasy las
tuercasdeseguridadde losdos agujerosdelextremo
superiordela trabade sosten.
........................................
Figura4
/ • i
,/
i
i
Figura5
41
Page 42

2, f
A,Pongaen Ifneaelcanalde lacortadoraporencimade los
esp_.rragosde la soldadurade maneraquela ranuraen
la basedelcanalmirehaciaabajo,
B.Ajusteelcanal dela cortadoracontresarandelascurvas
(conel ladocurvocontraelcanalde lacortadora)yconlas
tuercashexagonalesquehabfasacadoanteriormente,No
ajustelastuercasen estemomento.Veala Figura6.
,
Lacortadoratrituradorafueenviadaconun extremodela
trabadesost@nyaunidoal bastidorinferior.Aflojeperono
saquelosbulonesqueunenla trabaal basfidor,
A,Pongaen Ifnealosagujerosdelcanalconlos agujerosdela
partesuperiorde latrabay unala mismaalcanaldela
cortadoraconloselementosde ferreterfapreviamente
retirados,Lasarandelaslianasdeberianser colocadas
bajolascabezasdecerrojoy contrala superfMeinteriordel
pl&sficochippertolva.Ajustebien.Veala Figura7.
B.Ajustelos bulonesqueunenlatrabade sost@nal bastidor.
C,Ajustelastrestuercasde losesp_.rragosdela soldaduraque
sostienenel canaldelacortadoraa la cajadelmotor,
COLOCAClON DE LA BOLSA
1. Paraadosarla bolsa:
A.Coloquela aberturadelabolsacompletamentesobreel
canaldeflector.
B.Tirede latiradeextracci6nhastaquelabolsaquede
ajustadaalrededordela aberturadelcanaldeflector.
C.Vuelvaasujetarlatira de extracci6nsobresi misma,
apri@telacontrael canaldeflectorparaque quedefirmeen su
lugar.Veala Figura8.
Ahoraqueyahaajustadosu cortadoratrituradoraparasufunciona-
miento,familiariceseconsuscontrolesycaracterfsticas.Estosse
describeny se ilustranen estap_.gina.Esteconocimientole permitir_.
utilizarsunuevoequipoa sum_.ximacapacidad.
/ /
/ /
7 /
i /
/
/ /
/
/
/ /
/ /
/
/
/
J
Figura6
/ /
/
/
/
Figura7
42
J
Figura8
Page 43

Montaje de la tolva
Varilla de liberaci6n
Llenadode aceite
Llenadode combustible
Canalde
cortadora
Pis6n
Figura9
CANAL DE LA CORTADORA
Permitequelas ramaspeque_asdehasta3"dedi_.metroingresenal
motorparaserpicadas.Veala Figura9.
MONTAJE DE LA TOLVA
Permitaquelashojasy lasramaspeque_asde hasta1/2dedi_metro
ingresenalmotorparaserpicadasytrituradas.Bajandoelmontaje
dela tolvasepuederastrillarmateriale introducirlodentrodel mismo.
Veala Figura9.
VARILLA DE LIBERACION
Lavarillade liberaci6nest,. ubicadaenelmontajedel soportedel
motory seusaparaliberarotrabarlatolvaal momentode subiro
bajar.Veala Figura9.
DEFLECTOR DEL CANAL
Losdesechoscortadosy trituradossedescarganfueradeldeflector
delcanal.Launidadpuedeseroperadacono sinlabolsade recolec-
ci6nadosadaal deflectordelcanal.Veala Figura9.
PIS6N
Esteenchufeesinsertadoenla tolvachipperparaempujarramitasy
peque_asramashacialasI_.minasdeaspasin poneren peligrosus
manos.
Deflector
del canal
AIoperarunacortadoratrituradorapuedeserqueobjetosextra_os
seanarrojadosa losojosIocualpuededa_arlosgravemente.Utilice
siemprelosanteojosdeseguridadprovistosconestaunidado
protectoresparaojos antesde picaro triturar el materialomientras
[rea zaajusteso reparacones.
CONTROL DEL ESTRANGULADOR
Estapalancacontrolalavelocidaddelmotory la funci6ndedetenci6n.
Mediantetresposicionesindependientesde la palanca,de izquierdaa
derecha,la operaci6nse realizadelasiguienteforma:
CONTROL DE OBTURACION
Elcontroldeobturaci6nseutiNzaparacebarelcarburadory ayudara
queel motorarranque.
Arranque/
funcionamiento
lento / Motor apagado
marcha lenta
Cumple con los estandares de seguridad de ANSI
LasaspiradorasparapatiosdeCraftsmancumplenconlosestAndaresdeseguridaddelinstitutoestadounidensedeestAndaresnacionales(ANSI).
43
Page 44

LLENADO DE GASOLINA Y ACEITE
Aceite (se env(a una botella junto con la unidad)
Primeruso
1. Saquela varilladelniveldeaceite.
2. Con lacortadoratrituradoraal niveldelsuelo,utiliceunembudo
paravaciardentrodelmotortodoel contenidode la botellade
aceitesuministradaconla unidad.
3. Vuelvaa colocarla varillade Ilenadodeaceitey ajQstela.
Usospostedores
Usesolamenteunaceitedetergentede alta calidadcuyaclasificaci6n
de servicioAPIseaSF,SGo SH.Seleccioneelgradodeviscosidad
SAEdel aceiteseg_nla temperaturade operad6nesperada,Cumph
lataNa queapareceacontinuaci6n.
Milsffio_ 32° _Mfis calien
Tablade viscosidaddel aceite
AunquelosaceitesdeviscosidadmOltiple(5W30,10W30,etc.)
mejoranelencendidocuandoelclimaest,.frio,losmismosincremen-
tanel consumode aceitecuandoseusanam_.sde32°ECompruebe
el niveldeaceiteconmayorfrecuenciaparaevitardaSosdebidoa que
el motortrabajeconun niveldeaceitebajo.
1. Compruebeel nivelde aceiteasegur_.ndosequelavarilladel
niveldeaceiteno rocecon lasparedesinterioresdel tubode
Ilenadodeaceite.Dehacerlosepuedeproducirunalectura
falsade la varilladelnivelde aceite.Rellenehastala marcade
FULL(lleno)dela varilladelnivelde aceite,siesnecesario.La
capacidades deaproximadamente28oz. ElIlenadoen exceso
hacequeel motoremanemuchohumoy queel rendimientodel
mismonosea bueno.
2. Vuelvaa colocarla varillade Ilenadodeaceitey ajQstela.
3. Mantengaelnivelde aceiteen la marcaFULL.Siponeel motor
en marchaconmuypocoaceitelepuedecausardaSosperman-
entes.
3. Lleneeltanquede combustibles61ocongasolinanormalsin
plomo,limpiay fresca.NousegasolinaquecontengaMETANOL.
Vuelvaacolocarlatapade combustibleensulugar.
Loscombustiblesconmezcladealcohol(queseIlamangasohol,
o queutilizanetanolo metanol)puedenatraerhumedad,Ioque
conducea la separaci6nyformaci6nde _.cidosduranteelalmace-
namiento.Elgasaddico puededa_arel sistemade combustibledel
motormientraslam_.q_uinaest,.almacenada.
Paraevitarproblemasconel motor,sedebevaciarel sistemade
combustibleantesdealmacenarla m_.quinadurante30dfaso m_.s.
Vade eltanquede nafta,enciendael motoryd_jelofuncionarhasta
quelaslineasdecombustibley el carburadorest_nvados.La
siguientetemporadausecombustiblefresco.ConsultelasInstruc-
clonesde ALMACENAMIENTOsideseainformaci6nadicional.
Nouse nuncaproductosde limpiezaparamotoresocarburadores
enel dep6sitodecombustible,sepuedenocasionardaSosperma-
nentes.
NOTA:Verifiqueperi6dicamenteelnivelde combustibleparaevitar
quedarsesingasolinamientrasest,.operandolacortadoratrituradora.
Si la unidadsequedasincombustiblemientrasest,.triturando,puede
resultarnecesariodestaparel _.readedescargaantesdepodervolver
a encenderla.Consultelasecci6nSERVlCIOY MANTENIMIENTO.
PARA ENCENDER EL MOTOR
1. Conecteel cabledelabujiay la mangadegomaa lamisma.
2. Lleneeltanqueno m_.sde 1/2pulgadapordebajode la basedel
cuellodel filtroparadejarespacioparaladilataci6ndelcombus-
tible.Vealafigura10.
f
Tengaextremocuidadocuandomanipulegasolina.Lagasolinaes
altamenteinflamabley susvaporespuedencausarexplosiones.
Nuncacarguecombustibleen lam_.quinaen unespaciocerrado
o cuandoelmotorest,.calienteoen marcha.Apaguecigarrillos,
cigarros,pipasyotrasfuentesdecombusti6n.
GASOLINA
1. Saquela tapadelcombustibledeldep6sitodel mismo.
2. Verifiquequeel recipientedelquevaa verterlagasolinaest_
limpioy librede6xidoodeobjetosextra_os.Nousenunca
gasolinaquepuedaestarviejaporhaberestadoalmacenadaensu
recipienteporlargosperiodos.Lagasolinaquehaestadoestacio-
nadapotunperiodosuperioracuatrosemanasdebeconsiderarse
vieja.
C
Figura10
44
Page 45

3. Girelav_.lvulade cierredecombustiblea la posici6nEN.
4. Muevaelcontroldelobturadorhaciaelcontroldel regulador!'o,I
paraobturarelcarburadordelmotor.(Siel motorest,.tibio
la obturaci6npuedeno sernecesaria).
5. Muevalapalancadecontroldel estranguladora la posici6n ,_
START/RUN(encendido/ funcionarniento,representadopor
unaliebre).Veala figura 10.
6. Situadodetr&sde la unidad,tomelarnanijadelarrancadorytire
dela cuerdahastaquesientauntir6n.
NOTA:Escuchar_.un sonidocuandoalcanceelcornienzodelciclode
cornpresi6n.Estesonidoes causadoporel descebadoylos topesque
sonparte delrnecanisrnodela trituradorayes de esperarhastaqueel
motoralcancela rn_.xirnavelocidad.
7. Tiredelacuerdadernanerar_.pidaycontinua.Aprietebienla
rnanijadelarrancador.Dejequelacuerdase enrosque
lentarnente.
8. Repitaestepaso,de sernecesario,hastaquese enciendael
motor.Cuandose enciendeelmotorrnuevaelcontrolde
obturacidngradualrnentelejosdelcontroldelestrangulador.
9. Siel motorfalla,rnuevaelcontroldel obturadorhaciaatr_.s,en
direccidnal controldelestrangulador,y repitalospasos5 a8.
10. MantengaSIEMPREelcontroldelestranguladorenposicidn
START/RUN(encendido/funcionarniento)rnientrasoperela
cortadoratrituradora._lJ
PARA DETENER EL MOTOR
1. El reguladorde movirnientocontrolala palancaparareducirla
rnarcha(tortuga)_ delaposici6n.Siernpreque posible,
gradualrnentereduzcala velocidadde motorantesdepararel
motor.
2. Muevalas palancasdecontroldel reguladora la posici6n
STOP(detencidn)uOFF(apagado).
3. Girelav_.lvulade cierredecombustiblea la posicidnOFR
4. Desconecteel cabledela bujfay tierracontrael motorparaevitar
el arranqueaccidentalrnientraselequipoest,.desatendido.
TRITURACION
Eldesechoqueseacurnulaen lospatioscornoporejernplolas hojas
ylas agujasdelospinospuedesercolocadoenla tolvaparatriturarlo.
Despu_sdeprocesarel materialconlacuchillade latrituradoray
dedesgranar,esernpujadofueradel deflectordelcanaly,si est,.
instalada,haciael interiordela bolsade recolecci6nde desechos.
Respetelassiguientespautascuandotrituredesechosquese
acurnulanen lospatios:
• $61outilicela rn_.quinaparatriturarelmaterialquese encuentra
enun pationormal(hojas,rarnas,picasde lospinos,etc.).
• Evitarlatrituracidnlasplantasfibrosas,cornolasvidesde
tornate,hojasde palrna,etc,hastaqueest_ncornpletarnente
secos.Frescasvisasnotriturebienytiendena envolverseen
todoel irnpulsory flails.
• Coloquecantidadesrazonablesde desechosen latolvaporvez.
Nosobrecarguelatolva.
Perrnitaqueel materialqueseencuentraen latolvaseaatrafdo
hastalascuchillasytrituradoantesde agregarrn_.sdesechos
dentrode larnisrna.Deno hacerlosepuedetaparla tolva,el
deflectordelcanalo detenerelmotor.
CORTE
Sepuedeperrnitirelingresode rarnasdehasta3" de di_.rnetroen el
canalde lacortadora.Respetelassiguientespautasparaelcortede
lasrarnas:
• Mantengaarnbasrnanosfirrnernenteen la rarnaarnedidaquela
colocadentrodelcanaldela cortadora.
• Noponganuncarn_.sdeunararnadentrodelcanaldelacortadorapor
vez.
• Enelcanalde lacortadoras61osepuedecolocarrarnas(de
rnadera).
• Apliquepresi6ninterrnitente(fuerza,enirnpulsoscortos)cuando
coloquerarnasrn_.slargas(de3pulgadasdedi_.rnetro)dentro
del canaldelacortadoraparaevitarinundaroahogarel motor.
IMPORTANTE:Nuncacoloquerarnasconundi_.rnetrosuperiora tres
(3)pulgadasdentrodelcanalde lacortadora.Dehacerlosepueden
daSargravernentelascuchillasdecorte,eldesgranadoo el motorde
launidad.
NOTA:Pararnejoresresultados,operesiernprela unidadcon
cuchillasdecorteafiladas.Si seproduceunareducci6napreciable
en el rendirnientornientrassecortanrarnas,sedebereernplazarlas
cuchillasdela cortadora.
C6MO BAJAR EL MONTAJE DE LA TOLVA
1. Conunarnanotomela rnanijaqueseencuentraenla parte
superiordel rnontajede latolvay lev_.ntelalevernente.
2. Conlaotra rnanotirehaciaafuerade lavarilladeliberaci6ny
bajeel rnontajede la tolvahastaelpiso.
C6MO DESCARGAR LA BOLSA
1. Sueltela cuerdadeextracci6ny aflojelabolsade laaberturadel
canaldeflector.
2. Vacfela bolsay vuelvaa colocarlaenla aberturadelcanalde
descarga.Tiredela cuerdahastaquela bolsaest_ajustada
alrededordela aberturadelcanaly sujetela cuerdaapret_.ndola
contraelcanaldeflector.
IMPORTANTE:Lapantalladedesgranadoest,. ubicadadentrodela
cajaenla zonadedescarga.Sisetapala pantalladedesgranado,
s_.quelayIfrnpielacornoseindicaenlasecci6nServicioy Man-
tenirniento.Paraobtenerelrnejorresultadotarnbi_nesirnportante
rnantenerafiladala cuchilladela cortadora.
45
Page 46

LISTA DE iVlANTENIIVllENTO
Antesde realizarcualquiertipodel rnantenirniento/servicio,suelte
todoslosrnandosypareel motor.Esperehastaquetodaslas partes
de rnovirnientohayanvenidoaunaparadacornpleta.Desconecteel
alarnbredebujiay b_.selocontrael motorparaprevenirelcornienzo
involuntario.SiernpreIlevepuestoscristalesinastillablesdurantela
operaci6norealizandocualquierajusteo reparaciones.
CadaUso
los 5- 8 horas
25 horas
1. Niveldel aceitede motor
2. Hardwaresueltooausente
3. Unidadymotor
1. Elaceitede motor
1. Elaceitede rnotort
2. Filtrode aire
3. Encadenarnientosdecontrol
1. Cornprobar
2. Aprieteo sustituir
3. Lirnpio
1. Carnbio
1. Carnbio
2. Sustituyen
3. Lubricaci6nconpetr61eoligero
ypivotes
Anualrnenteo50 horas
Anualrnenteo 100horas
Antesde Alrnacenaje
1. Elaceitede motor
2. Elsilenciador
1. Bujia
1. Sisternadecombustible
1. Carnbio
2. Inspeccionar
1. Clean,checkand resetgap,or
1. Elmotordirigidohastaqueestose
Bajocargapesadao enternperaturasaltas
Siernpredetengael motorydesconecteelcabledela bujiaantes
de hacercualquiertipodemantenirnientoo ajustes.Utilicesiernpre
pnteojos de seguridaddurantela operaci6nornientrasajustao
[reparaesteequipo.
Sigalalistade rnantenirnientodadaabajo.Estacartadescribepautas
de servicios61o.Usela colurnnade TroncodeServicioparaguardar
la pistade tareasdernantenirnientocornpletadas.Localizarel rn_.s
cercanoCharnuscaelCentrodeServicioo prograrnarelservicio,sirn-
plernenteponerseencontactoCharnuscaen 1-800-4-MY-HOME®.
replacesparkplug.
parea faltadelcombustibleoaSada
un aditivodegasolinaalgas enel
tanque.
f
2
3
RECOMENDACIONES GENERALES
• Alwaysobserveallsafetyrulesfoundonproductlabelsandin
thisoperator'smanualwhenperforminganymaintenance.Safety
rulescan befoundonthe productlabelsandin thisOperator's
Manualbeginningon page36.
• Lagarantiadeestacortadoratrituradoranocubreelernentosque
banestadosujetosalrnalusoo negligenciadel operador.Para
recibirel reernbolsototaldelagarantia,eloperadordeber_,dar
rnantenirnientoal equipotaly cornose indicaenestemanual.
• Algunosajustesdebenser realizadosperi6dicarnenteparael
mantenirnientoadecuadodela unidad.
• Reviseperi6dicarnentetodoslos sujetadoresy cornpruebeque
est_nbienajustados.
iVlANTENIlVlIENTO DE MOTOR
Servicio A La Bujia
Lirnpielabujiayajusteelespacioa 0.030"al rnenosunavezpor
estaci6n;sustituyacada100horasde la operaci6n.
1,
Espaciode0,030pulg(0,76mm)
2.
Electrodo
3.
Porcelana
\
Figura11
• Arealirnpiaalrededorde labasede bujia. Nolijelabujfa.Se
debenlirnpiarlasbujfasrnedianteraspadootalladoconcepillo
de alarnbrey lavadoconunsolventecornercial.
• Quitee inspeccionelabujfa.Cornpruebeelhuecoparaasegu-
rarsequees puestoen .030".Veala Figura11.
• Sustituyalabujiasi loselectrodossonpicados,quernados,ola
porcelanaesrajada.
46
J
Page 47

Servicio Del Filtro De Aire f
Nouse akepresurizadoo solventesparalimpiarelcartuchodefiltro
de aire,
Elfiltrode aireevitael ingresoalcarburadorde suciedad,polvo,etc,
perjudicialesy evitaque losmismosseanintroducidosdentrodelmo-
tor.Adem_.s,dichofiltroesimportanteparalavidaQtilyel rendimiento
delmotor.Noponganuncaenfuncionamientoelmotorsinhaber
montadototalmenteelfiltrode ake.
Sustituyenel filtrode airecada25horasdelaoperaci6n.
1. Sueltetornillosquesosfienenlatapadefiltrode aire.
2, Latapa abiertay quita Filtrodeaire,Veala Figura12,
3. DesecheelviejoFiltrode aire.
4. InstaleelnuevoFiltrode ake.
5. Qerre latapay aprietetornillos.
Filtrode aire
La )a
NOTA:Siel filtroestArotoo darado, cAmbielo,
Compruebe El Aceite Del Motor
1. Compruebeel petr61eoantesdecadauso. Detengael motory
esperevariosminutosantesde verificarelniveldeaceite.Conel
motorubicadoensueloparejo,elaceitedebeestaren la marca
FULL(lleno)dela varilladelniveldeaceite.
2. Saquela varilladelniveldeaceiteylimpielimpiocon latel&
3. Sustituyayaprietela varilladeaceite.Quitey compruebeelnivel
delaceite.Elniveldeberiaestaren laserialLLENA.
4. De set necesario,aradael petr61eodespacio-nuevocontrol.No
sobrellenar.
5. Limpielavarilladeaceitelimpia,sustituyayapretar.Quitey
compruebeelniveldel aceite.Elniveldelaceitedeberiaestaren
la lineaLLENAenla varilladeaceite.
Nohagaoverfil.Elsobrellenoconel petr61eopuedehacerqueel
motornocomience,o confuerzacomienzo.Sisobrela seral LLENA
en la varilladeaceite,dreneel petr61eoparareducirel niveldel
aceitea la seral LLENAen la varilladeaceite.
Cambio Del Aceite Del Motor
• Usesolamenteun aceitedetergentede altacalidadcuya
clasificaci6nde servicioAPIseaSF,SGoSH.Seleccioneel
gradode viscosidadSAEdel aceitesegQnlatemperaturade
operaci6nesperada.Consultelasecci6ndeoperaci6nparavetla
tablade viscosidad.
• Cambieelpetr61eodemotordespu6sdelas cincoa ocho
primerashorasde laoperaci6n,y cadacincuentahoraso
cadatemporadaapartirdeentonces.Cambieel petr61eocada
veinticincohorascuandomotordeoperacionesbajolacarga
pesadaoentemperaturasaltas.
Figura12
2. ConelmotorLEJOSperotodaviacalientan,desconectanla bujia
Ioalambranyguardanlejosde labujia.
3. Quiteelenchufededesag(Jedel aceitecuadradoIocalizadoenla
basedelmotor,ydreneel petr61eoenun recept_.culoapropiado.
Veala Figura13enlap_.gina15.
4. Sustituyay aprieteelenchufededesagQedelaceite.
5. Cuandoelmotores drenadodetodoel petr61eo,nivelde motor
de lugar.Recambioconaproximadamente28onz.de petr61eo
fresco.LI6nesea lalineaLLENAen lavarilladeaceite.No
El petr61eousadoes undesechoarriesgado.Elimineel petr61eo
usadocorrectamente.Nodesecheconlabasuradela casa.
Compruebeconsusautoridadeslocaleso Chamuscael Centrode
Servicioparainstalacionesdedisposici6n/reciclajeseguras.
sobrellenar.Consultecomprobarel aceitedel motoreneste
SERVlCIOY MANTENIMIENTOsecci6n.
6. Sustituyael alambredebujiaantesdelcomienzo.
Servicio AI Silenciador
Inspeccioneel silenciadorcada50horasy reempl_.celode ser
necesario.Losrepuestosparaelsilenciadordebenserel mismoe
instaladoenla mismaposici6nquelaspartesoriginales.
Latemperaturadel silenciadory las_.reascercanaspuedesuperar
los 1500F(650F).Eviteesaszonas.
C6mo Vaciar El Aceite
1. Vacieel combustibledeltanquehaciendofuncionarelmotor
hastaqueel tanquedecombustibleest6vacio.
47
Page 48

Limpieza Del Motor
• Diariarnenteoantesdecadauso,lirnpiehierba,barciao
escornbrosacurnuladosdelmotor.Guardeencadenarniento,
prirnavera,y rnandoslirnpios.Guardeel&reaalrededorydetr&s
delsilenciadorsincualesquieraescornbroscombustibles.
• Elcuidadodelmotorlirnpioperrniteelrnovirnientoa_reoaired-
edordelmotor.
• Laspartesde motordeberfanserguardadaslirnpiasparareducir
el riesgoderecalentarseyla ignici6ndeescornbrosacurnulados.
Estees sobretodoirnportantecortandola altahierba.
Nouseel aguaparaNrnpiarpartesde motor.Elaguapodrfa
contarninarel sisternadecombustible.UseuncepiNoo latelaseca.
Ajuste de Carburador
Elcarburadorenestemotornoes ajustable.
f
/
/
/
/ /
i /
©
//
Velocidad de Motor
Nointentecarnbiarla velocidaddemotorrnanipulandoel encade-
narnientodegobernadordelmotor.Haciendotanpodrfacausarla
heridapersonalseriay da_aral motor.LasREVOLUCIONESPOR
IM NUTOdemotorbansdo puestasen a f_brca.
LUBFIICACI6N
• Montajede latoIva- Lubricalospuntosde pivoteen larnontaje
de latolvaconel petr61eoNgerounavezunaternporada.
• Deflectordel canal- Lubricalospuntosdepivoteen eldeflector
delcanalcon el petr61eoNgerounavezunaternporada.
• LaVarade Liberaci6n - Lubricalavaradeliberaci6nyla
prirnaveraconel petr61eoligerounavez unaternporada.
LIMPIEZA DEL EQUIPO
• Lirnpiecuidadosarnentelacortadoratrituradoradespu_sde cada
USO.
• Lavela bolsaconaguaperi6dicarnente.Perrnitaqueseseque
bienen un sitioa lasornbra.
• Sisetapa la pantalladedesgranado,s&quelay Ifrnpielacornose
indicaabajo.
NOTA:LaNrnpiezaconun chorrode aguaa presi6nnose recornien-
da,yaque elsisternadecombustiblepodrfaresultarcontarninado.
Antesde realizarcualquiertipodel rnantenirnientoen larn&quina,
esperetodaslaspartesa dejarde rnoversey desconectarel alarnbre
de bujfa.El fracasodeseguirestainstrucci6npodrfacausarla herida
)ersonaloel da_oa lapropiedad.
EXTRACCION DE LA PANTALLA DE DES-
GRANADO
Si lazonadedescargase tapa,saquelapantaNade desgranadoy
Nrnpielazonacornoseindicaacontinuaci6n:
/
Figura13
1. Detengaelmotory cornpruebequela cortadoratrituradorase
hayadetenidopotcornpleto.
2. Desconecteel cabledelabujfay p6ngalohaciendornasacontra
el motor.
3. A. Retirela bolsaydosperillasa rnariposaacadaladodel canal
deflector.VealaFigura13.
B.Levanteelcanaldeflectorpararnantenerlofueradelpaso.
C.Saquelosdos brochesde horquiNade cadapasadorde
horquiNaqueseextiendecruzandola cajay saquelos
pasadores.
D.Saquela pantaNadedesgranadodel interiordelacaja yNrnpie
la pantallacepiN_ndolao lav_ndolacon agua.VealaFigura13.
4. VuelvaacolocarlapantaNay asegOresedereensarnblarlacon el
ladocurvohaciaabajo.
5. Vuelvaa unirel canaldeflectorconloselernentosde ferreterfa
previarnentesacadosy conectela bolsaa la unidad.
AFILADO O RECAMBIO DE LAS CUCHILLAS
DE LA CORTADORA
1. Desconecteel cablede la bujfay p6ngalode rnaneraque haga
rnasacontrael motor.
2. Saquelapantallade desgranadoconforrneseindicaenla
secci6nanterior.
3. Saqueel canalde lacortadoraquitandotrestuercashexagonales
y arandelas.
4. Saquedel bastidorlatrabade sost_ndel canaldelacortadora
quitandolosbuloneshexagonales.
5. Gireel rnontajedelmotoren forrnamanualhastaubicarunade
lasdos cuchiNasde lacortadoraenlaaberturadelcanalde la
cortadora.
6. Parasacarla cuchillasaquelostorniNoshexagonalesinternos,
lasarandelasde seguridadylastuercashexagonalesque la
sujetanal motor.Guardeloselernentosdeferreterfa.Veala
Figura14.
48
Page 49

NOTA:UseunaIlavehexagonalde3/16" (Allen)enel exteriorde la
cuchillayunaIlavede tubode 1/2"(ocubo) enel interiordel motor.
Sostengala IlaveAllenfirrnernenteygirela Ilavedetubo(ocubo)para
aflojarlatuerca.
7. Coloqueunacuchillade repuesto(NQrnerodepieza742-0544)
conloselernentosdeferreteriaqueextrajoanteriorrnenteo
af[lela.
IMPORTANTE:Cuandoafilala cuchilla,prot_jaselasrnanosutilizando
guantes.Sigael_.ngulooriginalde afiladoy asegQresedeextraeruna
cantidadigualde cadacuchilla.
8. Parareernplazarla otracuchilla,gireel motorparaexponerla
segunacuchillay repitalos pasosanteriores.
NOTA:AsegQresede quelashojasse volvieronconel hordeafilado
enla rnisrnadirecci6ncornocuandose retiran.Pardehardwarea
250- 300pulgadasIbs.
AFILADO O CANIBIO DE LA CUCHILLA DE
LA TRITURADORA
1. Detengaelmotory verifiquequetodaslaspiezasrn6vilesse
hayandetenidoporcornpleto.
/
/
Figura14
Lascuchillasde trituraci6nyla cuchilladecortedel motorsonfilosas.
Utiliceguantesdetrabajode cueroparaprotegerselasrnanos.
2. Desconecteel cabledela bujiayp6ngalode rnaneraquehaga
rnasacontrael motor.
3. Bajeelrnontajede latolvaytrabela caja.
4. Saquelas seistuercashexagonalesde seguridady lasarandelas
planasdelos esp_.rragosde la soldadurade lacajadedes-
granado.Guardeloselernentosde ferreteria.
5. Conrnuchocuidadosepareelrnontajedela tolvadel rnontajedel
motory retirelaplacadesost_n.
NOTA:Cuandovuelvaa rnontarlaplacade sost_ncornpruebeque la
aletagrabadamirehaciaadentrohaciael motor.
6. Saquelas dosperillasarnariposaque unenel canaldeflectory
lev_.ntelo.
7. Inserteuntubode 1/2"o 3/4"de di_.rnetroatravesdela pantalla
dedesgranadohaciaelinteriordelmotorparaevitarqueel
rnisrnogireo saquelapantalladedesgranadoe inserteuntrozo
de rnaderaenla aberturadelcanal.
8. A. Saquelosdostornilloshexagonalesinternos,lasarandelasde
seguridadylastuercasde seguridadhexagonalesque sujetan
la cuchillade latrituradoraalmotor.
B.Saqueel pernohexagonal,laarandelade seguridady la
arandelaplanaparaliberartotalrnentelacuchillade la
trituradora.Veala Figura15.
IMPORTANTE:Cuandovuelvaarnontarlacuchilladetrituraci6n
ajusteel bul6ncentralentre550y 700pulgadaslibrasy losdos
bulonesextedoresentre250y350pulgadaslibras.
SueldeStuds
,_. Mayal ......... j
Figura15
NOTA:UseunaIlavehexagonalde 3/16"(Allen)en elexteriorde
lacuchillade latrituradoray unaIlavedetubode 1/2"(o cubo)en
el interiordela cuchilladelatrituradora.SostengalaIlaveAllen
firmernenteygirelaIlavedetubo(o cubo)paraafiojarlatuerca.Tenga
precauci6ncuandosaquelacuchillaparaevitarel contactoconlos
esp_.rragosdelasoldaduradelacaja.
IMPORTANTE:Cuandoafilelacuchilla,sigael_.ngulooriginalde
afiladocornogala.Es desurnairnportanciaquecadaextrernode
corteseadesbastadodeigualrnaneraparaevitarque lacuchilla
quededesequilibrada.Si lacuchillaest,.desequilibradaproducir_.
unavibraci6nexcesivacuandogirea altavelocidady puededa_arla
unidad.Sepuedeprobarlacuchillabalance_.ndolasobreundestornil-
ladoro clavo.Saquemetaldelladopesadohastaquequedebien
balanceada.
49
Page 50

Nuncaalrnacenecortadoratrituradoraconelcombustibleenel
tanquedentroo en _.reasrnalventiladasdondelosvaporesde
combustiblepuedenalcanzarunallamaabierta,la chispa,o el
pilotocornoenun homo,calentadordeagua,secadorderopa,o
aplicaci6ndegas.
PREPARACI6N DEL MOTOR
Yaquelosrnotoresalrnacenaronrn_.sde 30dfas:
1. Parairnpedira lagornaforrnarseenel sisternadecombustible
oen partesde carburador,dirijasel motorhastaqueestose
parea faltadel combustibleo aSadirun aditivodegasolinaal
gasen eltanque.Siustedusaunaditivode gas,dirigeelmotor
durantevariosrninutosparaponeren circulaci6nel aditivoporel
carburador-- despu_squeel motory elcombustiblepuedenser
alrnacenadoshastaseisrneses.
2. Mientrasel motorest,.todavfacaNente,carnbiarel aceite.Wase
Carnbiode aceitedel motorenla secci6nSERVICIOY MANTEN-
IMIENTO.
3. Retirela bujfay viertaaproxirnadarnente1oz.(30 rnl)de aceite
de motorlirnpioen elcilindro.Saqueel arranquevariasveces
paradistribuirel petr61eo,y volvera instalarlabujfa.
4. Lirnpieelmotorde escornbrossuperficiales.
LA PREPARACION LA CORTADORA
TRITURADORA
• Alrnacenandocortadoratrituradoraen uncobertizode alma-
cenajenoventiladoornet_.lico,elcuidadodeberfasertornado
a inoxidablelassuperficiesno pintadas.Usandoun petr61eo
ligeroo silicona,cubrael equipo,sobretodocualquierprirnavera,
portes,y cables.
• Quitetodalasuciedaddelexteriordemotory equipo.
• Sigarecornendacionesde lubricaci6n.
• Equipodetiendaen un_.realirnpia,seca.Noalrnaceneen un
_.readondeelequipoest,.presentequepuedeusar unpilotoo
tieneuncornponentequepuedecreeunachispa.
5O
Page 51

hayanvenidoa unaparadacornpleta.Desconecteel alarnbredebujfayb_.selocontrael motorparaprevenirel cornienzoinvolun-
SiernpreIlevepuestoscristabs inastillablesdurantelaoperaci6no realizandocualquierajusteo reparaciones.
Elmotornoarranca
Elmotorfuncionade rnanera
err_.tica
1. Lapalancadel reguladornoest,.en la
posici6ndearranquecorrecta
2. Lapalancade obturaci6nnoest,.en la
posici6nON(encendido)
3. Seha desconectadoelcabledela bujia
4. Labujianofuncionacorrectarnente
5. Eltanquedecornbustibbest,.vado o el
combustibleesviejo
6. No sepuedetirarde lacuerdade retroceso
7. Elmotorsedesbord6.
1. Launidadest,.funcionandoenla posici6n
CHOKE(obturaci6n)
2. Elcablede la bujfaest,.fiojo
3. EIcombustibleesviejo
4. Aguao suciedaden el sisternadel combus-
tible
5. Elfiltrodeaireest,.sucio
6. RPMdel motorbajas
7. Es necesarioajustarelcarburador
1. Muevalapalancadel reguladora la posici6nSTART
(inicio)/RUN(dirigido).
2. Pongaelinterruptorenlaposici6nCHOKE(obtura-
ci6n).
3. Conecteelcablea labujfa.
4. Lirnpie.ajusteladistanciadisruptivao carnbie.
5. Lleneel tanquecongasolinalirnpiayfresca.
6. Hayunaobstrucci6nenel motor.Desconecteel
cablede labujiay retireel objetoatascado.
7. Espereunosrninutosparareactivarse.
1. Carnbielapalancadeobturaci6nala posici6nOFF
(apagado).
2. Conecteyajusteel cablede la bujia.
3. Lleneel tanquecongasolinalirnpiayfresca.
4. Vacieel tanquedelcombustible.Vuelvaa Ilenarlo
concornbustibblirnpio.
5. Lirnpieocarnbieel filtrodeaire.
6. Siernpreaccioneelmotorcon el estranguladoral
m_.xirno.
7. Contacteconsucentrode partesyreparaciones
Sears.
_NECESITA MAS AYUDA?
_}incontlr#r5 b i_espuest# y m5 en managemy.com - isin cargo!
En Ifnea podr4 encontrar este manual y los manuales de todos los otros productos que poses
,, Sus preguntas ser4n respondidas por nuestro equipo de especialistas.
Obtenga un plan de mantenimiento personalizado para su hogar.
,, Encuentre informaci6n y herramientas que Io ayudar4n con los proyectos de su hogar.
maHage_Bome
b_o_ht to yeu by Sears
51
Page 52

tuiertipodel rnantenirniento/servicio,sueltetodoslosrnandosy pareel motor.Esperehastaquetodaslaspartesde
yan venidoaunaparadacornpleta.Desconecteel alarnbrede bujfay b_.selocontrael motorparaprevenirel cornienzoinvolun-
SiernpreIlevepuestoscristalesinastillablesdurantelaoperaci6no realizandocualquierajusteo reparaciones.
El motorrecalienta
1. Elnivelde aceitedel motores bajo
2. Flujodeairerestringido
Saltosocasionales(pausas)a 1. Ladistanciadisruptivade labujiaesrnuy
altavelocidad poca
El motorfuncionaen vado rnal 1. Bujiaensuciada 1.
2. Elfiltrode aireest,. sucio 2.
Dernasiadavibraci6n 1. Haypartesqueest_.nfiojaso el motorest,. 1.
da_ado
La unidadnodescarga 1. El_.readedescargaest,.tapada 1.
2. Hayunobjetoextra_oen el motor
3. RPMdel motorbajas
Latasade descargase reduce
1. RPMdel motorbajas
de rnaneraconsiderableo
carnbialacornposici6ndel
2. Lahojade lacortadoraest,.desafilada
materialdescargado
1. Lleneel c_.rterconla adecuadaselecci6nde aceite.
2. Recortesdeperi6dicodehierbalirnpiosyescorn-
brosdealrededordelas aletasde refrigeraci6ndel
motoryalojarnientodesoplador.
1. Quitela bujiay ajusteel hueco.
Sustituyalabujiay ajusteelhueco.
Lirnpieocarnbieelfiltrodeaire.
Detengael motorde inrnediatoydesconecteel
cabledela bujfa.Contacteconsucentrode partesy
reparacionesSears.
Detengael motorde inrnediatoydesconecteel
cabledela bujfa.Lirnpiela pantalladedesgranadoy
elinteriorde laaberturade descarga.
.
Detengael motorydesconecteelcablede labujia.
Saqueelobjetoextra_odel motor.
3.
Siernpreaccioneelmotorconel estranguladoral
rn_.xirno.
1. Siernpreaccioneelmotorconel estranguladoral
rn_.xirno.
2. Reernplacela hojade lacortadoraocontacteasu
centrode reparacionesy partesSears.
_NECESITA MAS AYUDA?
[:'r_c>r_U:lr_lr_I_ I_e_pUe_U:_y r_'_ er_rnanagerny.corn - isin cargo!
En linea podr_ encontrar este manual y los manuales de todos los otros productos que pose_
Sus preguntas ser_n respondidas pot nuestro equipo de especialistas.
Obtenga un plan de mantenimiento personalizado para su hogar.
Encuentre informaci6n y herramientas que Io ayudar_n con los proyectos de su hogar.
brough_ to yo_, b_ S_a_
52
Page 53

(Esta p_.ginase aplica s61oen EE.UU. y Canada.).
Sears, Roebuck and Co., U.S.A. (Sears), el Consejo de Recursos Arnbientales de California (CARB)
y la Agencia de Protecci6n Arnbiental de los Estados Unidos (EPA)
Declaraci6n de garantia del sistema de control de emisiones (derechos y obligaciones de la garantia de defectos del propi=
LACOBERTURADE LAGARANTJADECONTROLDEEMISIONESES Y PARALOSMODELOSCERTIFICADOSDELANO1997YPOSTERIORES,
APLIOABLEA LOSMOTORESCERTIFICADOSCOMPRADOSENCALIFOR- QUESE COMPRENY UTILICENENCUALQUIERPARTEDE LOSESTADOS
NIAEN1995Y POSTERIORMENTE,QUESE UTILIZANENCALIFORNIA, UNIDOS(Y A PARTIRDEL 1DE ENERODE2001ENCANADA).
Declaraci6n de garanfia sobre defectos en el control de ernisiones para California y los Estados Unidos
ElConsejodeRecursosAmbientalesdeCalifornia(CARB),la EPA(Agencia
de Protecci6nAmbientaldelosEE.UU.)y Searstienenel gusto deexplicarla
garantiadelsistemadecontroldeemisionesparamotoresdela_o 2000y para
elfuturoconrelaci6na motorespeque_ostodo terreno(SORE).EnCalifornia,
los nuevosmotorespeque_ostodo terrenodebenestardise_ados,construidos
y equipadosparacumplirconlas rigurosasnormasanti-smogdelestado.En
el restodelos EstadosUnidos,losmotoresnuevostodoterrenodeencendido
porchispacertificadosparaela_o 1997debencumplirest_ndaressimilares
establecidospot la EPA.Searsdebegarantizarel sistemadecontroldeemis-
Cobertura de la garantJa Sears para defectos en el control de ernJsiones
Losmotorestodoterrenopeque6osest_ngarantizadosenIo relativoalcontrol alas disposicionesque seindiquena continuaci6n.Si una partedesumotor
deemisionesparadefectosenpiezasduranteunper[ododedosa_os,sujeto cubiertapot lagaranfiaes defectuosa,Searsreparar_osustituir_dichaparte.
Responsabilidades del propietario en relacibn con la garantia
Comopropietariodelmotortodoterrenopeque_o,Ud.esresponsabledela
realizaci6ndel mantenimientorequeridoqueseincluyeenlasinstrucciones
deoperaci6ny mantenimiento.Searsrecomiendaquese conserventodoslos
recibosrelativosalmantenimientodesu motortodoterrenopeque_o,pero
nopudedenegarla garantiasimplementeporla faltade los mismos,opor su
incumplimientodelmantenimientoprogramatic.Comopropietariodelmotor
peque_otodoterrenodebesaberque,sinembargo,Searslepuedenegar
lacoberturade lagarantiasi su motortodoterrenopeque6oouna piezadel
mismohanfalladodebidoa abuso,negligencia,mantenimientoindebidoo
Disposiciones de la garantJa Sears para defectos en el control de emJsiones
Lassiguientessondisposicionesespecificasrelacionadasconlacoberturade lagarantiaparadefectosenel controldeemisiones.Esuna_adidoa lagarantiade
motorSearsparamotoresnoreguladosqueseencuentraen lasinstruccionesdefuncionamientoy mantenimiento.
1. Piezascongarantia
Lacoberturadeesta garantiase extiendeL]nicamentealas piezas
queaparecena continuaci6n(las partesde lossistemasdecontrolde
emisiones),siemprequedichaspiezasestuvieranya enel motoren el
momentodesucompra.
a. Sistemademedici6ndecombustible
•Sistemade enriquecimientoparaarranqueenfrio
•Carburadory partesinternas
• Bombade combustible
b. Sistemadeinducci6nde aire
• Filtrode aire
•Colectordeadmisi6n
c. Sistemadeencendido
• Bujia(s)deencendido
•Sistemade encendidomagneto
d. Sistemadelcatalizador
•Convertidorcatalitico
•Colectordeescape
•Sistemade inyecci6nde aireo v_lvulade impulsos
e. Elementosvariadosusadosenlossistemasanteriores
•Wlvulas devacio,sensiblesa temperatura,posici6nytiempo
einterruptores
•Conectoresy montajes
2. AIcancedela cobertura
Searsgarantizaal poseedorinicialy a loscompradoressubsiguientes
quelas piezascongarantianotendr_ndefectosenmaterialesnimano
deobraque provoquenla falladelas mismasduranteun periodode
dosaSosa partirdela fechaen queelmotorse entregaa uncomprador
particular.
3. Sincargo
Lareparaci6no reemplazodecualquierpartecongarantiase realizar_
Enlos EstadosUnidosy Canad_hayunalineadeatenci6nde24 horas,1-800-469--4GG3,quecuentacon unmenL]conmensajespre-grabadosque contienen
informaci6nparael mantenimientodemotores.
etario)
ionesdesumotorparalosperiodosdetiempoenumeradosa continuaci6n,
siemprequenohayaabuso,negligenciao mantenimientoindebidode su
motortodoterrenopeque_o.Susistemade controldeemisionespuedeincluir
piezastalescomoel carburador,el filtrodeaire,elsistemadeencendido,el
silenciadoryelconversorcatalitico.Tambienpuedeincluirconectoresyotras
unidadesrelacionadasconlasemisiones.Dondeexistaunacondici6ncubierta
porla garantia,Searsreparar_su peque6omotortodoterrenosin costoalguno
incluyendodiagn6stico,piezasymanode obra
a modificacionesnoaprobadas.Ud.esresponsabledepresentarsumotor
todoterrenopeque6oaundistribuidordeserviciosSearsautorizadotan pronto
comoaparezcaunproblema.Lasreparacionesdela garantiasinconfiicto
debencompletarseen unplazodetiemporazonable,nosuperiora 30dias.Si
tienealgunapreguntarespectoasusderechosyresponsabilidadesreferen-
tesa la garantia,debecontactarconunrepresentantede serviciosSearsal
1--800--469--4663.Lagarantiadeemisionesesunagarantiapordefectos.Los
defectossejuzgandeacuerdocon elfuncionamientonormalde unmotor.La
garantiano est_relacionadacon unapruebade emisionesenuso.
sin cargoalgunoparael poseedor,incluyendotareasdediagn6sticoque
permitandeterminarsi unapartecongarantiaes defectuosa,siempreque
dichodiagn6sticose realiceen undistribuidorde serviciosSearsautoriza-
do. Parael serviciode lagarantiade emisiones,contacteal distribuidorde
serviciosSearsautorizadom_scercanoincluidoen las"P_ginasamarillas"
en lascategorias"Motores,gasolina","Motoresdegasolina","Podadoras
de cesped",osimilares.
4. Reclamacionesyexclusionesa la cobertura
Las reclamacionesde lagarantia debenenviarsedeacuerdocon las
disposicionesdela politicadegarantiaparamotoresSears.La cobertura
de lagarantiaexcluir_defectosen piezascongarantia quenoseanpartes
originalesSears,o abuso,negligenciao mantenimientoincorrecto,tal y
comoseestableceen lapoliticadegarantiaparamotoresSears.Searsno
es responsablede lasfallasenpiezascongarantiaprovocadasporel uso
de partesa_adidas,quenoseanoriginaleso quesehayan modificado.
5. Mantenimiento
Cualquierpartecongarantiaquenoesteprogramadaparaser reem-
plazadacomomantenimientorequerido,o que s61odebainspeccionarse
regularmentealefecto de"inspeccioneoreemplacesegL]nsea necesario",
estar_garantizadacontradefectosduranteel periodode la garantia.Todas
las piezasgarantizadasqueestenprogramadasparasureemplazopara
cumplirconlos requisitosdemantenimientoestar_ngarantizadass61o
porel periodoanterioral primerreemplazoprogramaticparadicha pieza.
Cualquierpiezade recambioqueseaequivalenteenfuncionamientoy
durabilidadpuedeusarsepararealizarmantenimientoo reparaciones.El
propietarioes responsablederealizartodoel mantenimientorequerido,tal
y comose defineenlasinstruccionesdefuncionamientoy mantenimiento
Sears
6. Coberturaindirecta
Porla presente,la coberturase extiendeala falladecualquiercomponente
de motorprovocadapotlafallade unapiezacongarantiaqueestetodavia
en periodode garantia.
Page 54

Busque el periodo de duraci6n de emisiones importantes yla informaci6n de clasificaci6n de aire en
la etiqueta de emisiones de su motor
Los motores cuyo cumpiimiento con los estAndares de emisi6n Tier 2 de la Comisi6n de Recursos Ambientales de California (CARB)
est6 certificado deben exhibir la informaci6n relacionada con el perJodo de duraci6n de las emisiones y la clasificaci6n de aire. Sears,
Roebuck and Co., de los Estados Unidos ponen esta informaci6n a disposici6n deJconsumidor en nuestras etiquetas de emisiones.
El Periodo de Duraci6n de las Emisiones describe el nQmero de horas de tiempo real de funcionamiento para el cual se certifica que
el motor cumple con las reglas de emisi6n, descontando el mantenimiento adecuado deJmismo segQn las instrucciones de oper-
aci6n y mantenimiento. Se utilizan las siguientes categorias:
Moderado:Se certifica que el motor cumpie con las reglas de emisi6n durante 125 horas de tiempo real de funcionamiento deJmotor.
Inmediato:Se certifica que el motor cumple con las reglas de emisi6n durante 250 horas de tiempo real de funcionamiento deJ motor.
Extendido:Se certifica que el motor cumple con las reglas de emisi6n durante 500 horas de tiempo real de funcionamiento deJmotor.
Por ejemplo, una cortadora de c6sped tJpica que se empuja desde atrAs se usa entre 20 y 25 horas por afio. Por Io tanto, el Periodo
de Duraci6n de Emisiones de un motor con una clasificaci6n intermedia seria equivalente a entre 10 y 12 afios.
Laclasificaci6n de aJre es un nQmero calculado para describir eJnivel reiativo de emisiones para un grupo de motores en particular.
Cuanto menor sea Jaclasificaci6n de aire, mayor es JaJimpieza deJmotor. La informaci6n se presenta de forma gr&fica en Jaetiqueta
de emisiones.
Despu_s del 1 de julio de 2000, busque el periodo de cumplimiento de las reglas de
emisiones en la etiqueta de cumplimiento de las reglas de emisiones del motor
Despu_s deJ 1 de julio de 2000 se certificar_, que determinados motores Sears, Roebuck and Co., de los Estados Unidos
cumpien con los estAndares de emisiones de la fase 2 de la Agencia de Protecci6n Ambiental de los Estados Unidos (USE-
PA). Para los motores certificados para la etapa 2, el periodo de cumpiimiento con las reglas de emisiones al cual se hace
referencia en la etiqueta de cumpiimiento con las reglas de emisiones indica el nQmero de horas de funcionamiento para el
cuaJ se ha demostrado que el motor cumpie con los requerimientos federales de emisi6n.
Para los motores con desplazamiento inferior a 225 cc, Categoria C = 125 horas, B = 250 horas y A = 500 horas.
Para los motores con desplazamiento de 225 cc o mAs, Categoria C = 250 horas, B = 500 horas y A = 1000 horas.
El despiazamiento de los motores de la serie modelo 150112 es 249 cc.
La presente es una representaci6n gen_rica de laetiqueta de emisi6n que se encuentra generaimente en un
motor certificado.
FAMILYYBSXS.3192VA 274812
54
GDOC-100182Rev.A
Page 55

Felicitacionesporhaberrealizadounaadquisici6ninteligente.El
productoCraftsman@queha adquiridoest_dise_adoyfabricado
parabrindarrnuchosa_osde funcionarnientoconfiable.Perocorno
todoslosproductosa vecespuederequerirdereparaciones.Esen
esernornentocuandoel disponerdeunAcuerdodeprotecci6npara
reparacionesle puedeahorrardineroy problernas.
A continuaci6nsedetallanlospuntosincluidosenelAcuerdo:
• Servicio experto prestadopornuestros10,000especialistasen
reparacionesprofesionales
• Servicio ilirnitadosincargoparalaspiezasy larnanodeobraen
todaslas reparacionescubiertas
• Reernplazodel productohasta1500d61aressino es posible
repararel productocubierto
• Descuentode 10%del precionormaldel servicioy delas piezas
relacionadasconel rnisrnoqueno est_ncubiertasporel acuerdo;
adern&s,10%del precionormaldelaverificaci6ndernanten-
irnientopreventivo
• Ayudar_pidapottel_fono- IoIlarnarnosResoluci6nR_pida- el
apoyotelef6nicode unCharnuscaal representante.Pienseen
nosotroscornoel manual"deundue_ohablador."
Unavezadquiridoel Acuerdo,puedeprograrnarel serviciocon
tans61orealizarunaIlarnadatelef6nica.PuedeIlarnarencualquier
mornentodeldia o delanocheo prograrnarun servicioenlinea.
ElAcuerdodeProtecci6nde Reparaci6nesunacornprasinriesgo.
Siustedanulaporalgunaraz6nduranteel periodode garantiade
producto,proporcionarernosunreernbolsoIleno.O,un reernbolso
prorrateadoencualquiermornentodespu_sdelperiodode garantia
de productoexpira,iAdquieraboysu acuerdodeprotecci6npara
reparaciones!
Seaplican deterrninadaslimitaciones y exclusiones.Paraobtener
inforrnaci6nadicional y preciosen los Estados UnidosIlarneal
1-800-827-6655.
El*Coverageen Canad_variaenalgunosarticulos. Paradetalles
IlenoslaIlarnadaCharnuscaCanad_en 1-800-361-6665.
Servicio de instalaci6ndeSears
Sideseasolicitarla instalaci6nprofesionalde Searsdeaparatos
dorn_sticos,dispositivosparaabrirportones,calentadoresde agua
y otrosarficulosdorn_sticosirnportantes,en los EstadosUnidoso
Canad_Ilarneal 1-800-4-MY-HOME®.
55
Page 56

Your Home
For expert troubleshooting and home solutions advice:
www.managemyhome.com
For repair - in your home - of all major brand appliances,
lawn and garden equipment, or heating and cooling systems,
no matter who made it, no matter who sold it!
For the replacement parts, accessories and
owner's manuals that you need to do-it-yourself.
For Sears professional installation of home appliances
and items like garage door openers and water heaters.
1-800-4-MY-HOME ® (1-800-469-4663)
Call anytime, day or night (U.S.A. and Canada)
www.sears.com www.sears.ca
Our Home
For repair of carry-in items like vacuums, lawn equipment,
and electronics, call anytime for the location of your nearest
Sears Parts & Repair Service Center
1-800-488-1222 (U.S.A.) 1-800-469-4663 (Canada)
www.sears.com www.sears.ca
To purchase a protection agreement on a product serviced by Sears:
1-800-827-6655 (U.S.A.) 1-800-361-6665 (Canada)
Para pedir servicio de reparaci6n
a domicilio, y para ordenar piezas:
1-888-SU-HOGAR ®
(1-888-784-6427)
Au Canada pour service en fran£ais:
1-800-LE-FOYER M°
(1-800-533-6937)
www.sears.ca
® Registered Trademark / TMTrademark / SMService Mark of Sears Brands, LLC
® Marca Registrada / TMMarca de F&brica / Marca de Servicio de Sears Brands, LLC
MCMarque de commerce / MDMarque depos6e de Sears Brands, LLC © Sears Brands, LLC
SM
 Loading...