

Craftsman 768.884900 Owner's Manual

owner
s
manual
MODEL
768.884900
8
H.P.
25
INCH
J
SBARS
CRAFTSMAN
TRAC
-
DRIVE
DUAL
STAGE
SNOWBLOWER
With
Electric
Starter
*
•^
;•;**•?'
SEARS,
ROEBUCK
AND
CO., Chicago, Illinois 60664 U.S.A.
Part
No.
6757
Issue
9/86
LithoinCanada
OWNER'S INFORMATION 2
MAINTENANCE
AGREEMENT
2
CRAFTSMAN WARRANTY 2
SAFE
OPERATIONAL
PRECAUTIONS
3
ASSEMBLY 4-5
Contents ofshipping carton 4
Tools required for Assembly 4
Unpacking 4
Crank Assembly 5
Speed Select LeverAssembly 5
OPERATION 6
Engine Operating Controls 6
Snowblower Operating Controls 6-7
Weight Transfer
System
7
Table
of
Contents
Pre-check
useofsnowblower
7
To Service Engine 7
To Start Engine 8
Snowblower Operation 9
MAINTENANCE 10
Lubrication Points 10-11
Maintenance
Check
List 11
ADJUSTMENT/REPAIRS
12
Height Adjust Skid Adjustment 12
Auger
Drive
BeltAdjustment 12
Auger Drive Belt Replacement 13
Traction DriveBelt Replacement 13
Belt Guide Adjustment 13
Cable Adjustment 13
Friction Disc Adjustment 14
Friction Disc
Replacement
14
Shear BoltReplacement 15
Track
Adjustment 15
Spark Plug Adjustment 15
Headlight
Replacement
15
Carburetor Adjustment 16
Engine Servicing 16
STORAGE 17
OFF
SEASON
STORAGE
17
OPERATING
TIPS
17
TROUBLESHOOTING
18
UNIT REPAIR
PARTS
20-23
ENGINE
REPAIR
PARTS
24-27
NOTES
19
HOWTOORDER
REPAIR
PARTS
....
28
OWNER'S
INFORMATION
Record
the
following
information
about
your
unitsothat
you
willbeabletoprovideitin
caseof
lossortheft.
DATE
PURCHASED:
MODEL
NO.:
CODE
NO.:
_
STORE
WHERE PURCHASED: ADDRESS
CITY
STATE.
TELEPHONE.
MAINTENANCE
AGREEMENT
The
Craftsman
Warranty,
plusaMaintenance
Agreement,
provide
maximum
value
for
Sears
products.
Contact
your
nearest
Sears
store
for
details.
TWO
YEAR
WARRANTY
ON
CRAFTSMAN
SNOWBLOWER
Fortwo years fromthe date of purchase, when thissnowblower is maintained, lubricat
ing
ed
and
tunedupaccordingtothe
instructionsinthe
owners
manual,
Sears
will
repair,
'r4B&
*reeofchar9e«
any
defectinmaterial
and
workmanship.
If
this
snowblowerisused
for
commercialorrental
purposes,
this
warranty
applies
for
only 90 days from the date of purchase.
This warranty
does
not cover:
Expendable
items which
become
worn during normal use,
suchasspark
plugs, tire
chains
and
shear
pins.
Repairs
necessarybecauseofoperatorabuseornegligence
including
bentcrankshafts
and the failureto maintainthe equipment according to the instructionscontained inthe
owners
manual.
WARRANTY SERVICE IS AVAILABLE BY RETURNING
THE
SNOWBLOWER TO
THE
NEAREST SERVICE CENTER/DEPARTMENT IN
THE
UNITED STATES.
This
warranty
gives
youspecific
legal
rights,
andyoumayalsohaveother
rights
which
vary
from
statetostate.
SEARS,
ROEBUCK&COMPANY,
Department
698/731A,Sears
Tower,
Chicago,II60684

^^\
Safe Operation Practices forWalk-Behind SnowUowers
DO
NOT
OPERATE
THIS
EQUIPMENT
BEFORE
READING
THIS
MANUAL
Training
1.
Read
the
operating
and
service
instruction
manual
care
fully. Be
thoroughly
familiar
with
the
controls
and
the
proper
useofthe
equipment.
Know
howtostop
the
unit
and
disengage
the
controls
quickly.
2.
Never
allow
childrentooperate
the
equipment.
Never
allow
adultstooperate
the
equipment
without
proper
instruction.
3. Keep
the
areaofoperation
clear
of all persons, particularly
small
children,
and
pets.
4.
Exercise
cautiontoavoid
slippingorfalling,
especially
when
operating
in reverse.
Preparation
1.
Thoroughly
inspect
the
area
where
the
equipment
is to be
used
and
remove
all
doormats,
sleds,
boards,
wires,
and
other
foreign objects.
2. Disengage all clutches
and
shift into neutral before starting
the
engine
(motor).
3. Do not
operate
the
equipment
without wearing
adequate
winter
outer
garments.
Wear
footwear
that
will
improve
footingonslippery
surfaces.
4. Handle fuel with care; it is highly flammable.
(a)
Useanapproved
fuel
container.
(b) Never add fuel to a running engine or hot engine.
(c) Fill fuel
tank
outdoors
with
extreme
care.
Never
fillfuel
tank
indoors.
(d) Replace gasoline cap securelyand wipe up spilledfuel.
5. Use extension cords and receptacles as specified by the
manufacturer
for all
units
with
electric
drive
motorsorelec
tric
starting
motors.
6. Adjust
the
collector
housing
height to
clear
gravel or
crushed
rock
surface.
7. Neverattempt to make any adjustments while the engine
(motor) is running (except when specifically recommend
edbymanufacturer).
8. Letengine (motor) and machine adjust to outdoor temper
atures
before starting to
clear
snow.
9. Alwayswearsafety glassesor eye shields during operation
or whileperformingan adjustment or repairto protect eyes
from foreign objectsthat may be thrown from the machine.
Operation
1. Do not put hands orfeet nearor under rotatingparts. Keep
clear of the discharge opening at all times.
2. Exercise extreme caution when operating on or crossing
gravel drives, walks, or roads. Stay alert for hidden hazards
or
traffic.
3. After striking a foreign object,
stop
the
engine
(motor),
remove
the
wire from
the
spark plug, disconnect the cord
on electric motors, thoroughly inspect snowblower forany
damage,
and
repair
the
damage
before restarting
and
operating
the
snowblower.
4. If
the
unit
should
start
to vibrate abnormally,
stop
the
en
gine (motor)
and
check
immediately for
the
cause.
Vibra
tion is generally a warning of trouble.
5.
Stop
the
engine
(motor)
whenever
you
leave
the
operating
position, before
unclogging
the
collector/impeller housing
or
discharge
guide,
and
when
making
any
repairs, adjust
ments,orinspections.
6. When cleaning, repairing,orinspecting,
make
certain
the
collector/impeller
and
all moving
parts
have
stopped.
Dis
connect
the
spark
plug wire
and
keep
the
wire
away
from
the
plug to prevent
accidental
starting.
7. Do not run
the
engine
indoors,
except
when
starting
the
engine
and
for transporting
the
snowblower
in or
outofthe
building.
Open
the
outside
doors;
exhaust
fumes
are
dangerous.
8. Do
not
clear
snow
across
the
faceofslopes.
Exercise
extreme
caution
when
changing
directiononslopes.
Do
not
attempttoclear
steep
slopes.
9.
Never
operate
the
snowblower
without
proper
guards,
plates or
other
safety protective
devices
in place.
10.
Never
operate
the
snowblower
near
glass
enclosures,
automobiles,
window
wells, drop-offs,
and
the
like without
proper
adjustmentofthe
snow
discharge
angle.
Keep
children
and
pets
away.
11. Do not overload
the
machine
capacitybyattempting
to
clear
snowattoo
fastarate.
12.
Never
operate
the
machineathigh
transport
speeds
on
slippery surfaces. Look behind
and
use
care
when backing.
13. Never
direct
dischargeatbystandersorallow
anyone
in
frontofthe
unit.
14.
Disengage
powertothe
collector/impeller
when
snow
bloweristransportedornotinuse.
15.
Use
only
attachments
and
accessories
approvedbythe
manufacturer of
the
snowblower (such as wheel weights,
counterweights,
cabs,
and
the
like).
16. Never
operate
the
snowblower
without
good
visibility or
light. Always be
sure
of your footing
and
keep a firm hold
on
the
handles
and
walk,
never
run.
17. Do not over-reach. Keep
proper
footing
and
balance
at all
times.
18. Do
not
attempttouse
snowblowerona roof.
Maintenance and Storage
1. Check
shear
bolts
and
other bolts at frequent intervals for
proper
tightnesstobe
sure
the
equipment
is in
safe
working
condition.
2.
Never
store
the
machine
with
fuelinthe
tank
inside
a
building
where
ignition
sources
are
present
suchashot
water
and
space
heaters,
clothes
dryers,
and
the
like.Allow
the engine to cool before storing in
any
enclosure.
3. Alwaysrefer to operator's guide instructions for important
detailsifthe
snowbloweristobestored
foranextended
period.
4.
Maintainorreplace
safety
and
instruction
labels,
as
necessary.
5. Run
the
machine
a few
minutes
after
blowing
snow
to
prevent freeze-up of
the
collector/impeller.
y^^k
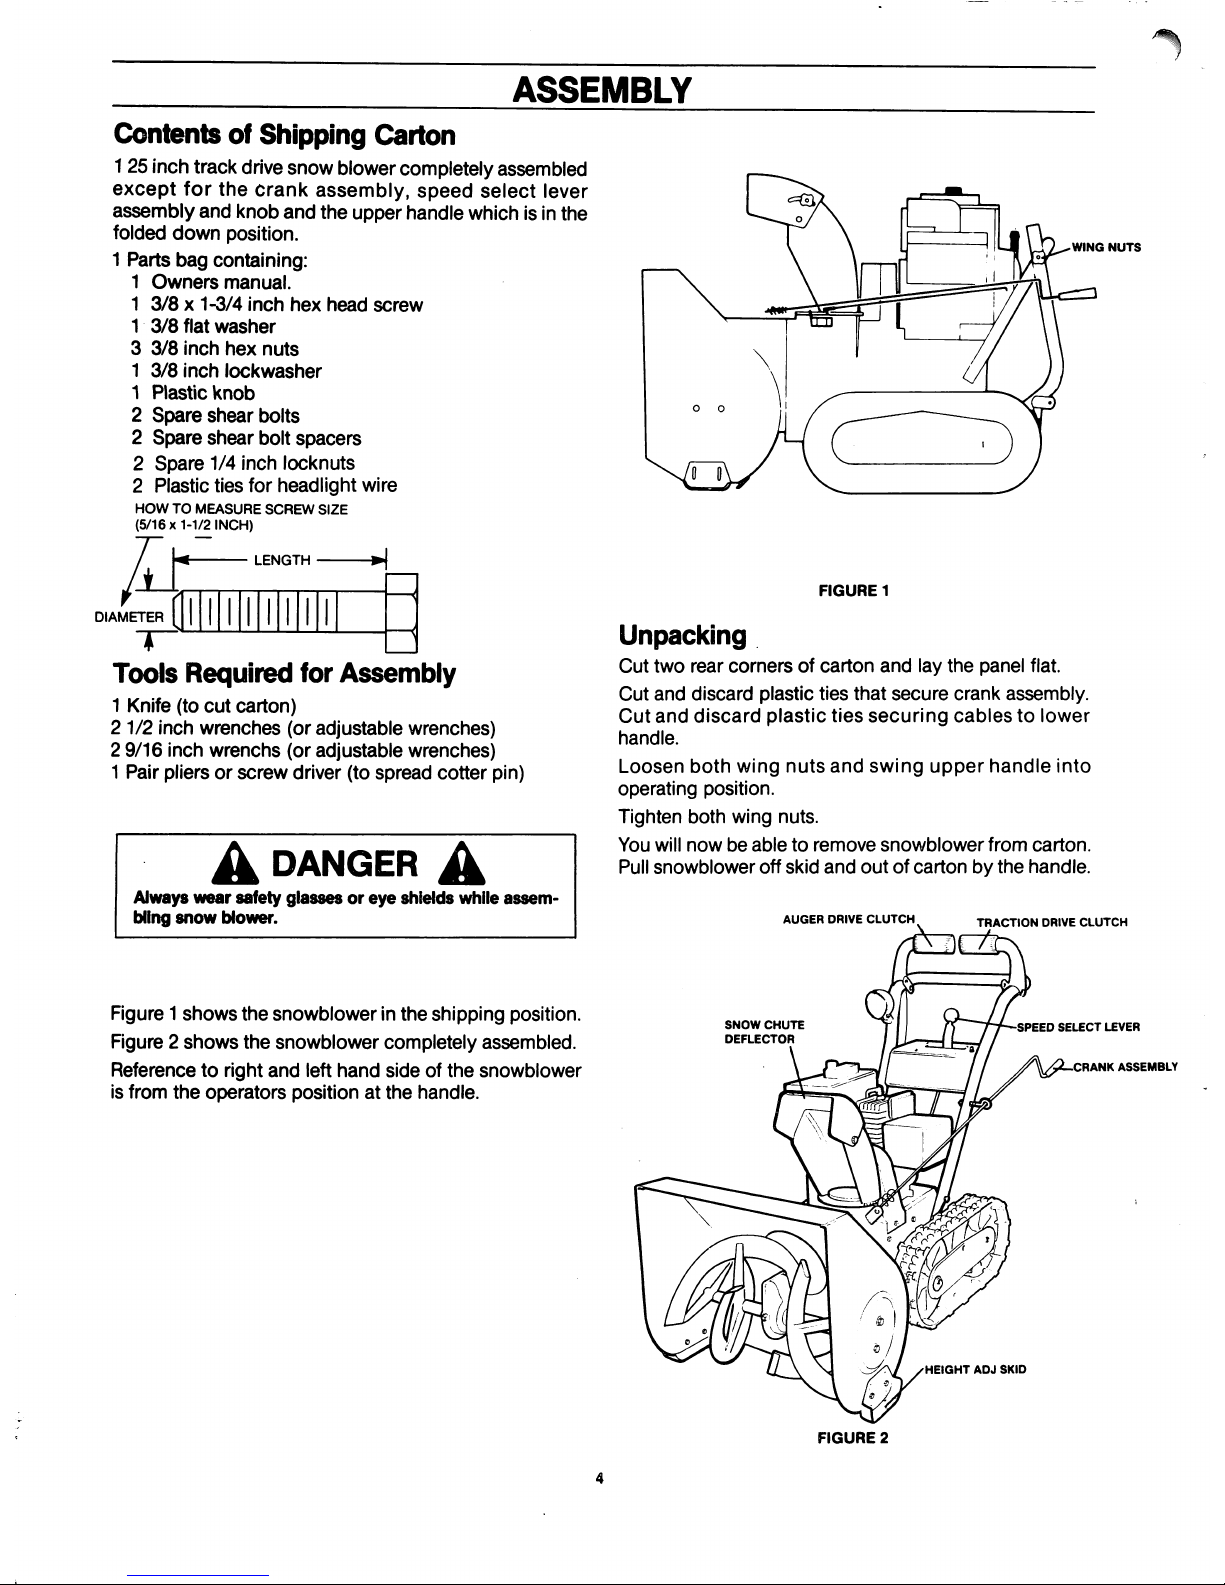
ASSEMBLY
ContentsofShipping Carton
125 inchtrack drivesnow blowercompletelyassembled
except
for
the
crank
assembly,
speed
select
lever
assembly
and
knob
and
the upperhandle which is inthe
folded
down
position.
1 Parts bag containing:
1
Owners
manual.
1
3/8x1-3/4
inch
hex
head
screw
1
3/8
flat
washer
3
3/8
inch
hex
nuts
1
3/8
inch
lockwasher
1
Plastic
knob
2
Spare
shear bolts
2 Spare shear bolt
spacers
2
Spare
1/4 inch locknuts
2 Plastic ties for
headlight
wire
HOWTOMEASURE
SCREW
SIZE
(5/16x1-1/2
INCH)
LENGTH
1
Tools
Required
for
Assembly
1 Knife (to
cut
carton)
2 1/2 inch wrenches (or adjustable wrenches)
2
9/16
inch
wrenchs
(or
adjustable
wrenches)
1 Pair pliersorscrew
driver (to
spread
cotter
pin)
A
DANGER
A
Always
wear
safety glasses or
eye
shields while
assem
bling
snow
blower.
Figure 1
shows
the
snowblowerinthe
shipping position.
Figure 2
shows
the
snowblower
completely
assembled.
Reference to right
and
left
hand
side of
the
snowblower
is from
the
operators
positionatthe
handle.
WING
NUTS
FIGURE
1
Unpacking
Cut
two
rear
cornersofcarton
and
lay
the
panel flat.
Cut
and
discard
plastic
ties
that
secure
crank
assembly.
Cut
and
discard
plastic
ties
securing
cablestolower
handle.
Loosen
both
wing
nuts
and
swing
upper
handle
into
operating
position.
Tighten
both
wing nuts.
You
will
nowbeabletoremove
snowblower
from
carton.
Pull
snowblower
off skid
and
outofcartonbythe
handle.
AUGER
DRIVE
CLUTCH
SNOW
CHUTE
DEFLECTOR
FIGURE
2
TRACTION
DRIVE
CLUTCH
SPEED
SELECT
LEVER
CRANK
ASSEMBLY
HEIGHT
ADJ
SKID
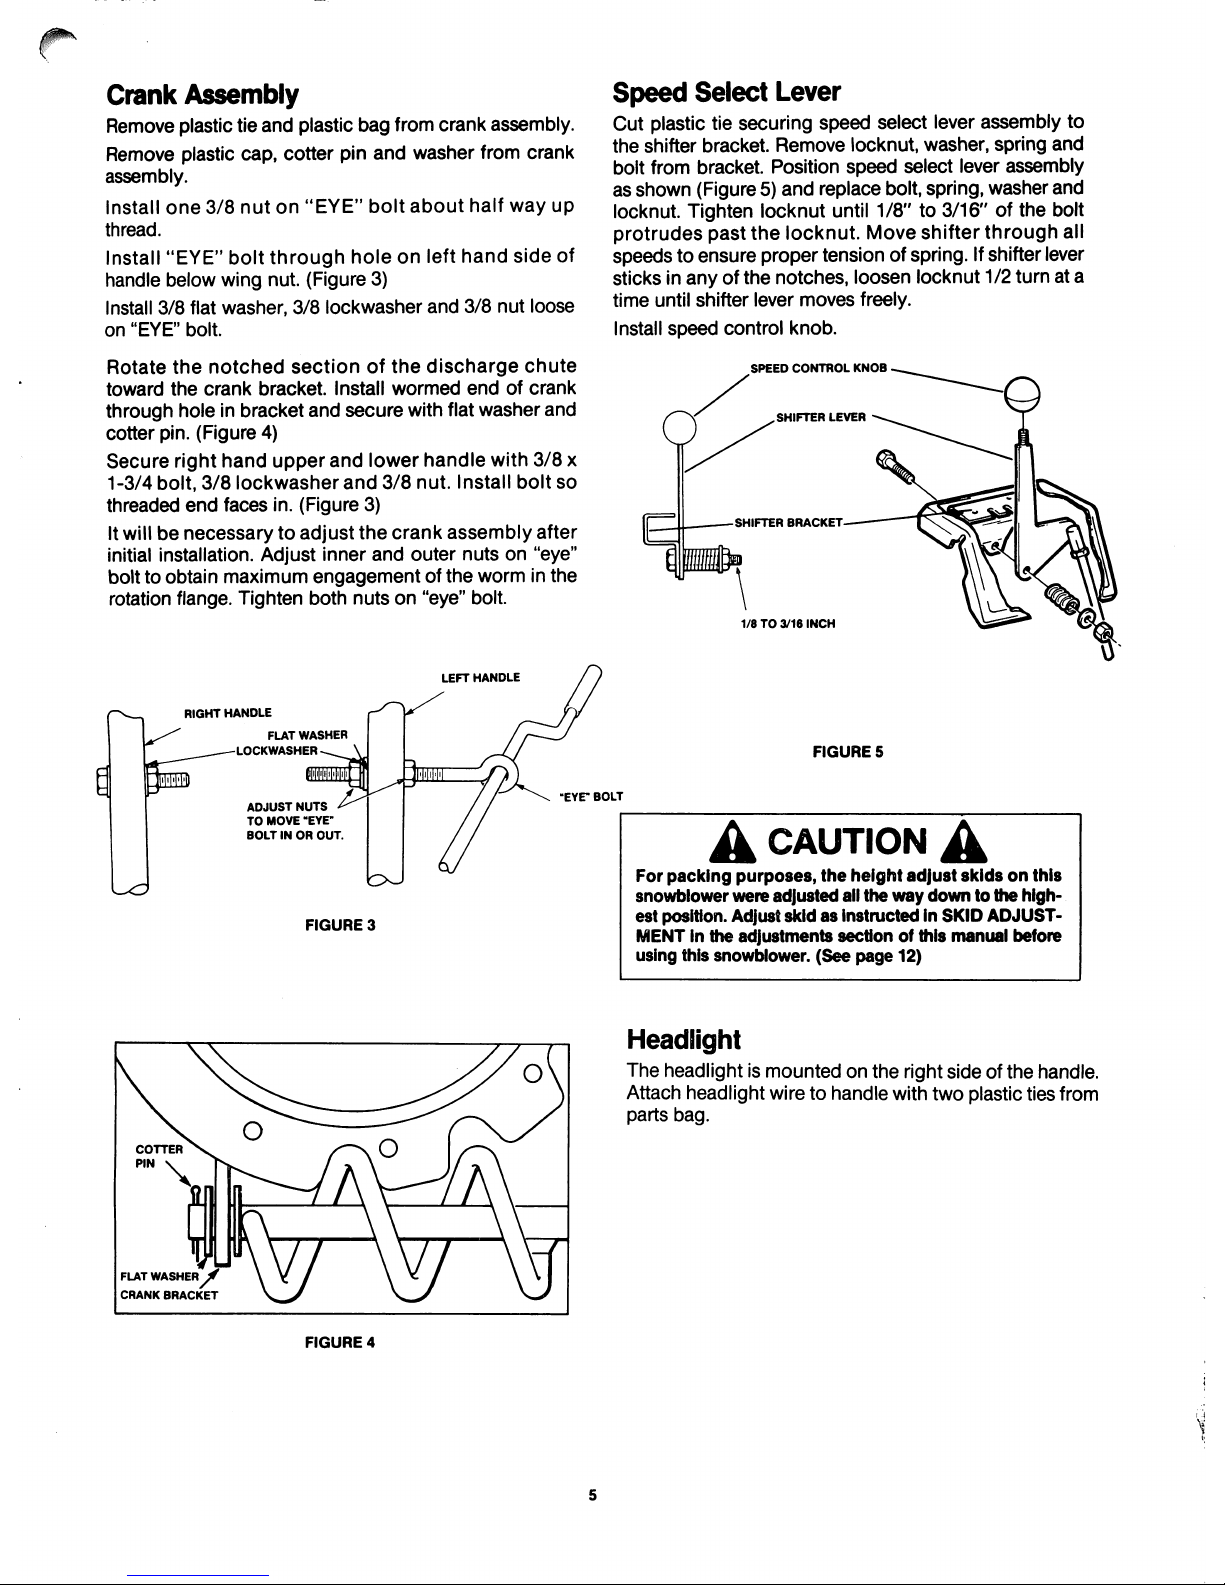
Crank
Assembly
Remove plastic tie and plastic bag from crank assembly.
Remove plastic cap, cotter pin
and
washer from crank
assembly.
Install
one
3/8
nuton"EYE"
bolt
about
half
way
up
thread.
Install "EYE"
bolt
through
hole
on left
hand
side
of
handle below wing nut. (Figure 3)
Install
3/8
flat
washer,
3/8
lockwasher
and
3/8
nut
loose
on
"EYE"
bolt.
Rotate
the
notched
sectionofthe
discharge
chute
toward
the
crank
bracket.
Install
wormed
endofcrank
through hole in bracket
and
secure
with flatwasher
and
cotter
pin. (Figure 4)
Secure
right
hand
upper
and
lower
handle
with
3/8
x
1-3/4
bolt,
3/8
lockwasher
and
3/8
nut.
Install
bolt
so
threaded
end
faces
in. (Figure 3)
Itwillbenecessary
to adjust
the
crank
assembly
after
initial installation. Adjust
inner
and
outer
nuts
on "eye"
bolt to obtain
maximum
engagementofthe
worm in
the
rotation flange. Tighten both
nutson"eye" bolt.
RIGHT
HANDLE
FLAT
WASHER
LOCKWASHER
-^\
LEFT
HANDLE
Speed
Select
Lever
Cut plastic tie securing
speed
select lever assembly to
the
shifter bracket.
Remove
locknut,
washer,
spring
and
bolt from bracket. Position
speed
select
lever assembly
as shown (Figure 5)
and
replace bolt,spring, washer and
locknut. Tighten locknut until 1/8" to 3/16" of the bolt
protrudes
past
the
locknut. Move shifter
through
all
speedsto ensure proper tension of spring. Ifshifter lever
sticks in
anyofthe
notches, loosen locknut 1/2 turn at a
time
until
shifter
lever
moves
freely.
Install
speed
control
knob.
SPEED
CONTROL
KNOB
SHIFTER
LEVER
SHIFTER
BRACKET
1/8TO3/16
INCH
FIGURE
5
ADJUST
NUTS
TO
MOVE
"EYE-
BOLTINOR
OUT.
EYE"
BOLT
u
FLAT
WASHER
jr
CRANK
BRACKET
FIGURE
4
A
CAUTION
A
For
packing
purposes,
the
height
adjust
skidsonthis
snowblower
were
adjusted
all
the
way
downtothe
high
est
position.
Adjust
skidasinstructed
in SKID
ADJUST
MENT in
the
adjustments
sectionofthis
manual
before
using this
snowblower.
(See
page
12)
Headlight
The headlight is mounted on
the
right side of
the
handle.
Attach headlight wire to handle with two plastic ties from
parts
bag.
<^Sk
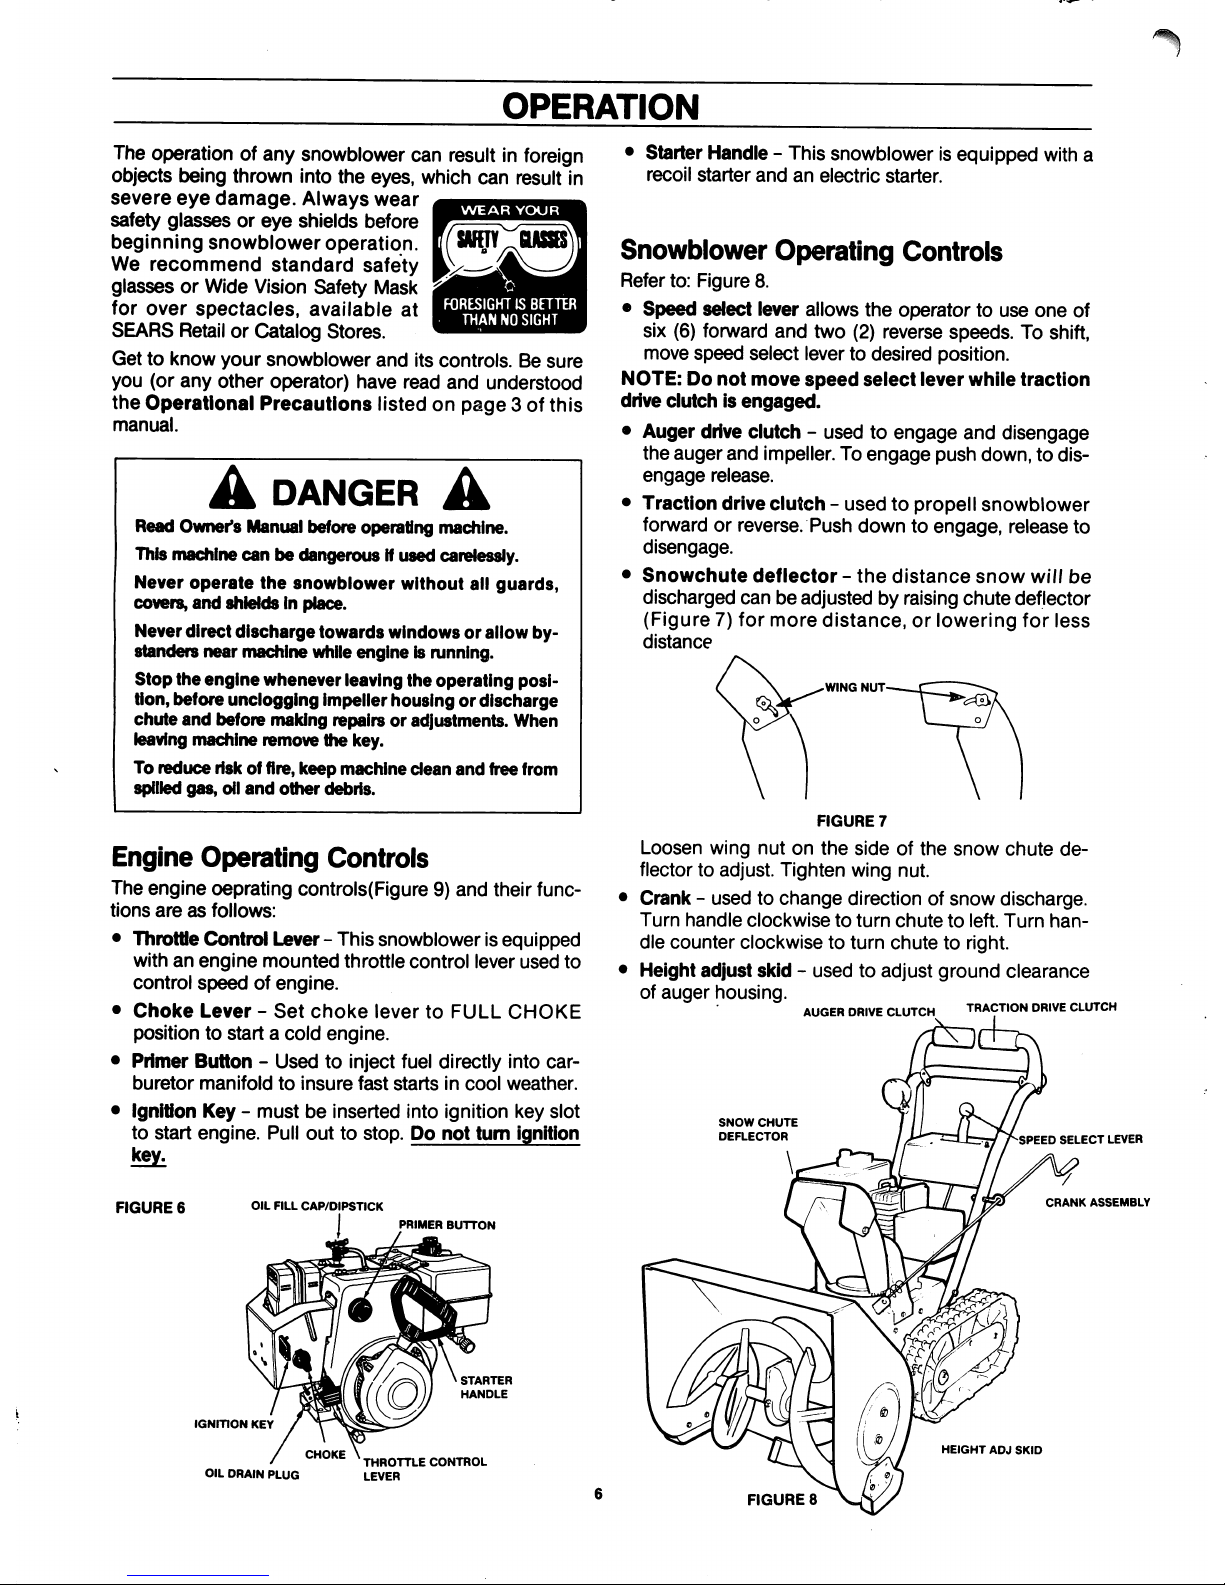
OPERATION
The operation of any snowblower can
resultinforeign
objects being thrown into the eyes, which can result in
severe
eye
damage.
Always
wear
safety
glassesoreye
shields before
beginning
snowblower
operation.
We
recommend
standard
safety
glasses or Wide Vision Safety Mask
for
over
spectacles,
available
at
SEARS Retailor Catalog Stores.
Get to
know
your
snowblower
and its controls. Be
sure
you (or
any
other
operator)
have
read
and
understood
the Operational Precautions listed on
page
3 of this
manual.
A
DANGER
A
Read Owner's Manual before operating machine.
This machine can be dangerous if used carelessly.
Never
operate
the
snowblower
without
all guards,
covers,
and
shields
in place.
Never direct discharge towards
windows
or allow by
standers near machine while engine is running.
Stop
the
engine
whenever
leaving
the
operating posi
tion, before unclogging impellerhousing or discharge
chute
and before making repairs or adjustments.
When
leaving machine remove the key.
To reduce risk of fire,
keep
machine
clean
and
free from
spilled
gas,
oil
and
other
debris.
Engine Operating Controls
The engine oeprating controls(Figure 9) and their func
tions
areasfollows:
• Throttle Control Lever - This snowbloweris equipped
withanengine
mounted
throttle control lever
used
to
control
speedofengine.
•
Choke
Lever-Set
choke
lever
to
FULL
CHOKE
position to start a cold engine.
• Primer
Button
- Used to inject fuel directly into
car
buretor
manifoldtoinsure
fast
startsincool
weather.
• Ignition
Key-mustbeinserted
into ignition key slot
to
start
engine.
Pull
outtostop.Donot
turn ignition
key.
FIGURE
6
OIL
FILL
CAP/DIPSTICK
IGNITION
KEY
OIL
DRAIN
PLUG
PRIMER
BUTTON
THROTTLE
CONTROL
LEVER
Starter Handle - This snowblower is equipped witha
recoil
starter
andanelectric
starter.
Snowblower Operating Controls
Refer to: Figure 8.
•
Speed
select lever allows
the
operator to use
one
of
six (6) forward
and
two (2) reverse speeds. To shift,
move
speed
select
lever to desired position.
NOTE: Do
not
move
speed
select
lever
while
traction
drive clutch is
engaged.
• Auger drive clutch - used to
engage
and disengage
the
auger
and
impeller. To
engage
push
down, to dis
engage
release.
• Traction drive
clutch-usedtopropelIsnowblower
forward or reverse. Push down to engage, release to
disengage.
•
Snowchute
deflector-the
distance
snow
will
be
discharged can be adjusted by raising
chute
deflector
(Figure7)for
more
distance,orlowering
for
less
distance
WING
NUT
FIGURE
7
Loosen
wing
nutonthe
sideofthe
snow
chute
de
flector to adjust. Tighten wing nut.
Crank - used to
change
direction of
snow
discharge.
Turn
handle
clockwisetoturn
chutetoleft.
Turn
han
dle
counter
clockwise to turn
chute
to right.
Height adjust
skid-usedtoadjust
ground
clearance
of
auger
housing.
SNOW
CHUTE
DEFLECTOR
AUGER
DRIVE
CLUTCH
TRACTION
DRIVE
CLUTCH
SPEED
SELECT
LEVER
CRANK
ASSEMBLY
HEIGHT
ADJ
SKID
FIGURE
8
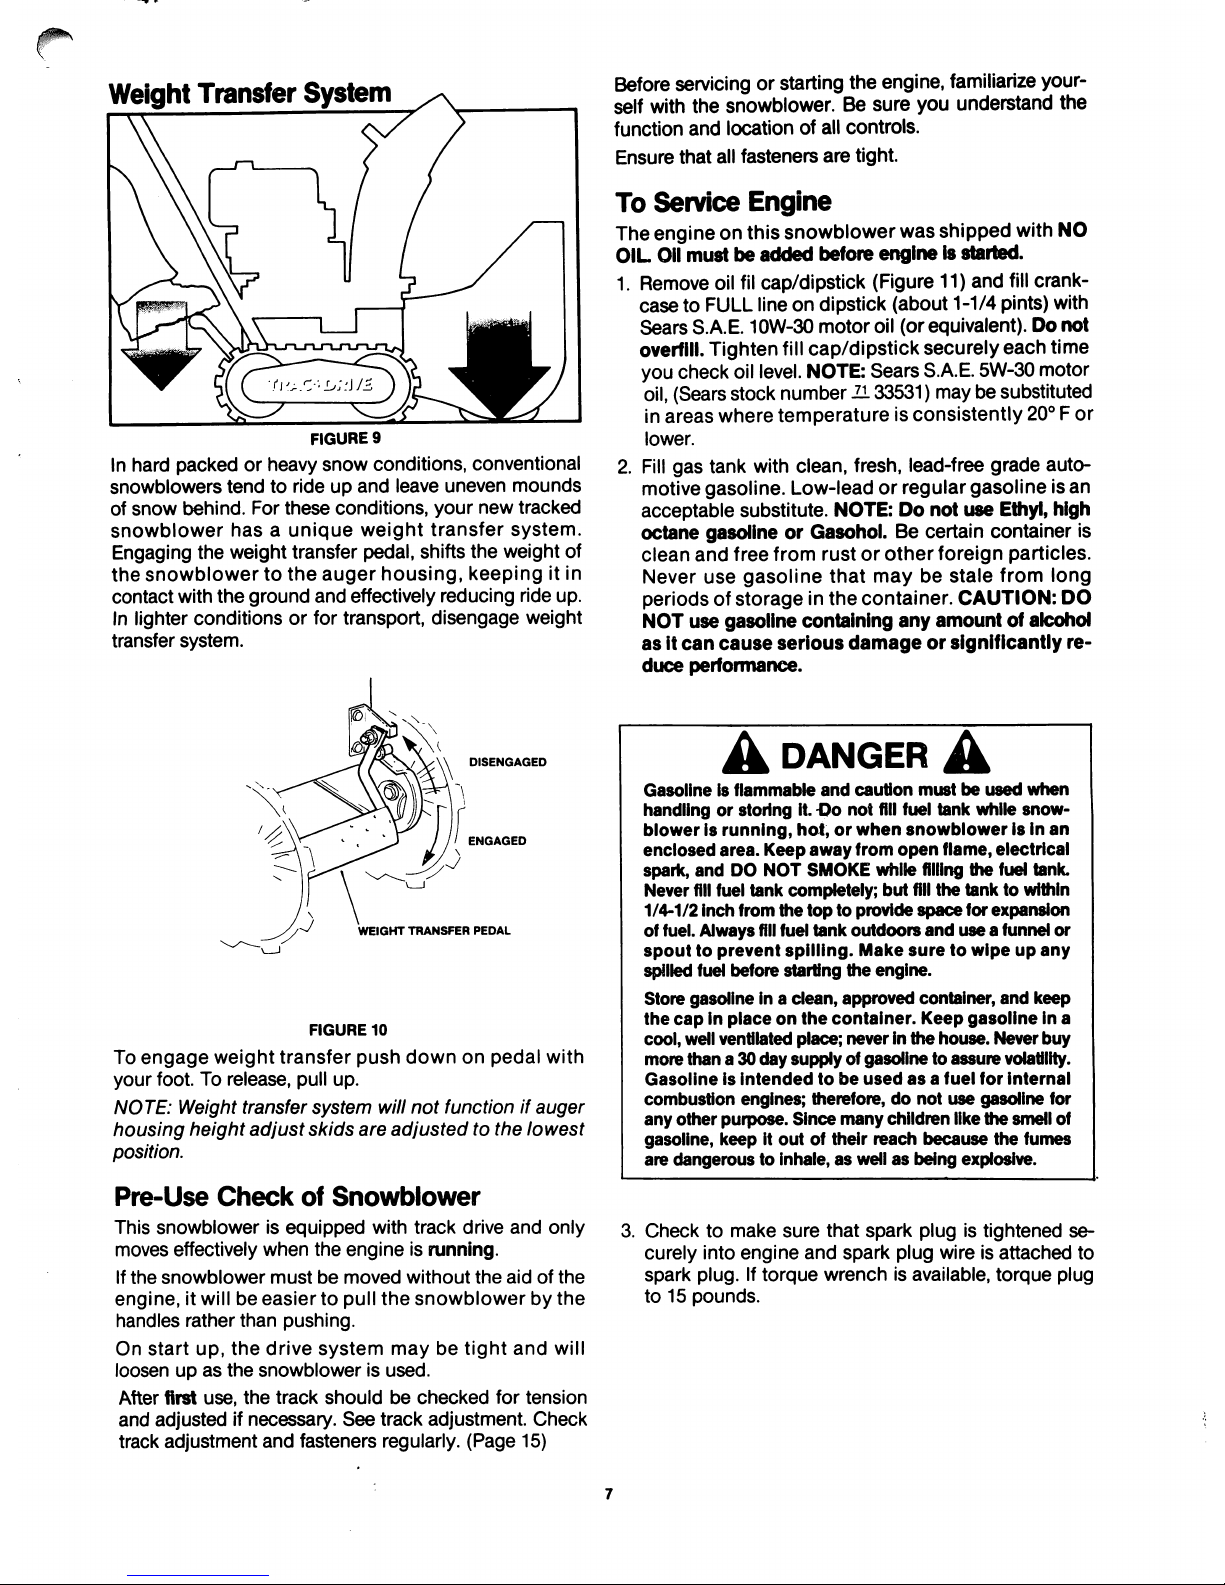
Weight Transfer
System
y^K
FIGURE
9
In hard
packed
or heavy
snow
conditions, conventional
snowblowers
tend
to ride up
and
leave
uneven
mounds
of
snow
behind.
For
these
conditions,
your
new
tracked
snowblower
hasaunique
weight
transfer
system.
Engaging the weight transfer pedal, shifts the weight of
the
snowblowertothe
auger
housing,
keeping
it in
contact
with
the
ground
and
effectively reducing ride up.
In lighter conditions or for transport,
disengage
weight
transfer
system.
DISENGAGED
ENGAGED
WEIGHT
TRANSFER
PEDAL
FIGURE
10
To
engage
weight
transfer
push
downonpedal
with
your
foot. To release, pull up.
NOTE: Weight transfer
system
will
not
function if auger
housing
height
adjust
skids
are
adjusted
to the
lowest
position.
Pre-Use
Check
of
Snowblower
This
snowblowerisequipped
with
track
drive
and
only
moves effectively
when
the
engine
is running.
If
the
snowblower
must
be
moved
without
the
aidofthe
engine,
it willbeeasiertopull
the
snowblower
by
the
handles
rather
than
pushing.
On
start
up,
the
drive
system
maybetight
and
will
loosenupas
the
snowblowerisused.
After
first
use,
the
track
should
be
checked
for
tension
and
adjustedifnecessary.
See
track
adjustment.
Check
track
adjustment
and
fasteners
regularly.
(Page
15)
Beforeservicing or startingthe engine,
familiarize
your
self with the snowblower. Be sure you understand
the
function
and
locationofall
controls.
Ensure that all fasteners are tight.
To
Service
Engine
The engine on this snowblowerwas shipped with NO
OIL
Oil
mustbeadded
before
engine
is started.
1. Remove oil
fil
cap/dipstick (Figure11) and
fill
crank-
case to FULLlineon dipstick (about 1-1/4 pints) with
Sears
S.A.E. 10W-30
motor
oil (or equivalent). Do
not
overfill.Tighten
fill
cap/dipsticksecurely
each
time
you check oil
level.
NOTE:Sears
S.A.E.
5W-30motor
oil,(Sears stock number 2133531) maybe substituted
in
areas
where
temperatureisconsistently
20° F or
lower.
2.
Fill
gas
tank with clean, fresh, lead-free grade auto
motive gasoline. Low-lead or regular
gasoline
isan
acceptable substitute. NOTE: Do
not
use
Ethyl, high
octane gasoline or Gasohol. Be certain container is
clean
and
free
from
rustorother
foreign
particles.
Never
use
gasoline
that
maybestale
from
long
periods of
storageinthe
container.
CAUTION: DO
NOT
use
gasoline containing
any
amount of alcohol
asifcan
cause
serious
damageorsignificantly
re
duce
performance.
A
DANGER
A
Gasolineisflammable
and
caution
mustbeused
when
handling or storing it. -Do
not
fill fuel
tank
while
snow
blowerisrunning,
hot,orwhen
snowblower
is in an
enclosed
area.
Keep
away
from
open
flame, electrical
spark, and DO
NOT
SMOKE while filling the fuel tank.
Never
fill
fuel
tank
completely;
but
fill
the
tank
to within
1/4-1/2
inch
from
the
top
to provide
space
for
expansion
of fuel.
Always
fill
fuel
tank
outdoors
and
use
a funnel or
spouttoprevent
spilling.
Make
suretowipeupany
spilled fuel
before
starting
the
engine.
Store gasoline in a clean,
approved
container,
and
keep
the
capinplaceonthe
container.
Keep
gasoline
in a
cool, well ventilated place;
neverinthe
house.
Never
buy
more
than a 30
day
supply
of gasoline to
assure
volatility.
Gasolineisintended
tobeusedasa
fuel
for
internal
combustion
engines;
therefore,donot
use
gasoline
for
any
other
purpose.
Since
many
children like
the
smell of
gasoline,
keepitoutoftheir
reach
because
the
fumes
are
dangerous
to inhale, as wellasbeing
explosive.
3.
Checktomake
sure
that
spark
plugistightened
se
curely
into
engine
and
spark
plug wire is
attached
to
spark
plug. If
torque
wrench
is available,
torque
plug
to 15
pounds.
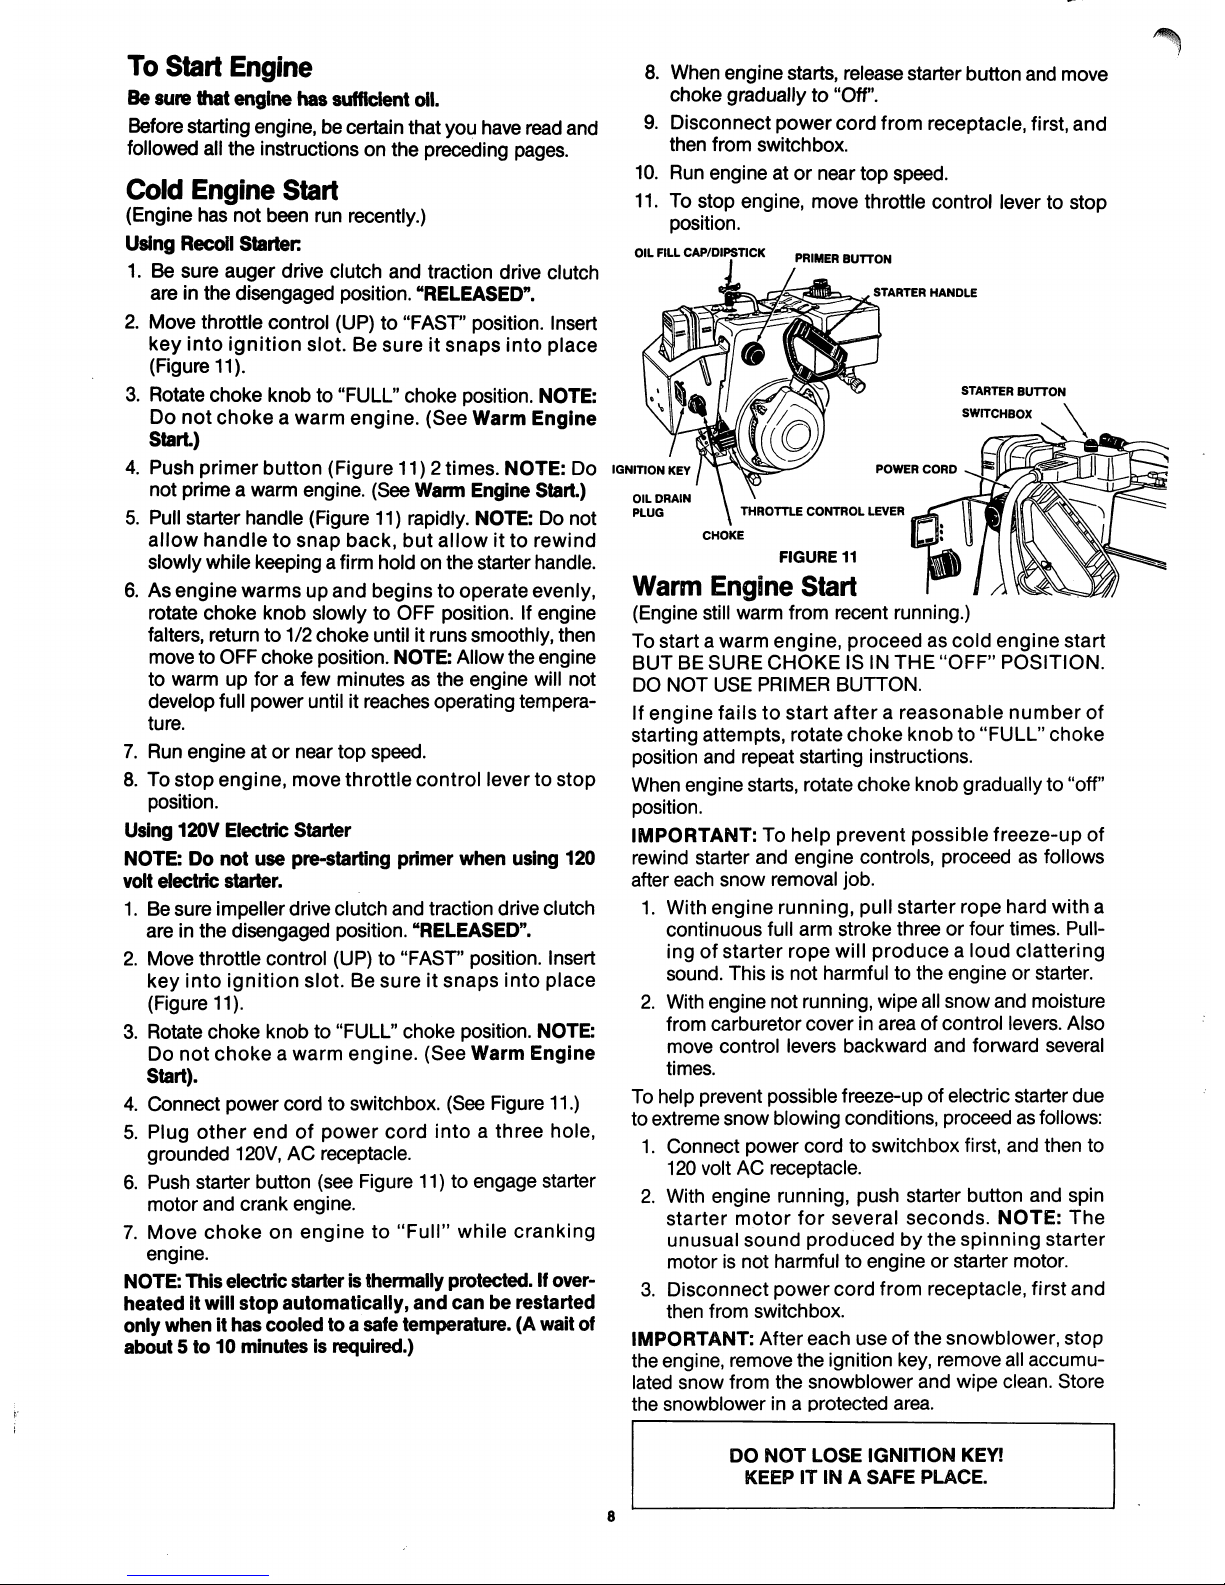
To Start Engine
Be sure that engine
has
sufficient oil.
Beforestarting engine, be certain thatyou have read and
followed allthe instructions on the preceding pages.
Cold
Engine Start
(Engine has not
been
run recently.)
Using Recoil
Starter
1. Be
sure
auger
drive
clutch
and
traction
drive
clutch
areinthe
disengaged
position. "RELEASED".
2. Move throttle control (UP) to "FAST" position. Insert
key
into
ignition
slot.Besureitsnaps
into
place
(Figure 11).
3. Rotate
choke
knob to
"FULL"
choke
position. NOTE:
Do
not
chokeawarm
engine.
(See
Warm
Engine
Start.)
4.
Push
primer
button
(Figure
11)2
times.
NOTE:
Do
not prime a warm engine. (See Warm Engine Start.)
5. Pull
starter
handle
(Figure 11) rapidly. NOTE: Do not
allow
handletosnap
back,
but
allowitto
rewind
slowly while keeping a firm holdonthe
starter
handle.
6. As
engine
warmsupand
beginstooperate
evenly,
rotate
choke
knob
slowly to
OFF
position. If
engine
falters, return to
1/2
choke
until it
runs
smoothly,
then
move to
OFF
choke
position. NOTE: Allow
the
engine
to
warmupfor a few
minutesasthe
engine
will
not
develop
full
power
until it
reaches
operating
tempera
ture.
7.
Run
engineator
near
top
speed.
8. To
stop
engine,
move
throttle
control
levertostop
position.
Using 120V Electric Starter
NOTE: Do
not
use
pre-starting primer
when
using
120
volt
electric
starter.
1. Be
sure
impellerdrive
clutch
and
traction drive clutch
areinthe
disengaged
position. "RELEASED".
2. Move
throttle
control
(UP)to"FAST" position. Insert
key
into
ignition
slot.Besureitsnaps
into
place
(Figure 11).
3. Rotate
choke
knob
to "FULL"
choke
position. NOTE:
Do
not
chokeawarm
engine.
(See
Warm
Engine
Start).
4.
Connect
power
cord
to switchbox.
(See
Figure 11.)
5.
Plug
other
endofpower
cord
intoathree
hole,
grounded
120V, AC receptacle.
6.
Push
starter
button
(see
Figure 11) to
engage
starter
motor
and
crank
engine.
7.
Move
choke
on
engine
to
"Full"
while
cranking
engine.
NOTE:
This
electric starter is thermally protected. If
over
heated
it will
stop
automatically,
and
canberestarted
only
whenithas
cooled to a safe temperature. (A wait of
about5to10minutesisrequired.)
8. When
engine
starts, release
starter
button
and
move
choke
gradually
to "Off".
9.
Disconnect
power
cord
from
receptacle,
first,
and
then
from
switchbox.
10. Run
engine
at or
near
top
speed.
11. To
stop
engine, move throttle control lever to
stop
position.
OIL
FILL
CAP/DIPSTICK
PRIMER
BUTTON
STARTER
HANDLE
STARTER
BUTTON
SWITCHBOX
IGNITION
KEY
POWER
CORD
THROTTLE
CONTROL
LEVER
CHOKE
FIGURE
11
Warm
Engine
Start
(Engine still warm from
recent
running.)
To
startawarm
engine,
proceed
as
cold
engine
start
BUT
BE
SURE
CHOKE
ISINTHE
"OFF"
POSITION.
DO
NOT
USE
PRIMER
BUTTON.
If
engine
failstostart
afterareasonable
number
of
starting
attempts,
rotate
choke
knob
to "FULL"
choke
position
and
repeat
starting instructions.
When
engine
starts, rotate
choke
knob
gradually to "off"
position.
IMPORTANT:Tohelp
prevent
possible
freeze-up
of
rewind
starter
and
engine
controls,
proceedasfollows
after
each
snow
removal job.
1. With
engine
running,
pull
starter
rope
hard
with a
continuous
full
arm
stroke
threeorfour
times.
Pull
ing of
starter
rope
will
producealoud
clattering
sound.
Thisisnot
harmfultothe
engineorstarter.
2. With
engine
not running, wipe all
snow
and
moisture
from
carburetor
coverinareaofcontrol
levers.
Also
move
control
levers
backward
and
forward
several
times.
To help prevent possiblefreeze-up of electric starter
due
to
extreme
snow
blowing conditions,
proceedasfollows:
1.
Connect
power
cordtoswitchbox
first,
and
then
to
120
volt AC
receptacle.
2. With
engine
running,
push
starter
button
and
spin
starter
motor
for
several
seconds.
NOTE:
The
unusual
sound
produced
by
the
spinning
starter
motorisnot
harmfultoengineorstarter
motor.
3.
Disconnect
power
cord
from
receptacle,
first
and
then
from
switchbox.
IMPORTANT:
After
each
useofthe
snowblower,
stop
the
engine, remove
the
ignition key,
remove
all
accumu
lated
snow
from
the
snowblower
and
wipe
clean.
Store
the
snowblower
in a
protected
area.
DO
NOT
LOSE
IGNITION
KEY!
KEEPITINASAFE
PLACE.
/^^k
c
Snowblower Operation
The
most
effective
useofthe
snowblower
willbeestab
lished by experience, taking into consideration
the
ter
rain,wind
conditions
and
building location which will
determine the direction of the discharge chute. NOTE:
Donot blowsnow towards a building as hidden objects
could be blown withsufficient force to cause damage.
1. Start the engine as described in paragraph To Start
Engine.
ENGINE
WILL
NOT
START
UNLESS
IGNITION
KEY
IS
INSERTED
INTO
IGNITION
SLOTINCARBURETOR
COVER.
DO
NOT
TURN
IGNITION
KEY.
o
IGNITION
KEY
2. Adjust
snow
chute
deflector.
3. Using crank, position
the
discharge
chute
to dis
charge
snow
with
the
wind.
4. Select
proper
speed
for
snow
conditionsasoutlined
below
and
set
speed
select
lever to
desired
position.
NOTE:
Always
release traction drive
clutch
lever
before
moving
speed
select
lever.
Ground
speedisdeterminedbysnow
conditions.
Select
the
speed
you
desire
by moving
the
speed
selector
into
the
appropriate
coloured
areaonthe
control
panel.
Red - Wet, Heavy,
Slushy,
Extra
Deep
Amber
-
Moderate
White - Very Light
Green -
Transport
Only
For additional
operating
instructions
see
"OPERATING
TIPS"
page
17.
5. Engage
auger
drive clutch (right hand).
IMPORTANT:
Besurefront of unit isclear ofbystand
ers or obstacles before operating.
AUGER
DRIVE
CLUTCH
FIGURE
12
TRACTION
DRIVE
CLUTCH
6.
Engage
traction drive clutch (left hand)asthe
snow
blower
startstomove,
maintainafirm
holdonthe
handles and guide
the
snowblower along
the
cutting
path. Do
not
attempttopush
the
snowblower.
7. To
stop
forward motion,
release
traction drive clutch
(left
hand).
8. To
stop
auger,
release
auger
drive
clutch
(right hand).
9.Tomove
the
snowblower
backwards,
move
speed
select
lever
into
firstorsecond
reverse
and
engage
drive
traction
clutch
(left
hand).Tostop,
release
drive
traction
clutch.
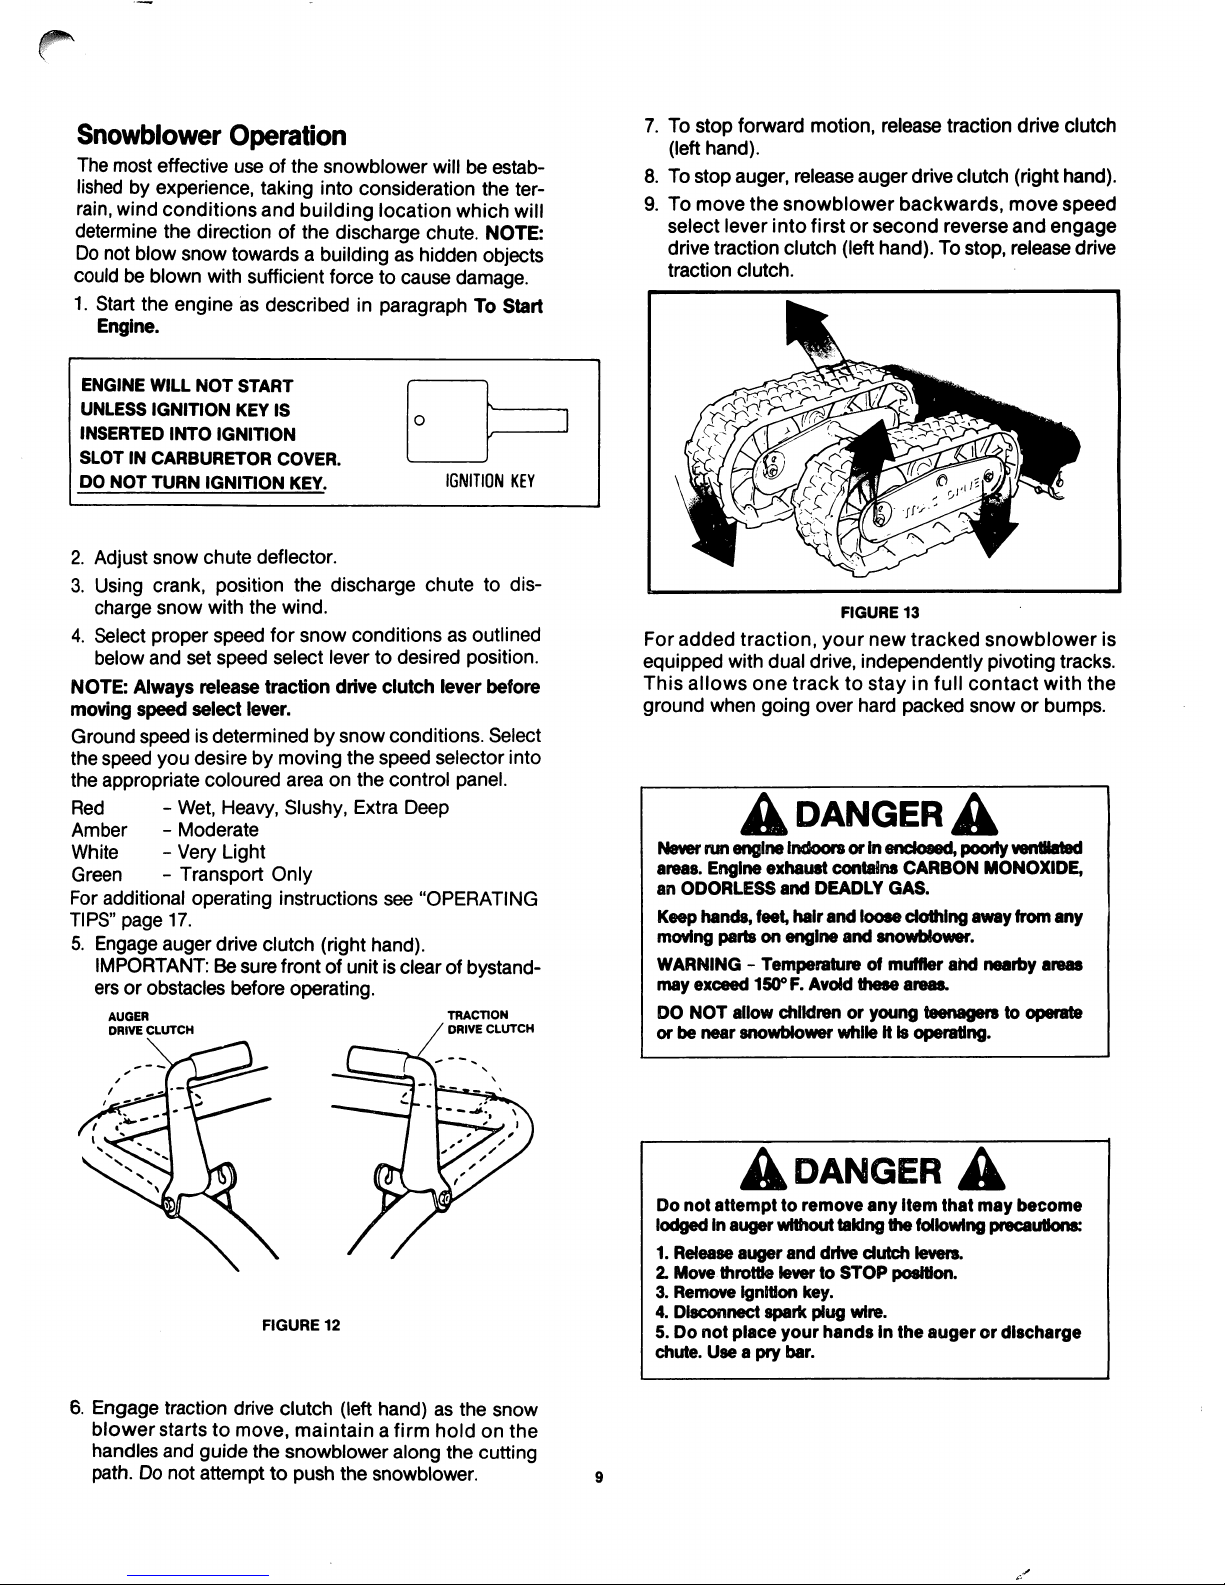
FIGURE
13
For
added
traction,
your
new
tracked
snowblower
is
equipped
with
dual
drive,
independently
pivoting tracks.
This
allows
one
tracktostay
in full
contact
with
the
ground
when
going
over
hard
packed
snoworbumps.
A
DANGER
A
Never run
engine
indoorsor inenclosed, poorly ventHated
areas. Engine
exhaust
contains
CARBON
MONOXIDE,
an
ODORLESS
and
DEADLY
GAS.
Keep
hands,
feet, hair
and
loose
clothing
away
from
any
moving
partsonengine
and
snowblower.
WARNING-Temperatureofmuffler
ahd
nearby
areas
may
exceed
150° F.
Avoid
these
areas.
DO
NOT
allow children or
young
teenagers
to operate
or
be
near
snowblower
while it is operating.
A
DANGER
A
Do
not
attempttoremove
any
item
that
may
become
lodgedinauger
without
taking
the
following precautions:
1.
Release
auger
and
drive
clutch
levers.
2.
Move
throttle levertoSTOP
position.
3.
Remove
ignition
key.
4.
Disconnect
spark
plug
wire.
5. Do
not
place
your
handsinthe
augerordischarge
chute.
Use
a pry bar.
 Loading...