

Craftsman 580762202 Owner’s Manual
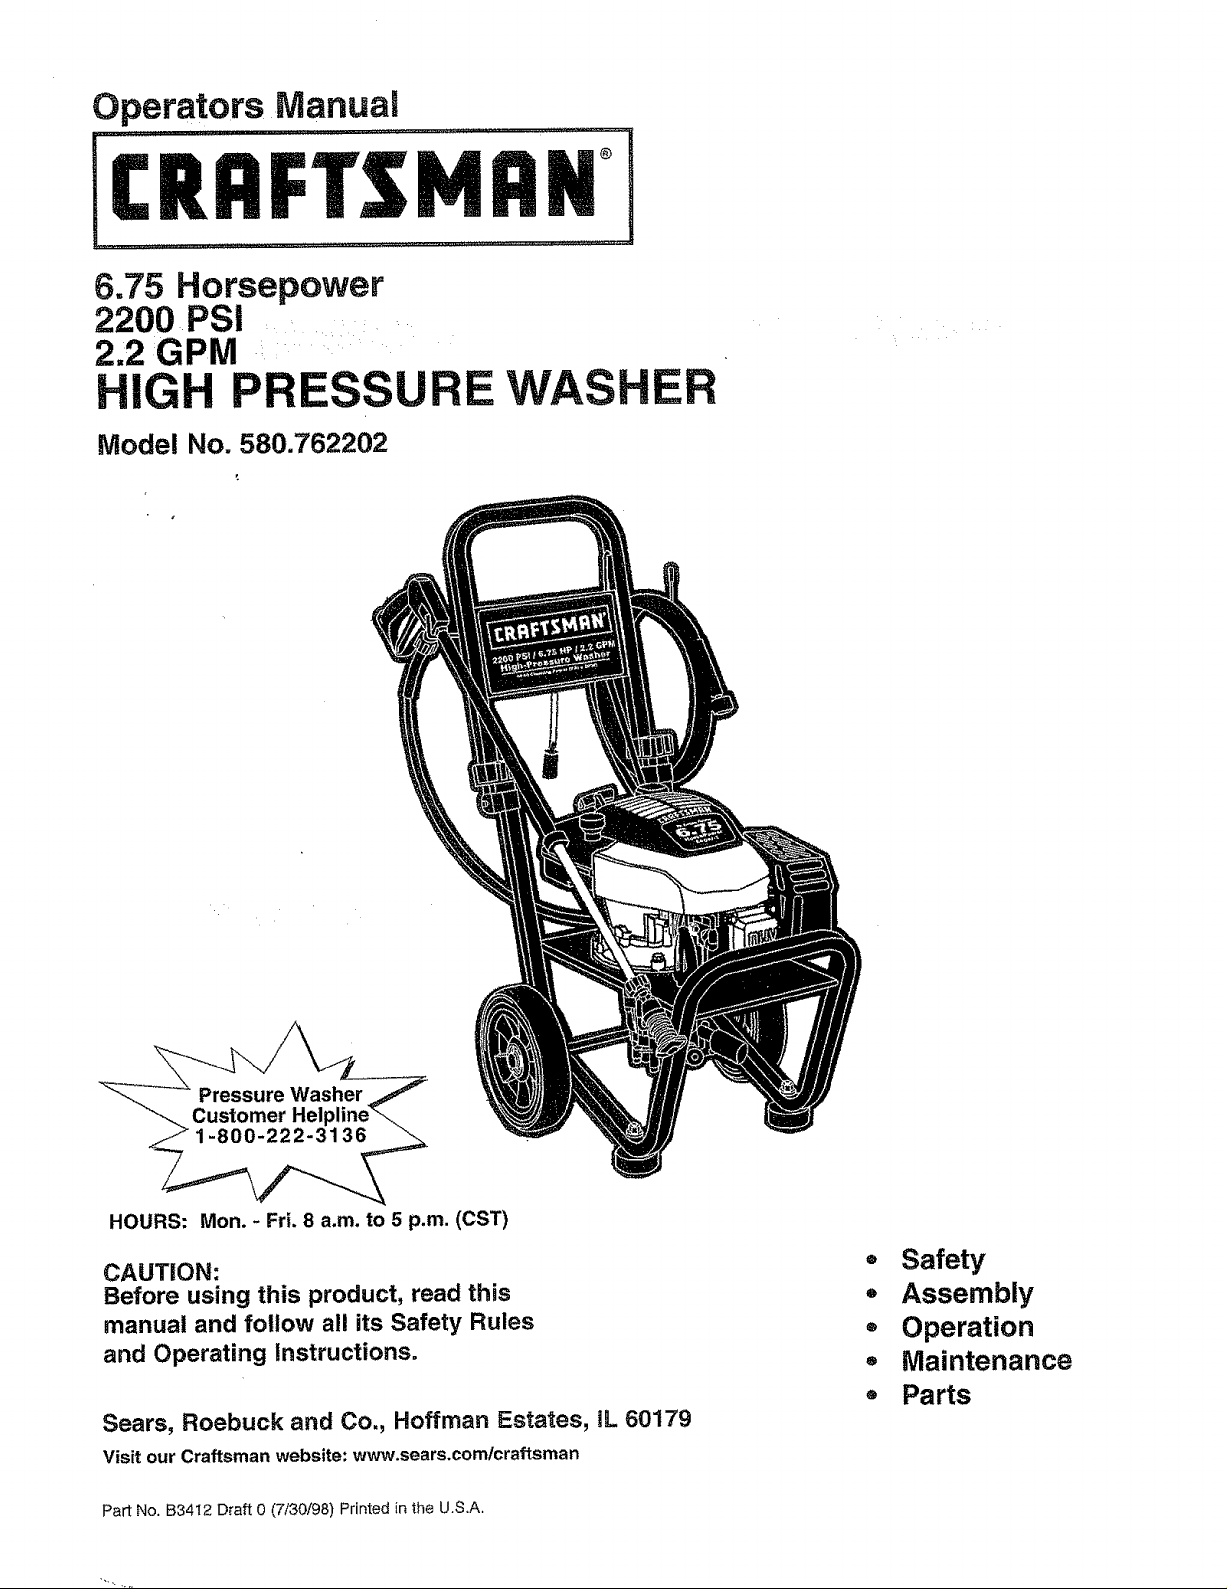
Operators tVlanuai
&75 Horsepower
2200 PSI
2.2 GPM ' .....
Model No. 580.762202
E WAS
Pressure Washer
Customer Hel
1-800-222-3136
HOURS: Mon.- Fri. 8 a.m. to 5 p.m. (CST)
CAUTION:
Before using this product, read this
manual and follow all its Safety Rules
and Operating Instructions.
Sears, Roebuck and Co., Hoffman Estates, IL 60179
Visit our Craftsman website: www.sears.com/craftsman
Part No. B3412 Draft 0 (7/30/98) Printed in the U,S,A.
- Safety
• Assembly
- Operation
- Maintenance
• Parts
SAFETY RULES ........................ 2-3
ASSEMBLY ............................ 4-5
OPERATION .......................... 6-t 0
MAINTENANCE ...................... 11-14
STORAG E ............................. 15
TROUBLESHOOTING .................... 16
REPLACEMENT PARTS ................ 18-27
HOW TO ORDER PARTS .................. 28
LIMITED ONE YEAR WARRANTY ON CRAFTSMAN HIGH PRESSURE WASHER
For one year from the date of purchase, when this Craftsman High Pressure Washer is maintained and
operated according to the instructions in the owner's manual, Sears wilt repair, free of charge, any defect in
material and workmanship.
If this high pressure washer is used for commercial purposes, this warranty applies for only 90 days from the
date of purchase, if this high pressure washer is used for rental purposes, this warranty applies for only 30
days after date of purchase.
This warranty does notcover:
o Expendable items such as spark plugs and air filters, which become worn during normal use.
Repairs necessary because of operator abuse or negligence, including damage resulting from no water
being supplied to pump or failure to maintain the equipment according to the instructions contained in the
owner's
manual.
WARRANTY SERVICE iS AVAILABLE BY RETURNING THE HIGH PRESSURE WASHER TO THE
NEAREST SEARS SERVICE CENTER OR DEALER IN THE UNITED STATES.
This warranty gives you specific legal rights and you may also have other rights, which vary from state to
state.
Sears, Roebuck and Coo, D/817 WA, Hoffman Estates, IL 60179
CONTACT SPARK PLUG, TO PREVENT ACCIDENTAL STARTING WHEN SETTING UP,
CAUTION: ALWAYS DISCONNECT SPARK PLUG WIRE AND PLACE WIRE WHERE IT CANNOT
•TRANSPORTING, ADJUSTING OR MAKING REPAIRS TO YOUR HIGH PRESSURE WASHER.
CAUTION: Before using this product, I
read this manual and follow all Safety
Rules and Operating Instructions.
Engine exhaust gases contain DEADLY carbon
monoxide gas. This dangerous gas, if breathed in
sufficient concentrations, can cause
unconsciousness or even death. Operate this
equipment only in the open air where adequate
ventilation is available.
1
Gasoline is highly FLAMMABLE and its vapors are
EXPLOSIVE. Do not permit smoking, open flames,
sparks or heat in the vicinity while handling
gasoline. Avoid spilling gasoline on a hot engine.
Allow unit to coo! for 2 minutes before refueling.
Comply with all laws regulating storage and
handling of gasoline.
- Locate this pressure washer in areas away from
combustible materials, combustible fumes or dust.
The high pressure equipment is designed to be
used with Sears authorized parts only. If you use
this equipment with parts that do not comply with
minimum specifications, the user assumes all risks
and liabilities.
2
Some chemicals or detergents may be harmful if
inhaled or ingested, causing severe nausea,
fainting or poisoning. The harmful elements may
cause property damage or severe injury.
Do not allow CHILDREN to operate the Pressure
Washer at any time.
Operate engine only at governed speed. Running
the engine at excessive speeds increases the
hazard of personal injury. Do not tamper with parts
which may increase or decrease the governed
speed,
Do not wear loose clothing, jewelry or anything
that may be caught in the starter or other rotating
parts.
Before starting the Pressure Washer in cold
weather, check all parts of the equipment and be
sure ice has not formed there.
Units with broken or missing parts, or without
protective housing or covers should NEVER be
operated.
The muffler and air cleaner must be installed and
in good condition before operating the Pressure
Washer. These components act as spark arrestors
if the engine backfires,
Check the fuel system for leaks or signs of
deterioration such as chafed or spongy hose,
loose or missing clamps or damaged tank or cap.
Correct all defects before operating the Pressure
Washer.
o
Do not spray flammable liquids.
o
Never allow any part of the body to come in
contact with the fluid stream. DO NOT come in
contact with a fluid stream created by a leak in the
high pressure hose.
High pressure streams of fluid this equipment
produces can pierce skin and its underlying
tissues, leading to serious injury and possible
amputation.
@
Never aim the gun at people, animals or plants.
@
High pressure spray can cause paint chips or
other particles to become airborne and fly at high
speeds.
Always wear eye protection when you use this
equipment or when you are in the vicinity where
the equipment is in use,
Operate the pressure at no more than the PSI fluid
pressure rated for your pressure washer.
Never move the machine by pulling on the high
pressure hose. Use the handle provided on the top
of the unit.
Always be certain the spray gun, nozzies and
accessories are correctly attached.
Never use a spray gun which does not have a
trigger lock or trigger guard in place and in working
order.
Use a respirator or mask whenever there is a
chance that vapors may be inhaled, Read all
instructions with the mask so you are certain the
mask will provide the necessary protection against
inhaling harmful vapors.
High pressure spray may damage fragile items
including glass. Do not point spray gun at gtass
when in the jet spray mode.
Keep the hose connected to machine or the spray
gun while the system is pressurized.
Disconnecting the hose while the unit is
pressurized is dangerous.
Hold the spray gun firmly in your hand before you
start the unit. Failure to do so could result in an
injury from a whipping spray gun. Do not leave the
spray gun unattended while the machine is
running.
The cleaning area should have adequate slopes
and drainage to reduce the possibility of a fall due
to slippery surfaces,
Keep water spray away from electric wiring or fatal
electric shock may result.
Do not adjust unioader valve to a pressure in
excess of machine rating.
Do not secure trigger gun in the pulFback (open)
position.
o
Do not by-pass any safety device on this machine.
@
The muffler and engine heat up during operation
and remain hot immediately after shutting it down.
Avoid contact with a hot muffler or engine or you
could be severely burned.
Operate and store this unit on a stable surface.
®
High pressure hose can develop leaks from wear,
kinking, abuse, etc. Water spraying from a leak is
capable of injecting material into skin. Inspect
hose each time before using it. Check all hoses for
cuts, leaks, abrasions or bulging of cover, or
damage or movement of couplings. If any of these
conditions exist, replace hose immediately. Never
repair high pressure hose. Replace it with another
hose that meets minimum pressure rating of your
pressure washer.
LOOK FOR THIS SYMBOL TO POINT OUT IMPORTANT SAFETY PRECAUTIONS. IT " l
MEANS "ATTENTION!!! BECOME ALERT!!! YOUR SAFETY IS INVOLVED,"
1
CARTON CONTENTS
The following parts are shipped loose with your
pressure washer:
o Main Unit -- pressure washer with wheels,
guide handle.
• High Pressure Hose
® Parts Box #1 (which includes items listed below)
® Rotating Brush
Vehicle/Boat Wash
• House/Multi-purpose Wash
• Parts Box #2 (which includes items listed below)
Adjustable Nozzle
° Turbo Nozzle
• Spray Gun
o Nozzle Extension
,, Wire Form
,, Motor Oil
- Rotating Brush Adapter
° Manual Bag (which includes the items listed
below)
• Owner's Manual
• Nozzle Cleaning Kit
• "O"-Ring Kit
Become familiar with each piece before assembling
the pressure washer. Check all contents against the
illustration on Page 6. if any parts are missing or
damaged, call the Pressure Washer Helpline at 1-800-
222-3136.
HOW TO SET UPYOUR PRESSURE
WASHER
For the most part, your Craftsman High Pressure
Washer has been assembled at the factory. You must,
however, attach the wire form, assemble the spray gun,
and attach the high pressure hose to the pump and
spray gun.
While facing the rear of the Pressure Washer,
insert the wire support with the longer arm
positioned on the left. From this view the hook
should resemble a "J".
° Cut tie wrap on chemical injection tube. Remove
chemical injectionfilter, thread chemical injectiontube
through the wire form and reinsert filter into tube.
TO REMOVE PRESSURE WASHER FROM
CARTON
Remove parts boxes included with pressure
washer. The high pressure hose is packed in the
bottom of the carton. Remove the hose.
• Slice two corners at handle end of carton from top
to bottom so the panel can be folded down flat.
= Raise handle, secure in place with the locking caps
and roll the pressure washer out the open end of
the carton.
Locking Caps
° Check carton for additional loose parts.
4
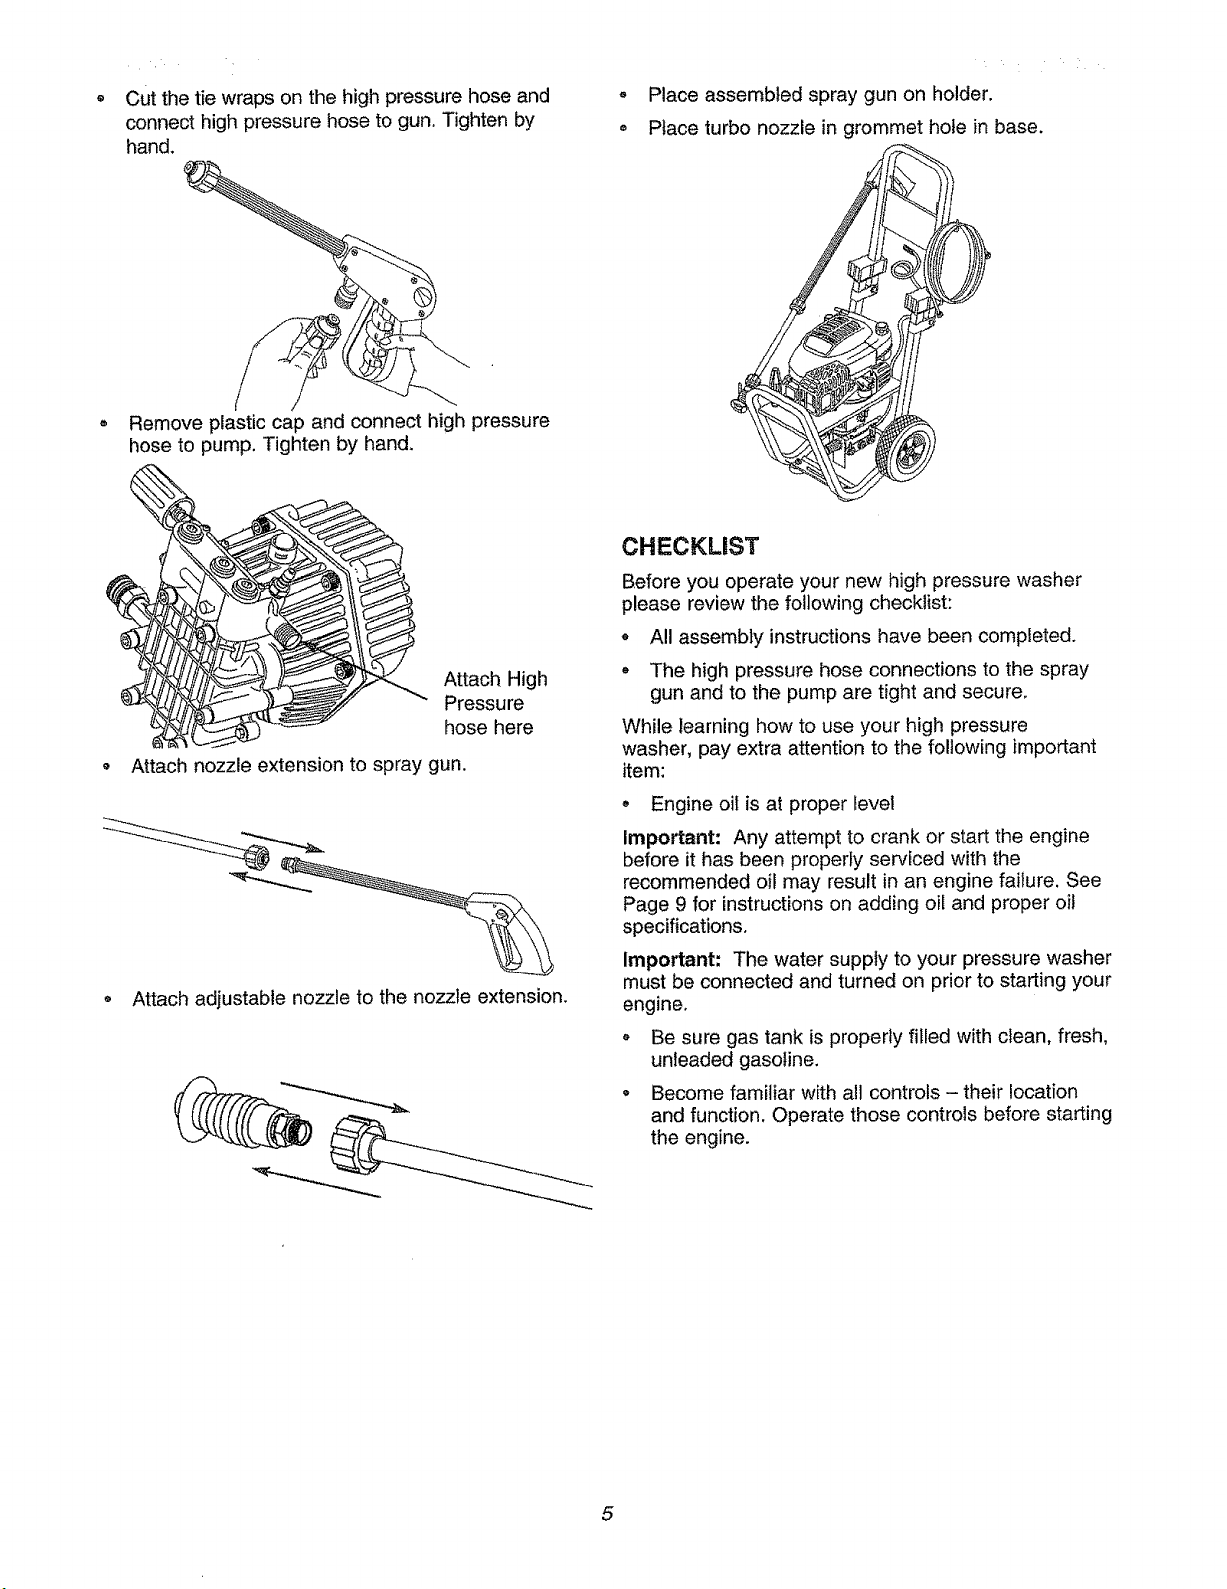
Cut the tie wraps on the high pressure hose and
connect high pressure hose to gun. Tighten by
hand,
Remove plastic cap and connect high pressure
hose to pump, Tighten by hand,
Attach High
Pressure
hose here
Attach nozzle extension to spray gun.
o
Place assembled spray gun on holder.
o
Place turbo nozzle in grommet hole in base.
CHECKLIST
Before you operate your new high pressure washer
please review the following checklist:
o All assembly instructions have been completed.
, The high pressure hose connections to the spray
gun and to the pump are tight and secure,
While learning how to use your high pressure
washer, pay extra attention to the following important
item:
Attach adjustable nozzle to the nozzle extension.
Engine oil is at proper level
important: Any attempt to crank or start the engine
before it has been properly serviced with the
recommended oil may result in an engine failure. See
Page 9 for instructions on adding oil and proper oil
specifications.
Important: The water supply to your pressure washer
must be connected and turned on prior to starting your
engine.
Be sure gas tank is properly filled with clean, fresh,
unleaded gasoline.
Become familiar with all controls - their location
and function. Operate those controls before starting
the engine.
5
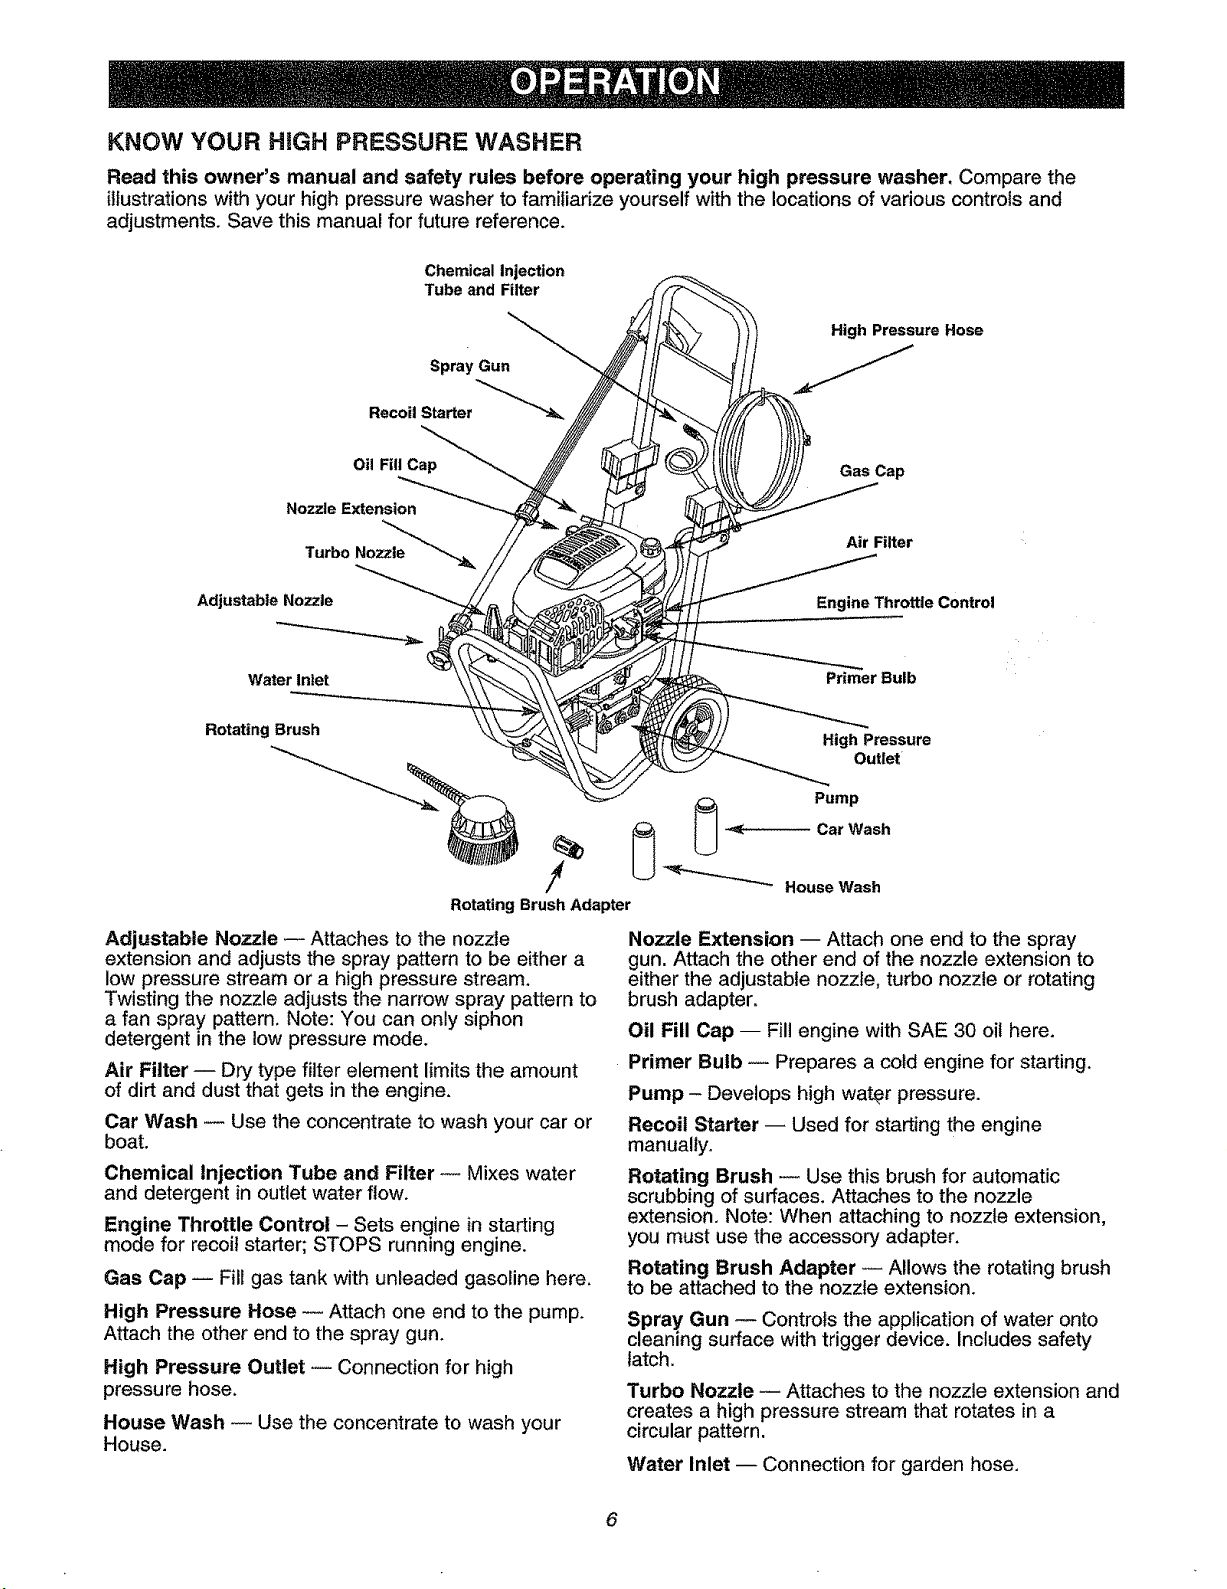
KNOW YOUR HiGH PRESSURE WASHER
Read this owner's manual and safety rules before operating your high pressure washer. Compare the
illustrations with your high pressure washer to famiIiarize yourself with the locations of various controls and
adjustments. Save this manual for future reference.
Chemical Injection
Tube and Filter
High Pressure Hose
Spray Gun
Recoil Starter
Oil Fill C_''_
Nozzle Extension
Turbo Nozzl_e _'_'_j_
Adjustable Nozzle
Water Inlet
Rotating Brush
!
Rotating Brush Adapter
Adjustable Nozzle m Attaches to the nozzle
extension and adjusts the spray pattern to be either a
low pressure stream or a high pressure stream.
Twisting the nozzle adjusts the narrow spray pattern to
a fan spray pattern. Note: You can only siphon
detergent in the low pressure mode.
Air Filter -- Dry type filter element limits the amount
of dirt and dust that gets in the engine.
Car Wash -- Use the concentrate to wash your car or
boat.
Chemical Injection Tube and Filter- Mixes water
and detergent in outlet water flow.
Engine Throttle Control - Sets engine in starting
mode for recoil starter; STOPS running engine.
Gas Cap -- Fill gas tank with unleaded gasoline here.
High Pressure Hose -- Attach one end to the pump.
Attach the other end to the spray gun.
High Pressure Outlet -- Connection for high
pressure hose.
House Wash -- Use the concentrate to wash your
House.
Gas Cap
Air Filter
Engine Throttle Control
-'_ Car Wash
Pump
House Wash
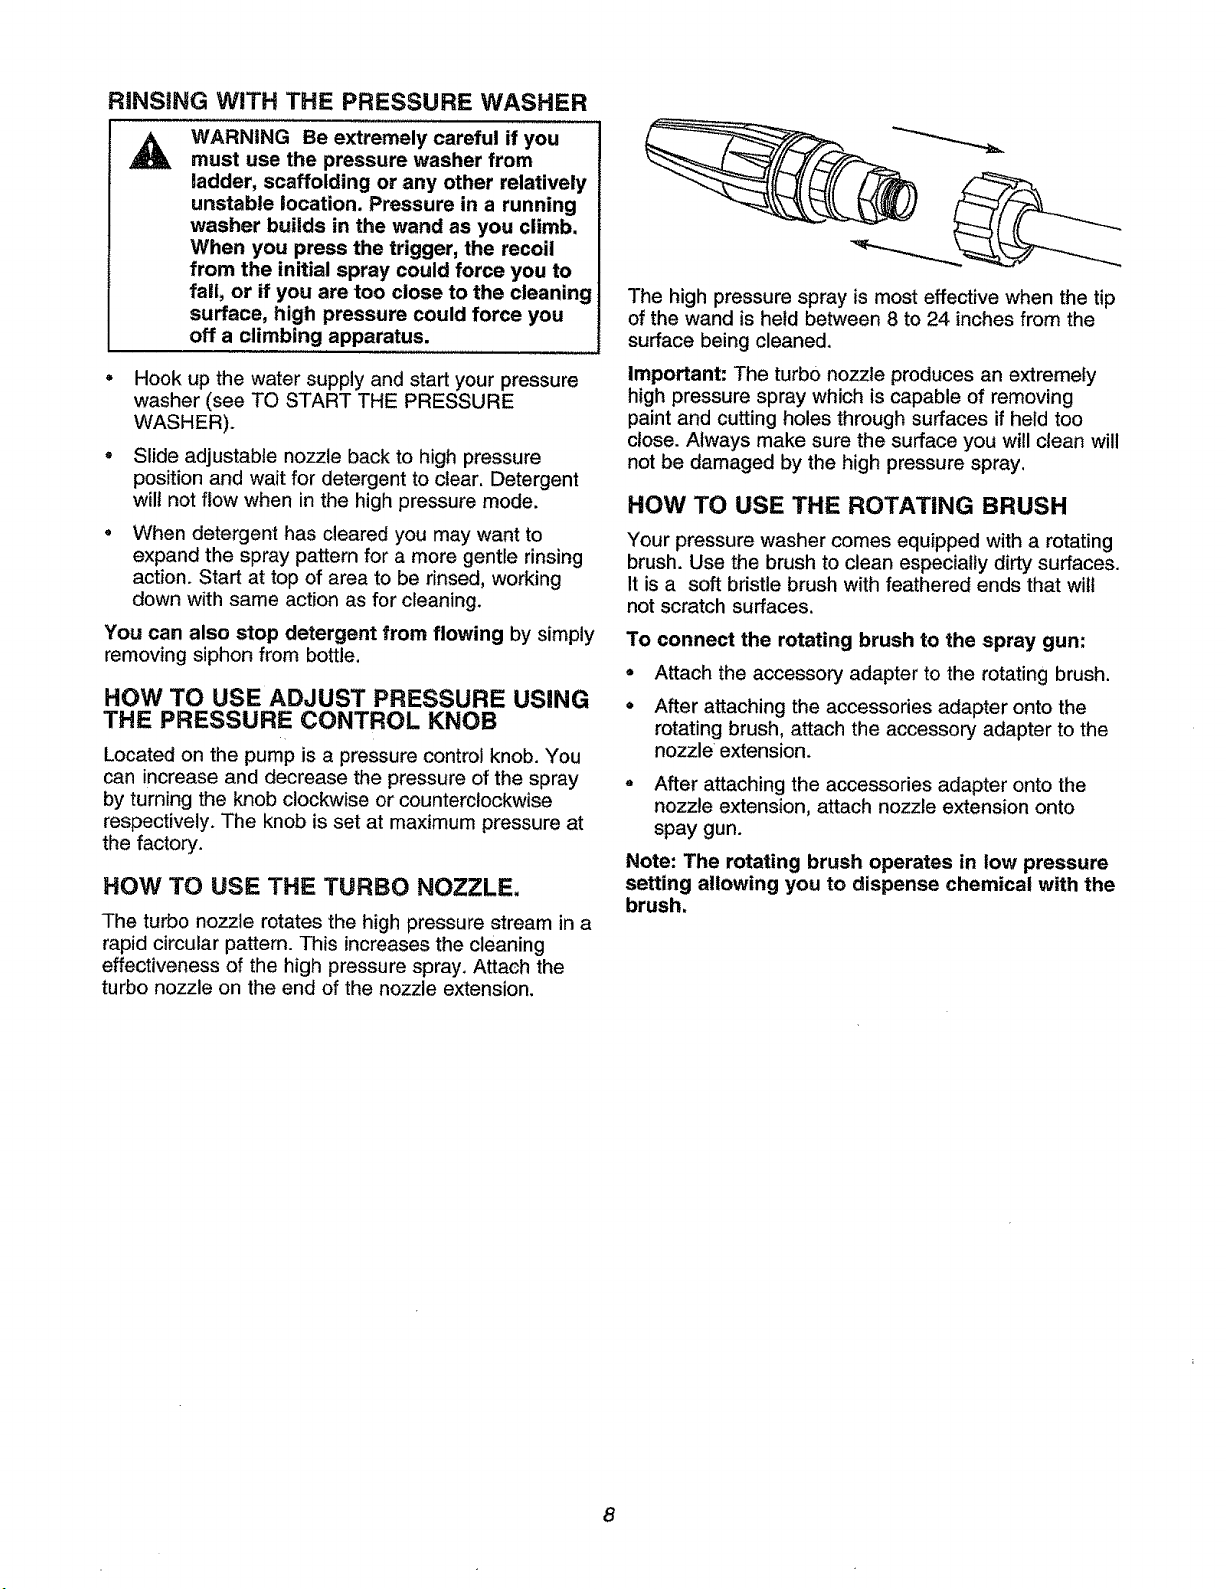
Nozzle Extension -- Attach one end to the spray
gun. Attach the other end of the nozzle extension to
either the adjustable nozzle, turbo nozzle or rotating
brush adapter.
Oil Fill Cap -- Fill engine with SAE 30 oil here.
Primer Bulb -- Prepares a cotd engine for starting.
Pump - Develops high water pressure.
Recoil Starter -- Used for starting the engine
manually.
Rotating Brush -- Use this brush for automatic
scrubbing of surfaces. Attaches to the nozzle
extension, Note: When attaching to nozzle extension,
you must use the accessory adapter,
Rotating Brush Adapter -- Allows the rotating brush
to be attached to the nozzle extension.
Spray Gun -- Controls the application of water onto
cleaning surface with trigger device. Includes safety
latch.
Turbo Nozzle -- Attaches to the nozzle extension and
creates a high pressure stream that rotates in a
circular pattern.
Water Inlet -- Connection for garden hose.
6
HOW TO USE YOUR PRESSURE WASHER
IF YOU HAVE ANY PROBLEMS operating your
pressure washer, please call the pressure washer
helpline at 1-800-222-3136.
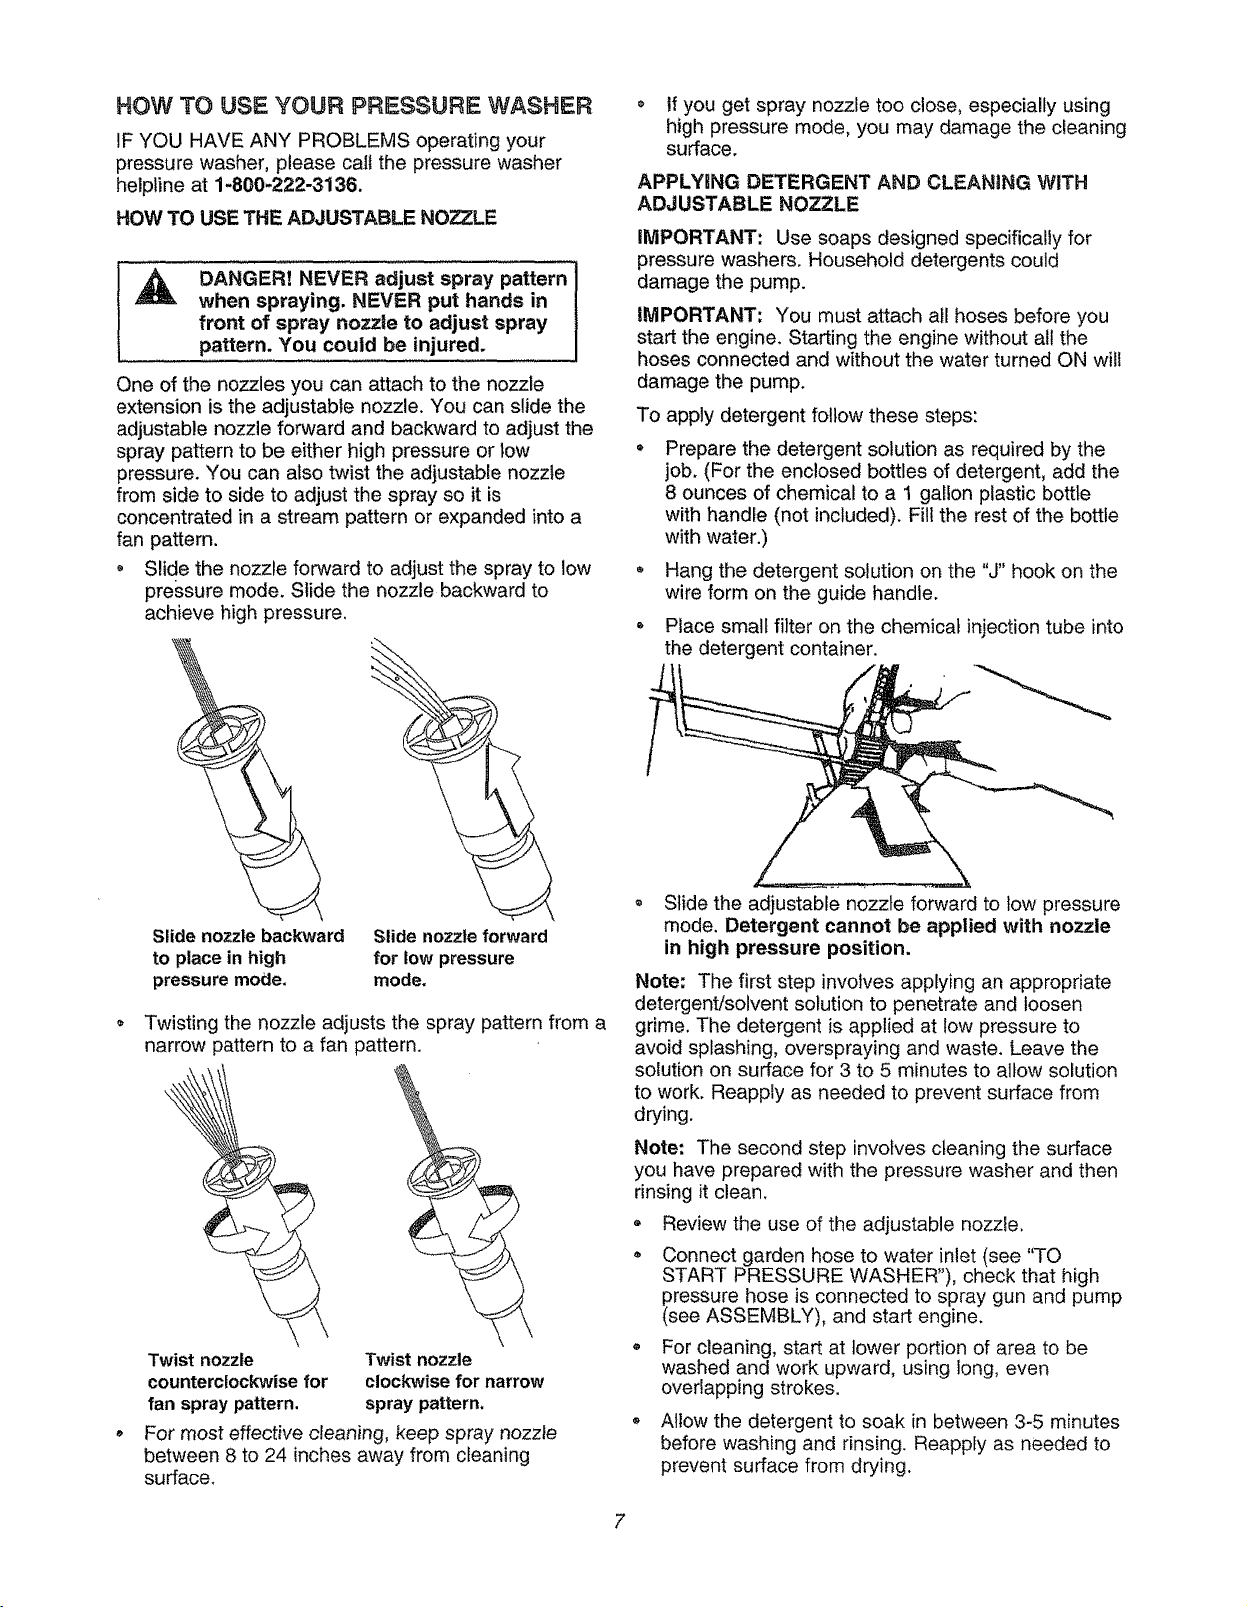
HOW TO USE THE ADJUSTABLE NOZZLE
A
One of the nozzles you can attach to the nozzle
extension is the adjustable nozzle. You can slide the
adjustable nozzle forward and backward to adjust the
spray pattern to be either high pressure or low
pressure. You can also twist the adjustable nozzle
from side to side to adjust the spray so it is
concentrated in a stream pattern or expanded into a
fan pattern.
• Slide the nozzle forward to adjust the spray to low
DANGERt NEVER adjust spray pattern
when spraying. NEVER put hands in
front of spray nozzle to adjust spray
pattern. You could be injured.
pressure mode. Slide the nozzle backward to
achieve high pressure.
If you get spray nozzle too close, especially using
high pressure mode, you may damage the cleaning
surface.
APPLYING DETERGENT AND CLEANING WITH
ADJUSTABLE NOZZLE
iMPORTANT: Use soaps designed specifically for
pressure washers. Household detergents could
damage the pump.
iMPORTANT: You must attach all hoses before you
start the engine. Starting the engine without all the
hoses connected and without the water turned ON wilt
damage the pump.
To apply detergent follow these steps:
Prepare the detergent solution as required by the
job. (For the enclosed bottles of detergent, add the
8 ounces of chemical to a 1 gallon plastic bottle
with handle (not included). Fill the rest of the bottle
with water.)
Hang the detergent solution on the "J" hook on the
wire form on the guide handle.
Place small filter on the chemical injection tube into
the detergent container.
Slide nozzle backward Slide nozzle forward
to place in high for low pressure
pressure mode, mode.
Twisting the nozzle adjusts the spray pattern from a
narrow _attern to a fan pattern.
Twist nozzle Twist nozzle
counterclockwisefor clockwise for narrow
fan spray pattern, spray pattern,
For most effective cleaning, keep spray nozzle
between 8 to 24 inches away from cleaning
surface.
Slide the adjustable nozzle forward to low pressure
mode. Detergent cannot be applied with nozzle
in high pressure position.
Note; The first step involves applying an appropriate
detergent/solvent solution to penetrate and loosen
grime. The detergent is applied at low pressure to
avoid splashing, overspraying and waste. Leave the
solution on surface for 3 to 5 minutes to allow solution
to work. Reapply as needed to prevent surface from
drying.
Note: The second step involves cleaning the surface
you have prepared with the pressure washer and then
rinsing it clean.
Review the use of the adjustable nozzle.
Connect garden hose to water inlet (see "TO
START PRESSURE WASHER"), check that high
pressure hose is connected to spray gun and pump
(see ASSEMBLY), and start engine.
o For cleaning, start at lower portion of area to be
washed and work upward, using long, even
overlapping strokes.
o Allow the detergent to soak in between 3-5 minutes
before washing and rinsing. Reapply as needed to
prevent surface from drying.
RiNSiNG WITH THE PRESSURE WASHER
WARNING Be extremely careful if you
must use the pressure washer from
ladder, scaffolding or any other relatively
unstable location. Pressure in a running
washer builds in the wand as you climb.
When you press the trigger, the recoil
from the initial spray could force you to
fall, or if you are too close to the cleaning
surface, high pressure could force you
off a climbing apparatus.
• Hook up the water supply and start your pressure
washer (see TO START THE PRESSURE
WASHER).
• Slide adjustable nozzle back to high pressure
position and wait for detergent to clear. Detergent
will not flow when in the high pressure mode.
When detergent has cleared you may want to
expand the spray pattern for a more gentle rinsing
action. Start at top of area to be rinsed, working
down with same action as for cleaning.
You can also stop detergent from flowing by simply
removing siphon from bottle.
HOW TO USE ADJUST PRESSURE USING
THE PRESSURE CONTROL KNOB
Located on the pump is a pressure control knob. You
can increase and decrease the pressure of the spray
by turning the knob clockwise or counterclockwise
respectively. The knob is set at maximum pressure at
the factory.
HOW TO USE THE TURBO NOZZLE.
The turbo nozzle rotates the high pressure stream in a
rapid circular pattern. This increases the cleaning
effectiveness of the high pressure spray, Attach the
turbo nozzle on the end of the nozzle extension.
The high pressure spray is most effective when the tip
of the wand is held between 8 to 24 inches from the
surface being cleaned.
Important: The turbo nozzle produces an extremely
high pressure spray which is capable of removing
paint and cutting holes through surfaces if held too
close. Always make sure the surface you witl clean will
not be damaged by the high pressure spray.
HOW TO USE THE ROTATING BRUSH
Your pressure washer comes equipped with a rotating
brush. Use the brush to clean especially dirty surfaces.
It is a soft bristle brush with feathered ends that wilt
not scratch surfaces.
To connect the rotating brush to the spray gun:
* Attach the accessory adapter to the rotating brush.
, After attaching the accessories adapter onto the
rotating brush, attach the accessory adapter to the
nozzle extension.
After attaching the accessories adapter onto the
nozzle extension, attach nozzle extension onto
spay gun.
Note: The rotating brush operates in low pressure
setting allowing you to dispense chemical with the
brush.
8
BEFORE STARTnNG THE PRESSURE
WASHER
To operate the engine you will need to do the following:
ADD ENGINE ODL
Use only high quality detergent oil rated with API
service classification SF or SG rated SAE 30
weight, Use no special additives,
Place pressure washer on a level surface
• Clean area around oil fill and remove oil dipstick.
Wipe dipstick clean.
• Pour oil from enclosed bottle into the oil fill opening
until oil reaches FULL mark on the dipstick. Stop
and check the oil level periodically. DO NOT
OVERFILL.
• Install oil dipstick, hand tighten securely.
Check oil level often during engine break in.
ADD GASOLINE
o Use fresh, clean, unleaded regular, unleaded
TO START YOUR PRESSURE WASHER
You have assembled your high pressure washer and
have prepared the engine for starting. You are now
ready to clean your car, boat or whatever you plan to
clean.
Place the pressure washer in an area close
enough to an outside water source that can flow at
a rate of at least 2.2 gallons per minute. Connect a
garden hose to the water spout.
Check that the high pressure hose is tightly
connected to the spray gun and to the pump. See
ASSEMBLY section for illustrations.
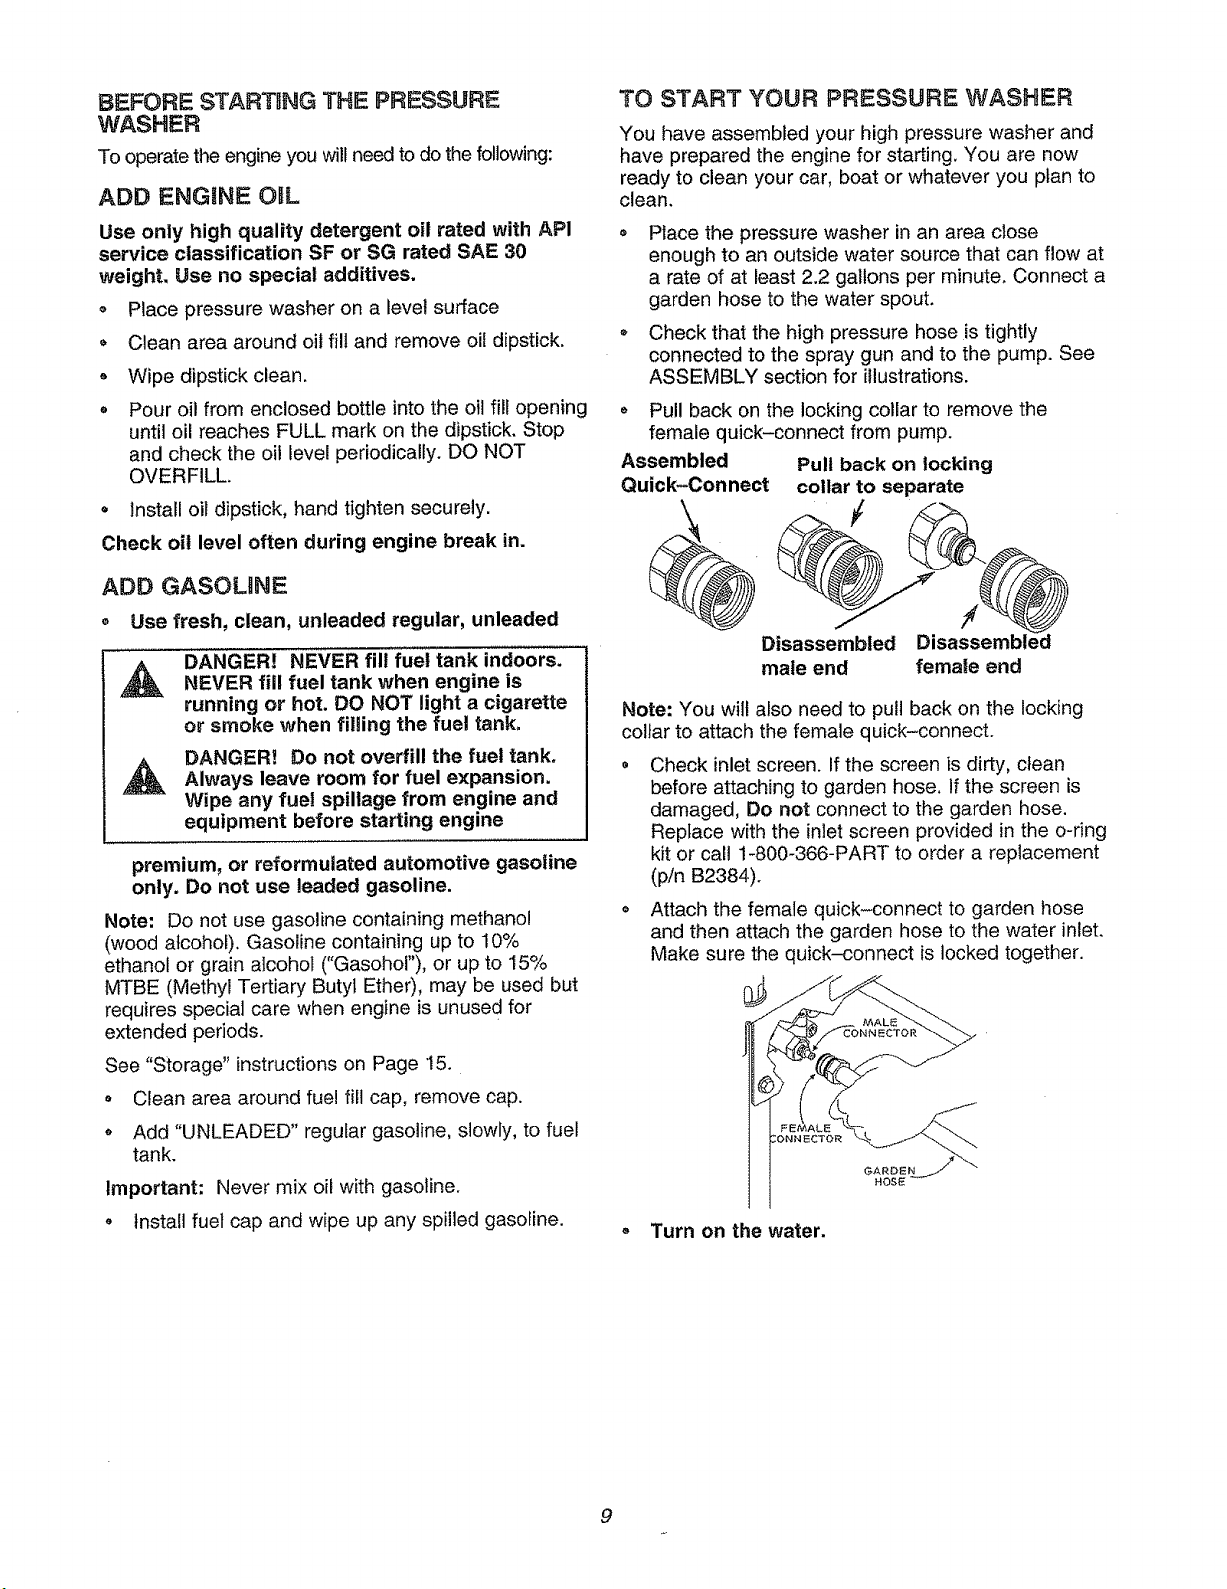
Pull back on the locking collar to remove the
female quick-connect from pump.
Assembled Pull back on locking
Quick-Connect collar to separate
DANGER! NEVER fill fuel tank indoors.
NEVER fill fuel tank when engine is
running or hot. DO NOT light a cigarette
or smoke when filling the fuel tank.
DANGERt Do not overfill the fuel tank.
A
Note: Do not use gasoline containing methanol
(wood alcohol). Gasoline containing up to 10%
ethanol or grain alcohot ("Gasohol"), or up to 15%
MTBE (Methyl Tertiary Butyl Ether), may be used but
requires special care when engine is unused for
extended periods.
See "Storage" instructions on Page 15.
o Clean area around fuel fill cap, remove cap.
o Add "UNLEADED" regular gasoline, slowly, to fuel
Important: Never mix oil with gasoline.
° install fuel cap and wipe up any spilled gasoline.
Always leave room for fuel expansion.
Wipe any fue! spillage from engine and
equipment before starting engine
premium, or reformulated automotive gasotine
only. Do not use leaded gasoline.
tank.
male end female end
Note: You wilt also need to pull back on the locking
collar to attach the female quick-connect.
Check inlet screen, if the screen is dirty, clean
before attaching to garden hose. If the screen is
damaged, Do not connect to the garden hose.
Replace with the inlet screen provided in the o-ring
kit or call 1-800-366-PART to order a replacement
(pin B2384).
o Attach the female quick-connect to garden hose
and then attach the garden hose to the water inlet.
Make sure the quick-connect is locked together.
HOSE
Turn on the water.
9
 Loading...