

Craftsman 580752500 Owner’s Manual
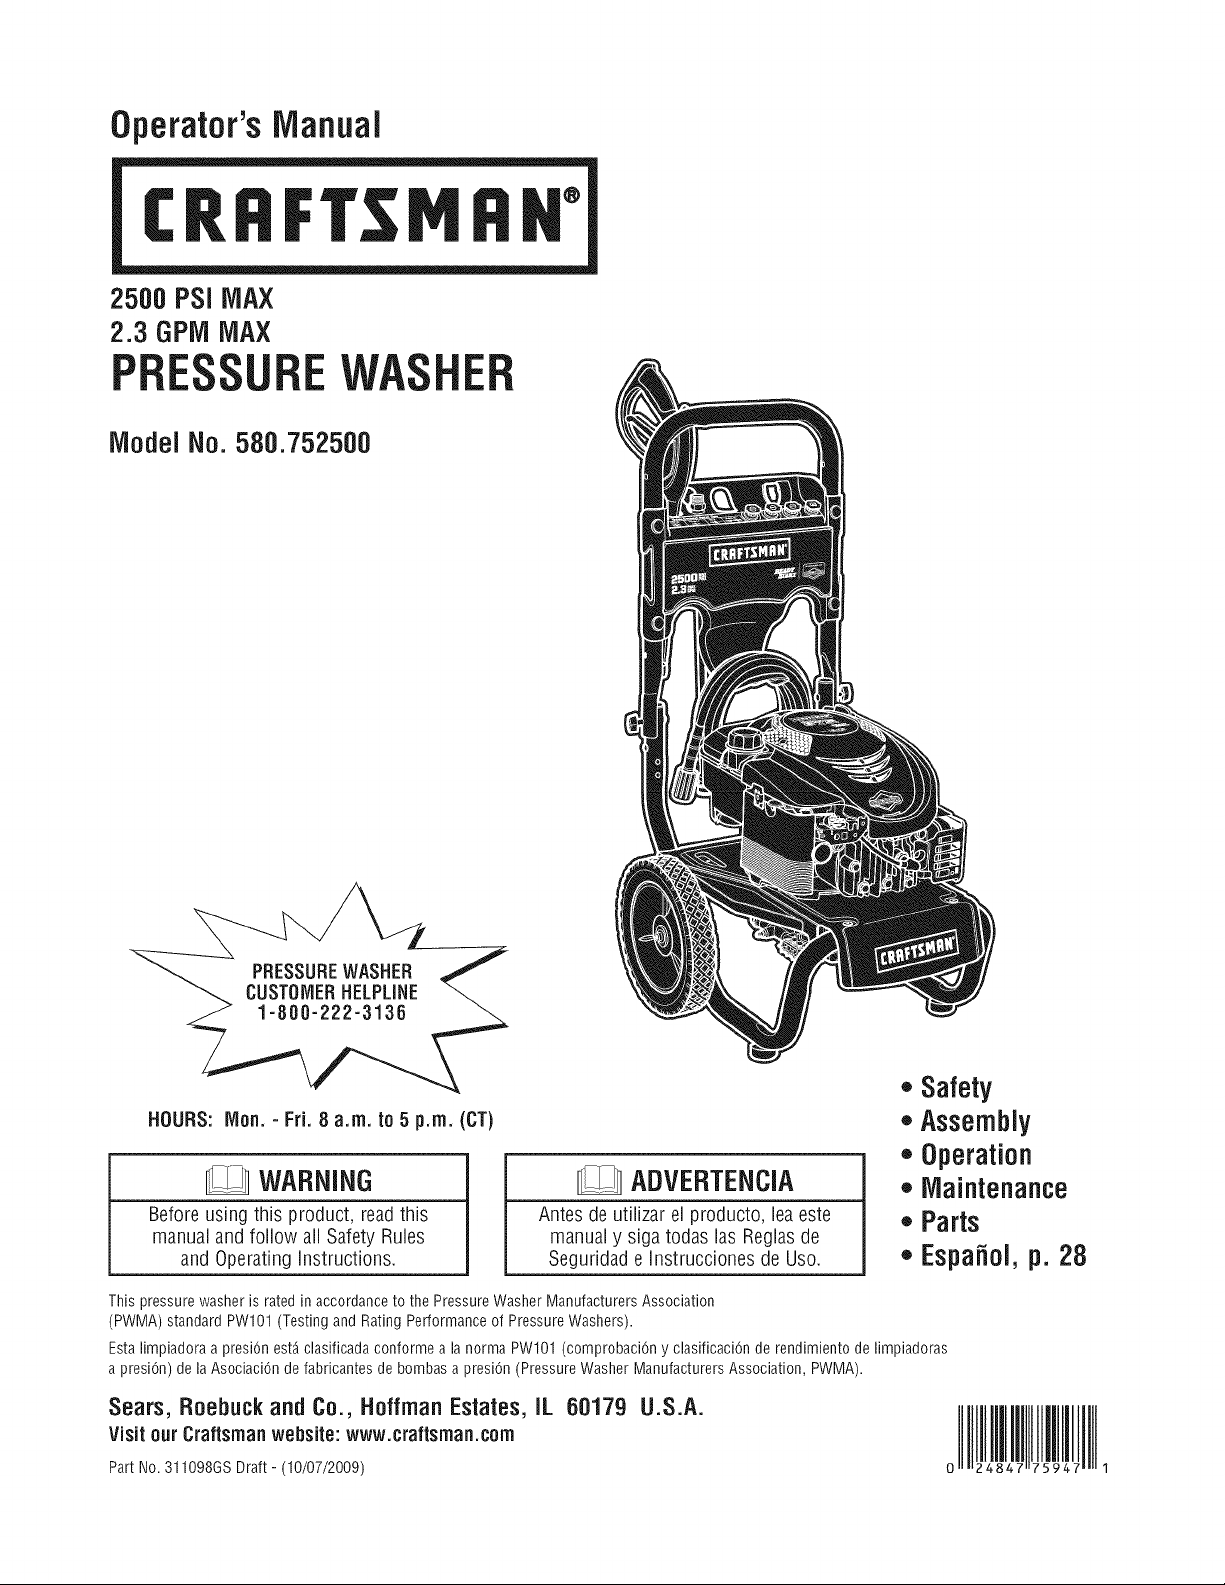
Operator'sIVianual
2500 PSi iViAX
2.3 GPiViMAX
iViodelNo. 580.752500
®
,, Safety
HOURS: IVlon.- Fri. Ba.m. to 5 p.m. (CT)
,, Assembly
,, Operation
WARNING
Beforeusing this product, readthis
manualand follow all Safety Rules
and Operatinginstructions.
This pressure washer is rated in accordance to the Pressure Washer Manufacturers Association
(PWMA) standard PWl01 (Testing and Rating Performance of Pressure Washers).
Esta limpiadora a presiOnest_ clasificada conforme a la norrna PWl01 (comprobaciOn y clasificaciOn de rendimiento de limpiadoras
a presiOn) de la AsociaciOn defabricantes de bombas a presiOn (Pressure Washer Manufacturers Association, PWMA).
Sears, Roebuckand Co., HoffrnanEstates,IL 60179 U.S.A.
Visit our Craftsman website: www.craftsman.com
Part No. 311098GS Draft - (10/07/2009)
Antes de utilizar el producto, leaeste
manualy siga todas las Reglasde
Seguridad e Instrucciones de Uso.
ADVERTENCIA
,,iVlaintenance
,, Parts
,, Espafiol,p. 28
WARRANTY .......................................... 2
REPAIRPROTECTIONAGREEMENT........................ 2
SAFETYRULES...................................... 3-5
FEATURESAND CONTROLS.............................. 6
ASSEMBLY......................................... 7-9
OPERATION....................................... 10-13
SPECIFICATIONS..................................... 14
MAINTENANCE.................................... 15-18
STORAGE........................................... 19
TROUBLESHOOTING.................................. 20
REPLACEMENTPARTS.............................. 21-25
EMISSIONCONTROLWARRANTY..................... 26-27
ESPANOL......................................... 28-51
HOWTO ORDERPARTS........................ BACKPAGE
CRAFTSMANLIMITEDWARRANTY
If this Craftsmanproduct fails due to a defect in material or workmanship within two years from the date of purchase, return it
to anySearsstore, Sears Parts & RepairService Center,or other Craftsmanoutlet inthe United Statesfor free repair (or
replacementif repair proves impossible).
This warranty appliesfor only 90 days from the dateof purchase if this product is ever usedfor commercial or rental
purposes.
Thiswarranty coversOHLYdefects in material andworkmanship.Searswill HOTpayfor:
* Expendableitems that can wear out from normal usewithin the warranty period, such as spray guns, hoses, nozzle
extensions, nozzles,filters and spark plugs.
, Repairsnecessarybecauseof accident, or failure to operateor maintainthe product according to all supplied instructions.
, Preventivemaintenance,or repairs necessarydue to improper fuel mixture, contaminated or stalefuel.
This warranty givesyou specific legal rights, and you may also have other rights which vary from state to state.
Sears, Roebuck and Co., Hoffman Estates, IL 60179
Congratulations on making a smart purchase.
Your new Craftsman® product is designed and manufactured
for years of dependableoperation. But like all products, it
may require repair from time to time. That's when havinga
Repair ProtectionAgreement can saveyou money and
aggravation.
Here'swhat the RepairProtection Agreement*includes:
* Expert service by our 10,000 professional repair
specialists
, Unlimited service and no chargefor parts and labor on
all covered repairs
, Product replacementup to $1500 if your covered
product can't be fixed
, Discountof 10% from regular priceof serviceand related
installed parts not covered by the agreement;also, 10%
off regular price of preventivemaintenancecheck
* Fasthelp by phone-we call it Rapid Resolution- phone
support from aSears representative.Think of us as a
"talking owner's manual".
Onceyou purchasethe Repair Protection Agreement, a
simple phone carlis all it takes for you to schedule service.
You can call anytimeday or night, or schedule a service
appointment online.
The Repair ProtectionAgreementis a risk-free purchase, if
you cancelfor any reasonduring the product warranty
period,we will provide a full refund. Or, a prorated refund
anytime after the product warranty period expires. Purchase
your RepairProtectionAgreement today!
Some limitations and exclusions apply. Forprices and
additional informationin the U.S.A. caii 1-800-827-6655.
* Coverage in Canada varies on some items. Forfuji
details, caii Sears Canada at 1-800-361-6665.
SearsInstallation Service
ForSears professional installation of home appliances,
garagedoor openers, water heaters,and other major home
items, in the U.S.A.or Canadacall 1-800-4-MY-HOME®.
© 2010
Readthis manual carefully and becomefamiliar
with yourpressurewasher. Knowits applications,
itslimitations, and any hazardsinvolved.
important Safety I.formation
Safety Symbolsand Meanings
_i, WARNING Theengine exhaustfrom this product
contains chemicals known to the Stateof California to
cause cancer,birth defects, or other reproductive harm.
_i, WARNING This product contains lead and lead
compounds, known to the State of Californiato cause
birth defects or other reproductive harm. Washyour
handsafter handling this product.
ToxicFumes Kickback
ElectricalShock
M
SlipperySurface Fall
Fire
Explosion Operator'sManual
ilb
MovingParts
,A The safety alert symbol indicatesa potential personal
injury hazard.A signalword (DANGER,WARNING,or
CAUTION)is usedwith thealert symbol to designatea degree
or level of hazardseriousness. A safety symbol may be used
to representthe type of hazard.The signal word NOTICEis
usedto addresspractices not relatedto personalinjury.
_i, DANGERindicatesa hazardwhich, if not avoided, will
result in deathor serious injury.
_i, WARNINGindicates a hazardwhich, if not avoided, could
result in deathor serious injury.
_i, CAUTIONindicates a hazardwhich, if not avoided, could
result in minor or moderate injury.
NOTICEaddresspractices not related to personal injury.
Flying Objects Hot Surface
ChemicalBurn
FluidInjection
_i, WARNING Runningengine gives off carbon
monoxide, an odorless, colorless, poison gas.
_ Breathingcarbon monoxide headache,
fatigue, dizziness,vomiting, confusion, seizures,
nausea,fainting or death.
Some chemicals or detergentsmay be harmful if inhaled
or ingested, causing severenausea,fainting, or
poisoning.
• OperatepressurewasherONLYoutdoors.
• Keepexhaustgasfromenteringa confinedareathrough
windows,doors,ventilationintakes,or otheropenings.
• DONOTstartorrun engineindoorsorin anenclosedarea,
evenifwindowsanddoorsareopen.
• Usearespiratoror maskwheneverthereisa chancethat
vaporsmaybeinhaled.
• Readall instructionswith masksoyouarecertainthemaskwill
providethenecessaryprotectionagainstinhalingharmful
vapors.
_i, WARNING ChemicalBurn Hazard.
.... Chemicalscould cause bodily injury, property
_: damage or death.
• DONOTusecausticliquidwith pressurewasher.
• UseONLYpressurewashersafedetergents/soaps.Followall
manufacturersinstructions.
can cause
A. WARNING Starter cord kickback(rapid retraction) can
result in bodily injury. Kickbackwill pull hand and
,_arm toward enginefaster than you can let go.
Broken bones,fractures, bruises, or sprains
could result.
• NEVERpullstarter cord without first relieving spray gun
pressure.
• When starting engine, pull cord slowly until resistance isfelt
andthen pull rapidly to avoid kickback.
• After each starting attempt, where enginefails to run, always
point spray gun in safe direction, press red button and squeeze
spray guntrigger to releasehigh pressure.
• Firmly grasp spray gun with both hands when using high
pressure sprayto avoid injury when spray gun kicks back.
A. WARNING Riskof electrocution.
"_.dh Contactwith power source can causeelectric
shock or burn.
• NEVERspraynearpowersource.
A. WARNING The high pressure stream of water that
and its underlying tissues, leading to serious
this equipment produces can cut through skin
injury and possible amputation.
Spray gun traps high water pressure, even when engine is
stopped and water is disconnected, which can cause
injury.
• DONOTallow CHILDRENto operate pressure washer.
• NEVERrepairhigh pressure hose. Replaceit.
• NEVERrepairleaking connections with sealant of any kind.
Replaceo-ring or seal.
• NEVERconnect high pressure hoseto nozzleextension.
• Keephigh pressure hose connectedto pump and spraygun
while system is pressurized.
• ALWAYS point spray gun in safedirection, pressred button
andsqueezespray gun trigger to releasehigh pressure, every
time you stop engine.
• NEVERaim spray gun at people,animals, or plants.
• DO NOTsecure spraygun in open position.
• DO NOTleavespray gun unattendedwhile machine is running.
• NEVERuseaspray gun which does not have a trigger lock or
trigger guard in placeand in working order.
• Always be certain spray gun, nozzlesand accessoriesare
correctly attached.
A. WARNING Fuel and its vapors are extremely
flammable and explosive.
Fire or explosion can cause severe burns
or death.
WHENADDING OR DRAININGFUEL
* Turn pressurewasher OFFand let it cool at least2 minutes
before removing fuel cap. Loosen capslowly to relievepressure
in tank.
. Fill or drain fuel tank outdoors.
. DONOToverfill tank. Allow spacefor fuel expansion.
. Iffuel spills, wait until it evaporates beforestarting engine.
. Keepfuel away from sparks, open flames, pilot lights, heat,and
other ignition sources.
. DONOTlight a cigaretteor smoke.
WHENSTARTINGEQUIPMENT
* Ensurespark plug, muffler,fuel cap,and air cleanerarein place.
* DO NOTcrank enginewith spark plug removed.
WHENOPERATINGEQUIPMENT
* DONOTtip engine or equipmentat angle which causes fuel to
spill.
* DONOTsprayflammable liquids.
WHENTRANSPORTING,MOVINGOR REPAIRINGEQUIPMENT
. Transport/move/repair with fuel tank EMPTYor with fuel shutoff
valveOFF.
. DONOTtip engine or equipment at angle which causes fuel to
spill.
. Disconnectspark plug wire.
WHENSTORINGFUELOR EQUIPMENTWITH FUELIN TANK
* Store awayfrom furnaces, stoves, water heaters,clothes
dryers, or other appliancesthat have pilot light or other ignition
source becausethey can ignitefuel vapors.
A. WARNING Contact with muffler area can result in
serious burns.
,_ _ Exhaust heat/gases can ignite
fuel tank causing a fire.
• DO NOTtouch hot parts and AVOIDhot exhaust gases.
• Allow equipment to cool beforetouching.
• Keepat least5 feet (152 cm) of clearanceon all sides of
pressure washer including overhead.
• It is aviolation of California Public Resource Code,Section
4442, to use or operate the engine on any forest-covered,
brush-covered, or grass-covered land unless the exhaust
system is equipped with a spark arrester, as defined in Section
4442, maintained in effective working order. Other states or
federaljurisdictions may have similar laws.
Contactthe original equipment manufacturer, retailer, or dealer
to obtain aspark arrester designed for the exhaust system
installed on this engine.
• Replacement parts must bethe sameand installed in the same
position as the original parts.
combustibles, structures or damage
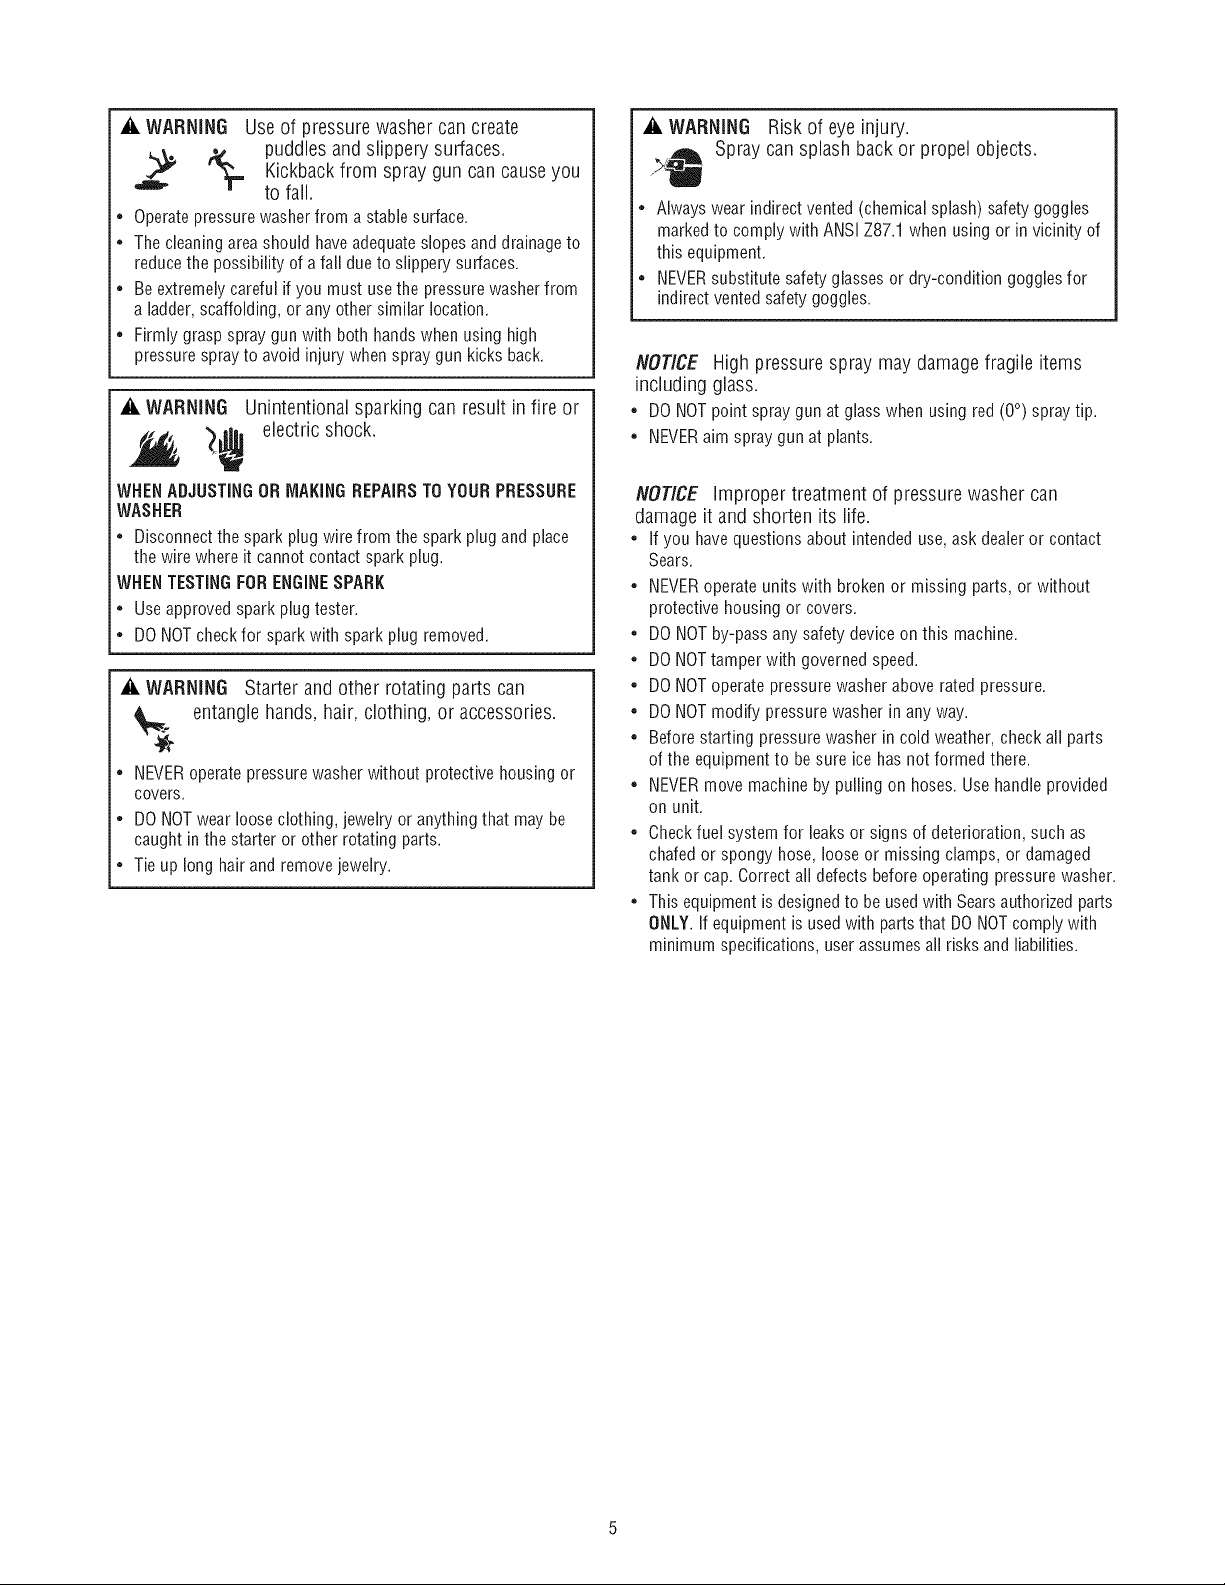
_i, WARNING Use of pressure washer can create
_' Kickback from spray gun can cause you
• Operatepressurewasher from a stable surface.
• Thecleaning areashould have adequateslopes and drainageto
reducethe possibility of a fall dueto slippery surfaces.
• Beextremely careful if you must usethe pressurewasherfrom
a ladder,scaffolding, or any other similar location.
• Firmly grasp spray gun with both hands when using high
pressure sprayto avoid injury when spray gun kicks back.
A, WARNING Unintentional sparking can result in fire or
WHENADJUSTINGOR MAKING REPAIRSTOYOURPRESSURE
WASHER
• Disconnect the spark plug wire from the spark plug and place
the wire where it cannot contact spark plug.
WHENTESTINGFORENGINESPARK
• Use approved spark plug tester.
• DONOTcheckfor spark with spark plug removed.
puddles and slippery surfaces.
to fall.
_¢ electric shock.
A, WARNING Starter and other rotating partscan
entanglehands, hair, clothing, or accessories.
. NEVERoperatepressurewasherwithoutprotectivehousingor
covers.
. DONOTwearlooseclothing,jewelryor anythingthat maybe
caughtin thestarteror otherrotatingparts.
* Tieuplonghairandremovejewelry.
A, WARNING Riskof eyeinjury.
Spray cansplash back or propel objects.
• Always wear indirect vented (chemical splash) safety goggles
markedto comply with ANSI Z87.1 when using or in vicinity of
this equipment.
• NEVERsubstitute safety glasses or dry-condition goggles for
indirect vented safety goggles.
NOTICE High pressure spray may damage fragile items
including glass.
• DONOTpointspraygunat glasswhenusingred(0°)spraytip.
= NEVERaimspraygunatplants.
NOTICE Improper treatment of pressure washer can
damage it and shorten its life.
• If you have questions about intended use,ask dealer or contact
Sears.
• NEVERoperate units with broken or missing parts,or without
protective housing or covers.
• DO NOT by-pass any safety device on this machine.
• DONOTtamper with governed speed.
• DONOToperate pressure washer above rated pressure.
• DONOTmodify pressure washer in any way.
• Before starting pressure washer in cold weather, check all parts
of the equipment to besure ice has not formed there.
• NEVERmove machine by pulling on hoses. Use handle provided
on unit.
• Checkfuel system for leaks or signs of deterioration, such as
chafed or spongy hose,loose or missing clamps, or damaged
tank or cap. Correct all defects before operating pressure washer.
• This equipment is designedto be used with Searsauthorized parts
ONLY.If equipment is used with parts that DONOTcomply with
minimum specifications, user assumesall risksand liabilities.
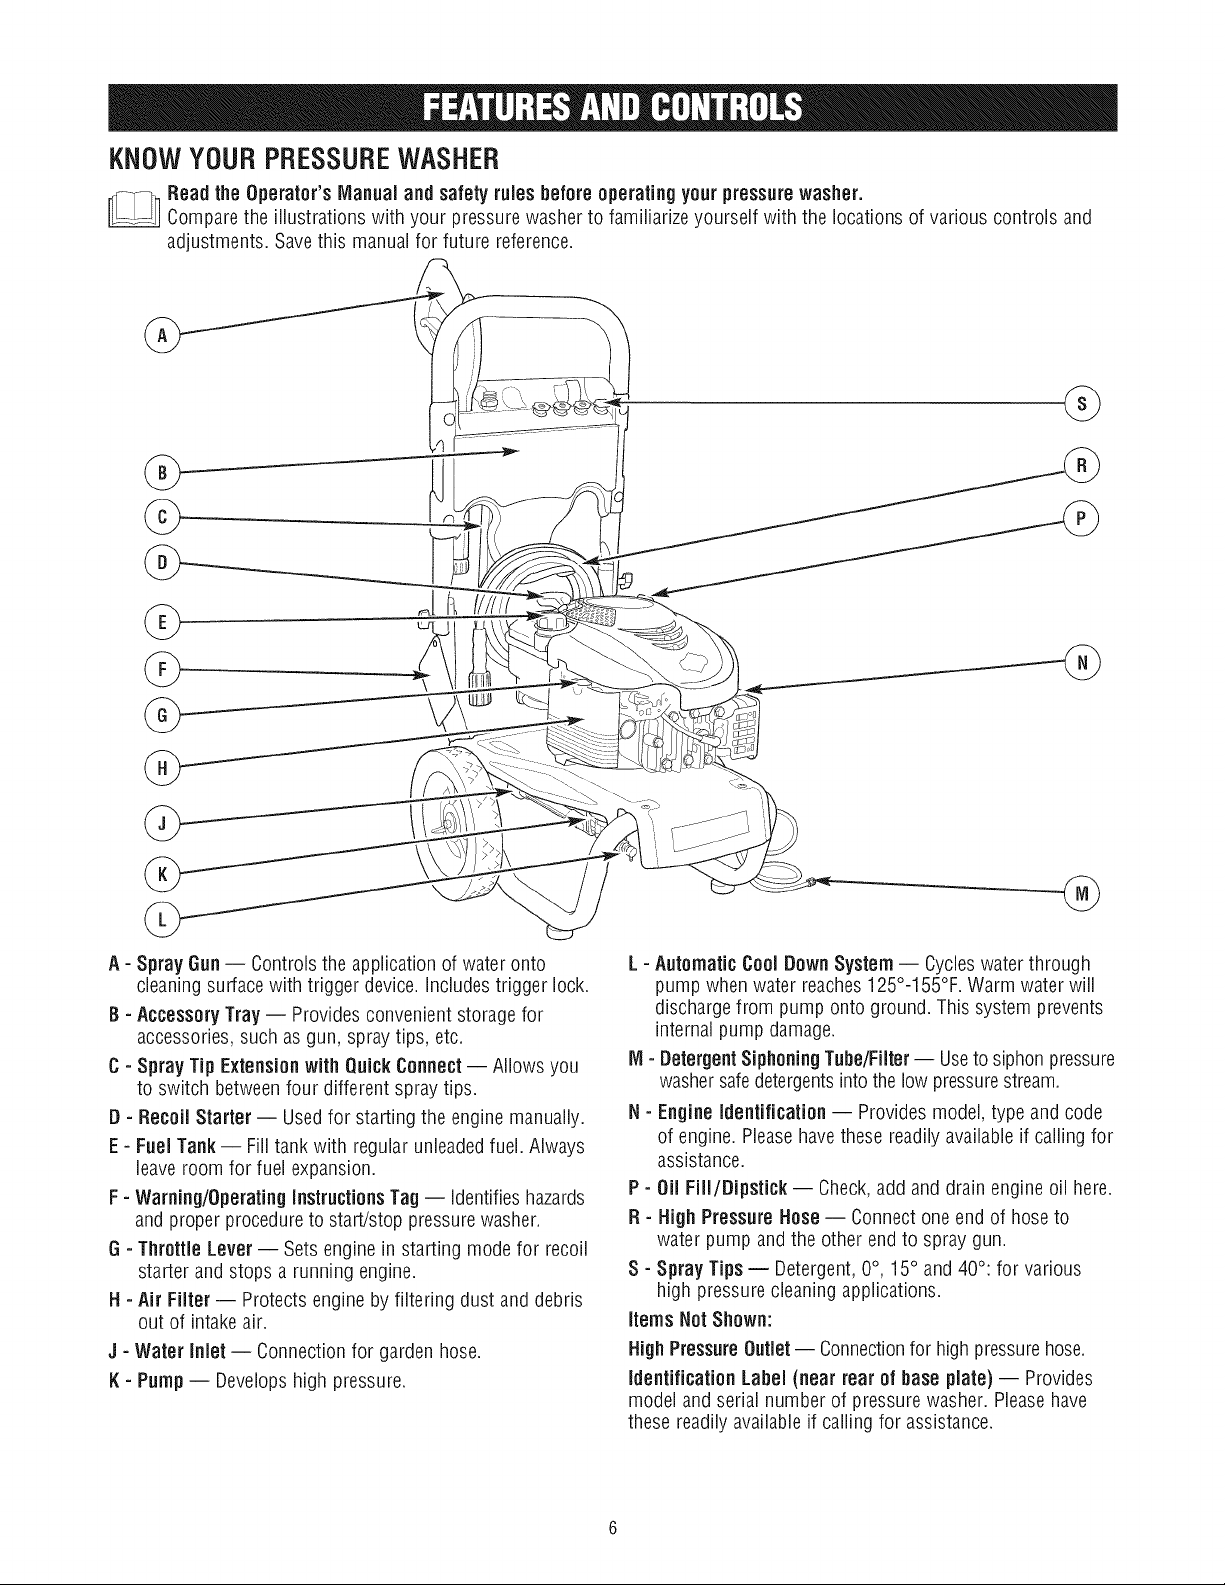
KNOWYOURPRESSUREWASHER
Readthe Operator's Manual and safetyrules before operating your pressure washer.
Comparethe illustrations with your pressurewasherto familiarize yourself with the locations of various controls and
adjustments. Savethis manualfor future reference.
A - Spray Gun-- Controlsthe application of water onto
cleaningsurface with trigger device, includes trigger lock.
B- Accessory Tray -- Provides convenientstorage for
accessories, such as gun, spray tips, etc.
C- Spray Tip Extension with QuickConnect -- Allows you
to switch betweenfour different spray tips.
D - Recoil Starter -- Usedfor starting the engine manually.
E - FuelTank -- Fill tank with regular unleadedfuel. Always
leaveroom for fuel expansion.
F- Warning/OperatingInstructions Tag -- identifies hazards
and proper procedureto start/stop pressurewasher.
G - Throttle Lever-- Sets engine in starting mode for recoil
starter and stops a running engine.
H - Air Filter-- Protects engine by filtering dust and debris
out of intake air.
J - Water Inlet -- Connectionfor garden hose.
I( - Pump-- Developshigh pressure.
L=AutomaticCool DownSystem-- Cycleswater through
pump when water reaches125°-155°F.Warm water wiii
dischargefrom pump onto ground. This system prevents
internal pump damage.
IVl- DetergentSiphoning Tube/Filter-- Useto siphon pressure
washersafedetergentsinto thelow pressurestream.
N- EngineIdentification -- Provides model, type and code
of engine. Pleasehavethese readilyavailable if calling for
assistance.
P - Oil Fill/Dipstick -- Check,add and drain engine oil here.
R- HighPressure Hose-- Connectone end of hoseto
water pump and the other end to spray gun.
S - Spray Tips-- Detergent,0°, 15° and 40°: for various
high pressure cleaningapplications.
items Not Shown:
HighPressure Outlet-- Connectionfor high pressurehose.
Identification Label (near rear of base plate) -- Provides
model and serial number of pressurewasher. Pleasehave
these readily availableif calling for assistance.
Your pressure washer requires some assembly and is ready
for useonly after it has been properly servicedwith the
recommendedoil andfuel.
If you haveany problemswith theassemblyof your
pressurewasher, pleasecall the pressurewasher helpline
at 1=800-222-3136.
UNPACKTHEPRESSUREWASHER
1. Removeeverything from carton except pressurewasher.
2. Opencarton completely by cutting eachcorner from top
to bottom.
3. Removepressure washer from carton.
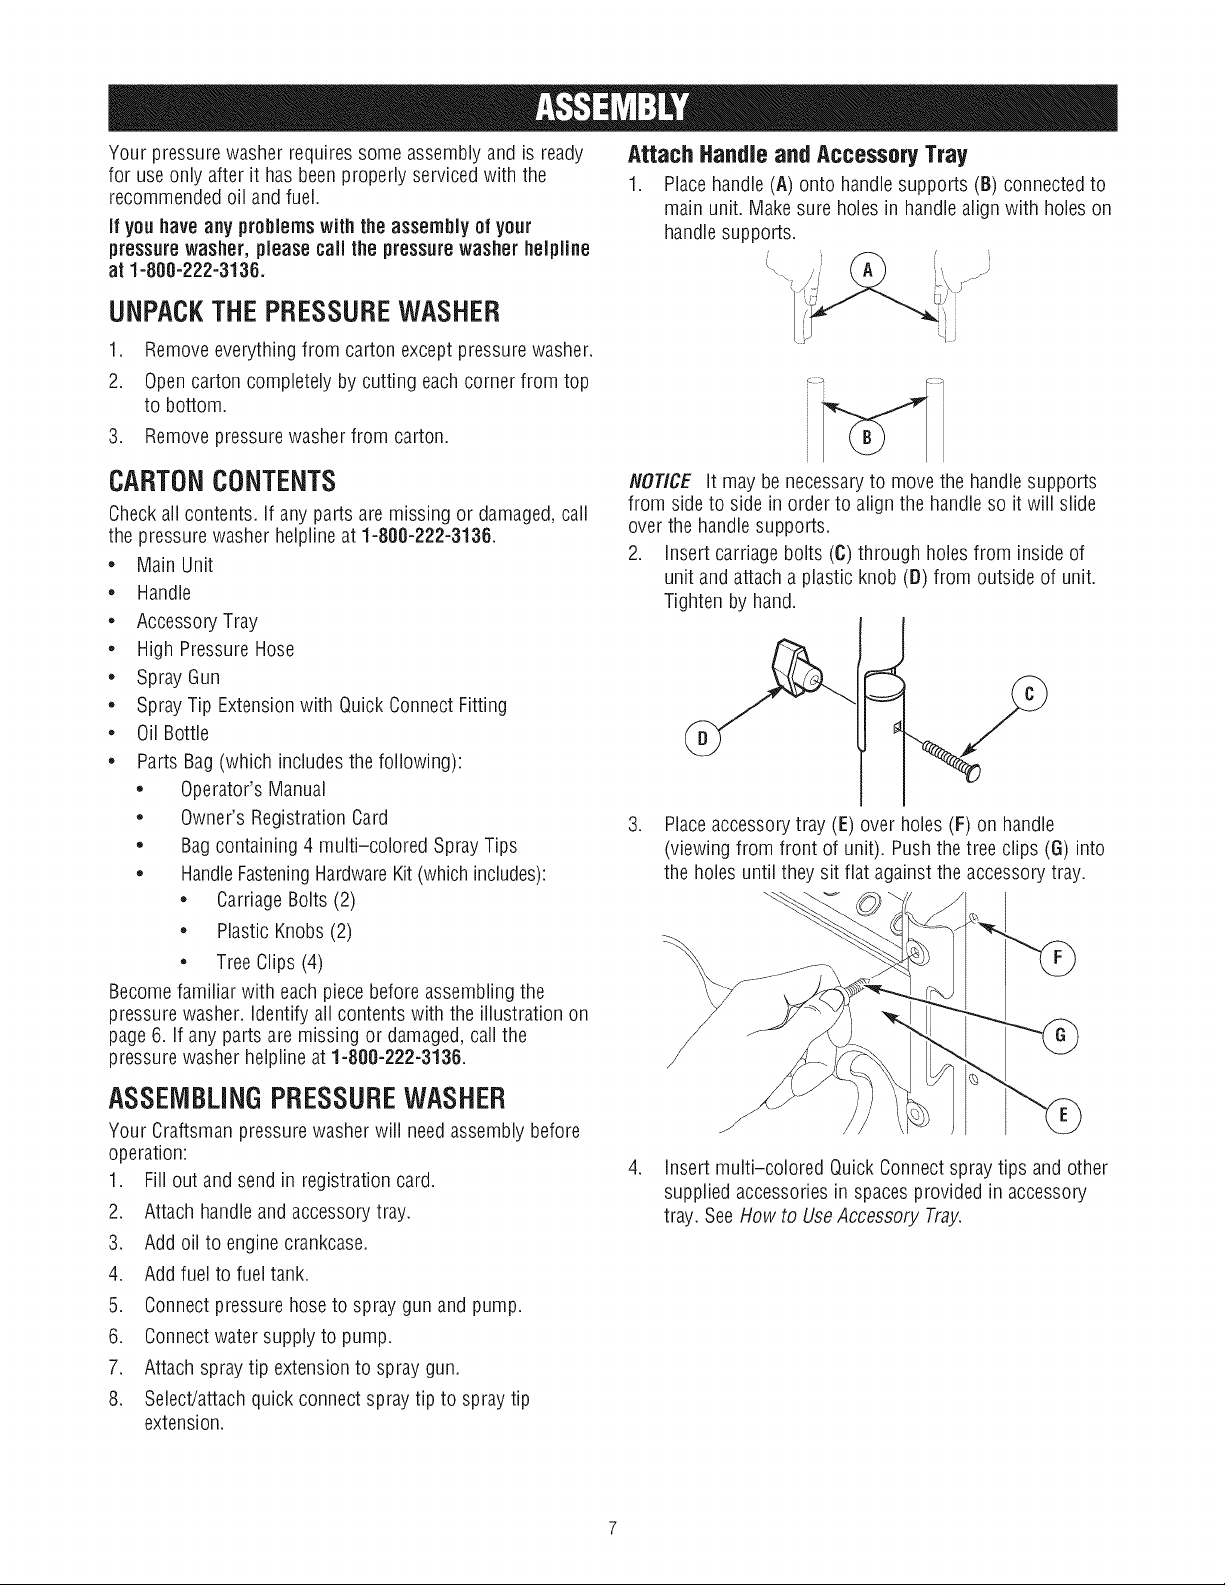
Attach Handle and Accessory Tray
1. Placehandle(A) onto handle supports (B) connectedto
main unit. Make sure holes in handlealign with holes on
handlesupports.
i
-\ J
CARTONCONTENTS
Checkall contents. If anyparts are missing or damaged,call
the pressure washer helplineat 1-800-222-3136.
* Main Unit
* Handle
* AccessoryTray
* High PressureHose
* Spray Gun
* SprayTip Extensionwith Quick ConnectFitting
* Oil Bottle
* Parts Bag(which includes the following):
* Operator's Manual
* Owner's Registration Card
* Bag containing 4 multi-colored Spray Tips
* HandleFasteningHardwareKit (whichincludes):
* Carriage Bolts (2)
* Plastic Knobs (2)
* Tree Clips (4)
Becomefamiliar with eachpiece beforeassemblingthe
pressure washer, identify all contents with the illustration on
page 6. if any parts are missing or damaged, call the
pressure washer helpline at 1-800-222-3136.
NOTICE It may be necessaryto move the handlesupports
from side to side in order to align the handleso it will slide
overthe handlesupports.
2. insert carriage bolts (C) through holesfrom inside of
unit and attach a plastic knob (D) from outside of unit.
Tighten by hand.
3. Placeaccessory tray (E) over holes (F) on handle
(viewing from front of unit). Push the tree clips (G)into
the holes until they sit fiat against the accessory tray.
Y
ASSEMBLINGPRESSUREWASHER
Your Craftsman pressure washer will needassemblybefore
operation:
1. Fill out and sendin registration card.
2. Attach handle and accessory tray.
3. Add oil to engine crankcase.
4. Add fuel to fuel tank.
5. Connectpressure hose to spray gun and pump.
6. Connectwater supply to pump.
7. Attach spray tip extensionto spray gun.
8. Select/attach quick connect spray tip to spray tip
extension.
4. insert multi-colored Quick Connect spray tips andother
supplied accessoriesin spacesprovided in accessory
tray. SeeHow to UseAccessory Tray.
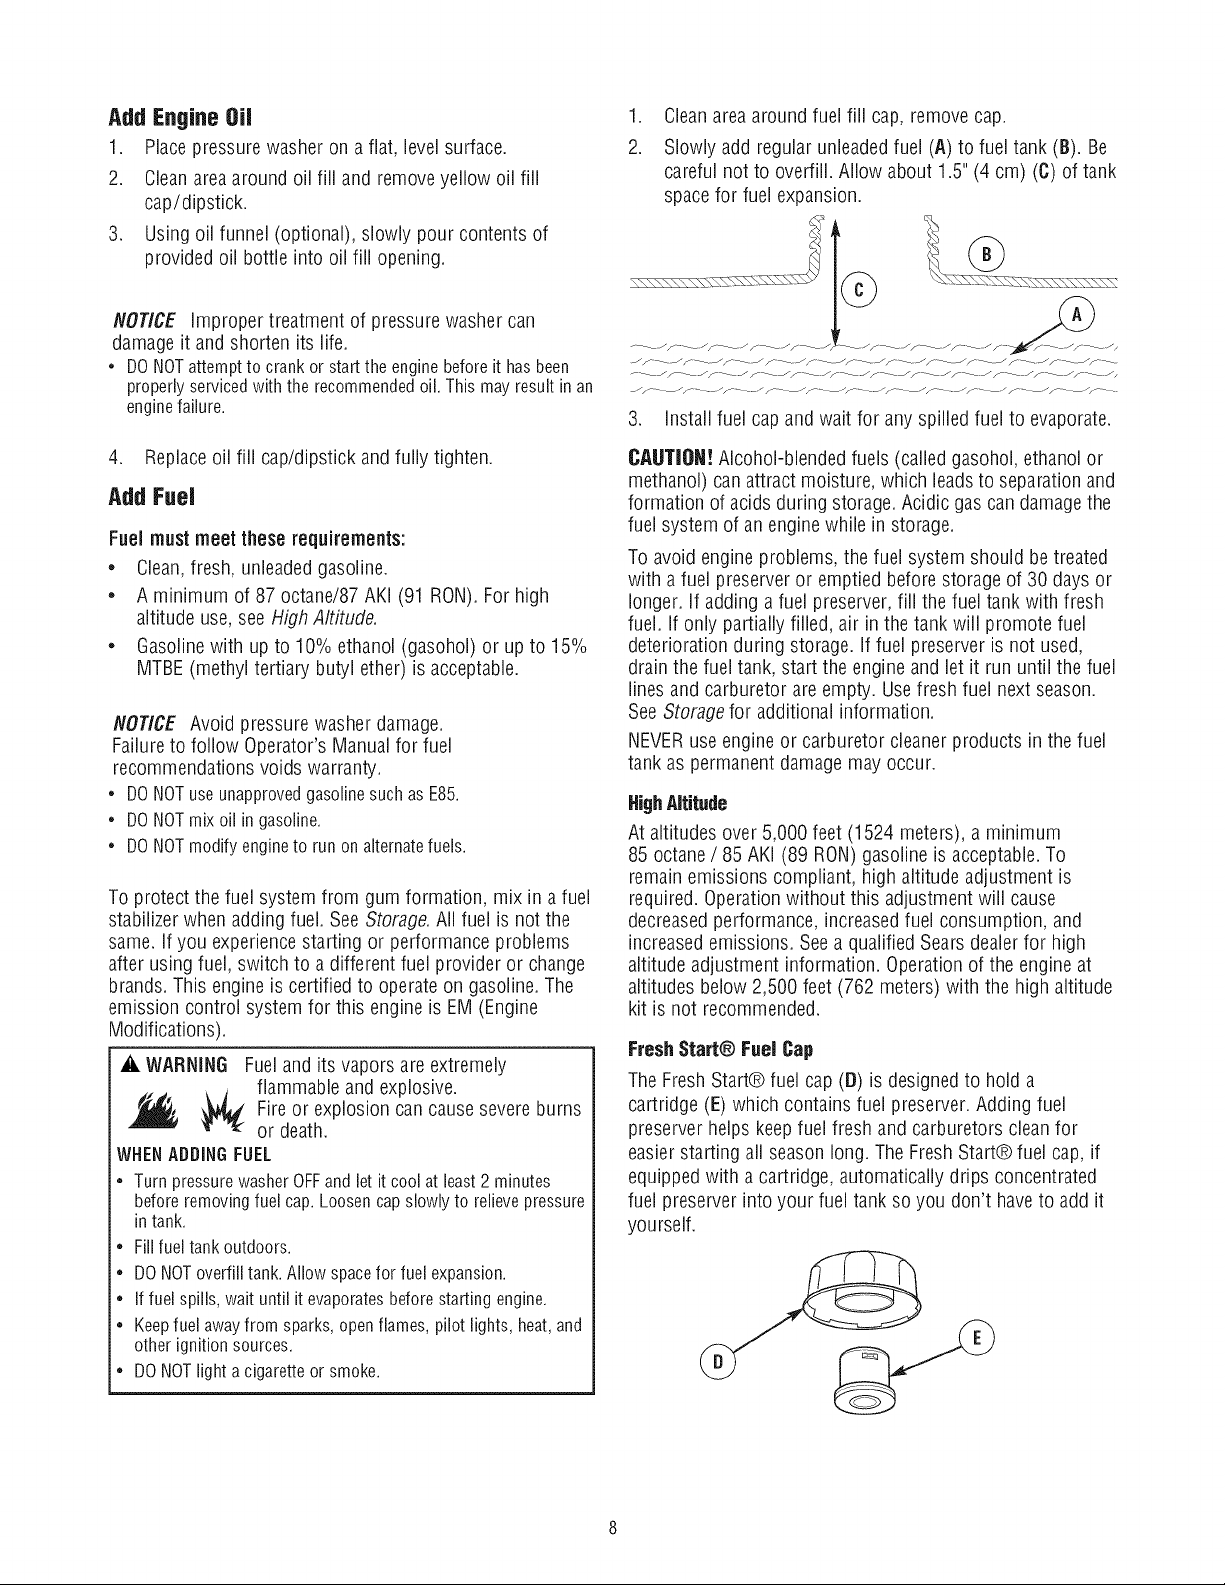
AddEn!tine(Ill
1. Placepressure washer on a flat, levelsurface.
2. Cleanarea around oil fill andremove yellow oil fill
cap/dipstick.
3. Using oil funnel (optional), slowly pour contents of
provided oil bottle into oil fill opening.
NOTICE Improper treatment of pressure washer can
damage it and shorten its life.
• DO NOTattempt to crank or start the engine beforeit has been
properly servicedwith the recommended oil. This may result in an
enginefailure.
.
Cleanareaaround fuel fill cap, removecap.
2.
Slowly add regular unleadedfuel (A) to fuel tank (B). Be
careful not to overfill. Allow about 1.5" (4 cm) (O)of tank
spacefor fuel expansion.
/f __/_ _/__/f_ _/f-_ Jf _/F ¸__ _/f __._/F_/F_/f_ _/f _
3. Install fuel cap and wait for any spilledfuel to evaporate.
4. Replaceoil fill cap/dipstick and fully tighten.
Add Fuel
Fuel mustmeet theserequirements:
* Clean,fresh, unleaded gasoline.
* A minimum of 87 octane/87 AKI (91 RON).Forhigh
altitude use, seeHigh Altitude.
* Gasolinewith upto 10% ethanol (gasohol) or up to 15%
MTBE (methyl tertiary butyl ether) is acceptable.
NOTICE Avoid pressure washer damage.
Failureto follow Operator's Manualfor fuel
recommendations voids warranty.
• DONOTuseunapprovedgasolinesuchasE85.
• DONOTmixoil in gasoline.
• DONOTmodifyengineto runonalternatefuels.
To protect the fuel system from gum formation, mix in a fuel
stabilizerwhen adding fuel. SeeStorage.All fuel is not the
same. If you experiencestarting or performanceproblems
after using fuel, switch to a different fuel provider or change
brands. This engine is certified to operateon gasoline. The
emission control system for this engine is EM (Engine
Modifications).
A. WARNING Fueland its vapors are extremely
flammable and explosive.
Fireor explosion can causesevere burns
or death.
WHEN ADDINGFUEL
• Turn pressure washer OFFand let it cool at least2 minutes
before removing fuel cap. Loosen capslowly to relieve pressure
in tank.
• Fill fuel tank outdoors.
• DONOToverfill tank. Allow spacefor fuel expansion.
• If fuel spills, wait until it evaporatesbefore starting engine.
• Keepfuel away from sparks, open flames, pilot lights, heat,and
other ignition sources.
• DONOTlight a cigarette or smoke.
(IAIITIOII! Alcohol-blendedfuels (called gasohol, ethanol or
methanol) canattract moisture, which leadsto separation and
formation of acids during storage.Acidic gas candamagethe
fuel system of an enginewhile in storage.
To avoid engine problems, the fuel system should be treated
with a fuel preserveror emptied beforestorage of 30 days or
longer. If adding a fuel preserver,fill the fuel tank with fresh
fuel. If only partially filled, air in the tank will promote fuel
deterioration during storage. If fuel preserver is not used,
drain the fuel tank, start the engine and let it run until the fuel
lines and carburetor are empty. Usefresh fuel next season.
SeeStoragefor additional information.
NEVERuse engine or carburetor cleaner products in the fuel
tank as permanent damagemay occur.
HighAltitude
At altitudes over 5,000 feet (1524 meters), a minimum
85 octane / 85 AKI (89 RON)gasoline is acceptable.To
remainemissions compliant, high altitude adjustment is
required. Operationwithout this adjustment win cause
decreasedperformance, increasedfuel consumption, and
increasedemissions. Seea qualified Searsdealerfor high
altitude adjustment information. Operationof the engine at
altitudes below 2,500 feet (762 meters) with the high altitude
kit is not recommended.
FreshStart@ Fuel Cap
The FreshStart® fuel cap (D) is designedto hold a
cartridge (E) which contains fuel preserver.Adding fuel
preserver helps keepfuel fresh and carburetors clean for
easierstarting all season long. TheFresh Start® fuel cap, if
equippedwith a cartridge, automatically drips concentrated
fuel preserver into your fuel tank so you don't haveto add it
yourself.
NOTICE FreshStart® fuel preserver cartridge isavailableas
an optional accessory, retail item7133386. It is not included
with the pressurewasher. Contact the original equipment
manufacturer, retailer,or dealerto obtain a cartridge
designedfor the FreshStart® fuel cap installed on this
engine.
Readand follow all instructions andwarnings given in the
FreshStart® fuel preservercartridge package.
Connect Hose and Water Supply to Pump
NOTICE DONOTrun the pump without the water supply
connectedand turned on.
• Damagetoequipmentresultingfrom failuretofollowthis
instructionwill voidwarranty.
4. Runwater through garden hosefor 30 seconds to flush
itof debris. Turn off water.
NOTICE DONOTsiphon standing water for the water
supply. Use ONLYcold water (less than 100°F).
5. Connectgarden hose(not to exceed50 feet in length) to
water inlet.Tighten by hand.
NOTICE Removeand discard the shipping caps from the
pump's high pressure outlet and water inlet before attaching
hoses.
1. Uncoil high pressure hose and attachone end of hoseto
baseof spray gun. Tighten by hand.
_, WARNING The high pressure stream of water that
and its underlying tissues, leading to serious
this equipment produces can cut through skin
injury and possible amputation.
• NEVERconnect high pressure hoseto nozzleextension.
• Keephigh pressure hose connectedto pump and spraygun
while system is pressurized.
• Always becertain spray gun, nozzlesand accessoriesare
correctly attached.
2. Attach other end of high pressure hoseto high pressure
outlet on pump. Tighten by hand.
NOTICE Using a OneWay Valve (vacuumbreakeror check
valve) at pump inlet can cause pump or inlet connector
damage.
• ThereMUSTbeat leasttenfeetof unrestrictedgardenhose
betweenthepressurewasherinletandanydevice,suchasa
vacuumbreakeror checkvalve.
• Damageto equipment resulting from failure to follow this
instruction will void warranty.
A. WARNING Riskof eyeinjury.
Spray cansplash back or propel objects.
• Always wear indirect vented (chemical splash) safety goggles
markedto comply with ANSI Z87.1 when using or in vicinity of
this equipment.
• NEVERsubstitute safety glasses or dry-condition goggles for
indirect vented safety goggles.
6. Turn ONthe water, press red button (B) on the gun and
squeezethe trigger to purge the pump system of air and
impurities.
.
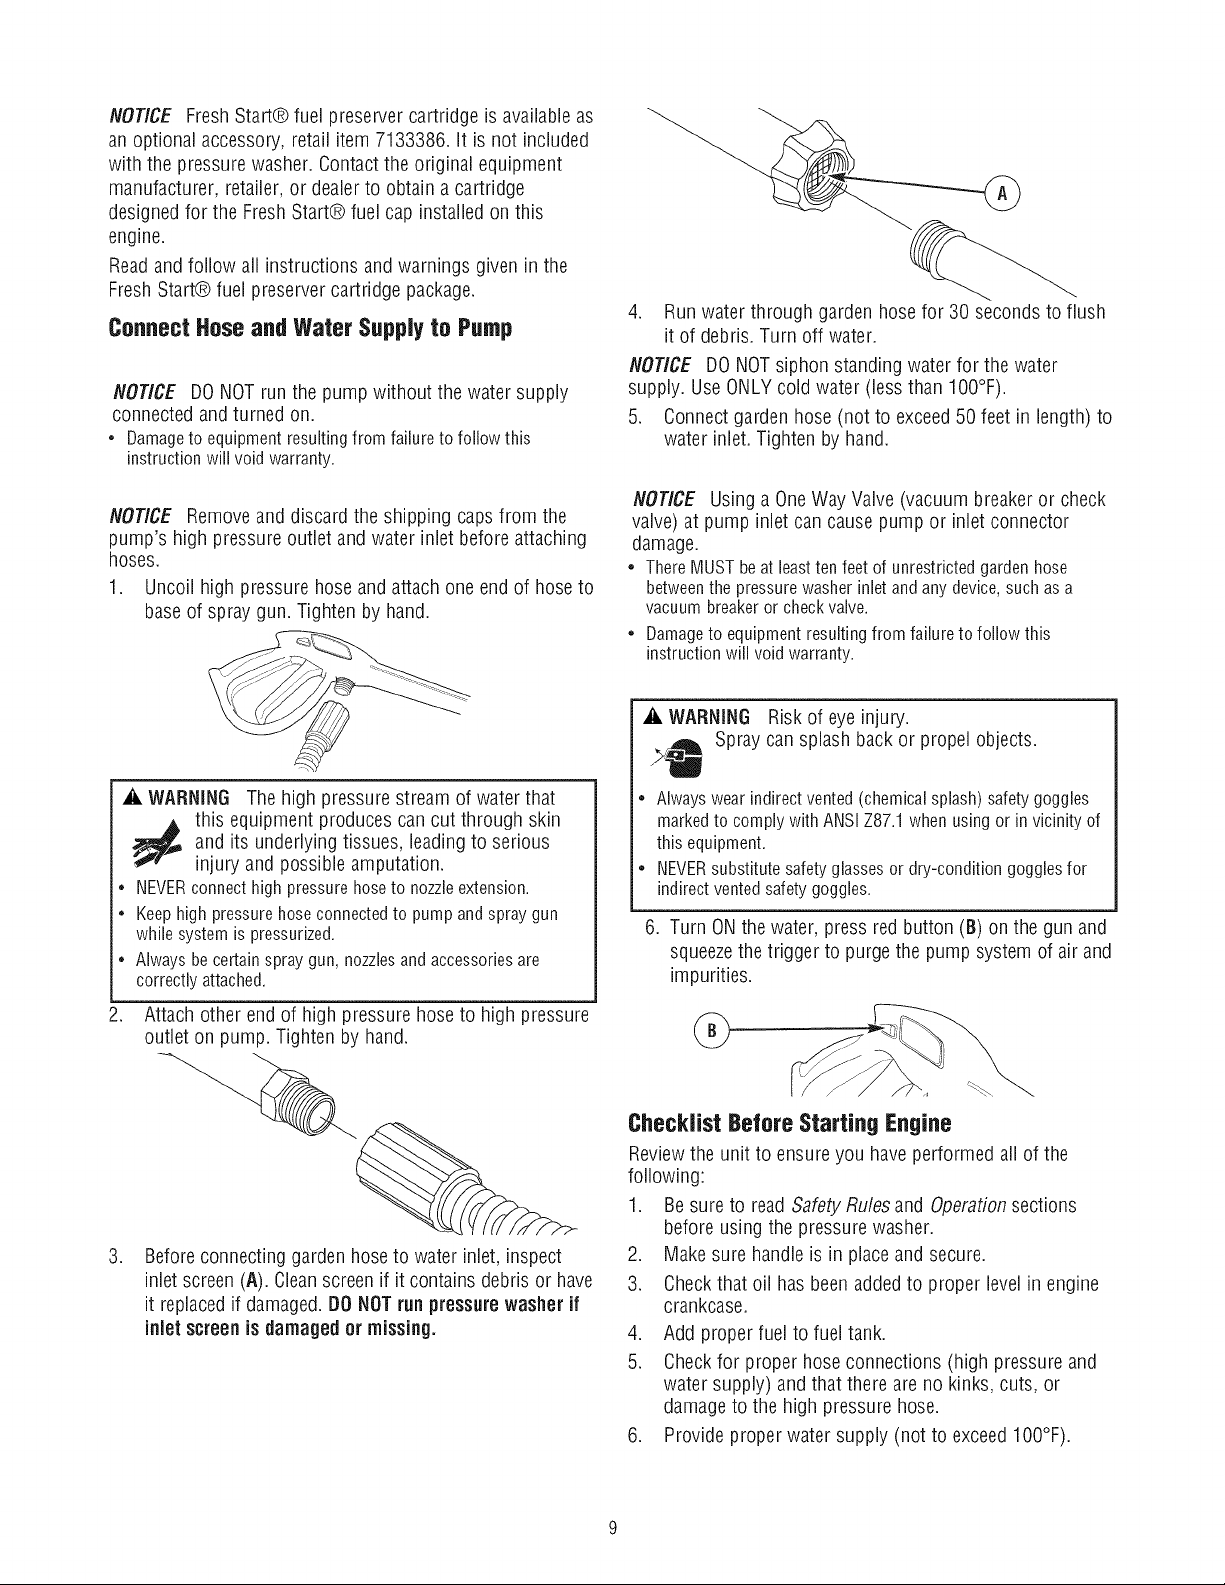
Beforeconnecting garden hose to water inlet, inspect
inlet screen (A). Cleanscreen if it contains debris or have
it replacedif damaged.DO NOTrunpressurewasher if
inlet screenisdamaged or missing.
Checklist Before Starting Engine
Reviewthe unit to ensureyou haveperformed all of the
following:
1. Besure to read SafetyRules and Operationsections
before using the pressure washer.
2. Makesure handleis in placeand secure.
3. Checkthat oil has beenadded to proper levelin engine
crankcase.
4. Add proper fuel to fuel tank.
5. Checkfor proper hoseconnections (high pressureand
water supply) and that there are no kinks, cuts, or
damageto the high pressure hose.
6. Provide proper water supply (not to exceed100%).
HOWTO USEYOURPRESSUREWASHER
If you haveanyproblems operating your pressure washer,
pleasecall the pressure washer helpline at 1-800-222-3136.
PressureWasherLocation
PressureWasherCJearance
A. WARNING Exhaustheat/gases can ignite
combustibles, structures or damagefuel tank
causing a fire.
* Keepat least 5 ft. (152 cm) clearanceon all sides of pressure
washer including overhead.
Placepressure washer outdoors in an area that will not
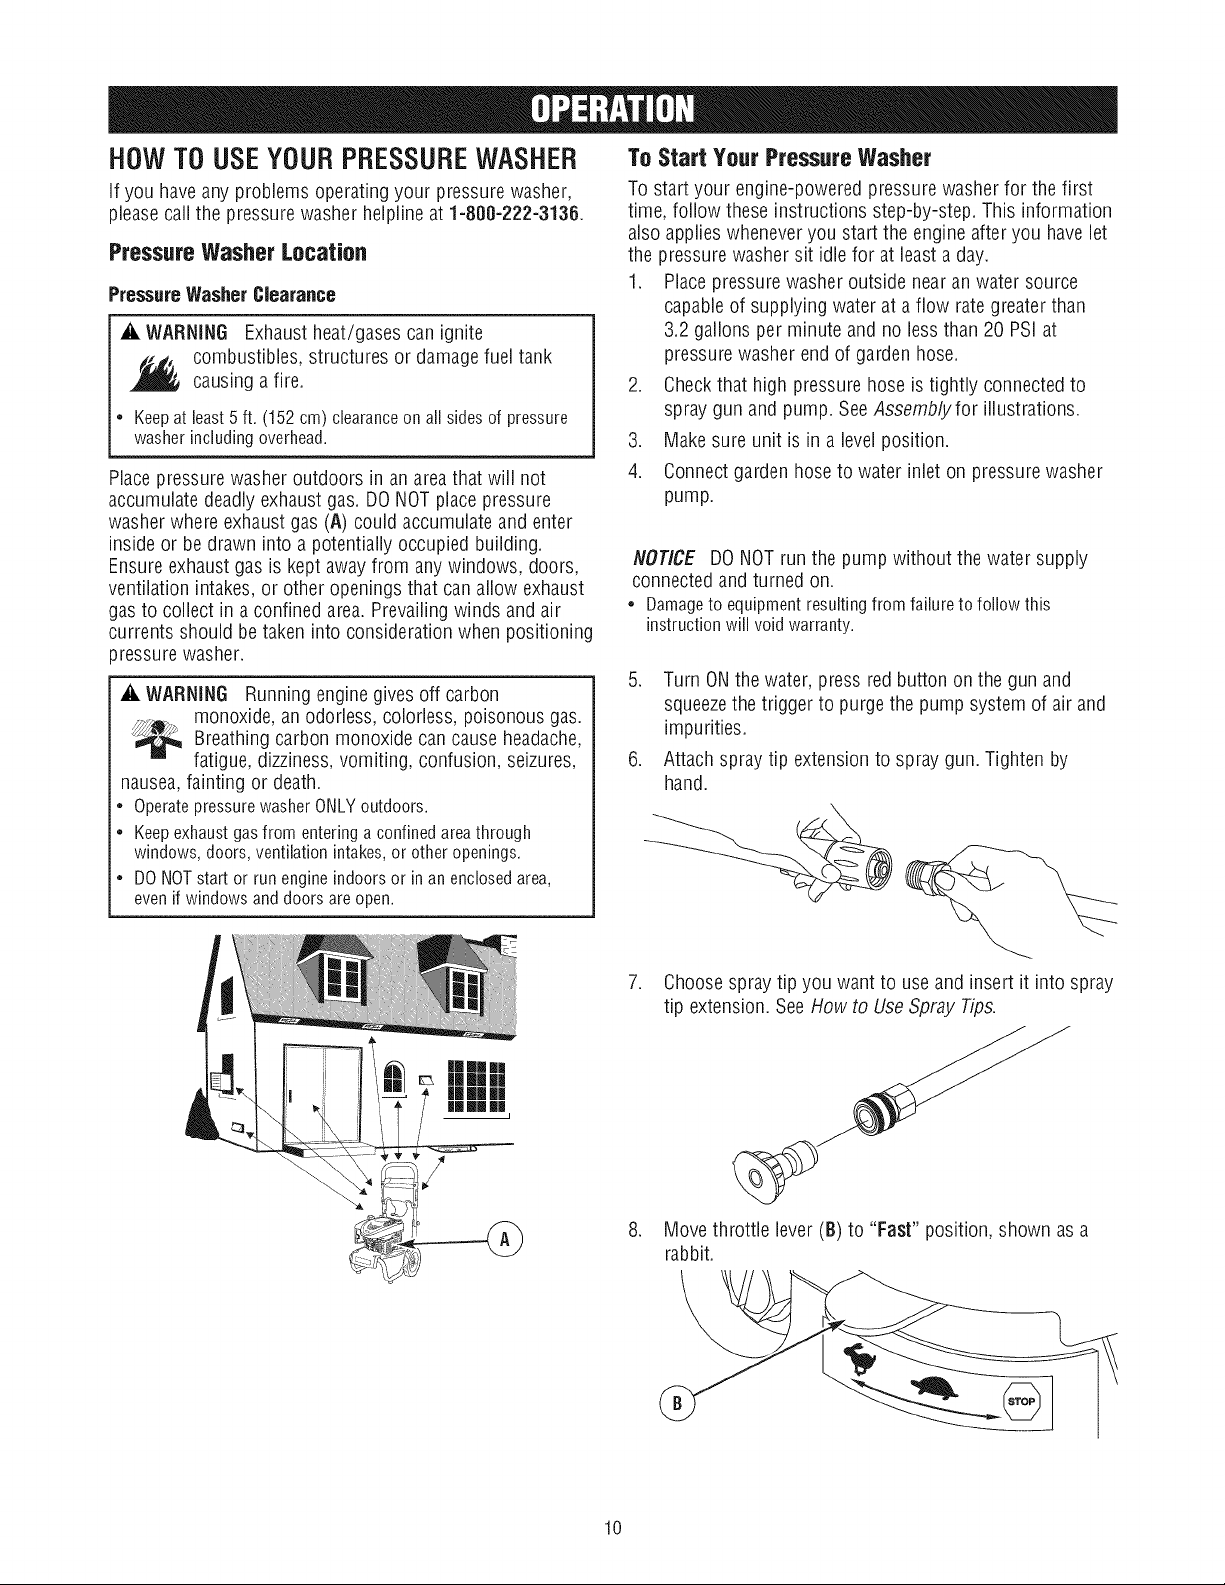
accumulate deadlyexhaustgas. DO NOTplacepressure
washer where exhaustgas (A) could accumulate and enter
inside or be drawn into a potentially occupied building.
Ensureexhaust gas is kept awayfrom any windows, doors,
ventilation intakes, or other openings that can allow exhaust
gasto collect in aconfined area. Prevailing winds and air
currents should be taken into considerationwhen positioning
_ressurewasher.
A. WARNING Running enginegives off carbon
monoxide,an odorless, colorless, poisonous gas.
_ Breathing cancause headache,
fatigue, dizziness,vomiting, confusion, seizures,
nausea,fainting or death.
• OperatepressurewasherONLYoutdoors.
• Keepexhaustgasfromenteringa confinedareathrough
windows,doors,ventilationintakes,or otheropenings.
• DONOTstartorrunengineindoorsor in anenclosedarea,
evenifwindowsanddoorsareopen.
carbon monoxide
To StartYourPressureWasher
To start your engine-powered pressurewasher for the first
time, follow these instructions step-by-step. This information
alsoapplies wheneveryou start the engine after you havelet
the pressure washer sit idle for at leasta day.
1. Placepressurewasher outside nearan water source
capableof supplying water at a flow rate greaterthan
3.2 gallons per minute and no less than 20 PSi at
pressurewasher end of garden hose.
2. Checkthat high pressure hose is tightly connected to
spray gun and pump. SeeAssembly for illustrations.
3. Makesure unit is in a levelposition.
4. Connectgarden hoseto water inlet on pressurewasher
pump.
NOTICE DONOTrun the pump without the water supply
connectedand turned on.
• Damageto equipmentresultingfromfailuretofollowthis
instructionwill voidwarranty.
.
Turn ONthe water, press red button on the gun and
squeezethe trigger to purge the pump system of air and
impurities.
.
Attach spray tip extension to spray gun. Tighten by
hand.
.
Choosespray tip you want to use and insert it into spray
tip extension. See How to Use Spray Tips.
.
Move throttle lever (8) to "Fast" position, shown as a
rabbit.
10
NOTICE Beforestarting the pressure washer, be sureyou
are wearing safety goggles asdescribed below.
_i, WARNING Riskof eye injury.
Spraycan splash backor propelobjects.
• Always wear indirect vented (chemical splash) safetygoggles
markedto comply with ANSI Z87.1 when using or in vicinity of
this equipment.
• NEVERsubstitute safety glasses or dry-condition goggles for
indirect vented safety goggles.
NOTICE This unit is equipped with a ReadyStart® engine.A
ReadyStart® engine means there is no priming or choking
required.
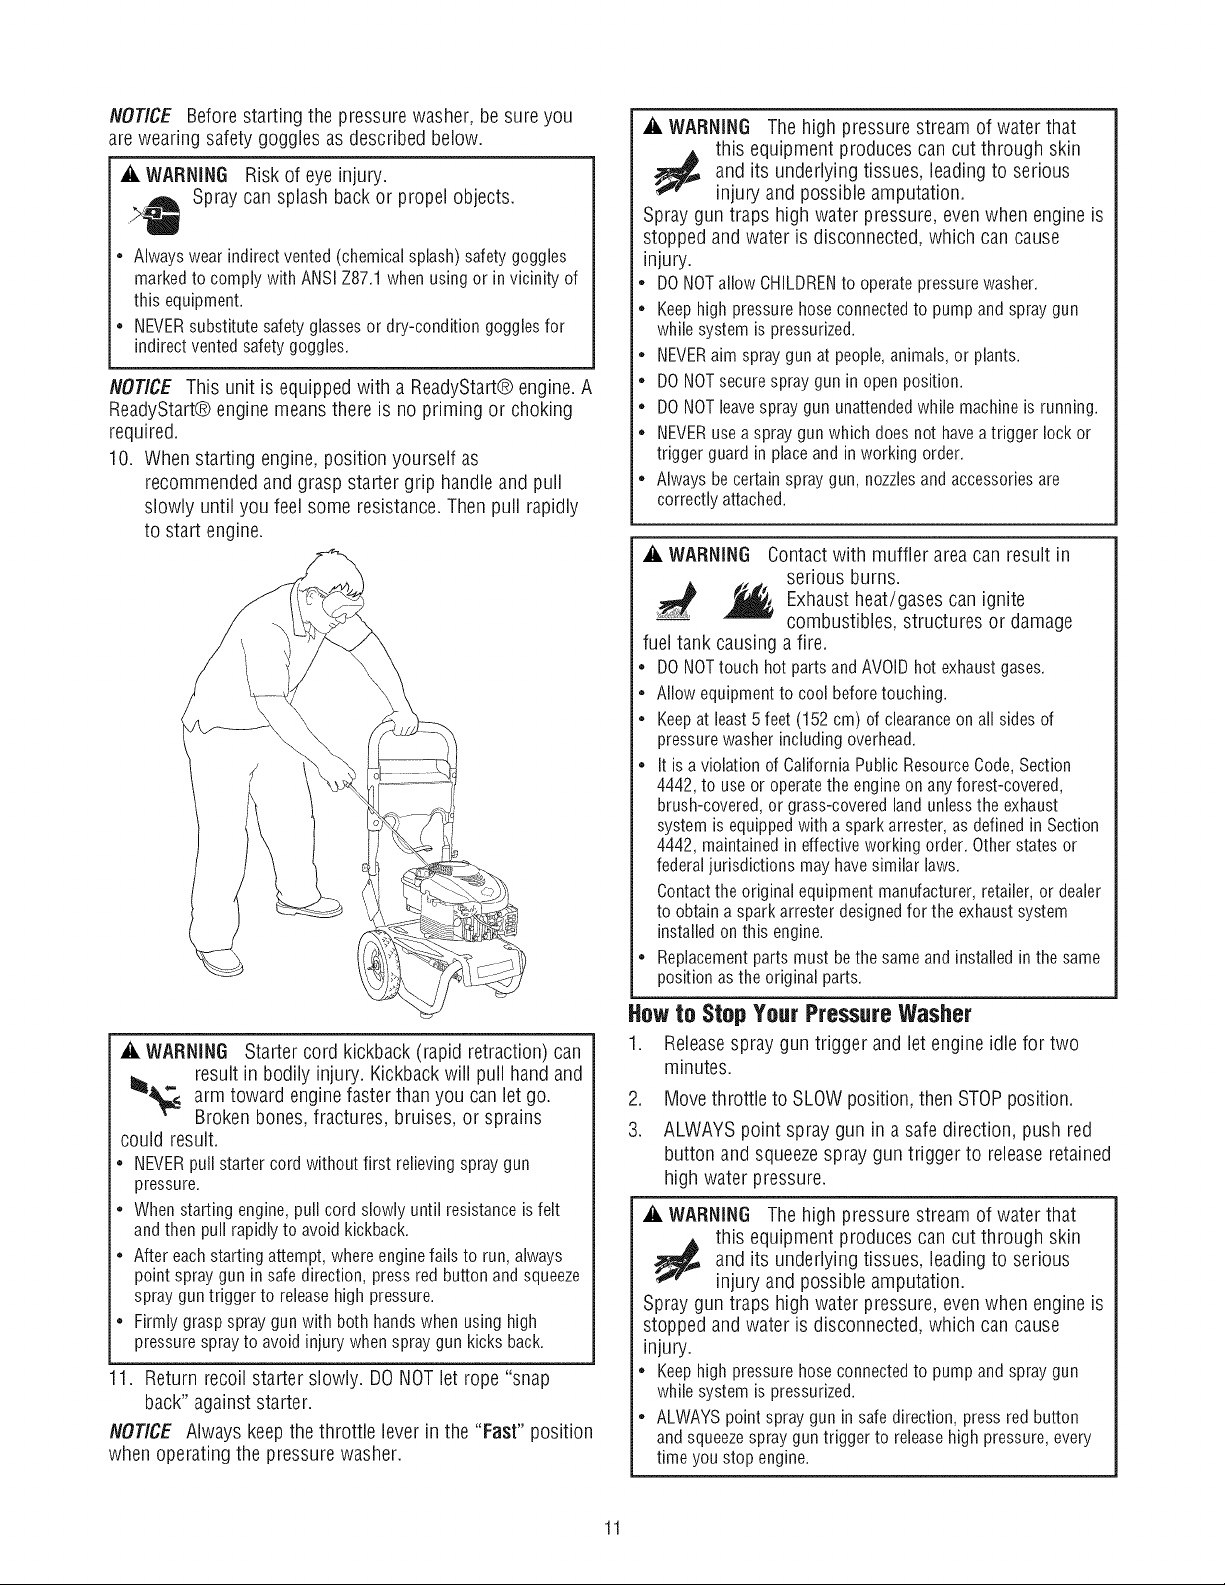
10. When starting engine, position yourself as
recommendedand grasp starter grip handle and pull
slowly until you feel some resistance. Then pull rapidly
to start engine.
_i, WARNING The high pressure stream of water that
this equipment produces can cut through skin
and its underlying tissues, leading to serious
injury and possible amputation.
Spray gun traps high water pressure, even when engine is
stopped and water is disconnected, which can cause
injury.
• DONOTallow CHILDRENto operatepressure washer.
• Keephigh pressure hose connectedto pump and spraygun
while system is pressurized.
• NEVERaim spray gun at people,animals, or plants.
• DO NOTsecure spray gun in open position.
• DO NOTleavespray gun unattendedwhile machine is running.
• NEVERuse a spray gun which does not have atrigger lock or
trigger guard in place and in working order.
• Always be certain spray gun, nozzlesand accessoriesare
correctly attached.
_i, WARNING Contact with muffler area can result in
serious burns.
_ heat/gases can ignite
fuel tank causing a fire.
• DO NOTtouch hot parts and AVOIDhot exhaust gases.
• Allow equipment to cool beforetouching.
• Keepat least5 feet (152 cm) of clearanceon all sides of
pressure washer including overhead.
• It isa violation of California PuNic ResourceCode, Section
4442, to use or operate the engine on any forest-covered,
brush-covered, or grass-covered land unlessthe exhaust
system is equippedwith a spark arrester,as defined in Section
4442, maintained in effective working order. Otherstates or
federaljurisdictions may havesimilar laws.
Contactthe original equipment manufacturer, retailer, or dealer
to obtain a spark arrester designed for the exhaustsystem
installed onthis engine.
• Replacementparts must be the same and installed in the same
position asthe original parts.
Exhaust
combustibles, structures or damage
_i, WARNING Starter cord kickback (rapid retraction) can
result in bodily injury. Kickback will pull hand and
I1_ arm toward engine faster than you can let go.
Broken bones, fractures, bruises, or sprains
could result.
• NEVERpullstarter cord without first relieving spray gun
pressure.
• When starting engine, pull cord slowly until resistance isfelt
andthen pull rapidly to avoid kickback.
• After each starting attempt, where enginefails to run, always
point spray gun in safe direction, press red button and squeeze
spray guntrigger to releasehigh pressure.
• Firmly grasp spray gun with both hands when using high
pressure sprayto avoid injury when spray gun kicks back.
1. Return recoil starter slowly. DONOT let rope "snap
back" against starter.
NOTICE Always keepthe throttle leverin the "Fast" position
when operating the pressure washer.
Howto Stop Your Pressure Washer
1. Release spray gun trigger and let engine idle for two
minutes.
.
Movethrottle to SLOWposition, then STOPposition.
3.
ALWAYSpoint spray gun in a safe direction, push red
button and squeezespray gun trigger to release retained
high water pressure.
_i, WARNING The high pressure stream of water that
and its underlying tissues, leading to serious
this equipment produces can cut through skin
injury and possible amputation.
Spray gun traps high water pressure,even when engine is
stopped and water is disconnected, which can cause
injury.
• Keephighpressurehoseconnectedto pumpandspraygun
whilesystemispressurized.
• ALWAYSpointspraygunin safedirection,pressredbutton
andsqueezesprayguntriggerto releasehighpressure,every
timeyoustopengine.
11
NOTICE Spraygun traps high water pressure,evenwhen
engine is stopped and water is disconnected.
2. Select desired spray tip:
How to Use Accessory Tray
The unit is equipped with an accessorytray with places to
store your spray gun, spray tip extension and quick connect
spray tips. Thereis also a hook at the front of the accessory
tray to hold your high pressure hose.
NOTICE Theextra hole in the tray is for storing a utility
brush. The extra clip in the tray is for storing a turbo spray
tip. The brush and turbo nozzleare NOTincluded with your
pressure washer. You can buy these items as optional
accessories.
1. Placespraytip extensionthrough holeon accessory tray,
as shown.
2. Placespraygun through hole on accessorytray on right
side of unit.
3. insert multi-colored spray tips in spaces provided in
accessorytray.
4. Hanghigh pressure hoseon hook attached to accessory
tray on front of tray asshown.
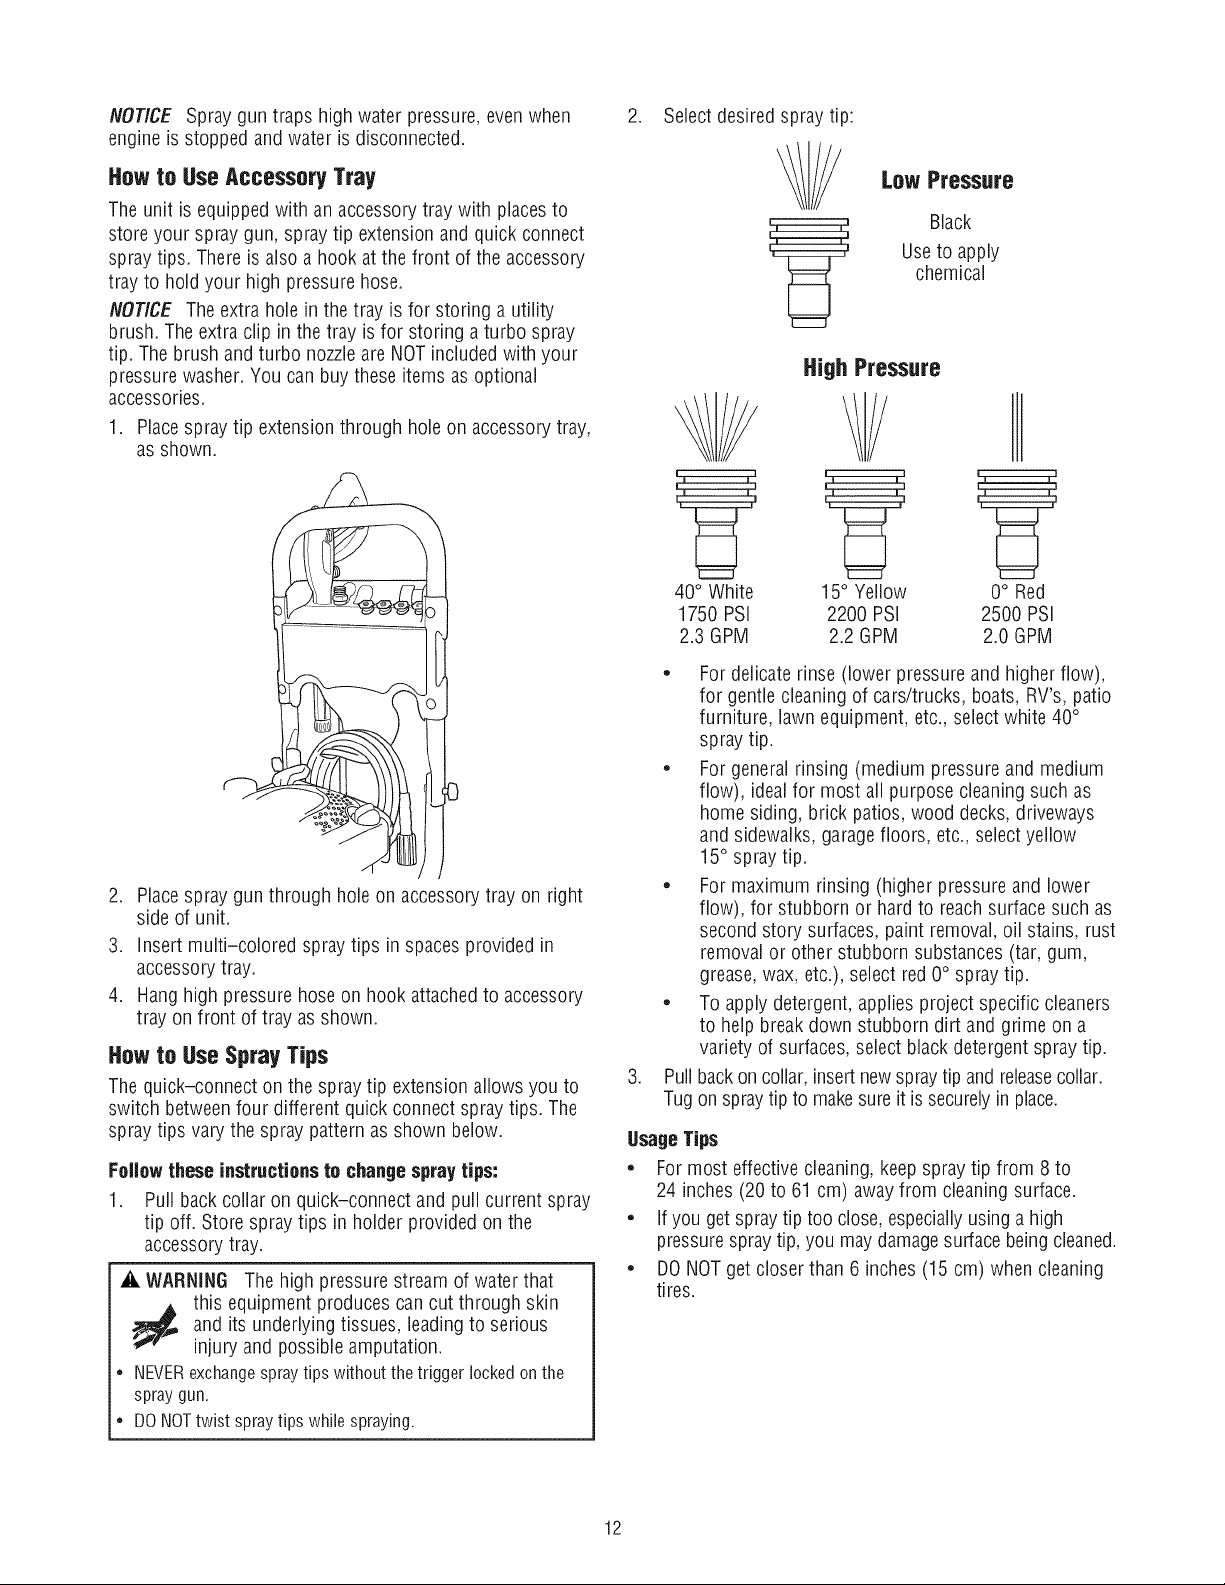
How to Use Spray Tips
The quick-connect on the spray tip extension allows you to
switch betweenfour different quick connect spray tips. The
spray tips vary the spray pattern as shown below.
Foflowtheseinstructions to changespraytips:
1. Pull back collar on quick-connect andpull current spray
tip off. Storespray tips in holder provided on the
accessorytray.
_i, WARNING The high pressure stream of water that
Low Pressure
Black
Use to apply
chemical
High Pressure
m i
40° White
1750 PSi
2.3 GPM
* Fordelicate rinse (lower pressure and higher flow),
for gentle cleaning of cars/trucks, boats, RV's, patio
furniture, lawn equipment, etc., select white 40°
spray tip.
Forgeneral rinsing (medium pressure and medium
flow), idealfor most all purpose cleaning such as
home siding, brick patios, wood decks, driveways
and sidewalks, garagefloors, etc.,selectyellow
15° spray tip.
Formaximum rinsing (higher pressure and lower
flow), for stubborn or hard to reach surface such as
second story surfaces, paint removal, oil stains, rust
removal or other stubborn substances (tar, gum,
grease, wax, etc.), select red 0° spray tip.
To apply detergent, appliesproject specific cleaners
to help breakdown stubborn dirt and grime on a
variety of surfaces, select black detergent spray tip.
.
Pullbackon collar, insert newspraytip andreleasecollar.
Tugon spraytip to makesure it is securelyin place.
UsageTips
* Formost effective cleaning, keep spray tip from 8 to
24 inches (20 to 61 cm) away from cleaning surface.
* If you getspray tip too close, especiallyusinga high
pressurespray tip, you maydamagesurface beingcleaned.
* DONOTget closer than 6 inches (15 cm) when cleaning
tires.
15° Yellow 0° Red
2200 PSi 2500 PSi
2.2 GPM 2.0 GPM
and its underlying tissues, leadingto serious
this equipment produces cancut through skin
injury and possible amputation.
• NEVERexchangespraytipswithoutthetriggerlockedonthe
spraygun.
• DONOTtwist spraytips whilespraying.
12

CleaningandApplyingDetergent
A WARNING Chemical Burn Hazard.
--- Chemicalscould cause bodily injury, property
_ damage or death.
• DONOTusecausticliquidwithpressurewasher.
• UseONLYpressurewashersafedetergents/soaps.Followall
manufacturersinstructions.
Toapply detergent, follow thesesteps:
1. Reviewuse of spray tips.
2. Preparedetergent solution as required by job.
3. Placesmall filter end of detergent siphoning tube into
detergent container.
NOTICE Contact with the hot muffler can damage detergent
siphoning tube.
• When inserting the siphon into a detergent solution bottle, route
the tube so as to keepit from inadvertently contacting the hot
muffler.
NOTICE Make surethe filter is fully submergedin detergent
while applying detergent.
4. Make sure black spray tip is installed.
NOTICE Detergentcannot be applied with the high pressure
spray tips (White, Yellow or Red).
5. Make sure garden hose is connectedto water inlet.
Checkthat high pressure hoseis connected to spray gun
and pump. Turn on water.
NOTICE You must attach all hoses before you start the
engine.
• Starting the engine without all the hoses connected and without
the water turned ONwill damagethe pump.
• Damageto equipment resulting from failure to follow this
instruction will void warranty.
.
Start enginefollowing instructions How to Start Your
Pressure Washer.
7.
Apply detergent to a dry surface, starting at lower
portion of areato be washedand work upward, using
long, even,overlapping strokes.
8. Allow detergent to "soakin" for 3-5 minutes before
washing and rinsing. Reapplyas neededto prevent
surfacefrom drying. DO NOTallow detergentto dry on
(prevents streaking).
iMPORTANT:You must flush the detergent siphoning system
after each use by placing the filter into a bucket of clean
water, then run the pressure washer in low pressure for 1-2
minutes.
Pressure Washer Rinsin9
ForRinsing:
1. Removeblack spray tip from nozzleextension.
2. Select and install desired high pressure spray tip
following instructions Howto UseSpray Tips.
.
Keepthe spray gun a safe distancefrom the areayou
plan to spray.
A WARNING Kickback from spray gun can cause you to
fall.
• Operatepressure washer from a stable surface.
• Beextremely careful if you must use the pressure washer from
a ladder,scaffolding, or any other similar location.
• Firmly grasp spray gun with both hands when using high
pressure spray to avoid injury whenspray gun kicks back.
4. Apply a high pressure spray to a small areaand then
check surfacefor damage. If no damageis found, you
can assume it is okay to continue rinsing.
5. Start at top of areato be rinsed, working down with
same overlapping strokes asyou usedfor cleaning.
Cleaning Detergent Siphoning Tube
If you usedthe detergent siphoning tube, you must flush it
with cleanwater before stopping the engine.
1. Placedetergent siphoning tube/filter in a bucketfull of
cleanwater.
2. Removehigh pressure spray tip from spray tip
extension.
3. Select and install black detergent spray tip following
instructions How to UseSpray Tips.
4. Flushfor 1-2 minutes.
5. Shut off engine following instructions How to Stop
Pressure Washerand turn off water supply.
6. ALWAYSpoint spray gun in a safe direction push red
button and squeezespray gun trigger to release retained
high water pressure.
NOTICE Spray gun traps highwater pressure, evenwhen
engine is stopped and water is disconnected.
A WARNING The high pressure stream of water that
and its underlying tissues, leading to serious
this equipment produces can cut through skin
injury and possible amputation.
Spray gun traps high water pressure,even when engine is
stopped and water is disconnected, which can cause
injury.
• Keephighpressurehoseconnectedto pumpandspraygun
whilesystemispressurized.
• ALWAYSpointspraygunin safedirection,pressredbutton
andsqueezesprayguntriggerto releasehighpressure,every
timeyoustopengine.
Automatic Cool Down System {Thermal Relief}
If you runthe engine on your pressure washer for
3-5 minutes without pressing the trigger on the spray gun,
circulating water in the pump can reachtemperatures above
125°F.The system engagesto cool the pump by discharging
the warm water onto the ground.
13
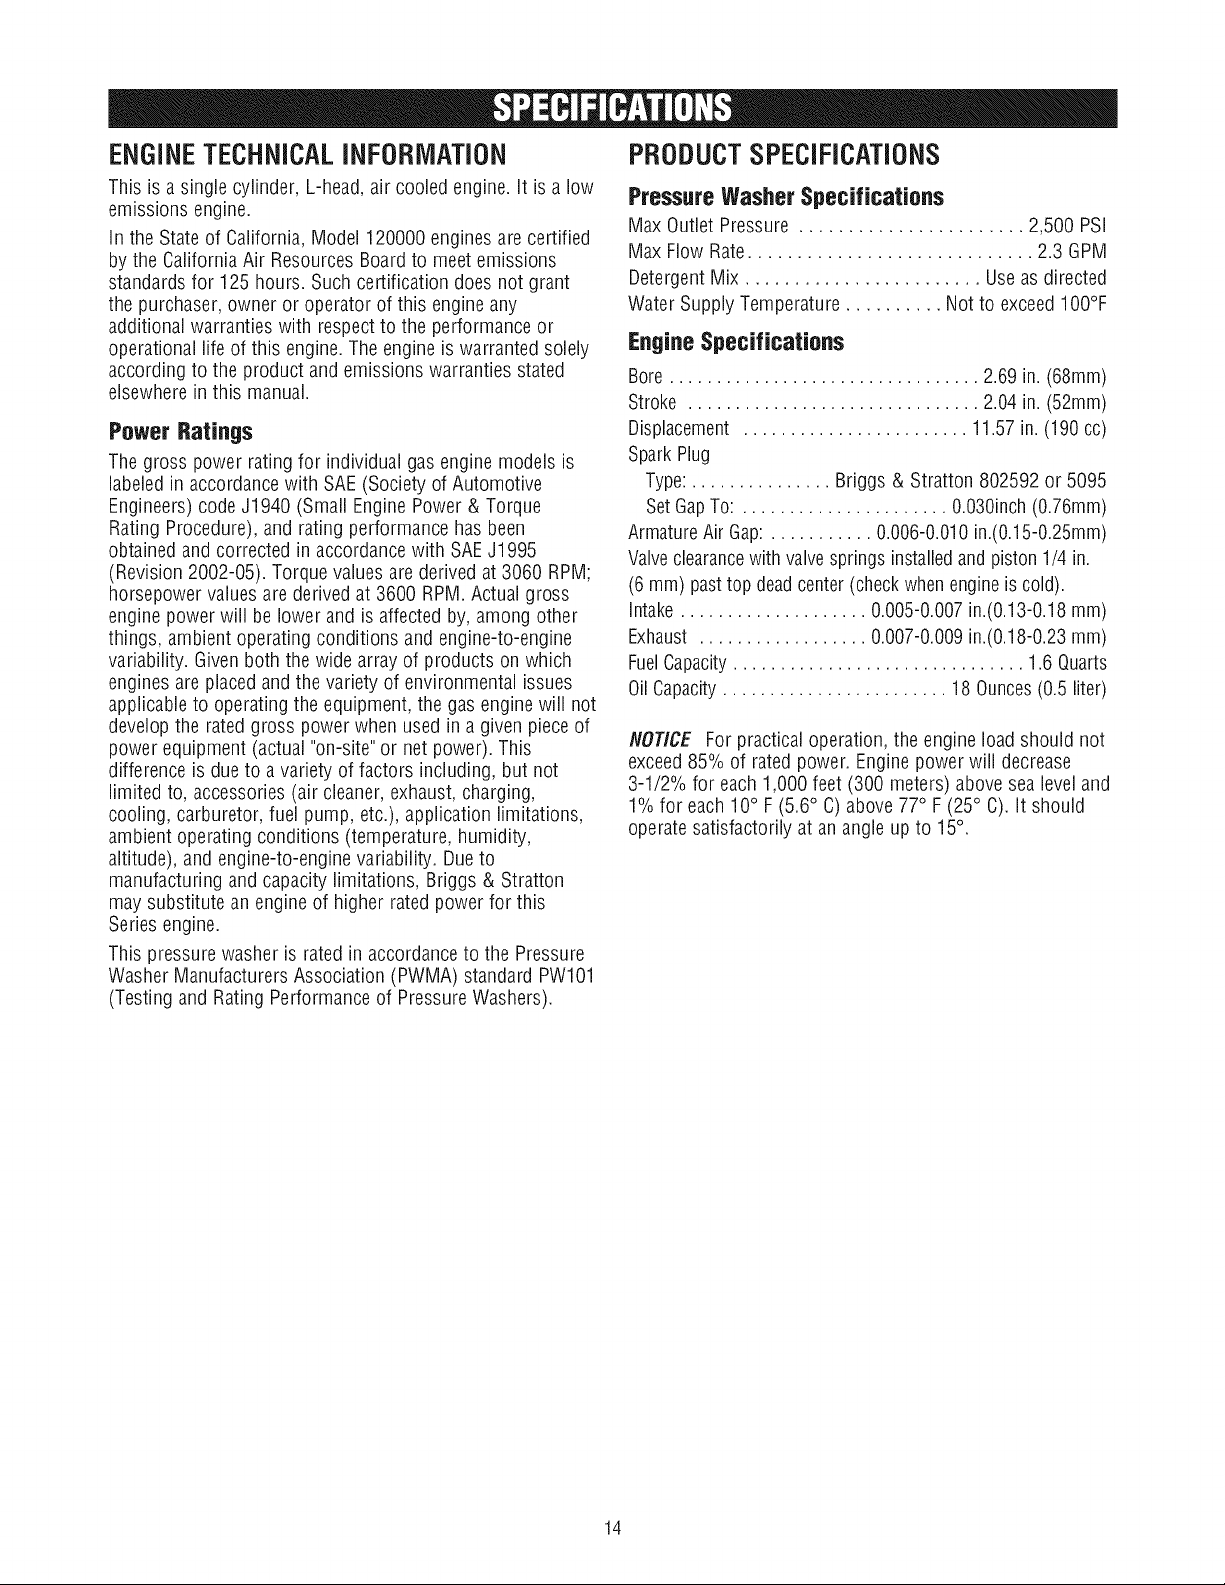
ENGINETECHNICALiNFORMATiON
This is a single cylinder, L-head,air cooled engine, it is a low
emissions engine.
In the State of California, Model 120000 engines are certified
by the California Air Resources Boardto meet emissions
standardsfor 125 hours. Such certification does not grant
the purchaser, owner or operator of this engine any
additional warranties with respectto the performance or
operational life of this engine. Theengine is warranted solely
according to the product and emissions warranties stated
elsewherein this manual.
PowerRatings
Thegross power rating for individual gas engine models is
labeled in accordancewith SAE(Society of Automotive
Engineers)code J1940 (Small Engine Power & Torque
Rating Procedure), and rating performance has been
obtained and corrected in accordancewith SAEJ1995
(Revision 2002-05). Torque values are derived at 3060 RPM;
horsepower values are derived at 3600 RPM.Actual gross
engine power will be lower and is affected by, among other
things, ambient operating conditions and engine-to-engine
variability. Given both the wide arrayof products on which
enginesare placed andthe variety of environmental issues
applicableto operatingthe equipment,the gas engine wiii not
developthe ratedgross power when used in a given pieceof
power equipment (actual "on-site"or net power). This
difference is due to a variety of factors including, but not
limited to, accessories (air cleaner, exhaust, charging,
cooling, carburetor, fuel pump, etc.), application limitations,
ambient operating conditions (temperature, humidity,
altitude), and engine-to-engine variability. Dueto
manufacturing and capacity limitations, Briggs & Stratton
may substitute an engine of higher ratedpower for this
Seriesengine.
This pressurewasher is rated in accordanceto the Pressure
Washer ManufacturersAssociation (PWMA) standard PW101
(Testing and Rating Performanceof PressureWashers).
PRODUCTSPECIFICATIONS
PressureWasherSpecifications
Max Outlet Pressure ....................... 2,500 PSi
Max Flow Rate............................. 2.3 GPM
DetergentMix ........................ Use asdirected
Water Supply Temperature .......... Not to exceed100%
Engine Specifications
Bore ................................. 2.69 in. (68mm)
Stroke ............................... 2.04 in.(52mm)
Displacement ........................ 11.57in.(190cc)
SparkPlug
Type:............... Briggs & Stratton 802592 or 5095
SetGapTo: ...................... 0.030inch (0.76mm)
ArmatureAir Gap:........... 0.006-0.010in.(0.15-0.25mm)
Valveclearancewithvalvesprings installedand piston 1/4 in.
(6 mm) pasttop deadcenter(checkwhenengineiscold).
Intake.................... 0.005-0.007in.(0.13-0.18mm)
Exhaust .................. 0.007-0.009in.(0.18-0.23mm)
FuelCapacity............................... 1.6Quarts
0il Capacity........................ 18 Ounces(0.5liter)
NOTICE Forpractical operation, the engine load should not
exceed85% of rated power. Enginepower will decrease
3-1/2% for each1,000 feet (300 meters) above sealeveland
1% for each 10° F(5.6° C) above77° F(25° C). It should
operatesatisfactorily at an angle up to 15°.
14
OWNER'SRESPONSiBiLiTiES
Follow the hourly or calendar intervals, whichever occurs
first. More frequent service is required when operating in
adverseconditions noted below.
* Changeengine oil
* Check/clean water inlet screen'
* Check high pressure hose
* Checkdetergent siphoning hose
* Checkspray gun and assembly for leaks
* Cleandebris
* Checkengine oil level
* Serviceengine air cleaner2
* Changeengine oil2
* inspect muffler and spark arrester
* Servicespark plug
Emissions Control
Maintenance, replacement, or repair of the emissions
controldevices and systemsmay be performedbyany non-
roadengine repair establishment or individual. However,
to obtain "no charge" emissions control service, the work
must be performed by a factory authorizeddealer. Seethe
Emissions Warranty.
Before Each Use
1. Checkengine oil level.
2. Cleandebris.
3. Checkwater inlet screenfor damage.
4. Checkhigh pressure hose for leaks.
5. Checkgun and spray tip extension assemblyfor leaks.
6. Purge pump of air and contaminants.
PRESSUREWASHERMAINTENANCE
CleanDebris
Daily or before use, clean accumulateddebris from pressure
washer. Keeplinkage, spring and controls clean. Keeparea
around and behind muffler free from any combustible debris.
inspect cooling air slots and openings on the pressure
washer. Theseopenings must be kept clean and
unobstructed.
Pressurewasher parts should be kept clean to reduce the
risk of overheating and ignition of accumulated debris.
* Usea damp cloth to wipe exterior surfaces clean.
* Cleancooling system2
' Clean if clogged. Replace if perforated or torn.
2Service more often under dirty or dusty conditions.
GeneralRecommendations
Regularmaintenance will improve the performance and
extendthe life of the pressurewasher. Seeany Sears or
other qualified service dealerfor service.
Thepressure washer warranty does not cover items that
havebeensubjected to operator abuseor negligence.To
receivefull valuefrom the warranty, the operator must
maintain pressurewasher as instructed in this manual
including proper storage as detailed in Storage.
Someadjustments will needto be made periodically to
properly maintain your pressurewasher.
All service and adjustments should be madeat least once
eachseason. Follow the requirementsin the Maintenance
Schedulechart above.
NOTICE Oncea yearyou should cleanor replace the spark
plug and replacethe air filter. A new spark plug and clean air
filter assure proper fuel-air mixture and helpyour engine run
better and last longer.
Pump Oil
DONOTattempt any oil maintenanceon this pump. The
pump is pre-iubricated and sealedfrom the factory, requiring
no additional maintenancefor the life of the pump.
NOTICE improper treatment of pressurewasher can
damageit and shorten its life.
• DONOTinsertanyobjectsthroughcoolingslots.
* Usea soft bristle brush to loosencaked on dirt, oil, etc.
* Usea vacuum cleanerto pick up loosedirt and debris.
Checkand Cleaninlet Screen
Examinegarden hose inlet screen. Cleanif it is clogged or
replaceif it is torn.
Check High Pressure Hose
High pressure hoses can develop leaksfrom wear,kinking,
or abuse, inspect hose before eachuse. Check for cuts,
leaks,abrasions, bulging of cover, or damage or movement
of couplings. If anyof these conditions exist, replacehose
immediately.
_lLWARNING The high pressure stream of water that
and its underlying tissues, leading to serious
this equipment produces can cut through skin
injury and possible amputation.
• NEVERrepairhighpressurehose.Replaceit.
• ReplacementhoseratingMUSTexceedmaximumpressure
ratingof unit.
15
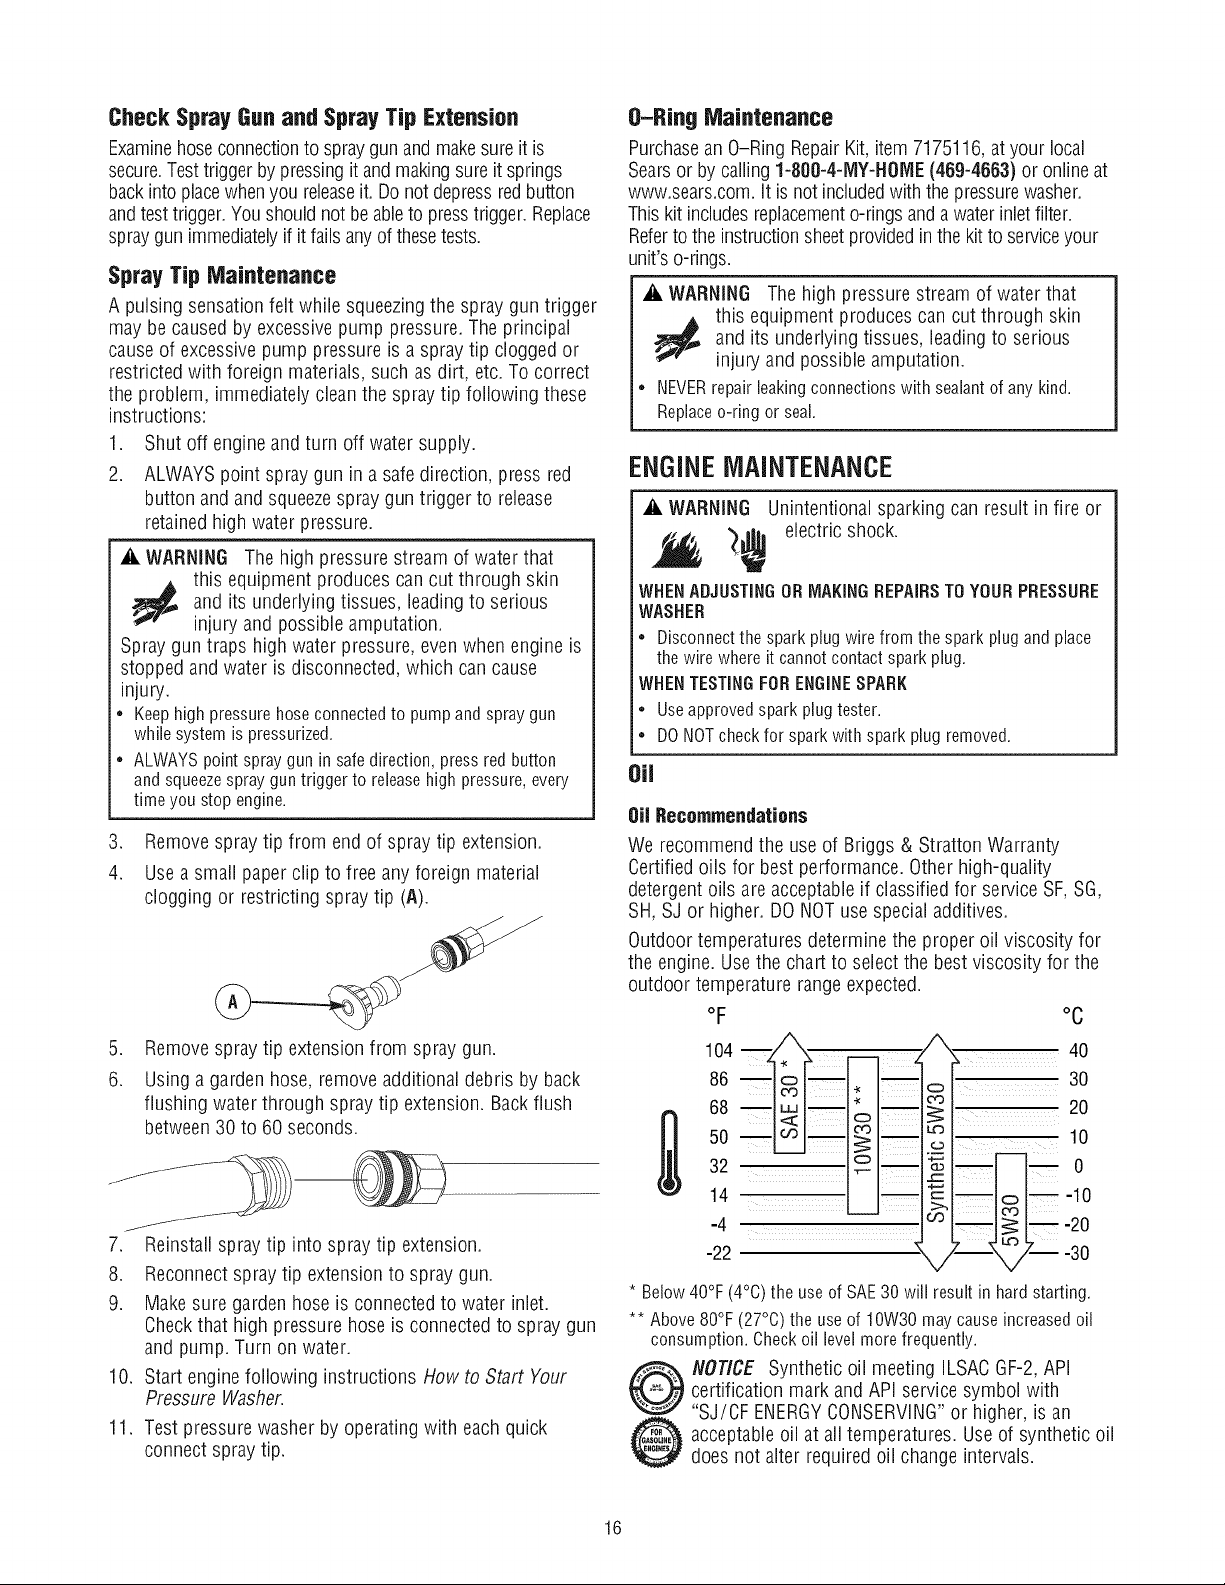
Check Spray Gunand Spray Tip Extension
Examinehoseconnectionto spraygun and makesure it is
secure.Testtrigger bypressingit and makingsureit springs
backintoplacewhenyou releaseit. Donotdepressredbutton
andtesttrigger.Youshould not beableto presstrigger. Replace
spraygun immediatelyif it fails anyof thesetests.
Spray Tip Maintenance
A pulsing sensationfelt while squeezingthe spray gun trigger
may be causedby excessivepump pressure. Theprincipal
causeof excessivepump pressure is a spray tip clogged or
restricted with foreign materials, such asdirt, etc. To correct
the problem, immediately cleanthe spray tip following these
instructions:
1. Shut off engine and turn off water supply.
2. ALWAYSpoint spray gun in a safe direction, press red
button and and squeezespray gun trigger to release
retainedhigh water pressure.
_i, WARNING The high pressure stream of water that
and its underlying tissues, leadingto serious
this equipment produces cancut through skin
injury and possible amputation.
Spraygun traps high water pressure,even when engine is
stopped and water is disconnected, which can cause
injury.
* Keephighpressurehoseconnectedto pumpandspraygun
whilesystemispressurized.
* ALWAYSpointspraygunin safedirection,pressredbutton
andsqueezesprayguntriggerto releasehighpressure,every
timeyoustopengine.
3. Removespray tip from endof spray tip extension.
4. Use a small paper clip to free any foreign material
clogging or restricting spray tip (A).
5. Removespray tip extension from spray gun.
6. Usinga garden hose, remove additionaldebris by back
flushingwater through spray tip extension. Backflush
between 30 to 60 seconds.
7. Reinstall spray tip into spray tip extension.
8. Reconnectspray tip extensionto spray gun.
9. Make sure garden hose is connectedto water inlet.
Checkthat high pressure hoseis connected to spray gun
and pump. Turn on water.
10. Start enginefollowing instructions How to Start Your
Pressure Washer.
11. Test pressurewasher by operating with each quick
connect spray tip.
O-Bino Maintenance
Purchasean O-Ring RepairKit,item 7175116,atyour local
Searsor by calling1-888-4-1VlY-NOME(469-4663)or onlineat
www.sears.com,it is not includedwiththe pressurewasher.
This kit includesreplacemento-rings anda waterinlet filter.
Refertothe instructionsheetprovidedin thekit to serviceyour
unit'so-rings.
_i, WARNING The high pressure stream of water that
and its underlying tissues, leading to serious
this equipment produces can cut through skin
injury and possible amputation.
* NEVERrepairleakingconnectionswithsealantof anykind.
Replaceo-ringor seal.
ENGINEMAINTENANCE
_i, WARNING Unintentional sparking can result in fire or
_ electric shock.
WHENADJUSTINGOR MAKING REPAIRSTOYOUR PRESSURE
WASHER
* Disconnectthe spark plug wire from the spark plug and place
the wire where it cannot contact spark plug.
WHENTESTINGFORENGINESPARK
* Useapproved spark plug tester.
. DONOTcheckfor spark with spark plug removed.
Oil
8il Recommendations
We recommendthe use of Briggs & Stratton Warranty
Certifiedoils for best performance. Other high-quality
detergent oils are acceptable if classified for serviceSF,SG,
SH,SJ or higher. DO NOTusespecial additives.
Outdoortemperatures determine the proper oil viscosity for
the engine.Usethe chart to select the best viscosity for the
outdoor temperature range expected.
oF
\ 40
;_30
104___506886 _o__
32 .o
14
-4
-22
* Below40°F(4°C)theuseof SAE30will resultin hardstarting.
** Above80°F(27°C)the useof 10W30maycauseincreasedoil
consumption.Checkoil levelmorefrequently.
O OTICE Syntheticoil meetingILSACGF-2,API
certification mark and API service symbol with
"SJ/CF ENERGYCONSERVING"or higher, is an
acceptableoil at all temperatures. Useof synthetic oil
does not alter required oil changeintervals.
°_20
_m m 0
--_C °
°C
10
-20
-30
16
CheckingOil Level
Oil level should be checked prior to eachuseor at least every
8 hours of operation. Keepoil level maintained.
1. Make sure pressure washer is on a levelsurface.
2. Removeoil dipstick and wipe dipstick with clean cloth.
Replaceand tighten dipstick. Remove and and check oil
level.
3. Verify oil is at FULL mark (top hole) on dipstick. Replace
and tighten dipstick.
Full
Adding EngineOil
1. Make sure pressure washer is on a levelsurface.
2. Checkoil level as described in CheckingOilLevel
3. If needed,slowly pour oil into oil fill opening to the FULL
mark on dipstick. DONOToverfill.
4. Tip your pressure washer to drain oil from oil fill into a
suitable container making sure you tip your unit away
from spark plug. When crankcaseis empty, return
pressurewasher to upright position.
5. Slowly pour recommendedoil (about 18 oz.) into oil fiii
opening. Pauseto permit oil to settle. Fill to "Full" mark
on dipstick.
6. Wipe dipstick cleaneachtime oil level is checked. DO
NOToverfill.
7. Replaceand tighten dipstick.
8. Wipe up any remaining oil.
9. Reconnectspark plug wire to spark plug.
Service Air Cleaner
Your engine will not run properly and may be damagedif you
run it with a dirty air cleaner. Service more often if operating
under dirty or dusty conditions. Replacementsare available
atyour local Searsservicecenter.
To service the air cleaner, follow these steps:
1. Loosenscrew (A) and tilt cover (B) down.
NOTICE Overfilling with oil may cause the engine to not
start, or hard starting.
• DO NOT overfill.
• If overthe FULL mark on dipstick, drain oil to reduce oil level to
FULLmark on dipstick.
4. Replaceand tighten dipstick.
ChangingEngineOil
if you are usingyour pressurewasher under extremely dirty
or dusty conditions, or in extremely hot weather, change oil
more often.
A CAUTION Avoid prolonged or repeatedskin contact
with usedmotor oil.
• Usedmotoroil hasbeenshownto causeskincancerincertain
laboratoryanimals.
• Thoroughlywashexposedareaswith soapandwater.
KEEPOUTOFREACHOFCHILDREN.DON'T
POLLUTE.CONSERVERESOURCES.RETURN
USEDOILTO COLLECTIONCENTERS.
Changeoil while engineis still warmfrom running,as
follows:
1. Drain fuel tank by running pressure washer until fuel
tank is empty.
2. Disconnect spark plug wire and keepit away from spark
plug.
3. Cleanarea around oil fill, removeoil fill cap/dipstick.
Wipe dipstick clean.
2. Carefullyremove cartridge (C) assembly.
3. To clean cartridge, gently tap pleatedpaperside on a fiat
surface.
4. Reinstallclean or new cartridge assembly inside cover.
5. insert cover's tabs (B) into slots in bottom of base (E).
6. Tilt cover up and tighten screw securely to base.
NOTICE You can purchasenew air filter elements by calling
1-800-4-1VlY-NOIVlE(469-4663).
Service Spark Plug
Changingthe spark plug will help your engine to start easier
and run better.
1. Cleanareaaround spark plug.
2. Removeand inspect spark plug.
3. Replacespark plug if electrodes are pitted, burned or
porcelain is cracked. Usethe recommendedreplacement
plug. See Specifications.
17
.
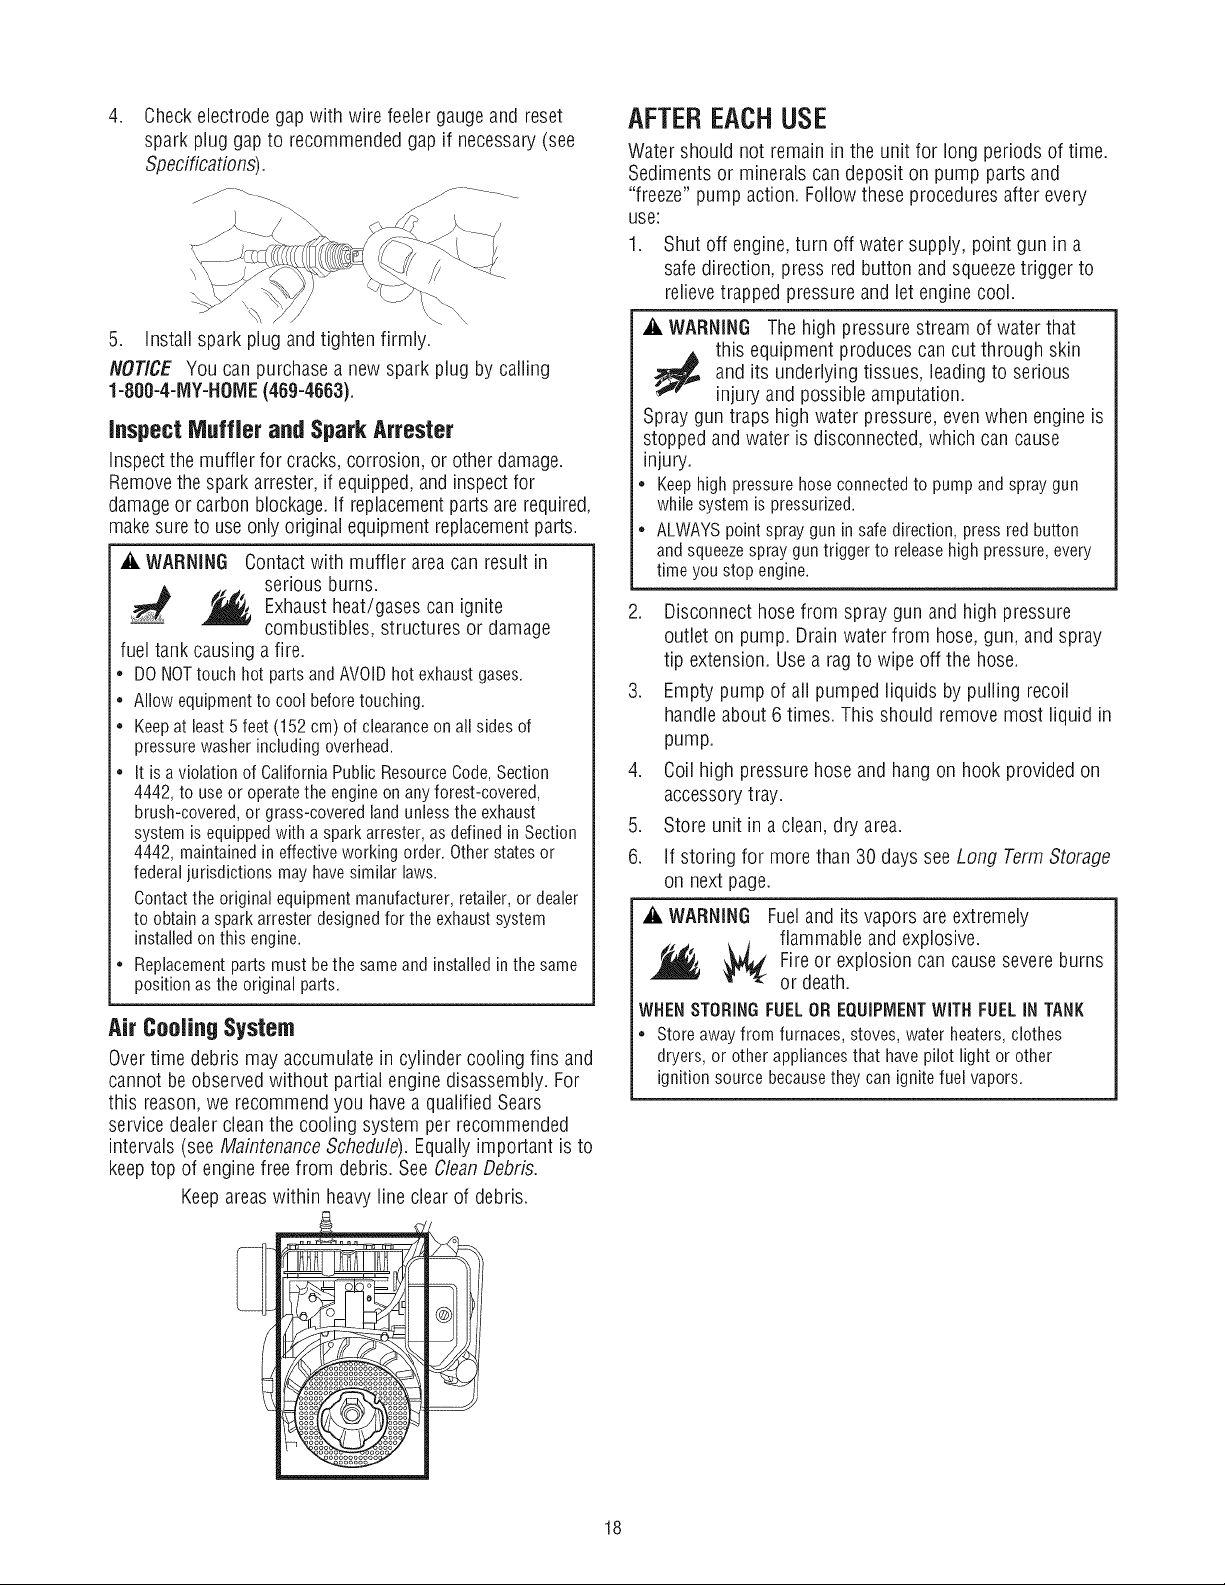
Checkelectrode gap with wire feeler gaugeand reset
spark plug gap to recommended gap if necessary(see
Specifications).
5. install spark plug and tighten firmly.
NOT/CE You can purchase a new spark plug by calling
1-800-4-iVlY-NOiVlE(469-4663).
inspect Muffler and Spark Arrester
inspectthe mufflerfor cracks,corrosion, or otherdamage.
Removethe spark arrester,if equipped,and inspectfor
damageor carbonblockage,if replacementpartsare required,
makesureto useonly original equipmentreplacementparts.
A, WARNING Contact with muffler area can result in
serious burns.
_ Exhaust heat/gases can ignite
combustibles, structures or damage
fuel tank causing a fire.
• DO NOTtouch hot parts and AVOID hot exhaust gases.
• Allow equipment to cool before touching.
• Keepat least 5 feet (152 cm) of clearanceon all sidesof
pressure washer including overhead.
• It isa violation of California Public Resource Code,Section
4442, to use or operatethe engine on any forest-covered,
brush-covered,or grass-covered land unless the exhaust
system is equippedwith a spark arrester,as defined in Section
4442, maintained in effectiveworking order. Otherstates or
federal jurisdictions may havesimilar laws.
Contactthe original equipment manufacturer, retailer, or dealer
to obtain a sparkarrester designedfor the exhaustsystem
installedon this engine.
• Replacementparts must be the sameand installed in the same
position as the original parts.
Air Cooling System
Overtime debris may accumulate in cylinder cooling fins and
cannot be observedwithout partial engine disassembly. For
this reason,we recommendyou have a qualifiedSears
servicedealer cleanthe cooling system per recommended
intervals (see MaintenanceSchedule). Equallyimportant is to
keeptop of engine free from debris. See CleanDebris.
Keepareaswithin heavyline clear of debris.
AFTEREACHUSE
Water should not remain in the unit for long periods of time.
Sedimentsor minerals candeposit on pump parts and
"freeze" pump action. Follow these procedures after every
use:
1. Shut off engine,turn off water supply, point gun in a
safedirection, press red button and squeezetrigger to
relievetrapped pressure and let engine cool.
_ILWARNING The high pressure stream of water that
and its underlying tissues, leading to serious
this equipment produces can cut through skin
injury and possible amputation.
Spray gun traps high water pressure,even when engine is
stopped and water is disconnected, which can cause
injury.
• Keephighpressurehoseconnectedto pumpandspraygun
whilesystemispressurized.
• ALWAYSpointspraygunin safedirection,pressredbutton
andsqueezesprayguntriggerto releasehighpressure,every
timeyoustopengine.
.
Disconnecthose from spray gun and high pressure
outlet on pump. Drainwater from hose,gun, and spray
tip extension. Usea ragto wipe off the hose.
.
Empty pump of aii pumped liquids by puffing recoil
handleabout 6 times. This should remove most liquid in
pump.
.
Coilhigh pressurehose and hang on hook provided on
accessorytray.
5.
Store unit in a clean, dry area.
6.
If storing for more than 30 days see Long Term Storage
on next page.
_ILWARNING Fueland its vapors are extremely
flammable and explosive.
Fireor explosion can causesevere burns
or death.
WHENSTORINGFUELOREQUIPMENTWITHFUELINTANK
* Storeawayfromfurnaces,stoves,waterheaters,clothes
dryers,orotherappliancesthathavepilotlightorother
ignitionsourcebecausetheycanignitefuelvapors.
18
WINTERSTORAGE ChangeOil
While engine is still warm, drain oil from crankcase.Refill
NOTICE You must protect your unit from freezing
temperatures.
= Failure to do so will permanently damageyour pump and render
your unit inoperable.
= Freezedamage is not covered underwarranty.
To protectthe unit from freezingtemperatures:
1. Follow steps 1-4 in the previous section AfterEach Use.
2. Use pump saver, availableat Sears retailitem 7174403,
to treat pump. This minimizes freezedamageand
lubricates pistons and seals.
3. If pump saver is not available,connect a 3-foot section
of garden hose to water inlet adapter. Pour
RV-antifreeze (antifreezewithout alcohol) into hose. Pull
recoil handletwice. Disconnect 3-foot hose.
4. Store unit in a clean,dry area.
LONGTERIViSTORAGE
If you do not plan to usethe pressure washer for morethan
30 days, you must preparethe engine and pump for long
term storage.
It is important to prevent gum deposits from forming in
essentialfuel system parts such as the carburetor, fuel filter,
fuel hoseor tank during storage. Also, experienceindicates
that alcohol-blended fuels (called gasohol, ethanol or
methanol) can attract moisture, which leadsto separation
and formation of acids during storage. Acidic gas can
damagethe fuel system of an enginewhile in storage.
with recommendedgrade. See ChangingEngineOil.
Protect Pump
To protect the pump from damagecaused by mineral
deposits or freezing, use PumpSaver, item 7174403, to treat
pump. This preventsfreeze damageand lubricates pistons
and seals.
NOTICE PumpSaveris availableas an optional accessory, it
is not included with the pressure washer. Contactyour local
Searsservice center to purchase PumpSaver.
NOTICE You must protect your unit from freezing
temperatures.
= Failureto do so will permanently damage your pump and render
your unit inoperable.
= Freezedamageis not covered under warranty.
To usePumpSaver,make surethe pressurewasher is turned
off and disconnected from supply water. Readand follow all
instructions and warnings given on the PumpSavercontainer.
Other Storage Tips
1. DONOTstore fuel from oneseasonto another unless it
hasbeen treated asdescribed in Protect FuelSystem.
.
Replacefuel container if it starts to rust. Rust and/or dirt
in fuel cancause problems if it's used with this unit.
3.
Coverunit with a suitable protective cover that does not
retain moisture.
_i, WARNING
Storagecovers can be flammable.
Protect Fuel System
FueJAdditive:
Fuelcan becomestale when stored over 30 days.Stale fuel
causesacid and gum deposits to form in the fuel system or
on essential carburetor parts. To keepfuel fresh, use Briggs
& Stratton FRESHSTART®fuel stabilizer, availableasa
liquid additive or a drip concentrate cartridge.
Thereis no needto drain gasolinefrom the engine if a fuel
stabilizer is added according to instructions. Run the engine
for 2 minutes to circulate the stabilizerthroughout the fuel
system. The engine andfuel canthen be stored up to
24 months.
If gasoline in the engine hasnot beentreated with afuel
stabilizer, it must be drained into an approvedcontainer. Run
the engine until it stops from lackof fuel. The useof a fuel
stabilizer in the storage container is recommendedto
maintain freshness.
• DO NOT placea storage cover over ahot pressure washer.
• Let equipment cool for a sufficient time before placing the
cover on the equipment.
4. Store unit in a clean and dry area.
19
Problem Cause
Correction
Pump hasfollowing problems:
failure to producepressure,
erraticpressure, chattering,Joss
of pressure,low water volume.
Detergentfails to mix with spray.
Enginerunsgoodat no-load but
"bogs" whenload is added.
Enginewill not start;or startsand
runsrough.
1. Water inlet is blocked.
2. inadequatewater supply.
3. inlet hose is kinkedor leaking.
4. Clogged inlet hosestrainer.
5. Water supply is over IO0°F.
6. High pressure hoseis blocked or
leaks.
7. Gun leaks.
8. Spraytip is obstructed.
9. Pump is faulty.
1. Detergentsiphoning tube is not
submerged.
2. Detergentsiphoning tube/filter is
clogged or cracked.
3. High pressure spray tip installed.
Engine speedis too slow.
1. Throttle leverin STOPposition.
2. Dirty air cleaner.
3. Out of fuel.
4. Stalefuel.
5. Spark plug wire not connected to
spark plug.
6. Badspark plug.
7. Water in fuel.
8. Overchoking.
9. Excessivelyrich fuel mixture.
1. Clearinlet.
2. Provide adequatewater flow.
3. Straighten inlet hose, patch leak.
4. Checkand cleaninlet hose strainer.
5. Provide cooler water supply.
i
i
i6. Clearblocks in high pressure hose or
replacehose.
7. Replacegun.
8. Cleanspray tip.
9. Contact Searsservicefacility.
1. insert detergent siphoning tube into
detergent.
2. Cleanor replacefilter/detergent
siphoning tube.
3. Replacehigh pressure spray tip with
black spray tip.
Move throttle lever to FASTposition, if engine
still "bogsdown", contact Sears service
facility.
1. Move throttle lever to FASTposition.
2. Cleanor replaceair cleaner.
3. Fillfuel tank.
i
i
i4. Drain fuel tank; fill with fresh fuel.
5. Connectwire to spark plug.
6. Replacesparkplug.
7. Drain fuel tank; fill with fresh fuel.
8. Openchoke fully and crank engine.
9. Contact Searsservicefacility.
Engine shutsdown during Out of fuel. Fillfuel tank.
operation.
Engine Jackspower. Dirty air filter.
Engine"hunts" or faJters.
Choke is openedtoo soon.
Replaceair filter.
Move choke to halfway position until engine
runs smoothly.
2O

CRAFTSMAN2500 PSi Pressure Washer 580.752500
Main Unit m Exploded View and Parts List
900
\
item
Part #
1
206033GS
2
R204650GS
3
311094GS
B1797GS
4
B2203GS
5
202274GS
6
189971GS
7
23139GS
8
208673GS
9
192914GS
10
201496GS
11
B2384GS
12
201497GS
13
203526GS
14
204971GS
195983AEGS
195983RGS
195983XGS
198841GS
15
204627GS
16
196006GS
17
200595GS
18
192310GS
19
208797GS
192050GS
7026257MA
900
NSP
Description
BASE
HANDLE
BILLBOARD
CLIP
KIT-HARDWAREHANDLE
PUMP
KIT-CHEMICALHOSE
KEY
VALVE-THERMALRELIEF
KIT-CHEMICALINJ
KIT-WATERINLET
FILTER-GARDENHOSE
FITTING
KIT-HARDWAREPUMPMOUNTING
KiT-QCNOZZLES
NOZZLE-QCRED
NOZZLE-QCWHITE
NOZZLE-QCYELLOW
NOZZLE-QCBLACK
GUN
HOSE
EXTENSION-QC
MOUNT-VIBRATION
KIT-WHEEL
E-RING
WASHER-WAVE
ENGINE(126TO2-O301-B1)(see pages
22-25)
PartsNot Illustrated
Part#
311098GS
AB3061BGS
205411GS
794693
208648GS
699864
194256GS
Optional Accessories
7175187
7175197
7175124
7175122
7175116
7175129
7175121
7174402
7174403
7174404
7174405
7174406
@
18
Description
MANUAL-OPERATOR'S
OILBOTTLE
AXLE
DECAL-Warning
DECAL-Shroud
COVER-LABEL/ASSY
TAG-WARNING
Not Illustrated
GardenHoseQuick Connect
Accessory Quick Connect
Rotating Brush Kit
30' ReplacementHose
0 RingRepair Kit
Turbo Nozzle
25' Extension Hose
HoseReel
PumpSaver
Project Pro@ PerfectMixTM Multi-
Purposeand VehicleCleaner
Project Pro@ PerfectMixTM Concrete,
Brick, andTile Cleaner
Project Pro@ PerfectMixTM Mold and
Mildew Cleaner
19
21
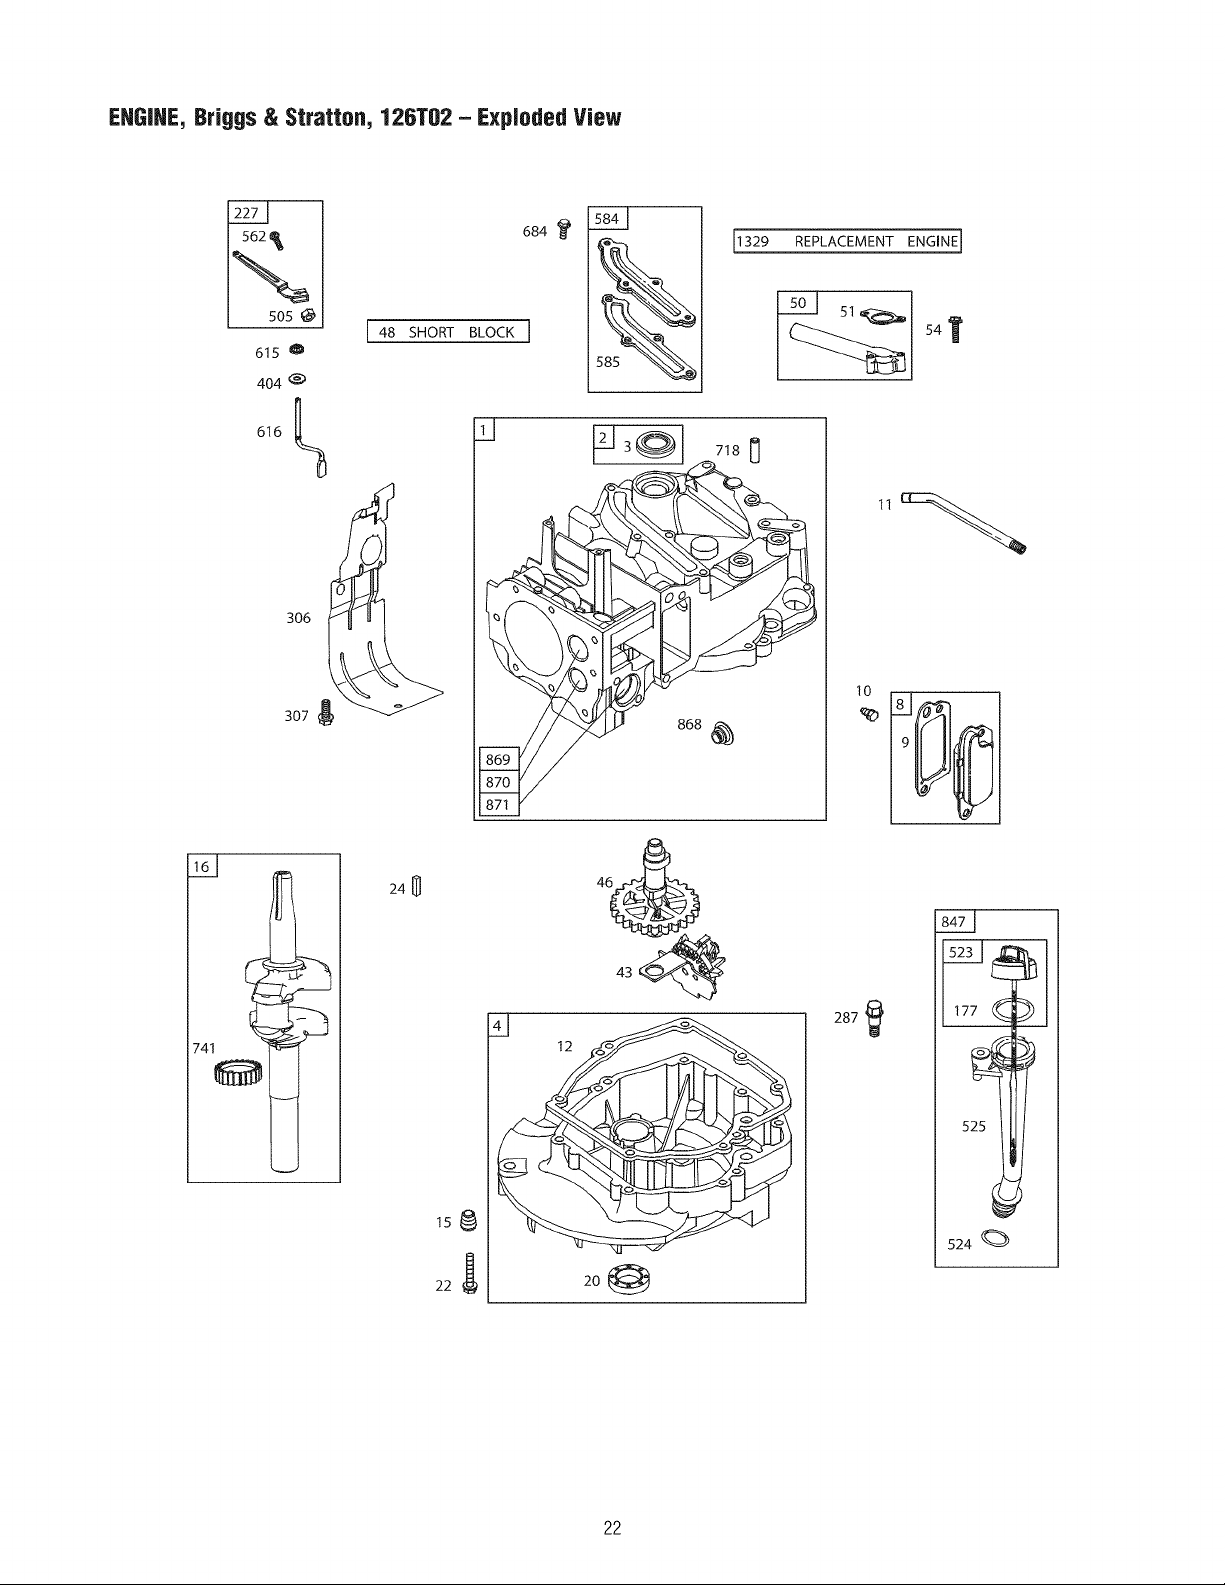
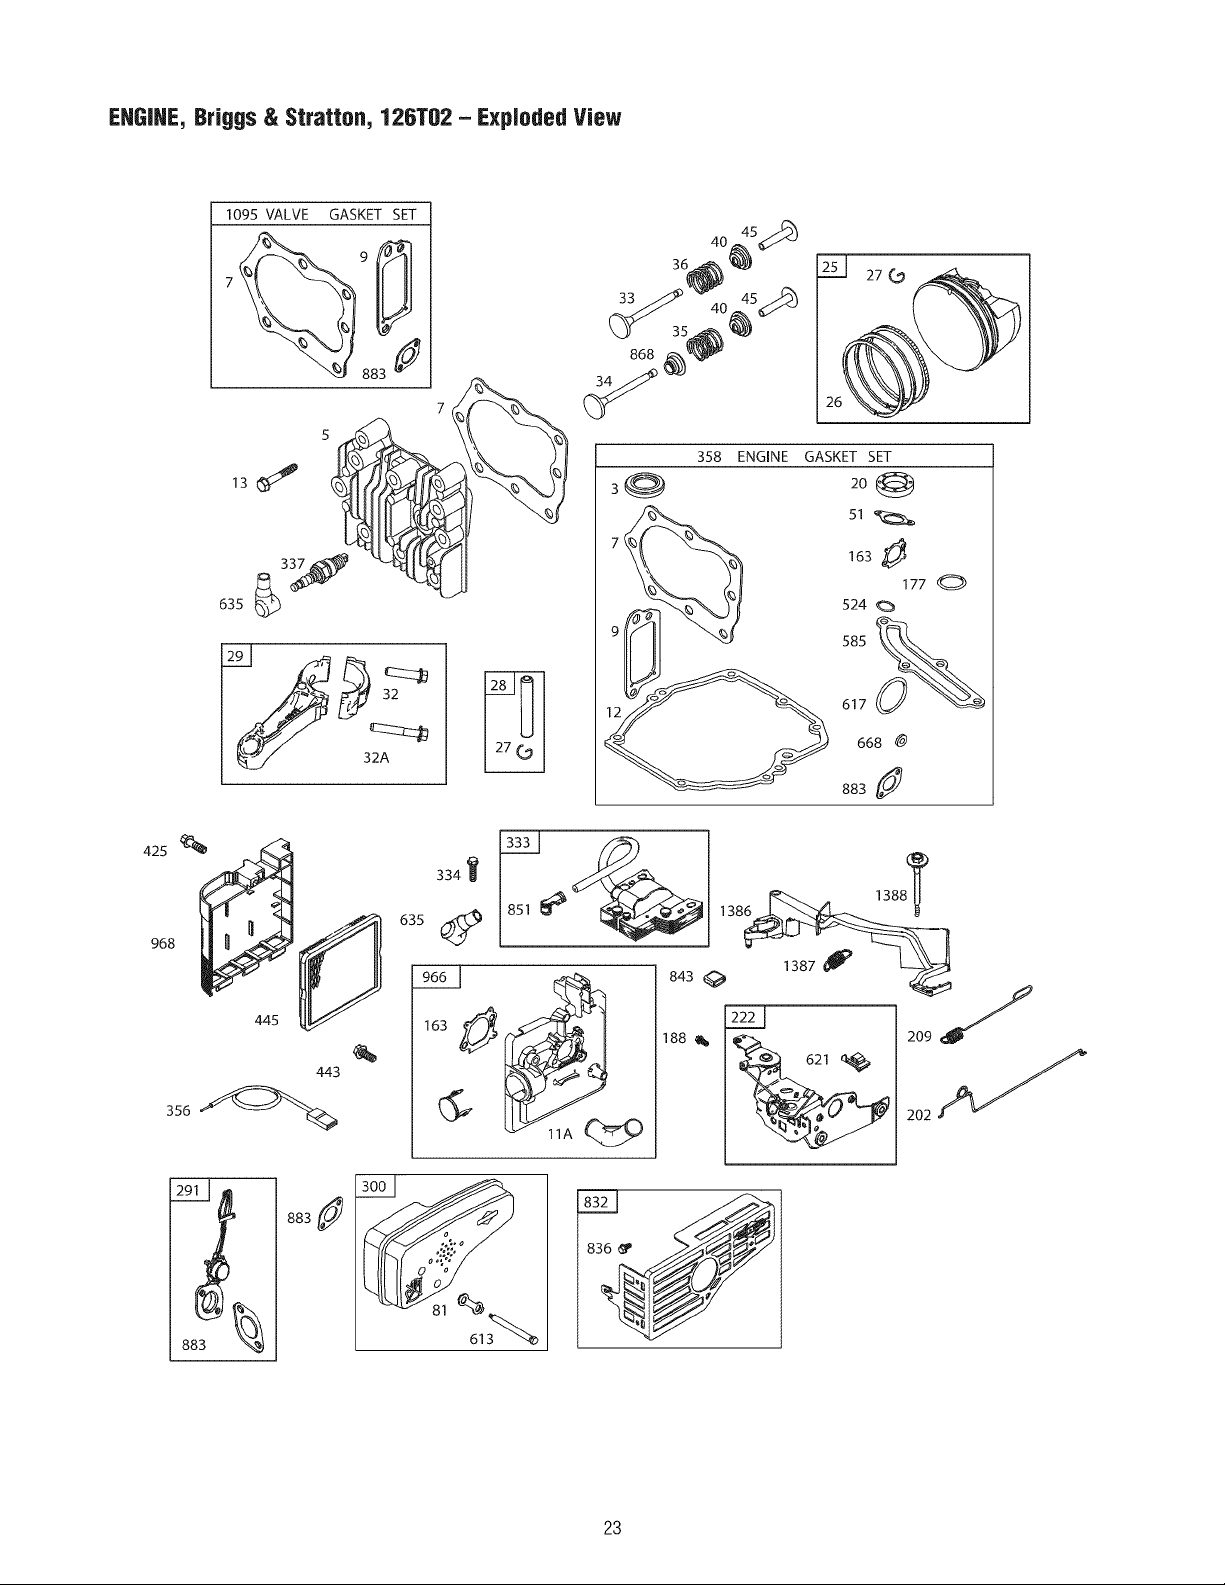
ENGINE,Briggs & Stratton, 126T02 - ExpJodedView
[sos
615 0
404 _
616 __
306
48 SHORT BLOCK ]
d
684 ?
1329
718
10
8o8
241_
287
12
524 (_
22
ENGINE,Briggs & Stratton, 126T02 - ExpJodedView
1095 VALVE GASKET SET
883 _
34_
364o_
2sl 27(__
3583_ENGINE GASKET SET
2o_
51 _
163 _
177 0
524
585
617
425 _
356 _
443
32A
668 @
883 J
163
23
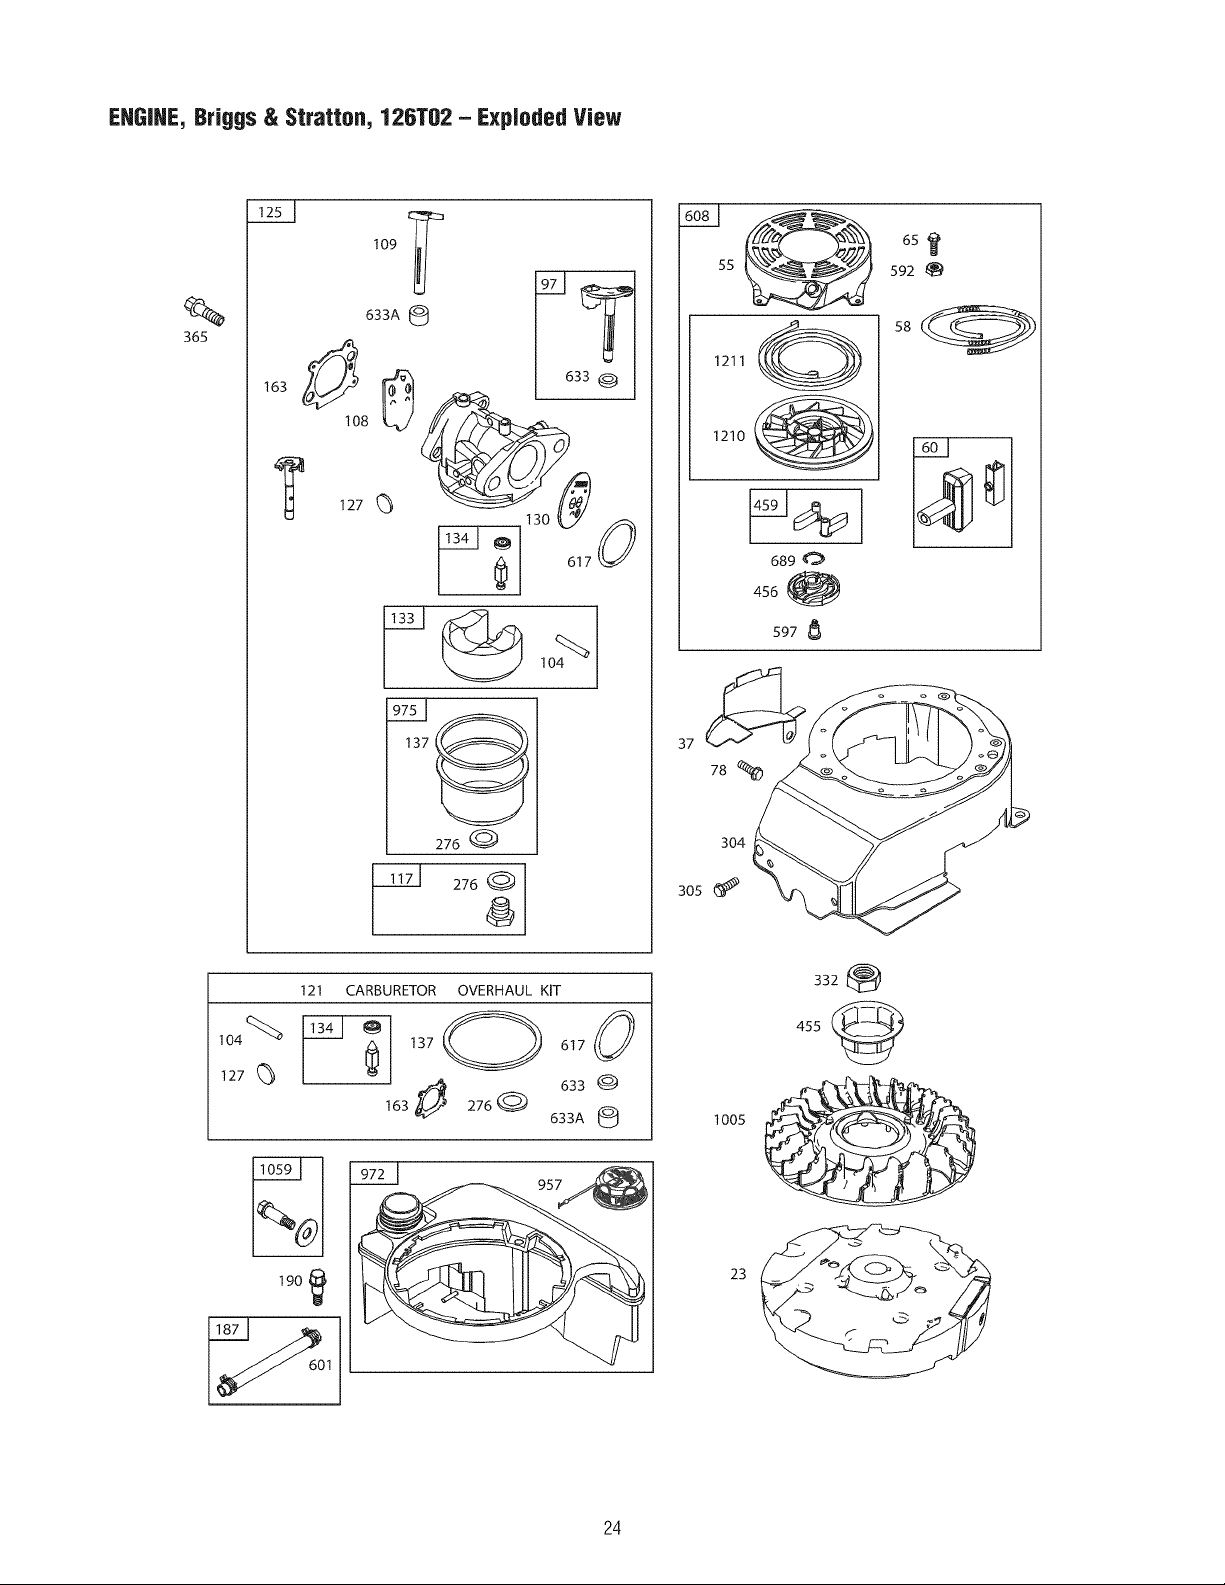
ENGINE,Briggs & Stratton, 126T02 - ExpJodedView
365
109
137
37
55
Q
1211
1210
456
78
65
$92
689 0
597
276
276
121 CARBURETOR OVERHAUL KIT
1341 @
137
163# 276_ )
190
617
633 (_
633A (_
304
305
332
455
23
24

ENGIHE,Briggs & Stratton, t26T82 - Parts List
Item Part # Description
1 697322 Cylinder Assembly
2 399269 Kit-Bushing/Seal (Magneto Side)
3 299819s Seal-Oil (Magneto Side)
4 493279 Sump-Engine
5 691160 Head-Cylinder
7 692249 Gasket-Cylinder Head
8 695250 BreatherAssembly
9 699472 Gasket-Breather
10 691125 Screw (Breather Assembly)
11 691781 Tube-Breather
11A 691923 Tube-Breather
12 692232 Gasket-Crankcase
13 690912 Screw (Cylinder Head)
15 691680 Plug-Oil Drain
16 797372 Crankshaft
20 399781s Seal-Oil(PTOSide)
22 691092 Screw (Crankcase Cover/Sump)
23 790536 Flywheel
24 222698s Key-Flywheel
25 797302 Piston Assembly (Standard)
797303 Piston Assembly (.020" Oversize)
26 797304 Ring Set (Standard)
797305 Ring Set (.020" Oversize)
27 691588 Lock-Piston Pin
28 298909 Pin-Piston
29 797306 Rod-Connecting
30 694692 Dipper-Connecting Rod
32 691664 Screw (Connecting Rod) (Short)
32A 695759 Screw (Connecting Rod) (Long)
33 262651s Valve-Exhaust
34 262652s Valve-intake
35 691270 Spring-Valve (intake)
36 691270 Spring-Valve (Exhaust)
37 793756 Guard-Flywheel
40 692194 Retainer-Valve
43 691997 Slinger-Governor/Oil
45 690548 Tappet-Valve
46 691449 Camshaft
48 792440 Short Block
50 794305 Manifold-intake
51 794306 Gasket-intake
54 691650 Screw (intake Manifold)
55 691421 Housing-Rewind Starter
58 691921 Rope-Starter
60 493926 Grip-Starter Rope
65 690837 Screw (Rewind Starter)
78 691108 Screw (FlywheelGuard)
81 691740 Lock-Muffler Screw
97 696565 Shaft-Throttle
104 691242 Pin-Float Hinge
108 795935 Valve-Choke
109 795936 Shaft-Choke
117 695042 Jet-Main (Standard)
121 498260 Kit-Carburetor Overhaul
125 794304 Carburetor
127 694468 Plug-Welch
130 696564 Valve-Throttle
133 398187 Float-Carburetor
134 398188 Kit-Needle/Seat
137 796610 Gasket-FloatBowl
163 272653s Gasket-Air Cleaner
177 691031 SeaFORing (Dipstick)
187 791766 Line-Fuel(Cut To Required Length)
188 693399 Screw (Control Bracket)
190 690940 Screw (FuelTank)
202 691829 Link-Mechanical Governor
209 691290 Spring-Governor (Meadow Green)
222 790143 Bracket-Control
227 690783 Lever-Governor Control
276 271716 Washer-Sealing
Item Part#
287 690940
291 790830
300 790828
304 791291
305 691108
306 790836
307 690345
332 690662
333 802574
334 691061
337 796112s
356 692390
358 794307
365 691688
404 690272
425 690670
443 692523
445 491588s
455 791960
456 692299
459 281505s
505 691251
523 499621
524 692296
525 495265
562 691119
584 697734
585 691879
592 690800
597 691696
601 791850
608 497680
613 790833
615 690340
616 698801
617 270344s
621 692310
633 691321
633A 693867
635 66538s
684 690345
689 691855
718 690959
741 794388
832 499034
836 690664
843 691884
847 692047
851 493880s
868 697338
869 691155
870 690380
871 262OO1
63709
883 691881
957 793606
966 792040
968 692298
972 699374
975 796611
1005 691346
1059 692311
1095 498528
1210 498144
1211 498144
1329 126T0201
1386 790848
1387 790849
1388 790850
Description
Screw (Dipstick Tube)
Thermostat
Muffler
Housing-Blower
Screw (Blower Housing)
Shield-Cylinder
Screw (Cylinder Shield)
Nut (Flywheel)
Armature-Magneto
Screw (Magneto Armature)
Plug-Spark
Wire-Stop
GasketSet-Engine
Screw (Carburetor)
Washer (Governor Crank)
Screw (Air Cleaner Cover)
Screw (Air Cleaner Primer Base)
Filter-Air Cleaner Cartridge
Cup-Flywheel
Plate-Pawl Friction
PawI-Ratchet
Nut (Governor Control Lever)
Dipstick
Seal-Dipstick Tube
Tube-Dipstick
Bolt (Governor Control Lever)
Cover-Breather Passage
Gasket-Breather Passage
Nut (Rewind Starter)
Screw (Pawl Friction Plate)
Clamp-Hose (Green)
Starter-Rewind
Screw (Muffler)
Retainer-Governor Shaft
Crank-Governor
Seal-O Ring (intake Manifold)
Switch-Stop
Seal-Choke/Throttle Shaft (Throttle Shaft)
Seal-Choke/Throttle Shaft (Choke Shaft)
Boot-Spark Plug
Screw (Breather PassageCover)
Spring-Friction (Rewind Starter)
Pin-Locating
Gear-Timing (Steel)
Guard-Muffler
Screw (Muffler Guard)
Sleeve-Lever (Control Bracket)
Dipstick/Tube Assembly
Terminal-Spark Plug
Seal-Valve
Seal-Valve
Seat-Valve(Intake)
Bushing-Valve Guide (Exhaust)
Bushing-Valve Guide (Intake)
Gasket-Exhaust
Cap-FuelTank
Base-AirCleaner Primer
Cover-Air Cleaner
Tank-Fuel
Bowl-Float
Fan-Flywheel
Kit-Screw/Washer (Fuel Tank)
GasketSet-Valve
Pulley/Spring Assembly (Pulley)
Pulley/Spring Assembly (Spring)
14BI Replacement Engine
Vane-Air
Spring-Air Vane
Screw (Air Vane)
25
California, U.S. EPA,and Sears Emissions
ControlWarrantyStatement
YourWarranty RightsAnd Obligations
TheCalifornia Air Resources Board,U.S. EPA,and Sears,
Roebuckand Co.,U.S.A.(Sears) are pleasedto explain the
emissions control system warranty on your Model Year2008
and later engine/equipment. In California,new small off-road
engines must be designed, built, and equippedto meet the
State'sstringent anti-smog standards. Searsmust warrant
the emissions control system on your engine/equipmentfor
the periods of time listed below provided there has been no
abuse, neglect,or impropermaintenance of your small off-
road engine.
Your emissions control system may includepartssuch as
the carburetor or fuel injection system, fuel tank, ignition
system, and catalytic converter. Also includedmay be hoses,
belts, connectors, sensors, and other emissions-related
assemblies.Where a warrantable condition exists, Searswill
repair your engine/equipmentat no cost to you including
diagnosis, parts, and labor.
Manufacturer'sWarrantyCoverage:
Small off-road engines arewarranted for two years. If any
emissions-related part on your engine/equipment is
defective,the part will be repaired or replacedby Sears.
Owner'sWarrantyResponsibilities:
* As the small engine/equipment owner, you are
responsiblefor the performance of the required
maintenancelistedinyour owner's manual. Sears
recommendsthat you retainall receipts covering
maintenanceon your engine/equipment, but Sears
cannot deny warranty solely for the lackof receiptsor
your failure to ensure the performanceof all scheduled
maintenance.
• As the engine/equipmentowner, you should however
be awarethat Sears may deny you warranty coverage if
your engine/equipment or a part hasfailed due to
abuse, neglect,improper maintenance,or unapproved
modifications.
• You are responsiblefor presentingyour
engine/equipmentto a Sears distribution center,
servicing dealer,or other equivalent entity, as
applicable, assoon as a problem exists. Thewarranty
repairsshould be completed in a reasonableamount of
time, not to exceed30 days. If you have any questions
regardingyour warranty rights and responsibilities, you
should contact Sears at (800) 469-4663.
Sears EmissionsControl Warranty Provisions
Thefollowing arespecific provisions relativeto your
Emissions Control Warranty Coverage. it is in addition to the
Searsengine warranty for non-regulatedenginesfound in
the Operator'sManual.
1. Warranted Emissions Parts
Coverageunder this warranty extends only to the parts
listed below (the emissions control systems parts) to
the extent these parts were present on the engine
purchased.
a. FuelMetering System
• Coldstart enrichment system (soft choke)
• Carburetorand internalparts
• Fuelpump
• Fuelline,fuel line fittings, clamps
• Fueltank, cap and tether
• Carboncanister
b. Air Induction System
• Air cleaner
• intake manifold
• Purge and vent line
c. ignition System
• Sparkplug(s)
• Magneto ignition system
d. CatalystSystem
• Catalyticconverter
• Exhaustmanifold
• Air injection system or pulsevalve
e. Miscellaneous items Usedin AboveSystems
• Vacuum, temperature, position, time sensitive
valves and switches
• Connectorsand assemblies
2. Length of Coverage
Fora period of two years from date of original
purchase,Sears warrants to the original purchaserand
eachsubsequent purchaser that the engine is designed,
built, and equipped so as to conform with all applicable
regulations adopted bythe Air ResourcesBoard;that it
is freefrom defects in material and workmanship that
could causethe failure of a warranted part; and that it is
identical in aii material respects to the enginedescribed
in the manufacturer's application for certification. The
warranty period beginson the datethe engine is
originally purchased.
In the USA and Canada,a 24-hour hotline, 1-800-469-4663, has a menu of pro-recorded messages offering you product maintenance
information.
26
Thewarrantyonemissions-relatedpartsisasfollows:
• Anywarranted part that is not scheduledfor
replacementas required maintenancein the owner's
manual supplied, is warranted for the warranty period
stated above. If any such part fails during the period of
warranty coverage,the part will berepairedor replaced
by Searsat no charge to the owner. Any such part
repairedor replaced under the warranty will be
warranted for the remaining warranty period.
• Anywarranted part that is scheduled only for regular
inspection in the owner's manual supplied, is warranted
for the warranty period stated above. Any such part
repairedor replaced under warranty will be warranted
for the remaining warranty period.
• Anywarranted partthat is scheduledfor replacementas
requiredmaintenancein theowner's manualsupplied, is
warrantedfor the period of time prior to the first
scheduledreplacementpoint for that part. If the part fails
prior to thefirst scheduled replacement,the part will be
repairedor replacedby Searsat no chargeto the owner.
Anysuch part repairedor replacedunderwarrantywill be
warrantedfor the remainderof the period prior to the
first scheduledreplacementpointfor the part.
• Add on or modified parts that are not exempted bythe
Air Resources Board may not be used.The useof any
non exempted add on or modified parts by the owner
will be grounds for disallowing a warranty claim. The
manufacturer will not be liable to warrant failures of
warranted parts caused by the use of a non exempted
add on or modified part.
3. ConsequentialCoverage
Coverageshall extend to the failure of any engine
components causedby the failure of any warranted
emissions parts.
4. Claims and CoverageExclusions
Warranty claims shall be filed according to the
provisions of the Sears engine warranty policy.
Warranty coveragedoes not apply to failures of
emissions parts that are not original equipment Sears
parts or to partsthat fail due to abuse, neglect,or
improper maintenanceasset forth in the Sears engine
warranty policy. Sears is not liable for warranty
coverageof failures of emissions parts caused by the
use of add-on or modified parts.
LookFor ReJevantEmissionsDurability Periodand Air
Index Information OnYour EngineEmissionsLabeJ
Enginesthat are certified to meet the California Air Resources
Board (CARB)Emissions Standard must display information
regarding the Emissions Durability Period and the Air Index.
The engine manufacturer makes this information availableto
the consumer on emissions labels. Theengine emissions
labelwill indicatecertification information.
The Emissions DurabilityPerioddescribes the number of
hours of actual running time for which the engine is certified
to be emissions compliant, assuming proper maintenance in
accordancewith the Operating& Maintenance Instructions.
Thefollowing categories are used:
Moderate: Engine is certified to be emissions compliant for
125 hours of actual engine running time.
Intermediate: Engineis certified to be emissions compliant
for 250 hours of actual engine running time.
Extended: Engineis certified to be emissions compliant for
500 hours of actual engine running time.
Forexample, a typical walk-behind lawn mower is used20 to
25 hours per year. Therefore,the Emissions Durability
Period of an enginewith anintermediate ratingwould
equateto 10 to 12 years.
Small off-road enginesare certified to meet the United States
EnvironmentalProtection Agency (USEPA)Phase2
emissions standards. For Phase2 certified engines,the
Emissions CompliancePeriod referred to on the Emissions
Compliancelabel indicatesthe number of operating hours for
which the engine has been shown to meet Federalemissions
requirements.
Forengines lessthan 225 cc displacement.
CategoryC = 125 hours
CategoryB =250 hours
CategoryA = 500 hours
Forengines of 225 cc or more displacement.
CategoryC = 250 hours
CategoryB =500 hours
CategoryA = 1000 hours
27
GARANTIA .......................................... 28
CONTRATODEPROTECCI6NPARAREPARACIONES......... 28
REGLASDESEGURIDAD ............................ 29-31
CARACTERiSTICASY CONTROLES....................... 32
MONTAJE ........................................ 33-35
OPERACION....................................... 36-40
ESPECIFICACIONES................................... 41
MANTENIMIENTO.................................. 42-46
ALMACENAMlENTO................................... 47
REPARACIONDEDAVIesREPUESTOS.................... 48
NOTAS............................................. 49
GARANTIADELCONTROLDEEMISIONES............... 50-51
COMeORDENARPARTES............... PAGINAPOSTERIOR
GARANTJALllVliTADADECRAFTSMAN
Si este producto de Craftsmanfalla debido a defectos de materiales o mane deobra en el plazode dos a_osa partir de la fecha de compra,
devu_lvalo acualquier aimac_n Sears, centre de reparaci6n y repuestos Sears, u otro punto deventa de Craftsman de los EstadosUnidos
para su reparaci6n gratuita o, en case de que _sta no sea posible, para su sustituci6n.
Esta garantiase reducir_ a 90 dias desde la fecha de compra si este producto se utiliza en alg_n memento con fines comerciales o de
alquiler.
Estagarantia SOLOcubre defectos de materiales y de manede obra. Sears it0 pagard:
= Los elementos que pueden desgastarseen condiciones de use normaies dentro dei periodo de garantia, come pistolas rociadoras,
mangueras, proiongadores de boquilla, boquillas, filtros y bujias.
• Reparacionesnecesariasdebido a accidentes o fallos que se deriven de la incapacidad para operar o mantenerel producto de acuerdo
con todas las instrucciones facilitadas.
• Mantenimiento preventive o reparaciones necesariasdebido al use de mezclas de combustible inadecuadas o de combustible
contaminado o pasado.
Esta garantia le otorga determinados derechos legales yes posible que tenga otros derechosque puedenvafiar de una provincia a otra.
Sears, Roebuck and Co., Hoffman Estates, IL 60179
Felicidadesper realizar una compra inteligente.
Su nuevo producto Craftsman® est_dise_ado y fabricado para
funcionar de manerafiable durante muchos a_os. Perocome todos
los productos, es posible que requiera reparaci6n ocasionalmente.
Esen esos mementos, tenet un contrato de protecci6n para
reparaciones puede ahorrarle dinero y molestias.
Acentinuacibn se menciona Io que el contrato de proteccibn
para reparaciones* contempia:
* Servicie experte de nuestros 10.000 especiaiistas profesionaies
en reparaci6n.
, Servicie ilimitade ysin ¢este en partes y mane de obra en
todas las reparaciones incluidas en la cobertura.
, Cambie del preductoper hasta $1.500 si el producto incluido
en ia cobertura no se puede reparar.
, Un 10% de descuento en el precio normal de servicio y en
partes instaladas relacionadas no inciuidas en la cobertura dei
contrato; asimismo, un10% de descuento en ei precio normal
de revisiones de mantenimiento preventive.
, Ayudatelef6nica rdpida. Nuestro servicio de Soluci6n r_pida
consiste en apoyo telef6nico per un representante de Sears.
Pienseque somos un "manual dei usuafio paflante".
Unavez que adquiera ei contrato de protecci6n para reparaciones,
s61otiene que hacer una sencilla Ilamada teief6nica para programar
un servicio. Puede Ilamar a cualquier hera dei dia o la noche, o
programar unacita de servicio en linea.
El contrato de protecci6n para reparacioneses una compra segura.
Si io cancela per cualquier motive durante el periodo de garantia del
producto, le reembolsaremos el total de su dinero o una parte
proporcional en cualquier memento posterior al vencimiento del
periodo de garantia del producto. Adquiera hey su contrato de
protecci6n para reparaciones.
AplicanaBgunaslimitacienes y exclusienes. Para conocerprecies
y obtener inforrnaci6n adicienal en EE. UU., Ilarne al
1-800-827-GG55,
* La coberturaen Canaddvaria en determinades articules. Para
ebtenertodos losdetalles, cemuniquesea Sears Canad_ al
1-800-361-6665,
Serviciode instaiaci6ndeSears
Parasolicitar un servicio de instalaci6n per parte de unprofesional
de Searspara aparatos dom6sticos, puertas autom_ticas de garajes,
calentadoresde agua y otros articulos dom_sticos importantes en
EE.UU.o Canada,comuniqueseal 1-800-4-1ViY-HOME®.
28
Leaestemanualminuciosamentey conozcaafondolas
partesy elluncionamientodesurn_quinalimpiadoraa
presi6n.Conozcasusaplicaciones,suslimitacionesy los
peligrosinvolucrados,
Informaci6nimportantedeseguridad
Simbolossobrela seguridady significados
A. ADVERTENCIA Elescapedei motor de este producto
contiene eiementos quimicos reconocidosen el Estadode
California por producir c_.ncer,defectosde nacimiento u
otros da_os de tipo reproductivo.
_lLABVERTENCIA Esteproducto contiene plomo y
compuestos de plomo declaradoscausantes de
malformaciones y otros defectos cong6nitos por el Estado
de California. Ldveselas manos despu6s de manipular
esteproduct&
GasesT0xicos Contragolpe DescargaEI6ctrica
z 5-
SuperficiesResbalosas Caer InyecciOnLiquida
Partes en Movimiento
Fuego ExplosiOn Manual del Operario
A. Elsimbolo dealerta de seguridad indica un posible
riesgo parasu integridad fisica. Se utiliza una palabra,de
se_alizaciOn(PELIGRO,ADVERTENCIAo PRECAUCION)
junto con el simbolo de alerta paradesignar un grado o
nivel de gravedadde riesgo. Se puede utilizar un simbolo de
seguridad para representarel tipo de riesgo. La palabrade
se_alizaciOnAVlSO se utiliza para hacer referenciaa una
pr_.cticano relacionadacon una lesionfisica.
_i. PELI6RO indica un riesgo que,de no evitarse, pmvocard
la muerte o lesiones de gravedad.
A. ADVERTENCIAindica un riesgo que, de no evitarse,
podrfa provocar la muerte o lesiones de gravedad.
A. PRECAUTIONindica un riesgo que, de no evitarse,podrfa
provocar lesiones leveso moderadas.
AI/l$O hacereferenciaa una pr_.cticano relacionadacon una
lesion fisica.
Objetos Voladores Superficie Caliente
A. ABVERTENCIA AI motor funcionar, se produce
mon0xido de carbono, un gas inodoro y
venenoso.
Respirar mon0xido de carbono puede provocar
dolor de cabeza, fatiga, mareos, v0mitos, confusion,
ataques, n_.useas, desmayos o inciuso la muerte.
Algunas sustancias quimicas o los detergentes pueden
ser perjudiciaies si inhalados o ingeridos, causando la
n_.usea severa, desmayando o para envenenar.
• Opereel limpiadora a presi6n SOLAMENTEalaire iibre.
• Aseg_resede que los gases deescapeno puedanentrar por
ventanas,puertas,tomas deaire de ventilaci6n u otras
aberturas en un espacio cerrado en ei que puedanacumubrse.
• NOarranque ni dejefuncionar el motor en interiores ni en
zonascerradas,aunque hayaventanasy puertas abiertas.
• Utilice un respirador o m_scara siempre que exista la
posibiiidad de inhaiar vapores.
• Leatodas las instrucciones de la m_scara paraasegurarsede
quele brindar_ la protecci6n necesafia contra la inhalaci6nde
vaporesnocivos.
_lLABVERTENCIA Riesgode eiectrocuci0n.
_.lih Elcontacto con los cablesel6ctricos puede
provocar electrocuci0n y quemaduras.
• NUNCArodecercadeunafuentedeenergbel_ctfica.
A. ADVERTENCIA Peligro de quemadura quimica.
,_ Los productosquimicospodrianprovocarlesiones,
_ da_osmaterialesdegravedado la muerte.
o
NO useliquido c_ustico con la limpiadora a presi6n.
o
Use EXCLUSIVAMENTEdetergenteso jabonesespeciaiespara
la limpiadora apresi6n. Sigatodas las instrucciones del
fabricante.
29
A ADVERTENCIA El retroceso (repliegue r_.pido) del
cable del arrancador puede producir lesiones. El
,_ retroceso impedir_, que el usuario suelte ei cable a
tiempo y tirar_ de su mano y brazo hacia el motor.
Como resultado, podrian producirse fracturas,
contusiones 0 esguinces.
• NUNCAtire dei cable dei arrancador sin eiiminar previamentela
presi6n de la pistola rociadora.
• Cuandoarranque el motor, tire ientamentedeicable hasta
sentir una resistenciay, a continuaci6n, tire r_pidamente de_i
para evitar su retroceso.
• Despu_s decada intento dearranque, cuando ei motor no
consigaarrancar, apuntecon la pistola rociadora hacia una
direcci6n segura, pulse el bot6n rojo y apriete ei gatillo para
descargarla presi6n.
• Sujetefirmemente la pistola rociadora con ambas manos
cuando aplique un rociado a alta presi6n paraevitar lesiones
cuando se produzcael retroceso de la pistola.
A ADVERTENCIA El contacto con la zona dei silenciador
puede producir quemaduras graves.
,_:_,,_ _ Los gases y ei calor de escape pueden
las estructuras 0 da_ar el dep6sito de combustible y
provocar un incendio.
• NOtoque ias superficies calientes y evite losgasesdei escapea
altatemperatura.
• Permita que el equipo se enffie antesdetocaflo.
• Deje un espacio minimo de 1.5 m (5 pies) airededor del
limpiadora a presi6n, incluida la parte superior.
• Utilizar el motor en unterreno boscoso, con maleza o cubierto
de hierba constituye una infracci6n al C6digo de recursos
p_blicos de California,a menos que el sistema de escapeest_
equipado con una pantalla apagachispas,de acuerdo a la
definici6n de la Secci6n4442, que se mantenga en buenas
condiciones de funcionamiento. En otros estados o
jurisdicciones federales puede haber leyes similares envigor.
P6ngaseencontacto con el fabricante, el vendedor o el
distribuidor del equipo original paraobtener una pantalla
apagachispasdise_ada parael sistema de escapeinstaladoen
este motor.
• Las piezasde recambio debenser las mismas que las piezas
originales y estar instaladasen la misma posici6n.
inflamar los matefiales combustibles y
A AI:IVERTENCIALa gasolina y sus vapores son
extremadamenteinfiamables y
_ explosivos.
Elfuego o una explosi6n pueden causar
quemaduras severase inclusive la muerte.
CUANDOANADACOMBUSTIBLE0 VACiEELDEPOSITO
• Apague el limpiadora a presi6n (posici6n OFF)y d_jelo enfriar al
menos por 2 minutos antes de remover la tapa de la
combustible. Afioje la tapa lentamente paradejar que la presi6n
salga deltanque.
• Llene o vacieel dep6sito de combustible a la intemperie.
• NO Ilenedemasiado eltanque. Permita al menos espacio para
la expansi6ndel combustible.
• Si se ha derramadocombustible, esperea que se evaporeantes
de arrancarel motor.
• Mantenga la gasolina alejada dechispas, llamasabiertas,
pilotos, calor y otras fuentes de ignici6n.
• NOencienda un cigarrillo o fume.
CUANDOPONGAENFUNCIONAMIENTOEL EQUIPO
• Compruebeque la bujia, el silenciador, el tap6n del dep6sito de
combustible y el fiitro deaire est_ninstaiados.
• NOarranque el motor sin la bujia instaiada.
CUANDOOPEREELEQUIPO
• NO incline ei motor o ei equipo, de tai maneraque la gasolina
se puedaderramar.
• NO rode liquidos inflamabies.
AL TRANSPORTAR,MOVER0 REPARAREQUIPO
• Transporte, mover o repare ei equipo con ei tanquede
combustible vacio, o con lav_lvula paraapagarei combustible,
apagada(posici6n OFF).
• NO incline ei motor o ei equipo, de tai maneraque la gasolina
se puedaderramar.
• Desconecteei cable de la bujia.
CUANDOALIVlACENE0 GUARDEELEQUIPOCONCOMBUSTIBLE
EN ELTANQUE
• Almacenealejado decalderas, estufas, calentadoresdeagua,
secadorasde ropa u otros aparatos eiectrodom_sticos que
posean pilotos u otras fuentes de ignici6n, porque ellos pueden
encenderlos vaporesde la combustible.
A AI:IVERTENCIA El uso de limpiadora a presi6n puede
A ADVERTENCIA El arrancador y otras piezas que rotan
pueden enredar las manos, el pelo, la ropa, o losaccesorios.
• NUNCAutiiice la limpiadora a presi6n sin sus carcasaso tapas
de protecci6n.
• NO use ropa suelta, joyaso elementos que puedanquedar
atrapadosen el arranque o enotras partes rotatorias.
• Ate paraarriba ei pelo largo y quite la joyefia.
_,_ _.. crearresbalosas.lOscharcos y superficies
El retroceso de la pistola rociadora
puede provocar caidas.
• Utilice la limpiadora a presi6n desdeuna superficie estable.
• El_rea de limpieza deber_tener inclinaciones y drenajes
adecuadospara disminuir la posibilidad de caidasdebido a
superficies resbalosas.
• Extremelas precaucionessi necesita utilizar la limpiadora a
presi6n desdeuna escalera, unandamio uotro lugar similar.
• Sujetefirmemente ia pistola rociadora con ambas manos
cuando aplique un rociado a alta presi6n paraevitar lesiones
cuando se produzcaei retroceso de la pistola.
3O
 Loading...