

Craftsman 580752020 Owner’s Manual
Operator'sManual
1800 PSI
1.6 GPM
ELECTRICPRESSUREWASHER
ModelNo. 580.752020
HOURS: IVlon.- Fri. 8 a.m. to 5 p.m. (CT)
WARNING
Beforeusing this product, readthis
manualand follow all Safety Rules
and Operating Instructions.
Sears, Roebuck and Co., Hoffman Estates, IL 60179 U.S.A.
Visit our Craftsmanwebsite: www.craftsman.com
Part No. 202543GS Draft E (11/04/2009)
Antesde utilizar el producto, leaeste
manualy sigatodas las Reglasde
SeguridadeInstrucciones de Uso.
ADVERTENCIA
• Safety
• Assembly
• Operation
• Maintenance
• Parts
• Espafiol,p. 18

TABLEOFCONTENTS............................. 2
WARRANTY..................................... 2
SAFETYRULES.................................. 2
FEATURESAND CONTROLS........................ 5
ASSEMBLY..................................... 6
OPERATION..................................... 8
MAINTENANCE................................. 12
TROUBLESHOOTING............................. 15
PARTS........................................ 16
ESPANOL...................................... 18
HOWTOORDERPARTS.......................... 32
OneYear FullWarrantyonCraftsmanPressureWasher
Whenassembled, operated and maintained according to all supplied instructions, if this Craftsman PressureWasherfails due
to defectin material or workmanship within oneyear from the date of purchase,return it to anySears store for replacement.
This warranty excludesrepairs necessarybecauseof operator abuseor negligence,including damage resulting from no water
being supplied to pump or failure to maintain the equipment according to the instructions contained in this operator's manual.
This warranty appliesfor only 30 days if this product is everused for commercialor rental purposes.
This warranty givesyou specific legal rights, andyou may also haveother rights which vary from state to state.
Sears Roebuck and Co., Hoffman Estates, IL 60179
,_ This is the safetyalert symbol.It is usedto alert you topotentialpersonalinjuryhazards.Obeyall safety
messagesthatfollow this symbolto avoidpossibleinjury or death.
HazardSymbolsandMeanings
Readthis manualcarefully and becomefamiliar
with your pressurewasher. Knowits applications,
itslimitations, and anyhazardsinvolved.
Thesafety alert symbol (,_.) is usedwith a signal word
(DANGER,CAUTION,WARNING),a pictorial and/or a safety
messageto alert you to hazards. DANGERindicatesa hazard
which, if not avoided, will result in deathor serious injury.
Electrical Shock Explosion Fall
WAFININGindicates a hazardwhich, if not avoided,could
result in deathor serious injury. CAUTIONindicatesa hazard
which, if not avoided, might result in minor or moderate
injury. NOTICEindicates a situation that could result in
equipment damage.Follow safety messagesto avoid or
FlyingObjects Fluid Injection Operator's Manual
reducethe risk of injury or death.
Slippery Surface
© SearsBrands, LLC
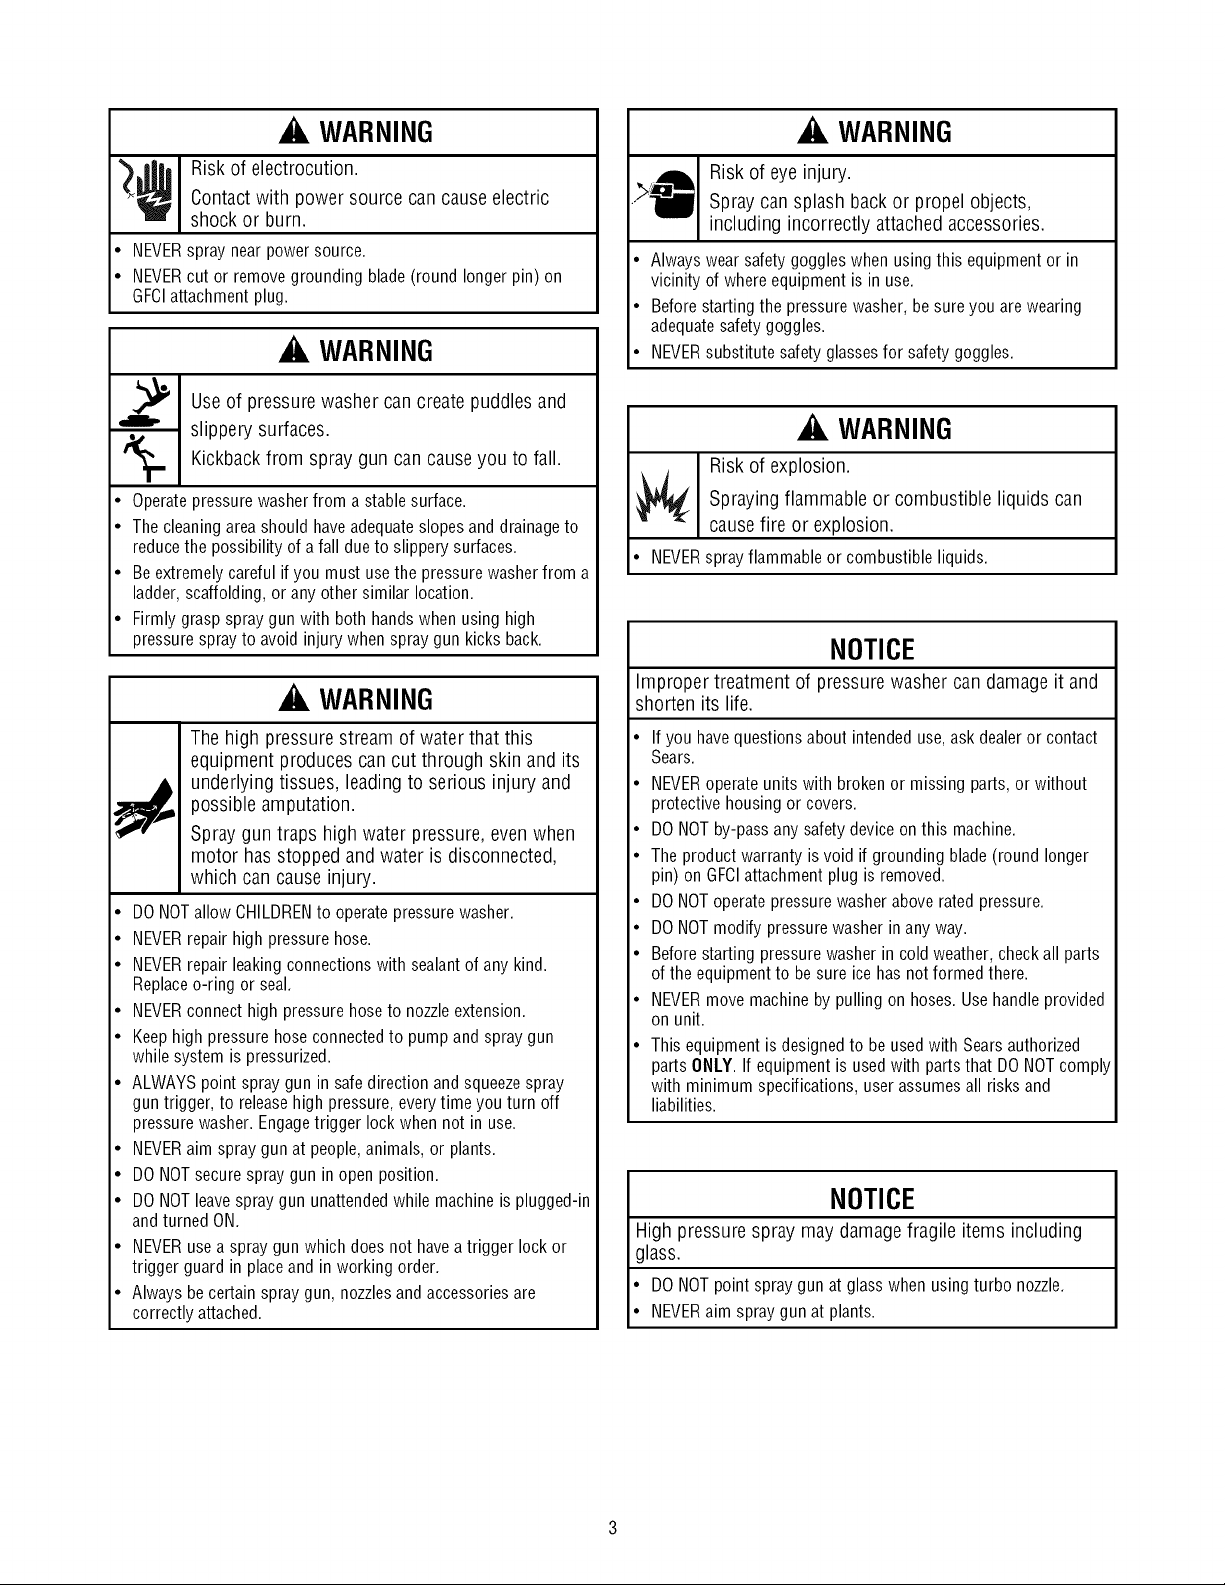
WARNING
_ Risk of electrocution.
• NEVERspray near power source.
• NEVERcut or remove grounding blade(round longer pin) on
• Operatepressurewasher from a stable surface.
• Thecleaning areashould have adequateslopes and drainage to
• Beextremely careful if you must use the pressure washerfrom a
• Firmly grasp spray gun with both handswhen using high
Contact with power source can cause electric
shock or burn.
GFCIattachment plug.
A WARNING
,_ Use of pressure washer can create puddles and
slippery surfaces.
Kickback from fall.
reducethe possibility of a fall dueto slippery surfaces.
ladder,scaffolding, or any other similar location.
pressure spray to avoid injury when spraygun kicks back.
spray gun can cause you to
WARNING
A WARNING
Risk of eye injury.
Spray can splash back or propel objects,
including incorrectly attached accessories.
• Always wear safetygoggles when using this equipment or in
vicinity of where equipment is in use.
• Beforestarting the pressure washer, besure you are wearing
adequatesafety goggles.
• NEVERsubstitute safety glassesfor safety goggles.
A WARNING
Risk of explosion.
_1_ Spraying flammable or combustible liquids can
cause fire or explosion.
• NEVERsprayflammable or combustible liquids.
NOTICE
Improper treatment of pressure washer can damage it and
shorten its life.
Thehigh pressurestream of water that this
equipment producescancut through skin and its
underlying tissues, leadingto serious injury and
possible amputation.
Spraygun traps high water pressure, even when
motor hasstopped andwater is disconnected,
which can causeinjury.
• DONOTallow CHILDRENto operatepressure washer.
• NEVERrepair high pressure hose.
• NEVERrepair leaking connections with sealantof any kind.
Replaceo-ring or seal.
• NEVERconnect high pressure hose to nozzleextension.
• Keephigh pressure hose connectedto pump and spray gun
while system is pressurized.
• ALWAYSpoint spray gun in safedirection and squeezespray
guntrigger, to releasehigh pressure, every time you turn off
pressure washer. Engagetrigger lock when not in use.
• NEVERaim spray gun at people,animals, or plants.
• DO NOTsecure spraygun in open position.
• DO NOTleavespray gun unattendedwhile machine is plugged-in
andturned ON.
• NEVERuse a spray gun which does not haveatrigger lock or
trigger guard in place and in working order.
• Always be certain spray gun, nozzlesand accessoriesare
correctly attached.
Ifyou havequestions about intended use,ask dealer or contact
Sears.
• NEVERoperateunits with brokenor missing parts, or without
protective housing or covers.
• DO NOTby-passany safety device on this machine.
• The product warranty is void if grounding blade (round longer
pin) on GFCIattachment plug is removed.
• DO NOToperate pressure washerabove rated pressure.
• DO NOTmodify pressurewasher in any way.
• Beforestarting pressurewasher in cold weather, check all parts
of the equipmentto be sure ice has not formed there.
• NEVERmove machine by pulling on hoses.Use handle provided
on unit.
This equipment is designedto be usedwith Searsauthorized
parts ONLY. If equipmentis usedwith parts that DONOTcomply
with minimum specifications, user assumesall risks and
liabilities.
NOTICE
High pressure spray may damage fragile items including
glass.
• DO NOTpoint spraygun at glass when using turbo nozzle.
• NEVERaim spray gun at plants.
SafetyIssues
GroundFaultCircuit InterrupterProtection
This product must be properly grounded. This electric
pressure washer is equippedwith a ground fault circuit
interrupter (GFCI).Thedevice will disconnect both power
conductors to the load circuit in the event of aninterruption
in either or both supply circuit power conductors. If a
malfunction or breakdownoccurs, the GFCIprovides
protection.
The plug must be plugged into an appropriate outlet that is
properly installed and grounded in accordancewith all local
codes and ordinances. Readthe instructions on the plug for
use or seeBeforeStarting Pressure Washer.
AutomaticShut-Off
The pressurewasher is equippedwith a sensor that will
detectthat high pressurewater flow has stopped when
releasingor locking the spray guntrigger. Thesensor will
causethe motor to shut off for as long as the spray gun
trigger is releasedor locked.
Motor Overload
Theelectric motor in this pressure washer is equippedwith
an overload protection device.This device will automatically
shut off the motor if the motor overheatsor draws excessive
current. After a period of time, the devicewill reset and the
pressure washer can resume normal operation.
ExtensionCords
We Do Not recommend the use of extension cords with this
device. If it is necessaryto useone, however,then you must
use only extension cords that are approvedfor outsideuse.
Theseextension cords are identified by a marking
"ACCEPTABLEFORUSEWITH OUTDOORAPPLIANCES".
Extensioncords arenot recommendedunless they are
plugged into a ground-fault-protected receptacle.DONOT
use damagedextensioncords. Also observe the following
specifications:
CableLength: Wire Gauge:
Upto 25 feet (8m) 14 AWG
50 feet(15m) 12 AWG
Always disconnect the extension cord from the receptacle
before disconnecting the GFCIfrom the extensioncord.
WARNING
"_f Riskof electrocution.
• Keepall electrical connections dry and off the ground.
• NEVERtouch plug with wet hands.
• NEVERcut or remove grounding blade(round longer pin) on
GFCIattachment plug.
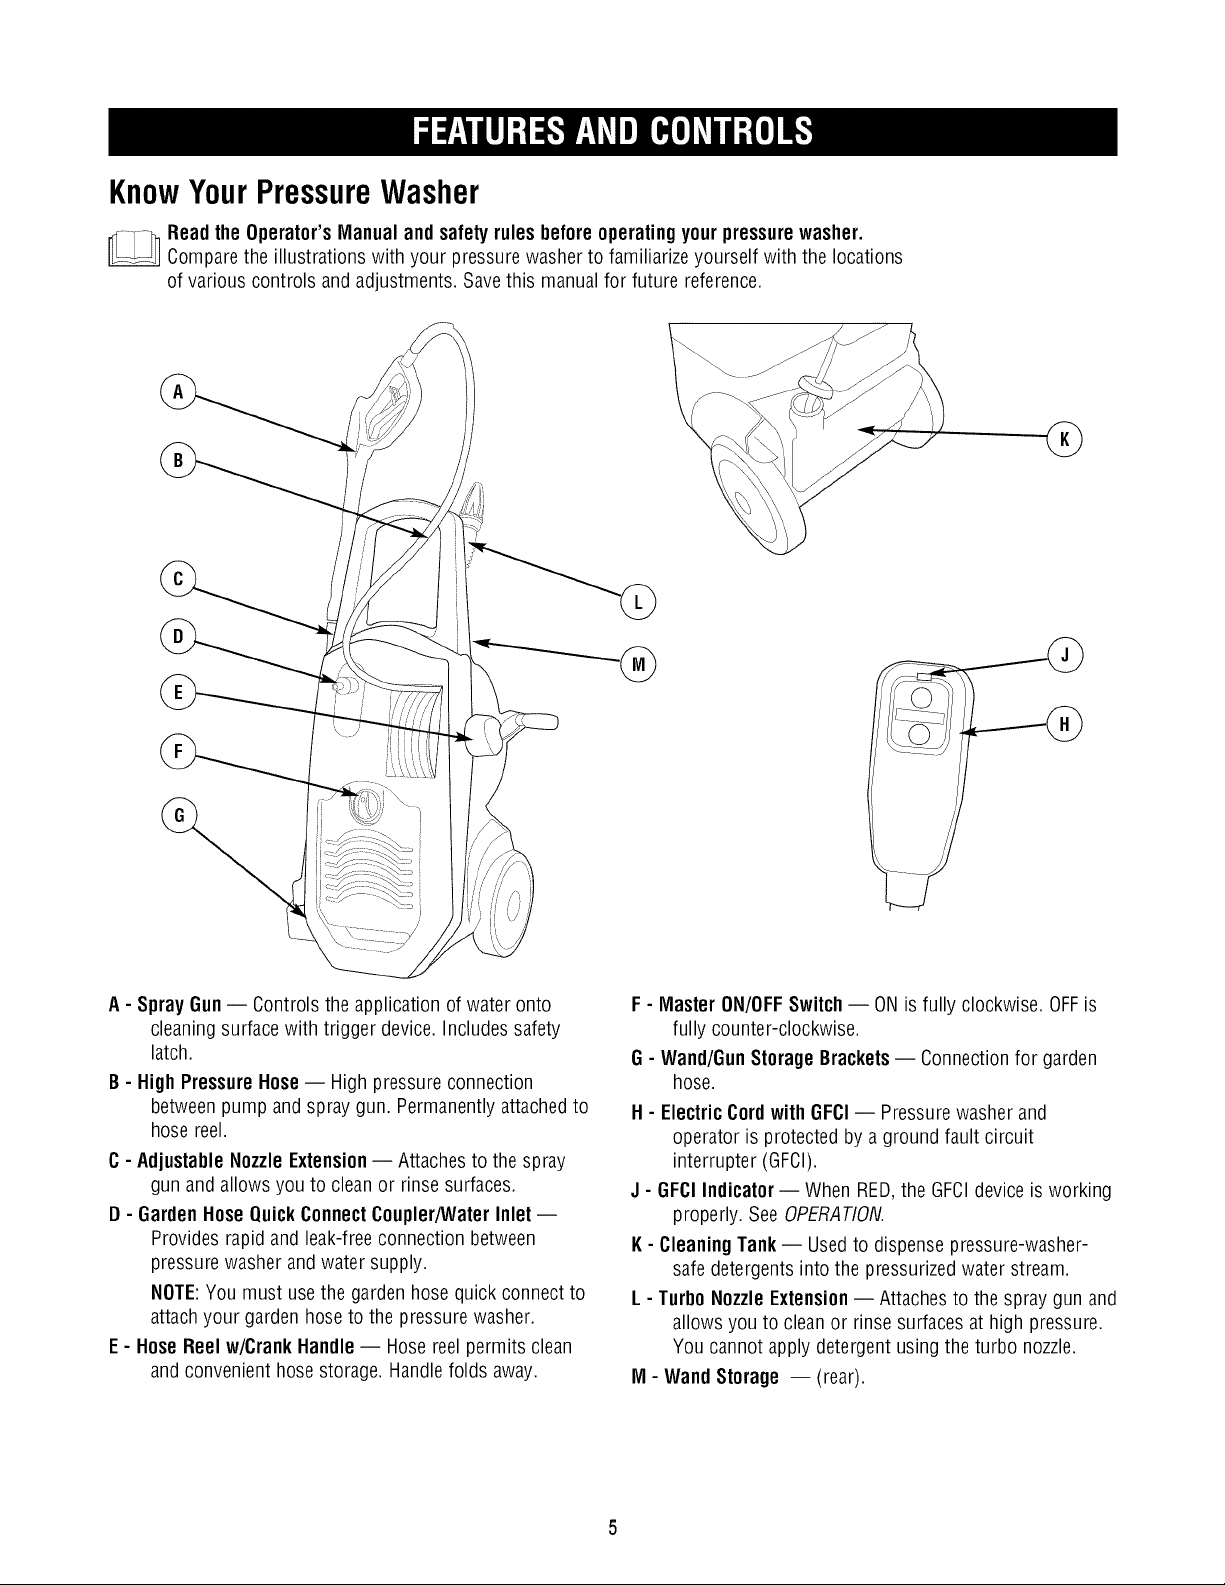
KnowYourPressureWasher
Readthe Operator's Manual andsafetyrules beforeoperating yourpressure washer.
Comparethe illustrations with your pressurewasher to familiarizeyourself with the locations
of various controls andadjustments. Savethis manual for future reference.
A - Spray Gun-- Controls the application of water onto
cleaningsurface with trigger device. Includes safety
latch.
B- HighPressure Hose-- High pressureconnection
between pump andspray gun. Permanently attached to
hose reel.
C- AdjustableNozzleExtension-- Attaches to the spray
gun andallows you to clean or rinse surfaces.
D - Garden Hose QuickConnectCoupler/WaterInlet --
Provides rapid and leak-free connection between
pressure washer and water supply.
NOTE:You must usethe garden hose quick connectto
attachyour garden hose to the pressure washer.
E - HoseReel w/CrankHandle-- Hose reel permits clean
and convenient hosestorage. Handlefolds away.
F - Master ON/OFFSwitch -- ONis fully clockwise. OFFis
fully counter-clockwise.
G - Wand/GunStorage Brackets-- Connectionfor garden
hose.
H - ElectricCordwith GFCI-- Pressurewasher and
operator is protected by a ground fault circuit
interrupter (GFCI).
J - GFCl Indicator -- When RED,the GFCIdevice isworking
properly. SeeOPERATION.
K- Cleaning Tank- Usedto dispensepressure-washer-
safe detergents into the pressurizedwater stream.
L - TurboNozzleExtension-- Attaches to the spray gun and
allows you to clean or rinse surfaces at high pressure.
You cannot apply detergentusing the turbo nozzle.
M- Wand Storage -- (rear).
Yourpressurewasherrequiressomeassemblybutisquickly
readyforuse.Ifyouhaveanyproblemswiththeassemblyof
yourpressurewasher,pleasecallthepressurewasher
helplineat(800}222-3136.
ToolsHeeded
• #2 Phillips screwdriver
UnpackPressure Washer
1. Removeeverything from carton except pressure
washer.
2. If pressurewasher is too heavyfor you to lift, open
carton completely bycutting eachcorner from top to
bottom.
CartonContents
Checkall contents. If anyparts are missing or damaged,call
the pressure washer helplineat 1-800-222-3136.
• Pressurewasher
• Pressurewasher handle
• Spray gun preattachedto high pressurehoseand hose
reel.
• Nozzleextension with adjustable nozzle
• Nozzleextension with turbo nozzle
• Partsbag (which includes the following):
• Operator'smanual
• Owner's registration card
• Safetygoggles
• Spraygun holders (2)
• Gardenhose quick connectcoupling (female and
male)
• Nozzlecleaning tool
• Handleattachment screws (4)
Becomefamiliar with eachcomponent before assembling the
pressure washer Identify contents with the illustration
shown in Featuresand Controls. If any parts are missing or
damaged,call the pressurewasher helpline at
(800) 222-3136.
AssemblingPressure Washer
Your Craftsmanpressurewasher will needassembly before
operation:
• Fill out and send in registration card
• Assemblehandle
• Attach spray gun holders
• Attach quick connect coupler to water inlet
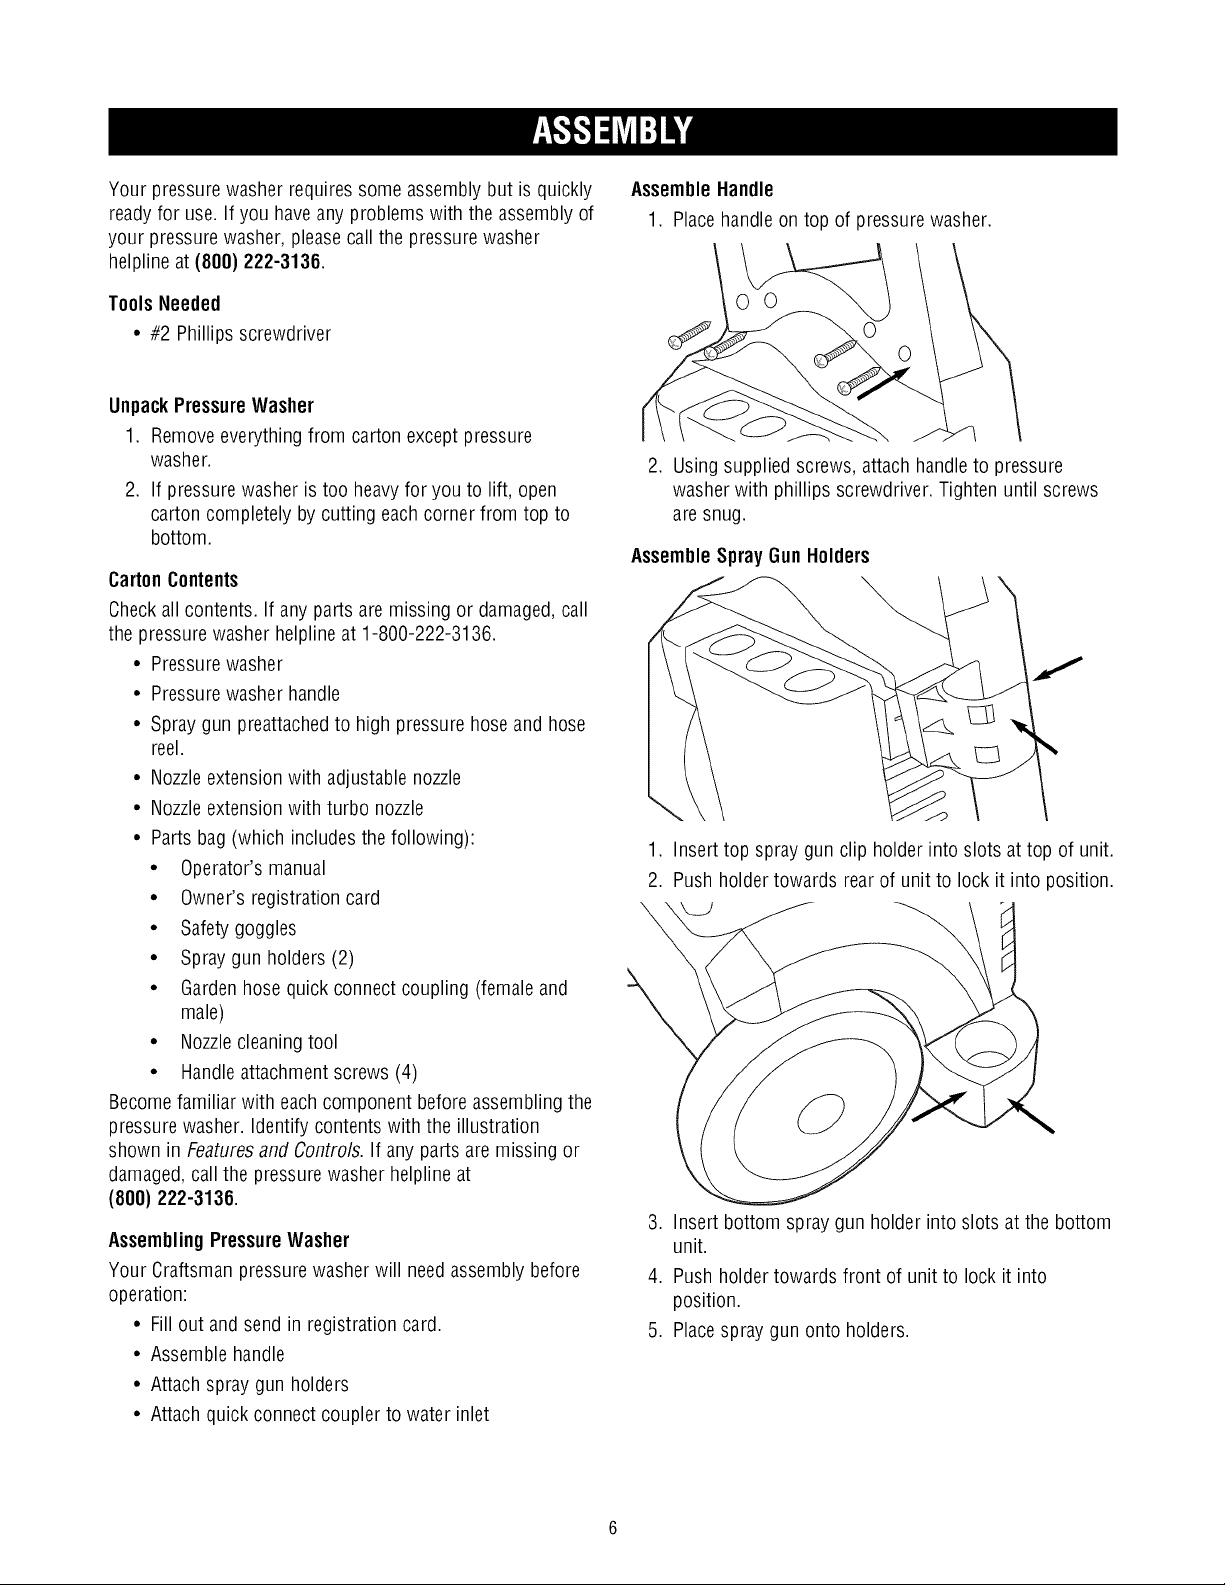
AssembleHandle
1. Place handle on top of pressurewasher.
2. Using supplied screws, attachhandle to pressure
washer with phillips screwdriver. Tighten until screws
are snug.
AssembleSprayGunHolders
1. Insert top spray gun clip holder into slots at top of unit.
2. Push holdertowards rearof unit to lock it into position.
i
3. Insert bottom spray gun holder into slots at the bottom
unit.
4. Push holder towards front of unit to lock it into
position.
5. Place spray gun onto holders.
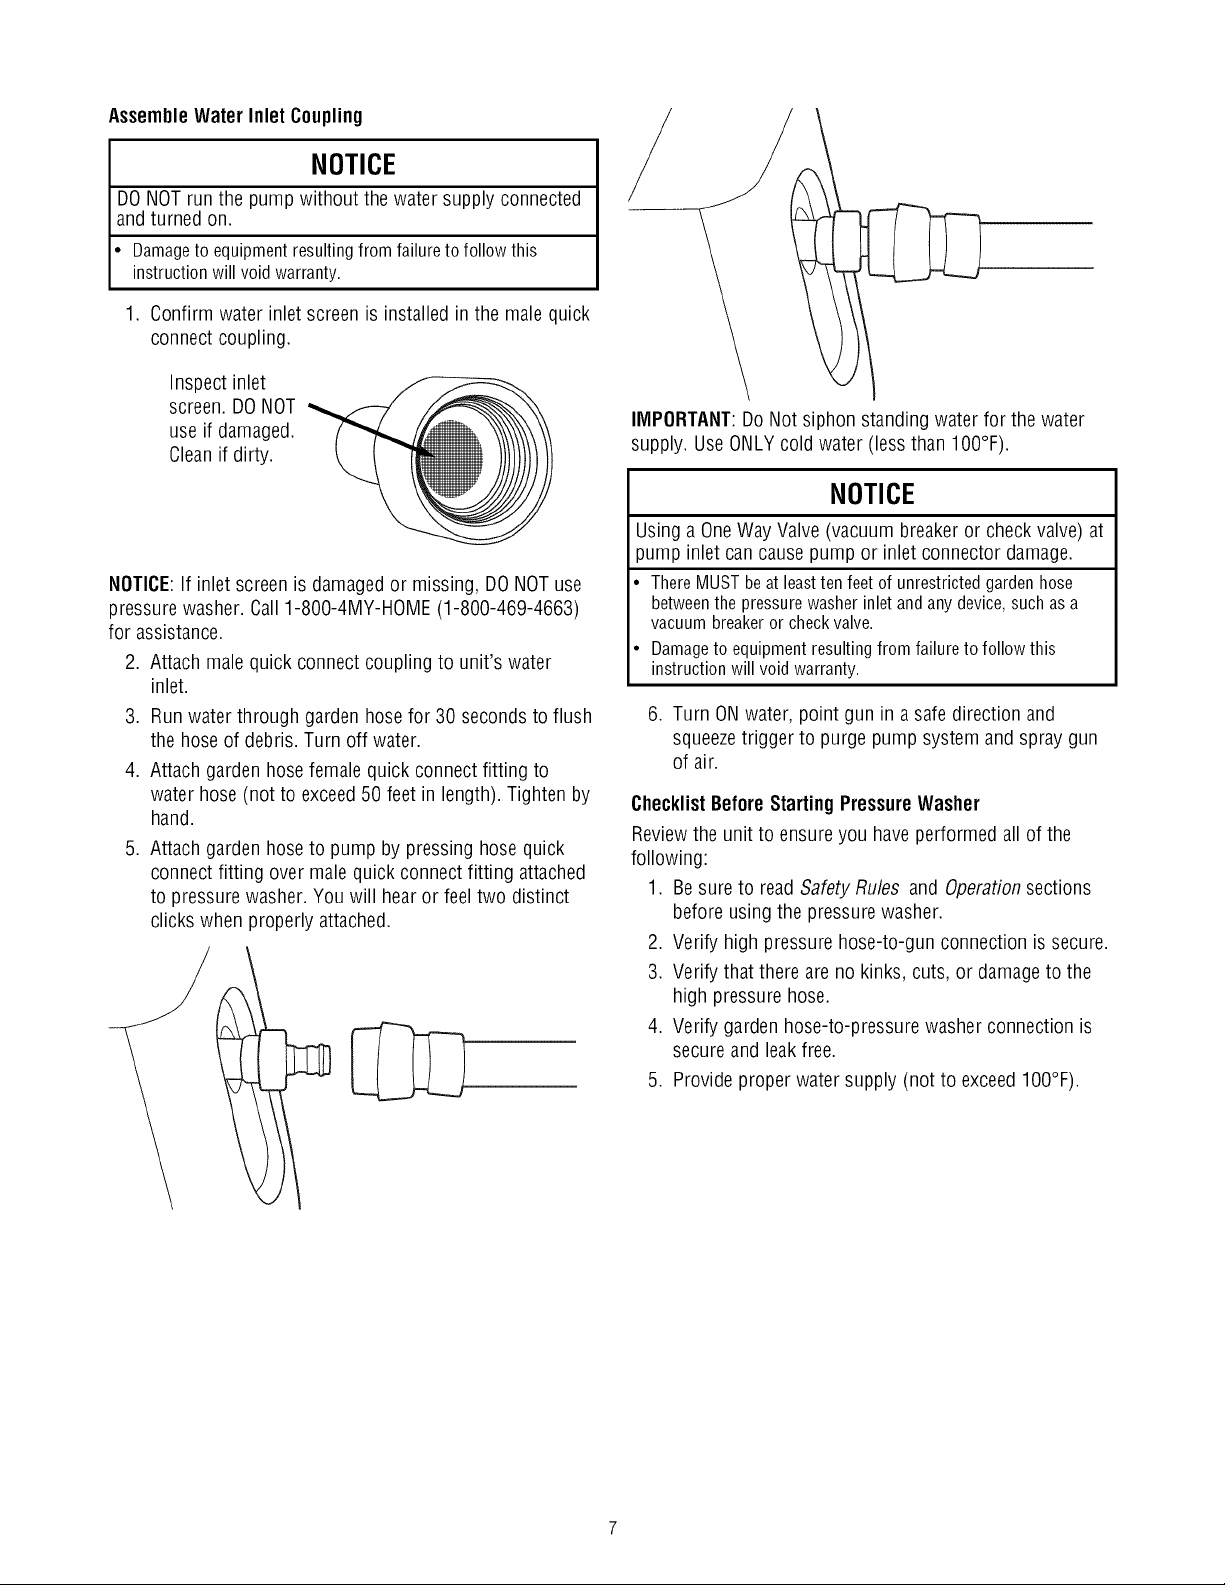
Assemble Water Inlet Coupling
NOTICE
DONOTrun the pump without the water supply connected
and turned on.
• Damageto equipmentresultingfromfailuretofollowthis
instructionwillvoidwarranty.
1. Confirm water inlet screen is installed in the male quick
connect coupling.
use if damaged.
Cleanif dirty.
screen. DONOT "_
Inspect inlet "__
NOTICE:If inlet screenis damaged or missing, DO NOTuse
pressure washer. Call1-800-4MY-HOME(1-800-469-4663)
for assistance.
2. Attach male quick connect coupling to unit's water
inlet.
3. Run water through gardenhose for 30 seconds to flush
the hose of debris. Turn off water.
4. Attach garden hose female quick connect fitting to
water hose(not to exceed50 feet in length). Tighten by
hand.
,
Attach garden hoseto pump by pressing hosequick
connect fitting over malequick connectfitting attached
to pressurewasher. You will hearor feeltwo distinct
clicks when properly attached.
IMPORTANT:DoNot siphon standing water for the water
supply. UseONLYcold water (less than IO0°F).
NOTICE
Using a OneWay Valve (vacuum breakeror check valve) at
pump inlet can causepump or inlet connector damage.
• There MUSTbeat leastten feetof unrestricted garden hose
betweenthe pressure washer inlet and any device, such as a
vacuum breakeror checkvalve.
• Damageto equipment resulting from failure to follow this
instruction will void warranty.
6. Turn ONwater, point gun in asafe direction and
squeezetrigger to purge pump system and spray gun
of air.
ChecklistBeforeStarting Pressure Washer
Reviewthe unit to ensure you haveperformed all of the
following:
1. Be sureto readSafety Rules and Operationsections
before using the pressure washer.
2. Verify high pressure hose-to-gun connection is secure.
3. Verify that there are no kinks, cuts, or damage to the
high pressurehose.
4. Verify garden hose-to-pressure washer connection is
secure and leakfree.
5. Provide properwater supply (not to exceedIO0°F).

Howto Start Your Pressure Washer
Follow the instructions below inthe order presented. If you
haveany problems operatingyour pressure washer, please
call the pressure washer helplineat (800) 222-3136.
1. Place pressure washer near an outside water source
capableof supplying water at a flow rategreaterthan
3 gallons per minute (11.4 I) andno less than 20 PSI
(1.38 BARS)at pressurewasher end of garden hose.
DONOTsiphon supply water.
2. Checkthat high pressure hoseis tightly connectedto
spray gun. SeeAssemblyfor illustrations.
3. Make sure unit is in a vertical position.
4. Connect garden hoseto water inlet.
NOTICE
DONOTrun the pump without the water supply connected
and turned on.
• Damageto equipmentresultingfromfailuretofollowthis
instructionwillvoidwarranty.
,
Turn ONwater, point gun in a safe direction and
squeezetrigger to purgepump system of air.
6.
Engagetrigger lock on spray gun trigger.
8. Rotate the unit's ON/OFFswitch to the OFFposition
(fully counterclockwise.)
9. Plug power cord into an electrical circuit rated for
120 VoltsACat 15Amps that has been installed in
accordancewith local safety regulations.The red
indicator on the GFCIshould appear.
NOTE:The red indicator must be visible for the pressure
washer to operate.
INDICATOR
RESET
TEST
_j
Trooer
lock -__
7. Remove any dirt or foreign matter from spray gun
outlet andattach desired nozzleextensionto spraygun.
10. Press TESTbutton. The red indicator should disappear.
11. Press RESETbutton. The red indicator should
illuminate.
IMPORTANT:Do Not use electric pressurewasher if above
test fails.
WARNING
Riskof eye injury.
Spraycan splash backor propel objects,
including incorrectly attachedaccessories.
• Alwayswearsafetygoggleswhenusingthisequipmentor in
vicinityofwhereequipmentis in use.
• Beforestartingthepressurewasher,besureyouarewearing
adequatesafetygoggles.
• NEVERsubstitutesafetyglassesfor safetygoggles.
12. Move unit's master ON/OFFswitch to the ONposition.
(Turn knobfully clockwise.)
13. Disengagespray gun trigger lock, point gun in a safe
direction andsqueezetrigger. Pressurewasher motor
will start.
Thepressurewasherisnowreadyforuse.Instructionsfor
useofthesuppliedaccessoriesaregivenlaterinthis
section.
Howto Stop YourPressure Washer
The pressurewasher motor runs only when the trigger is
engaged.To stop the pressure washer andturn off the
motor:
1. Releasespray gun trigger.
2. Move unit's master ON/OFFswitch to OFFposition.
IMPORTANT:Releasingthe trigger will shut off the motor
but doesnot shut off electrical power to the unit.
3. Turn off water supply.
4. ALWAYS point spray gun ina safe direction and
squeezespray guntrigger to relievebuilt up pressure in
the unit.
WARNING
Thehigh pressurestream of water that this
equipment producescancut through skin and its
underlying tissues, leadingto serious injury and
possible amputation.
Spraygun traps high water pressure, even when
motor is stopped and water is disconnected,
which can causeinjury.
• Keephigh pressure hose connectedto pump and spray gun at
all times.
• ALWAYSpoint spray gun in safedirection and squeezespray
guntrigger, to releasehigh pressure, every time you turn off
motor. Engagetrigger lock when not inuse.
.
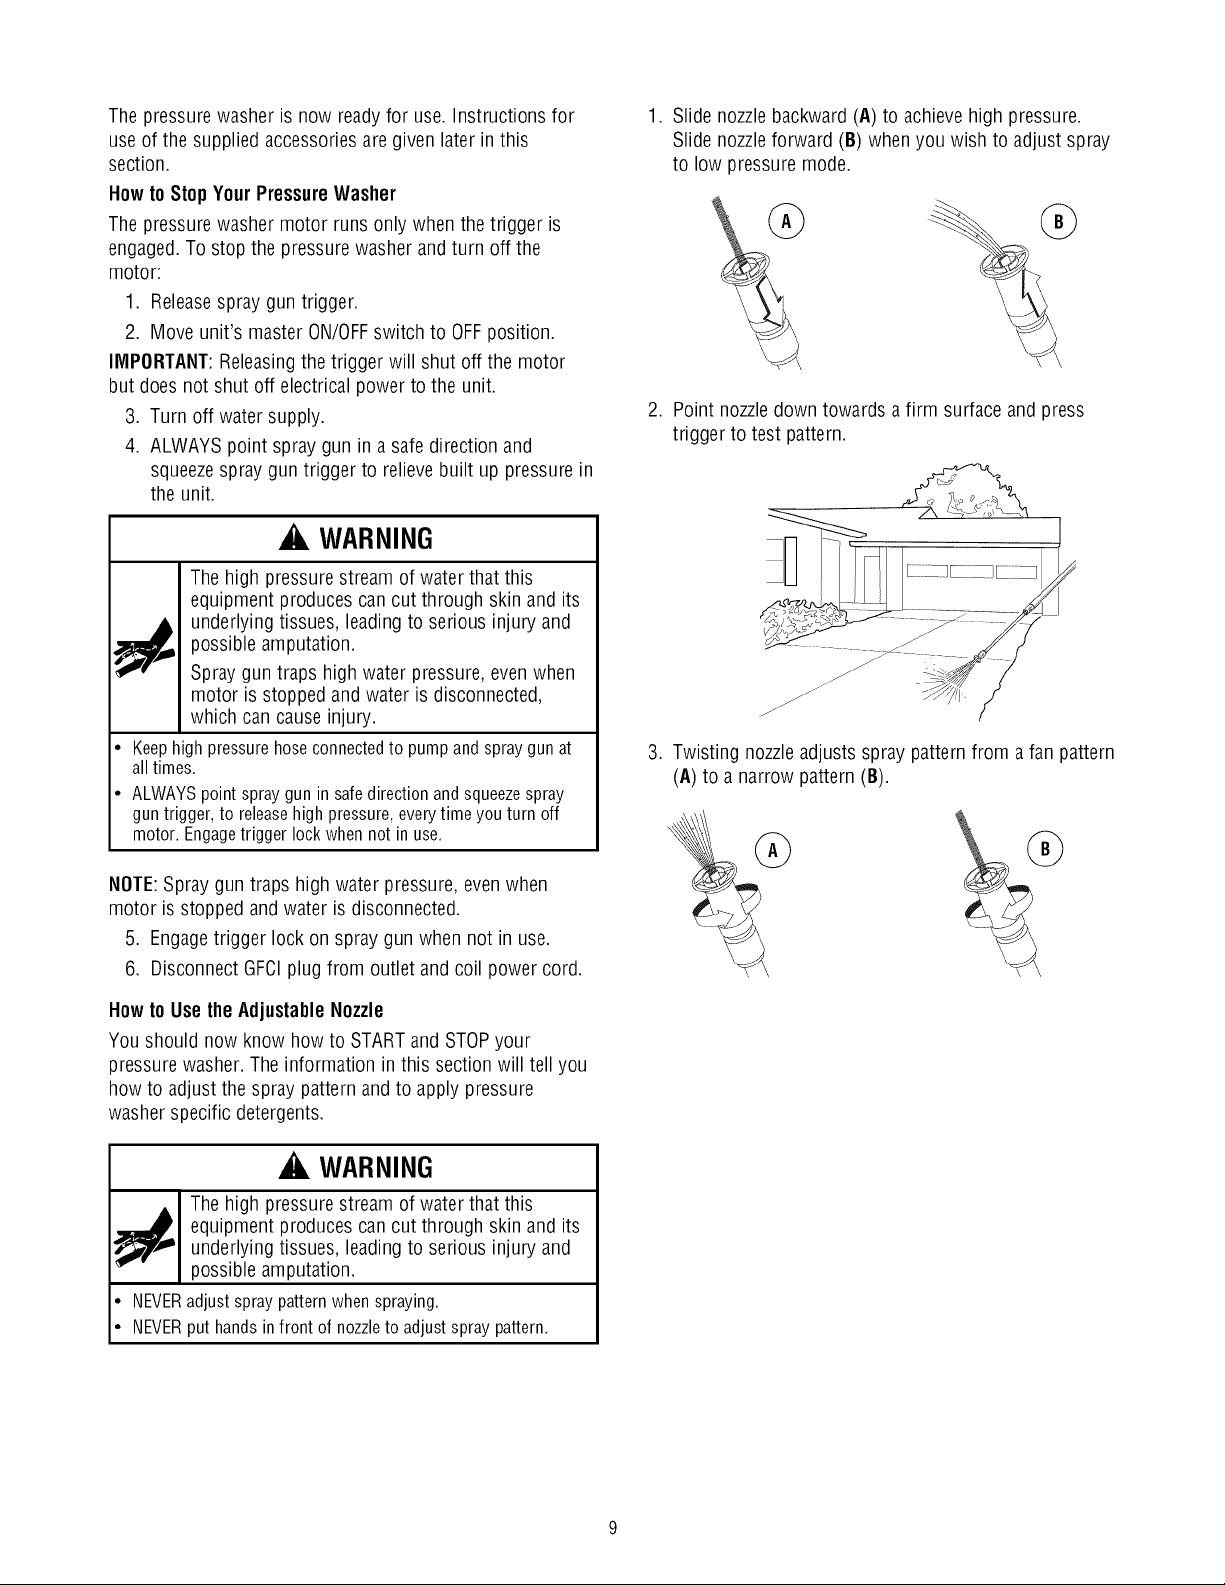
Slide nozzle backward(A) to achieve high pressure.
Slide nozzleforward (B) when you wish to adjust spray
to low pressure mode.
.
Point nozzledown towards a firm surface and press
trigger to test pattern.
.
Twisting nozzleadjusts spray pattern from a fan pattern
(A) to a narrow pattern (B).
NOTE:Spray gun traps high water pressure, evenwhen
motor is stopped andwater is disconnected.
5. Engagetrigger lock on spray gun when not in use.
6. Disconnect GFCIplug from outlet and coil power cord.
Howto Use the AdjustableNozzle
You should now know how to STARTand STOPyour
pressure washer. Theinformation in this section will tell you
how to adjustthe spraypattern and to apply pressure
washer specific detergents.
WARNING
Thehigh pressurestream of water that this
equipment producescancut through skin and its
underlying tissues, leadingto serious injury and
possible amputation.
• NEVERadjustspraypatternwhenspraying.
• NEVERputhandsinfront ofnozzletoadjustspraypattern.
UsageTips
• For most effective cleaning,keepspray nozzlefrom 8 to
24 inches(20 to 61cm) awayfrom cleaning surface.
• Ifyou getspray nozzletoo close,especially using high
pressure mode, you maydamagesurface being
cleaned.
• DoNot get closer than 6 inches (15 cm) when cleaning
tires.
ApplyingDetergentwith the AdjustableNozzle
To applydetergent, follow these steps:
1. Review use of adjustable nozzles.
2. Preparedetergent solution as requiredby job.
,
Allow detergent to "soak in" for 3-5 minutes before
washing andrinsing. Reapplyas neededto prevent
surfacefrom drying. Do Not allow detergent to dry on
(prevents streaking).
Pressure Washer Rinsing
For Rinsing:
1. Slide the nozzle backwardto high pressure,press the
trigger and wait for the detergentto clear.
2. Keepthe spray gun a safe distance from the areayou
plan to spray.
A WARNING
CAUTION
Chemicalscan cause bodily injury, and/or property
damage.
• NEVERusecausticliquidwith pressurewasher.
• UseONLYpressurewashersafedetergents!soaps.Followall
manufacturersinstructions.
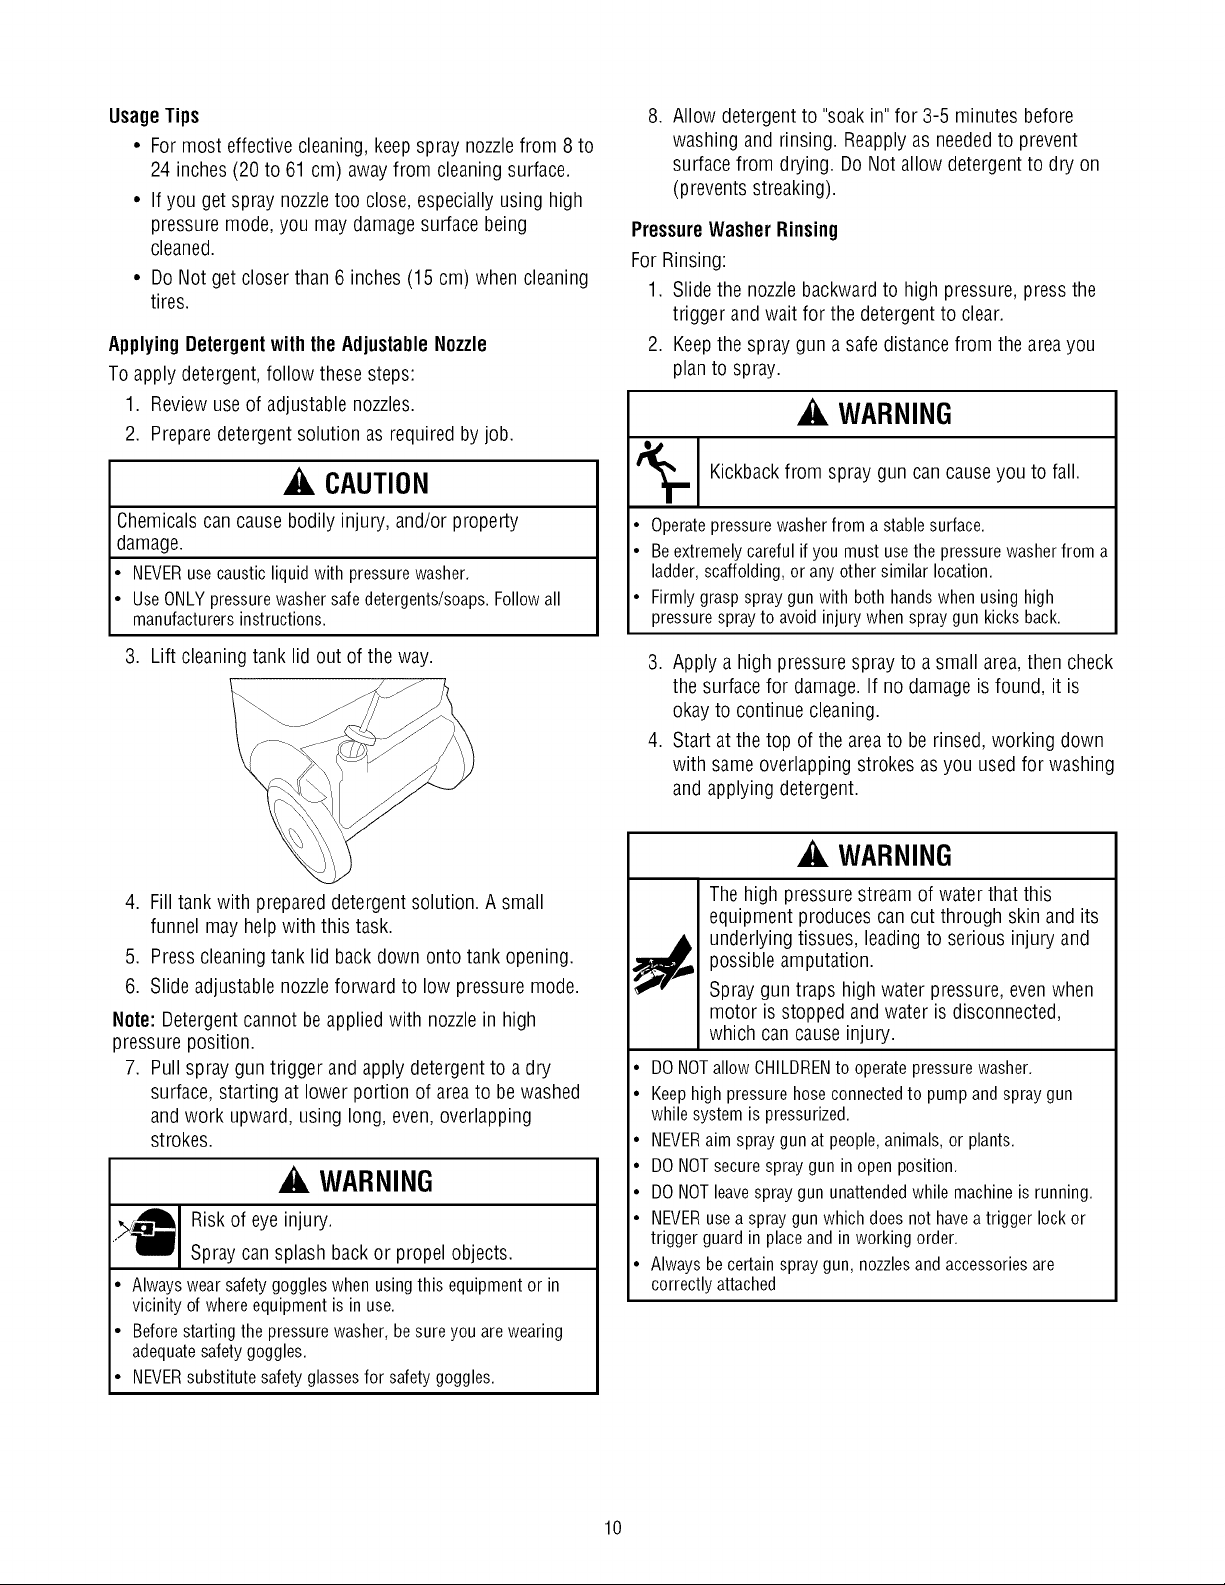
3. Lift cleaning tank lid out of the way.
4. Fill tank with prepareddetergent solution. A small
funnel may help with this task.
5. Press cleaningtank lid back down onto tankopening.
6. Slide adjustable nozzleforward to low pressure mode.
Note: Detergentcannot be applied with nozzlein high
pressure position.
7. Pull spray gun trigger and apply detergentto a dry
surface, starting at lower portion of areato be washed
and work upward, using long, even, overlapping
strokes.
A WARNING
Risk of eye injury.
Spray can splash back or propel objects.
• Always wear safety goggleswhen using this equipment or in
vicinity of where equipment is in use.
• Beforestarting the pressurewasher, besure you are wearing
adequatesafety goggles.
• NEVERsubstitute safety glassesfor safety goggles.
Kickbackfrom to fall.
spray gun cancauseyou
• Operatepressurewasherfroma stablesurface.
• Beextremelycarefulif youmustusethepressurewasherfroma
ladder,scaffolding,oranyothersimilarlocation.
• Firmlygraspspraygunwithboth handswhenusinghigh
pressuresprayto avoidinjurywhenspraygun kicksback.
3. Apply ahigh pressure spray to a small area,then check
the surfacefor damage.If no damageis found, it is
okay to continue cleaning.
4. Start at the top of the areato berinsed, working down
with sameoverlapping strokes as you usedfor washing
and applying detergent.
A WARNING
The high pressure stream of water that this
equipment produces can cut through skin and its
underlying tissues, leading to serious injury and
possible amputation.
Spray gun traps high water pressure, even when
motor is stopped and water is disconnected,
which can cause injury.
DO NOTallow CHILDRENto operate pressurewasher.
Keephigh pressure hose connectedto pump and spraygun
while system is pressurized.
NEVERaim spray gun at people, animals, or plants.
DO NOTsecure spray gun in open position.
DO NOTleavespray gun unattendedwhile machine is running.
NEVERusea spray gun which does not havea trigger lock or
trigger guard in placeand in working order.
Always becertain spray gun, nozzlesand accessories are
correctly attached
10
 Loading...