

Craftsman 580750290 Owner’s Manual
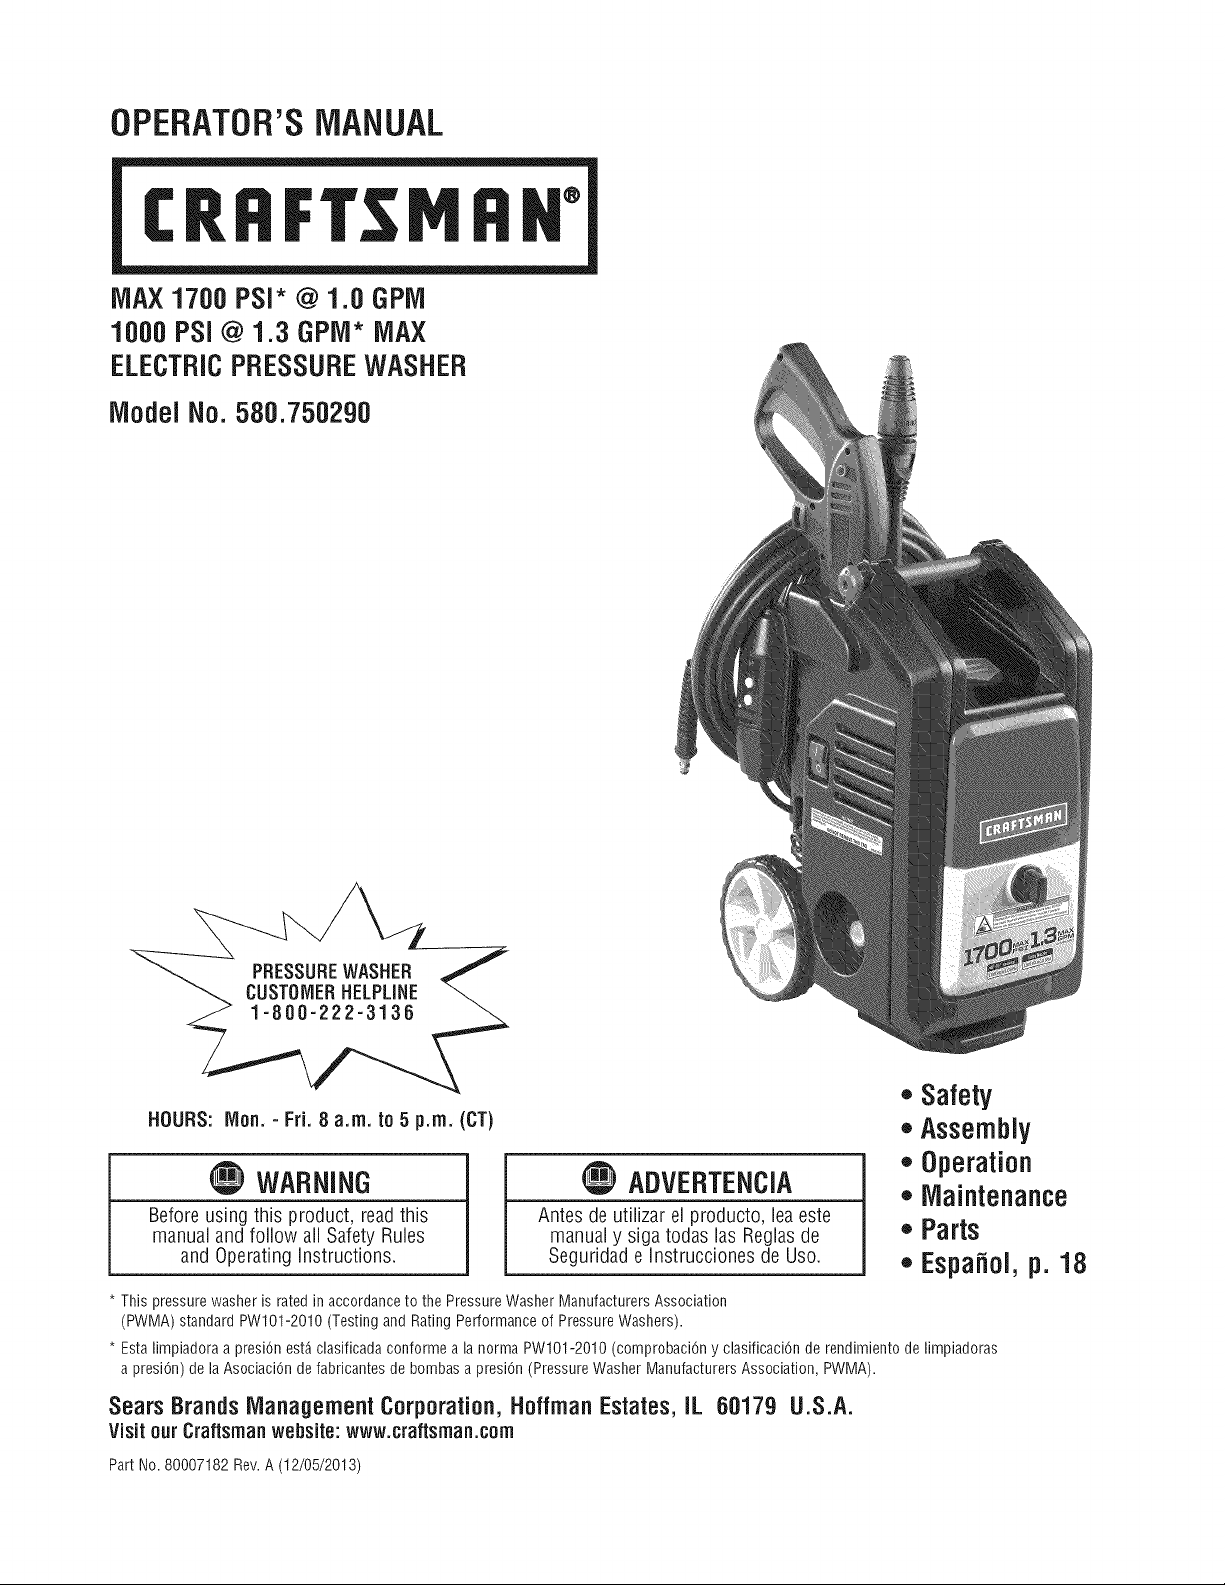
OPERATOR'SMANUAL
MAX 1700 PSi* @1.OGPiVi
1000 PSi @ 1.3 GPiVI*MAX
ELECTRICPRESSUREWASHER
iViodelNo. 580.750290
®
,, Safety
HOURS: IVIon.- Fri. 8 a.m. to 5 p.m. (CT)
,, Assembly
,, Operation
WARNING
Beforeusing this product, readthis
manualand follow all Safety Rules
and OperatingInstructions.
* This pressure washer is rated in accordance to the Pressure Washer Manufacturers Association
(PWMA) standard PW101-2010 (Testing and Rating Performance of Pressure Washers).
* Esta limpiadora a presiOn est_ clasificada conforme a la norma PWI01-2010 (comprobaciOn y clasificaciOn de rendimiento de limpiadoras
a presiOn) de laAsociaciOn de fabricantes de bombas a presiOn (Pressure Washer Manufacturers Association, PWMA).
SearsBrands Management Corporation, HoffmanEstates,IL 60179 U.S.A.
Visit our Craftsman website: www.craftsman.com
Part No. 80007182 Rev.A (12/05/2013)
Antes de utiiizar el producto, leaeste
manualy siga todas las Reglasde
Seguridad e Instrucciones de Uso.
ADVERTENCIA
,,Maintenance
,,Parts
,, EspaNol,p. 18
WARRANTY.......................................... 2
SAFETYRULES...................................... 3-4
FEATURESANDCONTROLS.............................. 5
ASSEMBLY......................................... 6-8
OPERATION....................................... 8-10
SPECIFICATIONS..................................... 11
MAINTENANCE.................................... 11-13
STORAGE........................................... 13
TROUBLESHOOTING.................................. 14
REPLACEMENTPARTS................................. 15
NOTES.......................................... 16-17
ESPANOL........................................ 18-31
CRAFTSMANONEYEARLIMITEDWARRANTY
FORONEYEARfrom the dateof purchase, this product is warranted against defects in material or workmanship. With proof of
purchase,a defective product will be replacedfree of charge.
Forwarranty coveragedetails to obtain free replacement,visit the web page:www.craftsman.com/warranty
This warranty does not cover spray guns, hoses,nozzleextensions, nozzles,spray tips or filters, which are expendableparts
that canwear out from normal use within the warranty period.
This warranty is void if this product is ever usedwhile providing commercial services or if rentedto another person.
This warranty givesyou specific legal rights and you may also have other rights which vary from state to state.
Sears Brands Management Corporation, Hoffrnan Estates, IL 60179
© 2013
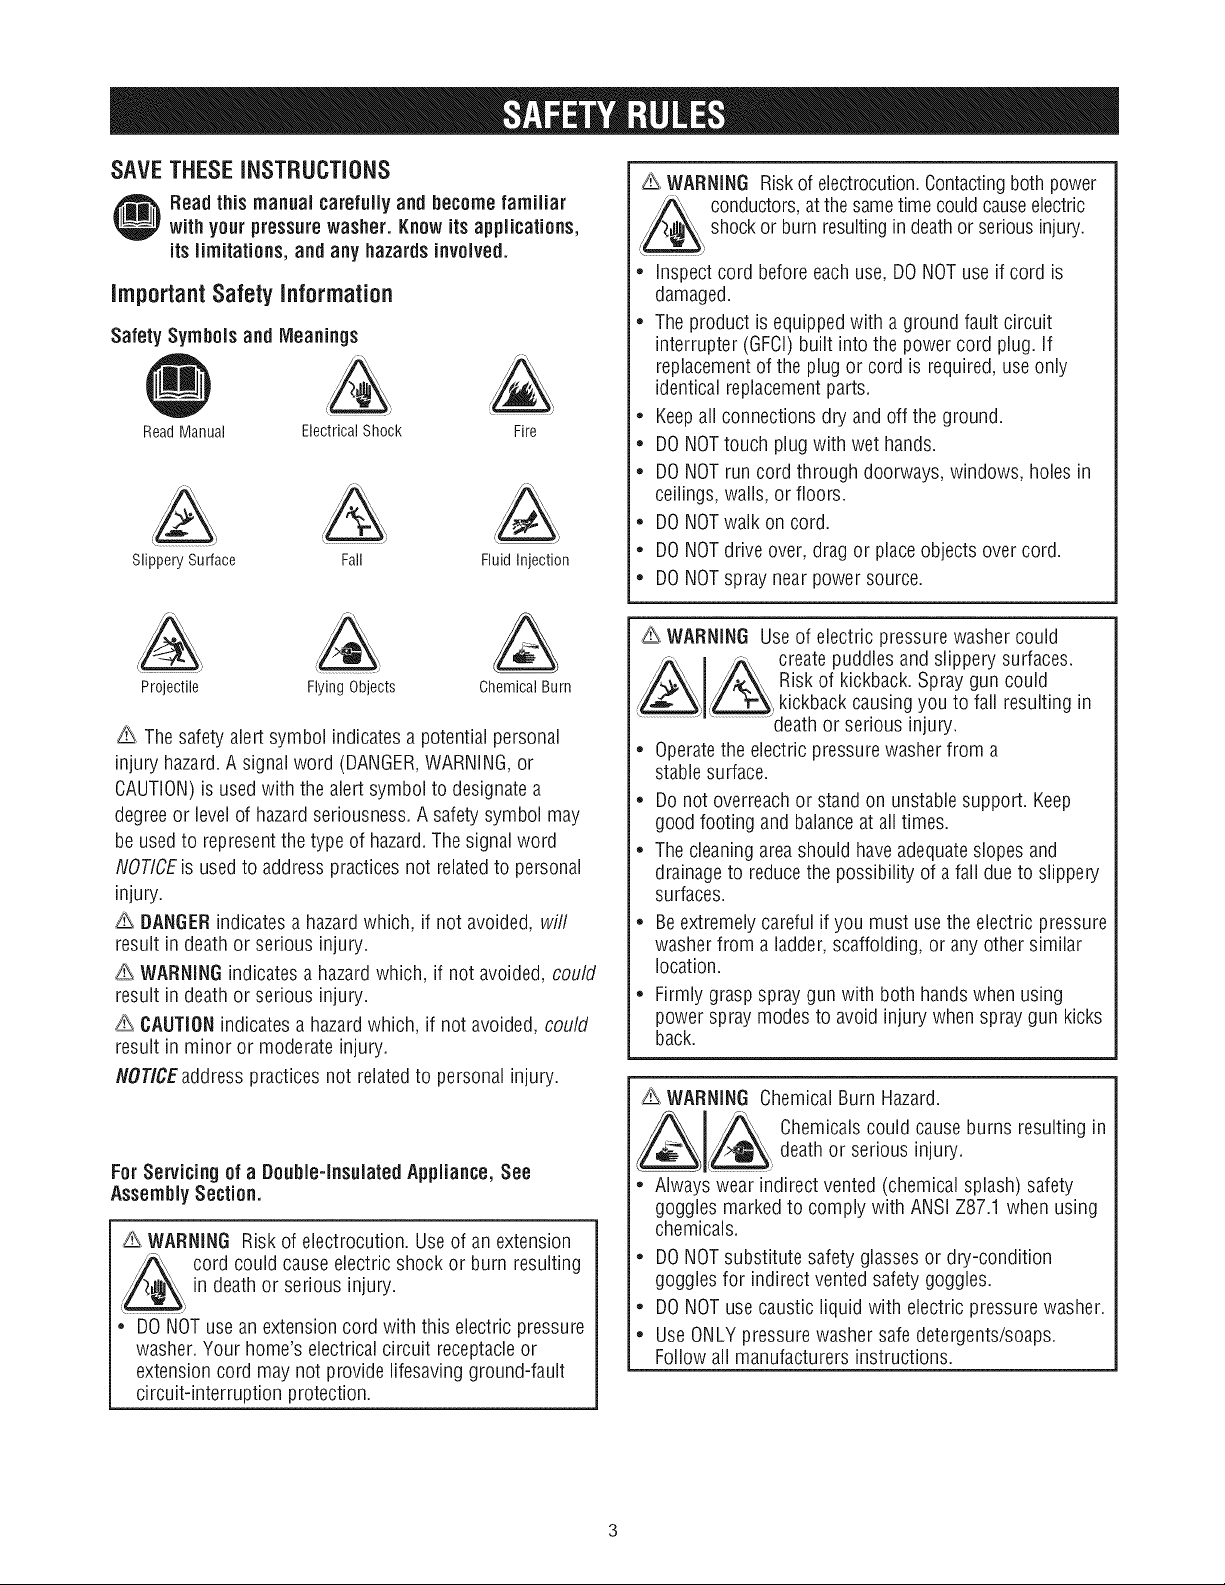
SAVETHESE INSTRUCTIONS
Readthis manual carefully and becomefamiliar
with your pressurewasher. Knowits applications,
itslimitations, andanyhazardsinvolved.
important Safety information
Safety Symbols and Meanings
A
ReadManual ElectricalShock
Slippery Surface Fall Fluid Injection
Fire
_, WARNING Riskof electrocution.Contactingboth power
///_\ conductors,at the sametime couldcauseelectric
shockor burn resultingin deathor seriousinjury.
• inspectcord before each use, DONOTuse if cord is
damaged.
• Theproduct is equippedwith a groundfault circuit
interrupter (GFCI)built into the power cord plug. If
replacementof the plugor cord is required, useonly
identical replacementparts.
e
Keepall
e
DONOT
e
DONOT
ceilings,
e
DONOT
e
DONOT
e
DONOT
connections dry and off the ground.
touch plug with wet hands.
run cord through doorways,windows, holes in
wails, orfloors.
walk on cord.
drive over,drag or placeobjects overcord.
spray near powersource.
,&, WARNING Useof electric pressure washercould
Projectile Flying Objects Chemical Burn
Thesafety alertsymbol indicatesa potentialpersonal
injury hazard.A signalword (DANGER,WARNING,or
CAUTION)is used with the alertsymbol to designatea
degreeor level of hazardseriousness.A safety symbol may
be used to representthe type of hazard.The signalword
NOTICEis usedto address practices not relatedto personal
injury.
BANGERindicatesa hazardwhich, if not avoided, will
result in death or serious injury.
WARNINGindicates a hazardwhich, if not avoided, could
result in death or serious injury.
._. CAUTIONindicates a hazardwhich, if not avoided, could
result in minor or moderate injury.
NOTICEaddress practices not relatedto personal injury.
For Servicing of a Double-insulatedAppliance,See
Assembly Section.
,&_WARNING Risk of electrocution. Useof an extension
i_cord could causeelectric shock or burn resulting
in death or serious injury.
• DONOTusean extension cord with this electric pressure
washer.Your home's electricalcircuit receptacleor
extensioncord may not provide lifesavingground-fault
circuit-interruption protection.
/A\ create puddles and slippery surfaces.
/_,_ Risk of kickback.Spray gun could
./_, kickback causingyou to fall resulting in
............................................................................death or serious injury.
• Operatethe electric pressurewasher from a
stable surface.
• Donot overreachor stand on unstablesupport. Keep
good footing and balanceat all times.
• Thecleaningareashould haveadequateslopes and
drainageto reducethe possibility of afall due to slippery
surfaces.
• Beextremelycareful if you must use theelectric pressure
washer from a ladder,scaffolding, or anyother similar
location.
• Firmly graspspray gun with both handswhen using
power spraymodes to avoid injury when spray gun kicks
back.
,_, WARNING
ChemicalBurn Hazard.
Chemicalscould cause burns resulting in
&
e
Alwayswear indirect vented (chemicalsplash) safety
deathor serious injury.
goggles markedto comply with ANSIZ87.1 when using
chemicals.
• DONOTsubstitute safety glassesor dry-condition
goggles for indirect vented safetygoggles.
• DONOTuse caustic liquid with electric pressurewasher.
• UseONLYpressurewasher safedetergents/soaps.
Follow all manufacturers instructions.
WARNINGRiskofeyeorbodilyinjury.Spraycould
,_, JA splashback,propelobjectsorcause
_"" _//_"_\ internalharmresultinginserious
* Always wear indirect vented (chemicalsplash) safety
gogglesmarked to comply with ANSIZ87.1 when using
or in vicinity of this equipment.NEVERsubstitute safety
glassesor dry-condition goggles for indirect vented
safetygoggles.
* Know howto stop the pressurewasher andbleed
pressure quickly. Bethoroughly familiar with the
controls.
* DONOTallow CHILDRENto operatethe electric pressure
washer.
* Keepoperatingareaclear of all persons.
* Inspecthigh pressure hose before eachuse. NEVER
repair high pressure hose;replaceit.
* DONOT repairleakingconnections with sealantof any
kind; replaceo-rings and gaskets.
* Keephoseconnectedto electric pressurewasher and
spray gun while system is pressurized.
* ALWAYS point spray gun in safedirection while system
is pressurizedand squeezespray gun trigger to release
high pressure,everytime you turn off the unit.
* DONOTaim spraygun at peopleor animals.
* DONOTdrink from hoseconnectedaccessories.
* DONOTsecure spraygun in open position.
. DO NOTleavespray gun unattendedwhile the electric
pressurewasher is in ON (I) position.
* DONOTusea spray gunwhich does not havea trigger
lock or trigger guard in placeandin working order.
* Always be certainspraygun and accessoriesare
correctly attached.
* Stayalert - watch what you aredoing.
* DONOToperatethe product when fatigued or under the
influenceof alcoholor drugs.
* Closesupervision is necessarywhen this product is used
nearchildren.
,&, WARNING The high pressure stream of water that
j_,_ this equipment producescould cut through skin
_ and its underlyingtissues, resulting in serious
,......................._,injury and possible amputation.
Spraygun traps high water pressure, even when motor is
stopped and water is disconnected,which could result in
serious injury.
* NEVERaim spray gun at people,animals,or plants.
* ALWAYS point spray gun in safe direction, squeeze
spray gun trigger to releasehigh pressure, every time
you turn off pressure washer.
injury.
_, WARNING Riskof fire. Sprayingflammable liquids
J"_ could result in death or serious injury.
* DONOTspray flammableliquids.
_, WARNING Riskof fire. Overheatedcord could result
j/A in death or serious injury.
* Uncoilcord completely prior to use.
* DONOTcover cord with any material.
_ WARNING This product contains lead and lead
compounds, known to the State ofCalifornia to cause
birth defects or other reproductive harm. Washyour
handsafter handling this product.
IVOTICEHigh pressurespray could damagefragile items
including glass.
* DONOTpoint spray gun at glasswhen using turbo spray
tip.
* NEVERaim spraygun atplants.
NOTICE improper treatment of electric pressurewasher
could damageit and shorten its life.
* Ifyou have questions about intendeduse, ask dealeror
contact authorizedservicecenter.
* DONOToperateunits with broken or missing parts, or
without protective housingor covers.
* DONOTby-pass anysafetydeviceon theelectric
pressurewasher.
* DONOTmodify the electric pressure washerin any way.
* Beforestarting the electricpressure washer incold
weather, checkall parts of the equipment to be sure ice
hasnot formed there.
* DONOTmove theelectric pressurewasher by pulling on
hoses.Move unit usingthe transport handlesupplied.
* This equipment is designedto beusedwith Sears
authorizedparts ONLY.if equipment is usedwith parts
that DONOTcomply with minimum specifications, user
assumesall risks and liabilities.
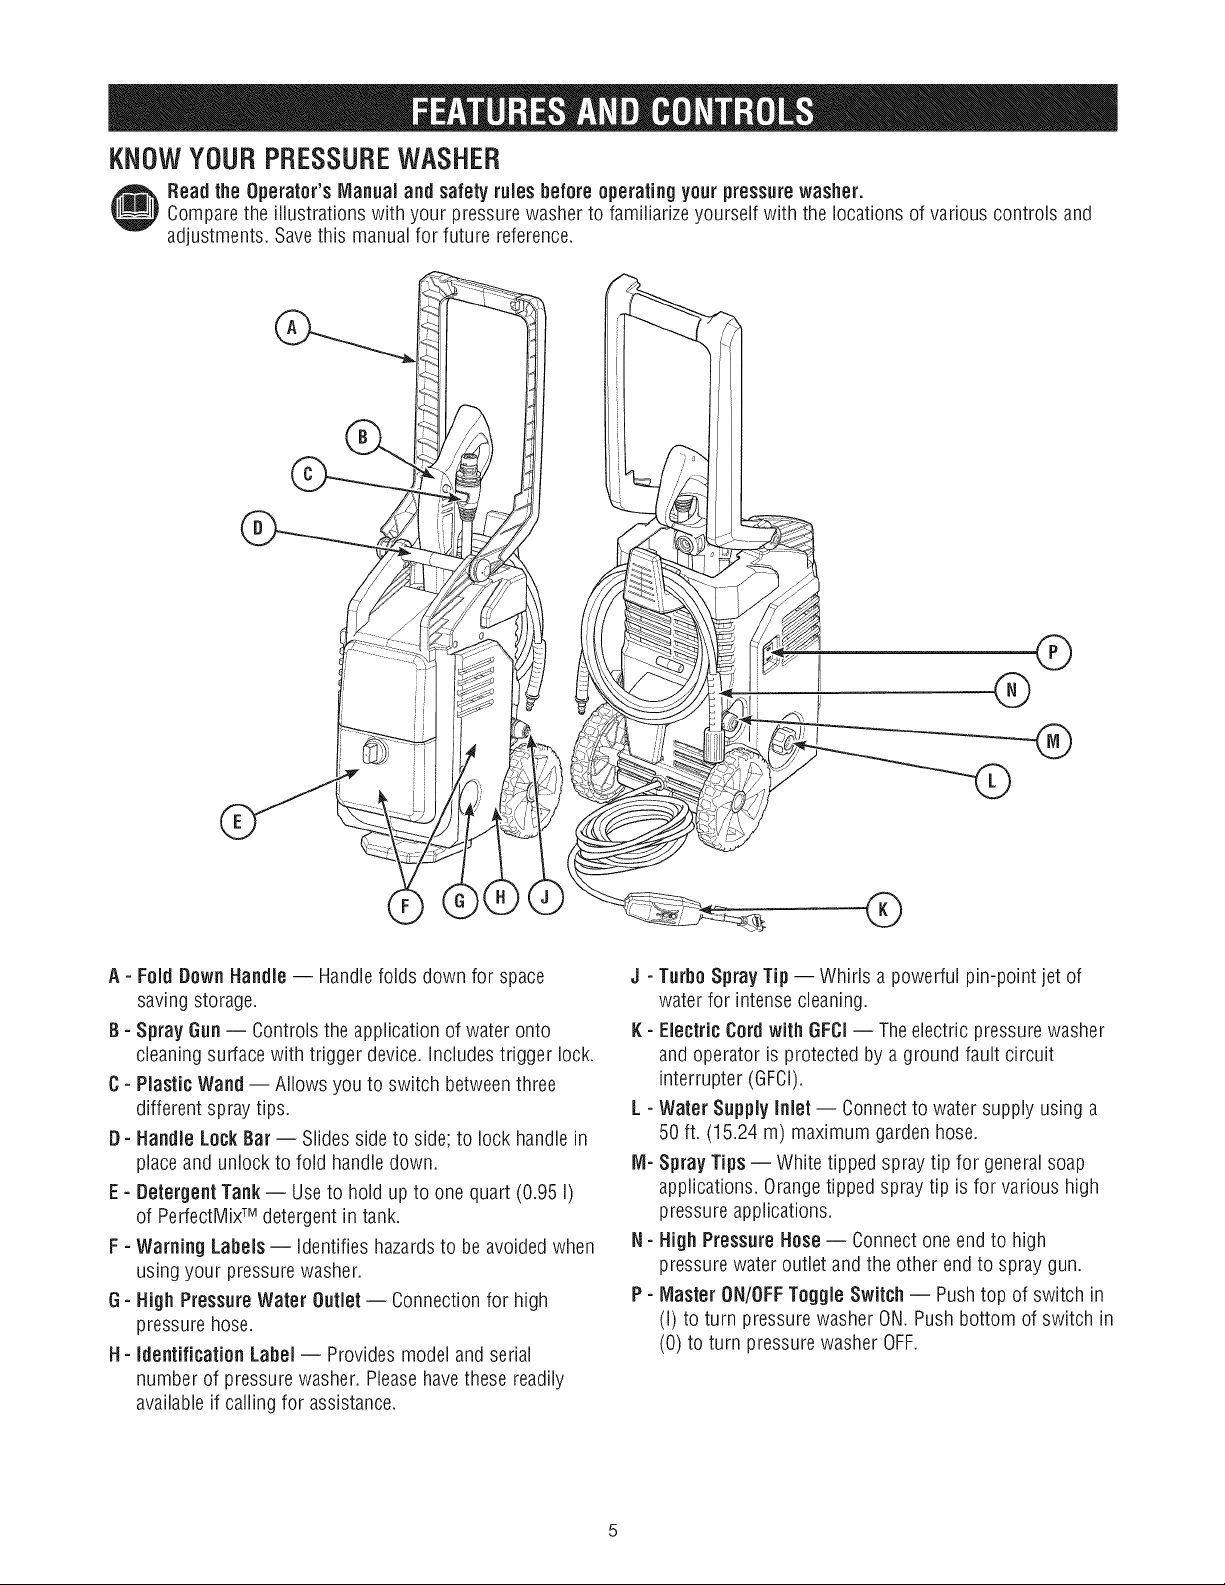
KNOWYOURPRESSUREWASHER
Readthe Operator'sManual andsafetyrules beforeoperating your pressurewasher.
Comparethe illustrations with your pressurewasher to familiarize yourself with the locations of various controls and
adjustments. Savethis manualfor future reference.
®
®
A - Fold DownHandle-- Handlefolds down for space
saving storage.
B - Spray Gun -- Controlsthe application of water onto
cleaningsurface with trigger device. Includestrigger lock.
C- Plastic Wand-- Allows you to switch between three
different spray tips.
D- Handle Lock Bar -- Slides side to side; to lock handle in
placeand unlock to fold handledown.
E - DetergentTank -- Useto hold up to one quart (0.95 I)
of PerfectMixTM detergent in tank.
F - WarningLabels-- Identifieshazardsto be avoidedwhen
using your pressure washer.
G- Nigh Pressure Water Outlet -- Connectionfor high
pressure hose.
H- Identification Label -- Providesmodel and serial
number of pressure washer. Pleasehavethese readily
availableif calling for assistance.
®
®
J - TurboSpray Tip-- Whirls a powerful pin-point jet of
water for intense cleaning.
K - Electric Cord with GFCI-- Theelectric pressure washer
and operator is protected by aground fault circuit
interrupter (GFCI).
L - Water Supply Inlet -- Connectto water supply using a
50 ft. (15.24 m) maximum garden hose.
M- Spray Tips -- Whitetipped spray tip for generalsoap
applications. Orangetipped spray tip is for various high
pressure applications.
N- High PressureHose-- Connect one endto high
pressure water outlet andthe other endto spray gun.
P - Master ON/OFFToggle Switch -- Push top of switch in
(I) to turn pressure washerON. Pushbottom of switch in
(0) to turn pressure washer OFF.
Your electric pressurewasher requires some assembly but is
quickly readyfor use.
If you have any problemswith theassembly of your
pressurewasher, please caiithe pressurewasher heJpJine
at 1=800-222-3136.
UNPACKTHEPRESSUREWASHER
1. Removeeverything from carton.
2. Ensureyou have all included items prior to assembly.
CARTONCONTENTS
Checkaii contents. If any parts are missing or damaged,call
the pressurewasher helplineat 1-800-222-3136.
• Main unit
• Spraygun
• High pressure hose
• Plastic wand
• Quick connect spray tips (3)
• Parts bag (which includes the following):
• O-ring Kit
• Operator's manual
• Owner's registration card
Becomefamiliar with eachpiece beforeassembling the
pressure washer, identify all contents with the illustration
on page5. If any parts are missing or damaged,call the
pressure washer helpline at 1-800-222-3136.
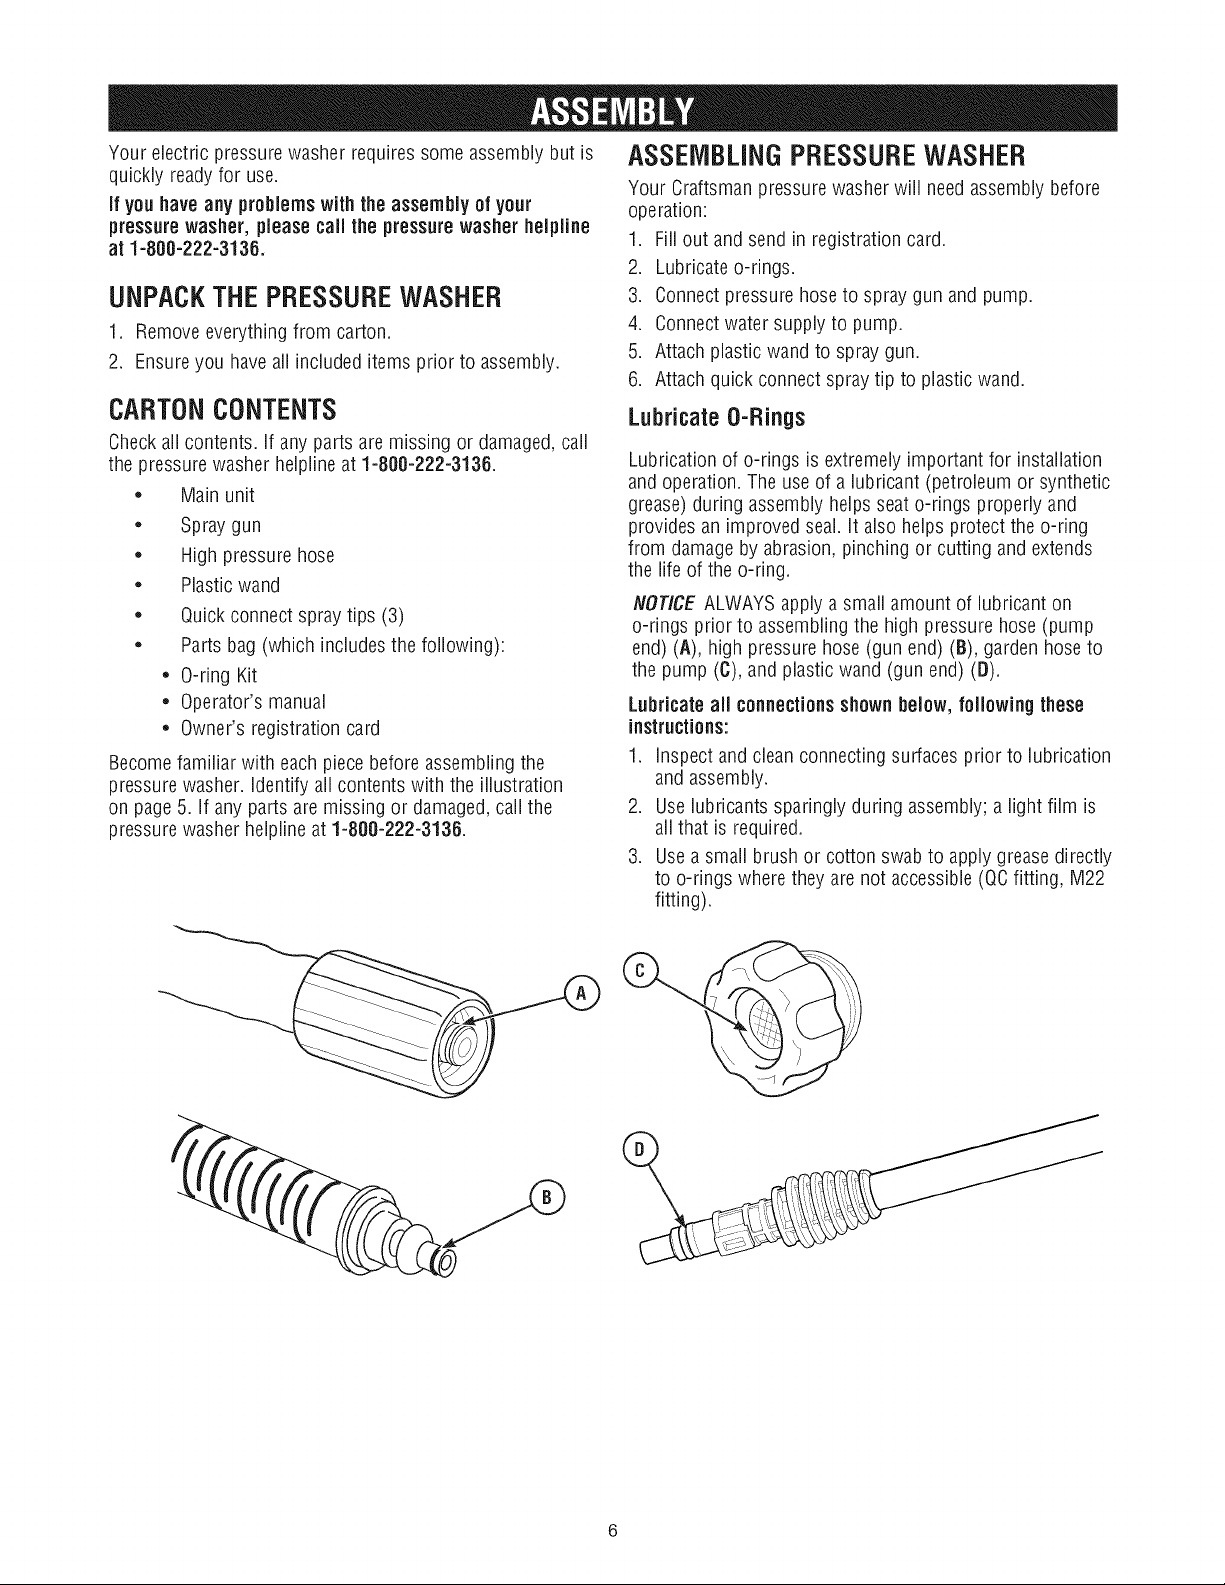
ASSEMBLINGPRESSUREWASHER
Your Craftsman pressurewasherwill need assemblybefore
operation:
1. Fill out and send in registration card.
2. Lubricateo-rings.
3. Connect pressure hoseto spray gun and pump.
4. Connectwater supply to pump.
5. Attach plastic wand to spray gun.
6. Attach quick connect spray tip to plastic wand.
LubricateO-Rings
Lubrication of o-rings is extremely important for installation
and operation. The use of a lubricant (petroleum or synthetic
grease)during assembly helps seat o-rings properly and
provides an improved seal. It alsohelps protect the o-ring
from damage by abrasion, pinching or cutting and extends
the life of the o-ring.
NOTICEALWAYSapply a small amount of lubricant on
o-rings prior to assemblingthe high pressure hose (pump
end) (A), high pressure hose(gun end) (B), garden hoseto
the pump (C), and plastic wand (gun end) (D).
Lubricateall connectionsshownbelow, following these
instructions:
1. inspect and cleanconnecting surfaces prior to lubrication
and assembly.
2. Uselubricants sparingly during assembly;a light film is
all that is required.
3. Usea small brush or cotton swab to apply greasedirectly
to o-rings where they are not accessible (QCfitting, M22
fitting).
ConnectHosesandWater Supply
NOTICE Use ONLYcold water (less than 100°F).
1. Attach garden hose(50 ft. / 15.24 m maximum) to water
supply.
.
Runwater through garden hose for 30 seconds to flush
the hose of debris. Turn off water.
3.
Confirm that waterinlet screen (A) is installedin water
inlet locatedon left side from front of unit; Do Not
remove except for cleaning.
NOTICE If inlet screenis damagedor missing, DONOT
use electric pressure washer. Call1-800-222-3136 for
assistance.
ConnectWand and SprayTip
1. Turn ONwater, point gun in a safedirection, press trigger
lock button (H), then squeezetrigger (J) to purge pump
system andspray gun of air and impurities.
2. Insertand twist plasticwand (K)into spray gun (N). Once
wand slidesintogun, applyfurther inwardpressure to
wand andtwist 1/4 turnclockwiseuntilsecurelyin place.
NOTICE DO NOT runthe pump without thewater supply
connectedand turned on.
• Damageto equipment resulting from failure to follow
this instruction will void warranty.
.
Attach opposite endof garden hose (B) to the water inlet
coupling (C). Tighten by hand.
5.
Attach high pressure hose(D) to the unit's water outlet
(E) located on right side from front of unit. Tighten by
hand.
.
Attach opposite endof high pressure hoseto the spray
gun. Press redbutton (F) on spraygun, then insert end
of high pressure hose (6) into gun until it SNAPSinto
place. Releasethe red button and makesure connection
is secure.
3. Turn OFFwater andreleasetrigger. Point gun in a safe
direction and make suretrigger cannot be squeezed.
4. insert the spray tip (N) into plastic wand (P). Once spray
tip slides into gun, apply further inward pressure until it
SNAPSinto place.
NOTICE To removespray tip, press releasebutton (R) on
wand andpull it awayfrom the wand.
ChecklistBeforeStarting Pump Motor
Reviewthe unit's assemblyto ensure you have performed all
of the following.
1. Besure to read OperatorSafetyand Operationbefore
using the electric pressure washer.
2. Checkfor properly tightened hoseconnections.
3. Checkto makesure there are no kinks, cuts, or damage
to hoses.
4. Providea proper water supply atan adequateflow (not to
exceed 100°F).
5. Plugelectrical power cord intoan electrical circuit rated
for 120 Volts ACat 15 Amps that isproperly installedin
accordancewith all local codes and ordinances.
Servicing OfA Double-InsulatedAppliance
In a double-insulatedproduct, two systems of insulation
are provided instead of grounding. No grounding means is
provided on adouble-insulated product, nor should a means
for grounding be added to the product. Servicing adouble-
insulated product requires extremecareand knowledgeof
the system,and should be done only by qualified service
personnel. Replacementparts for a double-insulated product
must be identical to the parts they replace.A double-
insulated product is marked with the words "DOUBLE
INSULATION"or "DOUBLEINSULATED."
F----1
Thesymbol L_ means DOUBLE-INSULATEDAPPLIANCE.
GroundFaultCircuit Interrupter Protection
This pressurewasher is provided with a ground-fault circuit-
interrupter (GFCi)built into the plug of the power supply
cord. This device provides additional protection from the risk
of electric shock. Should replacementof the plug or cord
become necessary, useonly identical replacementparts that
include GFCIprotection.
HOWTOUSEYOURPRESSUREWASHER
If you have any problems operatingyour pressure washer,
pleasecall the pressurewasher helpline at 1-800-222-3136.
Howto Start Your ElectricPressureWasher
.Z_,WARNING Risk of eyeinjury. Spraycould splash back
/A\ or propel objects resulting in serious injury.
Alwayswear indirectvented (chemical splash)
',_, safety goggles marked to comply with ANSI
Z87.1 when using or in vicinity of this equipment. NEVER
substitute safetyglassesor dry-condition gogglesfor
indirect ventedsafety goggles.
1. Placethe electric pressurewasher near anoutside water
source capable of supplying water at a flow rate greater
than 3gallons per minute (11.4 I) and no lessthan 20 psi
(1.38 bars) at the electric pressurewasher end of garden
hose. DONOTsiphon supply water.
2. Connect garden hoseto water inlet.
3. Check that high pressure hose is tightly connected to
spray gun. See ConnectHosesand WaterSupplyfor
illustrations.
NOTICE DO NOTrunthe pump without the water supply
connectedand turned on.
• Damageto equipment resulting from failure to follow
this instruction will void warranty.
4. Turn ONwater, point gun in a safe direction, press trigger
lock button and squeezetrigger to purge pump system of
air.
5. Removeany dirt or foreign matterfrom spray tips. install
wand andspray tip onto spray gun. See ConnectHoses
and WaterSupplyand How to Use Spray Tipsfor details.
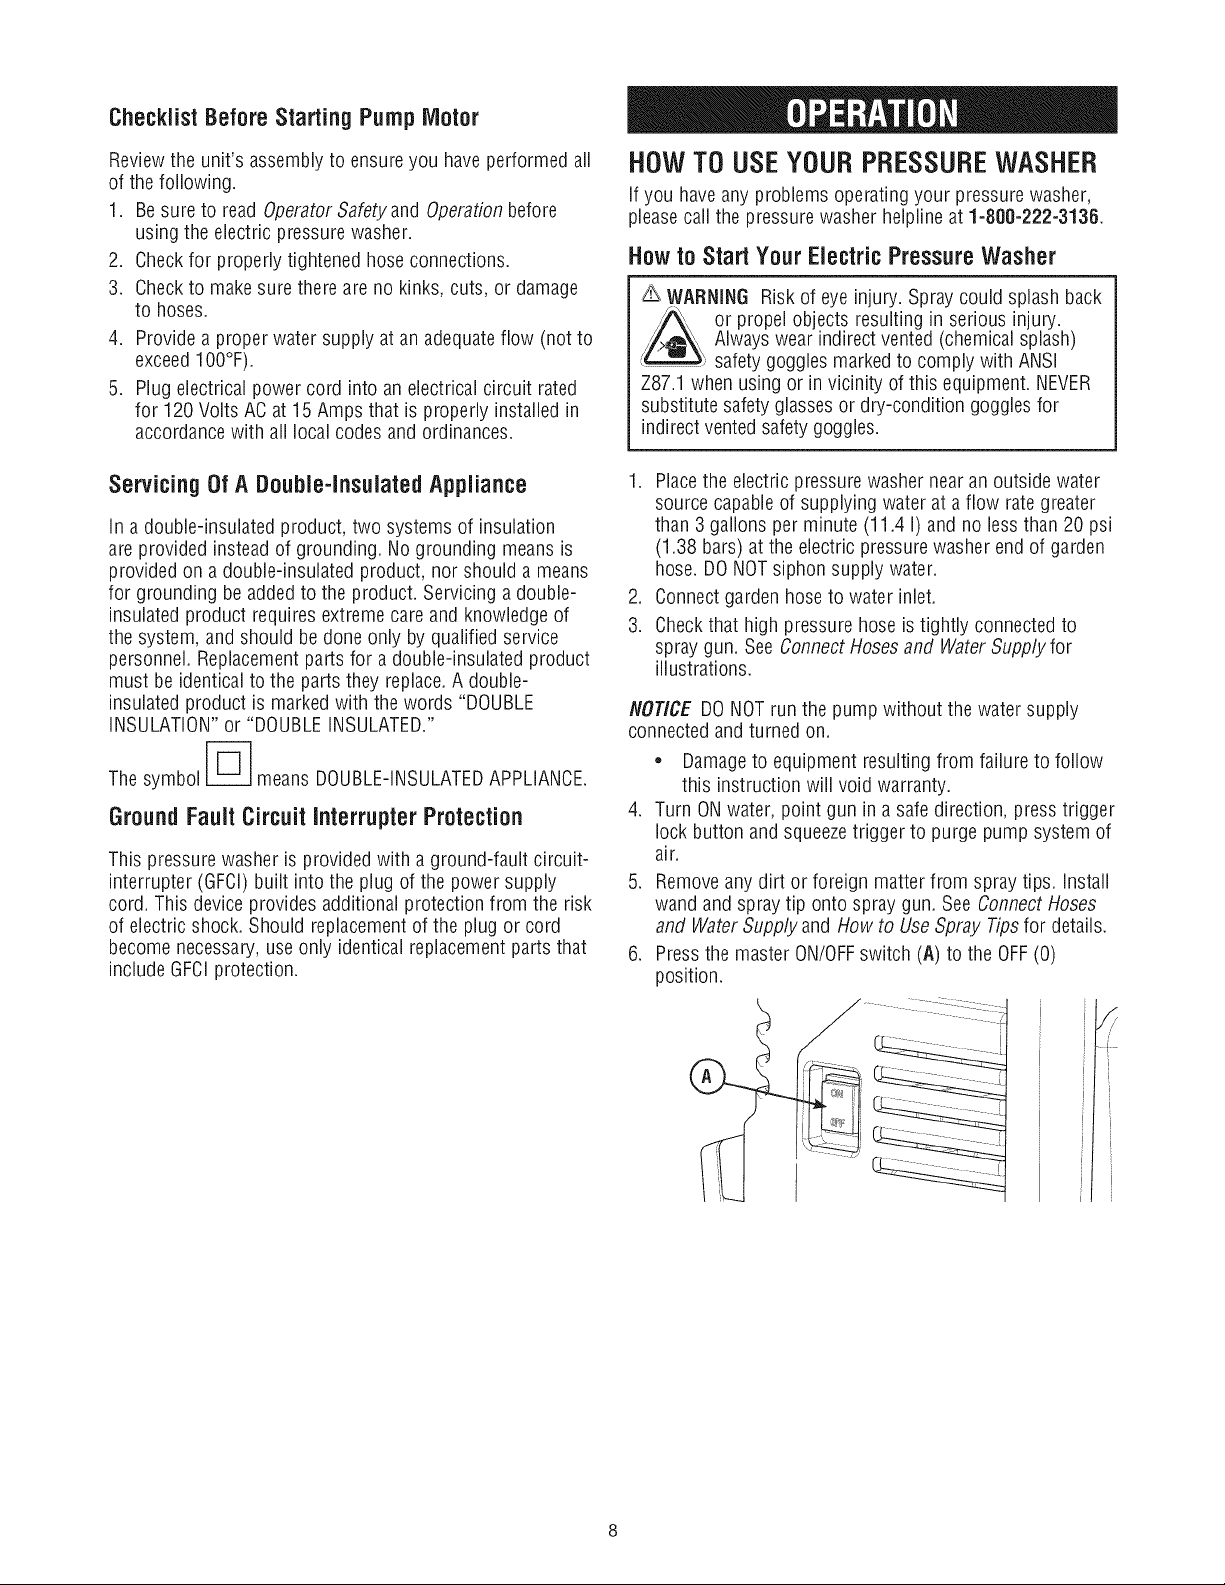
6. Pressthe master ON/OFFswitch (A) to the OFF(0)
position.
WARNINGRiskofelectrocution.Useofanextension
Howto Stop YourElectricPressureWasher
_A cordcouldcauseelectricshockorburnresulting
(//_;, in deathor serious injury.
• DONOTuse an extensioncord with this electric pressure
washer. Yourhome's electrical circuit receptacleor
extensioncord maynot providelifesaving ground-fault
circuit-interruption protection.
.
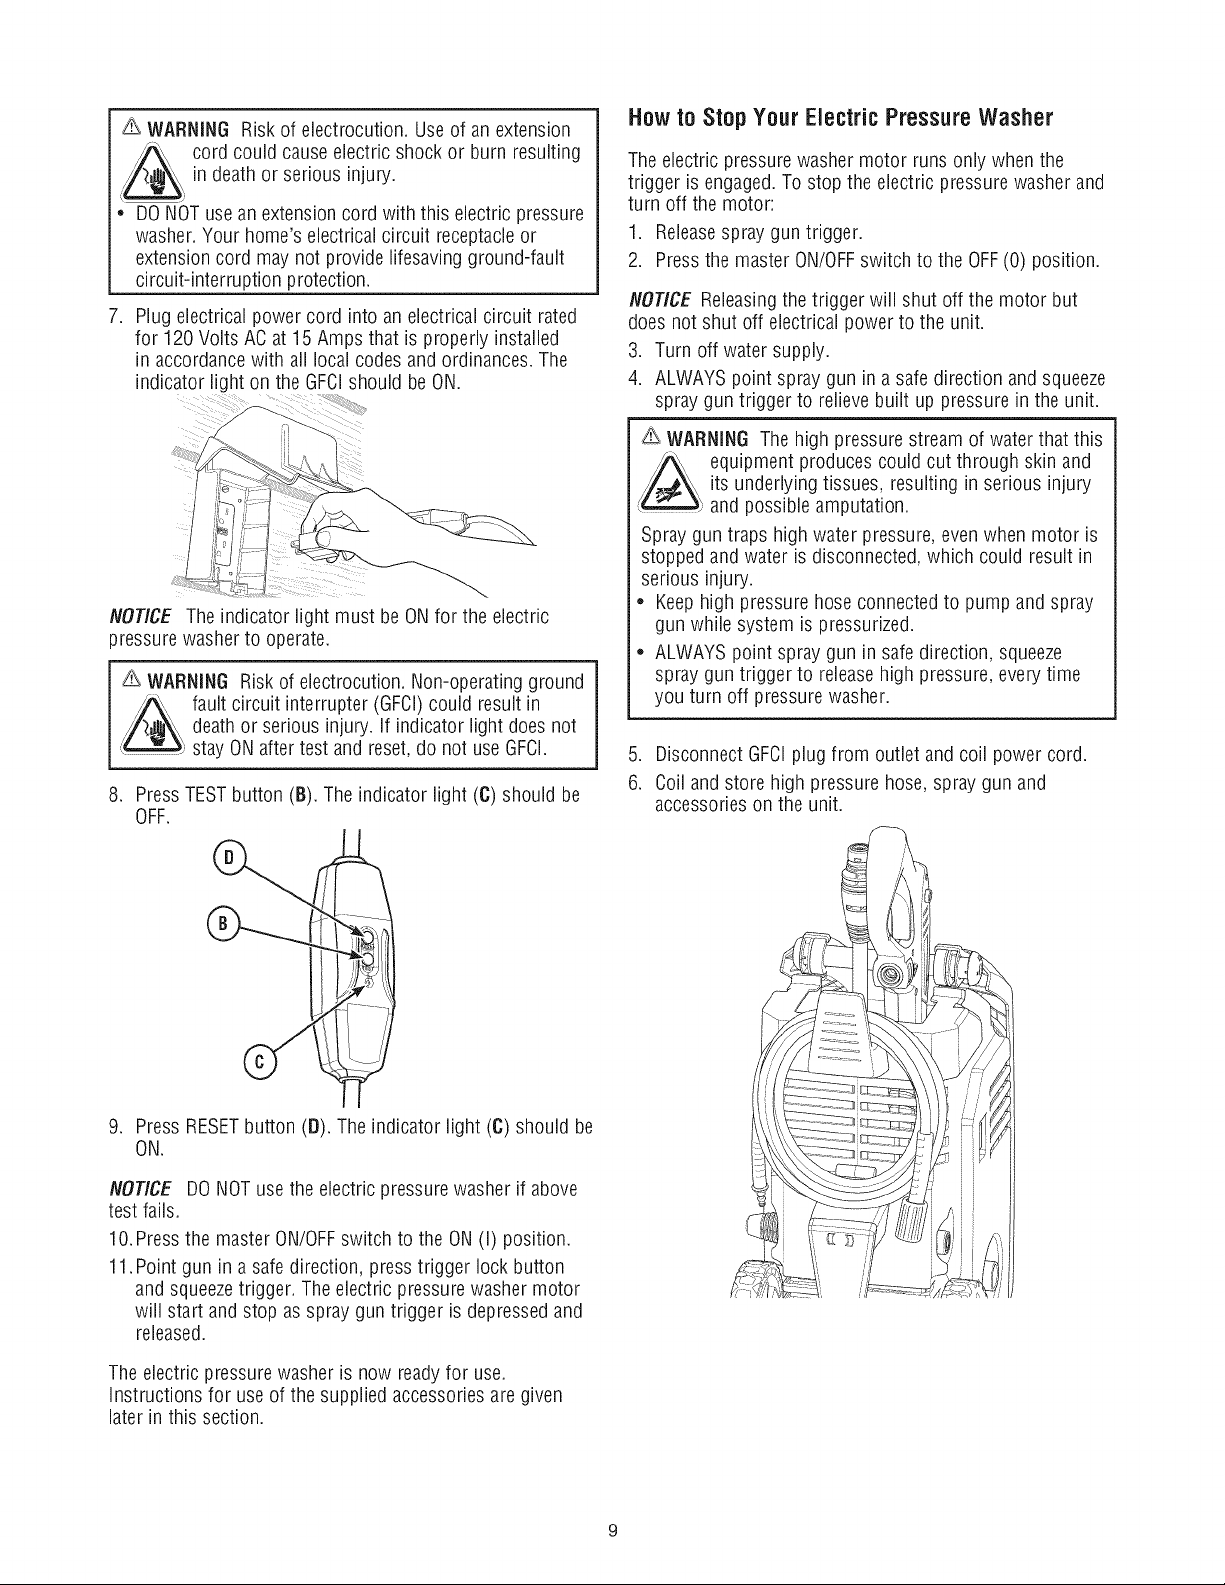
Plug electrical power cord into an electricalcircuit rated
for 120 Volts ACat 15 Amps that is properly installed
in accordancewith all local codes and ordinances.The
indicator light on the GFCIshould be ON.
NOTICE Theindicator light must be ON for the electric
3ressurewasher to operate.
WARNING Riskof electrocution. Non-operating ground
j_ fault circuit interrupter (GFCI)could result in
, . stay ONafter test and reset,do not useGFCI.
8. PressTESTbutton (B). The indicator light (C) should be
deathor serious injury. If indicator light does not
OFF.
The electric pressurewasher motor runs only when the
trigger is engaged.To stop the electric pressurewasher and
turn off the motor:
1. Releasespray gun trigger.
2. Pressthe master ON/OFFswitch to the OFF(0) position.
NOTICE Releasingthe trigger will shut off the motor but
does not shut off electrical power to the unit.
3. Turn off water supply.
4. ALWAYSpoint spray gun in a safedirection and squeeze
spray gun trigger to relieve built up pressure inthe unit.
_ WARNING The high pressurestream of waterthat this
_ quipment produces could cut through skin and
...........................and possible amputation.
Spray guntraps high water pressure, even when motor is
stopped and water is disconnected,which could result in
serious injury.
• Keephigh pressure hoseconnectedto pump and spray
• ALWAYSpoint spray gun in safe direction, squeeze
5. DisconnectGFCIplug from outlet and coil power cord.
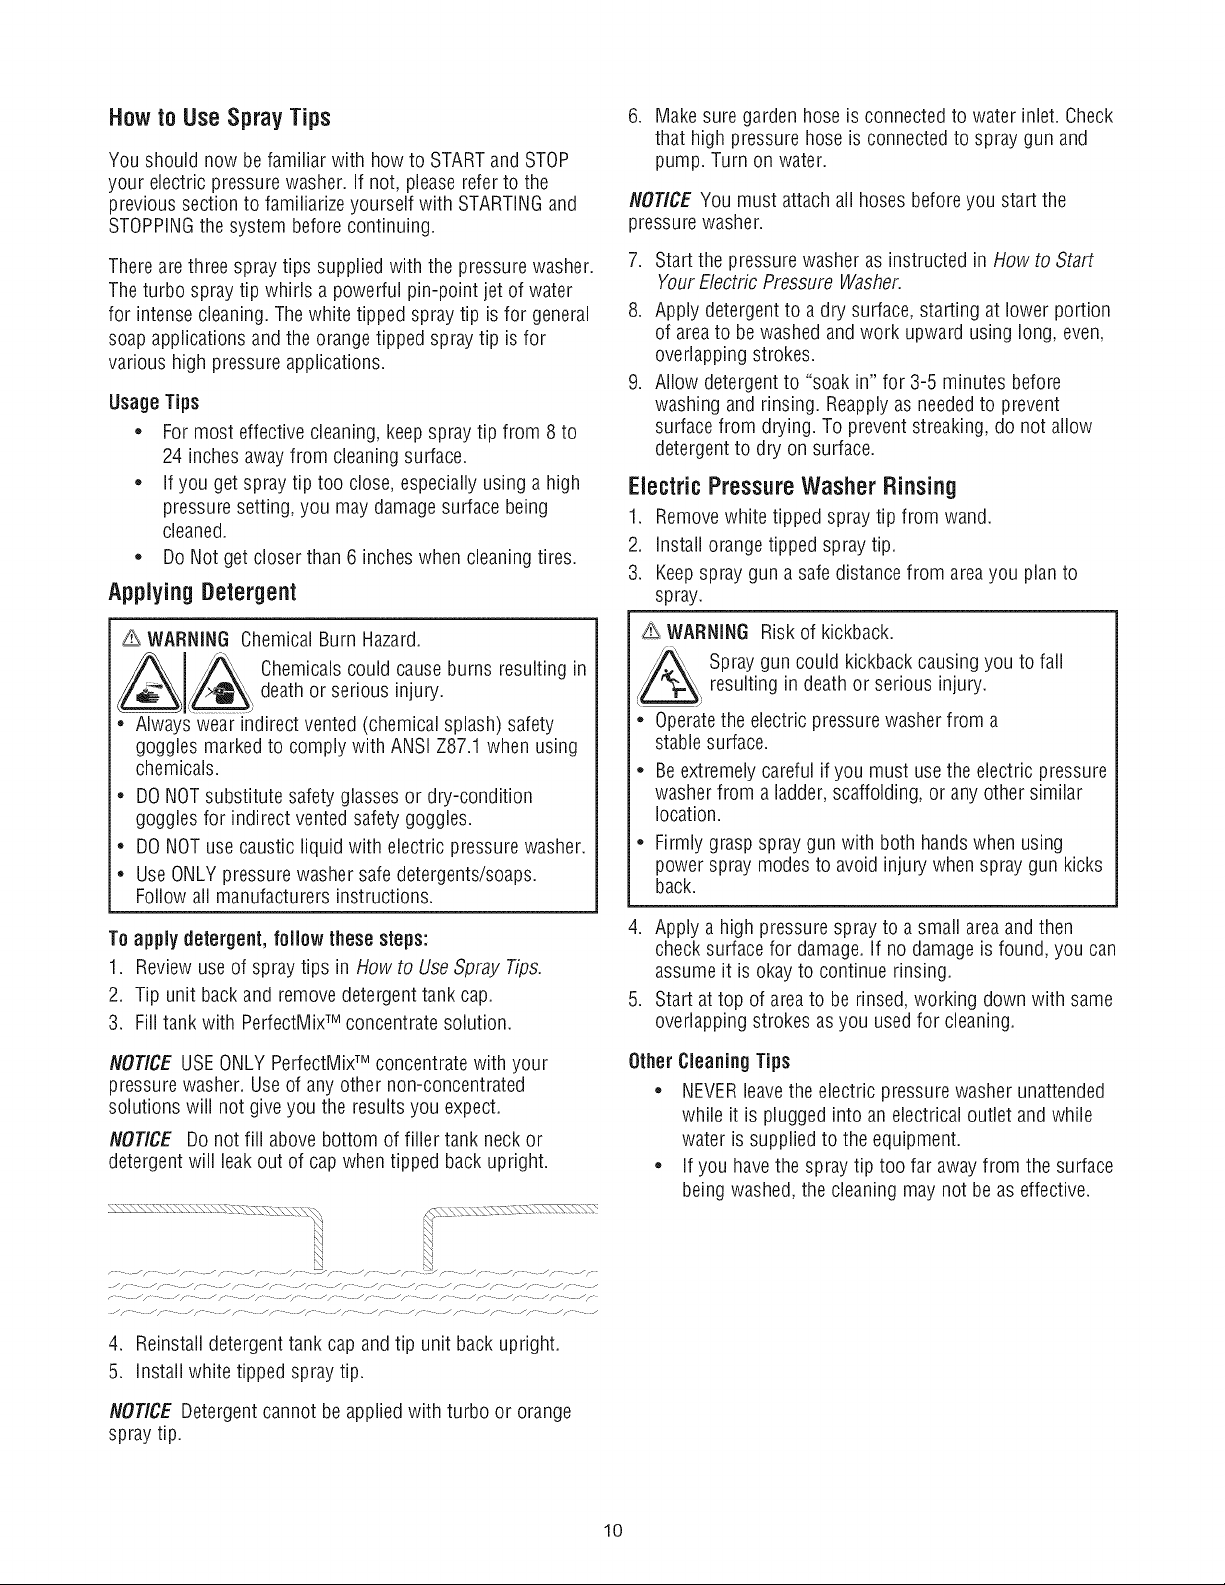
6. Coil and store high pressurehose, spray gun and
its underlying tissues, resulting in serious injury
gun while system is pressurized.
spray gun trigger to releasehigh pressure, everytime
you turn off pressure washer.
accessorieson the unit.
9. PressRESETbutton (D). The indicator light (C) should be
ON.
NOTICE DONOTusethe electric pressurewasher if above
test fails.
10.Pressthe master ON/OFFswitch to the ON(I) position.
11.Point gun in a safedirection, presstrigger lock button
and squeezetrigger. The electricpressure washer motor
will start and stop as spray gun trigger is depressedand
released.
Theelectric pressurewasher is now readyfor use.
Instructions for use of the supplied accessoriesare given
later in this section.
How to Use Spray Tips
You should now be familiar with how to STARTand STOP
your electric pressurewasher. If not, pleasereferto the
previous sectionto familiarizeyourself with STARTINGand
STOPPINGthe system before continuing.
Thereare three spray tips supplied with the pressurewasher.
Theturbo spray tip whirls a powerful pin-point jet of water
for intense cleaning. Thewhite tipped spray tip is for general
soap applications and the orangetipped spray tip is for
various high pressure applications.
UsageTips
* For most effective cleaning, keepspray tip from 8 to
24 inches awayfrom cleaning surface.
* If you get spray tip too close, especiallyusing a high
pressure setting, you may damagesurface being
cleaned.
DoNot getcloser than 6 inches when cleaningtires.
Applying Detergent
WARNING ChemicalBurn Hazard.
A _ Chemicalscould cause burns resulting in
death or serious injury.
• Alwayswear indirectvented (chemicalsplash) safety
goggles marked to comply with ANSi 787.1 when using
chemicals.
• DONOTsubstitute safety glasses or dry-condition
gogglesfor indirect vented safety goggles.
• DONOTusecaustic liquid with electric pressure washer.
• UseONLYpressure washer safedetergents/soaps.
Follow all manufacturers instructions.
To apply detergent, follow these steps:
1. Reviewuseof spray tips in How to UseSpray Tips.
2. Tip unit backand remove detergenttank cap.
3. Filltank with PerfectMixTM concentrate solution.
6. Make sure gardenhose is connected to water inlet. Check
that high pressure hose is connectedto spray gun and
pump. Turn on water.
NOT/CEYou must attach all hoses beforeyou start the
pressurewasher.
7. Start the pressure washeras instructed in How to Start
Your Electric Pressure Washer.
8. Apply detergent to a dry surface, starting at lower portion
of areato bewashed andwork upward using long, even,
overlapping strokes.
9. Allow detergentto "soak in" for 3-5 minutes before
washing and rinsing. Reappiyas neededto prevent
surface from drying. To prevent streaking,do not allow
detergent to dry on surface.
ElectricPressureWasher Rinsing
1. Removewhite tipped spraytip from wand.
2. Install orange tipped spray tip.
3. Keepspray guna safedistance from areayou plan to
spray.
_ WARNING Risk of kickback.
/,_\ Spray gun could kickbackcausing you to fall
/_, resulting in death or serious injury.
Operatethe electric pressurewasher from a
stable surface.
Beextremelycareful ifyou must use the electric pressure
washer from a ladder, scaffolding, or any other similar
location.
• Firmly grasp spraygunwith both handswhen using
power spraymodes to avoid injury when spray gun kicks
back.
4. Apply a high pressurespray to a small area andthen
check surfacefor damage, if no damageisfound, you can
assumeit is okayto continue rinsing.
5. Start attop of areato be rinsed, working down with same
overlapping strokes asyou used for cleaning.
NOT/CE USE ONLYPerfectMWMconcentratewith your
pressure washer. Use of any other non-concentrated
solutions will not give you the resultsyou expect.
NOTICE Do not fill above bottom of filler tank neck or
detergent will leak out of cap when tipped back upright.
4. Reinstalldetergent tank cap andtip unit back upright.
5. install white tipped spraytip.
NOT/CE Detergent cannot be appliedwith turbo or orange
spray tip.
Other Cleaning Tips
* NEVERleavethe electric pressurewasher unattended
while it is plugged into an electrical outlet and while
water is supplied to the equipment.
If you have the spray tip too far away from the surface
being washed, the cleaning maynot be as effective.
10
 Loading...