

Craftsman 580741380 Owner’s Manual
OVVNE "S
MANUAL
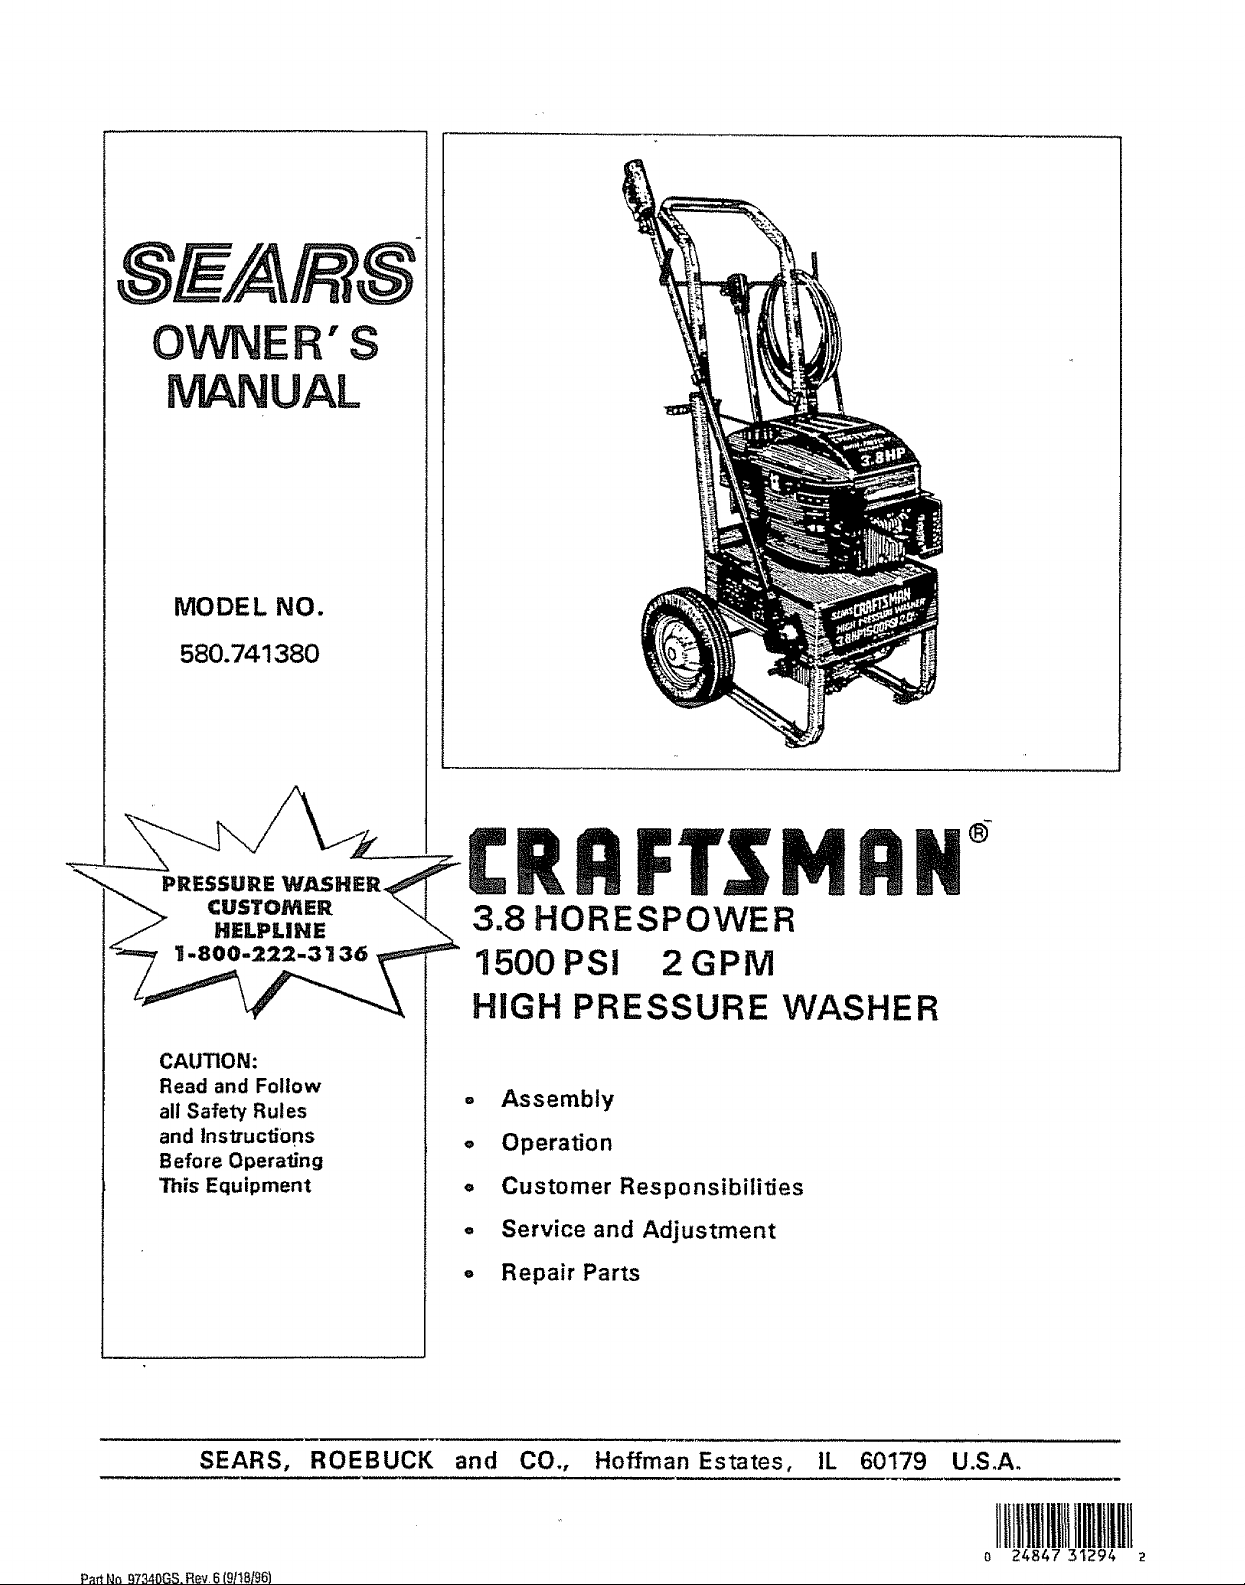
MODEL NO.
580.741380
3.8 HORESPOWER
CAUTION:
Read and Follow
all Safety Rules
and Inslructions
Before Operating
This Equipment
SEARS, ROEBUCK and CO., Hoffman Estates, IL 60179 U.S,A.
Part No 97340GS,Rev,6 (9t18]96)
1500 PSi 2GPM
HIGH PRESSURE WASHER
= Assembly
o Operation
° Customer Responsibilities
. Service and Adjustment
° Repair Parts
]tIlilillllltttllllHIltlRii
o 24847 31294
SAFETY RULES
CAUTION: ALWAYS DISCONNECT SPARK PLUG WIRE AND PLACE WIRE WHERE IT CANNOT CON-
TACT SPARK PLUG, TO PREVENT ACCIDENTAL START1NG WHEN SETTING UP, TRANSPORTING,
ADJUSTING OR MAKING REPAIRS TO YOUR HIGH PRESSURE WASHER
TRAINING:
® Engineexhaustgases containDEADLYcarbonmonox-
ide gas. This dangerous gas, if breathed in sufficient
concentrations, ce,'_cause unconsciousness or even
death. Operate thisequipmentonlyintheopenairwhere
adequateventilationis available.
e Gas_ine is highlyFLAMMABLE and itsv_aporsareE_'.-
PLOSIVE. DO not permit smoking,opennames,sparks
or heat in the vicink'y while handling gasoline. Avoid
spilling gasoline on a hot engir_. Allowunitto coolfor2
minutes before refueling. CompLywithall tawsregulating
storage and handling of gasolineo
• Locate this pressurewasher inareas awayfromcombus-
tible materials, combustiblefumes or duel
o The high pressure equipmentisdesignedto beusedwith
Sears authorized parts only. If you use this equipment
with parts that donotcomply with minimumspecif_-.ations,
the user assumes all risks and liabilities.
o Somechemicals ordetergentsmay be harmfulifinhaled
oringested,causing severenausea,faintingorpoisoning.
Theharmfu! elements may cause propertydamage or
severeinjury°
e Do notallowCHILDREN to operatethe PressureWasher
at any time,
PREPARATION:
o Operate engine only at governedspeed,.Runningthe
engine at excesswe speeds increasesthe hazard of
personalinjury,. Do not tamper _ partswhich may
increase or decreasethe govemea speea_
e Do notwear looseclothing,jewelryor anythingthatmay
be caught inthe starter or other' rotatingparts_
= Before starting the Pressure Washer in coldweather,
checkall parts of the equipment and be sure icehas not
formed there°
• Units with broken or missing parts, orwithout protective
housing or'covers shouidNEVER be operated,
• The muffler and air clearer must be installedand ingood
conditionbefore operating the PressureWasher. These
componentsact as spark anestors ifthe enginebackfires,,
• Check thefuel system for Ieaks orsignsofdeterioration
suchas chafedorspongyhose, Ic_seormissing damps
or'damagedtank orcap. Correct alldefectsbefore oper-
ating the PressureWasher.,
OPERATION:
• Do not sprayflammable liquids,,
e Never allowany part ofthe bodytocome incontac_
the fluidstream. DO NOT come in contactwitha fluid
streamcreatedby a leak in thehighpressurehose.
• High pressurestream of fluid that this equipmentcan
producecan pierceskinand its underlyincjtissues,lead-
ing to serious injury and possible amputation,,
LOOK FOR THIS SYMBOL TO POINT OUT IMPORTANT
SAFETY PRECAUTIONS. IT MEANS "ATTENTIONIH BE-
COME ALERTIt! YOUR SAFETY IS INVOLVED."
• Neveraimthe gunatpeople,animals or plants.
= High pressurespraycancause paint chipsor other par-
ticles to become airborneand flyat highspeeds.
e Ahvayswear eye protectionwhenyou usathisequipment
or when you are inthe vicinity where the equiprnent isin
USe,
• Operate the pressure at no more than the PSt fluid
pressure ratedfor your pressure washer.
• Never .movethemachineby pullingonthe high pres_re
hose_usa thehandle _ on timtop of the unit.
e Alwaysbecertainthespraygun, noT.._esandaccessories
are cor--r_! attached.
= Neverusea spraygunwhichdoesnot havea tnggerkx::k
or trigger guard inplaceandin workingorder°
• Use a respiratorormaskwheneverttmreis a chance that
vaporsmay be inhaled. Read ati instructionswith the
maskso you arecertainthe maskwill providethe neces-
sary protectionagainst inhalingharmfulvapors,
• High pressurespray maydamage fragile items including
glass,, Do not point spray gun at glass when in the jet
spray mode.
® Keep the hose connectedto machine or the spray gun
whilethe system ispressurized. Disconnecting the hose
whilethe unit is pressurizedis dangerous_
• Hold the spray g.n firmtyin your hand before you start
the uniL Failuretodo so couldresult in an injury1toma
whippingspraygun. Do not leave the spray gun unat-
tendedwhilethe machineisrunning.
® The cleaningarea shoLltdhave adequate slopes and
drainagetoreducethepossibility ofa fall dueto slippery
surfaces.
e Keepwatersprayawayfromelectricwiringorfatalelec_c
shockmay resuiL
• Do notadjustu_loadervalveto a pressure in excessof
machinerating_
• Do notsecuretriggerguninthepulkback(open) position.
e Do notby_passanysafety device onthis machine,
• Do notleave triggerclosedfor morethan5minutes wi_
enginerunning,This coulddamage the pump°
• The muffler'and engine heat up duringoperation and
remain hot immediatelyafter shutting it down. Avoid
contactwith a hot muffler or engineor you couldbe
severely burned.
MAINTENANCE AND STORAGE'.
• Operate andstorethisunit ona stable surface,
• Highpressurehose candevelopleaksfrom wear, kinking,
abuse, etc, Water spraying from a leak is capable Of
injeclJngmaterialintoskin,Inspecthose each timebefore
usingit,, Checkall hoses for cuts, leaks, abrasions or
bulgingof cover,ordamage ormovement of couplings,tf
any of theseconditionsexist, replace hose immediately.
Neverrepairhighpressurehose,,Replaceit with another
hosethat meets minimum pressurerating ofyour pres-
surewasher,,
CONGRATULATIONS on your purchase of a Sears Crafts-
man high pressure washer° It has been designed, engi-
neered and manufactt_red to give you the best possible
dependability and performance.
Should you experience any problem you cannot easily
remedy, please contact your nearest Sears Service Cen-
ter/Department or call the 1+800 number listed on the front
of _is manual We have competent, well-trained techni-
cians and the proper tools to service or repair this unit.
Please read and retain this manual. The instructions will
enable you to assemble and maintain your high pressure
washer properly. Always observe the "SAFETY RULES."
PRODUCT SPECIFICATIONS
Pressure Washer Specifications
PUMP PRESSURE
FLOW RATE
DETERGENT MIX
DETERGENT RATIO
WATER SUPPLY
TEMPERATURE Not to exceed 140°F
Adiustable to 15_ PS!
2 gpm
Use undiluted detergent
Adjustable to 26:1
MODEL
NUMBER 5804741380
SERIAL
NUMBER
DATE OF
PURCHASE_
THE MODEL AND SERIAL NUMBERS WILL BE
FOUND ON A DECAL ATTACHED TO THE PRES-
SURE WASHER.
YOU SHOULD RECORD BOTH SERIAL NUMBER
AND DATE OF PURCHASE AND KEEP IN A SAFE
PLACE FOR FUTURE REFERENCE°
MAINTENANCE AGREEMENT
A Sears Maintenance Agreement is available on this prod-
uct. Contact your nearest Sears store for details..
CUSTOMER RESPONSIBILITIES
+ Read and observe the safety rules.
• Follow regular schedule in maintaining, caring for and
using your high pressure washer,,
• Follow the instructions under "Customer Responsibili-
ties" and "Storage" sections of this Owner's Manual.
Engine Specifications
ENGINE MODEL
RATED HORSEPOWER
DISPLACEMENT
SPARK PLUG: TyI_:
Set Gap. To.
GASOLINE CAPACITY
OI L (20 oz. capacity )
SOLID STATE IGNITION
AIR GAP
In the State of California a spark arrestor is required by law
(Section 4442 of the California Public Resources Code).
Other states may have similar laws. Federal laws apply on
federal lands.
NOTE: ifyou equip the engine of your pressure washer with
a spark arrestor muffler, the spark arrestor must be maim
tained in effective working order by the owner/operator.
You can order a spark arrestor through your Sears Service
Center, See Repair Parts section of engine for part num-
bers.
Bdggs & Stratton
3.8
9.67 cu. inches. (158cc)
Champion RJ-8C
0,030 krt_ (0,76ram)
I-Ir2 u.s, mJarts
SAE,30 w_k:jht
0.0125 inch
FULL ONE YEAR WARRANTY ON CRAFTSMAN HIGH PRESSURE WASHER
For oneyear from the date of purchase,whenthisCraftsmanHighPressureWasher is maintained and operated according to
the instructions in the owner'smanual,Searswill repair,free ofcharge, any defect in material and workmanship.
if this washer is used for commerci_ purposes,this warranty applies for only 90 days from the date of purchase_If this high
pressurewasher isused for rental purposes,thiswarrantyappliesfor only 30days alter date of purchase.
This warranty does not cover:+
, Expendable items such as spark plugs and air filters, which become worn during normal use.
,, Repairs necessary because of operator abuse or negligence, includingdamage resulting from no water being supplied to
pump or failure to maintain the equipment according to the instructions contained in the owner's manual..
WARRANTY SERVICE IS AVAILABLE BY RETURNING THE HIGH PRESSURE WASHER TO THE NEAREST SEARS
SERVICE CENTER_EPARTMEN'F THROUGHOUT THE UNITED STATES,
This warranty gives you specific legal rights and you may also have other rights, which vary from state to state.
SEARS, ROEBUCK AND CO., D/817 WA, Hoffman Estates, 1L 60179
3
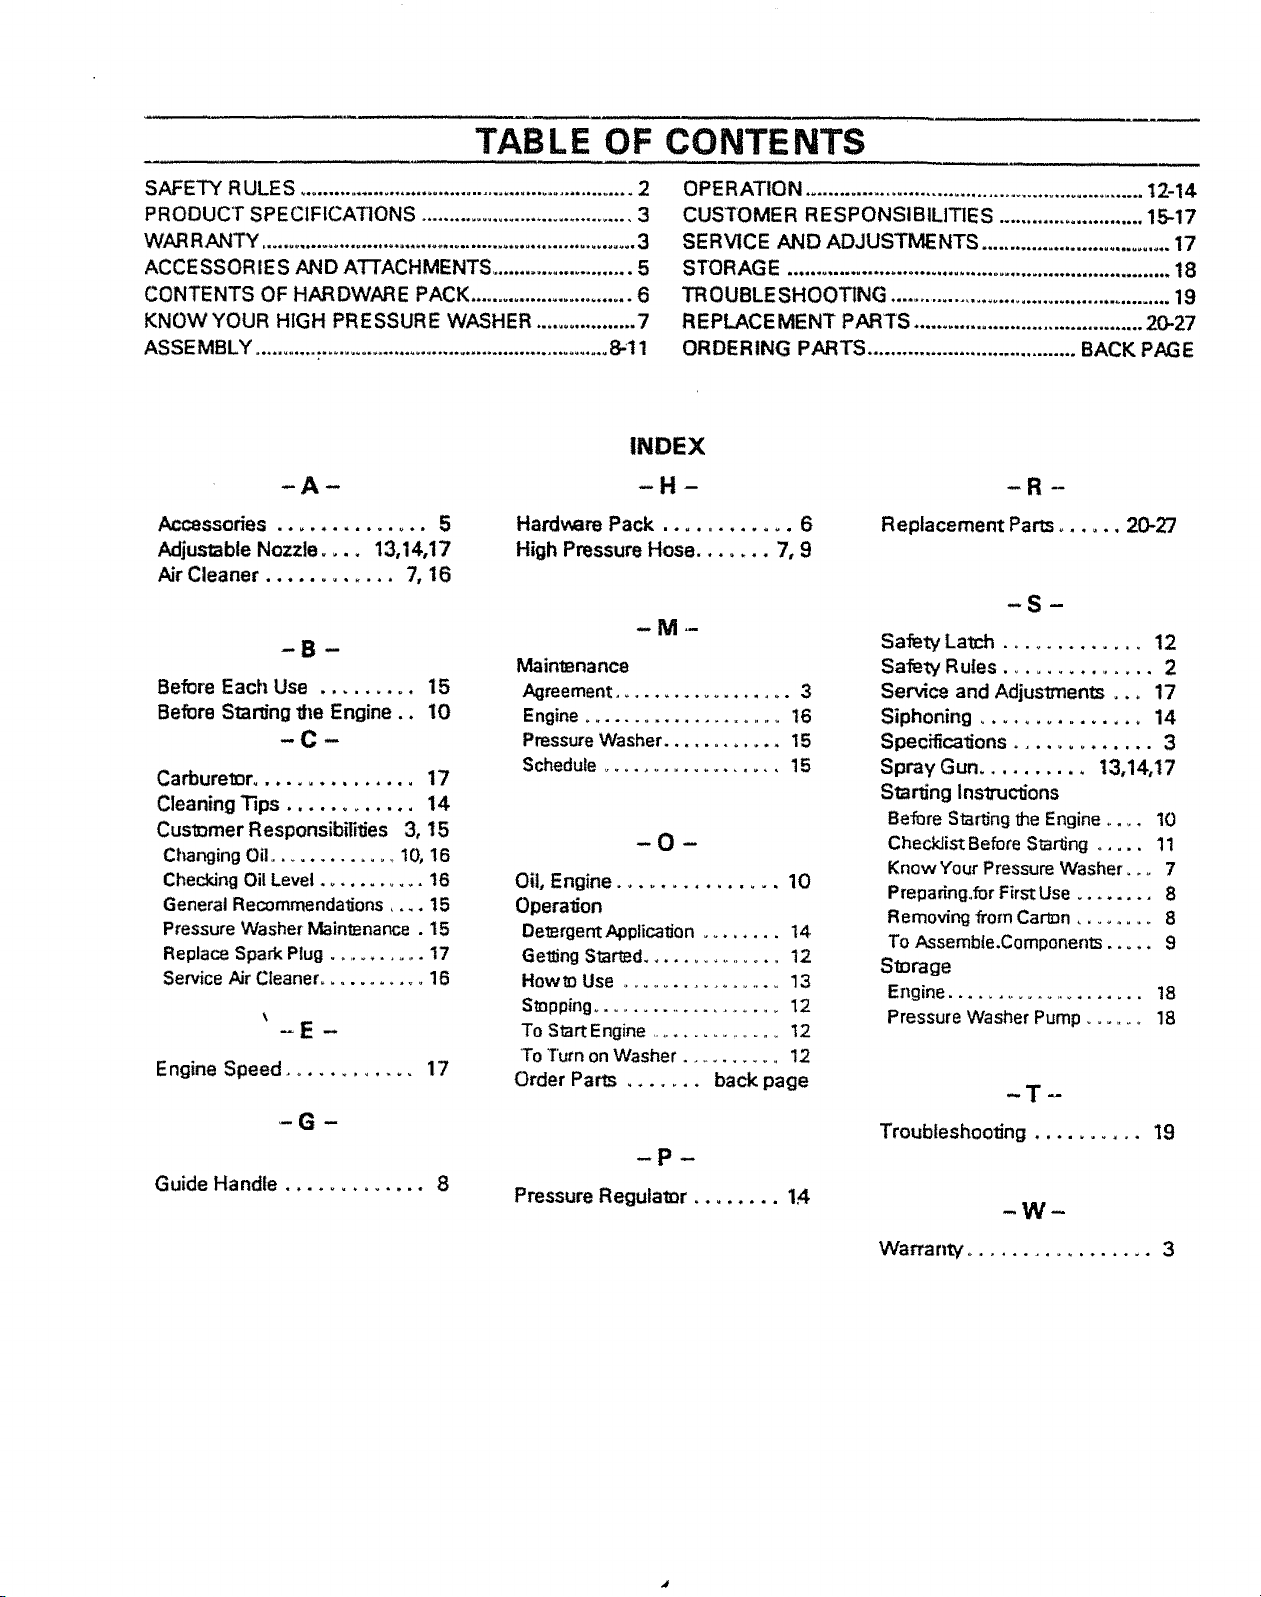
TABLE OF CONTENTS
SAFETY RULES ............................................................ 2
PRODUCT SPECIFICATIONS ...................................... 3
WARRANTY .................................................................... 3
ACCESSOR IES AND ATTACHMENTS ......................... 5
CONTENTS OF HARDWARE PACK ............................. 6
KNOW YOUR HIGH PRESSUR E WA_SHER.................. 7
ASSEMBLY ................................................................ 8-11
INDEX
-A-
Accessories .............. 5
Adjustable Nozzle .... 13,14,17
Air Cleaner ............ 7, 16
-B-
Before Each Use ......... 15
Before Stardng the Engine.. 10
--C--
Carburetor ............... 17
Cleaning Tips ............ 14
Customer ResponsibililJes 3, 15
Changing Oil ............. 10, 16
Checking Oil Level ........... 16
General RecomrnendalJons .... 15
Pressure Washer Maintenance . 15
Replaca Spark Plug ........... 17
Service Air Cleaner ........... 16
\
Engine Speed ............ 17
-G-
Guide Handle ............. 8
Hardware Pack ............ 6
High Pressure Hose ....... 7, 9
MaintBnance
Agreement .................. 3
Engine ...................... 16
Pressure Washer ............ 15
Schedule ................... 15
Oil, Engine ............... 10
Operation
Del_rgent Applica_on ........ 14
Ge_ng Stared ................ 12
How_o Use ..................... 13
S_pping .....................12
To Start Engine ............... 12
To Turn on Washer ............ 12
Order Parts ....... back page
PressureRegulator........ 1.4
OPERATION ............................................................ t2-14
CUSTOME R R ESPON SIBILITIE S .......................... 15-17
SERVICE AND ADJUSTMENTS .................................. 17
STORAGE .................................................................... 18
TROUBLESHOOTING ................................................... 19
REPLACE MENT PARTS ......................................... 20-27
ORDERING PARTS ..................................... BACK PAGE
-R--
Replacement Parts ...... 20-27
-S-
wi,-
-O-
-p-
Safety Latch ............. 12
Safety Rules .............. 2
Service and Adjuslments... 17
Siphoning ............... 14
Spec_calJons ............. 3
Spray Gun .......... 13,14,t7
Starting InslructJons
Before St_ng the Engine .... 10
Checklist Before S_ng ..... 11
KnowYour Pressure Washer... 7
Preparing,forFirstUse ........8
RemovingfromCartDn ......... 8
To Assemble.Components ..... 9
S_rage
Engine ..................... 18
PressureWasher Pump ...... 18
-T =-
Troubleshooting .......... I9
-W-
Warranty ................. 3
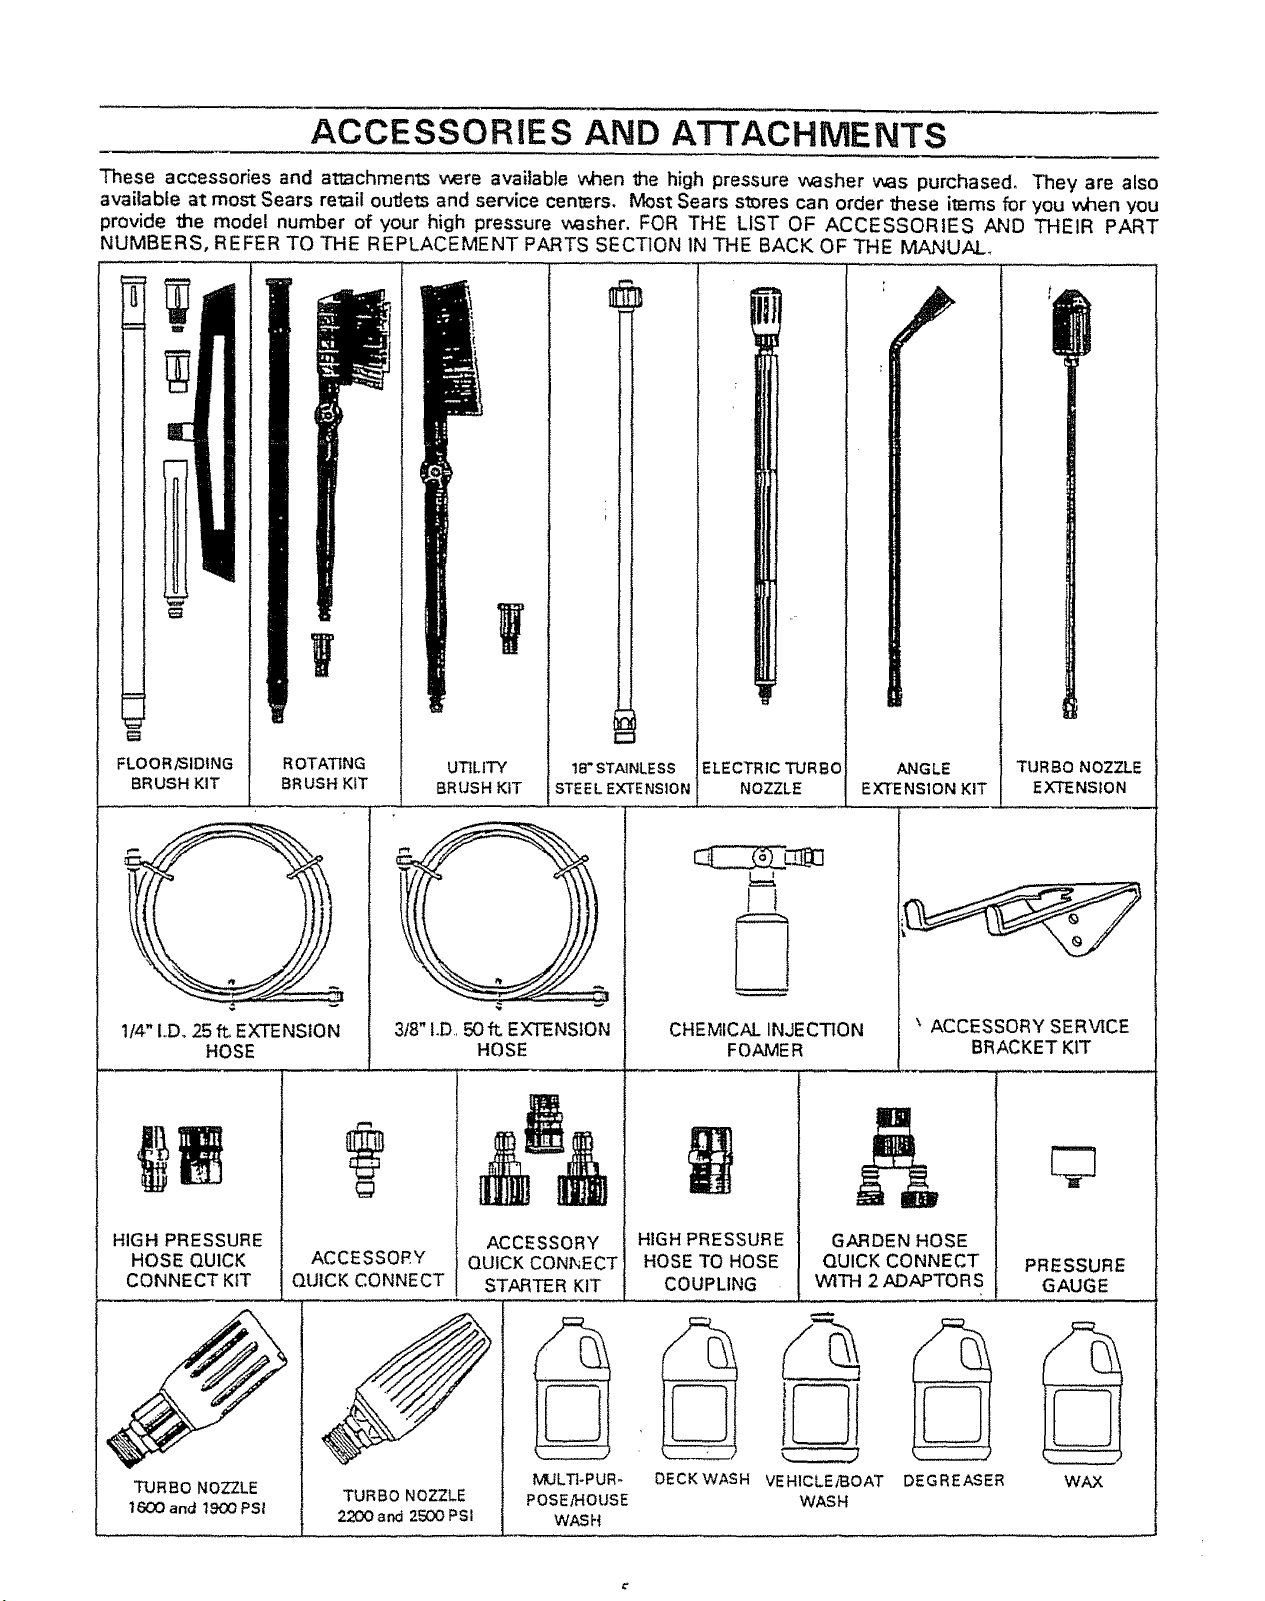
ACCESSORIES AND ATTACHMENTS
These accessories and attachments were available when _he high pressure v_sher v_s purchased° They are also
available at most Sears retail outlets and service cen_rs. Most Sears stores can order _hese imms for you when you
provide me model number of your high pressure washer. FOR THE LIST OF ACCESSORIES AND THEIR PART
NUMBERS, REFER TO THE REPLACEMENT PARTS SECTION IN THE BACK OF THE MANUAL
FLOOR/SIDING
BRUSH KIT
ROTATING
BRUSH KiT
1/4" I..Do25_ EXTENSION
HOSE
HIGH PRESSURE
HOSE QUICK
CONNECT KIT
QUICK CONNECT
3t8" I.D., 50ft. EXTENSION
ACCESSORY
UT]LITY
BRUSH KIT
HOSE
ACCESSORY
QUICK CONNECT
STARTER KIT
18" STAINLESS
STEEL EXTENSION
HIGH PRESSURE
HOSE TO HOSE
ELECTRIC TURBO
NOZZLE
CHEMICAL INJEC_ON
FOAMER
COUPLING
_*vtTH 2 ADAPTOR S
ANGLE
EXTENSION KIT
\ ACCESSORY SERVtCE
GARDEN HOSE
QUICK CONNECT
TURBO NOZZLE
EXTENSION
BRACKET KIT
PRESSURE
GAUGE
TURBO NOZZLE
16OOand 1900 PSi
TURBO NOZZLE
2200 and 2500 PSi
tV?JLTt-PUR-
POSE/HOUSE
WAS H
DECK WASH
WASH
DEGREASERVEHICLE 1130AT
WAX
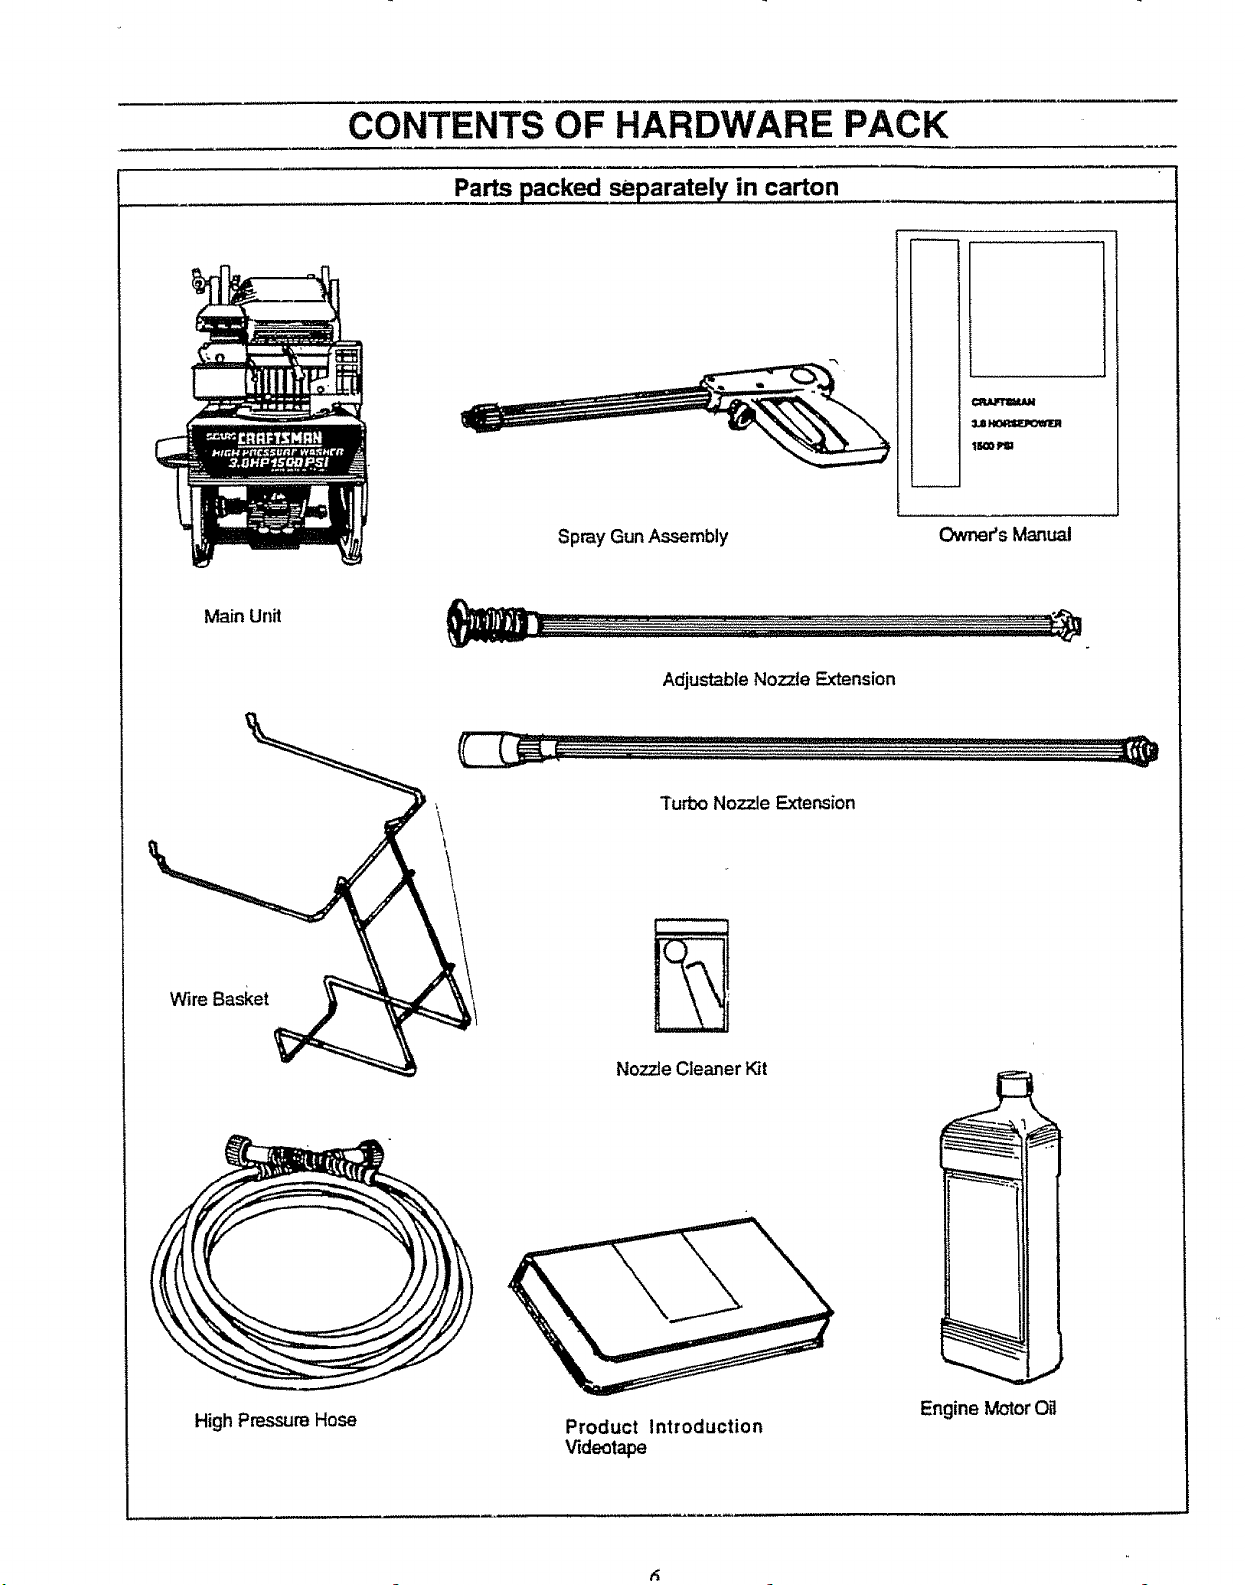
CONTENTS OF HARDWARE PACK
Parts packed separately in carton
=La_
lrIPtl=
Main Unit
Wire Basket
Spray GunAssembly
Adjustable Nozzle Extension
Turbo Nozzle Exter_ion
Owner's Manual
\
D
Nozzle Cleaner Kit
HighPressureHose
Product Introduction
Engine Motor(_1
Videotape
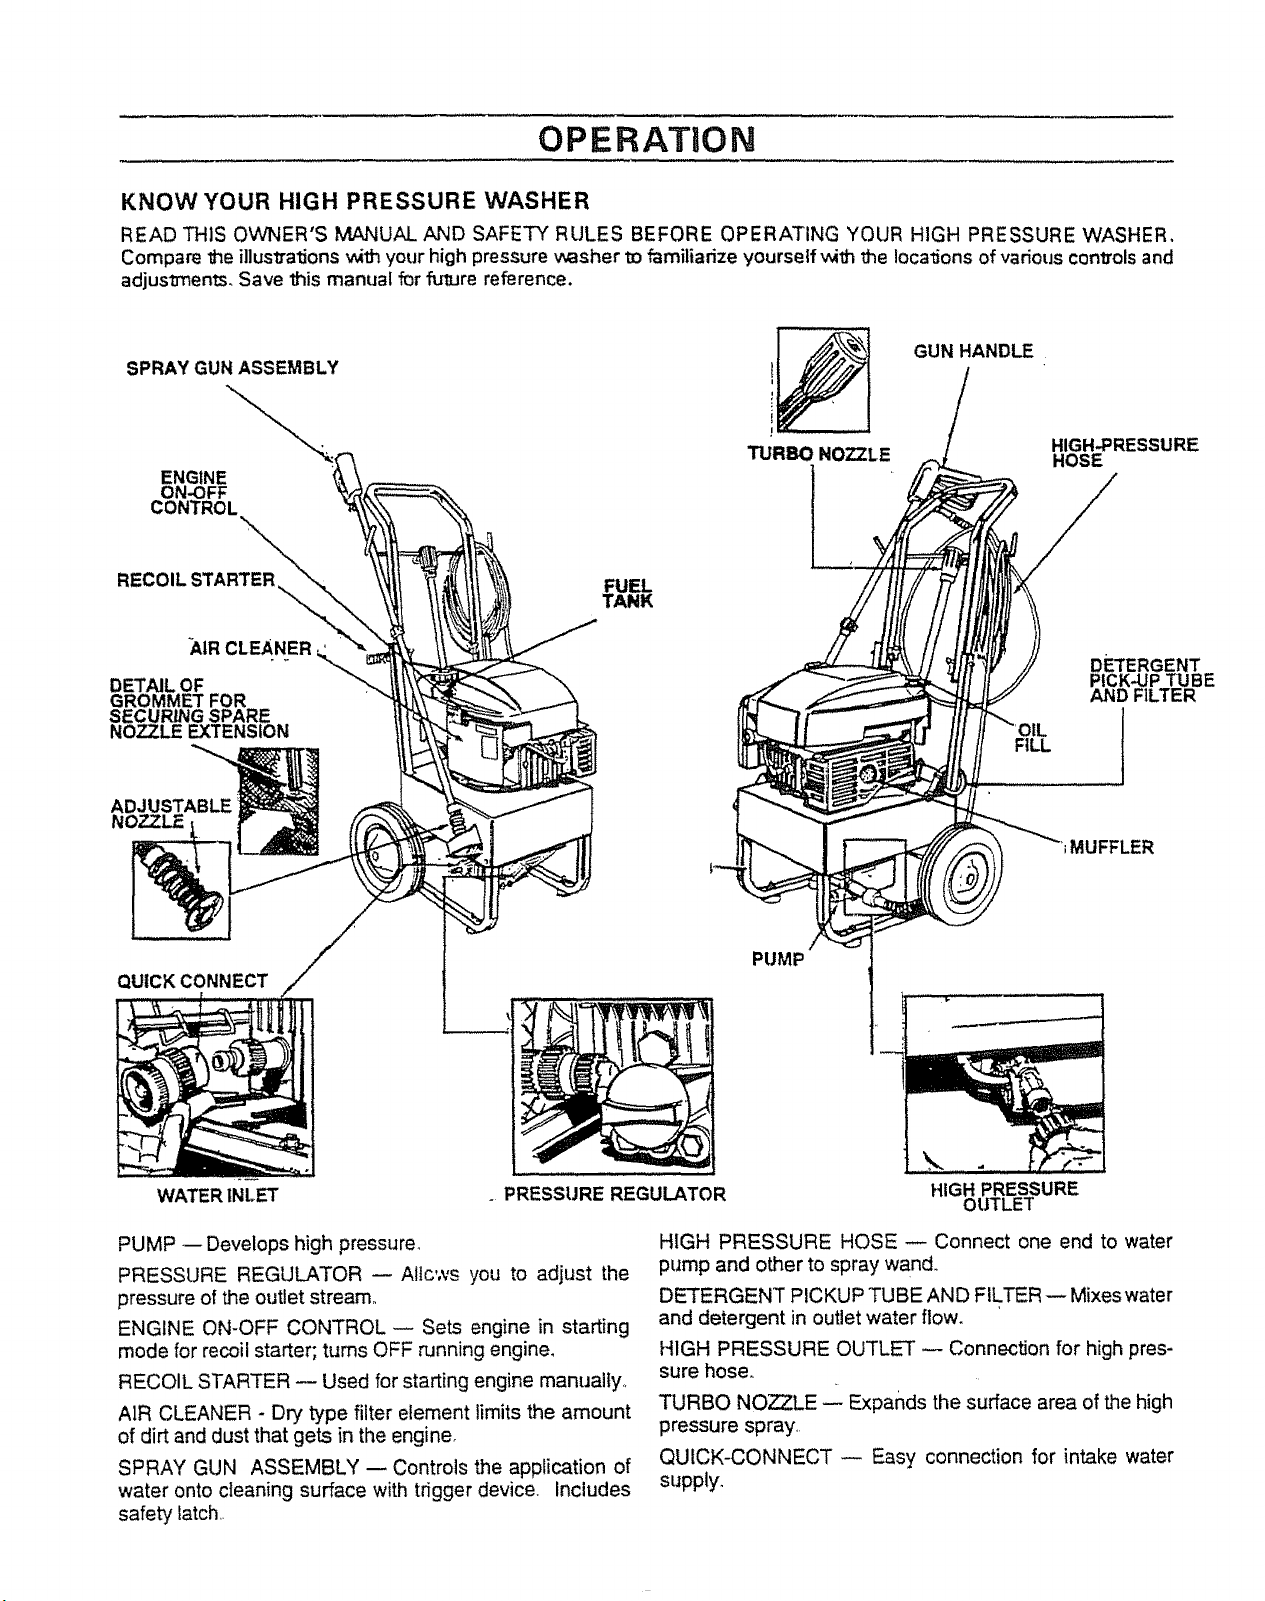
OPERATION
KNOW YOUR HIGH PRESSURE WASHER
READ THIS OWNER'S MANUAL AND SAFETY RULES BEFORE OPERATING YOUR HIGH PRESSURE WASHER,
Compare the illustralJons win your high pressure washer to familiarize yourself _th the locations of various con_'ols and
adjustments, Save this manual for future reference.
SPRAY GUN ASSEMBLY
ENGINE
ON, OFF
CONTROL
RECOIL STARTER
AIR CLEANER
DETAIL OF
GROMMET FOR
SECUPJNG SPARE
NOZZLE EXTENSION
A[
FUEL
TANK
TURBO NOZZLE
GUN HANDLE
HIGH-PRESSURE
HOSE
DETERGENT
PICK-UP TUBE
AND FILTER
FILL
QUICK CONNECT
WATER INLET . PRESSURE REGULATOR
PUMP -- Develops high pressure,,
PRESSURE REGULATOR -- Altc',vs you to adjust the
pressure of the outlet stream°
ENGINE ON-OFF CONTROL- Sets engine in starting
mode for recoil starter; turns OFF running engine,
RECOIL STARTER -- Used for starting engine manualIy,_
AIR CLEANER - Dry type filter element limits the amount
of dirt and dust that gets in the engine,
SPRAY GUN ASSEMBLY -- Controls the application of
water onto cleaning surface with trigger device. Includes
safety tatch,.
PUMP
HIGH PRESSURE
OUTLET
HIGH PRESSURE HOSE -- Connect one end to water
pump and other to spray wand_
DETERGENT PICKUP TUBE AND FILTER -- Mixes water
and detergent in outlet water flow.
HIGH PRESSURE OUTLET -- Connection for high pres-
sure hose,,
TURBO NOZZLE -- Expands the surface area of the high
pressure spray,
QUICK-CONNECT -- Easy connection for intake water
supply.
ASSEMBLY
Read entre Ovmer's manual before you attemptto asserrv
hie or operate your new pressure washer. Your new pres-
sure v_sher has been assembled atthe factory _th excep-
t{on of those parts left unassembled for shipping purposes.
REMOVE PRESSURE WASHER FROM CARTON
Open the carton and remove loose parts and parts box
included with carton.
o Cut two comers of carton and lay the end panel flat
o Remove all packing material.
e Roll pressure v_sher out of carton and check carton
thoroughly for additional loose parts,
Refer to Page 6, "Conten_s of Hardware Pack" for an
iUuslrated listing of all items included with your pressure
washer. Become familiar with each piece before assem-
bling pressure washer. Check all contents against illustra-
tions on Page 6. If any parts are missing or damaged, call
the Pressure Washer Helpline at 1-800-_-3136.
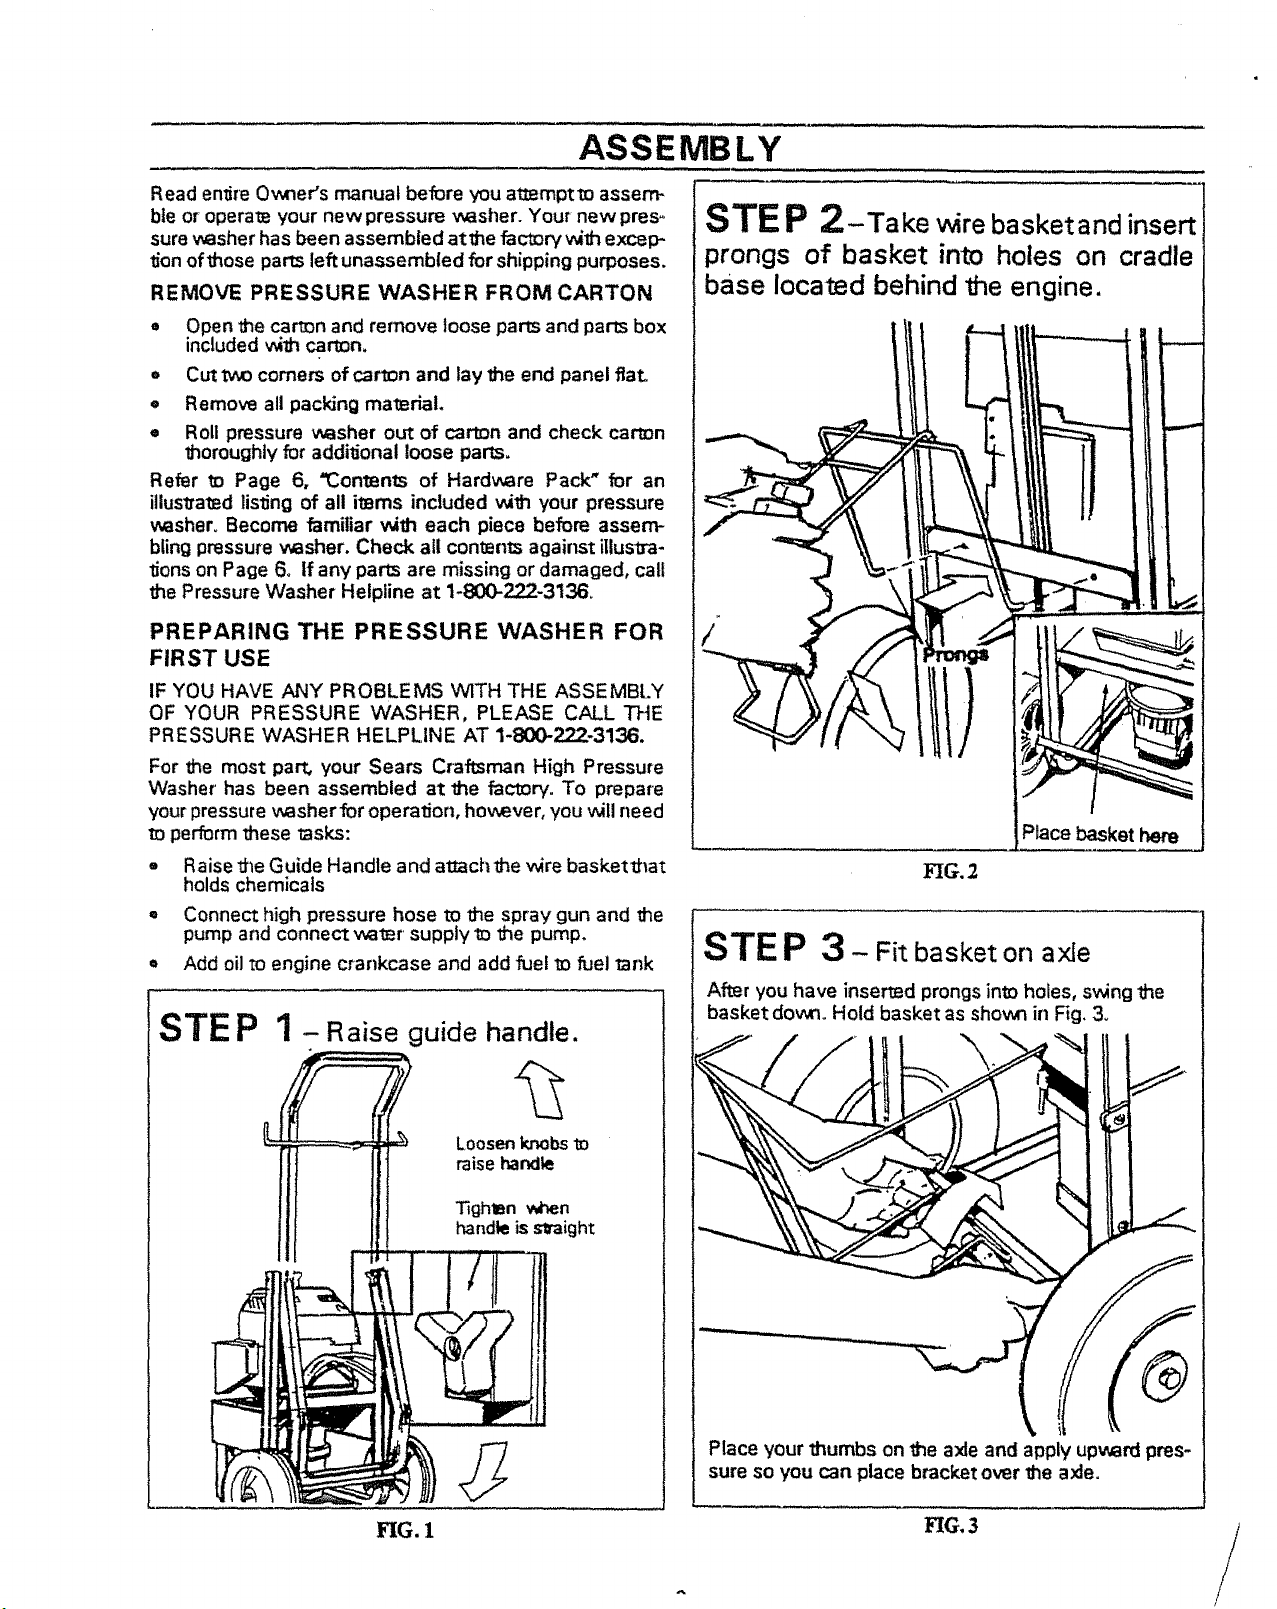
STE P 2-Take wire basketand insert
prongs of basket into holes on cradle
base located behind _he engine.
PREPARING THE PRESSURE WASHER FOR
FIRST USE
IF YOU HAVE ANY PROBLEMS WITH THE ASSEMBLY
OF YOUR PRESSURE WASHER, PLEASE CALL THE
PRESSURE WASHER HELPLINE AT 1-800-222-3136.
For the most part; your Sears Craftsman High Pressure
Washer has been assembled at the factor/. To prepare
your pressure washer for operation, however, you will need
to perform these tasks:
o Raise the Guide Handle and attach the wire basketthat
holds chemicals
Connect high pressure hose to the spray gun and the
pump and connect water supply to the pump.
Add oil to engine crankcase and add fue! to fuel tank
STEP
1- Raise guide handle.
Loosenknobsto
raisehandle
Tightan v_en
handle is straight
/
l!
FIG.2
STE P 3 - Fit basket on axle
After you have inserted prongsinto holes, swing the
basket dove. Hold basket as shown in F_g.&
i
FIG. 1
Place your thumbs on the axle and apply upward pres-
sure so you can place bracket over the axle.
FIG.3
ASSEMBLY
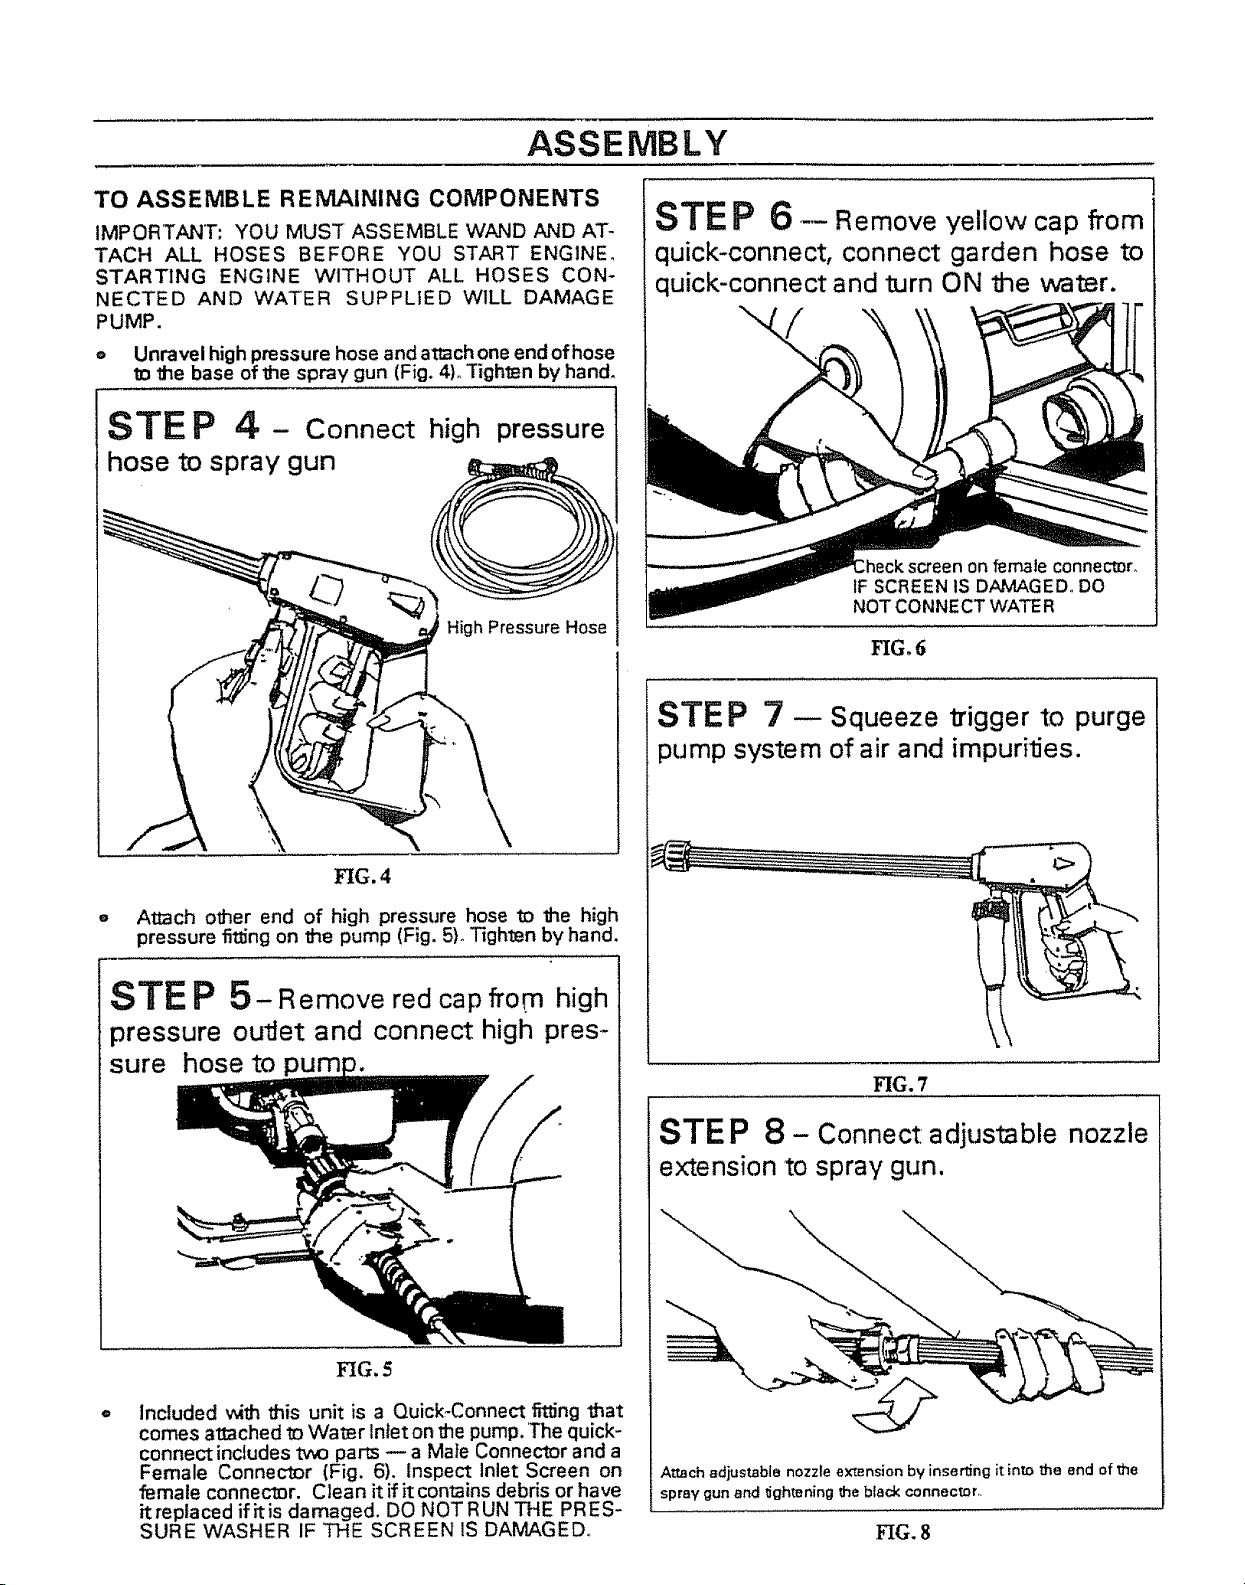
TO ASSEMBLE REMAINING COMPONENTS
IMPORTANT: YOU MUST ASSEMBLE WAND AND AT-
TACH ALL HOSES BEFORE YOU START ENGINE°
STARTING ENGINE WITHOUT ALL HOSES CON-
NECTED AND WATER SUPPLIED WILL DAMAGE
PUMP.
o Unravel highpressure hose and attachone end of hose
m the base of 1he spray gun (Fig. 4)° Tighten by hand°
STE P 4- Connect high pressure
hose to spray gun
STE P 6- Remove yellow cap from
quick-connect, connect garden hose to
quick-connect and turn ON the water.
-...
female connec_r_
IF SCREEN IS DAMAGED,, DO
NOT CONNECT WATER
HG. 6
STEP 7 -- Squeeze l]'igger to purge
pump system of air and impurities.
HG. 4
O
Attach other end of high pressure hose _o the high
pressure fitting on 1he pump (Fig. 5L Tighl_n by hand.
STE P 5- Removered cap from high
pressure outlet and connect high pres-
sure hose to
EIG.5
Included _th _is unit is a Quick-Connect fitting that
comes attached to Water Inlet on the pump. 'The quick-
connect includes two parts -- a Mate Connector and a
Female Connecl_r (Fig, 6). Inspect inlet Screen on
female connecl_r. Clean it if it contains debris or have
it replaced if iris damaged. DO NOTRUN THE PRES-
SURE WASHER IF THE SCREEN IS DA_,GEDo
HG. 7
STEP 8 - Connect. adjustable nozzle
extension to spray gun.
Attach adjustable nozzle ex-mnsion by inserting it into the and of _he
spray gun and _ghtening _e black connector_
HG. 8
ASSEMBLY
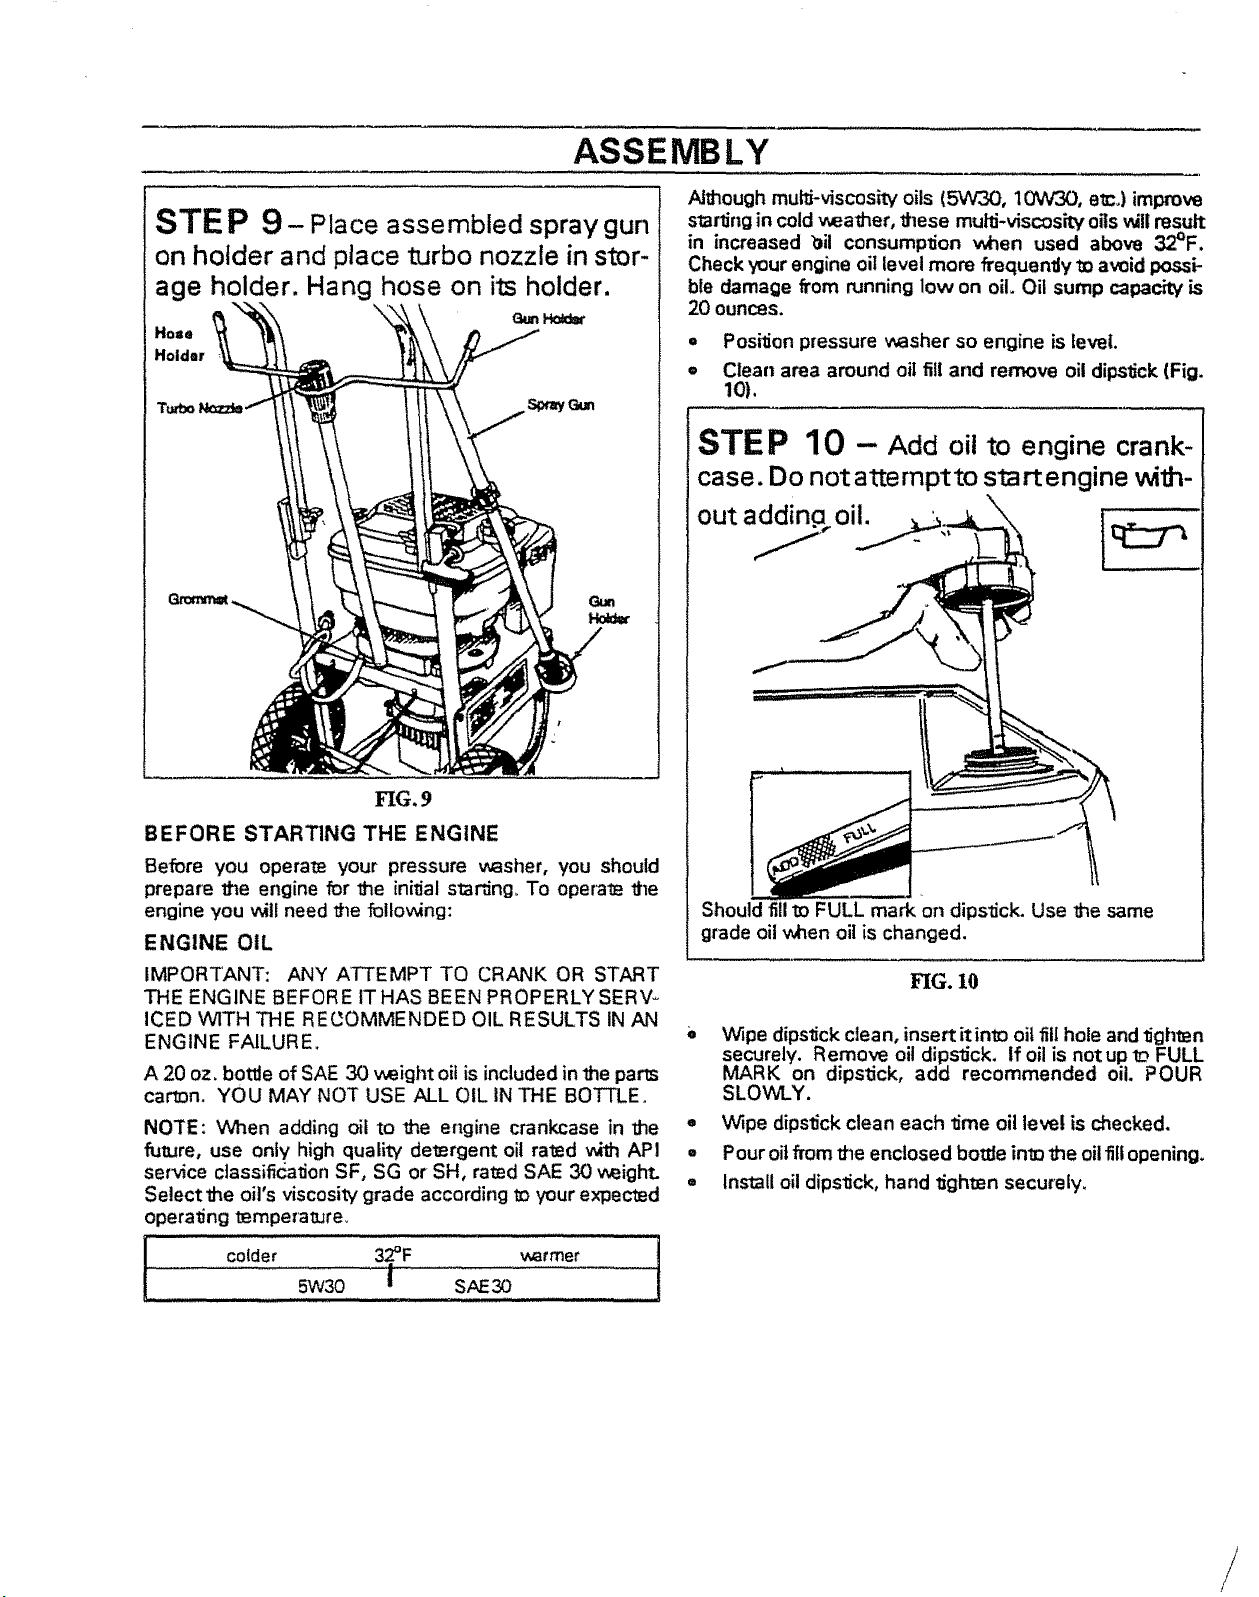
STE P 9- Place assembled spray gun
on holder and place turbo nozzle in stor-
age holder. Hang hose on its holder.
Ho=e
Holder
Althoughmutti-viscosit¢ oils (5W30, lOW30, etc,) improve
slartingin coldweather, these multi-viscosity oilsv_llresult
in increased bil consumplJon when used above 32°F.
Check your engine oil level more frequendy m avoid possi-
ble damage from running low on oil. Oil sump capacity is
20 ounces.
• PosilJon pressure v_sher so engine is level.
= Clean area around oil fill and remove oil dipstick (Fig.
10).
STEP 10 - Add oil to engine crank-
case. Do not attemptto start engine with-
out a_ oil. '
t_LG.9
BEFORE STARTING THE ENGINE
Before you operate your pressure washer, you should
prepare the engine for the ini_al star_ngo To operate the
engine you v_ill need the relieving:
ENGINE OIL
IMPORTANT: ANY ATTEMPT TO CRANK OR START
THE ENGINE BEFORE ITHAS BEEN PROPERLY SERV-
ICED WITH THE RErJOMMENDED OIL RESULTS IN AN
ENGINE FAILURE.
A 20 oz. bottle of SAE 30 weight oil is included in the parts
car_n. YOU MAY NOT USE ALL OIL INTHE BOTTLE.
NOTE: Wllen adding oil to the engine crankcase in the
future, use only high quality detergent oil rated with API
ser_ce classification SF, SG or SH, rated SAE 30 weight.
Select the oil's viscosity grade according I_ your expected
operating t_mpera_re_
I colder 32°F warmer
5W30 I SAE30
Should fillI_ FULL mark on dipstick. Use the same
grade oil when oil is changed.
FIG. 10
Wipe dipslJck clean, insert it into oil fill hole and _ghten
securely. Remove oil dipstick. If oil is not up to FULL
MARK on dipstick, add recommended oil. POUR
SLOWLY.
e
Wipe dipstick clean each time oil level is checked.
Q
Pour oilfrom the enclosed bo_e into the oil fill opening.
e
Install oildipstick, hand ggh_en securely_

ASSEMBLY
ADD GASOLINE
WARNING: NEVER FILL FUEL TANK INDOORS.
NEVER FILL FUEL TANK WHEN ENGINE IS RUN-
NING OR HOT° DO NOT SMOKE WHEN FILLING
FUEL TANK.
WARNING: NEVER FILL FUEL TANK COM-
PLETELY FULL. FILL TANK TO ABOUT 1/2" BE-
LOWTHE BOTTOMOF FILLER NECK TO PROVIDE
SPACE FOR FUEL EXPANSION. WIPE AWAY ANY
FUEL SPILLAGE FROM ENGINE AND EQUIPMENT
BEFORE STARTING.
The manufaclurer recommends fresh, clean, unleaded
regular automolJve gasoline with a minimum of 77 octane
(Leaded regular grade is an acceptable substitute). Tank
capacity is %1[2 U.S. quarts.
o Use clean fue! and store in approved, clean covered
containers. Use clean fill funr_els..Never use "stale"
gasoline left over from last season or gasoline stored
for long periods°
IMPORTANT: IT IS IMPORTANT TO PREVENT GUM
DEPOSITS FROM FORMING IN ESSENTIAL FUEL SYS-
TEM PARTS SUCH AS THE CARBURETOR, FUEL FIL-
TER, FUEL HOSE OR TANK DURING STORAGE. ALSO,
EXPERIENCE INDICATES THAT ALCOHOL-BLENDED
FUELS (CALLED GASOHOL OR USING ETHANOL OR
METHANO L) CAN ATTRACT MOISTUR E WH ICH LEADS
TO SEPARATION AND FORMATION OF ACIDS DURING
STORAGE. ACIDIC GAS CAN DAMAGE THE FUEL SYS-
TEM OF AN ENGINE WHILE IN STORAGE. TO AVOID
ENGINE PROBLEMS, THE FUEL SYSTEM SHOULD BE
EMPTIED BEFORE STORAGE OF 30 DAYS OR
LONGER,. SEE "STORAGE'ON PAGE 17. NEVER USE
ENGINE OR CARBURETOR CLEANER PRODUCTS IN
FUEL TANK OR PERMANENT DAMAGE MAY OCCUR.
o Clean area around fuel fitl cap, remove cap (Fig. 11),
o Add "UNLEADED" reg_lar gasoline, slowly, to fuel
tank.
STEP 11-- Add .clasoline to fuel tank.
_his level
FIG. 11
o Install fuel cap and wipe up any spilled gasoline°
CHECKLIST BEFORE STARTING ENGINE
lfyou have reached this point, look back over the assembly
to see if you have performed all of the following_
Checkfor proper hose connections (high pressure and
water supply) and for light connections and that there
are no kinks, cuts, or damage to the high pressure
hose.
o Check that oil has been added to proper level in engine
crankcase before trying to start the pressure wesher,
o Add proper gasoline to fuel tank,
o Provide proper water supply (notto exceed 140°F)_
= Be sure to read "Safety Rules" and "0peratJon" sec-
tions before using the pressure weshero
IMPORTANT: DURING THE OPERATION OF THIS
PUMP A SMALL AMOUNT OF WATER WILL WEEP
FROMTHE BOTTOM OFTHE PUMP.THIS IS ANORMAL
CONDITION AS "WATER IS USED TO LUBRICATE THE
SEALS IN THE PUMP, SEE FIGURE tlA.
FIG. 1IA
OPERATION
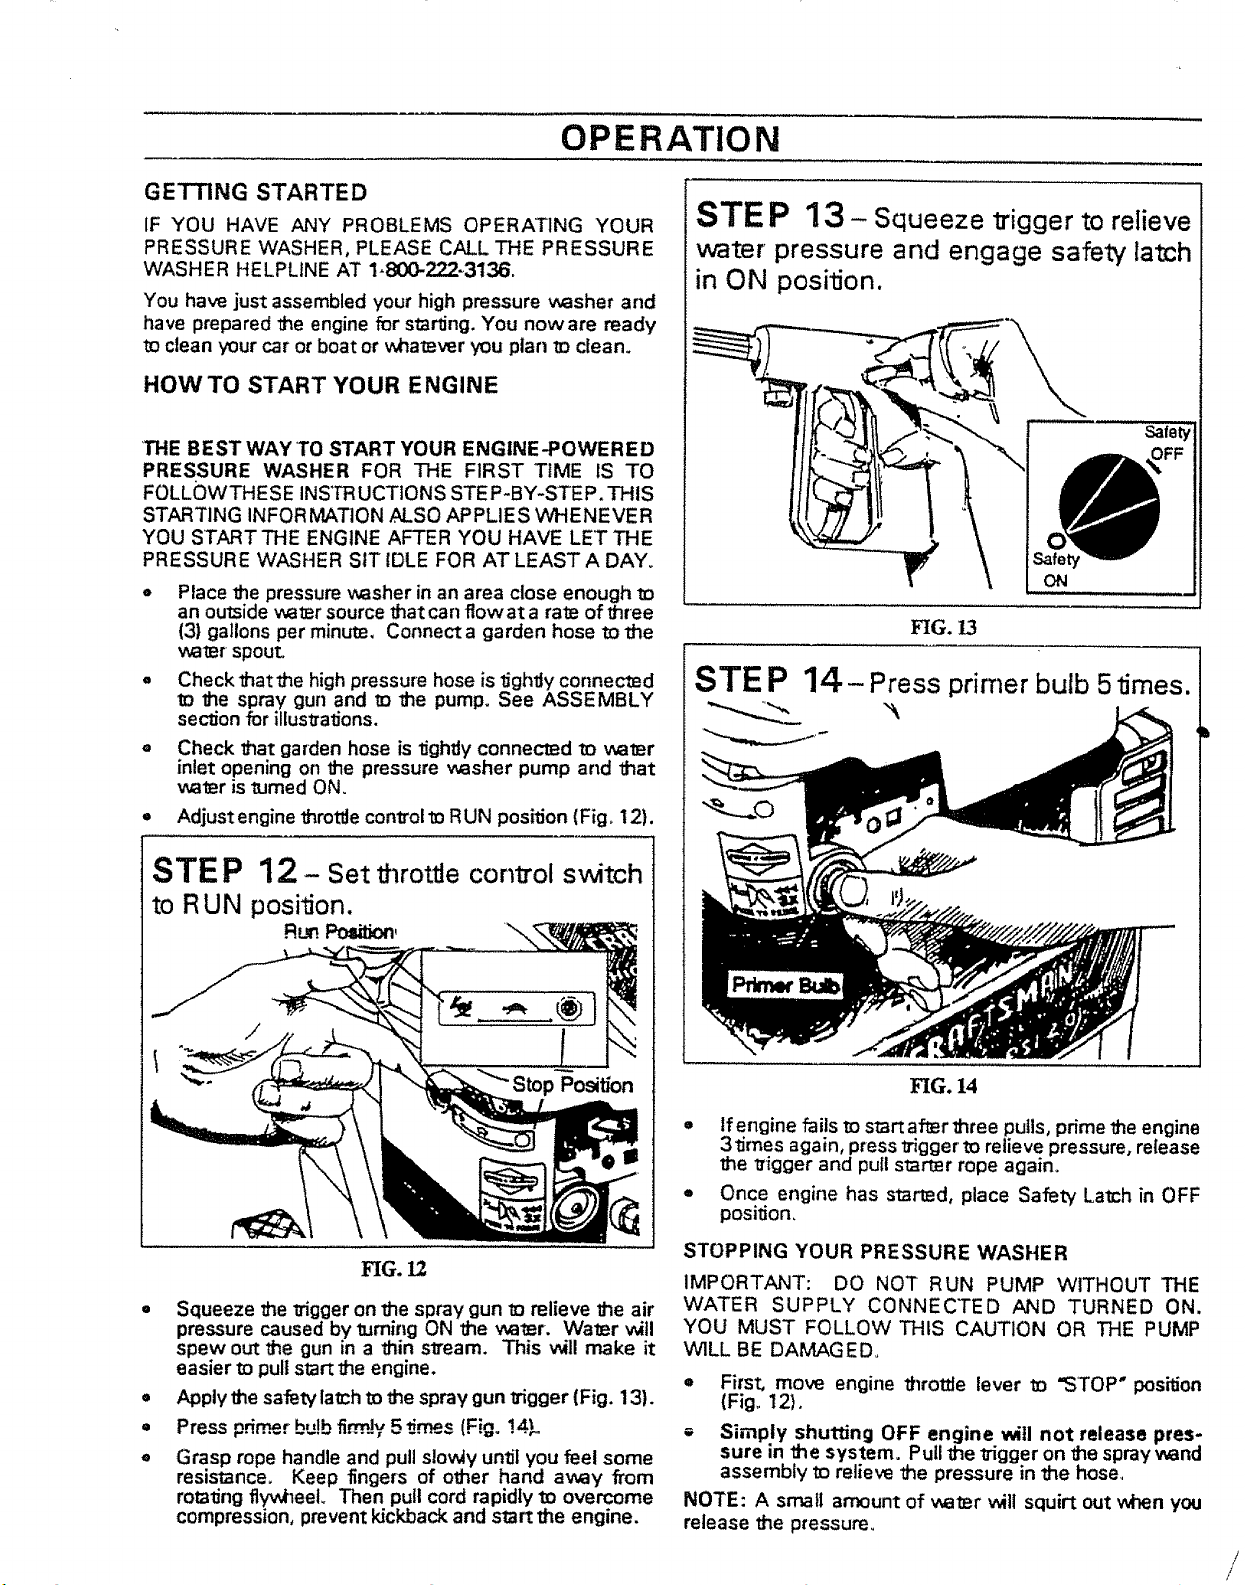
GETTING STARTED
IF YOU HAVE ANY PROBLEMS OPERATING YOUR
PRESSURE WASHER, PLEASE CALL THE PRESSURE
'WASHER HELPLINE AT 1-800-222+3136.
You have just assembled your high pressure v_sher and
have prepared the engine for starring. You noware ready
to clean your car or boat or whatever _iou plan to clean.
HOW TO START YOUR ENGINE
THE BEST WAY TO START YOUR ENGINE-POWERED
PRESSURE WASHER FOR THE FIRST TIME IS TO
FOLLC)WTHESE INSTRUCTIONS STEP-BY-STEP.THIS
STARTING INFOR MATION ALSO APPLIES WHENEVER
YOU START THE ENGINE AFTER YOU HAVE LET THE
PRESSURE WASHER SIT IDLE FOR AT LEAST A DAY.
= Place the pressure vuasher in an area close enough to
an outside wa=r source that can ffowat a rate of three
(3) gallons per minute. Connect a garden hose to l_e
',_lter spout
= Check thatthe high pressure hose islJghtty connected
to the spray gun and m the pump. See ASSEMBLY
section for illusvatJons.
O
Check that garden hose is lJghdy connected to weter
inlet opening on the pressure washer pump and that
water is turned ON,
o
Adjust engine throttle controlto RUN position (Fig. 12),
STEP 13- Squeeze trigger to relieve
water pressure and engage safety la_ch
in ON position.
FIG. 13
STE P 14- Press primer bulb 5 limes.
STEP 12- Set throttle conl_ol switch
to RUN posil_on.
R_ Pt:_ion,
/
Position
FIG. L_
- Squeeze the trigger on the spray gun to relieve the air
pressure caused by tuming ON the water. Water will
spew out the gun in a thin stream. This will make it
easier to pull start the engine.
. Apply the safety lamhto the spray gun trigger (Fig. 13).
* Press pd.me..rbuIbfirmJy 5 _.mes (Fig. !4L
e Grasp rope handle and pull slowly un_l you feel some
resistance. Keep fingers of other hand away from
ro_lJng flywheel Then pull cord rapidly to overcome
compression, prevent kickback and start the engine.
FIG. 14
• lfengine fails to startafmr three puUs, prime the engine
3 _mes again, press 1rigger to relieve pressure, release
the rigger and pull slitter rope again.
= Once engine has started, place Safety La_ch in OFF
position,
STOPPING YOUR PRESSURE WASHER
IMPORTANT: DO NOT RUN PUMP WITHOUT THE
WATER SUPPLY CONNECTED AND TURNED ON,
YOU MUST FOLLOW THIS CAUTION OR THE PUMP
WILL BE DAMAGED°
= First, move engine thro_e lever _o "STOP" position
(Fig+ 12).
+ Simply shutting OFF engine will not release pres-
sure in the system. Pull the rigger on the spraywand
assembly _orelieve the pressure in the hose_
NOTE: A small amount of water will squirt out when you
release the pressure_
OPERATION
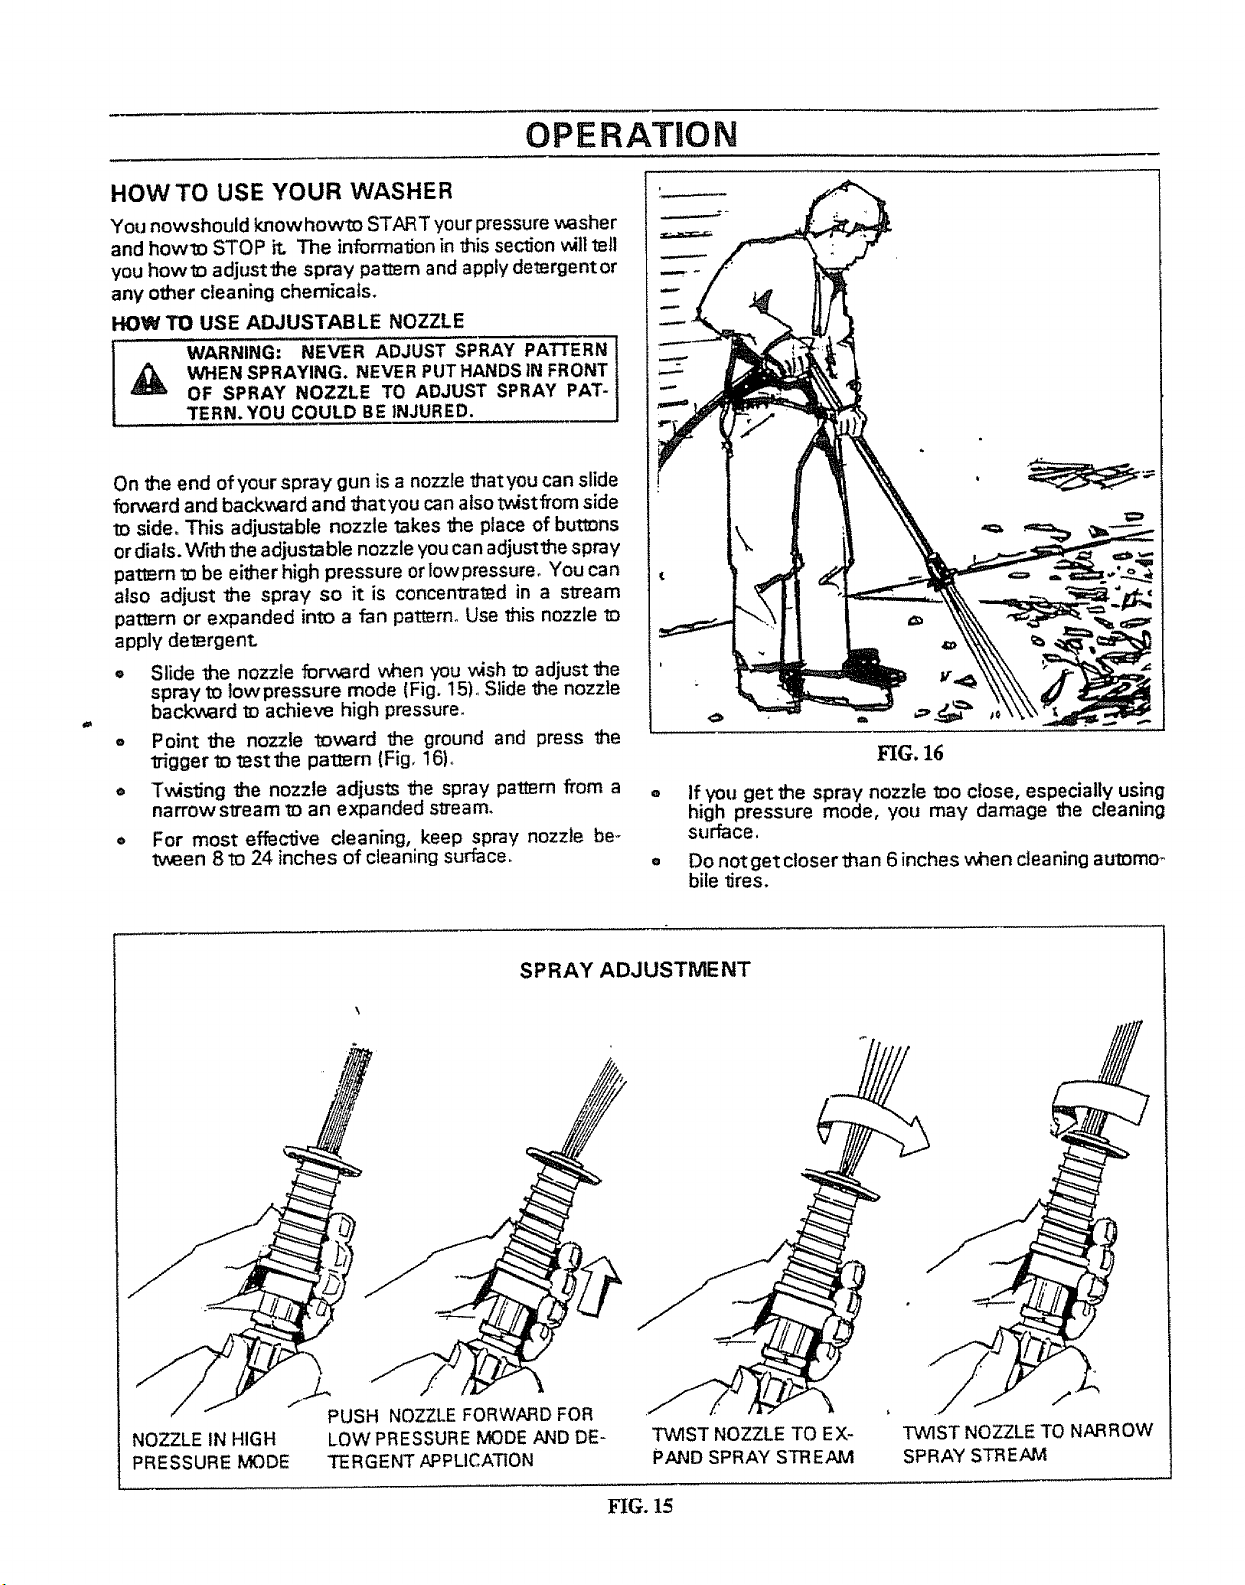
HOWTO USE YOUR WASHER
You nowshould knowhowl_ START your pressure washer
and howto STOP it, The informalJon in _hissection v_llell
you how_ adjust the spray pali_m and applydetergent or
any other cleaning chemicals.
HOW TO USE ADJUSTABLE NOZZLE
WARNING: NEVER ADJUST SPRAY PATTERN
WHEN SPRAYING. NEVERPUTHANDS tNFRONT
OF SPRAY NOZZLE TO ADJUST SPRAY PAT-
TERN. YOU COULD BE INJURED.
On the end ofyour spray gun is a nozzle thatyou can slide
forward and backward and thatyou can also _ist#om side
to side, This adjustable nozzle takes the place of buttons
or dials, v_rrthd_eadjustable nozzle you can adjust_he spray
pattern _obe either high pressure or lowpressureo You can
also adjust the spray so it is concentramd in a stream
pattern or expanded into a fan pat_rn, Use this nozzle
apply del_rgent
o Slide _he nozzle forward when you v_sh to adjustthe
spray to lowpressure mode (Fig, 15). Slide the nozzle
backward to achieve high pressure_
e Point the nozzle 1Dvvard the ground and press 1he
l_gger 1Dtestlhe pattern (Fig, 16),
o Tv_slJng the nozzle adjusts me spray pattern from a
narrow stream m an expanded stream,
For most effective cleaning, keep spray nozzle be-
_veen 8 to 24 inches of cleaning surface,
FIG. 16
If you get the spray nozzle too close, especially using
high pressure mode, you may damage _he cleaning
surface.
Do notget closer than 6 inches when cleaning automo_
bile tires.
NOZZLE IN HIGH
PRESSURE MODE
SPRAY ADJUSTME NT
PUSH NOZZLE FORWARD FOR
LOW PRESSURE MODE AND DE-
TERGENT APPLICATION
TWIST NOZZLE TO EX-
PAND SPRAY STREAM
FIG.15
TWIST NOZZLE TO NARROW
SPRAY STREAM
OPERATION
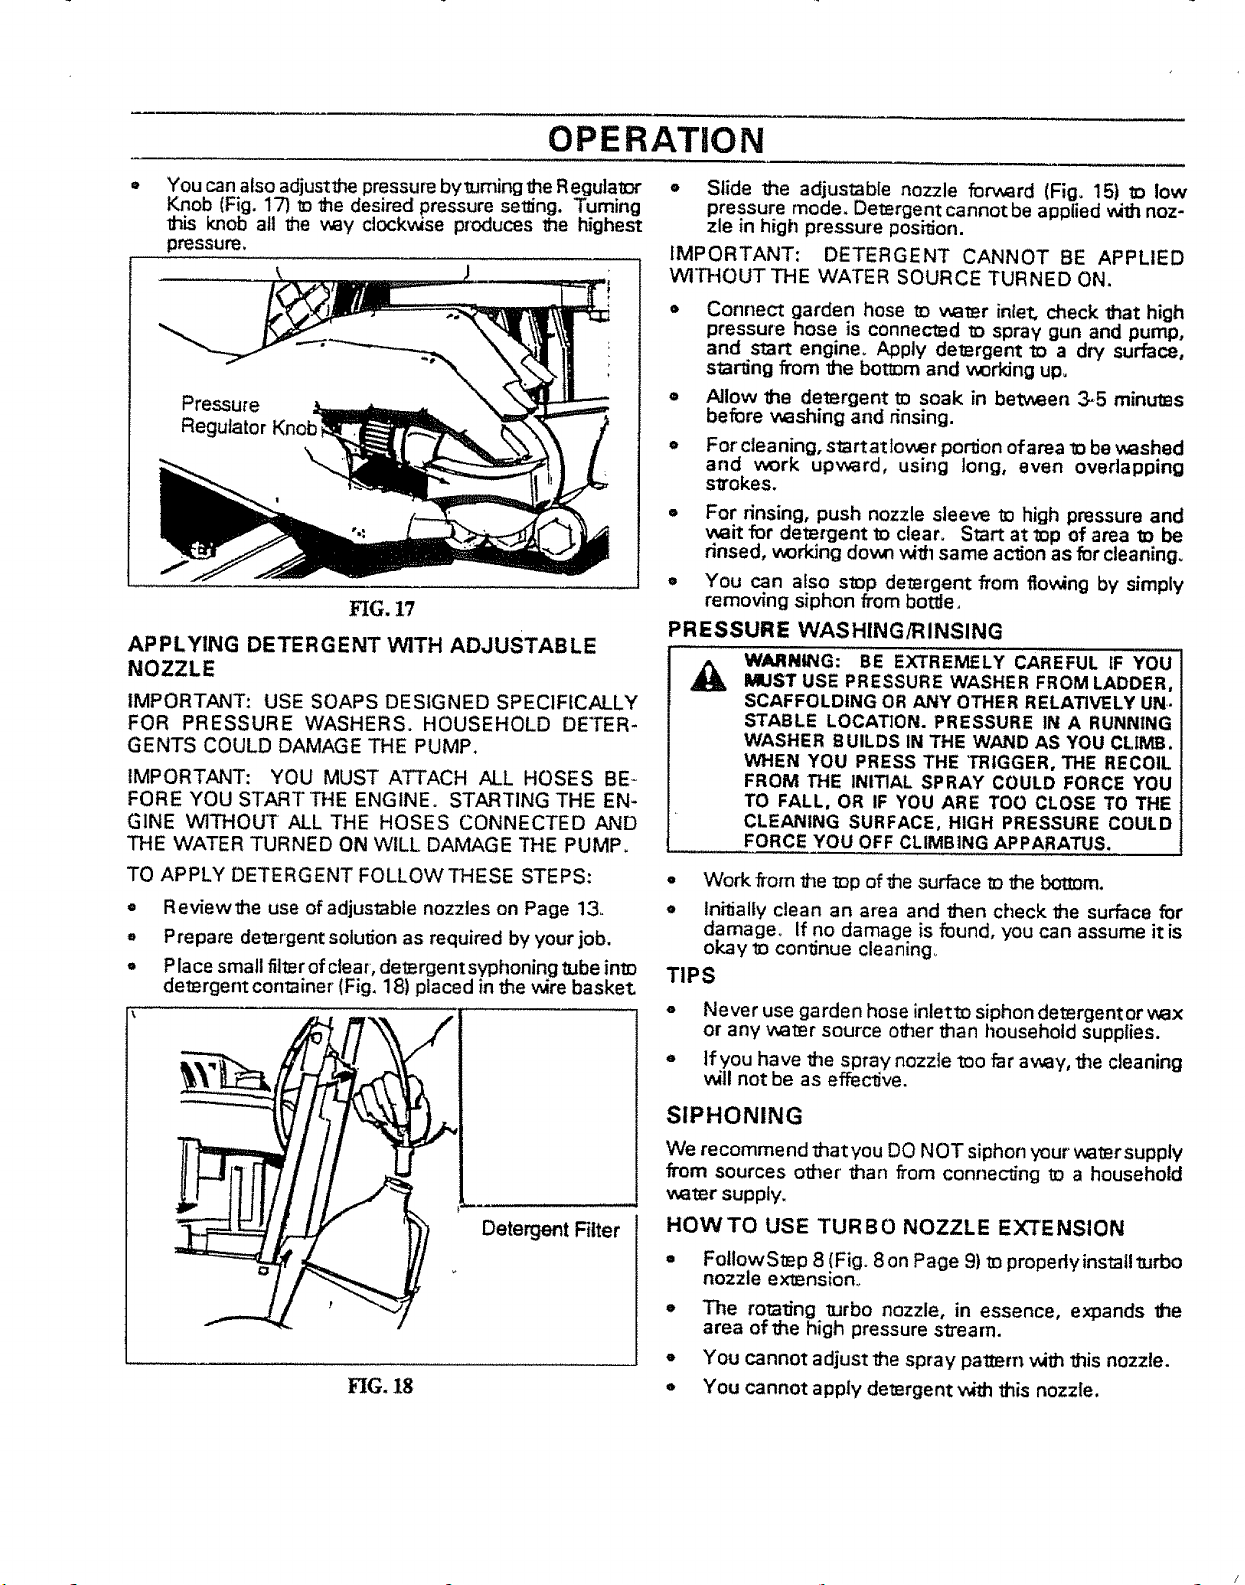
, You can also adjustthe pressure bytuming the RegutalDr
Knob (Fig. 17) 1_the desired pressure se_ng. Turning
this knob all me way clockv_se produces the highest
pressure,
Pressure
Regulator
HG. 17
AP P LY1NG DETE R GENT WITH ADJUSTAB LE
NOZZLE
IMPORTANT: USE SOAPS DESIGNED SPECIFICALLY
FOR PRESSURE WASHERS. HOUSEHOLD DETER-
GENTS COULD DAMAGE THE PUMP.
IMPORTANT: YOU MUST ATTACH ALL HOSES BE _
FORE YOU START 'THE ENGINE° STARTING THE EN-
GINE WITHOUT ALL THE HOSES CONNECTED AND
THE WATER TURNED ON WILL DAMAGE THE PUMP_
TO APPLY DETERGENT FOLLOW THESE STEPS:
= Reviewthe use of adjustable nozzles on Page 13_
o Prepare detergent solul_on as required by your job.
o Place small filter ofciear, detergent syphoning _Jbeinto
detergent container (Fig. 18) placed inthe ,,_irebasket,
= Slide the adjustable nozzle forward (Fig, 15) to low
pressure mode. Detergent cannot be applied v_th noz-
zle in high pressure pos_on.
IMPORTANT: DETERGENT CANNOT BE APPLIED
WITHOUT THE WATER SOURCE TURNED ON,
o Connect garden hose to water inlet, check that high
pressure hose is connected to spray gun and pump,
and start engine. Apply detergent to a dry surface,
starting from the bottom and working up,
= Allow the detergent tD soak in between _5 minutes
before washing and rinsing.
o For cleaning, startat]ower por_on ofarea to be washed
and work upward, using long, even overlapping
strokes.
* For rinsing, push nozzle sleeve to high pressure and
wait for detergent to clear_ Start at top of area to be
rinsed, working down v_thsame ac_on as for cleaning,
= You can also stop detergent from fio_ng by simply
remo'_ng siphon from bottle,
PRESSURE WASHING/RINSING
WARNING: BE EXTREMELY CAREFUL IF YOU
MUST USE PRESSURE WASHER FROM LADDER,
SCAFFOLDING OR ANY OTHER RELATIVELY UN.
STABLE LOCATION. PRESSURE IN A RUNNING
WASHER BUILDS IN THE WAND AS YOU CLIMB.
WHEN YOU PRESS THE TRIGGER, THE RECOIL
FROM THE INITIAL SPRAY COULD FORCE YOU
TO FALL, OR IF YOU ARE TOO CLOSE TO THE
CLEANING SURFACE, HIGH PRESSURE COULD
FORCE YOU OFF CLIMBING APPARATUS.
- Work #ore the E_pof the surface to the bottom.
- lnilJalty clean an area and then check the surface for
damage_ if no damage is found, you can assume it is
okay to conSnue cleaning_
TIPS
° Never use garden hose inletto siphon detergentorwax
or any water source other than household supplies.
* lfyou have the spray nozzle too far away, the cleaning
v_ll not be as effe_ve.
FIG. 18
Detergent Filter
SIPHONING
We recommend that you DO NOT siphon your water supply
from sources other' than from connec_ng to a household
water supply.
HOWTO USE TURBO NOZZLE EXTENSION
FotlowStep 8 (Fig. 8 on Page 9) _ propedy install turbo
nozzle extension°
o The totaling turbo nozzle, in essence, expands the
area of the high pressure stream.
= You cannot adjust the spray pattern _th this nozzle.
= You cannot apply detergent with this nozzle,
CUSTOMER RESPONSIBULITIES
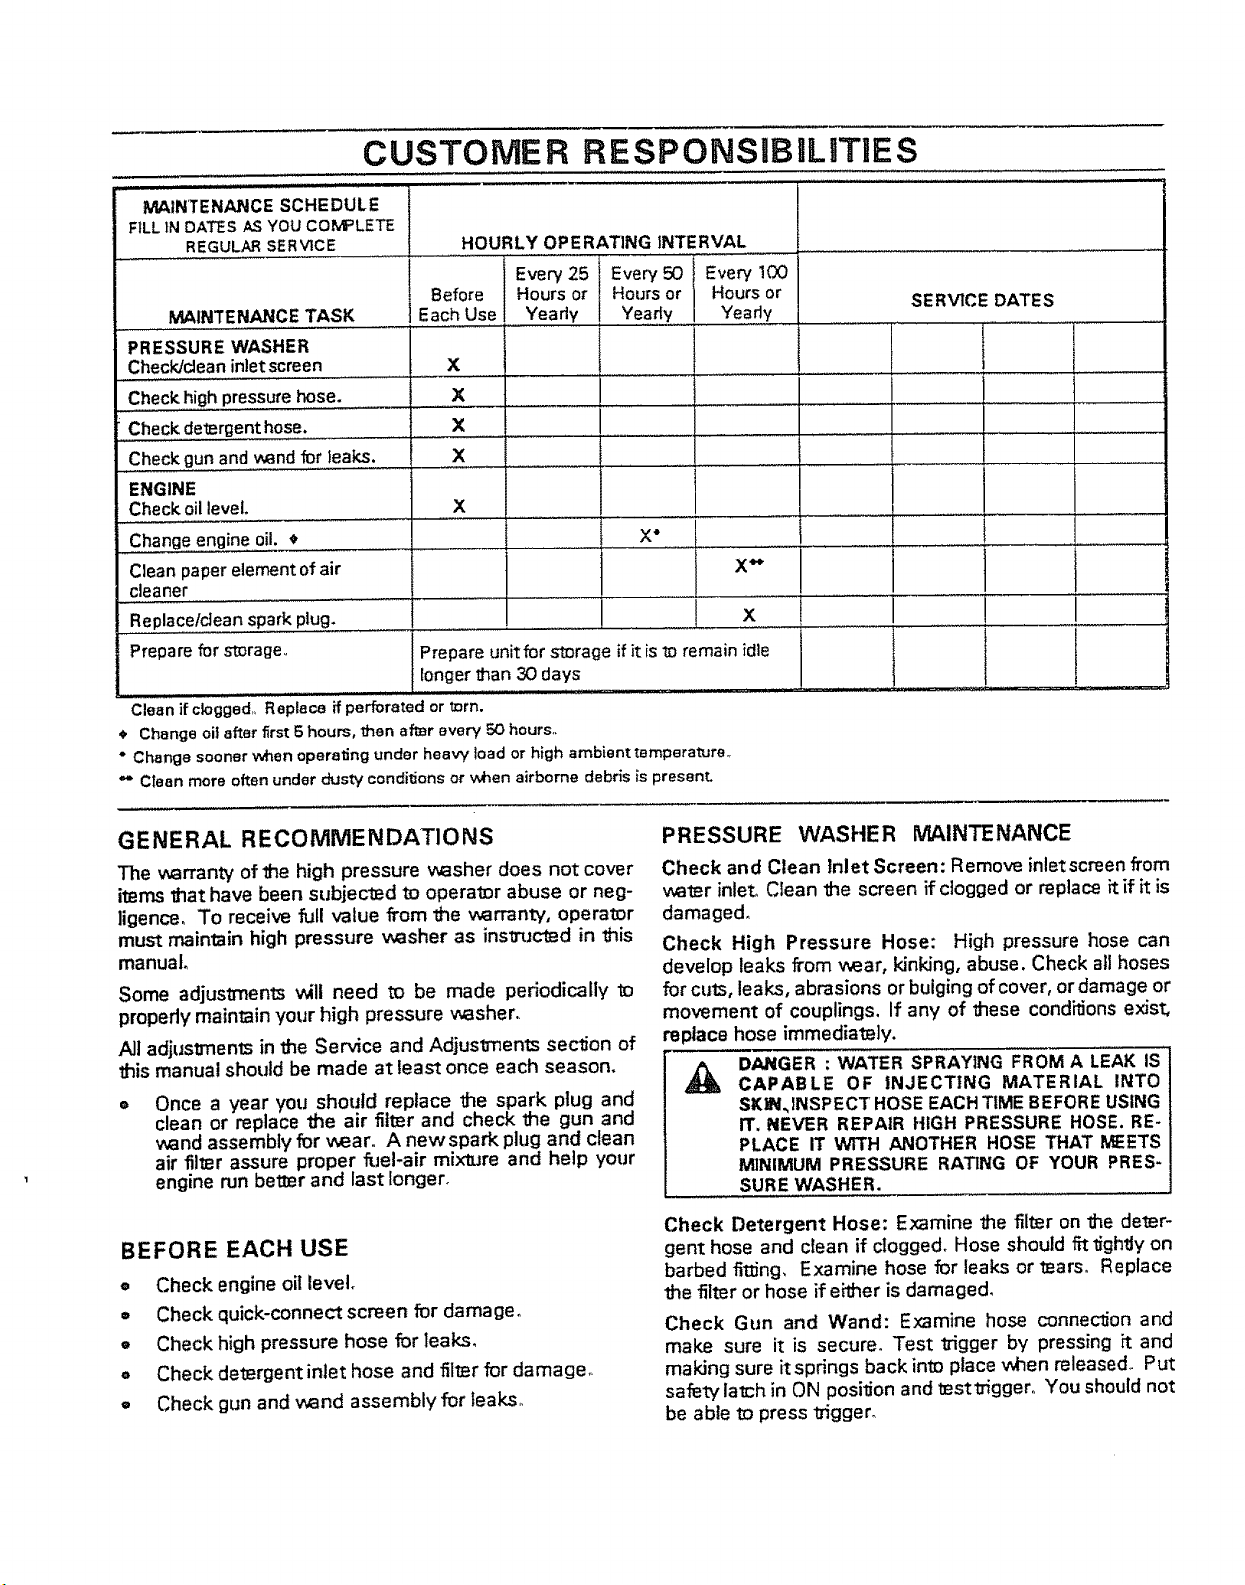
MAINTENANCESCHEDULE
FILL IN DATES AS YOU COMPLETE
REGULAR SERVICE
MAINTENANCETASK EachUse.:.. Yeady !
PRESSUREWASHER
Check/deaninletscreen X
............ •............... i ........... L
Checkhighpressurehose. ......... X ..............
Checkgun,,and,,,vvandfor,leaks. . X.....................
ENGINE
Checkoil level, X
Changeengineoil. • ...........
Cleanpaperelementofair
cleaner .....................
Replacelcteanspark plug:.......................
Preparefor storage,, Prepare unitfor storage ifit is1oremain
Clean if clogged,, Replace ff perforated or torn.
Change oil after first 5 hours, l_en altar every 50 hours,,
° Change sooner when operating under heavy toad or high ambient tBmperatura_
_* Clean more often under dusty conditions or when airborne debris is presanr_
HOURLY OPERATING INTERVAL
Before Hours or
Every25
Every50 Every 100
Hours or Hoursor SERVICE DATES
Ye,ady....... Yeady ......................
X
longer _an 30 days
X**
X
........... J .............
i
!
GENERAL RECOMMENDATIONS
The warranty of the high pressure washer does not cover
items that have been subjected to operator abuse or neg-
ligence, To receive full value from the warranty, operator
must maintain high pressure washer as ins_Jcl_d in this
manual,
Some adjus_nents will need to be made periodically to
properly maintain your high pressure v_sher,
All adjusVnents in the Service and Adjusvnents seclJon of
this manual should be made at least once each season,
Once a year you should replace the spark plug and
clean or replace the air filter and check the gun and
wand assembly for wear° A newspark plug and clean
air filter assure proper fuel-air mixture and help your
engine run better and last longer,
BEFORE EACH USE
= Check engine oil level
= Check quick-connect screen for damage°
e Checkhigh pressure hose for leaks,
= Check detergent inlet hose and filter for damage,.
= Check gun and wand assembly for leaks,,
PRESSURE WASHER MAINTENANCE
Check and Clean Inlet Screen: Remove inlet screen from
wal_r inlet, Clean the screen if clogged or replace it if it is
damaged,
Check High Pressure Hose: High pressure hose can
develop leaks from ,_ar, kinking, abuse. Check all hoses
for cuts, leaks, abrasions or bulging of cover, or damage or
movement of couplings. If any of these conditions exist,
replace hose immediately.
DANGER : WATER SPRAYING FROM A LEAK IS
CAPABLE OF INJECTING MATERIAL INTO
SKIN,INSPECT HOSEEACHTIME BEFOREUSING
IT. NEVER REPAIR HIGH PRESSURE HOSE. RE-
PLACE IT WITH ANOTHER HOSE THAT MEETS
MINIMUM PRESSURE RATING OF YOUR PRES-
SURE WASHER.
Check Detergent Hose: E_mine the filter on the deter-
gent hose and clean if ctogged. Hose should _ tightly on
barbed fi1_ng, Examine hose for leaks or tears° Replace
the filter or hose if ekher is damaged,
Check Gun and Wand: Examine hose connection and
make sure it is secure. Test trigger by pressing it and
making sure it springs back into place when released. Put
safety latch in ON position and test1_gger., You should not
be able to press Vigger_
CUSTOMER RESPONSIBILITIES
Purge Pump of Air and Contaminents:
To remove the air from the pump, fotlowthese steps:
= Set up the pressure washer as described in the AS-
SEMBLY section and connectthe water supply.
= Remove the nozzle attachment from the gun.
= Pull the 1rigger on the gun and hold.
To remove the containments from the pump, follow1_ese
steps:
= Set up the pressure washer as described in the AS-
SEMBLY section, connect the wamr supply.
= Remove the nozzle attachmentfrom _he gun and start
the engine according Io instruclJons in the OPERA-
TION secdon.
= Pull the _igger on the gun and hold.
* When the water supply is steady and constant, set
safetytatch on gunand refasten the no=te attachment
ENGINE MAINTENANCE
CHECKING OIL LEVEL
See _EFORE STARTING ENGINE" for informal_on on
checking oil level. Oil level should be checked prior to each
use or at least every 5 hours of operation_ Keep oil level
maintained,
CHANGING OIL
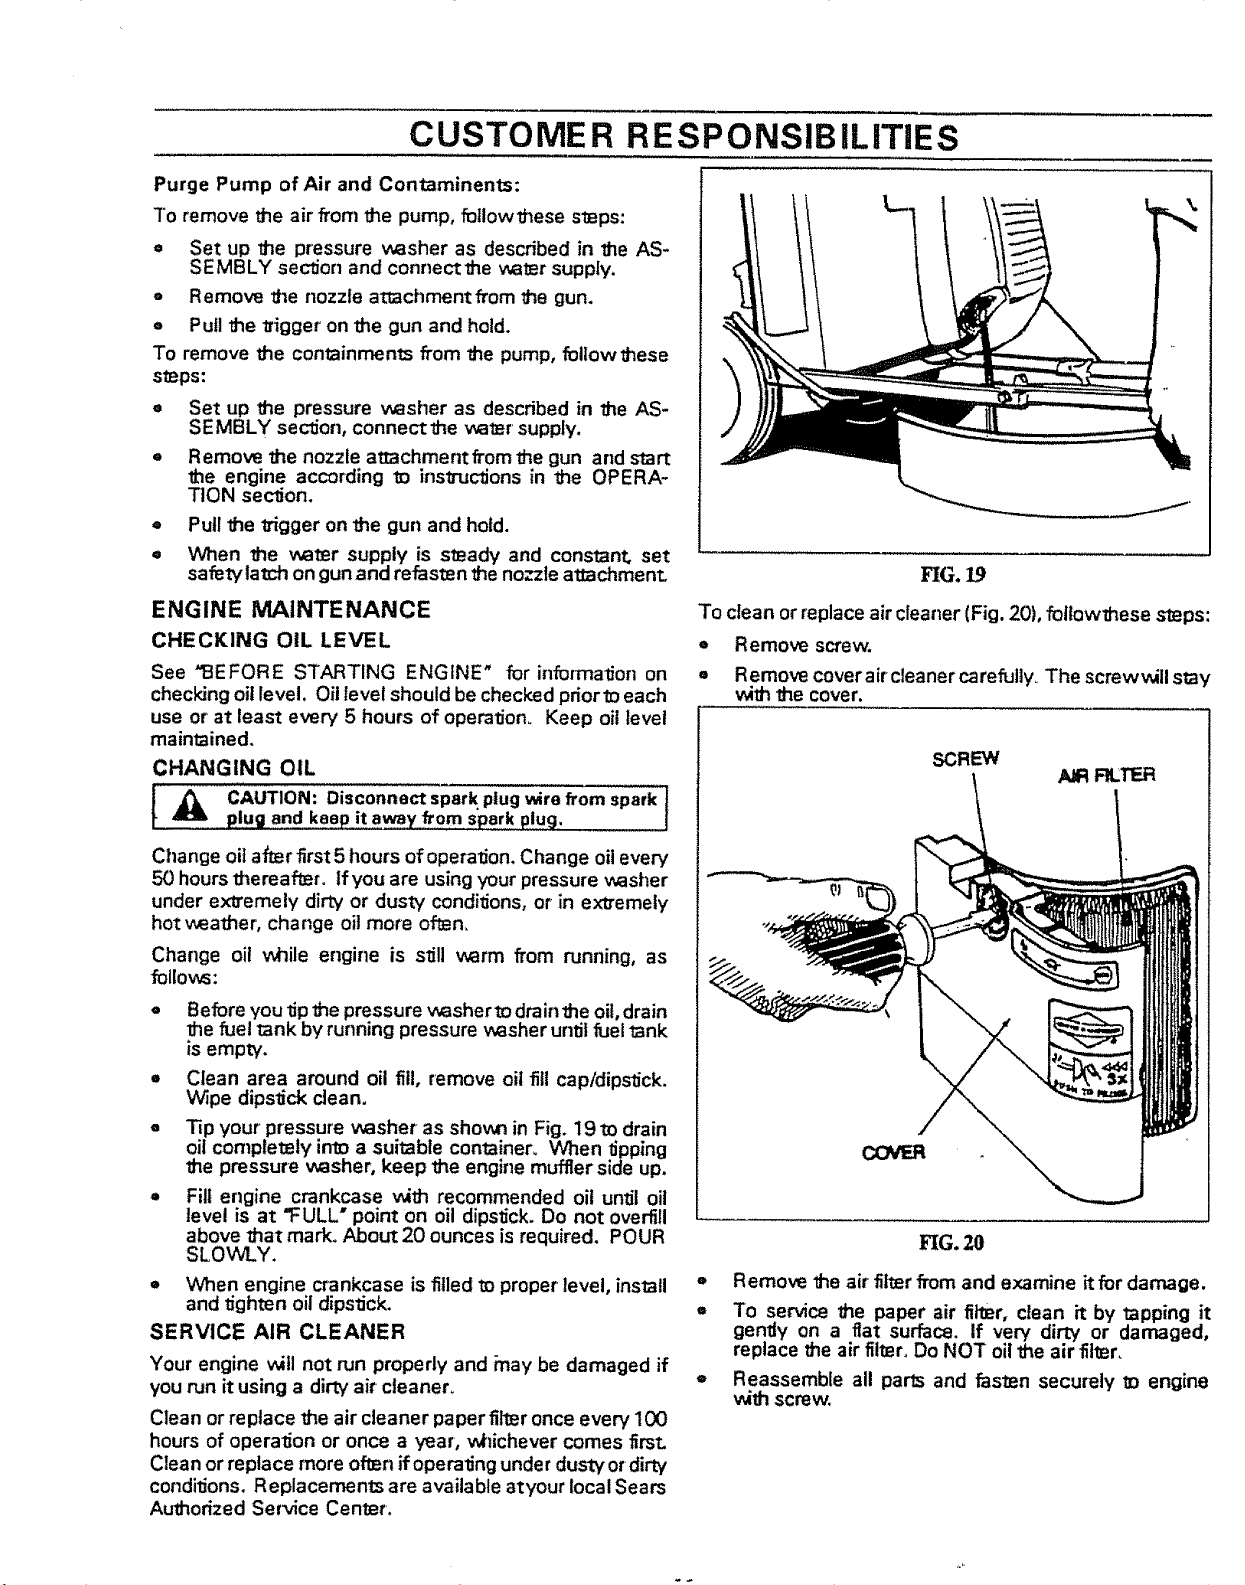
FIG. 19
To clean or replace air cleaner (Fig. 20), followthese steps:
o Remove screw,
= Remove coveraircleanercarefuUy, The screwv_il stay
_th the cover.
SCREW
t' _ CAUTION: Disconnect spark plug wire from spark
Change oil afar first 5 hours of operation, Change oil every
50 hours thereafter, If you are usingyour pressure washer
under extremely dirty or dusty conditions, or in extremely
hot weather, change oil more ofl_n,
Change oil while engine is s_ll v_rm from running, as
follows:
• Before you tip the pressure washer to drain the oil, drain
= Clean area around oil fill, remove oil fill cap/dipstick.
= Tip your pressure washer as shovm in Fig. 19 to drain
= Fill engine crankcase _th recommended oit until oil
= When engine crankcase is filled to proper level, install
SERVICE AIR CLEANER
Your engine will not run properly and Pnaybe damaged if
you run it using a dirtyair cleaner°
Clean or replace the air cleaner paper filteronce every 100
hours of operation or once a year, v_dchever comes first
Clean or replace more of_n if operating under dusty or dirty
conditions. Replacements are available atyour local Sears
Authorized Service Cen_er.
plug and keep it away from s'parkP!Ug. (
the fuel tank by running pressure washer until fuel tank
is empty,
Wipe dipslJck clean,
oil completely into a suitable container_ When lipping
_he pressure washer, keep the engine muffler side up.
level is at "FULL* point on oil dipstick. Do not overfill
above that mark. About 20 ounces is required, POUR
SLOWLY.
and tighten oil dipstick,
COVER
FIG. 20
= Remove 1heair filter from and examine it for damage.
= To service the paper air fll'0ar, clean it by tapping it
gently on a flat surface. If very dirty or damaged,
replace the air filter. Do NOT oil the air filter,
o Reassemble all parts and fasten securely _o engine
v_thscrew.
CUSTOMER RESPONSiBiLiTiES
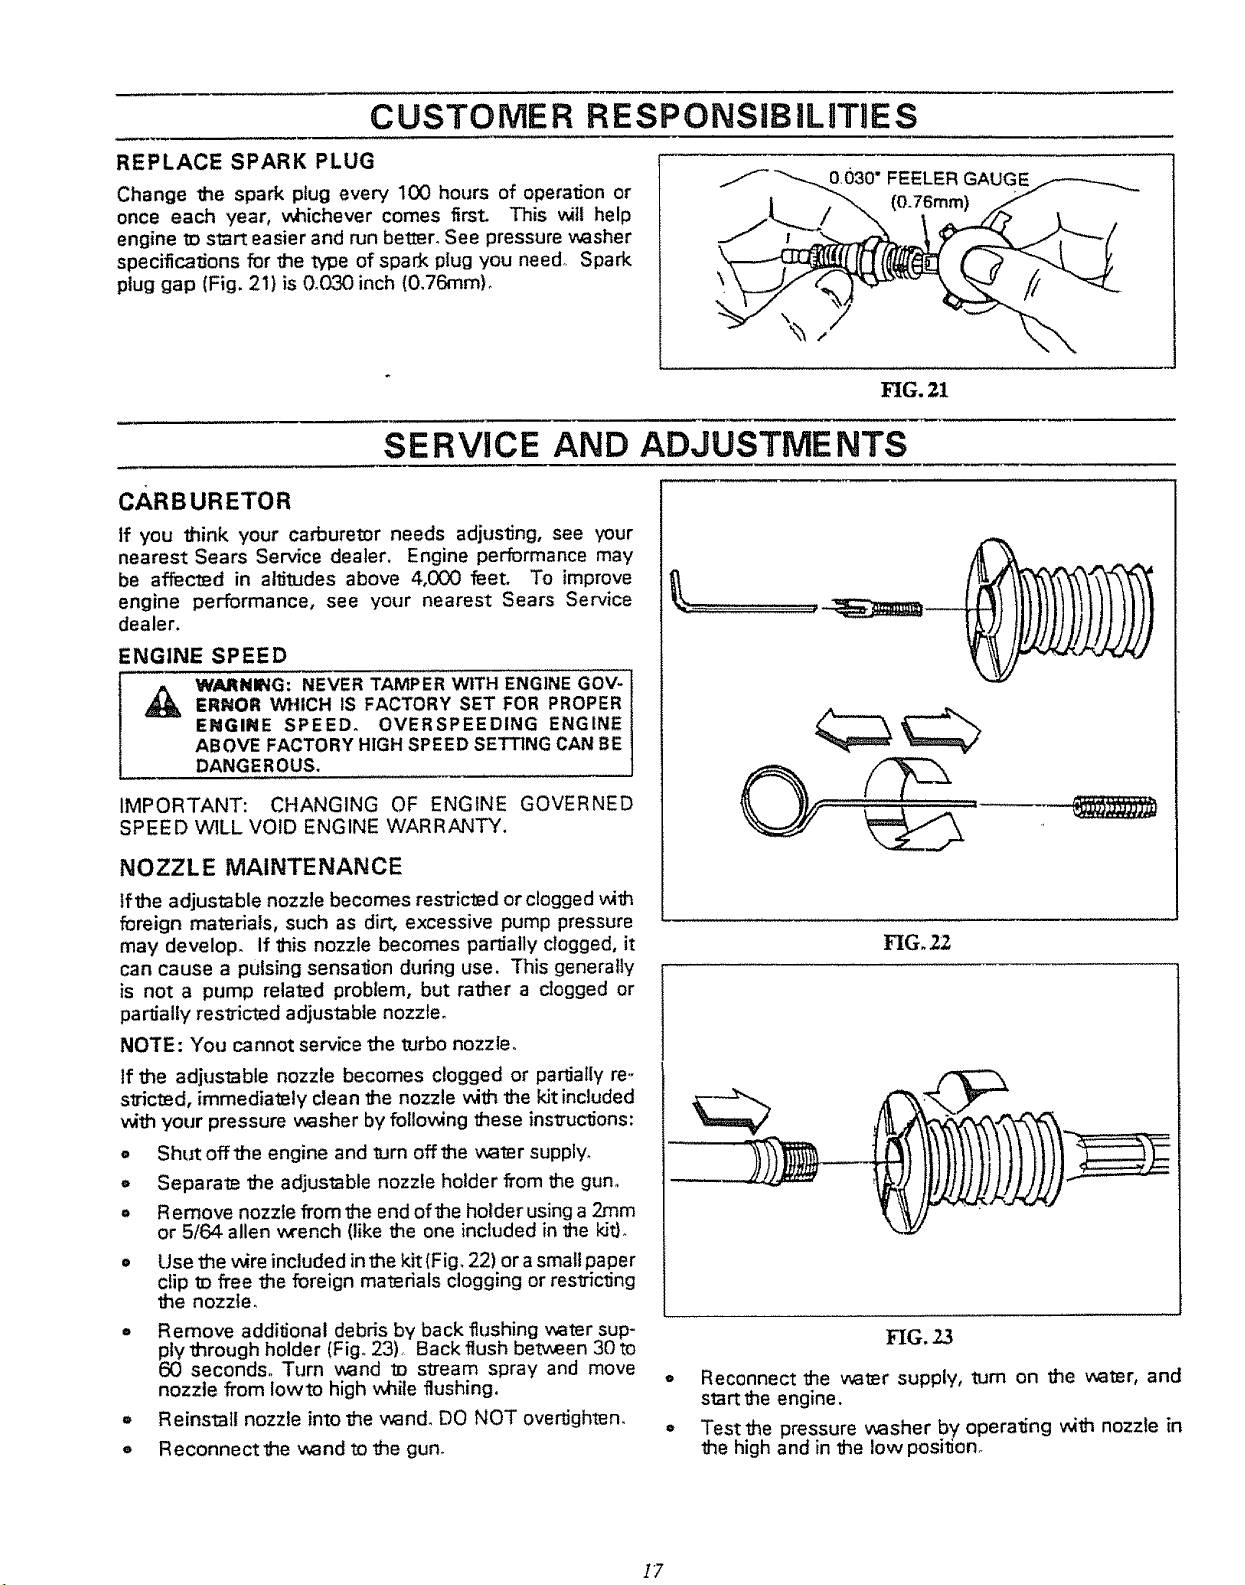
REPLACE SPARK PLUG
Change the spark plug every 100 hours of operation or
once each year, whichever comes first. This _tt help
engine ID start easier and run better. See pressure washer
specificagons for the type of spark plug you need° Spark
plug gap (Fig. 21) is 0_30 inch (0,76mmL
SERVICE AND ADJUSTMENTS
CARBURETOR
if you think your carburetor needs adjusting, see your
nearest Sears Service dealer. Engine performance may
be affected in altitudes above 4,000 feet. To improve
engine performance, see your nearest Sears Service
dealer.
ENGINE SPEED
WARNING: NEVER TAMPER "WITHENGINEGOV-
A ERNOR WHICH tS FACTORY SET FOR PROPER
ENGINE SPEED. OVERSPEEDING ENGINE
ABOVE FACTORY HIGH SPEEDSETTINGCAN BE
DANGEROUS.
0030" FEELER GAUGE
(0.76ram)
FIG. 21
IMPORTANT: CHANGING OF ENGINE GOVERNED
SPEED WILL VOID ENGINE WARRMqTY.
NOZZLE MAINTENANCE
Iflhe adjustable nozzle becomes restricted or clogged _th
foreign materials, such as dirt, excessive pump pressure
may develop. If this nozzle becomes partially clogged, it
can cause a pulsing sensalJon during use. This generally
is not a pump related problem, but rather a clogged or
partially restricted adjustable nozzle.
NOTE: You cannot service me turbo nozzie_
If me adjustable nozzle becomes clogged or parlJatly re..
stricted, immediately cJeanthe nozzle with the kit included
with your pressure washer by follo,,,_ng these instruclJons:
o Shut off the engine and turn off _e water supply_
o Separate the adjusteble nozzle holder from the gun°
= Remove nozzle from the end ofthe holder usinga 2mm
or 5/64 allen wrench (like the one included in the kitL
o Use the _re included in the kit(Fig. 22) or a smalt paper
clip to free the foreign ma!_rials clogging or resvicfing
the nozzle,
= Remove additional debris by back flushing ,_ter sup-
ply through holder (Fig. 23L Back f_ush between 30 to
60 seconds. Turn v_nd to stream spray and move
nozzle from lowto high while flushing.
o Reinstall nozzle intothe v_nd_ DO NOT overtighten_
• Reconnectthe wand tothe gun.
FIG. 22
FIG. 23
Reconnect the v_ter supply, turn on the water, and
start the engine.
Test the pressure washer by operating _th nozzle in
the high and in the low position°
17
 Loading...