

Craftsman 580676642 Owner’s Manual
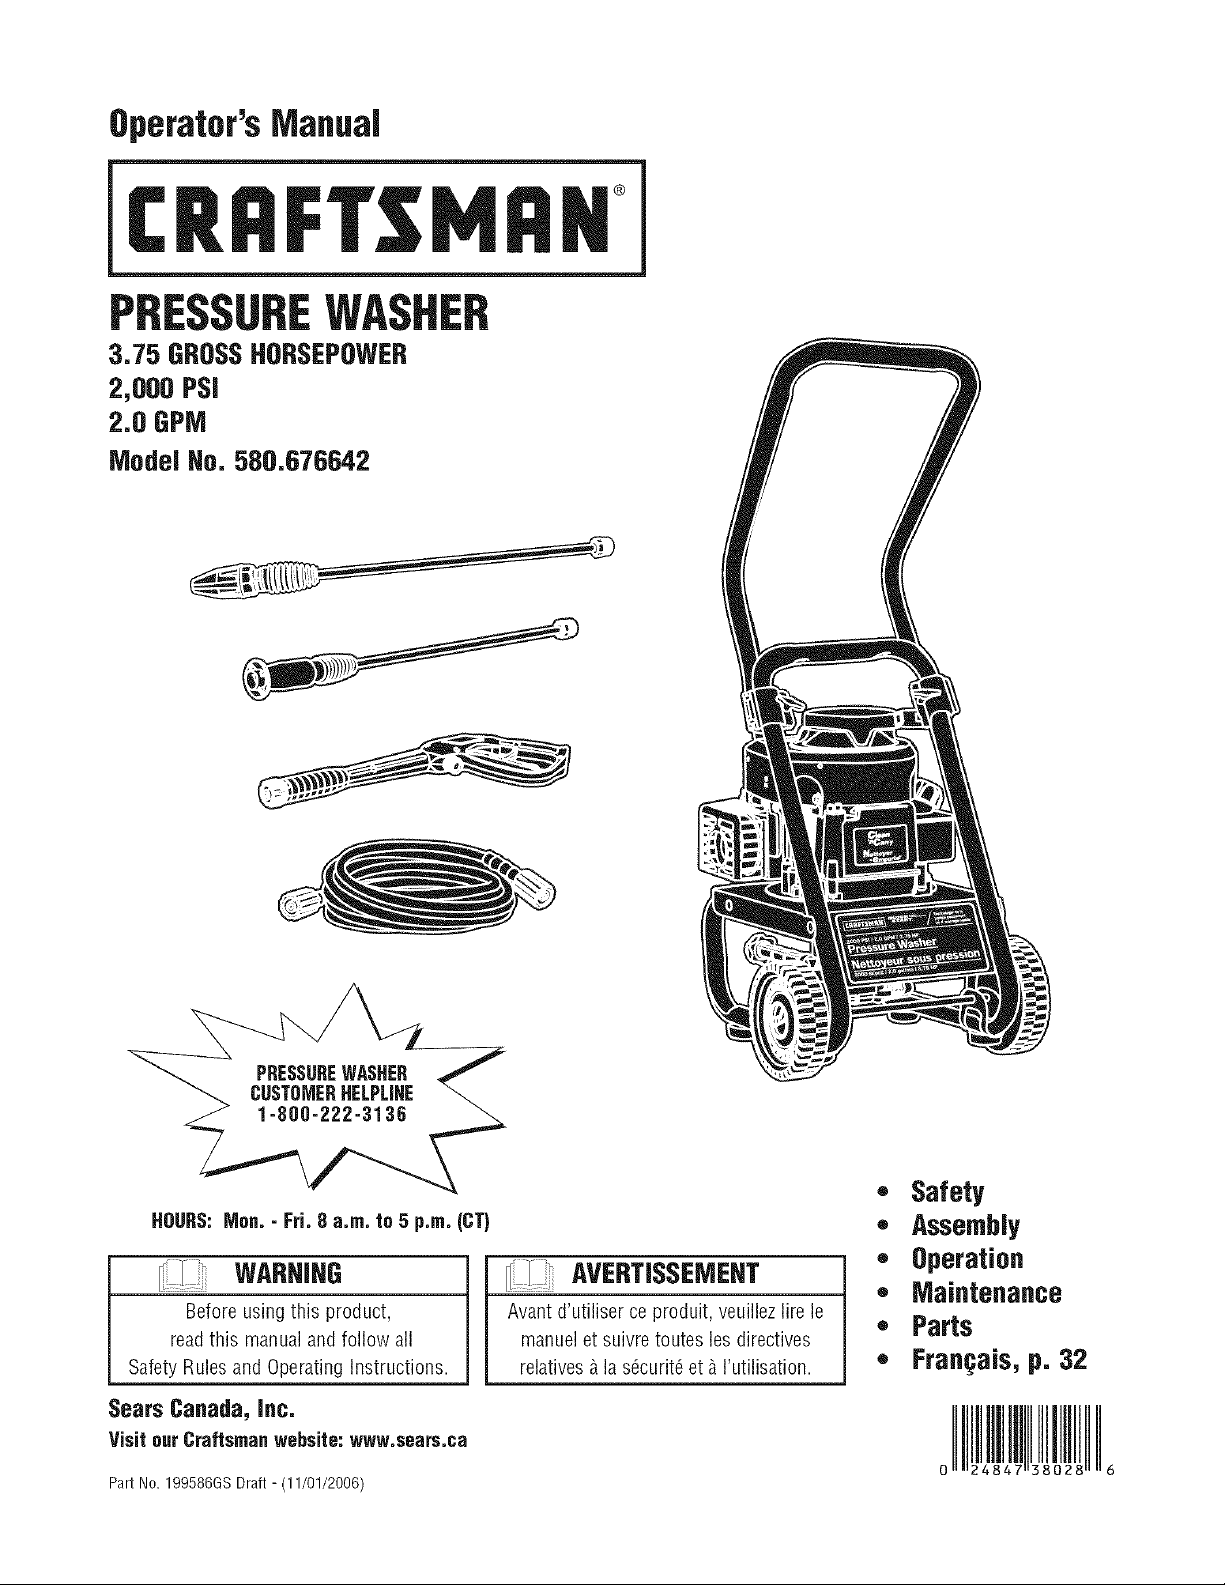
Operator'sManual
PRESSURE
3.75 GROSSHORSEPOWER
2,000 PSi
2.0 GPM
ModeJ Ho. 580.676642
®
CUSTOMERHELPLIHE
PRESSUREWASHER
HOURS:Non. - Frio8 aomoto 5 p.m. (CT)
WAReING
Beforeusing this product,
readthis manualand follow all
SafetyRules and Operating Instructions.
Sears Canada, Inc.
Visit ourCraftsmanwebsite:wwwosearsoca
Part No. 199586GS Draft - (11/01/2006)
AVERTiSSEMENT
Avant d'utiliser ce produit, veuillezlire le
manuelet suivre toutes les directives
relatives&la s6curit6et& I'utilisation.
• Safety
• Assembly
• Operation
• Maintenance
• Parts
• Fran_ais, p. 32
WARRANTY..................................... 2
SAFETYRULES................................. 2-5
FEATURES& CONTROLS........................... 6
ASSEMBLY.................................... 7-9
OPERATION................................. 10-13
SPECIFICATIONS................................ 14
MAINTENANCE............................... 15-20
STORAGE...................................... 21
TROUBLESHOOTING............................. 22
NOTES........................................ 23
REPLACEMENTPARTS......................... 24-29
EMISSIONCONTROLWARRANTY................ 30-31
FRAN_AIS................................... 32-56
HOWTOORDERPARTS.................. BACKCOVER
ONE-YEARFULLWARRAHTYOHCRAFTSMAHPRESSUREWASHER
If this pressure washerfails dueto a defect in material or workmanship within one year from the date of purchase, return it to
any Searsstore, other Craftsmanoutlet, or Sears Parts & Repair Centerin the United States or Canadafor free repair (or
replacementif repair proves impossible).
All warranty coverageappliesfor only 90 days from date of purchase if this pressure washer is everused for commercial or
rental purposes.
This warranty gives you specific legal rights, and you may also have other rights which vary from state to state.
Sears, Roebuck and Co., Hoffman Estates, IL 60179
Sears Canada Inc., Toronto, Ontario, Canada MSB 288
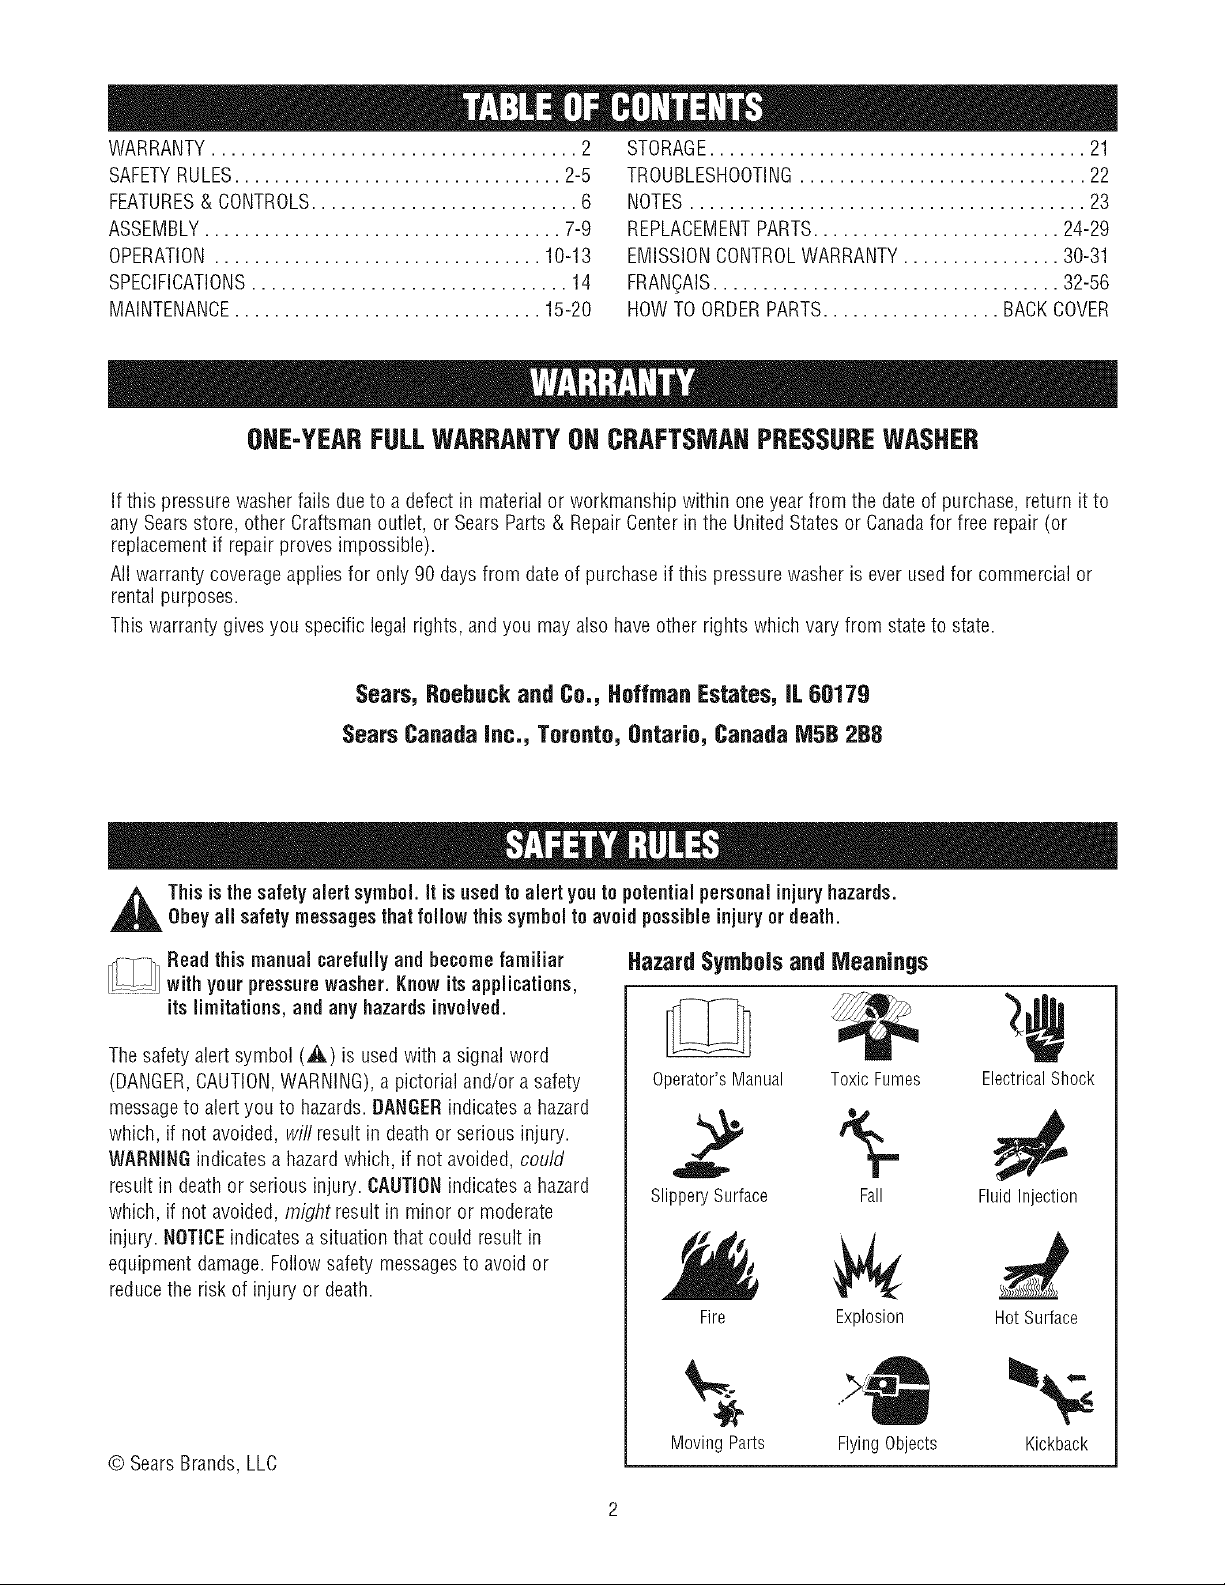
,_ Thisis thesafety alert symbol,it is used toalert youto potentialpersonal injuryhazards.
Obeyall safetymessagesthatfollow thissymbol to avoid possibleinjuryor death.
_] Read this manual carefully and becomefamiliar
with yourpressurewasher. Know its applications,
its limitations, and any hazardsinvolved.
Thesafety alert symbol (_) is usedwith a signal word
(DANGER,CAUTION,WARNING),a pictorial and/or a safety
messageto alert you to hazards. DANGERindicatesa hazard
which, if not avoided, will result in deathor serious injury.
WARNINGindicates a hazardwhich, if not avoided, could
result in death or serious injury. CAUTIONindicatesa hazard
which, if not avoided, might result in minor or moderate
injury. NOTICEindicatesa situation that could result in
equipment damage.Follow safety messagesto avoid or
reducethe risk of injury or death.
Hazard Symbols and Meanings
Operator'sManual ToxicFumes
Z 5-
SlipperySurface Fall
Fire
Explosion
ElectricalShock
FluidInjection
HotSurface
© SearsBrands, LLC
MovingParts
FlyingObjects
Kickback

WARHJHG
The engine exhaustfrom this productcontainschemicals
knownto the State of California to causecancer,birth
defects, or other reproductiveharm.
WARHJHG
Operatepressure washer ONLY outdoors.
Keepexhaust gas from entering a confined areathrough
windows, doors, ventilation intakes or other openings.
DO NOTstart or run pressure washer indoors or in an enclosed
area, evenif windows and doors areopen.
Use a respirator or maskwhenever there is a chance that vapors
may be inhaled.
Readall instructions packed with mask so you are certain mask
will provide necessary protection against inhaling harmful
vapors.
WARNING
WARHING
WHENADDING OR DRAININGFUEL
Turn pressure washer OFFand let it cool at least 2 minutes
before removing fuel cap. Loosen cap slowly to relieve pressure
in tank.
Fill or drain fuel tank outdoors.
DONOToverfill tank. Allow space for fuel expansion.
If fuel spills, wait until it evaporates before starting engine.
Keepfuel away from sparks, open flames, pilot lights, heat,and
other ignition sources.
DONOTlight a cigaretteor smoke.
JHENSTARTINGEQUIPMENT
. Ensure spark plug, muffler, fuel capand air cleaner are in place.
. DONOTcrank engine with spark plug removed.
WHENOPERATINGEQUIPMENT
. DONOTtip engineor equipment at angle which causes fuel to
spill.
. DONOTspray flammable liquids.
WHENTRANSPORTINGOR REPAIRINGEQUIPMENT
. Transport/repair with fuel tank EMPTYor with fuel shutoff valve
OFF.
. Disconnect spark plug wire.
WHENSTORINGFUELOR EQUIPMENTWiTH FUELIN TANK
Store awayfrom furnaces, stoves, water heaters, clothes dryers
or other appliances that have pilot light or other ignition source
becausethey can ignite fuel vapors.
Operatepressure washer from a stable surface.
The cleaningarea should haveadequateslopes and drainageto
reducethe possibility of a fall due to slippery surfaces.
Be extremely careful if you must usethe pressure washer from
a ladder,scaffolding or any other similar location.
Firmly grasp spray gun with both hands when using high
pressure spray to avoid injury when gun kicks back.

WARHIHG
NEVERpull starter cord without first relieving spray gun
pressure.
When starting engine, pull cord slowly until resistanceis felt
andthen pull rapidly to avoid kickback.
After eachstarting attempt, where enginefails to run, always
point gun in safedirection and squeezespray gun trigger to
release high pressure. Engagespray guntrigger lock.
Firmly grasp spray gun with both hands when using high
pressure spray to avoid injury when gun kicks back.
WARHIHG
DO NOTtouch hot parts and AVOID hot exhaust gases.
Allow equipment to cool before touching.
Keepat least 5 ft. (152 cm) clearanceon all sides of pressure
washer including overhead.
Codeof FederalRegulation (CFR)Title 36 Parks, Forests,and
Public Property require equipment powered by an internal
combustion engine to have aspark arrester, maintained in
effective working order, complying to USDAForestservice
standard 5100-1C or later revision. Inthe State of California a
spark arrester is required under section 4442 of the California
Public resources code. Other states may havesimilar laws.
WARHIHG
DONOTallow CHILDRENto operate pressure washer.
NEVERrepair high pressure hose.Replace it.
NEVERrepair leaking connections with sealant of any kind.
Replaceo-ring or seal.
NEVERconnect high pressure hose to nozzleextension.
Keephigh pressure hose connectedto pump andspray gun
while system is pressurized.
ALWAYS point gun in safe direction and squeezespray gun
trigger, to releasehigh pressure, every time you stop engine.
Engagetrigger lock when not in use.
NEVERaim spray gun at people, animals or plants.
DONOTsecure spray gun in open position.
DONOTleave spray gun unattendedwhile machine is running.
NEVERusea spray gun which does not haveatrigger lock or
trigger guard in place andin working order.
Always becertain spray gun, nozzlesand accessories are
correctly attached.
WARHIHG
WHENADJUSTINGORMAKINGREPAIRSTO YOURPRESSURE
WASHER
o Disconnectthe spark plug wire from the spark plug and place
the wire where it cannot contact spark plug.
WHENTESTINGFORENGINESPARK
Useapproved spark plug tester.
DONOTcheck for sparkwith spark plug removed.
WARHIHG
NEVERoperatepressure washer without protective housing or
covers.
DO NOTwear looseclothing, jewelryor anythingthat may be
caught instarter or other rotating parts.
Tie up long hair and remove jewelry.
WARHIHG
Alwayswear safety goggles when using this equipment or in
vicinity of where equipment is in use.
Beforestarting the pressure washer, be sure you are wearing
adequatesafety goggles.
NEVERsubstitute safetyglasses for safety goggles.
CAUTION
DO NOTsecure spray gun in open position.
DO NOTleavespray gun unattendedwhile machine is running.
NEVERusea spray gun which does not havea trigger lock or
trigger guard in place andin working order.
Always becertain spray gun, nozzlesand accessories are
correctly attached.
HOTICE
DONOTpoint spray gun at glass when in jet spray mode.
NEVERaim spray gun at plants.
If you have questions about intended use, ask dealer or contact
Sears.
NEVERoperateunits with broken or missing parts, or without
protective housing or covers.
DONOT by-pass any safety device on this machine.
DONOTtamper with governed speed.
DONOToperate pressure washer above rated pressure.
DONOT modify pressure washer in any way.
Beforestarting pressure washer in cold weather, check all parts
of the equipment to besure ice has not formed there.
NEVERmove machine by pulling on high pressure hose. Use
handle provided on unit.
Checkfuel system for leaksor signs of deterioration, such as
chafed or spongy hose, loose or missing clamps, or damaged
tank or cap. Correct all defects before operating pressure
washer.
This equipment is designed to be used with Sears authorized
parts ONLY. If equipment is used with parts that DO NOT
comply with minimum specifications, userassumes all risks
andliabilities.
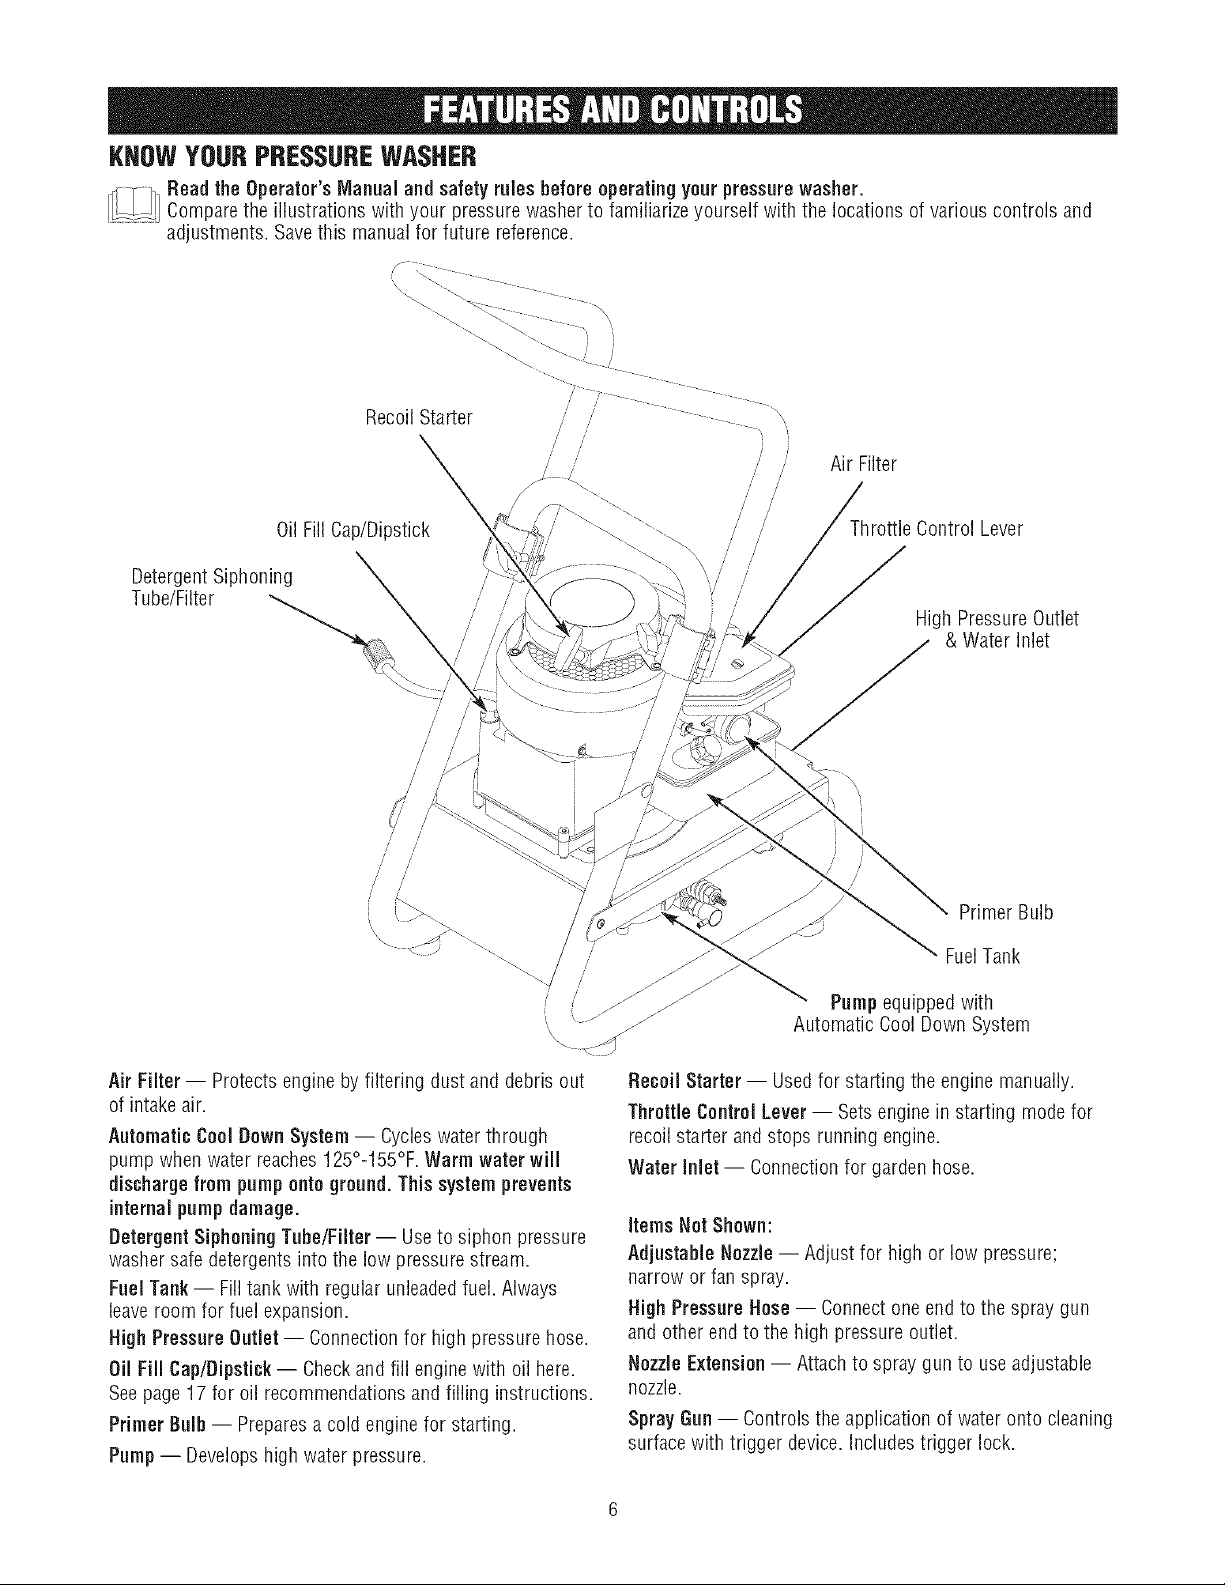
KNOWYOURPRESSUREWASHER
i[_-_ i Read the Operator'sManual and safety rulesbefore operatingyour pressurewasher.
.....................I Comparethe illustrations with your )ressurewasher to familiarizeyourself with the locations of various controls and
adjustments. Savethis manual for future reference.
RecoilStarter _ , ',
/
DetergentSiphoning
Tube/Filter
Oil Fill Cap/Dipstick_
/
/
/
/
/ /
/ /
/ /
/ /
/ /
/ /
/
//
//
/
Air Filter
Throttle Control Lever
High Pressure Outlet
& Water Inlet
//' //
/' /'
/ /'
/ //
/
Air Filter-- Protects engine by filtering dust and debris out
of intake air.
Automatic Cool Down System -- Cycleswater through
pump when water reaches125°-155°F. Warm water will
dischargefrompump onto ground. This systemprevents
internalpump damage.
DetergentSiphoning Tube/Filter-- Useto siphon pressure
washer safe detergentsinto the low pressure stream.
FuelTank-- Filltank with regular unleadedfuel. Always
leaveroom for fuel expansion.
High Pressure Outlet -- Connectionfor high pressure hose.
Oil Fill Cap/Dipstick -- Checkand fill engine with oil here.
Seepage 17 for oil recommendations and filling instructions.
Primer Bulb -- Preparesa cold engine for starting.
Pump-- Developshigh water pressure.
Primer Bulb
FuelTank
//
Pump equipped with
Automatic Cool Down System
Recoil Starter -- Usedfor starting the engine manually.
ThrottleControl Lever-- Setsenginein starting mode for
recoil starter and stops running engine.
Water Inlet -- Connectionfor garden hose.
Items Hot Shown:
AdjustableNozzle-- Adjust for high or low pressure;
narrow or fan spray.
HighPressureHose-- Connectone end to the spray gun
and other end to the high pressure outlet.
NozzleExtension-- Attachto spray gun to useadjustable
nozzle.
Spray Gun-- Controls the application of water onto cleaning
surface with trigger device. Includes trigger lock.
Your pressure washer requires some assembly and is ready
for useonly after it has been properly serviced with the
recommendedoil and fuel.
If you haveany problemswith the assembly of your
pressurewasher, please call the pressurewasher helpline
at 1-800-222-3136.
IMPORTANT:Any attempt to run the engine before it has
been servicedwith the recommended oil will result in an
engine failure.
Unpack the Pressure Washer
1. Removeeverything from carton except pressure washer.
2. Opencarton completely by cutting each corner from top
to bottom.
3. Removepressurewasher from carton.
CARTONCONTENTS
Checkall contents. If any parts are missing or damaged,call
thepressurewasherhelplineat 1-800-222-3136.
* Themain unit
* Handle
* Highpressure hose
* Spraygun
* Nozzleextension with adjustable nozzle
* Turbonozzle
* Wheelkit
* Engineoil
* Parts bag (which includes items listed below)
Operator's manual
Safetygoggles
Becomefamiliar with each piecebefore assembling the
pressure washer. Comparecontents against the view on page
6. if any parts are missing or damaged,call the pressure
washer helpline at 1-800-222-3136.
ASSEMBLINGYOURPRESSUREWASHER
Your Craftsman pressure washer was mostly assembledat
the factory. However,you wiil needto perform these tasks
beforeyou can operateyour pressure washer:
1. Attach handleto main unit.
2. Installwheel kit.
3. Add oil to engine crankcase.
4. Addfuel to fuel tank.
5. Connecthighpressurehoseto spraygun and pump.
6. Connectwatersupply to pump.
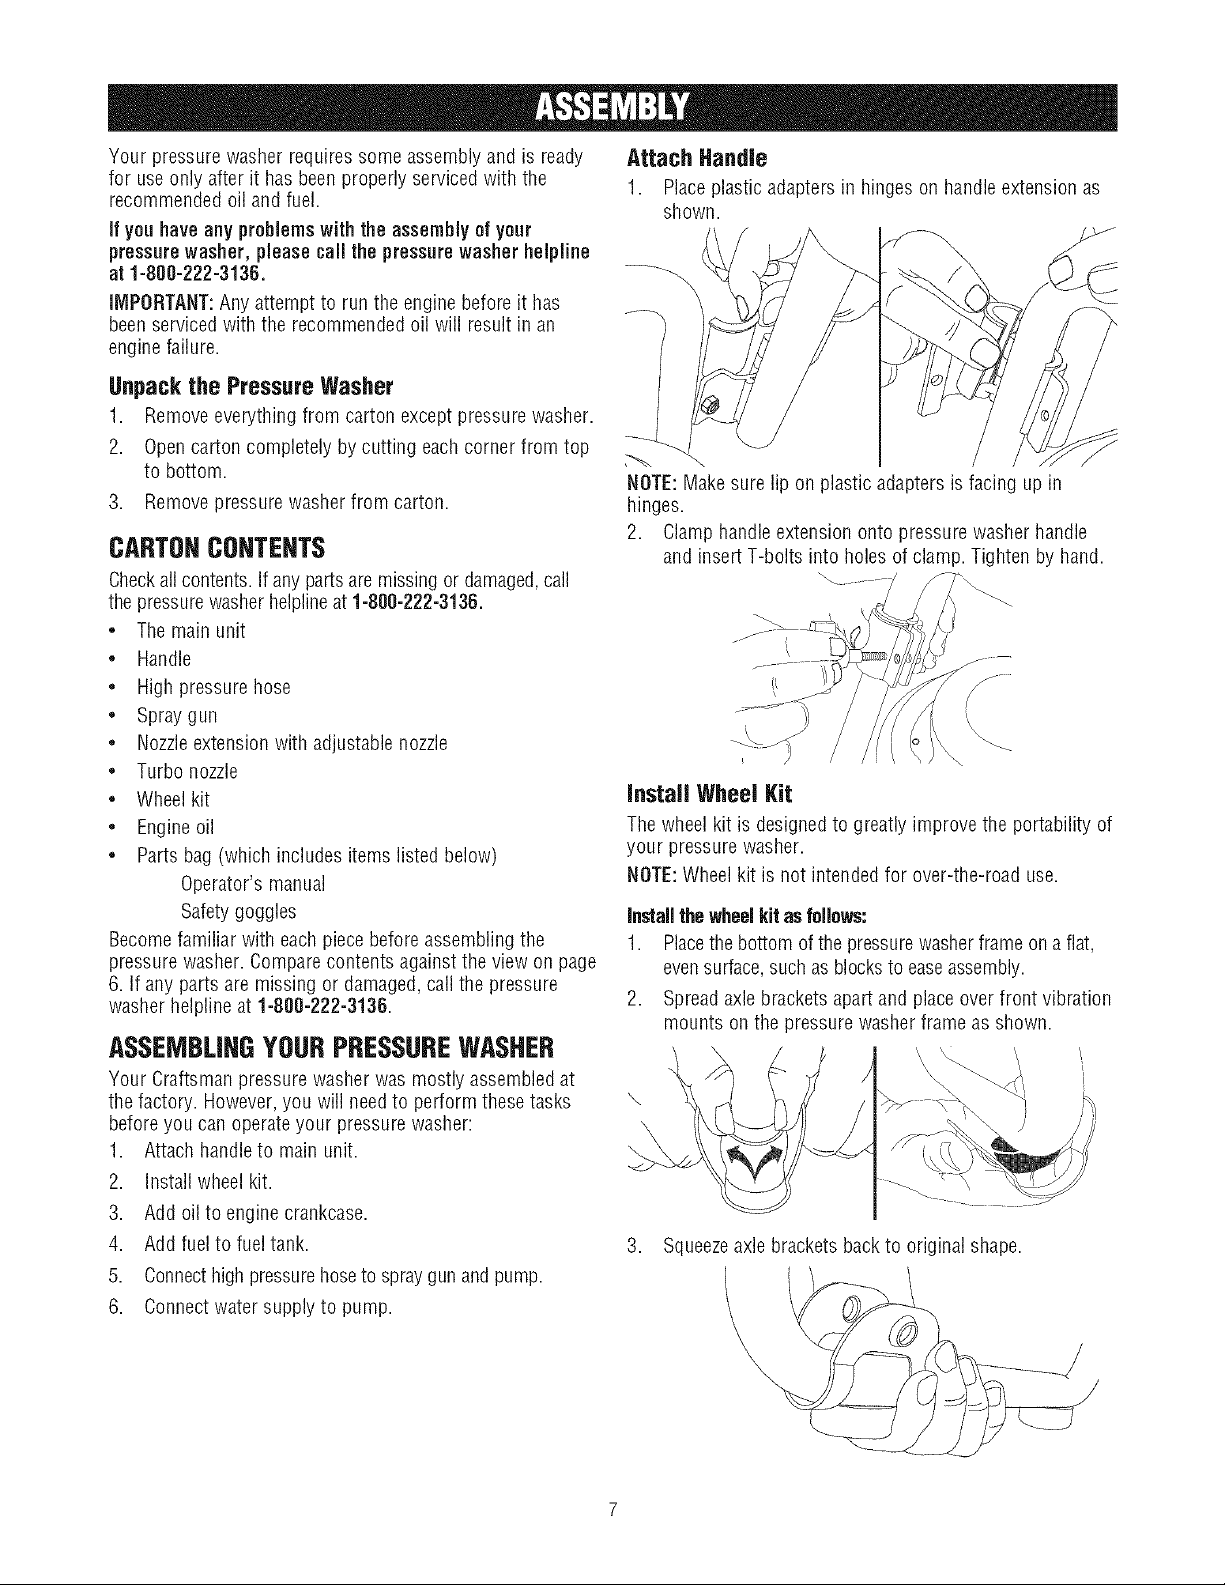
Attach Handle
1. Placeplastic adapters in hinges on handleextension as
shown.
NOTE:Make sure lip on plastic adapters is facing up in
hinges.
2. Clamphandleextension onto pressure washer handle
and insert T-bolts into holes of clamp. Tighten by hand.
Install Wheel Kit
Thewheel kit is designedto greatly improve the portability of
your pressure washer.
NOTE:Wheel kit is not intended for over-the-road use.
installthewheelkit asfollows:
1. Placethebottom of the pressurewasherframe ona flat,
evensurface,such as blocksto easeassembly.
2. Spreadaxlebrackets apartand placeover front vibration
mounts on the pressure washer frame as shown.
\
\
\
Squeezeaxle brackets back to original shape.
\
,
Slide axlethrough holes in both axlebrackets, as shown.
%
5. With raised hub inward, slide wheels over axle on each
side of pressure washer frame.
6. Install retainingclips into grooves on axleto retain
wheels.
7. Removethe temporary blocks.
Add Engine Oil
1. Placepressure washer on a flat, levelsurface.
2. Cleanareaaround oil fill and remove yellow oil fill
cap/dipstick.
NOTE:Seethe section "Oil" on page 17 to review oil
recommendations.Verify provided oil bottle is the correct
viscosity for current ambient temperature.
3. Using oil funnel (optional), slowly pour contents of
provided oil bottle into oil fill opening.
WARHING
WHENADDINGFUEL
TurnpressurewasherOFFandlet it coolat least2 minutes
beforeremovingfuel cap.Loosencapslowlyto relievepressure
intank.
Fillfueltankoutdoors.
DONOToverfilltank.Allowspaceforfuelexpansion.
If fuelspills,waituntilitevaporatesbeforestartingengine.
Keepfuelawayfromsparks,openflames,pilotlights,heat,and
otherignitionsources.
DONOTlighta cigaretteorsmoke.
To protect the fuel system from gum formation, mix in a fuel
stabilizer when adding fuel. See Storage.All fuel is notthe
same. If you experiencestarting or performance problems
after using fuel, switch to a different fuel provider or change
brands. This engine is certified to operateon gasoline. The
emission control system for this engine is EM (Engine
Modifications).
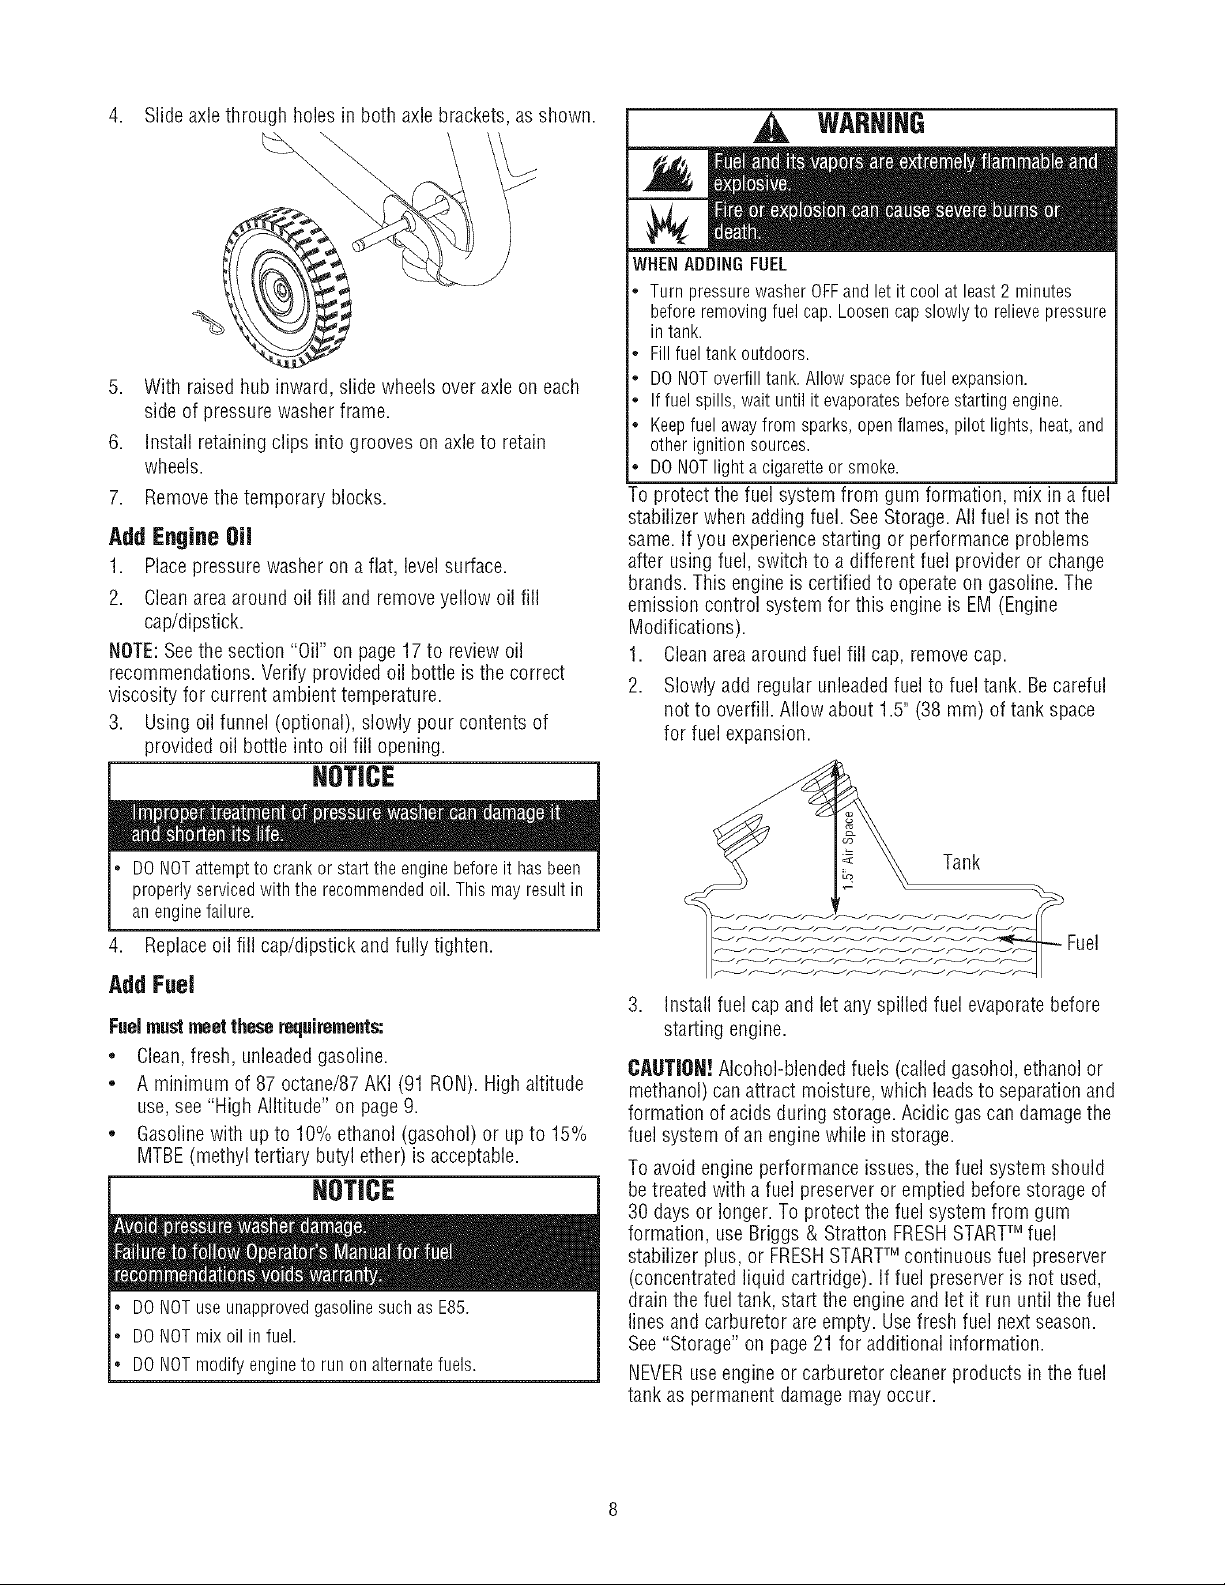
1. Cleanareaaround fuel fill cap, removecap.
2. Slowlyadd regular unleadedfuel to fuel tank. Becareful
not to overfill. Allow about 1.5" (38 mm) of tank space
for fuel expansion.
I NOTICE 1
DO NOTattempt to crank or start the engine before it has been
properly serviced with the recommended oil. This may result in
an engine failure.
,
Replace oil fill cap/dipstick and fully tighten.
Add Fuel
Fuelmust meettheserequirements:
• Clean,fresh, unleadedgasoline.
• A minimum of 87 octane/87 AKI (91 RON). Highaltitude
use,see"High AIItitude" on page9.
• Gasolinewith up to 10% ethanol (gasohol) or up to 15%
MTBE(methyl tertiary butyl ether) is acceptable.
I NOTICE 1
DO NOTuse unapproved gasoline such as E85.
DO NOTmix oil in fuel.
DO NOTmodify engine to run on alternatefuels.
Tank
3. Install fuel cap and let any spilled fuel evaporate before
starting engine.
CAUTION! Alcohol-blendedfuels (calledgasohol, ethanol or
methanol) canattract moisture, which leadsto separationand
formation of acids during storage.Acidic gas candamagethe
fuel system ofanengine while in storage.
To avoid engine performance issues,the fuel system should
betreated with a fuel preserver or emptied before storage of
30 days or longer. To protect the fuel system from gum
formation, use Briggs & Stratton FRESHSTARTTM fuel
stabilizer plus, or FRESHSTARTTM continuous fuel preserver
(concentrated liquid cartridge). If fuel preserver is not used,
drain the fuel tank, start the engine and let it run until the fuel
linesand carburetor are empty. Usefresh fuel next season.
See"Storage" on page21 for additional information.
NEVERuseengine or carburetor cleaner products in the fuel
tank as permanent damage may occur.
HighAltitude
At higher altitudes (over5,000 feet), 85 octane/85 AKI
(89 RON)gasoline is recommended. High-altitude usemay
require a carburetor jet kit to improve performance and
decreasefuel consumption. Seeany Sears or qualified dealer
for more information.
Connect Hose and Water Supplyto Pump
* Damageto equipmentwill resultfrom failureto followthis
instruction.
NOTE:Removeand discard the shipping caps from the
pump's high pressure outlet and water inlet beforeattaching
hoses.
1. Uncoilhigh pressure hose and attach one end of hoseto
baseof spray gun. Tighten by hand.
WARHJHG
4. Runwater through your garden hose for 30 seconds to
cleanout any debris.
IMPORTANT:DO NOTsiphon standing water for the water
supply. UseONLYcold water (lessthan I O0°F).
5. Connectgardenhose (not to exceed50 feet in length) to
water inlet. Tighten by hand.
CAUTJOH
* ThereMUSTbeatleasttenfeetof unrestrictedgardenhose
betweenthepressurewasherinletandany device,suchasa
vacuumbreakeror checkvalve.
. Damageto equipmentresultingfromfailuretofollowthis
instructionwillvoid warranty.
6. TurnONwater and squeezetrigger on gun to purge
pump system of air and impurities.
A WARNING
Always wear safety goggles when using this equipment or in
vicinity of where equipment is in use.
Beforestarting the pressure washer, be sure you are wearing
adequatesafety goggles.
NEVERsubstitute safetyglasses for safety goggles.
NEVERconnect high pressure hoseto nozzleextension.
Keephigh pressure hose connectedto pump and spray gun
while system is pressurized.
Always becertain spray gun, nozzlesand accessories are
correctly attached.
Attach other end of high pressure hose to high pressure
outlet on pump. Tighten by hand.
S
,
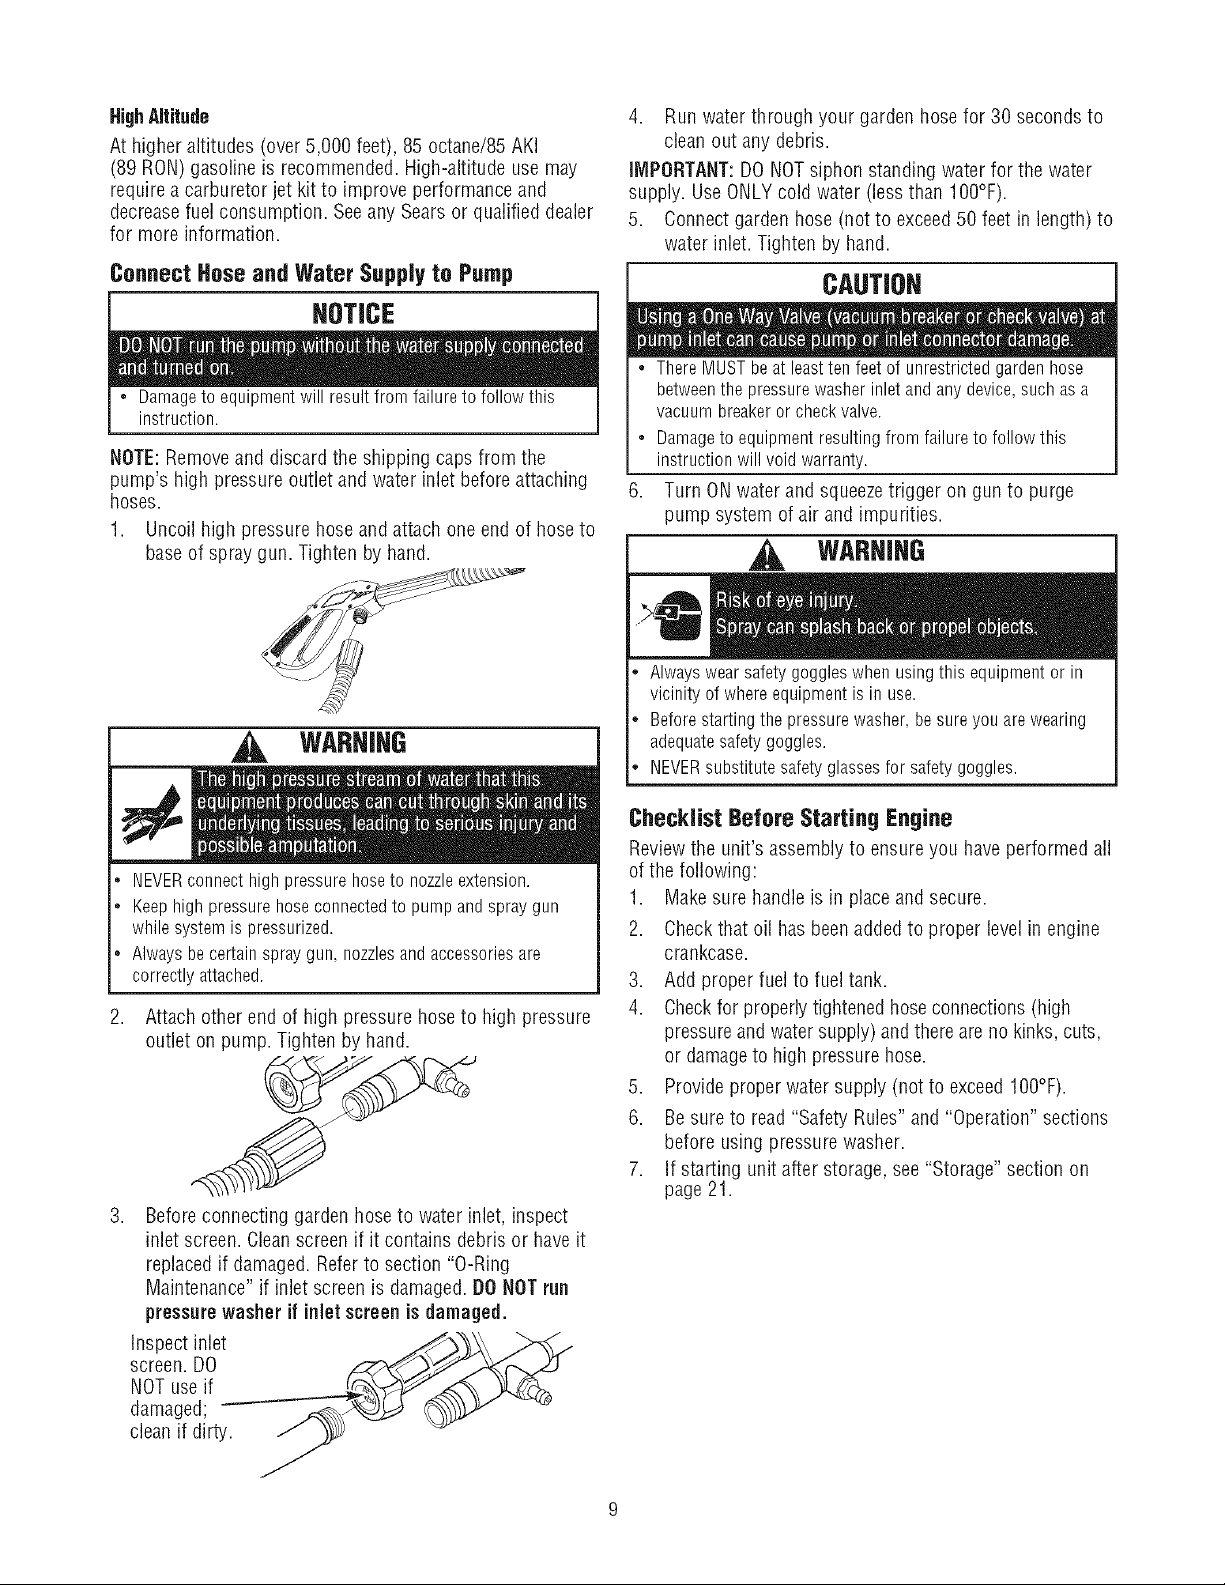
Beforeconnecting garden hose to water inlet, inspect
inlet screen. Cleanscreen if it contains debris or have it
replacedif damaged. Referto section "O-Ring
Maintenance"if inlet screen is damaged.DONOTrun
pressurewasher if inlet screen isdamaged.
Inspect inlet
screen. DO
NOTuseif
ChecMist Before Starting Enoine
Reviewthe unit's assembly to ensureyou have performed all
of the following:
1. Makesure handle is in place and secure.
2. Checkthat oil hasbeenadded to proper levelin engine
crankcase.
3. Addproper fuel to fuel tank.
4. Checkfor properly tightenedhose connections (high
pressureand watersupply) andthere are no kinks, cuts,
or damageto high pressurehose.
5. Provideproperwater supply (notto exceedIO0°F).
6. Besureto read "Safety Rules" and "Operation" sections
before using pressure washer.
7. If starting unit after storage, see "Storage" section on
page21.
cleanif dirty.
damaged;
HOWTOUSEYOURPRESSUREWASHER
If you haveany problems operatingyour pressure washer,
pleasecall the pressure washer helpline at 1-800-222-3136.
Pressure Washer Location
ClearancesandAirMovement
I A WARNING 1
Keepatleast5ft. (152cm)clearanceonall sidesofpressure
washerincludingoverhead.
Placepressure washer outdoors in an areathat will not
accumulate deadlyexhaust gas. DONOTplace pressure
washer where exhaustgas could accumulate and enter inside
or be drawn into a potentially occupied building. Ensure
exhaustgas is kept awayfrom any windows, doors,
ventilation intakes or other openings that canallow exhaust
gasto collect in a confined area. Prevailingwinds and air
currents should be taken into considerationwhen positioning
_ressurewasher.
To Start Your Pressure Washer
To start your pressure washer for the first time, follow these
instructions step-by-step. This starting information also
applies wheneverif you havelet the pressure washer sit idle
for at least a day.
1. Placepressurewashernearanoutsidewater source
capableof supplyingwater at a flow rategreaterthan
3.0gallons per minuteand no lessthan 20 PSiat pressure
washerend of gardenhose.DONOTsiphonsupply water.
2. Checkthathigh pressurehoseis tightly connectedto
spray gun and pump. See"Assembling Your Pressure
Washer"for illustrations.
3. Makesure unit is in a level position.
4. Connectgardenhoseto water inlet on pressure washer
pump.
NOTICE
o Damageto equipmentwill resultfrom failureto followthis
instruction.
_, WARHIHG
OperatepressurewasherONLYoutdoors.
Keepexhaustgasfromenteringaconfinedareathrough
windows,doors,ventilationintakesor otheropenings.
DONOTstartor runpressurewasherindoorsor in anenclosed
area,evenifwindowsanddoorsareopen.
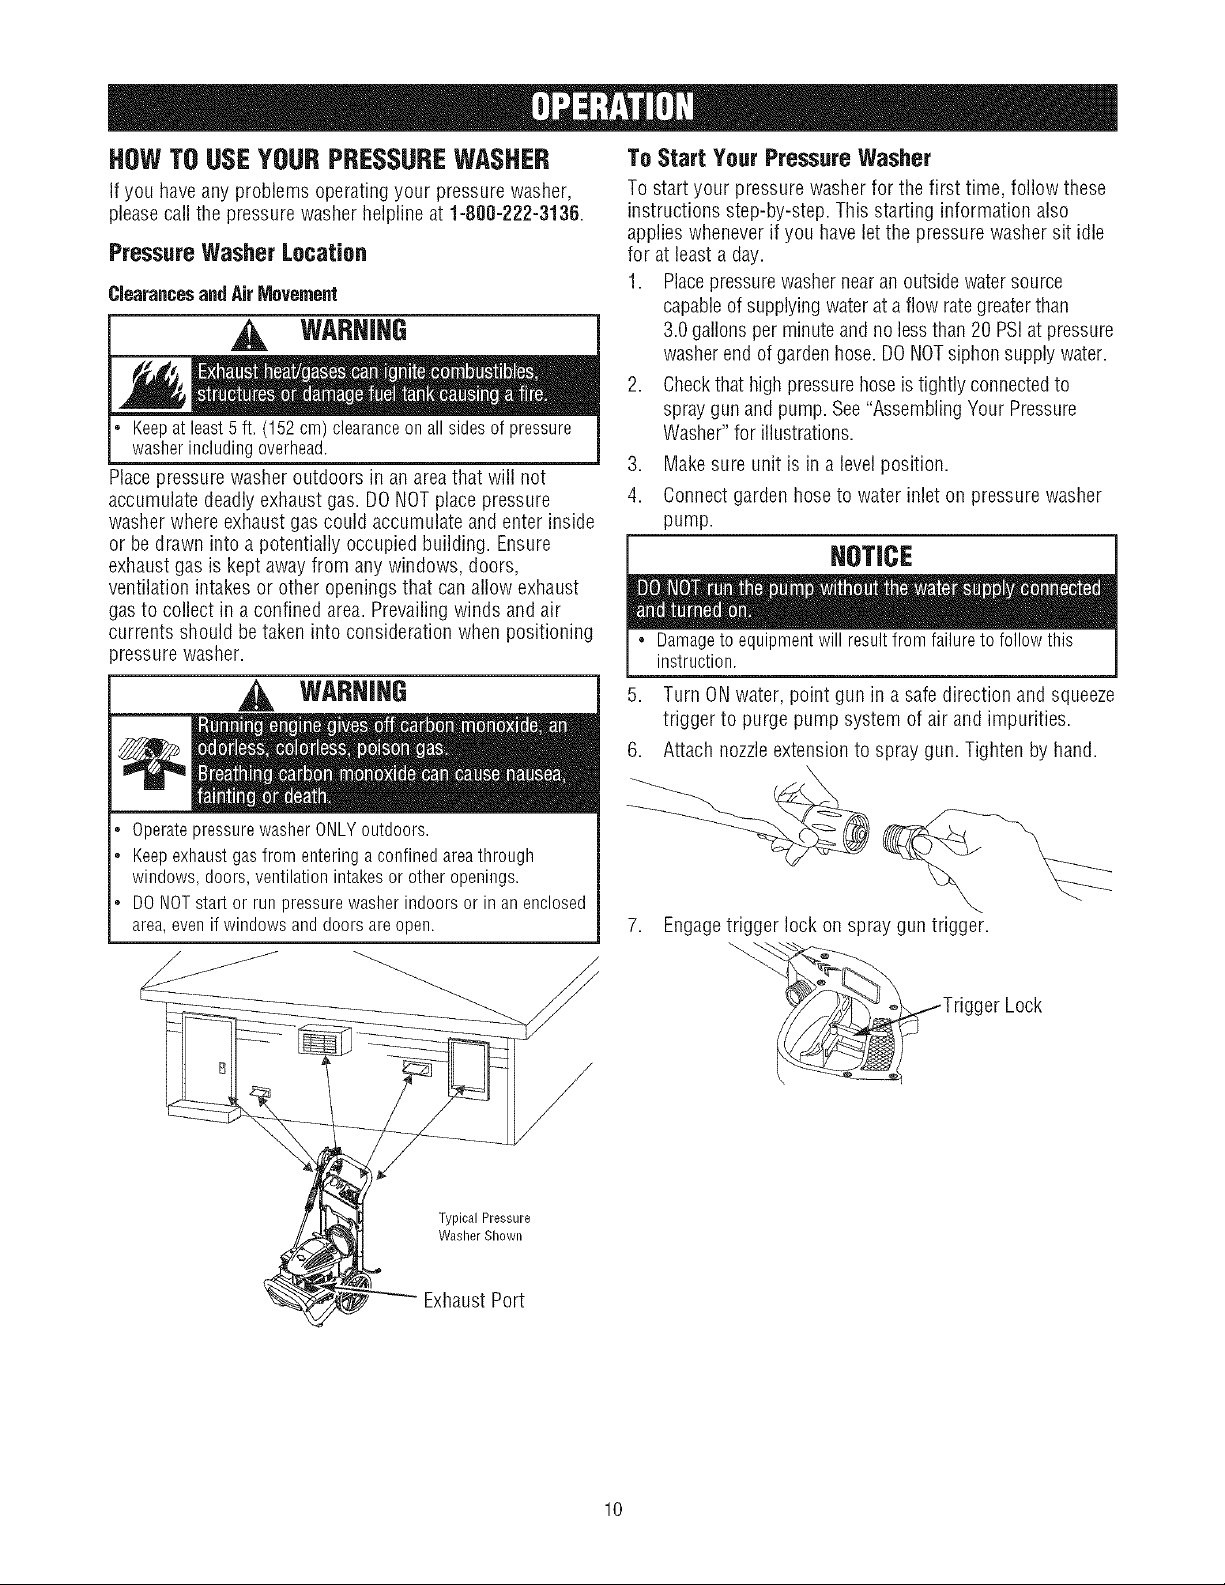
5. TurnONwater, point gun in a safe direction and squeeze
trigger to purge pump system of air and impurities.
6. Attachnozzleextensionto spray gun. Tighten by hand.
7. Engagetrigger lock on spray gun trigger.
Trigger Lock
_ '7"_-- ExhaustPort
10
,
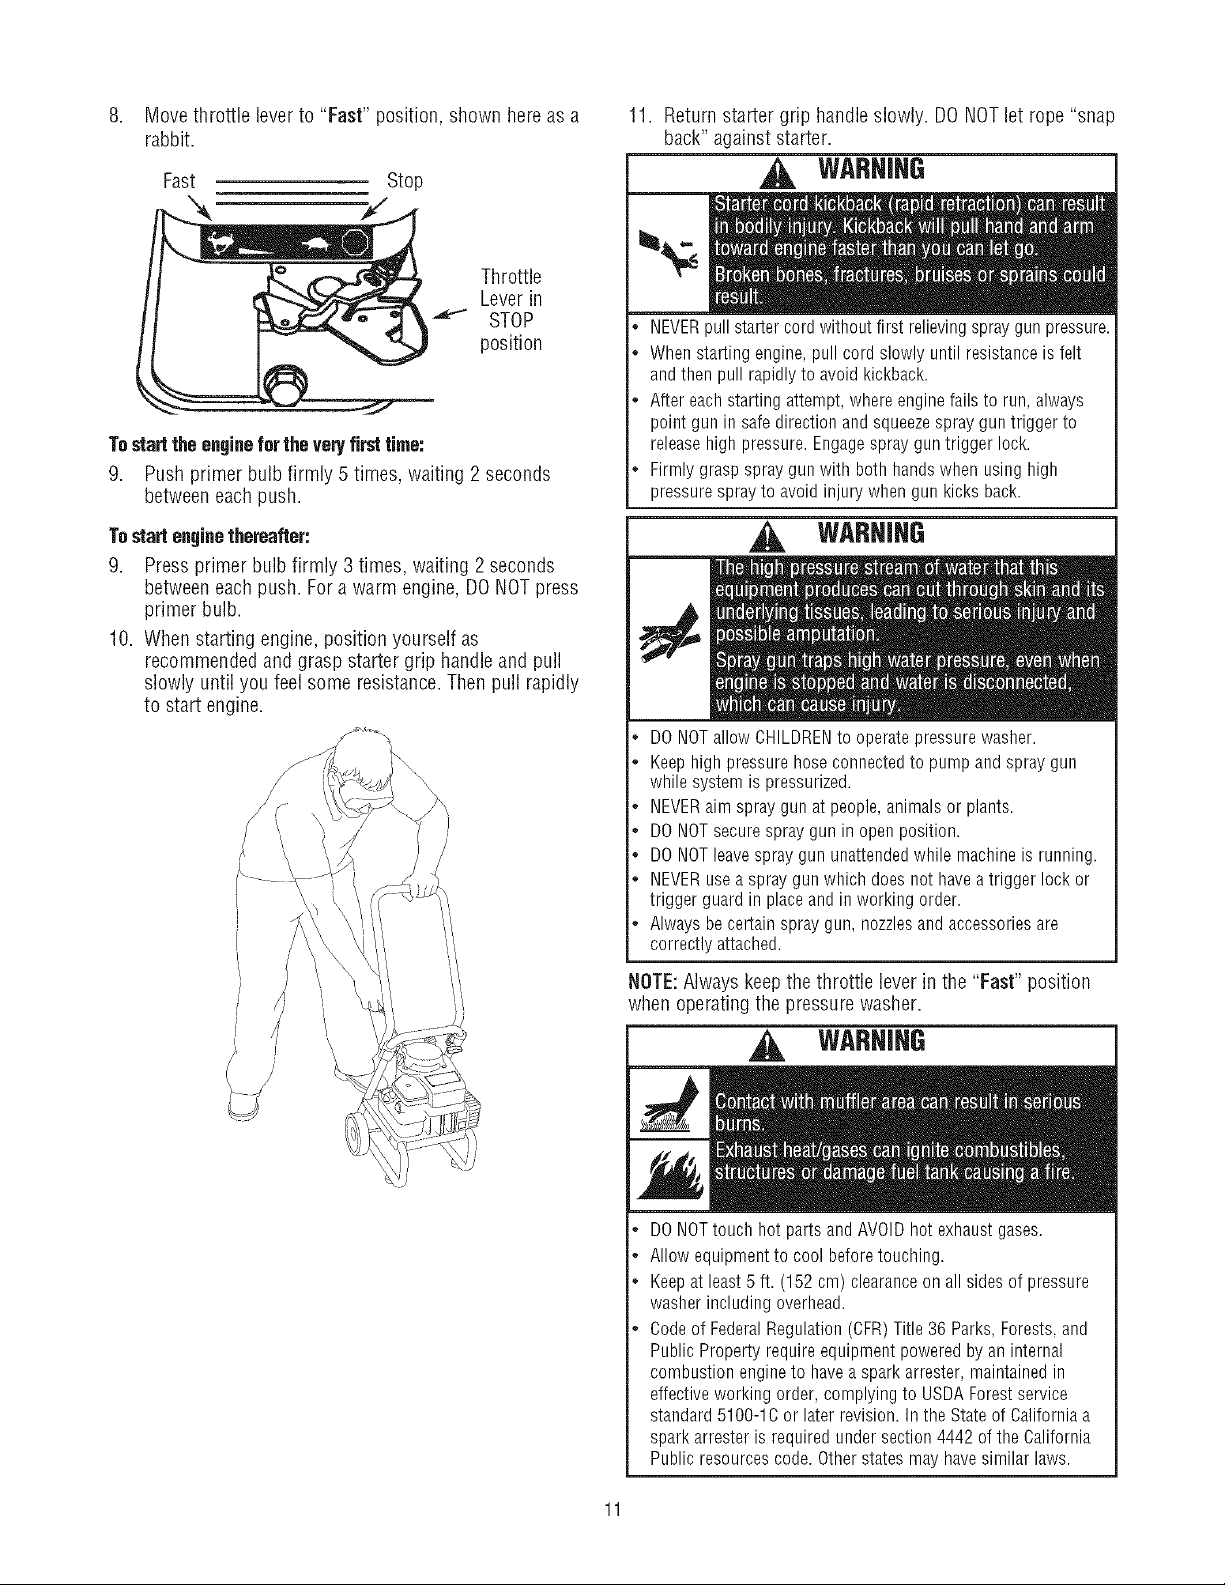
Move throttle lever to "Fast" position, shown here as a
rabbit.
11. Returnstarter grip handleslowly. DONOTlet rope "snap
back"against starter.
Fast
Stop
J
Throttle
Leverin
STOP
position
Testart the enginefor the veryfirsttime:
9. Pushprimer bulb firmly 5 times, waiting 2 seconds
betweeneach push.
Tostartenginethereafter:
9. Pressprimer bulb firmly 3 times, waiting 2 seconds
betweeneach push. Fora warm engine, DONOTpress
primer bulb.
10. When starting engine, position yourself as
recommendedand grasp starter grip handle and pull
slowly until you feelsome resistance. Thenpull rapidly
to start engine.
A WARNING
NEVERpullstartercordwithoutfirst relievingspraygunpressure.
Whenstartingengine,pullcordslowlyuntilresistanceisfelt
andthenpull rapidlytoavoidkickback.
Aftereachstartingattempt,whereenginefailsto run,always
pointgunin safedirectionandsqueezesprayguntrigger to
releasehighpressure.Engagesprayguntriggerlock.
Firmlygraspspraygunwith bothhandswhenusinghigh
pressurespraytoavoidinjurywhengunkicksback.
WARHIHG
DONOTallow CHILDRENto operate pressure washer.
Keephigh pressure hose connectedto pump andspray gun
while system is pressurized.
NEVERaim spray gun at people, animals or plants.
DONOTsecure spray gun in open position.
DONOTleave spray gun unattendedwhile machine is running.
NEVERusea spray gun which does not haveatrigger lock or
trigger guard in place andin working order.
Always becertain spray gun, nozzlesand accessories are
correctly attached.
NOTE:Always keepthe throttle lever in the "Fast" position
when operatingthe pressure washer.
A WARNING
DONOTtouch hot parts and AVOID hot exhaust gases.
Allow equipment to cool before touching.
Keepat least5 ft. (152 cm) clearance on all sidesof pressure
washer including overhead.
Codeof FederalRegulation(CFR) Title 36 Parks, Forests,and
Public Property require equipment powered by an internal
combustion engine to havea spark arrester, maintained in
effectiveworking order, complying to USDAForestservice
standard 5100-1C or later revision. In the Stateof Californiaa
spark arrester is required under section 4442 of the California
Public resources code.Other states may havesimilar laws.
11
How to Stop Your Pressure Washer
1. Releasespray gun trigger and let engine idle for two
minutes.
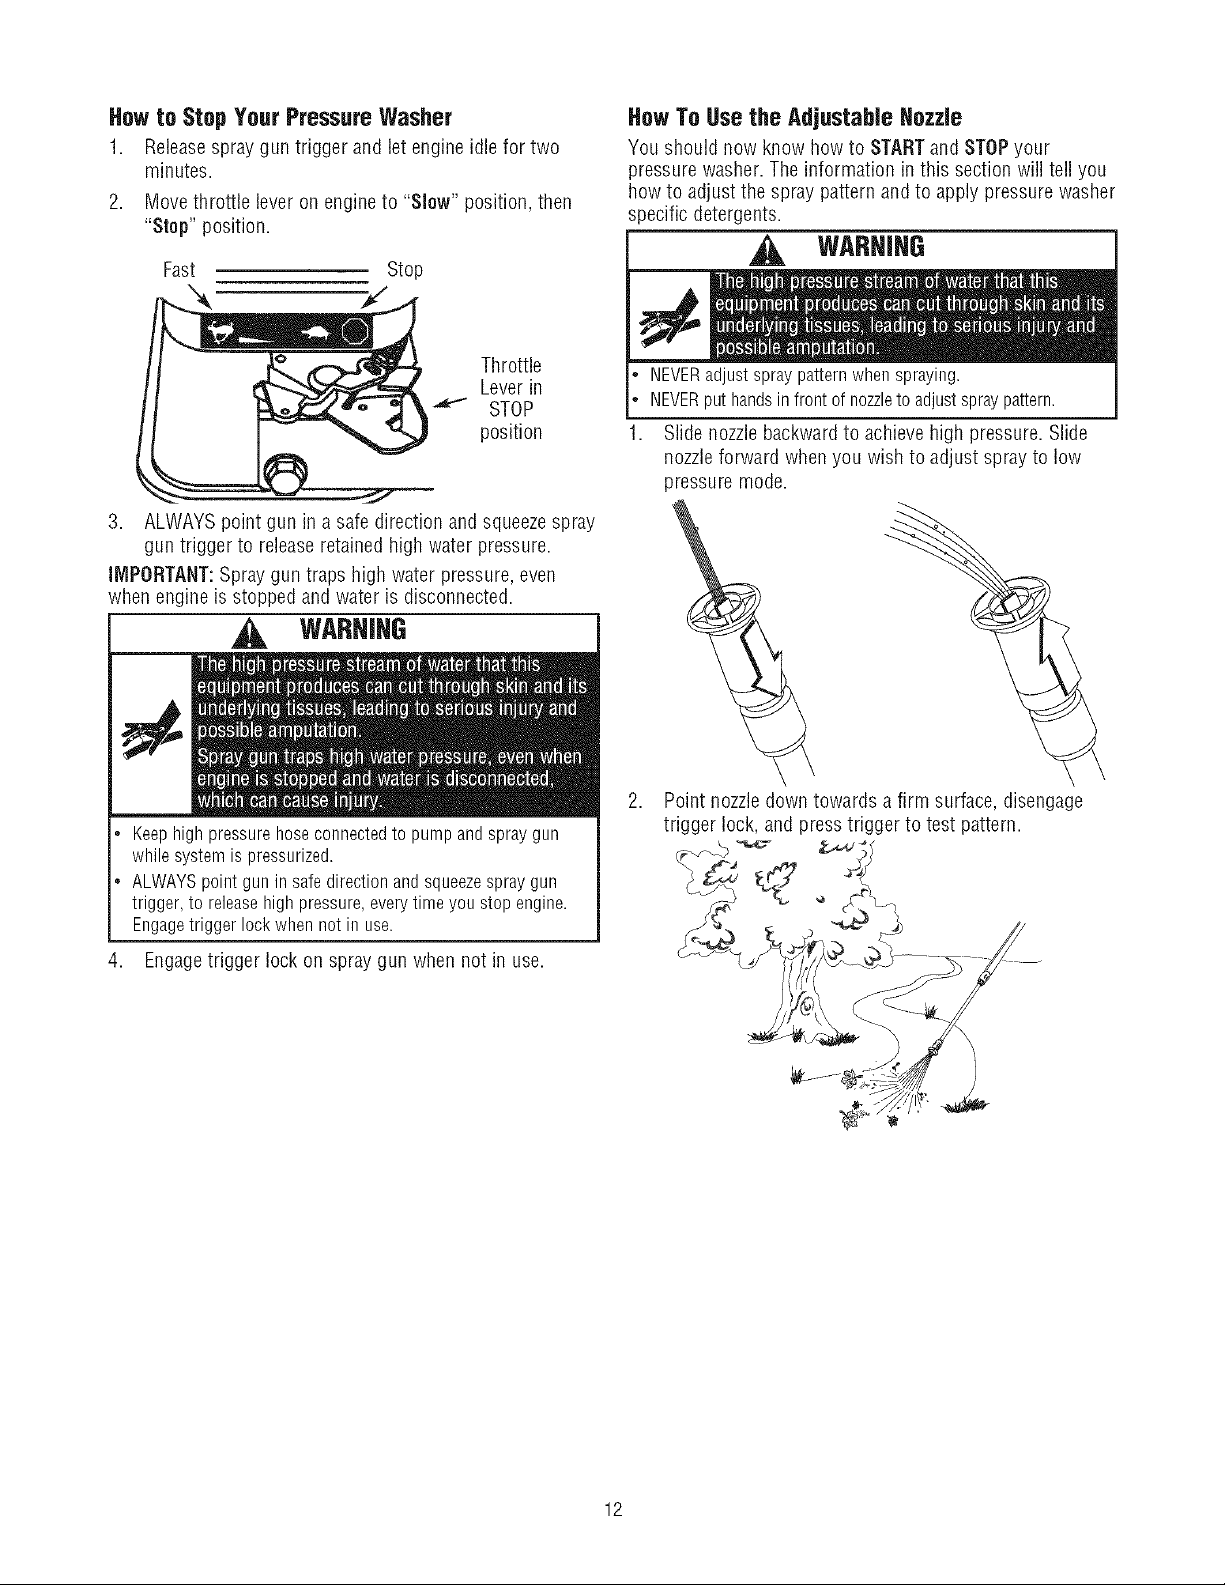
2. Movethrottle leveron engineto "Slow" position, then
"Stop" position.
Fast
Stop
J
HowTo Use the Adjustable Hozzle
You should now know howto STARTand STOPyour
pressure washer.The information in this section will tell you
howto adjust the spray pattern and to apply pressure washer
specific detergents.
A WARNING
Throttle
Leverin
STOP
position
3. ALWAYSpoint gun in a safe direction and squeezespray
gun trigger to release retainedhigh water pressure.
INIPORTANT:Spraygun traps high water pressure, even
when engine is stopped and water is disconnected.
,A WARNING
Keephigh pressure hose connectedto pump and spray gun
while system is pressurized.
ALWAYSpoint gun in safe direction and squeezespray gun
trigger, to releasehigh pressure, every time you stop engine.
Engagetrigger lock when not in use.
,
Engage trigger lock on spray gun when not in use.
NEVERadjustspraypatternwhenspraying.
NEVERputhandsinfrontof nozzleto adjustspraypattern.
Slide nozzlebackwardto achievehigh pressure. Slide
nozzleforward when you wish to adjust spray to low
pressure mode.
Point nozzledown towards a firm surface, disengage
trigger lock, and press trigger to test pattern.
12
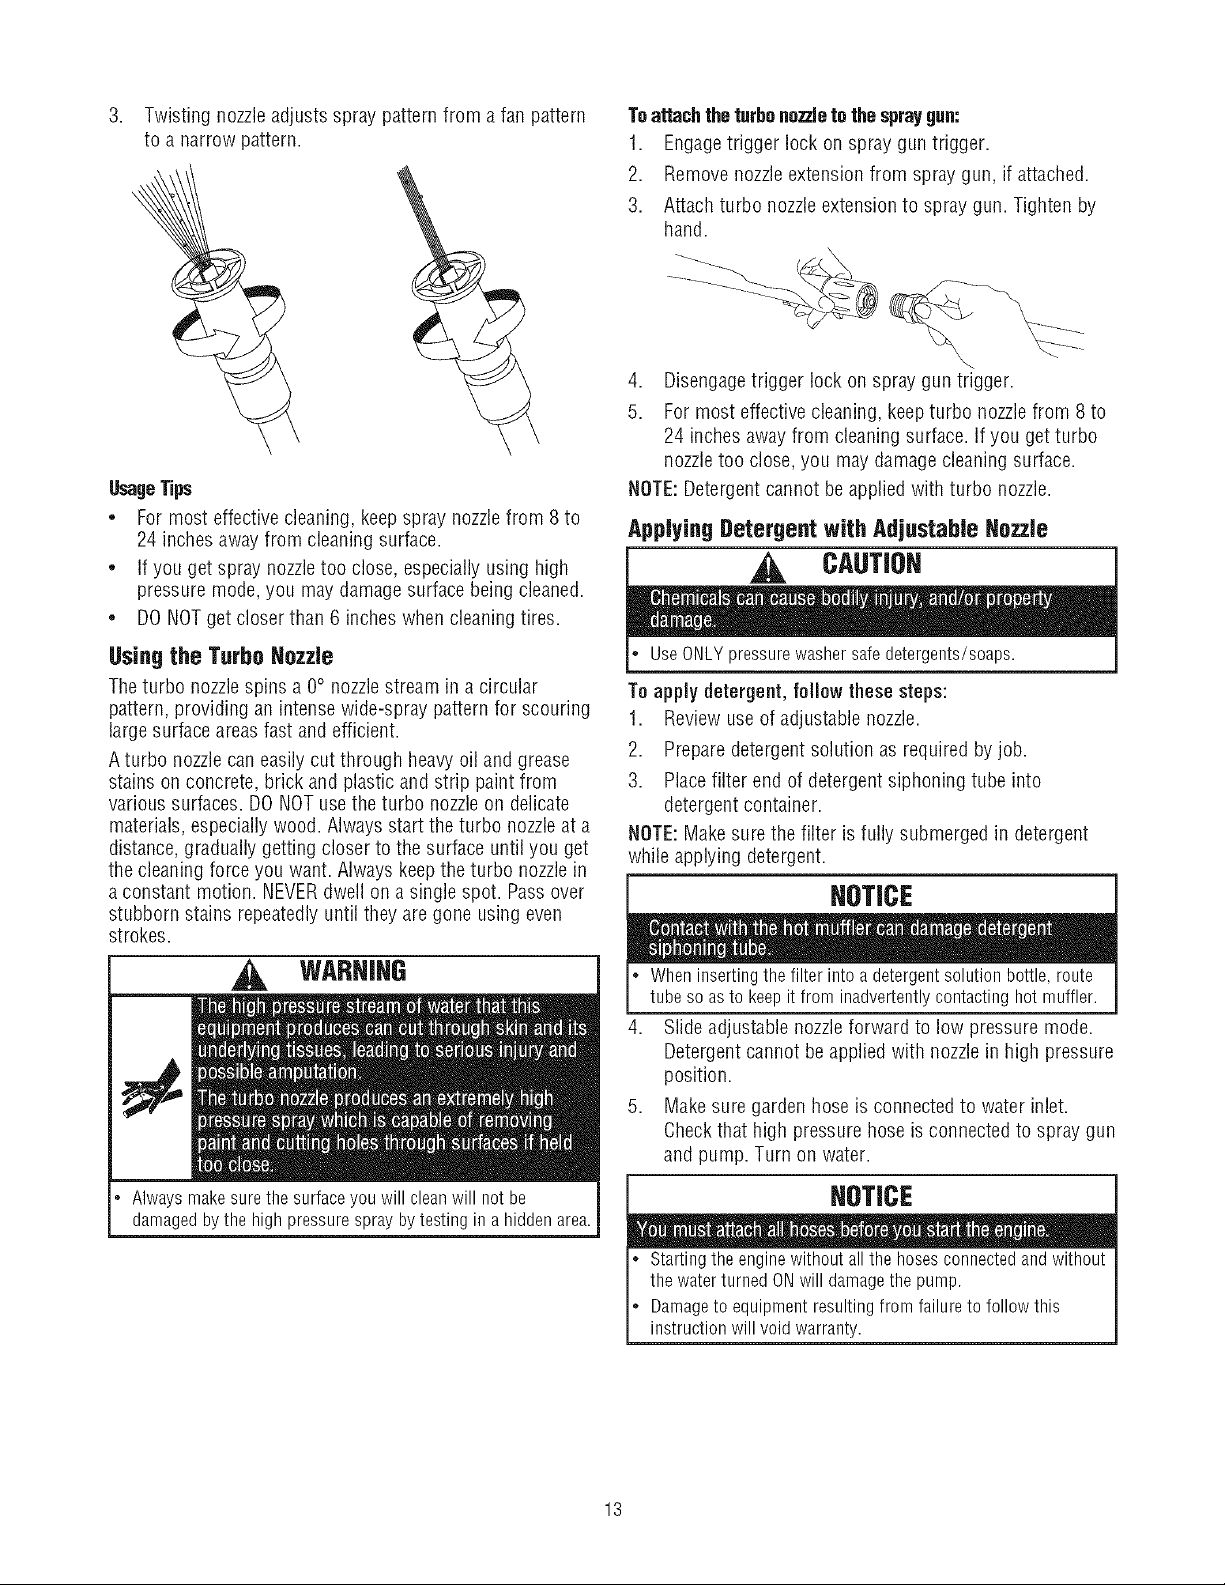
3. Twistingnozzleadjustsspraypatternfromafanpattern
toanarrowpattern.
UsageTips
• Formost effective cleaning, keepspray nozzlefrom 8 to
24 inches away from cleaning surface.
• Ifyou get spray nozzletoo close, especially using high
pressure mode,you may damagesurface being cleaned.
• DONOTget closer than 6 inches when cleaning tires.
Toattachtheturbonozzletothe spraygun:
1. Engagetrigger lock on spray gun trigger.
2. Removenozzleextension from spray gun, if attached.
3. Attachturbo nozzleextensionto spray gun. Tighten by
hand.
4. Disengagetrigger lock on spray gun trigger.
5. Formost effectivecleaning,keepturbo nozzlefrom 8 to
24 inchesaway from cleaning surface. If you get turbo
nozzletoo close, you may damagecleaning surface.
NOTE:Detergentcannot be applied with turbo nozzle.
Applying Detergent with Adjustable Nozzle
A CnUTlOe
Using the Turbo Hozzle
Theturbo nozzlespins a 0° nozzlestream in a circular
pattern, providing an intense wide-spray pattern for scouring
large surfaceareas fast and efficient.
A turbo nozzlecan easily cut through heavyoil and grease
stains on concrete, brick and plastic and strip paint from
various surfaces. DONOTuse the turbo nozzleon delicate
materials,especiallywood. Always start the turbo nozzleat a
distance, gradually getting closer to the surface until you get
the cleaning force you want. Always keep the turbo nozzlein
a constant motion. NEVERdwell on a single spot. Passover
stubborn stains repeatedlyuntil they are gone usingeven
strokes.
I wAR.I.G
Always makesure the surface you will cleanwill not be
damagedby the high pressure spray by testing in a hidden area.
UseONLYpressurewashersafedetergents/soaps.
To apply detergent, fellow thesesteps:
1. Reviewuseof adjustable nozzle.
2. Preparedetergent solution as required by job.
3. Placefilter end of detergentsiphoning tube into
detergentcontainer.
NOTE:Makesure the filter is fully submerged in detergent
while applying detergent.
NOTICE
j Wheninsertingthefilterintoa detergentsolutionbottle,route
tubeso asto keepit frominadvertentlycontactinghotmuffler.
4. Slideadjustable nozzleforward to low pressure mode.
Detergentcannot be applied with nozzlein high pressure
position.
5. Makesure garden hose is connected to water inlet.
Checkthat high pressure hose is connectedto spray gun
and pump. Turn on water.
NOTICE
Starting the engine without all the hoses connected and without
the water turned ONwill damagethe pump.
Damageto equipment resulting from failure to follow this
instruction will void warranty.
13
6. Engagetrigger lock on spray gun andstart engine
following instructions "How to Start Your Pressure
Washer".
7. Applydetergentto a dry surface, starting at lower
portion of area to be washedand work upward, using
long, even, overlapping strokes.
8. Allow detergentto "soak in" for 3-5 minutes before
washing and rinsing. Reapplyas neededto prevent
surfacefrom drying. DO NOTallow detergentto dry on
(prevents streaking).
IMPORTANT:You must flush the detergent siphoning system
after each useby placing the filter into a bucket of clean
water,then run the pressure washer in low pressure for
1-2 minutes.
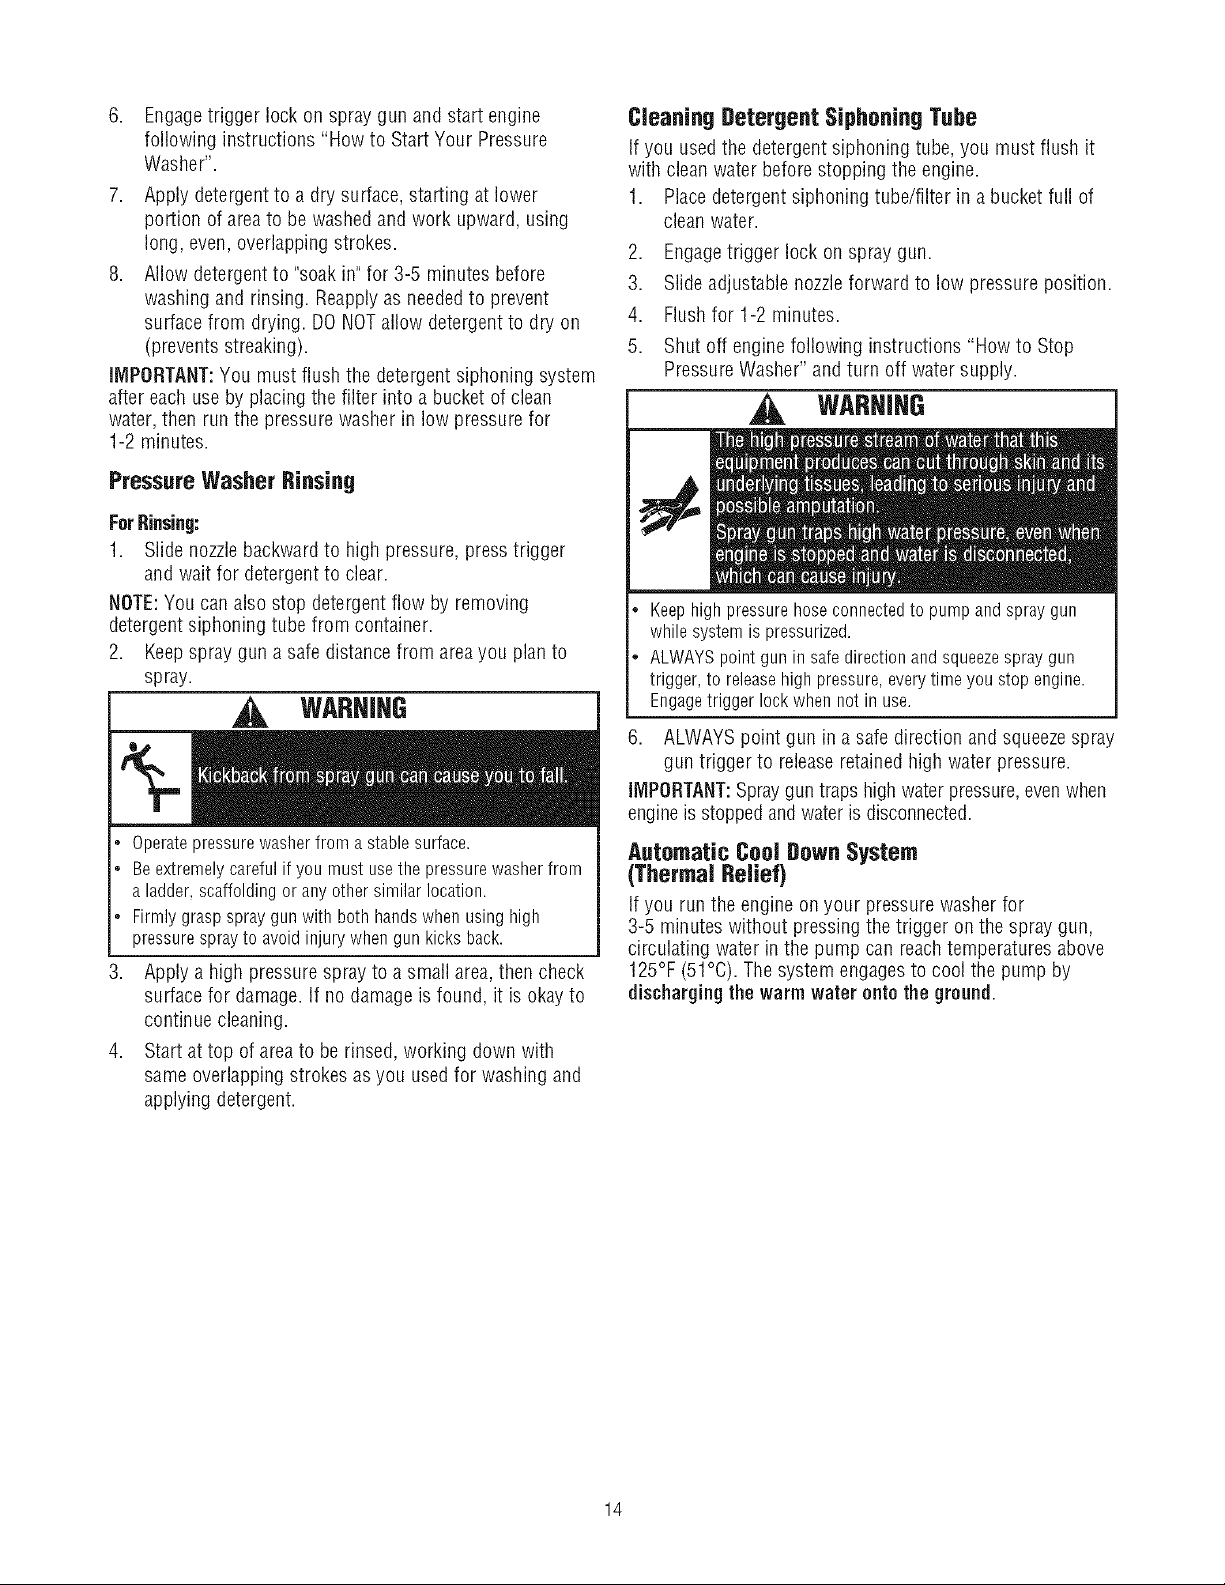
Pressure Washer Rinsing
FerRinsing:
1. Slide nozzlebackwardto high pressure, press trigger
and wait for detergentto clear.
NOTE:You can also stop detergentflow by removing
detergent siphoning tube from container.
2. Keepspray gun a safe distancefrom areayou plan to
spray.
WARNING
Operatepressurewasherfromastablesurface.
Beextremelycarefulif youmust usethepressurewasherfrom
a ladder,scaffoldingorany othersimilarlocation.
Firmlygraspspraygunwith bothhandswhenusinghigh
pressuresprayto avoidinjurywhengunkicksback.
3. Applya high pressure spray to a small area,then check
surfacefor damage.If no damage is found, it is okay to
continue cleaning.
4. Startat top of area to be rinsed, working down with
same overlappingstrokes asyou usedfor washing and
applying detergent.
Cleaning Detergent Siphoning Tube
If you usedthe detergentsiphoning tube, you must flush it
with cleanwater beforestopping the engine.
1. Placedetergentsiphoning tube/filter ina bucket full of
clean water.
2. Engagetrigger lock on spray gun.
3. Slideadjustable nozzleforward to low pressure position.
4. Flushfor 1-2 minutes.
5. Shut off engine following instructions "How to Stop
PressureWasher" and turn off water supply.
A WARNING
Keephigh pressure hose connectedto pump andspray gun
while system is pressurized.
ALWAYS point gun in safe direction and squeezespray gun
trigger, to releasehigh pressure, every time you stop engine.
Engagetrigger lock when not in use.
6. ALWAYSpoint gun in asafe direction and squeezespray
gun trigger to releaseretained high water pressure.
iMPORTANT:Spraygun traps high water pressure,evenwhen
engineis stoppedand water is disconnected.
Automatic Cool Down System
(Thermal Relief)
If you run the engine on your pressure washer for
3-5 minutes without pressing the trigger on the spray gun,
circulating water inthe pump can reachtemperaturesabove
125°F(51°C). The system engagesto cool the pump by
dischargingthewarm water ontothe ground.
14
ENGINETECHNICALINFORMATION
This is a single cylinder, L-head,air cooled engine. It is a low
emissions engine.
Inthe Stateof California, ModelSeries90000 engines are
certified by the CaliforniaAir ResourcesBoardto meet
emissions standards for 125 hours. Such certification does
not grant the purchaser,owner or operator of this engine any
additional warranties with respectto the performance or
operational life of this engine. Theengineis warranted solely
according to the product and emissions warranties stated
elsewherein this manual.
Power Ratings
* The gross power rating for individual gasengine models is
labeledin accordance with SAE(Societyof Automotive
Engineers)code J1940 (Small Engine Power & Torque
Rating Procedure),and rating performance has been
obtained andcorrected in accordancewith SAEJ1995
(Revision2002-05). Actual gross engine power will be lower
and is affected by, among other things, ambient operating
conditions and engine-to-enginevariability. Givenboth the
wide array of products on which enginesare placedand the
variety of environmental issues applicable to operating the
equipment,the gasengine will not developthe rated gross
power when used in a given piece of powerequipment
(actual"on-site"or net horsepower). This difference is due to
a variety of factors including, but not limited to, accessories
(air cleaner,exhaust, charging, cooling, carburetor, fuel
pump, etc.), application limitations, ambient operating
conditions (temperature, humidity, altitude), and engine-to-
engine variability. Due to manufacturing and capacity
limitations, Briggs & Stratton may substitute an engine of
higher rated power for this Seriesengine.
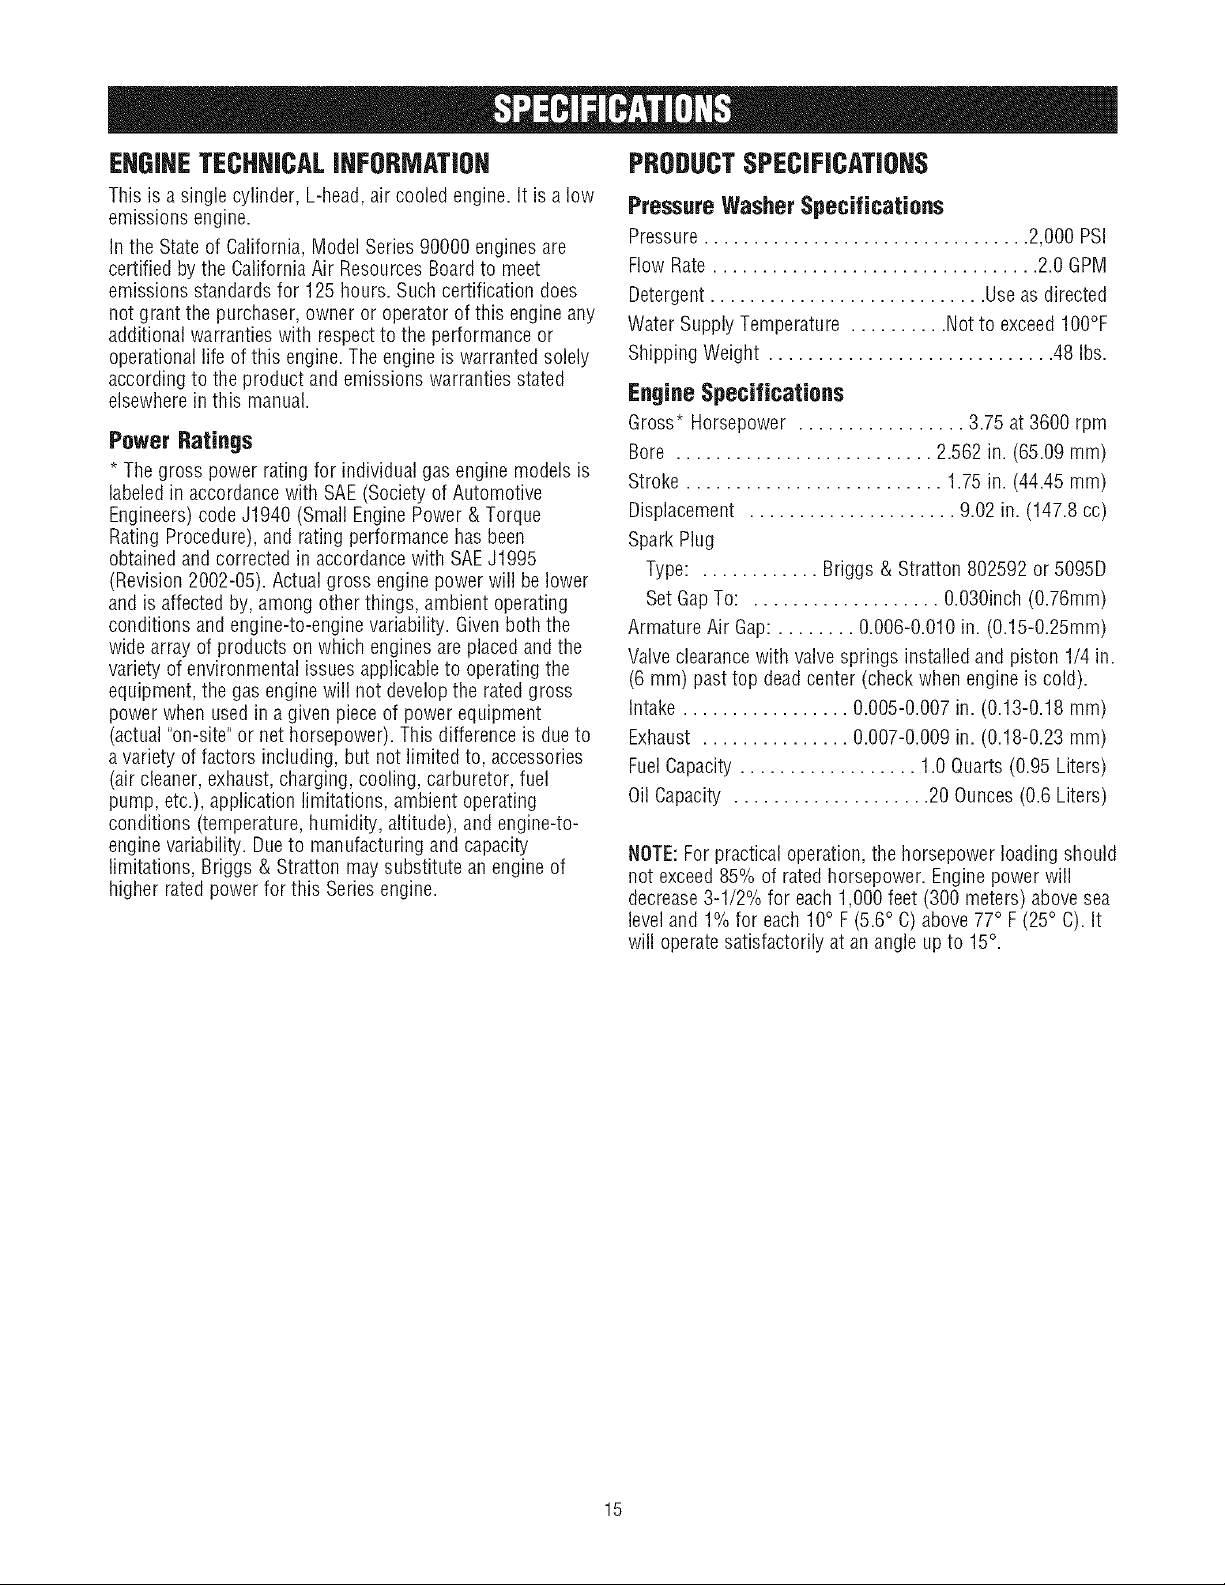
PRODUCTSPECIFICATIONS
Pressure Washer Specifications
Pressure ................................. 2,000 PSI
Flow Rate ................................. 2.0 GPM
Detergent............................ Use asdirected
Water Supply Temperature .......... Not to exceed IO0°F
Shipping Weight ............................. 48 Ibs.
Engine Specifications
Gross* Horsepower ................. 3.75 at 3600 rpm
Bore .......................... 2.562 in. (65.09 ram)
Stroke .......................... 1.75 in. (44.45 ram)
Displacement ..................... 9.02 in. (147.8 cc)
SparkPlug
Type: ............ Briggs & Stratton 802592 or 5095D
SetGapTo: ................... O.030inch(0.76mm)
Armature Air Gap: ........ 0.006-0.010 in. (0.15-0.25mm)
Valveclearancewith valvesprings installed and piston 1/4 in.
(6 mm) past top dead center (check whenengine is cold).
Intake ................. 0.005-0.007 in. (0.13-0.18 ram)
Exhaust ............... 0.007-0.009 in. (0.18-0.23 mm)
FuelCapacity .................. 1.0 Quarts (0.95 Liters)
Oil Capacity .................... 20 Ounces(0.6 Liters)
NOTE:For practical operation, the horsepower loading should
not exceed85% of rated horsepower. Engine power will
decrease3-1/2% for each 1,000feet (300 meters) abovesea
leveland 1% for each 10° F (5.6° C)above 77° F (25° C). It
will operate satisfactorily at an angle up to 15°.
15
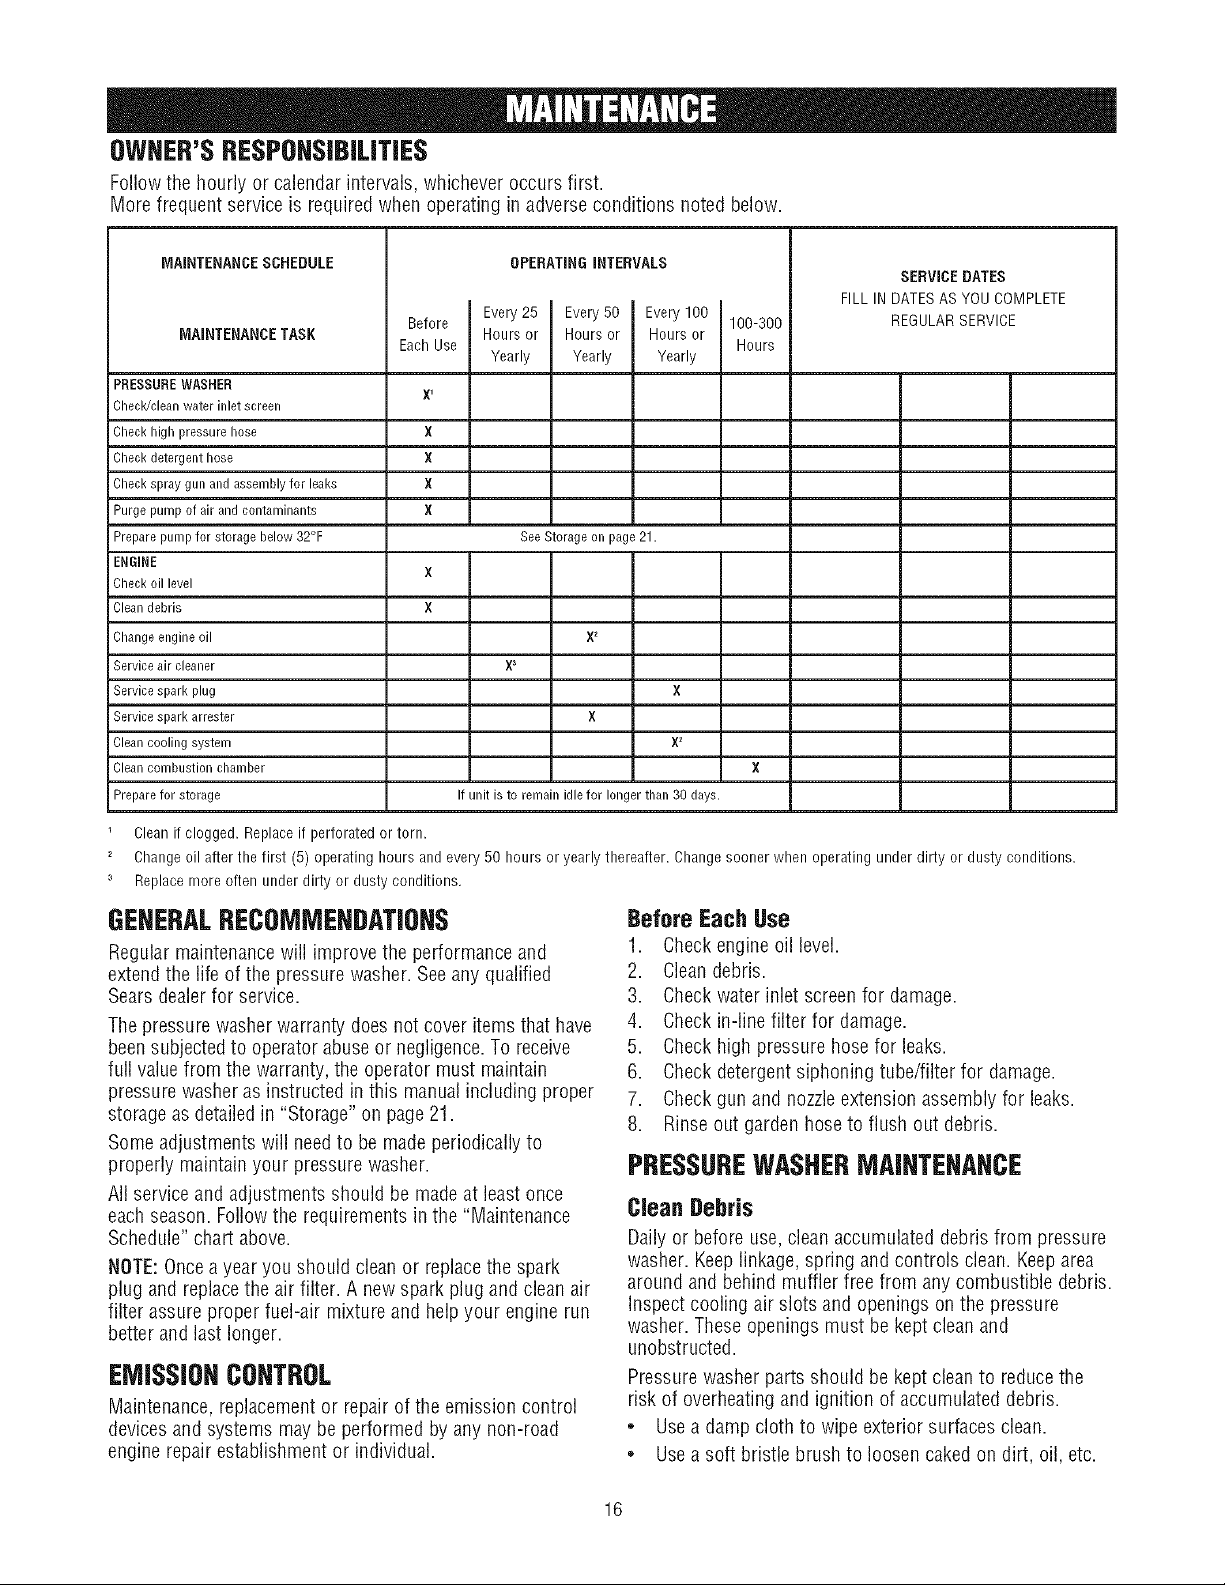
OWNER'SRESPONSIBILITIES
Followthe hourly or calendarintervals,whichever occurs first.
More frequent service is required when operating inadverse conditions noted below.
MAINTENANCESCHEDULE
MAINTENANCETASK
PRESSUREWASHER
ChecWcleanwater inlet screen
Cheek high pressure bose
Check detergent hose
Check spray gun and assembly for leaks
Purge pump of air and contaminants
Prepare pump for storage below 32°F
ENGINE
Check oil level
Clean debris
Change engine oil
Service air cleaner
Service spark plug
Service spark attester
Clean cooling system
Clean combustion chamber
Preparefor storage
Cleanif clogged. Replace if perforated or torn.
2 Change oil after the first (5) operating hours and every 50 hours or yearly thereafter. Changesooner when operating under dirty or dusty conditions.
3 Replace more often under dirty or dusty conditions.
Before
Each Use
X1
X
X
X
X
X
X
OPERATINGiNTERVALS
Every25
Hours or
I
Yearly
If unit is to remain idle for longer than 30 days.
Every50
Hours or
Yearly
See Storage on page 21.
X2
X_
X
Hours or
I very 100
Yearly
X
X_
100-300
Hours
SERVICEDATES
FILL IN DATESAS YOU COMPLETE
REGULARSERVICE
GENERALRECOMMENDATIONS
Regular maintenancewill improve the performanceand
extendthe life of the pressure washer. Seeany qualified
Searsdealerfor service.
Thepressurewasher warranty does not cover items that have
beensubjectedto operatorabuse or negligence.To receive
full valuefrom the warranty, the operator must maintain
pressure washeras instructed in this manualincluding proper
storage asdetailed in "Storage" on page21.
Someadjustments will needto be madeperiodically to
properly maintain your pressure washer.
All service and adjustments should be made at least once
eachseason. Follow the requirements in the "Maintenance
Schedule" chart above.
NOTE:Oncea year you should clean or replace the spark
plug and replace the air filter. A new spark plug and clean air
filter assure proper fuel-air mixture and helpyour engine run
better and last longer.
EMiSSiONCONTROL
Maintenance, replacementor repair of the emission control
devicesand systems may be performed by any non-road
engine repair establishment or individual.
Before Each Use
1. Checkengine oil level.
2. Cleandebris.
3. Checkwaterinlet screenfor damage.
4. Checkin-line filter for damage.
5. Checkhigh pressure hose for leaks.
6. Checkdetergentsiphoning tube/filter for damage.
7. Checkgunand nozzleextension assembly for leaks.
8. Rinseout garden hoseto flush out debris.
PRESSUREWASHERMAINTENANCE
Clean Debris
Daily or before use, clean accumulated debris from pressure
washer. Keeplinkage, spring and controls clean. Keeparea
around and behind muffler free from anycombustible debris.
Inspect cooling air slots and openings on the pressure
washer. Theseopenings must be kept clean and
unobstructed.
Pressurewasher parts should be kept clean to reducethe
risk of overheatingand ignition of accumulated debris.
• Useadamp cloth to wipe exterior surfaces clean.
• Useasoft bristle brush to loosen caked on dirt, oil, etc.
16
DONOTinsertanyobjectsthroughcoolingslots.
* Useavacuumcleanertopick up loosedirt anddebris.
Check and Clean Inlet Screen
Examinethe screen on the pump's water inlet. Cleanif it is
clogged or replaceif it is torn.
Check High Pressure Hose
High pressure hoses can developleaksfrom wear, kinking,
or abuse, inspect hose before each use.Checkfor cuts,
leaks,abrasions, bulging of cover, or damage or movement
of couplings. If any of these conditions exist, replacehose
immediately.
4. Assemblenozzleextensionto spray gun, as described
earlier in manual.
Hozzle Maintenance
A pulsing sensationfelt while squeezingthe spray gun
trigger may be caused by excessivepump pressure. The
principal cause of excessivepump pressure is a orifice
clogged or restricted with foreign materials, such asdirt, etc.
Tocorrect the problem, immediately clean the orifice
following these instructions:
1. Shutoff engine and turn off water supply.
2. ALWAYSpoint gun in a safe direction and squeezespray
gun trigger to release retainedhigh water pressure.
WARHIHG
I A WARNING
NEVERrepair high pressure hose. Replaceit.
Replacement hose rating MUSTexceedmaximum pressure
rating of unit.
Check Detergent Siphoning Tube
Examinethe filter on the detergenttube and cleanif clogged.
Thetube should fit tightly on the barbedfitting. Examinethe
tube for leaks or tears. Replacethe filter or tube if either is
damaged.
Check Gunand Hozzle Extension
Examinehoseconnection to gun and make sure it is secure.
Testtrigger by pressing it and making sure it springs back
into placewhen you releaseit. Engagesafety latch andtest
trigger. You should not be able to press trigger. Replacegun
immediately if it fails any of these tests.
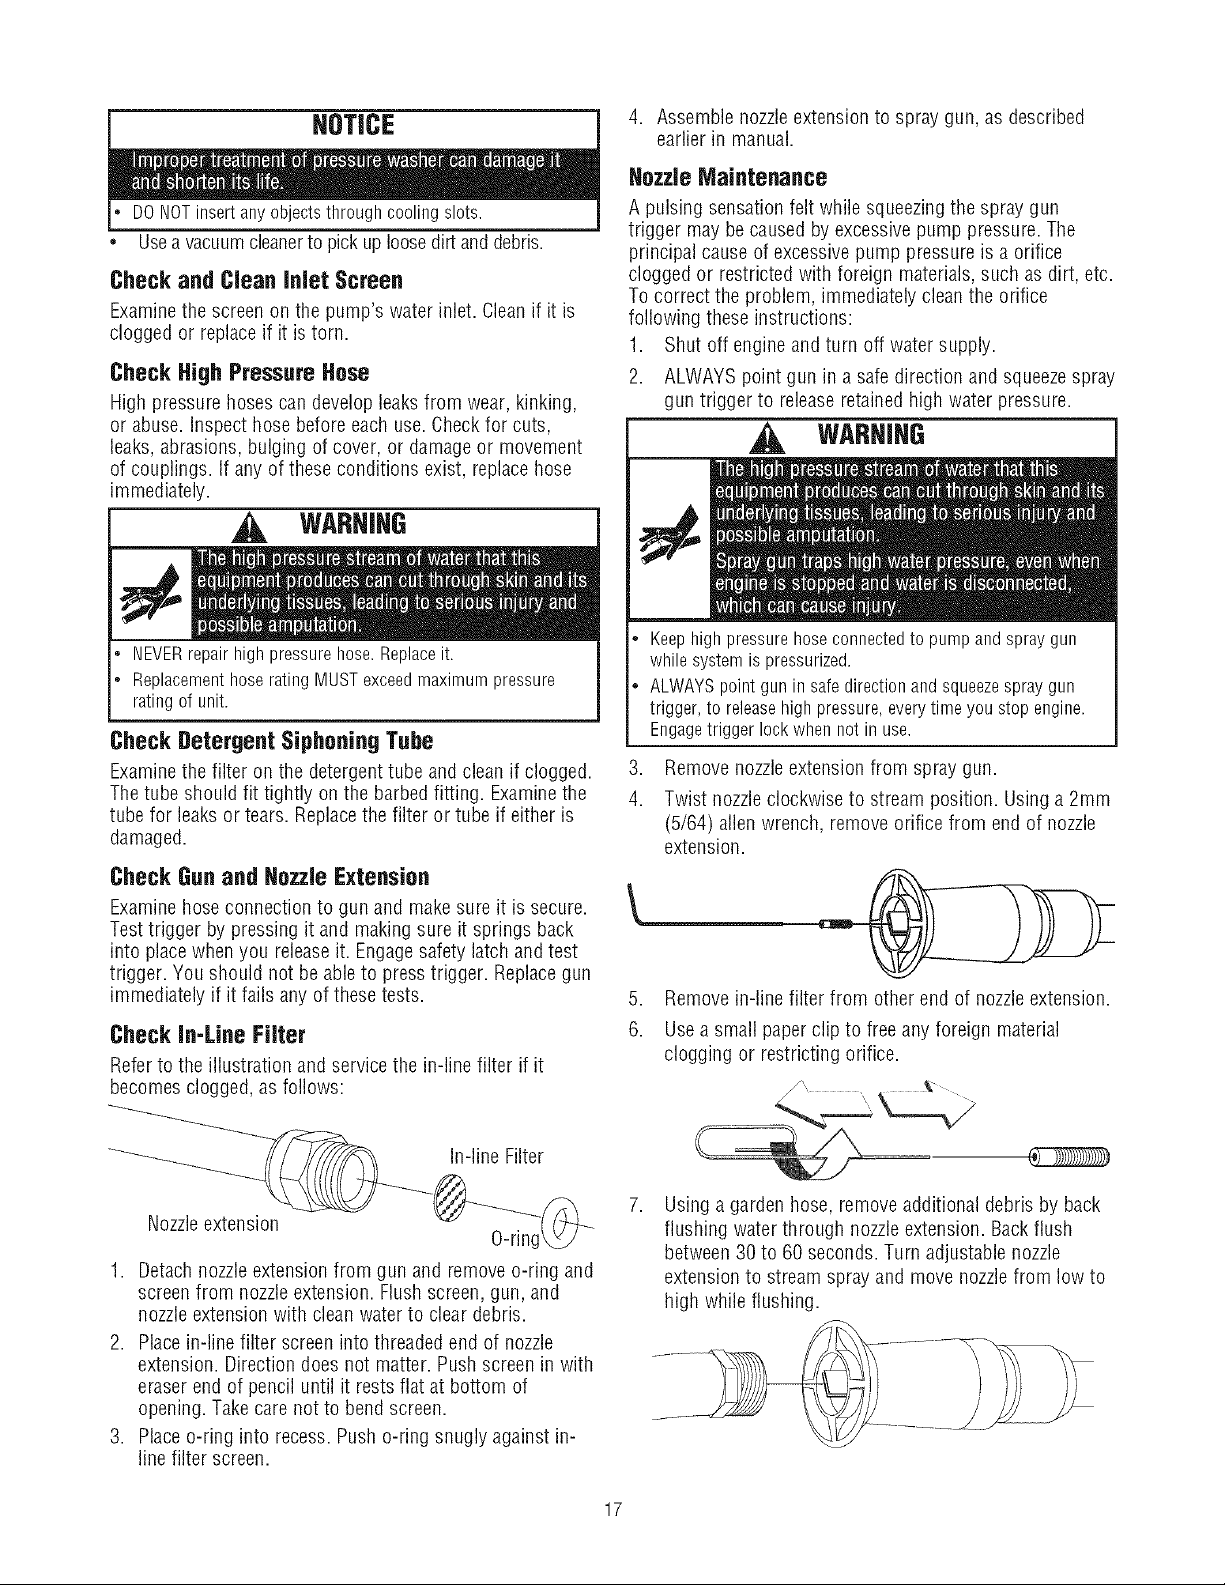
Check In-Line Filter
Referto the illustration and service the in-line filter if it
becomesclogged, as follows:
I
Keephigh pressure hose connectedto pump andspray gun
while system is pressurized.
ALWAYS point gun in safe direction and squeezespray gun
trigger, to releasehigh pressure, every time you stop engine.
Engagetrigger lock when not in use.
,
Removenozzleextension from spray gun.
4.
Twist nozzleclockwise to stream position. Using a 2ram
(5/64) allen wrench, removeorifice from end of nozzle
extension.
,
Removein-line filter from other end of nozzleextension.
6.
Usea small paperclip to free any foreign material
clogging or restricting orifice.
in-line Filter
Nozzleextension
1. Detachnozzleextensionfrom gun and removeo-ring and
screenfrom nozzleextension. Flushscreen, gun, and
nozzleextensionwith clean water to clear debris.
2. Placein-line filter screen into threaded end of nozzle
extension. Direction does not matter. Push screen in with
eraserend of pencil until it rests fiat at bottom of
opening.Take care not to bend screen.
3. Placeo-ring into recess. Push o-ring snugly against in-
line filter screen.
17
,
Using a garden hose, remove additional debris by back
flushing water through nozzle extension. Back flush
between 30 to 60 seconds. Turn adjustable nozzle
extension to stream spray and move nozzle from low to
high while flushing.
 Loading...