

Page 1
Operator'siVlanual
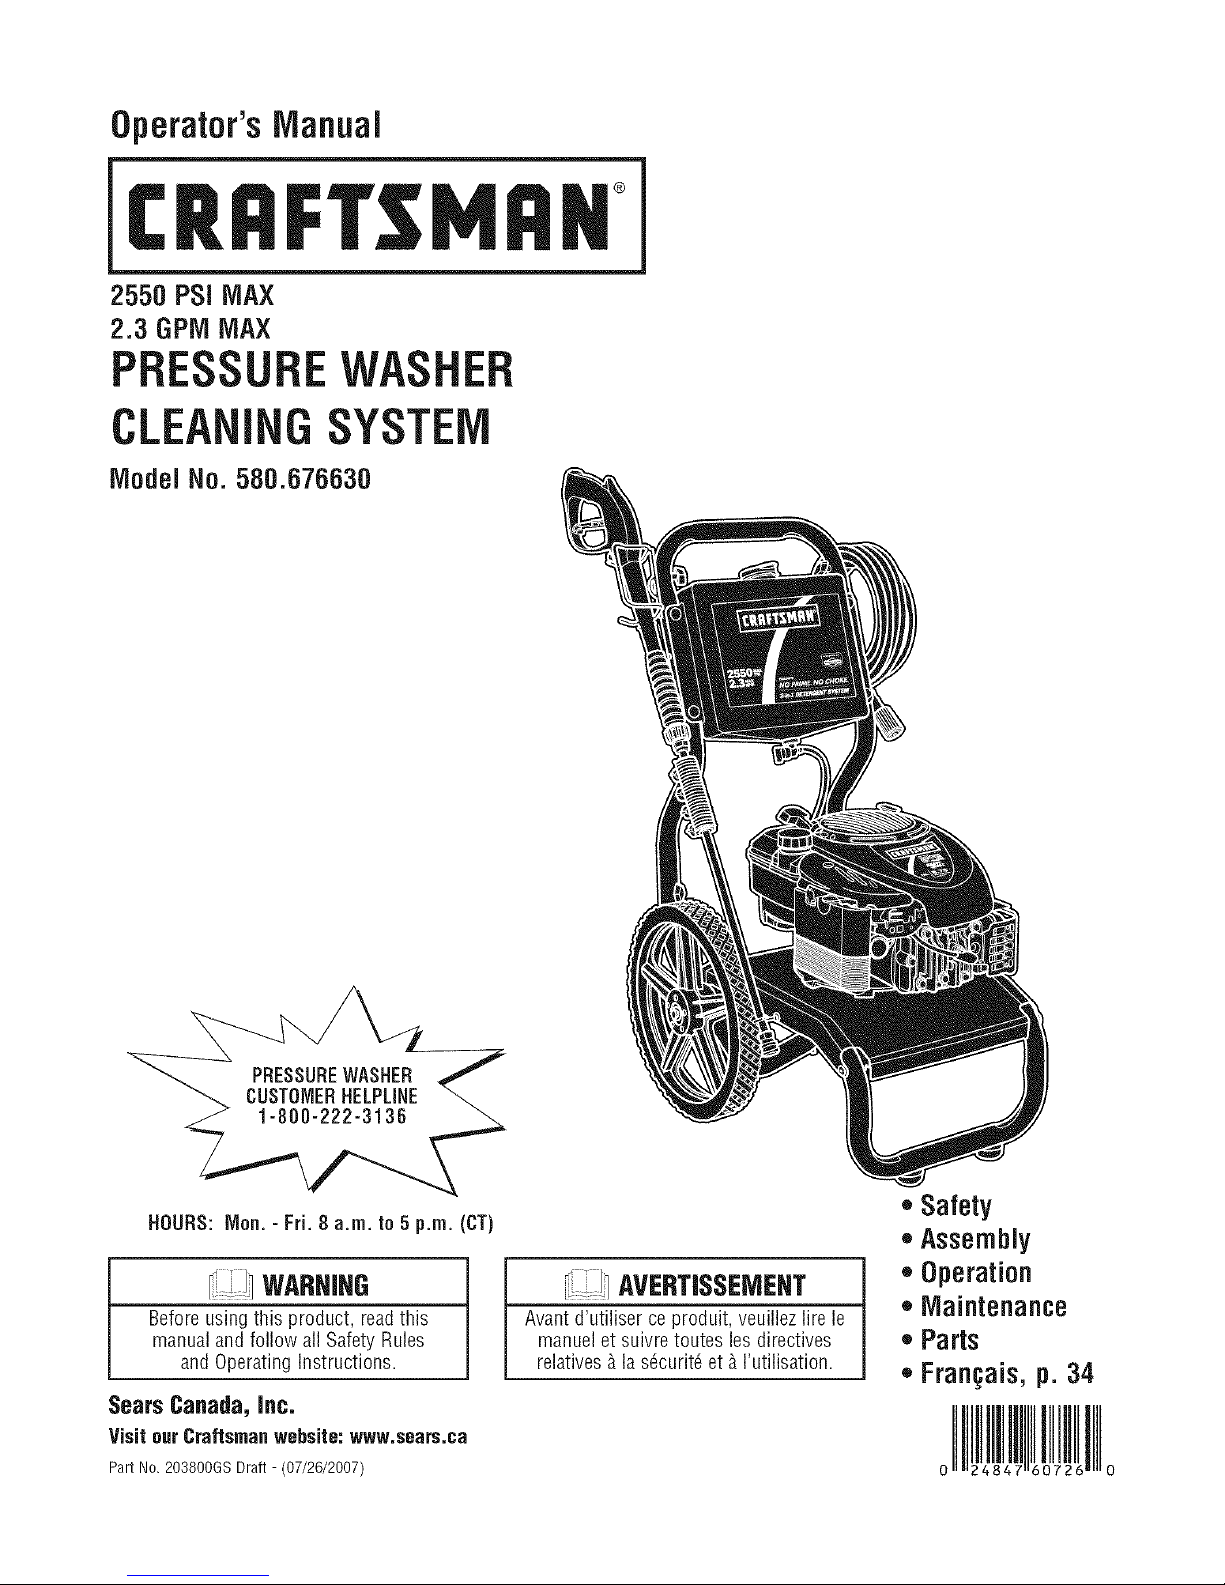
2550 PSi MAX
2.3 GPM MAX
CLEAN GSYSTEM
Model No. 580.676530
®
CUSTOMERHELPLINE
PRESSUREWASHER ,_
HOURS: Mon. - Fri. 8 a.m. to 5p.m. (CT)
WAReleG
Before usingthis product, readthis
manualand follow all SafetyRules
and Operating Instructions.
Sears Canada, Jnc,
Visit ourCraftsman website:www,sears,ca
Part No. 203800GS Draft - (07/26/2007)
AVERTJSSEMEHT
Avant d'utiliser ceproduit, veuillez lire le
manuelet suivre toutes les directives
relatives& la s6curit6 et &I'utilisation.
• Safety
• Assembly
• Operation
o Maintenance
• Parts
,, Fran_ais,p. 34
0
Page 2
WARRANTY.......................................... 2
SAFETYRULES...................................... 2-5
FEATURESANDCONTROLS.............................. 6
ASSEMBLY........................................ 7-10
OPERATION....................................... 11-14
SPECIFICATIONS..................................... 15
MAINTENANCE.................................... 16-20
STORAGE........................................... 21
TROUBLESHOOTING.................................. 22
NOTES ............................................. 23
REPLACEMENTPARTS.............................. 24-31
EMISSIONCONTROLWARRANTY ..................... 32-33
FRAN_AIS........................................ 34-59
HOWTO ORDERPARTS........................ BACKPAGE
ONE-YEARFULLWARRAHTYONCRAFTSMAHPRESSUREWASHER
If this pressurewasher fails dueto a defectin material or workmanship within one year from the dateof purchase, return it to
any Searsstore, other Craftsman outlet, or SearsParts & RepairCenterin the UnitedStates or Canadafor free repair (or
replacementif repair proves impossible).
All warranty coverageapplies for only 90 days from dateof purchaseif this pressure washer is ever usedfor commercial or
rentalpurposes.
This warranty gives you specific legal rights, and you mayalso haveother rights which vary from stateto state.
Sears, Roebuck and Co., Hoffman Estates, IL 60178
Sears Canada Inc., Toronto, Ontario, Canada M5B 288
,_ Thisis the safetyalert symbol.It isusedto alert youtopotential personalinjuryhazards. Obey all safetymessages
thatfollow thissymboltoavoid possibleinjury or death.
_Read this manualcarefully and becomefamiliar
with your pressurewasher. Knowits applications,
its limitations, and any hazardsinvolved.
Thesafety alert symbol (_.) is usedwith a signal word
(DANGER,CAUTION,WARNING),a pictorial and/or a safety
messageto alert you to hazards.BANGERindicates a hazard
which, if not avoided, willresult in death or serious injury.
WARNINGindicates a hazardwhich, if not avoided, could
result in death or serious injury. CAUTIONindicatesa hazard
which, if not avoided, might result in minor or moderate
injury. NOTICEindicatesa situation that could result in
equipment damage. Follow safety messagesto avoid or
reducethe risk of injury or death.
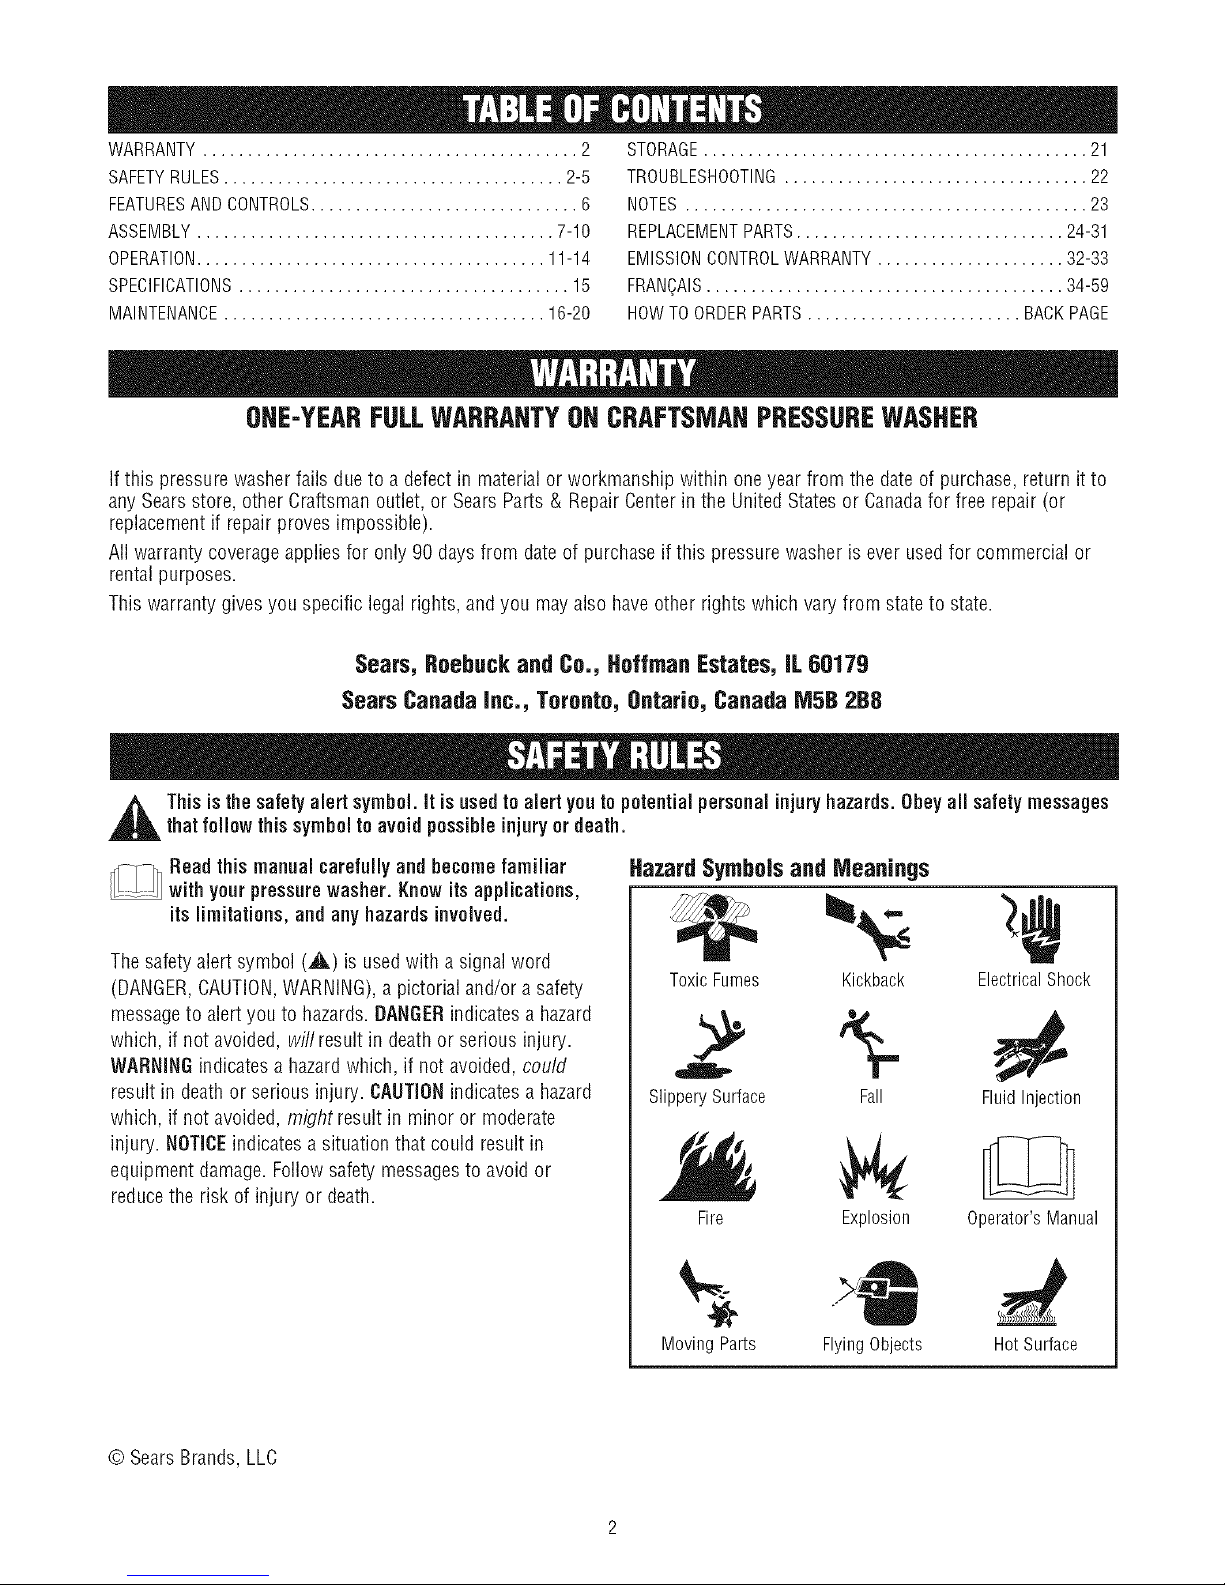
Hazard Symbolsand Meaninos
ToxicFumes Kickback
2 5-
SlipperySurface Fall
Fire
MovingParts FlyingObjects
Explosion
ElectricalShock
FluidInjection
Operator'sManual
HotSurface
© Sears Brands, LLC
Page 3
WARHJNG
Theengineexhaustfromthisproductcontains
chemicalsknownto the State of California tocause
cancer,birthdefects,or otherreproductiveharm.
WARHJHG
Runningengine gives off carbon monoxide, an
odorless, colorless, poison gas.
Breathingcarbon monoxide can cause headache,
_ atigue, dizziness,vomiting, confusion, seizures,
* OperatepressurewasherONLYoutdoors.
Keepexhaustgasfromenteringaconfinedareathrough
windows,doors,ventilationintakes,orotheropenings.
DONOTstartor runengineindoorsor in anenclosedarea,
evenif windowsanddoorsareopen.
Usea respiratoror maskwheneverthereisa chancethat
vaporsmaybeinhaled.
Readall instructionswith masksoyou arecertainthemaskwill
providethenecessaryprotectionagainstinhalingharmful
vapors.
nausea,fainting or death.
Some chemicals or detergents may be harmful if
inhaled or ingested, causing severe nausea,
fainting, or poisoning.
WARHIHG
_¢ isk of electrocution.
* NEVERspraynearpowersource.
Contactwith power source can causeelectric
shock or burn.
WARHIHG
Fueland its vapors are extremely flammable and
explosive.
death.
Fireor explosion cancause severe burns or
WHENADDINGORDRAININGFUEL
* TurnpressurewasherOFFandletit coolat least2 minutes
beforeremovingfuelcap.Loosencapslowlyto relievepressure
in tank.
Fillor drainfueltankoutdoors.
DONOToverfilltank.Allowspaceforfuelexpansion.
Iffuelspills,waituntil it evaporatesbeforestartingengine.
Keepfuelawayfromsparks,openflames,pilotlights,heat,and
otherignitionsources.
DONOTlighta cigaretteorsmoke.
WHENSTARTIN6EQUIPMENT
* Ensuresparkplug,muffler,fuelcap,andair cleanerarein
place.
. DONOTcrankenginewith sparkplugremoved.
WHENOPERATINGEQUIPMENT
* DONOTtip engineor equipmentat anglewhichcausesfuelto
spill.
. DONOTsprayflammableliquids.
WHENTRANSPORTINGORREPAIRINGEQUIPMENT
* Transport/repairwithfueltank EMPTYor withfuel shutoffvalve
OFF.
. Disconnectsparkplugwire.
WHENSTORINGFUELOREQUIPMENTWITH FUELIN TANK
* Storeawayfromfurnaces,stoves,waterheaters,clothes
dryers,orotherappliancesthathavepilotlight or otherignition
sourcebecausetheycanignitefuelvapors.
Page 4
WARHJHG
Startercord kickback (rapid retraction) can result
in bodily injury. Kickbackwill pull handand arm
_,_.< toward engine faster than you can let go.
Brokenbones, fractures, bruises, or sprains
could result.
• NEVERpull starter cord without first relieving spray gun
pressure.
. When starting engine, pull cord slowly until resistance is felt
andthen pull rapidly to avoid kickback.
• After eachstarting attempt, where enginefails to run, always
point spray gun in safe direction and squeezespray gun trigger
to releasehigh pressure. Engagespray guntrigger lock.
• Firmly grasp spray gun with both handswhen using high
pressure spray to avoid injury when spray gun kicks back.
WARHIHG
Useof pressure washer can create puddles and
slippery surfaces.
Kickbackfrom spray gun can cause you to fall.
%
. Operatepressure washer from astable surface.
• The cleaning area should haveadequateslopes and drainageto
reducethe possibility of afall due to slippery surfaces.
. Be extremelycareful if you must usethe pressure washer from
a ladder,scaffolding, or any other similar location.
• Firmly grasp spray gun with both hands when using high
pressure spray to avoid injury when spray gun kicks back.
WARHIHG
The high pressure stream of water that this
equipment produces can cut through skin and its
_ nderlying tissues, leading to serious injury and
• DONOTallow CHILDRENto operate pressure washer.
. NEVERrepair high pressure hose. Replaceit.
• NEVERrepair leaking connections with sealantof any kind.
Replaceo-ring or seal.
• NEVERconnect high pressure hoseto nozzle extension.
. Keep high pressure hose connectedto pump and spray gun
while system is pressurized.
• ALWAYSpoint spray gun in safe direction and squeezespray
gun trigger, to releasehigh pressure, every time you stop
engine. Engagetrigger lock when not in use.
• NEVERaim spray gun at people, animals, or plants.
. DONOTsecure spray gun in open position.
• DO NOTleavespray gun unattendedwhile machine is running.
. NEVERusea spray gun which does not have a trigger lock or
trigger guard in place and in working order.
. Always be certain spray gun, nozzlesand accessories are
correctly attached.
)ossible amputation.
Spray gun traps high water pressure, even when
engine is stopped and water is disconnected,
which can cause injury.
WARHIHG
_ Unintentionalsparking can result in fire or
WARHIHG
_ Contact with muffler result in serious
burns.
_ Exhaustheat/gases can ignite combustibles,structures or damagefuel tank causing a fire.
• DO NOTtouch hot parts and AVOID hot exhaust gases.
. Allow equipment to cool before touching.
• Keepat least 5feet (1.5 m) of clearanceon all sides of
pressure washer including overhead.
• Codeof FederalRegulation (CFR)Title 36 Parks, Forests,and
Public Property require equipment powered by an internal
combustion engine to have aspark arrester, maintained in
effective working order, complying to USDAForestservice
standard 5100-1C or later revision. In the State of California a
spark arrester is required under section 4442 of the California
Public resources code. Other states may havesimilar laws.
area can
_¢ electric shock.
WHENADJUSTINGORMAKINGREPAIRSTOYOUR
PRESSUREWASHER
. Disconnect the spark plug wire from the spark plug and place
the wire where it cannot contact spark plug.
WHENTESTINGFORENGINESPARK
. Use approved sparkplug tester.
• DONOTcheck for spark with spark plug removed.
Page 5
WARHJHG
Starter and other rotating parts canentangle
hands, hair, clothing, or accessories.
* NEVERoperate pressure washer without protective housing or
covers.
* DO NOTwear loose clothing, jewelry or anything that may be
caught in the starter or other rotating parts.
* Tie up long hair and remove jewelry.
WARNING
Risk of eye injury.
" _ JSpraycan splash back or propel objects.
Alwayswear safety goggles when using this equipment or in
vicinity of where equipment is in use.
Beforestarting the pressure washer, be sure you are wearing
adequatesafety goggles.
NEVERsubstitute safety glasses for safety goggles.
NOTICE
High pressure spray may damage fragile items including
lass.
DO NOTpoint spray gun at glass when using red (0°) spray tip.
NEVERaim spray gun at plants.
NOTICE
Improper treatment of pressure washer can damage it and
shorten its life.
Ifyou havequestions about intended use, ask dealer or contact
Sears.
NEVERoperate units with broken or missing parts, or without
protective housing or covers.
DONOT by-pass any safetydevice on this machine.
DONOTtamper with governed speed.
DONOToperate pressure washer above rated pressure.
DONOT modify pressure washer in any way.
Before starting pressure washer in cold weather, check all parts
of the equipment to besure ice has not formed there.
NEVERmove machine by pulling on hoses. Use handle
provided on unit.
Checkfuel system for leaksor signs of deterioration, such as
chafed or spongy hose, loose or missing clamps, or damaged
tank or cap. Correct all defects beforeoperating pressure
washer.
This equipment is designedto be used with Searsauthorized
parts ONLY.If equipment is usedwith parts that DO NOT
comply with minimum specifications, user assumes all risks
and liabilities.
Page 6
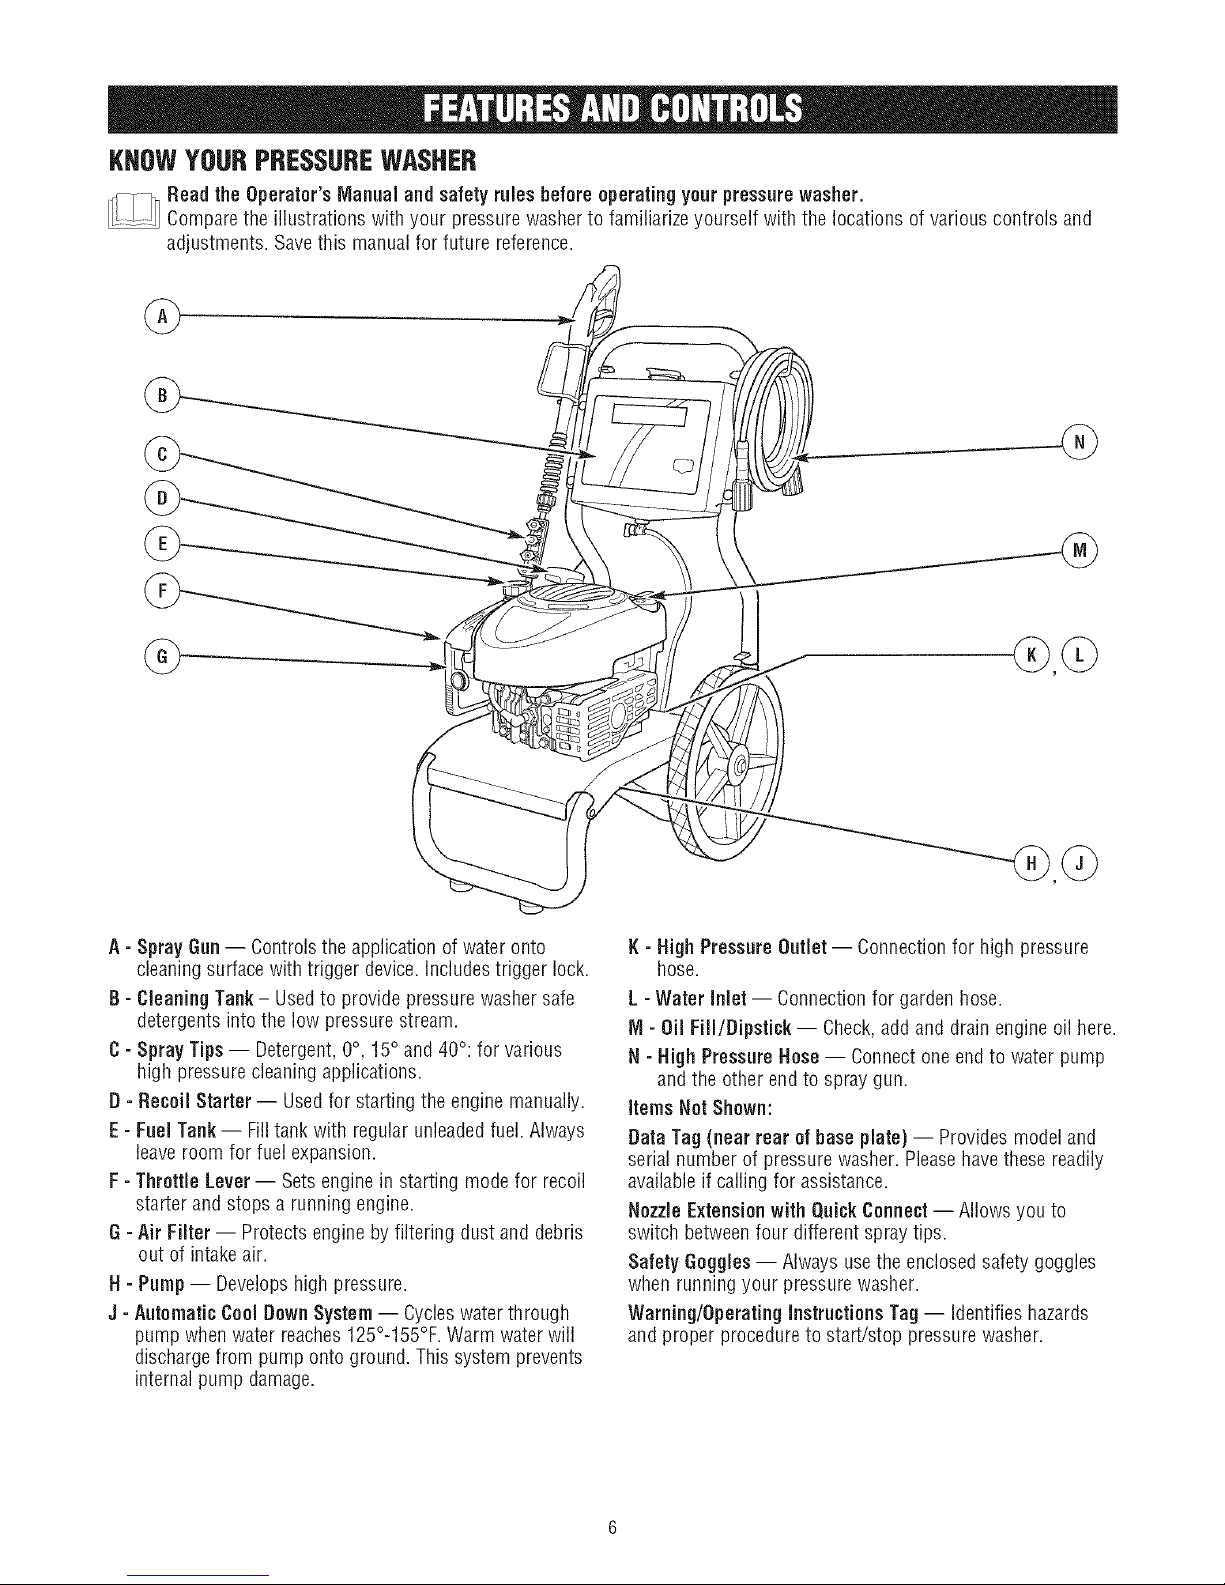
KNOWYOURPRESSUREWASHER
_Read the Operator'sManual and safety rules before operatingyourpressurewasher.
Comparethe illustrations with your pressurewasher to familiarizeyourself with the locations of various controls and
adjustments. Savethis manualfor future reference.
A- Spray Gun-- Controls the application of water onto
cleaningsurface with trigger device,includes trigger lock.
B - Cleaning Tank - Usedto provide pressure washer safe
detergents into the low pressure stream.
C- Spray Tips -- Detergent,0°, 15° and 40°: for various
high pressure cleaning applications.
D - Recoil Starter -- Used for starting the engine manually.
E - Fuel Tank -- Filltank with regular unleadedfuel. Always
leaveroom for fuel expansion.
F - Throttle Lever -- Setsengine in starting mode for recoil
starter and stops a running engine.
G - Air Filter -- Protects engine by filtering dust and debris
out of intake air.
H - Pump -- Developshigh pressure.
J - AutomaticCoolDownSystem-- Cycleswaterthrough
pump when water reaches125°-155°F.Warm water will
dischargefrom pump onto ground. This system prevents
internal pump damage.
K- High Pressure Outlet -- Connection for high pressure
hose.
L - Water Inlet -- Connectionfor gardenhose.
IVl- Oil Fill/Dipstick -- Check,add and drain engine oil here.
N - High Pressure Hose-- Connectone end to water pump
and the other end to spray gun.
Items Not Shown:
Data Tag (near rear of base plate) -- Provides model and
serial number of pressure washer. Pleasehavethese readily
availableif calling for assistance.
NozzleExtensionwith QuickConnect -- Allows you to
switch betweenfour different spray tips.
Safety Goggles-- Always usethe enclosedsafety goggles
when running your pressure washer.
Warning/Operating instructionsTag-- identifies hazards
and proper procedure to start/stop pressure washer.
Page 7
Yourcleaningsystemrequiressomeassemblyandisready
foruseonlyafterit hasbeenproperlyservicedwiththe
recommendedoilandfuel.
If you have any problemswith the assemblyof your
pressurewasher, please call the pressurewasher heipline
at 1-800-222-3135.
UNPACKTHEPRESSUREWASHER
1. Removeeverything from carton exceptpressure washer.
2. Opencarton completely by cutting eachcorner from top
to bottom.
3. Removepressure washer from carton.
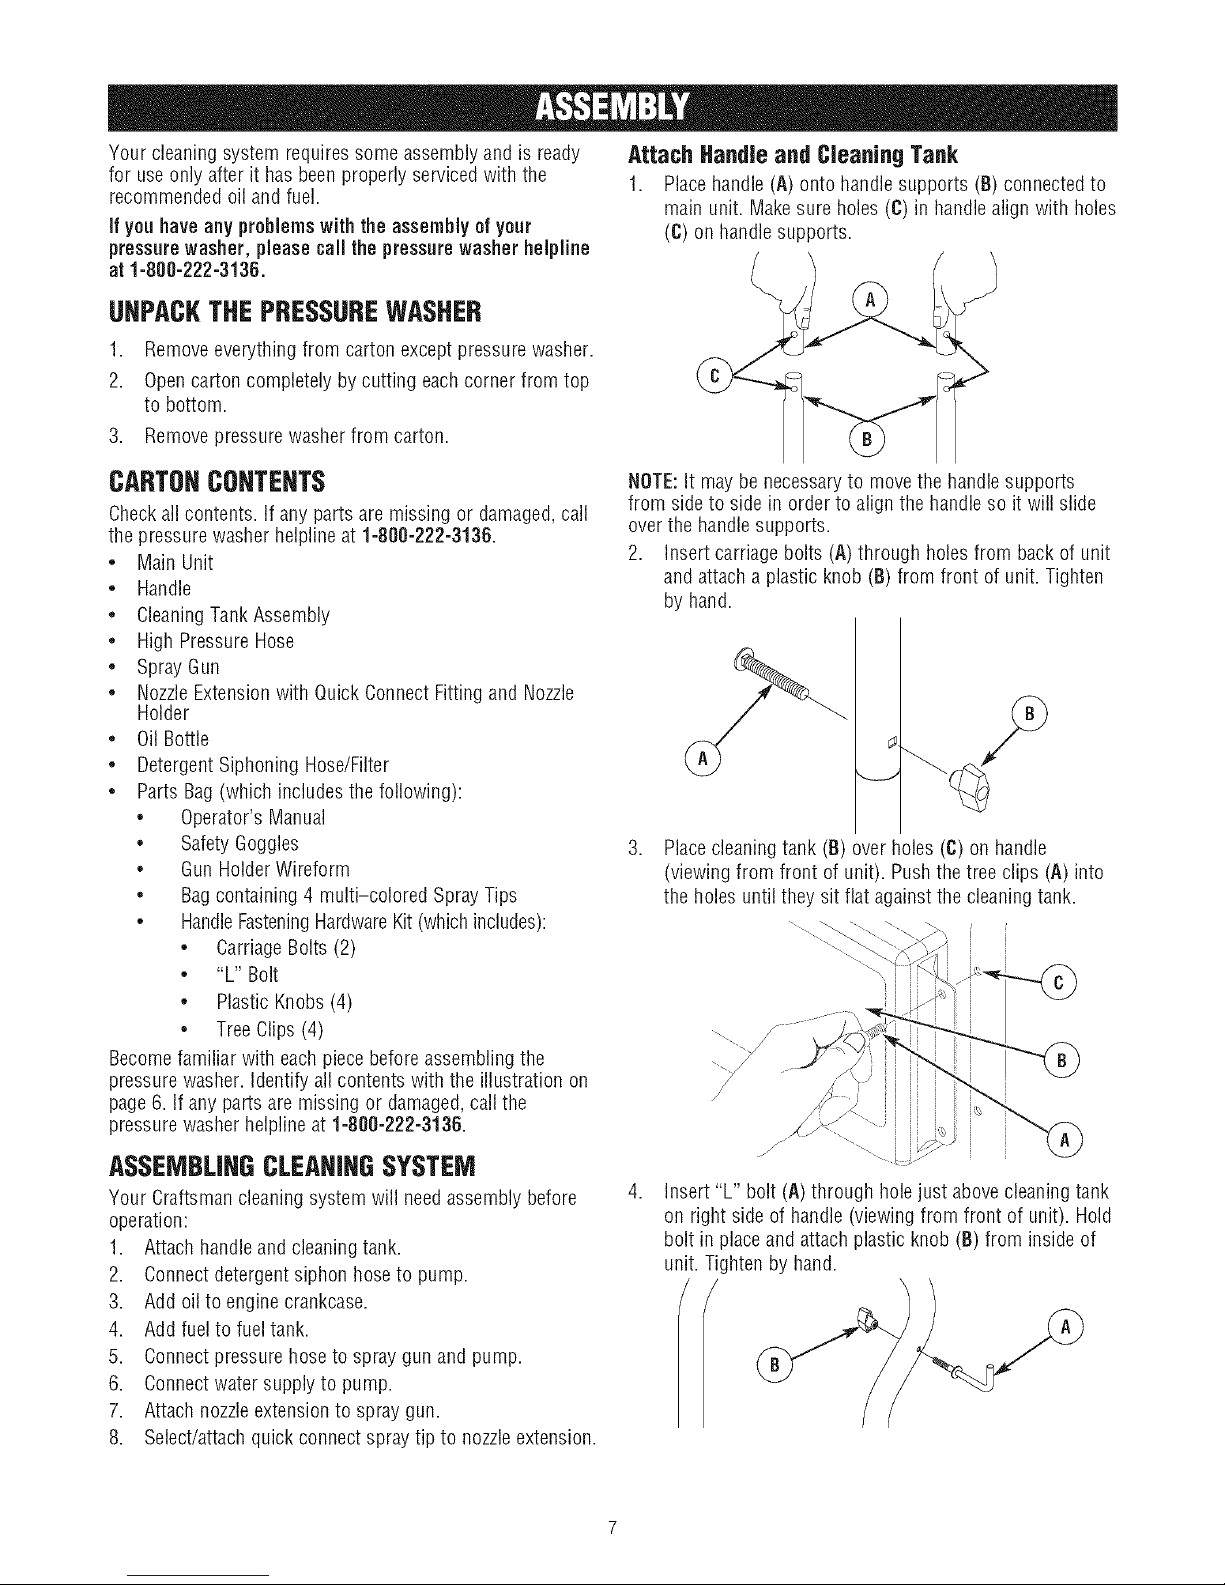
Attach Handle and Cleaning Tank
1. Placehandle (A) onto handlesupports (B) connectedto
main unit. Make sure holes (C) in handlealign with holes
(C) on handle supports.
CARTONCONTENTS
Checkall contents, if any parts are missing or damaged,call
the pressure washer helpline at 1-800=222=3136.
* Main Unit
* Handle
* CleaningTankAssembly
* High PressureHose
* Spray Gun
* NozzleExtensionwith Quick ConnectFitting and Nozzle
Holder
* Oil Bottle
* DetergentSiphoning Hose/Filter
* Parts Bag(which includes the following):
* Operator's Manual
* Safety Goggles
* Gun HolderWireform
* Bagcontaining 4 multi-colored Spray Tips
* HandleFasteningHardwareKit (whichincludes):
* CarriageBolts (2)
* "L" Bolt
* Plastic Knobs (4)
* TreeClips (4)
Becomefamiliar with eachpiece before assembling the
pressure washer, identify all contents with the illustration on
page 6. If any parts are missing or damaged,call the
pressure washer helpline at 1-800-222-3136.
ASSEMBLINGCLEAHIHGSYSTEM
Your Craftsman cleaning system will needassembly before
operation:
1. Attach handleand cleaningtank.
2. Connectdetergent siphon hoseto pump.
3. Add oil to engine crankcase.
4. Add fuel to fuel tank.
5. Connectpressure hoseto spray gun and pump.
6. Connectwater supply to pump.
7. Attach nozzleextensionto spray gun.
8. Select/attachquick connect spray tip to nozzleextension.
NOTE:It may be necessaryto move the handle supports
from sideto side in order to align the handle so it will slide
overthe handlesupports.
2. Insert carriagebolts (A) through holesfrom back of unit
and attach a plastic knob (B) from front of unit. Tighten
by hand.
3. Placecleaningtank (B) over holes (C) on handle
(viewing from front of unit). Pushthe tree clips (A) into
the holes until they sit flat againstthe cleaningtank.
/J
Insert "L" bolt (A) through hole just abovecleaning tank
on right side of handle (viewing from front of unit). Hold
bolt in placeand attach plastic knob (B) from inside of
unit. Tighten by hand.
Page 8
,
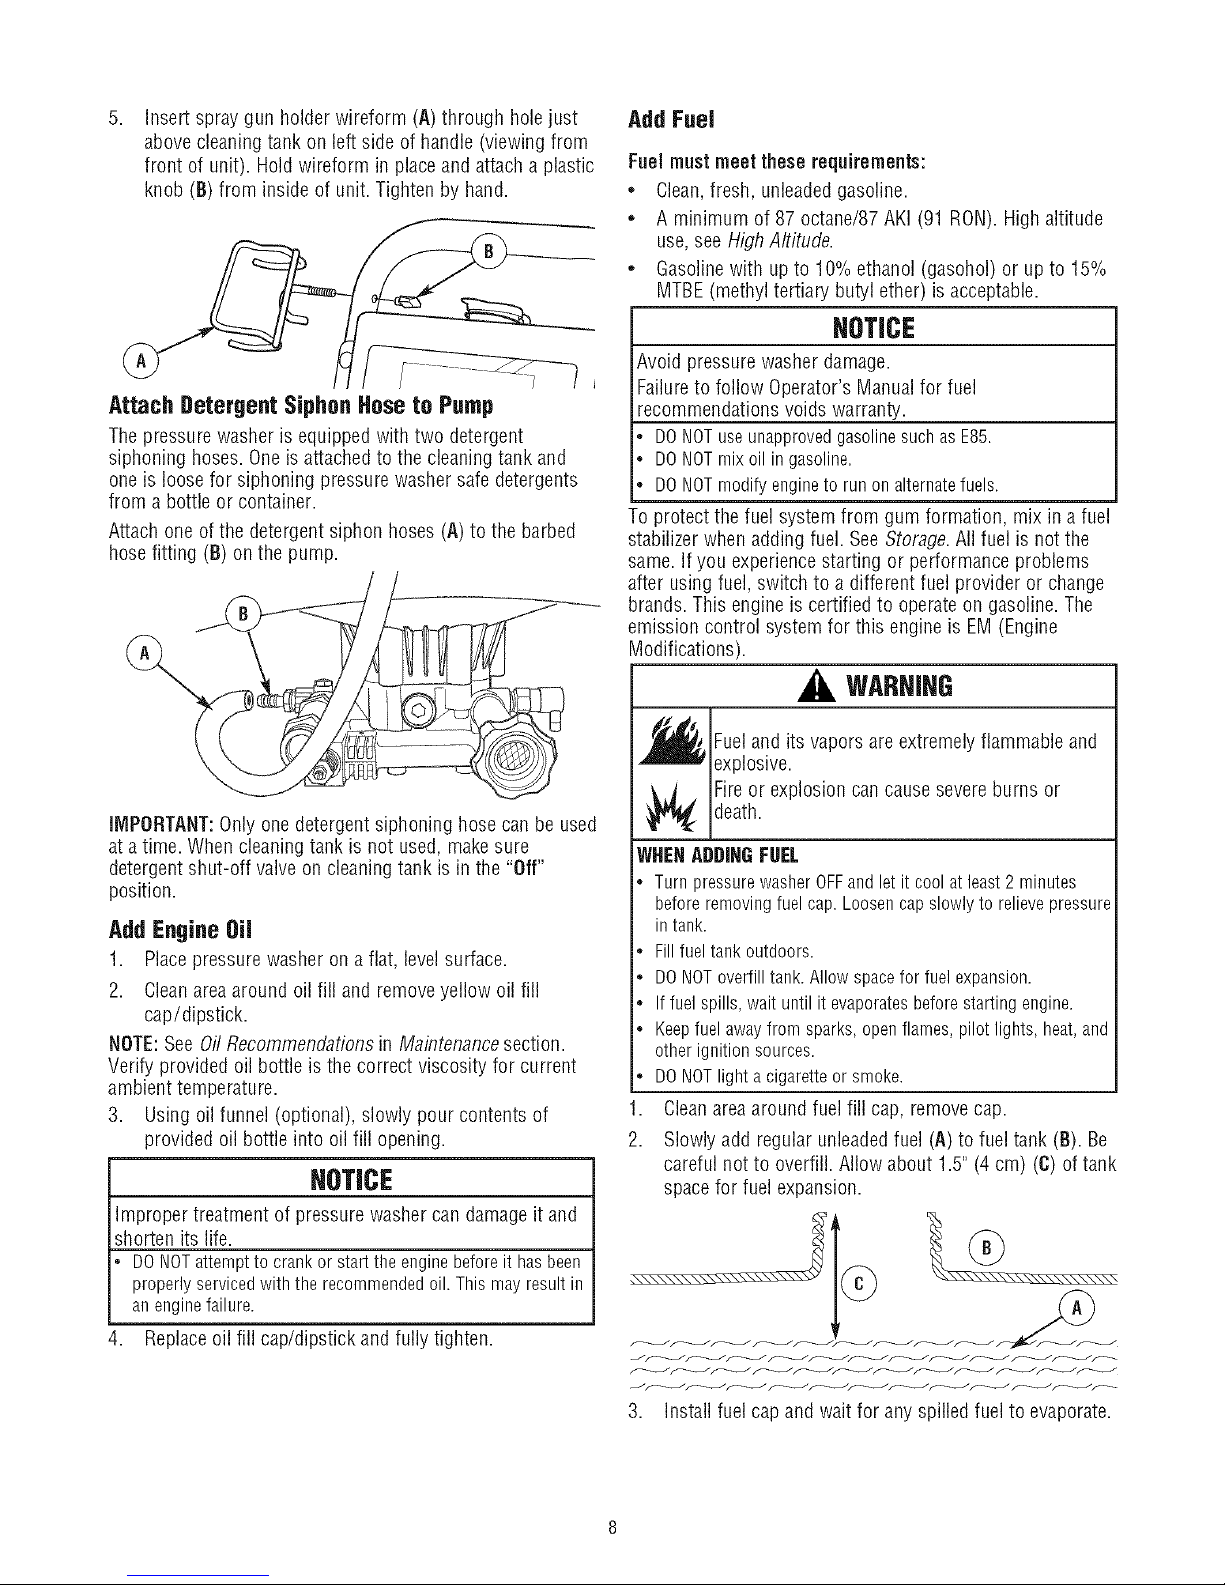
Insert spray gun holder wireform (h) through holejust
abovecleaning tank on left side of handle (viewing from
front of unit). Hold wireform in placeand attach a plastic
knob (B) from inside of unit. Tighten by hand.
Attach Detergent Siphon Hose to Pump
Thepressure washer is equipped with two detergent
siphoning hoses.One is attachedto the cleaningtank and
one is loosefor siphoning pressure washer safe detergents
from a bottle or container.
Attach one of the detergent siphon hoses (A) to the barbed
hose fitting (B) on the pump.
Add Fuel
Fuelmust meet theserequirements:
* Clean,fresh, unleadedgasoline.
* A minimum of 87 octane/87 AKI (91 RON).High altitude
use, see High Altitude.
* Gasolinewith up to 10% ethanol (gasohol) or up to 15%
MTBE(methyl tertiary butyl ether) is acceptable.
NOTICE
Avoid pressure washer damage.
Failureto follow Operator's Manualfor fuel
recommendations voids warranty.
DONOTuseunapprovedgasolinesuchas E85.
DONOTmixoil in gasoline.
DONOTmodifyengineto runon alternatefuels.
To protect the fuel system from gum formation, mix in a fuel
stabilizer when adding fuel. See Storage.All fuel is not the
same. If you experiencestarting or performance problems
after using fuel, switch to a different fuel provider or change
brands. This engine is certified to operate on gasoline. The
emission control system for this engine is EM (Engine
Modifications).
WARHIHG
IMPORTANT:Only one detergent siphoning hosecan be used
at a time. When cleaningtank is not used, makesure
detergent shut-off valve on cleaning tank is in the "Off"
position.
Add Enoine OiJ
1. Placepressure washeron a flat, levelsurface.
2. Cleanarea around oil fill and remove yellow oil fill
cap/dipstick.
NOTE:See Oil Recommendationsin Maintenancesection.
Verify provided oil bottle is the correct viscosity for current
ambient temperature.
3. Using oil funnel (optional), slowly pour contents of
provided oil bottle into oil fill opening.
HOTICE
Improper treatment of pressurewasher can damageit and
shorten its life.
DONOTattempttocrankor starttheenginebeforeit hasbeen
properlyservicedwith the recommendedoil. Thismayresultin
anenginefailure.
4. Replaceoil fill cap/dipstick and fully tighten.
FueIand its vapors are extremely flammable and
explosive.
death.
Fireor explosion can causesevere burns or
WHENADDINGFUEL
. TurnpressurewasherOFFandletit coolat least2 minutes
beforeremovingfuelcap.Loosencapslowlyto relievepressure
in tank.
. Fillfueltankoutdoors.
• DONOToverfilltank.Allowspacefor fuelexpansion.
. Iffuel spills,waituntilit evaporatesbeforestartingengine.
• Keepfuelawayfromsparks,openflames,pilot lights,heat,and
otherignitionsources.
• DONOTlight a cigaretteorsmoke.
1. Cleanareaaround fuel fill cap, removecap.
2. Slowly add regular unleadedfuel (A) to fuel tank (B). Be
careful not to overfill. Allow about 1.5" (4 cm) (C) oftank
space for fuel expansion.
3. Installfuel cap and wait for any spilled fuelto evaporate.
Page 9
CAUTION!Alcohol-blended fuels (called gasohoI, ethanol or
methanol) can attract moisture, which leads to separation and
formation of acids during storage. Acidic gas can damagethe
fuel system of an enginewhile in storage.
Toavoid engine problems, the fuel system should betreated
with a fuel preserver or emptied before storage of 30 days or
longer. If adding a fuel preserver, fill the fuel tank with fresh
fuel. if only partially filled, air in the tank will promote fuel
deterioration during storage, if fuel preserver is not used,
drain the fuel tank, start the engine and let it run until the fuel
lines and carburetor are empty. Usefresh fuel next season.
See Storagefor additional information.
NEVERuseengine or carburetor cleanerproducts in the fuel
tank as permanent damagemay occur.
HighAltitude
At altitudes over 5,000 feet (1524 meters), a minimum
85 octane/ 85 AKI (89 RON)gasoline is acceptable.To
remain emissions compliant, high altitude adjustment is
required. Operationwithout this adjustment will cause
decreasedperformance, increasedfuel consumption, and
increasedemissions. Seea qualified Searsdealer for high
altitude adjustment information. Operationof the engine at
altitudes below 2,500 feet (762 meters) with the high altitude
kit is not recommended.
Connect Hose and Water Supply to Pump
[ NOTICE
JDONOT the without the connected
and turned on.
L amageto equipmentresultingfromfailureto followthis
run
instructionwill void warranty.
pump
NOTE:Removeand discardthe shipping caps from the
pump's high pressure outlet and water inlet beforeattaching
hoses.
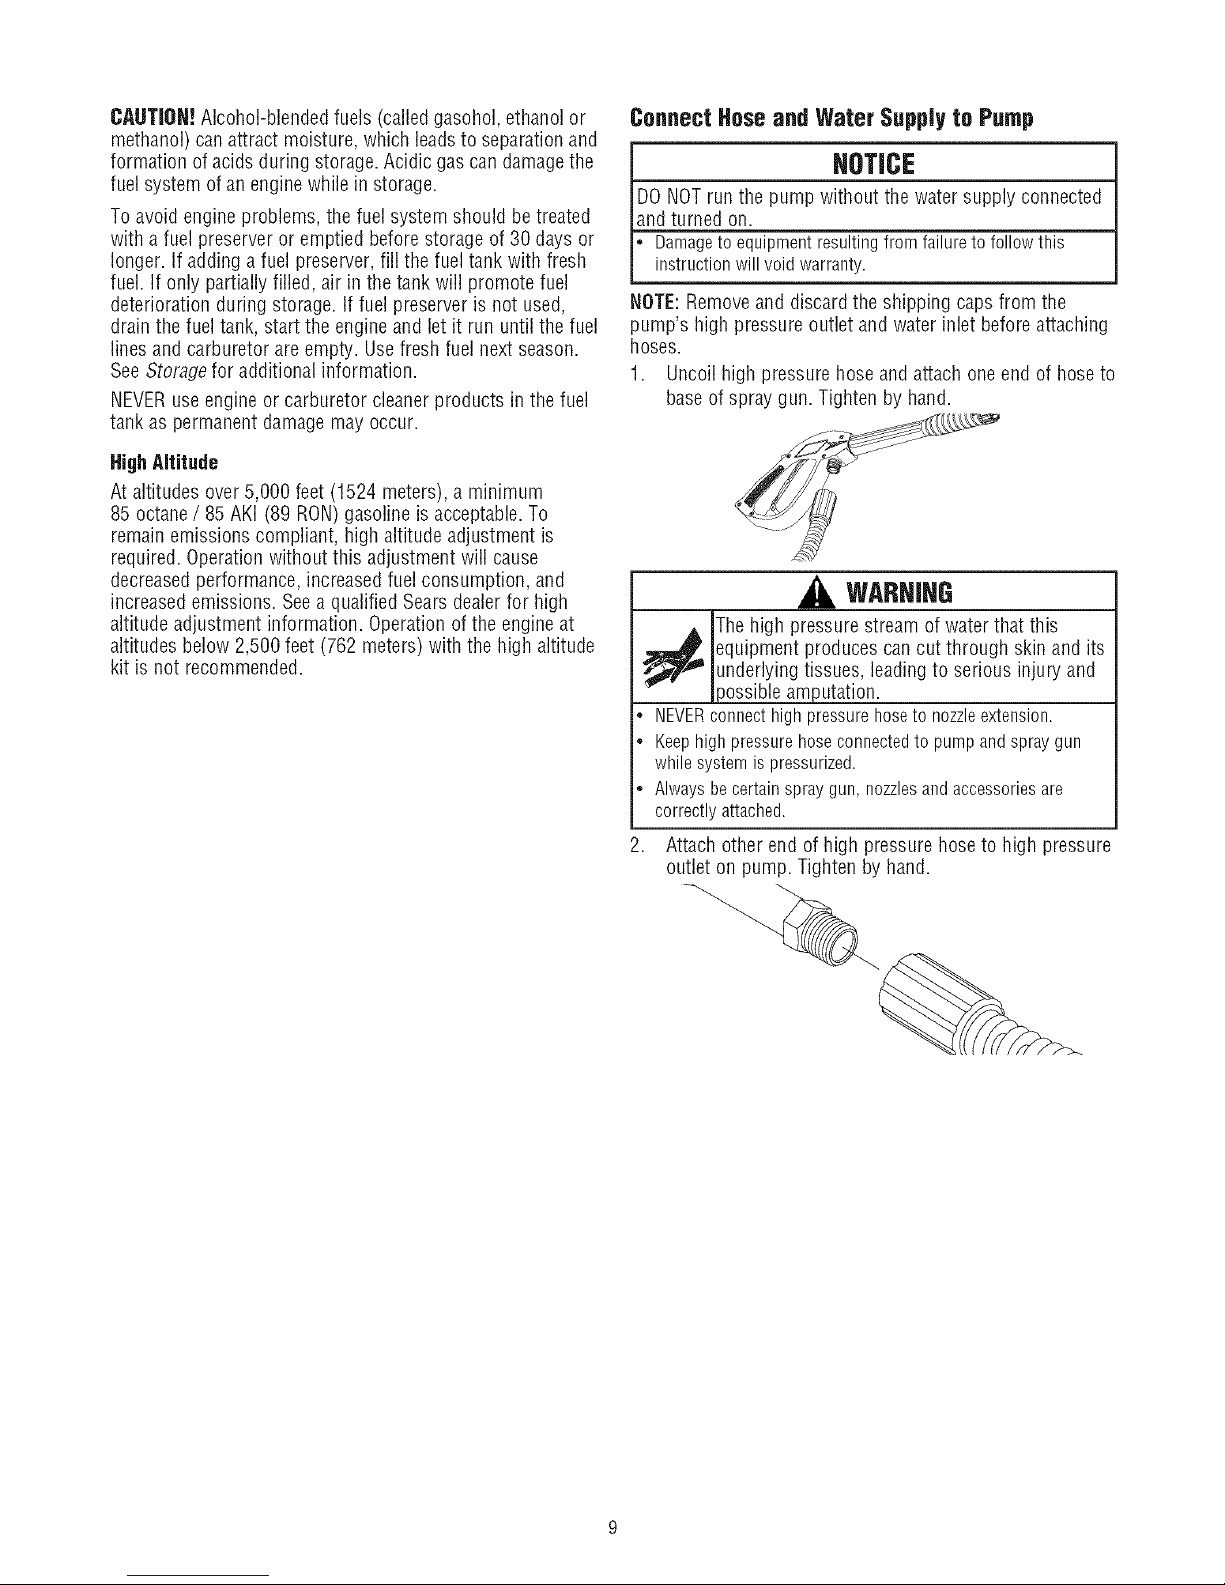
1. Uncoil high pressure hose and attach one end of hoseto
baseof spray gun. Tighten by hand.
water
supply
WARNING
Thehigh pressurestream of water that this
_ quipment produces can cut through skin and its
. NEVERconnecthighpressurehoseto nozzleextension.
• Keephighpressurehoseconnectedto pumpandspraygun
whilesystemispressurized.
• Alwaysbecertainspraygun,nozzlesandaccessoriesare
correctlyattached.
,
underlyingtissues, leadingto serious injury and
)ossible amputation.
Attach other end of high pressure hose to high pressure
outlet on pump. Tighten by hand.
Page 10
3. 6. TurnONwater,pointguninasafedirectionandsqueeze
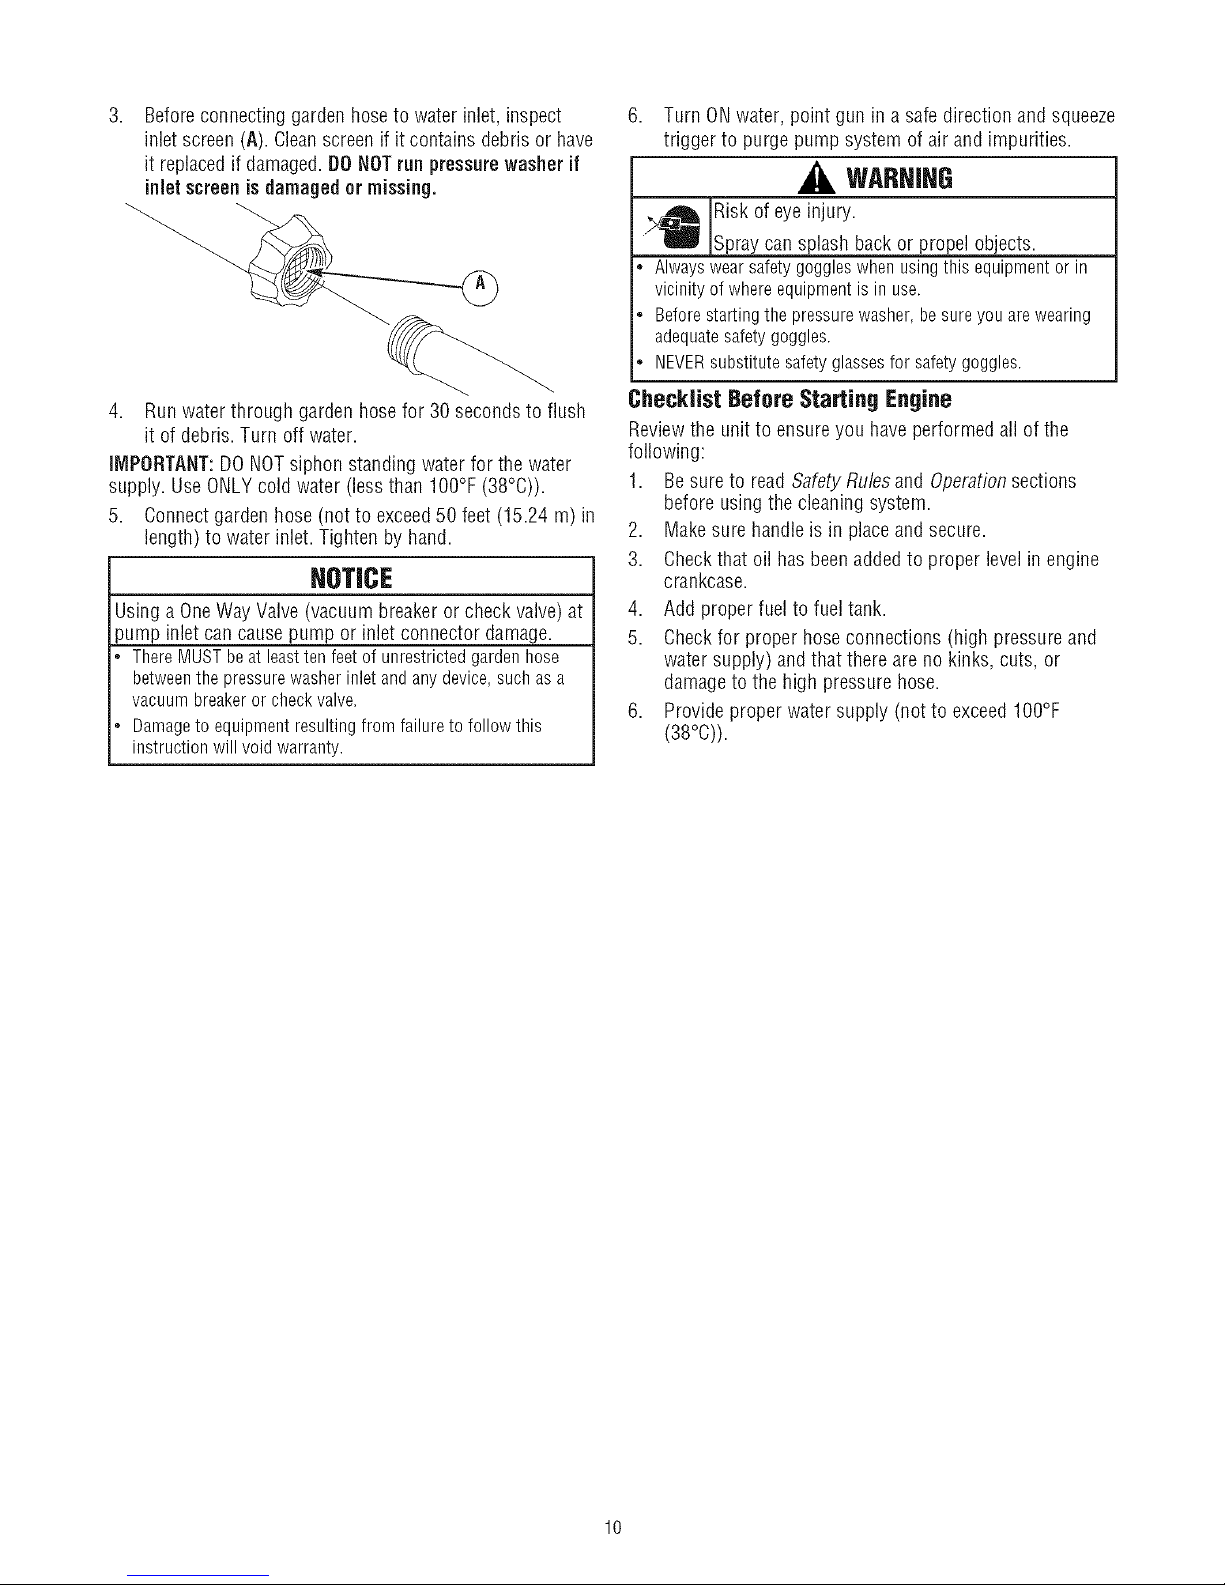
Beforeconnectinggardenhosetowaterinlet,inspect
inletscreen(A).Cleanscreenifitcontainsdebrisorhave
triggertopurgepumpsystemofairandimpurities.
itreplacedifdamaged.DO NOTrun pressurewasher if
inlet screenis damagedor missing.
Riskof eyeinjury.
m_JSpray cansplash back or propel objects.
Alwayswearsafetygoggleswhenusingthis equipmentor in
vicinityof whereequipmentisin use.
Beforestartingthepressurewasher,besureyouarewearing
adequatesafetygoggles.
NEVERsubstitutesafetyglassesfor safetygoggles.
WARHJHG
4. Run water through garden hose for 30 seconds to flush
it of debris. Turn off water.
IMPORTANT:DO NOTsiphon standing water for the water
supply. UseONLY cold water (less than IO0°F (38%)).
5. Connectgarden hose (not to exceed50 feet (15.24 m) in
length) to water inlet. Tighten by hand.
NOTICE
Using a OneWay Valve(vacuum breakeror check valve)at
pump inlet can cause pump or inlet connector damage.
ThereMUSTbeat leasttenfeetofunrestrictedgardenhose
betweenthe pressurewasherinletandanydevice,suchasa
vacuumbreakeror checkvalve.
Damageto equipmentresultingfromfailuretofollowthis
instructionwill void warranty.
ChecklistBefore StartingEngine
Reviewthe unit to ensure you have performed all of the
following:
1. Besure to read Safety Rubs and Operationsections
before usingthe cleaning system.
2. Makesure handle is in placeand secure.
3. Checkthat oil has beenadded to proper levelin engine
crankcase.
4. Add proper fuel to fuel tank.
5. Checkfor proper hoseconnections (high pressure and
water supply) and that there are no kinks, cuts, or
damageto the high pressure hose.
6. Provideproper water supply (not to exceedIO0°F
(38°C)).
10
Page 11
HOWTOUSEYOURCLEANJHGSYSTEM
If you haveany problems operating your pressure washer,
pleasecall the pressure washer helpline at 1-800-222-3136.
Pressure Washer Location
PressureWasherClearance
,_ WARNING
_ Exhaustheat/gases can ignitecombustibles,
* Keepatleast5ft. (152cm)clearanceonall sidesofpressure
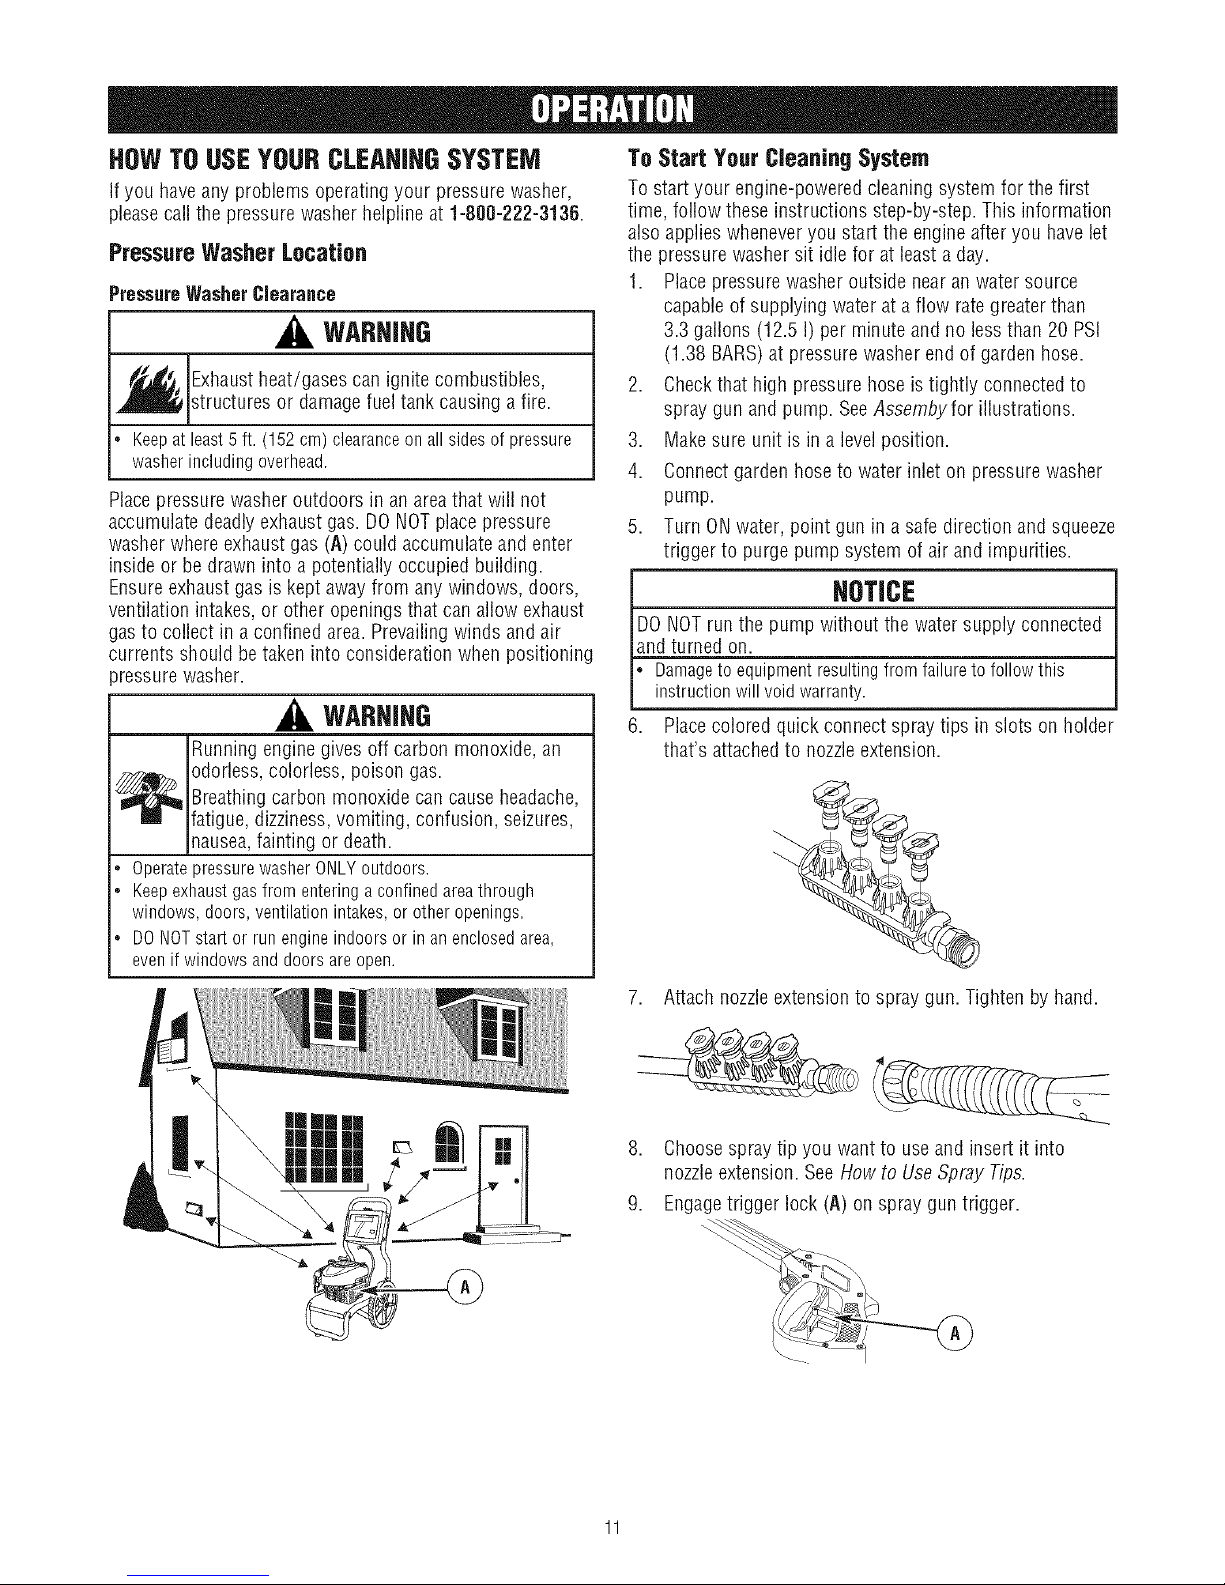
Placepressure washer outdoors in an areathat will not
accumulate deadlyexhaustgas. DONOTplacepressure
washer where exhaust gas (A) could accumulateand enter
inside or be drawn into a potentially occupied building.
Ensureexhaust gas is kept awayfrom any windows, doors,
ventilation intakes, or other openingsthat can allow exhaust
gasto collect in a confined area. Prevailingwinds and air
currents should be taken into considerationwhen positioning
_ressurewasher.
structures or damagefuel tank causing a fire.
washerincludingoverhead.
,_ WARHJHG
Runningengine gives off carbon monoxide, an
To Start Your Cleanin8 System
To start your engine-powered cleaning system for the first
time, follow these instructions step-by-step. This information
also applies wheneveryou start the engine after you have let
the pressure washer sit idle for at least a day.
1. Placepressure washer outside near an water source
capableof supplying water at a flow rategreater than
3.3 gallons (12.5 I) per minute and no less than 20 PSI
(1.38 BARS)at pressure washer end of garden hose.
2. Checkthat high pressure hose istightly connectedto
spray gun and pump. SeeAssembyfor illustrations.
3. Makesure unit is in a levelposition.
4. Connectgarden hose to water inlet on pressure washer
pump.
5. Turn ONwater, point gun in a safedirection and squeeze
trigger to purge pump system of air and impurities.
{ NOTICE
% NOTrun the pump without the water supply connected
and turned on.
L amageto equipmentresultingfromfailureto followthis
instructionwill void warranty.
6. Placecolored quick connect spray tips in slots on holder
that's attachedto nozzleextension.
_ dorless, colorless, poison gas.
. OperatepressurewasherONLYoutdoors.
* Keepexhaustgasfromenteringaconfinedareathrough
. DONOTstartor runengineindoorsorin anenclosedarea,
Breathingcarbon monoxide can causeheadache,
fatigue, dizziness,vomiting, confusion, seizures,
nausea,fainting or death.
windows,doors,ventilationintakes,or otheropenings.
evenif windowsanddoorsareopen.
\
7. Attach nozzleextension to spray gun. Tighten by hand.
B. Choose spray tipyou want to use and insert it into
nozzleextension. SeeHow to UseSpray Tips.
9. Engagetrigger lock (A) on spray gun trigger.
Page 12

10. Move throttle lever to "Fast" position (A), shown as a
rabbit.
\
IMPORTANT: Before starting the pressure washer, be sure
7ou are wearing adequate safety goggles.
WARNING
Risk of eye injury.
_Spray can splash back or propel objects.
Alwayswear safety goggles when using this equipment or in
vicinity of where equipment is in use.
Beforestarting the pressure washer, be sure you are wearing
adequatesafety goggles.
NEVERsubstitute safety glasses for safety goggles.
NOTE:This unit is equipped with a ReadyStartTM engine. A
ReadyStartTM engine meansthere is no priming or choking
required.
11. When starting engine, position yourself as
recommendedand grasp starter grip handle and pull
slowly until you feelsome resistance. Then pull rapidly
to start engine.
WARHIHG
Starter cord kickback (rapid retraction) can result
in bodily injury. Kickback will pull hand and arm
_ toward engine faster than you can let go.
Brokenbones, fractures, bruises, or sprains
could result.
• NEVERpull starter cord without first relieving spray gun
pressure.
• When starting engine, pull cord slowly until resistance is felt
andthen pull rapidly to avoid kickback.
After eachstarting attempt, where enginefails to run, always
point spray gun in safe direction and squeezespray gun trigger
to releasehigh pressure. Engagespray gun trigger lock.
Firmly grasp spray gun with both handswhen using high
pressure spray to avoid injury when spray gun kicks back.
12. Return recoil starter slowly. DO NOT let rope "snap
back" against starter.
NOTE: Always keep the throttle lever in the "Fast" position
when operating the pressure washer.
WARHIHG
Thehigh pressurestream of water that this
equipment produces cancut through skin and its
_ nderlying tissues, leadingto serious injury and
* DONOTallowCHILDRENtooperatepressurewasher.
. Keephighpressurehoseconnectedto pumpandspraygun
whilesystemispressurized.
. NEVERaimspraygunatpeople,animals,or plants.
* DONOTsecurespraygun inopenposition.
. DONOTleavespraygununattendedwhile machineis running.
* NEVERuseaspraygunwhichdoesnot haveatriggerlockor
triggerguardin placeandinworkingorder.
. Alwaysbecertainspraygun,nozzlesandaccessoriesare
correctlyattached.
_ossibleamputation.
Spray gun traps high water pressure,evenwhen
engine is stopped and water is disconnected,
which can cause injury.
WARHIHG
_ Contact with muffler result in serious
,_ Exhaustheat/gases can ignite combustibles,structures or damage fuel tank causing a fire.
* DONOTtouchhotpartsandAVOIDhotexhaustgases.
. Allowequipmenttocoolbeforetouching.
* Keepatleast5 feet(1.5m) ofclearanceonall sidesof
. Codeof FederalRegulation(CFR)Title36Parks,Forests,and
12
burns.
pressurewasherincludingoverhead.
PublicPropertyrequireequipmentpoweredbyaninternal
combustionengineto haveasparkarrester,maintainedin
effectiveworkingorder,complyingto USDAForestservice
standard51BB-1Cor later revision.IntheStateof Californiaa
sparkarresteris requiredundersection4442oftheCalifornia
Publicresourcescode.Otherstatesmayhavesimilarlaws.
area can
Page 13
Howto StopYour CleaningSystem
1. Releasespray gun trigger and letengine idlefor two
minutes.
2. Movethrottle to SLOW position, then STOPposition (A).
,
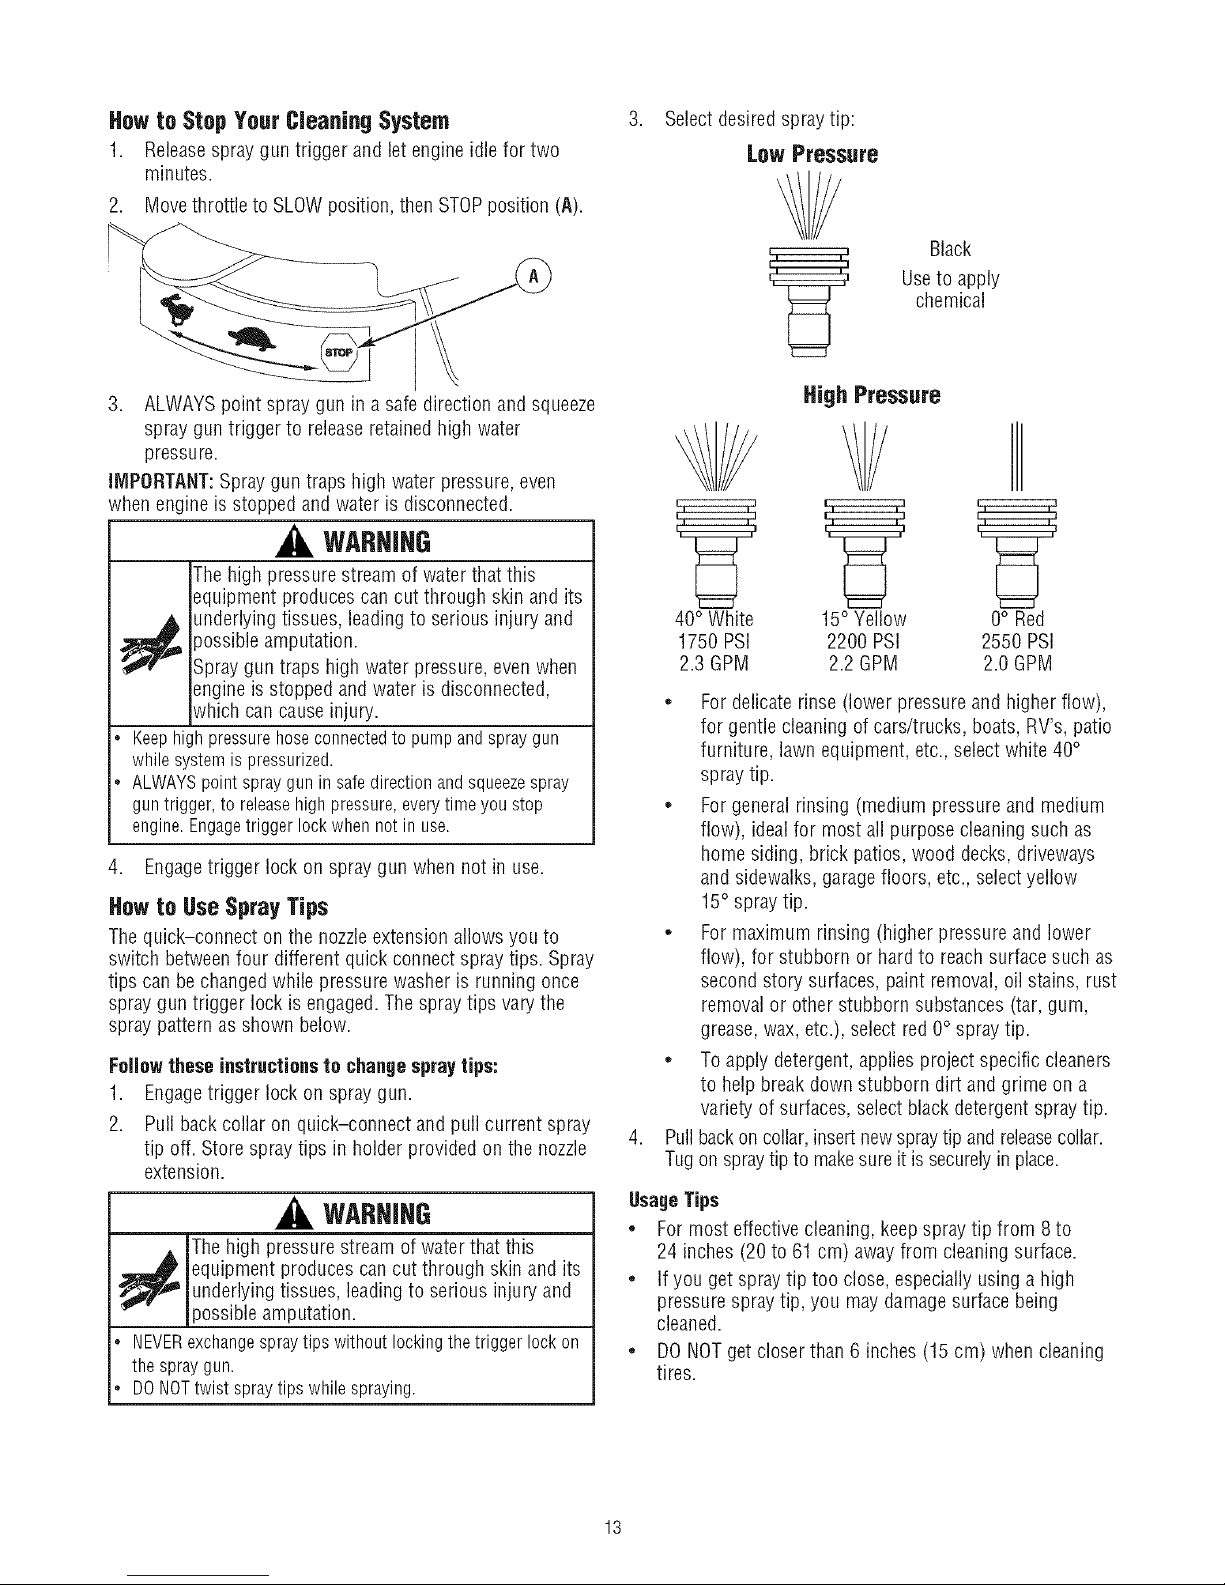
Select desiredspray tip:
Low Pressure
Black
Useto apply
chemical
3. ALWAYSpoint spray gun in a safe direction and squeeze
spray gun trigger to releaseretainedhigh water
pressure.
IMPORTANT:Spray gun traps high water pressure,even
when engine is stopped and water is disconnected.
WARHIHG
The high pressure stream of water that this
equipment produces cancut through skin and its
_ nderlying tissues, leadingto serious injury and
• Keephighpressurehoseconnectedto pumpandspraygun
whilesystemispressurized.
. ALWAYSpointspraygunin safedirectionandsqueezespray
guntrigger,to releasehighpressure,everytimeyoustop
engine.Engagetriggerlockwhennotin use.
4. Engagetrigger lock on spray gun when not in use.
)ossible amputation.
Spray gun traps high water pressure,evenwhen
engine is stopped and water is disconnected,
which can cause injury.
How to Use Spray Tips
Thequick-connect on the nozzleextension allows you to
switch between four different quick connect spray tips. Spray
tips can be changedwhile pressure washer is running once
spray gun trigger lock is engaged. The spray tips vary the
spray pattern asshown below.
FolJowthese instructionsto changespraytips:
1. Engagetrigger lock on spray gun.
2. Pull back collar on quick-connect and pull current spray
tip off. Storespray tips in holder provided on the nozzle
extension.
WARHIHG
The high pressure stream of water that this
_ quipment produces can cut through skin and itsunderlyingtissues, leadingto serious injury and
possible amputation.
. NEVERexchangespraytips withoutlockingthetriggerlockon
the spraygun.
. DONOTtwist spraytips whilespraying.
High Pressure
40° White 15° Yellow
1750 PSi 2200 PSi
2.3 GPM 2.2 GPM
* For delicate rinse (lower pressure and higher flow),
for gentlecleaning of cars/trucks, boats, RV's,patio
furniture, lawn equipment, etc., select white 40°
spray tip.
. Forgeneral rinsing (medium pressure and medium
flow), ideal for most all purpose cleaning such as
home siding, brick patios, wood decks, driveways
and sidewalks, garage floors, etc., selectyellow
15° spray tip.
. For maximum rinsing (higher pressure andlower
flow), for stubborn or hard to reachsurface such as
second story surfaces,paint removal,oil stains, rust
removal or other stubborn substances (tar, gum,
grease,wax, etc.), select red 0° spray tip.
. Toapply detergent,appliesproject specific cleaners
to help breakdown stubborn dirt andgrime on a
variety of surfaces, selectblack detergentspray tip.
,
Pull backon collar,insert new spraytip and releasecollar.
Tugon spraytip to makesure it is securelyin place.
UsageTips
• For most effective cleaning, keepspray tip from 8 to
24 inches (20 to 61 cm) awayfrom cleaningsurface.
• If you get spray tip too close, especially usinga high
pressure spray tip, you may damagesurface being
cleaned.
• DONOTget closer than 6 inches (15 cm) when cleaning
tires.
0° Red
255OPSi
2.0 GPM
13
Page 14
Cleaning and Applying Detergent
CAUTION
Chemicalscan causebodily injury, and/or property
damage.
NEVERusecausticliquidwithpressurewasher.
UseONLYpressurewashersafedetergents/soaps.Followall
manufacturersinstructions.
To apply detergent follow these steps:
1. Attach desired detergent siphon hosefollowing
instructions Attach DetergentSiphon Hose to Pump.
IMPORTANT:Besure engine is off and allowed to cool before
switching detergentsiphoning hoses.
IMPOFITANT:if using detergent siphoning hose, make sure
detergentshut-off valve on cleaning tank is in the ,Off,
position.
9B. If using detergent siphoning hose, place small filter end
of detergent siphoning tube into detergent container.
NOTE:Makesure the filter is fully submerged in detergent
while applying detergent.
NOTICE
Contact with the hot muffler can damagedetergent
siphoning tube.
Wheninsertingthefilterintoa detergentsolutionbottle,route
thetubesoasto keepit from inadvertentlycontactingthe hot
muffler.
WARNING
_ Contact with muffler result in serious
_ Exhaustheat/gases can ignite combustibles,
* DONOTtouchhotpartsandAVOIDhotexhaustgases.
* Allowequipmentto coolbeforetouching.
2. Reviewuse of spray tips.
3. Preparedetergent solution as required by job.
4. Make sure detergent shut-off valve on cleaningtank is in
5. If using cleaningtank, pour detergent into cleaningtank.
NOT[: Thecleaningtank holds one gallon.
6. Make sure black detergent spray tip is installed.
NOT[: Detergentcannot be applied with the high pressure
nozzles(White, Yellow or Red).
7. Make sure garden hoseis connectedto water inlet.
burns.
structures or damagefuel tank causing a fire.
"Off" position.
Checkthat high pressure hose is connectedto spray gun
and pump. Turn on water.
area can
NOTICE
You must attacha]] hoses before ou start the en ine.
Startingthe enginewithoutallthehosesconnectedandwithout
thewaterturnedONwill damagethe pump.
Damageto equipmentresultingfromfailuretofollowthis
instructionwillvoidwarranty.
8. Engagetrigger lock on spray gun and start engine
following instructions How to Start Your Pressure
Washer.
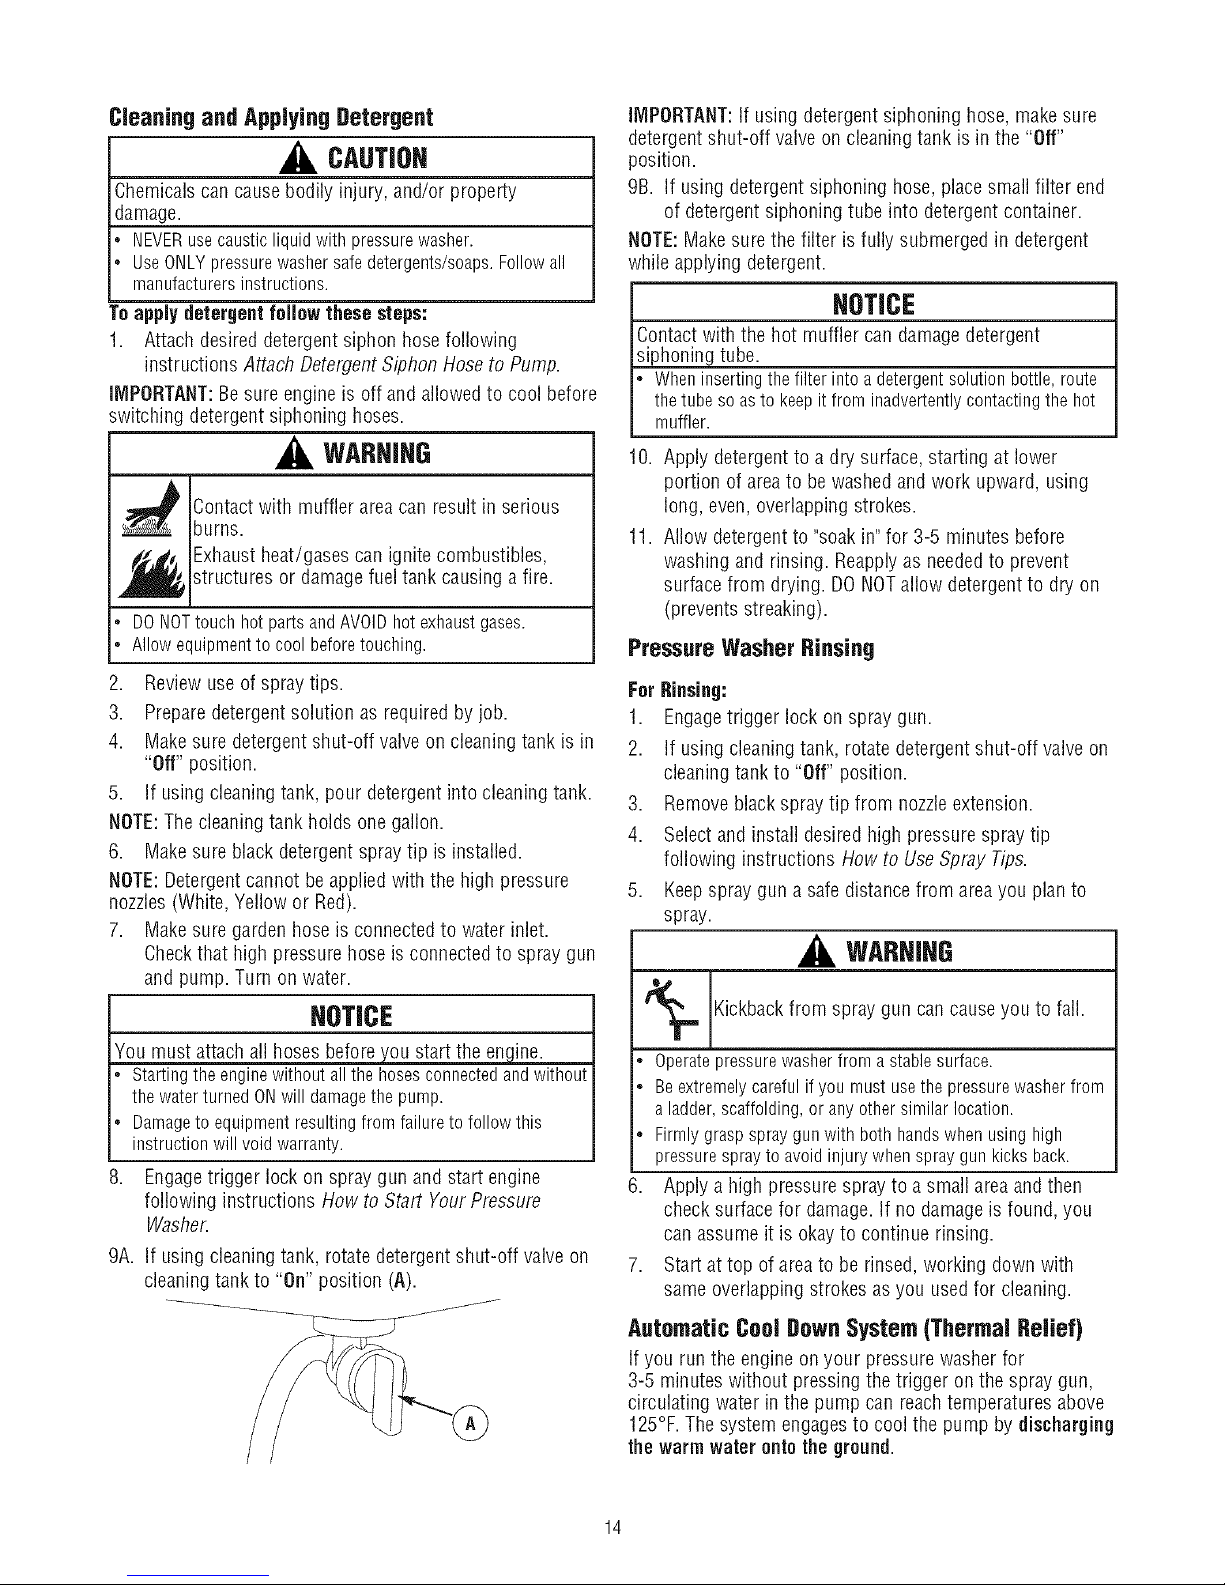
9A. If using cleaningtank, rotate detergentshut-off valve on
cleaningtank to "On" position (A).
10. Apply detergentto adry surface, starting at lower
portion of areato be washed and work upward, using
long, even, overlapping strokes.
11. Allow detergentto "soakin" for 3-5 minutes before
washing and rinsing. Reapplyas neededto prevent
surface from drying. DONOTallow detergent to dry on
(preventsstreaking).
Pressure Washer Rinsing
ForRinsing:
1. Engagetrigger lock on spray gun.
2. If using cleaningtank, rotate detergent shut-off valve on
cleaning tank to "Off" position.
3. Removeblackspray tip from nozzleextension.
4. Selectand install desiredhigh pressure spray tip
following instructions How to Use Spray Tips.
,
Keepspray gun a safe distance from areayou plan to
spray.
WARNING
Kickbackfrom to fall.
* Operatepressurewasherfrom astablesurface.
, Beextremelycarefulif you mustusethepressurewasherfrom
a ladder,scaffolding,or anyothersimilarlocation.
* Firmlygraspspraygunwith both handswhenusinghigh
pressuresprayto avoidinjurywhenspraygunkicksback.
6.
Apply a high pressure spray to a small areaand then
check surface for damage.If no damage is found, you
can assume it is okayto continue rinsing.
Start at top of areato be rinsed, working down with
same overlapping strokes asyou usedfor cleaning.
spray gun can causeyou
Automatic Cool Down System (Thermal Relief)
If you run the engine on your pressure washer for
3-5 minutes without pressing the trigger on the spray gun,
circulating water in the pump can reach temperatures above
125°F.The system engagesto cool the pump by discharging
the warmwater onto the ground.
14
Page 15
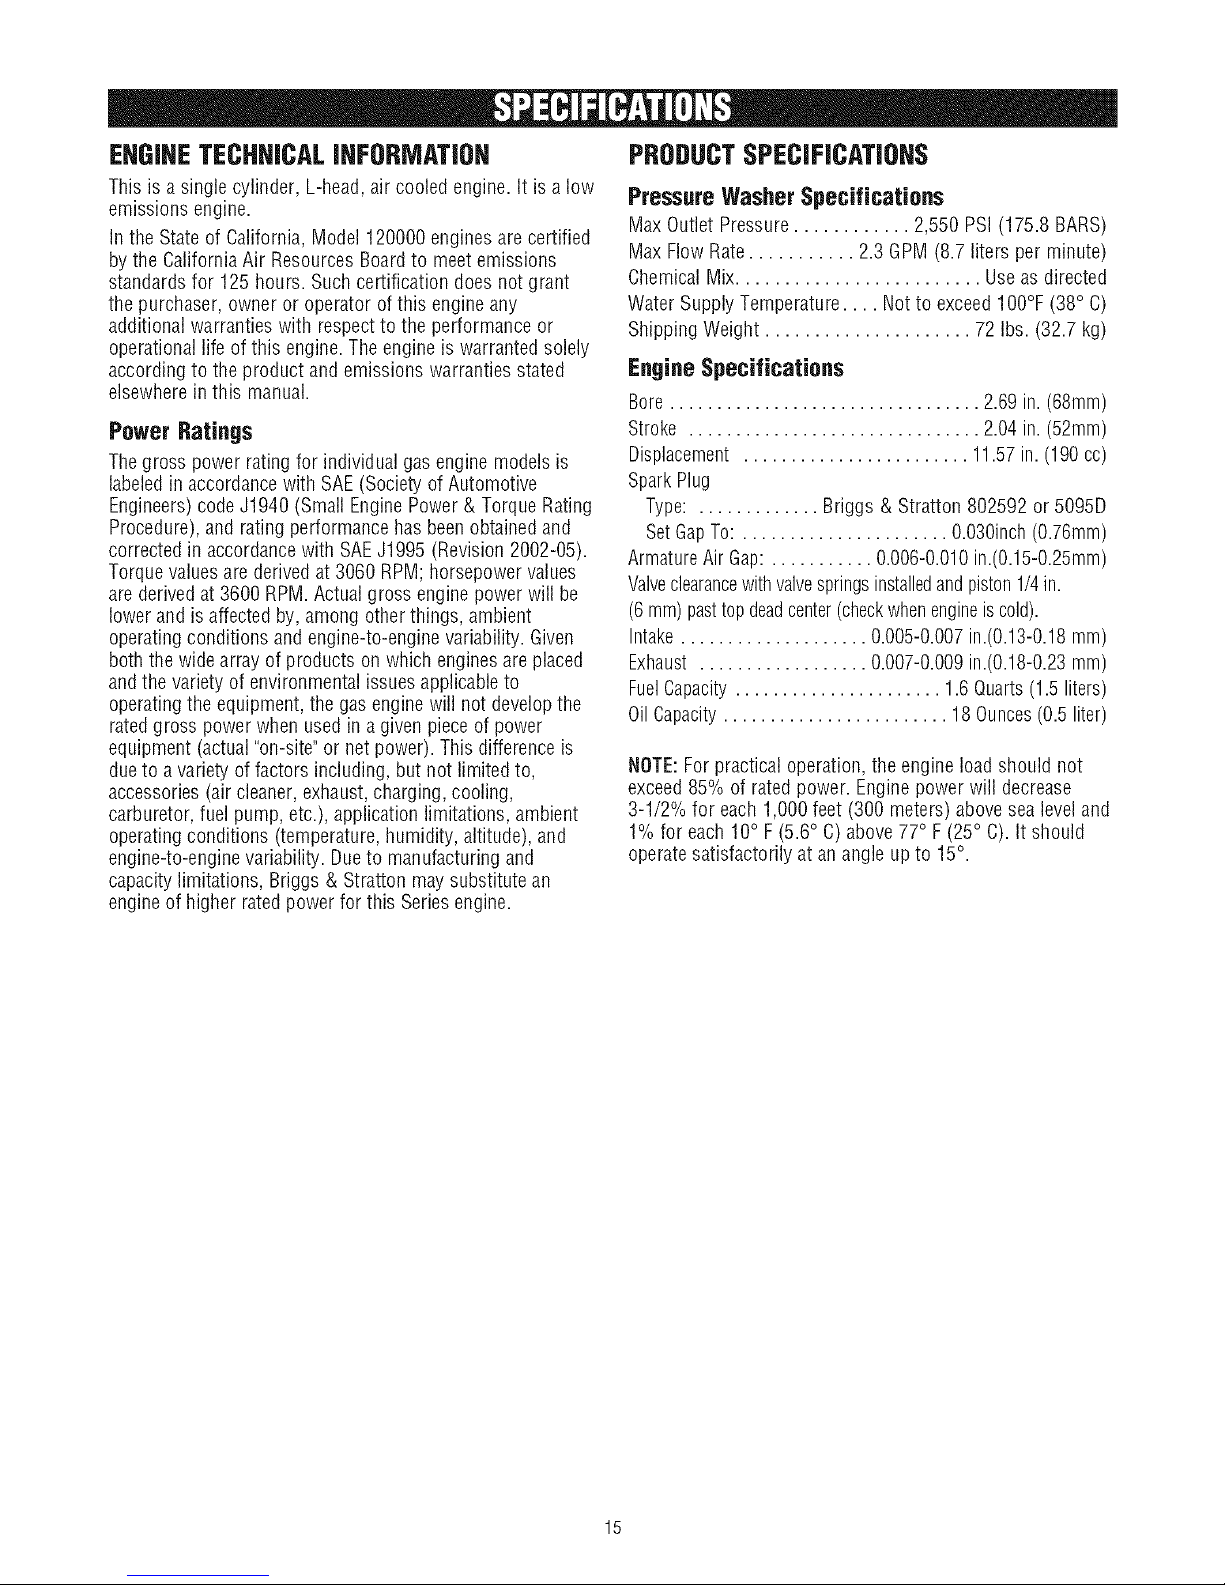
EHGINETECHNICALINFORMATIOH PRODUCTSPECIFICATIOHS
This is a single cylinder, L-head,air cooled engine. It is a low
emissions engine.
Inthe Stateof California, Model 120000 engines are certified
by the California Air Resources Boardto meet emissions
standardsfor 125 hours. Such certification does not grant
the purchaser, owner or operator of this engine any
additional warranties with respectto the performance or
operational life of this engine.Theengine is warranted solely
according to the product and emissions warranties stated
elsewherein this manual.
Power Ratings
Thegross power rating for individual gas engine modelsis
labeledin accordancewith SAE(Society of Automotive
Engineers)code J1940 (Small EnginePower& Torque Rating
Procedure),and rating performance has been obtainedand
correctedin accordancewith SAEJ1995 (Revision 2002-05).
Torquevaluesare derivedat 3060 RPM;horsepower values
are derived at 3600 RPM.Actual gross engine powerwill be
lower and is affected by, among otherthings, ambient
operatingconditions and engine-to-enginevariability. Given
both the wide arrayof products on which enginesare placed
andthe variety of environmental issues applicableto
operatingthe equipment,the gas enginewill not developthe
ratedgross power when used in a givenpiece of power
equipment (actual "on-site"or net power). This differenceis
dueto a variety of factors including, but not limited to,
accessories(air cleaner,exhaust,charging, cooling,
carburetor,fuel pump, etc.), application limitations, ambient
operatingconditions (temperature,humidity, altitude), and
engine-to-enginevariability. Dueto manufacturingand
capacitylimitations, Briggs & Stratton maysubstitute an
engineof higher ratedpowerfor this Series engine.
Pressure Washer Specifications
Max Outlet Pressure............ 2,550 PSi (175.8 BARS)
Max Flow Rate........... 2.3 GPM (8.7 liters per minute)
ChemicalMix......................... Use as directed
Water Supply Temperature.... Notto exceedI O0°F(38° C)
Shipping Weight ..................... 72 Ibs. (32.7 kg)
Engine Specifications
Bore ................................. 2.69 in. (68mm)
Stroke ............................... 2.04 in. (52mm)
Displacement ........................ 11.57in. (190 cc)
SparkPlug
Type: ............. Briggs & Stratton 802592 or 5095D
SetGapTo: ...................... O.030inch(0.76ram)
ArmatureAir Gap: ........... 0.006-0.010in.(O.15-O.25mm)
Valveclearancewithvalvespringsinstalledand piston1/4in.
(6 ram)pasttopdeadcenter(checkwhenengineiscold).
Intake.................... 0.005-0.007in.(0.13-0.18ram)
Exhaust .................. 0.007-0.009in.(0.18-0.23mm)
FuelCapacity...................... 1.6 Quarts(1.5 liters)
OilCapacity........................ 18Ounces(0.5 liter)
NOTE:For practical operation, the engine load should not
exceed 85% of rated power. Enginepower will decrease
3-1/2% for each1,000 feet (300 meters) above sea level and
1% for each 10° F(5.6° C) above77° F (25° C).It should
operatesatisfactorily at an angle up to 15°.
15
Page 16
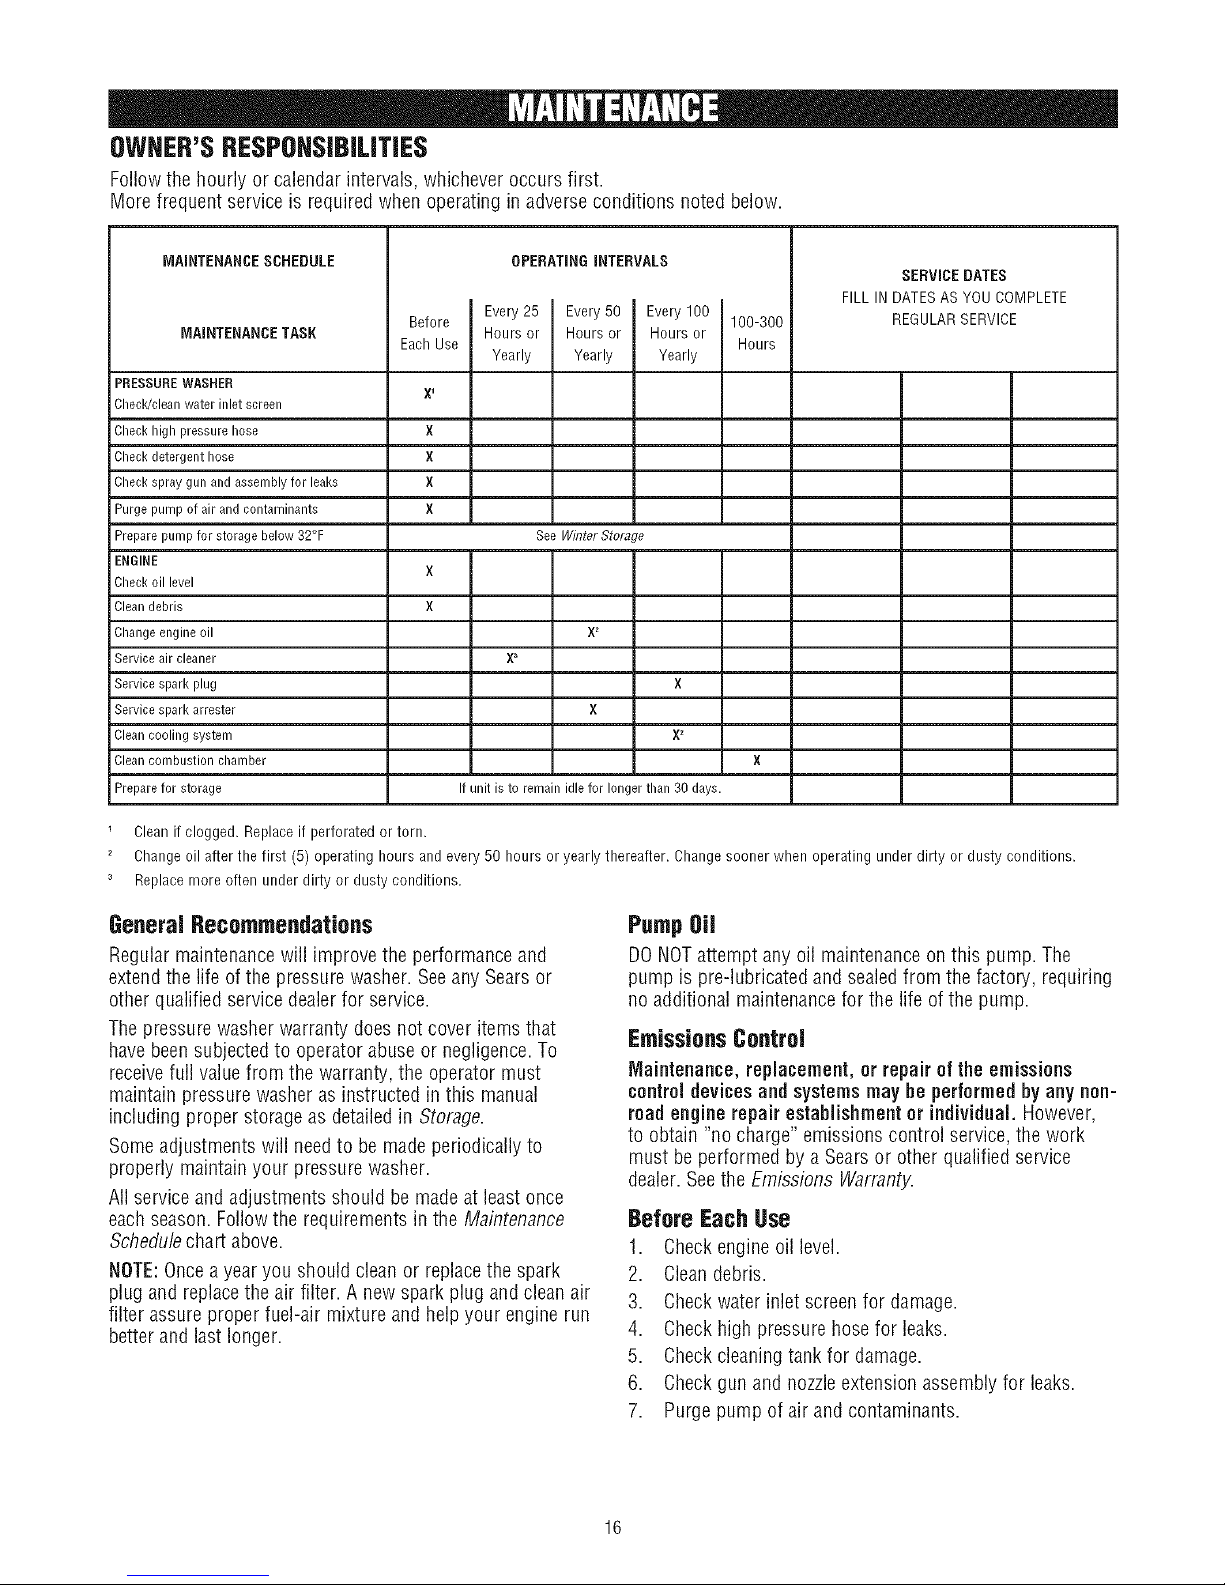
OWNER'SRESPONSIBILITIES
Followthe hourly or calendarintervals,whichever occurs first.
More frequent service is required when operating inadverse conditions noted below.
MAINTENANCESCHEDULE
MAINTENANCETASK
PRESSURE WASHER
Checldclean water inlet screen
Check high pressure hose
Check detergent hose
Check spray gun and assembly for leaks
Purge pump of air and contaminants
Prepare pump for storage below 32°F
ENGINE
Check oil level
Clean debris
Change engine oil
Service air cleaner
Service spark plug
Service spark arrester
Clean cooling system
Clean combustion chamber
Prepare for storage If unit is to remain idle for longer than 30 days.
Cleanif clogged. Replace if perforated or torn.
2 Change oil after the first (5) operating hours and every 50 hours or yearly thereafter. Changesooner when operating under dirty or dusty conditions.
3 Replace more often under dirty or dusty conditions.
Before
EachUse
X 1
X
X
X
X
X
X
OPERATINGiNTERVALS
Hours or Hours or Hours or
I Every 25 Every50 Every 100
Yearly Yearly Yearly
See Winter Storage
X_
X
X_
100-300
Hours
SERVICEDATES
FILL IN DATESASYOU COMPLETE
REGULARSERVICE
GeneraJRecommendations
Regularmaintenancewill improve the performance and
extendthe life of the pressure washer. Seeany Searsor
other qualified service dealerfor service.
Thepressure washer warranty doesnot cover items that
havebeen subjectedto operator abuse or negligence.To
receivefull valuefrom the warranty, the operator must
maintain pressure washer as instructed in this manual
including proper storage as detailedin Storage.
Someadjustments will needto be madeperiodically to
properly maintain your pressure washer.
All service and adjustments should be madeat least once
eachseason. Follow the requirements in the Maintenance
Schedulechart above.
NOTE:Oncea year you should clean or replacethe spark
plug and replacethe air filter. A new spark plug and clean air
filter assure proper fuel-air mixture and help your engine run
better and last longer.
Pump Oil
DONOTattempt any oil maintenance on this pump. The
pump is pre-lubricated and sealed from the factory, requiring
no additional maintenancefor the life of the pump.
EmissionsControl
Maintenance, replacement, or repair of the emissions
control devices and systems may be performedby any non-
road engine repair establishment or individual. However,
to obtain "no charge" emissions control service, the work
must be performed by a Searsor other qualified service
dealer.Seethe Emissions Warranty.
Before Each Use
1. Checkengine oil level.
2. Cleandebris.
3. Checkwater inlet screen for damage.
4. Checkhigh pressure hose for leaks.
5. Checkcleaningtank for damage.
6. Checkgun and nozzleextension assembly for leaks.
7. Purge pump of air and contaminants.
16
Page 17
PRESSUREWASHERMAINTENANCE
Clean Debris
Daily or before use, cleanaccumulated debris from cleaning
system. Keeplinkage, spring and controls clean. Keeparea
around and behind muffler free from any combustible debris.
Inspect cooling air slots and openings on the pressure
washer.These openings must be kept cleanand
unobstructed.
Cleaningsystem parts should be kept cleanto reducethe risk
of overheatingand ignition of accumulated debris.
• Usea damp cloth to wipe exterior surfaces clean.
NOTICE
Jlmproper treatment of pressurewasher can damage it and
_horten its life. _ ....
[, DONOTinsertanyobjectsthroughcoolingslots.
• Usea soft bristle brush to loosen cakedon dirt, oil, etc.
• Usea vacuum cleaner to pick up loose dirt and debris.
Check and Clean Inlet Screen
Examinegarden hose inlet screen.Clean if it is clogged or
replaceif it is torn.
2. ALWAYSpoint spray gun in a safe direction and squeeze
spray gun trigger to releaseretained high water pressure.
WARNING
Thehigh pressure stream of water that this
equipment produces can cut through skin and its
_ nderlying tissues, leading to serious injury and
• Keephighpressurehoseconnectedto pumpandspraygun
whilesystemispressurized.
, ALWAYSpointspraygunin safedirectionandsqueezespray
guntrigger,to releasehighpressure,everytimeyoustop
engine.Engagetriggerlockwhennot in use.
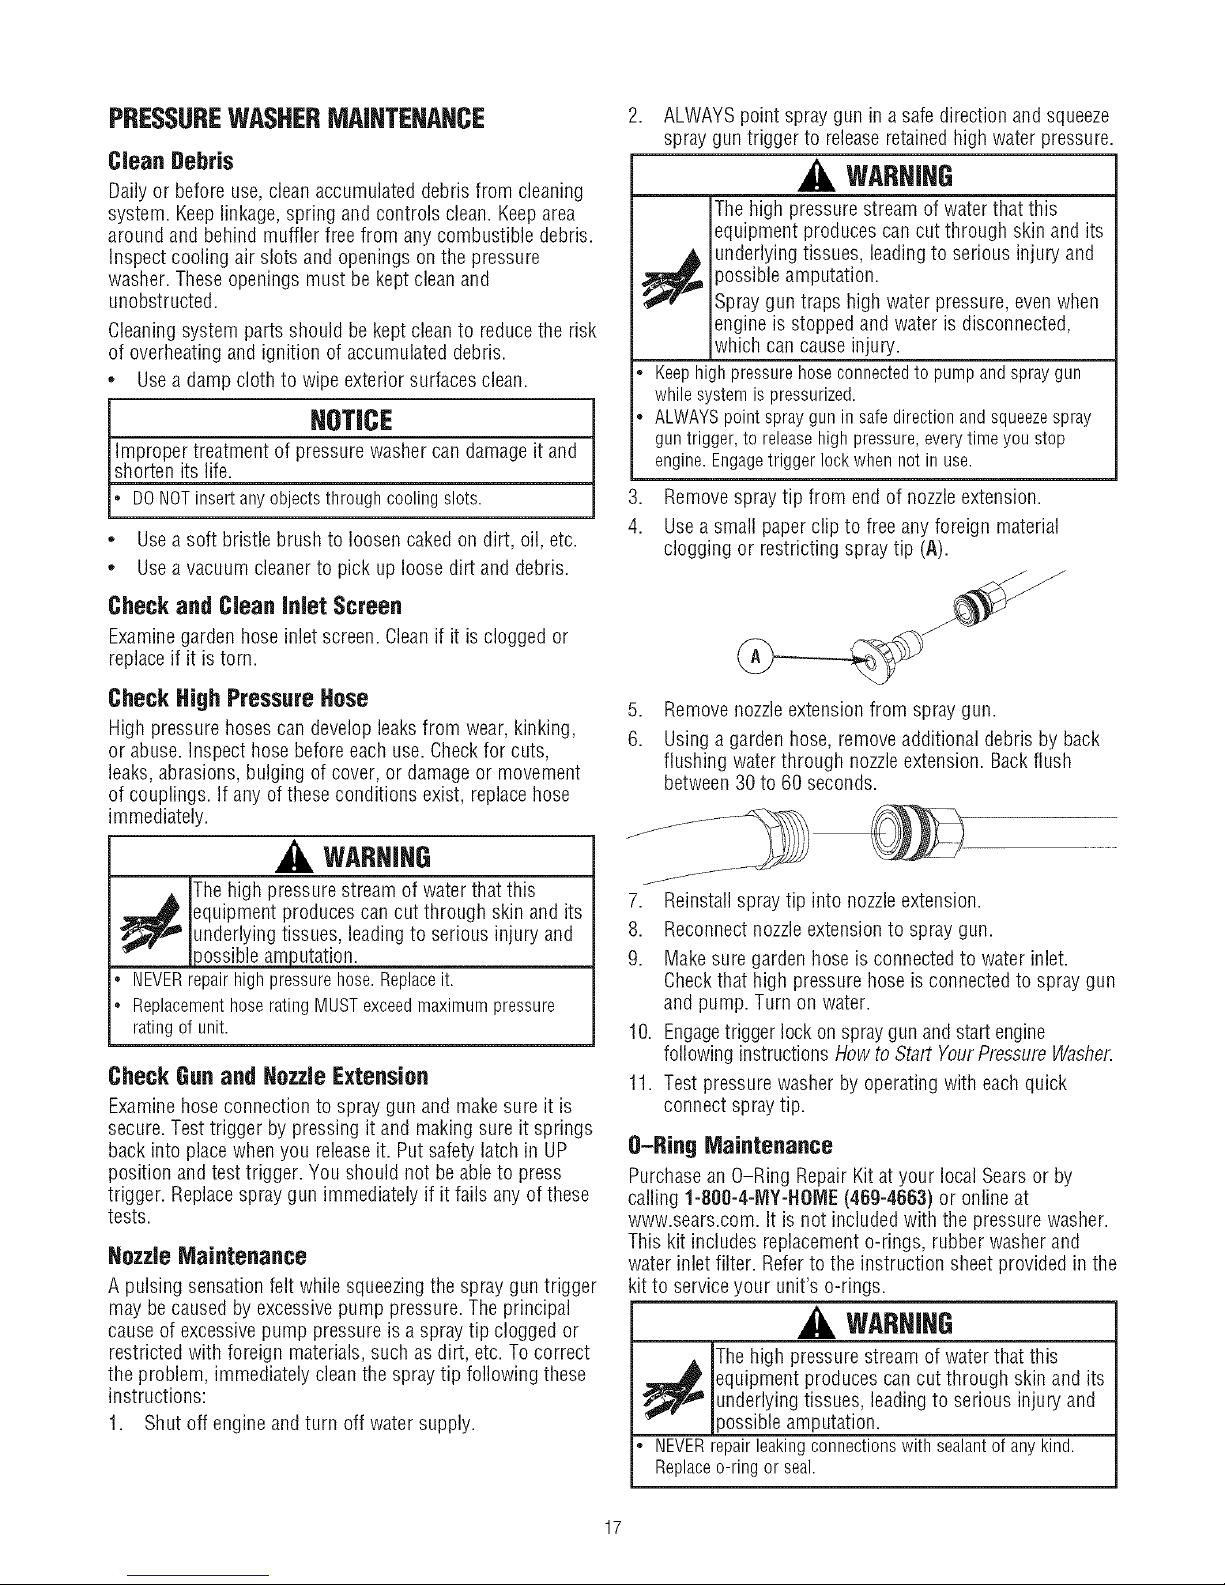
3. Removespraytip from end of nozzleextension.
4. Usea small paperclip to free any foreign material
)ossible amputation.
Spraygun traps high water pressure, evenwhen
engine is stopped and water is disconnected,
which can cause injury.
clogging or restricting spray tip (A).
Check High Pressure Hose
High pressure hoses can developleaks from wear, kinking,
or abuse. Inspect hose beforeeach use. Checkfor cuts,
leaks,abrasions, bulging of cover, or damageor movement
of couplings. If any of these conditions exist, replace hose
immediately.
WARHIHG
The high pressure stream of water that this
_ quipment produces can cut through skin and its
• NEVERrepairhighpressurehose.Replaceit.
, ReplacementhoseratingMUSTexceedmaximumpressure
ratingof unit.
Check Gun and Hozzle Extension
Examinehose connectionto spray gun and makesure it is
secure.Test trigger by pressing it and making sure it springs
back into placewhen you releaseit. Put safety latch in UP
position and test trigger. You should not beable to press
trigger. Replacespray gun immediately if it fails any of these
tests.
HozzJeMaintenance
A pulsing sensationfelt while squeezingthe spray gun trigger
may becaused by excessive pump pressure. The principal
cause of excessive pump pressure is a spray tip clogged or
restricted with foreign materials, such as dirt, etc. To correct
the problem, immediately cleanthe spray tip following these
instructions:
1. Shut off engine and turn off water supply.
underlyingtissues, leadingto serious injury and
)ossible amputation.
5. Remove nozzleextension from spray gun.
6. Using a garden hose, remove additional debris by back
flushing water through nozzle extension. Back flush
between 30 to 60 seconds.
7. Reinstallspray tip into nozzleextension.
8. Reconnectnozzleextensionto spray gun.
9. Makesure garden hose is connectedto water inlet.
Checkthat high pressure hose is connectedto spray gun
and pump. Turn on water.
10. Engagetrigger lock on spraygun andstart engine
following instructions How to Start YourPressure Washer.
11. Test pressure washer by operating with eachquick
connect spray tip.
O-Ring Maintenance
Purchasean O-Ring RepairKit atyour local Searsor by
calling 1-800-4-NIY-HOME(46g-4663) or online at
www.sears.com. It is not included with the pressure washer.
This kit includes replacemento-rings, rubber washer and
water inlet filter. Referto the instruction sheet provided in the
kit to serviceyour unit's o-rings.
WARHIHG
Thehigh pressurestream of water that this
_ quipment produces can cut through skin and its
, NEVERrepairleakingconnectionswith sealantof anykind.
Replaceo-ringor seal.
underlyingtissues, leadingto serious injury and
)ossible amputation.
17
Page 18
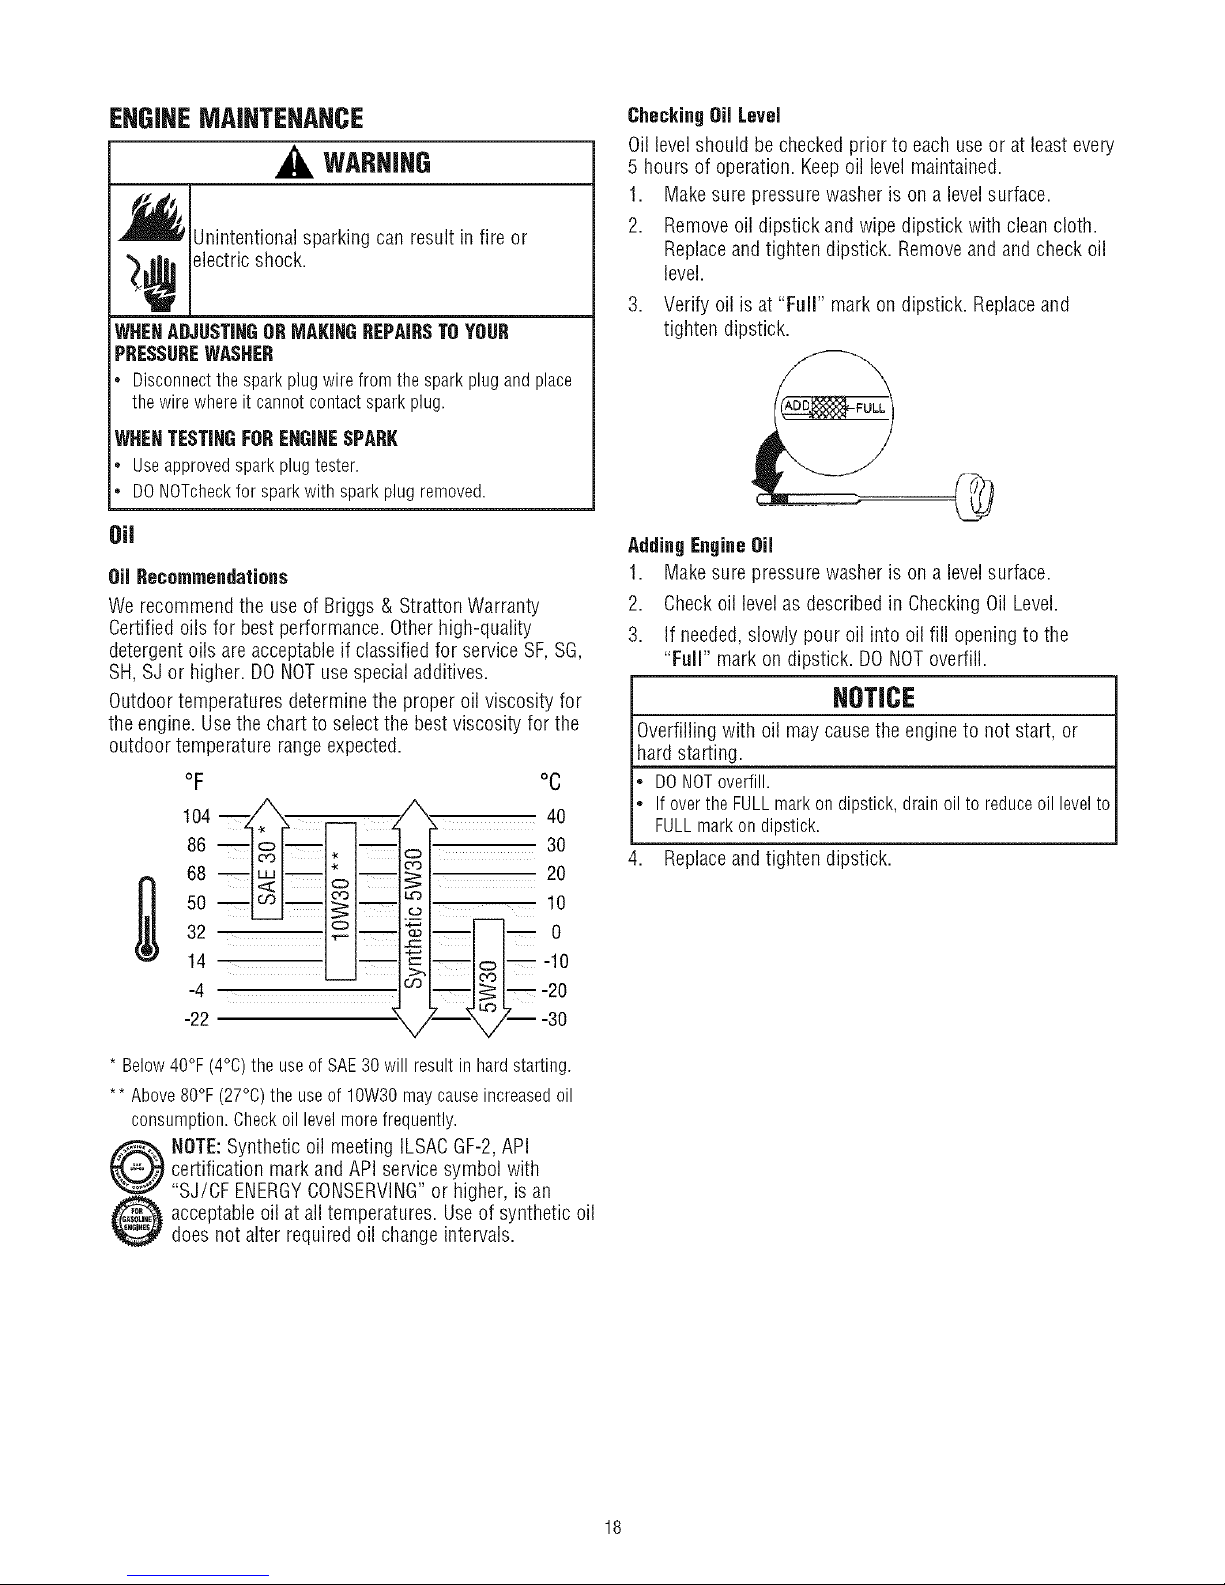
ENGINEMAINTENANCE
,_ WARHIHG
,_ Unintentional sparking can result in fire or
_¢ electric shock.
WHENADJUSTINGORMAKINGREPAIRSTOYOUR
PBESSUBEWASHER
* Disconnectthesparkplugwirefromthe sparkplugandplace
thewire whereit cannotcontactsparkplug.
WHENTESTINGFORENGINESPAEE
* Useapprovedsparkplugtester.
* DONOTcheckfor sparkwith sparkplugremoved.
Oil
Oil Recommendations
We recommendthe use of Briggs & Stratton Warranty
Certified oils for best performance. Otherhigh-quality
detergent oils are acceptableif classified for service SF,SG,
SH, SJ or higher. DO NOTuse special additives.
Outdoortemperatures determine the proper oil viscosity for
the engine. Usethe chart to selectthe bestviscosity for the
outdoor temperature rangeexpected.
oF
86 w
104 Z_I_
68
%_ 40
| 30
°C
20
;_1-- to
5o _
32 _
14
-4
-22
__m mO
l-r =-10
oLIj LI-*o
,_--_-- -30
CheckingOil Level
Oil level should be checkedprior to each useor at least every
5 hours of operation. Keepoil level maintained.
1. Makesure pressure washer is on a levelsurface.
2. Removeoil dipstick and wipe dipstick with cleancloth.
Replaceand tighten dipstick. Removeand and check oil
level.
3. Verify oil is at "Full" mark on dipstick. Replaceand
tighten dipstick.
@
AddingEngineOil
1.
Makesure pressure washer is on a levelsurface.
2.
Checkoil level as described in CheckingOil Level.
3.
If needed,slowly pour oil into oil fill openingto the
"Full" mark on dipstick. DONOToverfill.
NOTICE
Overfilling with oil may causethe engineto not start, or
hard starting.
DONOToverfill.
Ifoverthe FULLmarkondipstick,drainoil to reduceoil levelto
FULLmarkon dipstick.
4. Replaceand tighten dipstick.
* Below40°F(4°C)theuseof SAE30will resultin hardstarting.
** Above80°F(27°0)the useof 10W30maycauseincreasedoil
consumption.Checkoil levelmorefrequently.
certification mark and API servicesymbol with
NOTE:Synthetic oil meeting ILSACGF-2,API
"SJ/CF ENERGYCONSERVING"or higher, is an
acceptableoil at all temperatures. Useof synthetic oil
doesnot alter required oil change intervals.
18
Page 19

ChangingEngineOil
Changeengine oil after the first 5 hours and every50 hours
thereafter. If you are usingyour pressure washer under
extremely dirty or dusty conditions, or in extremely hot
weather,change oil more often.
CAUTION
Avoid prolonged or repeatedskin contact with usedmotor
oil.
Usedmotoroil hasbeenshownto causeskincancerin certain
laboratoryanimals.
Thoroughlywashexposedareaswith soapandwater.
KEEPOUTOFREACHOFCHILDREN.DON'T
POLLUTE.CONSERVERESOURCES.RETURN
USEDOILTO COLLECTIONCENTERS.
Changeoil while engine is still warmfrom running,as
follows:
1. Drain fuel tank by running pressure washer until fuel
tank is empty.
2. Disconnectspark plug wire and keepit away from spark
plug.
3. Cleanarea around oil fill, remove oil fill cap/dipstick.
Wipe dipstick clean.
4. Tipyour pressure washer to drain oil from oil fill into a
suitable container making sure you tip your unit away
from spark plug. When crankcaseis empty, return
pressure washer to upright position.
5. Slowly pour recommended oil (about 18 oz. (0.5 I))into
oil fill opening. Pauseto permit oil to settle. Fillto "Full"
mark on dipstick.
6. Wipe dipstick cleaneach time oil level is checked. DO
NOToverfill.
7. Replaceand tighten dipstick.
8. Wipe up any remaining oil.
9. Reconnectspark plug wire to spark plug.
Service Air Cleaner
Your engine will not run properly and may be damagedif you
run it with a dirty air cleaner.
Servicethe air cleaneronceevery 25 hours of operation or
onceeach year, whichever comesfirst. Servicemore often if
operating under dirty or dusty conditions. Replacementsare
availableat your local Searsservice center.
To service the air cleaner, follow these steps:
1. Loosenscrew (A) and tilt cover (B) down.
2. Carefullyremove cartridge (C)assembly.
3. To cleancartridge, gently tap pleatedpaper side on a flat
surface.
4. Reinstallcleanor newcartridge assembly inside cover.
5. Insert cover's tabs (8) into slots in bottom of base(E).
6. Tilt cover up and tighten screw securelyto base.
NOTE:You canpurchase new air filter elements bycalling
1-800-4-MY-HOIVlE(469-4663).
ServiceSparkPlug
Servicethe spark plug every 100 hours of operation or
yearly, whichever occurs first.
1. Cleanareaaround spark plug.
2. Removeand inspect spark plug.
3. Replacespark plug if electrodesare pitted, burned or
porcelainis cracked. Usethe recommended replacement
plug. See Specifications.
4. Checkelectrodegap with wire feelergauge and set spark
plug gap to 0.030 inch (0.76 ram) if necessary.
_. f_ ..........._
5. Install spark plug andtighten firmly.
NOTE:You canpurchase a new spark plug by calling
1-800-4-1VlY-HOIVlE(469-4663).
19
Page 20

Spark Arrester Service
Your engine is not factory-equipped with a spark arrester. In
some areas,it is illegal to operate an engine without a spark
arrester. Checklocal laws and regulations. A spark arrester is
availablefrom your nearest Sears servicecenter. Ifyou need
to order a sparkarrester, pleasecall 1-SOO-4-F,,IY-HOF,,IE
(46g-4663).
Thespark arrester must be serviced every 50 hours to keepit
functioning as designed.
If the engine has been running,the muffler will be very hot.
Allow the muffler to cool before servicing the spark arrester.
WARHIHG
s_ Contact with muffler area can result in serious
,_ Exhaustheat/gases can ignite combustibles,structures or damage fuel tank causing a fire.
* DO NOTtouch hot parts and AVOID hot exhaust gases.
. Allow equipment to cool before touching.
* Keep at least 5 feet (1.5 m) of clearanceon all sides of
* Codeof FederalRegulation (CFR)Title 36 Parks, Forests,and
* Remove spark arrester screen for cleaning and inspection.
* Replace if screen is damaged.
Air Cooling System
Overtime debris may accumulate in cylinder cooling fins and
cannot be observed without partial engine disassembly. For
this reason,we recommend you havea qualified Sears
servicedealer cleanthe cooling system per recommended
intervals (see MaintenanceSchedule). Equallyimportant is to
keeptop of engine freefrom debris. See CleanDebris.
burns.
pressure washer including overhead.
Public Property require equipment powered by an internal
combustion engine to have aspark arrester, maintained in
effective working order, complying to USDAForestservice
standard 5100-1C or later revision. In the State of California a
spark arrester is required under section 4442 of the California
Public resources code. Other states may havesimilar laws.
Keepareaswithin heavyline clear of debris.
AFTEREACHUSE
Water should not remain in the unit for long periods oftime.
Sedimentsor mineralscan deposit on pump parts and
"freeze" pump action. Followthese proceduresafter every
use:
1. Flush detergentsystem byturning its detergent shut-off
valveto "Off" position and run pressure washer with
black detergent spray tip. Flushfor oneto two minutes.
2. Shut off engine,turn off water supply, point gun in a
safe direction and squeezetrigger to relievetrapped
pressure,engagetrigger lock on spray gun and let
engine cool.
WARHIHG
Thehigh pressurestream of water that this
equipment produces cancut through skin and its
_ nderlying tissues, leadingto serious injury and
. Keephighpressurehoseconnectedto pumpandspraygun
whilesystemispressurized.
* ALWAYSpointspraygunin safedirectionandsqueezespray
guntrigger,to releasehighpressure,everytimeyoustop
engine.Engagetriggerlockwhennotin use.
3. Disconnect hosefrom spray gun and high pressure
4. Empty pump of all pumped liquids by pulling recoil
5. Coil high pressure hoseand properly hang it on hook
6. Store unit in a clean, dry area.
7. If storing for morethan 30 dayssee Long Term Storage
_ossibleamputation.
Spray gun traps high water pressure,evenwhen
engine is stopped and water is disconnected,
which can cause injury.
outlet on pump. Drainwater from hose, gun, and nozzle
extension. Usea rag to wipe off the hose.
handle about6 times. This should remove most liquid in
pump.
provided on handle.
on next page.
WARHIHG
CleanCombustionChamber
Werecommendyou havea qualified Searsservicedealer
removecombustion depositsfrom the cylinder, cylinder head,
top of piston and around valvesper recommendedintervals
(seeMaintenance Schedule).
, uel and its vapors are extremely flammable and
explosive.
death.
Fireor explosion can cause severeburns or
WHENSTORINGFUELOREQUIPMENTWITH FUELIN TANK
* Storeawayfromfurnaces,stoves,waterheaters,clothes
dryers,orotherappliancesthathavepilotlight or otherignition
sourcebecausetheycanignitefuelvapors.
2O
Page 21

WINTERSTORAGE If gasoline in the engine has not beentreated with a fuel
stabilizer, it must be drained into an approved container. Run
NOTICE
You must protect your unit from freezing temperatures.
Failuretodo so will permanentlydamageyourpumpand
renderyour unit inoperable.
Freezedamageisnotcoveredunderwarranty.
To protect the unitfrom freezingtemperatures:
1. Emptycleaning tank as follows:
a. Disconnecthoseconnectedto injection fitting on
pump. Place end of hose into suitable container.
b. Rotatedetergent shut-off valveto "On" position and
open the tanks cover. Gravitywill empty tank
contents into container.
c. Reconnect hoseto injection fitting on pump. Add
0.5 quart (0.5 1)of cleanfresh water to cleaning
tank and closetanks cover.
2. Flush cleaning tank by turning its detergent shut-off
valveto "On" position and run pressure washerwith
black nozzle. Flush until tank is empty. Turn detergent
shut-off valveto "Off" position.
3. Follow steps 2-5 in the previous sectionAfter EachUse.
4. Use PumpSaver,availableat Searsto treat pump. This
minimizes freeze damageand lubricates pistons and
seals.
5. If PumpSaveris not available,connect a 3-foot (1 m)
section of garden hoseto water inlet adapter. Pour
RV-antifreeze (antifreezewithout alcohol) into hose. Pull
recoil handletwice. Disconnect3-foot (1 m) hose.
6. Store unit in a clean, dry area.
LONGTERM STORAGE
If you do not plan to usethe pressure washer for morethan
30 days, you must prepare the engine and pump for long
term storage.
Protect Fuel System
FuelAdditive:
Fuelcan becomestale when stored over 30 days.Stalefuel
causesacid and gum depositsto form in the fuel system or
on essential carburetor parts. To keep fuel fresh, use Briggs
& Stratton FRESHSTARTTM fuel stabilizer, availableas a
liquid additive or a drip concentrate cartridge.
Thereis no needto drain gasolinefrom the engine if a fuel
stabilizer is added according to instructions. Runthe engine
for 2 minutes to circulate the stabilizer throughout the fuel
system. The engineand fuel can then be stored up to
24 months.
the engine until it stops from lackof fuel.The use of a fuel
stabilizer in the storage container is recommended to
maintain freshness.
Change Engine Oil
While engine isstill warm, drain oil from crankcase. Refill
with recommendedgrade. See ChangingEngine Oil.
Oil Cylinder Bore
* Removespark plug and pour about 1/2 ounce (15 m]) of
cleanengine oil into the cylinder.
* Install spark plug and pull starter handle slowly to
distribute oil.
Protect Pump
To protect the pump from damagecausedby mineral
deposits or freezing, usePumpSaverto treat pump. This
preventsfreezedamageand lubricates pistons andseals.
NOTE:PumpSaveris availableas an optional accessory, it is
not included with the pressurewasher. Oontactyour local
Searsservice center to purchase PumpSaver.
NOTICE
You must protect your unit from freezingtemperatures.
Failuretodo so will permanentlydamageyourpumpand
renderyour unit inoperable.
Freezedamageisnotcoveredunderwarranty.
To usePumpSaver,makesure the pressurewasher is turned
off and disconnected from supplywater. Readand follow all
instructions and warnings given on the PumpSavercontainer.
Other Storage Tips
1. DONOTstore fuel from oneseasonto another unless it
hasbeentreated as described in Protect FuelSystem.
2.
Replacefuel container if it starts to rust. Rust and/or dirt
in fuel cancause problems if it's used with this unit.
Ooverunit with asuitable protective cover that does not
retain moisture.
WARHIHG
_ Storagecovers can be flammable.
* DONOTplacea storagecoveroverahot pressurewasher.
* Letequipmentcoolfora sufficienttime beforeplacingthe
coverontheequipment.
4. Store unit in a cleanand dry area.
Page 22

Problem Cause Correction
1. Low pressure spray tip installed.
2. Water inlet is blocked.
3. Inadequatewater supply.
4. Inlet hose is kinked or leaking.
Pumphasfollowing problems:
failure to producepressure,
erraticpressure, chattering,loss
ofpressure, low watervolume.
Detergentfails to mix with spray.
Engineruns geed at no-load but Enginespeed is too slow.
"begs" when lead is added.
Enginewill net start; or startsand
runsrough.
5. Cloggedinlet hosestrainer.
6. Water supply is over IO0°F.
7. High pressure hose is blocked or
leaks.
8. Gun leaks.
9. Nozzleis obstructed.
1
O. Pump is faulty. 10. ContactSearsservice facility
i.
Detergentshut-off valveis in the
"Off" position.
2.
High pressure spray tip installed.
1. Dirty air cleaner.
2. Out of fuel.
3. Stalefuel.
4. Sparkplug wire not connectedto
spark plug.
5. Badspark plug.
6. Water in fuel.
7. Excessivelyrich fuel mixture.
1. Replacewith high pressure spray tip.
2. Clearinlet.
3. Provideadequatewater flow.
4. Straighten inlet hose, patch leak.
5. Checkandclean inlet hose strainer.
6. Providecooler water supply.
7. Clearblocks in high pressure hoseor
replacehose.
8. Replacegun.
9. Cleannozzle.
1. Rotatedetergent shut-off valve to "On"
position.
2. Replacewith low pressure spray tip.
Movethrottle control to FASTposition. If
engine still "bogs down", contact Sears
service facility.
1. Cleanor replaceair cleaner.
2. Fillfuel tank.
3. Drainfuel tank; fill with fresh fuel.
4. Connectwire to spark plug.
5. Replacespark plug.
6. Drainfuel tank; fill with fresh fuel.
7. ContactSearsservice facility.
Engineshutsdownduring Out of fuel. Fillfuel tank.
operation.
Enginelacks power. Dirty air filter. Replaceair filter.
22
Page 23

23
Page 24

CRAFTSMAH2550 PSi CJeaning System 580.676630
Hettoyeur _ pression CRAFTSMAHde 2,550 psi 580°676630
Main Unit -- ExpJodedView
Unit_ principaJe - Vue 6clst6e
--3
--4
i3
11
14
\
\
\
©
w!5
24
Page 25

CRAFTSMAH2550 PSi Cleaning System 580.676630
Hettoyeur _ pression CRAFTSMAHde 2,550 psi 580.676630
Main Unit -- Parts List
Unit6 principale - Liste des pi_ces
Item h_#
A_icle Pi_ce .o.
1 200159GS
2 M202522GS
3 202364GS
195964GS
1929BOGS
4 202605GS
194298GS
23139GS
5 192529GS
6 201661GS
7 199955GS
8 194264GS
9 192198GS
10 193482GS
11 2BO557GS
195983AEGS
195983RGS
195983XGS
198841GS
12 192309GS
13 B2203GS
14 192310GS
15 196006GS
16 196439GS
192050GS
195454GS
900 NSP
DescrlpUon
Description
ASSY,Base(ENSEMBLE,base)
HANDLE(POIGNEE)
ASSY,Chem Tank w/Decal & Clips (ENSEMBLE,R_servoir chimiques a/D6calqueset Attache)
Clip (Attache)
Kit,Fuel Valve(ENSEMBLE,Robinet d'essence)
ASSY,Pump (seepage26-27) (ENSEMBLE,pompe(voir page26-27))
Valve,Thermal Relief(SOUPAPEDESURPRESSIONTHERMIQUE)
Key(CLE)
KIT,Pump Mounting Hardware(ENSEMBLE,quincailleriede montage de la pompe)
KIT,Gun HolderWeldment (ENSEMBLE,Support de pistolet, Assemblage soud_)
KIT,CapChem (ENSEMBLE,Bouchon produits chimiques)
KIT,Hook, Handle (ENSEMBLE,Crochet, Poign_e)
ASSY,Extensionw/Nozzle Holder(ENSEMBLE,Rallongea/Porte-buse)
GUN(PISTOLET)
KIT,Nozzles(ENSEMBLE,Buses)
Nozzle,QC,Red(BUSE, Raccordrapide, Rouge)
Nozzle,QC,White (BUSE,Raccord rapide, Blanche)
Nozzle,QC,Yellow (BUSE,Raccord rapide, Jaune)
Nozzle,Plastic, Soap(Buse, Plastique, Savon)
KIT,Hook (ENSEMBLE,Crochet)
KIT,HandleConnector (ENSEMBLE,Poign_e,Connecteur)
KIT,Vibration Mount (ENSEMBLE,Montant antivibratile)
HOSE(TUYAU)
KIT,Wheel (ENSEMBLE,Roue)
E-Ring(Anneauen E)
Axle (GLISSER)
ENGINE(seepages28-31) (MOTEUR(voirpages28_.31)) (126T02-0114-B1)
itemsNot illustrated
A_Jcles.on fl|us_
Pa_ #
Piece .o,
203354GS
AB3061BGS
87815GS
AIO4ORGS
203377GS
790701
794693
282846
195015GS
Optional Accessories NotIllustrated
Accessoires en optionnon illustr_s
191922GS KIT, Maintenance,O-Ring (ENSEMBLE,entretien, joint torique)
7167300GS HouseWashConcentrate (makes 4 gallons) (Concentr_ de nettoyant m_nager (produit 15 litres))
7167301GS DeckWash Concentrate (makes 2 gallons) (Concentr_de nettoyant de pont (produit 7,5 litres))
7167302GS Vehicle/BoatWash Concentrate(makes4 gallons) (Concentr6 de nettoyant de v_hicule/bateau (produit 15 litres))
7167303GS DegreaserConcentrate (makes4 gallons) (Concentr6 de d_graissant (produit 15 litres))
Descr|pUon
DescrlpUon
MANUAL,Operator's(MANUELd'utilisation)
OIL,Bottle,Engine(HUILE,bouteille,moteur)
GOGGLES(LUNETTESDESECURITt_)
HOSE,Chemical(TUBE,Chimique)
DECAL,Shroud(DECALQUE,TOledeprotection)
SHROUD(TOLLDEPROTECTION)
LABEL,Warning(DECALQUE,Avertissement)
COVER,Control(COUVERCLE,Commande)
KIT,Tag/WaringSrv(ENSEMBLE,Avertissement/Etiquettes_curitQ)
25
Page 26

CRAFTSMAH2550 PSi Cleaning System 580.676630
Hettoyeur _ pression CRAFTSMAHde 2,550 psi 580.676630
Pump-- ExplodedView
Pompe-- Vue _clat_e
@@
k
@
L
(_
$
o_
0
CO% C}
@@
L
%
0
26
Page 27

CRAFTSMAH2550 PSi CJeanJngSystem 580.676630
Hettoyeur _ pressJonCRAFTSMAHde 2,550 psi 580.676630
Pump -- Parts List
Pompe -- Liste des pi_ces
Item Part#
Article Pieceno.
19 190571GS
28 190627GS
45 190578GS
62 190581GS
76 194298GS
A 190594GS
B 190632GS
C 190634GS
D 203631GS
E 193806GS
F 190592GS
G 190593GS
H 193807GS
J 189971GS
K 193971GS
L 193972GS
Items Not Illustrated
Articles nonillustr_s
B2384GS
NOTE:Item letters A- L are service kits and include all parts shown within the box.
REMARQUE:Losarticles A _.L sont des ensemblesde remplacement et incluent toutes les pi_ces illustr_es clansI'encadr_ correspondant.
Description
Description
CAP,Oil (BOUCHON,Huile)
MANIFOLD(COLLECTEUR)
PIN(TIGE)
CAP,1/8 (BOUCHON,1/8)
THERMALRELIEF(SOUPAPEDESURPRESSIONTHERMIQUE)
KIT,UNLOADERSTEM (ENSEMBLE,TIGEDEDI_COMPRESSION)
KIT,WATERINLET,ALUM (ENSEMBLE,ENTREED'EAU,ALUMINIUM)
KIT,OUTLET,ALUMINIUM (ENSEMBLE,SORTIE,ALUMINIUM)
KIT,HEADALUMINIUM(ENSEMBLE,TETEDEPOMPE,ALUMINIUM)
KIT,CHECKVALVES(ENSEMBLE,CLAPETSDERETENUE)
KIT,INLETCHECK(ENSEMBLE,SOUPAPED'ENTREE)
KIT,CHEMICALINJECTION(ENSEMBLE,INJECTIONDEPRODUITSCHIMIQUES)
KIT,SEALSET(ENSEMBLE,ETANCHEITE)
KIT,CHEMICALHOSE(ENSEMBLE,TUYAUDEPRODUITSCHIMIQUES)
KIT,PIPEFITTING(ENSEMBLE,RACCORDDETUYAU)
KIT,UNLOADERSEAT(ENSEMBLE,SIEGEDEDECOMPRESSION)
FILTER,Inlet(Filtre,I'Arriv_e)
27
Page 28

EHGIHE,Brigss & Stratto., 126T02 - Exploded View
MOTEUR, Briggs & Stratton, 126T02 - Vue 6clarke
51
306
684 '_
87O 871
161
24 0
741
287
718
a
- 869
524 Q_
81
9
__ lO_b
158
209
615
404
616
20
613
28
Page 29

EHGIHE,Brigss & Stratto., 126T02 - ExpJodedView
MOTEUR, Briggs & Stratton, 126T02 - Vue 6cJat_e
843
188
19o
670 @
2271 II 3331
I_ 601
957
365 ':_
17
633
334
127 G 130
977CARBURETOR
GASKETSET 121CARBURETOR
1
3.0 276 0 633® 104 _ 617 633 ®
163 _ 617 127 _ 633A ®
633A ®
617
37
276 0
_ 276 Q
OVERHAULKIT
12t 1_
1210_
65 1_ 58
592
459 _
689 O
456
___ __ 633A _m 137 0 276 O
1386 1388_ 163_ _ ]
597
305
332
1005
29
Page 30

EHGIHE,Brigss & Stratton, 126T02 - Parts List
MOTEUR, Briggs & Stratton, 126TO2 - Homenclature de pi_ces
Item Part#
Article Piece no.
1 697322
2 399269
299819S
4
493279
691160
5
696125
7
8 695250
9 699472
10 691125
11 691781
12 692232
13 690912
15 691680
16 694849
20 399781S
22 691092
23 691992
24 222698S
25 791097
791326
26 791098
791324
27 691866
28 499423
29 499424
32 691664
32A 695759
33 262651S
34 262652S
35 691270
36 691270
37 694086
40 692194
43 691997
45 690548
46 691449
50 497465
51 272199S
54 691650
Description Item Part #
Description Article Piece no.
CylinderAssembly (Ensemblecylindre) 55 691421
Kit- Bushing/Seal (Magneto Side) (Ensemble-
Garnitured'6tanch_it_/Joint (c6t_ 58 697316
magneto)
Seal-Oil(Magneto Side) (Joint-Huile (c6t_ 60 281434S
magneto))
Surnp-Engine (Puisard-Moteur) 65 690837
Head-Cylinder (Culasse-Cylindre)
Gasket-CylinderHead(Joint statique-Oulassede 78 691108
cylindre) 81 691740
BreatherAssembly (Ensemblede reniflard) 97 696565
Gasket-Breather(Joint statique-Reniflard) 194 691242
Screw (Breather Assembly) (Vis (Ensemblede
reniflard)) 108 790844
Tube-Breather(Tube-Reniflard) 109 790843
Gasket-Crankcase(Joint statique-Carter) 117 697355
Screw (Cylinder Head) (Vis (Culasse de
cylindre)) 118 494879
Plug-Oil Drain (Bouchon-Vidange d'huile)
Crankshaft (Vilebrequin) 121 498260
Seal-Oil(PTOSide) (Joint-Huile (C6t_ prise de
force)) 125 790845
Screw (CrankcaseCover/Sump)(Vis (Couvercle- 127 694468
Carter/Puisard)) 130 696564
Flywheel(Volant-rnoteur) 133 398187
Key-Flywheel(Clavette-Volant-rnoteur) 134 398188
Piston Assembly (Standard) (Ensemblede
piston (Standard)) 137 693981
Piston Assembly (.020" Oversize)(Ensemble de 159 691753
piston (51 mm (0.920 pc)
Surdimensionn_)) 163 272653S
Ring Set (Standard) (Jeude bagues (Standard)) 187 791766
Ring Set (.020" Oversize)(Jeu de bagues (51
mm (0.020 pc) Surdimensionn6))
Lock-Piston Pin (Verrou-Axe de piston) 188 693399
Pin-Piston (Axe-Piston)
Rod-Connecting (Bielle) 190 690940
Screw (Connecting Rod) (Vis (Bielle)) 292 691829
Screw (Connecting Rod) !Vis (Bielle))
Valve-Exhaust(Soupape-Echappement) 299 691290
Valve-Intake(Soupape-Entr_e) 222 790143
Spring-Valve (Intake) (Ressort-Soupape 227 690783
(Entree))
Spring-Valve (Exhaust) (Ressort-Soupape 231 691636
(l'--chappernent))
Guard-Flywheel(Capot-Volant-rnoteur) 276 271716
Retainer-Valve(Dispositif de retenue-Soupape) 287 690940
Governor/OilSlinger(Bague d'6tanch_it_-
R_gulateur/Huile) 291 790830
Tappet-Valve(Poussoir-Soupape) 300 790828
Camshaft (Arbre _.cames) 304 791291
Manifold-Intake (Collecteur-Entr_e) 305 691108
Gasket-Intake(Joint statique-Entr_e)
Screw (Intake Manifold) (Vis (Collecteur 396 790836
d'entr_e))
Description
Description
Housing-RewindStarter(B_ti-D6rnarreur_.
cordon)
Rope-Starter(Cutto RequiredLength)(Cordon-
B_rnarreur)
Grip-StarterRope(Poign_e-Cordonde
d_marreur)
Screw(RewindStarterHousing)(Vis
(D_marreur_ cordon))
Screw(FlywheelGuard)(Vis(Ecrandevolant))
Lock-MufflerScrew(Verrou-Visdesilencieux)
Shaft-Throttle(Arbre-Pouss_e)
Pin-FloatHinge(Axe-Pivotd'articulation
flotteur)
Valve-Choke(Soupape-Etrangleur)
Shaft-Choke(Axe-I_trangleur)
Jet-Main(Standard)(Gicleur-Principal
(Standard))
Jet-Main(HighAltitude)(Gicleur-Principal
(Altitude_lev_e))
Kit-CarburetorOverhaul(Ensemble-Rernise
neufducarburateur)
Carburetor(Carburateur)
Plug-Welch(Pastille-Obturation)
Valve-Throttle(Soupape-Pouss_e)
Float-Carburetor(Flotteur-Carburateur
Valve-Needle(IncludesSeat)(Soupape-Pointeau
(incluantlesi_ge))
Gasket-FloatBowl(Jointd'_tanch_it_-Cuve)
Bracket-AirCleanerPrimer(Support-Pompe
d'arnorgagedu filtre_ air)
Gasket-AirCleaner(Jointstatique-Filtre&air)
Line-Fuel(Cutto RequiredLength)(Conduite-
Essence(CouperAlaIongueur
requise))
Screw(ControlBracket)(Vis(Supportde
contr61e))
Screw(FuelTank)(Vis(R6servoird'essence))
Link-MechanicalGovernor(Tringlerie-
R_gulateurm_canique)
Spring-Governor(Ressort-R_gulateur)
Bracket-Control(Support-ContrOle)
Lever-GovernorControl(Levier-Contr61edu
r_gulateur)
Screw(ChokeValve)(Vis(Soupape
d'6trangleur))
Washer-Sealing(Rondelle-I_tanch_it_)
Screw(OilFillTube)(Vis-(Jauge/Assernbl_ede
tube)
Thermostat(Thermostat)
Muffler(Silencieux)
Housing-Blower(B&ti-Soufflerie)
Screw(BlowerHousing)(Vis-(B&tide
soufflerie))
Shield-Cylinder(l'--cran-Cylindre)
39
Page 31

EHGIHE,Brigss & Stratton, 126T02 - Parts List
MGTEUR, Briggs & Stratton, 126TO2 - Homenclature de pi_ces
Item Part #
Article Piece no.
307 690345
332 690662
333 802574
334 691061
337 802592S
356 692390
358 497316
365 692524
494 690272
425 690670
443 692523
445 491588S
455 791960
456 692299
459 281505S
595 691251
523 499621
524 692296
525 495265
529 691923
562 691119
584 697734
585 691879
592 690800
597 691696
601 791850
608 497680
613 790833
615 690340
616 698801
617 270344S
621 692310
633 693867
633A 691321
635 66538S
Description 668 493823
Description
Screw (Cylinder Shield) (Vis (l_crande Item Part #
cylindre)) Article Piece no.
Nut (Flywheel) (l_crou-Volant-moteur) 670 692294
Armature-Magneto (Armature-lVlagn6to)
Screw (Magneto Armature) (Vis (Armature de 684 690345
magneto))
Plug-Spark (Bougie-Allumage) 689 691855
Wire-Stop (FiI-Arr_t) 718 690959
GasketSet-Engine (Jeude joints statiques- 741 790345
Moteur) 832 499034
Screw (Carburetor) (Vis (Carburateur)) 836 690664
Washer (Governor Crank) (Rondelle (Manivelle-
R_gulateur)) 842 691031
Screw (Air CleanerCover) (Vis (Couvercledu 843 691884
filtre 9 air))
Screw (A/C Primer Bracket) (Vis (Support de 847 692017
pompe d'amorgageA/C))
Filter-A/CCartridge (Filtre-CartoucheA/C) 851 493880S
Cup-Flywheel(Coupelle-Volant-moteur) 868 697338
Plate-Pawl Friction (Plaque-Cliquet _friction) 869 691155
PawI-Ratchet (Cliquet-Rachet) 879 690380
Nut (Governor Control Lever) (l_crou (Levier de
contr61edu r_gulateur)) 871 262001
Dipstick (Jauge)
Seal-Dipstick Tube(Anneau-Ode Tube de 871 63709
Jauge)
Tube-Dipstick (Tube deJauge) 883 691881
Grommet (Oeillet)
Bolt (Governor Lever) (Boulon (Levierdu 957 699985
r_gulateur))
Cover-BreatherPassage(Couvercle-Passagedu 966 792040
reniflard)
Gasket-BreatherPassage(Joint d'_tanch_it6- 968 692298
Passagedu reniflard) 979 691669
Nut (Rewind Starter Housing) (l_crou 972 693974
(D_marreur 9 cordon)) 975 493640
Screw (Pawl Friction Plate) (Vis (Plaquede 976 694395
cliquet _ friction)) 977 498261
Clamp-Hose(Bride-Boyau)
Starter-Rewind (D_marreur-Rebobinage) 1005 691346
Screw (Muffler) (Vis (Silencieux)) 1059 692311
Retainer (Dispositif de retenue) 1210 498144
Crank-Governor(IVlanivelle-R_gulateur)
Seal-IntakeManifold (Joint-Collecteur d'entr_e)
Switch-Stop (Interrupteur-Arr_t) 1211 498144
Seal-Choke/Throttle Shaft (Choke) (Joint-
Etrangleur/Arbre de pouss_e
(l_trangleur)) 1386 790848
Seal-Choke/Throttle Shaft (Throttle) (Joint- 1387 790849
Etrangleur/Arbre de pouss_e 1388 790850
(Pouss_e))
Boot-Spark Plug (Couvre-borne-Bougie
d'allumage)
Spacer(Includes2) (Butted'espacement
(Comprend2))
Description
Description
Spacer-FuelTank(But6ed'espacement-
R_servoirdecombustible)
Screw(BreatherPassageCover)(Vis(Couvercle
depassagedu reniflard))
Spring-Friction(Ressort-Friction)
Pin-Locating(D_trompeur)
Gear-Timing(Pignondedistribution)
Guard-Muffler(Capuchon-Silencieux)
Screw(MufflerGuard)(Vis(Capuchondu
silencieux))
Seal-DipstickTube(Joint-Jointtorique(Jauge))
Sleeve-Lever(SpeedControl)(Manchon-Levier
(Contr01edelavitesse))
Dipstick/TubeAssembly(Jauge/Assembl_ede
tube)
Terminal-SparkPlug(Borne-Bougied'allumage)
Seal-Valve(Si_ge-Soupape)
Seat-Valve(Intake)(Si_ge-Soupape(Entree))
Seat-Valve!Exhaust)(Si_ge-Soupape
(Echappement))
Bushing-Guide(ExhaustValve)(Garniture
d'_tanch6it_-Guide(Echappement))
Bushing-Guide(IntakeValve)(Garniture
d'_tanch_it_-Guide(Entree)
Gasket-Exhaust(Jointd'_tanch_it_-
Echappement)
Cap-FuelTank(Bouchon-R6servoirde
combustible)
Base-AirCleanerPrimer(Base-Pompe
d'amorgagedu filtre_ air)
Cover-AirCleaner(Couvercle-Filtre_ air)
Screw(SupportBracket)(Vis (support))
Tank-Fuel(R_servoir-Essence)
Bowl-Float(Cuve-Flotteur)
Primer-Carburetor(Amorceur-Carburateur)
GasketSet-Carburetor(Jointd'_tanch6it_-
Carburateur)
Fan-Flywheel(Ventilateur-Volant)
Kit-Screw/Washer(Ensemble-Vis/Rondelle)
Pulley/SpringAssembly(Pulley)
(Poulie/Ensemblederessorts
(Poulie))
Pulley/SpringAssembly(Spring)
(Poulie/Ensemblederessorts
(Poulie))
Vane-Air(Aube-Air)
Spring-AirVane(Ressort-Aubed'air)
Screw(AirVane)(AutoChokeSystem)(Vis
(Aubed'air) (Syst_med'6trangleur
automatique))
31
Page 32

Sears,Roebuckand Co., U.S.A. (Sears),the CaliforniaAir ResourcesBoard(CARD)and
the UnitedStates EnvironmentaJProtectionAgency(U.S.EPA}
EmissionsControlSystemWarrantyStatement
(Owner'sDefectWarrantyRightsand Obligations)
TheCalifornia Air Resources Board (CARB), U.S. EPAand Sears are
pleasedto explain the Emissions Control System Warranty on your
small offroad engine (SORE).In California, new small offroad
engines model year 2006 and later must be designed, built and
equipped to meetthe State's stringent anti-smog standards.
Elsewhereinthe UnitedStates,newnon-road,spark-ignition engines
certifiedfor modelyear1997 and later must meetsimilar standardsset
forth bythe U.S.EPA.Searsmust warrant the emissions control
systemonyour enginefor the periodsoftime listed below, provided
there hasbeenno abuse,neglector improper maintenanceof your
smalloff-road engine.
Your emissions control system includes parts such as the
carburetor, air cleaner,ignition system, fuel line, muffler and
catalytic converter. Also included may beconnectors and other
emissions related assemblies.
Wherea warrantable condition exists, Searswill repair your small
off-road engine at no cost to you including diagnosis, parts and
labor.
Sears, Roebuck and Co, Emissinns Cnntrnl Defects Warranty
Coverage
Small off-road enginesarewarranted relative to emissions control
parts defects for a period of two years, subject to provisions set
forth below. If any covered part on your engine is defective,the part
will be repaired or replacedby Sears.
Owner's Warranty Responsibilities
Asthe small off-road engine owner, you are responsible for the
performance of the required maintenancelisted in your Operating
andMaintenance Instructions. Searsrecommends that you retain all
your receiptscovering maintenanceon your small off-road engine,
but Searscannot deny warranty solely for the lack of receipts or for
your failure to ensurethe performance of all scheduled maintenance.
Asthe small off-road engine owner, you should however beaware
that Sears may deny you warranty coverage if your small off-road
engine or a part has failed due to abuse, neglect, improper
maintenanceor unapproved modifications.
You are responsible for presenting your small off-road engineto an
Authorized Sears ServiceDealer as soon as a problem exists.
The undisputed warranty repairs should be completed in a
reasonableamount of time, not to exceed30 days.
If you have any questions regarding your warranty rights and
responsibilities, you should contact a Sears ServiceRepresentative
at 1-800-469-4663.
Theemissions warranty is a defects warranty. Defects arejudged
on normal engine performance. The warranty is not related to an in-
use emissions test.
Sears, Roebuck and Co, Emissinns Cnntrni Defects Warranty
Provisions
Thefollowing arespecific provisions relativeto your Emissions
Control DefectsWarranty Coverage.It is in addition to the Sears
enginewarranty for non-regulated enginesfound in the Operatingand
MaintenanceInstructions.
1. Warranted Parts
Coverageunder this warranty extendsonly to the parts listed
below (the emissions control systems parts) to the extent these
parts were present on the enginepurchased.
a. Fuel Metering System
* Cold start enrichment system
Inthe USAandCanada,a24-hourhotline,1-800-469-4663,hasa menuof pre-recordedmessagesofferingyou productmaintenance
information.
* Carburetor and internal parts
* Fuel Pump
* Fuelline, fuel line fittings, clamps
. Fueltank, cap andtether
. Carbon canister
b. Air Induction System
* Air cleaner
. Intake manifold
. Purge and vent line
c. Ignition System
. Spark plug(s)
. Magneto ignition system
d. Catalyst System
* Catalytic converter
. Exhaustmanifold
. Air injection system, Pulsevalve
e. Miscellaneous Items
. Vacuum, temperature, position, time sensitive valves and
switches
. Connectors and assemblies
2. Lengthof Coverage
Searswarrants to the initial owner and eachsubsequent
purchaserthat the Warranted Parts shallbefree from defects in
materialsand workmanship which causedthe failure of the
WarrantedPartsfor a period of two yearsfrom the date the
engineis deliveredto a retail purchaser.
3. NeCharge
Repairor replacementof any Warranted Part will be performed
at no charge to the owner, including diagnostic labor which
leads to the determination that a Warranted Part is defective if
the diagnostic work is performed at an Authorized Sears
Service Dealer.
4. Claims and Coverage Exclusions
Warranty claims shall befiled in accordance with the provisions
of the Sears EngineWarranty Policy. Warranty coverage shall
be excludedfor failures ofWarrantedParts which are not
original Searsparts or becauseof abuse, neglector improper
maintenanceas set forth in the SearsEngineWarranty Policy.
Searsis not liableto cover failures of Warranted Parts caused
bythe use of add-on, non-original, or modified parts.
5. Maintenance
AnyWarranted Part which is not scheduledfor replacementas
required maintenanceor which is scheduledonly for regular
inspection to the effect of "repairor replaceas necessary"shall
bewarranted asto defectsfor the warranty period. Any
WarrantedPartwhich is scheduledfor replacementas required
maintenanceshall bewarranted as to defects only for the period
of time up to the first scheduled replacementfor that part. Any
replacementpartthat is equivalent in performanceand
durabilitymay be usedin the performanceof any maintenanceor
repairs.The owneris responsiblefor the performance of all
required maintenance,as defined in the SearsOperatingand
MaintenanceInstructions.
6. Censequential Coverage
Coveragehereunder shall extendto the failure of any engine
components caused by the failure of any Warranted Part still
under warranty.
32
Page 33

Emissions information
Enginesthat are certified to meetthe CaliforniaAir Resources
Board(CARB)Tier 2 Emission Standards must display
information regardingthe Emissions Durability Period and Air
Index.The engine manufacturer makesthis information
availableto the consumer on emission labels. Theengine
emission label will indicate certification information.
TheEmissionsDurabilityPeriod describes the number of
hours of actual running time for which the engine is certified
to beemissions compliant, assuming proper maintenancein
accordancewith the Operating& MaintenanceInstructions.
Thefollowing categoriesare used:
Moderate: Engineis certified to be emission compliant for
125 hours of actual engine running time.
Intermediate: Engineis certified to beemission compliant
for 250 hours of actual engine running time.
Extended:Engineis certified to beemission compliant for
500 hours of actual engine running time.
Forexample, a typical walk-behind lawn mower is used 20 to
25 hours per year. Therefore,the EmissionsDurability
Period of an engine with an intermediaterating would
equateto 10to 12 years.
Certainengineswill be certified to meetthe United States
EnvironmentalProtection Agency (USEPA)Phase2 emission
standards. For phase 2 certified engines, the Emissions
CompliancePeriod referredto on the Emissions Compliance
label indicatesthe number of operating hours for which the
engine has been shown to meet Federalemission
requirements.
Forengines less than 225 cc displacement:
CategoryC = 125 hours
CategoryB = 250 hours
CategoryA = 500 hours
Forengines of 225 cc or more:
CategoryC = 250 hours
CategoryB = 500 hours
CategoryA = 1000 hours
33
Page 34

GARANTIE........................................... 34
REGLESDESt_CURITE.............................. 34-37
FONCTIONSETCOMMANDES........................... 38
ASSEMBLAGE..................................... 39-42
OPI_RATION....................................... 43-47
CARACTERISTIQUESDU PRODUIT ....................... 48
ENTRETIEN....................................... 49-54
RANGEMENT......................................... 55
DC:PANNAGE......................................... 56
REMARQUES........................................ 57
GARANTIEDUDISPOSITIFANTIPOLLUTION ............. 58-59
COMMENTCOMMANDERLESPARTIES .... PAGEPOSTERIEURE
GARANTIECOMPLETED'UHAH SURLAHETTOYEURA PRESSIONCRAFTSMAH
Encas de d_faillance de la nettoyeur _ pression due _.un d_faut de materiel ou de fabrication _ I'int_rieur d'un an 9.partir de ladate d'achat,
retournez-laA un magasin Sears,_.un point de venteCraftsman ou _.un Centrede service Searsaux Etats-Unis ou au Canadapour une
r@aration gratuite (ou un remplacement si la r_paration s'av_re impossible).
Toute la couverture envertu de la garantie s'applique pendant seulement 90 jours A compter de la date d'achat si cette nettoyeur_.pression
est utilis_e Ades fins commerciales ou de location.
La pr_sente garantievous accorde certains droits I_gauxsp_cifiques et il se peut que vous ayez_galement d'autres droits, lesquelsvarient
d'un Etat&I'autre ou d'une province &I'autre.
Sears, Roebuck and Co., Hoffman Estates, IL 68179
Sears Canada Inc., Toronto, Ontario, Canada MSB 288
,_ Cesiest la sQret_ le symhoie vif. II est utiiis_ pour vo,s aierter aux dangers de bless,re personnelspotentieis.Oh_ir to,s
messagesde s_ret_ q,i s,ivent ¢esymboie _viter la bless,re o, la mortpossibles.
L,sezoveoso,nsemonue,et,om.,or,sez-vo.saveovotreSy...olesdeDangeret.oyens
..................nettoyeur_ pression.Connaissezsos applications,sos
limitationset los dangers qu'il impliq,e.
Le symbole indiquant un messagede s_curit_ (_.) estaccompagn_
d'un mot indicateur (DANGER,ATTENTION,AVERTISSEMENT),d'un
messageillustr_ et/ou d'un message de s_curit_visant Avous avertir
des dangers. DANGERindiqueun danger qui, s'il n'est pas _vit6,
provoquera des blessures graves,voire fatales. AVERTISSEMENT
indique un danger qui, s'il n'est pas_vit_, peutprovoquer des
blessures graves, voire fatales. ATTENTIONindique un danger qui,
s'il n'est pas _vit_, peutprovoquer des blessures mineures ou
16g_res.Le mot AViS indique une situation pouvant endommager
I'_quipement. Suivez les messages des_curit_ pour 6viter ou r_duire
les risques deblessures ou de mort.
Manuel d'Utilisation EmanationsToxiques ChocElectrique
SurfaceGlissante Chute Injection Fluide
Feu
Partiesen mouvement
Explosion Surface Chaude
Objetsvolant
Effet de Recul
34
Page 35

AVERTISSEMENT
L'_chappementdumoteurdeceproduitcontientdesproduits
chimiqgesqueri_tat deCalifornieconsid_recommecausantle
cancer,desd_formations_la naissanceou d'autresdangers
concernantla reproduction.
AVERTISSEMENT
Lemoteur,Iorsqu'ilfonctionne,produitdumonoxyde
de carbone, un gaz toxique inodore et incolore.
L'inhalation du monoxyde de carbone peut causer des
maux de t_te, de la fatigue, des _tourdissements, le
_ omissement, de la confusion, des crises _pileptiques,
• Faitesfonctionner le nettoysur _ pression SEULEMENT_ I'ext6rieur.
• Evitsz que les gaz d'_chappernent entrent dans un espacs rsstreint, par
• NE d_rnarrsz, ni ns faitss fonctionner un rnoteur _ I'int6rieur ou dans
• Utilissz un apparsil respiratoire ou un masque Iorsqu'il y a des risques
• Lisez toutes les instructions qui accornpagnsnt Is masque pour 6tre
des naus_es, I'_vanouissement ou la mort.
Certains produits chimiques et d_tergents peuvent _tre
nocifs en cas d'ingestion ou d'inhalation et peuvent
provoquer des naus_es, un _vanouissement ou un
empoisonnement.
une fenStre,une ports, une prise d'a6ration ou touts autre ouverturs.
un espace fermi, rn_rnesi les fen_tres ou les portes sont ouvertes.
d'inhalation des vapeurs.
certain qu'il vous protagera de faqonefficace centre I'inhalation des
vapeurs nocives.
AVERTISSEMENT
_¢ isqued'_lectrocution.
• NE pulv_risez JAMAIS pros d'une source d'alirnentation.
Tout contact avec une source d'alimentation de courant
3eut causer un choc _lectrique ou des brt31ures.
AVERTISSEMENT
_j L'essence et ses sont extr_mement
LORS DE L'AJOUT OU DE LA VIDANGE DU CARBURANT
* Eteignezle nettoyeur _ pression et laissez-le refroidir au rnoins
. Rernplissez ou vidangez le r_servoir d'essence & I'extdrieur.
* NErernplissez PAStrop le rdservoir. Laissez I'expansion de I'essence.
. Si du carburant est renversd, attendezqu'il s'_vapore avant de
. EloignezI'essence des _tincelles, des flarnrnes, des veilleuses, de la
. N'ALLUMEZ PASde cigarette ou ne furnez pas ;_proxirnitd de I'appareil.
LORS DU BI_MARRAGE DE L'ItQUIPEiVlENT
* Assurez-vous que la bougie d'allurnage, le silencieux, le bouchon
* NEd_rnarrez PASle rnoteur Iorsque la bougie d'allurnage est enlev_e.
LORSQUE L'I_QUIPEMENT FONCTIONNE
* NEpenchez PAS lernoteur ou I'_quipernent. vous risqueriez de
* NEvaporisez PASde liquides inflammables.
LORSQUE VOUS TRANSPORTEZ OU RItPAREZ L'EQUIPEIVIENT
. Le rdservoir d'essence doit _tre VIDEou le robinet d'arr_t de carburant
. Ddbranchezle cgble de bougie.
LORSQUE VOUS ENTREPOSEZ L'ESSENCE OU UN ItQUIPEIVIENT
AVEC UN RItSERV01R A ESSENCE
. Entreposez-leloin des appareilsde chauffage,des fours, des chauffe-eau,
inflammables et explosives.
blessures graves, pouvant_tre fatales.
Le feu ou I'explosionrisquede provoquer des
2 minutes avant de retirer le capuchon du rdservoir de carburant,
Desserrezlenternent le capuchon pour laisser la pression s'_chapper du
rdservoir.
ddrnarrer le rnoteur.
chaleur et de route autre source d'inflarnrnation.
essenceet le filtre ;_air sont en place.
renverser de I'essence.
doit _tre _ la position ferrnde (OFF) pendant le transport ou la
r@aration.
des s_cheusesoude tout autreappareil_lectrorn_nagerdisposant d'une
veilleuseou de route autre source d'inflarnrnation risquant d'enflarnrner
lesvapeurs d'essence.
vapeurs
35
Page 36

AVERTISSEMENT
Un effet de recul (r_troaction rapide) de la corde du
d_marreur pourrait entrafner des blessures corporelles.
L'effet de recul tirera votre main et votre brasvers le
_ moteur plus rapidement que vous ne pouvezrel_.cherla
corde.
Vous risquez ainsi de subir des fractures, des
ecchymosesou des entorses.
o NEtirezJAMAISsur lacordedud6marreursansavoird'abordlib6r_la
pressiondu pistoletdepulv6risation.
Lorsdu d_marragedumoteur,tirezlentementsur lacordejusqu'_ce
quevoussentiezuner6sistanceettirezalorsrapidementafind'_viter
uneffetde recul.
Apreschaquetentativeded6marrage,alorsquelemoteurn'apas
d6marr6,dirigeztoujoursle pistoletversunendroits6curitaireet
appuyezsur lad_tentedu pistoletdepulv6risationpourlib6rerla haute
pression.Engagezleverroudelad6tentedu pistoletdepulv_risation.
Lorsquevousutilisezunevaporisation9 hautepression,saisissez
fermementlepistoletdevaporisationaveclesdeuxmainsafind'_viter
lesrisquesdeblessuresentratn_sparleseffetsderecul.cuandoaplique
unrociadoaaltapresi6nparaevitarlesionescuandoseproduzcael
retrocesodelapistola.
AVERTISSEMENT
Usage de pression peut crier puddles et glissant.
Un effet de recul du pistolet de pulv_risation pourrait
entrafner une chute.
• Utilisez le nettoyeur _ pression 9 partir d'une surface stable.
• La surface $ nettoyer dolt 8tre inclin6e et 6quip6e d'_coulements afin de
r_duire la possibilit_ de chutes dues aux surfaces glissantes.
, Soyeztr_s vigilant si vous devezutiliser le nettoyeur _ pression Iorsque
vous 8tes dans une _chelle. un 6chafaudage ou autre emplacement
similaire.
• Lorsque vous utilisez une vaporisation 9 haute pression, saisissez
fermement le pistolet de vaporisation avecles deux mains afin d'_viter
les risques de blessures entratn_s par les effets de recul.
AVERTISSEMENT
s_ Tout contact avec la zone du silencieux peut causer des
brOlures graves.
La chaleur et les gaz d'_chappement peuvent
AVERTISSEMEHT
Lejetd'eausouspressionproduitparcet_quipement
peut percer la peau et les tissus sous-jacents, risquant
amputation.
de provoquer des blessures graves pouvant mener _.une
Le pistolet de pulv_risation retient une pression d'eau
_lev_e, m_me Iorsque le moteur est _teint et que I'eau
est d_connect_e, ce qui peut causer des blessures.
• N'autorisez JAMAIS des ENFANTS9se servir du nettoyeur 9 pression.
• Ne r_parezJAMAIS les tuyaux _ haute pression. Remplacez.
• Ne r@arez JAMAIS des raccords non _tanches _ I'aide de scellant.
Remplacez lejoint torique ou lejoint d'_tanch_it&
• Ne connectezJAMAIS le boyau _thaute pression _ la rallonge de buse.
, Gardeztoujours le tuyau flexible _ haute pression raccord_ _ la pompe
et au pistolet de pulv_risation Iorsque le systSme est sous pression.
Avant de d_marrer le moteur, dirigez TOUJOURSle pistolet vers un
endroit s_curitaire et appuyez sur la d6tente du pistolet de pulv_risation
pour libSrer la haute pression et _viter un effet de recul. Lorsque vous
n'utilisez pas le pistolet, engagez le verrou de la d_tente.
• N visez JAMAIS des personnes,des animaux ou des plantes avec le
pistolet pulv_risateur.
• NE verrouillez PAS le pistolet de pulv_risation dans la position ouverte.
• NE laissez PASle pistolet de pulv_risation sans surveillance alers que
I'appareil est en marche.
, N'utilisez JAMAIS un pistolet de pulv_risation qui n'est pas muni d'un
verrou d'arme ou d'un pontet install_ et en ordre de marche.
Assurez-vous toujours que le pistolet de pulverisation, lee buses et lee
accessoires sont bien fixes.
AVERTISSEMENT
Unintentionalpeutr_sulterdansfeuou_lectrique.
LORSQUE VOUS RI_GLEZ 0U RI_PAREZVOTRE NETTOYEUR ,_
PRESSION
• D_branchez toujours le c_tblede bougie et placez-lede faqon _ ce qu'il
ne soit pas encontact avec la bougie.
LORS DE TESTS D'ALLUMAGE DU iVIOTEUR
• Utilisez un v_rificateur de bougies d'allumage approuv&
NEv_rifiezPASI'allumageIorsquela bougied'allumageest enlev_e.
_ nflammer des mat_riaux combustibles et les
• NE touchez PASaux pi_ces chaudes et _vitez le contact avecles gaz
• Laissez 1'6quipement refroidir avant de letoucher.
• Laissez un d_gagement d'au moins 1,5 m (5 pi) tout autour de la
o Le Code of FederalRegulation (CFR)Title 36 Parks, Forests, and Public
structures ainsi que causer des dommagesau r6servoir
d'essence et entrafner un incendie.
d'6chappement.
nettoyeur _tpression, y compris au-dessus.
Property exige que de1'6quipementaliment_ par un moteur
combustion interne soit dot6 d'un pare-_tincelles et constamment
maintenu en bon 6tat fonctionnement, conform6ment _ la norme de
service 5100-1C de la USDA Forest ou 9 une r6vision de celle-ci. Dans
I'Etat de la Californie, un pare-6tincelles est requis en vertu de la
section 4442 du California Public Resources Code. II se peut que
d'autres Etatsaient des lois semblables.aux terres f6d6rales. Si vous
6quipez le silencieux d'un pare-6tincelles, il dolt atre en bon 6tat de
fonctionnement.
36
Page 37

AVERTISSEMENT
4_ D_marreur et autre tourneres peut ernp_trer mains,
• N'utilisez JAMAIS un appareil sans bgti ou couvercles protecteurs.
• NE portez PASde vetements 19ches,de bijoux ou tout ce qui risquerait
o Embouteiller des cheveux longs et enlSve la bijouterie.
cheveux,v_tement,ou accessoires.
d'Stre pris dans le demarreur ou toute autre piece rotative.
AVERTISSEMENT
• Lejet peutrejaillirsurvousoupropulserdesobjets.
Risquedeblessureauxyeux.
Portez toujours des lunettes de s6curit6 Iorsque vous utilisez cet
appareil ou que vous vous trouvez _ proximit6 d'un appareil en marche.
Avant de demarrer le nettoyeur _ pression, assurez-vous de porter des
lunettes de securit6 appropriees.
Utilisez TOUJOURSdes lunettes de s6curite appropri6es.
AVIS
Le jet _ haute pression risque d'endommager les articles fragiles
comme le verre.
NEPASdiriger le pistolet de pulv@isation vers les vitres Iorsque la
buse rouge 0° est utilisee.
N'visez JAMAIS des plantes avec le pistolet pulverisateur.
AVIS
Letraitementinad_quatdu nettoyeurb.pressionpeut
_er etr_duiresadur@devieutile.
Si vous avezdes questions _ propos de I'utilisation pr@ue de cet
appareil, consultez votre detaillant ou communiquez avec Sears.
N'utilisez JAMAIS un appareil ayant des pisces brisees ou manquantes
ou sans bgti ou couvercles protecteurs.
NEneutralisez AUCUNdispositif des6curit6 de cette machine.
NEmodifiez PAS la vitesse regul_e du moteur.
N'utilisez PASle nettoyeur 9 pression _des valeurs exc_dant la
pression nominale.
NEmodifiez PAS le nettoyeur _tpression.
Partemps froid, avant ded_marrer le nettoyeur 9 pression, verifiez-en
tousles elements pour vous assurer qu'aucune glace ne s'y est fortune.
N'utilisez JAMAIS le tuyau 9 haute pression comme poignee pour
d@lacer I'appareil. Utilisez toujours la poignee de I'appareil.
V_rifiez la presencede fuites ou les signes de deterioration du systSme
de combustible, comme un tuyau us6 ou spongieux, des brides de
serrage desserreesou manquantes, ou un reservoir ou un bouchon
endommag& R@arez toutes les d6fectuosites avant d'utiliser le
nettoyeur _ pression.
Cetappareil est concu pour Stre utilise uniquement avec des pisces
Sears approuv_es. Si I'appareil est utilise avec des pieces qui NEsont
PAS conformes aux caract@istiques minimales, tousles risques et
responsabilites incomberont _ r utilisateur.
37
Page 38

CONHAiTREVOTRENETTOYEURA PRESSJON
_ isezce manuel d'utiiisation ainsi que lesr_gies de s_curit_avant de faire fonctionnervetre nettoyeur_ pressien.
Comparezles illustrations avecvotre nettoyeur _.pression pour vous familiariser avecI'emplacement des diff_rents boutons et
r_glages.Conservezce manuel pour rd_rence ult_rieure.
A- Pistelet de pulv_risatiou-- Un dispositif de d_tente permet de
contr(31erle jet d'eau sur la surface _ nettoyer. Le pistolet est
muni d'un verrou de s_curit&
B- R_servoir de nettuyage-- L'usage pour tenir jusqu'_ 3,78 I (un
gallon) de nettoyeur _ haute pression d_tergent sOrdans le
r_servoir.
C- Buses -- D_tergent, 0°, 15° et 40° : pour les diff_rentes
applications de nettoyage _ hautepression.
B - B_marreur_ recul-- Utilis_ pour d_marrer le moteur
manuellement.
E- Reservoir d'essence-- Remplissezle r_servoir avecde
I'essenceordinaire sans plumb. Laisseztoujours de la place
pour I'expansion de I'essence.
F - Manetle de poess_e-- Cette manette place le moteur en mode
d6marrage pour le lanceur et_teint le moteur en marche.
G - Filtre _ air -- Filtre de type sec qui limite la quantit6 de
poussi_res et de salet_s dans le moteur.
H - Pempe -- D_veloppe unepression _lev_e.
J- Syst_rne de refroidissernentauternatique-- Fait circuler I'eau
dansla pompe Iorsqu'elle atteint 51° _.68°C (125° _ 155°F).
L'ea. cha.de s'_ceulera de la pernpes.r le sol. Be syst_rne
emp_chela pornpeinterne de s'ah_mer.
K- Prisehautepression-- Vouspermetde brancherletuyau
hautepression.
L- Prise d'eau-- Branchementpourletuyaud'arrosage.
IVI- Bouchende rernplissageetja.ge d'huile -- V_rifiezleniveau
d'huileetremplissezle moteurd'huileici.
N- T.yau_ hautepressien-- Raccordezuneextr6mit_dutuyau
aupistoletdepulv_risationet I'autreAlasortiedu nettoyeur_.
pression.
Articles nonmentr_s:
I_tiquetteavertissernent/directives d'utilisatien --Identifie les
risques et la procedure appropri_epour le d_marrageet I'arr_t du
nettoyeur_ haute pression.
I_tiquettededenn_es(prOs de rarriere de la plaquede fend) --
Indique le num_ro de rnod_leet de s_rie du nettoyeur _.haute pres-
stun. Veuillez avoir ces renseignementssous la main Iors d'appel de
service.
Lunettesde s_curit_ -- Porteztoujours des lunettes de s_curit_
fournies Iors de I'utilisation du nettoyeur Ahaute pression.
Rallenge de buse_ rassordrapide -- Cette rallongevous permet
de changer les buses (quatre mod_les diff_rents).
38
Page 39

Votrenettoyeur_pressionexigequequelqueassembl_eetsoitpr_t
pourI'usageapr_sila_t_convenablemententretenuaveclep_troleetle
carburantrecommand6s.
Si vous avez des probl_mesau courude I'assemhlage de votre
nettoyeur _ pressionousi certaines pi_ces sont manquantes ou
endommag_es, appeiez la ligne d'assistancepourles nettoyeur
pressionau 1-800-222-3136.
g_ballage du nettoyeur _ pression
1. Enleveztous lescomposants de la boTted'exp_dition
I'exceptiondu nettoyeur _.pression.
2. Ouvrezla boTted'exp_dition en coupanttous lescoins du haut
vers le bas.
3. Enlevezle nettoyeur _.pression de la boTted'exp_dition.
CONTENUDUCARTON
V_rifieztoutes les pi_ceset accessoiresdu nettoyeur _ pression. Si
certainesdes pi_ces _num_r_esci-dessus sont manquantesou
endommag_es,appelezla ligne d'assistancepour les nettoyeur_.
pression au 1-800-222-3136.
° Appareil principal
° Poign_e
. R_servoir de nettoyage
. Tuyau _.haute pression
. Pistolet pulv_risateur
. Rallonge de buse _ raccord rapide et porte-buse
. Tube de siphonnement/filtre de d_tergent
. Huile_ moteur
. Sac de pi_ces (comprenant les pi_ces _num_r_esci-dessous)
. Manuel d'utilisation
. Lunettes de s_curit_
. Moule en brochedu support de pistolet de pulv_risation
. Saccontenant 4 buses multicolores
. Materiel de fixation b.lapoign_e
. Boulons de carrosserie, (2)
, Boulon en <<L >_
, Boutons en plastique, (4)
, Agrafes, (4)
Familiarisez-vous avecchaque pieceavant d'assembler le nettoyeur
pression. Wrifiez le contenu de la bofte_ I'aide de I'illustration de
la page38. Si une pieceest manquanteou endommag_e,veuillez
joindre le service de d_pannagedu nettoyeur_ pression au num_ro
sans frais 1-808-222-3136.
8. Choisissez unebuse _.raccord rapide et installez-la sur la
rallongede buse.
FixationdeJapoign e et dnr6servoirde
nettoyage
1. PlacezI'assemblagede la poign_e (A) sur le support de la
poign_e(B) reli_ _ I'unit_ principale. Assurez-vous que les
trous (C) de la poign_esont alights avec ceux du support.
REMARQUE:Vous devrez peut-_tre d_placer lat_ralement les
supports de la poign_eafin d'aligner la poign_e defagon _ ce qu'elle
seglisse sur les supports de la poign_e.
2. Ins_rez les boulons de carrosserie (A) dans les trous _.I'arri_re
de I'unit_, puis fixez un bouton en plastique (B) _.partir de
I'avantde I'unit& Serrez_ la main.
Placezle r_servoir de nettoyage (A) au-dessus des trous (C) de
la poign_e (en regardant Apartir de I'avantde I'appareil).
Poussezles trois agrafes (B) dans les trous jusqu'_ ce qu'elles
reposent sur le r_servoir de nettoyage.
....- I i
/
ASSEMBLA6EDUNETTOYEURA PRESSIO
Votre nettoyeur _.pression Craftsman a_t_ mont_ en grande partie
en usine. Cependant, vous devrez effectuer les t9ches ci-dessous
avant d'utiliser votre nettoyeur & pression.
1. Fixezla poign_e et le r_servoir de nettoyage_.I'unit_ principale.
2. Branchezle tube de siphonnement du d_tergent _.la pompe.
3. Ajoutez de I'huile au carter du moteur.
4. Ajoutez de I'essence dans le r_servoir.
5. Branchezle tuyau _.haute pression au pistolet pulv_risateur et
_.la pompe.
6. Branchezla source d'alimentation d'eau _.la pompe.
7. Connectezla rallonge de buse sur le pistolet de pulv_risation.
39
Ins_rez I'autre crochet en "L" (A) par le trou situ_ directement
en ci-dessus du r_servoir de nettoyage, du c6t_ droit dela
poign_e(en regardant de I'avant de I'appareil). Maintenezle
crochet etfixez an bouton en plastique (B) depuis I'int_rieur de
I'unit& Serrez_.la main.
/ /
/ /
/
/
/
Page 40

Ins_rez le moule en broche du support de pistolet de
pulv_risation (A) par le trou situ_ du c6t_ gauche de la poign_e
(en regardant de I'avant de I'appareil). Maintenezle moule en
broche et fixez un bouton en plastique (B) _ partir de I'int_rieur
de I'unit& Serrez _.la main.
Fixez le tube de siphonnement du d6tergent _ la
pompe
Le nettoyeur _ hautepression est muni de deux tubes de
siphonnement de d_tergent. Un destubes est fix_ au r_servoir de
nettoyage et I'autre n'est pasfix_ afin de siphonner les d_tergents
sans risque d'endommagement pour le nettoyeur A hautepression _.
partir d'une bouteille ou d'un autre type de contenant.
Fixezun des tubes de siphonnement de d6tergent (A) aux raccords
du boyau_ barbelure (B) sur la pompe.
Ajoutez de I'essence
L'essencesatisfait lee exigences suivantes:
• Essencesans plomb fra.Tcheet propre.
• Un indice d'octane minimum de87/87 AKI (91 IOR). Utilisation
_.des altitudes _lev_es,consultez la section Altitude 41ev#e.
. Une essenceavec jusqu'_ 10 % d'_thanol (gazohol) ou jusqu'_.
15 % d'_ther m_thyltertiobutylique estacceptable.
Evitezd'endommager le nettoyeur _ pression.
Le manquement _ suivre les recommandations relatives_.I'huile
du manuel d'utilisation annule la garantie.
NEPASutiliserd'essencenon approuvSetellequeE85.
NEPASm_langerI'huileavecI'essence.
NEPASmodifierlemoteurafinqu'ilfonctionneavecd'autrestypes
d'essence.
Au momentd'ajouterdeI'essence,la m61angeravecunstabilisateur
d'essenceafinde prot_gerlecircuitd'alimentationcontrela
formationded_p6tsdegomme.Voir Entreposage.Lesessencesne
sontpastoutespareilles.Sivous_prouvezdesprobl_mesde
d_marrageou deperformanceapr_savoirutilis8uneessence,
changezdefournisseurd'essenceou demarqued'essence.Le
fonctionnementdumoteuravecdeI'essenceestcertifi& Ce
dispositifantipollutionpource moteurestdetypeEM
Modificationsdemoteur).
IMPORTANT: Unseultubedesiphonnementdud_tergentpeutatre
utilis_&lafois.Lorsqueler_servoirdenettoyagen'estpasutilis_,
assurez-vousquelasoupaped'arr6tded_tergentdu r_servoirde
nettoyageest_.laposition<<Off_>.
Ajoutez de I'huile _ moteur
1. Placezle nettoyeur _.pression sur une surface plane.
2. Nettoyezla surface autour de I'orifice de remplissage d'huile et
enlevezla jauged'huile.
REMARQUE:Consultezla section Huile au sujet des
recommandations relatives _.I'huile. Wrifiez si la viscosit_ de la
bouteille d'huile fournie est appropri_e _.latemperature ambiante.
3. _,I'aide d'un entonnoir pour huile (optionnel), versez lentement
le contenu complet de la bouteille d'huile fournie dansI'orifice
de remplissage.
AVIS
Un traitement inappropri_ du nettoyeur _ pression risque de
I'endommager et de raccourcir sa dur_e d'utilisation.
NEtentezJAMAISde d6marrerlemoteursansd'abordv_rifiers'il adt6
entretenudefaqonappropri_eavecI'huilerecommand_e.Cela
risqueraitd'entratnerunbrisdemoteur.
4. Replacezlajauge d'huile et serrez-la solidement.
AVERTISSEMENT
_ L'essenceet ses sont extr_mement
LORSDEL'AJOLITOU DELAVIDANGEDUCARBURANT
• Eteignezle nettoyeur_ pressionetlaissez-lerefroidiraumoins
• Remplissezouvidangezle r_servoird'essence_tI'extdrieur.
• NEremplissezPAStrop ler_servoir.LaissezI'expansiondeI'essence.
• Siduearburantest renversd,attendezqu'il s'_vaporeavantde
• EloignezI'essencedes_tincelles,desflammes,desveilleuses,dela
• N'ALLUMEZPASdecigaretteou nefumezpas_proximitdde I'appareil.
inflammables et explosives.
blessures graves, pouvant _tre fatales.
Lefeu ou I'explosion risque de provoquer des
2minutesavantderetirerlecapuehondu rdservoirdecarburant,
Desserrezlentementlecapuchonpourlaisserlapressions'_chapperdu
rdservoir.
d_marrerle moteur.
chaleuret derouteautresourced'inflammation.
vapeurs
4O
Page 41

1. Nettoyezla partie autour du bouchon du r_servoir d'essence,
enlevezle bouchon.
2. Ajoutez lentement de I'essence"SANS PLOMB"(A) dans le
r_servoir (B). Utilisez un entonnoir pour @iter d'en renverser.
Remplissezlentement le r@ervoir jusqug, environ 4 cm (1.5")
(C) po en dessusdu col de remplissage.
3. Installezle bouchon _ essence et attend le carburant renvers6
pour s'@aporer.
ATTENTION!Les carburants _ I'alcool (appel_sessence-alcool,
_thanol ou m_thanol) attirent I'humidit& cequi entraTnela s@aration
et la formation d'acides durant I'entreposage. Les gaz acides peuvent
endommager le syst_med'alimentation du moteur pendant
I'entreposage.
Pour _viterlos probl_mes reli6s _.la performance, le syst_me
d'alimentation en essencedevrait _tretrait_ avec un conservateur
d'essenceou vid_ avant un entreposagede30 jours ou plus.
Vidangezle r_servoir d'essence, d_marrez le moteur et laissez-le
tourner jusqu'_,ce los conduits d'essence et le carburateur soient
vides. Utilisez de I'essencefraTchela saison suivante. Pour obtenir
plus de renseignements, consultez la section Entreposage.
N'utilisez JAMAIS de produits denettoyage de moteur ou de
carburateur darts le r_servoir _.essence,ils pourraient causer des
dommages irr@ersibles.
Raccorderle tuyau et la sourced'eau la
pompe
[ AViS
NEfaites PAS marcher la pompe sans que le nettoyeur _ pression
[soit connect_ Ala source d eau ouverte.
L ousdevezsuivrecetavertissement,aurisqued'endommagerla
pompe.
iMPORTANT:Enlevezetjetez les bouchons d'exp_dition de la sortie
haute pression de la pompe et de I'admission de I'eau avant de
brancherles boyaux.
1. D_roulezle tuyau & haute pression et fixez le &la base du
pistolet pulv_risateur. Serrezmanuellement.
AVERTISSEMENT
Lejet d'eau sous pression produit parcet _quipernent
:_ peutpercer la peauet lestissus sous-jacents,risquantde provoquer desblessures gravespouvant menerA une
amputation.
• NeconnectezJAMAISleboyau9 hautepression_ la rallongedebuse.
• Gardeztoujoursletuyauflexible_hautepressionraccord__la pompe
etaupistoletdepulv6risationIorsquelesyst6rneestsouspression.
Assurez-voustoujoursquele pistoletdepulv6risation,lesbusesetles
accessoiressontbienfix6s.
2. FixezI'autre extr6mit_ dutuyau _.hautepression _.la prisehaute
pression sur la pompe.Serrez manuellement.
Altitude_lev_e
Ades altitudes _lev_es(plus de 1 524 m / 5 000 pi), il est
acceptabled'utiliser des essencespr_sentant un indice minimum de
85 octane / 85 AKI (89 IOR). Un r@lage pour les altitudes 61ev_es
est requis pour respecterles normes relatives aux _missions. Une
utilisation sans ce r_glage entrafne une diminution de la
performance, une augmentation de la consommation d'essenceet
des _missions. Consultez un d_taillant Sears qualifi_ au sujet de
renseignements relatifs au r_glage pour les altitudes _lev@s.
Page 42

Avantdebranchervotretuyaud'arrosage9.laprised'eau,
inspectezlafiltreint_gr6(A).Nettoyezlafiltreint_gr_sielle
contientdesd_bris,remplacez-lasielleestendommag@.NE
vousservezPASdunettoyeur_pressionsilafiltreint_gr_est
endommag_e.
OUVREZlerobinet d'eau et appuyez sur la g_chette du pistolet
pulv_risateur afin de purger I'air et les impuret_s du syst_me
de la pompe.
AVERTISSEMENT
4. FaitescoulerdeI'eaudansletuyaud'arrosagependant
30secondespournettoyertouslesd_bris.Fermezlerobinet
d'eau.
IMPORTANT:NEsiphonnezPASdeI'eaustagnantepourvousen
servir.UtilisezSEULEMENTdeI'eaufroide(_.moinsdeIO0°F
(38°C)).
5. Connectezle tuyau d'arrosage (ne pas d@asser 50 pieds
(15.24 m) darts la Iongueur) & la prise d'eau. Serrez
manuellement.
AVIS
L'utilisation d'un clapetde non-retour (reniflard ou so@apede
sGret_)AI'entr@ dela pompe peut entra;ner I'endommagementde
la pompe ou du connecteur d'entr@.
IIdoity avoiruneIongueurd'aumoinsdixpieds(troismetres)deboyau
d'arrosagelibreentreI'entr_edu nettoyeur_hautepressionettout
dispositif,telquereniflardouso@apedesaret_.
Lesdommagesinflig6saunettoyeur_ pressionparsuitedenepas
avoirrespect6cetteconsigne,neserontpascouvertsparlagarantie.
• Le jet peut rejaillir sur vous ou propulser des objets.
• Porteztoujoursdeslunettesdes_curit6Iorsquevousutilisezcet
• Avantded6marrerlenettoyeur_ pression,assurez-vousdeporterdes
• UtilisezTOUJOURSdeslunettesdes_curit6appropri_es.
Risque de blessure aux yeux.
appareilouquevousvoustrouvez_ proximit6d'unappareilen marche.
lunettesde s_curit_appropri6es.
Liste de v6rifications avant de d6marrer le
moteur
ExaminezI'assemblagede I'appareil pour confirmer quevous avez
effectu_tout ce qui suit:
1. Assurez-vous d'avoir lu les Raglesde S4curit# et Comment
Utitiser Votre IVettoyeur_Pression avant de I'utiliser.
2. Assurez-vous que la poign@ est en placeet bien fix_e.
3. Wrifiez qu'il y a de I'huile dans le carter, jusqu'au niveau
appropri&
4. Ajoutez de I'essence dans le r6servoir.
5. Wrifiez que les connexions du tuyau sont correctement serr@s
(haute pressionet eau) et qu'il n'y ait pas de coude, de
coupures ou d'endroits aNm_s.
6. Fournissezde I'eau A une cadenceappropri@.
42
Page 43

COMMENT UTILISER VOTRE NETTOYEUR A Mettre votre nettoyeur _ pression en marche
PRESSIOH
Si vous avezdes probl_mes _.faire fonctionner votre nettoyeur _.
pression,n'h_sitez pas _.appelerle service d'assistance au
1-800-222-3136.
Emplacement de la nettoyeur _ pression
D_gagementde la nettoyeur_ pression
AVERTISSEMENT
Lachaleur et les gaz d'_chappement peuvent
_ enflammer des mat_riaux combustibles et les
• Laissezunddgagernentd'aurnoins1,5rn(5 pi)tout autourdela
nettoyeur9 pression,y cornprisau-dessus.
Placezla nettoyeur _ pression dans un endroit bienventil_ qui
permet I'_limination des gazd'_chappement mortels. N'installez
PAS la nettoyeur Apression dans un endroit ot_les gaz
d'6chappement (A) pourraient s'accumuler et p_n_trer ou _tre
aspir6s dans un 6difice qui pourrait 6tre occup& Assurez-vous que
les gazd'_chappement ne puissent entrer par une fen_tre, une
porte, une prise d'a6ration ou uneautre ouverture qui pourrait leur
permettre de s'accumuler dans un espace restreint. Tenezaussi
compte desvents dominants et des courants d'air au moment de
choisir I'endroit o_ vous installerez la nettoyeur _ pression.
structures ainsi que causer des dommages au
r_servoir d'essence et entraTnerunincendie.
Pour d_marrer votre nettoyeur A haute pression la premiere fois,
suivezces instructions pas _.pas. Cetteinformation quivous aide
mettrevotre nettoyeur_.hautepression en marches'applique
_galements'il est rest_sans fonctionner pendant au moins une
journ_e.
1. Placerla rondelle de pression pros d'un hors de la source
d'eaucapable d'alimentation d'eau _ un taux deflux plus grand
que3.3 gallons (12.5 I) par la minute et aucun moins que
20 PSI (1.38 BARS)_.la fin de rondelle de pression du tuyau
dejardin.
2. Wrifiez quele tuyau _.hautepression est bienserr_ sur le
pistolet pulv6risateuret sur la pompe. Consultez les illustrations
de la rubrique Assemblagedu Nettoyeur _Pression.
3. V_rifiez que I'appareil est en position horizontale.
4. Branchezletuyau d'arrosage _.la source d'eau sur la pompe
du nettoyeur _ pression.
Aw__ss
NEfaites PAS marcher la pompe sans que le nettoyeur _ pression
soit connect_ Ala source d'eau ouverte.
L vousdevezsuivrecetavertissernent,aurisqued'endommagerla pompe.
5. OuvrezI'eau, dirigez le pistolet vers un endroit s_curitaire et
appuyezsur la d_tente pour purger la pompe de Fair et des
impuret_s qui s'y trouvent.
6. Placezles buses A raccord rapide Aleur emplacement
appropri_ sur le support reli_ Ala rallonge de buse.
AVERTISSEMENT
Lemoteur, Iorsqu'il fonctionne, produit du monoxyde
de carbone, un gaztoxique inodore et incolore.
_ 'inhalation du monoxyde de carbone peut causer des
• Faitesfonctionnerlenettoyeur_ pressionSEULEMENT_ I'ext6rieur.
• Evitezquelesgazd'_chappemententrentdansunespacerestreint,par
unefenStre,uneporte,uneprised'a6rationoutouteautreouverture.
• NEd6rnarrez,nine faitesfonctionnerunrnoteur_I'int6rieuroudans
unespaceferrn&mSmesi lesfen_tresou lesportessontouvertes.
mauxde t6te, de la fatigue, des _tourdissements, le
vomissement, dela confusion, des crises _pileptiques,
des naus_es,I'_vanouissement ou la mort.
\
!.
I
7. Fixezla rallonge du gicleur au pistolet pulv_risateur. Serrez
manuellement.
8. Choisissezla buse que vous voulez utiliser, tirez la baguede la
rallongede buse,ins_rez la buse, puis rel_.chezla bague.
Wrifiez si la buse est correctement install_e en tirant dessus.
Consultezla section Comment utiliser les buses.
9. Engagezle verrou des_curit_ (A) de la g_chettedu pistolet
pulv_risateur.
43
Page 44

10.
Placezlamanettedepouss@(A)depuissanceenposition
"Rapiae"@, illustr@iciparunlapin.
2
IMPORTANT: Avant de d_marrer le nettoyeur _ pression, assurez-
vous de porter des lunettes de s_curit_ appropri@s.
AVERTISSENENT
" Le jet peut rejaillir sur vous ou propulser des objets.
• Portez toujours des lunettes de s6curit_ Iorsque vous utilisez cet
• Avant de d_marrer le nettoyeur ) pression, assurez-vous de porter des
• Utilisez TOUJOURSdes lunettes de s_curit6 appropri_es.
REIVIARQUES:Votre moteur est dot_ d'une caract6ristique exclusive
Briggs & Stratton appel@ ReadyStarffM,qui n'exige ni amorgage
ni _trangleur et qui offre un d6marrage am_lior_, sanstracas.
11. Lors du d6marrage du moteur, placez-voustel que
Risque de blessure aux yeux.
appareil ou que vous vous trouvez _ proximit_ d'un appareil en marche.
lunettes de sdcurit_ approprides.
recommand_, saisissez la poign@ du d_marreur et tirez
lentement jusqu'_ ce que vous sentiez de la r_sistance. Tirez
alors rapidement pour d_marrer le moteur.
AVERTISSEMENT
Un effet de recul (r_troaction rapide) de la corde du
d_marreur pourrait entraTner des blessures corporelles.
L'effet de recul tirera votre main et votre bras vers le
_.,_ moteur plus rapidement que vous ne pouvez rel_.cher la
corde.
Vous risquez ainsi de subir des fractures, des
ecchymoses ou des entorses.
• NE tirez JAMAIS sur la corde du d_marreur sans avoir d'abord lib@_ la
pression du pistolet de pulv6risation.
• Lors du d_marrage du moteur, tirez lentement sur la corde jusqu'_ ce
quevous sentiez une r_sistance et tirez alors rapidement afin d'_viter
un effet de recul.
• Apr_s chaque tentative de d_marrage, alors que le moteur n'a pas
d_marr_, dirigez toujours le pistolet vers un endroit s6curitaire et
appuyez sur la ddtente du pistolet de pulv_risation pour lib@er la haute
pression. Engagez le verrou de la d6tente du pistolet de pulv_risation.
• Lorsque vous utilisez une vaporisation _ haute pression, saisissez
fermement le pistolet de vaporisation avecles deux mains afin d'dviter
les risques de blessures entrafnds par les effets de recul.cuando aplique
un rociado a alta presi6n paraevitar lesiones cuando se produzca el
retroceso de la pistola.
12. Ramenez la poign6e du d_marreur lentement. NE laissez PAS le
cordon se frapper contre le d6marreur.
REMARQUE: Toujours garder I'_trangler le levier dans le "Rapide"
la _osition en operant la nettoyeur _ pression.
AVERTISSEMENT
Lejet d'eau sous pression produit parcet @uipement
peutpercer la peauet lestissus sous-jacents,risquant
amputation.
de provoquer des blessuresgravespouvant mener& une
Le pistolet de pulv_risation retient une pression d'eau
_lev6e,m6me Iorsque le moteur est _teint et que I'eau
est d_connect_e,cequi peut causer des blessures.
• N'autorisezJAMAISdesENFANTS9seservirdunettoyeur_tpression.
• GardeztoujoursletuyauflexibleAhautepressionraccord__ la pompe
etaupistoletdepulv6risationIorsquelesyst6meestsouspression.
NvisezJAMAISdespersonnes,des animauxou desplantesavecle
pistoletpulv@isateur.
NEverrouillezPASle pistoletdepulv@isationdanslapositionouverte.
• NElaissezPASlepistoletdepulv6risationsanssurveillancealorsque
I'appareilestenmarche.
• N'utilisezJAMAISun pistoletdepulv6risationquin'estpasmunid'un
verroud'armeoud'unpontetinstall_et enordredemarche.
Assurez-voustoujoursquele pistoletdepulverisation,lesbusesetles
accessoiressontbienfixes.
44
Page 45

AVERTISSEMENT
brOluresgraves.
Tout contact avecla zone du silencieux peut causerdes
La chaleur et les gazd'_chappement peuvent
_j enflammer des mat_riaux combustibles et les
o NEtouchezPASauxpi_ceschaudeset_vitezlecontactaveclosgaz
Comment arr_ter votre nettoyeur _ pression
1. Rel_chezla.d_tentedu pistolet de pulv_risa.tionet laissezle
2. Placezle manettede pouss@du moteur en position "Slew"
structures ainsi que causerdes dommages au r_servoir
d'essenceet entraTnerun incendie.
d'_chappement.
LaissezI'_quipementrefroidiravantdeletoucher.
Laissezund6gagementd'aumoins1,5m(5 pi)tout autourdela
nettoyeur_tpression,y comprisau-dessus.
LeCodeof FederalRegulation(CFR)Title36Parks,Forests,and Public
Propertyexigequede1'6quipementaliment_parunmoteur
combustioninternesoit dot6d'unpare-_tincelleset constamment
maintenuenbon_tatfonctionnement,conform6ment_la normede
service5100-1CdelaUSDAForestou_tuner6visiondecelle-ci.Dans
I'EtatdelaCalifornie,unpare-_tincellesest requisenvertudela
section4442duCaliforniaPublicResourcesCode.IIsepeutque
d'autresEtatsaientdesloissemblables.auxterresf6d6rales.Sivous
_quipezlesilencieuxd'unpare-_tincelles,il dolt_treenbon_tatde
fonctionnement.
moteur tourner au ralenti durant deux minutes.
._I.,, puis _.la position "Step" _ (A).
Comment utiliser los buses
Le raccord rapide dela rallonge de busevous permet de changer
les quatre diff6rentes buses. Les buses peuvent 6trechang@s
pendant que le nettoyeur b.haute pression est en marche, alors que
leverrou de la d_tentedu pistolet de pulv_risation est engage.
Chacune des buses donne un jet different, tel qu'indiqu_ ci-dessus.
Basso PreSSJOfl
L'usagepour
noire
s'appliquerd_tergent
HautePression
40° blanche 15° jaune 0° rouge
1750 PSI 2200 PSI 2550 PSI
2.3 GPM 2.2 GPM 2.0 GPM
Pourchangerles buses,veuiiiez suivre les directivessuivantes:
1. Engagezle verrou dela d_tentedu pistolet de pulv_risation.
3. Dirigez TOUJOURSle pistolet vers un endroit s_curitaire et
appuyezsur la d6tentedu pistolet de pulv6risation pour lib6rer
la haute pression de I'eau.
IMPORTANT:Le pistolet depulv_risation retient une pression d'eau
_lev@, m_me Iorsque le moteur est _teintet que I'eau est
d_connect@.
AVERTISSEMENT
Lejet d'eau sous pression produit parcet @uipement
peut percerla peauet lestissus sous-jacents,risquant
amputation.
de provoquer desblessures gravespouvant mener_.une
Le pistolet de pulv_risation retient une pression d'eau
_lev@, re&meIorsque le moteur est _teint et que I'eau
est d6connect@,ce qui peut causer des blessures.
• Gardeztoujoursletuyauflexible_hautepressionraccord__ la pompe
etaupistoletdepulv6risationIorsquelesyst_meestsouspression.
Avantded_marrerle moteur,dirigezTOUJOURSlepistoletversun
endroits6curitaireetappuyezsur lad_tentedupistoletdepulv6risation
pourlib6rerlahautepressionet 6viteruneffetderecul.Lorsquevous
n'utilisezpaslepistolet,engagezleverroude lad6tente.
4. Lorsque vous n'utilisez pas le pistolet, engagezle verrou de la
d_tente.
AVERTISSEMENT
Lejet d'eau sous pression produit parcet @uipement
peutpercer la peauet lestissus sous-jacents,risquantde provoquer desblessures gravespouvant mener_.une
amputation.
NechangezJAMAISlosbusessansavoird'abordenclench_leverrou
delad_tentedu pistoletdepulv_risation.
NEtournezPASlesbusespendantlapulv@isation.
2. Tirez la baguedu raccord rapide et retirez la buse qui est d_j_
en place. Rangezles buses dans le support fix_ A la rallonge de
buse.
45
Page 46

3. Choisissezlabusevoulue:
, Utilisezlabuseblanchepourunringaged61icat(basse
pressionethautd_bit)etpourunnettoyageendouceur
desautomobiles/camions,desbateaux,desVR,des
meublesdepatio,des@uipementsd'entretiendugazon,
etc.
, Utilisezlabusejaunepourunringageg@_ral(pression
moyenneetd6bitmoyen).Cettebuseestid6alepourles
rev_tementsmurauxdelamaison,lespatiosenbriques,
lesterrassesenbois,lesentr@sdecoursetlestrottoirs,
lesplanchersdegarage,etc.
, Utilisezlabuserougepourunringagemaximum(haute
pressionetbasd6bit)pourlessurfacestenacesou
difficilesd'acc_stellesquesurfacesaudeuxi_me6tage,
enl@ementdepeinture,tachesd'huile,enl_vementde
rouilleouautressubstancestenaces(goudron,gomme,
graisse,cire.etc.).
* Utilisez la buse noire pour d_tergent pour I'application de
d_tergent tels que des nettoyants de surface pour aider _.
d_loger lessalet_s et la poussi_re sur une grande
diversit_ de surfaces.
4. Tirezla bague,ins_rez lanouvelle buse, puis relg.chezlabague.
V6rifiez si la buse est correctement install@ entirant sur elle.
Conseiis d'utJiisation
o Pour obtenir un nettoyage optimal, gardez la buse _ une
distance de 20 _ 61 cm (8 _ 24 pouces) de la surface _ nettoyer.
o Si la buse est trop pros,vous risquez d'endommager la surface
nettoyer.
o NEvous approchez PAS_ moins de 15 cm (6 pouces)Iors du
nettoyage de pneus.
2. R@isezla partie sur I'utilisation de la buse.
3. Pr@arezune solution d_tergente comme requis par le
fabricant.
4. Assurez-vous que la soupaped'arr_t de d_tergent du r6servoir
de nettoyageest _ la position <<Off _>.
5. Si un r_servoirde nettoyageest utilis_, versezle d6tergentdans
le r_servoirde nettoyage.
REMARI:IUE:Le r_servoir de nettoyage pout contenir 3,4 litres
(1 gallon).
6. Assurez-vous que la buse noire est install_e.
REMARQUE:Lesbuses _ haute pression (blanche,jaune et rouge)
ne peuvent pas _tre utilis@s pour appliquer du d6tergent.
7. Assurez-vousque leboyaud'arrosageest connect__.I'entr@
d'eau.V_rifiezsi le boyau_.hautepressionest connect6au
pistoletde pulv_risationet _ la pompe. OuvrezI'alimentationd'eau.
AVIS
Vous devez attachertousles tuyaux avant de d_marrer le moteur.
si vous d_rnarrezle moteursansquetousles tuyauxsoientbranch_s
etsansqueI'eausoitOUVERTE,vousallezaNrnerla pompe.
Vousdevezsuivrecetavertissernent,aurisqued'endornrnagerla
pornpe.
8. Engagezle verrou dela d_tentedu pistolet de pulv_risation et
d6marrezle moteur selon les directives Comment d#marrer
votre nettoyeur _ pression.
9A. Si un r_servoir de nettoyageest utilis_, tournez laso@ape
d'arr_t de d_tergent 9 la position <<On >>(A).
Hettoyage et application de produits d6tergente
ATTENTIOH
Les produits chimiques peuvententraTnerdesblessures
corporelles ou des dommages materiels.
NeJAMAISutiliserdeliquidecaustiqueaveclenettoyeur_ haute
pression.
UtilisezSEULEMENTdesd6tergents/savonssansrisque
d'endornrnagernentpourle nettoyeur_ pression.
Pour appiiquer des produitsd_tergents, proc_dez¢ommesuit:
1. Fixezle tube de siphonnement du d_tergent d6sir_ en suivant
les directives Fixezle tube desiphonnement du d_tergent _ la
pompe.
IMPORTANT:Assurez-vous que le moteur est 6teint et laissez-le
refroidir avantd'installer lostubes de siphonnement du d_tergent.
AVERTISSEMENT
s_ Tout contact avecla zone du silencieux peut causerdes
_ nflammer des mat_riaux combustibles etles
o NEtouchezPASauxpi_ceschaudeset_vitezlecontactaveclesgaz
brOluresgraves.
La chaleur et les gazd'_chappement peuvent
structures ainsi que causerdes dommages au r_servoir
d'essenceet entrafner un incendie.
d'_chappernent.
LaissezI'_quipementrefroidiravantdeletoucher.
IMPORTANT:Si un tube de siphonnement du d_tergent est utilis_,
assurez-vous que la soupape d'arr_t de d_tergent du r_servoir de
nettoyage est9.la position <_Off_.
9B. Si un tube de siphonnement du d_tergent est utilis_, placezla
petiteextr_mit_ du filtre du tube de siphonnement du d_tergent
dansle contenant de d_tergent.
REMARQIJE:Assurez-vous quele filtre est enti_rement immerg_
dansle d_tergent lots de I'application du d_tergent.
AVIS
Tout contact avecle silencieux chaud peut endommager le tube
de si honnement du d_ter ent.
LorsquevousinsSrezlefiltre dansunebouteilledesolutionde
ddtergent,placezletubede rnaniSre9cequ'iln'entrepasencontact
parm_gardeaveclesilencieuxchaud.
10. Appliquez le d_tergent sur unesurface s_che, en comme%ant
parla partie inf_rieure de la surface _.nettoyer et travaillez vers
le haut, avec de longs mouvements r_guliers et qui se
chevauchent.
11. Laissezle d_tergent "tremper" pendant 3 _ 5 minutes avantde
laveret de rincer. Appliquez _.nouveau,si besoin est, pour
@iter que la surface ne s_che.NE laissezPASle d_tergent
s_cher (pour @iter lostraces).
46
Page 47

Rincer le nettoyeur _ pression
Pour rincer:
1. Engagezleverrou de la d_tente du pistolet de pulv_risation.
2, Placezlasoupape d'arr_t de d_tergent _ la positon "Off".
3. Retirez la buse noire pour d_tergent de la rallonge de buse.
4. %lectionnez la buse _ hautepression d_sir_e et installez-la en
suivant les directives d6crites dans la section Comment utiliser
les buses.
5. NE placezPAS le pistolet pulv_risateur trop pros de la surface
quevous d_sirez pulv_riser.
AVERTISSEMENT
Un effet de recul du pistolet de pulv6risation pourrait
entrafner une chute.
o Utilisez le nettoyeur _ pression _ partir d'une surface stable.
Soyeztr_s vigilant si vous devez utiliser le nettoyeur _ pression Iorsque
vous 6tes dans une _chelle, un 6chafaudage ou autre emplacement
similaire.
Lorsque vous utilisez une vaporisation 9 haute pression, saisissez
fermement le pistolet de vaporisation avecles deux mains afin d'_viter
les risques de blessures entratn_s par les effets de recul.
6. Appliquez le jet _.haute pression sur une petite surface, puis
v_rifiez-la pour voir si elle n'est pasaNm_e. 8i elle n'est pas
aNm_e,vous pouvez continuer.
7. Commencez en haut de I'endroit que vous devez rincer, en
descendantavec les m6mes mouvements qui se chevauchent
comme Iorsquevous aveznettoy&
Syst_me de refroidissement automatique
(surpressionthermique)
Si vous faites tourner le moteur devotre pulv_risateur pendant 3 _.
5 minutes sans appuyer sur la g9chette du pistolet pulv_risateur,
I'eau qui circule darts lapompe peut atteindre unetemperature de
51° _.68°0 (125° A 155°F). Lorsque I'eau atteint cette temperature,
le syst_me de refroidissement automatique se d_clenehe et
refroidit la pompe envidant I'eau chaudesur le sol.
47
Page 48

RENSEIGNEMENTSTECHNIQUESSURLE
MOTEUR
IIs'agit d'un moteur _ un cylindre _ soupapes lat_ralesrefroidi
I'air, detype peu polluant.
Les moteurs de la 120000 sont homologu_s dans I'_tat de la
Californie par le California Air Resources Board. Selon cet
organisme, ils satisferont les normes relativesaux _missions durant
125 heures d'utilisation. Cetype d'homologation ne donne _.
I'acheteur, au propri6taire ou A I'utilisateur aucune garantie
suppl_mentaire en ce qui a trait _.la performance ou Ala dur_e de
vie du moteur. La garantie du moteur ne couvre queles garanties
relatives au produit et aux _missions dont il est fait mention ailleurs
dans ce manuel.
POJSSanC8 nomJnaJ8
Lapuissancenominalebrutedesmodulesavecmoteur_essence
estindiqu_esur une_tiquette,conform_mentau codeJ1940(Small
EnginePower& TorqueRatingProcedure)delaSAE(Societyof
AutomotiveEngineers),et laperformancenominalea _t_obtenueet
corrig_econform_mentaucodeJ1995(r_vision05-2002)dela
SAE.Lesvaleursdecoupleont_t_mesur_esA3 060tr/min; les
valeursdepuissanceont_t_mesur_es_.3 600tr/min. Lapuissance
bruter_elledumoteurserainf_rieureetseraaffect_e,entreautres
choses,parlesconditionsdefonctionnementambiantesainsique
parlesdiff_rentsentremoteurs.Etantdonn_lavastegammede
produitssurlesquelsnosmoteurssontinstall_s,ainsiquelavari_t_
deprobl_mesenvironnementauxreli6saufonctionnementde
I'_quipement,il estpossiblequele moteur_essencequevousavez
achet6ned6veloppepaslapuissancenominalebruteindiqu_e
Iorsqu'ilestutilis_pourentraTnerunappareil61ectriquedonn_
(puissance<<sursite_>ou netr6elle).Cettedifferenceestcaus_e
pardiff_rentsfacteursdont,entreautres,lesaccessoires(filtreAair,
_chappement,chargement,refroidissement,carburateur,pompe_.
essence,etc.),leslimitesdeI'appareil,lesconditionsde
fonctionnementambiante(temperature,humiditY,I'altitude)et les
differencesentremoteurs.Enraisondeslimitesdefabricationet de
capacitY,Briggs& Strattonpeutsubstituerunmoteurdeplus
grandepuissancepourun moteurdecettes_rie.
CARACTEBJSTIQUESDUPRODUIT
Caract_ristiques du nettoyeur _ pression
Max pression nominale ............... 175,8 BARS (2,550 PSI)
Max d_bit d'_coulement .............. 8,7 litres/min (2,3 GPM)
%tergent ...................... Utilisez selon les instructions
Temperature De L'eau ........ Nedolt pas d@asser 38°C(IO0°F)
Poids A I'Exp_dition ...................... 32,7 kg (72 Livres)
Caract_ristiques du moteur
Al_sage ................................ 68 mm (2,69 po.)
Course de piston ......................... 52 mm (2,04 po.)
Cylindre ............................... 190 cc (11,57 po.)
Bougied'allumage
Type : ................. Briggs & Stratton 802592 ou 5095D
%finir I'_cartement _ : ................. 0,76ram (0,030 po)
Distance d'_clatement : ........ 0,15-0,25 mm (0,006-0,010 po)
Jeu des soupapes avec ressorts de soupape install_s et piston 6
mm (1/4 po) pass_le point mort sup_rieur (_ v_rifier Iorsque le
moteur estfroid).
Admission .................. 0,13-0,18 mm (0,005-0,097 po)
Echappement ................ 0,18-0,23 mm (0,007-0,009 po)
Capacit_du r_servoir de combustible ........ 1,51 (1,6 quart US)
Capacit_du huile ........................ 0,5 I (18 onces US)
REMARQUE:Pourun meilleurfonctionnement,lachargeutilede
I'alternateurnedevraitpasd_passer85% dela puissance
nominale.Lapuissancedumoteurserar_duitede3,5% pour
chaque300 m_tres(1000pieds)au-dessusdu niveaudelamer, et
de1% pourchaque5,6° C(10°F)au-dessusde25° C(77° F). II
devraitfonctionnerdefagonsatisfaisantejusqug,unangle
maximumde 15°.
48
Page 49

RESPOHSABILITESDUPROPRIg:TAIRE
Respectezlecalendderd'entretien du nettoyeur selonle nombre Cheures de fonctionnement ou letemps _coul& le premier desdeux pr_valant.
Lorsque I'appareilest utilis_ dans les conditions adverses d_crites ci-dessous, il faut en faire I'entretienplus fr_quemment.
CALEHDRIERD'ENTRETIEN INTEeVALLEDEFUNCTlUHNEMENTSELUHLESDEDRE$D'UTILiSATlUH
DATESD'ENTDETIEH
INSCRIVEZLES DATESAU FUR ET
T,_ICUED'ENTDETiEN utilisation oul fois ran oul fois ran oul fois ran heures L'ENTRETIENREGULIER
NETTUYEUR,_ PRESSION
V_rifier/nettoyer la cr@ine d'eau d'arriv_e
V_rifier le tuyau & haute pression X
V_rifier le tuyau de d_tergent X
V_rifier la presence de fuites darts le pistolet & X
pulv_risation et rassemblage
Purger la pompe de rair et des impuret_s qui s'y X
trouvent
Pr@arer la pompe pour rentreposage _ une Voir section Entreposage pour fhiver
temperature inf_rieure &O°C(32_'F)
i_]OTEUR X
Wrifier le niveau d'huile
Nettoyez les d_bris X
Changer rhuile du moteur X2
Fake rentretien du filtre _ air Xs
Fake rentretien de la bougie d'allumage X
Fake rentretien du pare-_tincelles X
Nettoyez le syst_me de refroidissement X2
Nettoyez lachambre de combustion X
Pr@arer pour rentreposage Si le nettoyeur ne sera pas utilis_ durant plus de 30jours.
' Nettoyez I'appareil s'il est encrass& Remplacez route piece perforce ou endommag_e.
z Changezrhuile apr_s les cinq (5) premieres heures de fonctioooement et par la suite aux 50 heures defonctiomlement ou unefois ran. Nettoyez I'appareil plus souvent si vous
I'utilisez darts un milieu sale ou poussidreux.
Remplacez les pi_ces plus fr_quemment si vous utilisez I'appareil dane un milieu sale ou poussi_reux.
Recommandations General
Un entretien r6gulier am61iorerala performance et prolongera la
dur_ede vie du nettoyeur _ haute pression. Consultezun d_taillant
autoris_ Searspour I'entretien.
La garantiedu nettoyeur _.pression ne couvre pas les _l_ments
soumis _.I'abus ou _.la n6gligencede I'op6rateur. Pour obtenir la
pleineapplication de la garantie, il faut que I'op_rateur fasse
Aw. tch nuolA.x he. A.x Oh . lA.xlOOh u llO0- O0
X_
Contr_le des _missions
L'entretien,le remplacementuula r@aratiun des dispusitifs et
syst_mesantipollutiun peuvent_tre effectu_spar un _tablissement
de r@aratiun de muteurs bursrouteuupar une personnequaiifi_e.
Pour obtenir unentretien <<sans frais >_du dispositif antipollution, le
travail doit _tre effectu_ par un d_taillant autoris_ Searspar le
fabricant. Voir la garantie du dispositif antipoflufion.
I'entretien du nettoyeur _.hautepression conform_ment aux
directives de ce manueld'utilisation y compris son entreposage
ad6quatselon les directives de la section Entreposage.
Pour assurer I'entretien ad_quat du nettoyeur _ haute pression, il
faut effectuer p_riodiquement certains r_glages.
IIfaut effectuer toutes les operations d'entretien et les r_glages au
moins une fois par saison. Suivez les instructions du Calendrier
d'entretien ci-dessus.
REMARQUE:Unefois par annie, vous devez nettoyer ou remplacer
la bougie d'allumage et remplacer le filtre _.air. Une nouvelle bougie
d'allumage et un filtre _ air propre permettent d'assurer que le
m_langeessence-air est ad_quat en plus de contribuer au meilleur
fonctionnement devotre moteur et d'augmenter sa dur_e de vie.
Entretien de la pompe _ huile
NEtentezPASd'effectuer d'entretien relatif _ I'huile sur la pompe. Ce
module ne n_cessiteaucun entretien d'huile pour la pompe. La
pompeest pr_-Iubrifi_e et scell_een usine, ne n_cessitantaucune
lubrification suppl_mentaire au cours de la dur_e devie de la pompe.
Avant chaque utilisation
1. Wrifiez le niveaud'huile du moteur.
2. Nettoyagedes d_bris.
3. Wrifiez si la grille de la prise d'eau n'est pas abfm_e.
4. V_rifiez si letuyau _.hautepression n'a pas de fuite.
5. Wrifiez si des dommages sont visibles sur le tube de
siphonnement du d_tergent et le r_servoir.
6. V_rifiez si le pistolet pulv_risateur et de I'assemblage dela
rallonge r_glabledu gicleur n'ont pas defuite.
7. Rincezle boyau d'arrosage pour d_logertous d_bris.
49
Page 50

ENTRETIENDUNETTOYEUR PRESSION
HettoyagedesdGbris
Nettoyezles d_bris accumul_s sur le nettoyeur _ pression tous les
jours ou avant de I'utiliser. Gardeztoujours la tringlerie, leressort et
les commandes propres. Gardezlazone autour et derriere le
silencieux libre ded_bris combustibles. Inspectez les fentes d'air de
refroidissement et les ouvertures sur le nettoyeur _ pression. Ces
ouvertures doivent demeurer propres et non obstru_es.
Les parties du nettoyeur _.hautepression doivent _tre gard_es
propres afin de r_duire le risque de surchauffe et d'inflammation
des d_bris accumul_s.
Utilisez un linge humide pour nettoyer les surfaces ext_rieures.
AVIS
Un traiternent inappropri6 du nettoyeur_ pression risque de
I'endommager et de raccourcir sa dur_e d'utilisation.
N'ins_rezaucunobjetdanslesfentesderefroidissement.
Utilisez une brosse _ solesdouces pour d_tacher les
accumulations de salet_s,d'huile, etc.
. Utilisez unaspirateur pour ramasser les salet_s et d_bris.
V6rifiezet nettoyezla grille de ia prised'eau
Inspectezlagrille de la prise d'eau. Nettoyez-la si elle est bouch6e
ou remplacez-lasi elle est endommag_e.
V_rifiez le tuyau _ haute pression
Letuyau _.hautepression peutavoir desfuites, s'il est us_,tordu ou
realutilis6. Inspectezle tuyau avant chaqueutilisation. Wrifiez tous
les tuyauxpour les coupures, les fuites, I'abrasion ou le gonflement
du couvercle, ou si certains raccords sont abTm_sou mobiles. Si
vous remarquezquelque chose, remplacezimm_diatement letuyau.
AVERTISSEMENT
Lejet d'eau sous pression produit parcet _quipernent
_/_ eut percer lapeauet lestissus sous-jacents,risquant
• NEr_parezjarnaislestuyaux_hautepression.Remplacez.
• LetuyauderernplacernentDOlTr_sister_ unepressionsup6rieure_ la
V6rifiezle pistoletet la rallongede gicieur
Inspectezle raccord du tuyau sur le pistolet pulv_risateur, s'il est
correctement fix6. Essayezla ggchetteen appuyant et en vous
assurant qu'elle "s'enclenche" en place Iorsque vous la relg.chez.
Placezle verrou de s_curit_ en position MARCHEet essayezla
g_.chette.Vous ne devriez pas pouvoir I'enfoncer. Remplacezle
pistolet imm_diatement s'il _choue un de ces essais.
Entretien du gicieur
Si vous sentez un effet de pulsation en appuyant sur la d_tente du
pistolet de pulv6risation, c'est que la pression dela pompe est peut-
_tretrop _lev6e. Celapeut se produire si la buseest obstru_e,
compl_tement ou en pattie, par un corps _tranger, comme des
salet_s,etc. Pour rem_dier _.ce probl_me, nettoyez imm_diatement
la buse en suivant ces instructions :
1. Eteignezle moteur et fermez I'alimentation en eau.
2. Dirigez TOUJOURSle pistolet vers un endroit s_curitaire et
de provoquer desblessures gravespouvant menerAune
amputation.
pressionnominaledu nettoyeur.
appuyezsur la d6tentedu pistolet de pulv6risation pour lib6rer
la haute pression de I'eau.
AVERTISSEMENT
Lejet d'eau sous pression produit parcet _quipement
peutpercer la peauet lestissus sous-jacents,risquant
amputation.
de provoquer desblessures gravespouvant mener_.une
Le pistolet de pulv_risation retient une pression d'eau
_lev_e,m_me Iorsque le moteur est _teint et que I'eau
est d_connect_e,cequi peut causer des blessures.
• Gardeztoujoursletuyauflexible9hautepressionraccord__la pompe
etaupistoletdepulv_risationIorsquelesystSrneestsouspression.
• Avantded_rnarrerlemoteur,dirigezTOUJOURSle pistoletversun
endroits_curitaireetappuyezsur lad_tentedu pistoletdepulv_risation
pourlibSrerla hautepressionet _viterun effetde recul.Lorsquevous
n'utilisezpaslepistolet,engagezleverroude lad_tente.
3.
Enlevezla busede I'extr_mit_ dela rallonge de buse.
4.
Utilisez un trombone pour d_gagertout _l_ment pouvant
obstruer la buse (A).
/
5.
D_tachezla rallonge du pistolet pulv_risateur.
6.
_,raide d'un tuyau d'arrosage, enlevez les d_bris
suppl_mentaires en ringant la rallonge de buse. Rincez-la
pendant30 A 60 secondes.
7. R_installezla buse dans la rallonge de buse.
8. Rebranchezla rallonge de buse sur le pistolet de pulv_risation.
9. Assurez-vousque leboyaud'arrosageest connect__.I'entr_e
d'eau.Wrifiez si le boyau_.hautepressionestconnect_au
pistoletde pulv_risationet Ala pompe.OuvrezI'alimentationd'eau.
10. Engagezle verrou dela d_tente du pistolet de pulv_risation et
d6marrezle moteur selon les directives Comment d4marrer
votre nettoyeur _ pression.
11. Testez le nettoyeur _.pressionen I'utilisant avecchaque buse
raccord rapide.
Entretien du joint torique
Procurez-vous un n_cessaire de r_paration de joint torique, au
magasin Searsde votre localitY,en t_l_phonant au num_ro sans
frais 1-80G-4-MY-HOME (469-4663) ou sur Internet
www.sears.ca. Ce n_cessairen'est pas inclus avecle nettoyeur
haute pression. Le n_cessairecomprend des joints toriques de
rechange,une rondelle de caoutchouc et un filtre d'arriv_e d'eau.
Pour remplacer les joints toriques de votre nettoyeur, consultez la
feuille d'instructions fournie avecle n_cessaire.
AVERTISSEMENT
Le jet d'eausous pression produit par cet _quipement
peut percer la peau et lestissus sous-jacents, risquantde provoquer des blessures graves pouvant mener _.
uneamputation.
• Ner_parezJAMAISdesraccordsnon_tanches_ I'aidedescellant.
Remplacezlejoint toriqueou lejoint d'_tanch_it&
5O
Page 51

ENTRETIENDUMOTEUR
,, AVERTISSEMENT
Unintentional peut r_sulter dansfeu ou _lectrique.
LORSQUEVOUSREGLEZOUREPAREZVOTRENETTOYEUR._
PRESSIOH
• D6brancheztoujourslec_bledebeugieetplacez-ledefa_en_ cequ'il
nesoit paseRcontactaveclabougie.
LORSBETESTSD'ALLUIVlAGEDU IVlOTEUR
• UtilisezURv_rificateurdebougiesd'allumageapprouv&
• NEv_rifiezPASI'allumageIorsquelabougied'allurnageestenlev_e.
Huile
Recommandatiens relatives _ rhuile
Nous recomrnandons I'utilisation des huiles certifi_es par garantie
Briggs & Stratton pour obtenir unemeilleure performance. Les
autres huiles d_tergentes de haute qualit_ sont acceptablessi elles
ont les cotes pour service SF, SG,SH, SJ ou plus. N'utilisez pas
d'additifs sp6ciaux.
Les temperatures ext_rieures d_terminent la viscosit_ de I'huile
requise pour le moteur. Utilisez le tableau pour choisir la meilleure
viscosit_ pour la gamme detemperatures ext_rieures attendues.
OF °C
104 4O
86 ; o=_I-- 30
68 2O
V_rification du niveag d'huile
II est n6cessairede v_rifier le niveau d'huile avant chaque utilisation
ou apr_s chaque p_riode de 5 heuresd'utilisation. Gardezun niveau
d'huile constant.
1. Assurez-vous que nettoyeur _.pression se trouve sur une
surface de niveau.
2. Enlevezla jauged'huile etnettoyez-la avec un linge. Replacez-
la et resserrez-la.Retirez la jauge et v6rifiez le niveau d'huile.
3. Wrifiez que I'huile est _.la marque "Fulr' sur la jauge de niveau
d'huile. Replacez-laet resserrez-la.
DEPOSITAR
Ajoutd'huile
1. Assurez-vous que nettoyeur _ pression setrouve sur une
surface de niveau.
2. Wrifiez le niveau d'huile de la mani_red6crite dans la rubrique
V#flfication du niveau d'huile.
3. Au besoin,videz lentement I'huile dans I'orifice de remplissage
d'huile, jusqu'b,marque "Fulr' sur la jaugede niveau d'huile.
NEremplissez PAStrop le carter d'huile.
LLENO
AVIS
Le moteur risque de ne pas d_marrer ou de d_marrer difficilement
Iors u'il est tro rein li d'huile.
• NEremplissezPAStrop.
• Sileniveaud'huiled@assela marqueFULLdelajauged'huile,
vidangezI'huiledesortequeleRiveausoit_gal_ lamarqueFULLdela
jauged'huile.
Replacez-laet resserrez-la.
14 u -10
o
-4 oL--j L-- o
2- --3o
* Sous 40°F (4°C), I'utilisation d'une huile SAE30 entraTneun
d_marragedifficile.
** Au-dessus de 80°F (27°C),I'utilisation d'une huile 10W30 peut
entraTnerune consommation d'huile plus _lev_e.Wrifiez
fr_quemment le niveaud'huile.
_ REI'dARQUE: L'huile synth_tique respectant la marque
d'homologation ILSACGF-2,API et portant le symbole
d'entretien API (montr_ _ la gauche) avecla mention <<
O J/CF (6conomied'6nergie) >>ou plus, est une huile
acceptablepour toutes les temperatures. L'utilisation
d'huile synth_tique ne modifie pasles intervalles de
changement d'huile.
Vidange de I'huile meteur
ChangezI'huile apr_s les cinq (5) premieres heures d'op_ration et
par la suite aux 50 heures d'op_ration. Si vous utilisez votre
nettoyeur_ pression dans un endroit tr_s sale ou poussi_reux ou
partemps tr_s chaud, changez I'huile plus fr_quemment.
ATTENTION
Eviteztout contact cutan_ prolong_ ou r_p_t_avecI'huile moteur
usag_e.
IIa _t_d_rnontrdqueI'huilemoteurusagSerisquedeprovoquerun
cancerde la peauchezcertainsanirnauxdelaboratoire.
Rincezconsciencieusementleszonesexposdesavecde I'eauetdu
savoR.
GARDEZHOSDEPORTEEDESENFANTS.NEPOLLUEZ
PAS.CONSERVEZLE SURPLUS,RAPPORTEZL'HUILE
USAGEEAUX CENTRESDERECYCLAGE.
Page 52

ChangezI'hgile alors que le rnoteurest encore chaud,de la fa!;on
suivanie:
1. Videz le r_servoir d'essenceen faisant tourner le nettoyeur
pression jusqug. I'@uisement de I'essence.
2. D_branchezle fil de la bougie d'aliumage et gardez-le _loign6
de la bougie d'allumage.
3. Nettoyezla surface autour de I'orifice de remplissage d'huile,
enlevezle bouchon de remplissage d'huile et la jauge d'huile.
Essuyezlajauge d'huile.
4. Inclinezvotre nettoyeur _ haute pressionpour vidanger I'huile
par I'orifice deremplissage dans un contenantad@uat envous
assurantd'incliner le nettoyeur du c6t6 oppos__.labougie
d'allumageet aufiltre _.air. Une fois le carter vid_ de son huile,
remettezle nettoyeur debout.
5. Videz lentement I'huile (environ 18 oz (0,5 I)) darts I'orifice de
remplissage d'huile, jusqu'A marque "Full" sur la jauge de
niveaud'huile.
6. Essuyezla jauged'huile chaquefois que vous v_rifiez le niveau
d'huile. NE remplissez PAStrop le carterd'huile.
7. Replacez-laet resserrezda.
8. Essuyeztoute huile restante.
9. Rebranchezle fil dela bougie d'allumage _ la bougie d'allumage.
Entretiendufiitre air
Votre rnoteur ne fonctionnera pas ad@uatement et pourrait
s'endommager si vous le faites fonctionner avec un filtre _.air sale.
FaitesI'entretien du filtre _air apr_s toutes les 25 heures
d'utilisation ou une fois par an, le premier des deux pr@alant.
Remplacezle filtre plus souvent si vous utilisezle nettoyeur dans un
endroit saleou poussi_reux.
PourfaireI'entretiendgfiitre_ air,prec_dezcornrnesgit:
1. D@issezlavis (A) etouvrezlecouvercle(B).
2. Retirez soigneusement la cartouche (C).
3. Pour nettoyer la cartouche,frappez doucement le c6t_ de
papier en accord6onsur une surfaceplane.
4. R_installezla cartouche propre ou une nouvelle cartouche dans
le couvercle.
5. Ins_rez les pattes du couvercle (B) dans lesfentes inf_rieures
de la base(E).
6. Refermezle couvercleet serrez fermement la vis sur la base.
NOTA:Puedeadquirir nuevosfiltre Aair al nOmerotelef6nico
1-800-4-1VlY-HOME(469-4663).
52
Page 53

Entretien de la bouoie d'allumage
FaitesI'entretiende labougie d'allumage aux 100 heures
d'op_ration ou annuellement, le premier des deuxpr_valant.
1. Nettoyezla surface autour de la bougie d'allumage.
2. Enlevezla bougie d'allumage et examinez-la.
3. Si les _lectrodes sont uses ou si la porcelaineest craqu_e ou
_caill_e.Utilisez labougie de remplacement recommand_e.
ConsultezSp4cifications.
4. V6rifiez 1'6cartementdes _lectrodes AI'aide d'une jauge
d'@aisseur et si n_cessaire,r_glez I'_cartement_.0,76 mm
(0,03 po).
5. Installez la bougie d'allumage et serrez-la solidement.
NOTA:Puedeadquirir nuevos bujia al nOmerotelef6nico
1-800-4-1VlY-HOME(469-4663).
Entretien du pare-6tincelles
Ala sortie deI'usine,votre moteur n'est pas muni d'un pare-
_tincelles. Cependant,danscertaines r_gions, il est illegal d'utiliser
un moteur sans pare-_tincelles. Veuillez donc v_rifier les lois et
r_glements Iocaux.Vous pouvezvous procurer un pare-_tincellesau
centre de service Searsle plus pros de chezvous.
Afin de vous assurer quele pare-_tincellesfonctionne toujours bien,
vous devezeffectuer un entretien apr_schaque 50 heures
d'utilisation.
AVERTI$SENENT
Silemoteurfonctionnedepuisuncertaintemps,lesilencieuxpeut
6tretr_schaud.Laissez-lerefroidiravantd'effectuerI'entretiendu
pare-_tincelles.
• Enlevez1'6crandepare-_tincellespourproc_derau nettoyageet
AI'inspection.
S'ilestendommag&remplacezI'_cran.
Syst_me de refroidissement _ air
Avec le temps, les d_bris peuvent s'accumuler dans les ailettesde
refroidissement du cylindre et ne peuvent_tre reports que par un
d_sassemblagepartiel du moteur. Nous vous recommandons donc
de demander_ un distributeur de service Searsautoris_ de nettoyer
le syst&mede refroidissement aux intervalles recommand_s
(consultez la section Calendrier d'entretien). II est aussi important
de garder le moteur libre de d_bris. Consultez la section Nettoyage
des d4bris.
Mantengalibres de residuos las zonas situadas
dentro de las lineas gruesas.
Hettoyage de la chambre de combustion
Nousvous recommandonsdefaire enleverles d_p6ts decombustion
du cylindre, dela culasse, dela t_te du piston etautour dessoupapes
parun distributeur desewice Searsautoris& et ce,auxintewalles
recommand_s(consultezla section Calendrierd'entretien).
brOluresgraves.
Tout contact avecla zone du silencieux peut causerdes
La chaleur et les gazd'6chappement peuvent
_1_ enflammer des mat_riaux combustibles et les
• NEtouchezPASauxpi_ceschaudesetdvitezlecontactaveclesgaz
• LeCodeof FederalRegulation(CFR)Title36Parks,Forests,andPublic
structures ainsi que causerdes dommages au r6servoir
d'essenceet entrafner un incendie.
d'_chappement.
LaissezI'_quipementrefroidiravantdeletoucher.
Laissezunddgagementd'aumoins1,5m(5 pi)tout autourdela
nettoyeur_.pression,y comprisau-dessus.
PropertyexigequedeI'dquipementalimentdpar unmoteur_.
combustioninternesoit dot6d'unpare-dtincelleset constamment
maintenuenbon_tatfonctionnement,conform_ment_la normede
service5100-10delaUSDAForestouAunerSvisionde celle-ci.Dans
I'EtatdelaCalifornie,unpare-_tincellesest requisenvertudela
section4442duCaliforniaPublicResourcesCode.IIsepeutque
d'autresEtatsaientdesloissemblables.auxterresf_d_rales.Sivous
_quipezlesilencieuxd'unpare-_tincelles,il doit_treenbon_tatde
fonctionnement.
53
Page 54

Apr_s chaque utilisation
L'eau ne doit pas demeurer dansle nettoyeur durant une Iongue
p_riode detemps. Des s_diments ou des min_raux pourraient
s'accumuler sur les pi_ces de la pompe et bloquer son mouvement.
Suivez la procedure suivante apr_s chaque utilisation:
1. Rincezle syst_me de d_tergent en plagant la soupaped'arr_t
de d6tergent _.la positon <<Off >>et enfaisant fonctionner le
nettoyeur _.haute pression avec la buse noire de d_tergent.
Rincezpendant une ou deux minutes.
2. Arratez lemoteur, fermez I'alimentation en eau, dirigez le
pistolet vers un endroit s6curitaire et appuyezsur la d_tente du
pistolet de pulv_risation pour lib_rer la haute pression de I'eau.
Engagezle verrou de la d_tente sur le pistolet pulv_risateur et
laisser le moteur refroidit.
3. D_branchezletuyau du pistolet de pulv_risation et de lasortie
haute pression de la pompe. VidangezI'eau dutuyau, du
pistolet et de la rallonge de buse.Utilisez un chiffon pour
essuyer le tuyau.
4. Videz la pompe detout liquide en tirant sur la poign_e du
lanceur environ 6 fois. Cetteoperation devrait suffire pour
enlever presquetout le liquide darts la pompe.
5. Enroulezletuyau A hautepression et le suspendre
correctement sur le crochet fourni sur la poign_e.
6. Entreposezle nettoyeur dans un endroit propre et sec.
7. Sivous remisezle nettoyeur durant plus de 30 jours, consultez
la section Entreposage _ long terme.
AVERTISSEMENT
AVERTISSEMENT
Lejet d'eau sous pression produit parcet _quipement
peut percerla peauet lestissus sous-jacents,risquant
amputation.
de provoquer desblessures gravespouvant mener_.une
Le pistolet de pulv_risation retient une pression d'eau
_lev_e,m_me Iorsque le moteur est _teint et que I'eau
est d6connect_e,ce qui peut causer des blessures.
• 6ardeztoujoursletuyauflexible_ hautepressionraccord__la pornpe
etaupistoletdepulv_risationIorsquelesyst_rneest souspression.
• Avantded_marrerle moteur,dirigezTOUJOURSlepistoletversun
endroits_curitaireetappuyezsur lad6tentedupistoletdepulv_risation
pourlib6rerlahautepressionet 6viteruneffetderecul.Lorsquevous
n'utilisezpaslepistolet,engagezleverroude lad6tente.
_j L'essenceet ses sont extr6mement
LORSQUEVOUSENTREPOSEZL'ESSENCEOUUN EQUIPEIVIENT
AVECUNRI_SERVOIRA ESSENCE
• Entreposez-leloin des appareilsde chauffage,des fours, des chauffe-eau,
inflammables et explosives.
blessures graves, pouvant _tre fatales.
Lefeu ou I'explosion risque de provoquer des
des s_cheusesoude tout autreappareil_lectrorn6nagerdisposant d'une
veilleuseou de toute autresource d'inflarnrnation risquantd'enflarnmer
lesvapeurs d'essence.
vapeurs
54
Page 55

ENTREPOSAGEPOURL'HIVER Si le carburant du rnoteur n'a pas _t_trait_ avecun stabilisateur
d'essence,vousdevezlevidangerdansuncontenantapprouv&
Faitestournerle moteurjusqu'&cequ'ils'arrateparmanque
Vous devezprot6ger votre appareilcontre le gel.
si vous nelefaitespas,vouspouvezcauserdesdommages
irr_versibles_votrepornpequilarendrontinutilisable.
Losdornmagescausesparlegelne sontpascouvertsparlagarantie.
Pour pret_gerI'appareil centrele gel:
1. Videzle r_servoir de nettoyage cornme suit:
a. Placezla soupape d'arr_t de d_tergent _ la positon "Off".
b. D_branchezle boyau_ barbeluresur la pompe. Placezune
extr6mit6du boyaudans un contenantad@uat.
c. Placezla soupaped'arr_t de d6tergent_ la positon "On" et
ouvrez le couvercle du r_servoir. Le contenu du r_servoir
sevidera par gravit_ dans le contenant.
d. Rebranchezle boyauau raccord du boyau_ barbelure sur
la pompe.Ajoutez 0,5 litre (1 pinte) d'eau propre fraTche
dans le r_servoir de nettoyage et fermez le couvercle du
r_servoir.
2. Vidangezler_servoir de nettoyageenpla_ant la soupaped'arr_t
de d_tergent _.lapositon "On" eten faisantfonctionner le
nettoyeur_ hautepression avecla buse noire. Vidangezjusqu'_.
ceque le r_sewoir soit vide. Placezla soupaped'arr_t de
d_tergent_ la positon "Off".
3. R@_ter des _tapes2-5 dans la section pr_c_denteAprbs
ChaqueUtilisation.
4. Pour traiter votre pompe, utilisez PumpSaver,disponible chez
Sears. Ceproduit vous permet de r_duire les dommages
causespar le gel et de lubrifier les pistons et les joints.
5. Si "Pump saver" n'est pas disponible, raccordez une section de
tuyau d'arrosage de 1m (3 pi) de long _ un raccord d'eau
d'arriv@. Versezde I'antigel dev@icule de plaisance (antigel
sans alcool) dans le tuyau. Tirez sur la poign@ du lanceur
deuxfois. D_branchezle tuyau de 1 m (3 pi).
6. Entreposezle nettoyeur dans un endroit propre et sec.
EHTREPOSAGEA LONGTERME
Si vous Repr@oyez pas utiliser le nettoyeur _.pression durant plus
de 30 jours, vous devezpr@arer le moteur et la pompe pour
I'entreposage _.long terme.
Protection du syst_me d'aiimentation
Additifde carburant:
Lecarburantpeut_tre@ent_apr_sunentreposagedeplusde30
jours.Uncarburant@ent_causelaformationded@6tsacidesetde
gommedanslesystamed'alimentationousur lespi6cesessentielles
ducarburateur.PourgarderI'essencepropre,utilisezlestabilisateur
d'essenceFRESHSTARTTM deBriggs&Stratton,disponiblesous
formed'additifliquideoucartouchedeliquideconcentr_.
IIestinutiledevidangerlecarburantdumoteursivousajoutezun
stabilisateurd'essenceconform_mentauxdirectives.Faitestournerle
moteurpendant2 minutespourfairecirculerlestabilisateurdansle
syst_medecarburant.Vouspouvezensuiteentreposerlemoteuret
I'essencedurantunep_riodemaximalede24mois.
d'essence.II estrecommand_d'utiliserdustabilisateurd'essence
danslecontenantd'entreposagepourenconserverlafrafcheur.
Changement de I'huile
Alors quele moteur est encore chaud, vidangez I'huile du carter.
Remplissezle carter _.nouveauavecde I'huile de la qualit_
recommand@. Consultezla section Vidange deI'huile moteur.
Huilagede I'al6sage du cylindre
* Enlevezla bougie d'allumage et versez environ 15 ml (1/2 once)
d'huile _.moteur neuve dans le cylindre.
* Installez la bougie d'allumage et tirez lentement la poign@ du
d_marreur pour distribuer I'huile.
Protection de la pompe
Utilisez PumpSaver pour traitor la pompe contre los dommages
causespar de d@6ts min6raux ou le gel. Vous pr@iendrez ainsi les
dommagescaus6s par le gel et lubrifierez les pistons et les joints.
REMARQUE:PumpSaverest un accessoire disponible en option. II
n'est pas fourni avec le nettoyeur _.pression. Contactezle d_taillant
agr_ de service apr_svente situ_ le plus pros de chezvous pour
vous procurer PumpSaver.
[ AVIS
Vous devez prot6ger votre appareil contre le gel.
irr_versibles&votrepornpequilarendrontinutilisable.
i ivousnelefaitespas,vouspouvezcauserdesdornmages
Lesdomrnagescausesparlegelne sontpascouvertsparlagarantie.
Pour utiliser PumpSaver,assurez-vous que le nettoyeur A haute
pression est enposition d'arr_t et d_branch_de I'alimentation d'eau.
Veuillez lire lesdirectives et les avertissements mentionn_s sur le
contenant de PumpSaver.
Autres directives
1. N'entreposezPAS d'essenced'une saison &I'autre b.moins
qu'elle ne soit trait@ tel que d_crit dans Protection du systbme
d'alimentation.
2. Remplacezle contenant _.essences'il commence _.rouiller. Un
carburant contamin_ peut causer des probl_mes de moteur.
3. Couvrez I'appareil _ I'aided'une houssede protection ad@uate
qui ne retient pas I'humidit&
AVERTISSEMENT
Les couvertures de rangement peuvent _tre
inflammables.
NEplacez JAMAIS une couverture de rangernent sur un nettoyeur
pression.
LaissezI'appareil refroidir suffisarnrnent avant de placer la couverture
de rangernent dessus.
Entreposez la nettoyeur _ pression dans un endroit propre et
sec.
55
Page 56

Probl_me
La pompe a ies prohi_mes
suivants:pas de pression,
pressionirr_ggli_re, pressure,
claqgement,perte de pression,
faible d_hil Wean.
Le d_tergent ne se m_lange pas
avec le jet.
Le moteur tourne sanscharge
mats cale qnandnne charge est
ajont_e.
Lemoteurned_marrepas,ouil
d_marreet a desrat_s.
EImotorse apagadgrantela
operaci6n.
Manquedepgissancedg
moteur.
Cause
3. Buse _ basse pression install_e.
2. Entr6ed'eau bloqu_e.
3. Pasassez d'eau qui arrive.
4. Tuyau d'entr6e tortill_ ou avec fuites.
5. Filtre detuyau bouch_.
6. Eau&plus de IO0°F.
7. Tuyau de sortie bloqu_ ou avec fuites.
8. Le pistolet fuie.
9. La buse est obstru6e.
10. La pompe est d_fectueuse.
1. La soupape d'arr_t de d_tergent est Ala
positon "Off".
2. Buse A haute pression install_e.
Vitesse trop lente du moteur.
1. Filtre _air encrass_.
2. Panne d'essence.
3. Essence_vent_e.
4. Filde bougienonbranch_Ala bougie.
5. Bougied_fectueuse.
6. Eaupr_sentedansI'essence.
7. M_lange d'essencetrop riche.
Sin gasolina.
Filtre _.air encrass6. Remplacezle filtre _air.
Correction
1. Replacezla buse par la buse Ahaute pression.
2. D_gagerI'entr6e d'eau.
3. Fournir un d_bit ad6quat.
4. Redresserle tuyau, boucher la fuite.
5. V_rifier et nettoyer le filtre du tuyau d'entr_e.
6. Ayezune eau plus froide.
7. D_bloquez letuyau de sortie.
8. Remplacer le pistolet.
9. Nettoyezla buse.
10. Contacter votre concessionnaire Sears.
1. Placezla soupape d'arrSt de d_tergent Ala positon
"On".
2. Remplacezla buse par la buse _.basse pression.
Mettre I'acc_16rateursur FAST.Si le moteur continue
calercontacter votre concessionaire fabricant de
moteur.
1. Nettoyezou remplacez le filtre _ air.
2. Faitesle plein du r_servoir.
3. Vidangezle r_servoir; faites le plein avec de
I'essencenouvelle.
4. Branchezle fil _.la bougie.
5. Remplacezla bougie.
6. Vidangezle r_servoir; faites le plein avec de
I'essencenouvelle.
7. Contactezle centre de service Sears.
Lleneel tanque de combustible.
56
Page 57

57
Page 58

Sears,RoebgckandCo.,U.S.A. (Sears), le California Air ResourcesBoard(CARB}
et le United States EnvironmentalProtectionAgency(U.S. EPA}
['nonc_de garantie dudispositifantipollution
(Droitset obligations dg propri_taires relatifs _ la garantie centre les d_lagts}
Le California Air Resources Board (CARB), I'USEPA et Sears sent heureux de
vous expliquer la garantie couvrant le dispositif antipollution de votoe petit moteur
hers route. En Californie, les nouveaux mod6les de petits moteurs hers route de
I'ann6e 2006 et ult@ieurs doivent 6tre congus, construits et 6quip6s de fa£on
respecter les normes anti-smog rigoureuses de 1'6tat.
Ailleurs aux Etats-Unis, les nouveaux moteurs & 6tincelles hers route
homologu6s, mod61es 1997 ou plus r6cents, doivent respecter des normes
semblables d6finies par I'USEPA. Sears doit garantir le dispositif antipollution de
votoe moteur pour les p6riodes indiqu6es ci-dessous, _ condition qu'il n'y ait pas
eu d'abus, de n6gligence, de mauvais entretien sur ledit moteur.
Votre dispositif antipollution comprend des pi_ces comme le carburateur, le filtre
air, le syst6me d'allumage, le conduit d'essence, le silencieux et le convertisseur
catalytique. II peut aussi y avoir des connecteurs et d'autoes dispositifs reli_s aux
6missions.
Dans le cas d'un d6faut couvert par la garantie, Sears r@arera votoe petit moteur
hers route sans frais, et ce, incluant le diagnostic, les pi_ces et la main d'oeuvre.
Ceuverture de garantie centre lee d_tauts du dispositit antipollutien de Sears
La garantie de votre petit moteur hers route couvre les pi_ces d6fectueuses du
dispositif antipollution pour une p@iode de deux ans, sujette aux dispositions
d6taill@s ci-dessous. Si une piece de votoe moteur couverte par la garantie est
d6fectueuse, Sears la r@arera ou la remplacera.
Responsabilit_s de la garantJe du prepri_taire
En tant que propri6taire de petit moteur hers route, vous _tes responsable de
I'ex6cution de Fentretien requis indiqu6 dans vous instructions d'utilisation et
d'entretien. Sears recommande de conserver tousles re£us reli6s & I'entretien de
votoe petit moteur hers route; toutefois, Sears ne peut refuser la garantie
uniquement parce que vous 6tes dans I1mpossibilit_ de produire les regus ou que
vous n'avez pas effectu6 toutes les 6tapes de I'entretien pr@u.
N6anmoins, vous devez savoir, en tant que propri6taire de petit moteur hers
route, que Sears peut renter la garantie si votre moteur ou une piece font d6faut
en raison d'abus, de n6gligence, d'entretien inad6quat ou de modifications non
approuv6es.
D_s qu'un probl6me survient, vous avez la responsabilit6 de faire examiner votre
moteur & un distributeur de service Sears autoris&
Les r@arations couvertes par la garantie non contest_es doivent 6toe effectu@s
dans un d61ai raisonnable, n'exc6dant pas 30 jours.
Si vous avez des questions au sujet de yes droits et responsabilit_s reli6s & la
garantie, veuillez communiquer avec un repr6sentant de Sears au 1-800-469-
4663.
La garantie du dispositif antipollution est une garantie centre les d6fauts. Les
d6fauts sent @alu6s selon la performance normale du moteur. La garantie n'est
pas reli6e & un test du dispositif antipollution & I'usage.
Dispositions de la garantJe centre lee d_fants du dispositit antipellution de
Sears
Les dispositions qui suivent sent sp@ifiques _ la couverture de garantie centre
les d6fauts du dispositif antipollution. Elle est un ajout & la garantie sur les
moteurs de Sears pour les moteurs non r_gul6s, figurant dans les instructions
d'utilisation et d'entretien.
1. Pi_ces garanties
La couverture de cette garantie n'englobe que les pi_ces _num@@s ci-
dessous (pi6ces du dispositif antipollution) dans la mesure o_ ces pi_ces
6taient pr6sentes sur le moteur au moment de I'achat.
a. Syst_me de contr61e d'alimentation en carburant
Dispositif d'enrichissement pour d_marrage &froid
Carburateur et pi_ces internes
Pompe _ carburant
Conduit d'essence, raccords de conduit d'essence, brides de serrage
R_servoir d'essence, bouchon et attache
Absorbeur de vapeurs d'essence
b. Circuit d'entr_e d'air
Filtre & air
Collecteur d'admission
Ligne de purge et d'@acuation
c. Syst_me d'allumage
Bougie(s) d'allumage
Syst_me d'allumage & magneto
d. Syst_me de catalyseur
Convertisseur catalytique
Collecteur d'_chappement
Syst_me d'injection d'air ou soupape d'impulsion
e. Elements divers
So@apes et interrupteurs de d@ression, de temp@atuoe, de
position, _ d_lai critique
Connecteurs et dispositifs
2. Burke de la cenverture
Sears garantit au propri_taioe initial et &tousles acheteur que les pi_ces
garanties seront fibres de tout d_faut de mat@iel et de main d'oeuvre qui
pourrait entrafner la d_fectuosit_ des pi_ces garanties, et ce, pour une
p@iode de deux ans _ compter de la date de livraison du moteur _ un
acheteur au d_tail.
3, Aucun frets
La r@aration ou le remplacement de toute piece garantie s'effectuera sans
frais pour le propriStaire, y compris la main d'oeuvre reli@ au diagnostic
concluant qu'une piece garantie est effectivement d_fectueuse, si le
diagnostic est effectu8 dans un distributeur de service Sears autoris&
4. R_clamatiens et exclnsiens de couvertnre
Les r@lamations au titre de la garantie doivent _tre pr_sent@s
conform_ment aux dispositions de la politique de garantie de Sears. La
couverture de garantie n'englobe pas les d_fectuosit_s sur des pi_ces
garanties qui ne sont pas les pi_ces originales de Sears ou les d_fectuosit_s
reli@s & un abus, de la n_gligence ou un entretien inappropri8 tel que dStaill8
dans la politique de garantie du moteur de Sears. Sears n'a pas la
responsabilit_ de oouvrir les d_fectuosit6s des pi_ces garanties caus@s par
I'utilisation de pi_ces ajout@s, non originales ou modifiSes.
5. Entretien
Toute piece garantie dent le remplaoement n'est pas pr@u dans I'entretien
requis, ou qui ne doit faire I'objet que d'une inspection r_guli@e et qu'il ne
faut que" r@aoer ou remplacer au besoin ", est garantie contoe les
d_fectuosit_s pour la dur_e de la p@iode de garantie. Toute piece garantie
dont le remplacement fad partie de I'entretien requis est garantie contre les
d_fauts seulement pour la pSriode se terminant au premier remplacement
pr@u de ladite piSce. Toute piece de rechange dont la performance et la
durabilit_ sont _quivalentes peut 8tre utilis@ pour I'entretien ou les
r@arations. Le propriStaioe est responsable de I'ex_cution de I'entretien
requis, indiqu_ dans le present instructions d'utilisation et d'entretien de
Sears.
6. Ceuvertnre Jndirecte
La couverture pr@ue aux pr_sentes englobe toute d_fectuosit_ de I'un des
composants du moteur caus@ _ la suite d'une d_fectuosit_ d'une des pi_ces
garanties encore couverte par la garantie.
Aux Etats-Unis et au Canada, I'assistance t_l@honique de 24 heures, au 1-800-469-4663, comprend un menu de messages pr_enoegistr_s qui procure des
renseignements sur I'entoetien du produit.
58
Page 59

Benseignements sur les 6missions
Les renseignements eoneernant lap_riode de durabilit_ des
_missions etI'indicede pollution atmosph_rique doivent _tre fournis
avecles moteurs qui r_pondent aux normes relatives aux _missions
de cat_gorie 2 de la California Air Resources Board (CARB).Le
fabricant du moteur dolt fournir ces renseignements aux
consommateurs sur des _tiquettes d'_missions. L'_tiquette des
_missions du moteur fournit des renseignements sur la certification.
La p_riede de durabilit_ des _rnissiens d_crit le nombre d'heures
pendant lesquelles le moteur peut fonctionner en respectant les
normes relativesaux _missions, en supposant que I'entretien est
effectu_conform_ment aux directives de fonctionnement et
d'entretien. Lescat6gories utilis_es sent les suivantes :
IVled_r_: Le moteur peut fonctionner pendant 125 heurestout en
respeetant la norme relativeaux _missions.
Interm_diaire : Le moteur peut fonctionner pendant 250 heures
tout en respectant la norme relative aux _missions.
Prelong_ : Le moteur peut fonctionner pendant 500 heures tout en
respeetant la norme relativeaux 6missions.
Parexemple, I'utilisation d'une tondeuse pouss_eest d'environ 20 _.
25 heurespar annie. Par consequent, la p_riede de durabiiit_ des
_missiens d'un moteur de cat_gorie interm_diaire _quivaut _.une
p_riode de 10 _.12 ann_es.
Certains moteurs respecteront les normes relatives aux _missions
de phase 2 de la United States Environmental Protection Agency
(USEPA).Dans le cas des moteurs homologu_s phase2, la p_riode
de conformit_ des _missions indiqu_e sur %tiquette de conformit_
des_missions indique le nombre d'heures de fonctionnement
pendant lesquelles le moteur a d_montr_ qu'il respectait les
exigencesf6d_ralesen mati_red'6missions.
Pour les moteurs de cylindr_e inf_rieure _.225 cc:
Cat_gorieC = 125 heures
Cat_gorie B= 250 heures
Cat_gorieA = 500 heures.
Pour les moteurs de cylindr_e 6gale ou sup_rieure A225 cc:
Cat_gorieC = 250 heures
Cat_gorie B= 500 heures
Cat_gorieA = 1000 heures.
59
Page 60

• " r
Get it fixed, atyour home o ours!
Your Home
For repair-in your home -of all major brand appliances,
lawn and garden equipment, or heating and cooling systems,
no matter who made it, no matter who sold it!
For the replacement parts, accessories and
owner's manuals that you need to do-it-yourself.
For Sears professional installation of home appliances
and items like garage door openers and water heaters.
1-800-4-MY-HOME ® (1-800-469-4663)
Call anytime, day or night (U.S_Aoand Canada)
www,sears corn www.searsoca
Our Home
For repair of carry-in items like vacuums, lawn equipment,
and electronics, call or go on-line for the location of your nearest
Sears Parts & Repair Centerr
1-800-488-1222
Call anytime, day or night (UoSA. only)
www.sear5 corn
To purchase a protection agreement (UoS,A.)
or maintenance agreement (Canada) on a product serviced by Sears:
1-800-827-6655 (USA.) t-800-361-6665 (Canada)
Para pedir servicio de reparaci6n
a domicilio, y para ordenar piezas:
1-888-SU-HOGAR ®
(1-888-784-6427)
Au Canada pour service en fran(_ais:
1-800-LDFOYER Mc
(1-800-533-6937)
www..sears.ca
® Registered Trademark / TM Trademark ! su Service Mark e[ Sears Brands, LLC
_rM SM
® Marca Regisfr_da ! Marca de Ffibrisa i Merca de Sarvicio de Sears Brands, LLC
• Marque de commerce / ' Marque d_pos_e de Sears Brands. LLC
© Sears Brands. LLC
 Loading...