

Craftsman 580675612 Owner’s Manual
Operator'sIVlanual
rsldRli
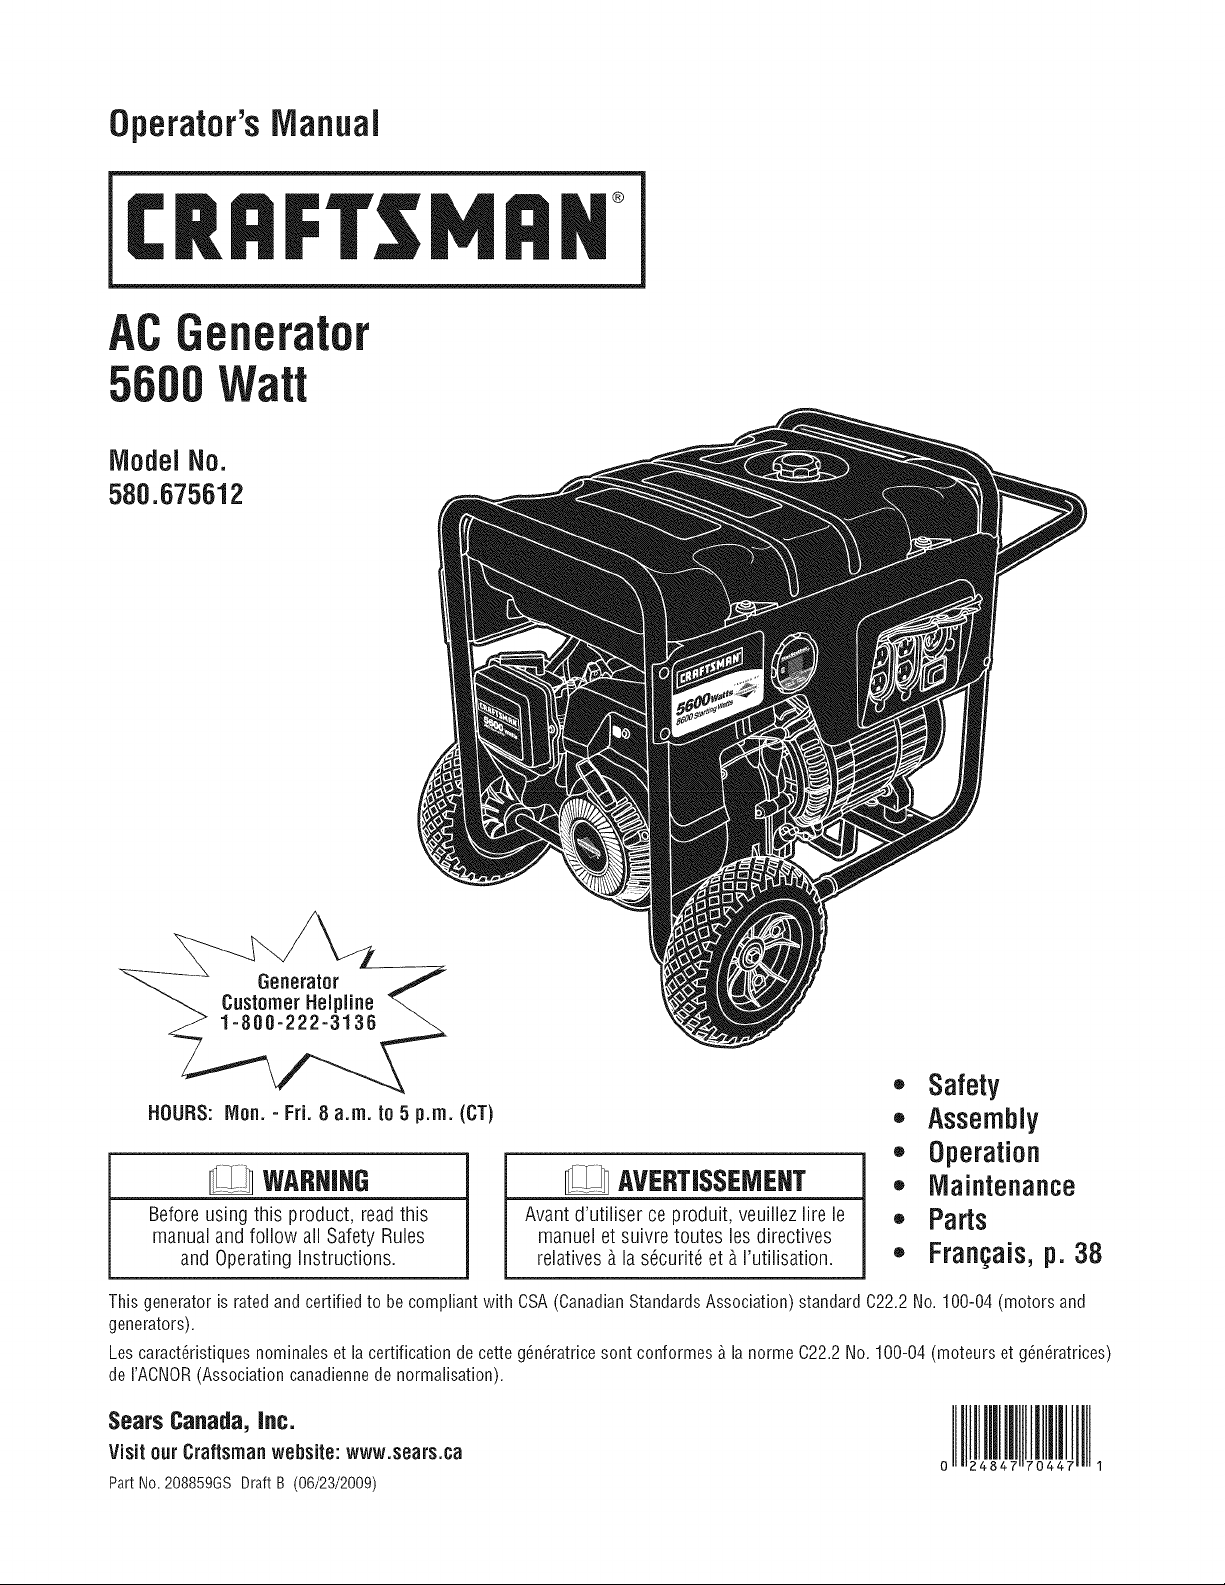
AC nerator
ModelNo.
580.675512
,, Safety
HOURS: IVlon.- Fri. 8 a.m. to5 p.m. (CT)
,, Assembly
,, Operation
WARHIHG
Before using this product, read this
manual and follow all Safety Rules
and Operating instructions.
This generator is rated andcertified to be compliant with CSA(Canadian Standards Association) standard 022.2 No. 100-04 (motors and
generators).
Les caract_ristiques nominales et la certification de cette g_n(iratrice sont conformes _ la norme 022.2 No. 100-04 (moteurs et g_n(iratrices)
de I'ACNOR(Association canadienne de normalisation).
Sears Canada, Jnc.
visit our Craftsman wehsite: www.sears.ca
PartNo.208859GSDraftB (06/23/2009)
Avant d'utiiiser ce produit, veuiliez lire ie
manuel et suivre toutes les directives
relatives _.la s6curit6 et _.rutilisation.
AVERTISSEMENT
. Maintenance
,, Parts
,, Fran_ais,p. 38
WARRANTY................................... 2-3
SAFETYRULES................................. 4-6
FEATURESAND CONTROLS........................ 7
ASSEMBLY................................... 8-10
OPERATION................................. 11-15
SPECIFICATIONS................................ 16
MAINTENANCE............................... 17-20
STORAGE...................................... 21
TROUBLESHOOTING............................. 22
NOTES........................................ 23
SCHEMATIC/WIRINGDIAGRAM.................. 24-25
REPLACEMENTPARTS......................... 26-35
EMISSIONSSYSTEMWARRANTY................ 36-37
FRANOAiS................................... 38-63
HOWTOORDERPARTS................... BACKPAGE
CRAFTSMANLiMiTEDWARRANTY
General:Craftsmanproducts arewarranted to befree from defects in materials or workmanship for aspecific time period as
set-out below (the "Warranty Period"). Warranties extend to the original purchaser of a Craftsman product only. Purchases
madethrough an online auction or through anywebsite other than www.sears.ca areexcluded. The relevantWarranty Period
commenceson the original date of purchase.Within this period, Sears Canada,Inc.will, at its sole option, repair or replace
any products or componentswhich fail in normal use. Such repairs or replacementwill be made at no charge to the customer
for parts or labor, provided that the customer shall be responsible for anytransportation cost.
Exclusions:This warranty does not coverfailures due to normal wear,abuse, misuse,neglect (including but not limited to the
use of stale fuel, dirt, abrasives, moisture, rust, corrosion, or any adversereaction due to improper storageor use habits),
improper maintenanceor failure to follow maintenanceguidelinesand/or instructions, failure to operatethe product in
accordancewith the owner's manual or any additional instructions or information provided at the time of purchaseor in
subsequentcommunications with the original purchaser, accidentor unauthorizedalterationsor repairsmade or attempted by
others. Also excludedfrom warranty coverage- exceptas provided below - arethe following: maintenance,adjustments,
components subject to wear including but not limited to: cosmetic components, belts, blades, bladeadapters, bulbs, tires,
filters, guide bars, lubricants, seats,grips, recoil assembly's, saw chains and bars, trimmer lines and spools, spark plugs,
starter ropers andtines, and discoloration resulting from ultraviolet light. Any product missing the model and/or serial
number identification labelwill be disqualified from coverageunder this warranty.
Repairs: Repairsconducted within the Warranty Periodwill be warranted until the end of the original Warranty Period.
Disclaimers:THEWARRANTIESAND REMEDIESCONTAINEDHEREINAREEXCLUSIVEAND iN LiEU OFALL OTHER
WARRANTIES,WHETHERORALORWRITTEN(OTHERTHANAS STATEDHEREIN),ANDWHETHEREXPRESS,IMPLIEDOR
STATUTORY,INCLUDINGBUTNOTLIMITED TO ANY.THIS WARRANTYGIVESYOUSPECIFICLEGALRIGHTS,WHICH MAY
VARYFROMPROVINCETO PROVINCE.
IN NO EVENTSHALLSEARSBELIABLEFORANYiNCiDENTAL,SPECIAL,iNDiRECTOR CONSEQUENTIALDAMAGES,
WHETHERRESULTINGFROMTHEUSE,MISUSEORINABILITYTO USETHE PRODUCTOR FROMDEFECTSIN THE
PRODUCT. THEEXCLUSIONSIN THIS PARAGRAPHSHALLNOTAPPLYIN JURISDiCATIONSWHEREAPPLICABLELAW
DOESNOTALLOW FORTHE EXCLUSIONOF iNCIDENTALORCONSEQUENTIALDAMAGES. IN SUCHJURISDICTIONS,THIS
PARAGRAPHSHALLNOTAPPLY,BUTTHE REMAININGPROVISIONSOFTHIS DOCUMENTSHALLREMAINVALID.
Searsretains the exclusive right to repairor replacethe product or offer a full refund of the purchaseprice at its sole
discretion. SUCH REMEDYSHALL BEYOURSOLEAND EXCLUSIVEREMEDYFORANYBREACHOFWARRANTY.
@2009
CustomerResponsibilities:inadditionaltocomplyingwithallsuggestedmaintenanceguidelinesandinstructions,customers'
obligations shall include but shall not be limited to: operating the product in accordancewith the owner's manual or any
additional instructions or information provided at the time of purchaseor insubsequent communications to the purchaser
from time to time, exhibit reasonablecarein the use, operation, maintenance,general upkeepand storage of the product.
Failureto comply with these requirementswill void anyapplicable warranty.
List of Applicable Warranty Periods: Thefollowing list contains the applicable Warranty Periodfor your Craftsman product
and is based on acombination of the typeof product or component and the intendedand actual use of the product or
component:
1. 98 days: Craftsman products intended for useor actually used for commercial, institutional, professional or income-
producing purposes
2. 2years: Craftsmanriding lawn mowers, yard and garden tractors, walk behind mowers, tillers, brush cutters, snow
blowers, handheld blowers, backpackblowers, hedge trimmers, portable generatorsand electrical products for
noncommercial, nonprofessional, non-institutional, or non-income-producing use,exceptfor those components which are
part of engine systems manufactured by third party enginemanufacturers for which the purchase has receivedan
separatewarranty with product information supplied at the time of purchase.
3. 1year: Craftsman pressurewashers, power cutters, stump grinders, pole pruners, gas chain saws, electric chain saws,
trimmer attachments, baggers and pole sawsfor noncommercial, nonprofessional, non-institutional, or non-income-
producing use.
4. 90 days: All defective batteries,which will be replaced during this 90-dayWarranty Period.
5. 60 days: Additional Warranty Periodof 60 days will applyto adjustments and worn products or components BUT DOES
NOTiNCLUDEWEAROR ADJUSTMENTSfor products usedfor commercial, institutional, professional or income-
producing purposes. Wear items include but are not limited to: belts, blades,tires, spark plugs, air filters, chains, shear
bolts, skid plates,scraper bars, drift cutters, ropes,tines, collection bags and pulleys.
Service Type: Craftsman product is either Carry-in/Shop serviceor At Homeservice. Thefollowing list identifies the service
by product type.
ShopService:
Craftsmanwalk behind mowers, tillers, brush cutters, handheld blowers, backpackblowers, hedgetrimmers, power
cutters, stump grinders, pole pruners, gas chain saws, electric chain saws, trimmer attachments, baggersand pole saws
AtHomeService:
Craftsman riding lawn mowers, yard and garden tractors and snow blowers
Asthe Warranty Period runs from the dateof purchaseand NOTfrom the date that a product is delivered,opened, assembled
or first used, pleaseensure during this time period that your product or component has been assembledand tested for
correction operation regardlessof whenyou intend to actually useit. Claims madeafter the Warranty Periodhasexpiredwill
not be honored.
Proofof Purchase/Documentation:Warranty coverage is conditioned upon the original purchaser furnishing Sears Canadaor
its authorized third party service provider if applicable,with the original sales receiptor other adequatewritten proof of the
original purchase dateand identification of the product, in the event that the original purchaser is unableto provide a
company of the original sales receipt, Sears Canadainc. reservesthe right to determine in its sole discretion what other
written proof of the original purchasedate and identification of the product is acceptable.
SEARSCANADAINC., TORONTO,ONTARIO,CANADA IViSB2C3
Read this manual carefullyand becomefamiliar
_ with your generator. Knowits appJicati0ns, its
limitati0ns, and any hazardsinv01ved.
important Safety information
The manufacturer cannot possibly anticipate every possible
circumstance that might involve a hazard.Thewarnings in
this manual,and the tags and decals affixed to the unit are,
therefore, not all-inclusive. Ifyou usea procedure, work
method or operating technique that the manufacturerdoes
not specifically recommend, you must satisfy yourself that it
is safe for you and others. You must also make surethat the
procedure, work method or operating technique that you
choose does not renderthe generator unsafe.
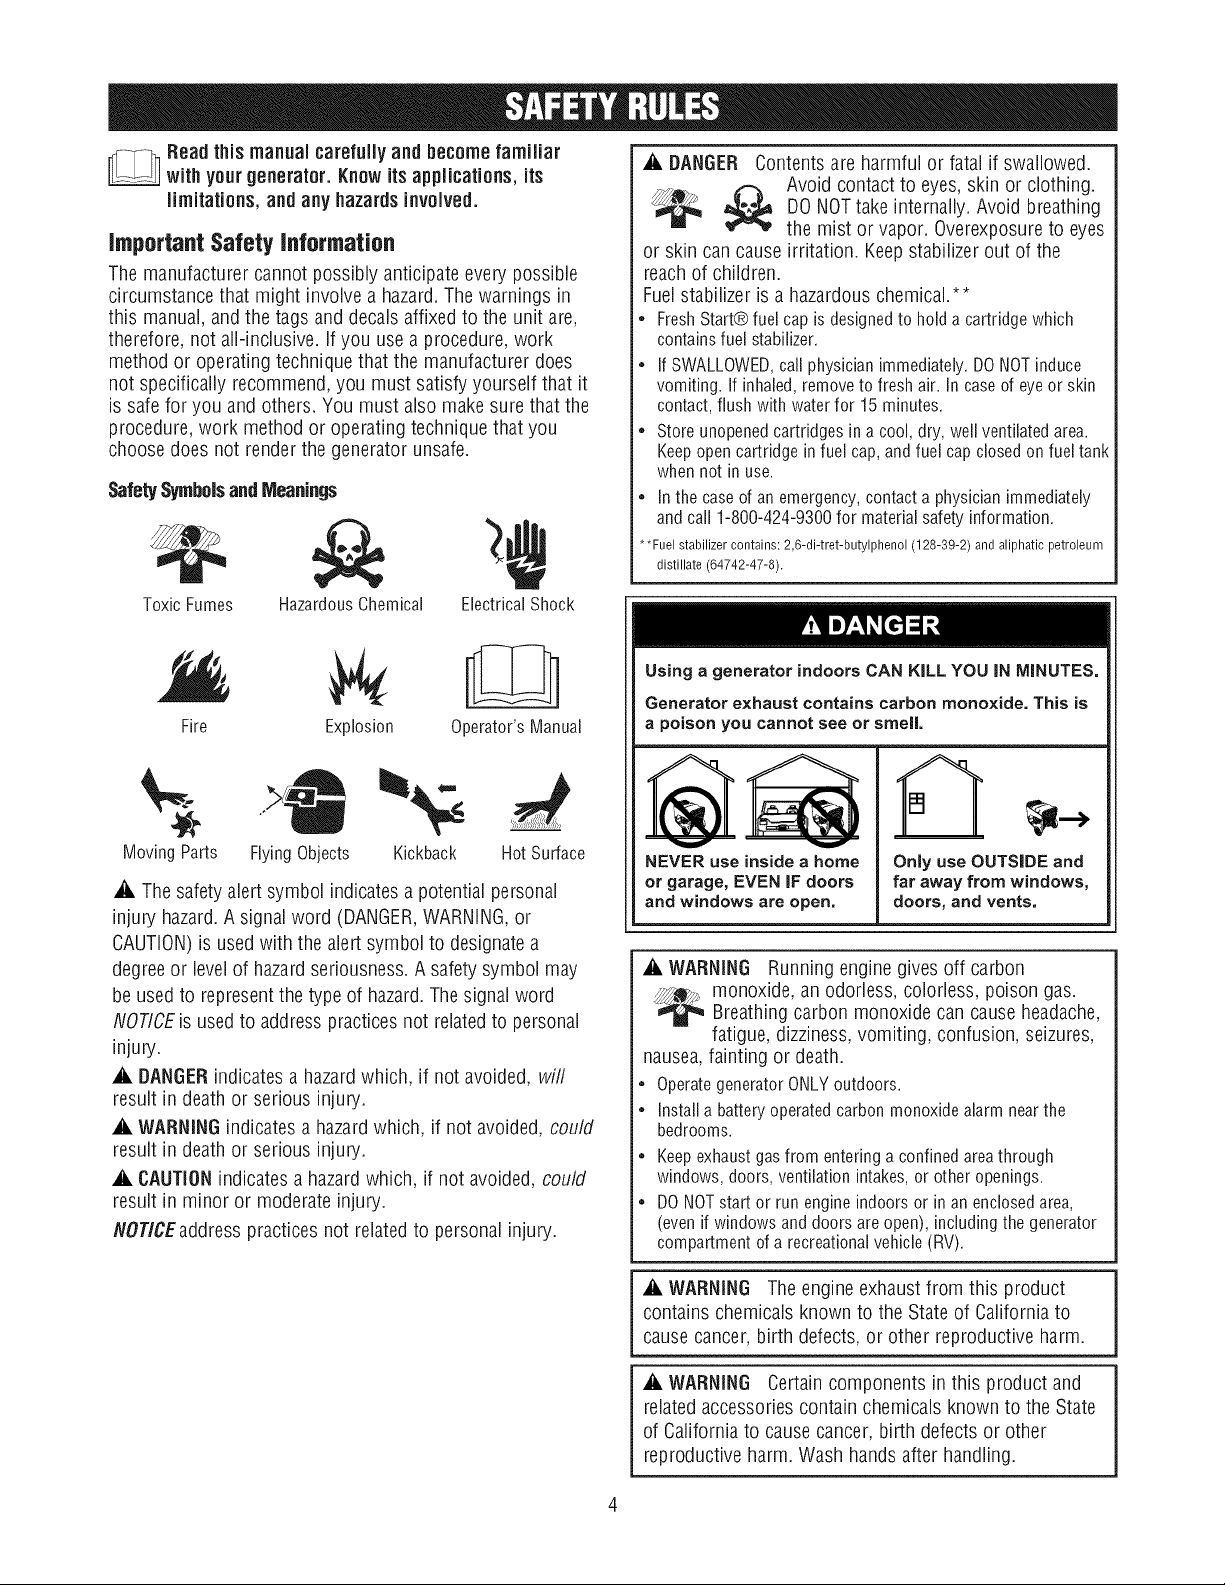
SafetySymbolsandMeanings
ToxicFumes HazardousChemical ElectricalShock
Fire
Explosion Operator'sManual
A. DANGER Contents are harmful or fatal if swallowed.
Avoid contact to eyes,skin or clothing.DONOTtake internally. Avoid breathing
the mist or vapor. Overexposureto eyes
or skin can cause irritation. Keepstabilizer out of the
reachof children.
Fuelstabilizer is a hazardous chemical.**
* FreshStart®fuelcapisdesignedto holda cartridgewhich
containsfuelstabilizer.
* If SWALLOWED,call physician immediately. DONOTinduce
vomiting. If inhaled, removeto fresh air. In case of eyeor skin
contact, flush with waterfor 15 minutes.
* Storeunopened cartridges in a cool, dry, well ventilated area.
Keepopen cartridge in fuel cap, andfuel capclosed on fuel tank
when not in use.
* In the caseof an emergency,contact a physician immediately
andcall 1-800-424-9300 for material safety information.
**Fuel stabilizer contains: 2,6-di-tret-butylphenol (128-39-2) and aliphatic petroleum
distillate (64742-47-8).
Using a generator indoors CAN KiLL YOU IN MINUTES,
Generator exhaust contains carbon monoxide, This is
a poison you cannot see or smell.
MovingParts FlyingObjects HotSurface
Kickback
,_. Thesafety alertsymbol indicatesa potential personal
injury hazard.A signalword (DANGER,WARNING,or
CAUTION)is used with the alert symbol to designatea
degreeor levelof hazardseriousness.A safetysymbol may
be used to representthe type of hazard.Thesignal word
NOTICEis used to addresspracticesnot relatedto personal
injury.
_k BANGERindicatesa hazardwhich, if not avoided, will
result in death or serious injury.
_k WARNINGindicatesa hazardwhich, if not avoided, could
result in death or serious injury.
_k CAUTIONindicatesa hazardwhich, if not avoided, could
result in minor or moderate injury.
NOTICEaddress practices not relatedto personal injury.
V V
NEVERuse insidea home
or garage,EVENJFdoors
andwindows areopen.
Only use OUTSIDE and
far away from windows,
doors, and vents,
A. WARNING Runningengine givesoff carbon
_ onoxide, an odorless, colorless, poison gas.
Breathingcarbon monoxide can causeheadache,
fatigue, dizziness,vomiting, confusion, seizures,
nausea,fainting or death.
• OperategeneratorONLYoutdoors.
• Installa batteryoperatedcarbonmonoxidealarmnearthe
bedrooms.
e
Keepexhaustgas from entering a confined areathrough
windows, doors, ventilation intakes,or other openings.
e
DO NOTstart or run engineindoors or in an enclosedarea,
(even if windows and doors are open), including the generator
compartment ofa recreationalvehicle (RV).
A. WARNING Theengine exhaust from this product
contains chemicals known to the Stateof California to
cause cancer, birth defects,or other reproductive harm.
A. WARNING Certaincomponents in this product and
relatedaccessories contain chemicals known to the State
of Californiato causecancer,birth defectsor other
reproductiveharm. Wash handsafter handling.
A. WARNING Generator produces hazardous voltage.
'_,||h Failure to isolate generator from power utility can
result in death or injury to electric utility workers
due to backfeed of electrical energy.
• When using generator for backup power, notify utility company.
Use approvedtransfer equipment to isolategenerator from
electric utility.
• Use aground fault circuit interrupter (GFCI)in any damp or
highly conductive area,such as metal deckingor steel work.
• DO NOTtouch bare wires or receptacles.
• DO NOTuse generatorwith electrical cords which are worn,
frayed, bareor otherwise damaged.
• DO NOToperate generator inthe rain or wet weather.
• DO NOThandle generator or electrical cords while standing in
water, while barefoot,or while hands or feet are wet.
• DO NOTallow unqualified persons or children to operateor
servicegenerator.
A. WARNING Starter cord kickback(rapid retraction)can
result in bodily injury. Kickbackwill pull hand and
,_arm toward enginefaster thanyou can let go.
Broken bones,fractures, bruises, or sprains
could result.
• Whenstartingengine,pullcordslowlyuntil resistanceisfelt
andthenpullrapidlytoavoidkickback.
• NEVERstartorstopenginewith electricaldevicespluggedin
andturnedon.
A. WARNING Contact with muffler area can result in
serious burns.
_ _ Exhaust heat/gases can ignite
fuel tank causing a fire.
• DO NOTtouch hot parts and AVOID hot exhaust gases.
• Allow equipmentto cool beforetouching.
• Keepat least5 feet (152 cm) of clearanceon all sidesof
generator including overhead.
• It isa violation of California Public Resource Code,Section
4442, to useor operatethe engine on anyforest-covered,
brush-covered,or grass-covered land unless the exhaust
system is equippedwith aspark arrester,as defined in Section
4442, maintained in effectiveworking order. Otherstates or
federal jurisdictions may havesimilar laws.
Contactthe original equipment manufacturer, retailer, or dealer
to obtain a sparkarrester designedfor the exhaustsystem
installedon this engine.
• Replacementparts must bethe sameand installed in the same
position as the original parts.
combustibles, structures or damage
A. WARNING Fuel and its vapors are extremely
flammable and explosive.
Fire or explosion can cause severe burns
or death.
WHENADDINGOR DRAININGFUEL
• Turn generator OFFand let it coolat least2 minutes before
removing fuel cap. Loosen cap slowly to relieve pressure in
tank.
• Fill or drain fuel tank outdoors.
• DONOToverfill tank. Allow spacefor fuel expansion.
• Iffuel spills, wait until it evaporatesbefore starting engine.
• Keepfuel awayfrom sparks, open flames, pilot lights,heat, and
other ignition sources.
• DONOTlight a cigaretteor smoke.
WHENSTARTINGEQUIPMENT
• Ensurespark plug, muffler, fuel cap,and air cleanerare in place.
• DO NOTcrank enginewith spark plug removed.
WHENOPERATINGEQUIPMENT
• DONOTtip engine or equipment at angle which causes fuel to
spill.
• This generator is not for use in mobile equipment or marine
applications.
WHENTRANSPORTING,MOVING OR REPAIRINGEQUIPMENT
• Transport/move/repair with fuel tank EMPTYor with fuel shutoff
valveOFF.
• DONOTtip engine or equipment at angle which causes fuel to
spill.
• Disconnect spark plug wire.
WHENSTORINGFUELOR EQUIPMENTWITH FUELiN TANK
• Store awayfrom furnaces, stoves,water heaters,clothes
dryers, or other appliancesthat havepilot light or other ignition
source becausethey can ignitefuel vapors.
Ak WARNING
o
This generator does not meet U. S. CoastGuard Regulation
33CFR-183and should not be used on marine applications.
o
Failureto usethe appropriate U. S.CoastGuard approved
generator could result in deathor serious injury and/or property
damage.
_i, WARNING Unintentional sparking can result in fire or
_ electric shock.
WHENADJUSTINGOR MAKINGREPAIRSTO YOURGENERATOR
• Disconnect the spark plug wire from the spark plug and place
the wire where it cannot contact spark plug.
WHENTESTINGFORENGINESPARK
• Use approvedspark plug tester.
• DO NOTcheckfor spark with spark plug removed.
A, WARNING Starter and other rotating parts can
NOTICE Exceeding generators wattage/amperage capacity
can damage generator and/or electrical devices connected to
it.
= DONOTexceedthe generator'swattage/amperage capacity.See
Don't OverloadGeneratorin the Operationsection.
= Start generator and let engine stabilizebefore connecting electrical
loads.
= Connectelectricalloads in OFFposition, then turn ONfor
operation.
= Turn electrical loads OFFand disconnectfrom generatorbefore
stopping generator.
entangle hands, hair, clothing, or accessories.
, NEVERoperategenerator without protective housing or covers.
* DO NOTwear looseclothing, jewelry or anything that may be
caught in the starter or other rotating parts.
* Tie up longhair and removejewelry.
_i, CAUTION Excessively high operating speeds increase
risk of injury and damage to generator.
Excessively low speeds impose a heavy load.
• DO NOTtamper with governed speed.Generatorsupplies
correct rated frequency andvoltage when running at governed
speed.
• DO NOTmodify generator inany way.
NOTICE improper treatment of generator can damage it
and shorten its life.
= Usegenerator only for intended uses.
= If you have questionsabout intended use,ask dealer or contact
Sears.
= Operategenerator only on level surfaces.
• DONOT exposegeneratorto excessivemoisture, dust, dirt, or
corrosivevapors.
• DONOT insert any objectsthrough cooling slots.
• If connected devices overheat,turn them offand disconnect them
from generator.
• Shutoff generator if:
-electrical output is lost;
-equipment sparks, smokes, or emits flames;
-unit vibrates excessively.
• This equipment is designedto be usedwith Searsauthorized
parts ONLY. If equipment is used with parts that DONOT comply
with minimum specifications, user assumes all risks and
liabilities.
KHOWYOURGEHERATOR
Readthe Operator's Manual and safety rulesbefore operating yourgenerator.
Comparethe illustrations with your generator to familiarize yourself with the locations of various controls and
adjustments. Savethis manualfor future reference.
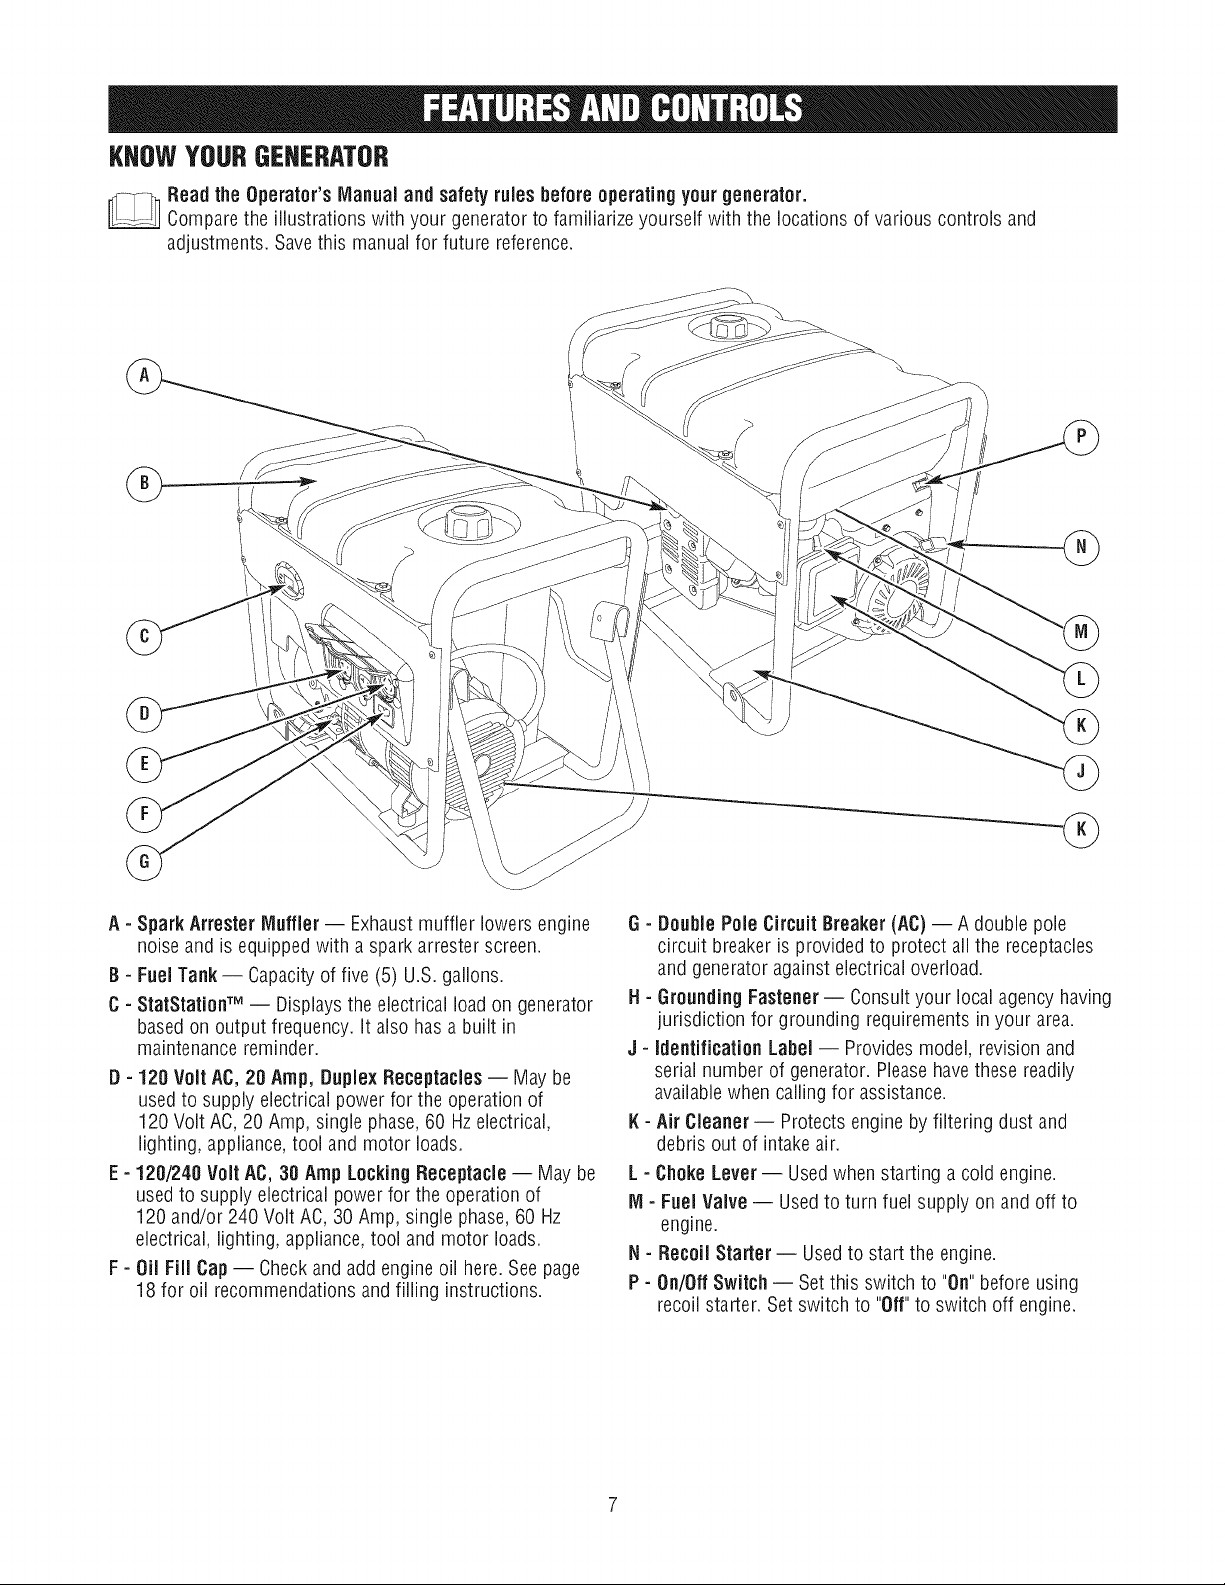
A - Spark Arrester Muffler -- Exhaustmuffler lowers engine
noiseand is equippedwith aspark arrester screen.
B - FuelTank -- Capacityof five (5) U.S.gallons.
C- StatStationTM -- Displaysthe electrical load on generator
basedon output frequency. It also hasa built in
maintenancereminder.
D - 120 Volt AC, 20 Amp, DuplexReceptacles -- May be
usedto supply electrical power for the operation of
120 Volt AC,20 Amp, single phase,60 Hzelectrical,
lighting, appliance, tool and motor loads.
E - 120/240 Volt AC, 30 Amp LockingReceptacle -- May be
usedto supply electrical powerfor the operation of
120 and/or 240Volt AC,30 Amp, single phase,60 Hz
electrical, lighting, appliance,tool andmotor loads.
F- Oil Fill Cap-- Checkand add engine oil here.Seepage
18 for oil recommendations and filling instructions.
G- DoublePole Circuit Breaker(AC)-- Adouble pole
circuit breakeris provided to protect all the receptacles
and generator against electrical overload.
H- GroundingFastener -- Consultyour local agencyhaving
jurisdiction for grounding requirementsin your area.
J - Identification Label-- Provides model, revision and
serial number of generator. Pleasehavethese readily
availablewhen calling for assistance.
14:- Air Cleaner -- Protects engine by filtering dust and
debris out of intake air.
L - Choke Lever- Usedwhen starting a cold engine.
M- Fuel Valve-- Usedto turn fuel supply on and off to
engine.
N- Recoil Starter -- Usedto start the engine.
P - On/OffSwitch -- Setthis switch to "On" before using
recoil starter. Set switch to "Off"to switch off engine.
YourCraftsmangeneratorrequiressomeassemblyandis
readyforuseonlyafterit hasbeenproperlyservicedwiththe
recommendedoilandfuel.
Ifyou have any problemswith the assembly of your
generator, please call the generator heJpJineat
1=800-222-3136.
Unpackingthe Generator
1. Set the carton on a rigid fiat surface.
2. Removeeverything from carton except generator.
3. Opencarton completely by cutting eachcorner from top
to bottom.
4. Leavegenerator on carton to install wheel kit.
CartonContents
Checkall contents against those listed below:
• M/ainunit
• Engineoil
• Operator's manual
• Wheel kit
• Adapter cord set
If any parts are missing or damaged,call the generator
helpline at 1-800-222-3136.
Install Wheel Kit
NOTICE Wheelkit is not intendedfor over-the-road use. DO
NOTtow this unit with amotorized vehicle.
You will needthe following tools to installthese components:
• 13mm wrenches
• Socket wrench with a 13ram socket
• Pliers
• Safety glasses
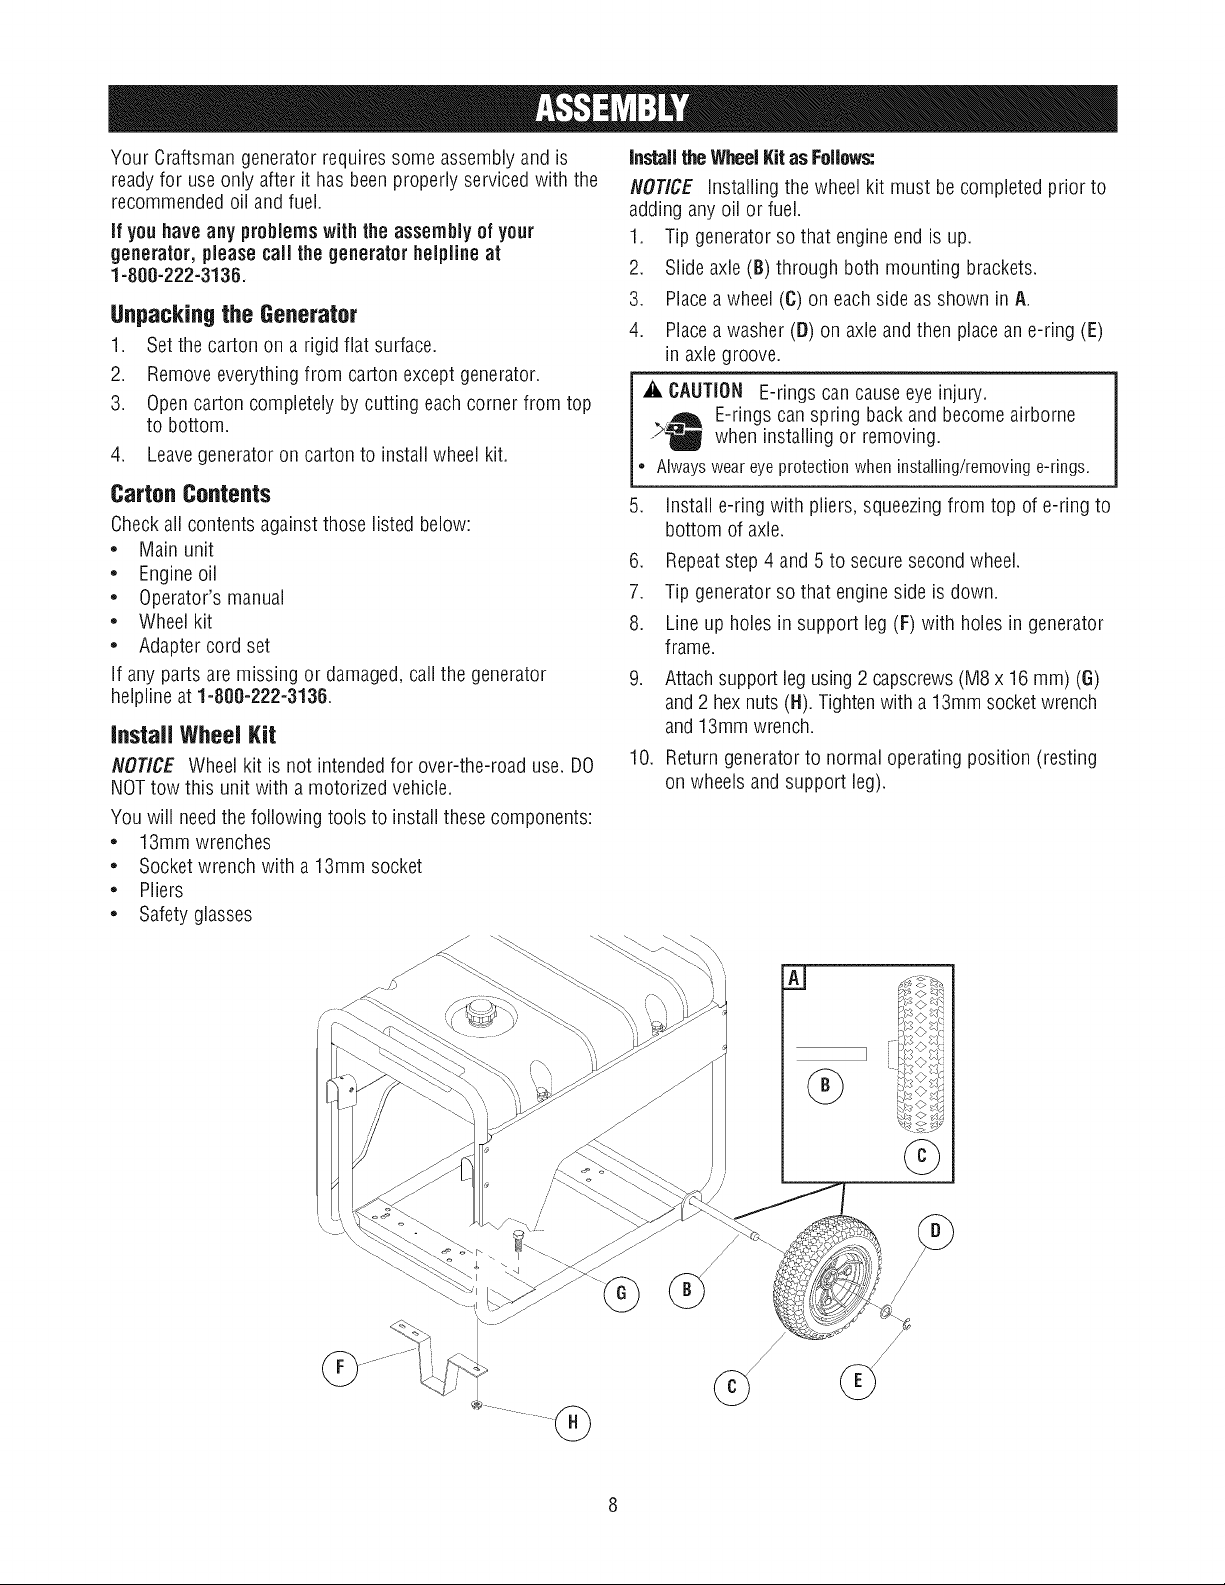
Installthe WheelKitas Follows:
NOTICE installing the wheelkit must be completedprior to
adding any oil or fuel.
1. Tip generator so that engineend is up.
2. Slideaxle (B) through both mounting brackets.
3. Placea wheel (C) on each sideas shown in A.
4. Placea washer (D) on axle and then placean e-ring (E)
in axle groove.
_k CAUTION E-rings can causeeye injury.
E-rings can spring back and becomeairborne
when installing or removing.
• Alwaysweareyeprotectionwheninstalling/removinge-rings.
.
Install e-ring with pliers, squeezingfrom top of e-ring to
bottom of axle.
6. Repeatstep 4 and 5 to secure secondwheel.
7. Tip generator so that engineside is down.
8. Line up holesin support leg (F) with holes in generator
frame.
.
Attachsupport leg using2 capscrews(iVl8x 16 mm) (G)
and 2 hexnuts (N).Tightenwith a 13mm socketwrench
and 13ram wrench.
10.
Return generator to normal operating position (resting
on wheels and support leg).
Aq
]
BEFORESTARTIHGTHEGEHERATOR
AddEngine0il
1. Placegenerator on a fiat, levelsurface.
2. Cleanarea aroundoil fill and remove yellow oil fill cap.
3. Usingoil funnel (optional), slowly pour contents of
provided oil bottle intooil fill opening.
NOTICE improper treatment of generator can damage it
and shorten its life.
• DO NOTattempt to crank or start the engine before it has been
properly serviced with the recommended oil.This may result in an
enginefailure.
4. Replaceoil fill cap andfully tighten.
Add Fuel
FueJmustmeet these requirements:
* Clean,fresh, unleaded gasoline.
* A minimum of 87 octane/87 AKI (91 RON).High altitude
use, see High Altitude.
* Gasolinewith up to 10% ethanol (gasohol) or up to 15%
MTBE (methyl tertiary butyl ether) is acceptable.
_i, WARNING Fueland its vapors are extremely
flammable and explosive.
Fireor explosion can causesevere burns
or death.
WHEN ADDING FUEL
• Turn generator OFFand let it cool at least2 minutes before
removing fuel cap. Loosen cap slowly to relieve pressure in
tank.
• Fill fuel tank outdoors.
• DONOToverfill tank. Allow spacefor fuel expansion.
• Iffuel spills, wait until it evaporatesbefore starting engine.
• Keepfuel awayfrom sparks, open flames, pilot lights, heat,and
other ignition sources.
• DONOTlight a cigaretteor smoke.
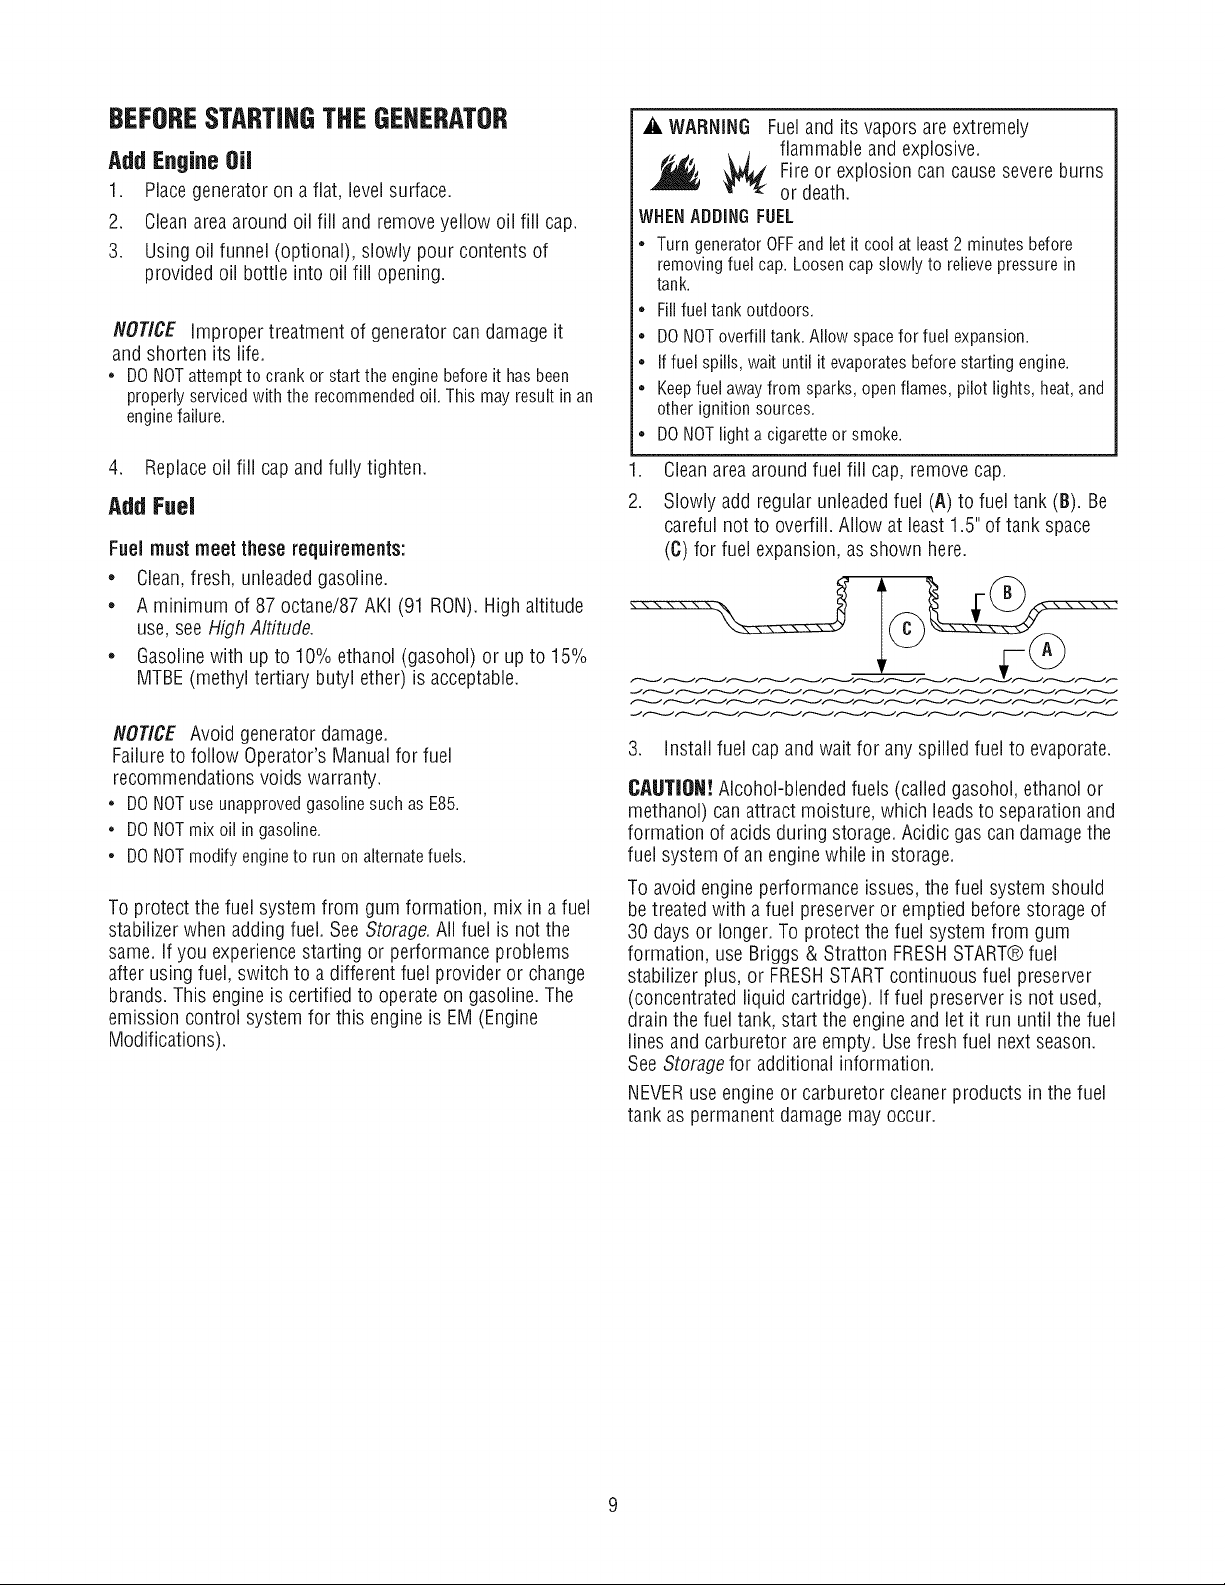
Cleanareaaround fuel fill cap, removecap.
.
Slowly add regular unleadedfuel (A) to fuel tank (B). Be
careful not to overfill. Allow at least1.5" of tank space
(C)for fuel expansion,asshown here.
NOTICE Avoid generatordamage.
Failureto follow Operator's Manual for fuel
recommendations voids warranty.
• DONOTuseunapprovedgasolinesuchasE85.
• DONOTmixoil in gasoline.
• DONOTmodifyengineto runonalternatefuels.
To protect the fuel system from gum formation, mix in a fuel
stabilizerwhen adding fuel. SeeStorage.All fuel is not the
same. if you experiencestarting or performanceproblems
after using fuel, switch to a different fuel provider or change
brands. This engine is certified to operateon gasoline. The
emission control system for this engine is EM (Engine
Modifications).
3. install fuel cap and wait for any spilledfuel to evaporate.
CA|JTION!Alcohol-blendedfuels (called gasohol, ethanol or
methanol) can attract moisture, which leadsto separationand
formation of acidsduring storage. Acidic gas can damage the
fuel system of an enginewhile in storage.
To avoid engine performance issues, the fuel system should
betreated with afuel preserveror emptied before storage of
30 days or longer. To protect the fuel system from gum
formation, use Briggs & Stratton FRESHSTART®fuel
stabilizer plus, or FRESHSTARTcontinuous fuel preserver
(concentrated liquid cartridge), if fuel preserver is not used,
drain the fuel tank, start the engine and let it run until the fuel
lines and carburetor are empty. Usefresh fuel nextseason.
See Storage for additional information.
NEVERuse engine or carburetor cleaner products inthe fuel
tank as permanent damagemay occur.
FreshStartFuelCap
Adding fuel preserverhelps keepfuel fresh and carburetors
cleanfor easierstarting, all season long. This new fuel cap
automatically drips concentratedfuel preserverinto your fuel
tank.
A. DANGER Contents are harmful or fatal if swallowed.
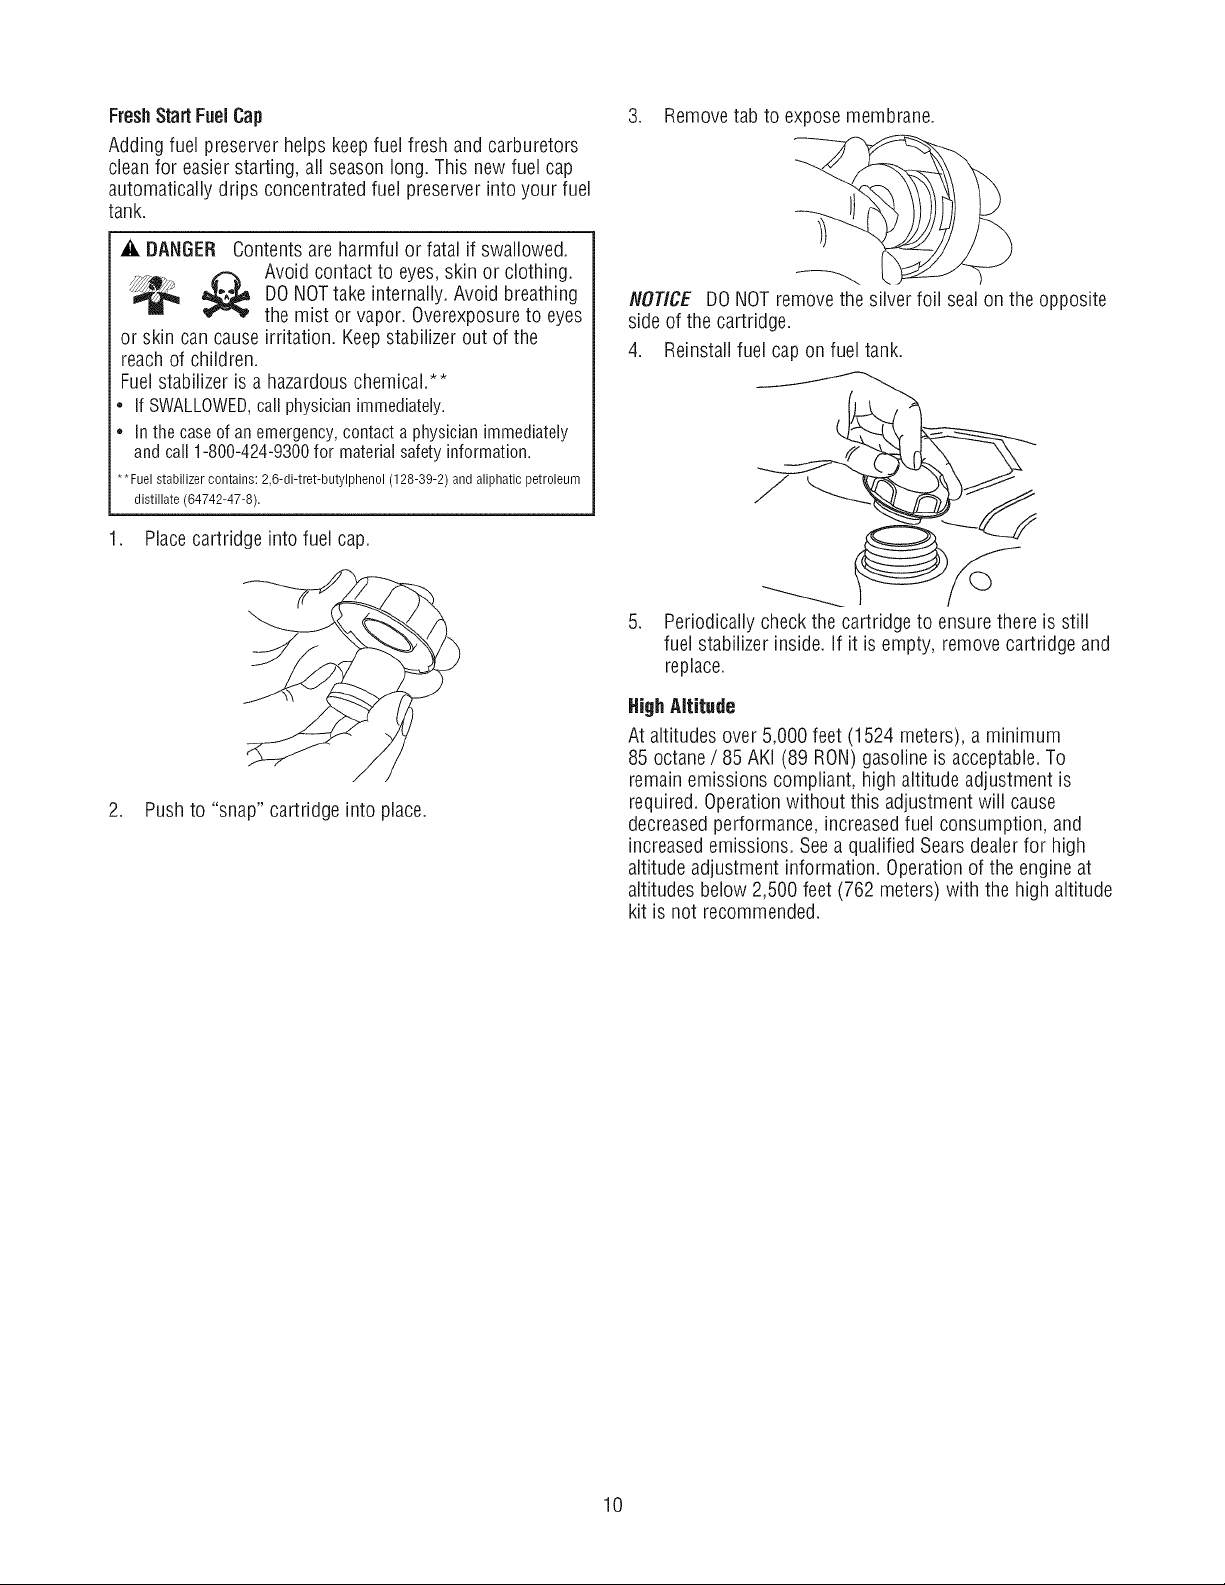
3. Removetab to expose membrane.
Avoid contact to eyes,skin or clothing.DONOTtake Avoid
internally. breathing
the mist or vapor. Overexposureto eyes
or skin can causeirritation. Keepstabilizer out of the
reachof children.
Fuelstabilizer is a hazardouschemical.**
• If SWALLOWED,call physicianimmediately.
• Inthecaseofanemergency,contacta physicianimmediately
andcall1-800-424-9300for materialsafetyinformation.
• *Fuel stabilizer contains: 2,6-di-tret-butylphenol (128-39-2) and aliphatic petroleum
distillate (64742-47-8).
1. Placecartridge into fuel cap.
2. Push to "snap" cartridge into place.
NOTICE DONOT removethe silver foil seal on the opposite
sideof the cartridge.
4. Reinstallfuel cap on fuel tank.
,
Periodically check the cartridge to ensure there is still
fuel stabilizer inside. If it is empty, removecartridge and
replace.
HighAltitude
At altitudes over 5,000 feet (1524 meters),a minimum
85 octane / 85 AKi (89 RON)gasoline is acceptable.To
remainemissions compliant, high altitude adjustment is
required. Operationwithout this adjustment wiii cause
decreasedperformance, increasedfuel consumption, and
increasedemissions. Seea qualified Sears dealerfor high
altitude adjustment information. Operationof the engine at
altitudes below 2,500 feet (762 meters) with the high altitude
kit is not recommended.
10
HOWTOUSEYOURGENERATOR
If you haveany problems operating your generatorafter
reading the manual, pleasecall the generator helpline at
1-800-222-3136.
SystemGround
Thegenerator hasa system ground that connects the
generatorframe components to the ground terminals onthe
ACoutput receptacles.Thesystem ground is connected to
the ACneutral wire (the neutral is bonded to the generator
frame).
SpecialRequirements
Theremay be Federalor State OccupationalSafety and
Health Administration (OSHA)regulations, local codes, or
ordinances that applyto the intended use of the generator.
Pleaseconsult aqualified electrician, electrical inspector, or
the local agency having jurisdiction.
• In some areas,generators are required to be registered
with local utility companies.
• If the generator is usedat a construction site, there may
be additional regulationswhich must be observed.
Connecting to a Building's Electrical System
Connectionsfor standby power to abuiiding's electrical
system must be made bya qualified electrician. The
connection must isolate the generator power from utility
power, and must comply with all applicable lawsand
electrical codes.
_i, WARNING Generatorproduces hazardousvoltage.
"_,llh Failureto isolategeneratorfrom power utility can
result in death or injury to electric utility workers
due to backfeedof electrical energy.
= Whenusinggeneratorfor backuppower,notifyutility company.
Useapprovedtransferequipmentto isolategeneratorfrom
electricutility.
= Useagroundfaultcircuitinterrupter(GFCI)in anydampor
highlyconductivearea,suchasmetaldeckingor steelwork.
= DONOTtouchbarewiresor receptacles.
• DONOTusegeneratorwithelectricalcordswhichareworn,
frayed,bareorotherwisedamaged.
= DONOToperategeneratorintherainorwetweather.
• DONOThandlegeneratoror electricalcordswhilestandingin
water,whilebarefoot,or whilehandsorfeetarewet.
= DONOTallowunqualifiedpersonsor childrento operateorser-
vicegenerator.
Generator Location
GeneratorClearance
_i, WARNING Exhaustheat/gases can ignite
combustibles, structures or damagefuel tank
causing a fire.
= Keepat least5 ft. (152 cm) clearanceon all sides of generator
including overhead.
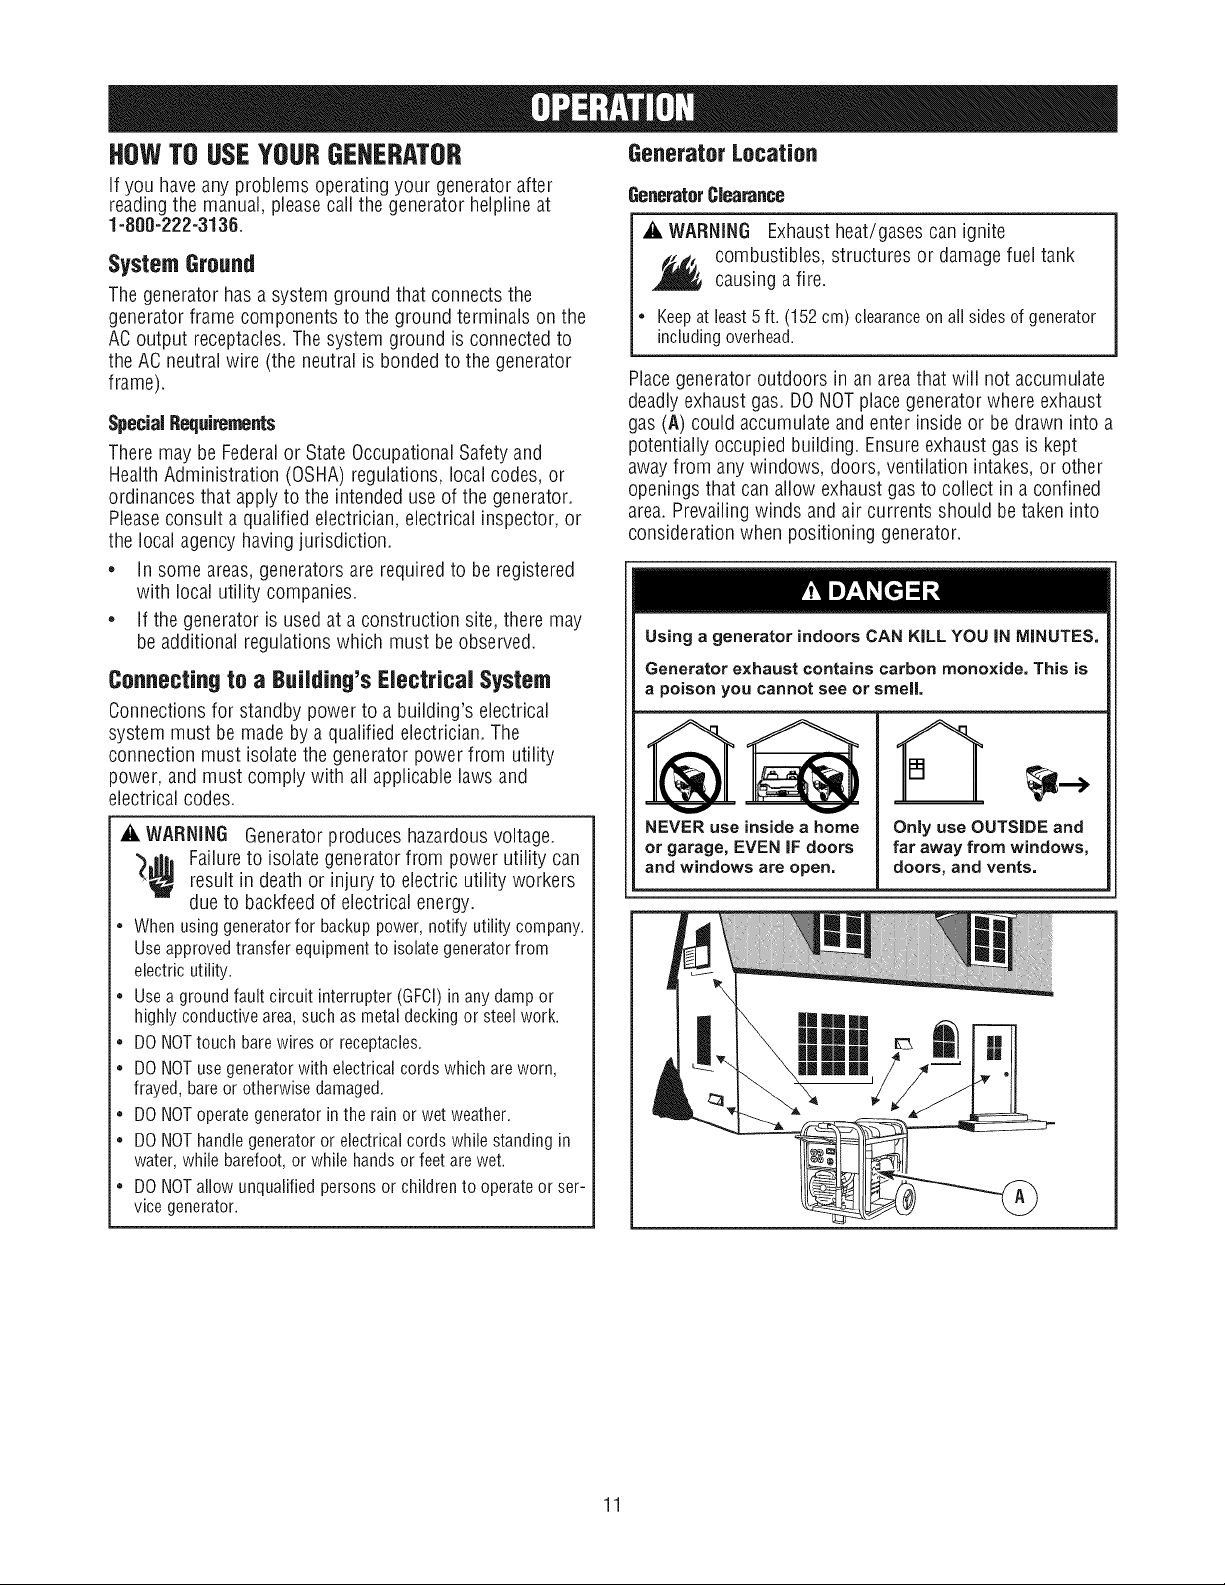
Placegenerator outdoors in an areathat wiii not accumulate
deadlyexhaustgas. DONOTplace generator where exhaust
gas(A) could accumulateand enter inside or be drawn into a
potentially occupied building. Ensureexhaust gas is kept
awayfrom anywindows, doors, ventilation intakes, or other
openingsthat can allow exhaust gas to collect in a confined
area.Prevailingwinds and air currents should be taken into
considerationwhen positioning generator.
Using a generator indoors CAN KiLL YOU IN MINUTES,
Generator exhaust contains carbon monoxide, This is
a poison you cannot see or smell,
V V
NEVERuse insidea home
or garage,EVENiF doors
and windows areopen.
Only use OUTSIDEand
far away from windows,
doors, and vents,
|
11
To Start The Engine
Disconnect all electrical loads from the generator. NEVER
start or stop enginewith electrical devicesplugged in and
turned ON.Follow start instruction steps in numerical order:
1. Makesure unit is on a levelsurface.
NOTICE Failureto start and operate unit on a levelsurface
will causethe unit not to start or shut down during operation.
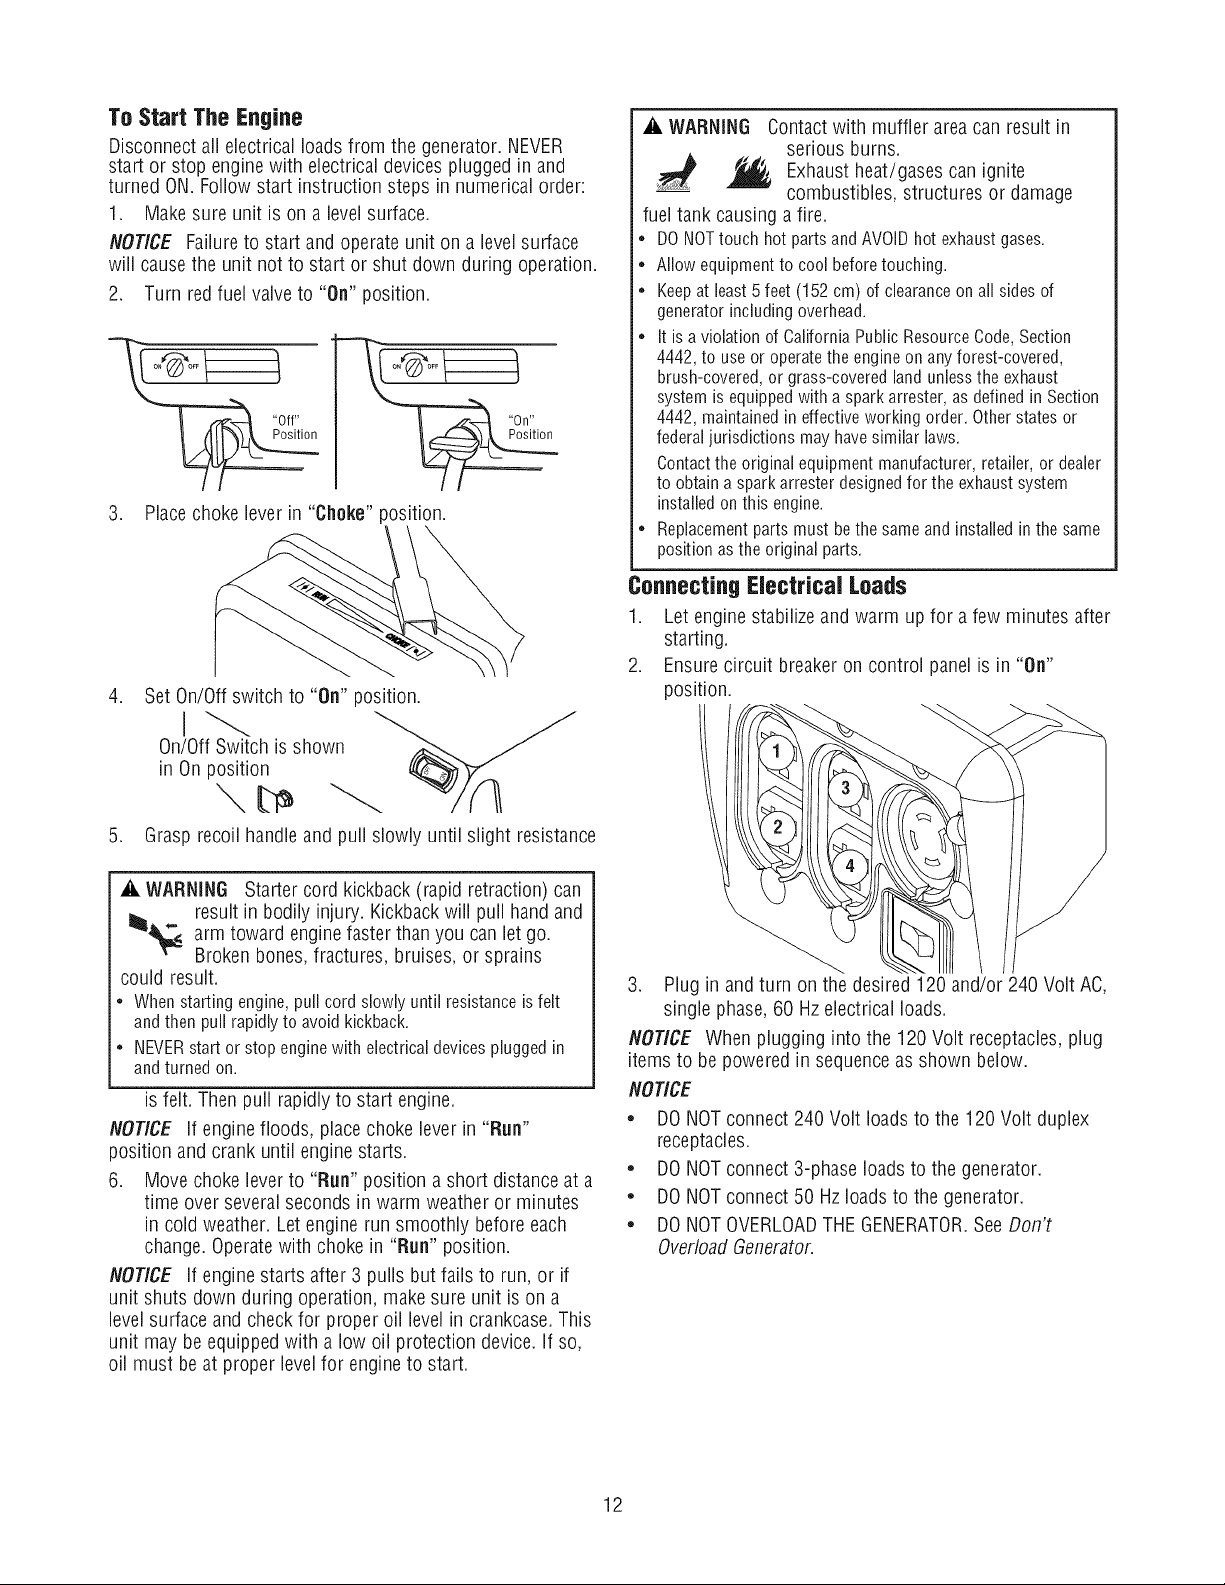
2. Turn redfuel valveto "On" position.
3. Placechoke lever in "Choke" position.
.
Set On/Offswitch to "On" position.
_i, WARNING Contact with muffler area can result in
serious burns.
_ Exhaust heat/gases can ignite
combustibles, structures or damage
fuel tank causing a fire.
• DO NOTtouch hot parts and AVOIDhot exhaust gases.
• Allow equipment to cool before touching.
• Keep at least5 feet (152 cm) of clearanceon all sides of
generator including overhead.
• It is a violation of California Public ResourceCode, Section
4442, to useor operate the engine on any forest-covered,
brush-covered, or grass-covered land unlessthe exhaust
system is equippedwith a spark arrester,as defined in Section
4442, maintained in effective working order. Otherstates or
federaljurisdictions may havesimilar laws.
Contactthe original equipment manufacturer, retailer, or dealer
to obtain a sparkarrester designedfor the exhaustsystem
installed onthis engine.
• Replacementparts must bethe same and installed in the same
position asthe original parts.
Connectin9 Electrical Loads
1. Let enginestabilize and warm up for a few minutes after
starting.
2. Ensurecircuit breaker on control panel is in "On"
position.
On/Off Switch is shown
in On position
.
Grasp recoil handleand pull slowly until slight resistance
_i, WARNING Starter cord kickback(rapid retraction) can
result in bodily injury. Kickbackwill pull hand and
,_arm toward enginefaster thanyou can let go.
Broken bones,fractures, bruises, or sprains
could result.
• Whenstartingengine,pullcordslowlyuntil resistanceisfelt
andthenpullrapidlytoavoidkickback.
• NEVERstartor stopenginewith electricaldevicespluggedin
andturnedon.
is felt. Then pull rapidlyto start engine.
NOT/CE if engine floods, placechoke lever in "Run"
position and crank until engine starts.
6. Movechoke leverto "Run" position a short distance at a
time over severalseconds in warm weather or minutes
in cold weather. Let engine run smoothly before each
change. Operatewith choke in "Run" position.
NOTICE if engine starts after 3 pulls but fails to run, or if
unit shuts down during operation, makesure unit is on a
levelsurface and check for proper oil levelin crankcase.This
unit may be equipped with alow oil protection device. If so,
oil must beat proper levelfor engine to start.
3. Plug in and turn on the desired 120 and/or 240 Volt AC,
single phase,60 Hz electrical loads.
NOT/CE When plugging into the 120Volt receptacles, plug
items to be poweredin sequenceas shown below.
NOT/CE
* DONOTconnect240 Volt loads to the 120Volt duplex
receptacles.
* DONOTconnect3-phase loads to the generator.
* DONOTconnect50 Hzloads to the generator.
* DONOTOVERLOADTHEGENERATOR.See Don't
OverloadGenerator.
12
NOTICE Exceeding generators wattage/amperage capacity
can damage generator and/or electrical devices connected to
it.
• DO NOTexceedthe generator's wattage/amperagecapacity. See
Don't OverloadGeneratorin the Operationsection.
• Start generator and let engine stabilize beforeconnecting electrical
loads.
• Connectelectrical loads in OFFposition, thenturn ONfor
operation.
• Turn electrical loads OFFand disconnectfrom generatorbefore
stopping generator.
Stopping the Engine
1. Turn off and unplug all electrical loads from unit. NEVER
start or stop enginewith electrical devicesplugged in
and turned on.
.
Let engine run at no-load for two minutes to stabilize
unit's internaltemperatures.
3.
Move On/Off switch to "Off" position.
,_WARNING
Backfire,fire or engine damagecould
occur.
DONOTstopenginebymovingchokecontrolto "Choke"
position(1"_1).
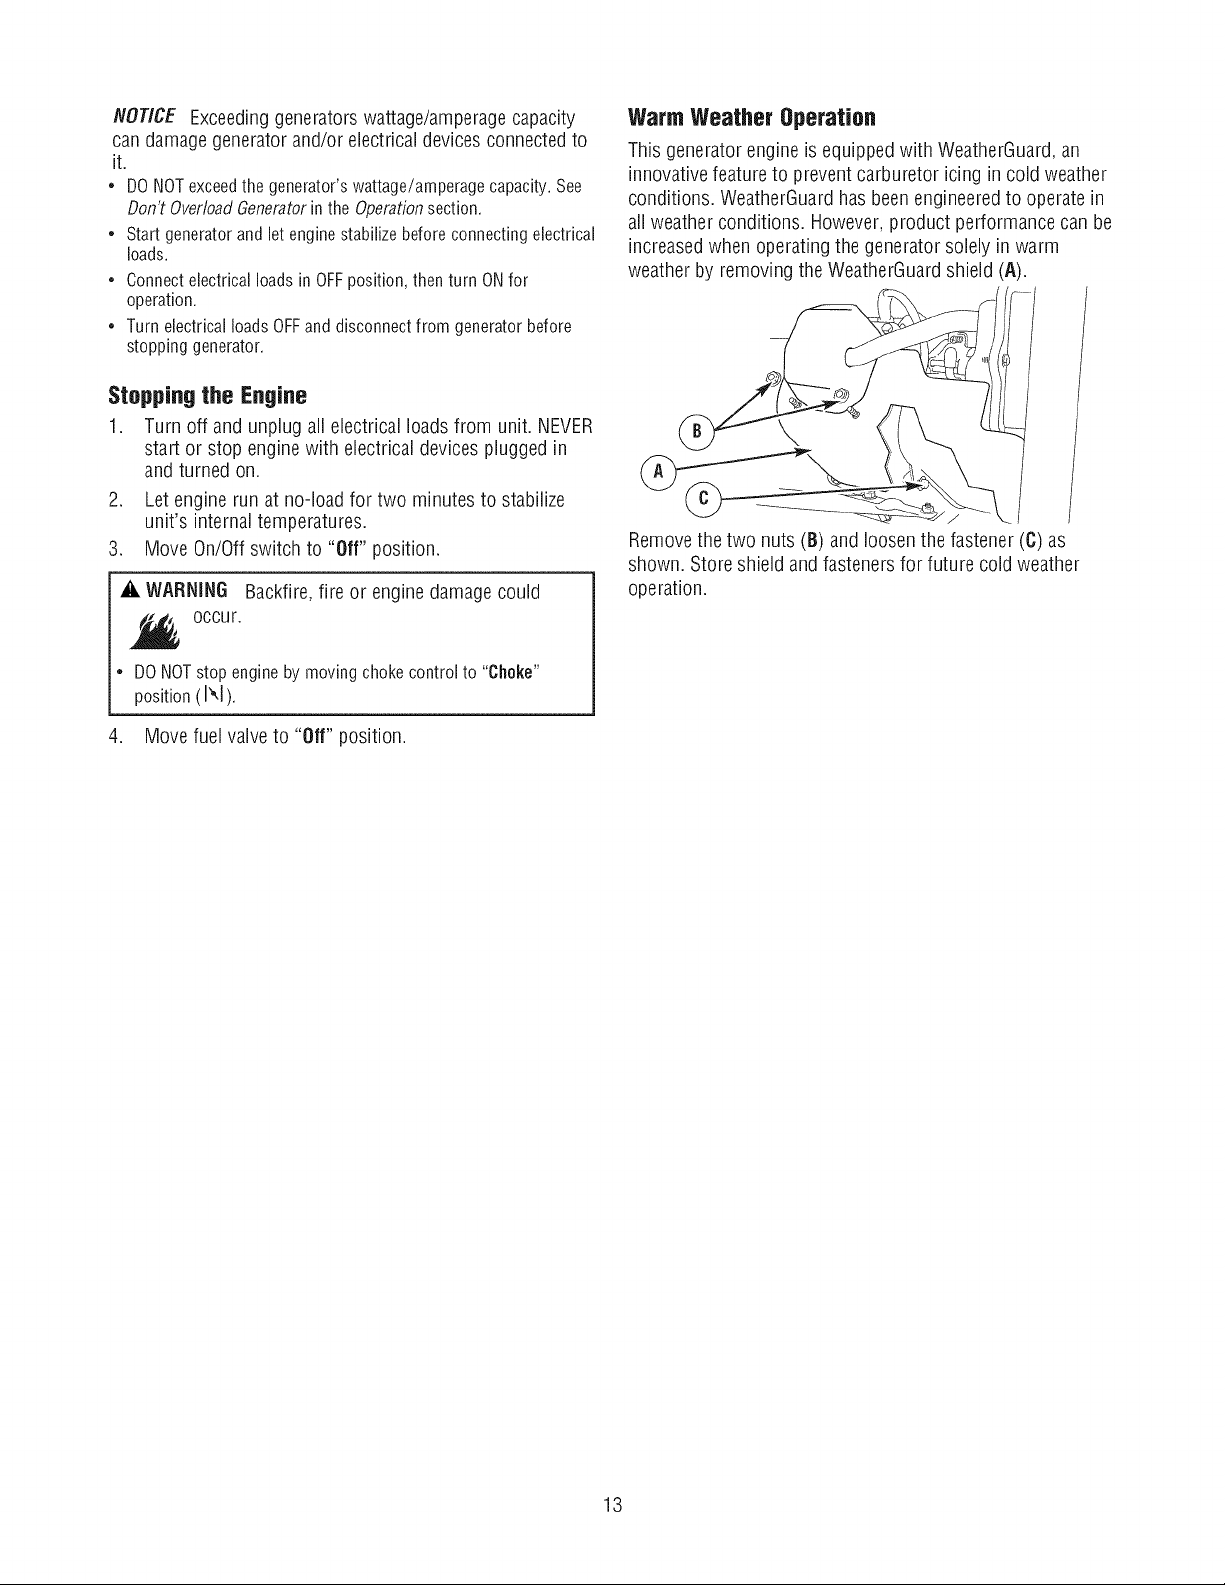
WarmWeather Operation
This generator engine is equippedwith WeatherGuard,an
innovativefeatureto prevent carburetor icing in cold weather
conditions. WeatherGuardhas beenengineeredto operate in
all weather conditions. However,product performance can be
increasedwhen operatingthe generatorsolely in warm
weather by removingtheWeatherGuardshield (A).
Removethe two nuts (B) and loosenthefastener (C) as
shown. Storeshield and fastenersfor future cold weather
operation.
4. Movefuel valve to "Off" position.
13
CORDSETSANDRECEPTACLES
Use only high quality, well-insulated, grounded extension
cords with the generator's 120 Volt electrical receptacles.
Inspect extension cords before each use.
Checkthe ratings of all extensioncords beforeyou use them.
Extensioncord sets usedshould beratedfor 125 Volt AC
loads at 20 Amps or greater for most electrical devices.
Somedevices, however, may not require this type of
extension cord. Checkthe operator's manuals of those
devicesfor the manufacturer's recommendations.
Keepextension cords asshort aspossible, preferably less
than 15 feet long, to preventvoltage drop and possible
overheating of wires.
_i, WARNING Overloadedelectrical cords can overheat,
arc, and burn resulting in death, bodily injury,
and/or property damage.
• ONLYusecordsratedfor yourloads.
• Followallsafetiesonelectricalcords.
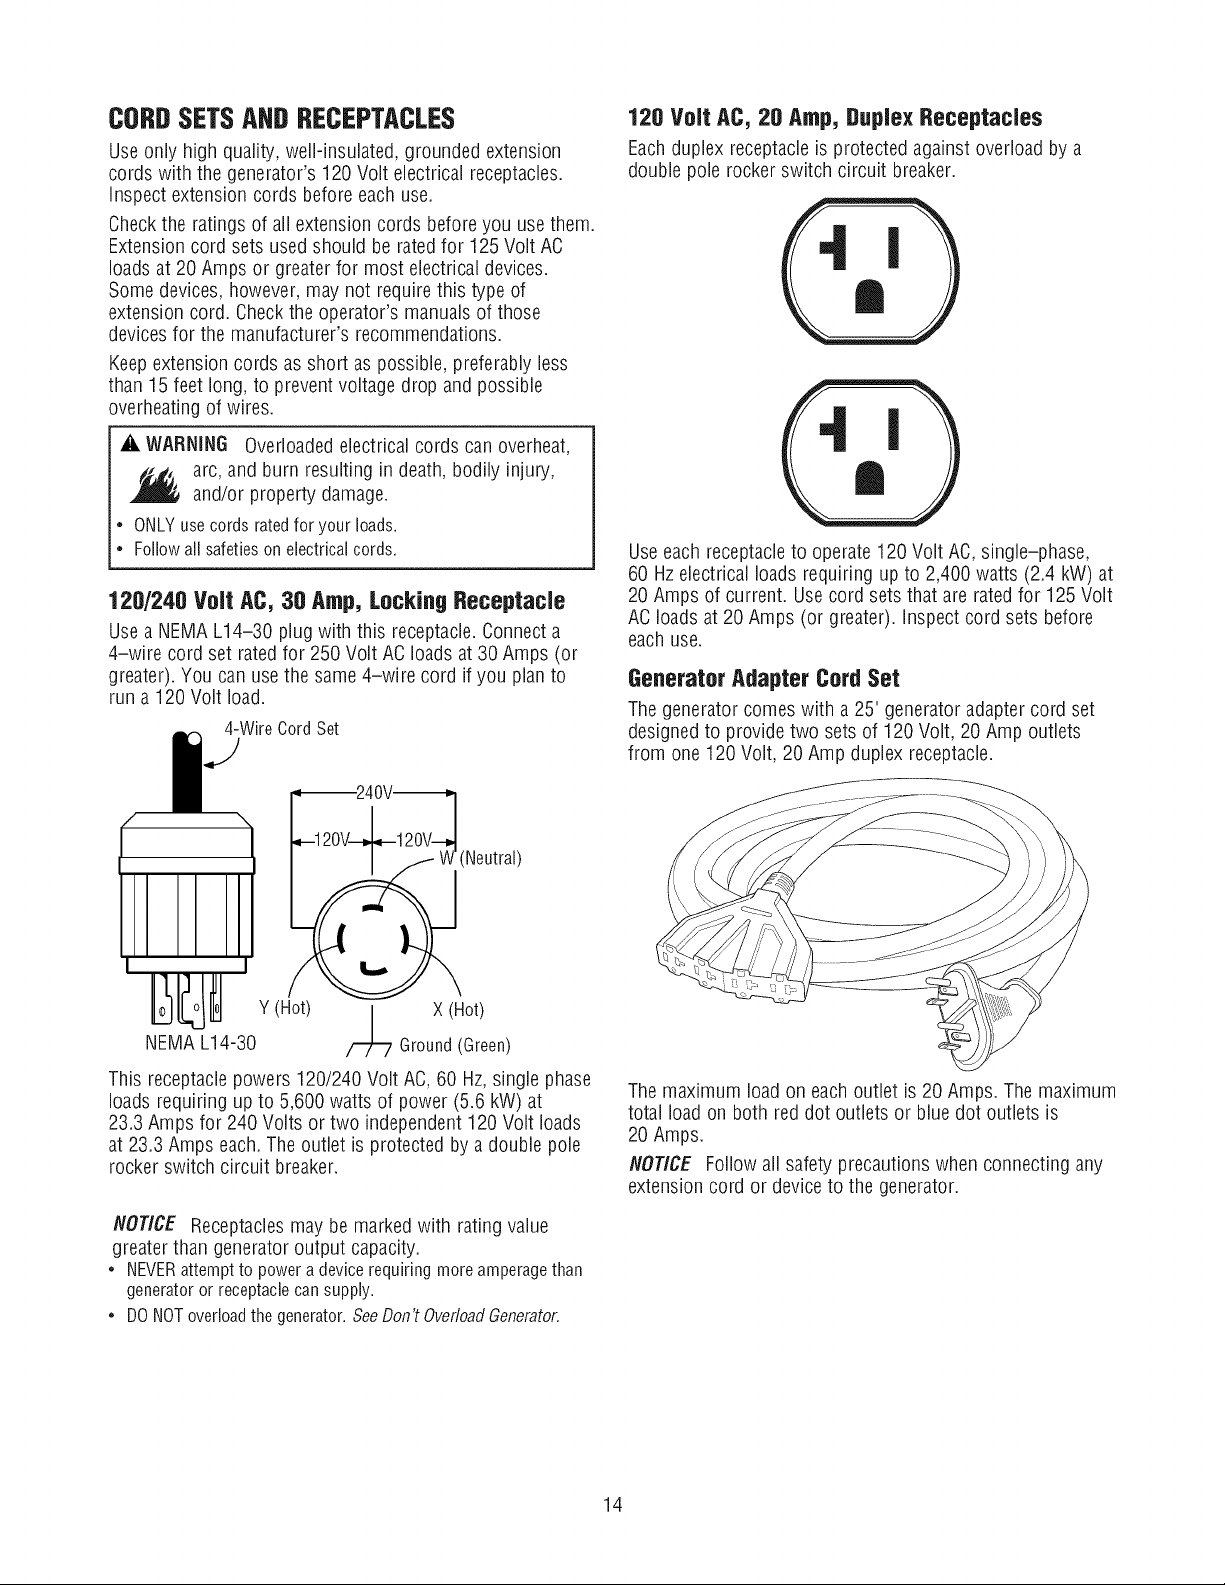
1201240 Voff AC, 30 Amp, Lockin9 Receptacle
Use a NEiViAL14-30 plug with this receptacle.Connecta
4-wire cord set ratedfor 250Volt AC loads at 30 Amps (or
greater). You can usethe same4-wire cord if you planto
run a 120 Volt load.
4-WireCordSet
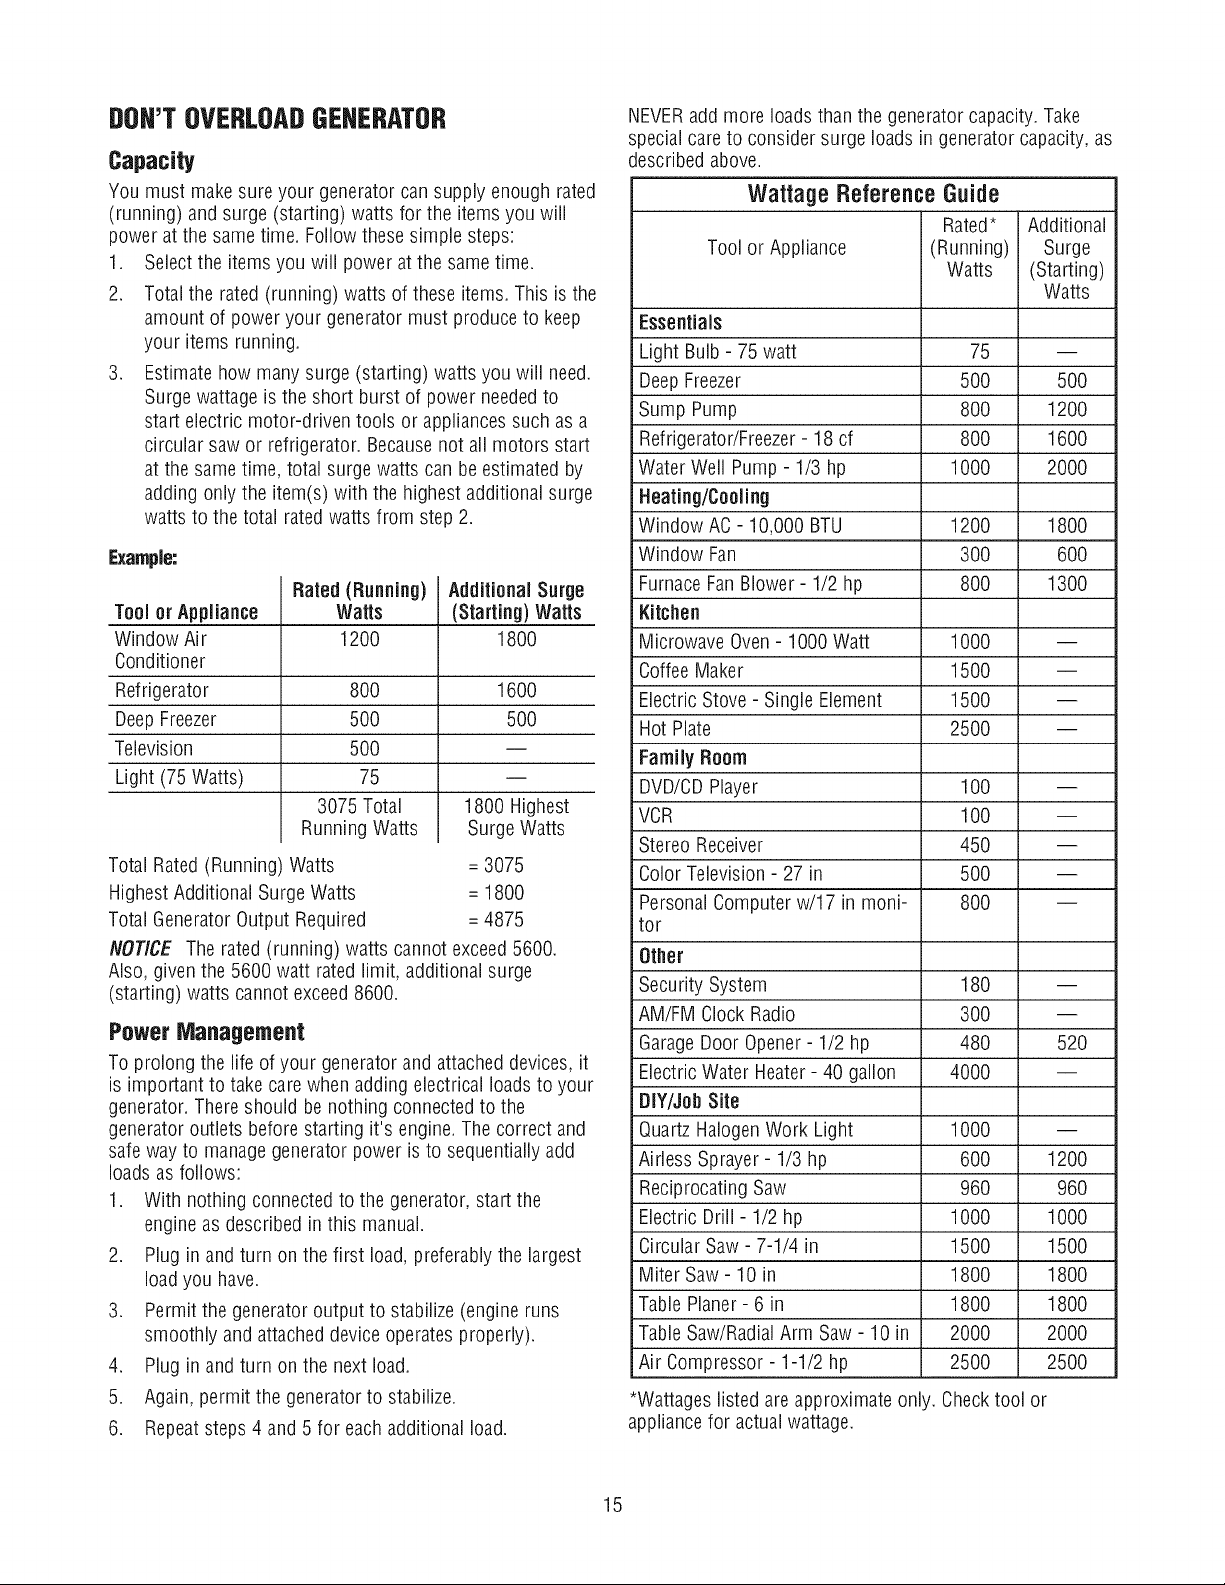
1211Voff AC, 20 Amp, DupJexReceptacles
Eachduplex receptacleis protected against overload by a
double pole rocker switch circuit breaker.
Useeach receptacleto operate 120 Volt AC,single-phase,
60 Hzelectrical loads requiring up to 2,400 watts (2.4 kW) at
20 Amps of current. Usecord sets that are rated for 125 Volt
AC loadsat 20 Amps (or greater). Inspect cord sets before
eachuse.
Generator Adapter CordSet
The generatorcomes with a25' generator adapter cord set
designedto providetwo sets of 120 Volt, 20 Amp outlets
from one 120 Volt, 20 Amp duplex receptacle.
--\
(Neutral)
x/,ot!
NEMAL14-30 7/I-7 Ground(Green)
This receptaclepowers 120/240 Volt AC, 60 Hz,single phase
loads requiring up to 5,600 watts of power (5.6 kW) at
23.3 Amps for 240 Volts or two independent 120 Volt loads
at 23.3 Amps each. Theoutlet is protected by a double pole
rocker switch circuit breaker.
NOTICE Receptacles may be marked with rating value
greater than generator output capacity.
• NEVERattempt to power adevice requiring more amperagethan
generator or receptaclecan supply.
• DONOToverloadthe generator.SeeDon't OverloadGenerator.
J
The maximum load on eachoutlet is 20Amps. The maximum
total loadon both red dot outlets or blue dot outlets is
20 Amps.
NOTICE Follow all safety precautions when connecting any
extensioncord or deviceto the generator.
14
DOH'TOVEBLOADGEHEBATOR
Capacity
You must makesureyour generator can supply enough rated
(running) andsurge (starting) watts for the items you will
power at the same time. Followthese simple steps:
1. Selectthe items you will powerat the same time.
2. Totalthe rated (running) watts of these items. This is the
amount of power your generator must produceto keep
your items running.
3. Estimatehow many surge (starting) watts you will need.
Surge wattage is the short burst of power neededto
start electric motor-driven tools or appliances such as a
circular saw or refrigerator. Becausenot all motors start
at the sametime, total surge watts can be estimated by
adding only the item(s) with the highest additional surge
watts to the total ratedwatts from step 2.
Example:
Rated (Running)
Tool or AppJiance
Window Air
Conditioner
Refrigerator
DeepFreezer
Television
Light (75 Watts)
Total Rated(Running) Watts = 3075
HighestAdditional Surge Watts = 1800
Total Generator Output Required =4875
NOTICE Therated (running) watts cannot exceed5600.
Also, given the 5600 watt ratedlimit, additional surge
(starting) watts cannot exceed8600.
Watts
1200
80O
5OO
5OO
75
3075 Total
Running Watts
PowerManagement
To prolong the life of your generatorand attacheddevices, it
is important to takecarewhen adding electrical loadsto your
generator. There should benothing connectedto the
generator outlets before starting it's engine.The correct and
safe way to manage generatorpower isto sequentiallyadd
loads asfollows:
1. With nothing connected to the generator, start the
engine as described in this manual.
2. Plug in and turn on the first load, preferablythe largest
load you have.
3. Permit the generatoroutput to stabilize (engine runs
smoothly and attacheddeviceoperates properly).
4. Plug in and turn on the nextload.
5. Again, permitthe generator to stabilize.
6. Repeatsteps 4 and 5 for eachadditional load.
Additional Surge
(Starting) Watts
1800
1600
500
1800 Highest
SurgeWatts
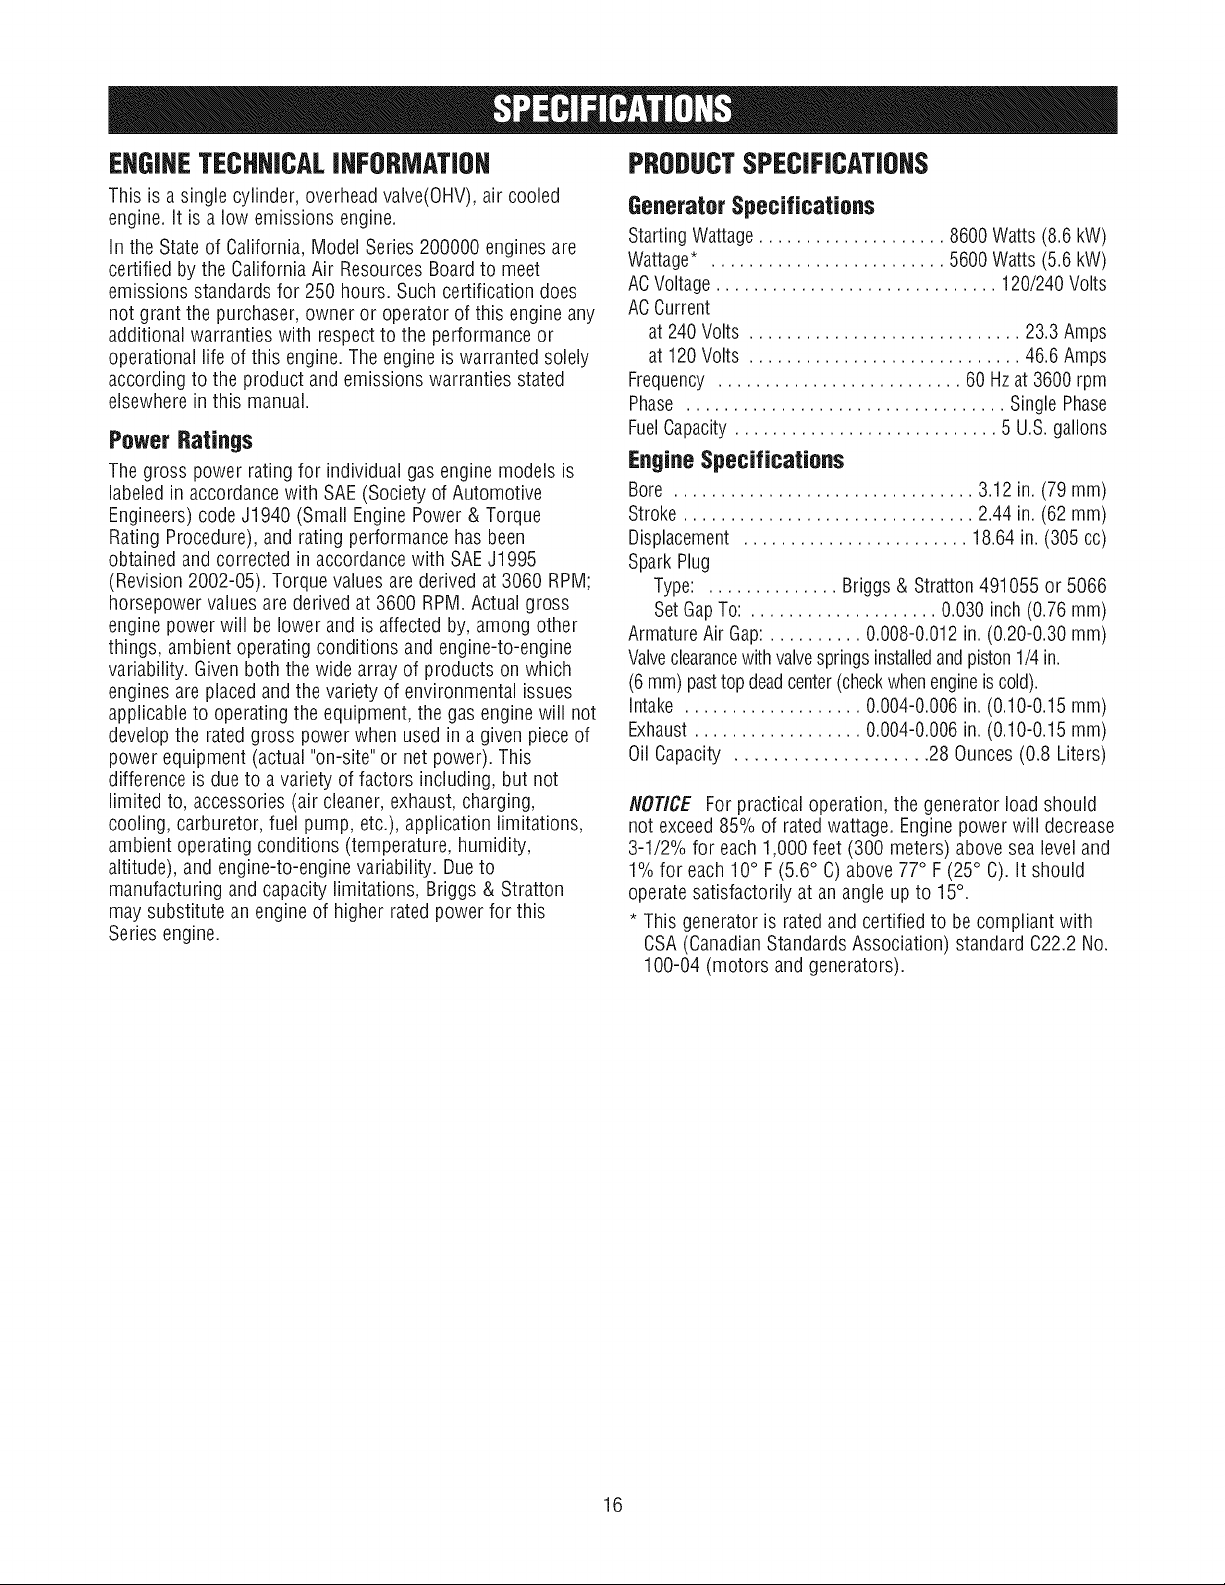
NEVERadd more loads than the generator capacity. Take
specialcare to consider surge loads in generatorcapacity, as
described above.
Wattage ReferenceGuide
Rated* Additional
Tool or Appliance (Running) Surge
Watts (Starting)
Watts
Essentials
Light Bulb - 75 watt 75 --
DeepFreezer 500 500
Sump Pump 800 1200
Refrigerator/Freezer- 18 cf 800 1600
Water Well Pump- 1/3 hp 1000 2000
Heating/CooJing
Window AC - 10,000 BTU 1200 1800
Window Fan 300 600
FurnaceFanBlower- 1/2 hp 800 1300
Kitchen
Microwave Oven- 1000 Watt 1000 --
CoffeeMaker 1500 --
Electric Stove - Single Element 1500 --
Hot Plate 2500 --
Family Room
DVD/CDPlayer 100 --
VCR 100 --
Stereo Receiver 450 --
Color Television- 27 in 500 --
PersonalComputer w/17 in moni- 800 --
tor
Other
Security System 180 --
AM/FM Clock Radio 300 --
GarageDoor Opener- 1/2 hp 480 520
ElectricWater Heater- 40 gallon 4000 --
DIY/JobSite
Quartz HalogenWork Light 1000 --
Airless Sprayer- 1/3 hp 600 1200
Reciprocating Saw 960 960
Electric Drill- 1/2 hp 1000 1000
Circular Saw - 7-1/4 in 1500 1500
Miter Saw- 10 in 1800 1800
TablePlaner - 6 in 1800 1800
TableSaw/RadialArm Saw- 10 in 2000 2000
Air Compressor - 1-1/2 hp 2500 2500
*Wattageslisted are approximateonly. Check tool or
appliancefor actualwattage.
15
EHGINETECHHICALINFORMATION
This is a single cylinder, overheadvalve(OHV),air cooled
engine, it is a low emissions engine.
In the State of California, ModelSeries 200000 engines are
certified bythe CaliforniaAir ResourcesBoard to meet
emissions standards for 250 hours. Such certification does
not grant the purchaser, owner or operator of this engine any
additional warranties with respectto the performanceor
operational life of this engine.The engine is warranted solely
according to the product and emissions warranties stated
elsewherein this manual.
Power Ratings
Thegross power rating for individual gas engine models is
labeled in accordancewith SAE(Society of Automotive
Engineers)codeJ1940 (Small Engine Power & Torque
Rating Procedure), and rating performance has been
obtained and corrected in accordancewith SAEJ1995
(Revision 2002-05). Torque values are derived at 3060 RPM;
horsepower values are derived at 3600 RPIVi.Actual gross
engine power will belower and is affected by, among other
things, ambient operating conditions and engine-to-engine
variability. Given both the wide arrayof products on which
enginesare placed andthe variety of environmental issues
applicableto operatingthe equipment,the gas engine will not
developthe ratedgross power when used in a given pieceof
power equipment (actual "on-site"or net power). This
difference is due to avariety of factors including, but not
limited to, accessories (air cleaner, exhaust,charging,
cooling, carburetor, fuel pump, etc.), application limitations,
ambient operating conditions (temperature, humidity,
altitude), and engine-to-engine variability. Dueto
manufacturing and capacity limitations, Briggs & Stratton
may substitute anengine of higher ratedpower for this
Seriesengine.
PRODUCTSPECiFICATIOHS
Generator Specifications
StartingWattage.................... 8600 Watts(8.6 kW)
Wattage* . ........................ 5600Watts(5.6 kW)
ACVoltage .............................. 120/240Volts
ACCurrent
at 240Volts ............................. 23.3Amps
at 120Volts ............................. 46.6Amps
Frequency .......................... 60 Hzat 3600 rpm
Phase .................................. SinglePhase
FuelCapacity............................ 5 U.S.gallons
Engine Specifications
Bore ................................ 3.12in. (79 ram)
Stroke ............................... 2.44 in. (62 mm)
Displacement ........................ 18.64in. (305cc)
SparkPlug
Type: .............. Briggs& Stratton491055 or 5066
SetGapTo: .................... 0.030inch (0.76mm)
ArmatureAir Gap:.......... 0.008-0.012in. (0.20-0.30mm)
Valveclearancewithvalvespringsinstalledandpiston1/4in.
(6 mm)pasttopdeadcenter(checkwhenengineiscold).
Intake ................... 0.004-0.006in. (0.10-0.15mm)
Exhaust.................. 0.004-0.006in. (0.10-0.15mm)
Oil Capacity .................... 28 Ounces(0.8 Liters)
flOTICE For practical operation, the generator load should
not exceed85% of rated wattage. Enginepower will decrease
3-1/2% for each1,000 feet (300 meters) above sea level and
1% for each 10° F(5.6° C) above 77° F(25° C).It should
operatesatisfactorily at an angle up to 15°.
* This generatoris rated and certified to becompliant with
CSA(CanadianStandardsAssociation) standard C22.2No.
100-04 (motors andgenerators).
16
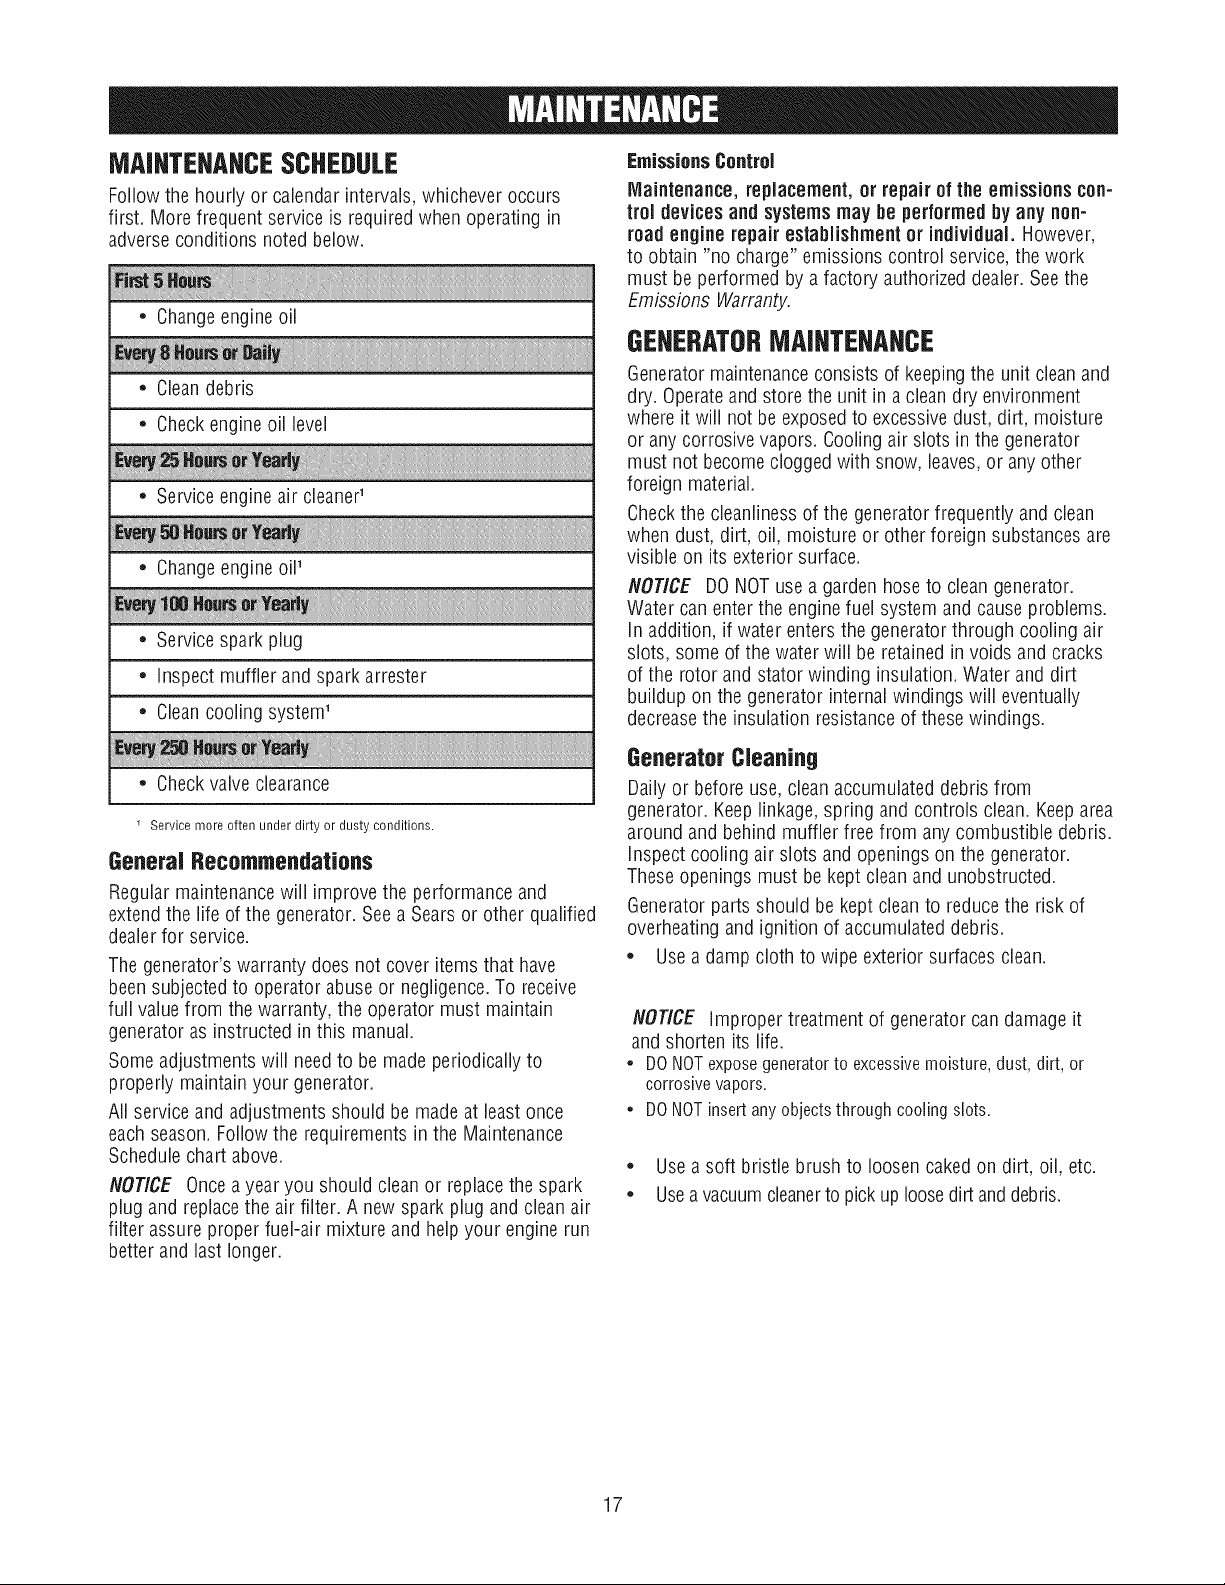
MAINTENANCESCHEDULE
Follow the hourly or calendarintervals, whichever occurs
first. More frequent serviceis requiredwhen operating in
adverseconditions noted below.
* Changeengine oil
* Cleandebris
* Check engineoil level
* Service engineair cleaner'
* Changeengine oil'
* Service spark plug
* Inspect muffler andspark arrester
* Cleancooling system'
EmissionsControl
Maintenance, replacement, or repair of the emissions con-
trol devices and systemsmay beperformedbyany non-
roadengine repair establishment or individual. However,
to obtain "no charge" emissions control service, the work
must be performed by a factory authorized dealer.Seethe
Emissions Warranty.
GEHERATORMAINTENAHCE
Generatormaintenanceconsists of keeping the unit clean and
dry. Operateand storethe unit ina clean dry environment
where it wiii not be exposedto excessivedust, dirt, moisture
or any corrosive vapors. Cooling air slots in the generator
must not becomeclogged with snow, leaves,or anyother
foreign material.
Checkthe cleanlinessof the generator frequently and clean
when dust, dirt, oil, moisture or other foreign substances are
visible on its exterior surface.
NOTICE DONOTuse a gardenhoseto cleangenerator.
Water can enter the enginefuel system and cause problems.
In addition, if water enters the generatorthrough cooling air
slots, some of the water will be retained in voids and cracks
of the rotor andstator winding insulation. Water and dirt
buildup on the generator internal windings will eventually
decreasethe insulation resistanceof these windings.
* Checkvalve clearance
Service more often under dirty ordusty conditions.
GeneralRecommendations
Regular maintenancewill improve the performance and
extend the life of the generator.Seea Searsor other qualified
dealerfor service.
Thegenerator's warranty doesnot cover items that have
been subjected to operator abuse or negligence.To receive
full valuefrom the warranty, the operator must maintain
generator asinstructed inthis manual.
Someadjustments will needto bemade periodically to
properly maintain your generator.
All service and adjustments should be made at least once
eachseason.Follow the requirementsin the Maintenance
Schedulechart above.
NOTICE Oncea year you should clean or replacethe spark
plug and replacethe air filter. A new spark plug and cleanair
filter assure proper fuel-air mixture and help your engine run
better and last longer.
GeneratorCleaning
Daily or beforeuse, clean accumulateddebris from
generator. Keeplinkage,spring and controls clean. Keeparea
around and behind muffler free from anycombustible debris.
Inspect cooling airslots and openings on the generator.
Theseopenings must bekept clean and unobstructed.
Generatorparts should be kept cleanto reducethe risk of
overheating and ignition of accumulateddebris.
* Usea damp cloth to wipe exterior surfaces clean.
NOTICE Improper treatment of generator can damage it
and shorten its life.
• DONOT exposegeneratorto excessivemoisture, dust, dirt, or
corrosive vapors.
• DONOT insertany objectsthrough cooling slots.
* Usea soft bristle brush to loosencaked on dirt, oil, etc.
* Usea vacuumcleanerto pickup loosedirt anddebris.
17

StatStaUonTM
TheStatStationTM displaysthe nominal load on generator
basedon output frequency. Jtalso hasa built in maintenance
reminder.
WattageMonitor 8potation
Thedisplay is two seven-segment LEDsthat provide an easy-
to-read indicationof the amount of power being supplied by
the generator. The load monitor displays the generator's
output as a percentage.
As generator load increases,the display values will increase.
Whenthe displayedvalues begin flashing, the user should
stop adding electrical loads to the generator.
If the power usagebecomestoo high, the letters "OL" (for
Over Load)will flash on the display. Theuser should reduce
the amount of loadattachedto the generator.
MaintenanceReminder
The LEDwill display certain codesto alertyou to check oil,
changeoil, checkor replaceair filter and checkor replace
spark plug. The following codes will display:
"01" Checkoil at 8 hour increments
"02" Changeoil at 50 hour increments
"03" Checkor replace air filter at 25 hour increments
"04" Checkor replace spark plug at 100 hour increments
Totake advantageof the StatStation"maintenance reminder"
capabilities, the user must pressthe resetbutton after
completing the maintenancecalled for in the displayed code
(01, 02, 03, or 04). This results in a displayof "0o" or "CA",
depending on how long the button is pressed:
1) "0o" - Pressingthe resetbutton once quickly will display
"00" (clearingto zero). This will clearany maintenance
codes that haveelapsedup to that point and they will
begin timing again from zero.
2) "CA"- Pressing and holding the reset button for
2 seconds will display "CA"(clearing all). This clears all
maintenancecodes, evenif they have not yet reached
their service point, and they will begintiming againfrom
zero.
If nominal loadand maintenancecodes appear
simultaneously, the LEDshall display, alternately,the
nominal load and code as follows:
Thecode will display for 3 seconds, then 1/2 secondoff. The
load will display for 6 secondsand then 1/2 second off.
ENGINEMAINTENANCE
A. WARNING Unintentionalsparking can result in fire or
_¢ electric shock.
WHENADJUSTINGORMAKINGREPAIRSTOYOURGENERATOR
• Disconnectthe sparkplugwirefromthe sparkplugandplace
thewirewhereitcannotcontactsparkplug.
WHENTESTINGFORENGINESPARK
• Useapprovedsparkplugtester.
• DONOTcheckfor sparkwithsparkplugremoved.
Oil
8il Recommendations
We recommendthe use of Briggs & Stratton Warranty
Certifiedoils for bestperformance. Other high-quality
detergent oils are acceptableif classified for serviceSF,SG,
SH,SJ or higher. DO NOTusespecial additives.
Outdoortemperatures determine the proper oil viscosity for
the engine.Usethe chartto selectthe bestviscosity for the
outdoor temperature range expected.
oF
86 _,
68
104 __ __ ,
50
32 o,_
14
-4
-22
* Below40°F (4°C)the use of SAE30 will result in hard starting.
** Above80°F(27°C)theuseof 10W30maycauseincreasedoil
consumption.Checkoil levelmorefrequently.
O OTICE Syntheticoil meeting ILSACGF-2,API
certification mark and APIservice symbol with
"SJ/0F ENERGYCONSERVING"or higher, is an
acceptableoil at all temperatures. Useof synthetic oil
does not alter required oil change intervals.
o
eo
=. 20
l 40
_n m 0
--__-- -10
oc
30
lO
-20
-30
18
CheckingOilLevel
Oil level should be checked prior to each use or at least every
8 hours of operation. Keepoil levelmaintained.
1. Makesure generatoris on a levelsurface.
2. Cleanarea aroundoil fill and remove oil fill cap.
3. Verifyoil is at the point of overflowing at oil fill opening.
4. Replaceand tighten oil fill cap.
AddingEngineOil
1. Makesure generatoris on a levelsurface.
2. Checkoil levelas described in CheckingOilLeveL
3. if needed,slowly pour oil into oil fill opening to the point
of overflowing at oil fill.
4. Replaceand tighten oil fill cap.
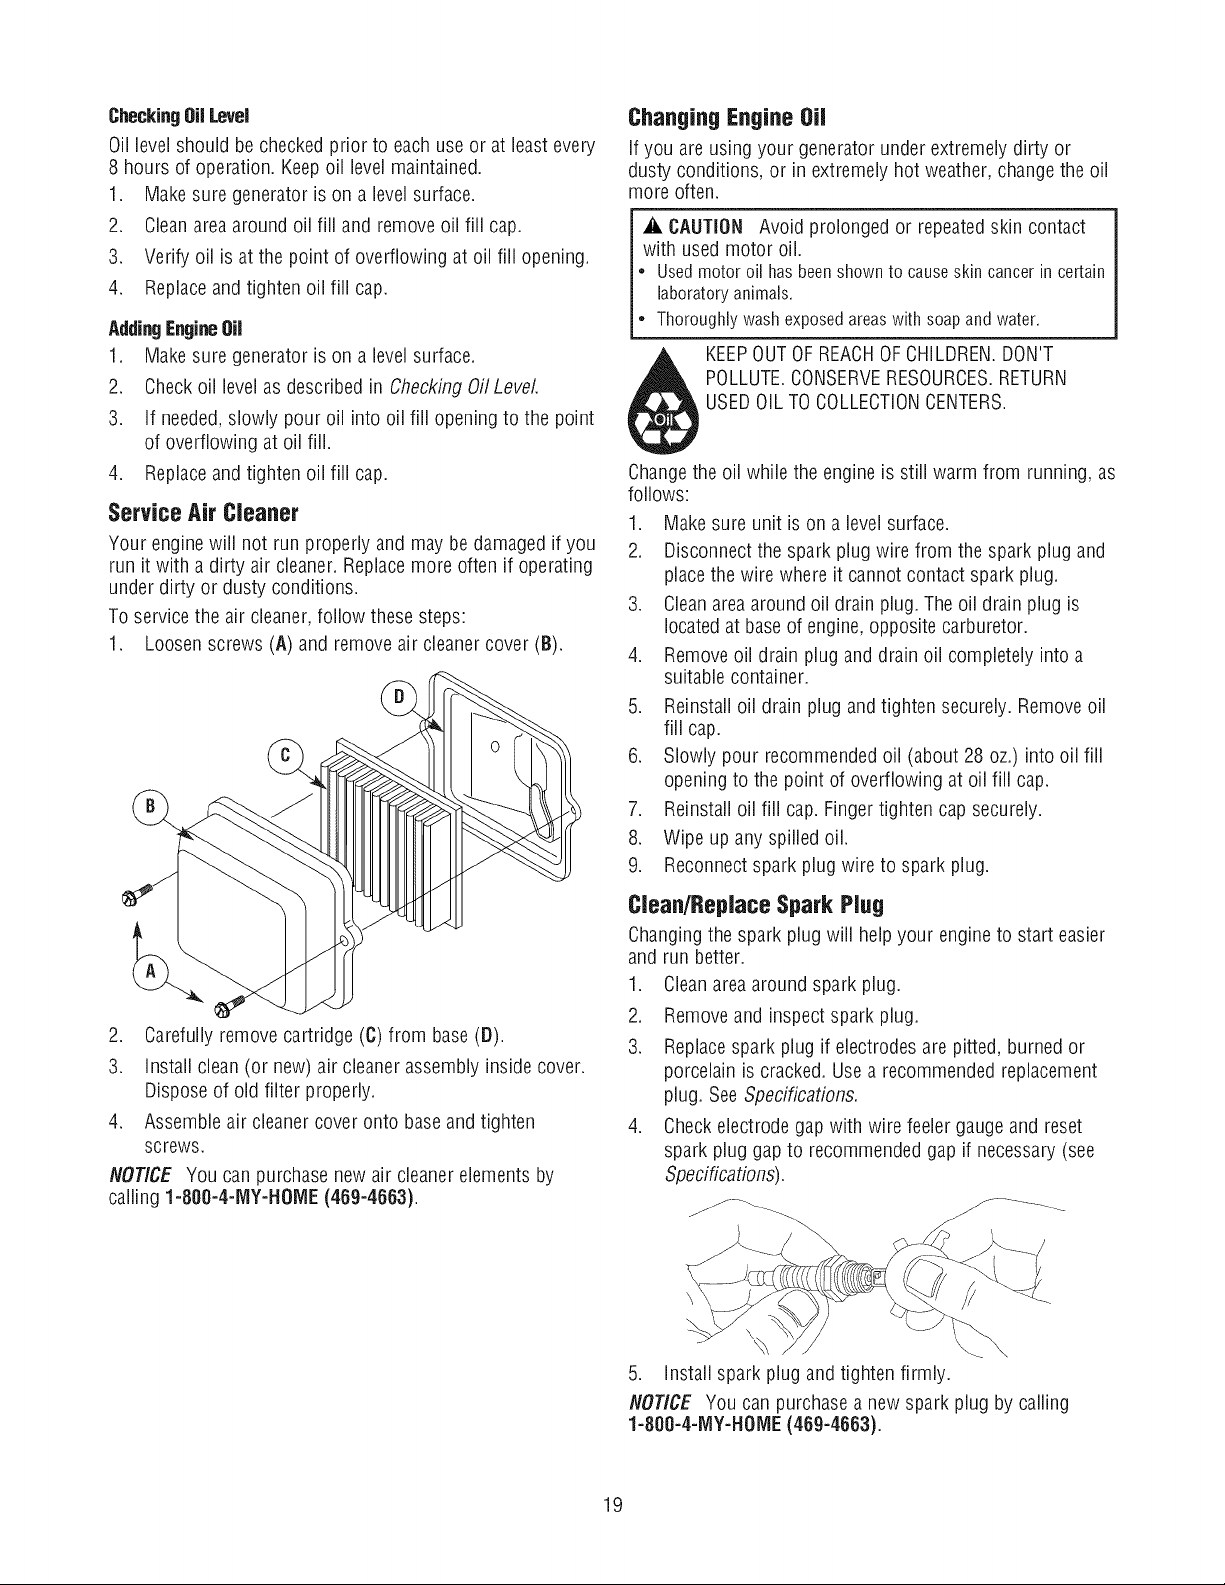
Service Air Cleaner
Your enginewill not run properly and may be damaged ifyou
run it with a dirty air cleaner. Replacemore often if operating
under dirty or dusty conditions.
To servicethe air cleaner,follow thesesteps:
1. Loosen screws(A) and removeair cleanercover (B).
Changing Engine Oil
If you areusing your generator under extremely dirty or
dusty conditions, or in extremely hot weather, change the oil
more often.
_lLCAUTION Avoid prolonged or repeatedskin contact
with usedmotor oil.
• Usedmotoroil hasbeenshownto causeskincancerin certain
laboratoryanimals.
• Thoroughlywashexposedareaswith soapandwater.
KEEPOUTOFREACHOFCHILDREN.DON'T
POLLUTE.CONSERVERESOURCES.RETURN
USEDOILTOCOLLECTIONCENTERS.
Changethe oil while the engine is still warm from running, as
follows:
1. Makesure unit is on a levelsurface.
2. Disconnectthe spark plug wire from the spark plug and
placethe wire where it cannot contact spark plug.
3. Cleanareaaround oil drain plug. The oil drain plug is
locatedat baseof engine,opposite carburetor.
4. Removeoil drain plug and drain oil completelyinto a
suitable container.
5. Reinstalloil drain plug and tighten securely. Removeoil
fill cap.
6. Slowly pour recommendedoil (about 28 oz.) into oil fill
opening to the point of overflowing at oil fill cap.
7. Reinstalloil fill cap. Fingertighten cap securely.
8. Wipe up any spilled oil.
9. Reconnectspark plug wire to spark plug.
2. Carefully removecartridge (C) from base(D).
3. Install clean(or new)air cleaner assembly inside cover.
Disposeof old filter properly.
4. Assembleair cleanercover onto baseand tighten
screws.
NOTICE You can purchase new air cleaner elements by
calling 1-800-4-1VlY-HOIVlE(469-4663).
Clean/ReplaceSparkPlug
Changingthe spark plug will helpyour engine to start easier
and run better.
1. Cleanareaaround spark plug.
2. Removeand inspect spark plug.
3. Replacespark plug if electrodes are pitted, burned or
porcelain is cracked. Usea recommended replacement
plug. SeeSpecifications.
4. Checkelectrode gap with wire feelergauge and reset
spark plug gap to recommendedgap if necessary(see
Specifications).
J
5. install spark plug and tighten firmly.
NOT/CE You can purchasea new spark plug by calling
1-800-4-1VlY-HOIVlE(469-4663).
19
inspect Muffler and Spark Arrester
inspect the muffler for cracks, corrosion, or other damage.
Removethe spark arrester, if equipped,and inspect for
damageor carbon blockage, if replacementparts are
required, make sure to useonly original equipment
replacementparts.
NOTICE You can purchase a new spark arrester screen by
calling 1-800-4-MY-HOME (469-4663),
_i, WARNING Contact with muffler area can result in
serious burns.
_ _ Exhaust heat/gases can ignite
combustibles, structures or damage
fuel tank causing a fire.
• DO NOTtouch hot parts and AVOID hot exhaust gases.
• Allow equipmentto cool beforetouching.
• Keepat least5 feet (152 cm) of clearanceon all sidesof
generator including overhead.
• It isa violation of California Public Resource Code,Section
4442, to useor operatethe engine on anyforest-covered,
brush-covered,or grass-covered land unless the exhaust
system is equippedwith aspark arrester,as defined in Section
4442, maintained in effectiveworking order. Otherstates or
federal jurisdictions may havesimilar laws.
Contactthe original equipment manufacturer, retailer, or dealer
to obtain a sparkarrester designed for the exhaust system
installed on this engine.
• Replacement parts must bethe sameand installed in the same
position as the original parts.
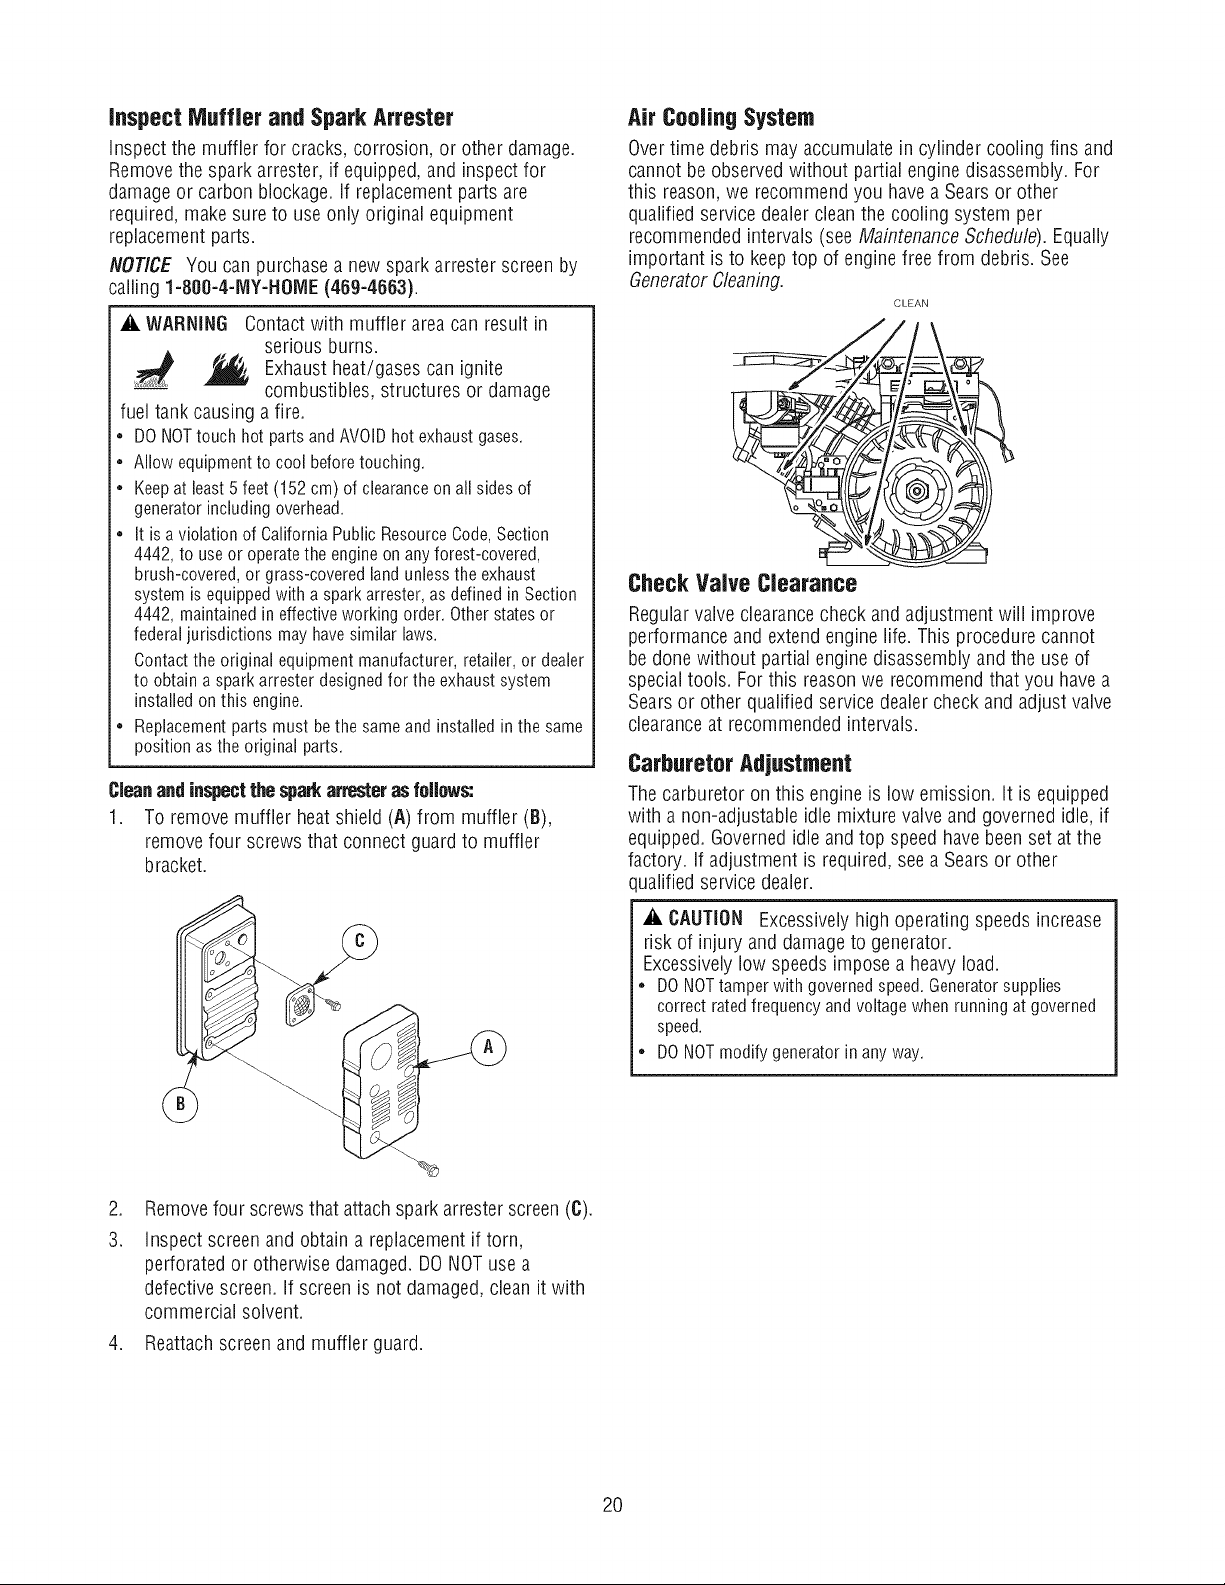
Cleanandinspectthesparkarresterasfollows:
1. To removemuffler heat shield (A) from muffler (B),
remove four screwsthat connect guard to muffler
bracket.
Air Coolin9 System
Overtime debris mayaccumulate in cylinder cooling fins and
cannot be observed without partial enginedisassembly. For
this reason,we recommendyou havea Searsor other
qualified servicedealer clean the cooling system per
recommendedintervals (see MaintenanceSchedule). Equally
important is to keeptop of enginefree from debris. See
GeneratorCleaning.
CLEAN
CheckValve Clearance
Regularvalve clearancecheck and adjustment will improve
performanceand extendengine life. This procedurecannot
be done without partial engine disassembly and the use of
specialtools. For this reason we recommendthat you have a
Searsor other qualified servicedealer check andadjust valve
clearanceat recommendedintervals.
CarburetorAdjustment
The carburetor on this engine is low emission, it is equipped
with anon-adjustable idle mixture valve and governedidle, if
equipped.Governedidle and top speedhavebeen setat the
factory, if adjustment is required, see a Searsor other
qualified servicedealer.
,
Removefour screwsthat attach sparkarrester screen(C).
3.
inspect screenand obtain a replacementif torn,
perforated or otherwise damaged.DO NOTusea
defective screen, if screen is not damaged, cleanit with
commercial solvent.
4. Reattachscreen and muffler guard.
_i, CAUTION Excessively high operating speeds increase
risk of injury and damage to generator.
Excessively low speeds impose a heavy load.
• DO NOTtamper with governed speed. Generatorsupplies
correct rated frequency andvoltage when running at governed
speed.
• DO NOTmodify generator inany way.
2O
 Loading...