

Craftsman 580675611 Owner’s Manual
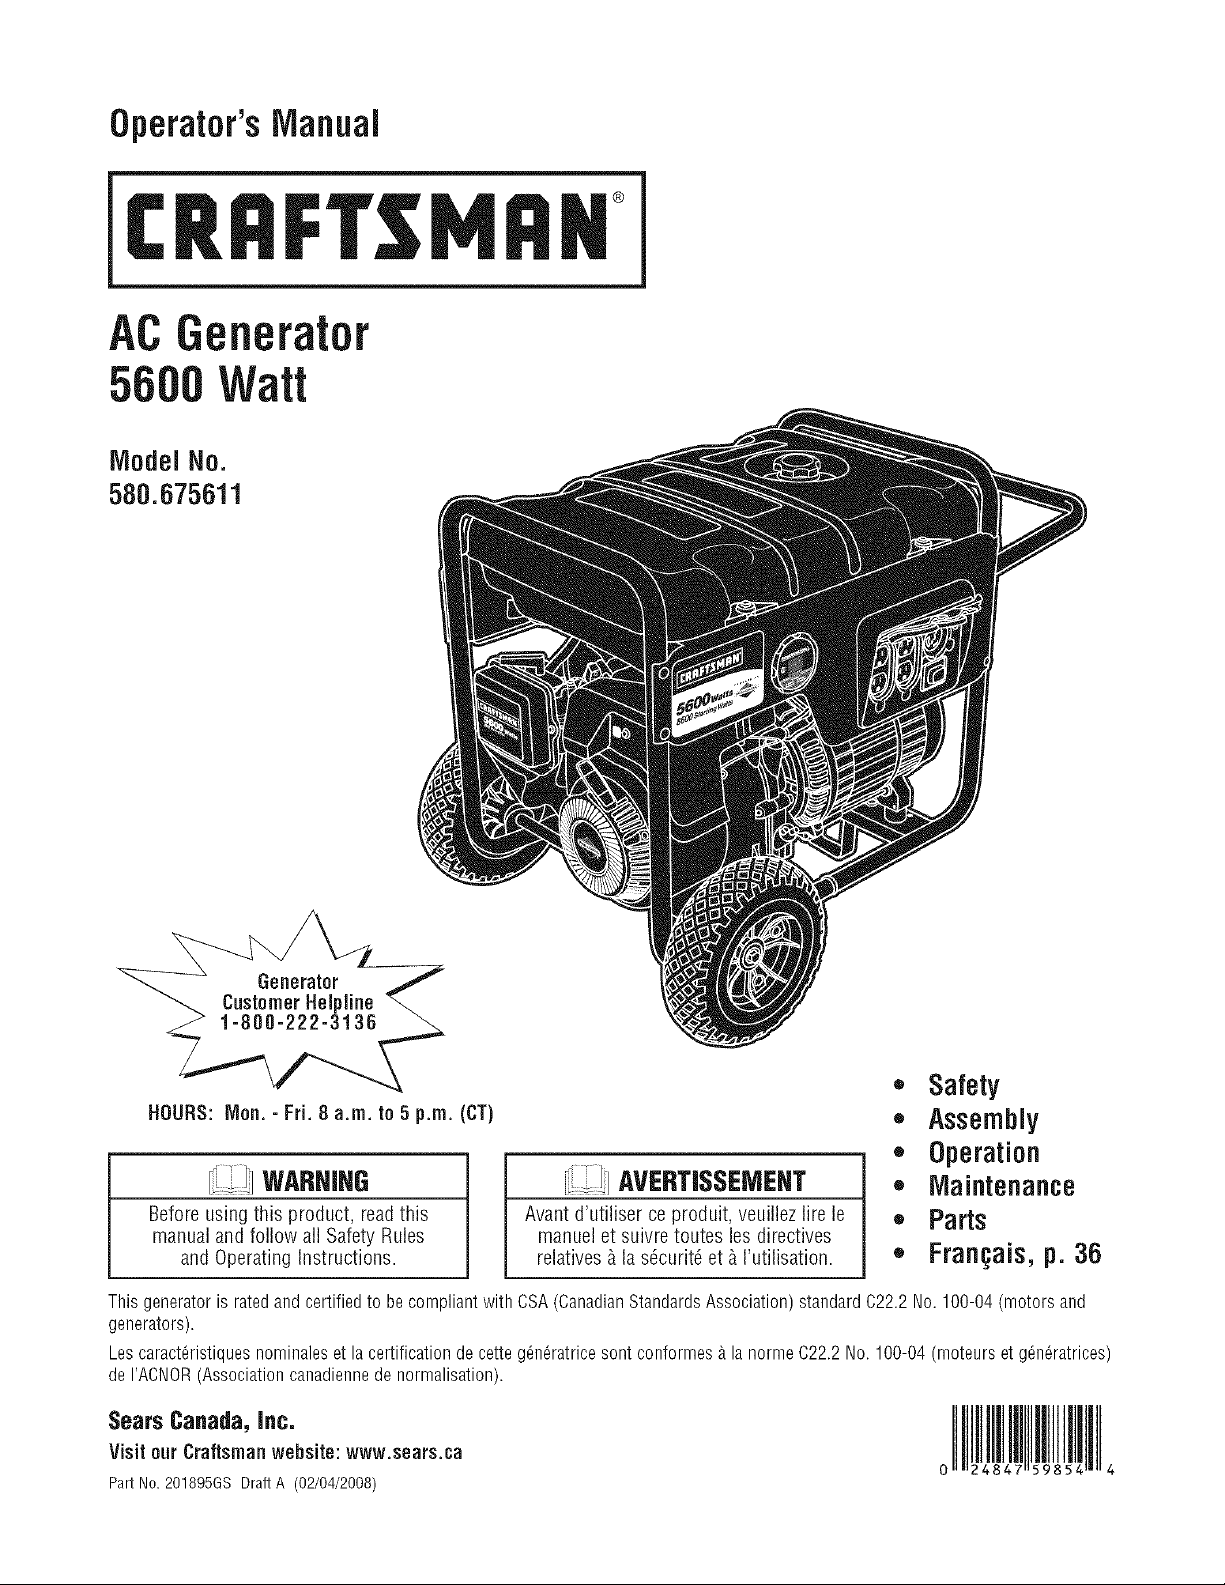
Operator'sManual
ACGenerator
®
,, Safety
,, Assembly
,, Operation
I;. wAemG
Before usingthis product, readthis
manualand follow all SafetyRules
and Operating Instructions.
Thisgeneratoris ratedandcertifiedto becompliantwithCSA(CanadianStandardsAssociation)standard022.2 No.100-04(motorsand
generators).
Lescaract6ristiquesnominalesetla certificationdecetteg6n6ratricesontconformesAla normeC22.2No.100-04(moteursetg6n6ratrices)
deI'ACNOR(Associationcanadiennedenormalisation).
Sears Canada, Jnc.
Visit our Craftsman wehsite:www.sears.ca
Part No. 201895GS Draft A (02/04/2008)
_i._i]AVERTISSEMENT
Avant d'utiliser ceproduit, veuillez lire le
manuelet suivre toutes les directives
relatives_1la s6curit6 et _1I'utilisation.
,, Maintenance
,, Parts
,, Fran+ais,p. 36
WARRANTY..................................... 2
SAFETYRULES................................. 3-5
FEATURESAND CONTROLS........................ 6
ASSEMBLY.................................... 7-9
OPERATION................................. 10-13
SPECIFICATIONS................................ 14
MAINTENANCE............................... 15-18
STORAGE...................................... 19
TROUBLESHOOTING............................. 20
NOTES........................................ 21
SCHEMATIC/WIRINGDIAGRAM.................. 22-23
REPLACEMENTPARTS......................... 24-33
EMISSIONSSYSTEMWARRANTY................ 34-35
FRAN_AIS................................... 36-59
HOWTOORDERPARTS................... BACKPAGE
OHE-YEARFULLWARRANTYOHCRAFTSMANGENERATOR
If this generator fails dueto a defect in material or workmanship within oneyear from the date of purchase,return it to any
Searsstore, other Craftsmanoutlet, or Sears Parts & RepairCenter inthe United Statesor Canadafor free repair(or
replacementif repair proves impossible).
Additional One-Year Limited Warranty on Craftsman Generator
Forthe second year from the date of purchase,ifany part ofthis generator fails dueto adefect in material or workmanship, a
new part will be supplied free of charge.You must pay the labor cost if you wish to have it installed.
All warranty coverageappliesfor only 90 days from date of purchase if this generator is ever usedfor commercial or rental
purposes.
This warranty gives you specific legal rights, and you may also haveother rights which vary from state to state.
Sears, Roebuck and Co., Hoffman Estates, IL 60179
Sears Canada Inc., Toronto, Ontario, Canada MSB 288
© SearsBrands, LLC
,_ Thisisthe safetyalert symbol,it isused to alert youtopotentialpersonalinjuryhazards.
Obeyall safetymessagesthat follow this symbolto avoid possibleinjuryordeath.
[ _-!] Read thismanual carefully and become familiar
...................withyourgenerator. Knowits applications,its
limitations,and any hazardsinvolved.
Thesafety alert symbol (_1_)is usedwith a signal word
(DANGER,CAUTION,WARNING),a pictorial and/or a safety
messageto alert you to hazards.DANGERindicatesa hazard
which, if not avoided, will result in deathor serious injury.
WARNINGindicates a hazardwhich, if not avoided, could
result in deathor serious injury. CAUTIONindicatesa hazard
which, if not avoided, might result in minor or moderate
injury. NOTICEindicatesa situation that could result in
equipment damage.Follow safety messagesto avoid or
reducethe risk of injury or death.
WARHIHG
Theengine exhaustfrom thisproductcontains
chemicalsknowntothe State of California to cause
cancer,birthdefects, orotherreproductiveharm.
WARNING
This generator doesnot meetU. S.Coast Guard Regulation
330FR-183 and should not be used on marine applications.
Failureto usethe appropriate U. S. CoastGuard approved
generator could result in bodily injury and/or property damage.
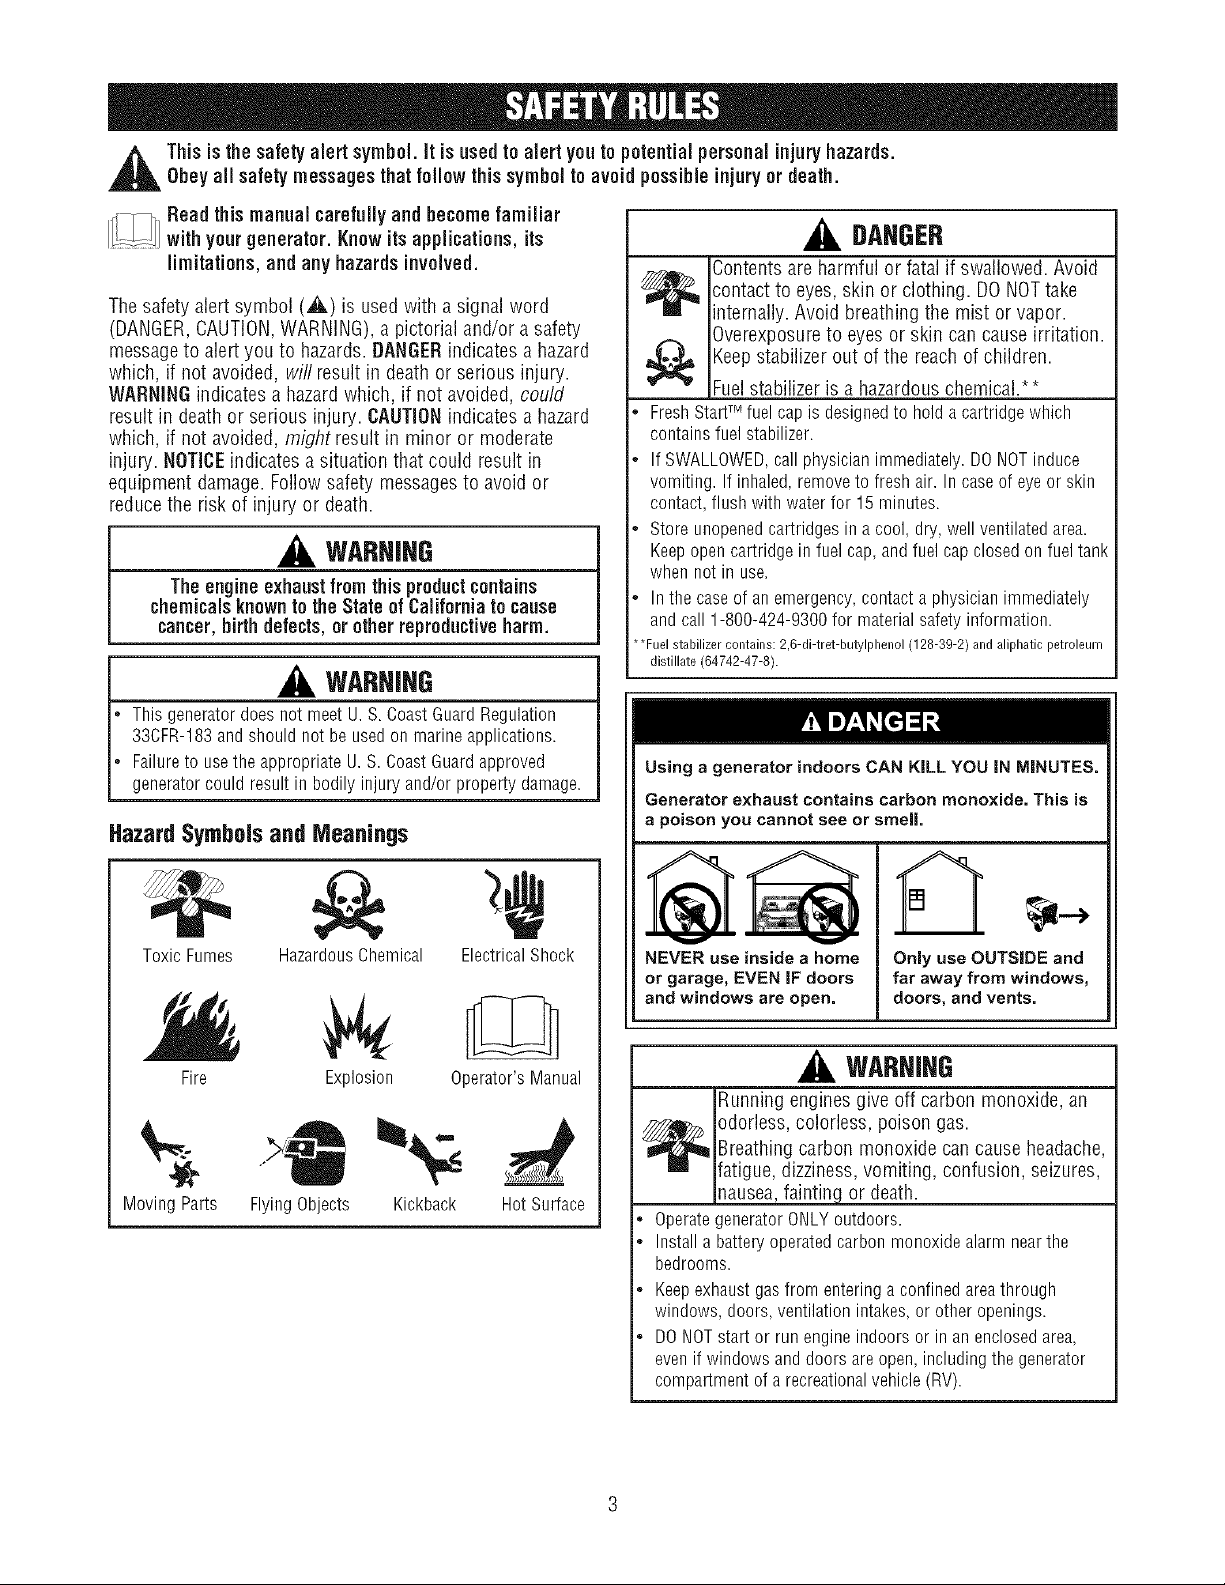
Hazard Symbolsand Meanings
DAHGER
Contentsare harmful or fatal if swallowed.Avoid
_ ontact to eyes, skin or clothing. DO NOT take
o FreshStartTM fuel cap is designed to hold acartridge which
contains fuel stabilizer.
o If SWALLOWED,call physician immediately. DONOTinduce
vomiting. If inhaled, remove to fresh air. In case of eye or skin
contact, flush with water for 15 minutes.
* Store unopenedcartridges in a cool, dry, well ventilated area.
Keepopen cartridge in fuel cap, andfuel cap closed on fuel tank
when not in use.
o In the caseof an emergency, contact a physician immediately
andcall 1-800-424-9380 for material safety information.
**Fuel stabilizer contains: 2,6-di-tret-butylphenol (128-39-2) and alipbatic petroleum
distillate (64742-47-8).
Using a generator indoors CAN KiLL YOU iN MINUTES.
Generator exhaust contains carbon monoxide. This is
a poison you cannot see or smeJJ.
internally. Avoid breathing the mist or vapor.
Overexposure to eyes or skin can cause irritation.
Keep stabilizer out of the reach of children.
Fuel stabilizer is a hazardous chemical.**
A
ToxicFumes
Fire
Moving Parts FlyingObjects
HazardousChemical Electrical Shock
Explosion Operator's Manual
Kickback HotSurface
NEVER use inside a home
or garage, EVEN IF doors
and windows are open.
Only use OUTSIDE and
far away from windows,
doors, and vents=
WARHIHG
Runningenginesgive off carbon monoxide, an
_ dorless, colorless, poison gas.
* OperategeneratorONLYoutdoors.
* Installabatteryoperatedcarbonmonoxidealarmnearthe
bedrooms.
* Keepexhaustgasfromenteringaconfinedareathrough
windows,doors,ventilationintakes,orotheropenings.
* DONOTstartor runengineindoorsor in anenclosedarea,
evenif windowsanddoorsareopen,includingthegenerator
compartmentof arecreationalvehicle(RV).
Breathingcarbon monoxide can cause headache,
Iatigue,dizziness,vomiting, confusion, seizures,
nausea_fainting or death.
WARHIHG
Generator produces powerful voltage.
_.¢ Failure to isolate generator from power utility can
• When using generator for backup power, notify utility company.
Use approved transfer equipment to isolate generatorfrom
electric utility.
• Use aground circuit fault interrupter (GFCI)in any damp or
highly conductive area, such as metal deckingor steelwork.
• DO NOTtouch barewires or receptacles.
• DO NOTusegenerator with electrical cords which areworn,
frayed, bare or otherwise damaged.
• DO NOToperate generator inthe rainor wet weather.
• DO NOThandlegenerator or electrical cords while standing in
water, while barefoot, or while hands or feet are wet.
• DO NOTallow unqualified persons or children to operate or
servicegenerator.
result in death or injury to electric utility workers
due to backfeed of electrical enerqy.
WARHIHG
Startercord kickback (rapid retraction) can result
in bodily injury. Kickbackwill pull handand arm
_,_< toward engine faster than you can let go.
Brokenbones, fractures, bruises, or sprains
could result.
• When starting engine, pull cord slowly until resistance is felt
andthen pull rapidly to avoid kickback.
• NEVERstart or stop engine with electrical devices plugged in
andturned on.
WARNING
_,,_s Contact with muffler result in serious
burns.
f'_ Exhaustheat/gases can ignite combustibles,structures or damagefuel tank causing a fire.
area can
WARHIHG
_ Fuel and its vapors are extremely flammable and
WHENADDINGORDRAININGFUEL
* Turn generator OFFand let it cool at least 2 minutes before
* Fill or drain fuel tank outdoors.
* DONOToverfill tank. Allow space for fuel expansion.
* If fuel spills, wait until it evaporates before starting engine.
* Keepfuel away from sparks, openflames, pilot lights, heat,and
* DONOTlight a cigarette or smoke.
WHENSTARTINGEQUIPMENT
* Ensure spark plug, muffler, fuel cap, andair cleaner arein
* DO NOTcrank enginewith spark plug removed.
WHENOPERATINGEQUIPMENT
* DONOTtip engine or equipment at angle which causes fuel to
. DO NOTchoke carburetor to stop engine.
* This generator is not for use in mobile equipment or marine
WHENTRANSPORTINGOR REPAIRINGEQUIPMENT
* Transport/repair with fuel tank EMPTYor with fuel shutoff valve
. Disconnect spark plug wire.
WHENSTORINGFUEL OR EQUIPMENTWITH FUEL IN TANK
* Store away from furnaces, stoves, water heaters,clothes
explosive.
death.
Fire or explosion can cause severe burns or
removing fuel cap. Loosencap slowly to relievepressure in
tank.
other ignition sources.
place.
spill.
applications.
OFF.
dryers, or other appliances that have pilot light or other ignition
source becausethey can ignite fuel vapors.
* DO NOTtouch hot parts and AVOID hot exhaust gases.
* Allow equipment to cool before touching.
. Keepat least 5 feet (1.5 m) of clearanceon all sides of
generator including overhead.
. Codeof FederalRegulation (CFR)Title 36 Parks, Forests,and
Public Property require equipment powered by an internal
combustion engine to have a spark arrester, maintained in
effective working order, complying to USDAForest service
standard 5100-1C or later revision. Inthe State of California a
spark arrester is required under section 4442 of the California
Public resources code. Other statesmay havesimilar laws.
WARHIHG
_ Unintentional sparking can result in fire or
_¢ electric shock.
WHENADJUSTINGORMAKING REPAIRSTO YOURGENERATOR
* Disconnectthe spark plug wire from the spark plug and place
the wire where it cannot contact spark plug.
WHENTESTINGFORENGINESPARK
* Use approved spark plug tester.
* DONOTcheck for spark with spark plug removed.
WARHIHG
Starter and other rotating parts can entanglehands, hair, clothing, or accessories.
CAUTION
Excessively high operating speeds increase risk of injury
and damage to generator.
Excessively low speeds impose a heavy_load.
DONOTtamper with governed speed.Generator supplies
correct ratedfrequency andvoltage when running at governed
speed.
DO NOTmodify generator in any way.
NOTICE
Exceeding generators wattage/amperage capacity can
damage generator and/or electrical devices connected to it.
See Don't Overload Generator.
Start generator andlet engine stabilize before connecting
electrical loads.
Connectelectrical loads in OFFposition, then turn ONfor
operation.
Turn electrical loads OFFand disconnect from generator before
stopping generator.
* NEVERoperategenerator without protective housing or covers.
* DO NOTwear loose clothing, jewelry or anything that may be
caught in the starter or other rotating parts.
* Tie up long hair and remove jewelry.
NOTICE
Improper treatment of generator can damage it and shorten
its life.
Use generator only for intended uses.
Ifyou havequestions about intended use,ask dealer or contact
Sears.
Operategenerator only on level surfaces.
DONOTexpose generator to excessive moisture, dust, dirt, or
corrosive vapors.
DONOT insert any objects through cooling slots.
Ifconnected devices overheat, turn them off and disconnect
them from generator.
Shut off generator if:
-electrical output is lost;
-equipment sparks, smokes, or emits flames;
-unit vibrates excessively.
This equipment is designed to be used with Searsauthorized
parts ONLY.If equipment is used with parts that DO NOT
comply with minimum specifications, userassumes all risks
and liabilities.
KNOWYOUROEHERATOR
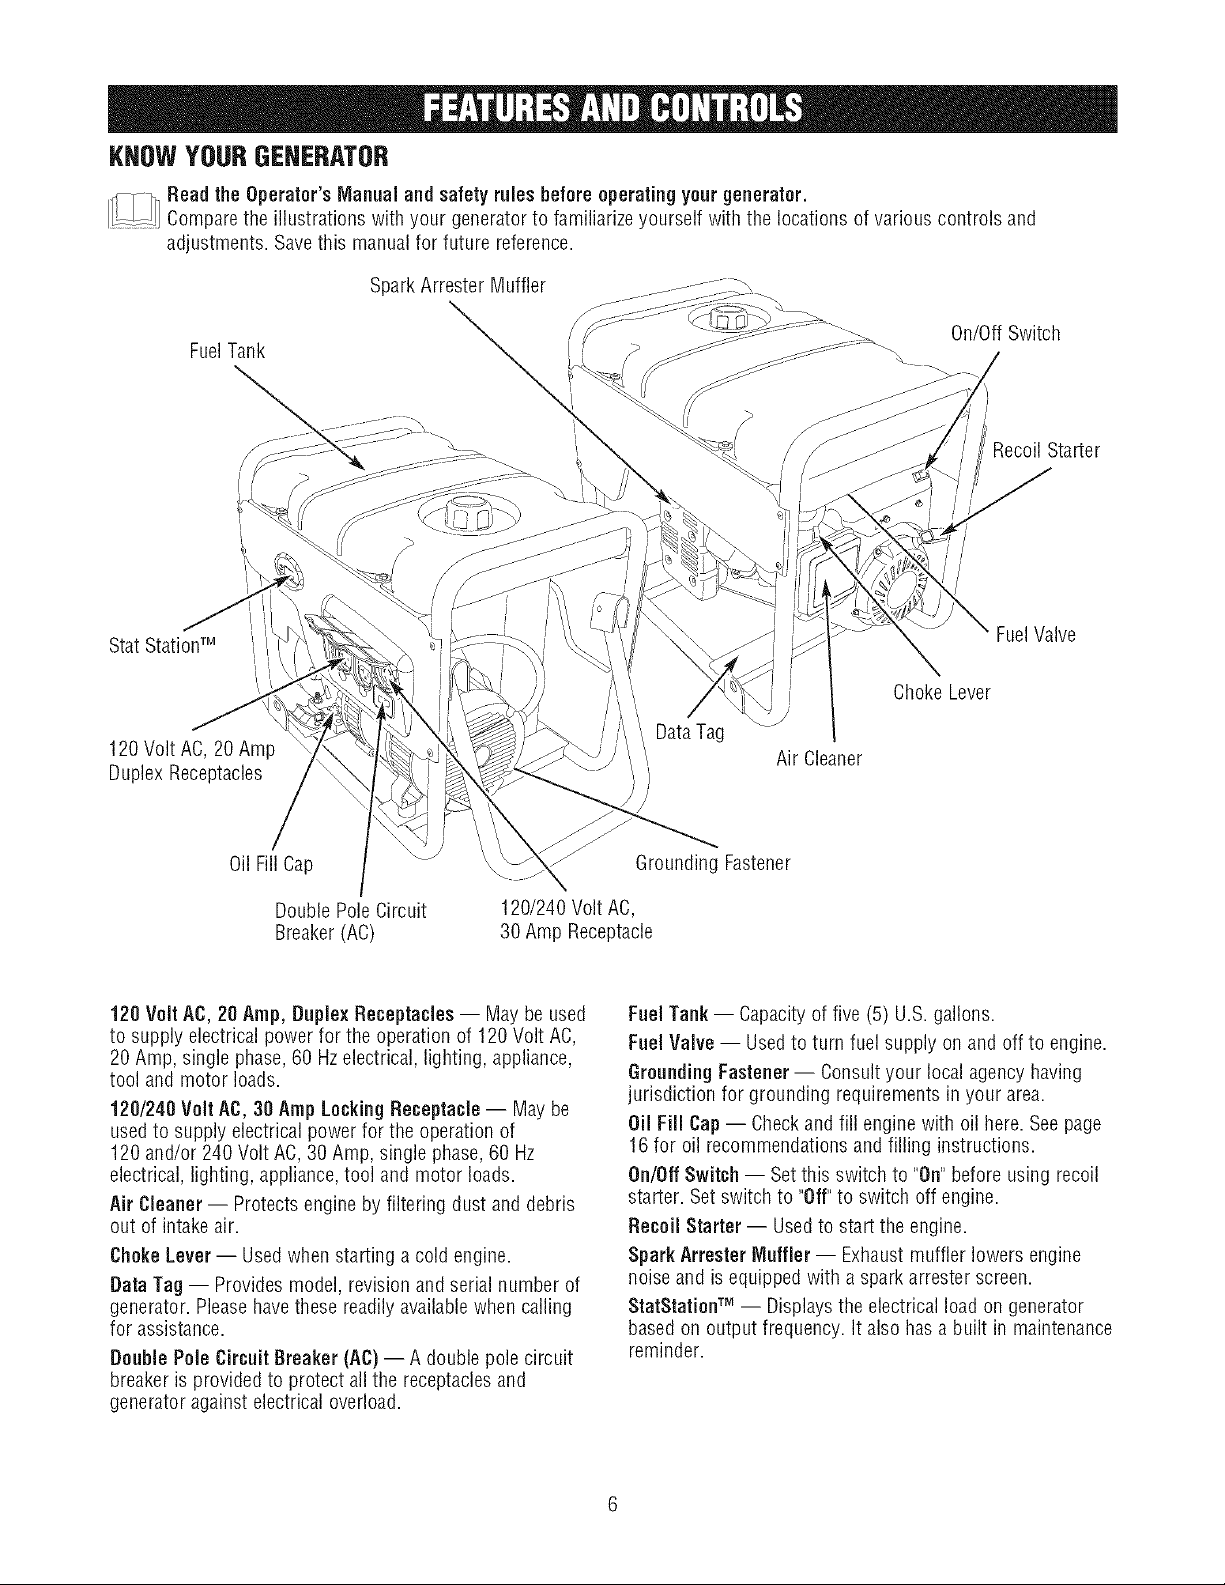
I!__-!i] Read the Operator'sManual and safety rules before operating your generator.
Comparethe illustrations with your generatorto familiarize yourself with the locations of various controls and
adjustments. Savethis manualfor future reference.
SparkArrester Muffler
FuelTank ,
\_. \ On/OffSwitch
Recoil Starter
Stat StationTM
120 Volt AC, 20 Amp
Duplex Receptacles
Oil Fill Cap
Double Pole Circuit
Breaker(AC)
120 Volt AC,20 Amp, Duplex Receptacles -- May be used
to supply electrical power for the operation of 120Volt AC,
20 Amp, single phase, 60 Hzelectrical, lighting, appliance,
tool and motor loads.
120/240 Volt AC, 30 AmpLockingReceptacle -- May be
usedto supply electrical powerfor the operation of
120 and/or 240 Volt AC,30 Amp, single phase,60 Hz
electrical, lighting, appliance,tool and motor loads.
Air gleaner -- Protects engineby filtering dust and debris
out of intake air.
ChokeLever-- Usedwhen starting a cold engine.
Data Tag -- Provides model, revision andserial number of
generator. Pleasehavethese readily availablewhen calling
for assistance.
DoublePole Circuit Breaker (AC)-- A double pole circuit
breakeris provided to protect all the receptaclesand
generatoragainst electrical overload.
120/240 Volt AC,
30 Amp Receptacle
FuelValve
Choke Lever
DataTag
Air Cleaner
Grounding Fastener
FuelTank-- Capacityof five (5) U.S. gallons.
FuelValve-- Usedto turn fuel supply on and off to engine.
GroundingFastener-- Consultyour local agency having
jurisdiction for grounding requirementsin your area.
Oil Fill Cap-- Checkand fill engine with oil here.Seepage
16 for oil recommendationsand filling instructions.
On/OffSwitch -- Setthis switch to "On"before using recoil
starter. Setswitch to "Off"to switch off engine.
Recoil Starter -- Usedto start the engine.
Spark ArrestorMuffler -- Exhaust muffler lowers engine
noiseand is equipped with a spark arrester screen.
StatStationTM -- Displaysthe electrical load on generator
basedon output frequency. It also hasa built in maintenance
reminder.
Your Craftsman generator requires some assembly andis
readyfor useonly after it has beenproperly serviced with the
recommendedoil and fuel.
If you haveany problemswith the assembly of your
generater, please call the generator helpline at
1-800-222-3136.
Unpacking the Generator
f. Setthe carton on a rigid fiat surface.
2. Removeeverything from carton except generator.
3. Opencarton compbtely by cutting eachcorner from top
to bottom.
4. Leavegeneratoron carton to installwheel kit.
Carton Contents
Checkall contents against those listed below:
* Main unit
* Engineoil
* Operator's manual
* Wheel kit
* Adapter cord set
If any parts are missing or damaged,call the generator
helpline at 1-800-222-3136.
install Wheel Kit
NOTE:Wheel kit is not intended for over-the-road use. DO
NOTtow this unit with a motorized vehicle.
You will needthe following tools to install these components:
* 13mmwrenches
* Socket wrenchwith a 13mm socket
* Pliers
*, Safety glasses
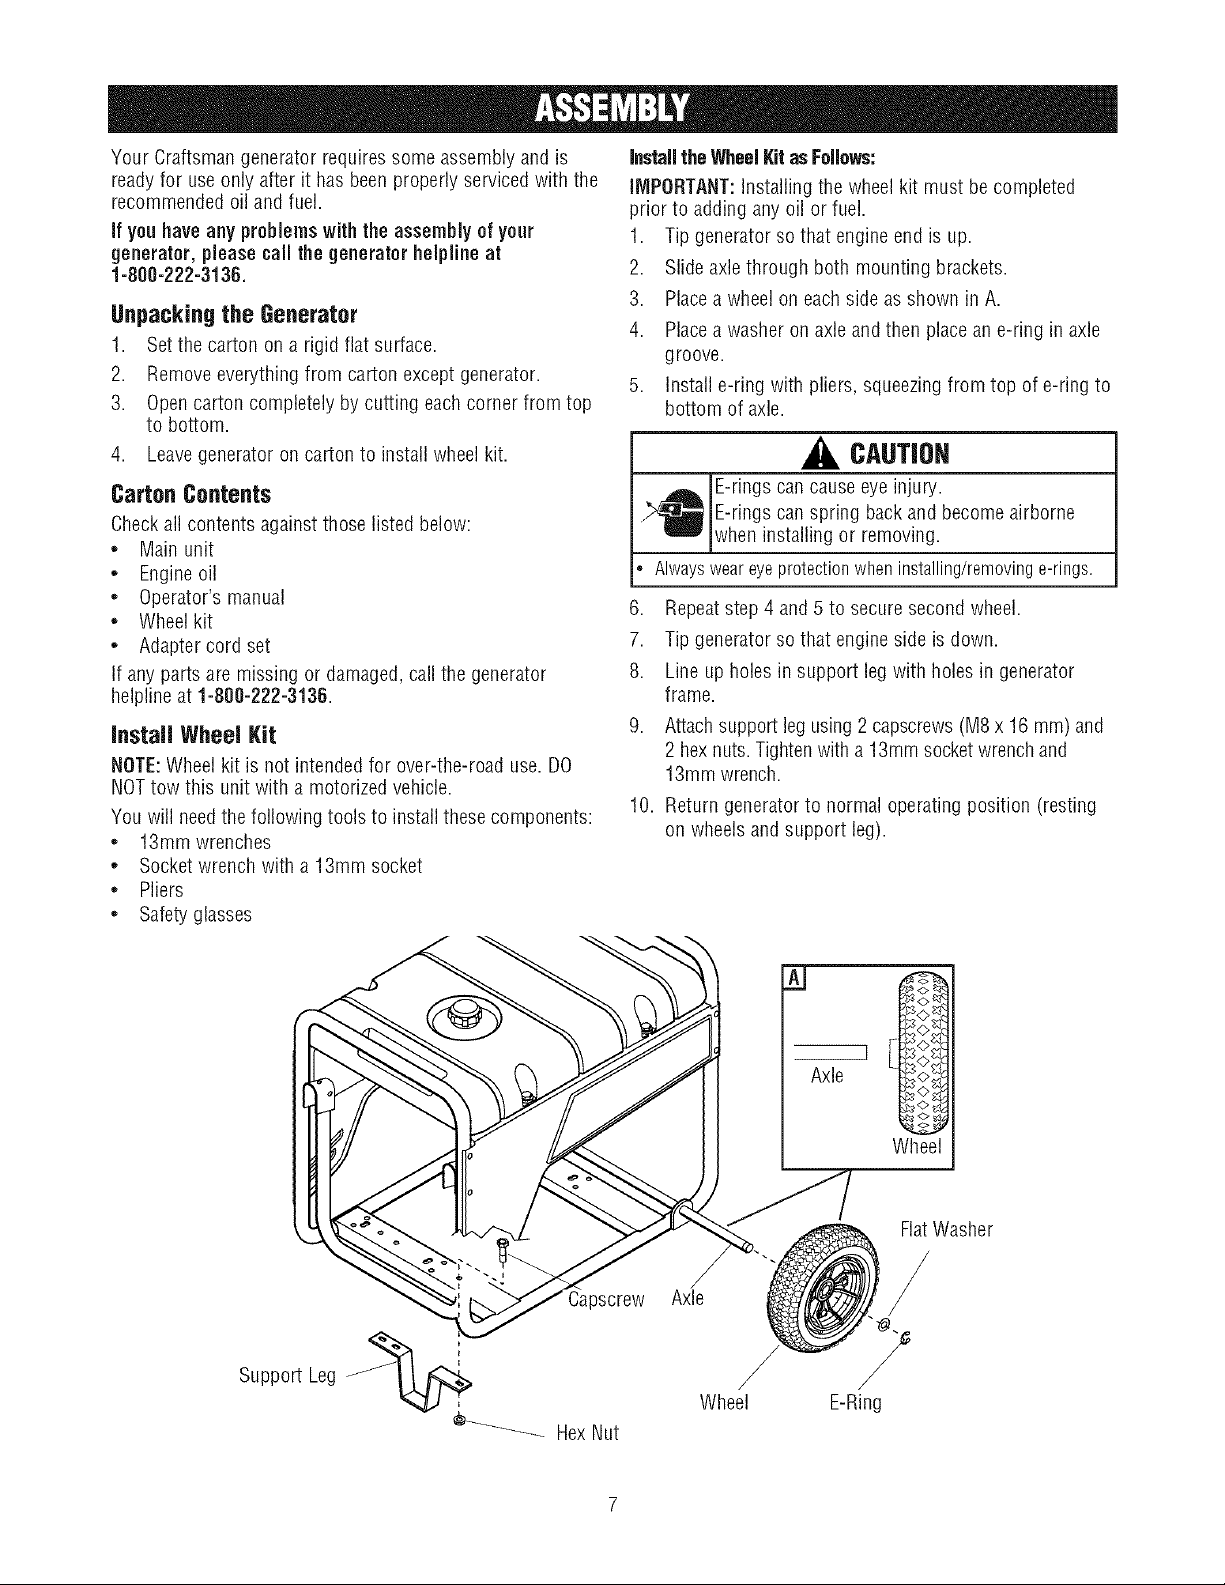
Install theWheelKitasFellows:
IMPORTANT:Installing the wheel kit must be completed
prior to adding any oil or fuel.
1. Tip generator so that engine end is up.
2. Slideaxlethrough both mounting brackets.
3. Placea wheel on each side as shown in A.
4. Placea washer on axleand then placean e-ring in axle
groove.
5. Install e-ring with pliers, squeezingfrom top of e-ringto
bottom of axle.
CAUTION
E-rings cancause eye injury.
._j_ E-rings can spring back and become airborne
when installing or removing.
* Alwaysweareyeprotectionwheninstalling/removinge-rings.
6. Repeatstep 4 and 5 to securesecond wheel.
7. Tip generatorso that engine side is down.
8. Line up holes in support leg with holes in generator
frame.
9. Attachsupport leg using 2 capscrews(Me x 16 mm) and
2 hex nuts. Tightenwith a 13mm socketwrench and
13mm wrench.
10. Return generatorto normal operating position (resting
on wheels and support leg).
Capscrew
Axle
Wheel
FlatWasher
J
E-Ring
BEFORESTARTINGTHEGENERATOR
Add Engine Oil
1. Place generator on a flat, levelsurface.
2. Cleanarea aroundoil fill and remove yellow oil fill cap.
NOTE:Seethe section Oi/to review oil recommendations.
Verify provided oil bottle is correct viscosity for current
ambient temperature.
3. Using oil funnel (optional), slowly pour contents of
provided oil bottle into oil fill opening.
NOTICE
Improper treatment of generator can damageit and shorten
itslife.
DONOTattemptto crankor startthe enginebeforeit hasbeen
properlyservicedwith the recommendedoil.Thismayresultin
anenginefailure.
4. Replaceoil fill cap and fully tighten.
Add Fuel
Fuel mustmeetthese requirements:
* Clean,fresh, unleadedgasoline.
* A minimum of 87 octane/87 AKI (91 RON).Highaltitude
use,see HighAltitude.
* Gasolinewith up to 10% ethanol (gasohol) or up to 15%
MTBE(methyl tertiary butyl ether) is acceptable.
WARHIHG
Fueland its vapors are extremelyflammable and
explosive.
Fireor explosion can causesevere burns or
death.
WHENADDINGFUEL
* TurngeneratorOFFandletit coolat least2 minutesbefore
removingfuelcap.Loosencapslowlyto relievepressurein
tank.
* Fillfueltankoutdoors.
* DONOToverfilltank.Allowspaceforfuelexpansion.
* Iffuelspills,waituntilit evaporatesbeforestartingengine.
* Keepfuelawayfromsparks,openflames,pilotlights,heat,and
otherignitionsources.
* DONOTlighta cigaretteorsmoke.
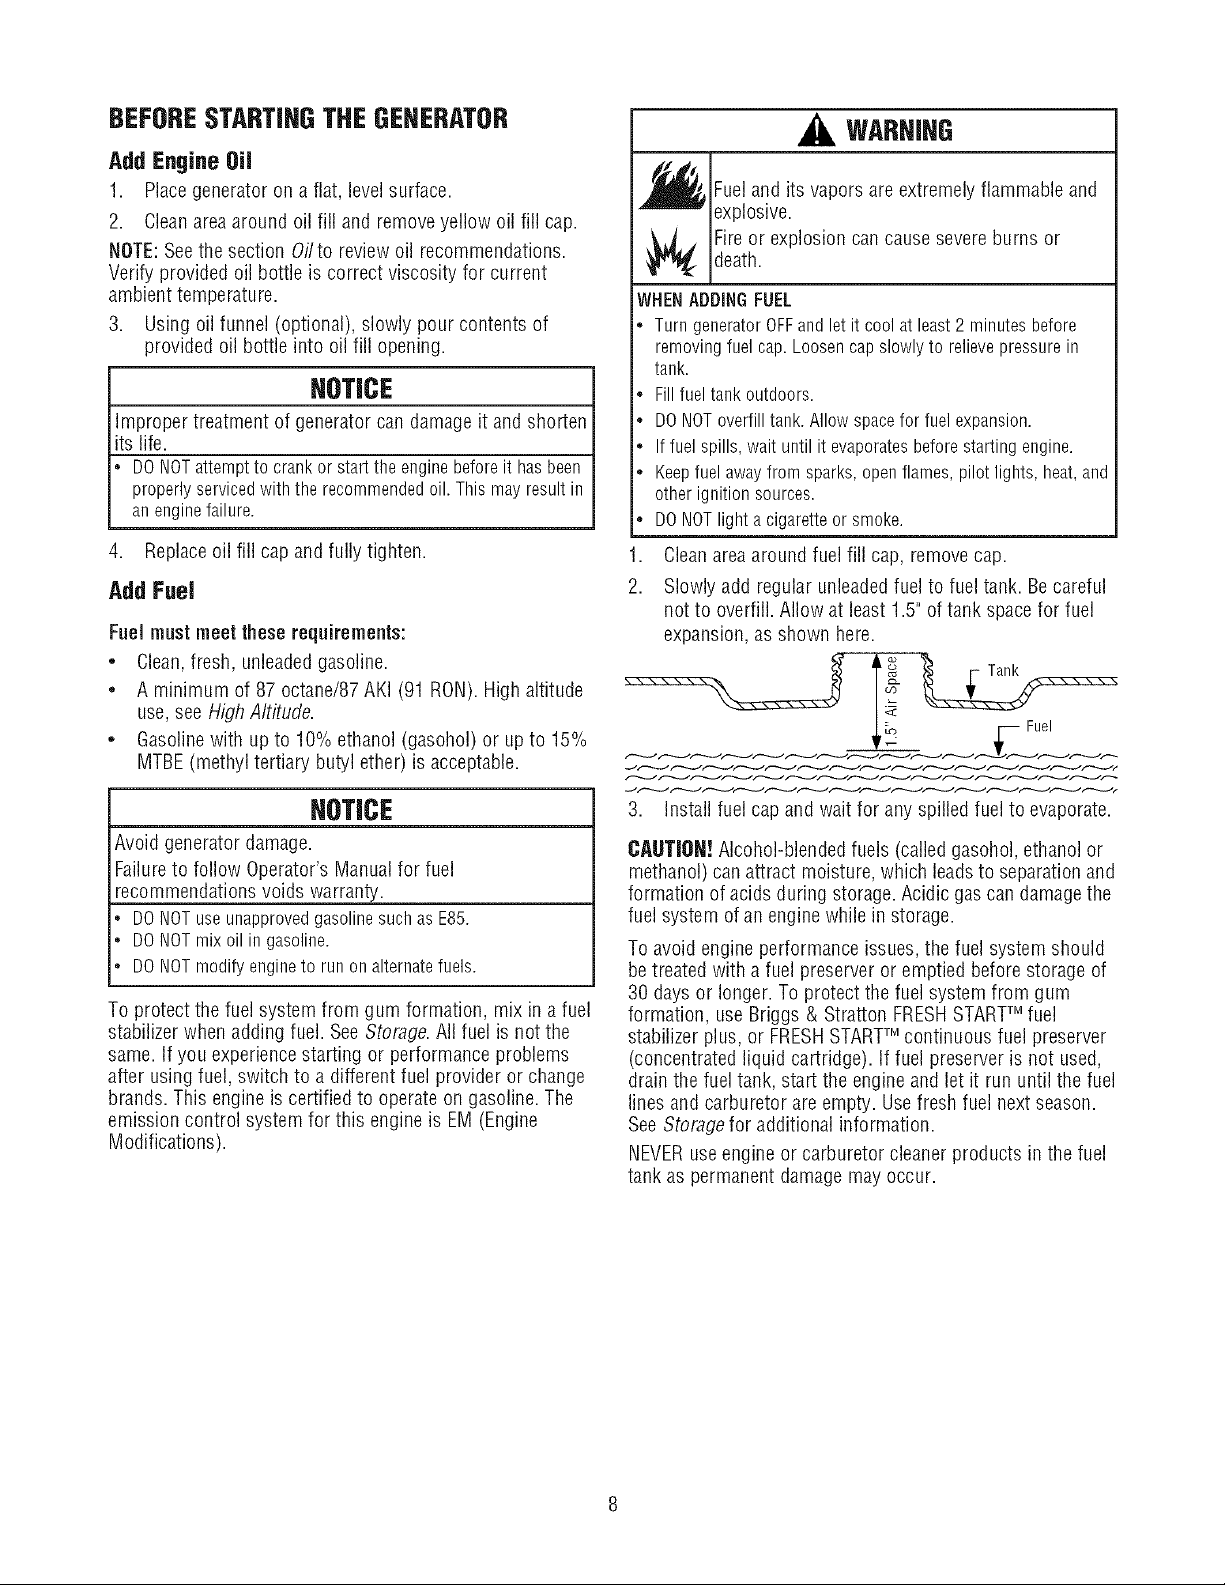
1. Cleanareaaround fuel fill cap, removecap.
2. Slowlyadd regular unleadedfuel to fuel tank. Becareful
not to overfill. Allow at least 1.5" of tank spacefor fuel
expansion,as shown here.
NOTICE
Avoid generatordamage.
Failureto follow Operator's Manualfor fuel
recommendations voids warranty.
DONOTuseunapprovedgasolinesuchasE85.
DONOTmixoil in gasoline.
DONOTmodifyengineto runon alternatefuels.
To protect the fuel system from gum formation, mix in a fuel
stabilizerwhen adding fuel. SeeStorage. All fuel is not the
same. If you experiencestarting or performanceproblems
after using fuel, switch to a different fuel provider or change
brands. This engine is certified to operateon gasoline. The
emission control system for this engine is EM(Engine
Modifications).
3. Install fuel cap and wait for anyspilled fuelto evaporate.
CAUTION! Alcohol-blended fuels (calledgasohol, ethanol or
methanol) can attract moisture, which leadsto separationand
formation of acids during storage. Acidic gas candamagethe
fuel system ofan enginewhile in storage.
To avoid engine performance issues,the fuel system should
betreated with a fuel preserver oremptied beforestorage of
30 days or longer. To protectthe fuel system from gum
formation, use Briggs & Stratton FRESHSTARTTM fuel
stabilizer plus, or FRESHSTARTTM continuous fuel preserver
(concentrated liquid cartridge). If fuel preserver is not used,
drain the fuel tank, start the engine and let it run until the fuel
linesand carburetor are empty. Usefresh fuel next season.
SeeStoragefor additional information.
NEVERuseengine or carburetor cleaner products in the fuel
tank as permanent damagemay occur.
FreshStaWMFuelCap
Adding fuel preserver helps keepfuel fresh and carburetors
cleanfor easierstarting, all season long. This new fuel cap
automatically drips concentrated fuel preserver into your fuel
tank.
DANGER
Contentsare harmful or fatal if swallowed. Avoid
contact to eyes, skin or clothing. DONOTtake
internally.Avoid breathingthe mist or vapor.
Overexposureto eyesor skin can causeirritation.
Keepstabilizerout of the reach of children.
Fuelstabilizer is a hazardouschemical.**
• If SWALLOWED,callphysicianimmediately.
• Inthecaseof anemergency,contacta physicianimmediately
andcall1-800-424-9300for materialsafetyinformation.
• *Fuel stabilizer contains: 2,6-di-tret-butylpbenol (128-39-2) and aliphatic petroleum
distillate (64742-47-8).
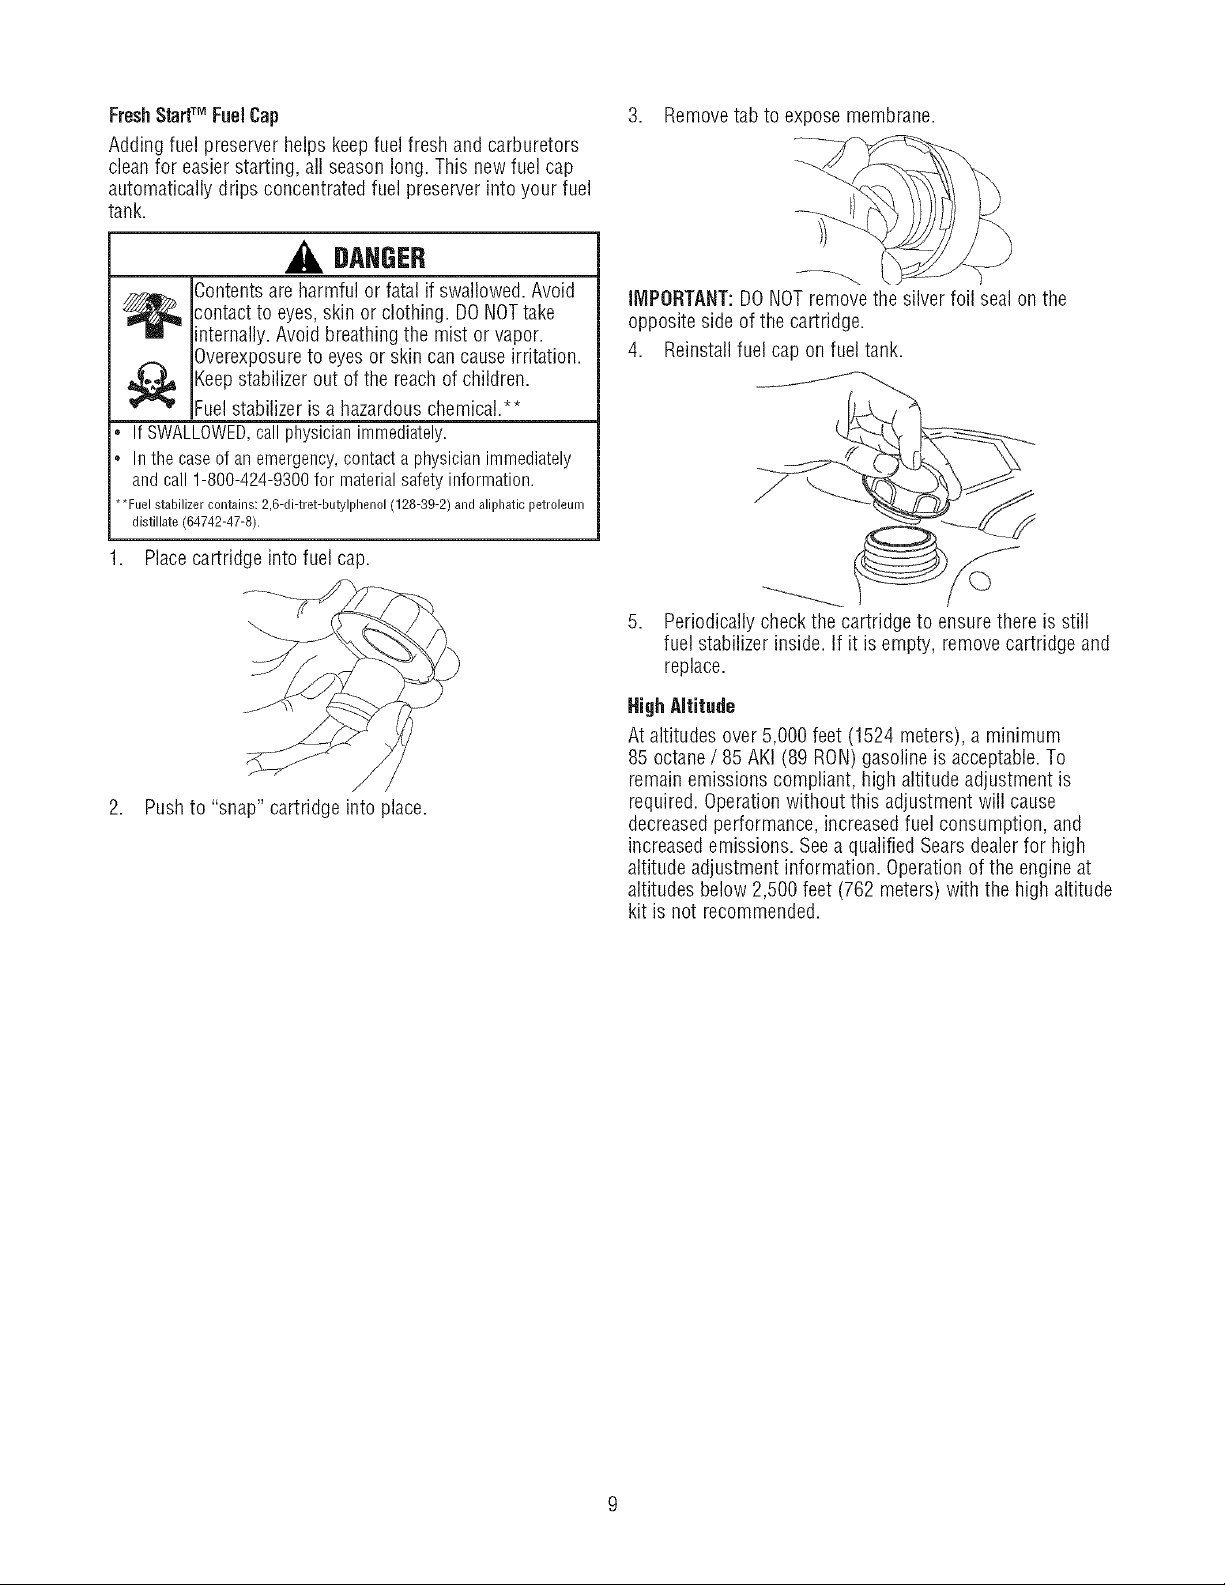
Placecartridge into fuel cap.
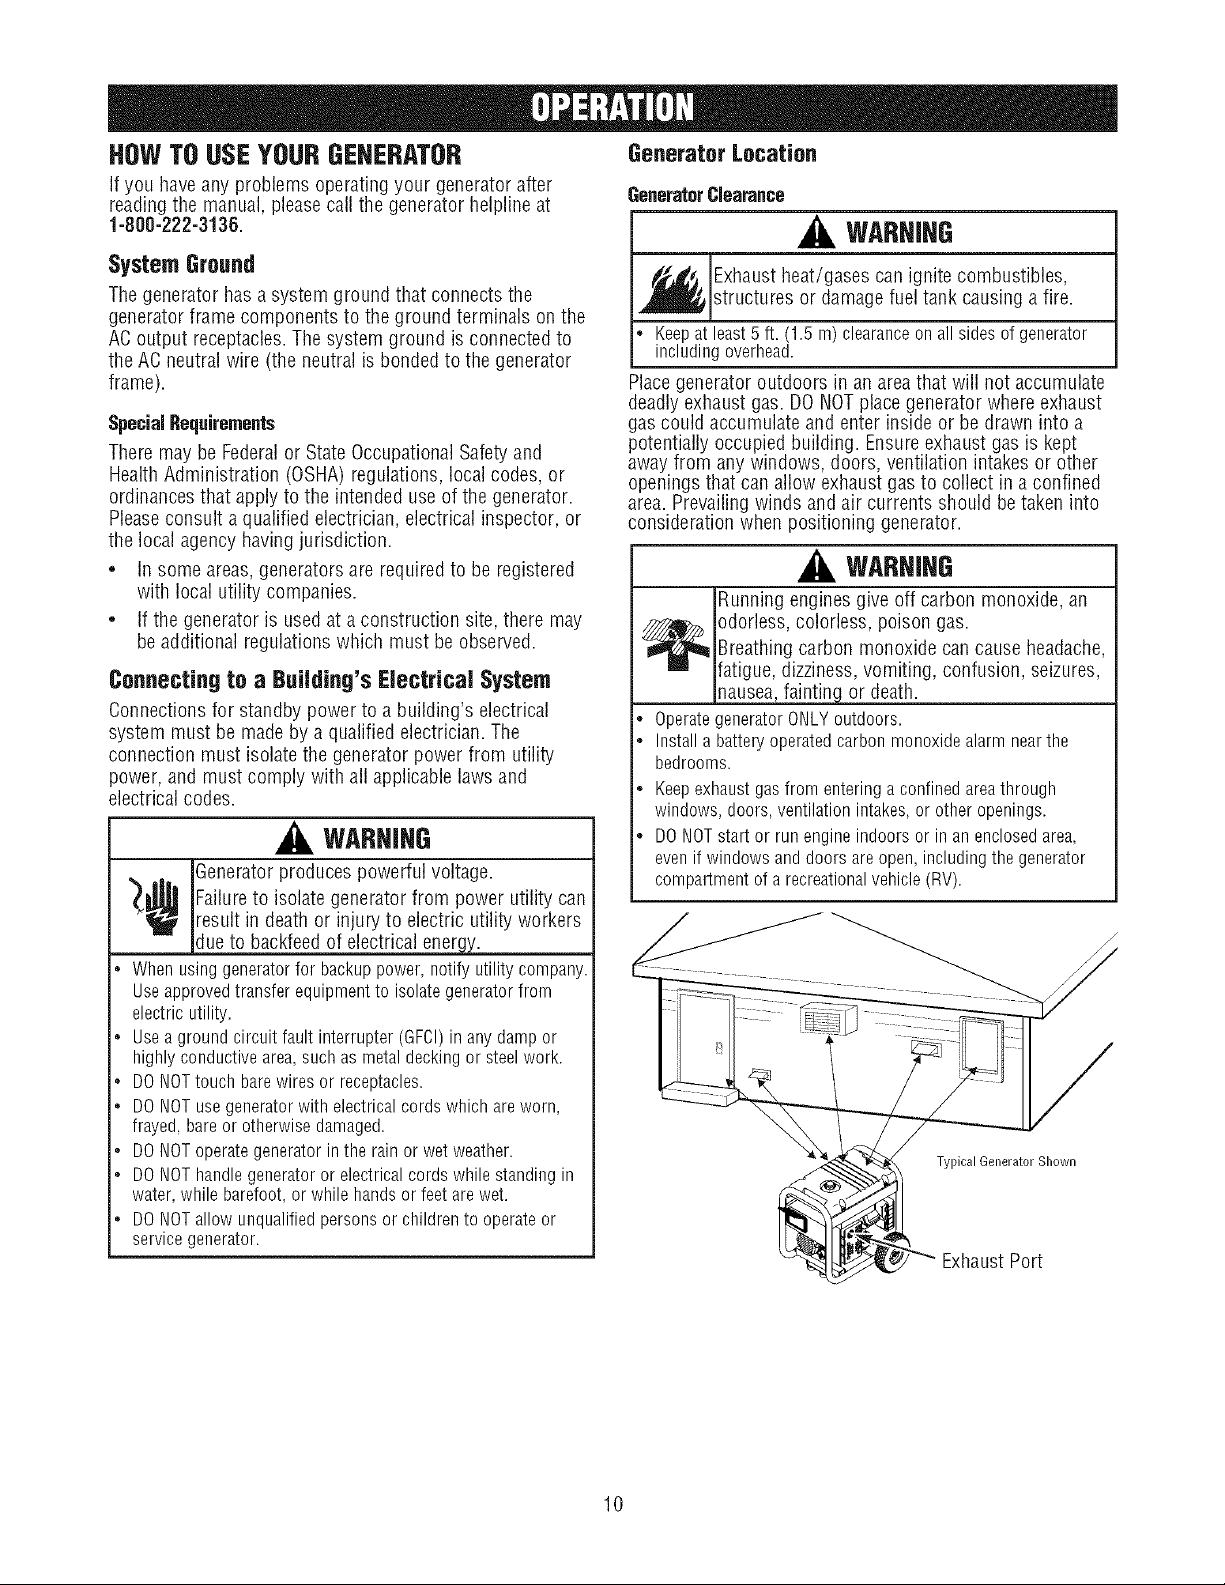
3. Removetab to expose membrane.
IMPORTANT:DONOTremove the silver foil seal on the
opposite side of the cartridge.
4. Reinstallfuel cap on fueltank.
_--_._ //_
Periodically check the cartridge to ensurethere is still
fuel stabilizer inside. If it is empty, removecartridge and
replace.
Y
2. Pushto "snap" cartridge into place.
HighAltitude
At altitudes over 5,000 feet (1524 meters), a minimum
85 octane / 85 AKI (89 RON)gasoline is acceptable.To
remainemissions compliant, high altitude adjustment is
required. Operationwithout this adjustment will cause
decreasedperformance, increasedfuel consumption, and
increasedemissions. Seea qualified Searsdealerfor high
altitude adjustment information. Operationof the engine at
altitudes below 2,500 feet (762 meters) with the high altitude
kit is not recommended.
HOWTOUSEYOURGEHERATOR
If you haveany problems operatingyour generatorafter
readingthe manual, pleasecall the generator helpline at
1-800-222-3136.
System Ground
Thegenerator hasa system ground that connects the
generatorframe components to the ground terminals on the
ACoutput receptacles.The system ground is connectedto
the ACneutral wire (the neutral is bonded to the generator
frame).
SpecialRequirements
Theremay be Federalor StateOccupational Safety and
HealthAdministration (OSHA)regulations, local codes, or
ordinancesthat applyto the intended use of the generator.
Pleaseconsult a qualified electrician, electrical inspector, or
the local agency having jurisdiction.
• Insome areas,generators are requiredto be registered
with local utility companies.
• Ifthe generator is usedat a construction site, there may
be additional regulations which must be observed.
Connecting to a Building's Electrical System
Connectionsfor standby power to a buiiding's electrical
system must be madeby a qualified electrician. The
connection must isolate the generator power from utility
power, and must comply with all applicable laws and
electricalcodes.
WARNING
Generatorproduces powerful voltage.
Generator Location
GeneraterClearance
WARNING
_ Exhaustheat/gases can ignite combustibles,
• Keepatleast5 ft. (1.5 m) clearanceonall sidesof generator
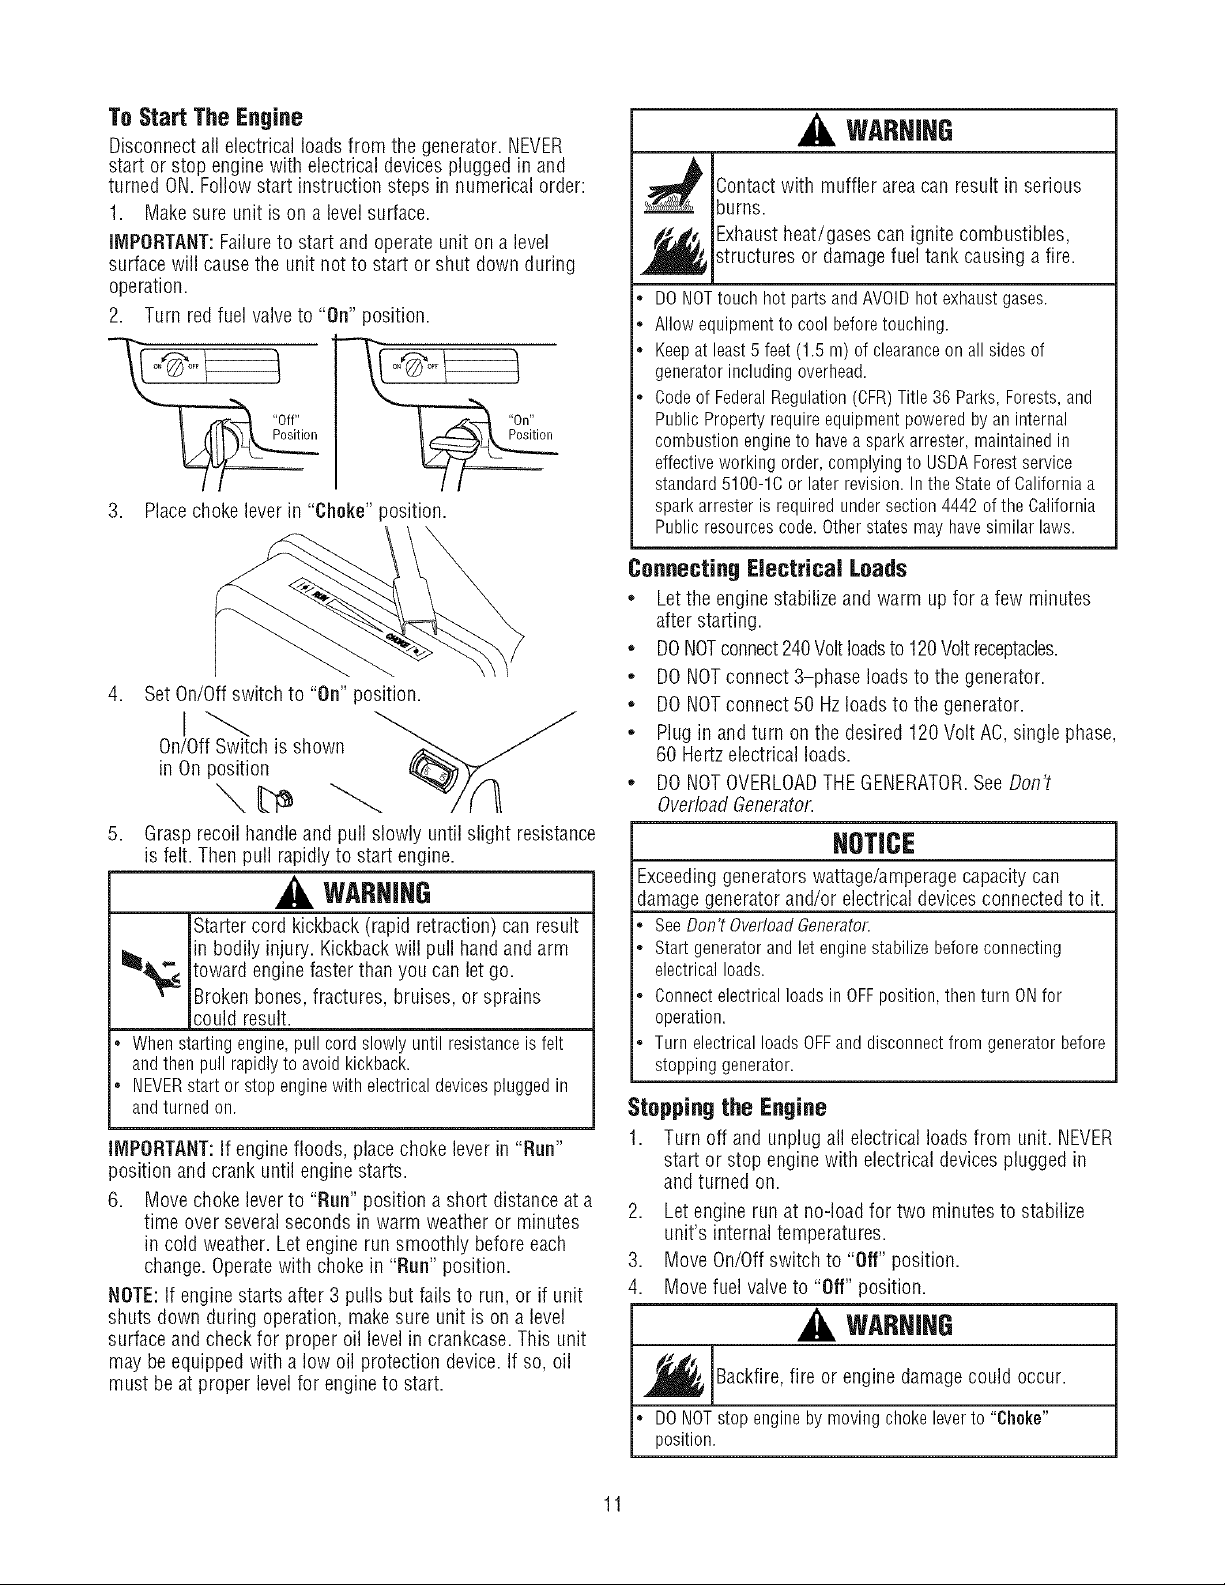
Placegenerator outdoors in an areathat will not accumulate
deadlyexhaustgas. DO NOTplace generator where exhaust
gas could accumulate and enter inside or be drawn into a
potentially occupied building. Ensureexhaustgas is kept
away from any windows, doors, ventilation intakes or other
openingsthat can allow exhaust gas to collect in a confined
area. Prevailingwinds and air currents should be taken into
consideration when positioning generator.
structures or damage fuel tank causing a fire.
includingoverhead.
WARHIHG
Runningenginesgive off carbon monoxide, an
_ dorless, colorless, poison gas.
. OperategeneratorONLYoutdoors.
* Installabatteryoperatedcarbonmonoxidealarmnearthe
bedrooms.
* Keepexhaustgasfromenteringaconfinedareathrough
windows,doors,ventilationintakes,orotheropenings.
. DONOTstart or runengineindoorsor in anenclosedarea,
evenif windowsanddoorsareopen,includingthegenerator
compartmentof arecreationalvehicle(RV).
Breathingcarbon monoxide can cause headache,
fatigue,dizziness,vomiting, confusion, seizures,
nausea,fainting or death.
_¢ Failureto isolategeneratorfrom power utility can
• Whenusinggeneratorfor backuppower,notifyutilitycompany.
Useapprovedtransferequipmentto isolategeneratorfrom
electricutility.
• Useagroundcircuitfaultinterrupter(GFCI)in anydampor
highlyconductivearea,suchasmetaldeckingor steelwork.
• DONOTtouchbarewiresor receptacles.
• DONOTusegeneratorwithelectricalcordswhichareworn,
frayed,bareorotherwisedamaged.
. DONOToperategeneratorinthe rainor wetweather.
• DONOThandlegeneratoror electricalcordswhilestandingin
water,whilebarefoot,orwhilehandsorfeetarewet.
• DONOTallow unqualifiedpersonsor childrento operateor
servicegenerator.
result in death or injury to electric utility workers
due to backfeedof electrical energy.
Typical Generator Shown
L ExhaustPort
10
To Start The Engine
Disconnectall electrical loadsfrom the generator. NEVER
start or stop engine with electrical devices plugged in and
turned ON. Follow start instruction steps in numerical order:
1. Make sure unit is on a level surface.
IMPORTANT:Failureto start and operateunit on a level
surfacewill cause the unit not to start orshut down during
operation.
2. Turn redfuel valveto "On" position.
3. Place choke lever in "Choke" position.
4. Set On/Offswitch to "On" position.
oo o,,sw,t h, howo
in On position _y
5. Grasprecoil handle and pull slowly until slight resistance
is felt. Thenpull rapidlyto start engine.
WARNING
Startercord kickback (rapid retraction) can result
in bodily injury. Kickbackwill pull handand arm
_,1_.< toward enginefaster than you can let go.
Brokenbones, fractures, bruises, or sprains
could result.
, Whenstartingengine,pullcord slowlyuntilresistanceisfelt
andthenpull rapidlyto avoidkickback.
* NEVERstartor stopenginewithelectricaldevicespluggedin
andturnedon.
IMPORTANT:If enginefloods, placechoke lever in "Run"
position and crank until engine starts.
6. Movechoke lever to "Run" position a short distanceat a
time over severalseconds in warm weather or minutes
in cold weather. Let engine run smoothly before each
change. Operatewith choke in "Run" position.
NOTE:If engine starts after 3 pulls but fails to run, or if unit
shuts down during operation, makesure unit is ona level
surfaceand check for proper oil level in crankcase.This unit
may beequipped with a low oil protection device.If so, oil
must be at proper levelfor engineto start.
WARHIHG
_ ontact with muffler area can result in serious
_ Exhaustheat/gases can ignite combustibles,
, DONOTtouchhotpartsandAVOIDhotexhaustgases.
• Allowequipmentto cool beforetouching.
, Keepatleast5 feet(1.5m) of clearanceonall sidesof
, Codeof FederalRegulation(CFR)Title36Parks,Forests,and
Connecting Electrical Loads
• Letthe engine stabilize and warm up for a few minutes
• DONOTconnect240Voltloadsto 120Voltreceptacles.
• DONOTconnect 3-phase loadsto the generator.
• DONOTconnect 50 Hzloadsto the generator.
• Plugin and turn on the desired 120 Volt AC, single phase,
• DONOTOVERLOADTHEGENERATOR.SeeDon't
burns.
structures or damagefuel tank causing a fire.
generatorincludingoverhead.
PublicPropertyrequireequipmentpoweredbyaninternal
combustionengineto haveasparkarrester,maintainedin
effectiveworkingorder,complyingto USDAForestservice
standard5100-1Cor laterrevision.IntheStateof Californiaa
sparkarresterisrequiredundersection4442of the California
Publicresourcescode.Otherstatesmayhavesimilarlaws.
after starting.
60 Hertz electrical loads.
OverloadGenerator.
NOTICE
Exceedinggenerators wattage/amperagecapacity can
damagegeneratorand/or electricaldevicesconnectedto it.
SeeDon'tOverloadGenerator.
Startgeneratorandletenginestabilizebeforeconnecting
electricalloads.
Connectelectricalloadsin OFFposition,thenturnONfor
operation.
TurnelectricalloadsOFFanddisconnectfromgeneratorbefore
stoppinggenerator.
Stopping the Engine
1. Turn off and unplug all electrical loadsfrom unit. NEVER
start or stop engine with electrical devices plugged in
and turned on.
2. Letengine run at no-load for two minutes to stabilize
unit's internal temperatures.
3. MoveOn/Offswitch to "Off" position.
4. Movefuel valveto "Off" position.
WARHIHG
Backfire,fire or engine damagecould occur.
DONOTstopenginebymovingchokeleverto "Choke"
position.
11
CORDSETSANDRECEPTACLES
Useonly high quality, well-insulated, grounded extension
cords with the generator's 120 Volt electrical receptacles.
Inspectextension cords before eachuse.
Checkthe ratings of all extensioncords beforeyou usethem.
Extensioncord sets usedshould be ratedfor 125Volt AC
loads at 20 Amps or greaterfor most electrical devices.
Some devices,however, may not require this type of
extensioncord. Checkthe operator's manuals of those
devicesfor the manufacturer's recommendations.
,_ WARHIHG
120 Volt AC, 20 Amp, Duplex Receptacles
Eachduplex receptacle is protected against overload by a
double pole rocker switch circuit breaker.
_ verloaded electrical cords can overheat,arc, and
burn resulting in death,bodily injury,and/or
propertydamage.
* ONLYusecordsratedforyourloads.
, Followall safetieson electricalcords.
Keepextensioncords as short as possible, preferably less
than 15 feet long, to prevent voltage drop and possible
overheating of wires.
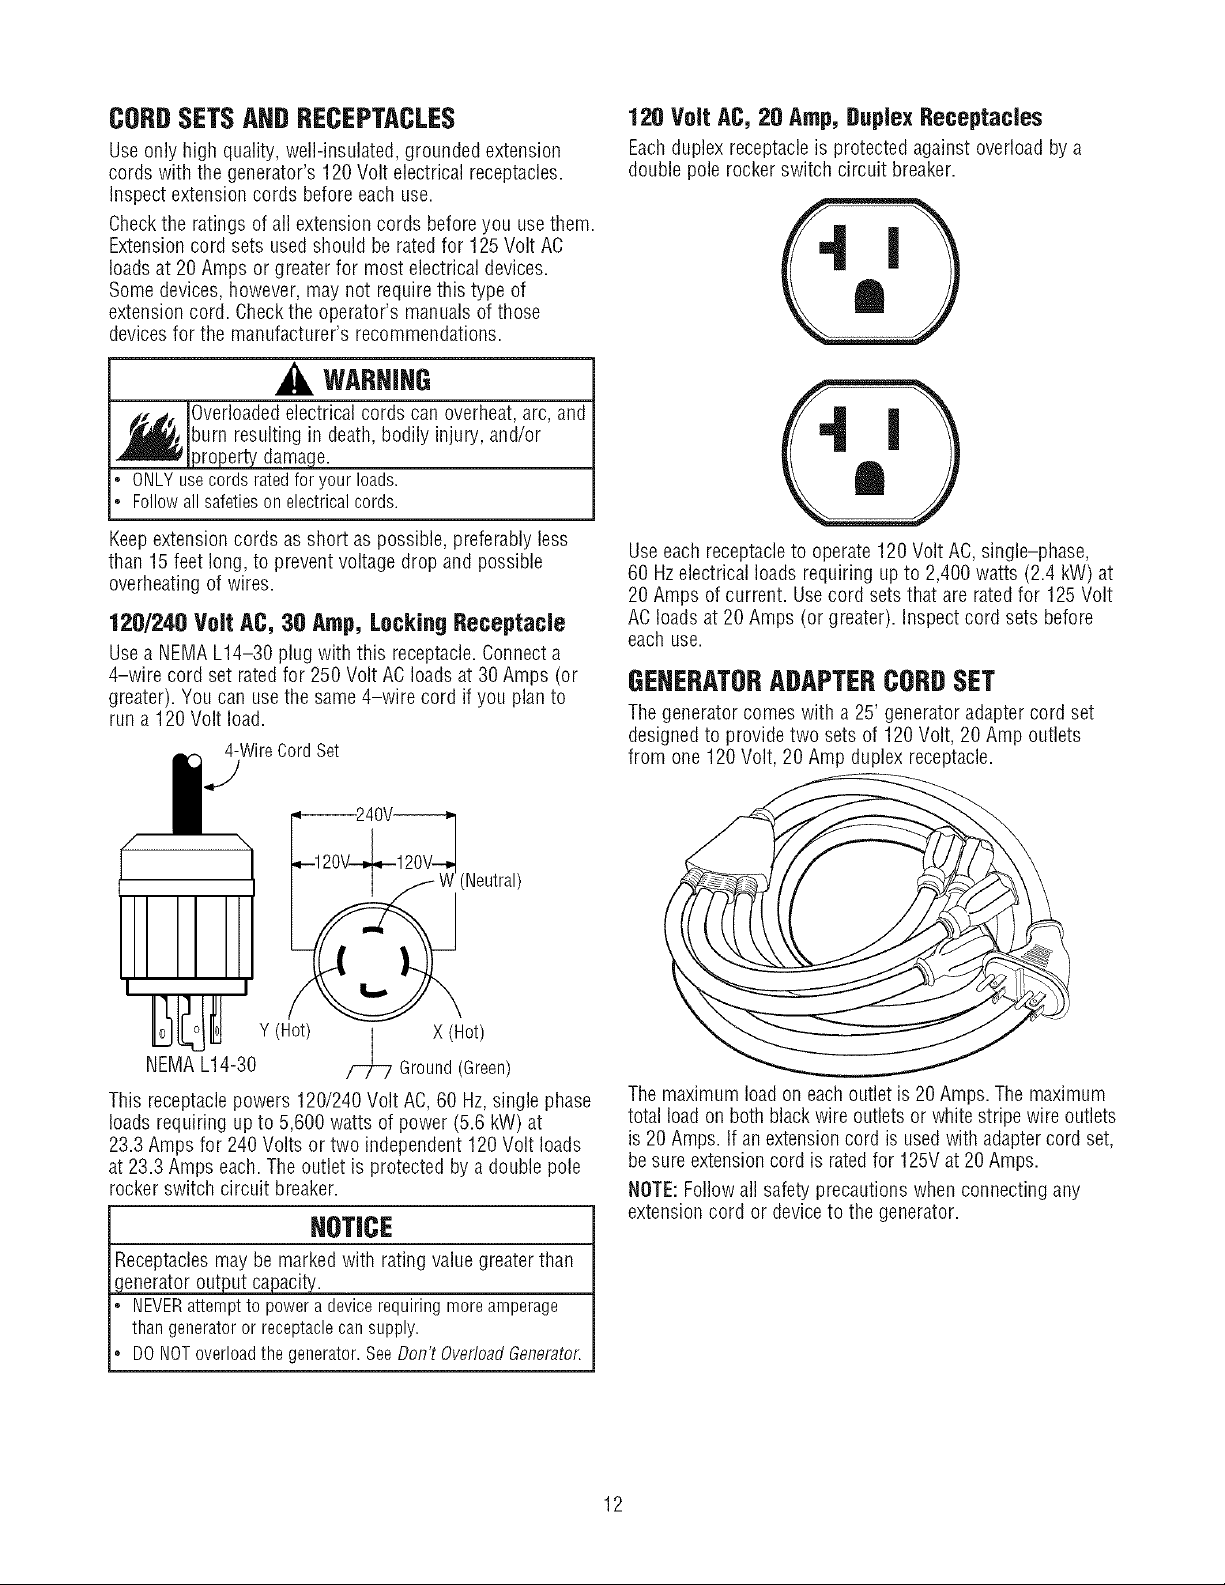
120/240 Volt AC, 30 Amp, Locking Receptacle
Usea NEMAL14-30 plug with this receptacle.Connecta
4-wire cord set rated for 250 Volt AOloadsat 30 Amps (or
greater). You can usethe same4-wire cord if you plan to
run a 120 Volt load.
4-WireCordSet
J
(Neutral)
Useeach receptacleto operate120 Volt AO,single-phase,
60 Hzelectrical loads requiring up to 2,400 watts (2.4 kW) at
20 Amps of current. Usecord sets that are ratedfor 125 Volt
AC loadsat 20 Amps (or greater). Inspect cord sets before
each use.
GEHERATORADAPTERCORDSET
Thegenerator comes with a 25' generatoradaptercord set
designedto provide two sets of 120 Volt, 20 Amp outlets
from one 120 Volt, 20 Amp duplex receptacle.
Y (Hot) | X (Hot)
NEMAL14-30 /--7I-7 Ground(Green)
This receptaclepowers 120/240 Volt A6, 60 Hz,single phase
loads requiring up to 5,600 watts of power (5.6 kW)at
23.3 Amps for 240 Volts or two independent 120 Volt loads
at 23.3 Amps each. Theoutlet is protected by a double pole
rocker switch circuit breaker.
NOTICE
Receptaclesmay be markedwith rating value greaterthan
_ienerator out_
NEVERattemptto poweradevicerequiringmoreamperage
thangeneratoror receptaclecansupply.
DONOToverloadthegenerator.SeeDon'tOverloadGenerator.
The maximum load on each outlet is 20 Amps. The maximum
total load on both black wire outlets or white stripe wire outlets
is 20 Amps. If an extension cord is used with adaptercord set,
besure extensioncord is ratedfor 125V at 20Amps.
NOTE:Followall safety precautions when connecting any
extension cord or deviceto the generator.
12
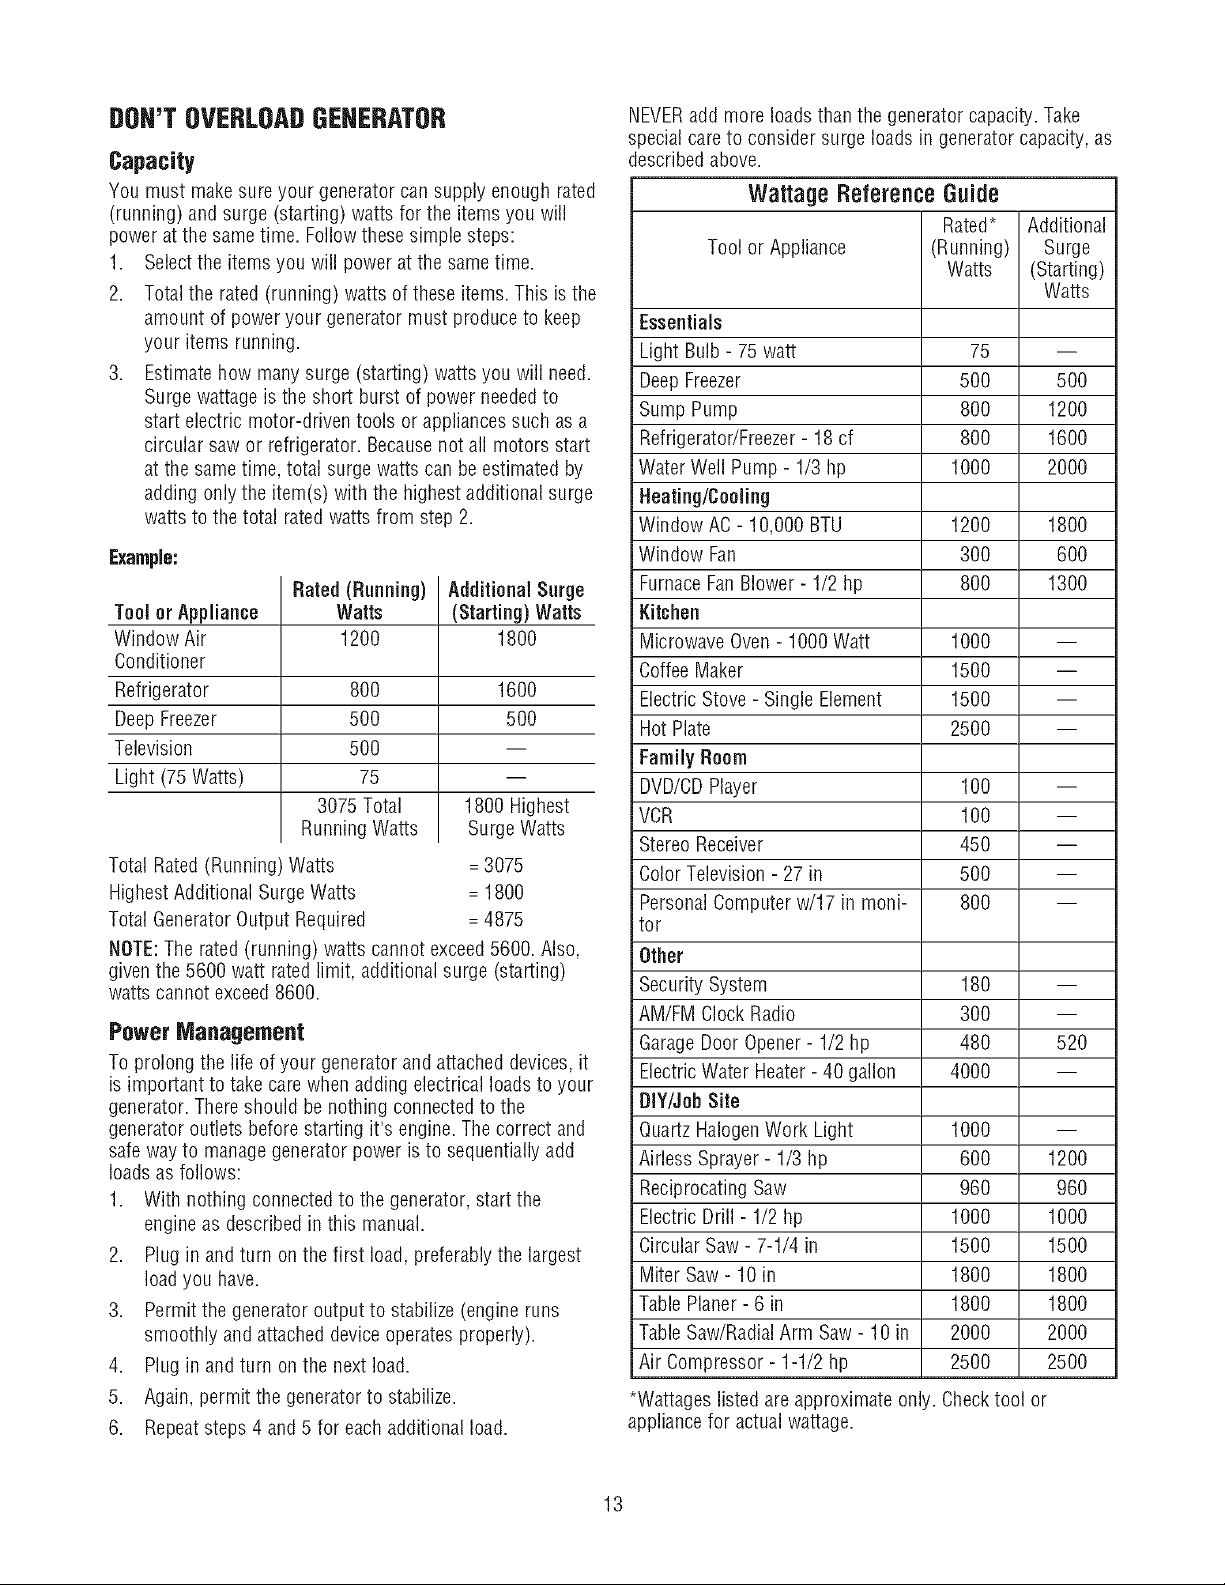
DOH'TOVERLOADGENERATOR
Capacity
You must make sureyour generator cansupply enough rated
(running) and surge (starting) watts for the itemsyou will
power at the sametime. Followthese simple steps:
1. Selectthe itemsyou will power at the same time.
2. Totalthe rated (running) watts of these items.This isthe
amount of power your generator must produce to keep
your items running.
3. Estimatehow manysurge (starting) watts you will need.
Surge wattage is the short burst of power neededto
start electric motor-driven tools or appliancessuch as a
circular saw or refrigerator. Becausenot all motors start
at the sametime, total surge watts can be estimated by
adding only the item(s) with the highest additional surge
watts to the total ratedwatts from step 2.
Example:
Rated (Running)
Tool or Appliance
Window Air
Conditioner
Refrigerator 1600
DeepFreezer 500
Television
Light (75 Watts)
Total Rated(Running) Watts
HighestAdditional SurgeWatts
Total Generator Output Required
NOTE:The rated (running) watts cannot exceed5600. Also,
giventhe 5600 watt rated limit, additional surge (starting)
watts cannot exceed8600.
Power Management
To prolong the life of your generator and attacheddevices, it
is important to take carewhen adding electrical loadsto your
generator. There should be nothing connected to the
generator outlets before starting it's engine.Thecorrect and
safe way to managegenerator power is to sequentiallyadd
loads asfollows:
1. With nothing connected to the generator, start the
engine as described in this manual.
2. Plug in andturn on the first load, preferablythe largest
load you have.
3. Permitthe generator output to stabilize (engine runs
smoothly and attached deviceoperates properly).
4. Plug in andturn on the next load.
5. Again,permit the generator to stabilize.
6. Repeatsteps 4 and 5 for eachadditional load.
Watts
1200
800
500
500
75
3075 Total
Running Watts
AdditionalSurge
(Starting) Watts
1800
1800 Highest
Surge Watts
=3075
= 1800
=4875
NEVERadd more loadsthan the generator capacity.Take
special care to consider surge loads in generatorcapacity,as
describedabove.
Wattage ReferenceGuide
Rated* Additional
Tool or Appliance (Running) Surge
Watts (Starting)
Watts
Essentials
Light Bulb - 75 watt 75 --
DeepFreezer 500 500
Sump Pump 800 1200
Refrigerator/Freezer- 18 cf 800 1600
Water Well Pump - 1/3 hp 1000 2000
Heating/Cooling
Window AC - 10,000 BTU 1200 1800
Window Fan 300 600
FurnaceFanBlower - 1/2 hp 800 1300
Kitchen
Microwave Oven- 1000 Watt 1000 --
CoffeeMaker 1500 --
Electric Stove - Single Element 1500 --
Hot Plate 2500 --
Family Room
DVD/CDPlayer 100 --
VCR 100 --
Stereo Receiver 450 --
Color Television- 27 in 500 --
PersonalComputer w/17 in moni- 800 --
tor
Other
Security System 180 --
AM/FM Clock Radio 300 --
GarageDoor Opener- 1/2 hp 480 520
ElectricWater Heater- 40 gallon 4000 --
DIY/JohSite
Quartz HalogenWork Light 1000 --
Airless Sprayer - 1/3 hp 600 1200
Reciprocating Saw 960 960
Electric Drill - 1/2 hp 1000 1000
Circular Saw - 7-1/4 in 1500 1500
Miter Saw- 10 in 1800 1800
TablePlaner- 6 in 1800 1800
TableSaw/RadialArm Saw- 10 in 2000 2000
Air Compressor - 1-1/2 hp 2500 2500
*Wattages listed are approximateonly. Checktool or
appliancefor actual wattage.
13
EHGINETECHNICALIHFORMATION
This is a single cylinder, overheadvaive(ORV),air cooled
engine, it isa low emissions engine.
Inthe Stateof California, ModelSeries 200000 enginesare
certified by the CaliforniaAir ResourcesBoardto meet
emissions standards for 250 hours. Suchcertification does
not grant the purchaser,owner or operator of this engine any
additional warranties with respectto the performance or
operational life of this engine.Theengine is warranted solely
according to the product and emissions warranties stated
elsewherein this manual.
Power Ratings
Thegross power rating for individual gas engine modelsis
labeledin accordancewith SAE(Societyof Automotive
Engineers)code J1940 (Small Engine Power & Torque
Rating Procedure),and rating performance has been
obtained andcorrected in accordancewith SAEJ1995
(Revision2002-05). Torquevalues arederived at3060 RPM;
horsepower values are derived at 3600 RPM. Actual gross
engine power will be lower and is affected by, among other
things, ambient operating conditions and engine-to-engine
variability. Given both the wide array of products on which
enginesare placed and the variety of environmental issues
applicableto operatingthe equipment, the gas engine will not
developthe ratedgross power when used in a given pieceof
power equipment (actual "on-site"or net power). This
difference is due to a variety of factors including, but not
limited to, accessories (air cleaner,exhaust,charging,
cooling, carburetor, fuel pump, etc.), application limitations,
ambient operating conditions (temperature,humidity,
altitude), and engine-to-engine variability. Dueto
manufacturing and capacity limitations, Briggs & Stratton
maysubstitute an engine of higher rated power for this
Seriesengine.
This generator is ratedand certified to be compliant with CSA
(CanadianStandardsAssociation) standard C22.2 No.100-04
(motors and generators).
PRODUCTSPECIFICATIOHS
Generator Specifications
StartingWattage.................... 8600 Watts(8.6 kW)
Wattage .......................... 5600Watts(5.6 kW)
ACVoltage.............................. 120/240Volts
ACCurrent
at240 Volts ............................. 23.3Amps
at 120Volts ............................. 46.6Amps
Frequency .......................... 60 Hzat 3600 rpm
Phase .................................. SinglePhase
FuelCapacity............................ 5 U.S.gallons
Engine Specifications
Bore ................................ 3.12in.(79 ram)
Stroke ............................... 2.44in. (62 ram)
Displacement ........................ 18.64in. (305 cc)
SparkPlug
Type: ............ Briggs& Stratton491055S or 5066D
SetGapTo: .................... 0.030 inch(0.76ram)
ArmatureAir Gap:.......... 0.008-0.012in. (0.20-0.30ram)
Valveclearancewithvalvespringsinstalledand piston1/4in.
(6 ram)pasttopdeadcenter(checkwhenengineiscold).
Intake ................... 0.004-0.006in. (0.10-0.15mm)
Exhaust.................. 0.004-0.006in. (0.10-0.15mm)
Oil Capacity .................... 28 Ounces(0.8 Liters)
NOTE:For practical operation, the generator load should not
exceed 85% of rated wattage. Enginepower will decrease
3-1/2% for each1,000 feet (300 meters) abovesea leveland
1% for each 10° F(5.6° C) above77° F (25° C). It should
operatesatisfactorily at an angle up to 15°.
14
MAINTENANCESCHEDULE
Followthe hourly or calendarintervals, whichever occurs
first. More frequent service is required when operating in
adverseconditions noted below.
* Changeengine oil
* Cleandebris
Checkengine oil level
Service engineair cleaner'
* Changeengine oil'
* Servicespark plug
* Servicespark arrestor
* Cleancooling systemr
EmissionsContrnl
Maintenance, replacement,or repair of the emissionscon-
trol devicesand systemsmay be performedby any non-
roadengine repair establishmentor individual. However,
to obtain "no charge" emissionscontrol service, the work
must be performed by a factory authorized dealer.Seethe
Emissions Warranty.
GENERATORMAINTENANCE
Generatormaintenanceconsists of keepingthe unit clean and
dry. Operateand storethe unit in a clean dry environment
where it will not beexposedto excessivedust, dirt, moisture
or any corrosive vapors. Cooling air slots in thegenerator
must not becomeclogged with snow, leaves,or any other
foreign material.
Checkthe cleanlinessof the generator frequently and clean
when dust, dirt, oil, moisture or other foreign substancesare
visible on its exterior surface.
NOTE:DO NOTusea garden hoseto cleangenerator. Water
can enterthe engine fuel system and causeproblems. In
addition, if water enters the generatorthrough cooling air
slots, some of the water will be retainedin voids and cracks
of the rotor and stator winding insulation. Waterand dirt
buildup on the generator internal windings will eventually
decreasethe insulation resistance of these windings.
* Checkvalve clearance
Service more often under dirty or dusty conditions.
General Becommendations
Regularmaintenancewill improve the performanceand
extendthe life of the generator. Seea Searsor other qualified
dealerfor service.
Thegenerator's warranty doesnot cover items that have
been subjected to operator abuseor negligence.To receive
full valuefrom the warranty, the operator must maintain
generatoras instructed in this manual.
Someadjustments will needto be madeperiodically to
properly maintain your generator.
All service and adjustments should be madeat least once
eachseason.Follow the requirementsin the Maintenance
Schedulechart above.
NOTE:Oncea year you should clean or replacethe spark
plug and replacethe air filter. A new spark plug and clean air
filter assure proper fuel-air mixture and help your engine run
better and last longer.
Generator Cleaning
Daily or before use,clean accumulated debrisfrom
generator. Keeplinkage,spring and controls clean. Keeparea
around and behind muffler free from any combustible debris.
Inspect cooling air slots and openings on the generator.
Theseopenings must be kept clean and unobstructed.
Generatorparts should be kept cleanto reducethe risk of
overheating and ignition of accumulated debris.
* Usea dampcloth to wipe exterior surfaces clean.
NOTICE
Improper treatment of generator can damageit and shorten
its life.
DONOTexposegeneratorto excessivemoisture,dust, dirt, or
corrosivevapors.
DONOTinsertanyobjectsthroughcoolingslots.
Usea soft bristle brush to loosencaked on dirt, oil, etc.
* Useavacuumcleanerto pick uploosedirtand debris.
15
StatStatienTM
TheStatStationTM displays the nominal load on generator
basedon output frequency, it also has a built in maintenance
reminder.
ENGINEMAIHTENANCE
WARHIHG
WattageMonitor Operation
Thedisplay is two seven-segmentLEDsthat provide an easy-
to-read indication of the amount of power being supplied by
the generator. The load monitor displays the generator's
output as a percentage.
As generatorload increases,the display values will increase.
Whenthe displayedvalues begin flashing, the user should
stop adding electrical loads to the generator.
If the power usagebecomestoo high, the letters "OL" (for
Over Load)will flash on the display. The usershould reduce
the amount of load attachedto the generator.
MaintenanceReminder
The LEDwill display certain codes to alert you to check oil,
changeoil, check or replaceair filter and checkor replace
spark plug. Thefollowing codes will display:
"C1" Checkoil at 8 hour increments
"C2" Changeoil at 50 hour increments
"C3" Checkor replaceair filter at 25 hour increments
"C4" Checkor replacespark plug at 100 hour increments
Totake advantage ofthe StatStation "maintenance reminder"
capabilities, the user must press the resetbutton after
completing the maintenancecalled for in the displayedcode
(Cl, C2, C3, or C4). This results in a display of "Co" or "CA",
depending on how long the button is pressed:
1) "Co" - Pressingthe reset button once quickly will display
"Co"(clearingto zero). This will clearany maintenance
codes that haveelapsedup to that point and they will
begin timing again from zero.
2) "CA" - Pressing and holding the reset button for
2 seconds will display "CA"(clearing all). This clears all
maintenancecodes, even if they havenot yet reached
their service point, and they will begin timing again from
ze ro.
If nominal load and maintenancecodes appear
simultaneously, the LEDshall display,alternately, the
nominal load and codeas follows:
Thecode will display for 3 seconds, then 1/2 second off. The
load will display for 6 seconds and then 1/2 second off.
f'_J Unintentionalsparking can result in fire or
_¢ electric shock.
WHENADJUSTINGORMAKINGREPAIRSTOYOURGENERATOR
* Disconnectthe sparkplugwire fromtile sparkplugandplace
thewire whereit cannotcontactsparkplug.
WHENTESTINGFORENGINESPARK
* Useapprovedsparkplugtester.
* DONOTcheckfor sparkwithsparkplugremoved.
Oil
Oil Recommendations
We recommendthe use of Briggs & Stratton Warranty
Certifiedoils for best performance. Other high-quality
detergentoils are acceptableif classified for service SF,SG,
SH,SJ or higher. DONOTuse special additives.
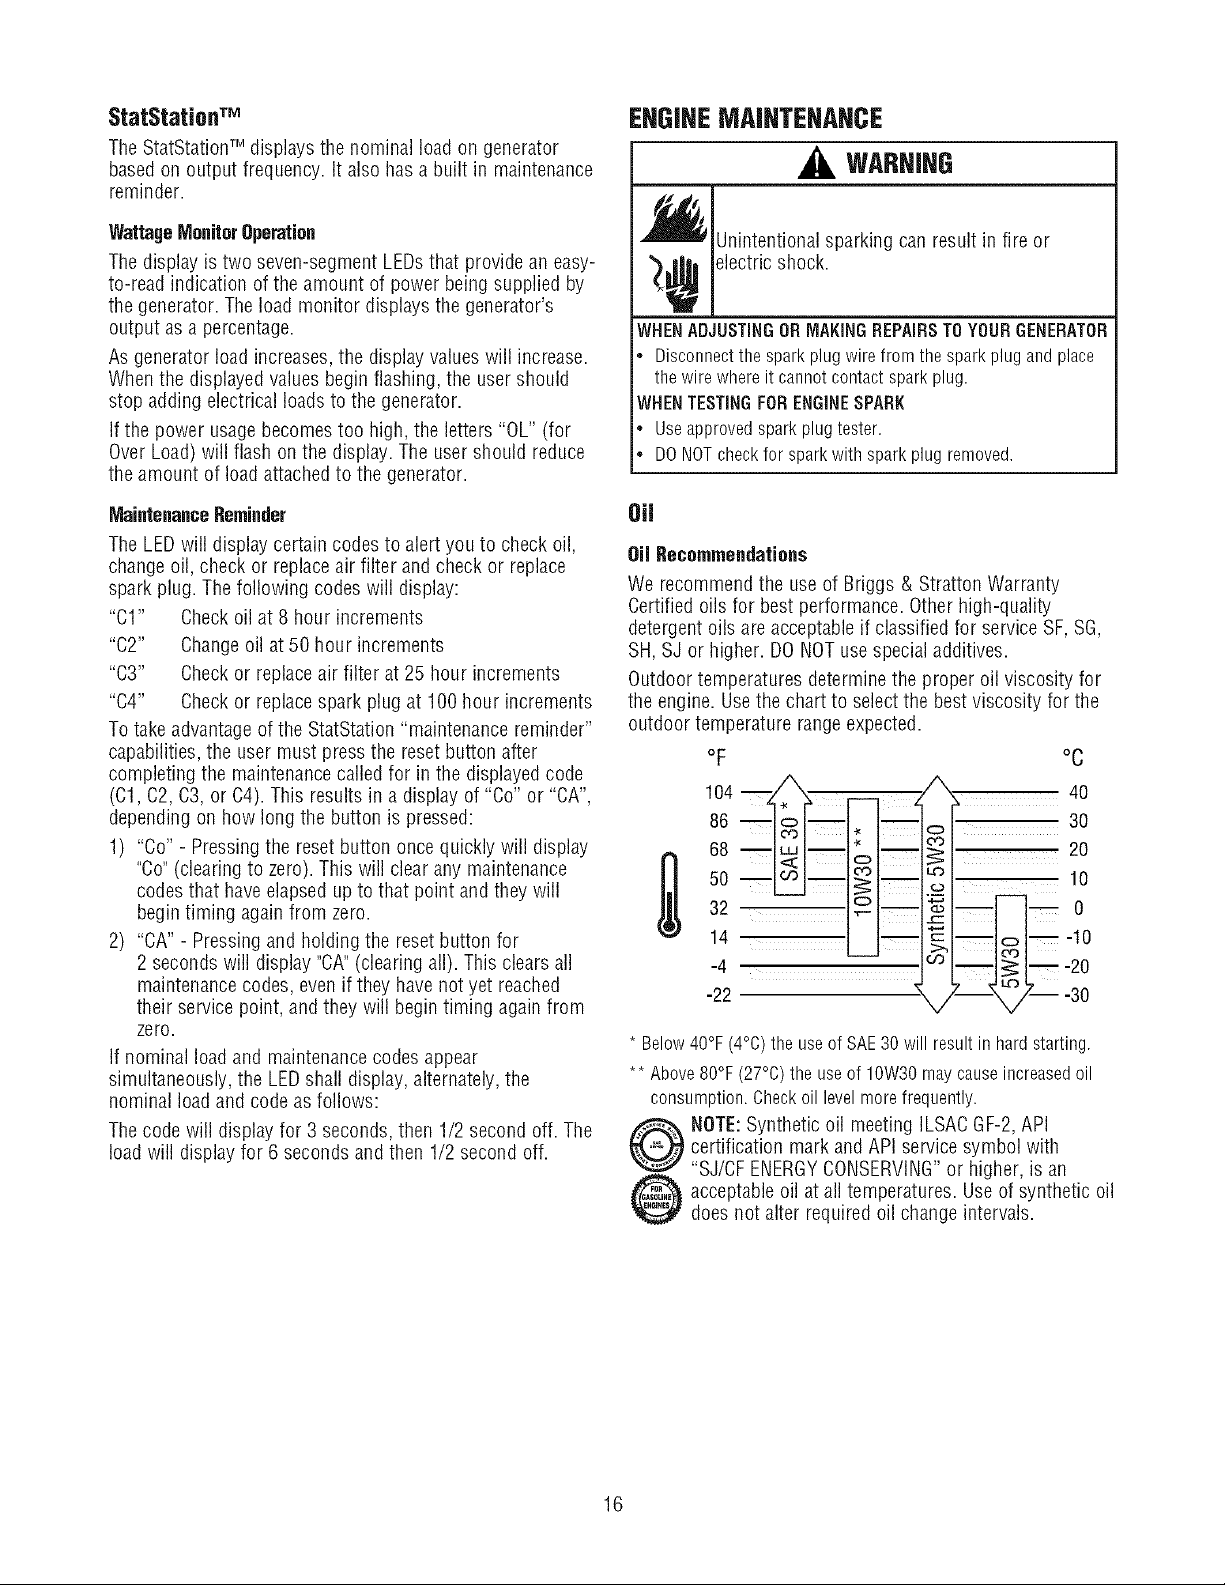
Outdoortemperatures determinethe proper oil viscosity for
the engine. Usethe chart to selectthe best viscosity for the
outdoor temperature range expected.
oF
104 m __
°C
86 __
68 -- w --_
32
14
-4
-22
* Below40°F(4°C)theuseof SAE30will resultinhardstarting.
** Above80°F(27°0)theuseof 10W30maycauseincreasedoil
consumption.Checkoil levelmorefrequently.
_ OTE:Synthetic oil meeting ILSACGF-2,API
certification mark and API serv,!cesymbol with
"SJ/CFENERGYCONSERVINGor higher, is an
acceptableoil at all temperatures. Use of synthetic oil
does not alter required oil changeintervals.
_ m 0
L--J L--2o
;--#X_/_---30
2O
16

ChecldngOilLevel
Oil level should be checked prior to each use or at least every
8 hours of operation. Keepoil level maintained.
1. Make sure generatoris on a levelsurface.
2. Cleanarea aroundoil fill and remove oil fill cap.
3. Verify oil is at the point of overflowing at oil fill opening.
4. Replaceandtighten oil fill cap.
AddingEngineOil
1. Make sure generatoris on a levelsurface.
2. Checkoil levelas described in CheckingOil Level
3. If needed,slowly pour oil into oil fill opening to the point
of overflowing at oil fill.
4. Replaceandtighten oil fill cap.
Service Air Cleaner
Your enginewill not run properly and may be damagedif you
run it with a dirty air cleaner.
Replacethe air cleanerevery 25 hours of operation or once
eachyear, whichever comes first. Replacemore often if
operating under dirty or dusty conditions.
Toservicetheair cleaner,feflew thesesteps:
1. Loosen screws and removeair cleanercover. Remove
paper filter.
Cartridge
Cover
\
\
Sore!
Base
2. Install clean (or new) air cleanerassembly inside cover.
Disposeof old filter properly.
3. Assembleair cleanercover onto baseandtighten
screws.
NOTE:You can purchase new air cleanerelementsby calling
1-80O-4-NIY-HONIE(46g-4663).
CAUTION
Avoid prolonged or repeatedskin contact with used motor
oil.
Usedmotoroil hasbeenshownto causeskincancerincertain
laboratoryanimals.
Thoroughlywashexposedareaswith soapandwater.
KEEPOUTOFREACHOF CHILDREN.DON'T
POLLUTE.CONSERVERESOURCES.RETURN
USEDOILTOCOLLECTIONCENTERS.
Changethe oil while the engine is still warm from running, as
follows:
1. Makesure unit is on a level surface.
2. Disconnectthe spark plug wire from the spark plug and
placethe wire where it cannot contact spark plug.
3. Cleanareaaround oil drain plug.The oil drain plug is
locatedat baseof engine,opposite carburetor.
4. Removeoil drain plug and drain oil completely into a
suitable container.
5. Reinstalloil drain plug and tighten securely. Removeoil
fill cap.
6. Slowlypour recommendedoil (about 28 oz.) into oil fill
opening to the point of overflowing at oil fill cap.
7. Reinstalloil fill cap. Fingertighten capsecurely.
8. Wipe up any spilled oil.
9. Reconnectspark plug wire to spark plug.
Clean/Replace Spark Plug
Changethe spark plug every 100 hours of operation or once
eachyear, whichever comes first. This will help your engine
to start easierand run better.
1. Cleanareaaround spark plug.
2. Removeand inspect spark plug.
3. Replacespark plug if electrodes are pitted, burned or
porcelainis cracked. Usea recommended replacement
plug.
4. Checkelectrode gap with wire feelergauge and set spark
plug gap to 0.030 inch (0.76ram) if necessary.
Changing Engine Oil
Changethe oil after the first 5 hours of operation. Changeoil
every 50 hours thereafter, if you are using your generator
underextremely dirty or dusty conditions, or in extremely hot
weather,changethe oil more often.
5. install spark plug and tighten firmly.
NOTE:You canpurchase a new spark plug by calling
1-800-4-NIY-HONIE(46g-4663).
17
Clean Spark Arrester Screen
Theengine exhaust muffler hasa spark arrester screen.
Inspectand cleanthe screen every 100 hours of operation or
once eachyear, whichever comes first.
NOTE:You can purchasea newspark arrester screen by
calling 1-800-4-MY-HOME (46g-4663).
If you useyour generatoron any forest-covered, brush-
covered,or grass-coveredunimproved land, it must havea
spark arrester. The spark arrester must be maintainedin good
condition by the owner/operator.
WARHIHG
Air Coofing System
Overtime debris may accumulate in cylinder cooling fins and
cannot be observed without partial engine disassembly. For
this reason,we recommend you havea Sears or other
qualifiedservice dealercleanthe cooling system per
recommendedintervals (see MaintenanceSchedule).Equally
important is to keeptop of engine free from debris. See
GeneratorCleaning.
CLEAN
s_ Contact with muffler area can result in serious
._ Exhaustheat/gases can ignite combustibles,structures or damagefuel tank causing a fire.
. DO NOTtouch hot parts and AVOID hot exhaust gases.
• Allow equipment to cool before touching.
. Keepat least 5 feet (152 cm) of clearanceon all sides of
• Codeof FederalRegulation (CFR)Title 36 Parks, Forests, and
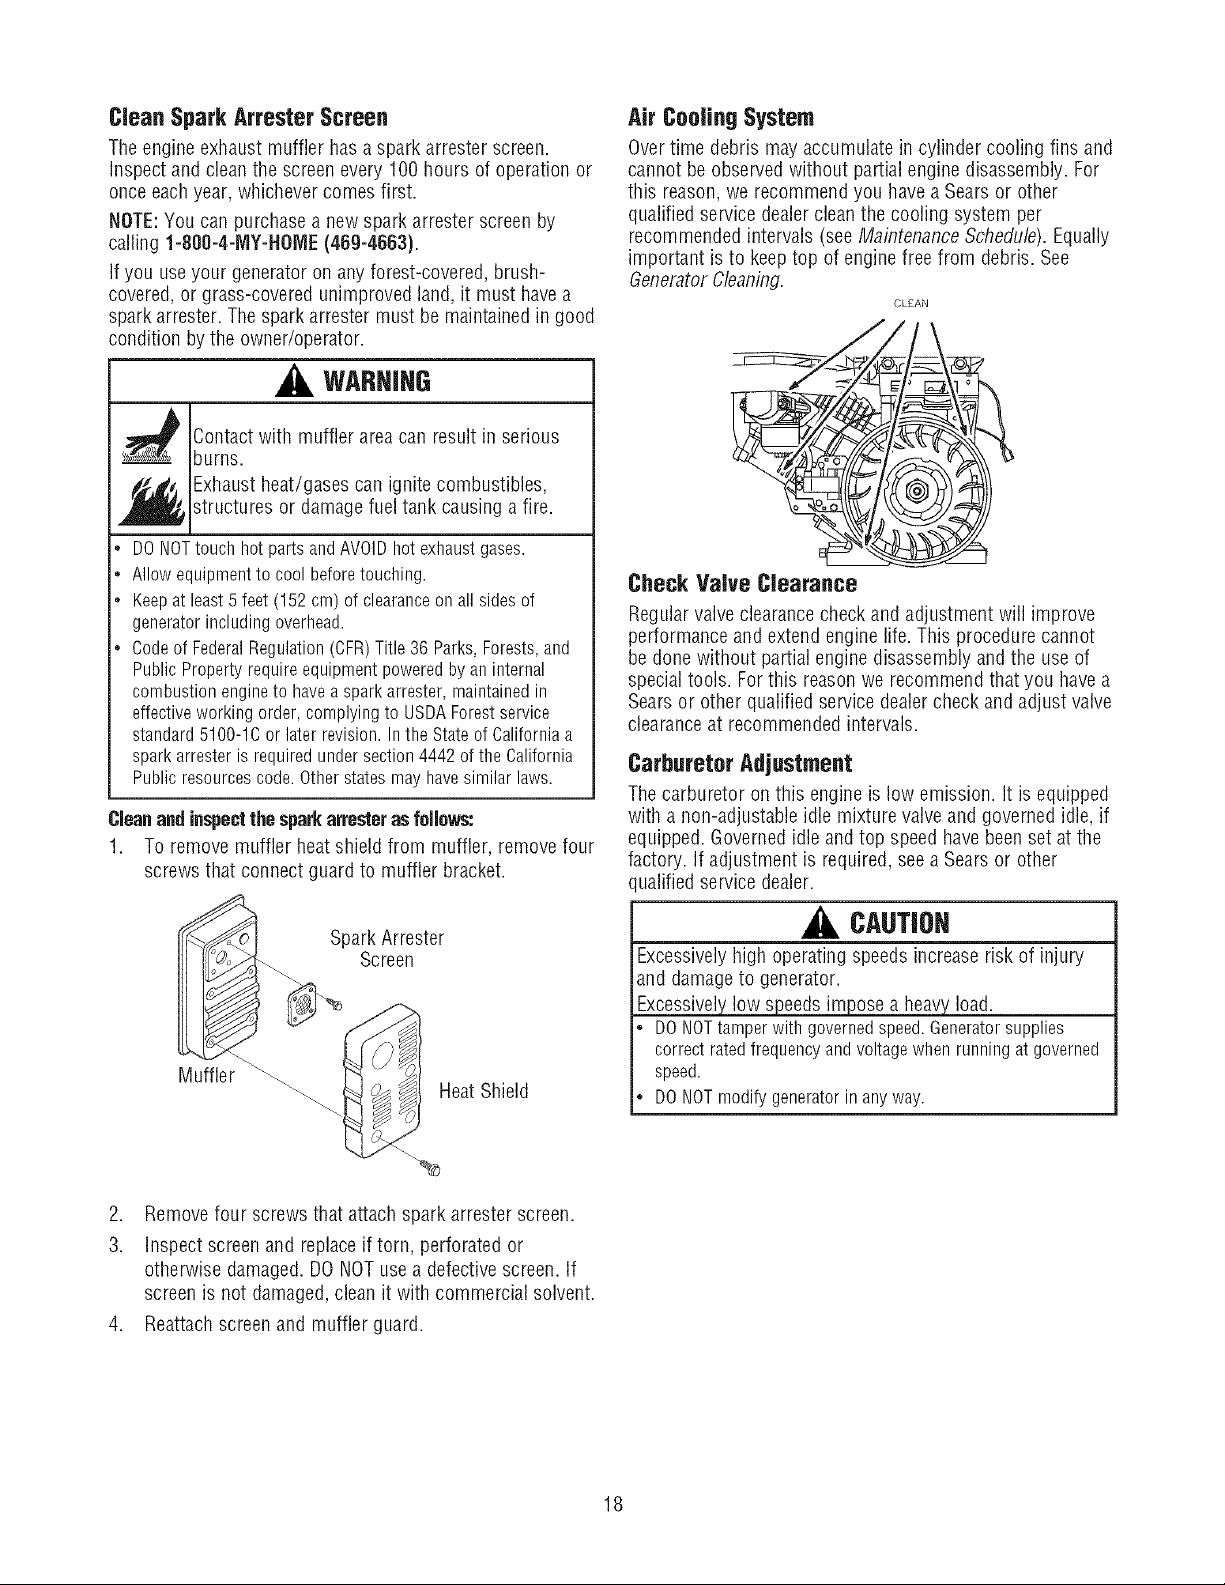
Cleanandinspectthe sparkattester asfollows:
1. To remove muffler heatshield from muffler, remove four
burns.
generator including overhead.
Public Property require equipment powered by an internal
combustion engine to have a spark arrester, maintained in
effective working order, complying to USDAForest service
standard 5100-1C or later revision. Inthe State of California a
spark arrester is required under section 4442 of the California
Public resources code. Other statesmay havesimilar laws.
screws that connect guard to muffler bracket.
_. SparkArrester
'_ Screen
Muffler
HeatShield
\
Check Valve Clearance
Regularvalveclearancecheck and adjustment will improve
performanceand extend engine life. This procedurecannot
be done without partial engine disassembly andthe use of
special tools. Forthis reasonwe recommend that you havea
Searsor other qualified service dealercheckand adjust valve
clearanceat recommended intervals.
Carburetor Adjustment
Thecarburetor on this engine is low emission. It is equipped
with a non-adjustable idle mixture valve and governed idle, if
equipped. Governedidle and top speed havebeenset at the
factory. If adjustment is required,seea Sears or other
ualifiedservice dealer.
CAUTION
Excessively high operating speeds increase risk of injury
and damage to generator.
Excessivel lows eeds Bose a heavy load.
DONOTtamper with governed speed.Generator supplies
correct ratedfrequency andvoltage when running at governed
speed.
DO NOTmodify generator in any way.
2. Removefour screws that attach spark arresterscreen.
3. Inspectscreen and replaceif torn, perforated or
otherwise damaged. DO NOTusea defective screen. If
screen is not damaged,cleanit with commercial solvent.
4. Reattachscreenand muffler guard.
18
 Loading...