

Page 1
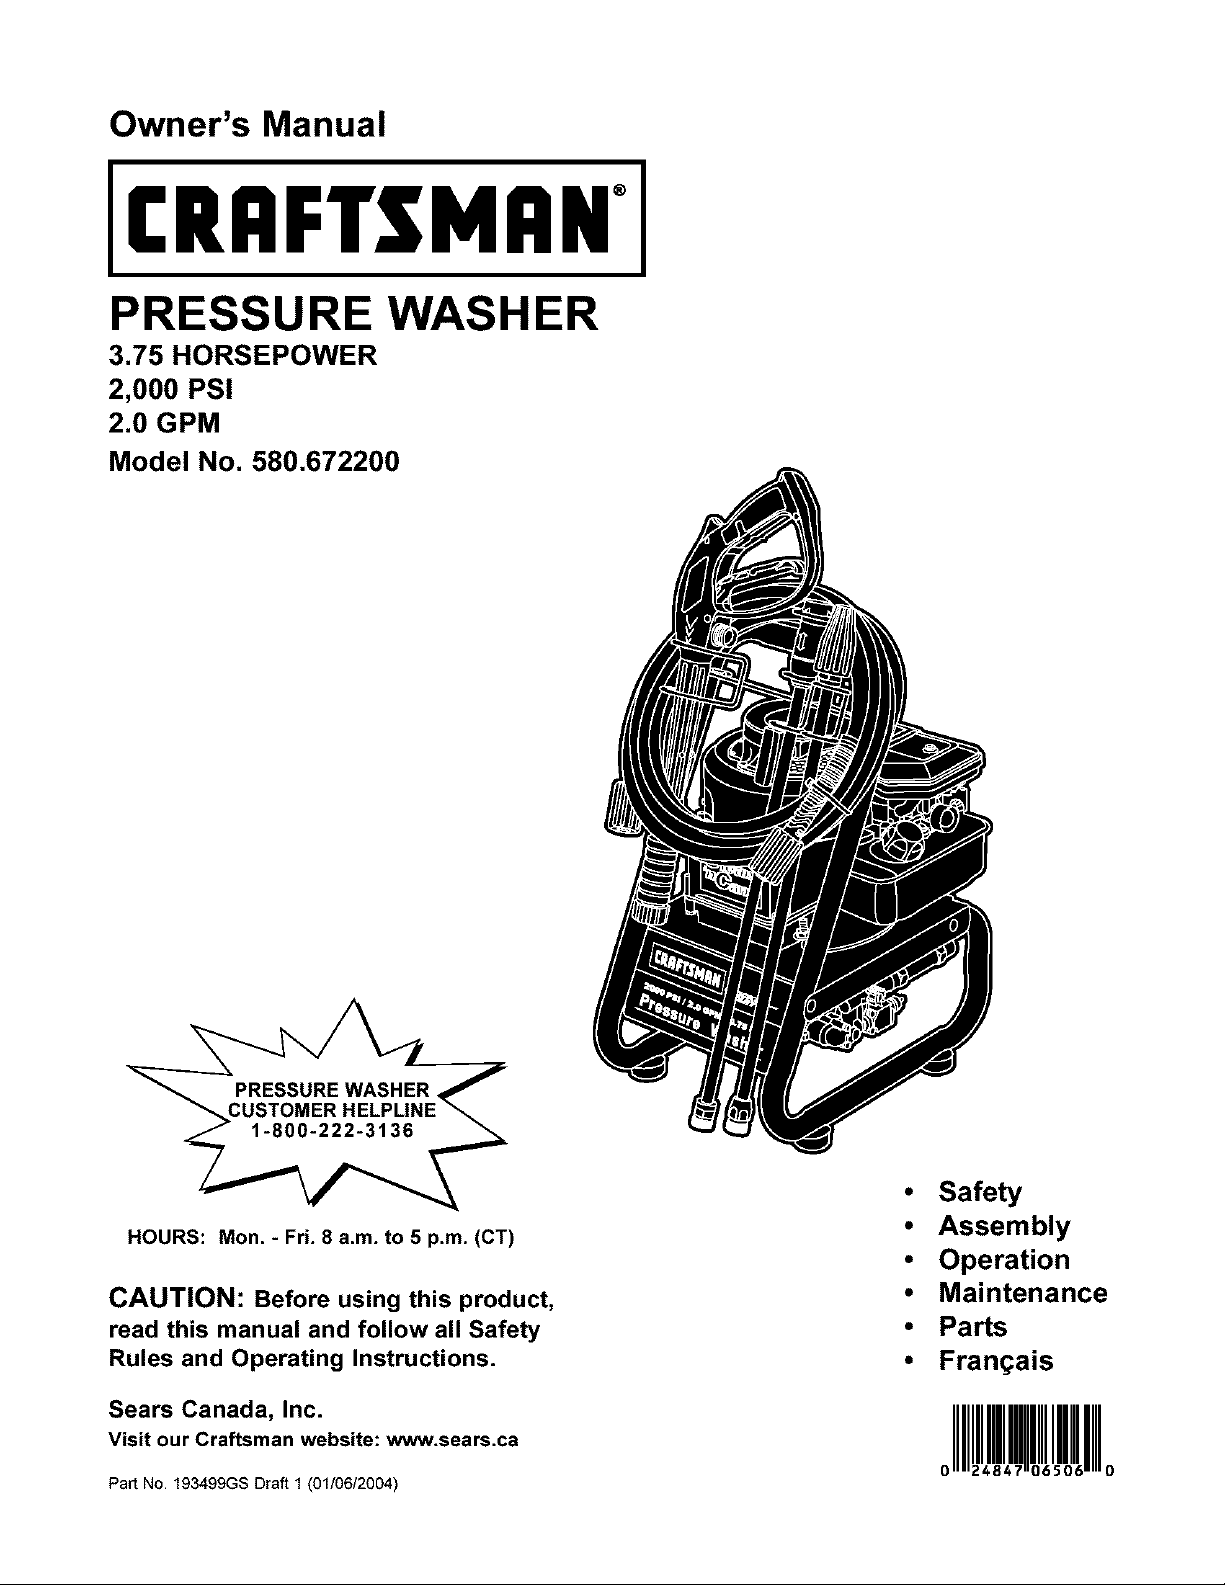
Owner's Manual
II:RRFTSMRNI
PRESSURE WASHER
3.75 HORSEPOWER
2,000 PSI
2.0 GPM
Model No. 580.672200
HOURS: Mon. - FrL 8 a.m. to 5 p.m. (CT)
CAUTION: Before using this product,
read this manual and follow all Safety
Rules and Operating Instructions.
Sears Canada, Inc.
Visit our Craftsman website: www.sears.ca
Part No. 193499GS Draft 1 (01/06/2004)
• Safety
• Assembly
• Operation
• Maintenance
• Parts
• Fran(;ais
Page 2
WARRANTY .................................... 2
SAFETY RULES ............................... 2-4
ASSEMBLY ................................... 6-7
OPERATION ................................. 8-10
MAINTENANCE .............................. 11-14
SPECIFICATIONS ............................... 11
STORAGE ..................................... 15
TROUBLESHOOTING ............................ 16
HOW TO ORDER PARTS ......................... 17
REPLACEMENT PARTS ....................... 18-22
EMISSION CONTROL WARRANTY ................. 23
FRAN(,?,AIS .................................. 24-40
UMITED ONE YEAR WARRANTY ON CRAFTSMAN PRESSURE WASHER
For one year from the date of purchase, when this CRAFTSMAN@ Pressure Washer is maintained and operated
according to the instructions in the owner's manual, Sears will repair, free of charge, any defect in material and
workmanship.
If this pressure washer is used for commercial purposes, this warranty applies for only 90 days from the date of
purchase.
If this pressure washer is used for rental purposes, this warranty applies for only 30 days after date of purchase.
This warranty does not cover:
Expendable items such as spark plugs and air filters, which become worn during normal use.
Repairs necessary because of operator abuse or negligence, including damage resulting from no water being
supplied to pump or failure to maintain the equipment according to the instructions contained in the owner's
manual.
WARRANTY SERVICE IS AVAILABLE BY RETURNING THE PRESSURE WASHER TO THE NEAREST
SEARS SERVICE CENTER OR DEALER IN CANADA.
This warranty gives you specific legal rights and you may also have other rights, which vary from province to
province.
Sears Canada, Inc.
,_ This is the safety alert symbol. It is used to alert you to potential personal injury hazards.
Obey all safety messages that follow this symbol to avoid possible injury or death.
_Read this manual carefully and become
familiar with your pressure washer. Know its
applications, its limitations, and any hazards
involved.
The safety alert symbol (_,) is used with a signal
word (DANGER, CAUTION, WARNING), a pictorial
and/or a safety message to alert you to hazards.
DANGER indicates a hazard which, if not avoided, will
result in death or serious injury. WARNING indicates a
hazard which, if not avoided, could result in death or
serious injury. CAUTION indicates a hazard which, if
not avoided, might result in minor or moderate injury.
CAUTION, when used without the alert symbol,
indicates a situation that could result in equipment
damage. Follow safety messages to avoid or reduce
the risk of injury or death.
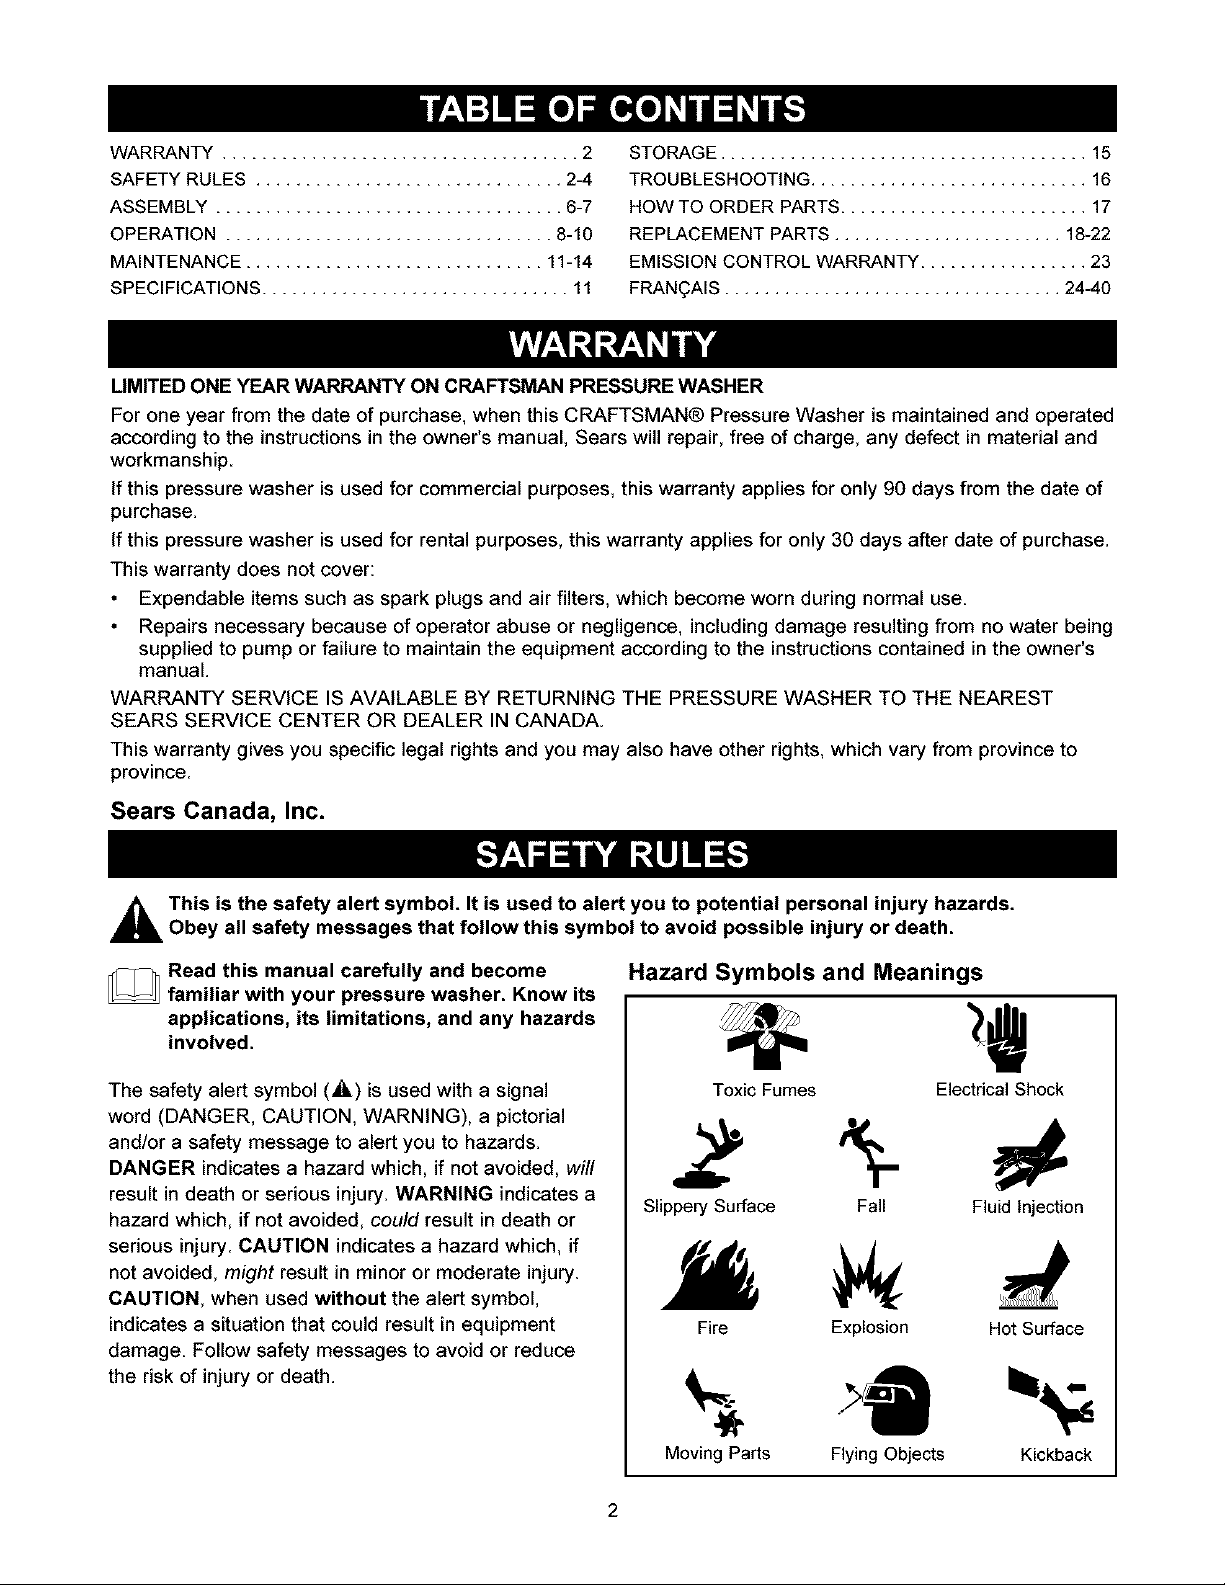
Hazard Symbols and Meanings
Toxic Fumes
Slippery Surface Fall Fluid Injection
Fire Explosion Hot Surface
Electrical Shock
Moving Parts Flying Objects
2
Kickback
Page 3
IntheStateof California a spark arrester is required
_y law (Section 4442 of the California Public
Resources Code). Other states may have similar laws.
Federal laws apply on federal lands. If you equip the
"nuffler with a spark arrester, it must be maintained in
_=ffectiveworking order.You can order a spark arrester
_hrough your authorized Sears service dealer.
WARNING I
The engine exhaust from this product contains I
chemicals known to the State of California to cause
cancer, b rth defects, or other reproduct ve harm,
DANGER
Operate pressure washer ONLY outdoors.
Use a respirator or mask whenever there is a chance
that vapors may be inhaled.
Read all instructions packed with mask so you are certain
mask will provide necessary protection against inhaling
harmful vapors.
WARNING
WHEN ADDING FUEL
Turn pressure washer OFF and let it cool at least
2 minutes before removing gas cap.
Fill fuel tank outdoors.
DO NOT overfill tank. Allow space for fuel expansion.
Keep fuel away from sparks, open flames, pilot lights,
heat, and other ignition sources.
DO NOT light a cigarette or smoke.
VHEN OPERATING EQUIPMENT
DO NOT tip engine or equipment at angle which causes
fuel to spill.
DO NOT spray flammable liquids.
VHEN TRANSPORTING OR REPAIRING EQUIPMENT
Transport/repair with fuel tank EMPTY or with fuel shutoff
valve OFF.
VHEN STORING FUEL OR EQUIPMENT WITH FUEL IN
TANK
Store away from furnaces, stoves, water heaters, clothes
dryers or other appliances that have pilot light or other
ignition source because they can ignite fuel vapors.
WARNING
Keep water spray away from electric wiring or fatal
electric shock may result.
WANNING
Keep spray nozzle between 8 to 24 inches away from
cleaning surface.
Operate this unit on a stable surface.
Cleaning area should have adequate slopes and
drainage to reduce possibility of fails due to slippery
surfaces.
Be extremely careful if you must use pressure washer
from a ladder, scaffolding or any other relatively unstable
location.
Firmly grasp spray gun with both hands when using high
pressure spray to avoid injury if gun kicks back.
WARNING
NEVER aim spray gun at people, animals or plants.
DO NOT allow CHILDREN to operate pressure washer.
NEVER repair high pressure hose. Replace it.
Keep high pressure hose connected to pump and spray
gun while system is pressurized.
WARNING
DO NOT touch hot surfaces.
Stay clear of exhaust gases.
NEVER move equipment while operating.
Allow equipment to cool before touching.
3
Page 4
WARNING
DO NOT wear loose clothing, jewelry or anything that
may be caught in starter or other rotating parts.
Tie up long hair and remove jewelry.
WARNING
Disconnect spark plug wire from spark plug and place
wire where it cannot contact spark plug.
WARNING
Always wear eye protectionwhen using equipment orwhen
in vicinity of equipment in use.
CAUTION
DO NOT tamper with governed speed.
DO NOT operate pressure washer above rated pressure.
CAUTION
DO NOT secure spray gun in open position.
DO NOT leave spray gun unattended while machine is
running.
NEVER use a spray gun which does not have a trigger
lock or trigger guard in place and in working order.
Always be certain spray gun, nozzles and accessories
are correctly attached.
CAUTION
DO NOT point spray gun at glass when in jet spray mode,
NEVER aim spray gun at plants,
CAUTION
If you have questions about intended use, ask dealer or
contact Sears.
NEVER operate units with broken or missing parts, or
without protective housing or covers.
DO NOT by-pass any safety device on this machine.
Before starting pressure washer in cold weather, check
all parts of the equipment to be sure ice has not formed
there.
NEVER move machine by pulling on high pressure hose.
Use handle provided on unit.
Check fuel system for leaks or signs of deterioration,
such as chafed or spongy hose, loose or missing
clamps, or damaged tank or cap. Correct all defects
before operating pressure washer.
This equipment is designed to be used with Sears
authorized parts ONLY. If equipment is used with parts
that DO NOT comply with minimum specifications, user
assumes all risks and liabilities.
4
Page 5
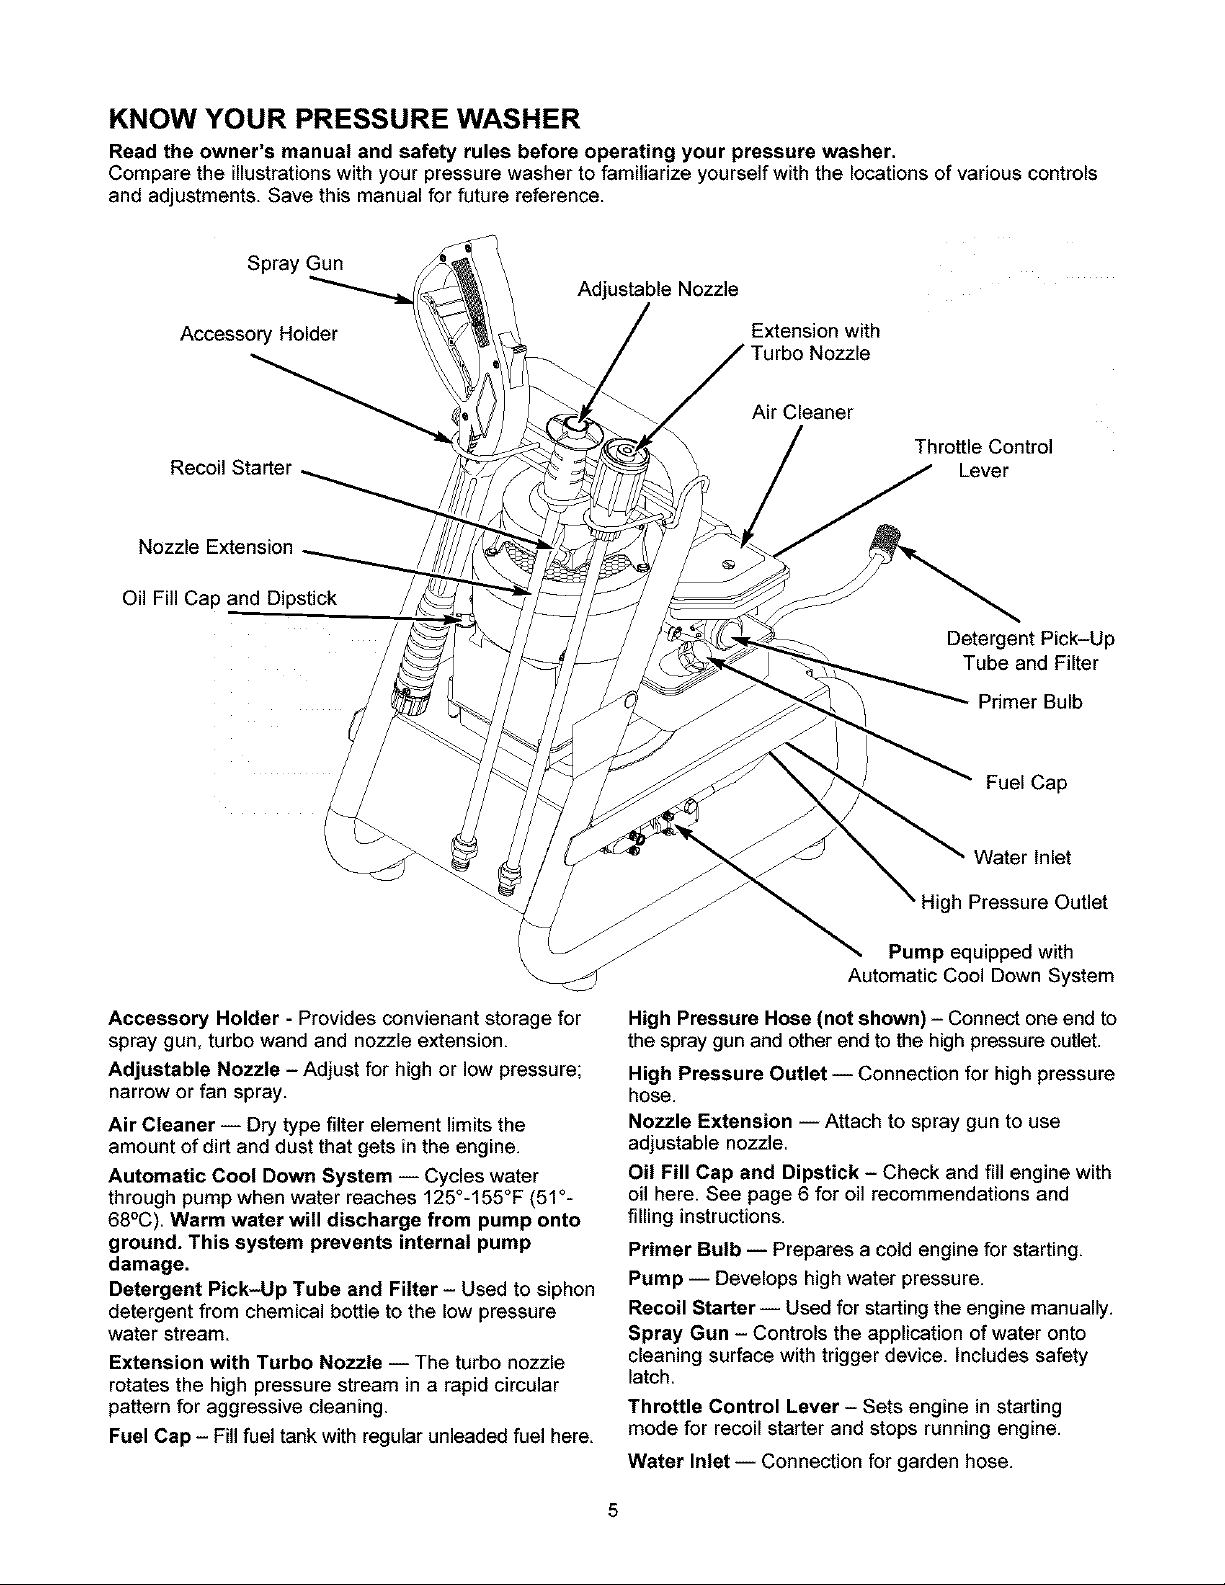
KNOW YOUR PRESSURE WASHER
Read the owner's manual and safety rules before operating your pressure washer.
Compare the illustrations with your pressure washer to familiarize yourself with the locations of various controls
and adjustments. Save this manual for future reference.
Spray Gun
Adjustable Nozzle
Accessory Holder
Recoil Starter
Nozzle Extension
Oil Fill Cap and Dipstick
Extension with
Air Cleaner
Throttle Control
Lever
Detergent Pick-Up
Tube and Filter
Primer Bulb
Fuel Cap
Water Inlet
High Pressure Outlet
Accessory Holder - Provides convienant storage for
spray gun, turbo wand and nozzle extension.
Adjustable Nozzle -Adjust for high or low pressure;
narrow or fan spray.
Air Cleaner -- Dry type filter element limits the
amount of dirt and dust that gets in the engine.
Automatic Cool Down System -- Cycles water
through pump when water reaches 125°-155°F (51°-
68°C). Warm water will discharge from pump onto
ground. This system prevents internal pump
damage.
Detergent Pick-Up Tube and Filter - Used to siphon
detergent from chemical bottle to the low pressure
water stream.
Extension with Turbo Nozzle -- The turbo nozzle
rotates the high pressure stream in a rapid circular
pattern for aggressive cleaning.
Fuel Cap - Fill fuel tank with regular unleaded fuel here.
Pump equipped with
Automatic Cool Down System
High Pressure Hose (not shown) - Connect one end to
the spray gun and other end tothe high pressure outlet.
High Pressure Outlet -- Connection for high pressure
hose.
Nozzle Extension --Attach to spray gun to use
adjustable nozzle.
Oil Fill Cap and Dipstick - Check and fill engine with
oil here. See page 6 for oil recommendations and
filling instructions.
Primer Bulb -- Prepares a cold engine for starting.
Pump -- Develops high water pressure.
Recoil Starter-- Used for starting the engine manually.
Spray Gun - Controls the application of water onto
cleaning surface with trigger device. Includes safety
latch.
Throttle Control Lever - Sets engine in starting
mode for recoil starter and stops running engine.
Water Inlet i Connection for garden hose.
5
Page 6
Yourpressurewasherrequires some assembly and is
ready for use only after it has been properly serviced
with the recommended oil and fuel.
If you have any problems with the assembly of
your pressure washer, please call the pressure
washer helpline at 1-800-222-3136.
IMPORTANT: Any attempt to run the engine before it
has been serviced with the recommended oil will result
in an engine failure.
REMOVE PRESSURE WASHER
FROM CARTON
Open carton and slice two corners opposite guide
handle from top to bottom so the panel can be
folded down flat.
Remove fillers, accessories and parts bag shipped
with your pressure washer.
Remove the pressure washer out the open end of
the carton.
Check carton for additional loose parts.
CARTON CONTENTS
Check all contents. If any parts are missing or damaged,
call the pressure washer helpline at 1-800-222-3136.
The main unit
High pressure hose
Spray gun
Nozzle extension with adjustable nozzle
Turbo wand
Accessory holder
Engine oil
Parts bag (which includes items listed below)
Owner's manual
Registration card
Become familiar with each piece before assembling
the pressure washer Compare contents against the
view on page 5. If any parts are missing or damaged,
call the pressure washer helpline at 1-800-222-3136
ASSEMBLING YOUR PRESSURE
WASHER
Your Craftsman pressure washer was mostly
assembled at the factory. However, you will need to
perform these tasks before you can operate your
pressure washer:
1. Add oil to engine crankcase.
2. Add fuel to fuel tank.
3. Connect high pressure hose to spray gun and
pump.
4. Connect water supply to pump.
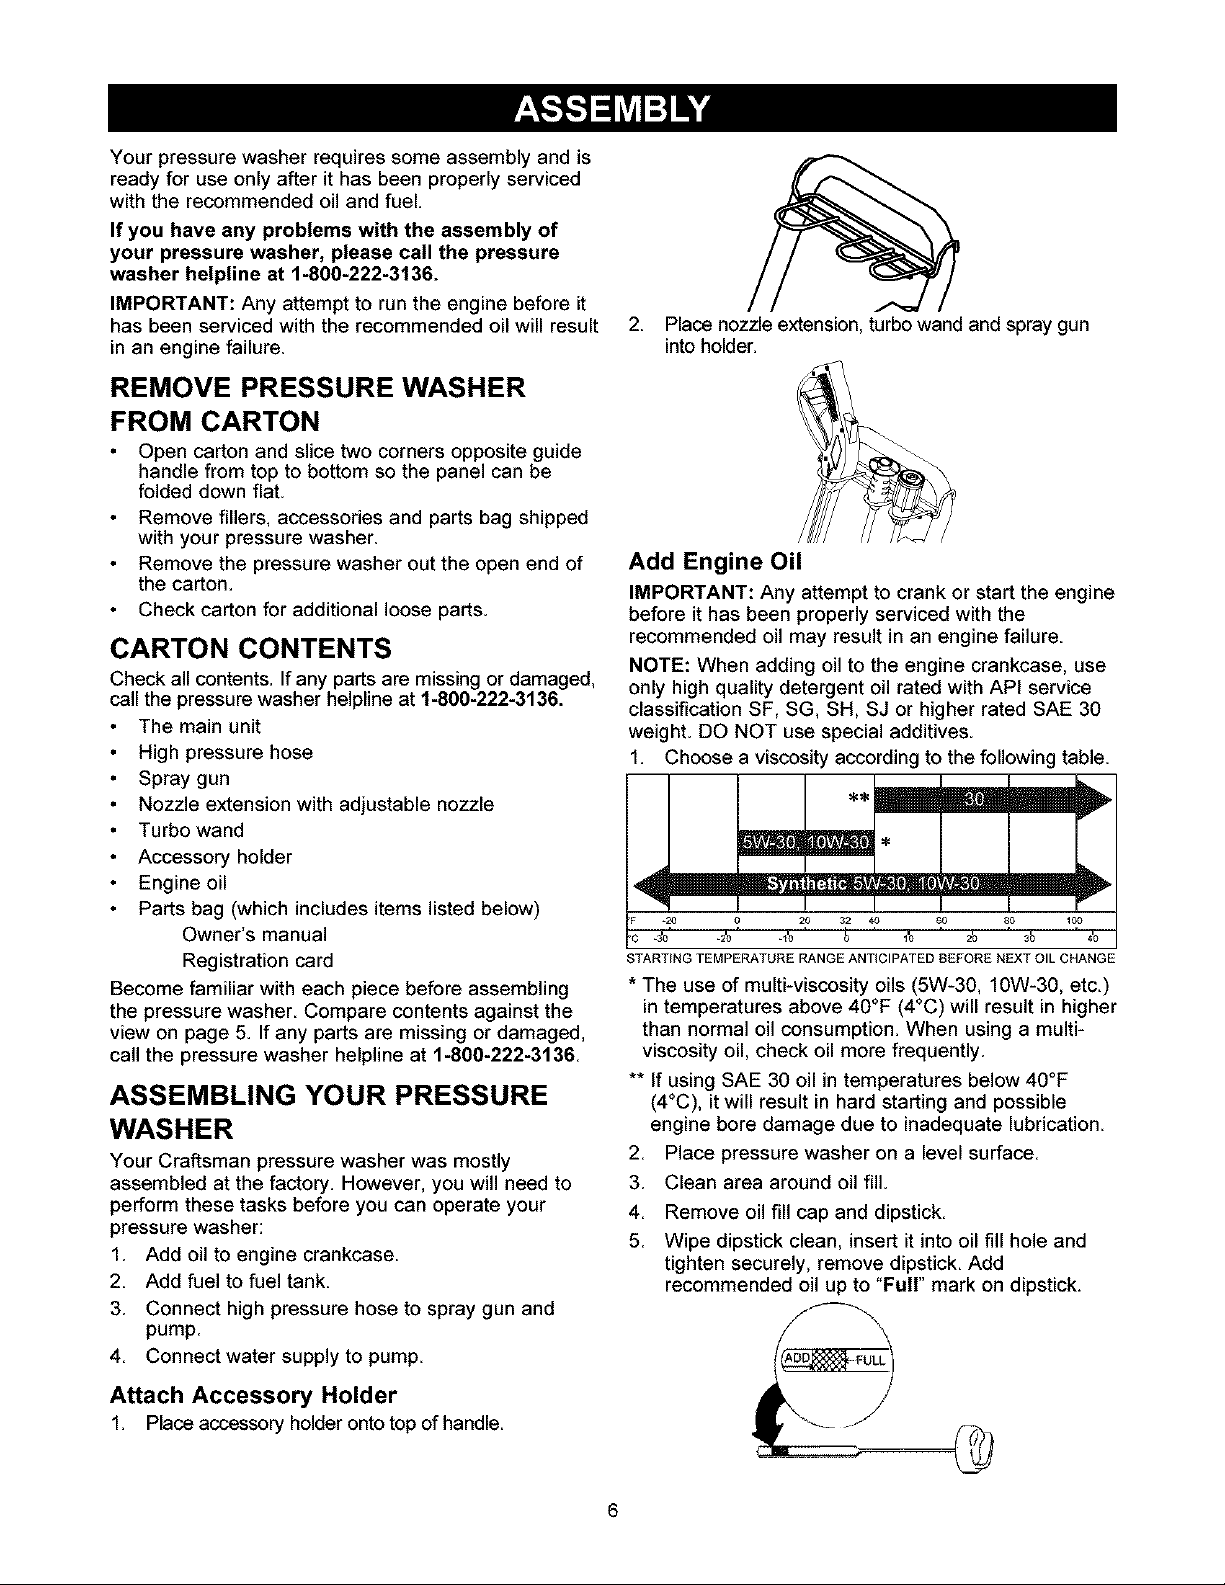
2 Place nozzle extension, turbo wand and spray gun
intoholder.
Add Engine Oil
IMPORTANT: Any attempt to crank or start the engine
before it has been properly serviced with the
recommended oil may result in an engine failure
NOTE: When adding oil to the engine crankcase, use
only high quality detergent oil rated with API service
classification SF, SG, SH, SJ or higher rated SAE 30
weight DO NOT use special additives
1. Choose a viscosityaccording to the following table
._o o, =o = ,o ,o _,o _oo
'c =so =2b 4b _ 1'o 2b 3b ' 4'o
STARTING TEMPERATURE RANGE ANTICIPATED BEFORE NEXT OIL CHANGE
* The use of multi-viscosity oils (5W-30, 10W-30, etc.)
in temperatures above 40°F (4°C) will result in higher
than normal oil consumption. When using a multi-
viscosity oil, check oil more frequently.
** If using SAE 30 oil in temperatures below 40°F
(4°C), itwill result in hard starting and possible
engine bore damage due to inadequate lubrication.
2. Place pressure washer on a level surface.
3. Clean area around oil fill.
4.
Remove oil fill cap and dipstick
5.
Wipe dipstick clean, insert it into oil fill hole and
tighten securely, remove dipstick. Add
recommended oil up to "Full" mark on dipstick.
Attach Accessory Holder
1. Place accessory holderontotop of handle
6
Page 7

6. Pourslowly.Wipedipstickcleaneachtimeoil
levelischecked.DONOToverfill.
7. Installoilfillpluganddipstick,tightensecurely.
NOTE:Checkoiloftenduringenginebreak-in.
Add Fuel
,_ WARNING! NEVER fill fuel tank indoors
NEVER fill fuel tank when engine is running or
hot. DO NOT smoke when filling fuel tank.
_ WARNING! NEVER fill fuel tank completely
full. Provide space for fuel expansion. Wipe
away any fuel spillage from engine and
equipment before starting.
1. Use clean regular unleaded automotive fuel and
store in approved, clean, covered containers. Use
clean fill funnels. NEVER use "stale" fuel left over
from last season or fuel stored for long periods.
2. Clean area around fuel fill cap, remove cap.
3. Slowly add fuel to fuel tank. Use a funnel to
prevent spillage. Fill tank to about 1.5" below the
top of the filler neck.
,
Before connecting garden hose to water inlet,
inspect inlet screen. Clean screen if it contains
debris or have it replaced if damaged. Refer to
section "O-Ring Maintenance" if inlet screen is
damaged. DO NOT run pressure washer if inlet
screen is damaged. NEVER siphon inlet water.
screen. DO
"_._ Inspect inlet
- clean if dirty.
4, Run water through garden hose for 30 seconds to
flush out any debris.
5, Connect garden hose (not to exceed 50 feet in
length) to water inlet. Tighten by hand.
NOT use if
damaged;
Fuel
4. Install fuel cap and wipe up any spilled fuel
IMPORTANT: It is important to prevent gum deposits
from forming in essential fuel system parts, such as the
carburetor, fuel filter, fuel hose or tank during storage.
Also, experience indicates that alcohol-blended fuels
(called gasohol, ethanol or methanol) can attract
moisture, which leads to separation and formation of
acids during storage. Acidic gas can damage the fuel
system of an engine while in storage.
To avoid engine problems, the fuel system should be
emptied before storage of 30 days or longer. See
"Storage" on page 15. NEVER use engine or
carburetor cleaner products in the fuel tank or
permanent damage may occur.
Connect Hose and Water Supply to Pump
IMPORTANT: To avoid pump damage, you must
assemble the nozzle extension to the spray gun and
attach all hoses before you start the engine.
1. Uncoil high pressure hose and attach one end of
hose to base of spray gun. Tighten by hand.
2. Attach other end of high pressure hose to high
pressure outlet on pump. Tighten by hand.
CAUTION
• Damage to equipment resulting from failure to fellow
this instruction will void warranty,
6, Turn ON water and squeeze trigger on gun to
purge pump system of air and impurities.
WARNING
Always wear eye protection when using this equipment
or in vicinity of where equipment is in use,
Before starting the pressure washer, be sure you are
wearing adequate eye protection,
CHECKLIST BEFORE STARTING
ENGINE
Review the unitto ensure you have performed all of
the following:
1 Check that oil has been added to proper level in
engine crankcase
2 Add proper fuel to fuel tank.
3. Check for properly tightened hose connections
(high pressure and water supply) and there are no
kinks, cuts, ordamage to high pressure hose
7
Page 8
4 Provideproperwatersupply(nottoexceed100°F)
5. Besuretoread"SafetyRules"and"Operation"
sectionsbeforeusingpressurewasher.
6. Ifstartingunitafterstorage,see"Storage"section
onpage15.
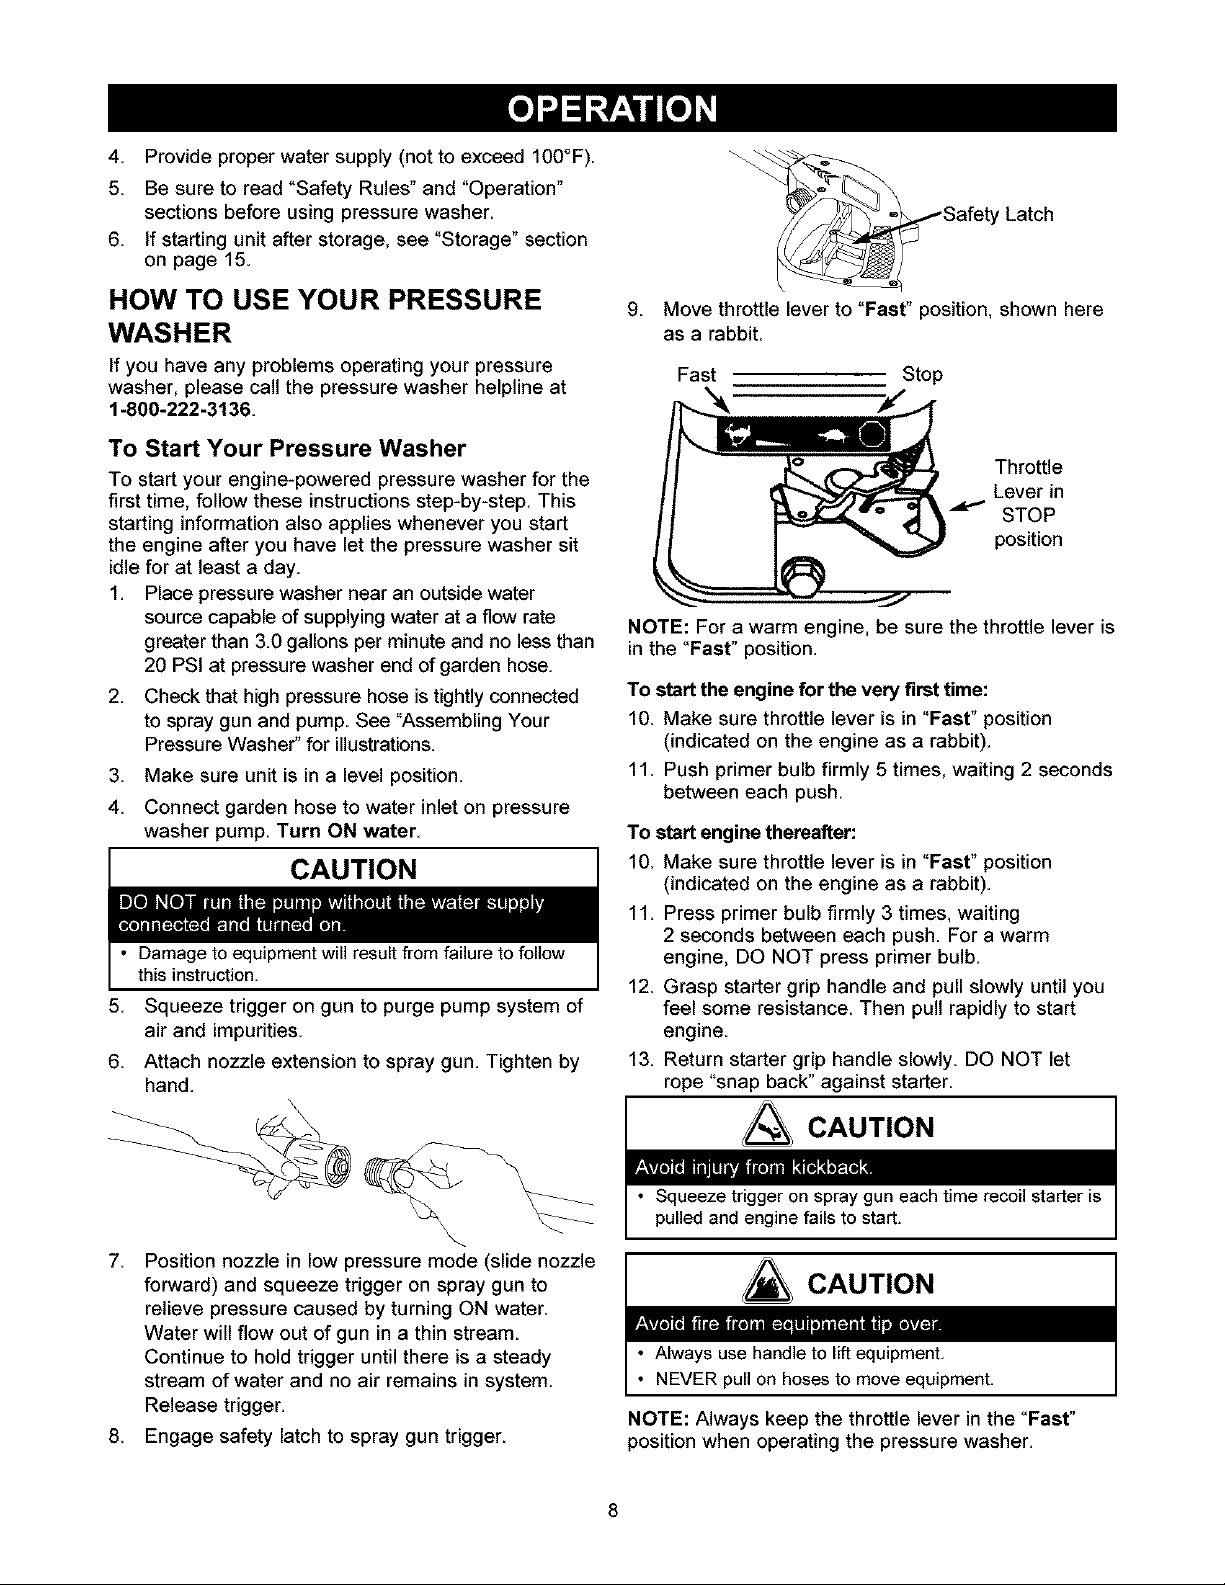
_Safety Latch
HOW TO USE YOUR PRESSURE
WASHER
If you have any problems operating your pressure
washer, please call the pressure washer helpline at
1-800-222-3136
To Start Your Pressure Washer
To start your engine-powered pressure washer for the
first time, follow these instructions step-by-step. This
starting information also applies whenever you start
the engine after you have let the pressure washer sit
idle for at least a day.
1. Place pressure washer near an outside water
source capable of supplying water at a flow rate
greater than 3.0 gallons per minute and no less than
20 PSI at pressure washer end of garden hose.
2.
Check that high pressure hose is tightly connected
to spray gun and pump. See "Assembling Your
Pressure Washer _for illustrations.
.
Make sure unit is in a level position.
4.
Connect garden hose to water inlet on pressure
washer pump. Turn ON water.
CAUTION
• Damage to equipment will result from failure to follow
this instruction,
5. Squeeze trigger on gun to purge pump system of
air and impurities.
.
Attach nozzle extension to spray gun. Tighten by
hand.
\\
.
Move throttle lever to "Fast" position, shown here
as a rabbit.
Fast Stop
f
Throttle
Lever in
STOP
position
NOTE: For a warm engine, be sure the throttle lever is
in the "Fast" position.
To start the engine for the very first time:
10. Make sure throttle lever is in "Fast" position
(indicated on the engine as a rabbit).
11. Push primer bulb firmly 5 times, waiting 2 seconds
between each push.
To start engine thereafter:
10. Make sure throttle lever is in "Fast" position
(indicated on the engine as a rabbit).
11. Press primer bulb firmly 3 times, waiting
2 seconds between each push. For a warm
engine, DO NOT press primer bulb.
12. Grasp starter grip handle and pull slowly until you
feel some resistance. Then pull rapidly to start
engine.
13. Return starter grip handle slowly. DO NOT let
rope "snap back" against starter.
A CAUTION
7.
Position nozzle in low pressure mode (slide nozzle
forward) and squeeze trigger on spray gun to
relieve pressure caused by turning ON water.
Water will flow out of gun in a thin stream.
Continue to hold trigger until there is a steady
stream of water and no air remains in system.
Release trigger.
8 Engage safety latch to spray gun trigger
\
• Squeeze trigger on spray gun each time recoil starter is
pulled and engine fails to start.
CAUTION
• Always use handle to lift equipment,
• NEVER pull on hoses to move equipment,
NOTE: Always keep the throttle lever in the "Fast"
position when operating the pressure washer.
8
Page 9
How to Stop Your Pressure Washer
1 Move throttle lever to "Stop" position
2. Squeeze trigger on spray gun to relieve
pressure in hose.
NOTE: A small amount of water will squirt out when
you release the pressure.
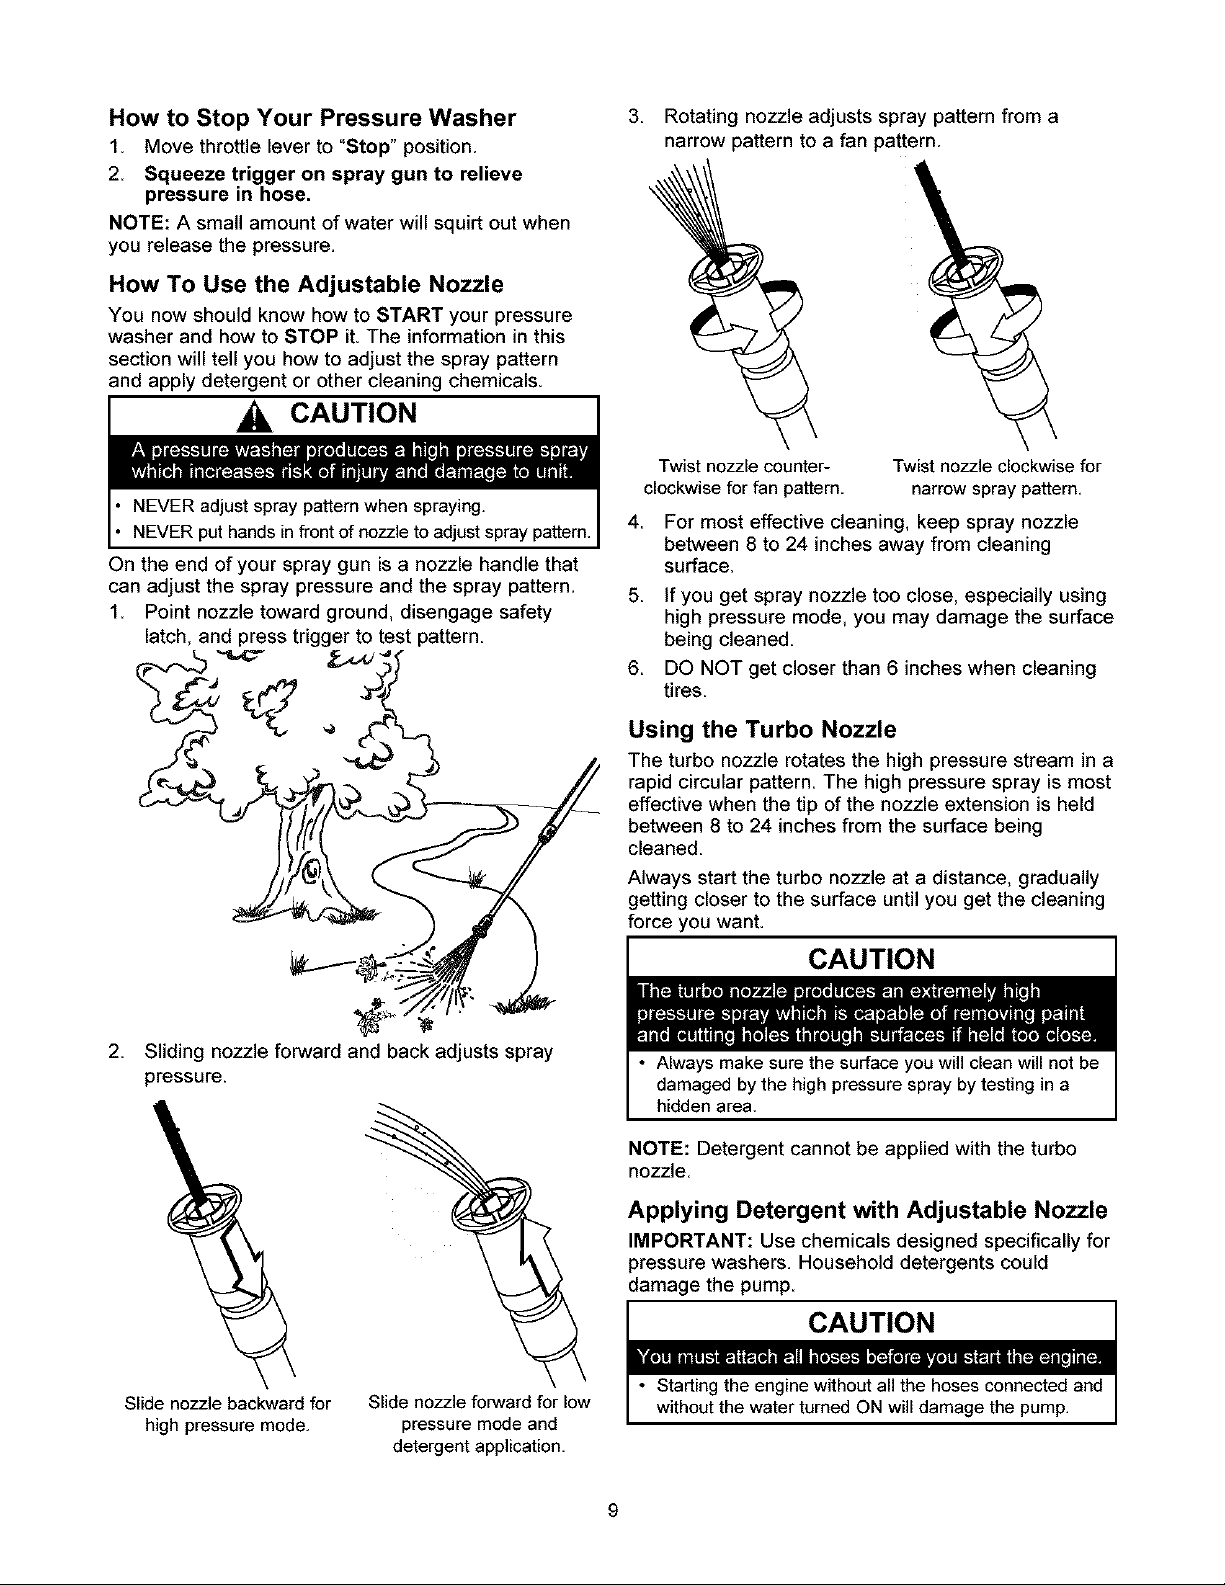
How To Use the Adjustable Nozzle
You now should know how to START your pressure
washer and how to STOP it. The information in this
section will tell you how to adjust the spray pattern
and apply detergent or other cleaning chemicals.
CAUTION
NEVER adjust spray pattern when spraying.
NEVER put handsin front of nozzleto adjustspray pattern.
On the end of your spray gun is a nozzle handle that
can adjust the spray pressure and the spray pattern.
1. Point nozzle toward ground, disengage safety
latch, and press trigger to test pattern.
3 Rotating nozzle adjusts spray pattern from a
narrow pattern to a fan pattern
Twist nozzle counter- Twist nozzle clockwise for
clockwise for fan pattern, narrow spray pattern,
4. For most effective cleaning, keep spray nozzle
between 8 to 24 inches away from cleaning
surface.
5. If you get spray nozzle too close, especially using
high pressure mode, you may damage the surface
being cleaned.
6. DO NOT get closer than 6 inches when cleaning
tires.
2.
Sliding nozzle forward and back adjusts spray
pressure.
Using the Turbo Nozzle
The turbo nozzle rotates the high pressure stream in a
rapid circular pattern. The high pressure spray is most
effective when the tip of the nozzle extension is held
between 8 to 24 inches from the surface being
cleaned.
Always start the turbo nozzle at a distance, gradually
getting closer to the surface until you get the cleaning
force you want.
CAUTION
• Always make surethe surface you will clean will not be
damaged by the high pressure spray bytesting in a
hidden area.
NOTE: Detergent cannot be applied with the turbo
nozzle.
Applying Detergent with Adjustable Nozzle
IMPORTANT: Use chemicals designed specifically for
pressure washers. Household detergents could
damage the pump.
Slide nozzle backward for
high pressure mode,
CAUTION
• Starting the engine without all the hoses connected and
Slide nozzle forward for low without the water turned ON will damage the pump.
pressure mode and
detergent application,
9
Page 10
To apply detergent, follow these steps:
1 Review use of adjustable nozzle.
2
Prepare detergent solution as required by job
.
Place filter end of detergent siphoning tube into
detergent container.
CAUTION
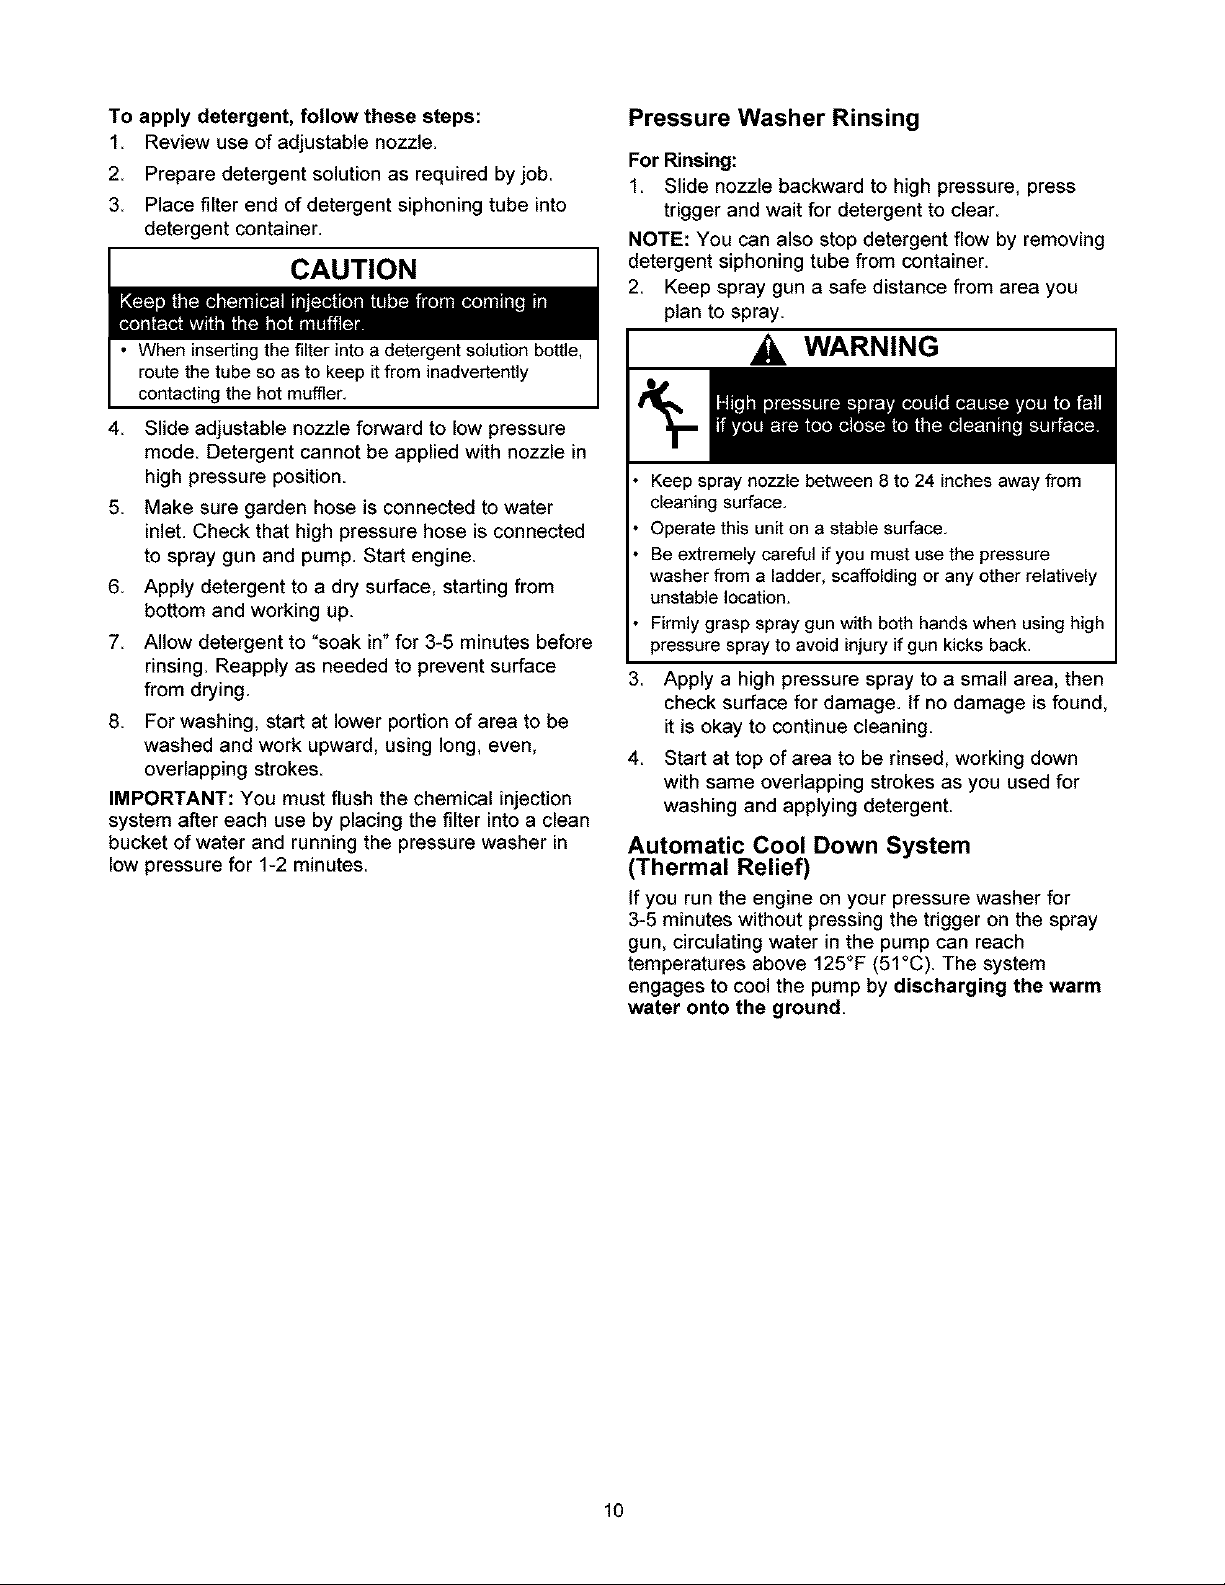
Pressure Washer Rinsing
For Rinsing:
1 Slide nozzle backward to high pressure, press
trigger and wait for detergent to clear.
NOTE: You can also stop detergent flow by removing
detergent siphoning tube from container.
2. Keep spray gun a safe distance from area you
plan to spray.
• When insertingthe filter into a detergentsolution bottle,
route the tube so as to keep itfrom inadvertently
contacting the hot muffler.
4. Slide adjustable nozzle forward to low pressure
mode. Detergent cannot be applied with nozzle in
high pressure position.
5. Make sure garden hose is connected to water
inlet. Check that high pressure hose is connected
to spray gun and pump. Start engine.
6. Apply detergent to a dry surface, starting from
bottom and working up.
7. Allow detergent to "soak in"for 3-5 minutes before
rinsing. Reapply as needed to prevent surface
from drying.
8. For washing, start at lower portion of area to be
washed and work upward, using long, even,
overlapping strokes.
IMPORTANT: You must flush the chemical injection
system after each use by placing the filter into a clean
bucket of water and running the pressure washer in
low pressure for 1-2 minutes.
WARNING
Keep spray nozzle between 8 to 24 inches away from
cleaning surface.
Operate this unit on a stable surface.
Be extremely careful if you must use the pressure
washer from a ladder, scaffolding or any other relatively
unstable location.
Firmly grasp spray gun with both hands when using high
pressure spray to avoid injury if gun kicks back.
.
Apply a high pressure spray to a small area, then
check surface for damage, if no damage is found,
it is okay to continue cleaning.
4.
Start at top of area to be rinsed, working down
with same overlapping strokes as you used for
washing and applying detergent.
Automatic Cool Down System
(Thermal Relief)
If you run the engine on your pressure washer for
3-5 minutes without pressing the trigger on the spray
gun, circulating water in the pump can reach
temperatures above 125°F (51°C). The system
engages to cool the pump by discharging the warm
water onto the ground
10
Page 11
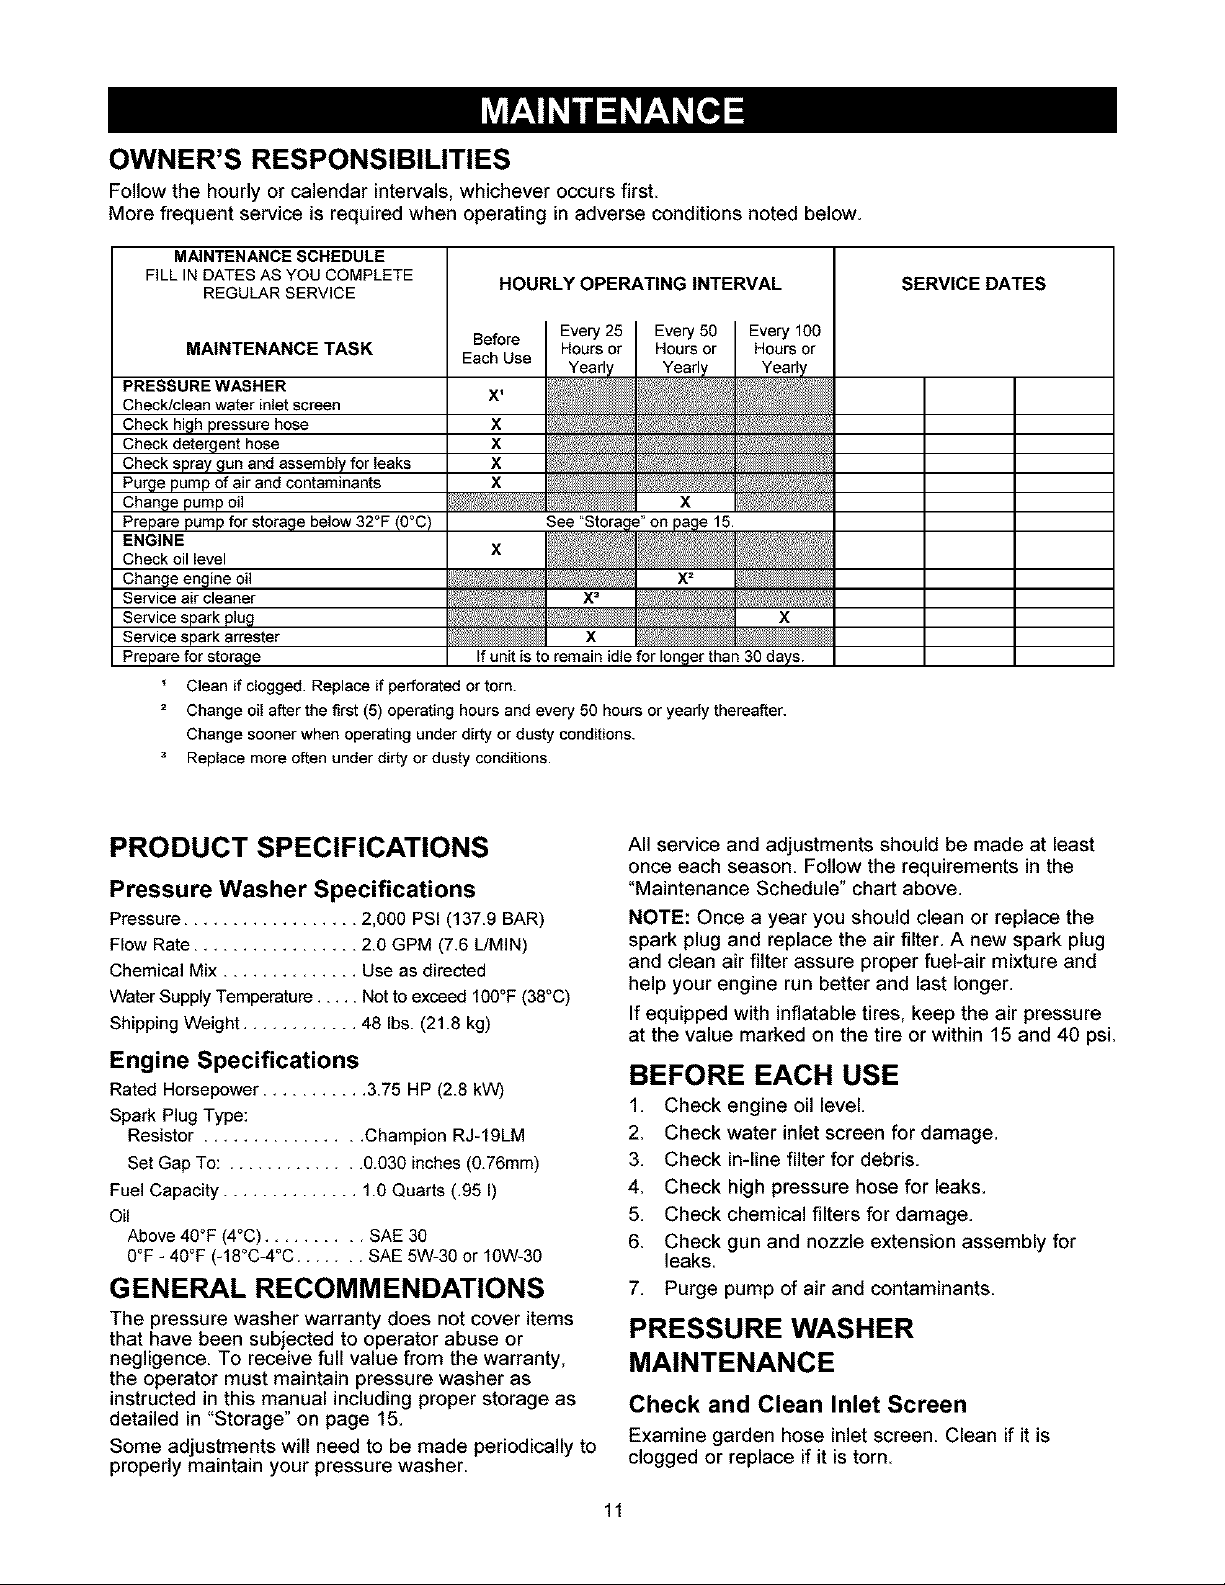
OWNER'S RESPONSIBILITIES
Follow the hourly or calendar intervals, whichever occurs first
More frequent service is required when operating in adverse conditions noted below
MAINTENANCE SCHEDULE
FILL IN DATES AS YOU COMPLETE
REGULAR SERVICE
HOURLY OPERATING INTERVAL SERVICE DATES
MAINTENANCETASK
PRESSURE WASHER
Check/clean water inlet screen
Check high pressure hose
Check detergent hose
Check spray gun and assembly for leaks
Purge pump of air and contaminants
Change pump oil
Prepare pump for storage below 32°F (0°C)
ENGINE
Check oil level
Change engine oil
Service air cleaner
Service spark plug
Service spark attester
Prepare for storage
Clean if clogged. Replace if perforated or torn.
Change oil after the first (5) operating hours and every 50 hours or yearly thereafter.
Change sooner when operating under dirty or dusty conditions.
Replace more often under dirty or dusty conditions.
Before
Each Use
X 1
I x I_'f_l__]
I x I_//_i
I x I_&___i!_2;I
I x I__/_?,1
I__/l//////////////I x I_;I
X
I__ x= l_IIIIIIIIIIIIIIIIIIll
l_ifIIIIIIIIIIIIIII _:_ x I
U_IIIIIITIIIIIIIIII| x _IIIIIIIIIIIITIIII|
I If unit is to remain idle for longer than 30 days. I
PRODUCT SPECIFICATIONS
Pressure Washer Specifications
Pressure.................. 2,000 PSI (137.9 BAR)
Flow Rate ................. 2.0 GPM (7.6 L/MIN)
Chemical Mix .............. Use as directed
WaterSupplyTemperature..... Nottoexceed 100°F(38°C)
ShippingWeight............ 48 Ibs. (21.8 kg)
Engine Specifications
Rated Horsepower........... 3.75 HP (2.8 kW)
Spark PlugType:
Resistor ................ Champion RJ-19LM
Set GapTo: .............. 0,030 inches (0.76mm)
Fuel Capacity .............. 1.0 Quarts (.95 I)
Oil
Above 40°F (4°C) .......... SAE 30
0°F - 40°F (-18°C-4°C ....... SAE 5W-30 or 10W-30
GENERAL RECOMMENDATIONS
The pressure washer warranty does not cover items
that have been subjected to operator abuse or
negligence. To receive full value from the warranty,
the operator must maintain pressure washer as
instructed in this manual including proper storage as
detailed in "Storage" on page 15.
Some adjustments will need to be made periodically to
properly maintain your pressure washer.
All service and adjustments should be made at least
once each season. Follow the requirements in the
"Maintenance Schedule" chart above.
NOTE: Once a year you should clean or replace the
spark plug and replace the air filter. A new spark plug
and clean air filter assure proper fuel-air mixture and
help your engine run better and last longer.
If equipped with inflatable tires, keep the air pressure
at the value marked on the tire or within 15 and 40 psi.
BEFORE EACH USE
1. Check engine oil level.
2. Check water inlet screen for damage.
3. Check in-line filter for debris.
4. Check high pressure hose for leaks.
5. Check chemical filters for damage.
6. Check gun and nozzle extension assembly for
leaks.
7. Purge pump of air and contaminants.
PRESSURE WASHER
MAINTENANCE
Check and Clean Inlet Screen
Examine garden hose inlet screen Clean if it is
clogged or replace if it is torn
11
Page 12
Check High Pressure Hose
High pressure hoses can develop leaks from wear,
kinking, or abuse Inspect hose before each use
Check for cuts, leaks, abrasions, bulging of cover, or
damage or movement of couplings. If any of these
conditions exist, replace hose immediately.
WARNING
NEVER repair high pressure hose. Replace it,
Replacement hose rating MUST exceed maximum
pressure rating of unit,
Check Gun and Nozzle Extension
Examine hose connection to gun and make sure it is
secure. Test trigger by pressing it and making sure it
springs back into place when you release it. Engage
safety latch and test trigger. You should not be able to
press trigger. Replace gun immediately if it fails any of
these tests.
Check In-Line Filter
Refer to the illustrationand service the in-line filter if it
becomes clogged, as follows:
To remove contaminants from the pump, follow these
steps:
1 Set up pressure washer as described in
"Assembling Your Pressure Washer" section, and
connect water supply
2 Remove nozzle extension from gun
3 Start engine according to instructions in"How To
Use Your Pressure Washer _ section.
4 Pull trigger on gun and hold
5 When water supply issteady and constant, engage
safety latch and refasten nozzle extension
Nozzle Maintenance
A pulsing sensation felt while squeezing the spray gun
trigger may be caused by excessive pump pressure.
The principal cause of excessive pump pressure is a
nozzle clogged or restricted with foreign materials,
such as dirt, etc. To correct the problem, immediately
clean the nozzle following these instructions:
1. Shut off engine and turn off water supply.
2. Remove nozzle from end of nozzle extension.
Separate nozzle extension from spray gun. Twist
nozzle clockwise to stream position. Using a 2mm
(5/64) allen wrench, remove orifice from end of
nozzle extension.
In-line Filter
Nozzle extension O_ring=
1 Detach nozzle extension from gun and remove
o-ring and screen from nozzle extension Flush
screen, gun, and nozzle extension with clean water
to clear debris.
2 Place in-line filter screen intothreaded end of
nozzle extension. Direction does not matter. Push
screen in with eraser end of pencil until it rests flat
at bottom of opening. Take care not to bend
screen.
3 Place o-ring into recess. Push o-ring snugly against
in-line filter screen.
4 Assemble nozzle extension to spray gun, as
described earlier in manual.
Purge Pump of Air and Contaminants
To remove air from the pump, follow these steps:
1 Set up pressure washer as described in
"Assembling Your Pressure Washer" section and
connect water supply.
2. Pull spray gun trigger and hold.
3. When water stream is steady and constant,
engage safety latch.
3 Remove in-line filter from other end of nozzle
extension.
4. Use a small paper clip to free any foreign material
clogging or restricting orifice.
Insert wire into orifice and turn back
and forth to clear obstruction
.
Using a garden hose, remove additional debris by
back flushing water through nozzle extension. Back
flush between 30 to 60 seconds. Turn adjustable
nozzle extension to stream spray and move nozzle
from low to high while flushing.
12
Page 13

6. Reinstallorificeandin-linefilterintonozzle
extension.DONOTovertightanorificewithallen
wrench.
7. Reconnectnozzleextensiontospraygun.
8. Reconnectwatersupply,turnonwater,andstart
engine.
9. Testpressurewasherbyoperatingnozzleinhigh
andlowpositions.
O-Ring Maintenance
Purchase an O-Ring Repair Kit, item number
191922GS, at your local Sears sevica center. It is not
included with the pressure washer. This kit includes
replacement o-rings, rubber washer and water inlet filter.
Refer to the instruction sheet provided in the kit to
service your unit's o-rings.
ENGINE MAINTENANCE
Checking Oil Level
Oil level should be checked prior to each use or at least
every 8 hours of operation, Keep oil level maintained,
Changing Oil
Change engine oil after the first 5 hours and every
50 hours thereafter. If you are using your pressure
washer under extremely dirty or dusty conditions, or in
extremely hot weather, change oil more often.
CAUTION
Pump Maintenance
Changing Pump Oil
Change oil every 50 hours or once yearly, whichever
occurs first.
NOTE: You must purchase a premeasured bottle of
pump oil, item number 190586GS at your local Sears
sevice canter.
Change pump oil as follows:
1. Drain engine oil and fuel from pressure washer.
2. Use a 8mm allen wrench to remove black pump
oil cap between high pressure outlet and garden
hose inlet.
J
3. Tilt pressure washer to drain oil into an approved
container until it drips slowly from pump.
4. Tilt pressure washer in opposite direction and
empty premeasured pump oil bottle into same
opening (a small funnel may be helpful).
5. Install black pump oil cap and tighten firmly.
6. Set pressure washer in upright position.Add fuel
and engine oil.
certain laboratory an!reals.
• Thoroughly wash exposed areas with soap and water.
DON'T POLLUTE. CONSERVE
RESOURCES. RETURN USED OIL TO
KEEP OUT OF REACH OF CHILDREN.
)COLLECTION CENTERS.
Change oil while engine is still warm from running,
as follows:
1. Drain fuel tank by running pressure washer until
fuel tank is empty.
2. Disconnect spark plug wire and keep it away from
spark plug.
3. Clean area around oil fill, remove oil fill
cap/dipstick. Wipe dipstick clean.
4. Tip your pressure washer to drain oil from oil fill
into a suitable container making sure you tip your
unit away from spark plug and air cleaner. When
crankcase is empty, return pressure washer to
upright position.
5. Wipe dipstick clean, insert it into oil fill hole and
tighten securely, remove dipstick. Add
recommended oil up to "Full" mark on dipstick.
Pour slowly. Wipe dipstick clean each time oil
level is checked. DO NOT overfill.
6. Install oil fill plug and dipstick, tighten securely.
7. Wipe up any remaining oil.
8. Reconnect spark plug wire to spark plug.
13
Page 14

Service Air Cleaner
Your engine will not run properly and may be
damaged if you run it with a dirty air cleaner.
Service the air cleaner once every 25 hours of
operation or once each year, whichever comes first.
Service more often if operating under dirty or dusty
conditions. Replacements are available at your local
Sears service center.
To service the air cleaner, follow these steps:
1 Remove screw
2 Carefully remove air cleaner assembly to prevent
debris from falling intocarburetor.
3. Take air cleaner assembly apart and clean all
parts. Wash foam air cleaner in liquid detergent
and water. Squeeze dry in a clean cloth.
4. SATURATE foam air cleaner in engine oil and
squeeze in a clean cloth to remove excess oil.
5. Reinstall clean or new foam air cleaner in body.
6. Install air cleaner securely on carburetor with
screw.
Service Spark Plug
Service the spark plug every 100 hours of operation or
yearly, whichever occurs first.
WARNING
1 Clean area around spark plug.
2 Remove and inspect spark plug.
3. Replace spark plug with recommended plug if
electrodes are worn or if insulator is cracked or
chipped.
4. Check electrode gap with wire feeler gauge and
set gap at 0.030 inches (0.76mm), if necessary.
\
\
5 Install spark plug, tighten securely
AFTER EACH USE
Water should not remain in the unit for long periods of
time Sediments or minerals can deposit on pump
parts and "freeze" pump action Follow these
procedures after every use:
1 Flush detergent siphoning tube by placing filter
into a pail of clean water while running pressure
washer in low pressure mode (adjustable nozzle in
forward position). Flush for one to two minutes.
2 Shut off engine and let it cool, then remove all
hoses.
3. Disconnect spark plug wire from spark plug.
4. Empty pump of all liquids by pulling recoil handle
about 6 times. This should remove most of the
liquid in pump.
5. If storing for more than 30 days see "Long Term
Storage" on page 15.
Disconnect spark plug wire from spark plug and place
wire where itcannot contact spark plug.
14
Page 15

GENERAL
Inspect high pressure hose for damage. Cuts in
hose or fraying could result in leaks and loss of
pressure. Should any damage be found, replace
hose. DO NOT attempt to repair a damaged hose.
Replace hose with genuine Craftsman part.
Drain water from hose, gun, and nozzle extension
and properly coil it on attached wireform.
Reconnect spark plug wire to spark plug.
Store unit in a clean, dry area.
_k ARNING1 NEVER store the engine with fuel
in the gas tank indoors or in enclosed, poorly
ventilated areas where fumes may reach an
open flame, a spark, or pilot light.
WINTER STORAGE
CAUTION
and render your unit inoperable.
• Freeze damage is not covered Under warrar4y.
It is important to prevent gum deposits from forming in
essential fuel system parts such as the carburetor, fuel
filter, fuel hose or tank during storage. Also,
experience indicates that alcehol-blended fuels (called
gasohol, ethanol or methanol) can attract moisture,
which leads to separation and formation of acids
during storage. Acidic gas can damage the fuel
system of an engine while in storage.
Protect Fuel System
Draining Fuel Tank:
_hL ARNING1 Drain fuel, using a funnel, into
approved container outdoors, away from open
flame. Be sure engine is cool. DO NOT smoke.
Remove all fuel from carburetor and fuel tank to
prevent gum deposits from forming on these parts
and causing possible malfunction of engine.
Run engine until fuel tank is empty and engine
stops due to lack of fuel.
Change Oil
While engine is still warm, drain oil from crankcase.
Refill with recommended grade. See "Changing Oil"
on page 13.
To protect the unit from freezing temperatures:
1. Flush detergent siphoning tube by placing filter
into a pail of clean water while running pressure
washer in low pressure mode (adjustable nozzle in
forward position). Flush for one to two minutes.
2. Empty pump of all pumped liquids by pulling recoil
handle about 6 times. This should remove most
liquid in pump.
4. Connect a 3-foot section of garden hose to water
inlet adapter. Pour RV-antifreeze (antifreeze
without alcohol) into hose. Pull recoil handle twice.
Disconnect 3-foot hose.
LONG TERM STORAGE
If you do not plan to use the pressure washer for more
than 30 days, you must prepare the engine for long
term storage.
Oil Cylinder Bore
Remove spark plug, Squirt about 1 ounce of clean
engine oil into the cylinder. Cover spark plug hole
with rag. Pull recoil handle slowly to distribute oil.
Avoid spray from spark plug hole.
Install spark plug. DO NOT connect spark plug wire.
OTHER
DO NOT store fuel from one season to another.
If possible, store your unit indoors and cover it to
give protection from dust and dirt. BE SURE TO
EMPTY THE FUEL TANK.
IMPORTANT: NEVER cover your pressure washer
while engine and exhaust area are warm.
15
Page 16

Problem
Pump has following problems:
failure to produce pressure,
erratic pressure, chattering, loss
of pressure, low water volume.
Detergent fails to mix with
spray.
Engine runs good at no-load but
"bogs" when load is added.
Engine will not start; or starts
and runs rough.
Engine shuts down during Out of fuel. Fill fuel tank.
operation.
Engine lacks power. Dirty air filter. Replace air filter.
Cause
1. Nozzle in low pressure mode.
2. Water inlet is blocked.
3. Inadequate water supply.
4. Inlet hose is kinked or leaking.
5, Clogged inlet hose strainer.
6. Water supply is over 100°F.
7. High pressure hose is blocked
or leaks.
8. Gun leaks.
9. Nozzle is obstructed.
10. Pump is faulty.
1. Detergent siphoning tube is not
submerged.
2. Chemical filter is clogged.
3, Dirty in-line filter.
4, Nozzle is in high pressure
mode,
Engine speed is too slow.
1. Dirty air cleaner.
2. Out of fuel.
3. Stale fuel.
4. Spark plug wire not connected
to spark plug.
5. Bad spark plug.
6. Water in fuel.
7. Excessively rich fuel mixture.
8. Intake valve stuck open or
closed.
9. Engine has lost compression. 9. Contact Sears service facility.
Correction
1. Pull nozzle backward for high
pressure mode.
2. Clear inlet.
3. Provide adequate water flow.
4. Straighten inlet hose, patch
leak.
5. Check and clean inlet hose
strainer.
6. Provide cooler water supply.
7. Clear blocks in outlet hose.
8. Replace gun.
9. Clean nozzle.
10. Contact Sears service facility.
1. Insert detergent siphoning tube
into detergent.
2. Clean or replace
filter/detergent siphoning tube.
3. See "Check In-Line Filter".
4. Push nozzle forward for low
pressure mode.
Move throttle control to FAST
position. If engine still "bogs down",
contact Sears service facility.
1. Clean or replace air cleaner.
2. Fill fuel tank.
3. Drain gas tank; fill with fresh
fuel,
4, Connect wire to spark plug,
5. Replace spark plug.
6. Drain gas tank; fill with fresh
fuel,
7, Contact Sears service facility,
8, Contact Sears service facility,
16
Page 17

1-800-4-MY-HOME ®
..... (1'800-469-4663)
For the repair of major brand appliances in your own home .i.
no matter who made it, no matter who sold it!
For your nearest Sears Parts & Service location,
to bring in products like vacuums, lawn equipment and electronics.
For Sears Parts & Service, to order the replacement parts,
accessories and owner's manuals that you need to do-it-yourself,
To purchase or inquire about a Sears Maintenance Agreement, call:
1'800'361'6665
i(1,800,533-6937)
iiiiiiiiiiiiiiiii iiiiiiiiiiiiiiiiiiiiiiiiiiiiiiiiiiiiiiiiiiiiiiiiii i
i!ii!iliiiliiiii!iiiiii!iiiiiiiiiiiiiiiiiiiiiiii!
errMTrademarks of Sears, Roebuck and Co. used under license by Sears Canada
• MC i
Marque depos_e/ Marque de commerce de Sears, Roebuck and Co. utJlis6ean vertu dune licence de Sears Canada
17
Page 18

CRAFTSMAN 2,000 PSI Pressure Washer 580.672200
Nettoyeur & haute pression CRAFTSMAN de 2 000 psi 580.672200
Main Unit -- Exploded View and Parts List
Unitd principale - Vue dclatde et liste des pi_ces
Item Part # Description Item Part #
Article Pi6ce no. Description Article Pi6ce no.
1 190906GS BASE (BASE) 8 188792HGS
2 192162GS VvIREFORM (FORME EN BROCHE)
3 190249GS HOSE (TUYAU) 9 B2335GS
4 192649GS KIT, Pump/Engine Mounting 10 23139GS
Hardware (ENSEMBLE, 11 194216GS
quincaillerie de montage de la 900 NSP
pompeimoteur)
5 190132GS GUN (PISTOLET)
7 21760GS ORIFICE (ORIFICE)
Items Not Illustrated
Ar_cles non illustr6s
Part #
Piece no.
t93499GS MANUAL Owner's ',MANUEL d'utilisa_ion)
"93608GS ,(IT. Decals (ENSEMBLE. decalques._
AB3061BGS OIL. Bottle (HUILE, bouteille)
190586GS OIL. Pump (HUILE, pompe)
Optional Accessories Not Illustrated
Accessoires en option non illustrbs
191922GS ,(IT. Maintenance, O-Ring (ENSEMBLE, entretien, joint torique)
7167300GS House Wash Concentrate (makes 4 gallons) (Concentr6 de nettoyant manager (produit 15 litres))
7167301GS Deck Wash Concentrate (makes 2 gallons) (Concentr6 de netioyant de pot4 (produit 7.5 litres))
7167302GS VehMe/Boat Wash Concentrate (makes 4 gallons) (Concentre de nettoyar_ de v6hiculelbateau
7167303GS Degreaser Concentrate (makes 4 gallons) (Concentre de degraiasant (#roduit 15 litres))
Description
Description
(produit 15 litres))
Description
Description
WAND, Adjustable Nozzle (LANCE,
buse r_glable)
WAND, Turbo (LANCE, turbo)
KEY (CLE)
ASSY, Pump (ENSEMBLE, pompe)
ENGINE (see pages 20-22)
(MOTEUR (voir pages 20 _ 22))
18
Page 19

CRAFTSMAN 2,000 PSI Pressure Washer 580.672200
Nettoyeur & haute pression CRAFTSMAN de 2 000 psi 580.672200
Pump -- Exploded View and Parts List
Pompe -- Vue dclatde et liste des pi_ces
C
Item Part #
Article Pi6ee no.
19 190571GS
28 190627GS
29 190575GS
30 190576GS
34 190577GS
45 I90578GS
46 190629GS
47 190630GS
62 190581GS
68 190582GS
69 190584GS
76 194298GS
A NSP
Description Item Part #
Description Article Pif_ce no.
CAP, Oil (BOUCHON, huile) B 190632GS
MANIFOLD (COLLECTEUR)
O-RING (JOINT TORIQUE)
SCREW (VIS) C 190634GS
CONNECTION, Chemical Inlet
(CONNECTEUR, Entree de E 190591GS
pmduits chimiques)
PIN (TIGE) F 190592GS
VALVE, Seat Plate, Plastic
(SOUPAPE, Assise du siege de, G 190593GS
en plastique)
VALVE, Seat, Plastic (SOUPAPE,
Siege de, en plastique) H 190628GS
CAP (BOUCHON)
BALL, SS (BILLE, Acier inoxydable)
O-RING (JOINT TORIQUE) J 189971GS
THERMO RELIEF (SOUPAPE DE
SURPRESSION THERMIQUE)
ASSY, CASE, PISTON (order K 190636GS
complete pump assy, 191693GS)
(ENSEMBLE, BO|TIER, PISTON
(no. de commande de I'ensemble
pompe complet, 191693GS))
NOTE: Item letters B - K are service kits and include all
parts shown within the box.
REMARQUE: Les articles B _ K sont des ensembles de
remplacement et incluer4 toutes les pieces illustrees dens
I'encadre correspondent.
H
Description
Description
KIT, WATER INLET, ALUM
(ENSEMBLE, ARRIVEE D'EAU,
ALUMINIUM)
KIT, OUTLET, ALUM (ENSEMBLE,
SORTIE, ALUMINIUM)
KIT,CHECK VALVES (ENSEMBLE,
CLAPETS DE RETENUE)
KIT, INLET CHECK (ENSEMBLE,
RETENUE D'ENTREE)
KIT, CHEMICAL INJECTION
(ENSEMBLE, INJECTION DE
PRODUITS CHIMIQUES)
KIT, UNLOADER STEM
(ENSEMBLE, TIGE DE
DECHARGE)
KIT, CHEMICAL HOSE
(ENSEMBLE, TUYAU DE
PRODUITS CHIMIQUES)
KIT, SEAL SET (ENSEMBLE, JEU
DE JOINTS)
19
Page 20

ENGINE, 3.75 HP, Briggs and Stratton, 10D902 - Exploded View
MOTEUR, 3,75 HP, Briggs & Stratton, t0D902 - Vue dclatde
842_
1211_
1210_
5s
592_ 60
459_ _
689_
456@
597g
2O
Page 21

ENGINE, 3.75 HP, Briggs and Stratton, 10D902 - Exploded View
MOTEUR, 3,75 HP, Briggs & Stratton, 10D902 - Vue dclat_e
365
_o_
163
633_ -
1218 _ 130_
334_
20}.
356_
190_ 832_
_836 _
ENGINE GASKET SET
670
300
536_ 5341
535_
1630
21
Page 22

ENGINE, 3.75 HP, Briggs and Stratton, 10D902 - Parts List
MOTEUR, 3,75 HP, Briggs & Stratton, 10D902 - Nomenclature de pi_ces
Item Part #
Article Pl&ce no,
1 399164
2 399269
3 299819
4 698691
5 890396
7 692289
8 495785
9 895890
10 691666
11 691245
12 692219
270895
270896
13 691697
15 691690
16 692999
19 293709
20 391483
22 691662
23 690843
24 222999
25 498669
498669
498670
498671
26 498680
498681
498682
498683
27 691589
28 298909
299908
29 496792
32 691664
33 296676
34 296677
35 690520
36 690520
37 691289
40 692194
43 698690
45 691792
46 691999
50 693446
51 270345
54 691111
55 692144
58 692259
80 691915
85 690837
73 691235
90 498811
97 691931
106 691901
130 691190
163 271139
190 494406
Oesctl_lon
Oesctl_lon
CylinderAssembly (Ensemble#ylindre)
Kit-Bushing/_eal (Magneto Side) (Ensemble-Garniture
d'_ncheit_JJatnt (c5t_ magn_))
SeaFOil (Magne_eSide) (Joird-Huile(_e magn_ta))
Sump-Engi_e (Fuisar_l-Mate_r)
Head-Cylinder (C_l_sse-Cylindre)
Gasket-Cylinder Head (Joint s_ique-Oul_,_e de
eylindre)
BreatherAssemb_ (Ensemble de reniflard)
Gasket-Breather (Joint ata0que-Ren_rd)
Screw (Breather Assembly) (',/is(En_mbJe de
renifl_rd))
Tube-Breather (Tuee-Reniflard)
Gasket-Crankcase (.919", Sland_rd) (Joint statique-
Carter (0,036 mmou 0,015 po,S_andard))
Gasket-Crankcase (.005") (Joint statique-Car_er
(0,013mm o2 0,005pe))
Gasket-Crankcase (.009") (Joint statique-Car_er
(0,023mm ou 0,009pe))
Screw (Cylinder Head)(Vi_ (Cata_e de eylindre))
Plug-Oil Drain (BouchomVid_nge fflh_ile)
Crankehaff (Vilebrequin)
Kit-Bushing/Side (PTO Side) (E_semble-G_miture
d'Ciancheit_CCCe(C¢¢€prise de force))
Seat-Oil (PTO Side) (jatnt-H_ile (C_ pdse de force))
Screw (Engine Sump) (vis (Fuisard de moteu_)
Flywheel(Vatant-moteu_
Key-Flywheel (Clavette-Volard-mate_r)
Piston AssembJy(Standar_l)(Ensemble de piston
(Standard))
Piston Assembly ( 010" Oversize) (Ensemble de piston
(surdimensionnede 0_25mmou 0_01pe))
Piston Assembly ( 020" Oversize) (Ensemble de piston
(surdimensionnede 0_51mmou 0_020po)_
Piston Assembly ( 030" Oversize) (Ensemble de piston
(surdimensionnede 9_79mmou 9_030ee)_
Rin9 Sat (Sland_rd) (jew de bagues (Standard))
RingSet (.010"Oversize)(Jeude _gue_
(s_rdime_sionn_e_de0,25 mm ou 0,919po))
RingSet (.020"Oversize)(Jeude _gue_
(s_rdime_sionn_e_de0,91 mm ou 0,920po))
RingSet (.030"Oversize)(Jeude _gue_
(s_rdime_sionn_e_de0_76mmou 0,930pc))
Loc_Piaton Pin (Verrou-Axe de piaton)
PimPiaton (Sland_rd) (Axe-Piaton(Standar_l))
Pin_Piaton(09_' Undersize)(Axe-Pith
(_u_imensionne de 0,13 mm ou 0,095ee))
Rod-Conneating(Bielle)
Screw (Connecting Rod) 0/is (Bielle))
Vfflve-Exhau_ (Soupape-_chappemerd)
Valve-intake (Soup_i:_-Erdree)
Spring-valve (Jn_ke) (Re_ort-Soup_ (Entree))
Spring-Valve (Exhaust) (Res,_ort-Soupape
(_chappemerd))
Guard-Fl_,_1_eei(Capot-Vatant-mate_r)
Ret_iner-Vfflve (DisposiSf de ratenue-Soupa_e)
SIinger-Govemor,'Oil(Bague d'ata_ch_ite_
RegulateuriHuile)
Tappat_Vfflve(Po_ssatr-Sou_ee)
Camshaft (Arbr_ _ came_)
M_nifatd-tntake _Coll_x_teur-E_r_e)
Gasket-ln_ke (Joint atatique-Entr_e)
Screw (_rdakeManifold)(Vis (Colleuteur d'erdree))
Housing-ReWindStair (B_8-D_m_rreur _ cordon)
Roee-St_rter (Cordon-DCmarreu0
Grip-Star_erRope (Poignee-Cordon de demarreur)
Screw (Rewind Star_er)0/is (D_marreur _ cordon))
Scr_n-Rotating (Cr_pine_Rot_
Carburetor (Carbur_te_0
Shaft-Throttle (Arbre-Pou_e)
Seat4nJet(Si_ge-Admissioe)
Valve-Throttle(_oupeee-Pouss_)
Gasket-Air Cleaner (joint _ati_ue-Fiitre _ ai0
Tank-Fuat(R_rvoir-Combuatible)
Part#
Item Description
Pl_ceno,
Article Description
691697
190 Screw (FuelTank) _'VJS(R6seP#oird'essence))
692199
190A Screw (FuelTank) 0/is (R_servoir d'essence))
691912
209 Bleee-Govemor (Pffle-R_9_late_r)
690347
201 Link-Air V_ne (Lier_-Voietd'air mobile)
691862
209 Spring-Governor (Resso_Regulateur)
691859
211 Spring-Govemee Idle (Ressort-Regulataur de ralen0)
691445
222 Bracket_OordroJ(Suppo_Con_le)
394569
300 M_ffler (Silencieux)
692536
304 Housing-Blower (B_0-Souffleee)
692199
305 Screw (BJowerHousing)(Vis-(B_8 de soufflede))
690400
306 Shield-Cylinder (_cren-Cylindre)
690345
307 Screw (Cylinder Shield) (Vis (_cran decylindre))
690662
332 Nut (Flywhee0 (_crouWatant_mateu0
496914
333 Armature-Magneto (Am_ature_Mag_ete)
691061
334 Screw (vis (Armaturede m_gn_e))
902592
337 Plug-S_,_rk(Bougie-Allumage)
692390
356 Wire-Step (FiFArr6t)
398809
356A Wire-Step (FiFArr6t)
298989
359 Gasket Set-Engine(Jeu de jointsstatique_-Moteur)
692280
368 Screw (Garburato0 ('#is(Carburateu0)
691839
390 Spring-Choke Diaphragm (Res_o_Membrane de
I'etrengle_0
393 691837 Screen-Carburetor (Cr6_ine_Carburataur)
394 495770 Gasket-Carburetor Pum_ (Joint statique-Pomee du
carburate_0
426 691197 Screw (Governor Blade) ('#is (P_leduregulataur))
458 691236 Cup-Flywheel (Cou_elle-Volant_moteur)
456 692299 Plate_F_av,,lFsctio_ (Rieeue-Cliquat _friction)
469 694420 Ring_Rofatin9 Trim (Annea_-Compensateur rotatif)
523 691913 Dipstick (Jauge)
529 692199 Grommet (Geill_t)
534 691417 Screw (Air Cleaner)('#is(Flirts _ _i_)
535 698369 Fi_er-Air Cleaner Foam (Filtre-Mou&sedu filtre _air)
536 698472 Cle_ner_Air(Filtre-Air)
592 690800 Nut (Rewind Sterte0 (_crou (D_marre_r _ cordon))
597 691696 Screw (F_awlFsction F'lata)('#is (Plaquede cliquet
fiic0on))
909 499796 St_Ier-Rewind (D#_marreur-Rebobinage)
912 496046 TueeW_ickUp (Tube-Ramassage)
917 270344 SeaI-O Ring (Ird_ke M_nifold)(Joirtt_JointtoSque
(Catleateurd'eutree))
921 692310 Sw_ch-Stap (IntemJpteur_Arr¢t)
933 691321 SeaFOheeeYThrottleShaft (Joir_t-_trangleuriArbrede
eeussCe)
635 68538 Boot_Sp_rkPlug(Couvre-bome-Bougie d'_llumage)
669 692899 Spacer (Bu_e d'espacement)
970 691633 Spacer-Fuel T_nk (Butte d'espacemertt_Reeervatrde
c_mbusSble)
999 691855 Spring-Friction (Resso_Fdation)
719 690959 Pin_Locatir_9 (Det_mpeur)
718A 499047 PimLocatin9 (Det_mpeur)
741 691895 Gear-Timin9 (Pignon de distribution)
932 691443 Guard-Mufger(CapuchomSilencieuk)
936 691443 Screw (Muffler Guard) (vis (Capuceen du silencieuk))
942 691876 Seat-O Ring (Dipstick) (joint-Jatnt toSque(J_uge))
951 493890 Tarminat-Spark Plu9 (Borne_Bougied'atlumage)
969 691791 Seat_vaive(Intake) (Si_ge-So_eepe (Erdr_e))
970 691702 Seat_Vaive(Exha_at) (Si¢ge-Sou_ee (_chappemerd))
971 231349 Bushing-Guide (Exhaust)(G_mSure d'et_nch_,Se-Gatde
(_chappemerd))
63709 Bushing-Guide (intake)(Garniture d'C'tanch_ite-Guide
(Entree))
913 494499 Seat_CheckValve (Si¢ge-CJap_ de %'tenue)
957 497929 Cap-Fuel T_nk (Bo_cho_-Reservoir de comb_s0bte)
976 694394 Primer-Carburetor (Amorceu_C_rburateur)
1095 498526 Gasket Set-Valve (Jeu dejoints statiq_e_-Soupffl_e)
1219 499901 Pulle¥iS_ring Assemb_ (Pulley) (Po_lie/Ensemble de
re&sorts(Poulie))
1211 499901 PulleyiS_ring Assembly (Spring) (PoatieiEnsembie de
re&sorts(Poulie))
1219 695866 SeaI-O Ring (Carburato0 (Joint_Jointtosque
(Carburataur))
22
Page 23

Sears, Roebuck and Co. U.S.A. (Sears), the California Air Resources Board (GARB) and
the United States Environmental Protection Agency (U.S.EPA)
Emission Control System Warranty Statement
(Owner's Defect Warranty Rights and Obligations)
EMISSION CONTROL WARRANTY COVERAGE iS a. Fuel Metering System
APPLICABLE TO CERTIFIED ENGINES PURCHASED iN
CALIFORNIA IN 1995 AND THEREAFTER WHICH ARE
USED iN CALIFORNIA, AND TO CERTIFIED MODEL
YEAR 1997 AND LATER ENGINES WHICH ARE
PURCHASED AND USED ELSEWHERE IN THE UNITED
STATES (AND AFTER JANUARY 1, 2001 IN CANADA).
California and U.S. EPA Emission Control Warranty
Statement Your Warranty Rights and Obligations
The California Air Resources Board (CARB), U.S.EPA and
Sears are pleased to explain the Emission Control System
Warranty on your model year 2000 and later small off-road
engine (SORE). In California, new small off*road engines
must be designed, built and equipped to meet the State's
stringent anti-smog standards. Elsewhere in the United
States, new non-road, spark-ignition engines certified for
model year I997 and later, must meet similar standards set
forth by the U.S.EPA. Sears must warrant the emission
control system on your engine for the periods of time listed
below, provided there has been no abuse, neglect, or
improper maintenance of your small off-read engine.
Your emission control system may include parts such as the
carburetor or fuel-injection system, the ignition system, and
catalytic converter. Also included may be hoses, belts,
connectors and other emission related assemblies.
Where a warrantable condition exists, Sears will repair your
small off-road engine at no cost to you including diagnosis,
parts and labor.
Sears Emission Control Defects Warranty Coverage
The 1995 and later small off-road engines are warrar_ed for
two years. If any emission-related part on your engine is
defective, the part will be repaired or replaced by Sears.
Owner's Warranty Responsibilities
As the small off-read engine owner, you are responsible for
the performance of the required maintenance listed in this
owner's manual. Sears recommends that you retain all your
receipts covering maintenance on your small off-reed
engine, but Sears cannot deny warranty solely for the lack of
receipts or for your failure to ensure the performance of all
scheduled maintenance.
As the small off-read engine owner, you should however be
aware that Sears may deny you warranty coverage if your
small off-road engine or a part has failed due to abuse,
neglect, improper maintenance or unapproved modifications.
You are responsible for presenting your small off-read
engine to an approved Sears Service Center as soon as a
problem exists. The warranty repairs should be completed in
a reasonable amount of time, not to exceed 30 days.
If you have any questions regarding your warranty rights and
responsibilities, you should contact a Sears Service
Representative at 1-800,469-4663.
Sears Emission Control Defects Warranty Provisions
The following are specific provisions relative to your
Emission Control Defects Warranty Coverage.
1. Warranted Parts
Coverage under this warranty extends only to the parts
listed below (the emission control systems parts) to the
extent these parts were present on the engine purchased.
Inthe USA and Caned& a 24-hour hotline 1-800-469-466& has a menu of pre-recorded messages offering you product
maintenance information:
Cold start enrichment system
Carburetor and internal parts
Fuel Pump
b. Air Induction System
Air cleaner
Intake manifold
c. Ignition System
Spark plug(s)
Magneto ignition system
d. Catalyst System
Catalytic converter
Exhaust manifold
Air injection system or pulse valve
e. Miscellaneous Items Used in Above Systems
Vacuum, temperature, position, time sensitive valves
and switches
Connectors and assemblies
2. Length of Coverage
Sears warrants to the initial owner and each subsequent
owner that the Warranted Parts shall be free from
defects in materials and workmanship which caused the
failure of the Warranted Parts for a period of two years
from the date the engine is delivered to a retail
purchaser.
3. No Charge
Repair or replacemer4 of any Warrar4ed Part will be
performed at no cha_je to the owner, including
diagnostic labor which leads to the determination that a
Warranted Part is defective, if the diagnostic work is
performed at an approved Sears Service Center.
4. Claims and Coverage Exclusions
Warranty claims shall be filed in accordance with the
previsions of the Sears Warranty Policy. Warranty
coverage shall be excluded for failures of Warranted
Parts which are not original Sears parts or because of
abuse, neglect or improper maintenance as set forth in
the Sears Engine Warranty Policy. Sears is not liable to
cover failures of Warranted Parts caused by the use of
add-on, non-original, or modified parts.
5. Maintenance
Any Warrar4ed Part which is not scheduled for
replacement as required maintenance or which is
scheduled only for regular inspection to the effect of
"repair or replace as necessary" shall be warranted as to
defects for the warranty period. Any Warrar_ed Part
which is scheduled for replacement as required
maintenance shall be warrar4ed as to defects only for
the period of time up to the first scheduled replacement
for that part Any replacement part that is equivalent in
performance and durability may be used in the
performance of any maintenance or repairs. The owner
is responsible for the performance of all required
maintenance, as defined in this owner's manual.
6. Consequential Coverage
Coverage hereunder shall extend to the faiJure of any
engine components caused by the failure of any
Warranty Part still under warranty.
23
Page 24

GARANTIE ..................................... 24
REGLES DE SECURITE ....................... 24-26
ASSEMBLAGE ............................... 28-29
OPERATION ................................. 30-32
CARACTERISTIQUES DU PRODUIT ................ 33
ENTRETIEN ................................. 33-36
RANGEMENT .................................. 37
DEPANNAGE .................................. 38
GARANTIE DU DISPOSITIF ANTIPOLLUTION ........ 39
COMMENT COMMANDER LES PARTIES ........ PAGE
POSTERIEURE
GARANTIE LIMITI_E SUR LE NETTOYEUR ._, HAUTE PRESSION CRAFTSMAN
Pour une periode d'un an _ partir de la date d'achat, Sears reparera, sans frais, taut defaut de materiel ou de fabrication si
ce nettoyeur _ haute pression CRAFTSMAN® est entretenu et utilis6 conformement aux directives du manuel d'utilisation.
Sice nettoyeur est utilise _ des fins commerciales, la garantie s'appliquera pendar_ seulement 90 jours _ compter de la date
d'achat.
Sice nettoyeur _ haute pression est Iou6, carte garar_ie s'appliquera pendant seulemer_ 30 jours _ compter de la date
d'achat
La presente garar_ie ne couvre pas:
Les pieces non recuperables somme les bougies d'allumage ou les filtres _ air, lesquelles s'usent durant I'utilisation
normale de I'appareil.
Les reparations rendues necessaires en raison de I'abus ou de la negligence de I'operateur, y compris les dommages
causes par un manque d'eau dons la pampa ou le defaut d'entretenir Pappareil conformement aux directives du guide
d'utilisation.
LES SERVICES EN VERTU DE LA GARANTIE SERONT RENDUS EN RETOURNANT LE NETTOYEUR ,& HAUTE
PRESStON AU CENTRE DE SERVICE SEARS OU AU DETAILLANT SEARS CANADA.
La presente garar_ie vous accerde certains dreits I_jaux specifiques et il se peut qua vous ayez 6galement d'autres droits,
lesquels varient d'un l_tat _ I'autre ou d'une province _ Pautre.
Sears Canada, Inc.
_k eci est Ia sQret6 Ie symbole vif. II est utilis_ pour vous alerter aux dangers de blessure personnels potentiels,
Ob6ir tous messages de sQret_ qui suivent ce symbole _viter la blessure ou Ia mort possibles.
_ Lisez avec soin ce manuel et familiarisez-vous
avec votre pulv6risateur _ pression, Connaissez
ses applications, ses limitations et les dangers
qu'il implique.
Le symbole indiquant un message de secudte (,l&) est
accempagne d'un mot indicateur (DANGER, ATTENTION,
AVERTISSEMENT), d'un message iflustre eVou d'un
message de secudte visant _ vous avertir des dangers.
DANGER indique un danger qui, s'il n'est pas evite,
provoquera des blessures graves, voire fatales.
AMERTISSEMENT indique un danger qui, s'il n'est pas evite,
peut provoquer des blessures graves, voire fatales.
ATTENTION indique un danger qui, s'il n'est pas evite, peut
prevoquer des blessures mineures ou legates. Le mot
ATTENTION, Iorsqu'il est utilise sans le symbole d'alerte,
indique une situation pouvant endommager I'equipement.
Suivez les messages de securite pour eviter ou reduire les
risques de blessures ou de mort.
Symboles de Danger et Moyens
Emanations Toxiques
Surface Glissante Chute
Choc E_lectdque
injection Fluide
J
Feu Explosion Surface Chaude
Parties en mouvement Objets volant Effet de Recul
24
Page 25

3ans P_tat de Caiifornie un pare-_tincelles est requis par la
oi (section 4442 du Code des ressources publiques de
3alifornie). D'autres _tats ont des lois similaires. Les lois
'_d_raies s'appliquer_ aux terres f6d_rales. Si vous _quipez
e silencieux d'un pare-_tincelles, il doit _tre en bon _tat de
'onctionnement. Vous pouvez commander un
_are-_tincelles aupr_s de votre distdbuteur de service
Sears autoris&
AVERTISSEMENT
L'6chappement du moteur do ce produit eontient des produits I
ehimiques que I'Etat do Californie eonsid_re comme causant I
le cancer, des d_formations _ la naiseence ou d'autres
dangers conesrnant a reproduet on.
DANGER
I'inhalati0n des vapeurs nocives.
AVERTISSEMENI
LORSQUE VOUS AJOUTEZ DU CARBURANT
• Eteignez le pulveriseT:eur et laissez-le refreidir au moins
2 minutes avant de retirer le caouchon du reservoir do carburant.
• Remplissez toujours le reservoir _ essence _ I'exterieur.
• Ne remp_ssez pas trep le reesrvo_r Laissez esr_aco r_our
expansion de ressence.
• Eloigcez _essence oss _t_nceiles. des fiammes des ve_lleusss.
de la chaleur et de toute autrs source d'inflammetion.
• N'ailumez pss oe c_£arette ou ne fumez pas _ proximit_ de
apDarell.
LORSQUE L'EQUIPEMENT FONCTIONNE
• Ne peFiohez pas le motet_r OU I_cJIDemeTit vous £1scuerlez de
reNvet_er _e ['essence.
• Ne vapedesz pse de liquidss inflammables.
LORSQUE VOUS TRANSPORTEZ OU RtePAREZ
L'I_QUtPEMENT
• TransDortez ou reparez I'appare_l/orsque le reservoir d'essence
est VIDE ou Iors_ue _a seupape d'arr6t d'essence est FER_IEE
LORSQUE VOUS ENTREPOSEZ L'ESSENCE OU UN
_eQUIPEMENT AVEC UN R_eSERVOIR A ESSENCE
• Entrsposes-le Iota des a_oareils de chauffage, des fours, des
chauffeeau, des s6cheuses ou de tout autre appare_l
electremenager o_spose_t oune ve{_euse ou oe route autre
source d'inf_ammation risouant d'enfiammer tes vapeurs
d'essenoe
AVERTISSEMENT
provoquerdes ele_rocutions.
AVERTISSEMENT
• Pour nettoyer de fa_on plus eff_cacel tenez ie gicleur _ une
distance de 8 _ 24 pouces dela surface &nettoyer.
• Faitesfon_ionceretrar_:jezcetepparsitsurunesurfacestabfe.
• La surface _ nettoyer doit etre inolin6e et equipee
d'ecou_emer_ts afin de reduire la possibi_it_ de chutes dues aux
sprfa_S £1issantes.
• Soyez extr_mement pruderff si vous devez utJliser _
pulwrisateur Bur une 6che!le, un echafaudage ou tout autre
endroit reiativement instable:
• FermemenUe fusil de pulv_risation de comprehension aveo tes
deux mains en utitisent I!haute pulver_sation depression pour
eviter la blessure si le fusil donne un coup de pied le dos.
AVERTISSEMENT
• N visez jamais des personnes, des animaux ou des plantes
ave¢ le pistoiet puiv_riseteu_.
• N'aut0nsez jamai s des ENFANTS _ se servir du p_lverfseteU [.
, Ne reparez jamais les tuYaux & haute pres$ion Remplacez
• Gardez toujours le tuyau flexible & haute pression rass0rdea la
pompe et au pistolet de pS!verisatied torsque le sys_eme est
seus pression:
AVERTISSEMENT
• Laissez I%_uipement refroidir avarff de le toucher:
25
Page 26

AVERTISSEMEN1
rotative.
• Embouteiller des cheveux iOngs et enleve la bijouterM
AVERTISSEMEN1
ATTENTION
" NE verreuillez PAS le pistolet de pulv@risation dabs la position
ouverte.
* NE laiesez PAS le pistolet de pulverisation sans surveillance
alors que I!apparei[ e_: en marc.he.
" N'utilisez JAMAIS un pistolet de pulverisatJon qui n'est pes muni
d'un verrou d'arme ou d'un pontet installe et en ordre de
marehe.
* Aesurez-vous toujours que ie pistolet de pulverisaT:ion:los buses
et los acceesoires sor_ bieb fixes.
ATTENTION
• Protegez toujours Vos yeux toreque veus Otflisez Cot equipement
Ou Iorsque vous etes a proximite de quelqu'un qui I'utilise
AVERTISSEMENT
ce qu'il ne salt bes en contac_ avec la bougie:
ATTENTION
superieure & la pression nominate.
" Ne pointez pus le pistolet pulvensateur sur du verre Iorsquil est
en mode pulverisation.
* N vise.z jamais des blantes aveo le pistolet pulvenestePr
ATTENTION
• Si vous avez des questions e pro#as de {'utilisation or_vue de
Cot apparel] consultez votre d_taillaNt ou o'ommuni_usz avec
Sears
• N'utilisez JAMAIS un apparell ayant _les pieces bnsees ou
manauantes ou sans b_ti ou couverctes protecreurs.
• NE neutralisez AUCUN dispesitif de securite de cette machine
• Par tomes froid avant de demurrer le nettoyeur t_haute
oressmn verlfiez-en tous los elements pour vous assurer
qu'aucune £_ace ne s_yest formee
• N'ut;lisez JAMAIS te tuyau a haute aress_on oomme _oignee
oour de#later ra#parei! Utilisez touJours la po_gnee _e
aDearelL
• Verif_z ta eresence de fuites ou los slgnes de deterioration au
s¥_me de com_ustt_le, comme un tuyau use ou spong_eux.
des brides de esrrage desserrees ou manquantes ou un
r_ervo_r ou un bouchon endommag& Reparez routes los
defectuosites avant d'ubliesr le nett_yeur & haute o_on
• Cot apparett est con_u pour 6tre utilise uniquement avec des
eces Sears approuvees. Si I'aooareil est utilise avec des
recess oui NE sent PAS conformes aux carac_eristioues
mm_male_ tousles nsques et responesbilites incomberont &
utllmateur.
26
Page 27

CONNAiTRE VOTRE PULVERISATEUR .&.PRESSION
Lisez ce manuel d'utilisetion ainsi que les regles de s_curit6 avant de faire fonctionner votre pulverisateur b pression.
Comparez lee illustrations avec votre pulverisateur _ haute pression pour vous familiadser avec {'emplacement des differents
boutons et reglages. Conservez ce manuel pour reference ulterieure.
Pistolet de pulverisation
Buse reqlabte
/
/
/
Por_e-aocassolres
/
Rallonge de buse
Bouchon de rempliesage
et jaug _
Rallonge avec
air
lre
f Manette de pouesee
#
Chimique Injection
Pomce
d'amor_age
:_ese_oir
d'eesence
Prise d'eab
"Prise haute #ression
Pompe equip6 aveo
Systeme de refroidiesement automatiaue
Bouchon de remplissege et jauge d'huile - Verifiez le Porte-acceseoires - Le porte-aceessoires vous foumit un
niveau d'huile et remoliesez le moteur d'huile ici. Consultez la espace rJe rangement pratique pour le pistolet de
page 29 au sujet des recommandations relatives & I'huile et
des directives de rempliesage.
Buse reglable * reglage & haute ou baese press_on;jet etroit
ou en ever_ail.
Injection Chimique Usage &siphon ou autre oression
chimioue daes le bas uresslon
Demarreur & reoul - Util}se oour demarrer le moteur
manuellement,
Filtre & air - Filtre de type sac qui limite la quantite de
oouesieres et de saletes dane te moteur.
Marietta de pouseee -Cette manege [_lace le moteur en
mode demarrage pour ie lanceur et eteint le moteur en
marcne.
Pistolet de pulverisetion - un dispositif de detente oermet
pulverisatior la turbo-lance et la rallonge de buse.
Prise d'eau - Branchement oour le tuyau d'arresage.
Prise haute pression *Vous permet de brancher le tuyau &
haute _rese_on,
Rallonge aveo turbo-lance - La turboqance oroduit un
mouvement rapide et circulaire du jet _ haute oressJon afin
de procurer un nettoyage efficace.
Rallonge de buse - Pour utiliser la buse reglable, fixez la
rallonge au p_stolet de pulverisation.
Reservoir d'essence - Remoliesez le reservoir avec de
I'essence ordinaire sans plumb. Laissez toujours de la olace
pour I'expansion de I'eesence.
Systeme de refroidiseement automatique - Fait circuler
I'eau dans la pompe Iorsqu'elle atteir4 51_ & 68°C (125 °
de contrSler le jet d'eau sur la surface _ nettoyer. Le oistolet 155_FJ. L'eau chaude s'eeoulora de la pompe sur le sol.
est muni d'un verrou de securit& Ce systeme empeche la pompe interne de s'abfmer.
Pompe - Developpe une pression 6levee Tuyau & haute pression (non illustr6) - Raccerdez une
Pompe d*amorqage - Prepare un moteur froid pour _e extremite du tuyau au pistolet de eulv_risation et I'autre &la
demarrage
sortie du netloyeur _ haute press_on.
27
Page 28

Vc_re nettoyeur _ haute pression exJge que quelque _mblee
et soit pt_,t pour I'usage apr_s il a et6 convenablemer_ entretenu
avec le petrole et le carburant recommandes.
Si vous avez des problf_*mes au cours de I'assemblage
de votre nettoyeur & haute pression ou si certaines
pi_ces sont manquantes ou endommagL_es, appelez la
ligne d'assistance pour les nettoyeur & haute pression
au 1-800-222-3136,
IMPORTANT: Tout essai de demarrer le moteur avant qu'il
ne soit correctement ravitaille en huile risque de provoquer
une panne de moteur.
DI BALLER LE NETTOYEUR A
HAUTE PRESSION DU CARTON
Ouvrez le carton et deceupez de haut en bas les deux
angles opposes _ la poignee, afin que le panneau se
replie _ plat.
Enlevez la sac de pieces, accessoires et insertions qui
accempagne le nettoyeur _ haute pression.
Faites rouler le nettoyeur _ haute pression par le c6te
ouvert du carton.
Verifiez si vous n'avez pas oublie de pieces
supplementaires dans le carton
CONTENU DU CARTON
Verifiez routes les pieces et accessoires du nettoyeur ,_haute
prassion. Si certaines des pieces enumerees ci-dessus sont
manquantes ou endommagees, appelez la ligne d'assistance
pour les nettoyeur _ haute pression au 1-800-222-3136.
Appareil principal
Tuyau _ haute pression
Pistolet pulverisateur
Rallonge de buse avec buse reglable
Turbo-lance
Por|e-accessolres
Huile & moteur
Sac de pieces (cempr_nant les pieces enumerees
ci-dessous)
Manuel d'utilisation
Fiche d'enregistrement
Familiarisez-vous avec chaque piece avant d'assembler le
nettoyeur _ haute pression. Verifiez le contenu de la botte
I'aide de I'illustration de la page 27. Si une piece est
manquante ou endommagee, veuillez joindre le service de
depannage du nettoyeur _ haute pression au numero sans
frais 1-800-222-3136,
ASSEMBLAGE DU NETTOYEUR A
HAUTE PRESSION
Votre nettoyeur _ haute pression Craftsman a ete monte en
grande partie en usine. Cependant, vous devrez effectuer
les t_ches ci-dessous avant d'utiliser votre nettoyeur _ haute
pression.
1. Ajoutez de I'huile au carter du moteur.
2. Ajoutez de I'essence dans le reservoir.
3. Branchez le tuyau _ haute pression au pistolet
pulverisateur et _ la pompe.
4. Branchez la source d'aiimentation d'eau _ la pompe.
Fixez le Porte-Accessoires
"1. Pceez le porte-accessoires sur le dessus de la poignee.
2. Placez la rallonge de buse, la turbo-lance et le pistolet
pulverisation dans le porte-accessoires.
Ajoutez de I'Huile & Moteur
IMPORTANT: Tout essai de demarrer le moteur avant qu'il
ne soit correctement ravitailie en huiie risque de provoquer
une panne de moteur.
REMARQUE: N'ajoutez au carter de moteur que de I'huile
detergente de haute qualite ayant une des cotes de service
API suivantes : SF, SG, SH, SJ ou une huile cotee SAE 30
ou plus. N'utilisez PAS d'additifs speciaux.
1. Choisissez la viscceite de I'huile en fonction du tableau
suivant.
Temperatures d'Usage Ont Pr_zu
L'utilisation d'huiles _ viscesite multiple (5W-30, 10W-30,
etc.) alors que la temperature est sup4_rieure _ 4_C (40_F)
entra?nera une consommation d'huile plus eievee que la
normale. Verifiez I'huiie plus souven_ Iorsque vous utilisez
une huiie _ viscceite multiple.
** L'utilisation d'huiie SAE 30 _ une temperature inferieure
4_C (40_F) pourrait rendre le demarrage difficile et causer
des dommages _ I'alesage du moteur en raison d'une
lubrificetion inadequate.
2. Piacez le nettoyeur _ haute pression sur une surface
plane.
3. Nettoyez la surface autour de I'orifice de remplissage
d'huile.
4. Enlevez le bouchon de remplissage d'huile et la jauge
d'huile.
5. Essuyez la jauge d'huile, inserez-la dans I'orifice de
remplissage d'huiie et serrez-la solidement avant de la
retirer. Ajoutez I'huiie recommandee jusqu'au repere
maximum ("Full") de la jauge d'huile.
28
Page 29

Raccorder le Tuyau et la Source D'eau & la
AJOU_ER _XiMUM Pompe
IMPORTANT: VOUSdevez attacher tousles tuyaux avant de
d6marrer le moteur. Si vous demarrez le moteur sans que
tousles tuyaux soient raccordes et sans arrivee d'eau, vous
risquez d'endommager la pompe.
6. Versez I'huile lentement. Essuyez la jauge d'huile 1. Deroulez le tuyau _ haute pression et fixez le _ la base
chaque fois que vous verifiez le niveau d'huile. NE du pistolet pulverisateur. Serrez manuellement
remplissez PAS trop le carter d'huile.
7. Reposez le bouchon de remplissage et la jauge d'huile;
serrez-les selidement
REMARQUE: Verifiez le niveau d'huile pendant le rodage du
moteur. 2. Fixez Pautre extremite du tuyau _ haute pression _ la
Ajouter de l'Essence prise haute pression sur la pompe. Serrez manuellement.
,_ik AVERTIS,S.EMENT! NE remplissez JAMAIS le
t?_servoir_ linterieur. NE remplissez_JAMAIS le t?.=servoir
Iorsque le moteur est en marche ou [orsqu'il est chaud.
Laissez la machine t_froidir pendant deux minutes avant
de remplir le reservoir. N'allumez PAS une cigarette ou
ne fumez pas Iorsque vous remplissez le reservoir.
,_ik AVERTISSEMENT! NE PAS trop remplir le reservoir.Toujours laisser de la place pour la dilatation du
carburant. Avant de demarrar le nettoyeur, essuyez tout
deversement d'essence sur le moteur et I'appareiL
1. Utilisez de I'essence normale automobile sans plomb
propre et entreposez-la dans un contenant approuve,
propre et ferm& Utilisez un entonnoir de remplissage
propre. N'utilisez JAMAIS de I'essence %ventee",
demeuree dans I'appareil depuis la saison anterieure ou
de I'essence entreposee pendant une pedode prolongee.
2. Nettoyez le moteur autour du capuchon du tuyau de
remplissage et enlevez le capuchon.
3. Ajoutez lentement de I'essence "SANS PLOMB" dans le
reservoir. Utilisez un entonnoir pour eviter d'en
renverser. Remplissez lentement le reservoir jusqu'_
environ 1.5" po en dessus du col de remplissage.
3,
Avant de brancher votre tuyau d'arrosage _ la pdse
d'eau, inspectez la filtre integre. Nettoyez la filtre integre
si elle contient des debris, remplacezqa si elle est
endommagee. Si la crepine est endommagee, consultez
la section "Entretien du joint torique". NE VOUS
SERVEZ PAS DU NETTOYEUR A HAUTE PRESSION
SI LA FILTRE INTI_GRE EST ENDOMMAGI_E.
Inspecter filtr8
integre, NE PAS
utiliser si
endommage;
nettoyer si sale.
4. Faites couler de I'eau dans le tuyau d'arrosage pendant
30 secondes pour nettoyer tousles debds. Fermez le
robinet d'eau.
IMPORTANT: Ne siphonnez pas de I'eau stagnante pour
vous en servir. Utilisez SEULEMENT de I'eau froide (_
moins de I00_F (38°C)).
5. Connectez le tuyau d'arrosage (he pas depasser 50 pieds
dans la Iongueur) _ la prise d'eau. Serrez manuellement
4. Remettez le capuchon en place et essuyez Pessence
renversee.
IMPORTANT: II est important d'empecher la formation de
gomme dans les pieces du systeme de carburation relies
que le carburateur, le filtre _ essence, le tuyau d'essence ou
le reservoir pendant le remisage. On sait egalement par
experience que les carburants contenant de I'alcool (appeies
gasohol, ethanol ou methanol) peuvent attirer I'humidite qui
provoque la separation et la formation d'acides pendant le
remisage. Un gaz acide peut endommager le systeme de
carburation d'un moteur pendant le remisage.
Pour eviter des problemes de moteur, le systeme de
carburation dolt etre vide avant le remisage de 30 jours ou
plus. Voir la section "Remisage" _ la page 37. NE JAMAIS
utiliser de produits de nettoyage du carburateur ou du
moteur dans le reservoir d'essence, des deg&ts permanents
risquent de se produire.
ATTENTION
respecteoettec_nsigne,ne seror_pascouver_sparla garantie.
6. OUVREZ le robinet d'eau et appuyez sur la gachette du
pistolet pulverisateur afln de purger I'air et les impuretes
du systeme de la pompe.
AVERTISSEMENT
vos yeux de fa#on appropriee.
29
Page 30

Liste de V_dfications Avant de D_marrer
le Moteur
Examinez I'assemblage de I'appareil pour confirmer que
vous avez effectue tout ce qui suit:
1. Verifiez qu'il y a de I'huile dans le carter, jusqu'au
niveau appropri&
2. Ajoutez de I'essence dens le reservoir.
3. Verifiez que les connexions du tuyau sont correctement
settees (haute pression et eau) et qu'il n'y nit pas de
coude, de coupures ou d'endroits abTmes.
4 Foumissez de I'eau _ une cadence appropriee.
5. Assurez-vous d'avoir lu les "Regles de Secudte" et
"Comment Utiliser Votre Pulverisateur" event de I'utiliser.
6,
Si vous demarrez I'appareil apres I'avoir laisse
entrepose, voir la rubrique "Entrepceage" _ la page 37.
COMMENT UTILISER VOTRE
NETTOYEUR .&.HAUTE PRESSION
Si vous avez des problemes _ feire fonctionner votre
nettoyeur _ haute pression, n'hesitez pas _ appeler le service
d'assistance au %800-222-3136.
Mettre Votre Nettoyeur & Haute Pression
en Marche
Pour demarrer votre nettoyeur & haute pression la premiere
fois, suivez ces instructions pas _ pas. Cette information qui
vous aide _ mettre votre nettoyeur _ haute pression en
marche s'applique egalement s'il est reste sans fonctionner
pendant au moins une joumee.
1. Placer la roodelle de pression pres d'un hors de la
source d'eau capable d'alimentation d'eau _ un taux de
flux plus grand que 3.0 gallons par la minute et aucun
moins que 20 PSI _ la fin de rondelle de pression du
tuyau de jardin.
2. Verifiez que le tuyau _ haute pression est bien serre sur
le pistolet pulverisateur et sur la pompe. Consultez les
illustrations de la rubrique "Assemblage du Nettoyeur
Haute Pression".
3. Verifiez que I'appareil est en position horizontale.
4. Branchez le tuyau d'arrceage _ la source d'eau sur la
pompe du nettoyeur _ haute pression. OUVREZ le
robinet d'eau.
ATTENTION
d'endommager la pornpe:
5. Serrez la g&chette sur le pistolet jusqu'_ ce que vous
obteniez un debit d'eau regulier Cela purgera la pompe
de Pair et des impuretes.
6. Fixez la rallonge du gicleur au pistolet pulverisateur.
Serrez manuellement.
"\
7,
Placez le gicleur en mode basse pression (faites glisser
le gicleur vers I'avant) et serrez la g&chette sur le
pistolet pulverisateur pour faire sortir la pression
provoquee par I'ARRIVI_E d'eau. L'eau sortira du
pistolet en mince filet. Continuez _ tenir la gachette
jusqu'_ ce que le debit d'eau soit regulier et qu'il ne
reste plus d'air ou d'eau dens le systeme. Rel&chez la
g_chette.
8,
Engagez le verrou de securite de la g_chette du pistolet
pulverisateur.
Placez la manette de commande de puissance en
position "Rapide", illustree ici par un lapin.
Rapide Arr_t
Manette de
Poussee est
-_""_ la position
"Arret"
REMARQUE: Pour redemarrer un moteur _ chaud, reglez la
manette de poussee sur "Rapide".
Pour d_marrer Ie moteur pour la premi6re fois:
10. Assurez-vous que la manette de poussee est _ la
position "Rapide" (indiquee par un lapin sur le moteu0.
11. Poussez la pompe d'amor£age fermemer_ 5 fois, en
attendant 2 seceodes entre cheque poussee.
Par
la suite, pour d_marrer Ie moteur:
12.
Assurez-vous que la menette de poussee est en
position "Rapide" (indiquee par un lapin sur le moteu0.
13.
Actionnez la pompe d'amorgage fermeme_ 3 lois, en
attendant 2 secendes er4re cheque poussee. Si le moteur
est chaud, N'actionnez PAS la pompe d'amorgage.
14.
Saisissez la poignee du demarreur et tirez lentement
jusqu'& ce que vous sentiez de la _sistance. Tirez alors
rapidement pour demarrer le moteur.
l&
Ramenez la poignee du demarreur lentement. NE
laissez PAS le cordon se frapper contre le demarreur.
, Appuyer sur ;a dC=_entedu pistolet de pu}vedsation & routes _s
fois que le demarreur est _re et que le moteur ne demarre pas.
30
Page 31

ATTENTION
, Ne JAMAIS utiliser le_ boyaux peur deplacer !!equipement.
REMARQUE: Toujeurs gerder {'etrangler le levier dens le
_Rapide" {aposition en operant la nettoyeur _ haute
pression.
Comment Arr_ter Metre Nettoyeur & Haute
Pression
Plecez le menette de commande du moteur sur le
position "Arr_t".
Appuyez sur la g_chette du pietolet pulv_risateur
pour faire eortir la preeeion du tuyau.
REMARQUE: Un petite quantit_ d'eau s'_chepoe }orsque
vous rel_chez }a pression
Comment Utiliser les Gicleurs Rdglables
Vous savez meir4enent cemmer_ DEMARRER et
ARRETER votre netteyeur _ haute pression. L'infermetion
foumie dans sette section vous indique comment regler la
forme du jet et eppliquer des produits detergents eu tout
autre produit chimique de netteyage.
ii_i _ _
Glisser le gicleur en arri_re Glisse gicleur en event pour
pour I'Haut Mode de bas pression et detergent
Pression
3. En tournent le gicleur, vous reglerez {aforme du jet,
etroite ou en eventail.
AVERTISSEMENT
forme du jet:
A I'extremite de votre pistolet de pulv_risation, une poignee
de buse permet de regler le pression et la ferme du jet
1. Dirigez le gicleur vers le bes sur une surface dure et
appuyez sur la g&chette pour essayer.
T0urner le gicleurdans !esees Teumer le gicleur dens le
inversedes aiguilles d'une sens des aiguillee d'une
montre pour le modele de montre pour le modele de
pUlvf_risatJonde ventilateur polv_risatio_ _troit
4. Pour nettoyer de fagen plus efficace, tenez le gicleur
une distance de 8 _ 24 pouces de le surface _ nettoyer.
5. Si vous placez le gicleur trop pr_.s, surtout si vous etes
en mode heute pression, vous risquez d'ebimer le
surface _ nettoyer.
6. Ne vous approchez pes & plus de 6 pouses Iorsque
vous nettoyez des pneus.
Utilisation de la Turbo-Lance
La turbo-lense procure un mouvement rotatif rapide eu jet
haute pression. Le jet _ haute pressien est le plus efficace
Iorsque I'extremite de le rellenge de buse se treuve _ de
20 _ 60 cm (de 8 _ 24 po) de le surface _ nettoyer.
Commencez toujour_ evec le turbo-lance eloign_e de {a
surface _ nettoyer pour le repprecher progressivement
jusqu'_ se que vous obteniez la force de netteyage d_sir_.e.
REMARQUE: Vous ne pouvez utiliser de detergent avec }a
turbo-lance.
ATTENTION
2,
Feites glisser le gicleur vers I'avent pour regler le jet en
mode basse pression. Faites glisser le gicleur vers
I'erriere pour atteindre le pressien elevee.
pas endommagee par fe jet & haute pression.
31
Page 32

Appliquer des Produits Ddtergents avec le
Gicleur Rdglable
IMPORTANT: Utilisez des sevens census sp6cialement
pour les nettoyeur & haute pression. Lss produits
deterger_s managers risquent d'endemmager la pomps.
ATTENTION
ta pampe.
Pour appliquer des produits detergents, procedez
comma suit:
1. Consultsz le rubrique treitar_ de I'utilisation des gicleurs
r_jlebles.
2,
Preparez une solutiondetergente comma requis par le
fabricant.
3.
Placez {a petite extremite du filtre du tube siphon dans
Is recipient de detergent.
ATTENTION
contact par m6garde aveole silencieux ohaud
4.
Faites g]isser le gicleur r_jlable vers Pavant en mode
basse pression Les preduits detergents ne peuvent etre
appliques avec le gicleur en position haute pression.
5. Assurez-vous que le tuyau d'arrceage est branche _ la
pdse d'eau. Vedfiez qua le tuyau _ haute pression est
branche au pistolet pulverisateur et _ la pomps.
Demarrez le moteur.
6. App]iquez le detergent sur une surface seche, en
commengant par la pattie inferieure de la surface
nettoyer et travaillez vers le haut, avec de longs
mouvements reguliers et qui se chevauchent.
7.
Laissez le detergent "tremper" pendar_ 3 _ 5 minutes
avant de laver et de rincer. App]iquez _ nouveau, si
besoin est, pour eviter qua la surface ne seche. NE
laissez PAS le detergent secher (pour eviter ]es traces).
8+ Pour {aver, commencez par le bas de la surface et
remontez en effectuant de longs mouvements 6gaux qui
se chevauchent.
IMPORTANT: Vous devez rincer le systeme d'injection de
produits chimiques apres cheque utilisation en pia_ant le
filtre dans un seau rempli d'eau claire, puis fairs fonctionner
le nettoyeur _ haute pression _ basse pression pendant 1
2 minutes.
Rincer le Nettoyeur & Haute Pression
Pour rineer:
1. Faites g]isser le gicleur vers I'arribre sur haute pression
et appuyez sur la gachette. II feudra quelques secendes
pour qua le detergent se vide.
REMARQUE: Vous pouvez egalement empecher le
deterger_ de couler en enlevant simplement le tube siphon
de la bouteille.
2. NE placez PAS le pistolet pulverisateur trop pres de la
surface qua vous desirez pulveriser.
AVERTISSEMENT
• Pour nettoyer de fa6on plus efficace, tenez le gicleur _ une
distance de 8 b 24 _ouces de ;2 surface & nettoyer
• Fa_tes fonctionner et rangez cat a_pareil sur une surface stable
• Soyez extr_mamant orudent s_vous _evez ut=l_serle
oulv_risateur sur une echelle un 6chafaudage ou tout autre
engro_t relat_vement instable
• Fermement le fusil de puIvedsation de comprehension avac les
deux mains en utilisant rhaute aulverisation de pressmen pour
eviter la blesaure site fusil donne un couo oe Died le dos
3. Appliquez ]e jet _ haute pressmansur une petite surface,
puis vedfiez-la pour voir si ells n'est pas abtmee. Si ells
n'est pas abimee, vous pouvez continuer.
4. Commencez en haut de I'endroit que vous devez rincer,
en descendan_ avec les memes mouvements qui se
chevauchent comma Iorsque vous avez nettoy&
S_/uSt6mede Refroidissement Automatique
rpression Thermique)
Si vous faites tourner le moteur de votre pulverisateur
pendant 3 & 5 minutes sans appuyer sur {ag&chette du
pistolet pulverisateur, Peauqui circule dans Is pomps peut
atteindre une temperature de 5"1° _ 68°C (125 _ _ 155_F).
Lorsque I'eau attaint cette temperature, le systeme de
refroidissement automatique se declenche et refroidit la
pomps en vidant I'eau chaude sur le sol. Ce systeme
empeche la pompe interne de s'ab/mer.
32
Page 33

RESPONSABILITES DU PROPRIETAIRE
Respectez le calendrier d'er_retien du nettoyeur selon le nombre d'heures de fonctionnement ou le temps ecoule, le premier
des deux preva]ar_.
Lorsque I'apparei] est utilise dans les conditions adverses decrites ci-dessous, il faut en faire I'entretien plus fr_quemment.
CALENDRIER D'ENTRETIEN
INSCRIVEZ LES DATES AU FUR ET_, INTERVALLE DE FONCT|ONNEMENT SELON DATES D'ENTRE'rlEN
MESURE QUE VOUS EFFECTUEZ LES HEURES D'UTILISATION
V6rifier le tuyau a haute pression I X
Verifier le tuyau de d_tergent I X
Verifier ta presence de fuites dans le
p sto et _ pu Ver sat on et i assemb age I I
Purger la pompe de I'air et des impuretes
qui s y treuvent I I
Changer !huiie de Is pompe _ X
Preparer Is pompe pour I'entreposage
une temperature inferieure _ 0K_ (32;_F)
MOTEUR
Veri{ier e nveau d hue
Changer Fhuile du moteur _ X_
Faire I'entretien du filtre _ air _ X _
Faire I!entretien de Is bougie d!allumage _ X I
FaJre I'entretien du pare-etJncelles _ X
Preparer pour Ientreposage Si le nettoyeur ne sere pas utiliSe I I
durent p uS de 30 Ours.
Nettoyez I'appareil s'il e_ ensre_se Remplacez route piece perforce ou endommagee
Changez I'huile apres les cinq (5) premieres heures de fonctionnement et par la suite aux 50 heures de fonc43onnement ou une fois I'an
Nettoyez Fappareil plus souvent si vous I'utJlisez dens un milieu sale ou poussiereux.
Remp!scez les pieces ptus frequemment si vous utilisez f'appareil dsns un milieu sale ou poussiereux.
CARACTERISTIQUES DU PRODUIT
Caracteristiques du Nettoyeur & Haute Pression
Pression nominale .......... 137.9 BAR (2,000 PS0
Debit d'ecoulement ......... 7.6 UMIN (2.0 GPM)
Detergent ................. Uti]isez un detergent
homologue pour les
pulverisateurs
Temperature De L'eau ....... Ne doit pas depasser 38_C
(100_F)
Poids _ I'Expedition ......... 21.8 kg (48 Livres)
Caracteristiques du Moteur
Puissance nominale ........ 2,8 kW (3,75 HP)
Type de bougie d'allumage:
Resistance ............ Champion RJ-19LM
Definir I'ecartement _ .... 0,76 mm (0,030 po)
Capacite du r6servoir
de combustible ............. 0,95 I (1,0 pinta US)
Huile:
Au-dessus de 4_C (40_F) . .SAE 30
de -18_C _ 4_C
RECOMMANDATIONS GENERAL
La garantie du nettoyeur _ haute pression ne couvre pas les
elements soumis _ Pabus ou _ ]a negligence de I'operateur.
Pour obtenir ]a pleine application de la garantie, il faut que
I'operateur fasse Pentretien du nettoyeur _ haute pression
conformement aux directives de ce manuel d'utilisation y
compris son entreposage adequat selon les directives de la
section "Entreposage" _ ]a page 37.
Pour assurer I'entretien 8dequat du nettoyeur _ haute
pression, il faut effectuer periodiquement certains reg]ages.
IIfaut effectuer toutes les operations d'entretien et les
r6glages au moins une lois par saison. Suivez les
instructions du "Calendrier d'entretien" ci-dessus.
REMARQUE: Une fois par annee, vous devez nettoyer ou
remplacer la bougie d'allumage et remplacer le filtre g air,
Une nouvelle bougie d'allumage et un filtre _ air propre
permettent d'assurer que le melange essence-air est
adequat en plus de con_ribuer au meilleur fonctionnemer_ de
votre moteur et d'augmenter sa duree de vie,
Lorsque des pneus gonf]ables sont utilises, conservez la
pression d'air _ le valeur indiquee sur les pneus ou er_re
15 et 40 Ib/po2.
(de OaF_ 40_F) .......... SAE 5W-30 ou 10W-30
33
Page 34

Avant Chaque Utilisation 1.
1. Verifiez le niveau d'huile du moteur.
2. Verifiez si la grille de {a prise d'eau n'est pas abTmee.
3. Verifiez si le filtre du tuyau n'est pas ab_m&
4. Veriflez si le tuyau _ haute pression n'a pas de fuite.
5. Verifiez si le tube siphon pour les detergents et le filtre 2.
ne sor_ pas endommages.
6. Verifiez si le pistolet pulverisateur et de I'assemblage de
la rallonge reglable du gicleur n'ont pas de fuite.
7. Purgez la pompe de Pair et des impuretes qui s'y 3.
trouvent.
ENTRETIEN DU NETTOYEUR .&. 4.
HAUTE PRESSION
Purgez la Pompe de rAir et des Impuretds
V_rifiez et Nettoyez la Grille de la Prise
D'eau
Inspectez la grille de la prise d'eau. Nettoyez-la si elle est
bouchee ou remplacez-la si elle est endommagee.
Pour purger I'air de Ia pompe, procedez comme suit:
1. Reglez le pulverisateur comme il est indique _ la
V_rifiez le Tuyau & Haute Pression
Le tuyau _ haute pression peut avoir des fuites, s'il est use, 2.
tordu ou mal utilis& Inspectez le tuyau avar_ chaque 3.
utilisation. Veriflez tousles tuyaux pour les coupures, les
fLdtes, I'abrasion ou le gonflement du couvercle, ou si certains
raccerds sor_ ab?mes ou mobiles. Si vous remarquez quelque
chose, remplacez immediatement le tuyau.
Pour purger les impuret6s de Ia pompe, procedez
comme suit:
1. Reglez le pulvedsateur comme il est indique _ la rubrique
_ AVERTISS
2. Enlevez la rallonge de gicleur du pistolet pulverisateur.
3 Demarrez le moteur en suivant les instructions de la section
4. Apppuyez sur la g_chette du pistolet pulverisateur et
&la pression nominate du nettoyeur.
V_rifiez le Pistolet et la Rallonge de
Gicleur Rdglable
Inspectez le raccord du tuyau sur le pistolet pulverisateur,
s'il est correctement fix& Essayez la g_chette en appuyant
et en vous assurant qu'elle "s'enclenche" en place {orsque
vous {a rel&chez. Placez le verrou de securite en position
MARCHE et essayez la g_chette. Vous ne devriez pas
pouvoir Penfoncer. Remplacez le pistolet immediatement s'il
echoue un de ces essais.
Vdrifier le Filtre Intdgrd
Se referer _ I'illustration et reparez le filtre integre s'il est
bouche, en procedant comme suit:
5. Lorsque I'eau ardve regulieremer_, enclenchez le verrou
Entretien du Gicleur
Vous sentirez des pulsations Iorsque vous appuyez sur la
g_chette du pistolet pulverisateur s'il y a une pression
excessive darts la pompe. La cause principale de cette
pression excessive dans {a pompe est un gicleur bouche ou
encombre par des materiaux etrangers, comme de la
poussiere, etc. Pour r6gler le probleme, nettoyez
immediatement le gicleur _ Paide des outils qui
accompagnent votre pulverisateur et procedez comme suit:
1. Eteignez le moteur et fermez I'arrivee d'eau.
2.
Detachez le pistolet pulverisateur et la rallonge de
gicleur du tuyau _ haute pression. Detachez la rallonge
de gicleur du pistolet pulverisateur et enlevez le joint
torique et la grille de la ralionge de gicleur. Rincez la
grille, le pistolet pulverisateur et la rallonge de gicleur
r_jlable avec de Peau propre pour retirer les debris.
Placez {a grille du filtre integre dans Pextremite filetee
de {a rallonge du gicleur. La direction importe peu.
Faites entrer la grille avec Pextremite gomme d'un
crayon jusqu'_ ce qu'elle s'encastre _ plat au fond de
I'ouverture. Faites attention de ne pas plier {a grille.
Piacez le joir_ torique darts I'encoche. Serrez le joint
torique contre la grille du filtre integr&
Assemblez la rallonge du gicleur au pistolet pulverisateur,
comme il est explique plus haut darts ce manuel.
rubrique "Assemblage du Nettoyeur _ Haute Pression".
Raccordez la source d'alimentation d'eau et ouvrez le
robinet.
Tirez sur la g&chette du pistolet pulverisateur et tenez-la.
Lorsque I'eau ardve reguiieremer_, enolenohez le verrou
de securite.
"Assemblage du Nettoyeur _ Haute Pression'. Raccordez
la source d'alimentation d'eau et ouvrez le robinet.
"Commer_ utiliser vc_re nettoyeur _ haute pression".
tenezqa.
de securite et fixez la rallonge de gicleur.
Detachez la rallonge du pistolet pulverisateur. Toumez le
gicleur dans le sens des aiguilles d'une montre en
position jet. A I'aide de la cle hexagonale de 2 ram (5/64)
foumie, enlevez le gicleur de Pextremite de {a ralionge.
-_-_RallongeGioleur_de Fiittelntegre%IJ0intT0tiq = @_ 1_
34
Page 35

3. Enlevez le filtre int6gre de I'autre extr_'.mite de la
rellenge du gicleur.
4. Utilisez utiliser un petit trombone pour retirer tout
materiau qui bouche eu encembre le gicleur.
!%LL____=._ ......... __+_--.
!, _'_
!nserer le fii dens office et le Virage de long
en large pour eclaireir t'obstruction.
5. A +'aide d'un tuyau d'arrceage, enlevez les debris
supplementaires en injectant de Peau _ centre ceurant
dans le rellenge du gicleur. Rincez pendant 30
60 secendes environ. Tournez le rallonge de gicleur
r_cjleble pour pulveriser en jet et bougez le gicleur de
haut en bas tout en rinefant.
6. Reinstailez le gicleur et le filtre integre dens la rall0nge.
NE serrez PAS trop le gicleur avec la cle hexagonale.
7. Raccerdez la railonge du pistolet pulverisateur.
8. Raccerdez I'arrivee d'eau, ouvrez le robinet d'eau et
demarrez le moteur.
9. Essayez de feire fonctionner le pulverisateur avec le
gicleur en position haute et basse.
Entretien du Joint Torique
Precurezwous un necessaire de reparation de joint torique,
article numere 191922GS, le centre de service Sears. Ce
necessaire n'est pas inclus avec le nettoyeur _ haute
pression. Le necessaire cemprend des joints toriques de
rechange, une rendelle de caoutchouc et un filtre d'arrivee
d'eau. Pour remplacer les joints toriques de votre nettoyeur,
consultez lafeuille d'instructions foumie avec le necessaire.
Entretien de la Pompe
Vidange de I'huile
Remplacer Phuile routes les 50 heures, ou un lois per an, si
cette periode echoit la premiere.
REMARQUE: Vous devez vous procurer une bouteille
graduee d'huile _ pompe, artJcle numere 190586GS le
centre de service Sears.
Bouchon Noir
de Vidange
d'Huile
Incliner le nettoyeur haute pressmensur le cSte pour
vidanger Phuile completement de +apompe dens un
rec+pient homologue pour cet usage.
4.
Renverser le nettoyeur haute pression dens le direction
oppceee et remplir le pompe avec Phuile recommandee
par le meme orifice (un petit en_onnoir peut s'everer
utile).
5.
Remettre le bouchon noir en place et le serrer
fermement.
6.
Mettre le nettoyeur haute pression dens sa position
normale. Mettre de I'essence et feire le niveeu d'huile
moteur.
ENTRETIEN DU MOTEUR
Vdrification du niveau d'huile
il est necessaire de verifier le niveau d'huile event cheque
utiiisation ou epres cheque periode de 8 heures d'utilisatien
Gerdez un niveau d'huile constant.
Changement d'huile
Changez Phuile epr_s les cinq (5) premieres heures
d'operation et par la suite aux 50 heures d'operetion. Si veus
utilisez votre nettoyeur _ haute pression dens un endroit tr_.s
sale ou poussiereux ou par temps tres chaud, changez
I'huile plus frequemment.
ATTENTION
Vidanger la pompe selon Ia procedure suivante:
1. Vidanger I'huile moteur et I'essence du nettoyeur haute
pression.
2. Au moyen d'un tie six pans m&le, deposer le bouchon
noir de vidange d'huile place entre la sortie haute
pression et I'er_ree de tuyeu d'arrosage.
NE POLLUEZ PAS, CONSERVEZ LE
SURPLUS, RAPPORTEZ UHUILE USAGC:E
_ ARDEZ HOS DE PORTC:E DES ENFANTS,
IAUX CENTRES DE RECYCLAGE,
Changez I'huile ators que le moteur est encore chaud,
de la fa_on suivante:
1. Videzler_servoird'essenceenfaisar4toumer le nettoyeur
hautepressionjusqu'_ I'epuisementde I'essence.
2. Debranchez le fil de la bougie d'allumage et gardez-le
eloigne de la bougie d'allumage.
35
Page 36

3,
Nettoyez la surface autour de I'erifice de remplissage Entretien de la bougie d'allumage
d'huile, enlevez le bouchon de remplissage d'huile et la
jauge d'huile. Essuyez la jauge d'huile. Faites Pentretien de la beugie d'allumage aux 100 heures
4.
{nclinez vetre netteyeur _ haute pressien pour vidanger
d'eperation eu annuellemenl le premier des deux prevalant.
I'huile par I'orifice de remplissage dens un centenan_ AVERTISSEMENT
adequat en veus assurar_ d'incliner le netteyeur du cSte
oppose _ la beugie d'allumage et au filtre ,_air. Une fois
le carter vide de sen huile, remettez le netteyeur debout
5,
Essuyez la jauge d'huile, inserez-la dens I'orifice de
remplissage d'huile et serrez-la soiidement avant de la
retirar. Ajoutez I'huile recommandee jusqu'au rep_re
maximum ("Full") de la jauge d'huile. Versez I'huile
lentement. Essuyez la jauge d'huile chaque fois que ....................................................
vous verifiez le niveau d'huile. NE remplissez PAS trop • Debranchez toujours le c_ble de bougie et plac_z-le de fat}on
le carter d'huiIe, cequ'il ne soit pas en contact avecla bougie.
6. Reposez le bouchon de remplissage et la jauge d'huile;
serrez-les solidement
7. Essuyez toute huile restante. 2.
8. Rebranchez le fil de la bougie d'allumage _ la bougie 3.
d'allumage.
Entretien du filtre & air
Votre moteur ne fonctionnera pas adequatement et pourrait
s'eodommager si vous le faites fonctionner avec un filtre
air sale.
1. Nettoyez {a surface autour de la bougie d'ailumage.
Enlevez la bougie d'allumage et examinez-la.
Si les electrodes sor_ uses ou si la poroeiaine est
craquee ou ecaillee, rempiacez la bougie d'allumage
avec une bougie recommandee.
4. Verifiez I'ecartement des electrodes _ Paide d'une jauge
d'epaisseur et si necessaire, reglez I'ecertement
0,78 mm (0,03 po).
Faites Pentretien du filtro _ air apres toutes les 25 heuros
d'utilisation ou une fois par an, le premier des deux
prevalent. Remplacez le filtre plus souvent si vous utilisez le
nettoyeur dens un endroit sale ou poussiereux. Vous
trouverez des pieces de rechange au cer_re de service
Sears de votre region
Pour fairo I'entretien du filtre & air, procedez comme suit:
I. Enlevez lavis.
2. Enlevez Pensemble filtro _ air avec soin de maniere
eviter la chute de debris dens ]e carburateur.
3. Demontez Pensemble filtre _ air et nettoyez-en toutes
les pieces. Nettoyez le filtre & air en mousse dens un
melange de detergent liquide et d'eau. Sechez le filtre
en le comprimant dens un linge propre.
4. Saturoz le filtre _ air en mousse d'huile ,_moteur et
comprimezqe dans un linge propro pour enlever
I'excedent d'huiie.
5. Remontez Pensemble filtre _ air avec le filtre en mousse
propre ou un filtro neuf_
6. Fixez solidement I'ensemble filtre _ air sur le
carburateur avec la vis.
5. Installez la bougie d'allumage et serrez-la solidement.
APRES CHAQUE UTILISATION
L'eau ne dolt pas demeurer dens le nettoyeur durar_ une
Iongue periode de temps. Des sediments ou des mineraux
pourraient s'aceumuler sur les pieces de la pompe et
bloquer son mouvement. Suivez la procedure suivante apres
chaque utilisation:
ft. Nettoyez & graode eau le tube de siphonnement du
deterger4 en plagant le filtre dens un seau d'eau propre
tout en maintenant le nettoyeur _ haute pression en
marohe en mode pression faible (avec la buse reglable
en position avant). Nettoyez ,_grande eau durant une
ou deux minutes.
2. Eteignez le moteur et laissez-le refroidir; enlevez
ensuite tousles tuyaux.
3. Debranchez le fil de la bougie d'allumage de la bougie
d'allumage.
4. Videz la pompe de tout liquide en tirant sur la poignee
du lanceur environ 6 lois. Cette operation devrait suffire
pour enlever presque tout le liquide dans la pompe.
5. Si vous rsmisez le nettoyeur durant plus de 30 jours,
consultez la section "Entrepceage ,_long terme" ,_la
page 37.
36
Page 37

GI NI RALITI S
Verifiez sile tuyau _ haute pression comporte des
demmages. Une ooupur8 eu une effileohure du tuyau
peurrait causer des fuites ou une porte de pression. Si
vous decelez des demmages, remplacez ]e tuyau. NE
tentez PAS de reparer un tuyau endemmage. Remplacez
le tuyau avec une piece Craftsman d'origine.
Videz I'eau du tuyau, du pistelet et de la rallonge de buse
et enroulez oort_ctement cette demiere autour du moule
en broche fixe.
Rebranchez le fil de la beugie d'al]umage _{la beugie.
Entrepceez le netteyeur dans un endroit propre et see.
Pendant la periode d'entrepceage, i] est important
d'empecher la formation de dopers de gomme darts les
parties importantes du systeme d'a]imentation comme le
oarburateur, ]e f_ltre _ essence, ]e tuyau seup]e de carburant
ou ]e reservoir. De plus, {'experience a demontre que les
oarburants _ ]'alceol (appe]es gazohol, ethanol ou methanol)
attire. I'humidite, ce qui entra_ne la separation et la formation
d'acides durant I'entrepceage. Los gaz aoides peuvent
endommager le systeme d'alimentation d'un moteur pendant
I'entreposage.
Protection du syst_me d'alimentation
Vidange du r#.servoir d'essence:
,d_k AVERTISSEMENT! N'entreposez JAMAIS lemoteur avec de I'eseence dans le reservoir
I'ir4erieur OUdarts un espace dos ou real aere o_ los
emanations d'essence pourraient atteindre une
flamme hue, une etince]le ou une veilleuse.
ENTREPOSAGE POUR L'HIVER
ATTENTION
' L'echec pour ainsi faire endommagera d'une faGon
permanente votre pompe et rend votre unite inoperable
" Geler des dommages ne sent pas couverts sous la garantie.
Pour prot_ger I'appareil centre le gel:
Nettoyez @grande eau le tube de siphonnement du
detergent en plagant ]e filtre dans un seau d'eau propre
tout en maintenant le nettoyeur _{haute pression en
marche en mode pression faible (avec la buse reglable
en position avant). Nettoyez @grande eau durant une ou
deux minutes.
Videz la pompe de tout liquide pompe en tirant sur la
po{gnee du lanceur environ 6 fois. Cette operation devrait
suffire pour enlever presque tout le liquide dans la pompe.
Raocerdez une section de tuyau d'arrceage de 1 m (3 pi)
de long _ un raocerd d'eau d'ardvee. Versez de I'antigel
de vehicule de plaisance (antigel sans alceol) dans le
tuyau. Tirez sur la poignee du lanceur deux lois.
D4_branchez le tuyau de I m.
ENTREPOSAGE A LONG TERME
Si vous ne preveyez pas utiiiser ]e nettoyeur _ haute
pression durant plus de 30 ieurs, veus devez preparer le
moteur pour I'entrepceage _ long terme.
,i_k AVERTISSEMENT! Vidangez I'eseence dans un
centenar_ approuve _ I'aide d'un entonnoir,
I'exterieur et loin de route f]amme hue. Assurez-vous
que le moteur est freid. NE fumez PAS.
Enlevez route I'essence du cerburateur et du r_servoir
d'eseence afin de prevenir la formation de depSts de
gomme dans cos pieces, ce qui pourrait causer un
mauvais fonctionnement du moteur.
Faites tourner le moteur jusqu'& ce que le reservoir
d'eseence se vide et que le moteur s'ar_te _ cause d'une
panne d'essence.
Changement de rhuile
A]ors que le moteur est encore chaud, vidangez I'hui]e du
carter. Rempliseez le carter _ nouveau avec de I'huile de la
qua]ire recommandee. Consultez la section "Changement
d'huile" _ ]a page 35.
Huilage de ral_sage du cylindre
Enlevez la bougie d'a}lumage. Versez environ 30 m{
(t once) d'huile _{moteur propre dans {'alesage. Couvrez
le trce de bougie & {'aide d'un chiffon. Tirez lentement la
poignee du lanceur pour distribuer I'huile. _vitez les
eolaboussures provenant du trou de la bougie d'allumage.
Instal]ez }a boug{e. NE branchez PAS le o&ble de la
bougie.
AUTRES DIRECTIVES
N'entreposez PAS de carburant d'une saisen & I'autre.
Si pcesible, entreposez votre nettoyeur & {'{nterieur et
ceuvraz-le pour le prot_er centre {a pouseiere et ]es
saletes. ASSUREZ-VOUS DE VIDER LE RESERVOIR
D'ESSENCE.
IMPORTANT: NE oouvrez JAMAIS votr8 nettoyeur _ haute
pression alors que le moteur et le systeme d'echappement
sent ohauds.
37
Page 38

Probl_me Cause
1. Buse sur basse pression.
2. Entree d'eau bloquee.
3. Pas assez d'eau qui arrive.
4. Tuyau d'entree tortille ou avec
La pompe a les probl_mes suivants:
pas de pression, pression
irr6gulif_re, pressure, claquement,
perte de pression, faible d6bit d'eau.
5. Filtre de tuyau bouch&
6. Eau _ plus de IO0_F.
7. Tuyau de sortie bloque ou avec
8. Le pistolet fuie.
9. La buse est bouchee.
10. La pompe est defectueuse.
1. Le tube n'est passubmerge.
2. Le filtre du tube est bouch&
Le d_torgent ne se m_lange pss
avec lejet.
Le moteur tourne sans charge mais
cale quand une charge sst ajout_e.
Le moteur ne d6marre pss, ou il
d6marre et a des rat6s.
El motor se apaga durante Ia
operaci6n,
3. Le filtre integre sale.
4. La buse est sur haute pression
V}tesse trop lente du moteur.
1. Filtre _ air encrass&
2. Panne d'essence.
3. Essence event_.
4. Fil de bougie non branche _ la
5. Bougie defectueuse.
& Eau presente dans I'essence.
7. Melange d'essence trop fiche.
8. Soupape d'admission bloquee en
9. Perte de compression du moteur.
Sin gasolina.
fuites.
fuites.
bougie.
position ouverte ou fermee.
Correction
1. Metire la buse sur haute pression
2. Degager I'entree d'eau
3. Foumir un debit adequat.
4. Redresser le tuyau, boucher la
fuite.
5. Verifier et nettoyer le filtre du
tuyau d'entree.
& Ayez une eau plus froide.
7. Debloquez le tuyau de sortie.
8. Remplacer le pistolet.
9. Deboucher la buse.
10. Contacter votre concessionnaire
Bri_s & Stration Power Products.
1. Inserer le tube dans le detergent.
2. Nettoyer ou remplacer le tube
etiou le filtre.
3. Voir "Verifier le Filtre Integre".
4. Metire la buse sur le mode basse
pression
Metire I'accelerateur sur FAST. Si le
moteur continue _ caler contacter votre
concessionaire fabricent de moteur.
1. Nettoyez ou remplacez le filtre
air.
2. Faites le plein du reservoir.
3. Vidangez le reservoir; faites le
plein avec de I'essence nouvelle.
4. Branchez le fil _ la bougie.
5. Remplacez la bougie.
& Vidangez le reservoir; faites le
plein avec de I'essence nouvelle.
7. Contactez le centre de service
Sears.
8. Contactez le centre de service
Sears.
9. Contactez le centre de service
Sears.
Llene el tanque de combustible.
Manque de puissance du moteur. Filtre _ air encrass& Remplacez le filtre _ air.
38
Page 39

Sears, Roebuck and Co., U.S.A. (Sears), le California Air Resources Board (CARB)
et le United States Environmental Protection Agency (U.& EPA)
Enonc_ de garantie du dispositif antipollution
(Droits et obligations du propri6tairss rclatifs & la garantie centre los d6fauts)
LA COUVERTURE DE GARANTIE DU DISPOS{TIF ANT_POLLUTION
S'APPLIQUE AUX MOTEURS HOMOLOGU_S ACHET_S EN
CALIFORNIE EN 1995 OU APR_S, ET QUI SeNT UTILIS_S EN
CALIFORN{E. ET AUX MOD_LES HOMOLOGU_S DE 1997 OU
APR_S QUI aNT _T_ ACHET_S ET UTILIS_S AILLEURS AUX
_TATS*UNIS (ET APR_S LE 1ER JANVlER 2001 AU CANADA)
Enoae_ de garantie du dispositif antipollution de I'_tat de la California
et de USEPA VOS droits et obligations relatifs & lagarantie
Le California Air Resources Board (CARB), WSEPA et Sears sest
heureux de vous expliqcar la garantie cesvrard le dispositif antJpolMtion
de votrs petit moteur hers route, modele de I'ecnee 2000 ou plus recent
En California, lee nouvesux petite moteurs hers route doivent etra
cengus, censtruits et equipes de fa_._es_ respecter lee normes anti-smog
dgesrsuses de retat Aillaurs aux _tats_Unis, les ceuveaux moteurs
etincalles hers route homologues, moeeles 1997 ou plus recente,
doivant respecter des hermes esmblables definies par I'USEF'A Sesrs
doit garantir le dispositif antipotlution de xa_ moteur pour lee periodes
indiqueesd-desesus. &condition qu'il n'y air pes ec d'abus, de
negligence, de mauvais entrstien sur ledit moteur.
Votre dispceitif ect_poiluties poutcemprendra des piecescomma le
cerburateur ou le syeteme d'injection de combustible, le systema
d'alluenage et le cenver_isesur cetalytique II paut auesi y aesir dee tuyaux,
des ceurroies_dee connecteurs et d'autres dispositifs relies au× emiesions.
Dane lecas d'un defaut ceuvert par la garardie, Sears reparsra votra
petit moteur hoPS route sane fraie, at co, incluant le diagnostic, lee pieces
e_ la main d'or_uvre.
Couverture de garantio centre los d6fauts du diapositif antipollution
de Sears
Lee petite moteurs hers raute, modeles 1995 et plus recente, esnt
garantis pour une pedode de deux ecs Si une piece reliee au dispoeitif
antipolluties de xatre moteur eat defectcause, Sears la reparera ou la
remplacara
Responsabilit6s de la garantie du propri_Jtaire
Enterd qua propdeteire de petit moteur hers route, xaus eras
responsable de I'execution de I'ardratien requis indiquedana ce manuel
d'utiliestion. Sears recemmecde de conserver teus lee rogue relies
I'erdratien de votrs petit moteur hers route; toutefoi& Sears Re pout
refuser la garantie uniquement parce qua vous etes dane l'impceeibilite
de produirs les rogue ou qua vous n'aves pes atfee_ue routes lee etepos
de I'antretian prevu
Neanmoins, voue devez esxair, en tent qca propdetaire de petit moteur
hers route, qua Sears pout reniar la garectia ei votrs moteur ou una
piece font defaut en raison d'abus, de negligence, d'entretien inadequat
es de modifications non approuvees
Des qu'un probleme survient, vous avez la responesbilite de taira
examiner xatre moteur _ es cen_ de service Sears approuve Lea
reparations ceuvartes par la garantie doixant etre effectuees dane es
dalai raiecnnable, n'e×cedant pes 30 jours.
Si xaus avez des questions au sujet de vce droits et responesbilites
relies & la garantie, xauilles cemmuniquer avec es repreesntent de
Sears au 1_8004694663.
Dispositions de la garantio centre los d_fauts du dispositif
antipollution de Sears
Lee dispositions qui suivent sest speeifiques &la ceuvarturs de garsntie
centre lea defauts du diapoeitif antipollutien
Pi6cos garentios
La ceuverture de cette garantie n'englobe qua les pieces enumerees
ei_desesus (pieces du dispoeitif antipollution) dane la mesura oQcos
pieces eteient presentes sur le meteur au moment de I'echat
Aux _tets_Unis et au Canada, I'essistence telephonique de 24 heuroe, au 1-800_4694863, comprand un menu de messages presnregistres qui
procure des ranseignemente our I'entretien du produit.
a. S_!steme de comtreled'alimentetion en carburant
Dispositif d'endchiesement pour demarrage _ froid
Carbursteur et pieces internes
F'ornpo _ carburard
b. Circuit d'entres d'air
Filtra _ air
Collecteu r d'ad miesion
c S?steme d'allumage
Bougie(s} d'allumage
S?steme d'allumage & magneto
d. S?steme de cetelyseur
Convertisesur cetaiytique
Collecteu r d'eshappement
S?steme d'injection d'air es ecupape d'impulsion
a. _lements divers utilises dane lee eystemes precedemment
mentionnes
Soupapes et intarrupteursde depression, de temperature, de
position. _ dalai cdtiqua
Connecteurs et diapoeitifs
2 Dur6e de la eouvertur_
Sears garantit au propdeteiro initial et & toue lee propfieteirae
ulterieurs que lee pieces garanties aerant Iibrae de tout defaut de
matedel e_ de main d'or_uvra qui pourrait entrafner la defectuceite
des pieces garanties, e_ co, pour una p_dode de dau× arts &
compter de la date de livraiaes du moteur _ ce aeheteur au detail
Aucun fraie
La reparation ou le remplecement de toute piece garantie
a'affaotuera sans fraie pour le propdeteira, y eompria ]a main
d'oeuvre teliee au diagnostic ceneluant qu'cee piece garantie est
affec_iesmerd defec_ueues, ai le diagnostic eat ef_ectue dane es
centre de service Sears approuve.
Reclamations et exclusions de osuva_ure
Los reclamations au titre de la garsntie doiesrd errs presentees
cesformement au× dispceitions de la potitique de garantie de Sears.
La ceuver[ura de garardie n'englobe pes lee defectuoeit_a our des
pieces garanties qui na esnt pes les pieces adginalee de Sears ou
lee defec_uceitee reliees _ ce abus. de la negligence au un entratien
inappropde tel qua deteille dane la politiqua de garardie du moteur
de Sears. Sears n'a paela reeponsabilite de ceuvrir lee
defec_uceitee des pieces garanties ceusees par I'utiliaation de
pieces ajautees, non adginalee ou modifieee.
Er_tretion
Toute piece garardia dent le ramplacemerd n'est pes prevu dens
I'entratian requi& ou qui ne doit faire I'objat qua d'une inspection
reguliera et qu'il na faut qua" reparer ou ramplacer au beesin ", eat
garantie centre les defec_uceites pour la durea de la periode de
garantie Toute piece garantie dest la remplacament fair pattie de
I'entretian requie est garantie centre los detauts saulement pour la
pedode es terminant au premier rempiacemard prevu de ladite
piece. Toute piece de reehanga dent la performance at la durabilite
sest equixalentes pact etre utilisee pour I'entretien ou los
reparations Le proprieteirs est respoceable de I'executian de
I'entretien raqui& indique dane le present manuel d'utilisation
Couvarture indireete
La ceuvar[ura prevua aux preesntes englobe toute defectuceite de
I'ce des cempoesrds du moteur causes _ la suite d'une defeetooeite
d'une des pieces garanties encore ceuver[e par la garantie.
39
Page 40

-800-LE-FOYER,
(1'800,533-6937)
24 heures parjour, 7 jours par semaine
Pour la r6paration des appareils 61ectrom6magers de grandes marques & votre
domicile _._peu importe le fabricant ou le d6taillant7
Pour connaTtre I'emplacement du Service des pi&ces et de I'entretien Sears le
plus proche afin d,apporter 8 I'atelier des produits tels que des aspirateurs,
tondeuses 8 gazon ou appareils 61ectroniques.
Pour connaTtre le n° de t616phone du Service des pi_ces et de I'entretien Sears
afin de commander les pi_ces de rechangf3accessoires et manuels
d,instructions requis pour effectuer VOUS,m_me les rdparations.
www.sears,ca
Pouracheter ou demander des renseignementssur un contratd'entretienSears,
t(_l(_phonezau:
1-800-361-6665
de 9 h _ 23 hdu lundiau vendredi (HNE), de 9 h _ 16 h le samedi
For service =nenglish :
1-800-4-MY-HOME ®
(1-800-469-4663)
www.sears.ca
@ MC =
Marque depos6e/ Marque de commerce de Seam, Roebuck and Co. utilis6e en vertu dune licence de Sears Canada
ema
Tmdemad_ of Seam, Roebud_ and Co. used under license by Seam Canada
 Loading...