

Owner's Manual
CRAFTSMAN+
1000 Watt
AC Generator
Model No
580.329100
CusGemneraHt°lpline_
HOURS: Mon.- Fri. 8 a.m. to 5 p.m. (CT)
CAUTION:
Before using this product, read this
manual and follow all its Safety Rules
and Operating Instructions
Sears, Roebuck and Co, Hoffman Estates, IL 60179
Visit our Craftsman website: www.sears.com/craftsman
Part No. 187814 Draft 1 (4/12/2001)
• Safety
• Assembly
• Operation
• Maintenance
• Parts
• Espahol
SAFETY RULES .......................... 3
ASSEMBLY ............................. 5
OPERATION ........................... 5-9
SPECIFICATIONS ....................... 10
MAINTENANCE ....................... 10-12
STORAGE ........................... 12-13
TROUBLESHOOTING .................... 14
SCHEMATIC/WIRING DIAGRAM ............ 15
REPLACEMENT PARTS ................ 16-23
EMISSION SYSTEM WARRANTY ......... 24-25
ESPAI_OL ........................... 26-39
HOW TO ORDER PARTS .......... BACK PAGE
LIMITED WARRANTY FOR CRAFTSMAN GENERATORS
SEARS warrants to the original purchaser that the alternator and engine for its portable generator will be free
from defects in materials or workmanship for the items and period set forth below from the date of original
purchase. This warranty is not transferable.
CONSUMER* COMMERCIAL*
Alternator 2 years 1 year
Engine 2 years 1 year
* NOTE: For the purpose of this warranty "Consumer Use" means personal residential household and
emergency use by original purchaser, not to be used as a primary source of power. "Commercial Use" means all
other uses, including rental, construction, commercial, and income producing purposes. Once a generator has
experienced commercial use, it shall thereafter be considered a commercial use generator for the purpose of
this warranty.
During said warranty period, SEARS will, at its option, repair or replace any part which, upon examination by
SEARS, is found to be defective under normal use and service**. Starting batteries are not warranted by
SEARS. All transportation costs under warranty, including return to the factory if necessary, are to be borne by
the purchaser and prepaid by him. This warranty does not cover normal maintenance and service and does not
apply to a generator set, alternator or engine, or parts which have been subjected to improper or unauthorized
installation or alteration, misuse, negligence, accident, overloading, over-speeding, improper maintenance, repair
or storage so as, in SEARS's judgment, to adversely affect its performance and reliability.
** NORMAL WEAR: As with all mechanical devices, engines need periodic parts service and replacement to
perform well. This warranty will not cover repair when normal use has exhausted the life of a part or engine.
THERE IS NO OTHER EXPRESS WARRANTY. SEARS HEREBY DISCLAIMS ANY AND ALL IMPLIED
WARRANTIES, INCLUDING BUT NOT LIMITED TO THOSE OF MERCHANTABILITY AND FITNESS
FOR A PARTICULAR PURPOSE TO THE EXTENT PERMITTED BY LAW. THE DURATION OF ANY
IMPLIED WARRANTIES WHICH CANNOT BE DISCLAIMED IS LIMITED TO THE TIME PERIOD AS
SPECIFIED IN THE EXPRESS WARRANTY. LIABILITY FOR CONSEQUENTIAL, INCIDENTAL, OR
SPECIAL DAMAGES UNDER ANY AND ALL WARRANTIES IS EXCLUDED.
Some provinces do not allow limitations on how long an implied warranty lasts, or the exclusion or limitation of
incidental or consequential damages, so the above limitations or exclusions may not apply to you. This warranty
gives you specific legal rights and you may also have other rights, which vary from state to state.
For service, see your nearest SEARS authorized warranty service facility. Warranty service can be performed
only by a SEARS authorized service facility. This warranty will not apply to service at any other facility. At the
time of requesting warranty service, evidence of original purchase date must be presented.
SEARS, ROEBUCK and CO., D/817WA, Hoffman Estates, IL 60179 U.S.A.
The engine exhaust from this product
contains chemicals known to the State of
California to cause cancer, birth defects, or
other reproductive harm.
A AUTION! Before using this product, read this
manual and follow all Safety Rules and
Operating Instructions.
DANGER! You must isolate the generator from
the electric utility by opening the electrical
system's main circuit breaker or main switch if
this unit is used for backup power. Failure to
isolate the generator from the power utility may
result in injury or death to electric utility workers
and damage to the generator. When used as
backup power, the local power utility must be
notified.
DANGER! Generator exhaust gases contain
DEADLY carbon monoxide gas. Carbon
monoxide, if breathed in sufficient
concentrations, will cause unconsciousness or
death. Operate this equipment outdoors where
adequate ventilation is available.
CAUTION! To prevent accidental starting when
setting up, transporting, adjusting or making
repairs to your generator, always disconnect
spark plug wire and place the wire where it
cannot contact the spark plug.
• The unit requires an adequate flow of cooling air
for its continued proper operation. Never operate
the unit inside any room or enclosure where the
free flow of cooling air into and out of the unit might
be obstructed. Allow at least 2 feet of clearance on
all sides of generator or you could damage the unit.
• The generator produces dangerously high voltage
that can cause extremely hazardous electrical
shock. Avoid contact with bare wires, terminals,
etc. Never permit any untrained person to operate
or service the generator.
• Do Not overfill the fuel tank. Always allow room for
fuel expansion. If tank is overfilled, fuel can
overflow onto a hot engine and cause FIRE or an
EXPLOSION.
• Never operate the generator:
in rain; in any enclosed compartment; when
connected electrical devices overheat; if electrical
output is lost; if engine or generator sparks; if flame
or smoke is observed while unit is running; if unit
vibrates excessively.
• Never handle any kind of electrical cord or device
while standing in water, while barefoot or while
hands or feet are wet. Dangerous electrical shock
will result.
• Use a ground fault circuit interrupter in any damp
or highly conductive area (such as metal decking or
steel work).
• Do Not use worn, bare, frayed or otherwise
damaged electrical cord sets with the generator.
Using any defective cord set may result in electrical
shock or damage to property.
• Operate generator only on level surfaces and
where it will not be exposed to excessive moisture,
dirt, dust or corrosive vapors.
• Gasoline is highly FLAMMABLE and its vapors are
EXPLOSIVE. Do Not permit smoking, open flames,
sparks or heat in the vicinity while handling
gasoline. Avoid spilling gasoline on a hot engine.
Comply with all laws regulating storage and
handling of gasoline.
• Never store generator with fuel in tank where
gasoline vapors might reach an open flame or
spark or pilot light (as on a furnace, water heater or
clothes dryer). FIRE or EXPLOSION may result.
• Never add fuel while unit is running.
• Never start or stop the unit with electrical loads
connected to receptacles AND with connected
devices turned ON. Start the engine and let it
stabilize before connecting electrical loads.
Disconnect all electrical loads before shutting down
the generator.
• Do Not insert any object through cooling slots of
the unit.
NOTE: Your generator is equipped with a spark
arrester muffler. The spark arrester must be
maintained in effective working order by the owner/
operator. In the State of California, a spark arrester is
required by law (Section 4442 of the California Public
Resources Code). Other states may have similar laws.
Federal laws apply on federal lands.
,_ THIS IS THE SAFETY ALERT SYMBOL. IT IS USED TO ALERT YOU TO POTENTIALPERSONAL INJURY HAZARDS. OBEY ALL SAFETY MESSAGES THAT FOLLOW THIS
SYMBOL TO AVOID POSSIBLE INJURY OR DEATH.
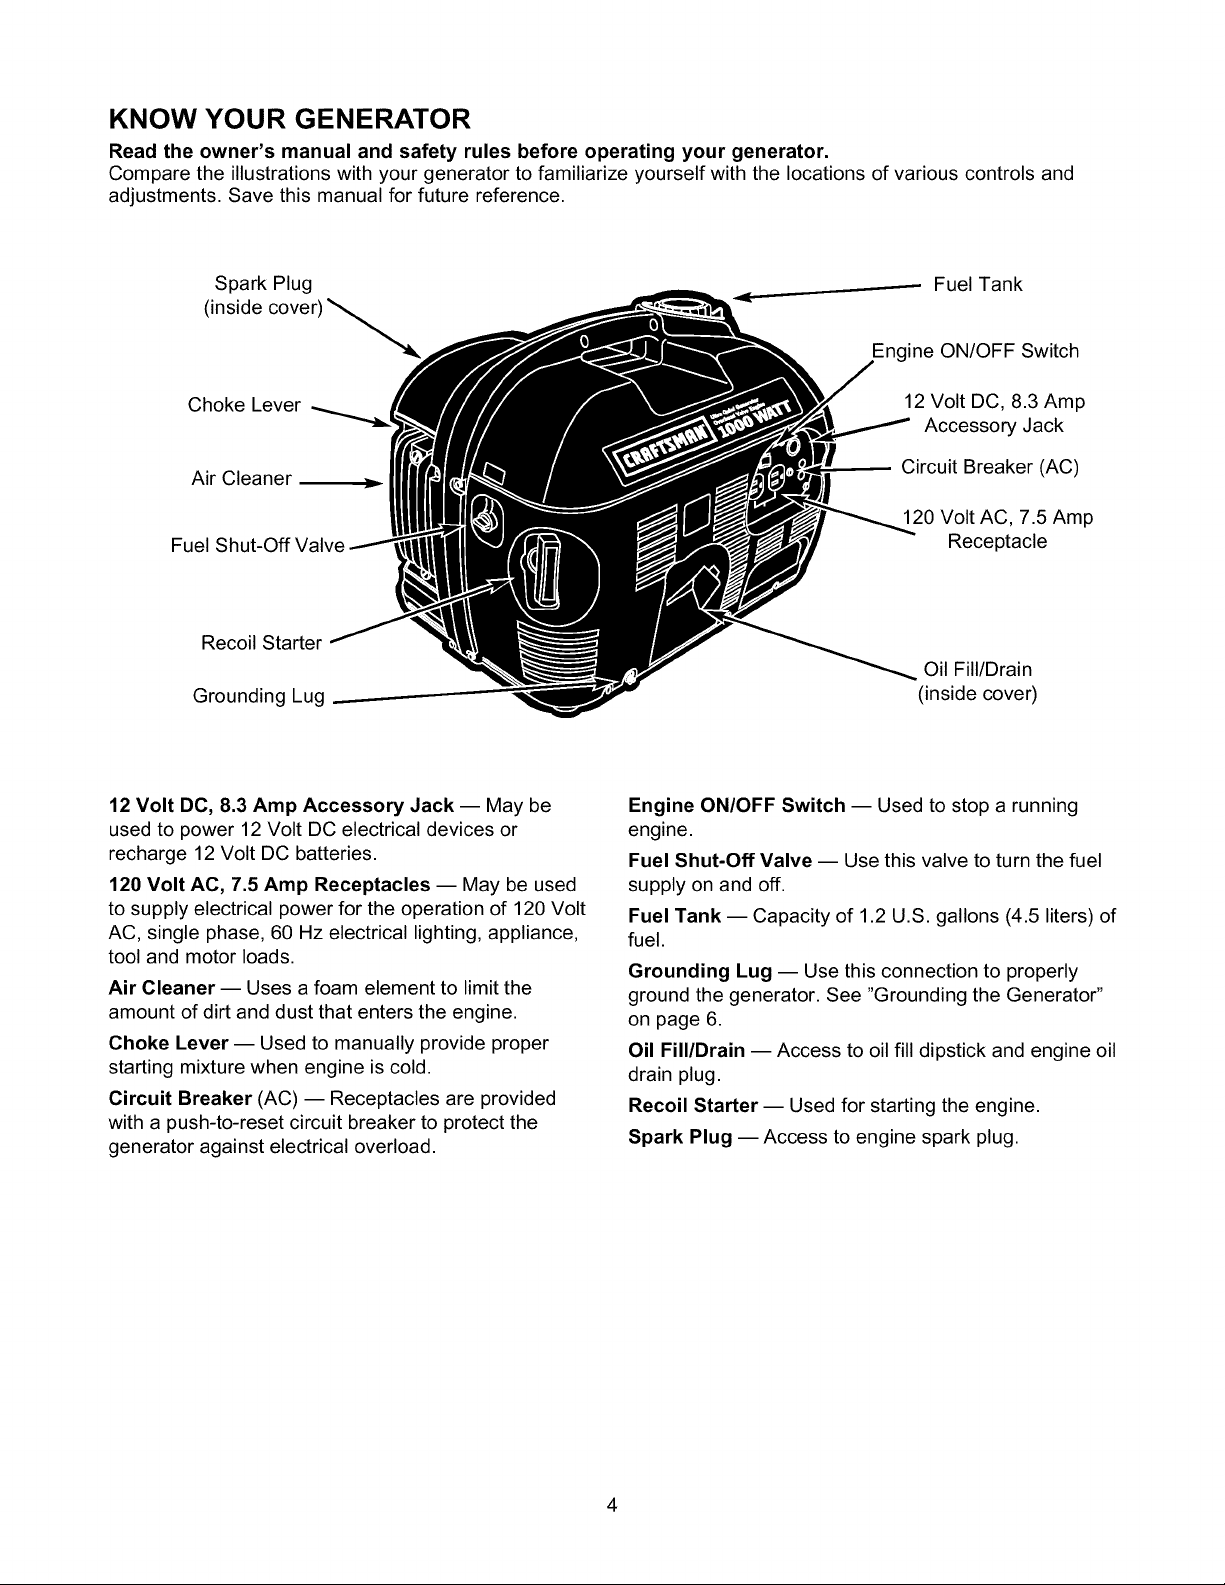
KNOW YOUR GENERATOR
Read the owner's manual and safety rules before operating your generator.
Compare the illustrations with your generator to familiarize yourself with the locations of various controls and
adjustments. Save this manual for future reference.
Spark Plug
(inside cover)
Choke Lever
Air Cleaner
Fuel
Recoil Starter
G_unding Lug
12 Volt DC, 8.3 Amp Accessory Jack -- May be
used to power 12 Volt DC electrical devices or
recharge 12 Volt DC batteries.
120 Volt AC, 7.5 Amp Receptacles -- May be used
to supply electrical power for the operation of 120 Volt
AC, single phase, 60 Hz electrical lighting, appliance,
tool and motor loads.
Air Cleaner -- Uses a foam element to limit the
amount of dirt and dust that enters the engine.
Choke Lever- Used to manually provide proper
starting mixture when engine is cold.
Circuit Breaker (AC) -- Receptacles are provided
with a push-to-reset circuit breaker to protect the
generator against electrical overload.
-- FuelTank
Engine ON/OFF Switch
12 Volt DC, 8.3 Amp
Accessory Jack
Circuit Breaker (AC)
120 Volt AC, 7.5 Amp
Receptacle
Oil Fill/Drain
(inside cover)
Engine ON/OFF Switch -- Used to stop a running
engine.
Fuel Shut-Off Valve -- Use this valve to turn the fuel
supply on and off.
Fuel Tank -- Capacity of 1.2 U.S. gallons (4.5 liters) of
fuel.
Grounding Lug -- Use this connection to properly
ground the generator. See "Grounding the Generator"
on page 6.
Oil Fill/Drain -- Access to oil fill dipstick and engine oil
drain plug.
Recoil Starter -- Used for starting the engine.
Spark Plug -- Access to engine spark plug.
4
TO REMOVE GENERATOR FROM
CARTON
• Remove staples along top center of flaps, bend
flaps open, then remove all packing material.
• Remove the generator and contents from the
shipping carton.
CARTON CONTENTS
Check all contents against those listed below:
• Main unit
• Oil bottle
• Owner's manual
• Battery charge cable
If any parts are missing or damaged, call the
generator helpline at 1-800-222-3136.
CONNECTOR PLUGS
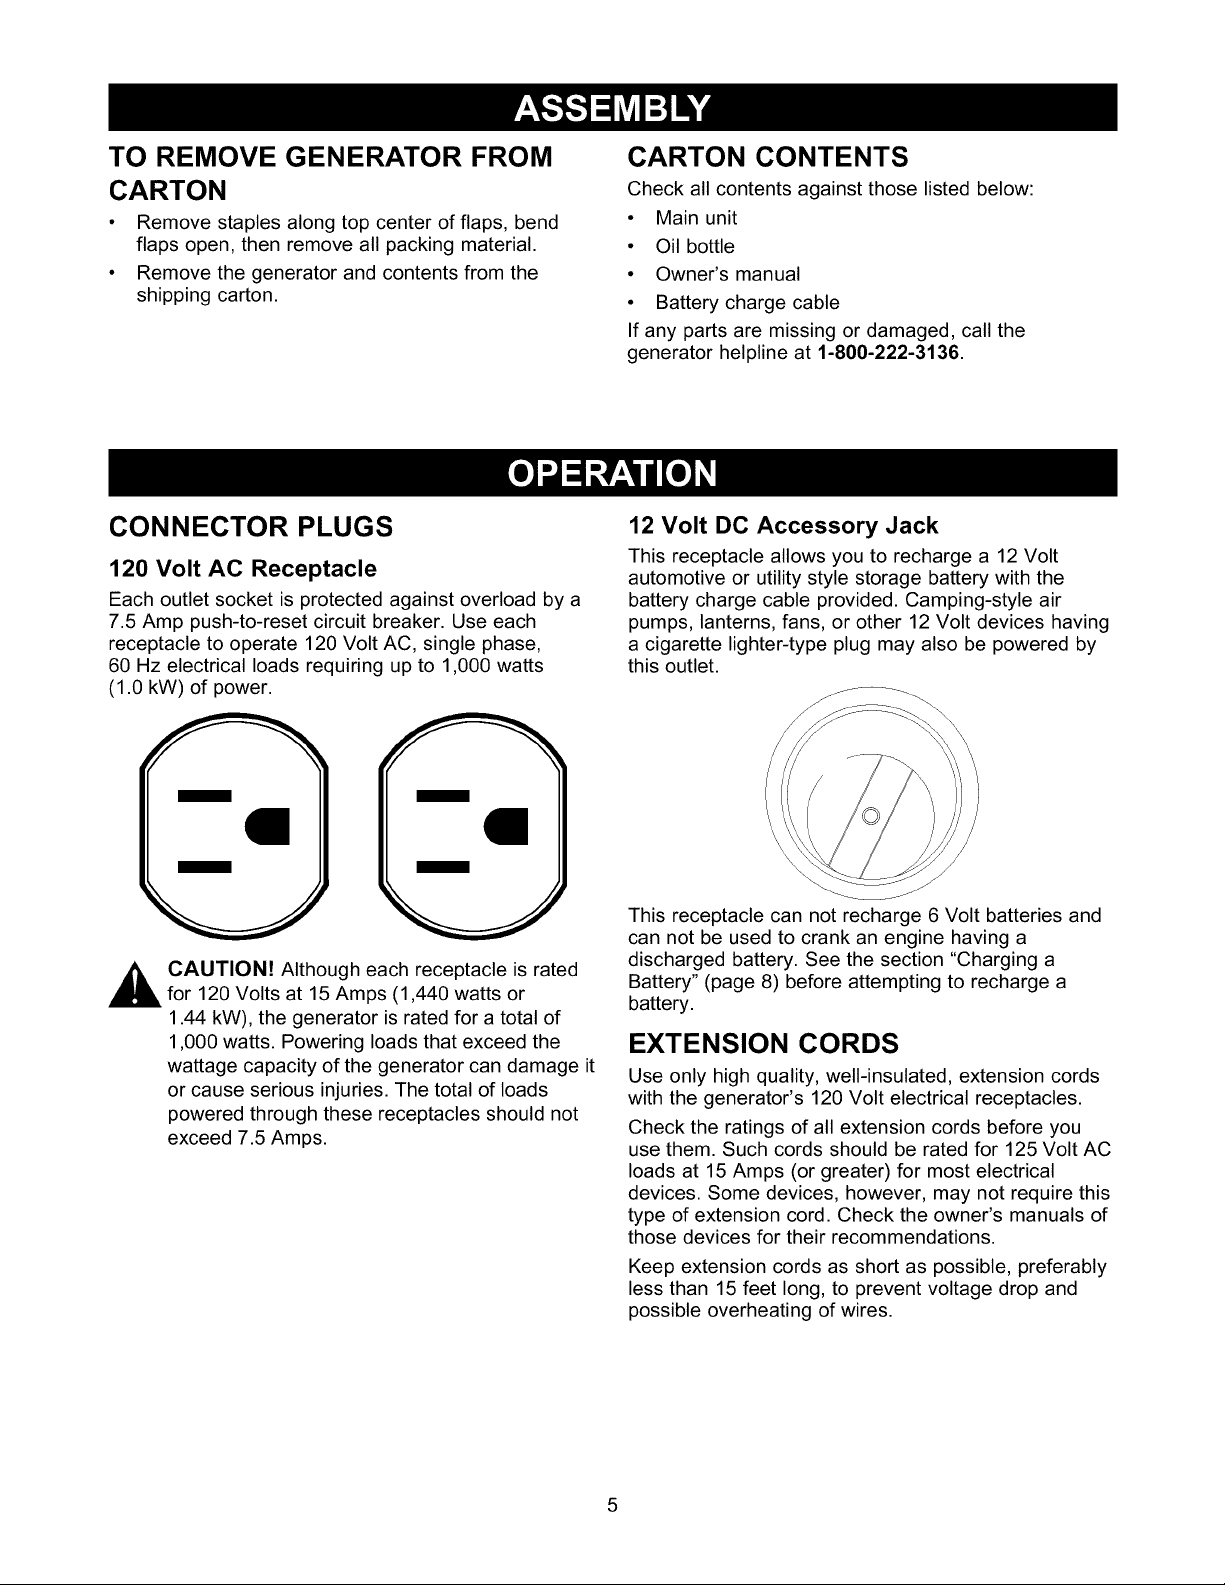
120 Volt AC Receptacle
Each outlet socket is protected against overload by a
7.5 Amp push-to-reset circuit breaker. Use each
receptacle to operate 120 Volt AC, single phase,
60 Hz electrical loads requiring up to 1,000 watts
(1.0 kW) of power.
m
m
/
m
_ CAUTION! Although each receptacle is rated
for 120 Volts at 15 Amps (1,440 watts or
1.44 kW), the generator is rated for a total of
1,000 watts. Powering loads that exceed the
wattage capacity of the generator can damage it
or cause serious injuries. The total of loads
powered through these receptacles should not
exceed 7.5 Amps.
i
m
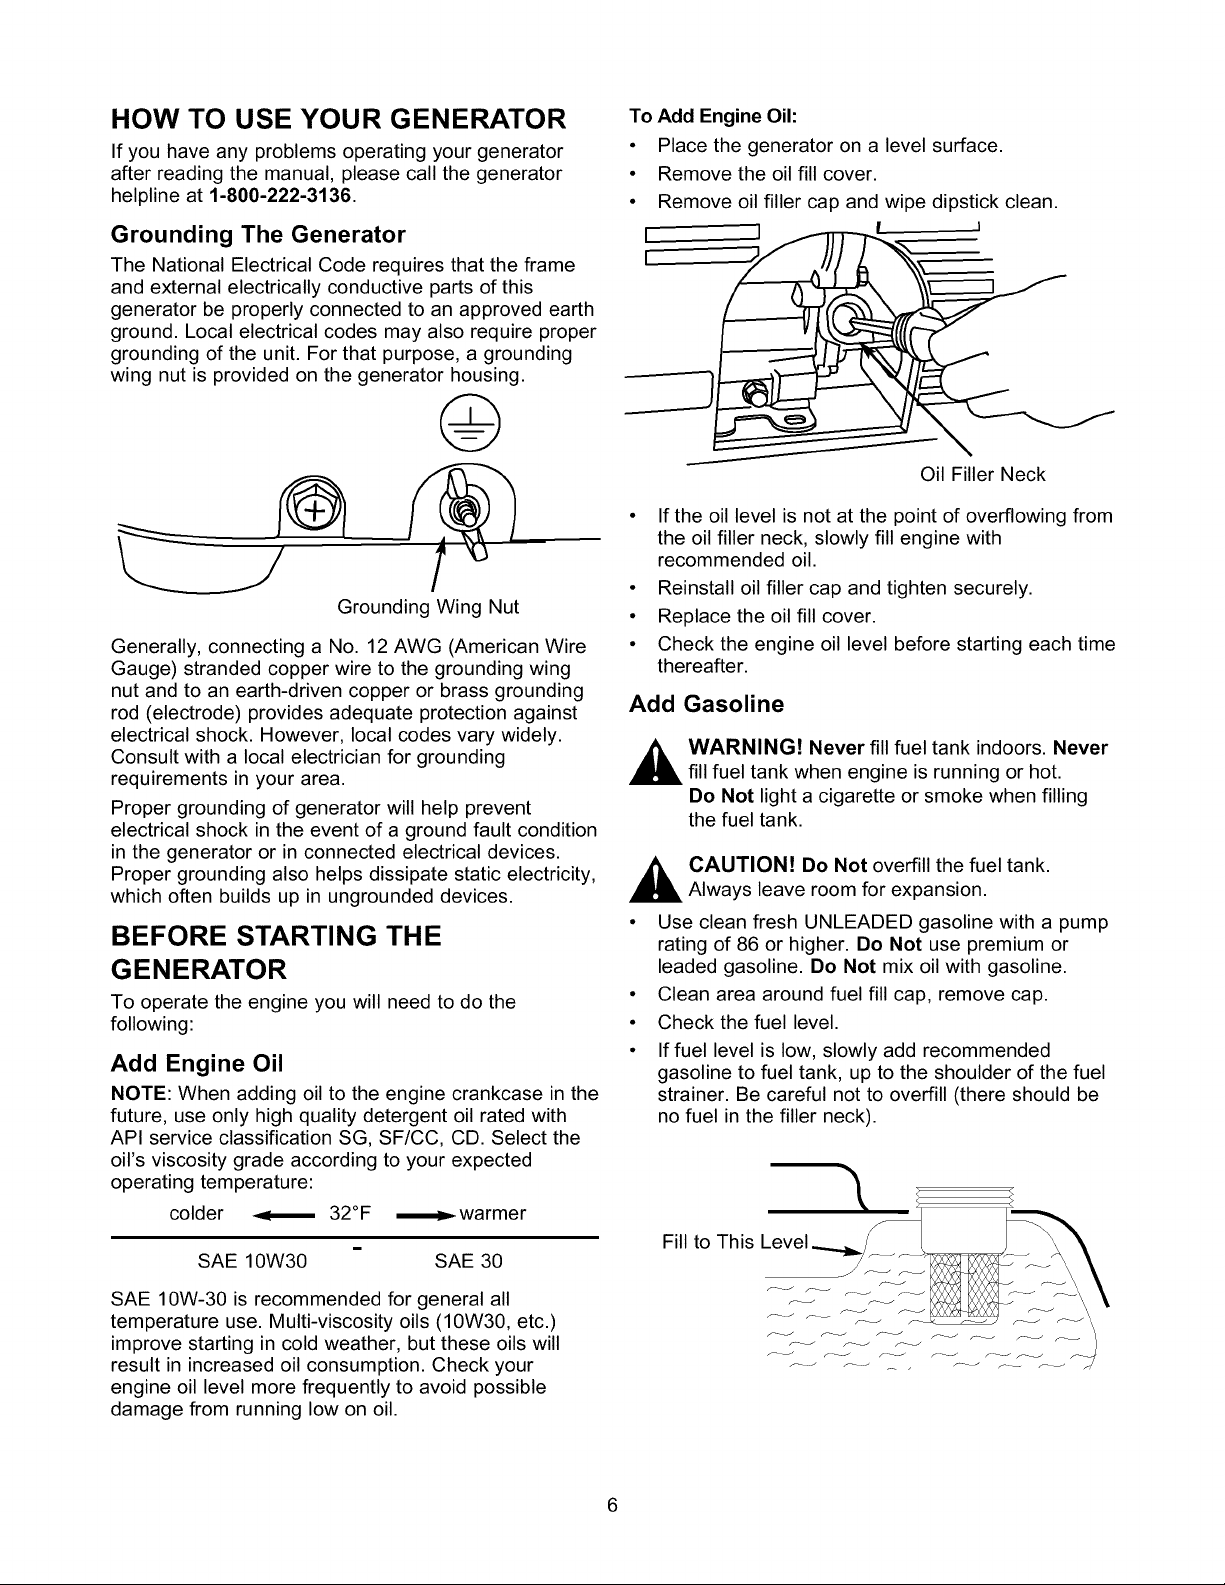
12 Volt DC Accessory Jack
This receptacle allows you to recharge a 12 Volt
automotive or utility style storage battery with the
battery charge cable provided. Camping-style air
pumps, lanterns, fans, or other 12 Volt devices having
a cigarette lighter-type plug may also be powered by
this outlet.
This receptacle can not recharge 6 Volt batteries and
can not be used to crank an engine having a
discharged battery. See the section "Charging a
Battery" (page 8) before attempting to recharge a
battery.
EXTENSION CORDS
Use only high quality, well-insulated, extension cords
with the generator's 120 Volt electrical receptacles.
Check the ratings of all extension cords before you
use them. Such cords should be rated for 125 Volt AC
loads at 15 Amps (or greater) for most electrical
devices. Some devices, however, may not require this
type of extension cord. Check the owner's manuals of
those devices for their recommendations.
Keep extension cords as short as possible, preferably
less than 15 feet long, to prevent voltage drop and
possible overheating of wires.
HOW TO USE YOUR GENERATOR
If you have any problems operating your generator
after reading the manual, please call the generator
helpline at 1-800-222-3136.
Grounding The Generator
The National Electrical Code requires that the frame
and external electrically conductive parts of this
generator be properly connected to an approved earth
ground. Local electrical codes may also require proper
grounding of the unit. For that purpose, a grounding
wing nut is provided on the generator housing.
G
Grounding Wing Nut
Generally, connecting a No. 12 AWG (American Wire
Gauge) stranded copper wire to the grounding wing
nut and to an earth-driven copper or brass grounding
rod (electrode) provides adequate protection against
electrical shock. However, local codes vary widely.
Consult with a local electrician for grounding
requirements in your area.
Proper grounding of generator will help prevent
electrical shock in the event of a ground fault condition
in the generator or in connected electrical devices.
Proper grounding also helps dissipate static electricity,
which often builds up in ungrounded devices.
BEFORE STARTING THE
GENERATOR
To operate the engine you will need to do the
following:
Add Engine Oil
NOTE: When adding oil to the engine crankcase in the
future, use only high quality detergent oil rated with
API service classification SG, SF/CC, CD. Select the
oil's viscosity grade according to your expected
operating temperature:
colder _ 32°F
SAE 10W30 SAE 30
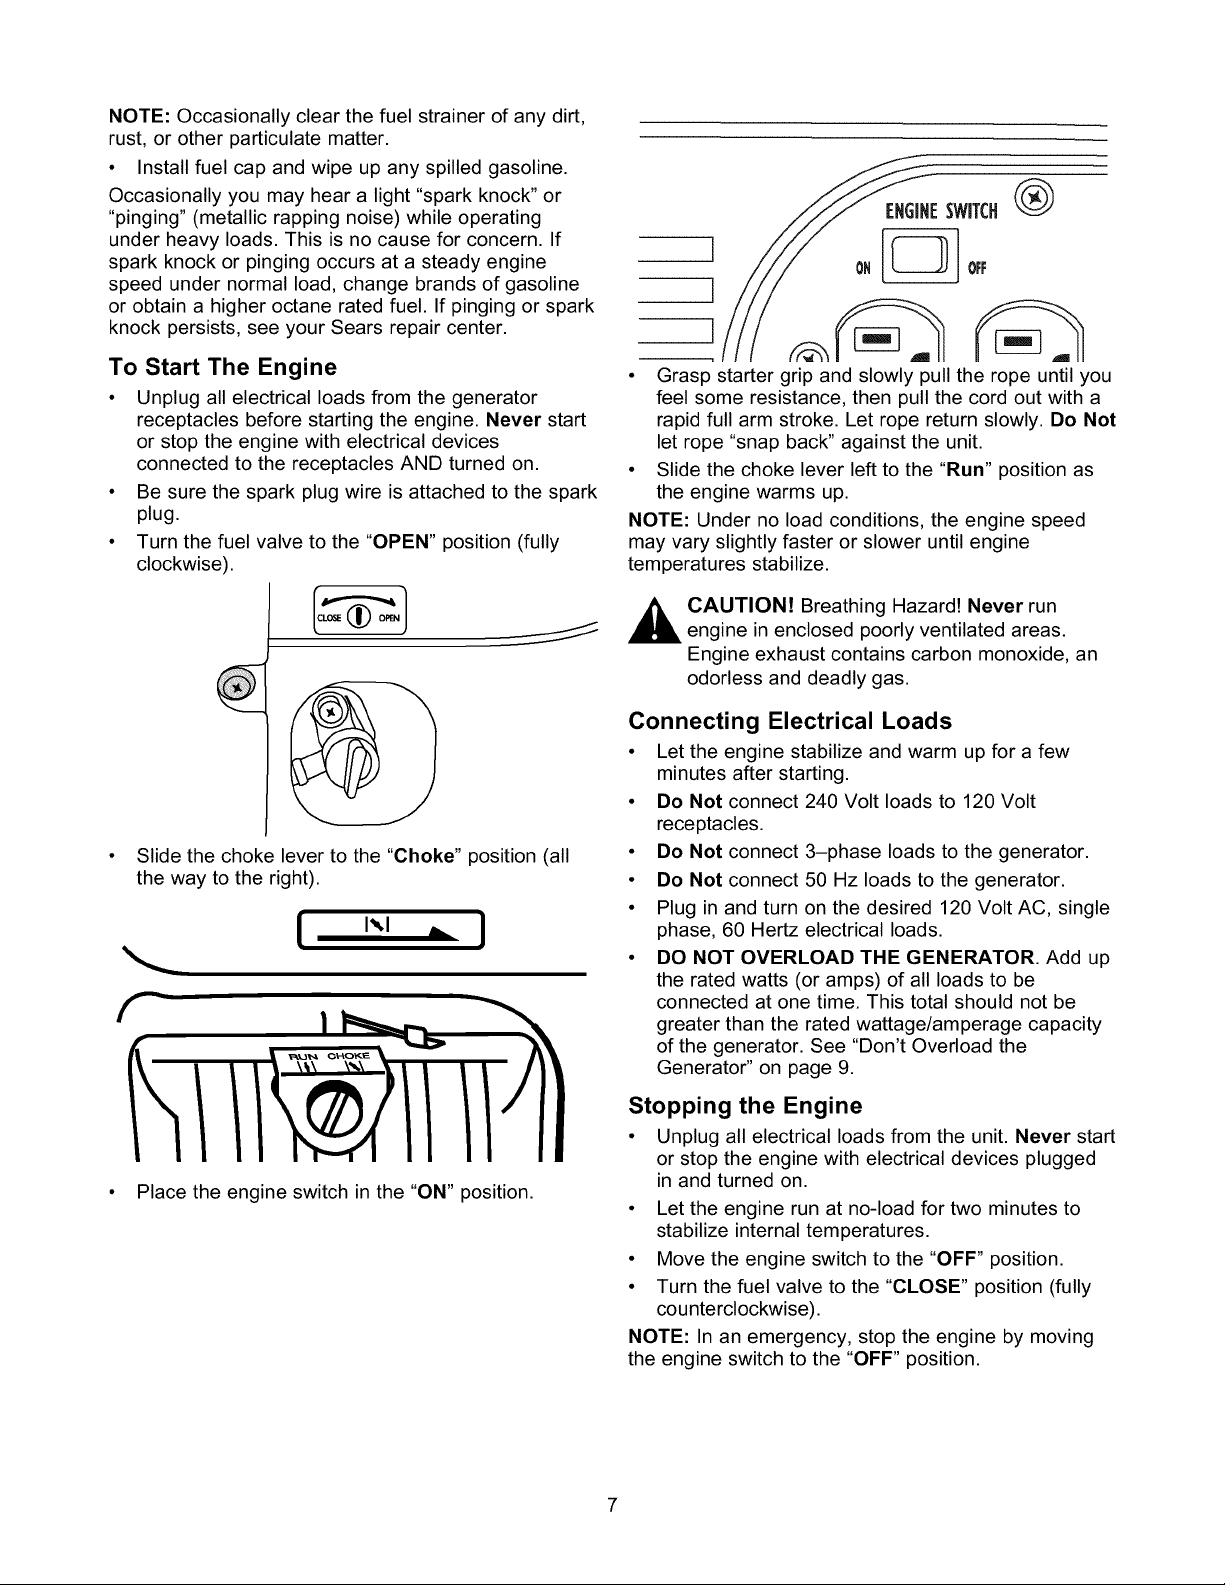
To Add Engine Oil:
• Place the generator on a level surface.
• Remove the oil fill cover.
• Remove oil filler cap and wipe dipstick clean.
J f J
, .))/l "% :
Oil Filler Neck
• Ifthe oil level is not at the point of overflowing from
the oil filler neck, slowly fill engine with
recommended oil.
• Reinstall oil filler cap and tighten securely.
• Replace the oil fill cover.
• Check the engine oil level before starting each time
thereafter.
Add Gasoline
,_ WARNING! Never fill fuel tank indoors. Never
fill fuel tank when engine is running or hot.
Do Not light a cigarette or smoke when filling
the fuel tank.
,_ CAUTION! Do Not overfill the fuel tank.
Always leave room for expansion.
• Use clean fresh UNLEADED gasoline with a pump
rating of 86 or higher. Do Not use premium or
leaded gasoline. Do Not mix oil with gasoline.
• Clean area around fuel fill cap, remove cap.
• Check the fuel level.
• Iffuel level is low, slowly add recommended
gasoline to fuel tank, up to the shoulder of the fuel
strainer. Be careful not to overfill (there should be
no fuel in the filler neck).
Fill to This Level
SAE 10W-30 is recommended for general all
temperature use. Multi-viscosity oils (10W30, etc.)
improve starting in cold weather, but these oils will
result in increased oil consumption. Check your
engine oil level more frequently to avoid possible
damage from running low on oil.
NOTE:Occasionallyclearthefuelstrainerofanydirt,
rust,orotherparticulatematter.
• Installfuelcapandwipeupanyspilledgasoline.
Occasionallyyoumayhearalight"sparkknock"or
"pinging"(metallicrappingnoise)whileoperating
underheavyloads.Thisisnocauseforconcern.If
sparkknockorpingingoccursatasteadyengine
speedundernormalload,changebrandsofgasoline
orobtainahigheroctaneratedfuel.Ifpingingorspark
knockpersists,seeyourSearsrepaircenter.
®
To Start The Engine
• Unplug all electrical loads from the generator
receptacles before starting the engine. Never start
or stop the engine with electrical devices
connected to the receptacles AND turned on.
• Be sure the spark plug wire is attached to the spark
plug.
• Turn the fuel valve to the "OPEN" position (fully
clockwise).
• Slide the choke lever to the "Choke" position (all
the way to the right).
• Grasp starter grip and slowly pull the rope until you
feel some resistance, then pull the cord out with a
rapid full arm stroke. Let rope return slowly. Do Not
let rope "snap back" against the unit.
• Slide the choke lever left to the "Run" position as
the engine warms up.
NOTE: Under no load conditions, the engine speed
may vary slightly faster or slower until engine
temperatures stabilize.
,_ CAUTION! Breathing Hazard! Never run
engine in enclosed poorly ventilated areas.
Engine exhaust contains carbon monoxide, an
odorless and deadly gas.
Connecting Electrical Loads
• Let the engine stabilize and warm up for a few
minutes after starting.
• Do Not connect 240 Volt loads to 120 Volt
receptacles.
• Do Not connect 3-phase loads to the generator.
• Do Not connect 50 Hz loads to the generator.
• Plug in and turn on the desired 120 Volt AC, single
phase, 60 Hertz electrical loads.
• DO NOT OVERLOAD THE GENERATOR. Add up
the rated watts (or amps) of all loads to be
connected at one time. This total should not be
greater than the rated wattage/amperage capacity
of the generator. See "Don't Overload the
Generator" on page 9.
• Place the engine switch in the "ON" position.
Stopping the Engine
• Unplug all electrical loads from the unit. Never start
or stop the engine with electrical devices plugged
in and turned on.
• Let the engine run at no-load for two minutes to
stabilize internal temperatures.
• Move the engine switch to the "OFF" position.
• Turn the fuel valve to the "CLOSE" position (fully
counterclockwise).
NOTE: In an emergency, stop the engine by moving
the engine switch to the "OFF" position.
Charging a Battery
WARNING! Storage batteries emit explosive
gas while charging that remains around a
battery for a long time after it has been charged.
The slightest spark can ignite the gas, causing
an explosion that can shatter the battery and
cause blindness or other injury.
_ ARNING! Do Not permit smoking, open
flame, sparks or any other source of heat
around a battery. Do Not use a lighter or other
flame for checking battery fluid levels. Wear
protective goggles, rubber apron and rubber
gloves when working around a battery. Battery
electrolyte fluid is an extremely caustic sulfuric
acid solution that can cause severe burns.
Do Not permit fluid contact with eyes, skin,
clothing, etc. If spill occurs, flush area with clear
water immediately.
Your generator has the capability of recharging a
discharged 12 Volt automotive or utility style storage
battery. Do Not use the unit to charge any 6 Volt
batteries. Do Not use the unit to crank an engine
having a discharged battery.
To recharge 12Volt batteries, proceed as follows:
• If necessary, clean battery posts or terminals.
• Check fluid level in all battery cells. If necessary,
add ONLY distilled water to cover separators in
battery cells. Do Not use tap water.
• Ifthe battery is equipped with vent caps, make
sure they are installed and are tight.
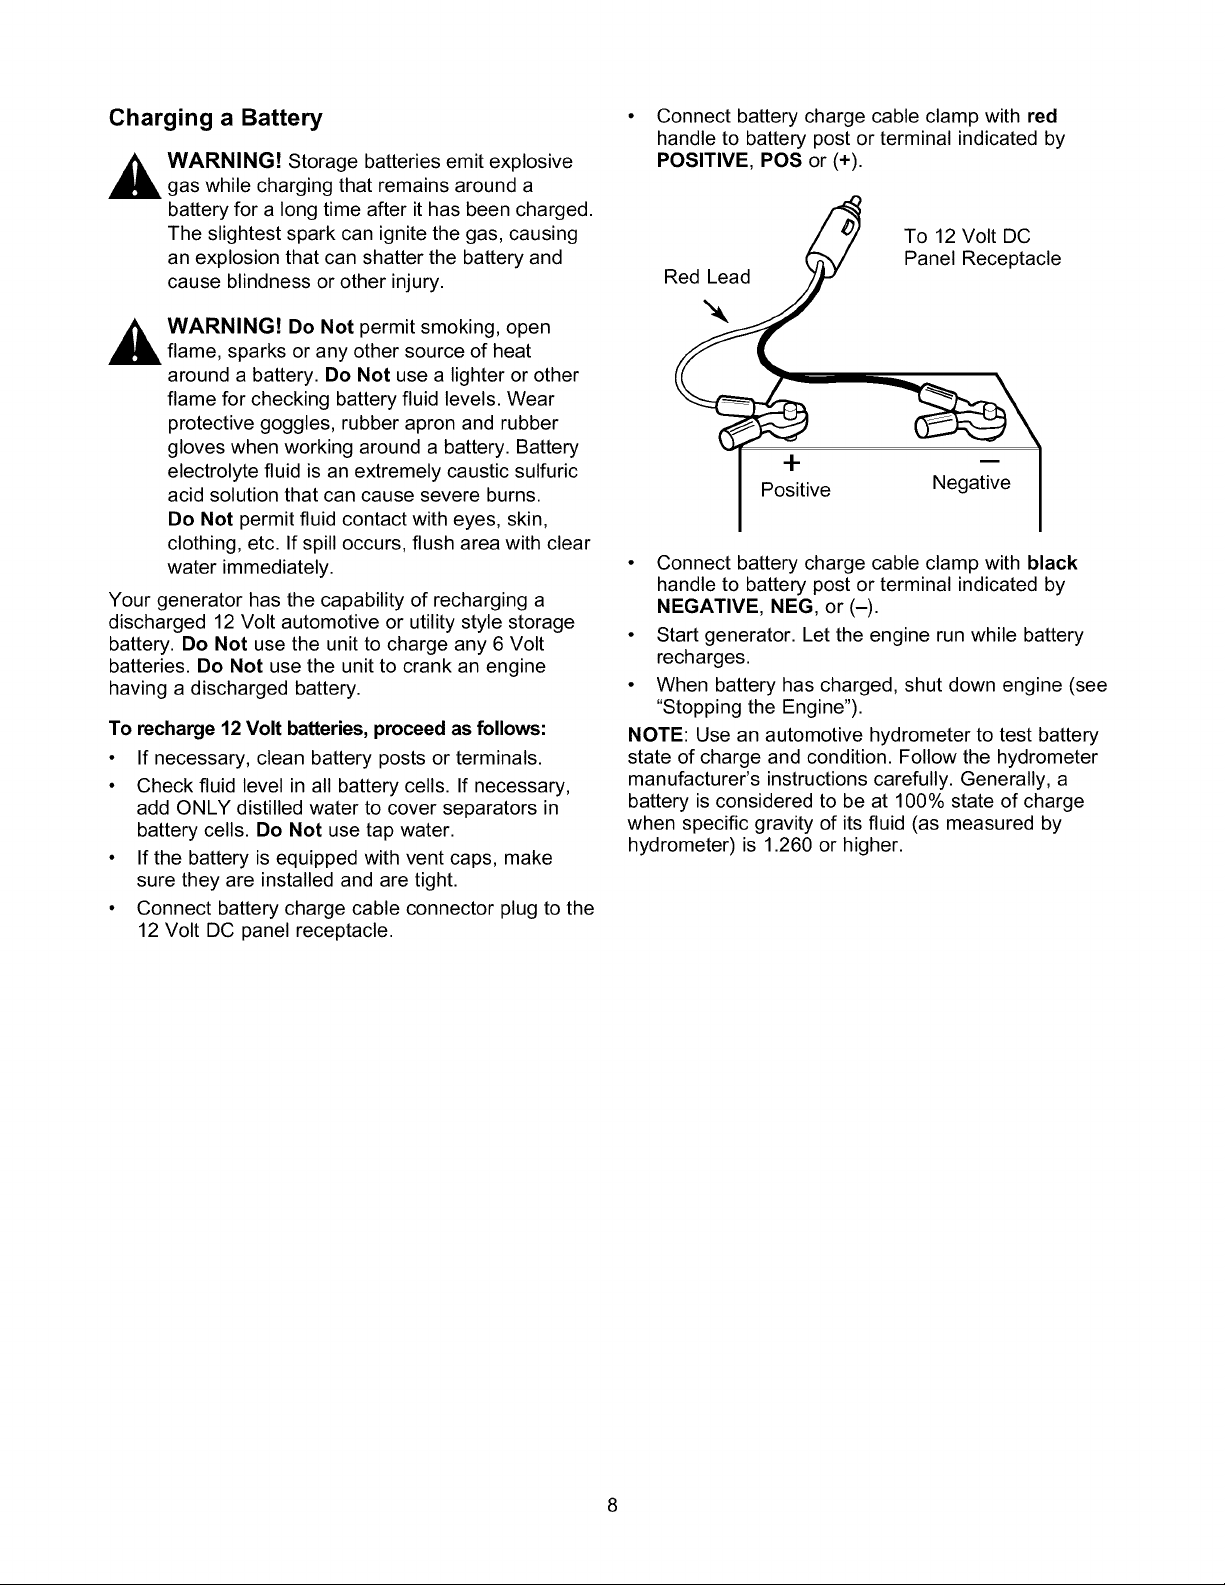
• Connect battery charge cable connector plug to the
12 Volt DC panel receptacle.
• Connect battery charge cable clamp with red
handle to battery post or terminal indicated by
POSITIVE, POS or (+).
To 12 Volt DC
Panel Receptacle
Red Lead
-I-
Positive Negative
• Connect battery charge cable clamp with black
handle to battery post or terminal indicated by
NEGATIVE, NEG, or (-).
• Start generator. Let the engine run while battery
recharges.
• When battery has charged, shut down engine (see
"Stopping the Engine").
NOTE: Use an automotive hydrometer to test battery
state of charge and condition. Follow the hydrometer
manufacturer's instructions carefully. Generally, a
battery is considered to be at 100% state of charge
when specific gravity of its fluid (as measured by
hydrometer) is 1.260 or higher.
DON'T OVERLOAD THE
GENERATOR
Overloading a generator in excess of its rated wattage
capacity can result in damage to the generator and to
connected electrical devices. Observe the following, to
prevent overloading the unit:
• Add up the total wattage of all electrical devices to
be connected at one time. This total should NOT
be greater than the generator's wattage capacity.
• The rated wattage of lights can be taken from light
bulbs. The rated wattage of tools, appliances and
motors can usually be found on a data plate or
decal affixed to the device.
WATTAGE REFERENCE GUIDE
• If the appliance, tool or motor does not give
wattage, multiply volts times ampere rating to
determine watts (volts x amps = watts).
• Some electric motors, such as induction types,
require about three times more watts of power for
starting than for running. This surge of power lasts
only a few seconds when starting such motors.
Make sure you allow for this high starting wattage
when selecting electrical devices to connect to your
generator. First, figure the watts needed to start the
largest motor. Add to that figure the running watts
of all other connected loads.
The Wattage Reference Guide provided here may
assist you in determining appropriate generator load. It
is important to note that most of these devices require
more power than the generator can supply.
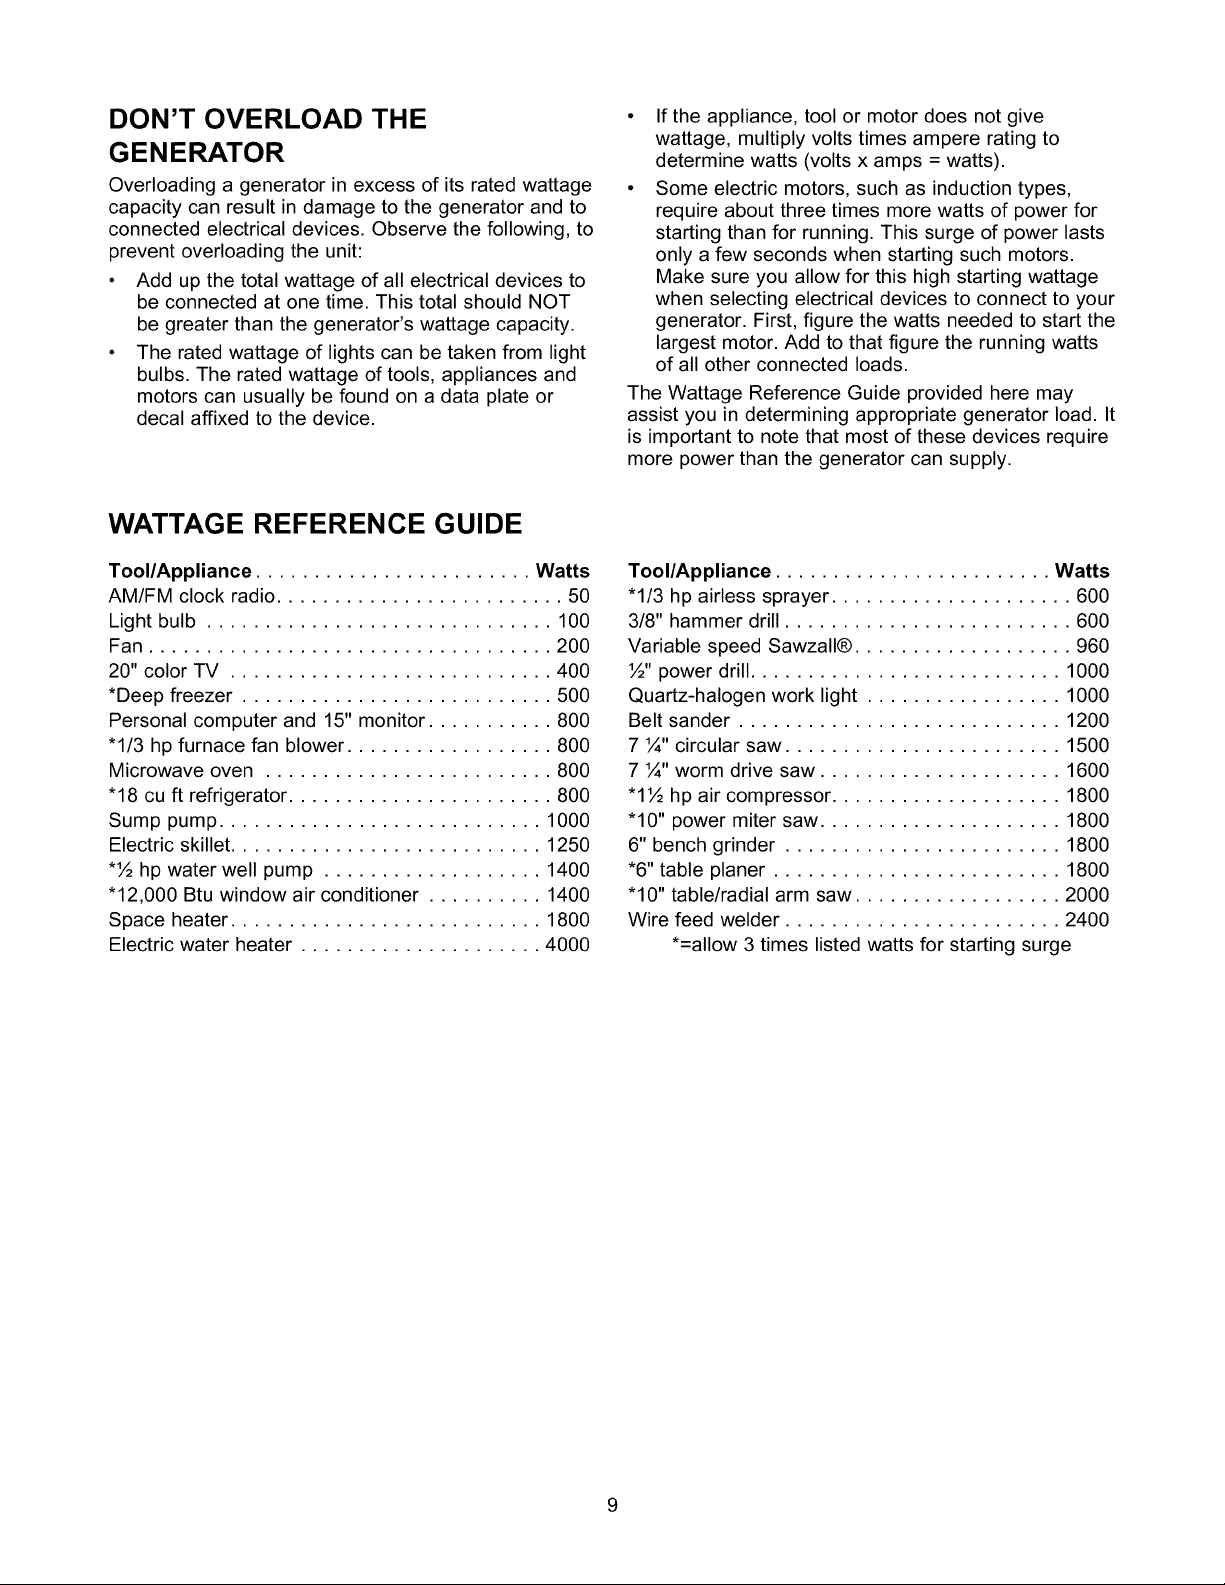
Tool/Appliance ........................ Watts
AM/FM clock radio ......................... 50
Light bulb .............................. 100
Fan ................................... 200
20" color TV ............................ 400
*Deep freezer ........................... 500
Personal computer and 15" monitor ........... 800
"1/3 hp furnace fan blower .................. 800
Microwave oven ......................... 800
"18 cu ft refrigerator ....................... 800
Sump pump ............................ 1000
Electric skillet ........................... 1250
*½ hp water well pump ................... 1400
"12,000 Btu window air conditioner .......... 1400
Space heater ........................... 1800
Electric water heater ..................... 4000
Tool/Appliance ........................ Watts
"1/3 hp airless sprayer ..................... 600
3/8" hammer drill ......................... 600
Variable speed Sawzall® ................... 960
½" power drill........................... 1000
Quartz-halogen work light ................. 1000
Belt sander ............................ 1200
7 ¼" circular saw ........................ 1500
7 ¼" worm drive saw ..................... 1600
"1½ hp air compressor .................... 1800
"10" power miter saw ..................... 1800
6" bench grinder ........................ 1800
*6" table planer ......................... 1800
"10" table/radial arm saw .................. 2000
Wire feed welder ........................ 2400
*=allow 3 times listed watts for starting surge
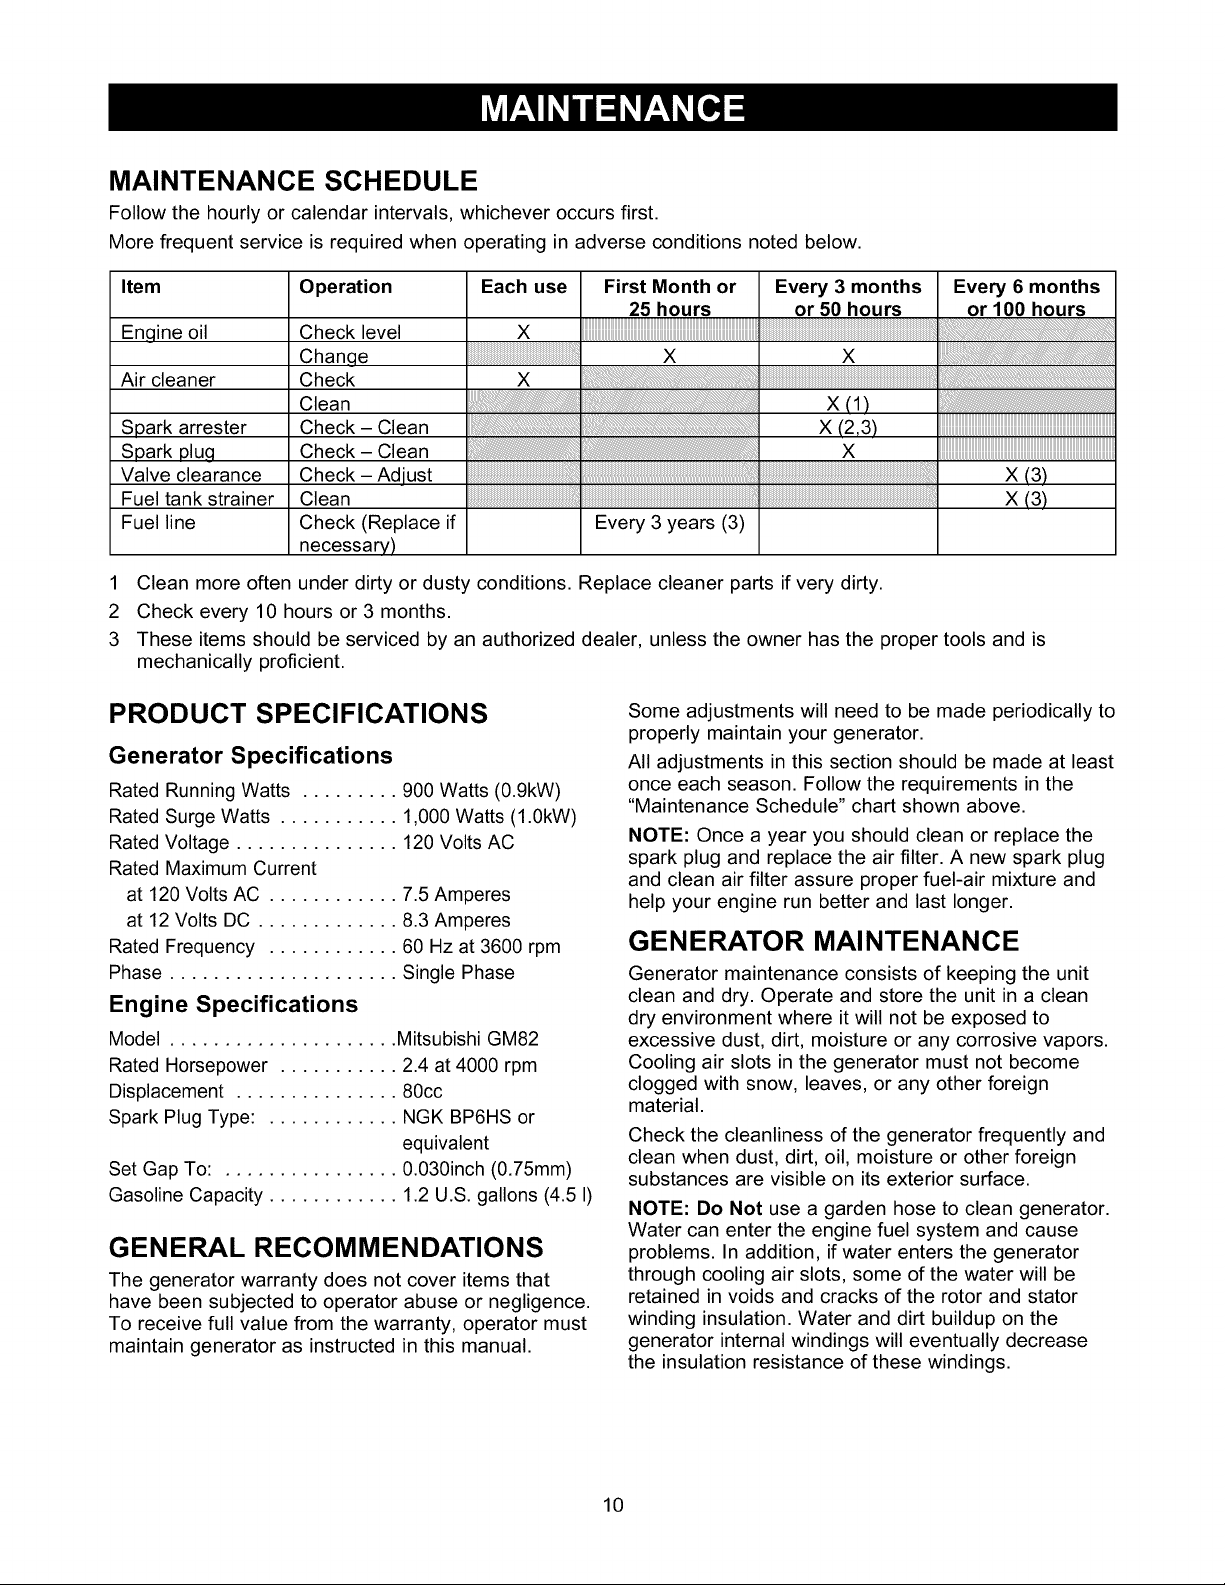
MAINTENANCE SCHEDULE
Follow the hourly or calendar intervals, whichever occurs first.
More frequent service is required when operating in adverse conditions noted below.
Item
Enqine oil
Air cleaner
Spark arrester
Spark pluq
Valve clearance
Fuel tank strainer
Fuel line
1 Clean more often under dirty or dusty conditions. Replace cleaner parts if very dirty.
2 Check every 10 hours or 3 months.
3 These items should be serviced by an authorized dealer, unless the owner has the proper tools and is
mechanically proficient.
Operation
Check level
Chanqe
Check
Clean
Check - Clean
Check - Clean
Check - Adiust
Clean
Check (Replace if
necessary)
PRODUCT SPECIFICATIONS
Generator Specifications
Rated RunningWatts ......... 900 Watts (0.gkW)
Rated Surge Watts ........... 1,000 Watts (1.0kW)
Rated Voltage ............... 120 Volts AC
Rated Maximum Current
at 120 Volts AC ............ 7.5 Amperes
at 12 Volts DC ............. 8.3 Amperes
Rated Frequency ............ 60 Hz at 3600 rpm
Phase ..................... Single Phase
Engine Specifications
Model ..................... Mitsubishi GM82
Rated Horsepower ........... 2.4 at 4000 rpm
Displacement ............... 80cc
Spark Plug Type: ............ NGK BP6HS or
equivalent
Set Gap To: ................ 0.030inch (0.75mm)
Gasoline Capacity ............ 1.2 U.S. gallons (4.5 I)
GENERAL RECOMMENDATIONS
The generator warranty does not cover items that
have been subjected to operator abuse or negligence.
To receive full value from the warranty, operator must
maintain generator as instructed in this manual.
Each use
X
X
First Month or Every 3 months Every 6 months
25 hours or 50 hours or 100 hours
X X
X('l)
X ('2,3)
X
Every 3 years (3)
Some adjustments will need to be made periodically to
properly maintain your generator.
All adjustments in this section should be made at least
once each season. Follow the requirements in the
"Maintenance Schedule" chart shown above.
NOTE: Once a year you should clean or replace the
spark plug and replace the air filter. A new spark plug
and clean air filter assure proper fuel-air mixture and
help your engine run better and last longer.
GENERATOR MAINTENANCE
Generator maintenance consists of keeping the unit
clean and dry. Operate and store the unit in a clean
dry environment where it will not be exposed to
excessive dust, dirt, moisture or any corrosive vapors.
Cooling air slots in the generator must not become
clogged with snow, leaves, or any other foreign
material.
Check the cleanliness of the generator frequently and
clean when dust, dirt, oil, moisture or other foreign
substances are visible on its exterior surface.
NOTE: Do Not use a garden hose to clean generator.
Water can enter the engine fuel system and cause
problems. In addition, if water enters the generator
through cooling air slots, some of the water will be
retained in voids and cracks of the rotor and stator
winding insulation. Water and dirt buildup on the
generator internal windings will eventually decrease
the insulation resistance of these windings.
10
To Clean the Generator:
• Use a damp cloth to wipe exterior surfaces clean.
• A soft bristle brush may be used to loosen caked
on dirt, oil, etc.
_ AUTION! Never insert any object or tool
through the air cooling slots, even if the engine
is not running.
• A vacuum cleaner may be used to pick up loose
dirt and debris.
Low pressure air (not to exceed 25 psi) may be
used to blow away dirt. Inspect cooling air slots
and openings on the generator. These openings
must be kept clean and unobstructed.
,_ DANGER! When working on the generator
always disconnect spark plug wire from spark
plug and keep it away from spark plug.
ENGINE MAINTENANCE
Checking Oil Level
Oil level should be checked prior to each use or at
least every 5 hours of operation. Keep oil level
maintained.
Changing Engine Oil
Change the oil after the first month of operation, then
every 25 hours. If you are using your generator under
extremely dirty or dusty conditions, or in extremely hot
weather, change the oil more often.
Change the oil while the engine is still warm from
running, as follows:
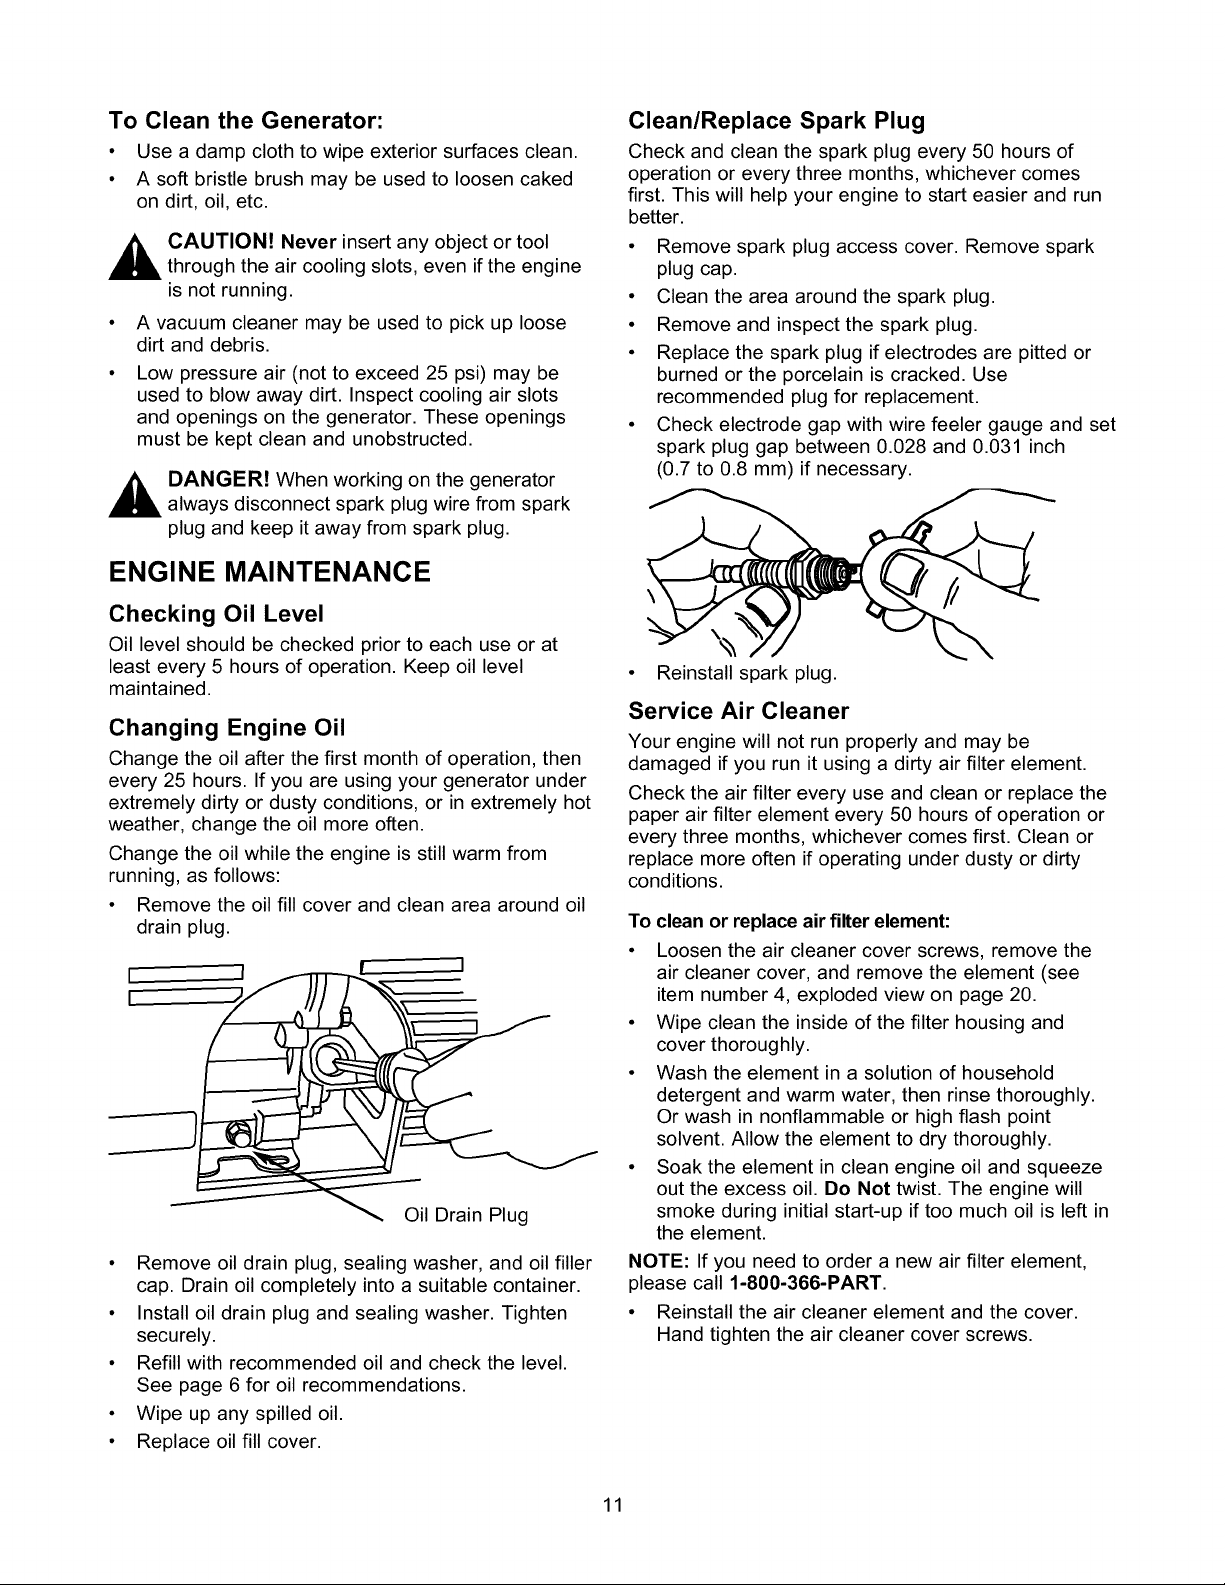
• Remove the oil fill cover and clean area around oil
drain plug.
E J ...-_[[T--_, I
L ;/ IIII "_,_ •
I Drain Plug
• Remove oil drain plug, sealing washer, and oil filler
cap. Drain oil completely into a suitable container.
• Install oil drain plug and sealing washer. Tighten
securely.
• Refill with recommended oil and check the level.
See page 6 for oil recommendations.
• Wipe up any spilled oil.
• Replace oil fill cover.
Clean/Replace Spark Plug
Check and clean the spark plug every 50 hours of
operation or every three months, whichever comes
first. This will help your engine to start easier and run
better.
• Remove spark plug access cover. Remove spark
plug cap.
• Clean the area around the spark plug.
• Remove and inspect the spark plug.
• Replace the spark plug if electrodes are pitted or
burned or the porcelain is cracked. Use
recommended plug for replacement.
• Check electrode gap with wire feeler gauge and set
spark plug gap between 0.028 and 0.031 inch
(0.7 to 0.8 mm) if necessary.
• Reinstall spark plug.
Service Air Cleaner
Your engine will not run properly and may be
damaged if you run it using a dirty air filter element.
Check the air filter every use and clean or replace the
paper air filter element every 50 hours of operation or
every three months, whichever comes first. Clean or
replace more often if operating under dusty or dirty
conditions.
To clean or replace air filter element:
• Loosen the air cleaner cover screws, remove the
air cleaner cover, and remove the element (see
item number 4, exploded view on page 20.
• Wipe clean the inside of the filter housing and
cover thoroughly.
• Wash the element in a solution of household
detergent and warm water, then rinse thoroughly.
Or wash in nonflammable or high flash point
solvent. Allow the element to dry thoroughly.
• Soak the element in clean engine oil and squeeze
out the excess oil. Do Not twist. The engine will
smoke during initial start-up if too much oil is left in
the element.
NOTE: If you need to order a new air filter element,
please call 1-800-366-PART.
• Reinstall the air cleaner element and the cover.
Hand tighten the air cleaner cover screws.
11
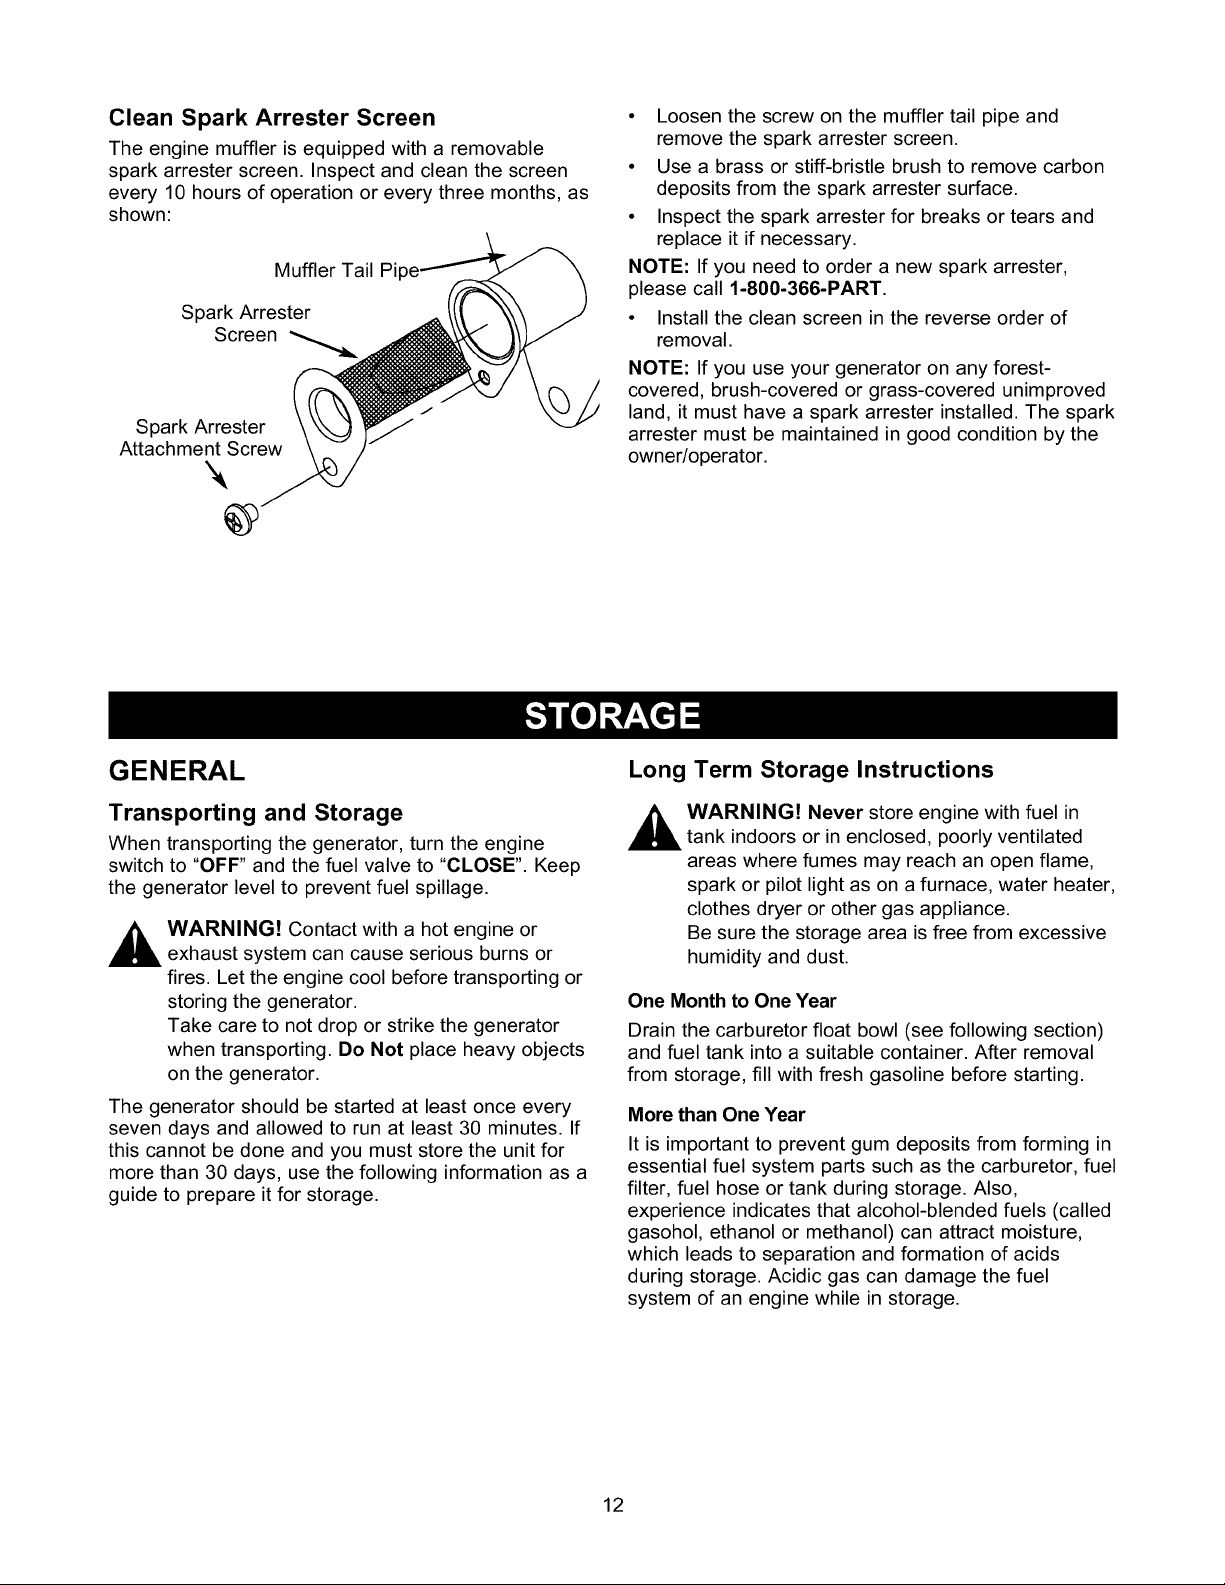
Clean Spark Arrester Screen
The engine muffler is equipped with a removable
spark arrester screen. Inspect and clean the screen
every 10 hours of operation or every three months, as
shown:
Muffler Tail Pi
Spark Arrester
Spark Arrester
Attachment Screw
@
• Loosen the screw on the muffler tail pipe and
remove the spark arrester screen.
• Use a brass or stiff-bristle brush to remove carbon
deposits from the spark arrester surface.
• Inspect the spark arrester for breaks or tears and
replace it if necessary.
NOTE: If you need to order a new spark arrester,
please call 1-800-366-PART.
• Install the clean screen in the reverse order of
removal.
NOTE: If you use your generator on any forest-
covered, brush-covered or grass-covered unimproved
land, it must have a spark arrester installed. The spark
arrester must be maintained in good condition by the
owner/operator.
GENERAL
Transporting and Storage
When transporting the generator, turn the engine
switch to "OFF" and the fuel valve to "CLOSE". Keep
the generator level to prevent fuel spillage.
_ WARNING! Contact with a hot engine or
exhaust system can cause serious burns or
fires. Let the engine cool before transporting or
storing the generator.
Take care to not drop or strike the generator
when transporting. Do Not place heavy objects
on the generator.
The generator should be started at least once every
seven days and allowed to run at least 30 minutes. If
this cannot be done and you must store the unit for
more than 30 days, use the following information as a
guide to prepare it for storage.
Long Term Storage Instructions
_ ARNING! Never store engine with fuel in
tank indoors or in enclosed, poorly ventilated
areas where fumes may reach an open flame,
spark or pilot light as on a furnace, water heater,
clothes dryer or other gas appliance.
Be sure the storage area is free from excessive
humidity and dust.
One Month to One Year
Drain the carburetor float bowl (see following section)
and fuel tank into a suitable container. After removal
from storage, fill with fresh gasoline before starting.
More than One Year
It is important to prevent gum deposits from forming in
essential fuel system parts such as the carburetor, fuel
filter, fuel hose or tank during storage. Also,
experience indicates that alcohol-blended fuels (called
gasohol, ethanol or methanol) can attract moisture,
which leads to separation and formation of acids
during storage. Acidic gas can damage the fuel
system of an engine while in storage.
12
 Loading...