

Craftsman 572.61000, 572.61002 Owner's Manual
owners
manual
CAUTION:
Read SAFETY
RULES and
INSTRUCTIONS
carefully
CRAFTSMAN
MODEL
NOS.
572.61000
&
572.61002
MADE
IN
U.S.A.
SEARS,
ROTARY POWER
assembly • operation
ROEBUCK
AND CO., Chicago, Ill. 60684 U.S.A.
TOOLS
- ---
---
--
------
Safety
READ AND SAVE ALL THE FOLLOWING INSTRUCTIONS:
1.
Keep
work
and benches invite injuries.
2.
Avoid
expose tools to rain. Don't use
damp
or
in the presence of flammable liquids or gases.
Avoid chemical or corrosive environments.
work
Keep
Guard
3.
body contact with
example: pipes, radiators, ranges, refrigerator enclosures.
4. Keep
contact tool or extension cord. All visitors
should be kept away from work areas.
5. Store
should
up place - out of reach of children.
Don't
6.
and safer at the rate for which it was intended.
7. Use
attachment to
Don't use tool for
example tree limbs or logs.
8. Dress
clothing
moving parts. Rubber gloves and
area clean - Cluttered areas
dangerous
wet
locat
area well lit.
against
children
idle
tools
be stored
force
right
tool -
don't
properly
or
jewelry. They can be
environment - Don't
ions. Don't use
electric
grounded
away
- Do
- When not
in
dry, and high or
tool
- It will do the
Don't
do
use
the
purpose
force small tool or
job
of a heavy-duty tool.
circular
- Do
shock
not intended - for
not
power
tools in
power
tools
- Prevent
surfaces. For
not
let visitors
in
use, tools
locked-
job
better
saw for cutting
wear loose
caught
in
non-skid
---------------
When
using
always
personal injury,
footwear are recommended when working
outdoors. Wear protective hair covering to
contain long hair.
9. Use safety
mask if cutting operation is dusty.
10.
Don't
cord
or yank it to
Keep cord from heat, oil and sharp edges.
11. Secure
hold work. It's safer than using your hand and
it frees both hands to operate tool.
12.
Don't
and balance at all times.
13. Maintain tools
sharp and clean for better and safer performance. Follow instructions for lubricating and
changing accessories. Inspect tool cords
periodically and if damaged, have repaired by
authorized service facility. Inspect extension
cords periodically and replace if damaged.
Keep handles dry, clean, and free from oil and
grease.
14.
Disconnect
before servicing, and when changing
sories, such as blades, bits, cutters.
15. Remove
-Form
adjusting wrenches are removed from tool
before turning it on.
glasses-Also
abuse
cord
- Never carry tool by
disconnect
work
- Use clamps or a vise to
over-reach - Keep
with
tools - When
adjusting
habit
of
checking
electric
be
followed
use face or dust
from receptacle.
proper
care
- Keep tools
keys and wrenches
to see that keys and
tools, basic safety precautions
to
reduce
including
footing
not
in use,
acces-
-
-------------------
the risk
of
lire,
the
following:
16.
Avoid
carry
plugged-in
Be sure switch is off when plugging in.
17.
Outdoor
tool is used outdoors, use only extension
cords
marked.
18
. Stay alert - Watch what you are doing .
Use
common
when you are tired. Don't use
after taking drugs, alcohol or medications.
19.
Check
further use of the
parts. Check the alignment of moving parts,
binding of moving parts, breakage of parts,
mounting, and any
affect its operation. A part that is damaged
should be properly repaired or replaced by an
authorized service center before further use
of the tool. Have defective
by authorized service center. Do no t use tool
if switch does not turn it on and off.
REPLACEMENTS - When servicing use
only
identical
POWER SUPPLY AC,
50-60
electric
unintentional
tool with finger on switch.
use extension
intended for use outdoors and so
sense. Do
for
damaged
replacement parts.
Hz.
should
shock, and
starting -Don't
cords
not
too
other
parts
l,
check
conditions
switches
Tool
operates on 115V.,
- When
operate tool
power
- Before
tor damaged
that may
replaced
·
tools
Grounding
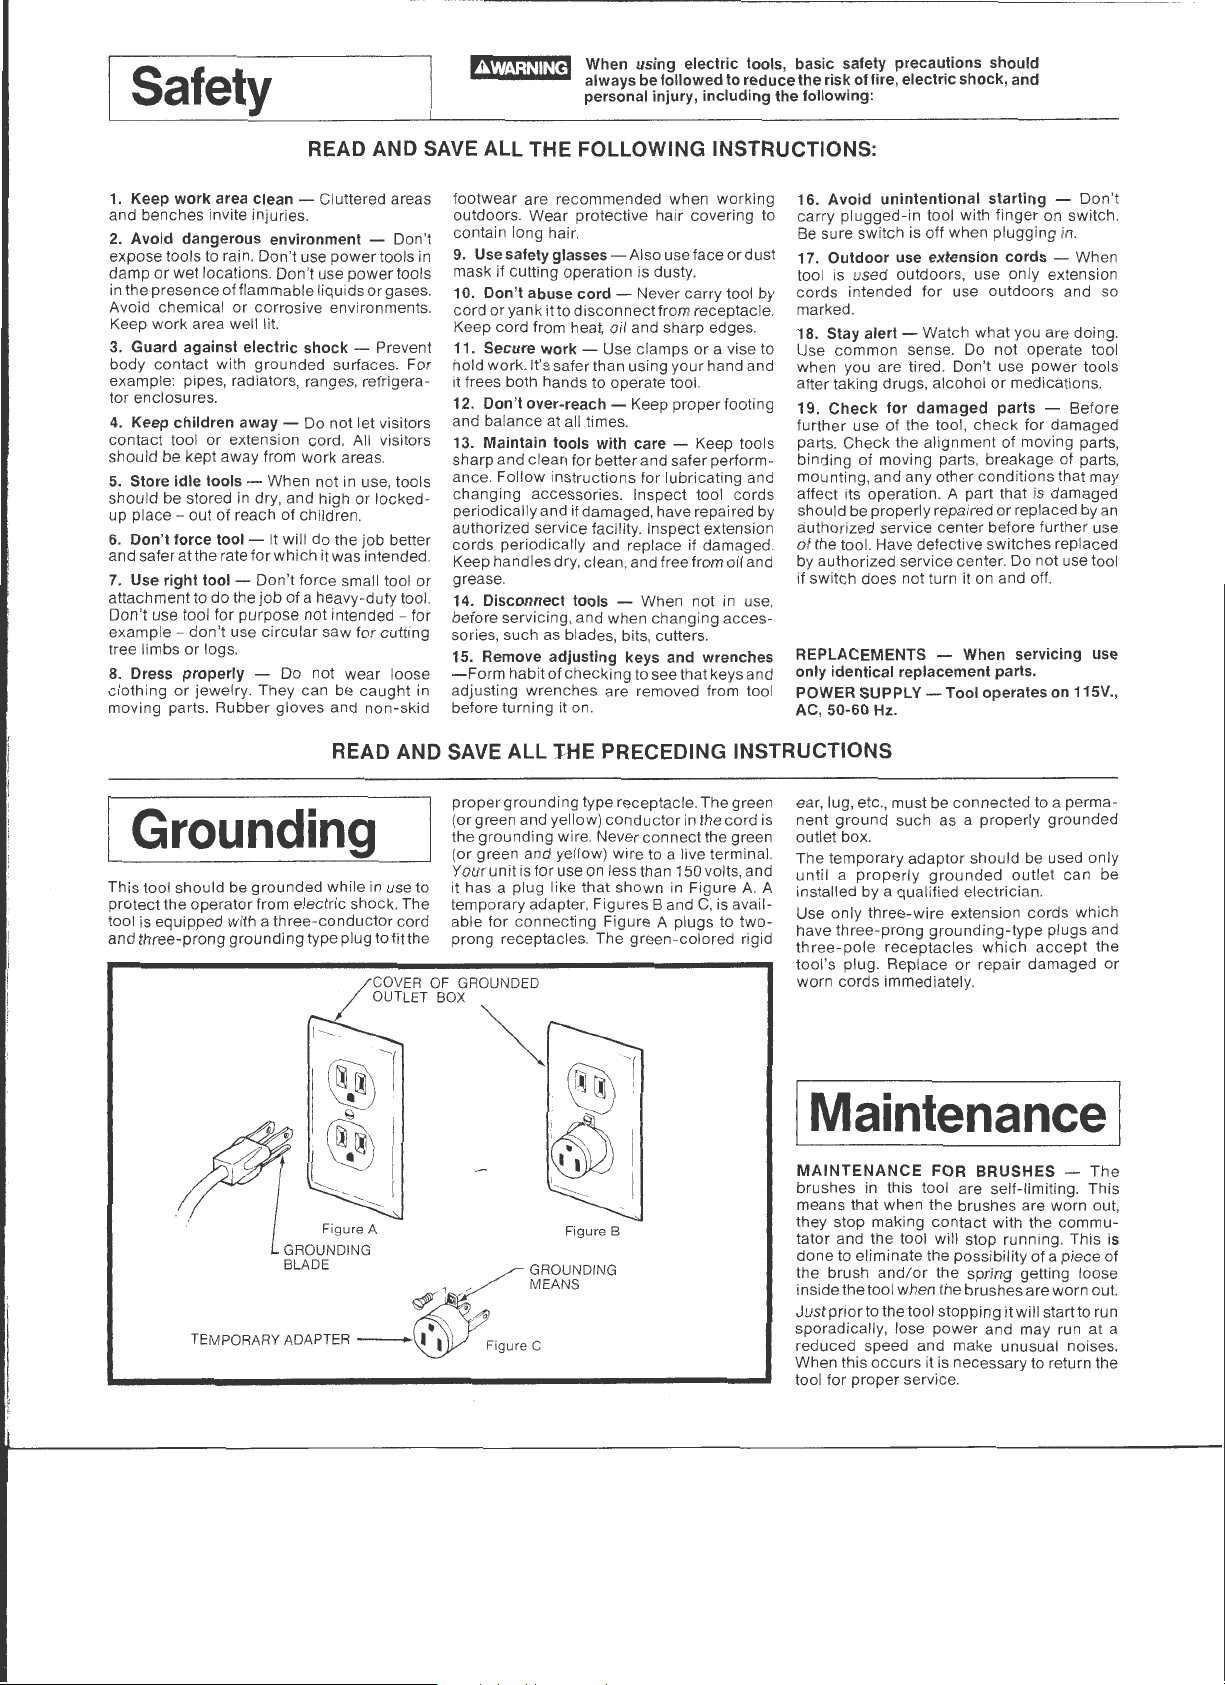
This tool should be
protect
the operator from electric shock. The
tool is equipped with a threeand
three-prong
A1
grounded
grounding
GROUNDING
BLADE
while in use to
conductor
type plug to
I~
~
I~
READ AND SAVE ALL THE PRECEDING INSTRUCTIONS
proper
fitthe
/COVER
OUTLET BOX
-I
grounding
(or green and ye
the
grounding
(or green and yel low) wire to a live terminal.
Your
unit
it has a plug like that shown in Figure
temporary adapter, Figures
cord
able for
prong receptacles. The
OF
GROUNDED
is for use on less than 150 volts, and
connecting
~
type receptacle. The green
ll
ow)
conductor
wire. Never
Figure A plugs to
,
@!)
-I
in
connect
Band
green-colored
the cord is
the green
A. A
C,
is avail-
two-
rigid
ear, lug, etc., must be
ground
nent
outlet box .
The temporary adaptor should be used only
until a proper
installed by a qualified electrician.
Use only
have three -prong
three-pole
tool's pl u
worn cords immediately.
three-wire
g.
I Maintenance ]
MAINTENANCE
brushes in this tool are self-limiting. This
-
~B
GROUND/NG
MEANS
means that when the brushes are worn out,
they stop making
tator and the tool wi ll stop running. This is
done
to eliminate the possibility of a piece of
the brush
inside the too l when the brushes are worn out.
Just
sporadically, lose
reduced speed and make unusual noises.
When this
tool for
and/or
prior
to the tool stopping it will start to run
occurs
proper
connected
such
as a properly
ly
grounded
extension cords which
grounding-type
receptac
Replace
les
FOR
contact
the spr ing getting loose
power
it is necessary to return the
service.
outlet
which
or
repair damaged or
BRUSHES -The
with the
and may run at a
to a perma-
grounded
can
be
plugs and
accept
the
commu-
----------------------------------------------
For
example, if you
square hole in a furnace duct, the Rotary Tool
will
do
the
in
your home is slightly misaligned because
the house has settled, the latch bolt may no
longer
enter the strike plate properly, making
door
the
Rotary Tool to cut
strike plate so the latch bolt operates properly.
You can
hundreds
these for the Rotary Tool in every home.
In
addition to these special applications,
of
your
Rotary Tool for shaping or removing
wood, metal and plastics. This is
carvers use the tool, and while you may
interested in wood carving, there are many
times when you
sharp corner, or enlarge
And then there are the
jobs
done
sharpen tools, scissors and cutlery, get rid
burrs and unwanted sharp edges,
lated rust, grind
The
point
jobs
many
properties and capabilities. When you have a
job
to do, think of the Rotary Tool as one
possible solution.
t,Yl?J;@W1
jects being
result in severe eye damage. Always wear
safety glasses or eye shields before
mencing
mend Wide Vision Safety Mask for use
spectacles,
available at Sears retail or catalog stores.
j
Operation
The operation
tool can result
thrown
into the eyes, which can
power
tool operation. We recom-
or
standard safety glasses ...
_of
in
any
power
foreign ob -
com-
over
t•W4iM@eJ
METER OTHER THAN THE NO. 53088 CUTOFF
WHEEL
CAN CAUSE LARGER WHEELS TO FLY
APART AND CAUSE INJURY.
BALANCING ACCESSORIES
sion work, it is important that all accessories
be in
good
tires on
balance an accessory, slightly loosen collet
cap and give the accessory or collet a
turn. Retighten col let cap and run the Rotary
Tool. You
and feel if
balance. Continue adjusting
best balance is achieved. To maintain
until
balance on abrasive wheel points, before
each use, with the wheel point secured
chuck, turn on the Rotary Tool and run a
Dressing Stone lightly against the revolving
wheel point. This removes high spots and
trues up the wheel point for good balance.
~~E~~~
ROTARY TOOL'S HIGH SPEED
balance
your
automobile). To true up or
should
your
ci'iEER
-
(much the same as
be
able
to tell by the sound
accessory
is running in
in
~~11~D~~A~
For preci-
this fashion
the
1/4
in
the
USE ONLY RECOMMENDED
ACCESSORIES
want
to
cut
a neat
2-inch
job
quickly
and easily.
difficult to close or lock. Use the
do
of special
is to
it can
away
it
in
minutes. There are literally
applications
want
to
cut
an
by
grinding
the
Rotary
new
shapes, etc.
think
of the Rotary Tool for the
do
because of its
Or
if a
door
just enough of the
such as
think
how
wood
not
a recess, round a
opening.
and polishing
Tool. You
accumu-
own
can
unique
be
of
r•W/]jkjj~[Cj
--·····,,··-
COLLETS OR INSERTING ACCESSORIES
trVlf.!·W@ij
• " ERATE CHUCK LOCK PIN
WHILE (ROTARY TOOL) IS RUNNING.
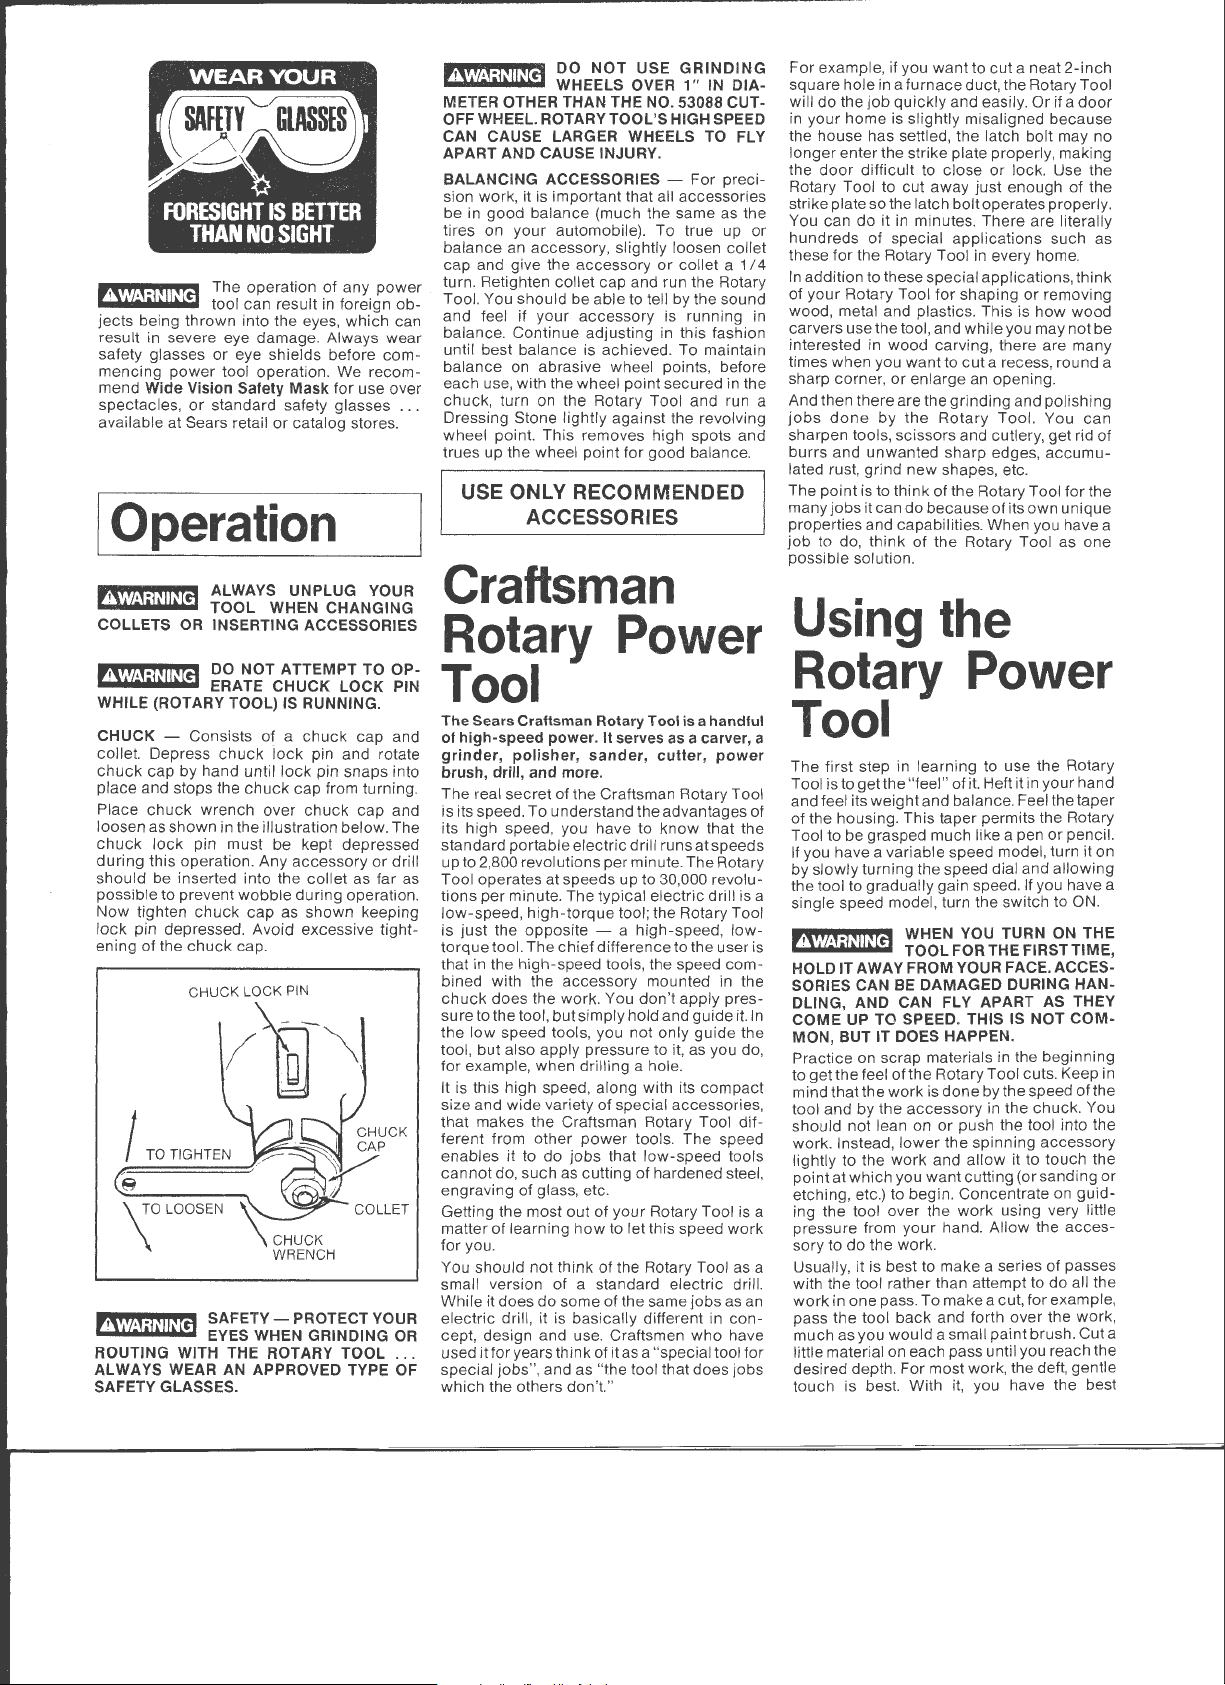
CHUCK
collet. Depress
chuck
cap by hand until
place and stops the
Place
chuck
loosen as shown in the illustration below. The
chuck
during
this operation . Any
should be inserted into the collet as far as
possible to prevent
Now
tighten
lock
pin depressed. Avoid excessive tight-
ening of the
ALWAYS UNPLUG YOUR
TOOL
WHEN CHANGING
DO
NOT
ATTEMPT
Consists of a
-
chuck
wrench
lock
pin must be kept depressed
wobble
chuck
chuck
cap.
chuck
lock
pin and rotate
lock
chuck
cap
pin snaps into
cap from turning.
over
chuck
accessory
during
as shown keeping
TO
OP-
cap and
cap
and
or
drill
operation.
I
\0
LOO
SEN
f•f@·
W@ij
b ' EYES WHEN GRINDING OR
ROUTING WITH
ALWAYS WEAR AN APPROVED TYPE OF
SAFETY GLASSES.
SAFETY - PROTECT YOUR
THE ROTARY TOOL
..
Craftsman
Rotary
Power
Tool
The
Sears
of
grinder, polisher, sander, cutter,
brush, drill, and more.
The real
is its speed. To understand the advantages of
its high speed , you have to
standard portable electric drill runs at speeds
up to 2,800 revolutions per minute. The Rotary
Tool operates at speeds up to 30,000 revolutions
low-speed,
is
torquetool.
that in the high-speed tools, the speed
bined with the accessory mounted in the
chuck
sure to the tool, but simply hold and guide
the low speed tools, you
too l, but also apply pressure to
for example, when drill ing a hole.
It is this high speed, along with its
size and wi
that makes the Craftsman Rotary Tool
ferent from
enables it to
cannot
engraving of glass, etc.
Getting the most
matter of le
for you.
You should
small version of a standard electric drill.
While it does
electric
cept, design and use. Craftsmen
used it for years
.
special jobs", and as "the tool that does jobs
which the others don't."
Craftsman Rotary Tool is a handful
high-speed power. II serves as a carveT,a
secret
of the Craftsman Rotary Tool
know
per
minute. The typical electric drill is a
just
high-torque
the opposite - a high-speed,
The
chief
does the
de
variety of
other
do
do, such as cutting of hardened steel,
arning
not think of the Rotary Tool as a
do
dr
ill, it is basically different in
th
tool; the Rotary Tool
difference to the user is
work
. You
don't
apply
not
only
it,
as you do,
spec
ial accessories,
power
jobs
out
how
some
ink of it as a "special tool for
tools. The speed
that
low-speed
of
your
Rotary Tool is a
to let this speed
of
the same
jobs
who
power
that the
lowcompres-
it.
guide
the
compact
dif-
tools
work
as an
conhave
Using
Rotary
the
Power
Tool
The first step in learning to use the Rotary
Tool is to
and feel its weight and balance. Feel the taper
of
Tool to be grasped much like a pen or pencil.
If you have a variable speed model, turn it on
by slowly turning the speed dial and allowing
the tool to gradually gain speed. If you have a
single speed model, turn the switch to ON.
,.
HOLD IT AWAY FROM YOUR FACE. ACCESSORIES CAN
DUNG,
In
COME
MON, BUT IT DOES HAPPEN.
Practice on scrap materials
to get the feel of the Rotary Too l cuts. Keep in
mind
tool and by
should
work. Instead,
lightly to the
point
etching, etc .) to begin. Concentrate on
ing the tool over the
pressure from
sory to
Usually, it is best to make a series of passes
with the tool rather than attempt to
work
pass the tool
much
little material on each pass until you reach the
desired depth. For most work, the deft, gentle
touch
getthe
"feel"
of
it.
Heft it in your hand
the housing. This taper permits the Rotary
,,n,c.i'11'rS
J'ur\
thatthe
at
in one pass. To make a cut, for example,
as you
WHEN YOU TURN ON THE
VJ
TOOL
FOR THE FIRST TIME,
BE
AND CAN FLY APART
UP TO SPEED. THIS IS
not
which
do
is best. With it, you have the best
DAMAGED DURING
in
the beginning
work
is
done
the
accessory
lean on or push the tool into the
lower
work
you
your
the work.
back
would
by the speed of the
in the chuck. You
the spinning
and
allow
want
hand.
and forth
a small
it to
cutting (or sanding or
work
using very little
Allow
over
paint
HAN·
AS
THEY
NOT
COM·
accessory
touch
the
guid-
the acces -
do
all the
the work,
brush. Cut a

control, are less likely to make errors, and will
get
the
most
accessory.
For best control
Rotary Tool like a pencil between your thumb
and forefinger.
The pencil grip we described is one way to
hold the Rotary Tool. A second way is to grip
the tool
bicycle, with your hand wrapped around the
housing and the
your
thumb and forefinger. This
used for cutoff wheels and saws for maximum
control and is often used with polishing ,
brushing, and
This
is
tool used
the
brushing.
f1\hf.i.mi~tij
-
lA'
......
TO COVER THE AIR VENTS WITH YOUR
HAND. THIS BLOCKS THE AIR FLOW AND
CAUSES THE MOTOR TO OVERHEAT.
f1\fQ.i·i@[ij
--1--'
......
WHILE USING EITHER OF THESE ACCESSORIES. WHEN USING THE SAW WHEEL
OR
CUTOFF WHEELS ALWAYS HAVE THE
WORK SECURELY CLAMPED.
The reason
they become slightly angled
and can kickback causing
resulting
should be used to steady and guide the hand
holding the tool. When a cutoff wheel grabs,
the wheel itself usually breaks. When the
steel saw wheel grabs, it may jump from the
groove
and you
efficient
much
as you
chuc
grinding
the "handgrip" method
for
WHENEVER YOU HOLD THE
_ TOOL,
NEVER ATTEMPT TO HOLD
_ THEWORKWITHONEHAND
is
that these wheels
in
serious injury.
could
work
out
of
the
in
close work, grip the
would
the
handgrip
k extending just beyond
accessories.
operations such as wire
BE
CAREFUL NOT
in
loss
Your
second hand
lose control of
on a
grip
must be
of
holding
will
grab
the groove,
of
control
the
too
Operating
Speeds
&
Accessories
There are two basic types of Rotary Tools:
Single speed and Variable speed. On the
si
ngle
speed model (572.61000), there is an
ON
-OFF switch. When the switch is on, the
P.M
tool runs at 30,000 R.
speed model (572.61002), there is a small
numbered dial
the operating speed needed. You can refer to
the dial setting chart to determine
mate revolutions per minute for each setting.
If you have the single speed model, you will
be able to use many
assortment of jobs. For the majority of jobs
top speed should be used.
which
. On the variable
you can turn to select
accessories
to
do a wide
Needs for slower speeds:
To achieve the best results when
with different materials, the speed of your
Rotary
Tool should be regulated.
For the single-speed model (572.61000) only
a full wave output speed control should be
used . Sears
(Model 572.61002) has an integral speed
control.
CONTROL SHOULD NEVER
Certain materials (some plastics, for example)
require a relatively slow speed because at
high speeds the friction of the tool generates
heat and causes the plastic to melt.
Slow
speeds {15,000 R.P.M.
are best for polishing operations employing
the felt polishing accessories. They may also
be best for working on delicate projects such
"eggery"
as
and fragile model parts. You should always
do
polishing with
slower
R.P.M.
Higher
routing, shaping, cutting dadoes or rabbets in
wood.
Hardwoods, metals, and glass require high
speed operation , and drilling should also be
done
at high speeds.
if
The speed
Tool
is
housing.
Dial Settings
l.
Per Minute, Craftsman Variable
Rotary Tool (No. 572.61002).
Dial Setting
(Note: You can dial intermediate settings. For
example, a dial setting
duce a motor
RPM.)
Variable
THEREFORE,
work, delicate wood carvings,
speeds, and never higher than 15,000
speeds are better for carving, cutting,
of
variable speed model Rotary To help
controlled
for
1
2
3
4
5
6
7
speed
Speed Rotary
AN
EXTERNAL SPEED
BE
USED.
or
less) usually
wire
brush accessories at
by
setting this dial
Approximate Revolutions
·Motor Speed
4,000 RPM
5,000 RPM
6,500 RPM
8,000 RPM
11,000 RPM
16,500 RPM
25,000 RPM
of
1-112 would
of
approximately 4,500
Ultimately, the best way to determine the
correct
speed for
practice for a few minutes on a piece of scrap,
approxi-
working
on
Speed
even after referring to the chart. You can
quickly
learn that a
more effective just by observing what
pens as you make a pass or
speeds. When
ple, start at a
speed until you observe that the plastic is
melting at the point of contact. Then
speed off slightly to get the optimum
speed.
Some rules of thumb in regard to speed:
1.
Plastics and materials that melt at
temperatures
2.
Polishing, buffing and cleaning with a wire
Tool
the Rotary Tool, dial the speed
wheel should be done at speeds below
15,000 RPM to prevent damage to the
wheel.
3.
Soft
4. Iron
using a tungsten
slower
cutters. If a high speed steel cutter starts to
chatter - this normally means it is running
too slow.
5.
Aluminum,
alloys, and tin may be
depending
done. Use paraffin or other suitable lubr
cant on the cutter to prevent the
material from adhering to the cutter teeth.
Increasing the pressure on the tool is
answer when it is
should. Perhaps
ferent cutter, and perhaps an adjustment
speed
on the tool seldom helps.
this
Sears Table Top Speed Control.
Dial settings
minute, using the Sears Model 572.25144
Manually Operated Speed Control
single speed Rotary Tool No. 572.61000.
Dial Selling
working
slow
wood
should be
or
steel should be
speeds if using high speed steel
copper
on the type of cutting being
would
solve the problem. But leaning
you
do
more with your single speed
for
approximate revolutions per
1
2
3
4
5
(Note: You can dial intermediate settings. For
example, a dial setting
pro-
duce a motor
RPM)
speed
work
on any material is to
slower
or faster speed is
two
with plastic, for exam-
rate and increase the
should
be
cut
at
cut
at high speeds.
cut
carbide
alloys, lead alloys, zinc
not
you should be using a dif-
of
at top speed if
accessory, but at
cut
at any speed,
cutting as you think it
you
Motor Speed
500 RPM
4,000 RPM
12,000 RPM
22,000 RPM
28,000 RPM
of
2-112 would
approximately 8,000
hap-
at different
back
wo
rking
low
speeds.
not
need
with
with
pro-
the
low
i-
cut
the
in
the
 Loading...