


Sears
OWNERS
MANUAL
MODEL NO.
572.36578
CAUTION:
115 VOLT A.C.
Read Rules for
Safe Operation
and Instructions
SAW CHAIN
SHARPENER
Carefully
Introduction
Assembly
Operation
Maintenance
Repair Parts
Sold by SE_RS, ROEBUCK AND CO_, Chicago, IL 60684 UoS A,
FORM NO 380223 PRINTED IN U,S A
FULL ONE YEAR WARRANTY ON CRAFTSMAN
SAW CHAIN SHARPENER _ --_._
For one year from the date of purchase, Sears will reptace this Crafts-
man Saw Chain Sharpener, free of charge, if it falls to work properly_
WARRANTY SERVICE IS AVAILABLE BY RETURNING THE
CRAFTSMAN SAW CHAIN SHARPENER TO THE NEAREST SEARS
STORE IN THE UNITED STATES
This warranty gives you specific legal rights, and you may also have
other rights which vary from state to state.
SEARS, ROEBUCK & COo
SEARS TOWER
DEPT. 6981731A
CHICAGO, IL 60684
INTRODUCTION
WE SUGGEST YOU TAKE A FEW MINUTES TO READ THE INSTRUCTIONS CONTAINED IN THIS MANUAL
BEFORE USING YOUR CRAFTSMAN SAW CHAIN SHARPENER THIS WILL HELP YOU OBTAIN THE FULL
BENEFITS OF THE QUALITY AND CONVENIENCE BUILT INTO THE TOOL
RULES FOR SAFE OPERATION
WARNING
When using electric tools, basic safety precautions should always be followed to reduce the risk of fire, electric
shock, and personal injury, including the following:
READ AND SAVE ALL THE FOLLOWING INSTRUCTIONS
1_ KEEP WORK AREA CLEAN -- Cluttered areas
and benches invite injuries
2 AVOID DANGEROUS ENVIRONMENT -- Don't
expose tools to rain Don't use power tools in damp
or wet Iocations. Don't use power tools in the pres-
ence of flammable liquids or gases. Avoid chemical
or corrosive environments. Keep work area well lit.
3 GUARD AGAINST ELECTRIC SHOCK -- Prevent
body contact with grounded surfaces. For example;
pipes, radiators, ranges, refrigerator enclosures.
4. KEEP CHILDREN AWAY -- Do not let visitors
contact tool or extension cord All visitors should
be kept away from work area_
5. STORE IDLE TOOLS -- When not tn use, tools
should be stored in dry, and high or locked-up place-
out of reach of children_
6. DON'T FORCE TOOL _ it will do the job better
and safer at the rate for which it was intended.
7. USE RIGHT TOOL -_. Don't force small tool or
attachment to do the job of a heavy-duty tool Don't
use tool for purpose not intended - for example -
don't use circular saw for cutting tree limbs or logs.
8 DRESS PROPERLY _ Do not wear loose cloth-
ing or jewelry., They can be caught in moving parts.
Non-skid footwear is recommended when working
outdoors_ Wear gloves to prevent cutting your fingers
when ,touching or rotating chain. Wear protective
hair covering to contain long hair.
9. USE SAFETY GLASSES -- Also use face or dust
mask tf cutting operation is dusty.
10. DON'T ABUSE CORD -- Never carry tool by
cord or yank it to disconnect from receptacle Keep
cord from heat, oil, and sharp edges.
11_SECURE WORK _ Use clamps or a vise to hold
work., It's safer than using your hand and it frees both
hands to operate tool
12_ DON'T OVER-REACH -- Keep proper footing
and balance at all times.
13 MAINTAIN TOOLS WITH CARE _ Keep tools
sharp and clean for better and safer performance.
Fotlow instructions for lubricating and changing
accessories. Inspect tool cords periodically and if
damaged, have repaired by authorized service
facility. Inspect extension cords periodically and
replace if damaged_ Keep handles dry, clean, and
free from oil and grease
14. DISCONNECT TOOLS _ When not in use,
before servicing, and when changing accessories,
such as blades, bits, cutters.
15 REMOVE ADJUSTING KEYS AND WRENCHES
Form habit of checking to see that keys and ad-
justing wrenches are removed from tool before
turning it on_
16. AVOID UNINTENTIONAL STARTING _ Don't
carry plugged-in tool with finger on switch_ Be sure
switch is off when plugging ino
17 OUTDOOR USE EXTENSION CORDS _ When
tool is used outdoors, use only extension cords
intended for use outdoors and so marked
18. STAY ALERT _ Watch what you are doing Use
common sense.. Do not operate tool when you are
tired Don't use power tools after taking drugs,
alcohol or medications..
!9,. CHECK FOR DAMAGED PARTS -- Before
further use of the tool, check for damaged parts,
Check for alignment of moving parts, binding of
moving parts, breakage of parts, mounting, and any
other conditions that may affect its operation. A part
that is damaged should be properly repaired or
replaced by an authorized service center before
further use of the tool Have defective switches
replaced by authorized service center. Do not use
tool if switch does not turn it on and off.
PAGE 2
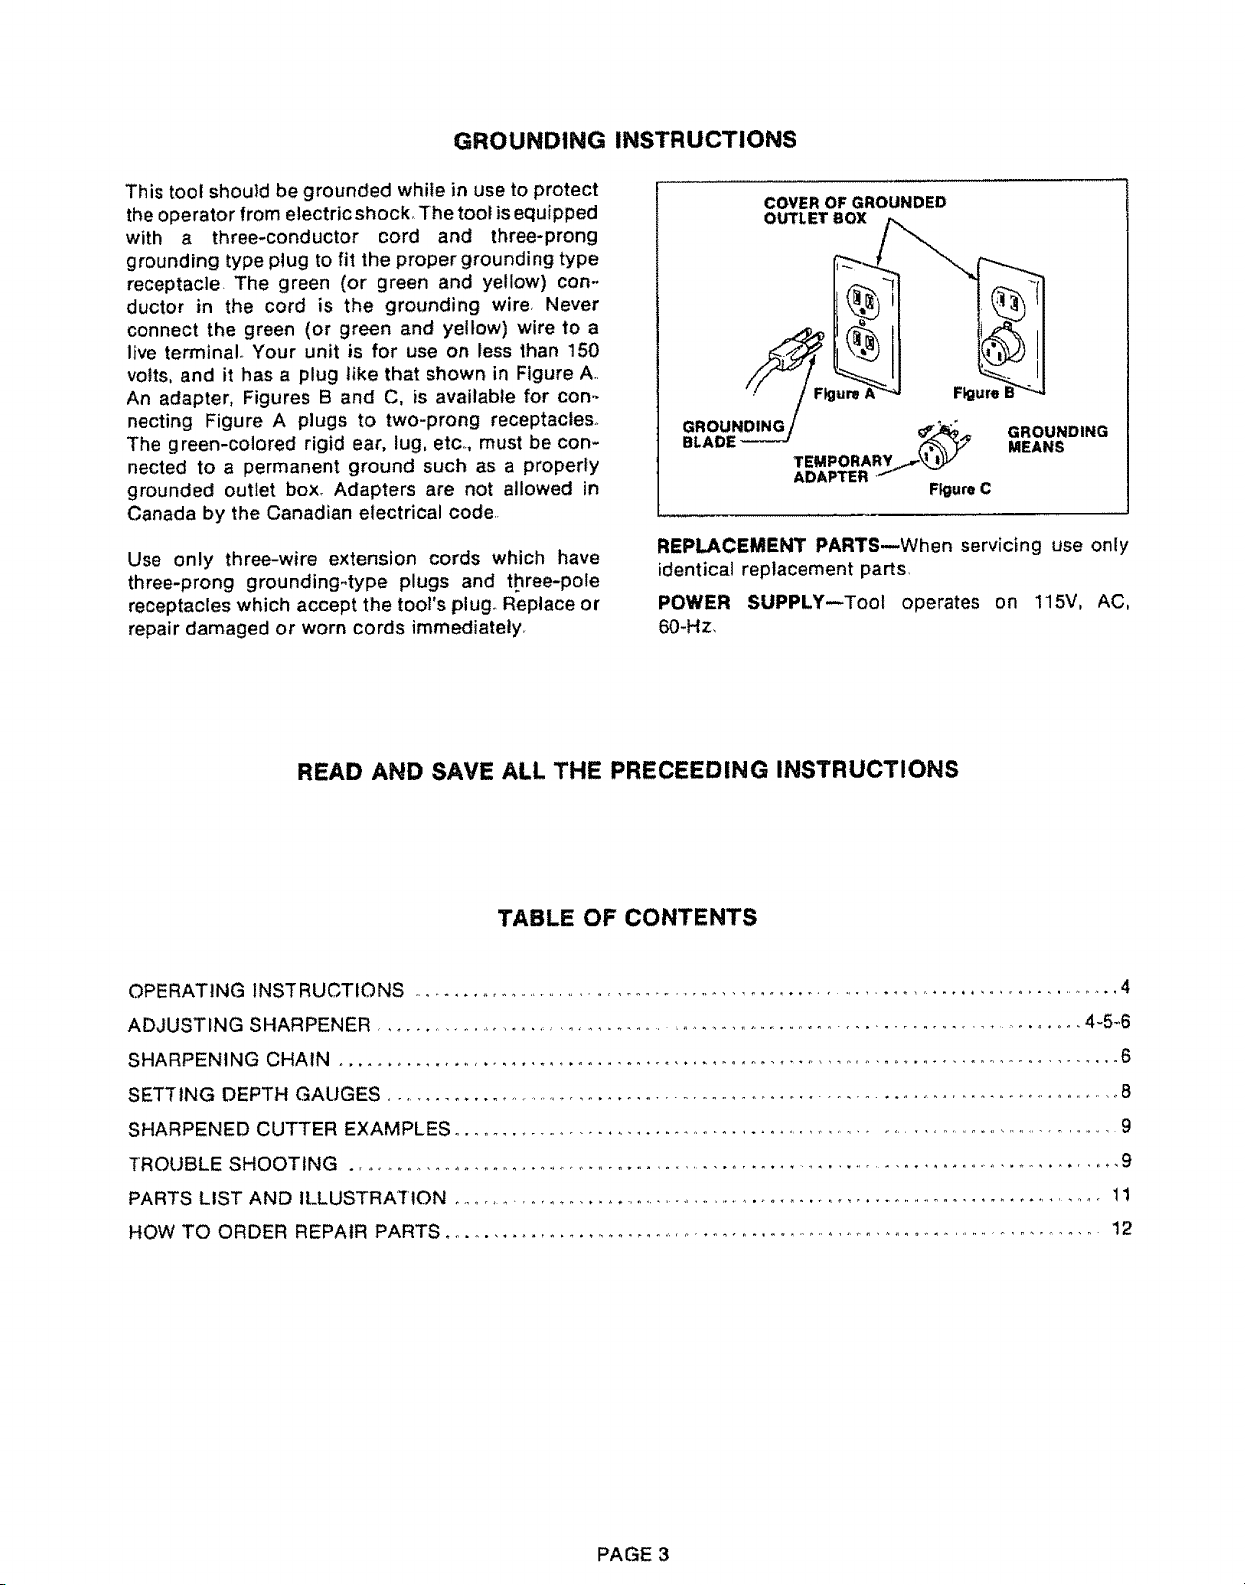
GROUNDING INSTRUCTIONS
This too! shou}d be grounded while in use to protect
the operator from electricshock, Thetool is equipped
with a three-conductor cord and three-prong
grounding type plug to fit the proper grounding type
receptacle. The green (or green and yellow) con-
ductor in the cord is the grounding wire, Never
connect the green (or green and yellow) wire to a
live terminal. Your unit is for use on less than 150
volts, and it has a plug like that shown in Figure A,,
An adapter, Figures B and C, is available for con_
necting Figure A plugs to two-prong receptacles°
The green-colored rigid ear, lug, etc,., must be con-
nected to a permanent ground such as a properly
grounded outlet box, Adapters are not allowed in
Canada by the Canadian electrical code..
Use only three-wire extension cords which have
three-prong grounding-type plugs and three-pole
receptacles which accept the toot's plugo Replace or
repair damaged or worn cords immediately_
READ AND SAVE ALL THE PRECEEDING INSTRUCTIONS
COVER OF GROUNDED
OUTLET BOX
GROUNDING _._ "',_ GROUNDING
BLADE _..f_ MEANS
TEMPORARY
ADAPTER I
Figure C
REPLACEMENT PARTS--When servicing use only
identica! replacement parts,
POWER SUPPLY_Tool operates on 115V, AC,
60-Hz,
TABLE OF CONTENTS
OPERATING INSTRUCTIONS ...................................................................................... 4
ADJUSTING SHARPENER ........................................................................................... 4-5_6
SHARPENING CHAIN .................................................................................. 6
SETTtNG DEPTH GAUGES ....................................................................................... 8
SHARPENED CUTTER EXAMPLES ..................................................................................... 9
TROUBLE SHOOTING ........................................................................................ 9
PARTS LIST AND ILLUSTRATION .................................................................................... 11
HOW TO ORDER REPAIR PARTS .............................................................................. 12
PAGE 3
IMPORTANT OPERATING INSTRUCTIONS -
Read before using.Chain Saw Sharpener
Check to see that the carton contains the following
items illustrated on pages 4 and 5.
One Chuck Cap - Part Number 660113
One Co!let - Part Number 480
One Chuck Wrench - Part Number 500045
Two Spacers
One Guide Gauge
Three Grinding Stones -
Part Numbers 36581, 82 & 83
Sharpener - Part Number 36578
IMPORTANT: If any of these parts are missing,
please IMMEDIATELY notify the Sears retail or
catalog store from which you purchased the sharp-
ener so corrective action can be taken as quickly as
possible,,
Read this manual carefully, It will help you use your
tool correctly and help you select the correct
accessory for your job
Your Craftsman Saw Chain Sharpener will sharpen
nearly all popular sizes of chain if you follow these
simple instructions
ALWAYS UNPLUG TOOL BEFORE CHANGING
GRINDING STONES OR SERVICING YOUR TOOL.
Just prior to the tool stopping it wdl start to run
sporadically, it will lose power and it may run at a
reduced speed and make unusual noises
BALANCING GRINDING STONES--It is important
that all grinding stones be in good balance (much
the same as the tires on your automobfle)_ To true
up or balance a grinding stone, slightly loosen chuck
cap and give the grinding stone or cotter a ¼ turn,
Retighten chuck cap and run the tool, You should
be able to tell by the sound and feel if your grinding
stone is running in balance.. Continue adjusting in
this fashion until best balance is achieved.
BEARINGS--Your tool is equipped with oil impreg-
nated sleeve bearings. Under normal use not more
than 2 drops of SAE No 5 or lighter, non-detergent
otl can be added to each oil hole for each 100 hours
of use,
STONE DIAMETER--Do not use grinding stones
other than the 3 listed in the chain identification
chart.
SAFETY--Protect your eyes when grinding with the
tool .... always wear an approved type of safety
glasses.
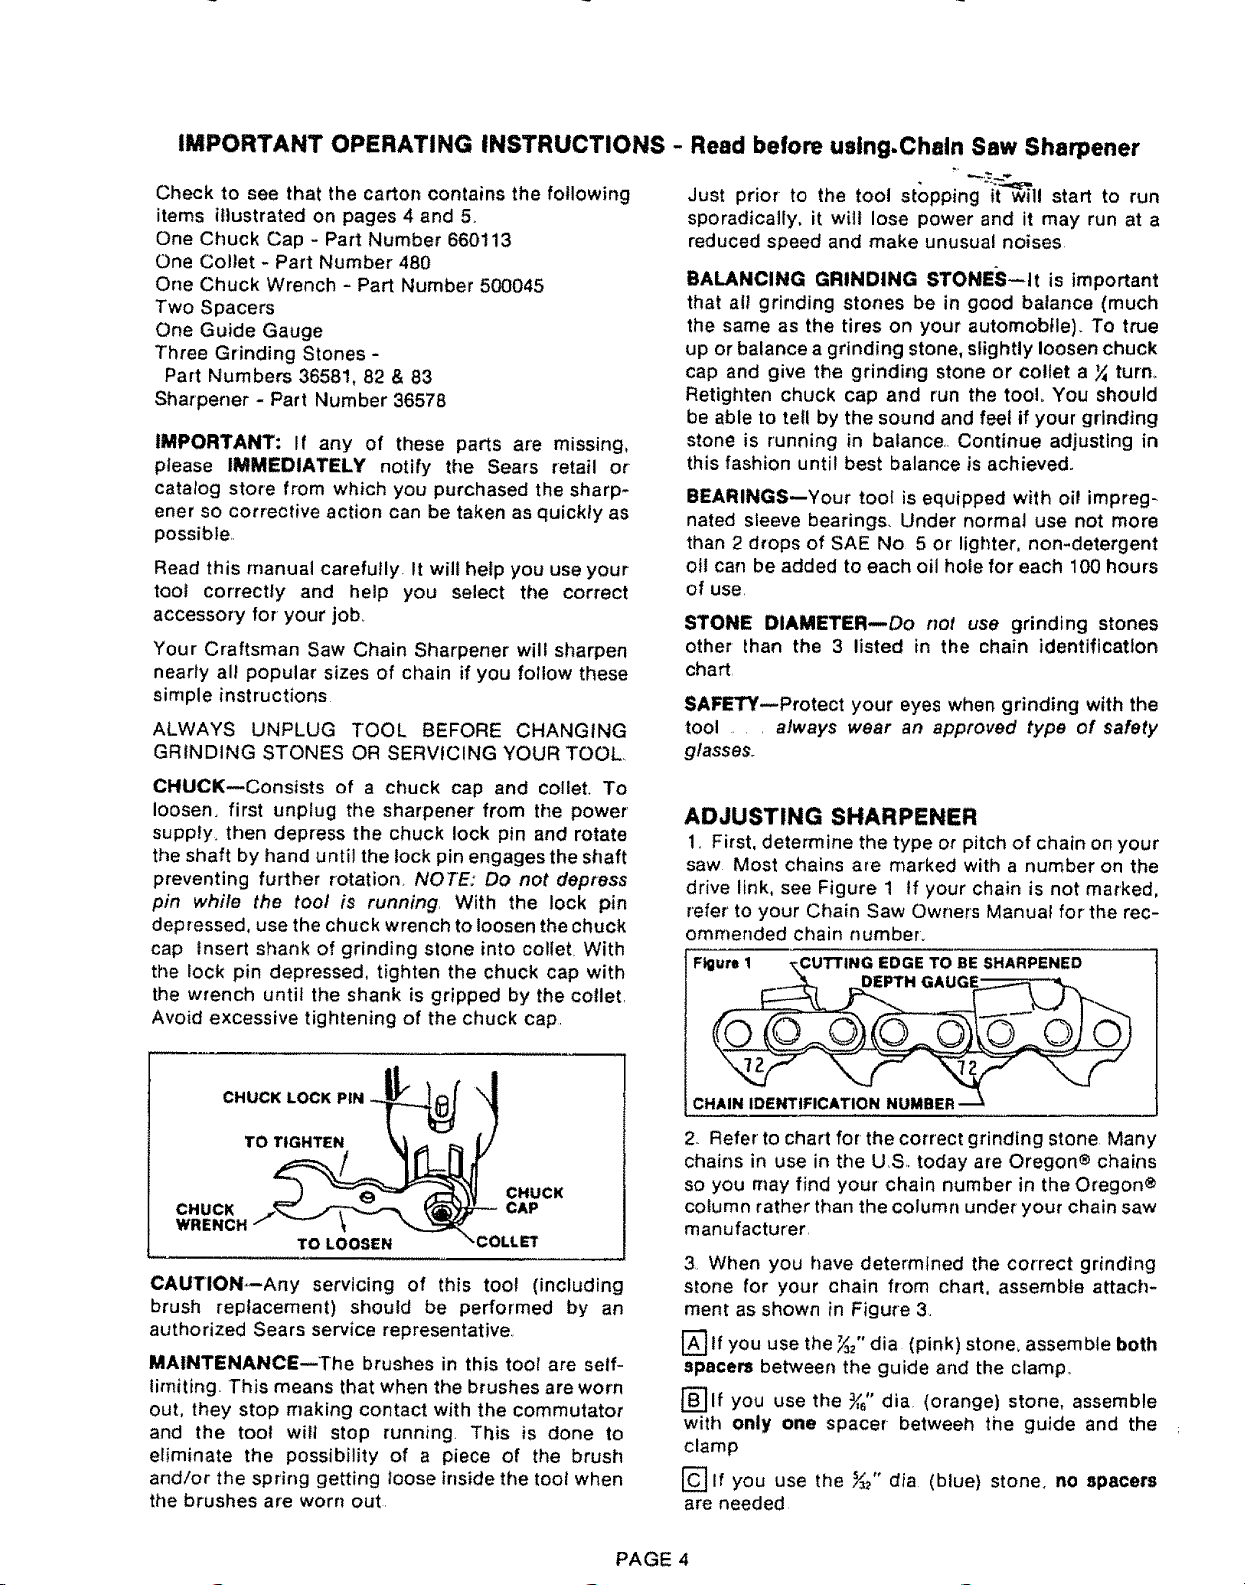
CHUCK--Consists of a chuck cap and collet. To
loosen, first unplug the sharpener from the power'
supply, then depress the chuck lock pin and rotate
the shaft by hand until the lock pin engages the shaft
preventing further rotation. NOTE: Do not depress
pin while the tool is running. With the lock pin
depressed, use the chuck wrench to loosen the chuck
cap Insert shank of grinding stone into colteL With
the lock pin depressed, tighten the chuck cap with
the wrench until the shank is gripped by the collet.
Avoid excessive tightening of the chuck cap.
CHUCK LOCK PIN -_J"
CHUCK j___j_-_,.,--_ _"_'_--- CAP
WRENCH / -- _
CAUTION--Any servicing of this tool (including
brush replacement) should be performed by an
authorized Sears service representative,
. I _'_ A'_ CHUCK
TO LOOSEN \COLLET
MAINTENANCE--The brushes in this tool are self-
limiting. This means that when the brushes are worn
out, they stop making contact with the commutator
and the toot wilt stop running This is done to
e_iminate the possibility of a piece of the brush
and/or the spring getting loose inside the toot when
the brushes are worn out.
ADJUSTING SHARPENER
1, First, determine the type or pitch of chain on your
saw Most chains are marked with a number on the
drive link, see Figure 1 tf your chain is not marked,
refer to your Chain Saw Owners Manual for the rec-
ommended chain number.
Figure 1 _\CUTTING EDGE TO BE SHARPENED
© ©
c
2,, Refer to chart for the correct grinding stone Many
chains in use in the US,, today are Oregon® chains
so you may find your chain number in the Oregon®
column rather than the column under your chain saw
manufacturer,
3 When you have determined the correct grinding
stone for your chain from chart, assemble attach-
ment as shown in Figure 3,
If you use the _" dia (pink) stone, assembte both
spacers between the guide and the clamp.
rB]lf you use the ¾_"dia. (orange) stone, assemble
with only one spacer betweeh the guide and the
clamp
[_ If you use the _" alia (blue) stone, no spacers
are needed
PAGE 4
 Loading...