

Craftsman 500.676620 Operator's Manual
Operator'siVlanual
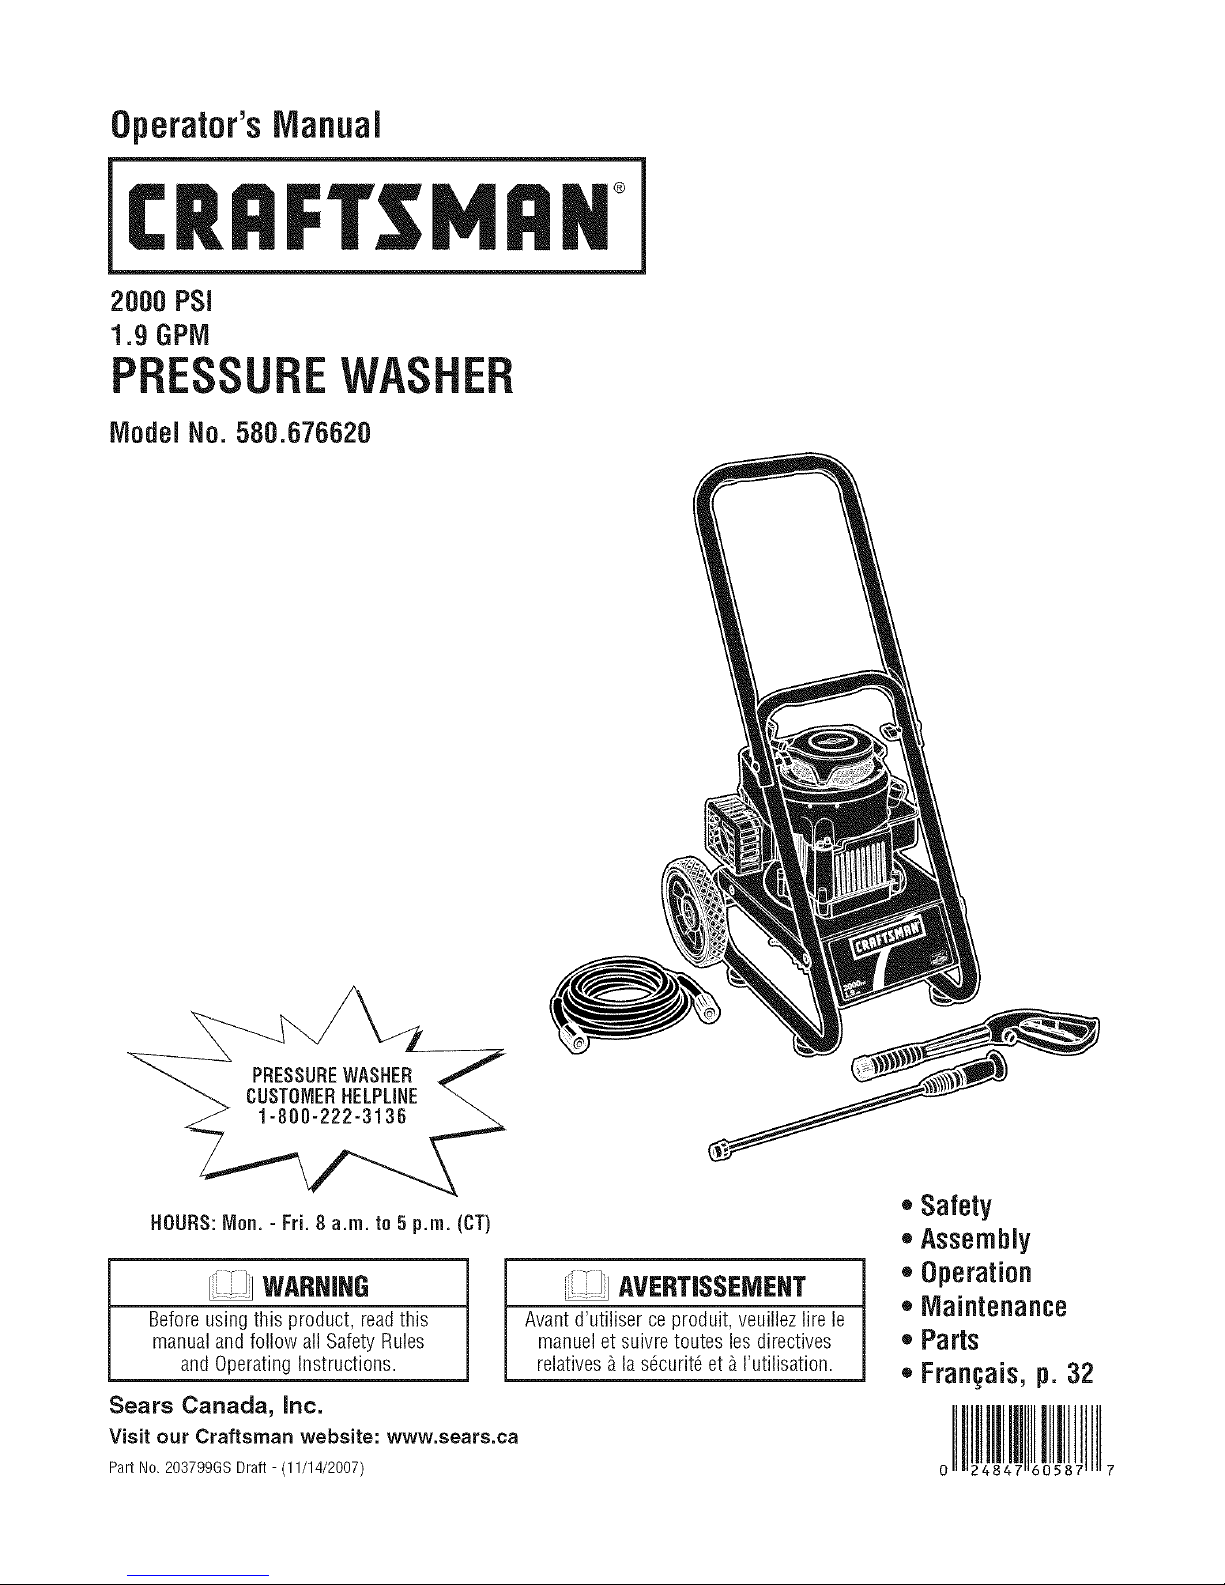
2000 PSi
1.9 GPM
Model No. 500.676620
®
CUSTOMERHELPLINE
PRESSUREWASHER ,_
HOURS:Non. - Fri. 8 a.m. to 5 p.m. (CT)
WARHJHG
Before usingthis product, readthis
manualandfollow all SafetyRules
and Operating Instructions.
Sears Canada, inc.
Visit our Craftsman website: www.sears.ca
Part No. 203799GS Draft - (11/14/2007)
AVERTJSSEMEHT
Avant d'utiliser ceproduit, veuillez lire le
manuelet suivre toutes les directives
relatives&la s6curit6et &I'utilisation.
,, Safety
,,Assembly
,, Operation
o Maintenance
• Parts
,, Fran_ais, p. 32
oI!J!IJ!LLI!!J
WARRANTY.......................................... 2
SAFETYRULES...................................... 2-5
FEATURESANDCONTROLS.............................. 6
ASSEMBLY......................................... 7-9
OPERATION....................................... 10-13
SPECIFICATIONS..................................... 14
MAINTENANCE.................................... 15-19
STORAGE........................................... 20
TROUBLESHOOTING.................................. 21
REPLACEMENTPARTS.............................. 22-26
EMISSIONCONTROLWARRANTY ..................... 27-28
NOTES........................................... 29-31
FRAN_AIS........................................ 32-55
HOWTO ORDERPARTS........................ BACKPAGE
ONE-YEARFULLWARRAHTYONCRAFTSMAHPRESSUREWASHER
If this pressurewasher fails dueto a defect in material or workmanship within one year from the date of purchase,return it to
any Searsstore, other Craftsman outlet, or SearsParts & RepairCenterin the UnitedStates or Canadafor free repair (or
replacementif repair proves impossible).
All warranty coverageapplies for only 90 days from dateof purchaseif this pressure washer is ever used for commercial or
rentalpurposes.
This warranty gives you specific legal rights, and you mayalso have other rights which vary from stateto state.
Sears, Roebuck and Co., Hoffman Estates, IL 60178
Sears Canada Inc., Toronto, Ontario, Canada M5B 288
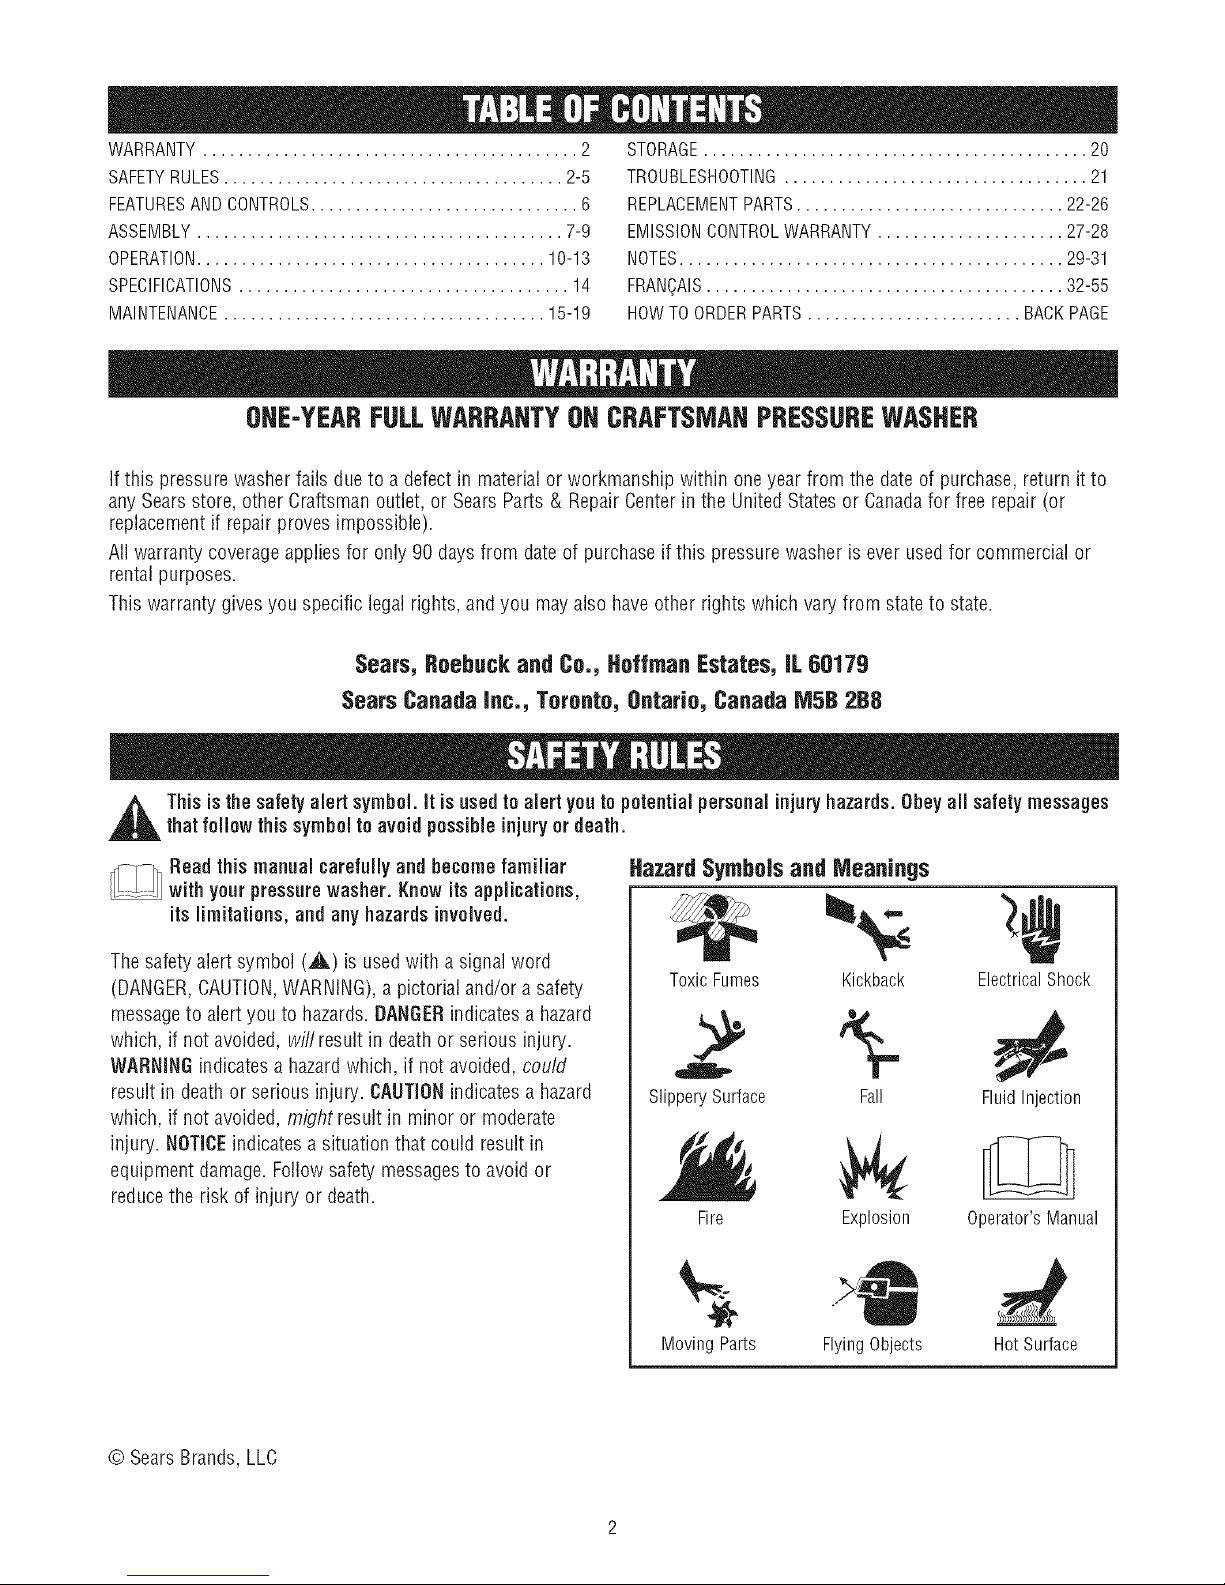
,_ Thisis the safetyalert symbol.It isusedto alert youtopotential personalinjuryhazards.Obey all safetymessages
thatfollow thissymboltoavoid possibleinjuryor death.
_Read this manualcarefully and becomefamiliar
with your pressurewasher. Knowits applications,
its limitations, and any hazardsinvolved.
Thesafety alert symbol (_.) is usedwith a signal word
(DANGER,CAUTION,WARNING),a pictorial and/or a safety
messageto alert you to hazards. BANGERindicates a hazard
which, if not avoided, willresult in death or serious injury.
WARNINGindicates a hazardwhich, if not avoided, could
result in death or serious injury. CAUTIONindicatesa hazard
which, if not avoided, might result in minor or moderate
injury. NOTICEindicatesa situation that could result in
equipment damage. Follow safety messagesto avoid or
reducethe risk of injury or death.
Hazard Symbolsand Meaninos
ToxicFumes Kickback
2 5-
SlipperySurface Fall
Fire
MovingParts FlyingObjects
Explosion
ElectricalShock
FluidInjection
Operator'sManual
HotSurface
© SearsBrands, LLC
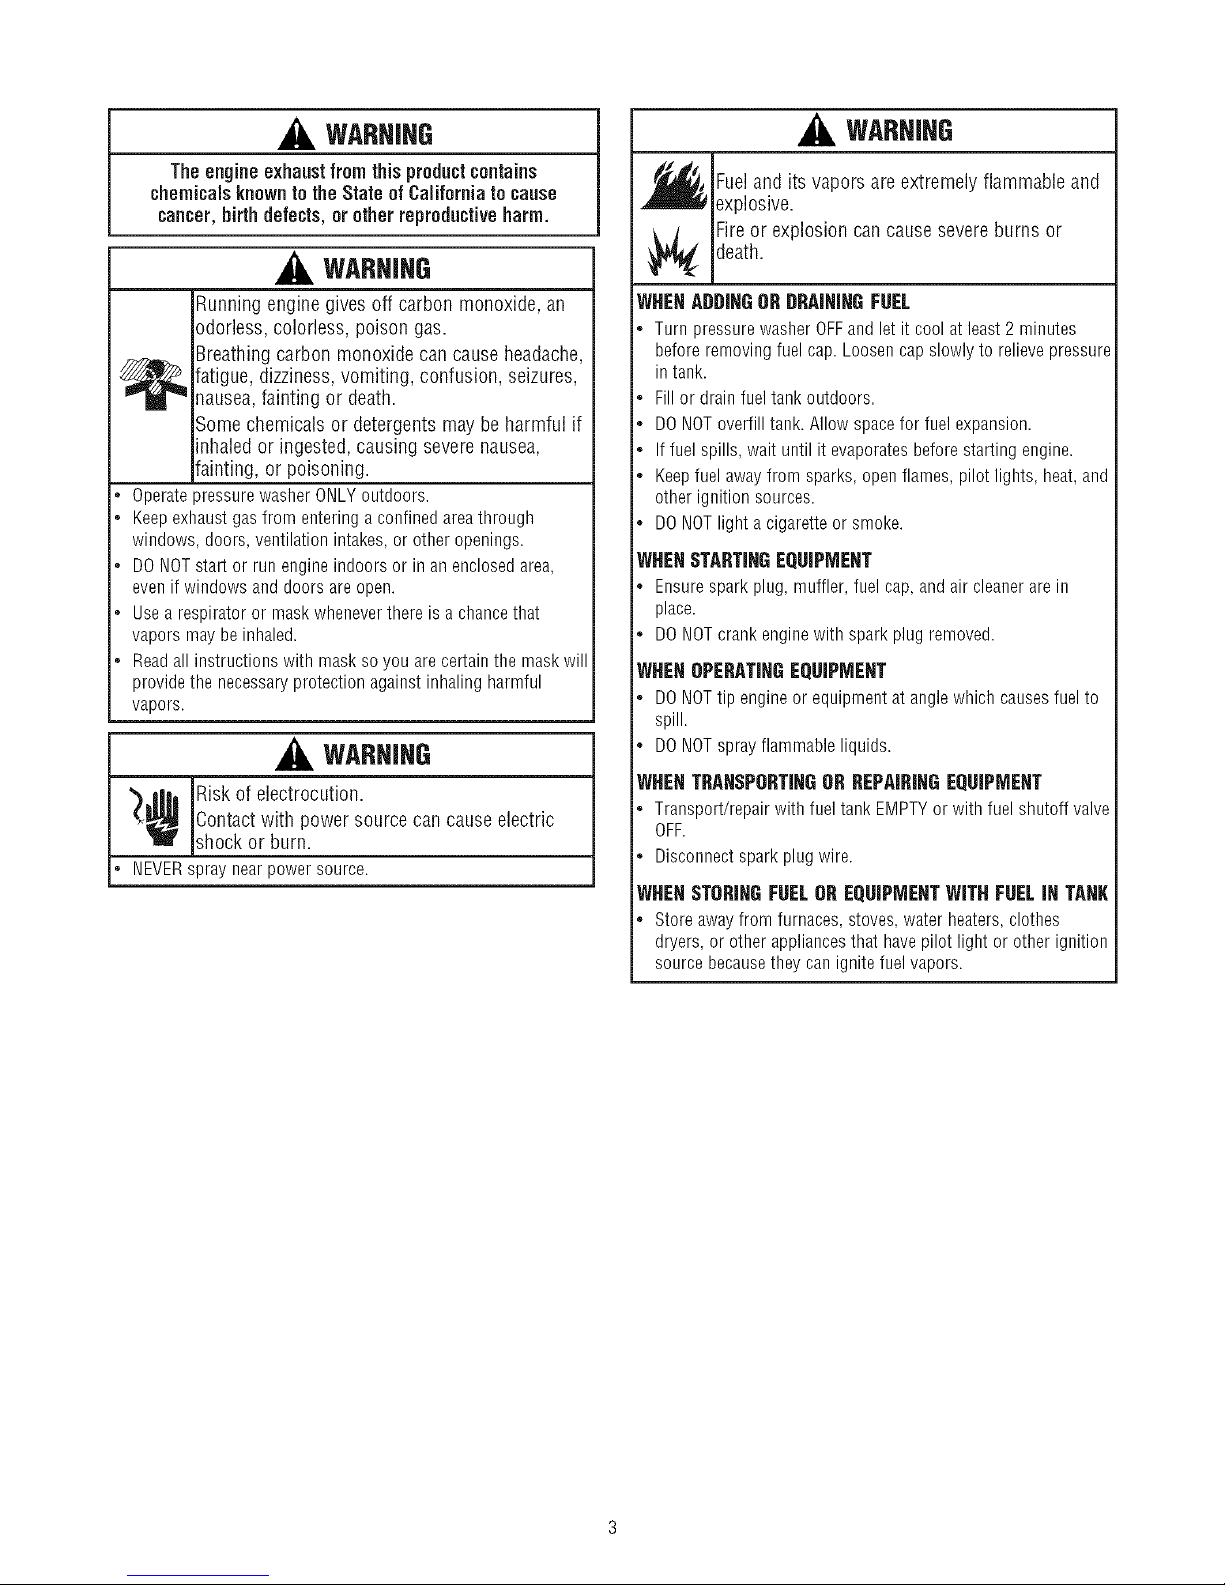
WARHJNG
Theengineexhaustfromthisproductcontains
chemicalsknownto the State of California tocause
cancer,birthdefects,or otherreproductiveharm.
WARHJHG
Runningengine gives off carbon monoxide, an
odorless, colorless, poison gas.
Breathingcarbon monoxide can cause headache,
_ atigue, dizziness,vomiting, confusion, seizures,
* OperatepressurewasherONLYoutdoors.
Keepexhaustgasfromenteringaconfinedareathrough
windows,doors,ventilationintakes,orotheropenings.
DONOTstartor runengineindoorsor in anenclosedarea,
evenif windowsanddoorsareopen.
Usea respiratoror maskwheneverthereisa chancethat
vaporsmaybeinhaled.
Readall instructionswith masksoyou arecertainthemaskwill
providethenecessaryprotectionagainstinhalingharmful
vapors.
nausea,fainting or death.
Some chemicals or detergents may be harmful if
inhaled or ingested, causing severenausea,
fainting, or poisoning.
WARHIHG
_¢ isk of electrocution.
* NEVERspraynearpowersource.
Contactwith power source can causeelectric
shock or burn.
WARHIHG
Fueland its vapors are extremely flammable and
explosive.
death.
Fireor explosion cancause severe burns or
WHENADDINGORDRAININGFUEL
* TurnpressurewasherOFFandletit coolatleast2 minutes
beforeremovingfuelcap.Loosencapslowlyto relievepressure
in tank.
Fillor drainfueltankoutdoors.
DONOToverfilltank.Allowspaceforfuelexpansion.
Iffuelspills,waituntil it evaporatesbeforestartingengine.
Keepfuelawayfromsparks,openflames,pilotlights,heat,and
otherignitionsources.
DONOTlighta cigaretteorsmoke.
WHENSTARTIN6EQUIPMENT
* Ensuresparkplug,muffler,fuel cap,andair cleanerarein
place.
. DONOTcrankenginewith sparkplugremoved.
WHENOPERATINGEQUIPMENT
* DONOTtip engineor equipmentat anglewhichcausesfuelto
spill.
. DONOTsprayflammableliquids.
WHENTRANSPORTINGORREPAIRINGEQUIPMENT
* Transport/repairwithfueltank EMPTYor withfuelshutoffvalve
OFF.
. Disconnectsparkplugwire.
WHENSTORINGFUELOREQUIPMENTWITHFUELIN TANK
* Storeawayfromfurnaces,stoves,waterheaters,clothes
dryers,orotherappliancesthathavepilotlightor otherignition
sourcebecausetheycanignitefuelvapors.
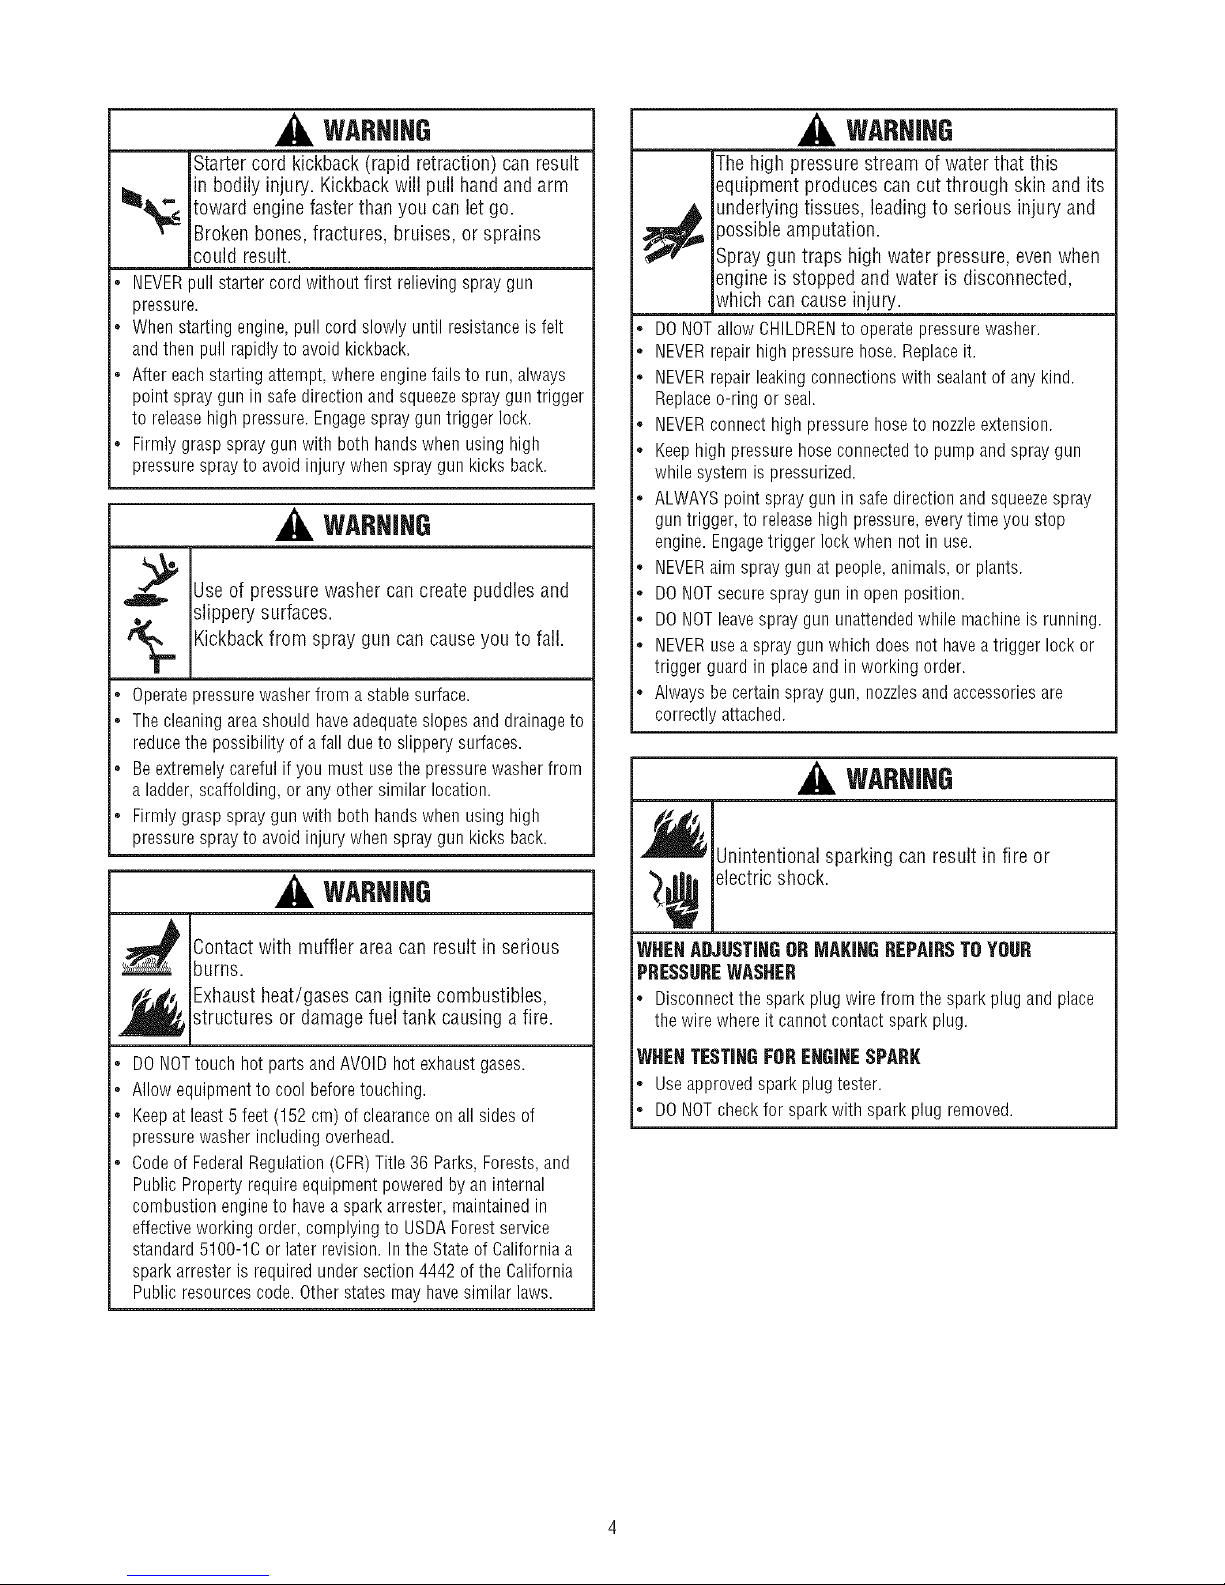
WARHJHG
Startercord kickback (rapid retraction) can result
in bodily injury. Kickbackwill pull handand arm
_,_.< toward engine faster than you can let go.
Brokenbones, fractures, bruises, or sprains
could result.
• NEVERpull starter cord without first relieving spray gun
pressure.
. When starting engine, pull cord slowly until resistance is felt
andthen pull rapidly to avoid kickback.
• After eachstarting attempt, where enginefails to run, always
point spray gun in safe direction and squeezespray gun trigger
to releasehigh pressure. Engagespray guntrigger lock.
• Firmly grasp spray gun with both handswhen using high
pressure spray to avoid injury when spray gun kicks back.
WARHIHG
Useof pressure washer can create puddles and
slippery surfaces.
Kickbackfrom spray gun can cause you to fall.
%
. Operate pressure washer from a stable surface.
• The cleaningarea should haveadequateslopes and drainageto
reducethe possibility of afall due to slippery surfaces.
. Be extremely careful if you must usethe pressure washer from
a ladder, scaffolding, or any other similar location.
• Firmly grasp spray gun with both hands when using high
pressure spray to avoid injury when spray gun kicks back.
WARHIHG
The high pressure stream of water that this
equipment produces can cut through skin and its
_ nderlying tissues, leading to serious injury and
• DONOTallow CHILDRENto operate pressure washer.
. NEVERrepair high pressure hose. Replaceit.
• NEVERrepair leaking connections with sealantof any kind.
Replaceo-ring or seal.
• NEVERconnect high pressure hoseto nozzle extension.
. Keep high pressure hose connectedto pump and spray gun
while system is pressurized.
• ALWAYS point spray gun in safe direction and squeezespray
gun trigger, to releasehigh pressure, every time you stop
engine. Engagetrigger lock when not in use.
• NEVERaim spray gun at people, animals, or plants.
. DONOTsecure spray gun in open position.
• DO NOTleavespray gun unattendedwhile machine is running.
. NEVERusea spray gun which does not have a trigger lock or
trigger guard in place and in working order.
. Always be certain spray gun, nozzlesand accessories are
correctly attached.
)ossible amputation.
Spray gun traps high water pressure, even when
engine is stopped and water is disconnected,
which can cause injury.
WARHIHG
_ Unintentionalsparking can result in fire or
WARHIHG
_ Contact with muffler result in serious
burns.
_ Exhaustheat/gases can ignite combustibles,structures or damagefuel tank causing a fire.
• DO NOTtouch hot parts and AVOID hot exhaust gases.
. Allow equipment to cool before touching.
• Keepat least 5 feet (152 cm) of clearance on all sides of
pressure washer including overhead.
• Codeof FederalRegulation (CFR)Title 36 Parks, Forests,and
Public Property require equipment powered by an internal
combustion engine to have aspark arrester, maintained in
effective working order, complying to USDAForestservice
standard 5100-1C or later revision. In the State of California a
spark arrester is required under section 4442 of the California
Public resources code. Other states may havesimilar laws.
area can
_¢ electric shock.
WHENADJUSTINGORMAKINGREPAIRSTOYOUR
PRESSUREWASHER
. Disconnect the spark plug wire from the spark plug and place
the wire where it cannot contact spark plug.
WHENTESTINGFORENGINESPARK
. Use approved spark plug tester.
• DONOTcheck for sparkwith spark plug removed.
WARHJHG
Starter and other rotating parts canentangle
hands, hair, clothing, or accessories.
* NEVERoperate pressure washer without protective housing or
covers.
* DO NOTwear loose clothing, jewelry or anything that may be
caught in the starter or other rotating parts.
* Tieup long hair and remove jewelry.
WARNING
Risk of eye injury.
" _ JSpraycan splash back or propel objects.
Alwayswear safety goggles when using this equipment or in
vicinity of where equipment is in use.
Beforestarting the pressure washer, be sure you are wearing
adequatesafety goggles.
NEVERsubstitute safety glasses for safety goggles.
NOTICE
High pressure spray may damage fragile items including
lass.
DONOTpoint spray gun at glasswhen in jet spray mode.
NEVERaim spray gun at plants.
NOTICE
Improper treatment of pressure washer can damage it and
shorten its life.
Ifyou havequestions about intended use, ask dealer or contact
Sears.
NEVERoperate units with broken or missing parts, or without
protective housing or covers.
DONOT by-pass any safetydevice on this machine.
DONOTtamper with governed speed.
DONOToperate pressure washer above rated pressure.
DONOT modify pressure washer in any way.
Before starting pressure washer in cold weather, check all parts
of the equipment to besure ice has not formed there.
NEVERmove machine by pulling on hoses. Use handle
provided on unit.
Checkfuel system for leaksor signs of deterioration, such as
chafed or spongy hose, loose or missing clamps, or damaged
tank or cap. Correct all defects before operating pressure
washer.
This equipment is designedto be used with Searsauthorized
parts ONLY.If equipment is used with parts that DO NOT
comply with minimum specifications, user assumes all risks
and liabilities.
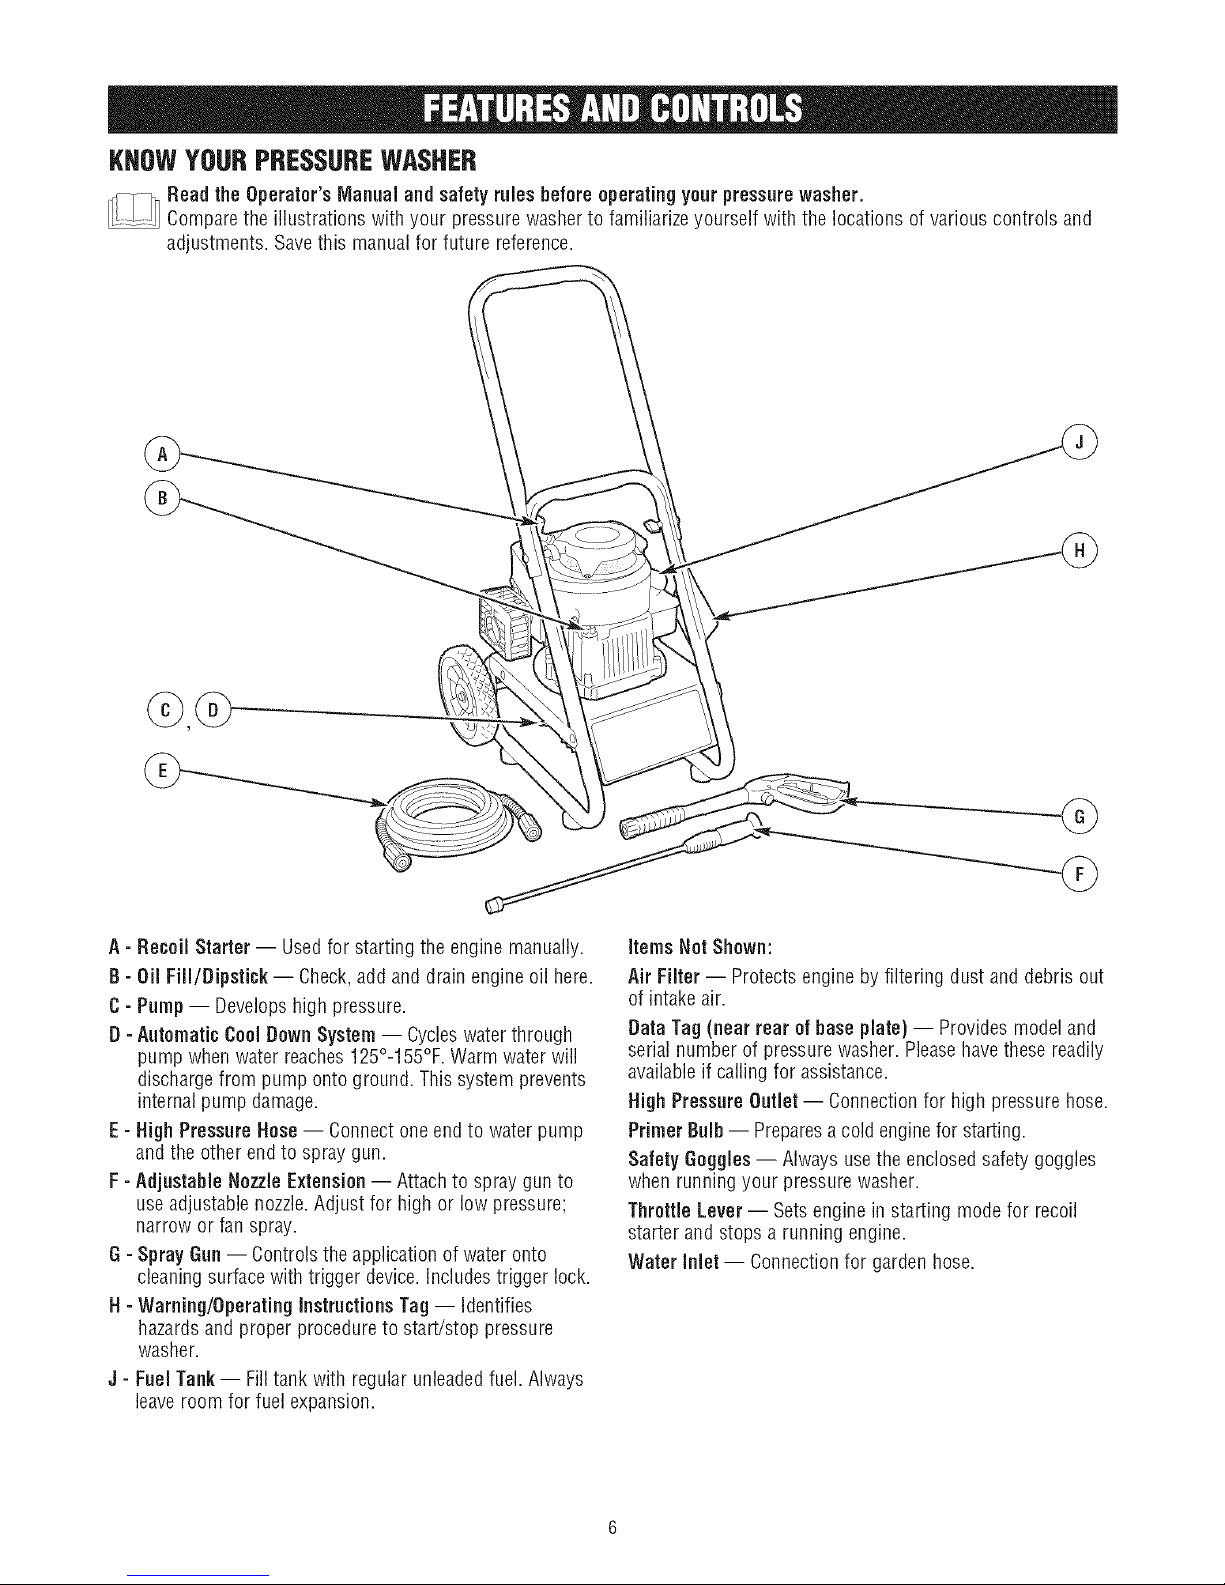
KNOWYOURPRESSUREWASHER
_Head the Operator'sManual and safety rules before operatingyourpressurewasher.
Comparethe illustrations with your pressurewasher to familiarizeyourself with the locations of various controls and
adjustments. Savethis manualfor future reference.
A - Recoil Starter -- Usedfor starting the engine manually.
B - Oil Fill/Dipstick -- Check,addand drain engine oil here.
C- Pump -- Developshigh pressure.
D - Automatic Cool DownSystem -- Cycleswater through
pump whenwater reaches125°-155°F.Warm water will
dischargefrom pump onto ground. This system prevents
internalpump damage.
E - HighPressureHose-- Connectone endto waterpump
and the other end to spraygun.
F - Adjustable Nozzle Extension-- Attachto spray gun to
useadjustable nozzle.Adjust for high or low pressure;
narrow or fan spray,
G - Spray,Gun-- Controlsthe application of water onto
cleaningsurface with trigger device,Includestrigger lock,
H - Warning/OperatingInstructions Tag -- Identifies
hazardsand proper procedureto start/stop pressure
washer.
J - Fuel Tank-- Filltank with regular unleadedfuel. Always
leaveroom for fuel expansion.
Items Net Shown:
Air Filter -- Protectsengine by filtering dust and debris out
of intake air.
Data Tag (near rear of base plate) -- Providesmodel and
serial number of pressure washer. Pleasehavethese readily
availableif calling for assistance.
HighPressureOutlet-- Connectionfor high pressure hose.
PrimerBulb -- Preparesacold enginefor starting.
Safety Goggles-- Always usethe enclosedsafety goggles
when running your pressure washer.
ThrottleLever-- Setsengine in starting mode for recoil
starter and stops a running engine.
Water Inlet -- Connectionfor garden hose.
Your pressure washer requires some assembly and is ready
for useonly afterit has been properly serviced with the
recommendedoil and fuel.
If you have any problemswith the assemblyof your
pressurewasher, please call the pressurewasher heipline
at 1-800-222-3135.
UNPACKTHEPRESSUREWASHER
1. Remove everything from carton exceptpressure washer.
2. Opencarton completely by cutting eachcorner from top
to bottom.
3. Removepressure washer from carton.
CARTONCONTENTS
Checkall contents, if any parts are missing or damaged,call
the pressure washer helpline at 1-800-222-3136.
* Main Unit
* Handle
* Wheel Kit
* High PressureHose
* Spray Gun
* Adjustable NozzleExtension
* Oil Bottle
* Parts Bag (which includes the following):
* Operator's Manual
* Safety Goggles
, MeshAccessory Bag
Becomefamiliar with each piece before assembling the
pressure washer, identify all contents with the illustration on
page 6. If any parts are missing or damaged,callthe
pressure washer helpline at 1-800-222-3136.
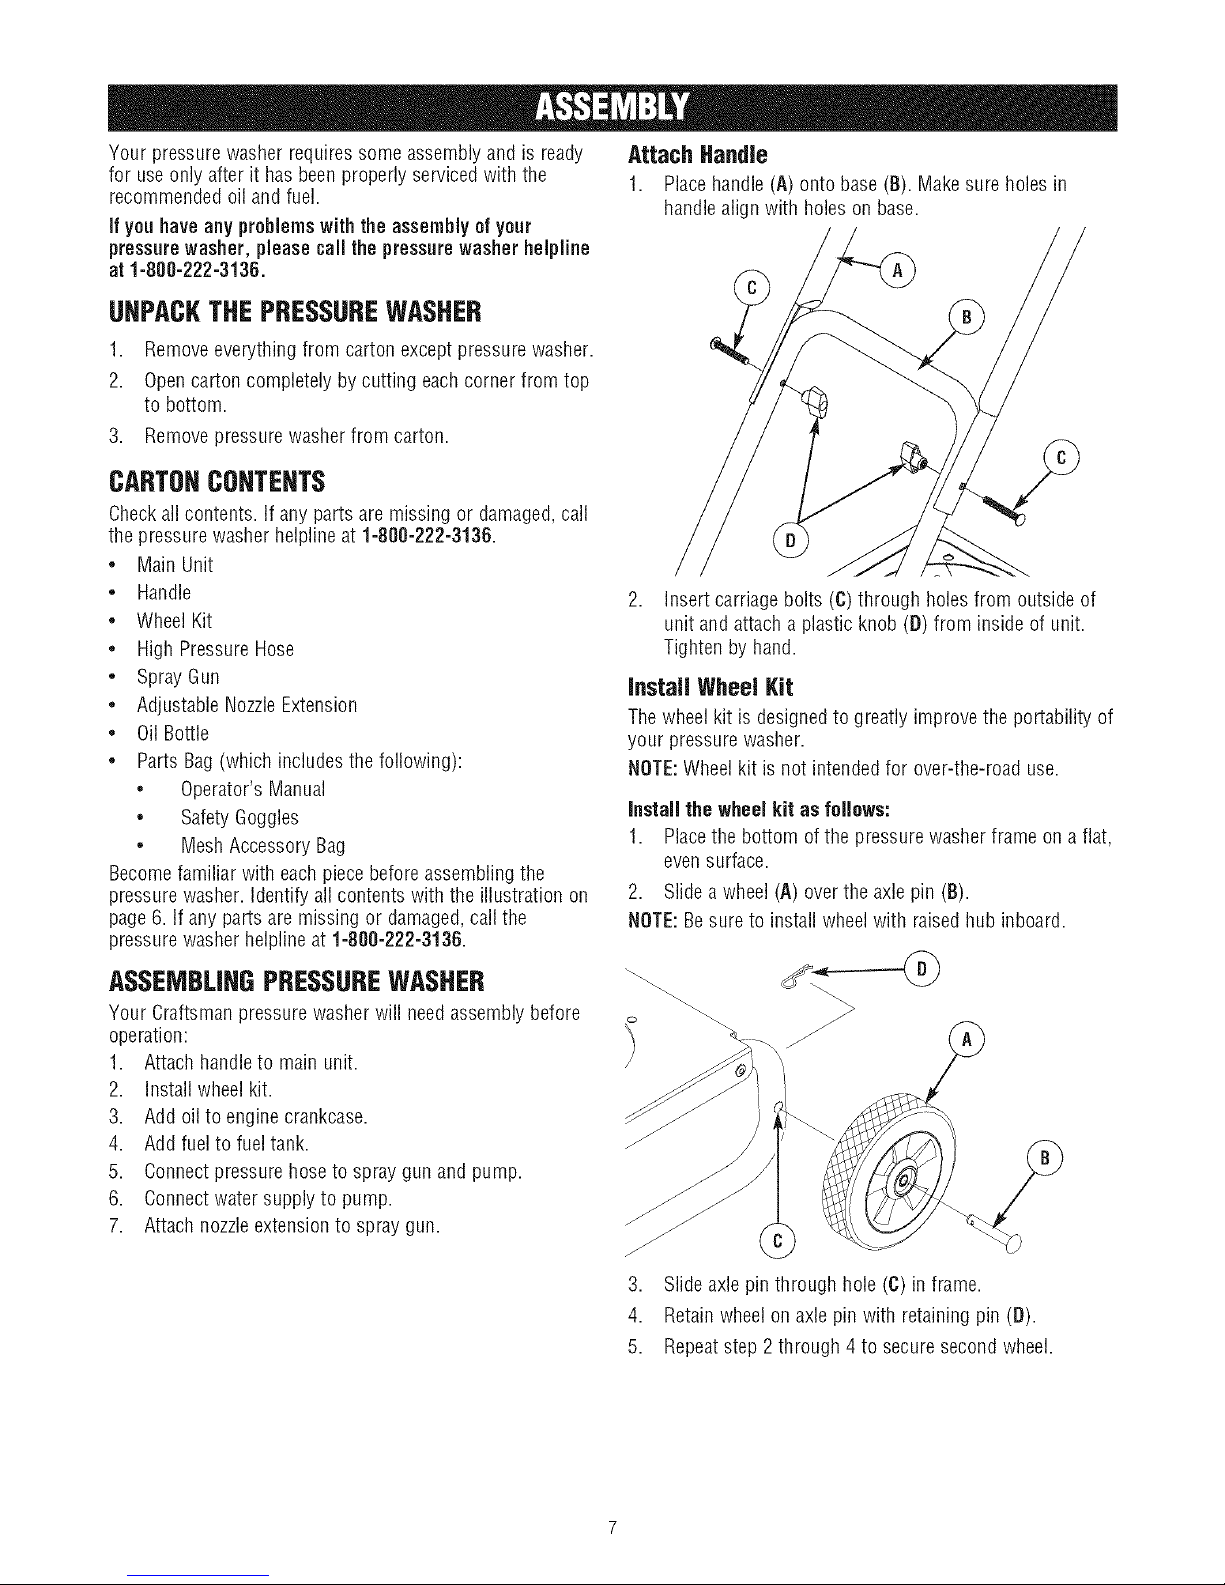
Attach Handle
1. Placehandle (A) onto base(B). Makesure holes in
handlealign with holeson base.
2. Insert carriagebolts (C)through holesfrom outside of
unit and attach a plastic knob (D) from inside of unit.
Tighten by hand.
Install Wheel Kit
Thewheel kit is designedto greatly improve the portability of
your pressure washer.
NOTE:Wheelkit is not intended for over-the-road use.
Install the wheel kit as fellows:
1. Placethe bottom ofthe pressure washer frame on a flat,
evensurface.
2. Slidea wheel (A) overthe axle pin (B).
NOTE:Besure to install wheel with raisedhub inboard.
ASSEMBLINGPRESSUREWASHER
Your Craftsman pressure washer will need assembly before
operation:
1. Attach handleto main unit.
2. Install wheel kit.
3. Add oil to engine crankcase.
4. Add fuel to fuel tank.
5. Connectpressure hoseto spray gun and pump.
6. Connectwater supply to pump.
7. Attach nozzleextensionto spray gun.
3. Slideaxle pin through hole (C) in frame.
4. Retainwheel on axle pin with retaining pin (D).
5. Repeatstep 2 through 4 to secure second wheel.
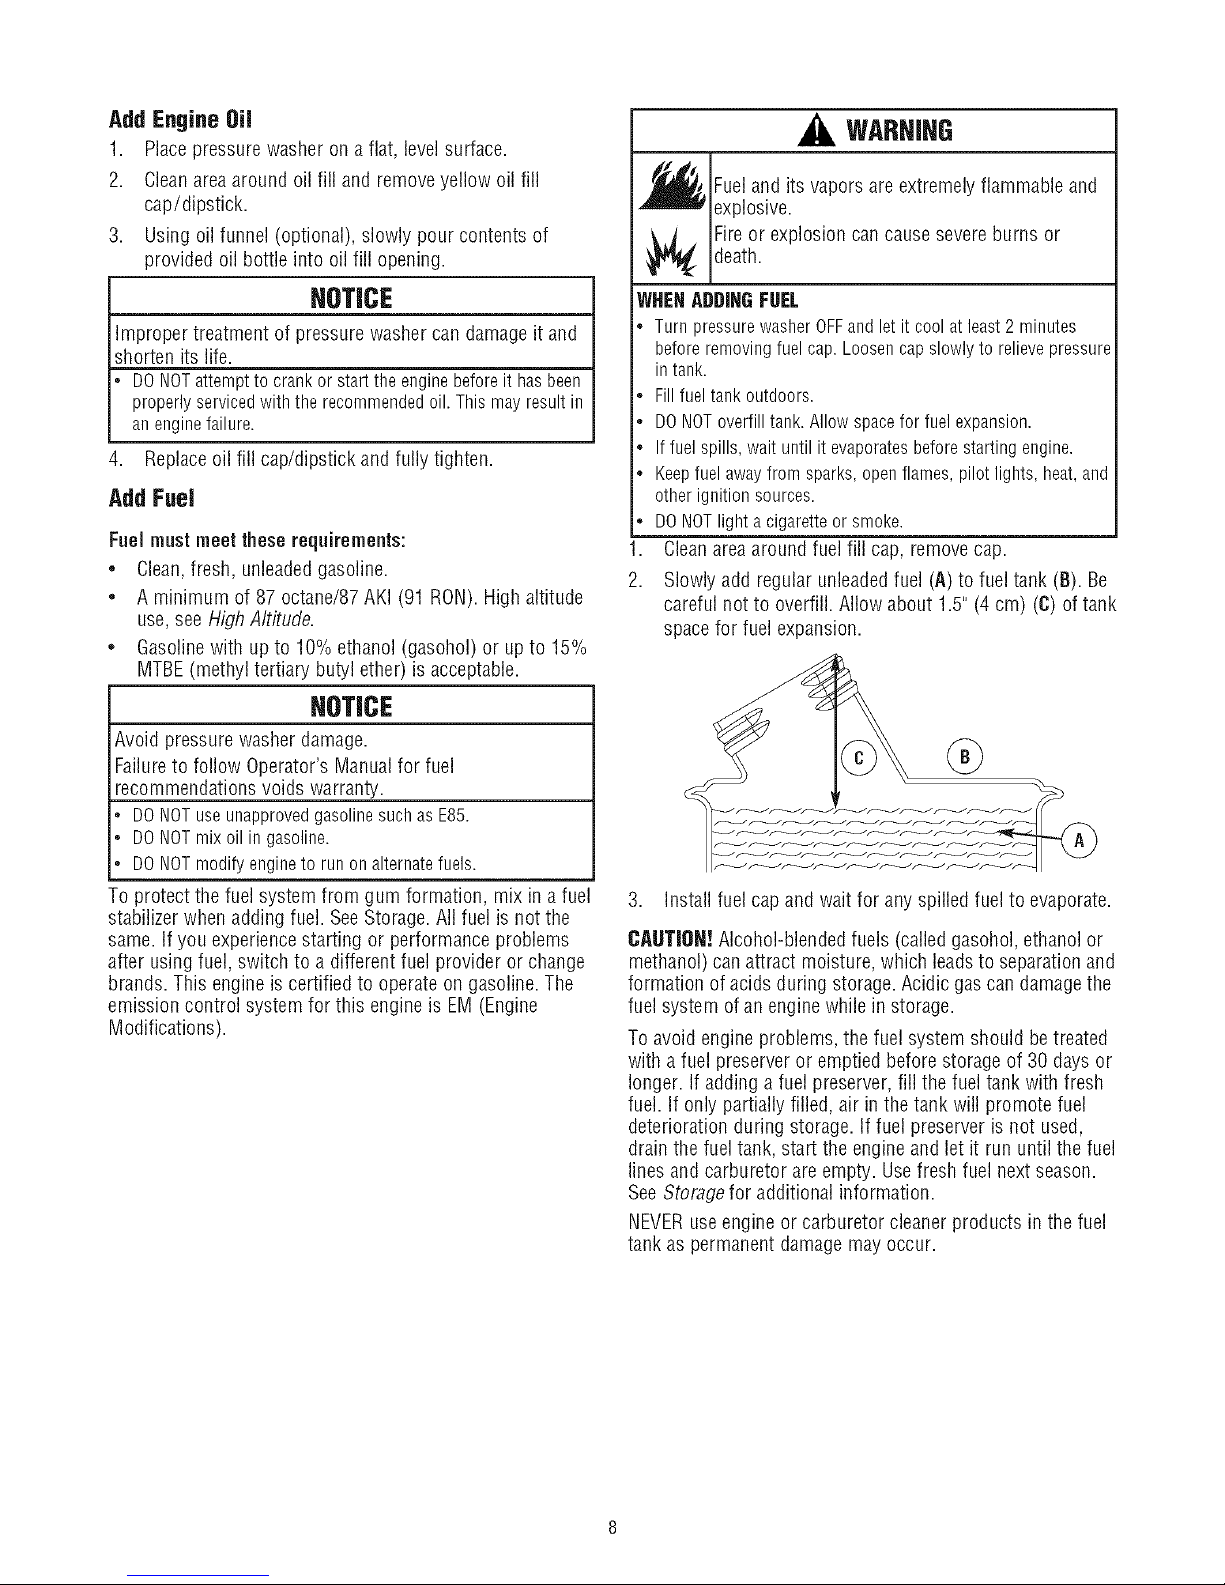
Add Engine Oil
1. Place pressure washer on a flat, ]eve]surface.
2. Cleanarea around oil fill and remove yellow oil fill
cap/dipstick.
3. Using oil funnel (optional), slowly pour contents of
provided oil bottle into oil fill opening.
WARHIHG
are
#_1_ Fueland its flammable and
explosive.
death.
Fireor explosion can causesevere burns or
vapors
extremely
NOTICE
Improper treatment of pressurewasher can damage it and
shorten its life.
DONOTattempttocrankor starttheenginebeforeit hasbeen
properlyservicedwith therecommendedoil.Thismayresultin
anenginefailure.
4. Replaceoil fill cap/dipstick and fully tighten.
Add FueJ
Fuel must meet these requirements:
* Clean,fresh, unleadedgasoline.
* A minimum of 87 octane/87 AKI (91 RON).Highaltitude
use,see HighAltitude.
, Gasolinewith up to 10% ethanol (gasohol) or up to 15%
MTBE(methyl tertiary butyl ether) is acceptable.
NOTICE
Avoid pressure washer damage.
Failureto follow Operator's Manualfor fuel
recommendations voids warranty.
DONOTuseunapprovedgasolinesuchas E85.
DONOTmixoil in gasoline.
DONOTmodifyengineto runon alternatefuels.
To protect the fuel system from gum formation, mix in a fuel
stabilizerwhen adding fuel. SeeStorage. All fuel is not the
same. If you experiencestarting or performanceproblems
after using fuel, switch to a different fuel provider or change
brands. This engine is certified to operate on gasoline. The
emission control system for this engine is EM (Engine
Modifications).
WHENADDINGFUEL
* TurnpressurewasherOFFandletit coolatleast2 minutes
beforeremovingfuelcap.Loosencapslowlyto relievepressure
in tank.
* Fillfueltankoutdoors.
DONOToverfilltank.Allowspaceforfuelexpansion.
Iffuelspills,waituntil it evaporatesbeforestartingengine.
Keepfuelawayfromsparks,openflames,pilotlights,heat,and
otherignitionsources.
DONOTlighta cigaretteorsmoke.
1. Cleanareaaround fuel fill cap, removecap.
2. Slowly add regular unleadedfuel (A) to fuel tank (B). Be
careful not to overfill. Allow about 1.5" (4 cm) (C) oftank
space for fuel expansion.
3. Install fuel cap and wait for anyspilled fuelto evaporate.
CAUTION! Alcohol-blendedfuels (calledgasohol, ethanol or
methanol) canattract moisture, which leadsto separationand
formation of acids during storage.Acidic gas candamagethe
fuel system of an engine while in storage.
To avoid engine problems, the fuel system should betreated
with a fuel preserver or emptied before storage of 30 days or
longer. If adding a fuel preserver,fill the fuel tank with fresh
fuel. If only partially filled, air in the tank will promote fuel
deterioration during storage. If fuel preserveris not used,
drain the fuel tank, start the engine and let it run until the fuel
linesand carburetor are empty. Usefresh fuel nextseason.
SeeStoragefor additional information.
NEVERuseengine or carburetor cleaner products in the fuel
tank as permanent damagemay occur.
HighAltitude
At altitudes over 5,000 feet (1524 meters), a minimum 85
octane/ 85 AKI (89 RON)gasoline is acceptable.To remain
emissions compliant, high altitude adjustment is required.
Operationwithout this adjustment will cause decreased
performance, increasedfuel consumption, and increased
emissions. Seea qualified Searsdealerfor high altitude
adjustment information. Operation of the engineat altitudes
below 2,500 feet (762 meters) with the high altitude kit is not
recommended.
Connect Hose and Water Supply to Pump
,
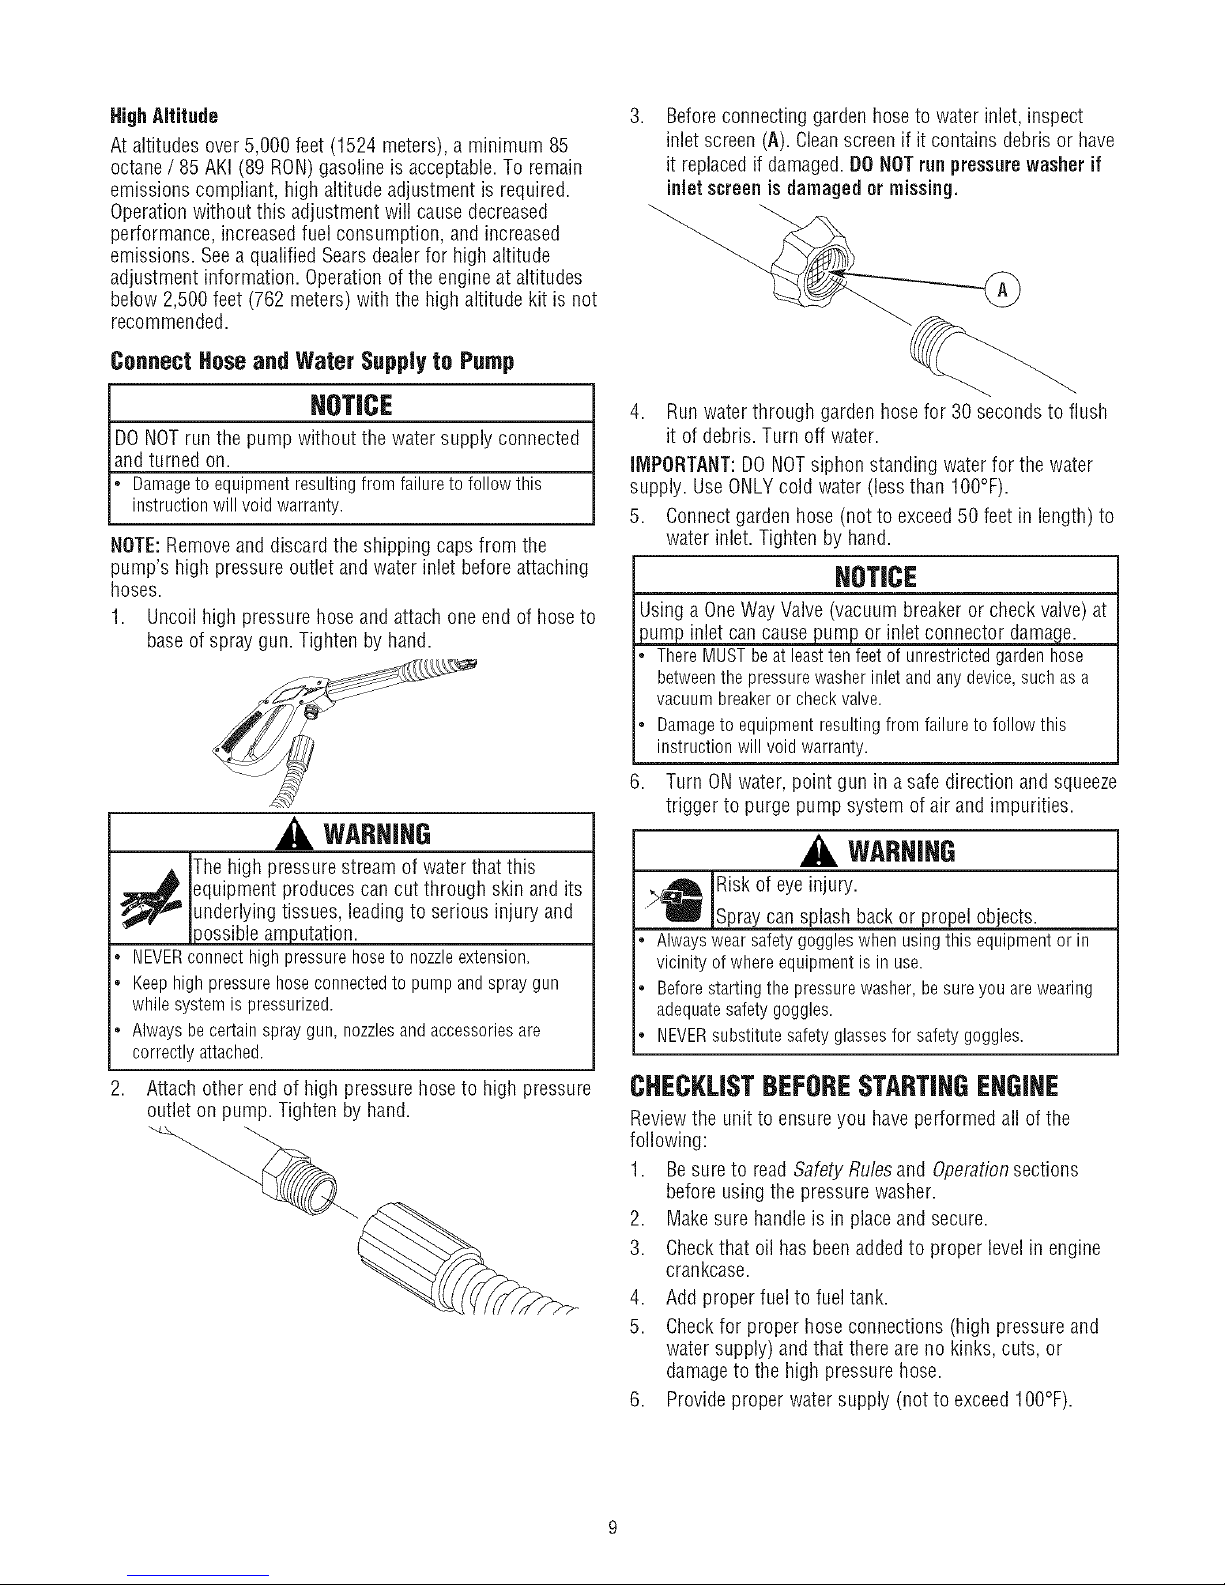
Beforeconnecting garden hoseto water inlet, inspect
inletscreen (A). Cleanscreen if it contains debris or have
it replacedif damaged.DOHOTrun pressurewasher if
inletscreenis damagedor missing.
NOTICE
JDONOTrun the pump without the water supply connected
L_ndturned on. ______
J, Damageto equipmentresultingfrom failuretofollowthis
L instructionwillvoid warranty.
NOTE:Remove and discard the shipping caps from the
pump's high pressure outlet and water inlet before attaching
hoses.
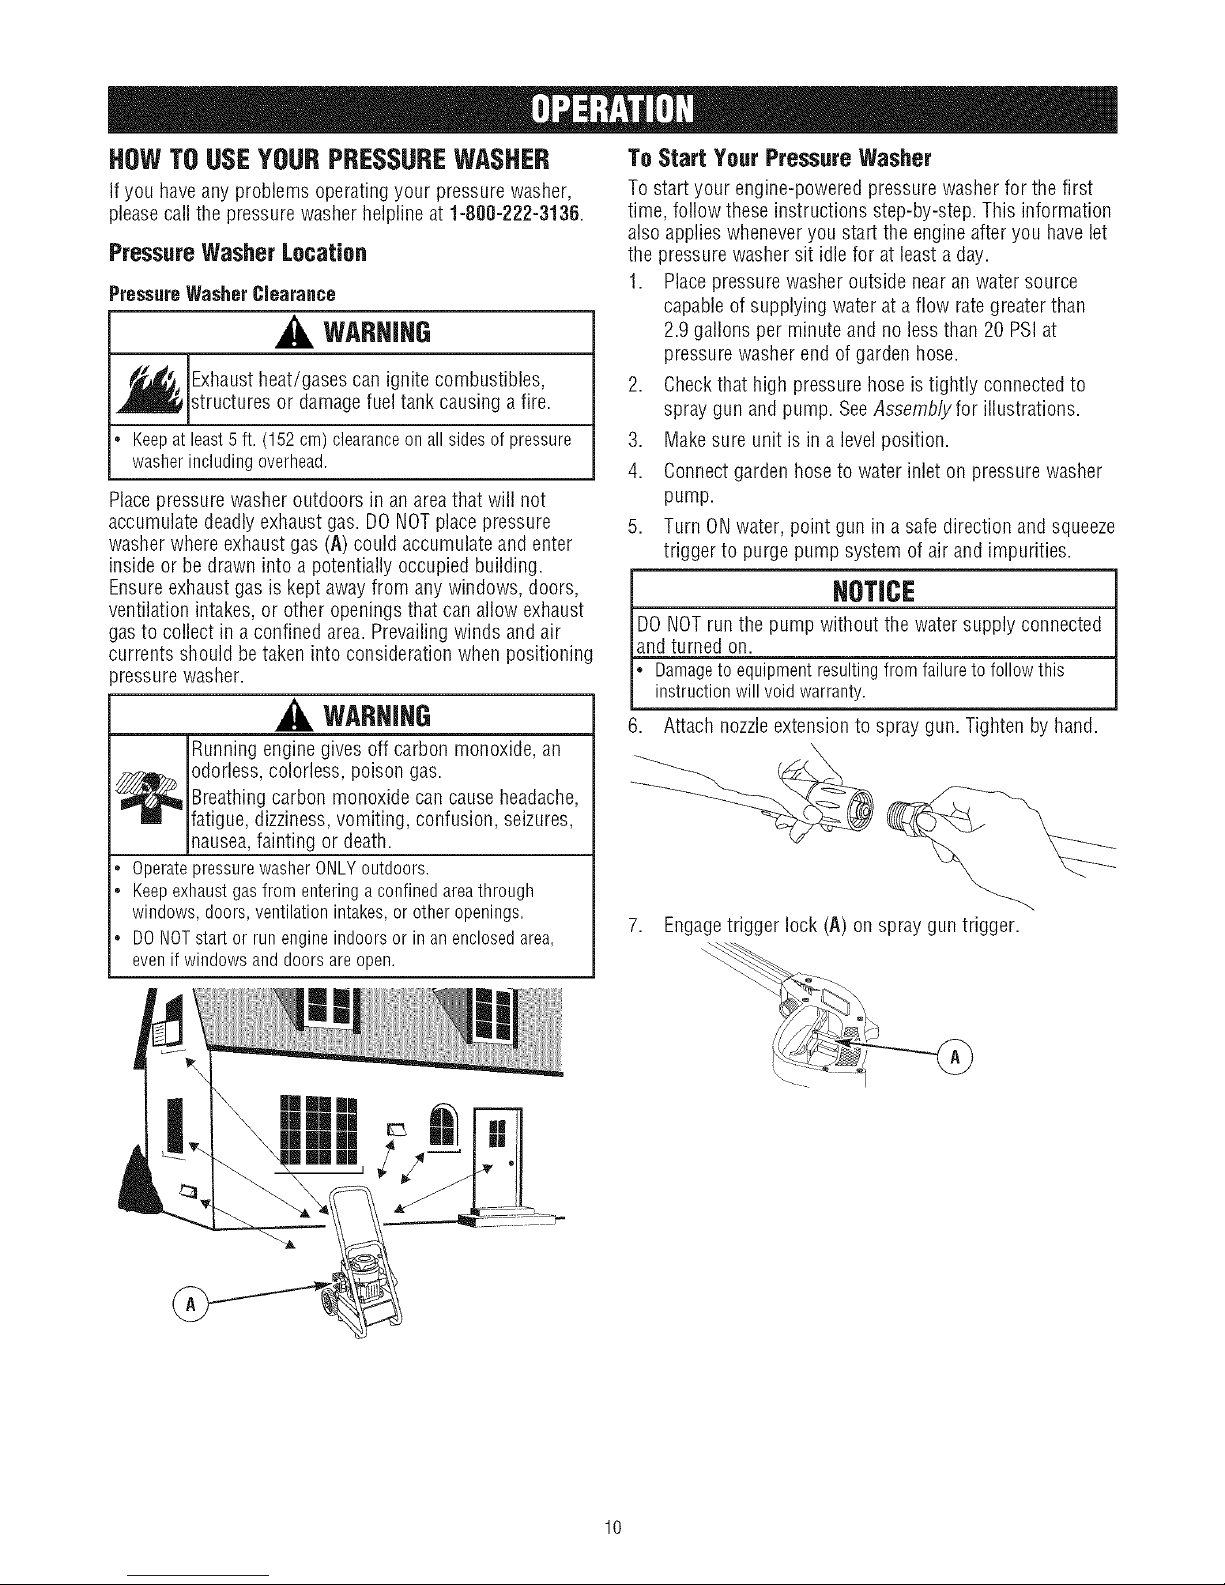
1. Uncoil high pressure hoseand attach one end of hose to
baseof spray gun. Tighten by hand.
WARHIHG
The high pressure stream of water that this
_ quipment produces can cut through skin and its
* NEVERconnecthighpressurehoseto nozzleextension.
. Keephighpressurehoseconnectedto pumpandspraygun
whilesystemispressurized.
. Alwaysbecertainspraygun,nozzlesandaccessoriesare
correctlyattached.
underlyingtissues, leadingto serious injury and
_ossibleamputation.
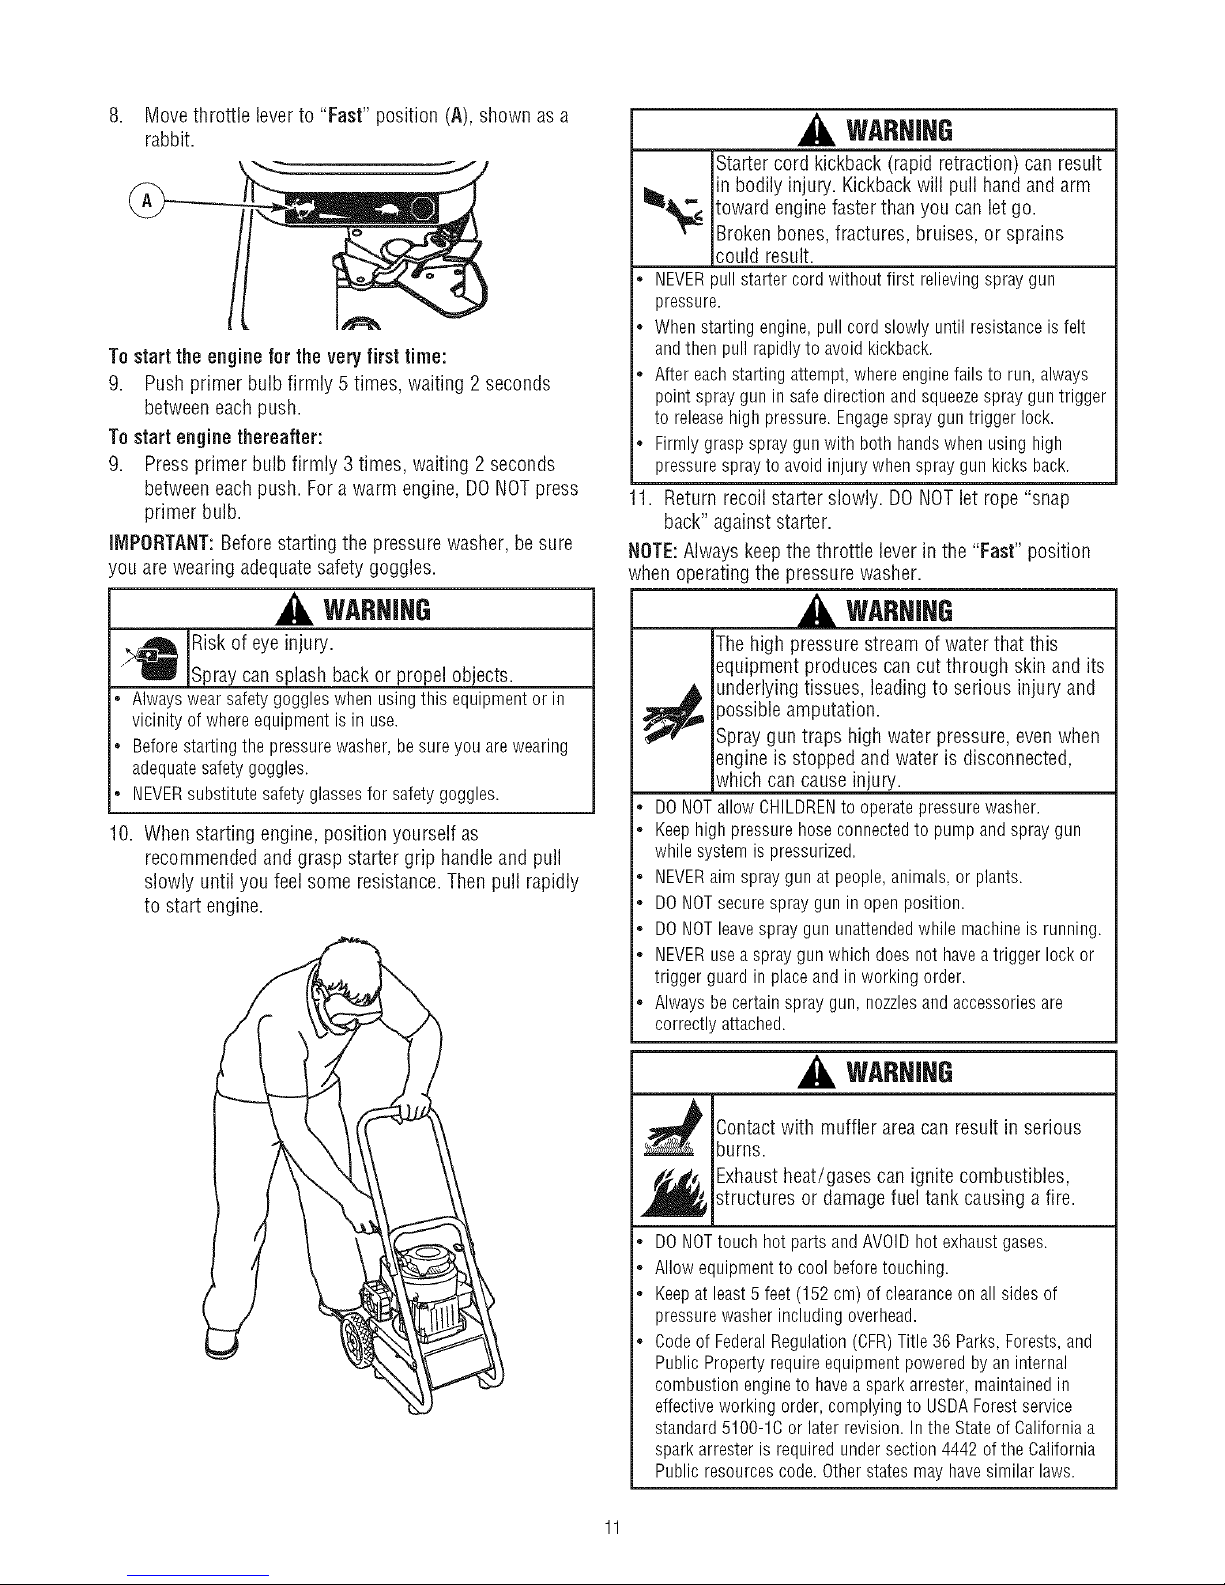
Attach other end of high pressure hoseto high pressure
outlet on pump. Tighten by hand.
4. Runwater through gardenhosefor 30 secondsto flush
it of debris. Turn off water.
IMPORTANT:DONOTsiphon standing water for the water
supply. Use ONLYcold water (less than IO0°F).
5. Connectgarden hose(not to exceed50 feet in length) to
water inlet. Tighten by hand.
NOTICE
Using a OneWay Valve(vacuum breakeror check valve) at
uj2_jo inlet cancause um or inlet connector dama e.
ThereMUSTbeat leasttenfeetof unrestrictedgardenhose
betweenthepressurewasherinletandany device,suchas a
vacuumbreakeror checkvalve.
Damageto equipmentresultingfromfailuretofollowthis
instructionwill voidwarranty.
6. Turn ONwater, point gun in a safe direction and squeeze
trigger to purge pump system of air and impurities.
WARNING
iRisk of eye injury.
_Spray cansplash back or propel objects.
Alwayswearsafetygoggleswhenusingthis equipmentor in
vicinityof whereequipmentis in use.
Beforestartingthe pressurewasher,besureyouarewearing
adequatesafetygoggles.
NEVERsubstitutesafetyglassesfor safetygoggles.
CHECKLISTBEFORESTARTINGENGINE
Reviewthe unit to ensure you haveperformed all of the
following:
1. Besure to read SafetyRules and Operationsections
before usingthe pressure washer.
2. Makesure handle is in placeand secure.
3. Checkthat oil has beenaddedto proper level in engine
crankcase.
4. Add proper fuel to fuel tank.
5. Checkfor proper hose connections (high pressure and
water supply) and that thereare no kinks, cuts, or
damageto the high pressure hose.
6. Provideproper water supply (not to exceed IO0°F).
HOWTOUSEYOURPRESSUREWASHER
If you haveany problems operatingyour pressurewasher,
pleasecall the pressure washer helpline at 1-800-222-3136.
Pressure Washer Location
PressureWasherClearance
WARNING
_ Exhaustheat/gases can ignitecombustibles,
• Keepatleast5ft. (152cm)clearanceonall sidesof pressure
Placepressure washer outdoors in an areathat will not
accumulate deadlyexhaustgas. DONOTplacepressure
washer where exhaust gas (A) could accumulateand enter
inside or be drawn into a potentially occupied building.
Ensureexhaust gas is kept awayfrom any windows, doors,
ventilation intakes, or other openingsthat can allow exhaust
gasto collect in a confined area. Prevailingwinds and air
currents should be taken into considerationwhen positioning
_ressurewasher.
structures or damagefuel tank causing a fire.
washerincludingoverhead.
WARHIHG
Runningengine gives off carbon monoxide, an
To Start Your Pressure Washer
To start your engine-powered pressurewasher for the first
time, follow these instructions step-by-step. This information
also applies wheneveryou start the engine after you have let
the pressure washer sit idle for at least a day.
1. Placepressure washer outside near an water source
capableof supplying water at a flow rategreater than
2.9gallons per minute and no less than 20 PSIat
pressurewasher end of garden hose.
2. Checkthat high pressure hose istightly connectedto
spray gun and pump. SeeAssemblyfor illustrations.
3. Makesure unit is in a level position.
4. Connectgarden hoseto water inlet on pressure washer
pump.
5. Turn ONwater, point gun in a safe direction and squeeze
trigger to purge pump system of air and impurities.
[ NOTICE
DONOTrun the pump without the water supply connected
and turned on.
L amageto equipmentresultingfrom failureto followthis
instructionwill void warranty.
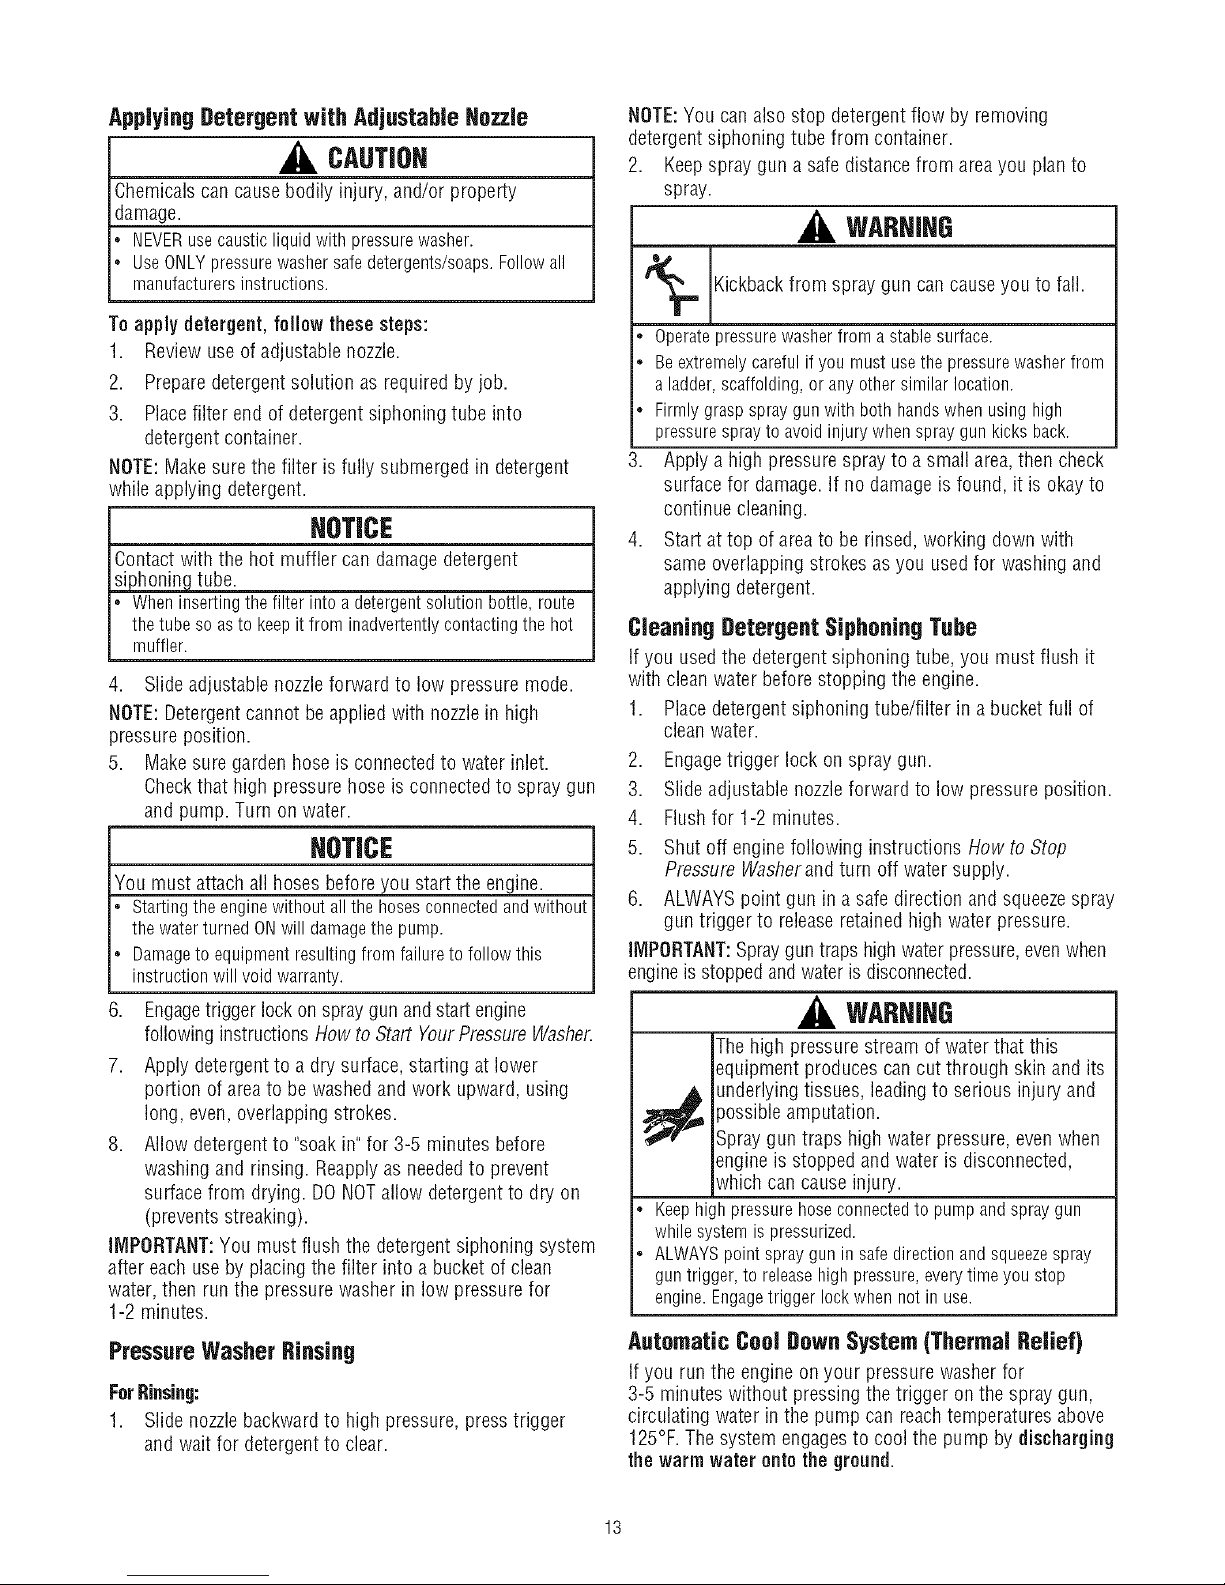
6. Attach nozzleextension to spray gun. Tighten by hand.
;_ odorless, colorless, poison gas.
. OperatepressurewasherONLYoutdoors.
• Keepexhaustgasfromenteringaconfinedareathrough
• DONOTstartor runengineindoorsorin anenclosedarea,
Breathingcarbon monoxide can causeheadache,
fatigue, dizziness,vomiting, confusion, seizures,
nausea,fainting or death.
windows,doors,ventilationintakes,orotheropenings.
evenif windowsanddoorsareopen.
7. Engagetrigger lock (A) on spray gun trigger.
10
8. Movethrottleleverto"Fast"position(A),shownasa
rabbit.
Tostarttheenginefortheveryfirst time:
9. Push primer bulb firmly 5 times, waiting 2 seconds
betweeneach push.
To start engine thereafter:
9. Press primer bulb firmly 3 times, waiting 2 seconds
betweeneach push. Fora warm engine, DONOTpress
primer bulb.
IMPORTANT:Before starting the pressure washer, be sure
/ou are wearing adequatesafety goggles.
WARHIHG
Starter cord kickback(rapid retraction) can result
in bodily injury. Kickbackwill pull handand arm
_ toward enginefaster thanyou canlet go.
Brokenbones, fractures, bruises, or sprains
could result.
* NEVERpullstartercordwithoutfirst relievingspraygun
pressure.
Whenstartingengine,pullcordslowlyuntil resistanceis felt
andthenpullrapidlyto avoidkickback.
Aftereachstartingattempt,whereenginefailsto run, always
pointspraygunin safedirectionandsqueezesprayguntrigger
to releasehighpressure.Engagesprayguntriggerlock.
Firmlygraspspraygunwith bothhandswhenusinghigh
pressuresprayto avoidinjurywhenspraygunkicksback.
11. Return recoil starter slowly. DONOTlet rope "snap
back"against starter.
NOTE:Always keepthe throttle lever in the "Fast" position
when operatingthe pressure washer.
WARHIHG
Riskof eyeinjury.
_Spray cansplash back or propel objects.
Alwayswearsafetygoggleswhenusingthis equipmentor in
vicinityof whereequipmentis in use.
Beforestartingthe pressurewasher,besureyouarewearing
adequatesafetygoggles.
NEVERsubstitutesafetyglassesfor safetygoggles.
10. When starting engine, position yourself as
recommendedand grasp starter grip handle and pull
slowly until you feelsome resistance. Then pull rapidly
to start engine.
WARHIHG
Thehigh pressurestream of water that this
equipment produces cancut through skin and its
,p_ underlyingtissues, leadingto serious injury and
, DONOTallowCHILDRENtooperatepressurewasher.
• Keephighpressurehoseconnectedto pumpandspraygun
whilesystemispressurized.
• NEVERaimspraygunatpeople,animals,or plants.
, DONOTsecuresprayguninopenposition.
• DONOTleavespraygununattendedwhilemachineis running.
, NEVERuseaspraygunwhichdoesnothaveatriggerlockor
triggerguardin placeandinworkingorder.
• Alwaysbecertainspraygun,nozzlesandaccessoriesare
correctlyattached.
)ossible amputation.
Spray gun traps high water pressure,evenwhen
engine is stopped and water is disconnected,
which can cause injury.
WARHIHG
_ Contact with muffler result in serious
burns.
area can
I
,_ Exhaustheat/gases can ignite combustibles,structures or damage fuel tank causing a fire.
DONOTtouchhotpartsandAVOIDhotexhaustgases.
* Allowequipmenttocool beforetouching.
Keepat least5 feet(152cm) ofclearanceonall sidesof
pressurewasherincludingoverhead.
* Codeof FederalRegulation(CFR)Title36Parks,Forests,and
PublicPropertyrequireequipmentpoweredbyaninternal
combustionengineto haveasparkarrester,maintainedin
effectiveworkingorder,complyingto USDAForestservice
standard51BB-1Cor laterrevision.IntheStateof Californiaa
sparkarresteris requiredundersection4442oftheCalifornia
Publicresourcescode.Otherstatesmayhavesimilarlaws.

How to Stop Your Pressure Washer
1. Releasespray gun trigger and let engine idle for two
minutes.
2. Movethrottle to SLOWposition,then STOPposition (A).
3. ALWAYSpoint spray gun in a safe direction and squeeze
spray gun trigger to releaseretainedhigh water
pressure.
IMPORTANT:Spray gun traps high water pressure, even
when engine is stopped and water is disconnected.
WARHIHG
[he high pressure stream of water that this
_quipment produces can cut through skin and its
1. Slide nozzle backwardto achieve high pressure.Slide
nozzleforward when you wish to adjust spray to low
pressure mode.
Point nozzledown towards a firm surface, disengage
trigger lock, and press trigger to test pattern.
@
,_ underlyingtissues, leadingto serious injury and
° Keephighpressurehoseconnectedto pumpandspraygun
whilesystemis pressurized.
° ALWAYSpointspraygunin safedirectionandsqueezespray
guntrigger,to releasehighpressure,everytimeyou stop
engine.Engagetriggerlockwhennot inuse.
4. Engagetrigger lock on spray gun when not in use.
_ossibleamputation.
Spraygun traps high water pressure, even when
_ngineis stopped and water is disconnected,
which can cause injury.
How To Use the Adjustable Hozzle
You should now know how to STARTand STOPyour
pressure washer. The information in this section will tell you
how to adjust the spray pattern andto apply pressure washer
specific detergents.
WARHIHG
Thehigh pressure stream of water that this
1_ equipment produces can cut through skin and its
° NEVERadjustspraypatternwhenspraying.
° NEVERputhandsinfrontof nozzletoadjustspraypattern.
underlying tissues, leading to serious injury and
)ossible amputation.
Twisting nozzleadjusts spray pattern from a fan pattern
to a narrow pattern.
UsageTips
4 For most effective cleaning, keepspray nozzlefrom 8 to
24 inches away from cleaning surface.
5 If you get spray nozzletoo close, especially using high
pressure mode,you may damagesurface being cleaned.
6 DO NOTget closer than 6 incheswhen cleaning tires.
12
Applying Detergent with Adjustable Hozzle
CAUTION
Chemicalscan causebodily injury, and/or property
damage.
NEVERusecausticliquidwithpressurewasher.
UseONLYpressurewashersafedetergents/soaps.Followall
manufacturersinstructions.
To apply detergent, fellow thesesteps:
1. Review use of adjustable nozzle.
2. Preparedetergent solution as required by job.
3. Placefilter end of detergent siphoning tube into
detergent container.
NOTE:Makesure the filter is fully submerged in detergent
while applying detergent.
NOTICE
Contact with the hot muffler can damagedetergent
_tube.
Wheninsertingthefilterintoa detergentsolutionbottle,route
thetubesoasto keepitfrom inadvertentlycontactingthehot
muffler.
4. Slide adjustable nozzleforward to low pressure mode.
NOTE:Detergentcannot be applied with nozzlein high
pressure position.
5. Make sure garden hoseis connectedto water inlet.
Checkthat high pressure hose is connectedto spray gun
and pump. Turn on water.
NOTICE
You must attachall hoses before you start the engine.
Startingthe enginewithoutallthehosesconnectedandwithout
thewaterturnedONwill damagethepump.
Damageto equipmentresultingfrom failuretofollowthis
instructionwill void warranty.
6. Engagetrigger lock on spray gun and start engine
following instructions How to Start YourPressureWasher.
7. Apply detergentto a dry surface, starting at lower
portion of area to be washedand work upward, using
long, even, overlapping strokes.
8. Allow detergentto "soakin" for 3-5 minutes before
washing and rinsing. Reapplyas neededto prevent
surfacefrom drying. DO NOTallow detergentto dry on
(prevents streaking).
IMPORTANT:You must flush the detergent siphoning system
after each use by placing the filter into a bucket of clean
water,then run the pressure washer in low pressure for
1-2 minutes.
Pressure Washer Binsing
ForRinsing:
1. Slide nozzlebackwardto high pressure, press trigger
and wait for detergentto clear.
NOTE:You canalso stop detergent flow by removing
detergentsiphoning tube from container.
2. Keepspray gun a safe distance from areayou plan to
spray.
WARHIHG
Kickbackfrom to fall.
, Operatepressurewasherfromastablesurface.
• Beextremelycarefulif you mustusethepressurewasherfrom
a ladder,scaffolding,or anyothersimilarlocation.
, Firmlygraspspraygunwith bothhandswhenusinghigh
pressuresprayto avoidinjurywhenspraygunkicksback.
3. Apply a high pressure spray to a small area,then check
surface for damage. If no damageis found, it is okay to
continue cleaning.
4. Start at top of areato be rinsed, working down with
same overlapping strokes asyou usedfor washing and
applying detergent.
Cleaning Detergent Siphoning Tube
If you usedthe detergentsiphoning tube, you must flush it
with cleanwater before stopping the engine.
1. Placedetergent siphoning tube/filter in a bucket full of
clean water.
2. Engagetrigger lock on spray gun.
3. Slideadjustable nozzleforward to low pressure position.
4. Flushfor 1-2 minutes.
5. Shut off engine following instructions How to Stop
Pressure Washerand turn off water supply.
6. ALWAYSpoint gun in a safe direction and squeezespray
gun trigger to releaseretained high water pressure.
IMPORTANT:Spraygun traps high water pressure,evenwhen
engineis stoppedand water is disconnected.
spray gun can causeyou
WARHIHG
Thehigh pressurestream of water that this
equipment produces cancut through skin and its
_ nderlying tissues, leadingto serious injury and
, Keephighpressurehoseconnectedto pumpandspraygun
whilesystemispressurized.
• ALWAYSpointspraygunin safedirectionandsqueezespray
guntrigger,to releasehighpressure,everytimeyoustop
engine.Engagetriggerlockwhennot in use.
Automatic Cool Down System (Thermal Belief}
If you run the engine on your pressure washer for
3-5 minutes without pressing the trigger on the spray gun,
circulating water in the pump can reach temperatures above
125°F.The system engagesto cool the pump by discharging
the warm water ontothe ground.
)ossible amputation.
Spray gun traps high water pressure,evenwhen
engine is stopped and water is disconnected,
which can cause injury.
13
EHGINETECHNICALINFORMATIOH PRODUCTSPECIFICATIOHS
This is a single cylinder, L-head,air cooled engine. It is a low
emissions engine.
Inthe Stateof California, Model90000 engines are certified
by the California Air Resources Boardto meet emissions
standardsfor 125 hours. Such certification does not grant
the purchaser, owner or operator of this engine any
additional warranties with respectto the performance or
operational life of this engine.Theengine is warranted solely
according to the product and emissions warranties stated
elsewherein this manual.
Power Ratings
Thegross power rating for individual gas engine models is
labeledin accordancewith SAE(Societyof Automotive
Engineers)code J1940 (Small Engine Power & Torque
Rating Procedure),and rating performance has been
obtained andcorrected in accordancewith SAEJ1995
(Revision2002-05). Torquevalues are derived at3060 RPM;
horsepower values are derivedat 3600 RPM.Actual gross
engine power will be lower and is affected by, among other
things, ambient operating conditions and engine-to-engine
variability. Given both the wide array of products on which
enginesare placedand the variety of environmental issues
applicableto operatingthe equipment, the gas engine will not
developthe ratedgross power when used in a given piece of
power equipment (actual "on-site" or net power). This
difference is due to a variety of factors including, but not
limited to, accessories (air cleaner, exhaust,charging,
cooling, carburetor, fuel pump, etc.), application limitations,
ambient operating conditions (temperature,humidity,
altitude), and engine-to-engine variability. Due to
manufacturing and capacity limitations, Briggs & Stratton
maysubstitute an engine of higher rated power for this
Seriesengine.
Pressure Washer Specifications
Outlet Pressure ........................... 2,000 PSi
How Rate................................. 1.9 GPM
DetergentMix ........................ Use asdirected
Water Supply Temperature .......... Not to exceed IO0°F
Shipping Weight ............................. 63 Ibs.
Engine Specifications
Bore .......................... 2.562 in. (65.09 ram)
Stroke .......................... 1.75 in. (44.45 ram)
Displacement ..................... 9.02 in. (147.8 cc)
SparkPlug
Type: ............ Briggs & Stratton 802592 or 5095D
SetGapTo: ................... O.030inch(0.76ram)
Armature Air Gap: ........ 0.006-0.010 in. (0.15-0.25mm)
Valveclearancewith valvesprings installed and piston 1/4 in.
(6 mm) past top dead center (check when engine is cold).
Intake ................. 0.005-0.007 in. (0.13-0.18 ram)
Exhaust ............... 0.007-0.009 in. (0.18-0.23 mm)
FuelCapacity .................. 1.0 Quarts (0.95 Liters)
OilCapacity........................ 18Ounces(0.5 liter)
NOTE:For practical operation, the engine load should not
exceed 85% of rated power. Enginepower will decrease
3-1/2% for each1,000 feet (300 meters) abovesea leveland
1% for each 10° F (5.6° C) above77° F (25° C).It should
operatesatisfactorily at an angle up to 15°.
14
OWHER'SRESPOHSIBILITIES
Followthe hourly or calendar intervals,whichever occurs
first.
Morefrequent service is required when operating in adverse
conditions noted below.
* Changeengine oil
, Check/clean water inlet screen1
, Checkhigh pressure hose
, Checkdetergentsiphoning hose
, Checkspray gun and assembly for leaks
, Cleandebris
, Checkengine oil level
* Service air cleaners
Pump Oil
DONOTattempt any oil maintenance on this pump. The
pump is pre-lubricated and sealed from the factory, requiring
no additional maintenancefor the life of the pump.
EmissionsControl
Maintenance, replacement, or repair of the emissions
controldevicesand systems may be performedby any non-
roadenginerepair establishmentor individual. However,
to obtain "no charge" emissions control service, the work
must be performed by a qualified service dealer. Seethe
Emissions Warranty.
Before Each Use
1. Checkengine oil level.
2. Cleandebris.
3. Checkwater inlet screen for damage.
4. Checkhigh pressure hose for leaks.
5. Checkdetergent siphoning hose/filter for damage.
6. Checkgun and nozzleextension assembly for leaks.
7. Purge pump of air and contaminants.
PRESSUREWASHERMAINTEHAHCE
* Changeengine oil
* Service spark arrester
* Service spark plug
* Air cooling systems
1Clean if clogged. Replace if perforated or tore.
sService more often under dirty or dusty conditions.
Genera] Recommendations
Regularmaintenancewill improve the performance and
extendthe life of the pressure washer. Seeany Searsor
other qualified service dealerfor service.
Thepressure washer warranty doesnot cover items that
havebeen subjectedto operator abuse or negligence.To
receivefull valuefrom the warranty, the operator must
maintain pressure washer as instructed in this manual
including proper storage as detailedin Storage.
Someadjustments will needto be made periodically to
properly maintain your pressure washer.
All service and adjustments should be madeat least once
eachseason. Follow the requirements in the Maintenance
Schedulechart above.
NOTE:Oncea year you should clean or replacethe spark
plug and replacethe air filter. A new spark plug and clean air
filter assure proper fuel-air mixture and help your engine run
better and last longer.
Clean Debris
Daily or before use,clean accumulated debris from pressure
washer. Keeplinkage, spring and controls clean. Keeparea
around and behind muffler free from any combustible debris.
Inspect cooling air slots andopenings on the pressure
washer. Theseopenings must bekept clean and
unobstructed.
Pressurewasher parts should be kept cleanto reducethe
risk of overheating and ignition of accumulated debris.
* Usea dampcloth to wipe exterior surfaces clean.
i NOTICE
Improper treatment of pressure washer can damageit and
|shorten ts fe.
L DONOTinsertanyobjectsthroughcoolingslots.
, Usea soft bristle brush to loosen caked on dirt, oil, etc.
* Usea vacuumcleaner to pick up loose dirt and debris.
Check and Clean Inlet Screen
Examinegarden hose inlet screen. Cleanif it is clogged or
replaceif it is torn.
15
Check High Pressure Hose
High pressure hoses can developleaks from wear, kinking,
or abuse. Inspect hose beforeeach use. Checkfor cuts,
leaks,abrasions, bulging of cover, or damageor movement
of couplings. If any of these conditions exist, replace hose
immediately.
WARNING
The high pressure stream of water that this
,
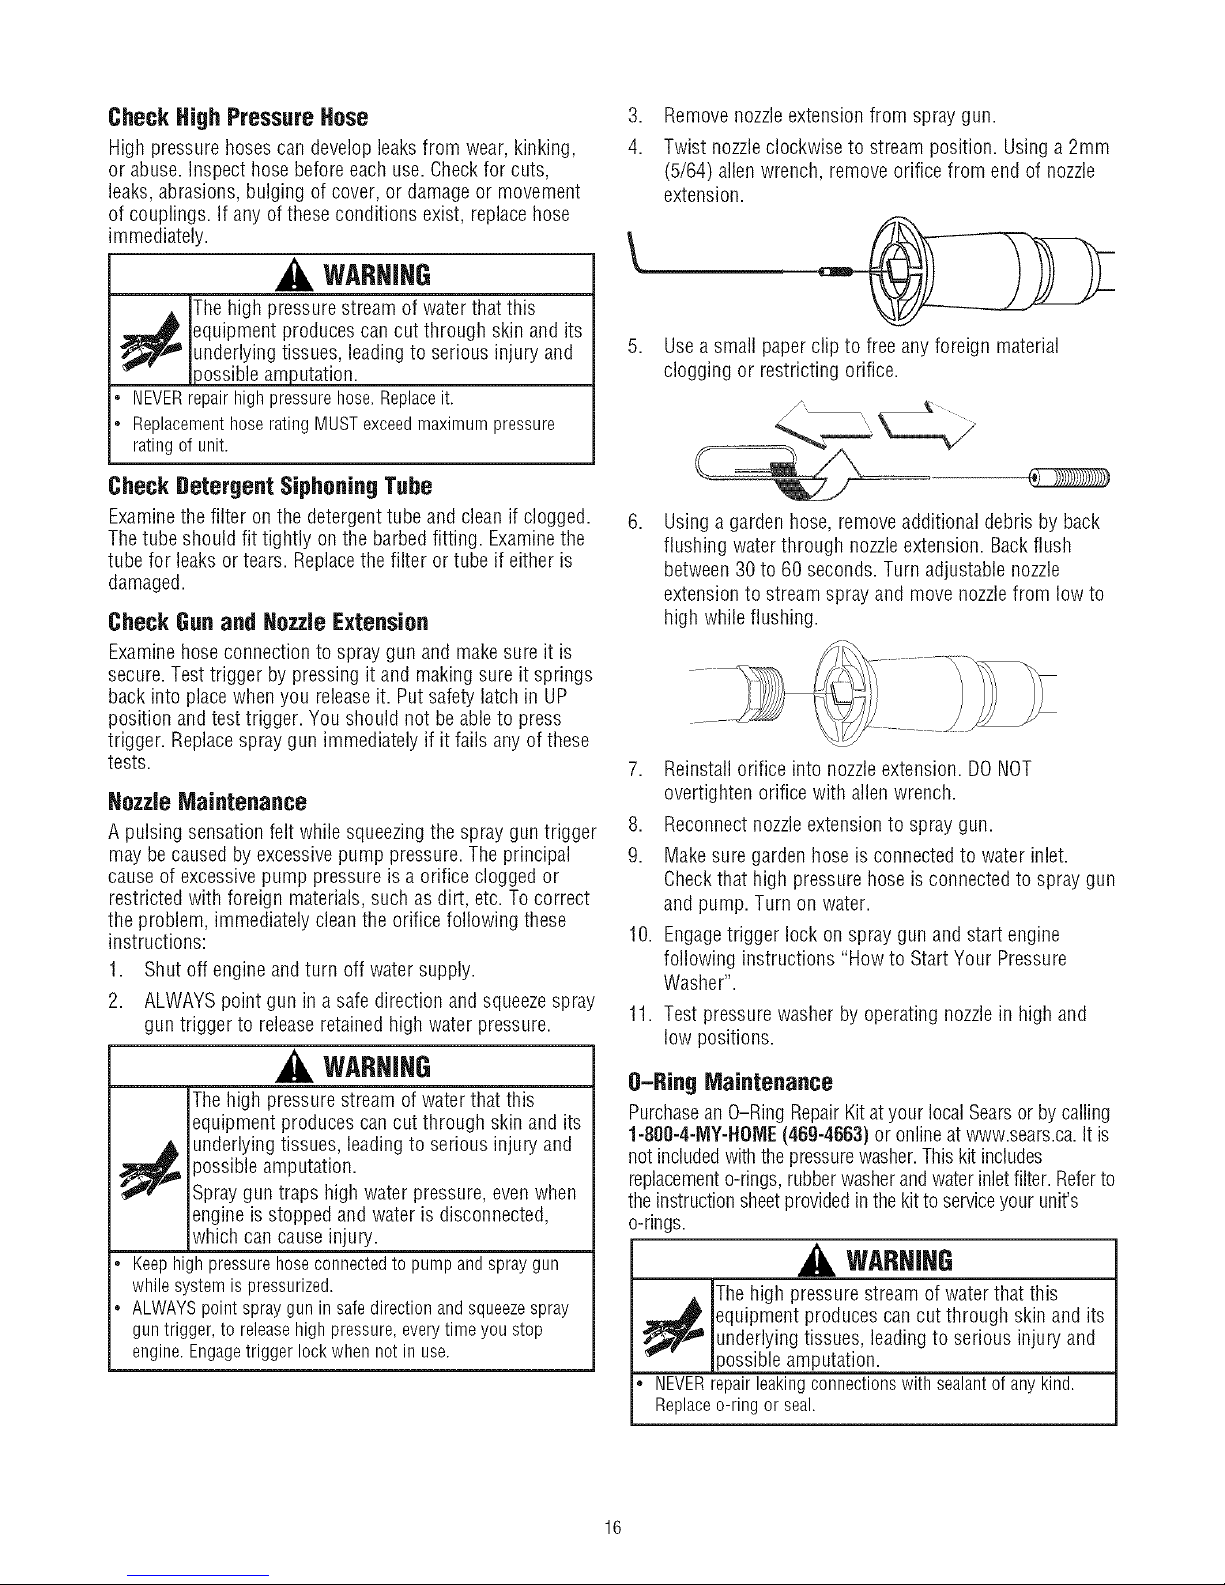
Removenozzleextension from spray gun.
4.
Twist nozzleclockwise to stream position. Using a 2mm
(5/64) allen wrench, remove orifice from end of nozzle
extension.
\
_ quipment produces can cut through skin and its
* NEVERrepairhighpressurehose.Replaceit.
* ReplacementhoseratingMUSTexceedmaximumpressure
ratingof unit.
underlyingtissues, leadingto serious injury and
_ossibleamputation.
Check Detergent Siphoning Tube
Examinethe filter on the detergent tube and clean if clogged.
Thetube should fit tightly on the barbed fitting. Examinethe
tube for leaksor tears. Replacethe filter or tube if either is
damaged.
Check Gun and NozzJe Extension
Examinehose connectionto spray gun and makesure it is
secure.Test trigger by pressing it and making sure it springs
back into placewhen you releaseit. Put safety latch in LIP
position and test trigger. You should not beable to press
trigger. Replacespray gun immediately if it fails any of these
tests.
HozzJeMaintenance
A pulsing sensationfelt while squeezingthe spray guntrigger
may becaused by excessive pump pressure. The principal
cause of excessive pump pressure is a orifice clogged or
restricted with foreign materials, such asdirt, etc. Tocorrect
the problem, immediately cleanthe orifice following these
instructions:
1. Shut off engine and turn off water supply.
2. ALWAYSpoint gun in a safe direction and squeezespray
gun trigger to releaseretainedhigh water pressure.
WARHIHG
Thehigh pressure stream of water that this
equipment produces cancut through skin and its
_ nderlying tissues, leading to serious injury and
* Keephighpressurehoseconnectedto pumpandspraygun
* ALWAYSpointspraygunin safedirectionandsqueezespray
possible amputation.
Spraygun traps high water pressure, evenwhen
engine is stopped and water is disconnected,
which can cause injury.
whilesystemispressurized.
guntrigger,to releasehighpressure,everytimeyoustop
engine.Engagetriggerlockwhennotin use.
5. Usea small paperclip to free any foreign material
clogging or restricting orifice.
Using a garden hose, removeadditional debris by back
flushing water through nozzleextension. Backflush
between30 to 60 seconds. Turn adjustable nozzle
extension to stream spray and move nozzlefrom low to
high while flushing.
7. Reinstallorifice into nozzleextension. DONOT
overtighten orifice with allen wrench.
8. Reconnectnozzleextensionto spray gun.
9. Makesure garden hose is connectedto water inlet.
Checkthat high pressure hose is connectedto spray gun
and pump. Turn on water.
10. Engagetrigger lock on spray gun and start engine
following instructions "How to Start Your Pressure
Washer".
11. Test pressure washer by operating nozzlein high and
low positions.
O-Ring Maintenance
Purchasean O-Ring RepairKit atyour localSearsor by calling
1-800-4-MY-HOME(469-4663)or online at www.sears.ca.It is
notincludedwith the pressurewasher.This kit includes
replacemento-rings,rubberwasherandwater inletfilter. Referto
the instructionsheetprovidedinthekit to serviceyour unit's
o-rings.
WARNING
Thehigh pressurestream of water that this
,_ equipment produces cancut through skin and its
* NEVERrepairleakingconnectionswith sealantof anykind.
Replaceo-ringor seal.
underlyingtissues, leadingto serious injury and
)ossible amputation.
16
ENGINEMAINTENANCE
WARHJHG
"_' Unintentionalsparking can result infire or
_¢ electric shock.
WHENADJUSTINGORMAKINGREPAIRSTOYOUR
PRESSUREWASHER
* Disconnectthesparkplugwirefromthesparkplugandplace
thewire whereit cannotcontactsparkplug.
WHENTESTINGFORENGINESPARK
* Useapprovedsparkplugtester.
* DONOTcheckfor sparkwithsparkplugremoved.
Oil
OIl Recommendations
We recommendthe useof Briggs & Stratton Warranty
Certified oils for best performance. Otherhigh-quality
detergent oils are acceptableif classified for service SF,SG,
SH, SJ or higher. DO NOTuse special additives.
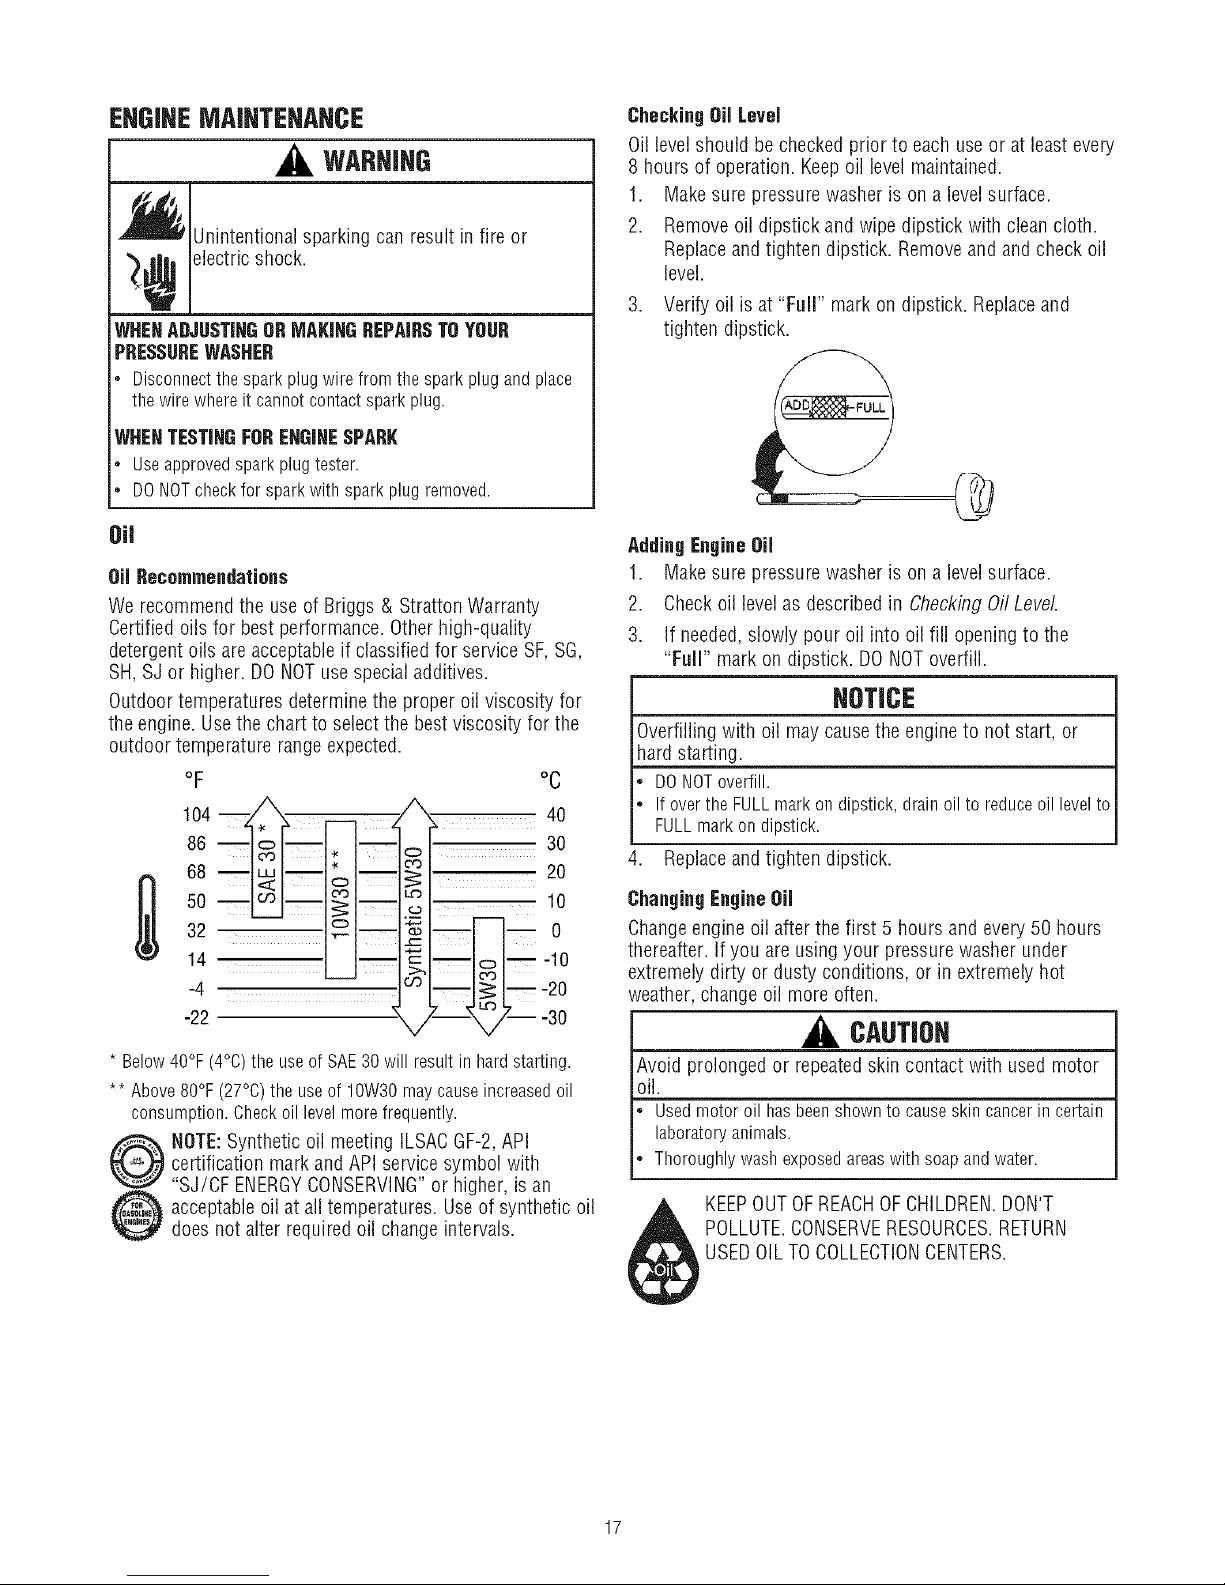
Outdoortemperatures determine the proper oil viscosity for
the engine. Usethe chart to select the bestviscosity for the
outdoor temperature rangeexpected.
oF oc
104 i i z _X 40
86 : = I--30
CheckingOil Level
Oil levelshould becheckedprior to each use or at least every
8 hours of operation. Keepoil level maintained.
1. Makesure pressure washer is on a levelsurface.
2. Removeoil dipstick and wipe dipstick with cleancloth.
Replaceand tighten dipstick. Removeand and check oil
level.
3. Verify oil is at "Full" mark on dipstick. Replaceand
tighten dipstick.
@
AddingEngineOil
1.
Makesure pressure washer is on a levelsurface.
2.
Checkoil level as described in CheckingOffLevel
3.
If needed,slowly pour oil into oil fill openingto the
"Full" mark on dipstick. DONOToverfill.
NOTICE
Overfilling with oil may causethe engineto not start, or
hard starting.
DONOToverfill.
Ifoverthe FULLmarkondipstick,drainoil to reduceoil levelto
FULLmarkon dipstick.
4. Replaceand tighten dipstick.
5o
14 " -10
32 _1--_-- 0
-4 oLIj L-
122 21_ I "30
* Below40°F(4°0)theuseof SAE30will resultin hardstarting.
** Above80°F(27°0)the useof 10W30maycauseincreasedoil
consumption.Checkoillevelmorefrequently.
certification mark and API service symbol with
NOTE:Synthetic oil meeting ILSACGF-2,API
"SJ/CF ENERGYCONSERVING"or higher, is an
acceptableoil at all temperatures. Useof synthetic oil
doesnot alter required oil change intervals.
ChangingEngine OiJ
Changeengine oil after the first 5 hours and every 50 hours
thereafter. If you are using your pressurewasher under
extremely dirty or dusty conditions, or in extremely hot
weather, changeoil more often.
CAUTIOH
Avoid prolonged or repeatedskin contact with used motor
oil.
Usedmotoroil hasbeenshownto causeskincancerincertain
laboratoryanimals.
Thoroughlywashexposedareaswith soapandwater.
KEEPOUTOFREACHOFCHILDREN.DON'T
POLLUTE.CONSERVERESOURCES.RETURN
USEDOILTO COLLECTIONCENTERS.
17
 Loading...