

Craftsman 358798540, 358798570 Owner’s Manual

atorlS Manual_
CRRFTSMRN°
1.46 cu. in./24cc 2-Cycle
17 Inch Cutting Path /.080 In. Line
GASOLINE WEEDWACKER _
Model No.
358.798540
358.798570
WARNING:
&
Sears, Roebuck and Co., Hoffman Estates, IL 60179 USA
530-084027 03/22/96
Read and follow all Safety Rules and Operating
Instructions before first use of this product.
For answers to your questions about this product:
Call 7 am-7 pm, Mon-Sat; Sun, 10 am-7 pm
II
1-800-235-5878

Warranty Statement 2 Storage
Safety Rules 2 TrOUbleshooting Chart
Assembly 4 : Repair Parts List
Operation 5
Maintenance 9 Spanish
Service & Adjustments 10 Parts and Ordering
FULL ONE YEAR "WARRANTY ON CRAFTSMAN GAS POWERED
WEEDWACKER ® LINE TRIMMER
For one year from the date of purchase, when this Craftsman Gas Powered
Weedwacker® Line Trimmer is maintained, lubricated, and tuned Up according to
the operating and maintenance instructions in the operator's manual, Sears will
repair, free of charge, any defect in material or workmanship.
This warranty excludes nyton line, spark plug, and air filter, which are expendable
parts and become worn during normal use.
If this Weedwacker® Line Trimmer is used for commercial purposes, this warranty
applies for only 90 days from the date of purchase. If this Weedwacker® Line Trim-
mer is used for rental purposes, th s warranty applies for or_!y30 days from the date
of purchase. This warranty applies only while this pr0duct is in use in the United
States.
WARRANTY SERVICEIS AVAILABLEBY RETURNINGTHE WEEDWACKER® LINE
TRIMMER TO THE NEAREST SEARS SERVICECENTER INTHE UNITED STATES.
This warranty gives you specific legal rights, and you may atso have other rights
which vary from state to state.
Sears, Roebuck and Co. Dept. D/817WA Hoffman Estates, IL 60179
Back Cover
11
12
13
16
WARNING: When using gardening
appliances, basic safety precautions
must always be followed to reduce the
risk of fire and serious injury. Read and
follow all instructions. Safetyinformationonthe unit
This power unit can be dangerous!
Operator is responsible for following _ DANGER: Never use blades or flailing
instructions and.warnings on unit and devices. This unit is designed for line.i
in manual. Read entire Operator's trimmer use only. Use of any other ac-
Manual before using unit! Be thorough- cessories or attachments will increase
ly familiar wi{h the controls and the ' the risk of injury.
proper use of the unit. Restrict the use
of this unit to persons who have read,
understand, and will follow the instruc-
tions and warnings on the unit and in WARNING: Trimmer line throws ob-
the manual. Never allow children to jects violently. You and others can be
operate this unit. - :.... blinded/injured. Wear eye and leg
protection. Keep body parts clear of
rotating line. Keep children, bystand-
2
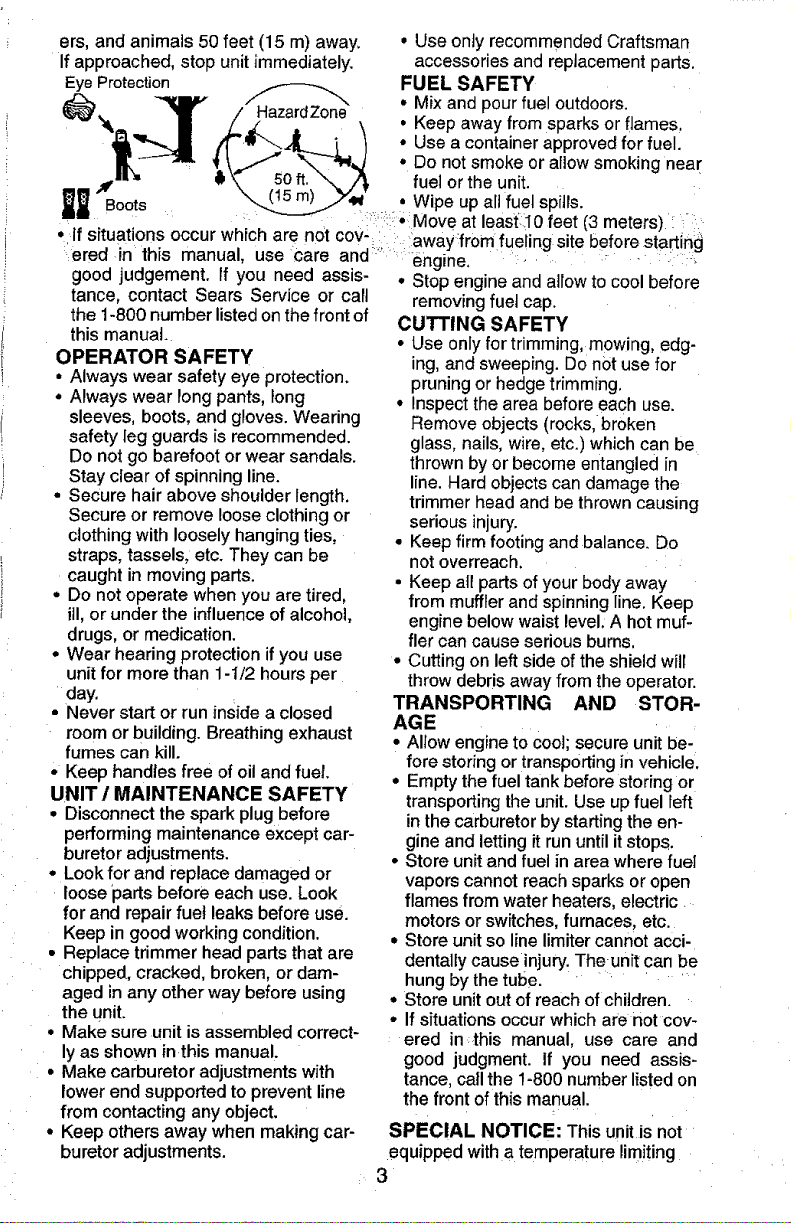
ers,andanimals50feet(15m)away. • UseonlyrecommendedCraftsman
Ifapproached,stopunitimmediately, accessoriesandreplacement parts.
Eye Protection FUEL SAFETY
_---'_- * Mix and pour fuel outdoors.
/ /Hazard/one \ • Keep away from sparks or flames.
il_-.._j.. _ • Use a container approved for fuel:
_._/"_. _'_4 • Do not smoke or allow smoking near
_ doots"B & \'_ 50 ft. \, /71, fuel or the unit. .i
• If situations occur which are not cov-i: : :awayfrom fue ing site before starting
ered in this manual, use Care and ........engine. :_ _-:i _'.
good judgement. If you need assis- • Stop engine and allow to cool before
lance, contact Sears Service or call
the !-800 number listed on the front of
this manual.
OPERATOR SAFETY
• Always wear safety eye protection.
• Always wear long pants, long
sleeves, boots, and gloves. Wearing
safety leg guards is recommended.
Do not go barefoot or wear sandals.
Stay clear of spinning line.
• Secure hair above shoulder length.
Secure or remove loose clothing or
clothing with loosely hanging ties,
straps, tassels, etc. They can be
caught in moving parts.
• Do not operate when you are tired,
ill, orunder the influence of alcohol,
drugs, or medication.
• Wear hearing protection if you use
unit for more than 1-1/2 hours per
day.
• Never start or run inside a closed
room or building. Breathing exhaust
fumes can kill.
• Keep handles free of oil and fuel.
UNIT / MAINTENANCE SAFETY
• Disconnect the spark plug before
performing maintenance except car-
buretor adjustments.
• Look for and replace damaged or
loose parts before each use. Look
for and repair fuet leaks before use.
Keep in good working condition.
• Replace trimmer head parts that are
chipped, cracked, broken, or dam-
aged in any other way before using
the unit.
• Make sure unit is assembled correct-
ly as shown in this manual.
• Make carburetor adjustments with
lower end supported to prevent line
from contacting any object.
• Keep others away when making car-
buretor adjustments.
"__'_i , Wipe up all fuel spitls.
:/:_:_* :Move at least:_10feet (3 meters) '._:
removing fuel cap.
CUTTING SAFETY
• Use only for trimming, mowing, edg-
ing, and sweeping. Do not use for
pruning or hedge trimming.
• inspect the area before.each use.
Remove objects (rocks, broken
g_ass, nails, wire, etc.) which can be
thrown by or become entangled in
line. Hard objects can damage the
trimmer head and be thrown causing
serious injury.
• Keep firm footing and balance. Do
not overreach.
• Keep all parts of your body away
from muffler and spinning line. Keep
engine below waist level: A hot muf-
fler can cause serious burns.
• Cutting on left side of the shield will
throw debris away from the operator.
TRANSPORTING AND STOR-
AGE
• Allow engine to Cool; secure unit be-
fore storing or transporting in vehicle.
• Empty the fuel tank before storing or
transporting the unit. Use up fuel left
in the carburetor by starting the en-
gine and letting it run until it stops.
• Store unit and fuel in area where fuel
vapors cannot reach sparks or open
flames from water heaters, electric
motors or switches, furnaces, etc.
• Store unit so line limiter cannot acci-
dentally cause injury. The unit can be
hung by the tube.
• Store unit out of reach of children.
° If situations occur which are r,ot cow
ered in:this manual, use care and
good judgment. If you need assis-
tance, call the 1-800 number listed on
the front of this manual.
SPECIAL NOTICE: This unit is not
equipped with a temperature limiting
• 3
muffler and spark arresting screen
which meets the requirements of Cali-
fornia Codes 4442 and 4443. All U.S.
forest land and the states of California,
Idaho, Maine, Minnesota, New JerSey,
Oregon, and WashingtOn require by
law that many internal combustion en-
gines be equipped with a spark arres-
CARTON CONTENTS
Check carton contents against the fol-
lowing list.
Model 358,798540
° Trimmer
° Shield
• Assist Handle
• Wing Nut (attached to shield)
, Container of Oil
Model 358.798570
• Trimmer
- Shield
- Assist Handle
° Wing Nut (attached to shield)
. Container of Oil
• Spool with 20 ft. of line
. One gallon gasoline container
° Pair of gloves
° Bulk line - 200 feet
Examine parts for damage. Do not use
damaged parts.
NOTE: Ifyou need assistance or find
parts missing or damaged, call the
1-800 number listed on the front of this
manual.
It is normal for the fuel filter to rattle in
the empty fuel tank.
Finding fuel or oil residue on muffler is
normal due to carburetor adjustments
and testing done by the manufacturer.
ASSEMBLY
:WARNING: If received assembled,
repeat all steps to ensure your unit is
properly assembled and all fasteners
are secure.
Ber sure to assemble the handle to the
unit before you assemble the shield.
ATTACHING THE HANDLE
(some units are already assembled)
WARNING: Make sure unit is properly
assembled and all fasteners are secure.
tor screen. If you operate in a locale
where such regulations exist, you are
legally responsible for installing and
maintaining the operating condition of:.
these parts. Failure to do so is a viola_
tion of the law: Refer tothe MAINTE-
NANCE section in this manual. :
j.7-6
Make sure knob isassembled on this side.
• Assemble handle to the unit asshown;
make sure bottom of handle is seated
in the groove inthe trigger housing.
NOTE,: Adjustment knob must be as-
sembled on the side of the unit oppo-
site the operator's position.
• Pivot handle to acomfortable position.
Tighten handle securely.
ATTACHING SHIELD
WARNING: The shield must be prop-
erly installed. The shield provides partial
protection from the riskofthrownobjects
to the operator and others and is
equippedwith a line ]imiter which cuts
excess line to the properlength.The line
limiter(on undersideof shield) is sharp
and can cutyou. For proper orientation,
see illustratio_in Operation section.
° Remove wing nut from shield.
• Insert bracket into s!ot as shown.
• Pivot shield until bolt passes through
hole in bracket.
° Securely tighten wing nut onto bolt,
Shield J
_ __"_ Bracket
_'_ Slot
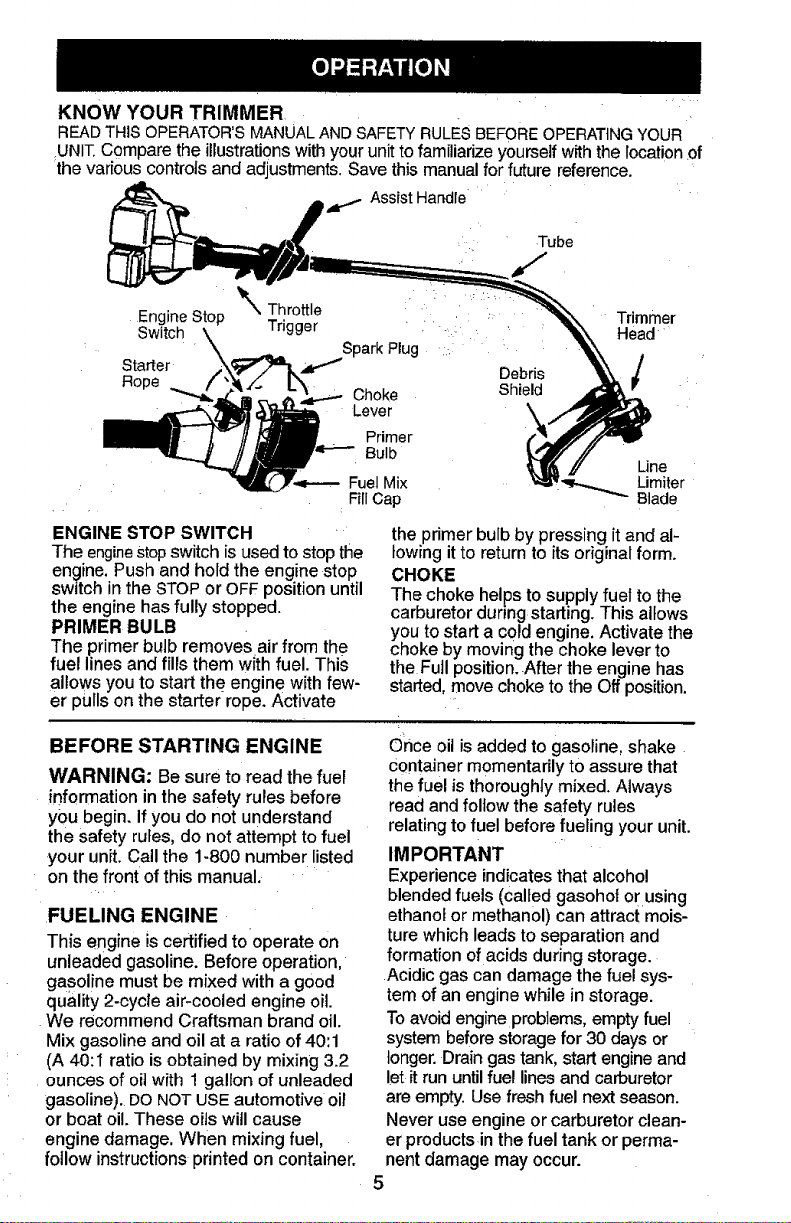
KNOWYOURTRIMMER
READTHISOPERATOR'SMANUALAND SAFETYRULESBEFOREOPERATINGYOUR
UNIT.Compare the illustrations with your unit to familiarize yourself with the location of
the various controls and adjustments. Save this manual for future reference.
i,,dr,._ Assist Handle
Tube
Engine Stop _' Throttle Trimmer
Switch Trigger Head
Starter _ Debris
Rope Shield
ENGINE STOP SWITCH
The engineStopswitch is used to stop the
engine. Push and hold the engine stop
switch in the STOP or OFF position until
the engine has fully stopped.
PRIMER BULB
The primer bulb removes air from the
fuel lines and fills them wlth fuel. This
allows you to start the engine with few-
er pulls on the starter rope. Activate
Spark Plug
Choke
Lever
Primer
Bulb
Fuel Mix
Fill Cap
the primer bulb by pressing it and al-
lowing it to return to its original form.
CHOKE
The choke helps to supply fuel to the
carburetor during starting. This allows
you to start a c0ld engine. Activate the
choke by moving the choke lever to
the Full position. After the engine has
started, move choke to the Off position.
Line
Limiter
Blade
BEFORE STARTING ENGINE
WARNING: Be sure to read the fuel
information in the safety rules before
you begin. If you do not understand
the safety rules, do not attempt to fuel
your unit. Call the 1-800 number listed
on the front ofthis manual.
FUELING ENGINE
This engine is certified to0perate on
unleaded gasoline. Before operation,
gasoline must be mixed with a good
quality 2-cycle air-cooled engine oil.
We recommend Craftsman brand oil.
Mix gasoline and oil at a ratio of 40:1
(A 40:I ratio is obtained by mixing 3.2
ounces of oil with 1 gallon of unleaded
gasoline). DO NOT USE automotive oil
or boat oi!.These oilswill cause
engine damage. When mixing fuel,
follow instructions printed on container.
Once oil is added to gasoline, shake
Container momentarily to assure that
the fuel is thoroughly mixed. Always
read and follow the safety rules
relating to fuel before fueling your unit.
IMPORTANT
Experience indicates that alcohol
blended fuels (called gasohol or using
ethanol or methanol) can attract mois-
ture which leads to separation and
formation ofacids during storage.
Acidic gas can damage the fuel sys-
tem of an engine while in storage.
Toavoid engine problems, empty fuel
system before storage for 30 days or
longer. Drain gas tank, start engine and
let it run until fuel lines and carburetor
are empty. Use fresh fuel next season.
Never use engine or carburetor clean-
er products in the fuel tank or perma-
nent damage may occur.
5
See:theSTORAGEsectionforaddition-:_
alinformation.
HOWTOSTOP YOUR UNIT
Push and hold the engine stop switch
in the STOPor OFF position until the
unit has fully stopped.
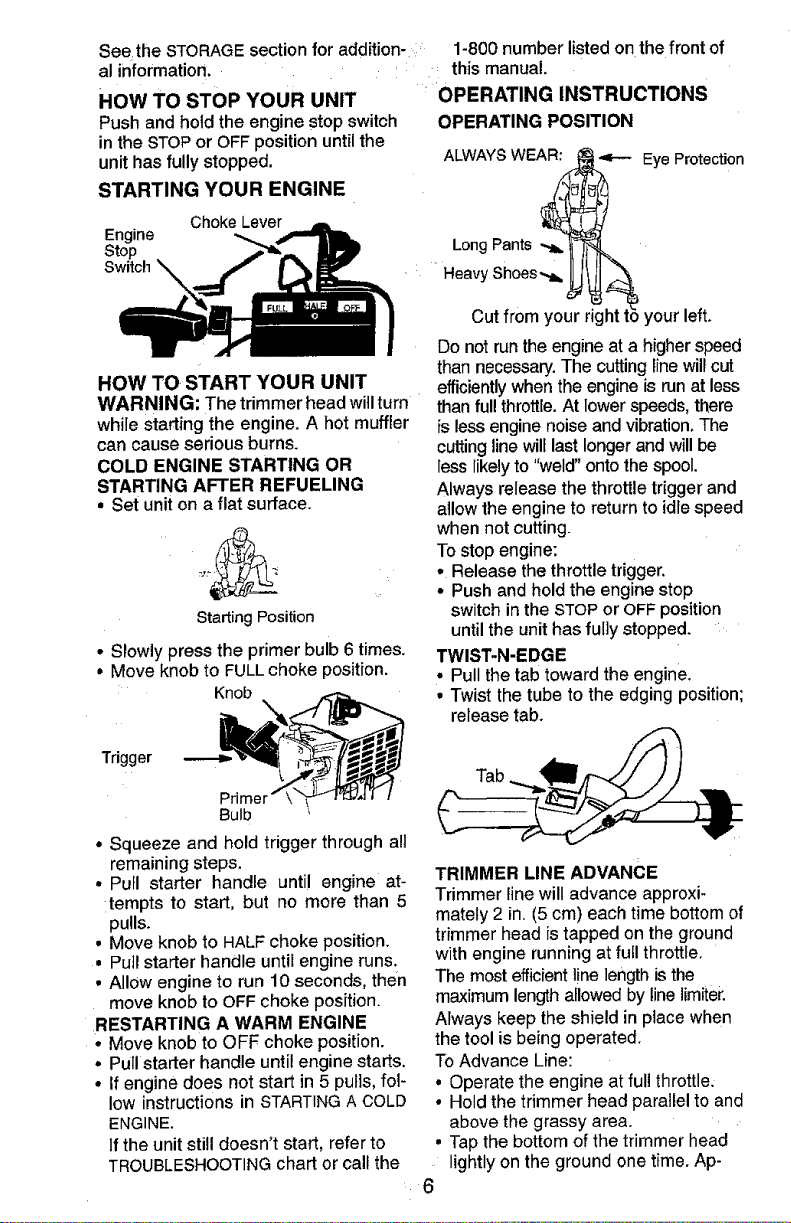
STARTING YOUR ENGINE
Engine
Stop
Switch
HOW TO START YOUR UNIT
WARNING: Thetrimmerhead willturn
whilestarting the engine.A hot muffler
cancauseserious burns.
COLD ENGINE STARTING OR
STARTING AFTER REFUELING
• Set uniton a flat surface.
• Slowly press the primer bulb 6 times.
• Move knob to FULL choke position.
Choke Lever
Starting Position
Knob
• OPERATING INSTRUCTIONS
1-800 number listed onthe front of
this manual,
OPERATING POSITION
ALWAYS WEAR: '4-'- Eye Protection
Long Pants -._
Heavy Shoes-t=
Cut from your right I left.
Do not run the engine at a higher speed
than necessary. The cutting line will cut
efficiently when the engine is run at less
than full throttle. At lower speeds, there
is less engine noiseand vibration, The
cutting line will last longer and will be
less likely to "weld" onto the spool.
Always release the throttle trigger and
allow the engine to return to idle speed
when not cutting.
To stop engine:
• Release the throttle trigger.
• Push and hold the engine stop
switch in the STOP or OFF position
until the unit has fully stopped.
TWIST-N-EDGE
• Pull the tab toward the engine.
• Twist the tube to the edging position;
release tab.
Trigger
Bulb
• Squeeze and hold trigger through all
remaining steps.
• Pull starter handle until engine at-
tempts to start, but no more than 5
pulls.
• Move knob to HALF choke position.
• Pull starter handle until engine runs,
• Allow engine to run 10 seconds, then
move knob to OFF choke position.
RESTARTING A WARM ENGINE
• Move knob to OFF choke position.
• Pull starter handle until engine starts,
° If engine does not start in 5 puI]s, fol-
low instructions in STARTING A COLD
ENGINE.
If the unit still doesn't start, refer to
TROUBLESHOOTING chart or call the
Tab
TRIMMER LINE ADVANCE
Trimmer line will advanceapproxi-
mately 2 in.(5 cm)eachtimebottomof
trimmerhead istapped ontheground
withenginerunningatfull throttle.
Themostefficientlinelengthisthe
maximumlengthallowedbyline limiter.
Always keep theshield in placewhen
thetoolis being operated.
ToAdvance Line:
• Operate the engineatfull throttle.
• Holdthetrimmerhead parallelto and
abovethe grassy area.
• Tapthe bottom of the trimmer head
lightly on the ground one time. Ap-
6
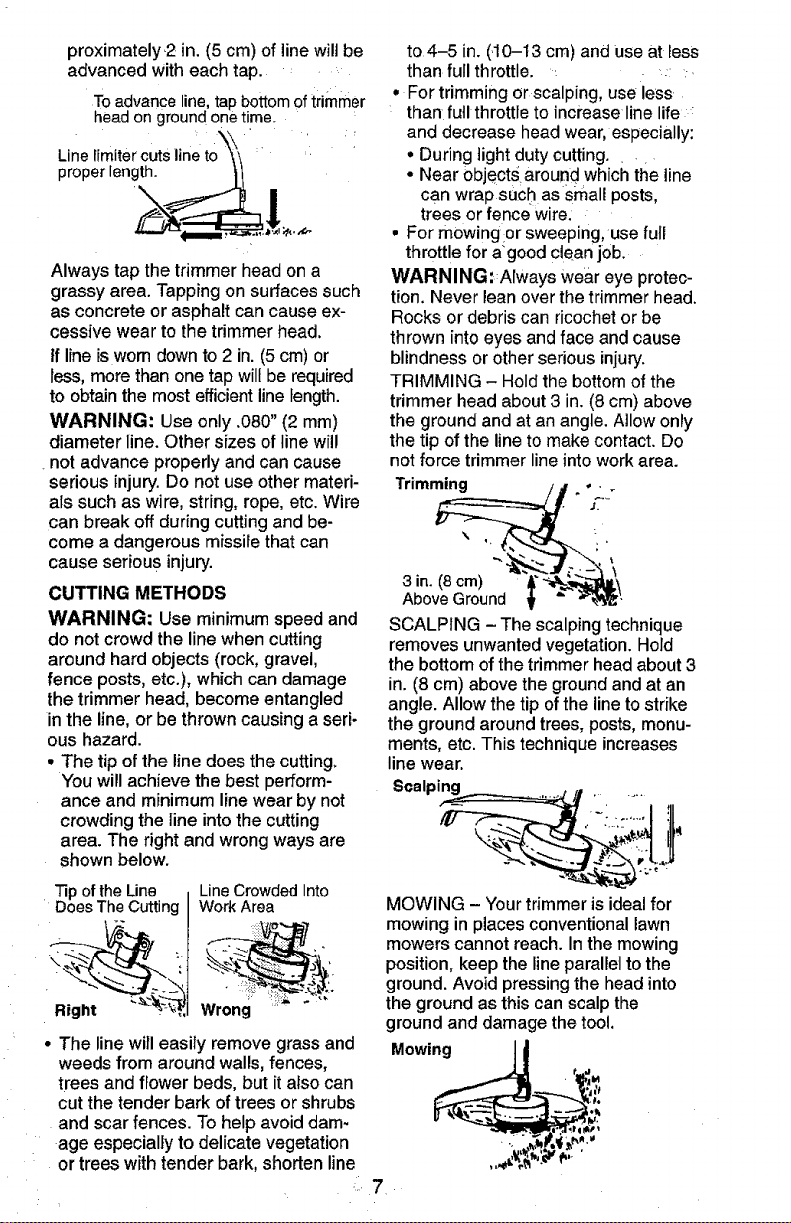
proximately.2 in. (5 cm) of line will be
advanced with each tap.
To advance line, tap bottomof trimmer
headon ground one time.
Line limiter cuts line :
proper length.
Always tap the trimmer head on a
grassy area. Tapping on surfaces such
as concrete or asphalt can cause ex-
cessive wear to the trimmer head,
If line is wom down to 2 in. (5 cm) or
less, more than one tap will be required
to obtain the most efficient line length.
WARNING: Use only .080" (2 mm)
diameter line. Other sizes of line wil!
not advance properly and can cause
serious injury. Do not use other materi-
als such as wire, string, rope, etc. Wire
can break off during cutting and be-
come a dangerous missile that can
cause seriou s injury.
CUTTING METHODS
WARNING: Use minimum speed and
do notcrowdthe linewhencutting
aroundhardobjects(rock,gravel,
fence posts,etc.), whichcan damage
thetrimmerhead, becomeentangled
inthe line,or be throwncausinga seri-
ous hazard.
• The tip ofthe linedoes the cutting.
You willachievethebest perform-
anceand minimumlinewear by not
crowdingtheline intothe cutting
area. The right andwrongwaysare
shownbelow.
Tip of the Line I
_--_-,_j_.,
Right ___I
• The line will easily remove grass and
weeds from around walls, fences,
trees and flower beds, but it also can
cut the tender bark of trees or shrubs
and scar fences. To help avoid dam-
age especially to delicate vegetation
or trees with tender bark, shorten line
LineCrowded Into
Work Area
Wrong
to4-5 in. (.10-13 cm) and Use at less
than fuIIthrottle. _ ::
• For trimming or scalping, use less
than full throttle to increase line life ;
and decrease head wear, especially:
• During light duty cutting.
• Near 0bjectsaround which the line
can wrap such as small posts,
trees or fence wire.
• For mowingor sweeping,use full
throttle for a"good clean job.
WARNING::AIways wear eye protec-
tion. Never lean over the trimmer head.
Rocks or debris can ricochet or be
thrown into eyes and face and cause
blindness or other serious injury.
TRIMMING - Hold the bottom of the
trimmer head about 3 in. (8 cm) above
the ground and at an angle. Allow only
the tip of the line to make contact. Do
not force trimmer line into work area.
Trimming
SCALPING - The scalping technique
removes unwanted vegetation. Hold
the bottom of the trimmer head about 3
in. (8 cm) above the ground and at an
angle. Allow the tip of the line to strike
the ground around trees, posts, monu-
ments, etc. This technique increases
line wear.
MOWING - Your trimmer is ideal for
mowing in places conventional lawn
mowers cannot reach. In the mowing
position, keep the line parallel to the
ground. Avoid pressing the head into
the ground as this can scalp the
ground and damage the too!.
Mowing J_
,,,4¢V,_i#' t',

SWEEPING-Thefanningactionof
rotatinglinecanbeusedforaquick
andeasycleanup.Keep.lineparallel
toandabovethesurfacesbeingswept
andmovethetoolfromsidetoside.
EDGING- TheTwist-N-Edgefeature
allowsforeasyedgingofsidewalks,
patios,driveways,etc.Adjusttrimmer
totheedgingposition.Allowonlythe
tipof the line to make contact. Do not
force trimmer line into work area.
/
Edging __
8
MAINTENANCE SCHEDULE
CARE & MAINTENANCE TASK
Check for Loose fasteners and parts
Check for damaged or worn parts
Clean unit and labels
Clean air filter
Replace spark plug
WHEN TO PERFORM
Before each use
Before each use
After each use
Every 5 hours of Operation
Yeaffy
GENERAL RECOMMENDATIONS
The warranty on this unit does not cov-
er items that have been subjected to
operator abuse or negligence. To re-
ceive full value from the warranty, the
operator must maintain unit as instruct-
ed in this manual. Various adjustments
will need to be made periodically to
properly maintain your unit.
CHECK FOR LOOSE
FASTENERS AND PARTS
• SparkPlug Boot
- Air Filter
- HousingScrews
= Assist HandleScrews
• DebrisShieldScrew
CHECK FOR DAMAGED OR
WORN PARTS
Refer replacement of damaged/worn
parts to your Sears Service Center.
=Engine Stop Switch - Ensure switch
functions propedy bypressing and
holding the switch in the "Stop" posi-
tion, Make sure engine stops; then
restart engine and continue.
• Fuel Tank - Do not use unit iffuel tank
shows signs of damage or leaks.
• Debris Shield- Discontinue use of
unit if debds shield is damaged.
CLEAN UNIT & LABELS
• Clean the unit using a damp cloth
with a mild detergent.
° Wipe off unitwith a clean dry cloth.
CLEAN AIR FILTER
Do not clean filter in gasoline or other
flammable solvent to avoid creating a
fire hazard or producing harmful evap-
orative emissions.
A dirty air filter decreases engine per-
formance and increases fuel consump-
tion and harmful emissions. Always
clean after every 5 hours of operation.
• Clean the cover and the area around
it to keep dirt and debris from falling
into the carburetor chamber when
the cover is removed,
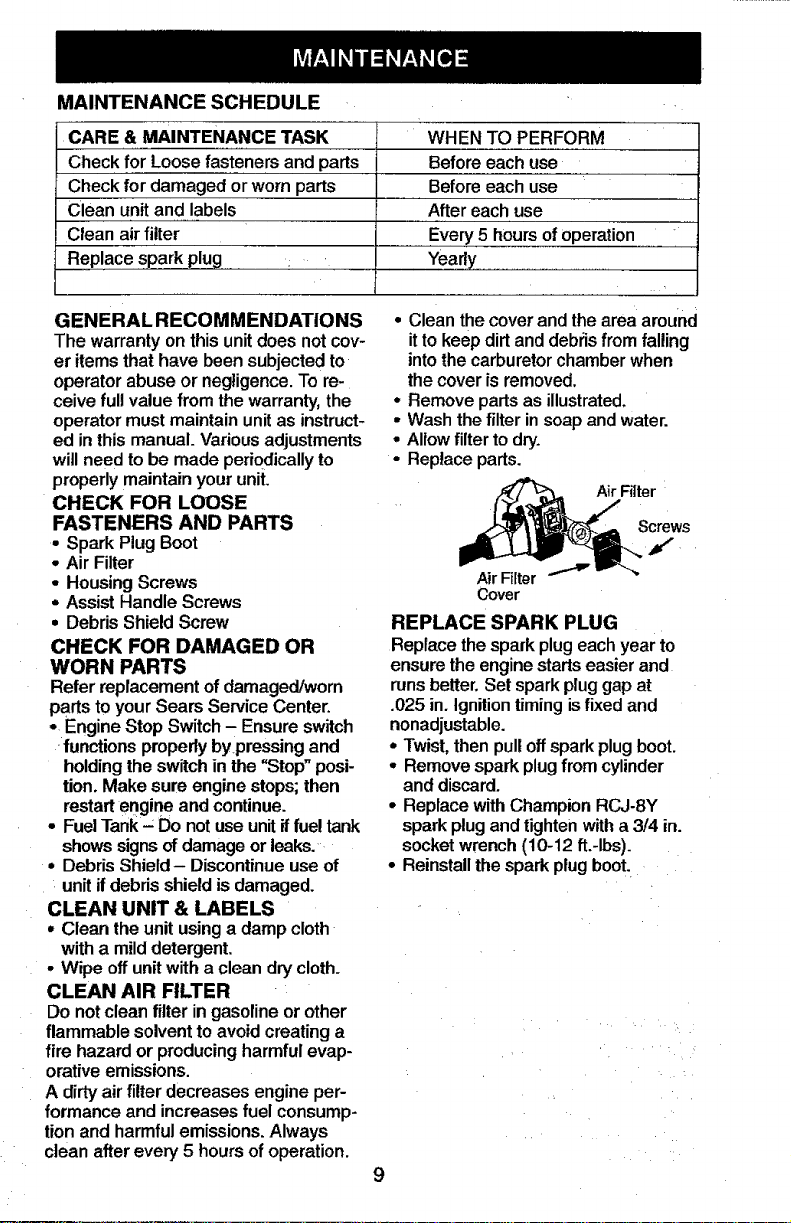
• Remove parts as illustrated.
o Wash the filter in soap and water.
° Allow filter to dry.
• Replace parts.
,_Fi|ter
Cover
REPLACE SPARK PLUG
Replace the spark plug each year to
ensure the engine starts easier and
runs better. Set spark plug gap at
.025 in. Ignition timing is fixed and
nonadjustable.
= Twist, then pull off spark plug boot.
= Remove spark plug from cylinder
and discard.
- Replace withChampion RCJ-8Y
spark plug and tighten with a 3/4 in.
socket wrench (10-12 ft.-Ibs).
* Reinstall the spark plug boot.
< •
 Loading...