

Craftsman 358798490 Owner’s Manual

_) _ _-' _ _F_ "
IINPORTANT NANUAL
Operator's
Manual
Model No.
358.798490
Db Not Throw Away
HOURS (CST)
Men -Sat 7am.-7pm
Sun- 10 a,rn -7pm
WARNING:
READ THE OPERATOR'S
MANUAL AND FOLLOW
ALL WARNINGS AND
SAFETY INSTRUCTIONS.
FAILURE 3"0 DO SO CAN
RESULT IN SERIOUS
INJURY.
Always Wear Eye Protection
®
32 cc/2.0 cu. in. 2-CYCLE
17 Inch Semi-Automatic Head
GAS WEEDWACKER®
oAssembly
- Operation
- Customer Responsibilities
o Service and Adjustments
° Repair Parts
530-083614-1-03/08/95
Sears, Roebuck and Co., Hoffman Estates, 1L60179 U.S.A.

SAFETY RULES
TACTsPA.K.LUGToP.sv NTACCID ALSTA. .GWHeNSEI".. I
cAu oN:ALWAYSD,SCONNECTSPA.KF'LUGWi. WiR WH RErrCANNOTCO.-I
ADJUSTING OR MAKING REPAIRS. .....................j
OPERATOR SAFETY
o Always wear'safety eye protection
o Always wear long pants, long sleeves, boots and
_loves_ Wearing safety leg guards is recommended.
o not go barefoot or wear sandals, short pants, short
sleeves, Being fully covered helps to protect you from
pieces of toxic plants thrown by the cutting head_
. Secure hair so it is above shoulder length Secure
loose clothing, jewelry, or clothing with loosely han_-
ing !ies, straps, tassels, etc.; they can be caught m
moving parts
. Do not operate this unit when you are tired, ill, or
under the influence of alcohol, drugs, or medication
• Wear hearing protection if you use this unit for more
than 1-1/2 hours per day
- Never start or run the engine inside a closed room or
building Breathing exhaust fumes can kin
. Keep handles free of oil and fuel
- !f situations occur which are not covered in this
manual, use care and good judgement
UNIT/MAINTENANCE SAFETY
o Look for and replace damaged or toose parts before
each use Look for and repair fuel leaks before use
Keep the unit in good working condition
* Use only ,080" diameter monofilarnent line Never use
wire, rope, string, etc
. Keep the cutting line at the proper length
. Make sure the unit is maintained and assembled cor-
rectly as listed in this manual
- Install the required shield properly before using the
unit
. Use only the specified semi-automatic trimmer head.
. Make carburetor adjustments with the lower end sup-
ported to prevent the trimmer line from contacting any
object Hold unit by hand
o Keep others away when making carburetor adjust-
ments
° Use only good quality SEARS accessories as recom-
mended for this unit.
FUEL SAFETY
° Mix and pour fuel outdoors
. Keep away from sparks or flames
° Use a container approved for fuel
o Do not smokeor allow smoking near fuel or the unit or
while using the uniL
- Wipe up all fuel spillsbefore starting engine,
o Move at least 10 feet (3 meters) away from fueling sits
beforestarting engine.
° Stop engine and allow unit to cool before removing
fuel cap
CUTTING SAFETY
o Inspect the area to be cut before each use. Remove
objects (rocks, broken glass, nails, wire, string, etc.)
which can be thrown or become entangled in the
semi-automatic line head
. Keep others including children, animate, bystanders
and helpers at least 50 feet (15 meters) away. Stop
the engine immediately il you are approached,
° Always keep the engine on the right-hand side of your
body
o Hold the unit firmly with both hands
° Keep firm footing and balance Do not over-reach
o Keep the semi-automatic line head below waist level
o Do not raise the engine above your waist
° Keep all parts of your body away from semi-automatic
Iine head and muffler when engine is running
° Cut from your right to your left
o Use only for jobs explained in this manual.
TRANSPORTING AND STORAGE
o Stop the unit before transporting
• Allow the engine to cool, and secure the unit before
storing or transporting in a vehicle
° Empty the fuel tank before storing or transporting the
unit Use up any fuel left in the carburetor by starting
the engine and letting the engine run until it stops,,
• Store unit and fuel in an area where fuel vapors can-
not reach sparks or open flames from water heaters,
electric motors or switches, furnaces, etc
o Store unit so the line limiter cannot accidentaIly cause
injury
• Store the unitout of the reach of children
SAFETY NOTICE
Exposure to vibrations through prolonged use of gasotine powered hand units could cause blood vessel or nerve damage in the
fingers, hands, and joints of people prone to circulationdisordersor abnormal swellings Prolonged use in cold weather has been
linked to blood vesset damage in otherwise healthy people If symptoms occur such as numbness, pain, toss of strength, change
in skin color or texture, or toss of feeling inthe fingers, hands or joints discontinuethe use of this unit and seek medical atten-
tion An antiwibration system does not guarantee the avoidance o! these problems Users who operate power tools on a continu-
al and regular basis must monitor closely theirphysica{conditionand the condition of this unit.
LOOK FOR THIS SYMBOL TO POINT OUT IMPORTANT SAFETY PRECAUTIONS.
IT MEANS -- A'I'rENTION!!! BECOME ALERT!!! YOUR SAFETY IS iNVOLVED.
-2-

SAFETY RULES
DANGER
THIS POWER UNIT CAN BE DANGEROUS! THIS UNIT CAN CAUSE SERIOUS INJURY OR
BLINDNESS TO THE OPERATOR AND OTHERS. THE WARNINGS AND SAFETY INSTRUCTIONS IN
THIS MANUAL MUST BE FOLLOWED TO PROVIDE REASONABLE SAFETY AND EFFICIENCY IN
USING THIS UNIT THE OPERATOR IS RESPONSIBLE FOR FOLLOWING THE WARNINGS AND
INSTRUCTIONS IN THIS MANUAL AND ON THE UNIT_READ THE ENTIRE OPERATOR'S MANUAL
BEFORE ASSEMBLING AND USING THE UNIT/RESTRICT THE USE OF THIS POWER UNIT TO
PERSONS WHO READ, UNDERSTAND AND FOLLOW THE WARNINGS AND INSTRUCTIONS IN
THIS MANUAL AND ON THE UNFI_.NEVER ALLOW CHILDREN TO USE THIS TOOL.
THIS UNIT IS DESIGNED FOR LINE
TRIMMER USE ONLY. NEVER USE ANY
OTHER CUTTING ATTACHMENT WITH
THIS UNIT. BLADES AND HEADS WITH
FLAILING DEVICES CAN CAUSE SERIOUS
INJURY
TRIMMER LINE CAN THROW OBJECTS
WARNING
VIOLENTLY. YOU CAN BE BLINDED
OR INJURED. WEAR EYE AND LEG
PROTECTION.
HAZARD ZONE FOR THROWN OBJECTS°
TRIMMER LINE CAN THROW OBJECTS
VIOLENTLY. OTHERS CAN BE BLINDED
OR INJURED_ KEEP PEOPLE AND ANI-
MALS 50 FEET (15 METERS) AWAY.
PROTECTION
HAZARD ONZ_E
READ OPERATOR'S MANUAL. FOLLOW
ALL WARNINGS AND INSTRUCTIONS.
FAILURE TO DO SO CAN RESULT IN
SERIOUS INJURY_
OPERATOR'S
MANUAL
-3_

CONGRATULATIONS on your purchase of a Sears
Craftsman Gas Weedwacker, tt has been designed, engi-
neered and manufactured to give you the best possible
dependability and performance.
Should you experience any problems you cannot easily
remedy, please contact your nearest Sears Service Cen-
tedDepartment, Sears has competent, well trained techni-
cians and the proper tools to service or repair this unit
Please read and retain this manual The instructions will
enable you to assemble and maintain your unit properly.,
Always observe the "SAFETY RULES."
MODEL NUMBER:
358.798490
DATE CODE/SERIAL NO.:
DATE OF PURCHASE:
PRODUCT SPECtRCATIONS
CUTTING PATH .................17" (43cm)
TRIMMER LINE ....................080" Diameter
Monofilament
SEMI-AUTOMATIC Counterclockwise
HEAD ROTATION ................(for operator) .
ENGINE ............................. 32cc, 2-cycle Air Cooled
FUEL/OIL MIX RATIO ...... 40:1 (3.2 ozooil per
gallon gas)
IGNITION .................................Solid State
(air gap D10" to O14")
IGNITION TIMING ........... Non-adjustable, fixed
SPARK PLUG .....................Champion (RCJ-8Y)
SPARK PLUG GAP ............025" (.6ram)
ENGINE RPM ....................7,500 RPM Max
THE MODEL AND SERIAL NUMBER WILL BE FOUND
ON THE PRODUCT
SPECIAL NOTICE
FoPuserson U.S. ForestLandandin somestates,including
YOU SHOULD RECORD BOTH SERIAL NUMBER
AND DATE OF PURCHASE AND KEEP IN A SAFE
PLACE FOR FUTURE REFERENCE.
California (PublicResourcesCodes 4442 and4443), Idaho,
Maine, Minnesota,New Jersey,Oregon, arid Washington:
Certain internal combustionengines operatedon forest
brush, andlor grass.-coveredlandsin theaboveareas are
requiredto be equippedwitha spark arrestor,maintainedin
effectiveworkingorder,or the enginemust beconstructed
equipped, and maintained for the preventionoffire. Check
MAINTENANCE AGREEMENT
A Sears Maintenance Agreement is available on this
product. Contact yournearest Sears Store for details.
CUSTOMER RESPONSIBILITIES
Read and observe the safety rules..
• Foliow a regular schedule in maintaining, caring for, and
using your uniL
• Follow the instructions under "Customer Responsibili-
ties" and "Storage" sections of this Operator's Manual.
withyour state orlocal authoritiesforregulationspertaining
totheserequirementsFailuretofollow theserequirements
isaviolationofthetaw.Thisunitis notfactory-equippedwith
a spark arrestor;however,a sparkarrestoris availableasan
optional part, Ifa spark arrestorisrequired inyourarea,con-
tact your SEARS ServiceCenter/Departmentfor thecorrect
kit.
_M_nu4ar.:l_red ut_det or,e or m_e of lt_e followittg US pale_tts 5 3_{3427 5.367,888
5 348 68_, 5 343 83"_: 5 276 958:5 269 665 5 02(_223 4 940 028 4 8_7 923 4 852 258
4 846 423:4 84_ 929: d 835 867; 4 825 548 4823 465 4819 742, 4 79_ t85 4 808 068
4 483 059 4 45_ 983 4 ;365 6_2; 4 366 82_ 4 352243 4 347 666:4 290,200 ,_286 675
4,236,312, 4.t77 56t 4,_72 322 4,167,8t2.4,_62.575: 4.461,820, 4 1Z2 653 4,104.797,
Re 32,265 D344 088 D324 054; 0304 495 D276 160 O4het U S _nd Igretgn 131_Ien_s
per_d_n8
FULL ONE YEAR WARRANTY ON CRAFTSMAN GAS-POWERED
WEEDWACKER ®LINE TRIMMER
For one year from the date of purchase, when this Craftsman Gas-Powered Weedwacker _Line Trimmer is maintained,
lubricated and tuned-up according to the operating and maintenance instructions in the operator's manual, Sears will
repair',free of charge, any defect in materials or workmanship
This warranty excludes nylon line, spark plug, and air filter,which are expendable parts and become worn during nor-
mal use_
if this Weedwacke_' LineTrimmer isused for commercial purposes, this warranty applies for only 90 days from the date
of purchase. If this Weedwacker _ Line Trimmer is used for rental purposes, this warranty applies for only 30 days from
date of purchase. This warranty applies only while this product is in use in the United States_
WARRANTY SERVICE IS AVAILABLE BY RETURNING THE WEEDWACKER _ LINE TRIMMER TO THE NEAREST
SEARS SERVICE CENTER IN THE UNITED STATES.
This warranty gives you specific legal rights, and you may also have other rights which vary from state to state.
SEARS, ROEBUCK AND CO., DI817WA, HOFFMAN ESTATES, IL 60179

TABLE OF CONTENTS
Safety Rules .................................................................... 2
Product Specitications ................................................... 4
Warranty ....................................................................... 4
Accessories .................................................................. 5
Assembly ............................................................................ 7
Operation ............................................................................. 8
aNDEX
A
Accessories .................................................................. 5
Adjustments
Assist Handle ......................................................... 9
Carburetor ...................................................................... 20
Air Filter ................................................................................. 15
Assembly ................................................................. 7
Assist Handle .................................................................................. 9
C
Carburetor Adjustments ......................................................... 20
Carton Contents .......................................................................6
Controls .............................................................................................9
Customer Responsibilities................................................t4
Spark Plug .............................................................................. 4
Cutting Techniques ................................................................13
D
Debris Shield .................................................................... 7
Drive Shaft Lubrication .............................................. 15
E
Engine
FueflOil .......................................................................... t 0
Spark Plug ..................................................................... 4
Starting ..........................................................................................11
Storage ........................................................................... 21
F
Fueling .............................................................................. 10
Fuel Filter ..................................................................................16
Customer Responsibilities .....................................................14
Service and Adjustments .................................................... I7
Storage ............................................................................ 21
Trouble Shooting ............................................................ 22
Repair Parts ............................................................................23
Repair Parts OrderinglService ..........................Back Cover
K
Know Your Weedwacker ................................................... 8
L
Line Advancement.................................................................9
Line Replacement ................................................................18
M
Maintenance Schedule .................................................... 14
Model Number...............................................................................4
0
Operation ...................................................................................... 8
Ordering Repair Parts ...........................................Back Cover
R
Repair Parts .............................................................................23
Ordering .............................................................. Back Cover
S
Service and Adjustments ...................................................17
Spark Arrestor Screen ..................................................... 15
Specilications ...................................................................................4
Starting ..................................................................................11
Storage ........................................................................................21
T
Trouble Shooting .................................................................22
W
Warranty ...........................................................................................4
ACCESSORIES
These accessories and attachments were available when the unit was originally purchased They are also available at
most Sears retail outlets and service centers, Most Sears stores can order these items for you when you provide the model
number of your unit
Accessories
SAFETY HEARING SPOOL BULK GAS
GOGGLES PROTECTION WITH LINE LINE CAN
SEMI-
AUTOMATIC
LINE HEAD
-5-
,080"
80 FT.
200 FT,
400 FT,,
SPARK I AIR
PLUG FILTER
!
-=0
SEARS
2-CYCLE
ENGINE OIL

(4) Debris Shield
Screws
CARTON CONTENTS
Hardware shown full size
Grass Washer
(1) Fiat Washer
Parts bag contents not shown full size
Short Hex Key
Parts packed separately in carton
--_--'.'r
Operator's Semi-automatic
Manual Head
ASSEMBLY
,, _, L,Jl I ,,,,1111 II II1,,
TOOLS REQUIRED FOR ASSEMBLY
• Torque Wrench (optional) - Reference torque values
are provided throughout this manua! for tightening
hardware_
• Long Hex Wrench
• Short HexWrench
Long Hex Key
Plastic
Debris Shield
• After removing the contents from the carton, check
parts against the Carton Contents list,
. Examine the parts for damage. Do not use damaged
parts,
o Notify Customer Assistance at 1-800-235-5878 imme-
diately ff a part is missing or' damaged
Engine Oil
TO REMOVE WEEDWACKER
FROM CARTON
• Remove loose parts bag included witll Weedwacker.
- Remove your Weedwacker from the packing material.
- You may use the opened packing material as a work
surface.
NOTE: ii is normal to hear the fuel filter rattle in an empty
fuel tank.
°6-
ASSEMBLY
HOW TO ASSEMBLE YOUR
WEEDWACKER
_ ARNING:
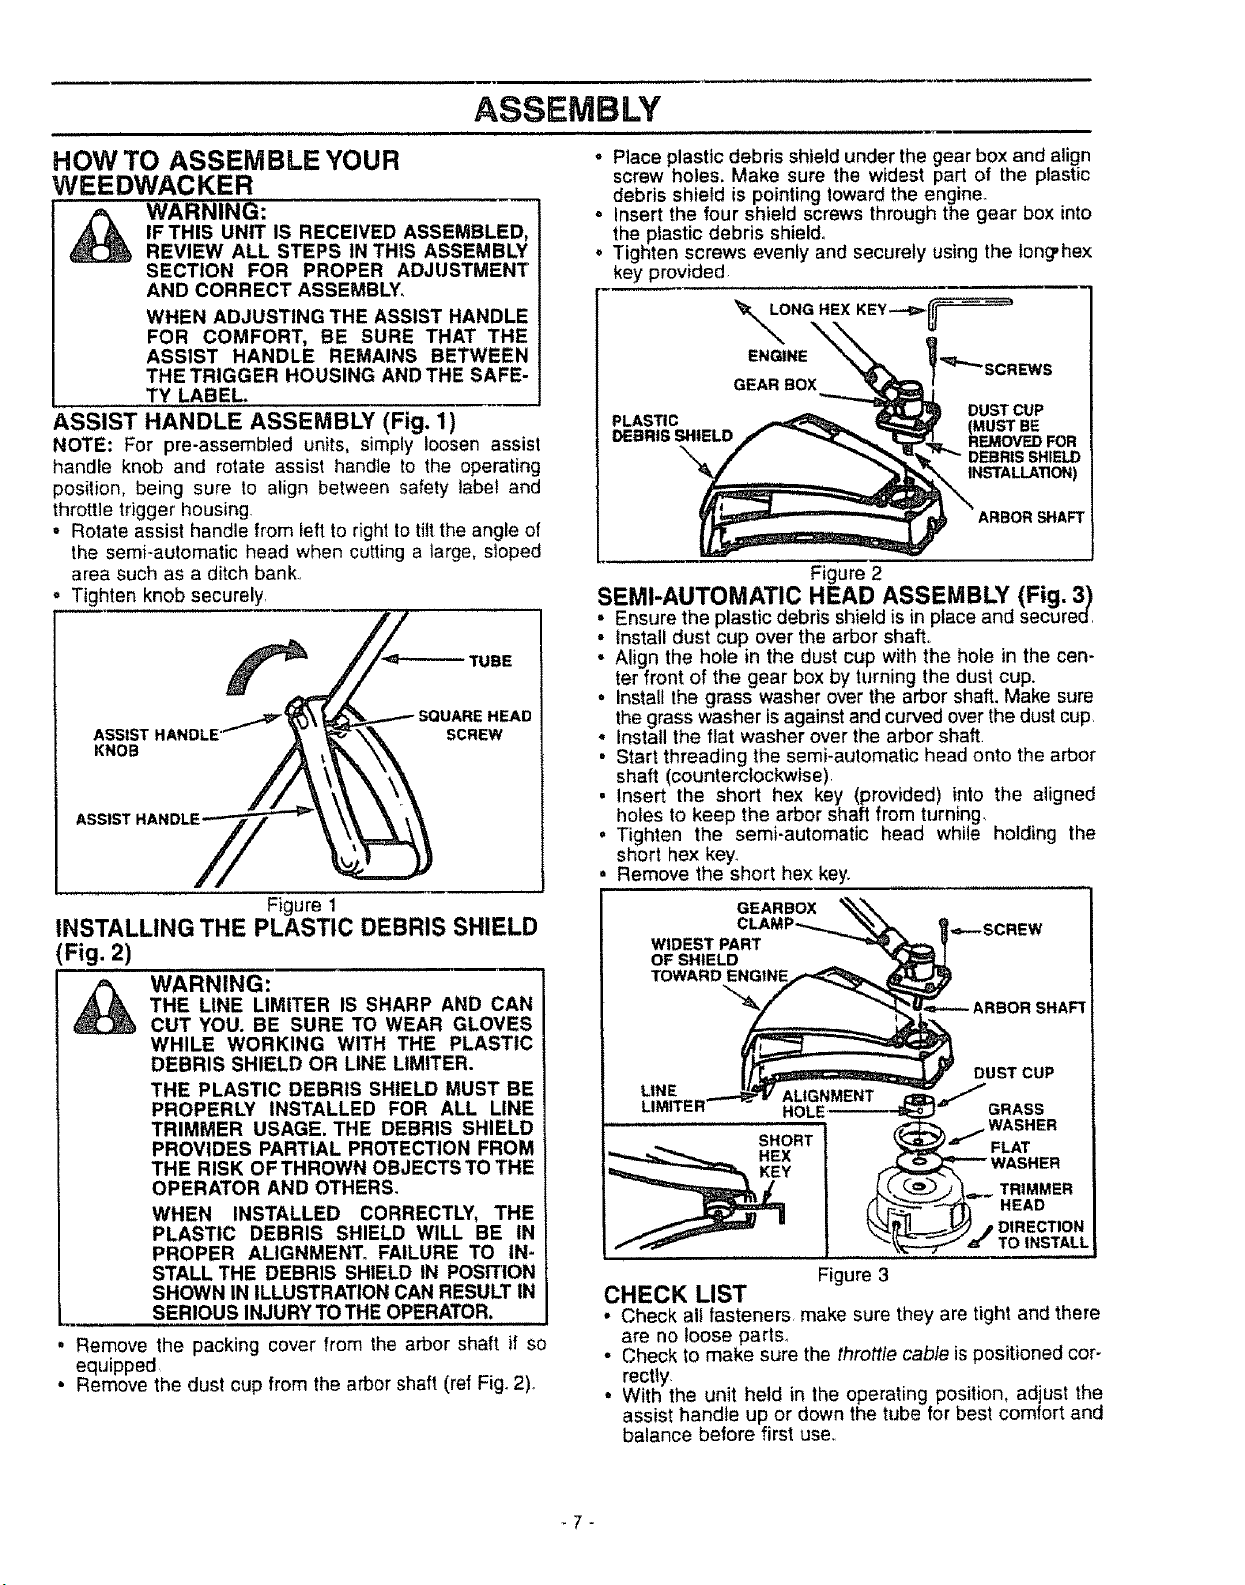
ASSIST HANDLE ASSEMBLY (Fig, 1)
NOTE: For pre-assembled units, simply loosen assist
handle knob and rotate assist handte to the operating
position, being sure to align between safety label and
throttle trigger housing,
• Rotate assist handle from left to right to tilt the angle of
the semi-automatic head when cutting a large, sloped
area such as a ditch bank.,
Tighten knob securely,
IF THIS UNIT IS RECEIVED ASSEMBLED,
REVIEW ALL STEPS 1NTHIS ASSEMBLY
SECTION FOR PROPER ADJUSTMENT
AND CORRECT ASSEMBLY.
WHEN ADJUSTING THE ASSIST HANDLE
FOR COMFORT, BE SURE THAT THE
ASSIST HANDLE REMAINS BETWEEN
THE TRIGGER HOUSING ANDTHE SAFE-
TY LABEL.
TUBE
E HEAD
SCREW
KNOB
- Place plastic debris shield under the gear box and align
screw holes. Make sure the widest part of the plastic
debris shield is pointing toward the engine.
o Insert the four shield screws through the gear box into
the plastic debris shield,,
• Tighten screws evenly and securely using the long,hex
key provided
ONG HEX KEY__
ENGINE
GEAR BOX
PLASTIC
DEBRIS SHIELD
DUST CUP
(MUST BE
REMOVED FOR
DEBRIS SHIELD
INSTALLATION)
ARBOR SHAFT
Figure 2
SEMI-AUTOMATIC HEAD ASSEMBLY (Fig. 3)
Ensure the plastic debris shield is in place and secured,
• Install dust cup over the arbor shaft,,
• Align the hole in the dust cup with the hofe in the cen-
ter front of the gear box by turning the dust cup.
= Install the grass washer over the arbor shaft. Make sure
the grass washer is against and curved over the dust cup,
. Install the flat washer over the arbor shaft.
• Start threading the semi-automatic head onto the arbor
shaft (counterclockwise),
Figure 1
INSTALLING THE PLASTIC DEBRIS SHIELD
(Fig. 2)
t_ WARNING:
L_ SERIOUS INJURY TOTHE OPERATOR,
• Remove the packing cover from the arbor shaft if so
equipped
• Remove the dust cup from the arbor shaft (ref Fig. 2).
THE LINE LIMITER IS SHARP AND CAN
CUT YOU. BE SURE TO WEAR GLOVES
WHILE WORKING WITH THE PLASTIC
DEBRIS SHIELD OR LINE LIMITER.
THE PLASTIC DEBRIS SHIELD MUST BE
PROPERLY INSTALLED FOR ALL LINE
TRIMMER USAGE. THE DEBRIS SHIELD
PROVIDES PARTIAL PROTECTION FROM
THE RISK OF THROWN OBJECTS TO THE
OPERATOR AND OTHERS,
WHEN INSTALLED CORRECTLY, THE
PLASTIC DEBRIS SHIELD WILL BE IN
PROPER ALIGNMENT. FAILURE TO IN-
STALL THE DEBRIS SHIELD IN POSITION
SHOWN IN ILLUSTRATION CAN RESULT 1N
holes to keep the arbor shaft from turning,
Insert the short hex key (provided) into the aligned
Tighten the semi-automatic head while holding the
short hex key_
Remove the short hex key_
GEARBOX _._
WIDEST pA_LAMP _ _ _,=_,-SCREW
OF SHIELD "%_ _LI
TOWARD ENGINE_""_,_ _J
Lirns I or1 HOLE _-
SHORT LY'3:FL_J F'AT
WASHER
.Ix w ,S.ER
_/ _,_,__-_,_j _,,,.=_.TRIMMER
_,_"-_ " _-__..._ / DIRECTION
,._- _v "'_'--.,..-_ _ TO INSTALL
CHECK LIST
o Check all fasteners, make sure they are tight and there
are no loose parts_
• Check to make sure the throttle cable is positioned cor-
rectly.
• With the unit held in the operating position, adjust the
assist handte up or down the tube for best comfort and
balance before first use,,
('__----"'_:"_- HEAD
Figure 3
-7-
 Loading...