

Craftsman 358798441 Owner’s Manual

iMPORTANT MANUAL Do Not Throw Away
S _AUk S
Operator's
Manual
Model No.
358.798441
ASSISTANCE
_ WARNING:
READTHE OPERATOR'S
MANUAL AND FOLLOW
ALL WARNINGS AND
SAFETYINSTRUCTIONS.
FAILURETO DO SO CAN
RESULT IN SERIOUS
INJURY.
Always Wear Eye Protection
CRAFTSMAN®
cc/1.3 cu. in. 2-CYCLE ENGINE
17" Semi-Automatic Head
GAS WEEDWACKER ®
• Assembly
• Operation
- Customer Responsibilities
• Service and Adjustments
• Repair Parts
Sears, Roebuck and Co., Hoffman Estates, IL 60179 U.S.A.
530-083680-1-03/16/95
SAFETY RULES
I& AUTION; ALWAYS DISCONNECT SPARK PLUG WIRE AND PLACE WIRE WHERE IT CANNOT CON-/
OPERATOR SAFETY " Donotsmokeorallowsmokingnearfuel or the unitor
• Always wear safety eye protection
• Always wear long pants, long sleeves, boots and
gloves_ Wearing safety leg guards is recommended.
Do not go barefoot or wear sandals, short pants, short
sleeves_ Being fully covered helps to protect you from
pieces of toxic plants thrown by the cutting head_
• Secure hair so it is above shoulder length. Secure
loose clothing, jewelry, or clothing with loosely hang-
ing ties, straps, tassels, etc.; they can be caught in
moving parts_
• Do not operate this unit when you are tired, ill, or
under the influence of alcohol, drugs, or medication
• Wear hearing protection if you use this unit for more
than 1-1/2 hours per day.
• Never start or runthe engine inside a closed room or
building Breathing exhaust fumes can kill
Keep handles free of oil and fuel
• If situations occur which are not covered in this
manual, use care and good judgement
UNIT/MAINTENANCE SAFETY
Look for and replace damaged or loose parts before
each use. Look for and repair fuel leaks before use
Keep the unit in good working condition.
• Use only 080" diameter monofilament line Never use
wire, rope, string, etc.
Keep the cutting line at the proper length
Make sure the unit is maintained and assembled cor-
rectly as listed in this manual
Install the required shield properly before using the
unit
Use only the specified trimmer head.
• Make carburetor adjustments with the lower end sup-
ported to prevent the trimmer line from contacting any
object Hold unit by hand.
• Keep others away when making carburetor adjust-
ments
• Use only good quality SEARS accessories as recom-
mended for this unit
FUEL SAFETY
• Mix and pour fuel outdoors Store unitso the line limiter cannot accidentally cause
• Keep away from sparks or flames injury
• Use a container approved for fuel • Store the unit out of the reach of children
Exposuretovibrationsthroughprolongeduse ofgasolinepoweredhandunitscouldcausebloodvesselor nerve damageinthe
fingers,hands,andjointsofpeopleproneto circulationdisordersorabnormalswellings.Prolongeduseincold weatherhas been
linkedtobloodvesseldamage in otherwisehealthypeople,tfsymptomsoccursuchasnumbness,pain,lossof strength,change
inskin color or texture,or loss of feelinginthe fingers,handsor joints,discontinuetheuseof thisunitand seek medicalatten-
tion.An anti-vibrationsystemdoes not guaranteethe avoidanceof theseproblemsUserswhooperatepowertoolson a continu-
al and regularbasismustmonitor closelytheirphysicalconditionand theconditionofthis unit.
TACT SPARK PLUG TO PREVENT ACCIDENTAL STARTING WHEN SETTING UP, TRANSPORTING,
whileusing the unit
. Wipe up all fuel spills before starting engine_
Move at least 10feet (3 meters) awayfrom fueling site
before starting engine,
o Stop engine and allow unit to cool before removing
fuel cap
CUTTING SAFETY
Inspectthe area to be cut before each use. Remove
objects (rocks,broken glass, nails, wire, string, etc)
which can be thrown or become entangled in tire
semi-automatic line head
= Keep others including children, animals, bystanders
and helpers at least 50 feet (15 meters) away Stop
the engineimmediatelyifyou are approached.
o Always keeptheengine onthe right-hand sideof your
body
o Holdthe unitfirmly with both hands_
• Keep firm footing and balance Do not over-reach
• Keep thesemi=automatic line head below waist level,
o Do not raisethe engineabove your waist
• Keep allpartsof your body away from semi-automatic
line headandmufflerwhen engine is running,
• Cut from your rightto yourleft
° Use onlyfor jobsexplainedin this manual
TRANSPORTING AND STORAGE
• Stop the unitbefore transporting
• Allow the engine to coo!, and secure ttle unit before
storing or transporting in a vehicle
• Empty the fuel tankbefore storing or transporting the
unit Use up any fuel left in the carburetor by starting
the engine and letting the engine run until it stops
Store unit and fuel in an area where fuel vapors can-
not reach sparks or open flames from water heaters,
electric motors or switches, furnaces, etc_
SAFETY NOTICE
JADJUSTING OR MAKING REPAIRS.
LOOK FOR THIS SYMBOL TO POINT OUT IMPORTANT SAFETY PRECAUTIONS.
IT MEANS -- A'n'ENTION!!! BECOME ALERT!!! YOUR SAFETY IS INVOLVED.
-2-
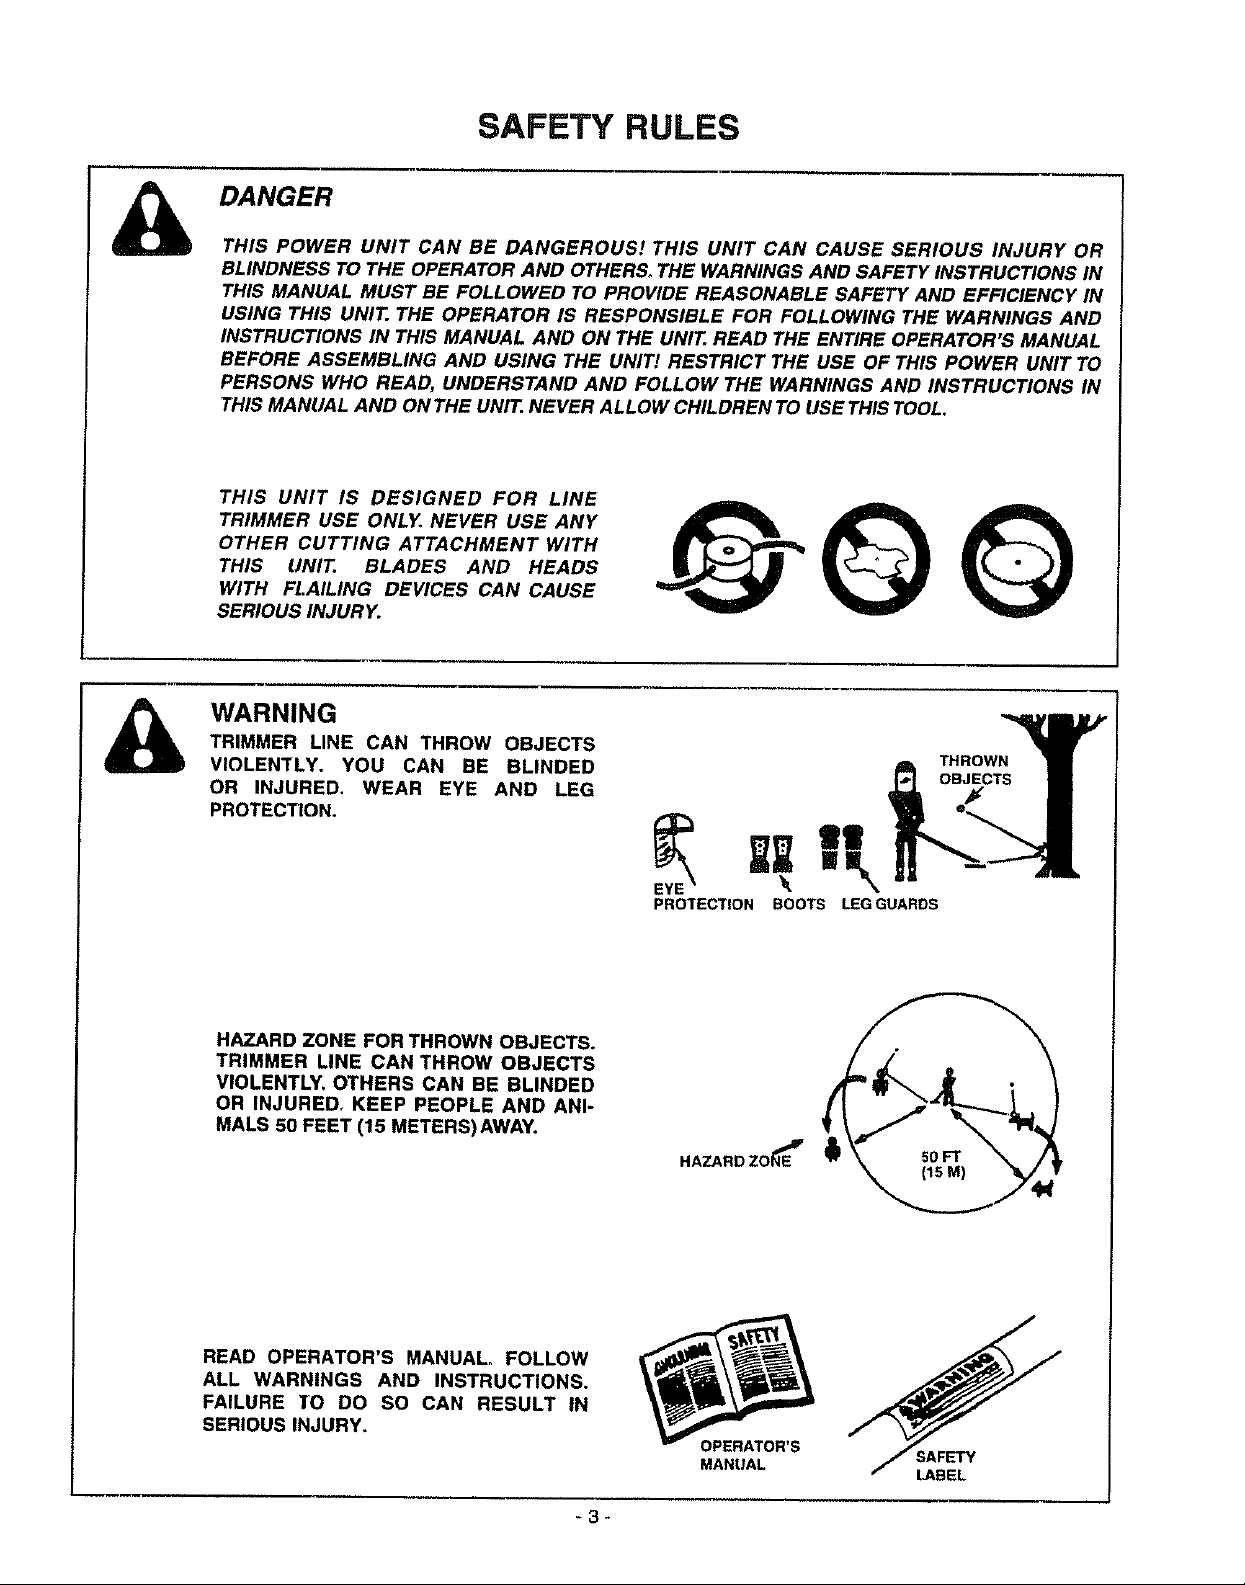
SAFETY RULES
DANGER
THIS POWER UNIT CAN BE DANGEROUS! THIS UNIT CAN CAUSE SERIOUS INJURY OR
BLINDNESS TOTHE OPERATOR AND OTHERS. THE WARNINGS AND SAFETY INSTRUCTIONS IN
THIS MANUAL MUST BE FOLLOWED TO PROVIDE REASONABLE SAFETY AND EFFICIENCY IN
USING THIS UNIT. THE OPERATOR IS RESPONSIBLE FOR FOLLOWING THE WARNINGS AND
INSTRUCTIONS IN THIS MANUAL AND ON THE UNIT. READ THE ENTIRE OPERATOR'S MANUAL
BEFORE ASSEMBLING AND USING THE UNIT! RESTRICT THE USE OF THIS POWER UNIT TO
PERSONS WHO READ, UNDERSTAND AND FOLLOW THE WARNINGS AND INSTRUCTIONS IN
THIS MANUAL AND ONTHE UNriP.NEVER ALLOW CHILDREN TO USE THIS TOOL.
THIS UNIT IS DESIGNED FOR LINE
TRIMMER USE ONLY, NEVER USE ANY
OTHER CUTTING ATTACHMENT WITH
THIS UNIT. BLADES AND HEADS
WITH FLAILING DEVICES CAN CAUSE
SERIOUS INJURY.
000
WARNING
TRIMMER LINE CAN THROW OBJECTS
VIOLENTLY. YOU CAN BE BLINDED
OR INJURED. WEAR EYE AND LEG
PROTECTION.
HAZARD ZONE FOR THROWN OBJECTS.
TRIMMER LINE CAN THROW OBJECTS
VIOLENTLY. OTHERS CAN BE BLINDED
OR INJURED_ KEEP PEOPLE AND ANI-
MALS 50 FEET (15 METERS)AWAY.
PROTECTION
HAZARD ZO E_
IIII
BOOTS LEG GUARDS
READ OPERATOR'S MANUAL. FOLLOW
ALL WARNINGS AND INSTRUCTIONS.
FAILURE TO DO SO CAN RESULT IN
SERIOUS INJURY.
CONGRATULATIONS on your purchase of a Sears
Craftsman Gas Weedwacker. It has been designed,engi-
neered and manufactured to give you the best possible
dependabilityand performance.
PRODUCT SPECIFICATIONS
CUTTING PATH .................. 17"
TRIMMER LINE ....................080" Diameter
Should you experience any problems you cannot easily
remedy, please contact your nearest Sears Service Cen-
terJDepartment, Sears has competent, well trained techni-
cians and the proper tools to service or repair this unit..
Please read and retain this manual. The instructionswill
enable you to assemble and maintain your unit properly.
Always observe the "SAFETY RULES/'
MODEL NUMBER: 358°798441
DATE CODE/SERIAL NO.:
DATE OF PURCHASE:
THE MODEL AND SERIAL NUMBER WILL BE FOUND
ON THE PRODUCT
YOU SHOULD RECORD BOTH SERIAL NUMBER
AND DATE OF PURCHASE AND KEEP IN A SAFE
PLACE FOR FUTURE REFERENCE
MAINTENANCE AGREEMENT
A Sears Maintenance Agreement'is available on this prod-
uct Contact your nearest Sears Store for details
CUSTOMER RESPONSIBILITIES
Read and observe the safety rules_
Follow a regular schedule in maintaining, caring for, and
using your unit
Follow the instructions under "Customer Responsibili-
ties" and "Storage" sections of this Operator's Manual.
SEMI-AUTOMATIC
HEAD ROTATION...............Counterclockwise
(for operator)
ENGINE................................21cc, 2..cycle Air Cooled
FUEL!OIL MIX RATIO...... 40:t (3.2 ez. oil per gallon
gas)
IGNITION.....................................Solid State
(air gap .010" to .014")
IGNITION TIMING .................Non-adjustable, Fixed
SPARK PLUG ..........................Champion (RCJ-aY)
SPARK PLUG GAP ................025" (6rnm)
ENGINE RPM..........................8,000 RPM Max
SPECIAL NOTICE
ForusersonU.S ForestLandandin somestates, including
California (Public ResourcesCodes4442 and4443), Idaho,
Maine.Minnesota_NewJersey,Oregon,and Washington:
Certain internalcombustionenginesoperated on forest.
brush, and/orgrass-coveredlandsin theabove areas are
requiredtobeequippedwitha sparkarrestor,maintained in
effectiveworkingorder,orthe enginemust be constructed,
equipped,andmaintainedfor thepreventionof fire. Check
withyourstateor localauthoritiesfor regulationspertaining
totheserequirementsFailuretofollow theserequirements
isaviolationofthelaw Thisunitisnotfactory-equippedwith
asparkarrestor;however,a sparkarrestorisavailableasan
optionalpart Ifasparkarrestorisrequiredinyourarea, con-
tactyourSEARSServiceCenter/Departmentfor thecorrect
kit.
Ma_ulacluted _n_tet one ot mote of Ihe fotlow_ng US patenls: 5 383_427; 5,367.986
5 345 684.5 343 631; 6 376 968; 6269 663; 6 020,223:4 940 026; 4 897 923; 4 852 258:
4 846,123 4 84t 926. 4 635867; 4825 548: 4633465; 4 819 742, 4 796 f85:4 506 066;
4 483,069. 4 451 963:4 366,623:4366 62t; 4 352243; 4 347 _66; 4 290 200; 4 266.675:
4 236.3t 2; 4,177561; 4,172.322: 4.167,812; 4.162.675; 4.161,820; 4 122 653; 4,104,797:
Re 33.266:C3_4 088; O334C51; 0304 196; C276 160 Olhet U S and foreign patents
pendln6
FULL ONE YEAR WARRANTY ON CRAFTSMAN GAS-POWERED
WEEDWACKER ®LINE TRIMMER
For one year from the date of purchase, when this Craftsman Gas-Powered Weedwacker_ LineTrimmer is maintairled
lubricated and tuned-up according to the operating and maintenance instructions in the operator's manual, Sears will
repair, free of charge, any defect in materials or workmanship.
This warranty excludes nylon line, spark plug, and air filter, whichare expendable parts and become worn during nor-
mal use.
If this Weedwacker_ Line Trimmeris used for commemia! purposes, thiswarrantyapplies for only 90 days from the date
of purchase. Ifthis Weedwacker_LineTrimmerisusedfor rentalpurposes,thiswarrantyappliesfor only 30 days from
date of purchase.This warranty appliesonly while thisproductis in usein the UnitedStates.
WARRANTY SERVICE IS AVAILABLE BY RETURNING THE WEEDWACKER®LINE TRIMMER TO THE NEARES"
SEARS SERVICE CENTER IN THE UNITED STATES.
This warranty gives you specific legal dghts, and you mayalso have other rightswhich vary from state to state.
SEARS, ROEBUCK AND CO., DI817WA,HOFFMAN ESTATES, IL 60179
-4-
i i
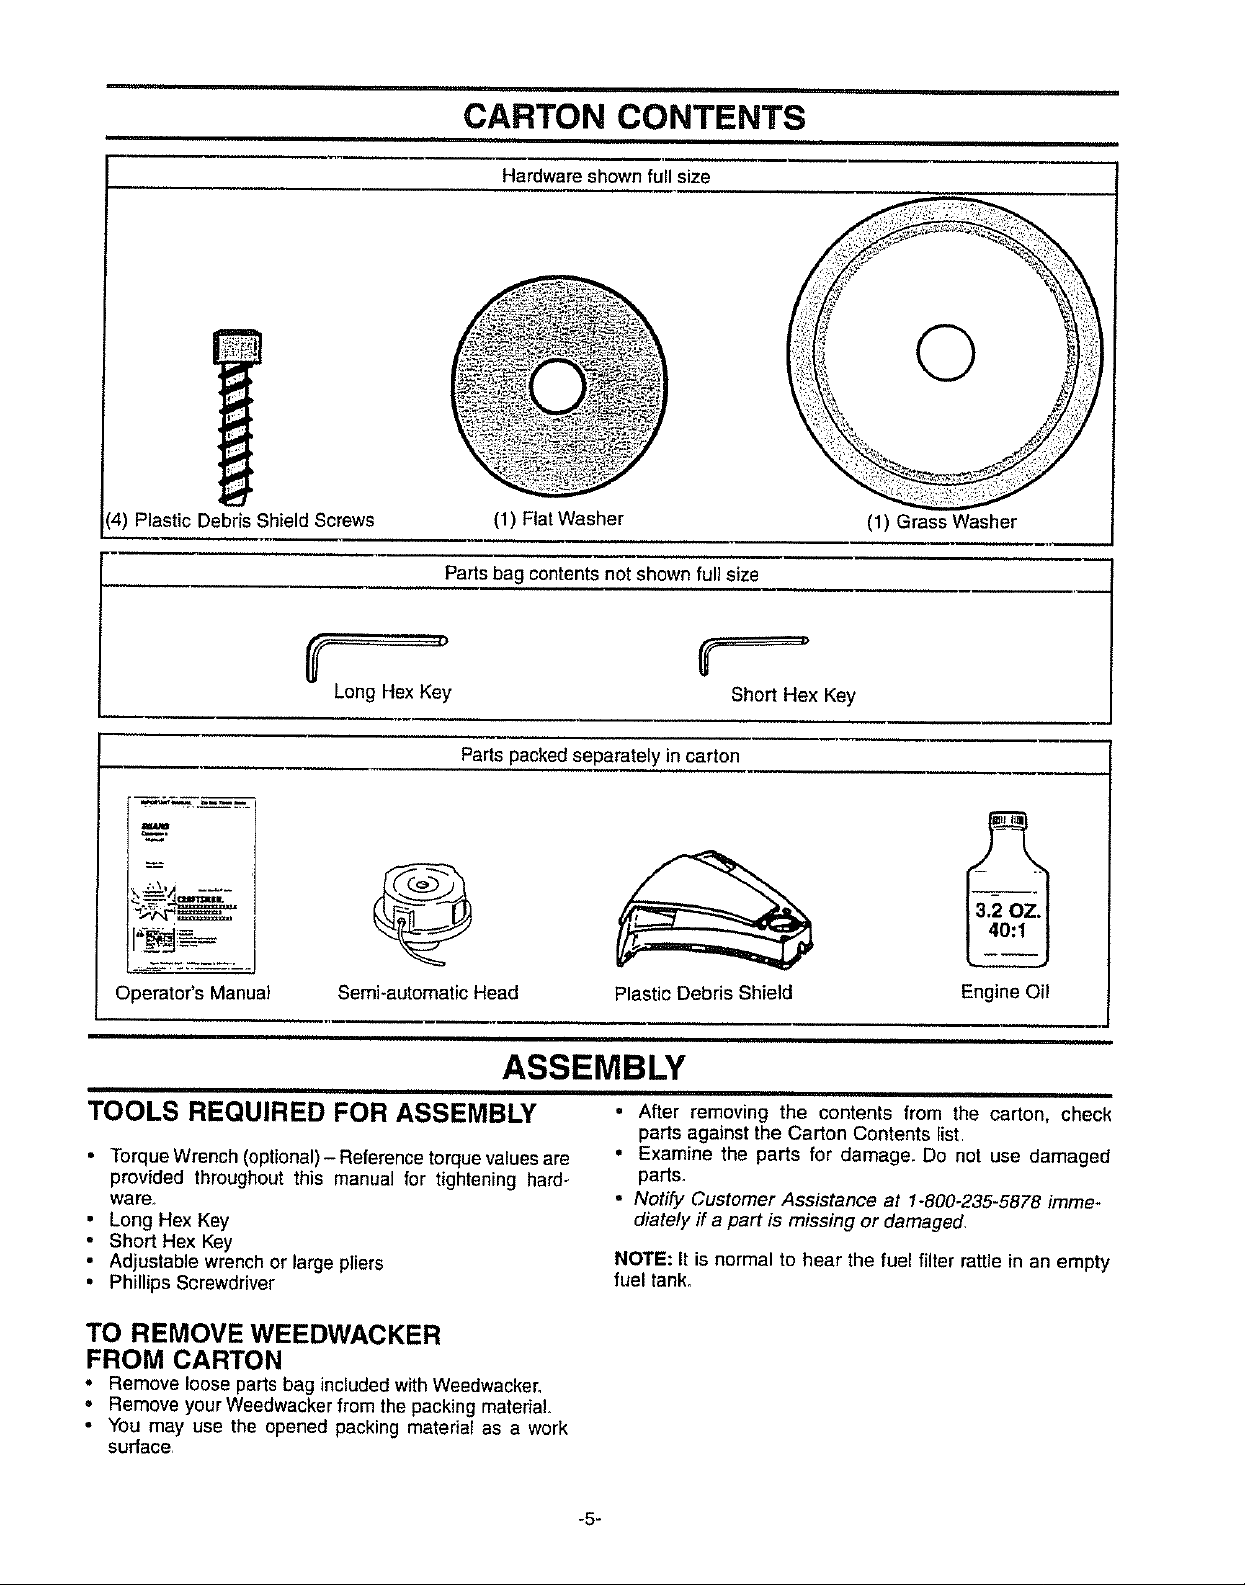
CARTON CONTENTS
Hardwareshownfull size
14)Plastic Debris Shield Screws (1) Flat Washer (1) Grass Washer
Parts bag contents not shown full size
Long HexKey Short Hex Key
Parts packed separately in carton
1_,3¸- :=
Operator's Manual
©
Semi-automatic Head
ASSEMBLY
TOOLS REQUIRED FOR ASSEMBLY
• Torque Wrench (optional)- Reference torque valuesare
provided throughout this manual for tightening hard-
ware,,
• Long Hex Key
• Short Hex Key
• Adjustable wrench or large pliers
• Phillips Screwdriver
TO REMOVE WEEDWACKER
FROM CARTON
• Remove loose partsbag included withWesdwacker,
• Remove your Weedwackerfrom thepackingmaterial
• You may use the opened packing material as a work
surface
Plastic Debris Shield Engine Oil
• After removing the contents from the carton, check
parts against the Carton Contents list
• Examine the parts for damage. Do not use damaged
parts.
• Notify Customer Assistance at 1-800-235-5878 imme-
diately if a part is missing or damaged,
NOTE: It is normal to hear the fuel filter rattle in an empty
fuel tank,
-5-
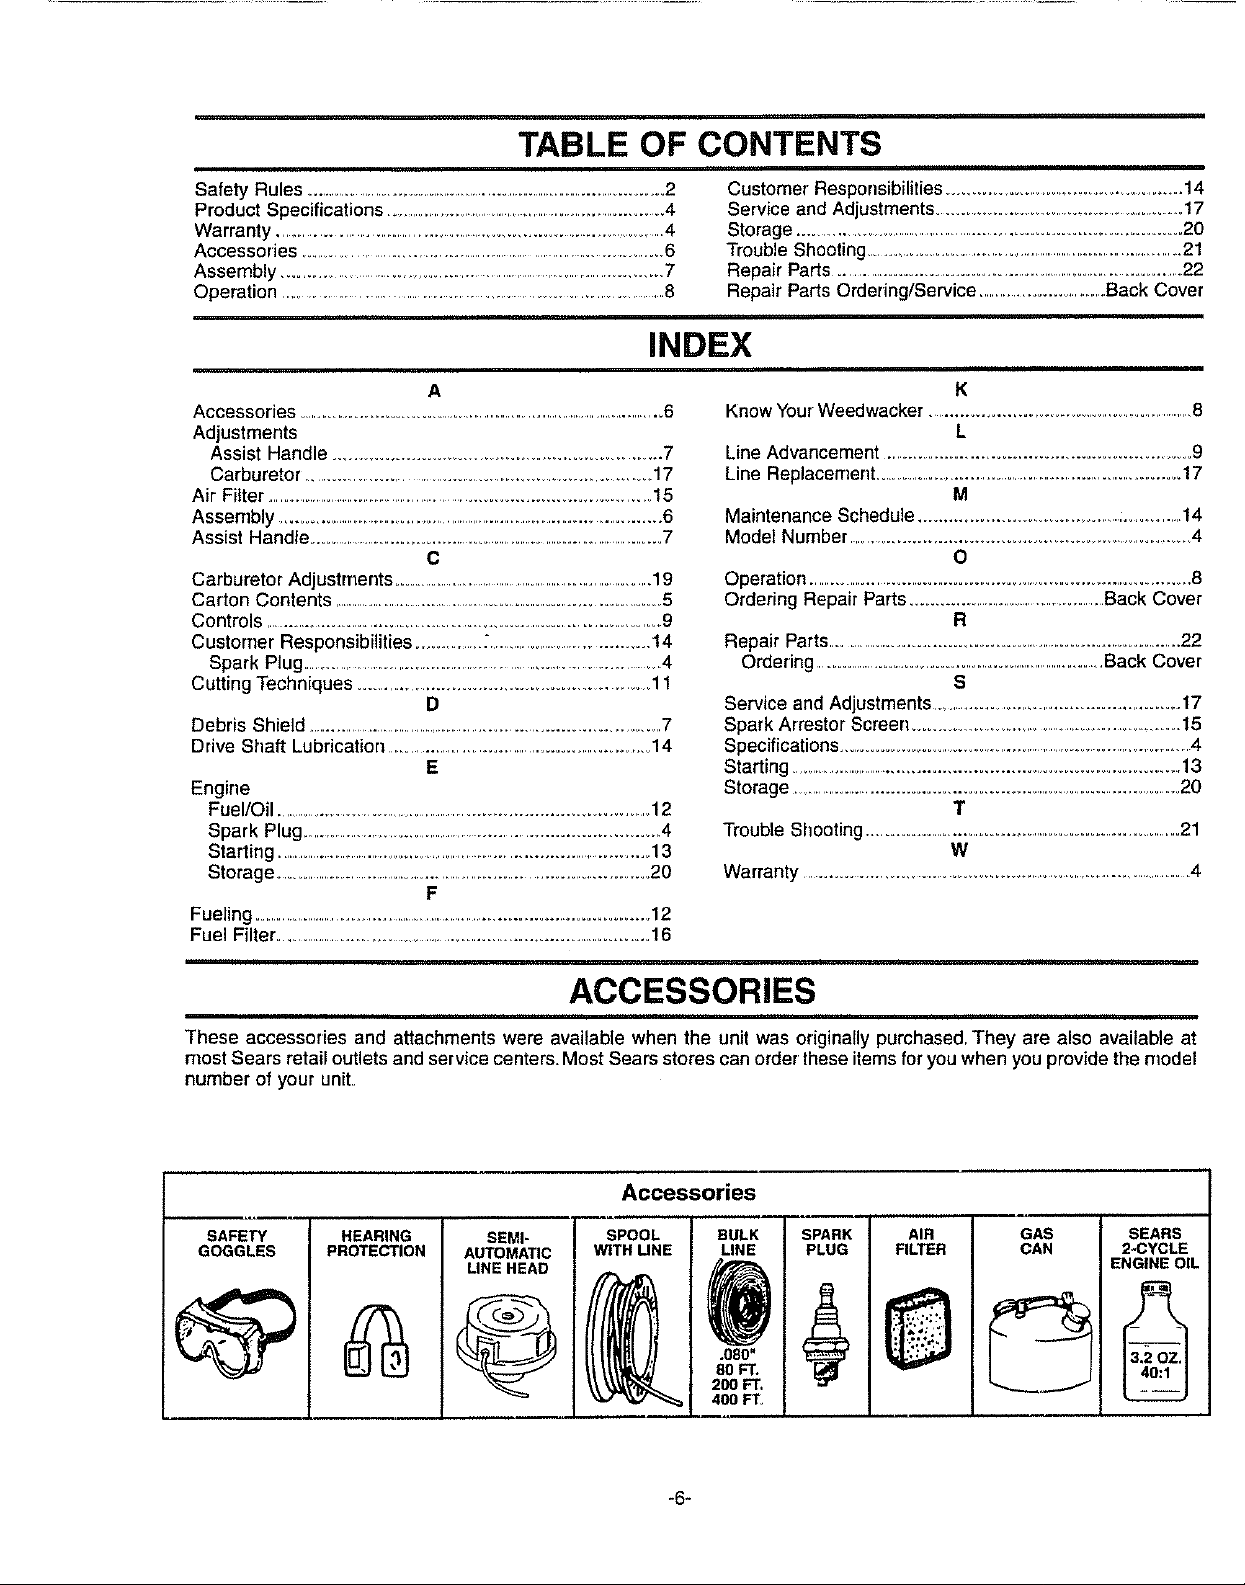
TABLE OF CONTENTS
Safety Rules ..............................................................................................2 Customer' Responsibilities ....................................................14
Product Specifications .........................................................................4 Service and Adjustments ...............................................................17
Warranty ................................................................................................4 Storage ......................................................................................20
Accessories ...............................................................................................6 TroubleShooting.....................................................................................21
Assembly ...............................................................................................7 Repair Parts.................................................................................22
Operation .....................................................................................................8 Repair Parts Ordering/Service .................................Back Cover
iNDEX
A
Accessories..............................................................................................6
Adjustments
Assist Handle ................................................................. 7
Carburetor ..............................................................................17
Air Filter ....................................................................................................15
Assembly .......................................................................................................6
Assist Handle ...................................................................................................7
C
Carburetor Adjustments .......................................................................19
Carton Contents .........................................................................................5
Controls ..........................................................................................9
Customer Responsibilities ..................:..........................................14
Spark Plug .....................................................................................................4
Cutting Techniques ...............................................................11
D
Debris Shield ...........................................................................................7
Drive Shaft Lubrication...............................................................14
E
Engine
Fuel/Oil .........................................................................................12
Spark Plug......................................................................................4
Starting ..............................................................................................13
Storage ............................................................................................20
F
Fueling ......................................................................................................12
Fuel Filter ..................................................................................................16
K
KnowYourWeedwacker ............................................................8
L
Line Advancement .................................................................9
Line Replacement....................................................................................17
M
Maintenance Schedule ...........................................:................14
Model Number ...............................................................................4
O
Operation ......................................................................................8
Ordering Repair Parts..................................................Back Cover
R
Repair Parts....................................................................................22
Ordering ................................................................................Back Cover
S
Service and Adjustments .......................................................17
Spark Arrestor Screen...................................................................15
Specifications..............................................................................................4
Starting .......................................................................................13
Storage .............................................................................................20
T
Trouble Shooting ...................................................................................21
W
Warranty................................................................................................4
ACCESSORIES
These accessories and attachments were available when the unitwas originally purchased, They are also available at
most Sears retail outlets and service center& Most Sears stores can order these items foryou when you provide the model
number of your unit
Accessories
SAFETY
GOGGLES
HEARING
PROTECTION
SEMI-
AUTOMATIC
LINE HEAD
©
SPOOL
WITH UNE
I
BULK AIR
LINE PLUG FILTER
.080"
80 FT.
200 FT.
400 FTo
*6-
SPARK I
GAS
CAN
SEARS
2*CYCLE
ENGINE OIL
P_
3.2oz.I
40:1 I
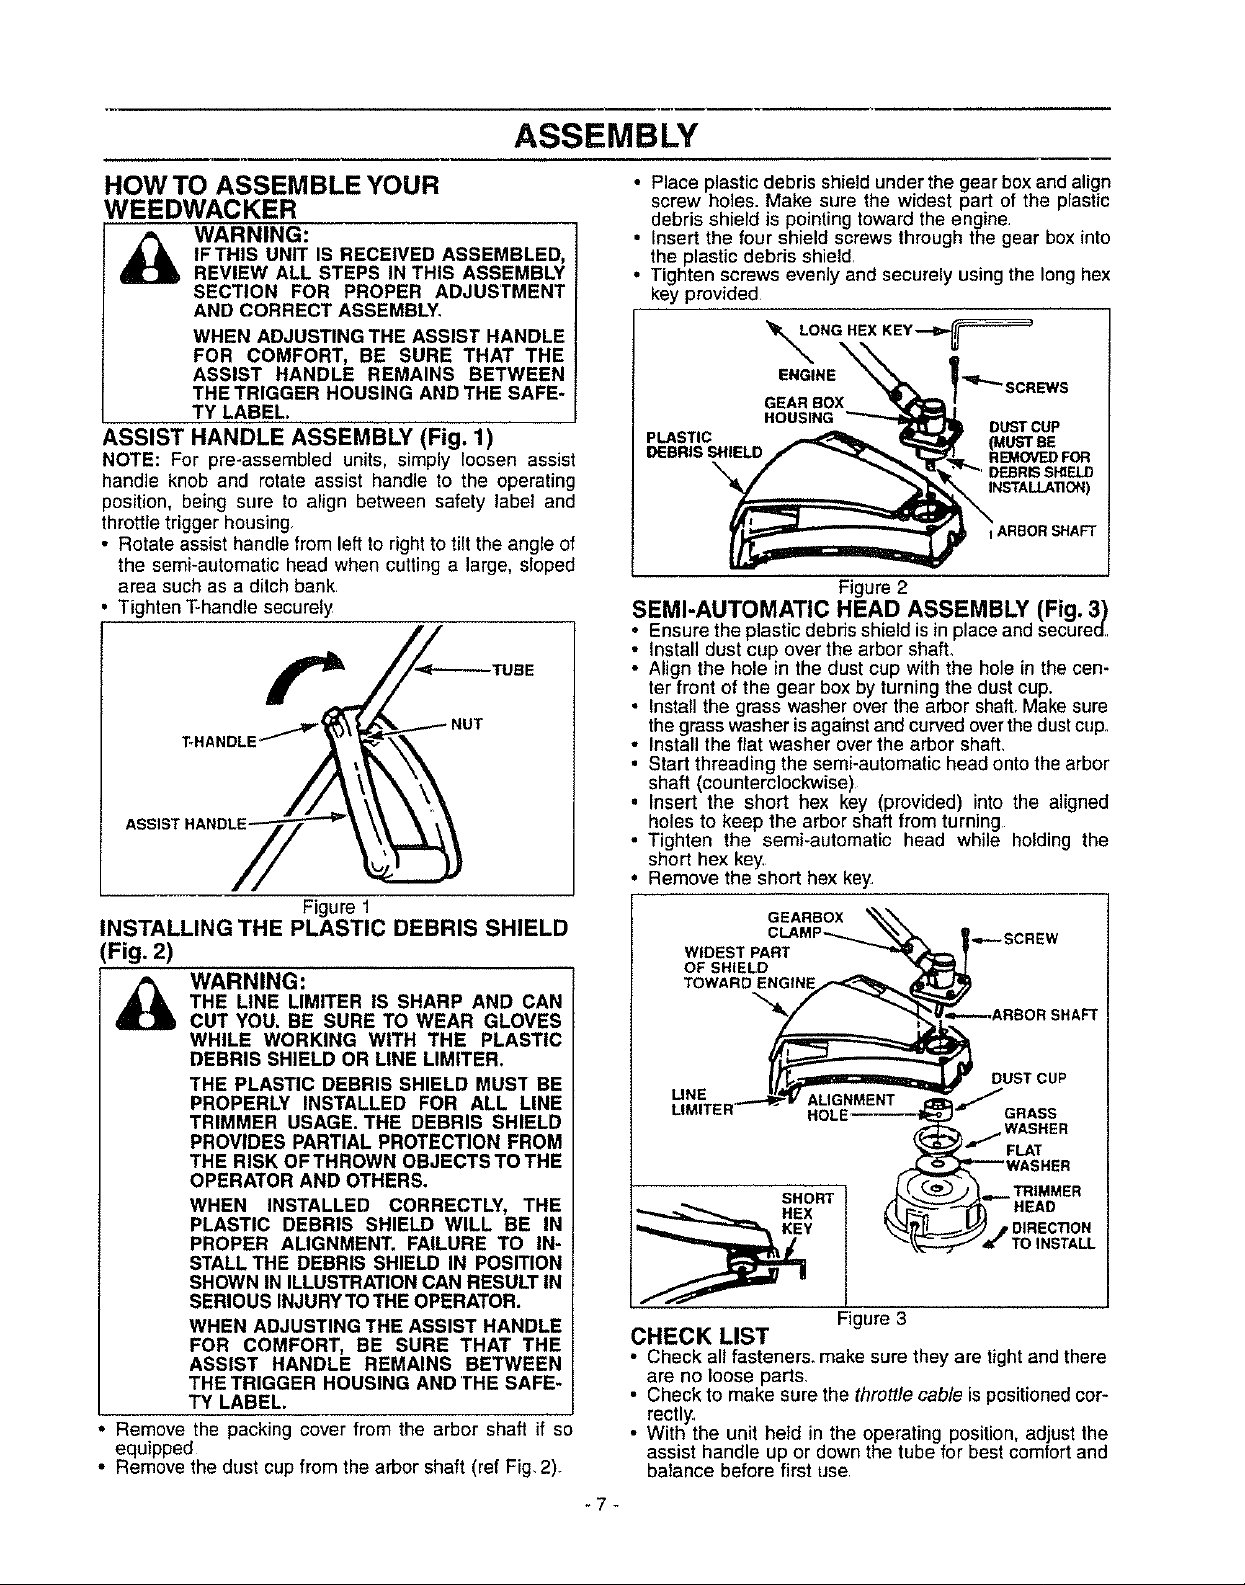
ASSEMBLY
HOW TO ASSEMBLE YOUR
WEEDWACKER
i_ WARNING:
ASSIST HANDLE ASSEMBLY (Fig. 1)
NOTE: For pre-assembled units, simply loosen assist
handle knob and rotate assist handle to the operating
position, being sure to align between safety label and
throttte trigger housing
• Rotate assist handle from left to right to tilt the angle of
the semi-automatic head when cutting a large, sloped
area such as a ditch bank
Tighten T-handle securely
IF THIS UNIT IS RECEIVED ASSEMBLED,
REVIEW ALL STEPS IN THIS ASSEMBLY
SECTION FOR PROPER ADJUSTMENT
AND CORRECT ASSEMBLY.
WHEN ADJUSTING THE ASSIST HANDLE
FOR COMFORT, BE SURE THAT THE
ASSIST HANDLE REMAINS BETWEEN
THE TRIGGER HOUSING AND THE SAFE-
TY LABEL.
r
INSTALLING THE PLASTIC DEBRIS SHIELD
(Fig. 2)
Figure 1
• Place plastic debris shield under the gear box and align
screw holes. Make sure the widest part of the plastic
debris shield is pointing toward the engine.
• insert the four shield screws through the gear box into
the plastic debris shield,
• Tighten screws evenly and securely using the long hex
key provided
GEAR BOX
PLASTIC
DEBRIS SHIELD
SEMI-AUTOMATIC HEAD ASSEMBLY (Fig. 3)
Ensure the plastic debris shield isin place and securao.
• install dust cup over the arbor shall
Align the hole in the dust cup with the hole in the cen-
ter front of the gear box by turning the dust cup.
• Install the grass washer over the arbor shaft. Make sure
the grasswasher is againstand curved overthe dustcup.
• Install the flat washer over the arbor shaft.
• Start threading the semi-automatic head onto the arbor
shaft (counterclockwise)
• Insert the short hex key (provided) into the aligned
holes to keep the arbor shaft from turning
• Tighten the semi-automatic head while holding the
short hex key.
Remove the short hex key
WIDEST PART
OF SHIELD
HOUSING
Figure 2
GEARBOX
DUST CUP
REMOVEDFOR
INSTALLATION)
I ARBOR SHAFT
i_ WARNING:
Remove the packing cover from the arbor shaft if so
equipped
• Remove fhe dust cup from the arbor shaft (ref Fig, 2)°
THE LINE LIMITER IS SHARP AND CAN
CUT YOU. BE SURE TO WEAR GLOVES
WHILE WORKING WITH THE PLASTIC
DEBRIS SHIELD OR LINE LIMITER.
THE PLASTIC DEBRIS SHIELD MUST BE
PROPERLY INSTALLED FOR ALL LINE
TRIMMER USAGE. THE DEBRIS SHIELD
PROVIDES PARTIAL PROTECTION FROM
THE RISK OFTHROWN OBJECTSTOTHE
OPERATOR AND OTHERS.
WHEN INSTALLED CORRECTLY, THE
PLASTIC DEBRIS SHIELD WILL BE IN
PROPER ALIGNMENT. FAILURE TO IN-
STALL THE DEBRIS SHIELD IN POSITION
SHOWN IN ILLUSTRATIONCAN RESULT IN
SERIOUS INJURYTO THE OPERATOR.
WHEN ADJUSTING THE ASSIST HANDLE
FOR COMFORT, BE SURE THAT THE
ASSIST HANDLE REMAINS BETWEEN
THE TRIGGER HOUSING AND 'THESAFE-
TY LABEL.
UNE
LIMITER"
CHECK LIST
• Check all fasteners, make sure they are tightand there
are no loose parts.
• Check to make sure the throttle cable is positioned cor-
rectly,
• With the unit hetd in the operating position, adjust the
assist handle up or down the tube for best comfort and
balance before first use
*7-
Figure 3
TRIMMER
HEAD
DIRECTION
TO INSTALL
 Loading...