

Craftsman 358797961, 358797982, 358797990, 358797922, 358797950 Owner’s Manual
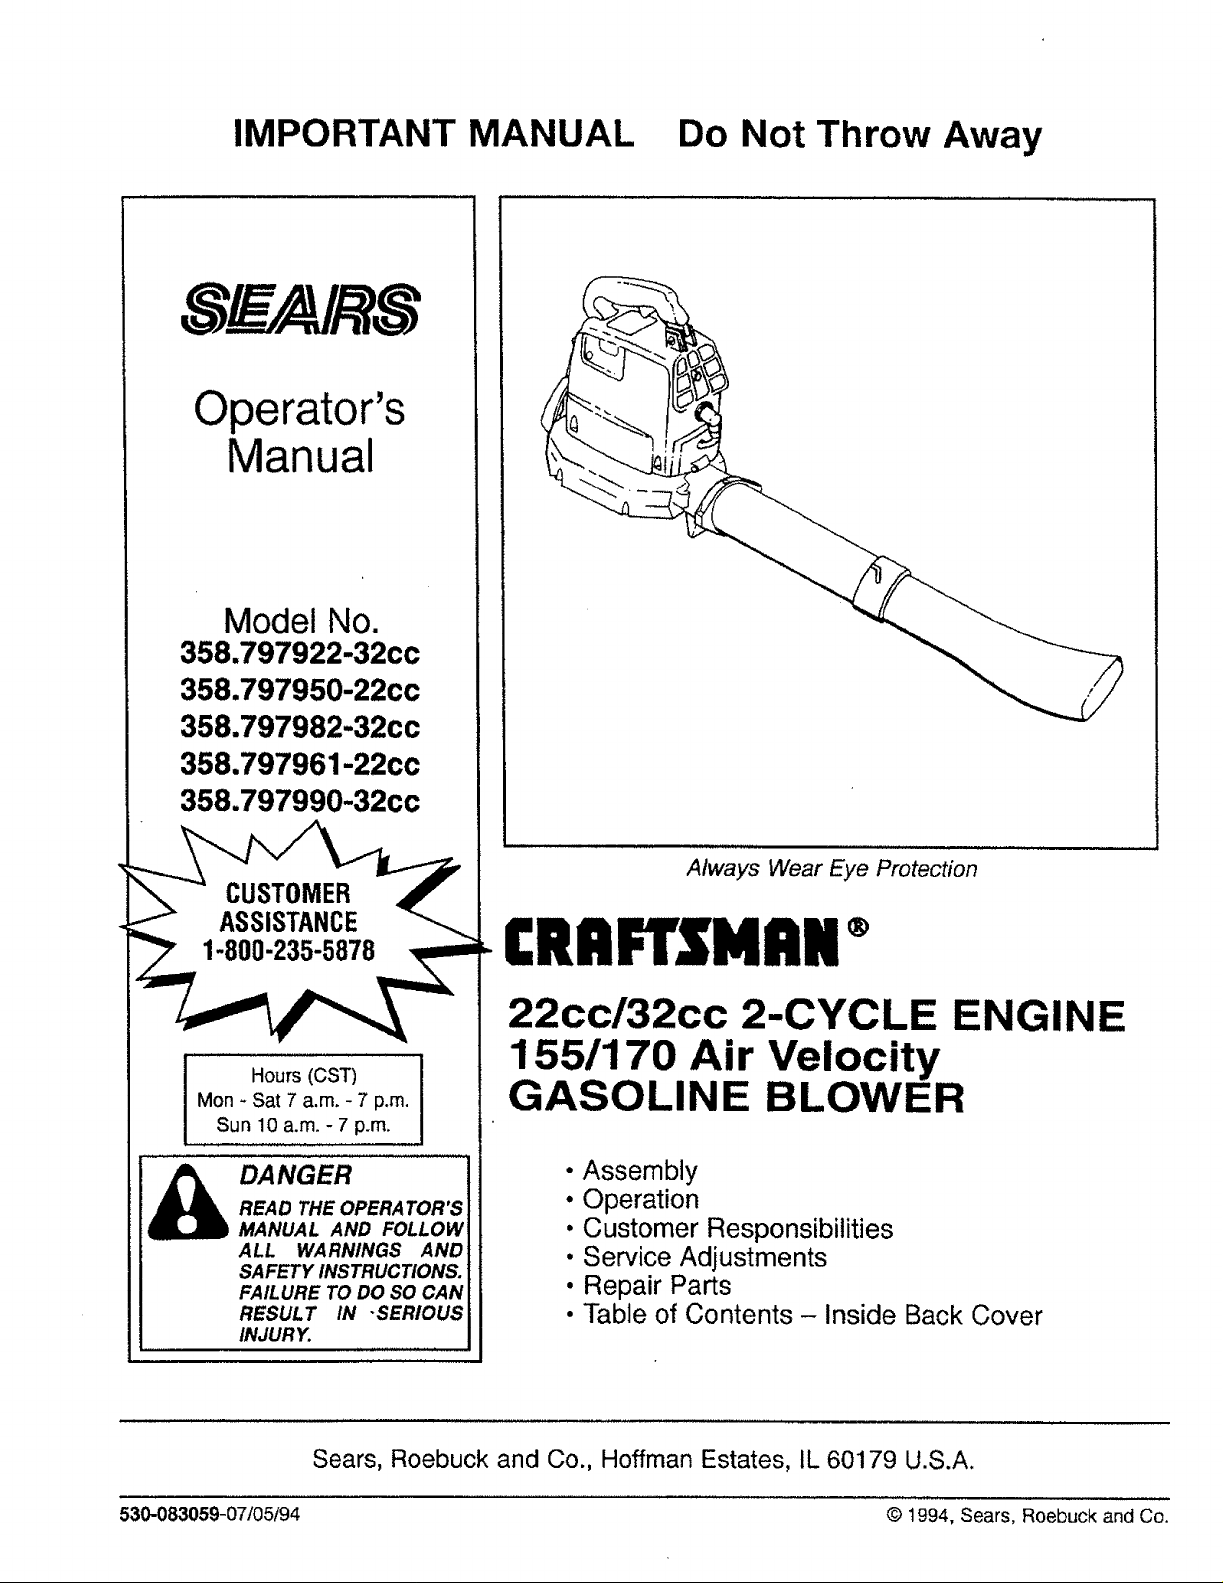
IMPORTANT MANUAL Do Not Throw Away
Operator's
Manual
Model No.
358.797922-32cc
358.797950-22cc
358.797982-32cc
358.797961-22cc
358.797990-32cc
Hours (CST)
Mon + Sat 7 a.m+- 7 p.m.
Sun !0 a.m. - 7 p.m.
_ DANGER
READ THE OPERATOR'S
MANUAL AND FOLLOW
ALL WARNINGS AND
SAFETY INSTRUCTIONS.
FAILURE TO DO SO CAN
RESULT IN "SERIOUS
INJURY.
Always Wear Eye Protection
.CRAFTSMAN®
22cc132cc 2-CYCLE ENGINE
155/170 Air Velocity
GASOLINE BLOWER
• Assembly
• Operation
• Customer Responsibilities
• Service Adjustments
• Repair Parts
° Table of Contents - Inside Back Cover
Sears, Roebuck and Co., Hoffman Estates, IL 60179 U.S.A.
530-083059-07/05t94 © t994, Sears, Roebuck and Co.

SAFETY RULES
CAUTION: ALWAYS DISCONNECT SPARK PLUG WIRE AND PLACE WIRE WHERE tT CANNOT I
i
OPERATOR SAFETY
• Always wear eye protection to preventrocks or debris
• Always wear a respirator or facemask when working
• Always wear heavy, long pants, boots, and gloves (To
• Donot operate this unit when you are tired, ill, or under
• Keep children, bystanders, and animals away from the
. Inspect the area before starting the unit. Remove all
UNIT/MAINTENANCE SAFETY
• Have all maintenance other than the recommended
° Disconnect spark plug before performing maintenance
• Use only genuine replacement parts as recommended
• Check air intake openings, blower tubes, elbow tube,
• Do not use an accessory andlor attachment other than
FUEL SAFETY
• Mix and pour fuel outdoors.
• Keep away from sparks or flames.
• Use a container approved for fuel.
• Do not smoke or allow smoking near fuel or the unit or
• Wipe up all fuel spills before starting engine.
, Move at least t0 feet (3 meters) away from fueling site
• Stop engine and allow unit to cool before removing fuel
OPERATION SAFETY
• Stop the engine before opening the vacuum inlet door
Exposure to vibrationsthrough prolonged use of gasoline powered hand units could cause blood vessel or nerve damage in the
fingers, hands, and wrists of people prone to circulation disorders or abnormal swellings. Prolonged use incold weather has been
linked to blood vessel damage in otherwise healthy people, tf symptoms occur such as numbness, pain, loss of strength, change
in skin color or texture, or loss of feeling in the fingers, hands or wrists, discontinue the use of this unit and seek medical atten-
tion. An anti-vibration system does not guarantee the avoidance of these problems. Users who operate power toolson a continu-
aJand regular basis must monitor closeJy their physical condition and the condition of this unit.
CONTACT SPARK PLUG TO PREVENT ACCIDENTAL STARTING WHEN SETTING UP.t
TRANSPORTING, ADJUSTING OR MAKING REPAIRS.
from being blownor ricocheting into eyes and face which
can result in blindness and!or other serious injury.
with the unit in dusty' environments.
avoid shock of static electricity, do not wear rubber
gloves). Do not go barefoot or wear short pants, san-
dais, jewelry, loose clothing, or clothing with loosely
hanging straps, ties, tassels, etc.; they can be caught in
moving parts. Secure hair so it is above shoulder
length.
the influence of alcohol, drugs, or medication.
work area at a minimum of 30 feet when starting or
operating the unit.
debris and hard objects such as rocks, glass, wire, etc.
that can ricochet, be thrown, or otherwise cause injury
or damage during operation.
procedures described in the Operator's Manual per-
formed by your Sears Service Center.
except for carburetor adjustment.
bySears to avoid creating a hazard and/or voiding your
warranty.
and vacuum tubes frequently, always with the engine
stopped. Keep vents and tubes free of debris whichcan
accumulate and restrict proper air flow.
those recommended by Sears with your unit.
while using the unit.
before starting engine.
cap.
or attempting to insert or remove the vacuum tubes.
The engine must be stopped and the impeller blades
SAFETY NOTICE
no longer turning to avoid serious injury from the rotat-
ing blades.
• Inspect the entire unit before each use for worn, loose,
missing, or damaged parts. Do not use untit the unit is
in proper working order.
° Keep the outside surfaces free of oil and fuel.
• Never start or run unit inside a closed room or building.
Breathing exhaust fumes can kill.
• Never use for spreading chemicals, fertilizers, or any
other material which may contain toxic substances.
• Do not set the unit on any surface except a clean, hard
area to start the engine or while the engine is running.
Debris such as gravel, sand, dust, grass, etc. could be
picked up by the air intake and thrown out through the
discharge opening, damaging the unit, property, or
causing serious injury to bystanders or the operator.
• Avoid dangerous environments. Do not use in unventi-
lated areas or where explosive vapors or carbon
monoxide build up could be present.
, Avoid situations which could set the vacuum bag on
fire. Do not vacuum discarded cigars or cigarettes or
ash from fireplaces, barbecue pits, brush piles, etc. To
avoid spreading fire, do not use blower near leaf or
brush fires, fireplaces, barbecue pits, ashtrays, etc.
• Do not overreach or use from unstable surfaces such
as ladders, trees, steep slopes, rooftops, etc. Use extra
care when cleaning on stairways. Keep firm footing and
balance at all times.
• Never place objects inside the blower tubes; always
direct the blowing debris away from people, animals,
glass, and solid objects such as trees, automobiles,
walls, etc. The force of air can cause rocks, dirt, or
sticks to be thrown or to ricochet which can hurt people
or animals, break glass, or cause other damage. Do not
allow the unit to be used as a toy.
- Never place any object in the air intake opening as this
could restrict proper air flow and cause damage to the
unit.
° Never run unit without the proper equipment attached.
When used as a blower, always install a blower tube.
When used as a vacuum, always install vacuum tubes
and vacuum bag assembly.
• Use only for jobs explained in this manual.
TRANSPORTING AND STORAGE
• Stop the unit before transporting.
• Allow the engine to cool, and secure the unit before
storing or transporting in a vehicle.
• Empty the fuel tank before storing or transporting the
unit. Use up any fuel left in the carburetor by starting
the engine and letting the engine run until it stops.
- Store unit and fuel in an area where fuel vapors cannot
reach sparks or open flames from water heaters, elec-
tric motors or switches, furnaces, etc.
• Store the unit out of the reach of children.
1
I ,, LOOK FOR THIS SYMBOL TO POINT OUT IMPORTANT SAFETY PRECAUTIONS.
dl3k
IT MEANS -- ATTENTION!!! BECOME ALERT!!] YOUR SAFETY IS INVOLVED.
-2-
SAFETY RULES
WARNING
THIS POWER UNIT CAN BE DANGEROUS! THIS UNIT CAN CAUSE SERIOUS INJURY OR
BLINDNESS TO THE OPERATOR AND OTHERS. THE WARNINGS AND SAFETY
INSTRUCTIONS IN THIS MANUAL MUST BE FOLLOWED TO PROVIDE REASONABLE
SAFETY AND EFFICIENCY IN USING THIS UNIT. THE OPERATOR IS RESPONSIBLE FOR
FOLLOWING THE WARNINGS AND INSTRUCTIONS IN THIS MANUAL AND ON THE UNIT.
READ THE ENTIRE OPERATOR'S MANUAL BEFORE ASSEMBLING AND USING THIS
UNIT! RESTRICT THE USE OF THE POWER UNIT TO PERSONS WHO READ, UNDER-
STAND AND FOLLOW THE WARNINGS AND INSTRUCTIONS IN THIS MANUAL AND ON
THE UNIT.
THIS UNIT IS DESIGNED FOR BLOWER
AND VACUUM USE ONLY. NEVER USE
ANY OTHER ATTACHMENTS WiTH THIS
UNIT EXCEPT THE OPTIONAL GUTTER
ATTACHMENT.
BLOWER CAN THROW OBJECTS VIO-
LENTLY. YOU CAN BE BLINDED OR
INJURED. WEAR EYE AND LEG PROTEC-
TION.
THIS IS THE HAZARD ZONE FOR BLOWN
OBJECTS. BLOWER CAN THROW
OBJECTS VIOLENTLY. OTHERS CAN BE
BLINDED OR INJURED. KEEP PEOPLE AND
ANIMALS 30 FEET (10 METERS)AWAY.
THROWN_r
OBJECTS I
FACE
SHIELD
30 FOOT
(10 METERS)
HAZARD ZONE
READ OPERATOR'S MANUAL. FOLLOW
ALL WARNINGS AND INSTRUCTIONS.
FAILURE TO DO SO CAN RESULT IN
SERIOUS INJURY.
OPERATOR'S
MANUAL
_3-
CONGRATULATIONSon yourpurchaseof a Sears
CraftsmanGasolineBlower.Ithasbeendesigned,engi-
neeredandmanufacturedtogiveyouthebestpossible
dependabilityandperformance.
Should you experience any problems you cannot easily
remedy, please contact your nearest Sears Service
Center/Department or Call the 1-800 number listed on
the front of this manual. Sears has competent, well
trained technicians and the proper tools to service or
repair this unit.
Please read and retain this manual, The instructions will
enable you to assemble and maintain your unit properly.
Always observe the "SAFETY RULES."
MODEL NUMBERS:
SERIAL NUMBER:
DATE OF PURCHASE:
THE MODEL AND SERIAL NUMBER WILL BE FOUND
ON THE PRODUCT.
YOU SHOULD RECORD BOTH SERIAL NUMBER
AND DATE OF PURCHASE AND KEEP IN A SAFE
PLACE FOR FUTURE REFERENCE.
MAINTENANCE AGREEMENT
A Sears Maintenance Agreement is available on this
product. Contact your nearest Sears Store for details.
CUSTOMER RESPONSIBILITIES
• Read and observe the safety rules.
• Followa regularschedule in maintaining, caring for, and
using your unit.
• Follow the instructions under "Customer Responsibili-
ties" and "Storage" sections of this Operator's Manual,
358.797922
358.797950
358.797982
358.797961
358.797990
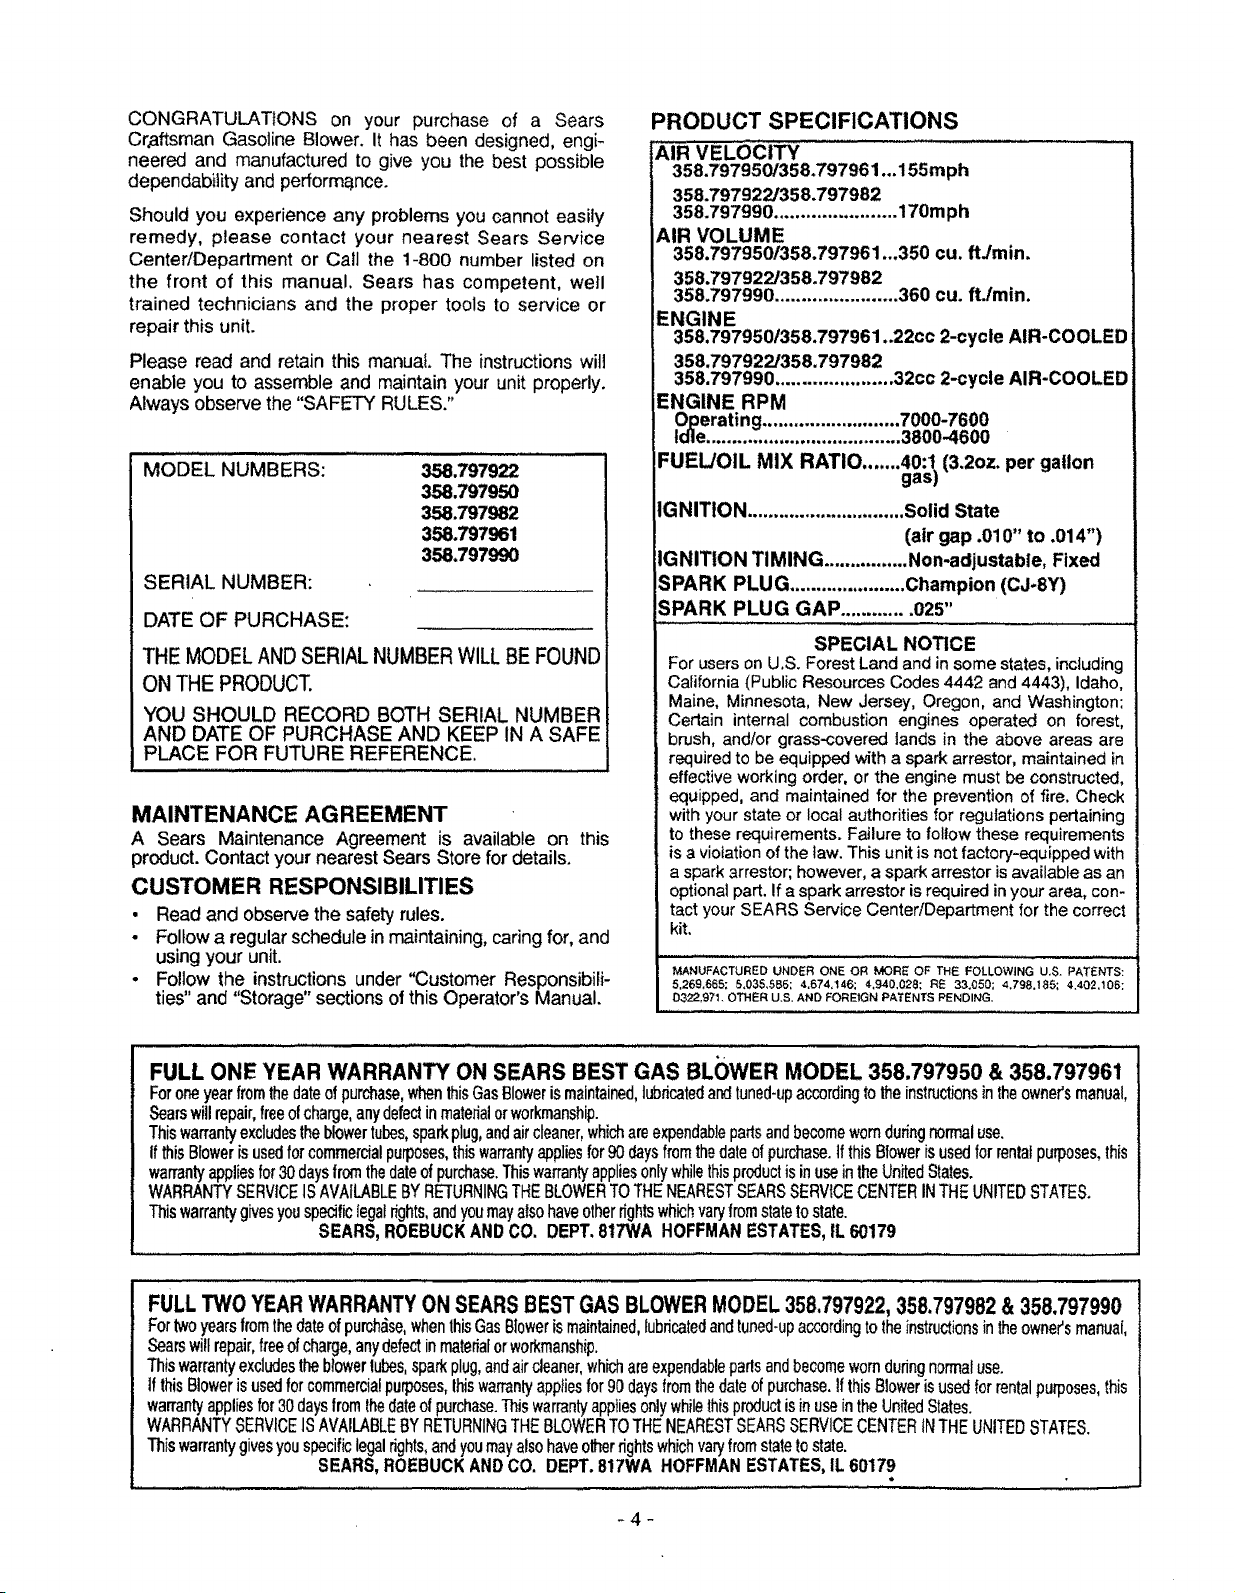
PRODUCT SPECIFICATIONS
AIR VELOCITY
358.797950/358.797961 ...155mph
358.797922/358.797982
358.797990 ....................... 170mph
AIR VOLUME
358.7979501358.797961 ...350 cu. ftJmin.
358.797922/358.797982
358.797990 ....................... 360 cu. ftJmin.
ENGINE
358,797950/358.797961 ..22cc 2-cycle AIR-COOLED
358.797922/358.797982
358.797990 ...................... 32cc 2-cycle AIR-COOLED
ENGINE RPM
Od_eerating.......................... 7000-7600
..................................... 3800-4600
FUEL/OIL MIX RATIO .......40:t (3.2oz. per gallon
gasl
IGNITION .............................. Solid State
(air gap .010" to .014")
IGNITION TIMING ................ Non-adjustable, Fixed
SPARK PLUG ...................... Champion (CJ*8Y)
SPARK PLUG GAP ............. 025"
SPECIAL NOTICE
For users on U.S. Forest Land and in some states, including
California (Public Resources Codes 4442 and 4443), Idaho,
Maine, Minnesota, New Jersey, Oregon, and Washington:
Certain internal combustion engines operated on forest,
brush, and/or grass-covered lands in the above areas are
required to be equipped with a spark arrestor, maintained in
effective working order, or the engine must be constructed,
equipped, and maintained for the prevention of fire. Check
with your state or local authorities for regulations pertaining
to these requirements. Failure to follow these requirements
is a violation of the law. This unit is not factory-equipped with
a spark arrestor; however, a spark arrestor is available as an
optional part. If a spark arrestor is required in your area, con-
tact your SEARS Service Center/Department for the correct
kit.
MANUFACTURED UNDER ONE OR MORE OF THE FOLLOWING U.S. PATIENTS:
5,269,665; 5,035,5B5; 4,674.146; 4,940,028; RE 33,050; 4,798.185; 4,402,106;
D3:22,971. OTHER U.S. AND FOREIGN PATENTS PENDING,
FULL ONE YEAR WARRANTY ON SEARS BEST GAS BLC)WER MODEL 358.797950 & 358.797961
Foroneyearfromthedateofpurchase,whenthisGasBlowerismaintained,lubricatedandtuned-upaccordingtotheinstructionsintheowner'smanual,
Searswillrepair,freeofcharge,anydefectinmaterialorworkmanship.
Thiswarrantyexcludestheblowertubes,sparkplug,andaircleaner,whichareexpendablepartsandbecomewornduringnormaluse.
If thisBlowerisusedforcommercialpurposes,thiswarrantyappliesfor90daysfromthedateofpurchase.IfthisBlowerisusedforrentalpurposes,this
warrantyappliesfor30daysfromthedateofpurchase.Thiswarrantyappliesonlywhilethisproductis inuseintheUnitedStates.
WARRANTYSERVICEISAVAILABLEBYRETURNINGTHEBLOWERTOTHENEARESTSEARSSERVICECENTERINTHEUNITEDSTATES.
Thiswarrantygivesyouspecificlegalrights,andyoumayalsohaveotherrightswhichvaryfromstatetostate.
SEARS,ROEBUCKANDCO. DEPT.817WAHOFFMANESTATES,IL 60179
FULLTWOYEARWARRANTYONSEARSBESTGASBLOWERMODEL358.797922,358.797982& 358.797990
Fortwoyearslromthedateofpurchdse,whenthisGasBlowerismaintained,lubricatedandtuned-upaccordingtotheinstructionsintheowner'smanual,
Searswillrepair,freeofcharge,anydefectinmaterialorworkmanship.
Thiswarrantyexcludestheblowertu_s,sparkplug,andaircleaner,whichareexpendablepartsandbecomewornduringnormaluse.
IfthisBlowerisusedforcommercialpurposes,thiswarranlyappliesfor90daysfromthedateofpurchase,ifthisBlowerisusedforrentalpurposes,this
warrantyappliesfor30daysfromthedateofpurchase.ThiswarrantyappliesonlywhilethisproductisinuseintheUnitedStates.
WARRANTYSERVICEISAVNLABLEBYRETURNINGTHEBLOWERTOTHENEARESTSEARSSERVICECENTERtNTHEUNITEDSTATES.
Thiswarrantygivesyouspecificlegalrights,andyoumayalsohaveotherrightswhichvaryfromstateto state.
SEARS,ROEBUCKANDCO. DEPT.817WAHOFFMANESTATES,IL60179
-4-
o

HARDWARE CONTENTS
_._ I.... i illiiiiiiiiiiiiiiiiii .......... i II II II IIIIIIIIIIIII III I nil lli I IllllIIIIIIIIIIllLlIIJlll I 7 IIIII iiii I iiN
Parts packed separately in carton
VACUUM BAG
358.797982, 358.797950
OPERATOR'S MANUAL
UPPER VACUUM TUBE
358.797982, 358.797950
&358.797990
& 358.797990
LOWER VACUUM TUBE
358.797982, 358.797950
& 358.797990
ELBOW TUBE
358.797982, 358.797950
& 358.797990
CONCENTRATOR NOZZLE
358.797950 & 358,797961 ONLY
FLARE NOZZLE BLOWER TUBE
358.797982J358_797990
ONLY
TOOLS REQUIRED FOR ASSEMBLY
• Standard Screwdriver
2-CYCLE ENGINE OIL
ASSIST HANDLE
358.797982, 358.797950
& 358.797990
f
TO REMOVE BLOWER FROM
CARTON
• Remove loose parts included with Blower.
• Remove all packing material.
• Check carton thoroughly for additional loose parts.
-5-

,,,,,,,,,,,,,,,,,,,,,,,,,,,, ................................................
HOW TO ASSEMBLE YOUR BLOWER
WARNING
STOP THE ENGINE BEFORE OPENING
THE VACUUM iNLET DOOR OR
ATTEMPTING TO INSERT OR REMOVE
THE VACUUM TUBES. THE ENGINE
MUST BE STOPPED AND THE IMPELLER
BLADES NO LONGER TURNING TO
AVOID SERIOUS INJURY FROM THE
ROTATING BLADES
pLOWER TUBE ASSEMBLY (Fig 1)
Locatethe two locking tabs on the side of the blower
tube.
• Align the grooves on the nozzle with the locking
tabs on the blower tube and push the nozzle onto
the blower tube
• Turn the nozzle clockwise until the parts snap into place
and are firmlytightened.
• Align grooves on the blower tube with locking tabs in the
blower outlet (inset) and push the blower tube into the
blower outlet.
• Turn the blower tube clockwise until the parts snap into
place and are firmly tightened.
LOCKING TABS
VACUUM BAG ASSEMBLY (Fig 2 & 3)
• Open the zipper on the large end of the vacuum bag.
• Insert the elbow tube, grooved end first, through the zip-
per opening in the vacuum bag. Then, push the grooved
end of the elbow tube through the vacuum bag tube
opening in the other end of the vacuum bag. Make sure
the vacuum bag tube opening is flush against the tube
flange.
• Close the zipper on the vacuum bag. Make sure the zip-
per is closed completely and the zipper seam is tucked
toward the inside of the vacuum bag.
ELBOW TUBE
v_uu_i
BAG TUBE
OPENING
ZIPPER
OPENING
BLOWER TUBE
FLARE NOZZLE
GROOVES
GROOVES
LOCKING TABS
Figure 1
BLOWER
OUTLET
Figure 2
VACUUM BAG
RECESSED TUBE OPENING
TUBE FLANGE
Figure 3
WRONG
-6-
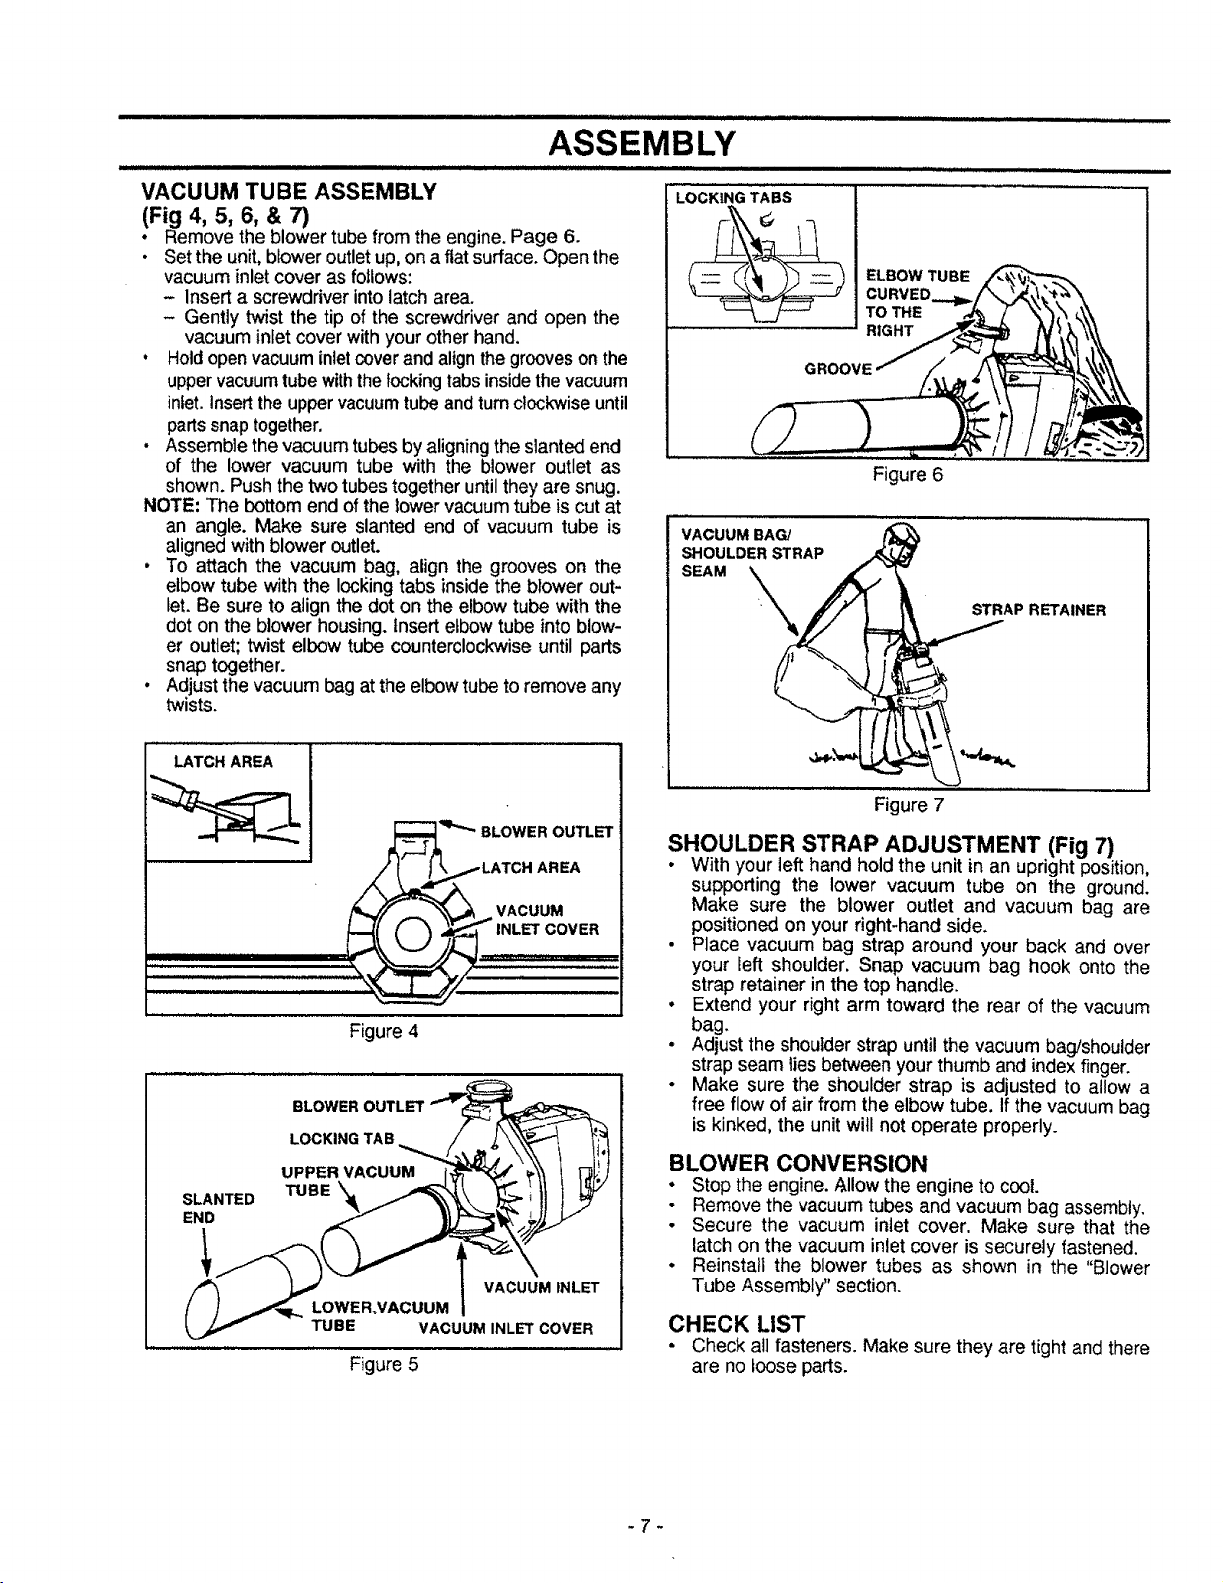
ASSEMBLY
VACUUM TUBE ASSEMBLY
(Fig 4, 5, 6, & 7)
• Remove the blower tube from the engine.Page 6.
• Setthe unit,bloweroutletup,ona flat surface.Open the
vacuuminlet coveras follows:
- Inserta screwdriverintolatcharea.
- Gently twistthe tip of the screwdriverand open the
vacuum intet cover withyourotherhand.
, Holdopenvacuuminletcoverand alignthegroovesonthe
uppervacuumtubewiththelockingtabsinsidethe vacuum
inlet.Insertthe uppervacuumtubeandturnclockwiseuntil
partssnaptogether.
• Assemble the vacuum tubes by aligning the slanted end
of the lower vacuum tube with the blower outlet as
shown. Push the two tubes together until they are snug.
NOTE; The bottom end of the lower vacuum tube is cut at
an angle. Make sure slanted end of vacuum tube is
aligned with blower outlet.
• To attach the vacuum bag, align the grooves on the
elbow tube with the locking tabs insidethe blower out-
let. Be sure to atign the dot on the elbow tube with the
dot on the blower housing, insert elbow tube into blow-
er outlet; twist elbow tube counterclockwise until parts
snap together,
• Adjust the vacuum bag atthe elbow tube to remove any
twists.
LATCH AREA
LOCKING TABS
ELBOW TUBE
TO THE
RIGHT
GROOVE
Figure 6
VACUUM BAG! (
SLANTED
END
BLOWER OUTLET
VACUUM
INLET COVER
Figure 4
LOCKING TAB
UPPER VACUUM
TUBE
VACUUM INLET
LOWER.VACUUM
TUBE VACUUM INLET COVER
Figure 5
AREA
Figure 7
SHOULDER STRAP ADJUSTMENT (Fig 7)
• With your left hand hold the unit in an uprightposition,
supporting the lower vacuum tube on the ground.
Make sure the blower outlet and vacuum bag are
positionedonyour right-handside.
• Place vacuum bag strap around your back and over
your Ieft shoulder. Snap vacuum bag hook onto the
strap retainer inthe top handle.
• Extend your right arm toward the rear of the vacuum
bag,
• Adjust the shoulder strap until the vacuum bag/shoulder
strap seam liesbetween your thumb and index finger.
• Make sure the shoulder strap is adjusted to allow a
free flow of air from the elbow tube. If the vacuum bag
is kinked, the unit will not operate properly.
BLOWER CONVERSION
• Stop the engine. Allow the engine to cool.
- Remove the vacuum tubes and vacuum bag assembly,
- Secure the vacuum inlet cover. Make sure that the
latch on the vacuum inlet cover is securely fastened.
• Reinstall the blower tubes as shown in the "Blower
Tube Assembly" section.
CHECK LIST
• Check all fasteners. Make sure they are tight and there
are no loose parts.
-7-
OPERATION
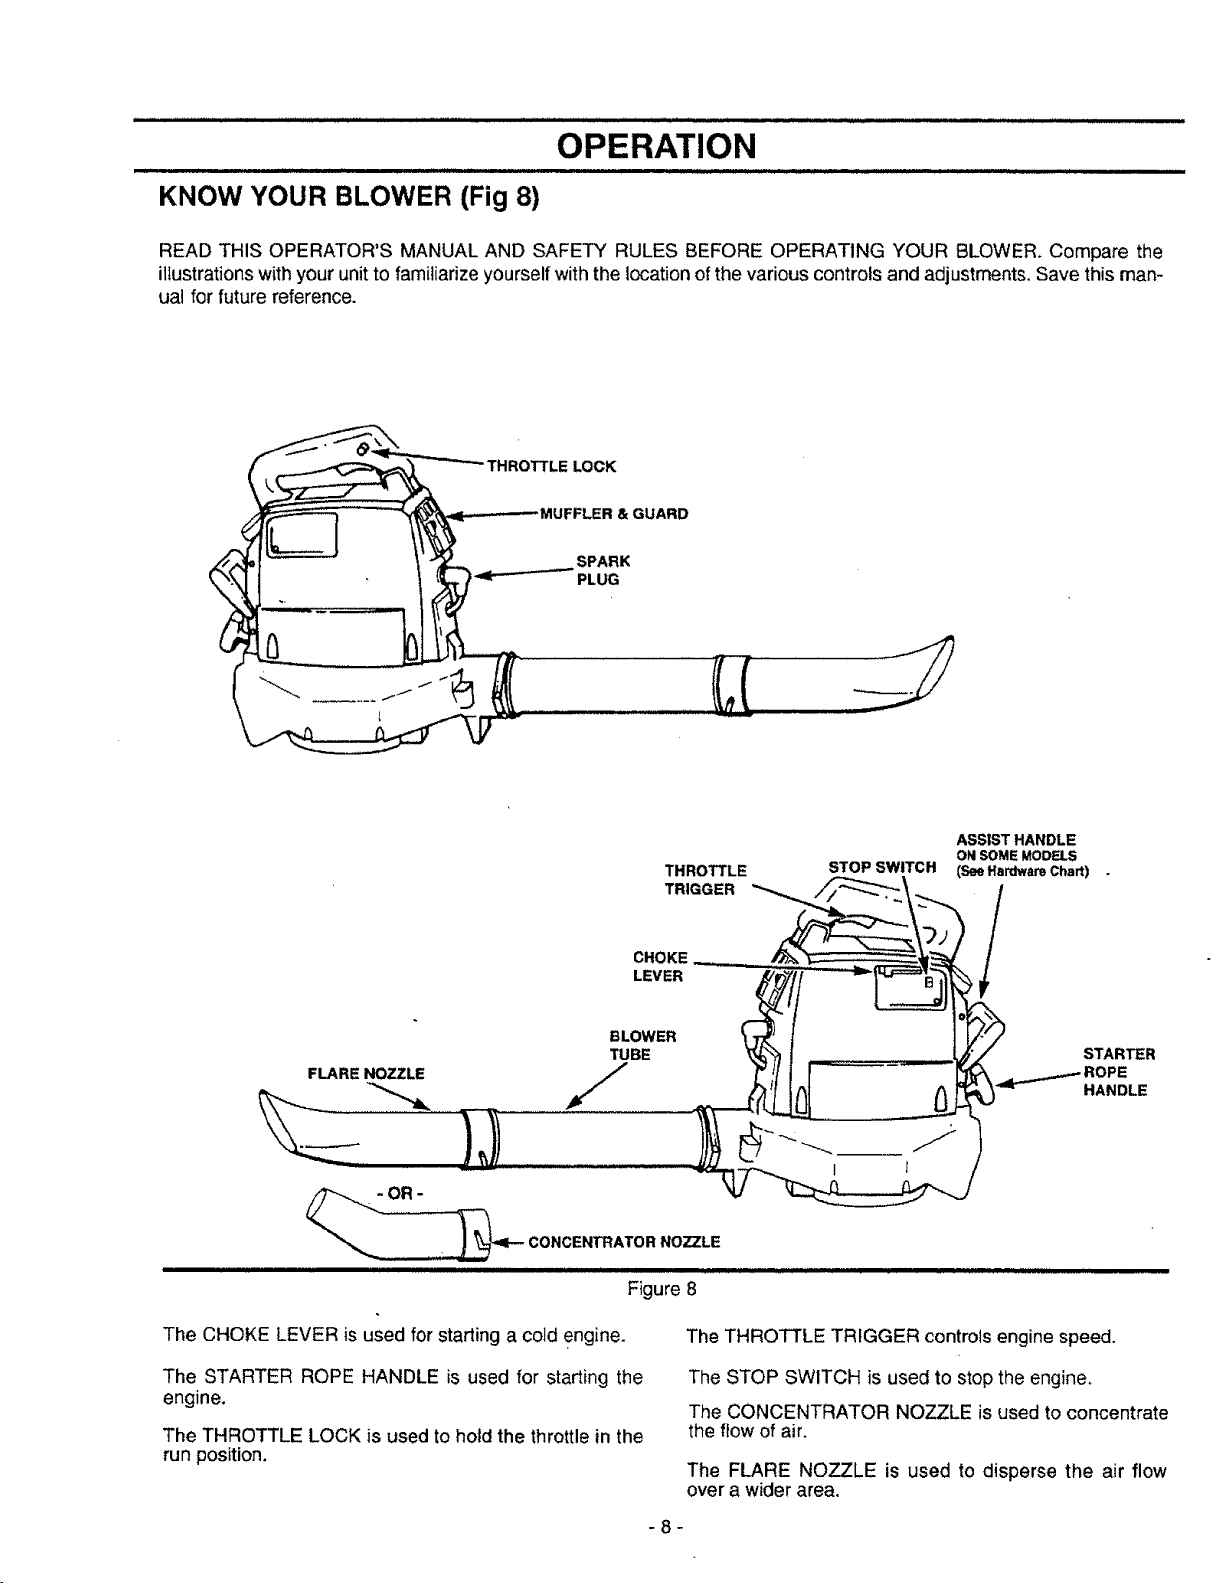
KNOW YOUR BLOWER (Fig 8)
READ THIS OPERATOR'S MANUAL AND SAFETY RULES BEFORE OPERATING YOUR BLOWER. Compare the
illustrations with your unit to familiarize yourself with the location of the various controls and adjustments. Save this man-
ual for future reference.
LOCK
:FLER & GUARD
PLUG
BLOWER
TUBE
FLARE NOZZLE
_ CONCENTRATOR NOZZLE
The CHOKE LEVER is used for starting a cold engine.
The STARTER ROPE HANDLE is used for starting the
engine.
The THROTTLE LOCK is used to hold the throttle in the
run position.
ASSIST HANDLE
THROTTLE
TRIGGER
CHOKE
LEVER
Figure 8
The THROTTLE TRIGGER controls engine speed.
The STOP SWITCH is used to stop the engine.
The CONCENTRATOR NOZZLE is used to concentrate
the flow of air.
The FLARE NOZZLE is used to disperse the air flow
over a wider area.
STOP SWITCH
ON SOME MODF.LS
(See Hardware Chart)
/
-8-
IIIIIIIIIIII III Jl ILl IIII I ..................................................................... 111111 llll iiii II LU II III I[ i I.._
OPERATION -
...................................................................................... ,,,,,,,,,,,,,,,,,,,,,,, ...............
BLOWER SAFETY
WARNING:
THE BLOWER CAUSES OBJECTS TO BE THROWN
VIOLENTLY. THE OPERATOR MUST WEAR A SAFETY
FACE SHIELD OR GOGGLES. ALWAYS WEAR HEAVY,
LONGPANTSAND BOOTS.KEEPOTHERSAT LEAST30
FEET(10 METERS)AWAY.
THIS UNITWILLTHROWOBJECTS.KEEPOTHERSINCLUDING FACE
CHILDREN,ANIMALS,BYSTANDERSANDHELPERSAT LEAST SHIELD
30 FEET(10METERS)AWAYFROMTHEOPERATORAND UNIT.
STOP THE ENGINE IF YOU ARE APPROACHED.IN AREAS
WHEREOTHER PEOPLEANDANIMALSARE PRESENT,SUCH
AS NEAR SIDEWALKS, STREETS, HOUSES, ETC.,/T.!S _100F_OETTERs)
STRONGLYRECOMMENDEDTHATTHE OPERATOR UsE ira:
BUDDY SYSTEM;,TI_ATIS, HAVE ANOTHERPERSONSERVE HAZARDZONE / /" \
ASA LOOK-OUT, KEEPINGHIMSELFANDOTHERS ATLEAST _'_ !11' •
30FEET (10METERS)AWAYFROMTHEOPERATOR. f[ "1" _ I_...,,.._J. , ]
DO NOT ASSEMBLE OR DISASSEMBLE THE VACUUM TUBE I _ __ _ 41qqJ
WHILE THE ENGINE IS RUNNING. INSERTING OR REMOVING 4!1\_ 30 FT _ /_.
THE VACUUM TUBE WHILE THE ENGINE IS RUNNING CAN "" \,,,. ,_1',; _ _ Y
RESULT IN SERIOUS INJURY. ALWAYS STOP THE ENGINE _ J'4kt
AND DISCONNECT THE SPARK PLUG BEFORE UNCLOGGING
THE UNIT OR PERFORMING ANY MAINTENANCE ON THE USE ONLYGOODQUALITY
VACUUM BAG. REPLACEMENTPARTS
/ \
OPERATOR SAFETY (Fig 9 & 10)
• Read your Operator's Manual. Make sure you com-
pletely understand and can follow all warnings and
safety instruction in the manual before operating.
• Always wear a respirator or facemask when working in
dusty environments.
• Always wear eye protection to prevent rocks or debris
from being blown or ricocheting into eyes and face
which can result in blindness or other serious injury.
• Always wear heavy, long pants, boots, and gloves. (To
avoid shock of static electricity, do not wear rubber
gloves). Do not go barefoot or wear short pants, san-
dais, jewelry, loose clothing, or clothing with loosely
hanging straps, ties, tassels, etc. Secure hair so it is
above shoulder length.
UNIT SAFETY
• Inspectthe entire unitbefore each use. Replace dam-
aged parts. Check for fuel leaks and make sure all fas-
teners are in place and securely fastened.
• Check air intake opening, blower tubes, vacuum tubes,
and elbow tube frequently, always with engine stopped
and spark plug disconnected. Keep vents and dis-
charge tubes free of debris which can accumulate and
restrict proper air flow.
- Never place objects insideblower tubes; always direct
blowing debris away from people, animals, glass, and
solid objects such as trees, automobiles, walls, etc.
The force of air can cause rocks, dirt, or sticks to be
thrown or to ricochet which may hurt people or ani-
mals, break glass, etc.
• Never run the unit without the proper equipment
attached. When using your unit as a blower always
install blower tubes. When using your unit as a vacu-
um, always install vacuum tubes and vacuum bag
assembly. Make sure vacuum bag assembly is com-
pletely zipped.
, When using the unit as a vacuum, always use the
shoulder strap to avoid loss of control.
, Use only good quality accessories or attachments.
BLOWER/VACUUM SAFETY
• As a blower, the unit is designed to sweep debris,
grass, straw, leaves, small twigs, or light snow. It can
also be used for fast drying wet outdoor areas such as
a patio, sidewalk, carport, etc. Never use for spreading
or misting chemicals, fertilizers, or any other materials
which may contain toxic substances.
• As a vacuum, the unit is designed to pick up dry mate-
rial such as leaves, grass, small twigs, and bits of
paper. Do not attempt to vacuum stones, gravel,
metal, broken glass, or any other debris which may
cause damage to the impeller. Do not attempt to vac-
uum water or any other liquids. Vacuuming water or
other liquids wilt cause damage to the engine. Avoid
situations that could catch the vacuum bag on fire. Do
not operate near an open flame. Do not vacuum dis-
carded cigars or cigarettes or ash from fireplaces, bar-
becue pits, brush piles, etc.
• Inspectarea before starting engine. Remove al[ debris
and objects such as rocks, glass, wire, large sticks,
etc., that _;ancause damage during operation.
- Use the correct operating position. Do not overreach
or use from unstable surfaces such as ladders, trees,
steep slopes, roof tops, etc. Keep firm footing and bal-
ance at all times.
-9-
 Loading...