

Craftsman 358797750 Owner’s Manual

Operator's Manual
CRRFTSMRNo
24cc 2-Cycle
GASOLINE EDGER
Model No.
358.797750
WARNING:
Read and follow all Safety Rules and Operating
Instructions before first use of this product.
For answers to your questions about this product,
call 7 a.m.-7 p.m., Mon-Sat; Sun, 10 a.m.-7 p.m.
1-800-235-5878
Sears, Roebuck and Co., Hoffman Estates, IL 60179 USA
530-084654 03/13/97
Warranty Statement 2
Safety Rules 2
Assembly 4
Operation 6
Maintenance 9
Service & Adjustments 10
FULL ONE YEAR WARRANTY ON CRAFTSMAN EDGER
For one year from the date of purchase, when this CRAFTSMAN EDGER is main-
tained, lubricated, and tuned up according to the instructions in the operator's
manual, Sears will repair, free of charge, any defect in material or workmanship.
Ifthis Edgerisused for commercial purposes, this warrant,/applies for only 90
days from the date of purchase.
If this Edgeris used for rental purposes, this warranty applies for only 30 days
from the date of purchase.
THIS WARRANTY"DOESNOT COVER:
Expendable items which become worn during normal use, such as rotary and/or
edger blades, blade guides, blade adaptors, air cleaners, spark plugs, tirechains,
and shear pins.
Repairs necessary because of operator abuse or negligence, includingbent
crankshafts and the failure to maintain the equipment according to the instruc-
tions contained in the Operator's manual.
WARRANTYSERVICE IS AVAILABLEBY RETURNINGTHE CRAFFSMAN EDGERTO
THE NEAREST SEARSSERVICE CENTER IN THE UNITEDSTATES.
This warranty gives you specific legal rights, and you may also have other rights
which vary from state to state.
Sears, Roebuck and Co. DI817WA Hoffman Estates, IL 60179
Storage 12
Troubleshooting Chart 14
lllustrated Parts List 15
Spanish 18
Parts Ordering Back Cover
OPERATOR SAFETY
• Dress properly. Always wear safety
glasses or similar eye protection
when operating, or performing main-
tenance on your unit. (Safety glasses
are available.) Always wear face or
dust mask if operation is dusty. Al-
ways wear heavy, long pants, long
sleeves, boots, and gloves. Do not
go barefoot or wear sandals.
• Secure hair above shoulder length.
Secure or remove loose clothing and
jewelry or clothing with loosely hang-
ing ties, straps, tassels, etc. They
can be caught in moving parts.
• Being fully covered also helps protect
you from debris and pieces of toxic
plants thrown by spinning blade.
• Stay Alert. Do not operate unit when
you are tired, ill, or under influence
of alcohol, drugs, or medication.
Watch what you are doing; use com-
mon sense.
• Wear hearing protection when using
this unit.
• Never start or run the unit inside a
closed room or building. Breathing
exhaust fumes can kill.
• Keep handles free of oil and fuel.
• Always use the handle.
UNIT SAFETY
• Inspect entire unit before each use.
Replace damaged parts. Check for
fuel leaks. Make sure all fasteners
are in place and securely fastened.
• Maintain the unit according to recom-
mended procedures.
• Throw away blades that are bent,
warped, cracked, broken, or dam-
aged in any other way. Replace parts
that are cracked, chipped, or dam-
aged before using the unit.
• Use only Craftsman replacement
blades. Never use wire, rope, string
etc.
2

• Use only recommended Craftsman
parts and accessories.
• Disconnect the spark plug before
performing maintenance (except for
carburetor adjustments).
• Be sure the blade stops turning
when the engine idles. See "Carbu-
retor Adjustments."
• Remove the blade before making car-
buretor adjustments. Herd the unit by
Safety
Glasses Boots
Blade rotates Allow bladeto stop
after the from thecut.
EDGING SAFETY
,, Inspect the area to be edged before
each use. Remove objects (rocks,
broken glass, nails, wire, string, etc.)
which can be thrown by the blade or
can wrap around the shaft.
• Keep others including children, ani-
mals, bystanders, and helpers at
least 50 feet (I5 meters) away. Stop
the unit immediately if you are ap-
proached.
• Hold the unit firmly with both hands.
• Keep firm footing and balance. Do
not overreach.
• Always keep the wheels in contact
with the ground.
f
before removing it
hand. Do not make carburetor adjust-
ments from the blade side of the unff.
• Keep others away when making car-
buretor adjustments.
• Never start the unit with the gearbox
removed. The clutch can fly off and
cause serious injury.
• Have all maintenance and service not
explained inthLs manual performed by
an Authorized Service Dealer.
WARNING
A
Blade can throw objects violently.
• You can be blinded
or injured.
• Wear safety glasses.
,_ WARNING
Hazard zone for thrown objects
• Blade can throw objects
violently.
• Others can be blinded or
injured.
• Keep people and animals
50 feet (15 m) away.
WARNING
Blade rotates momentarily after
the trigger is released.
• The blade can seriously cut
you or others.
• Allow blade to stop
before removing it from the cut.
WARNING
Read Operator's Manual.
• Follow all warnings and
instructions.
• Failure to do so can
result in serious injury.
• Keep all parts of your body away
from the blade and muffler.
• Always push the unit slowly over the
ground. Stay alert for uneven side-
walks, holes in the terrain, large
roots, etc.
• Use only for jobs explained in this
manual.
FUEL SAFETY
• Mix and pour fuel outdoors and
where there are no sparks or flames.
• Use a container approved for fuel.
• Do not smoke or allow smoking near
fuel or the unit; do not smoke while
using the unit.
• Wipeupallfuelspillsbeforestarting
ud_o
• Moveatleast10feet(3meters)away
fromfuelingsitebeforestartingunit.
• Stop engine and allow unit to cool
before removing the fuel cap.
, Do not store the unit with fuel in the
fuel tank; use up fuel left in the car-
buretor and fuel lines by starting the
unit and letting it run until it stops.
• Store unit and fuel in an area where
fuel vapors cannot reach sparks or
open flames from water heaters, ele¢.
tric motors or switches, furnaces, etc.
TRANSPORTING & STORAGE
• Stop unit before Heaving work area,
• Allow unit to cool, run fuel out of the
fuel tank, and secure the unit before
storing or transporting it in a vehicle.
• Before storing, use up fuel left in the
carburetor by starting the unit and
letting it run until it stops. Always al-
low the unit to cool before storage.
• Store unit and fuel in an area where
fuel vapors cannot reach sparks or
open flames from water heaters, elec-
tric motors or switches, furnaces, etc.
• Store unit so the blade cannot acci-
dentally cause injury.
• Store unit out of reach of children.
If situations occur which are not cov-
ered in this manual, use care and
good judgment. If you need assis-
tance, contact your nearest Sears Ser-
vice Center or call the 1-800 number
listed on the back page of this manual.
SAFETY NOTICE: Exposure to vibra-
tions through prolonged use of gasoline
powered hand units cou}d cause b_ood
vessel or nerve damage in the fingers,
hands, and joints of people prone to cir-
culation disorders or abnormal swell-
ings. Prolonged use in cordweather has
been linked to blood vessel damage in
otherwise healthy people, If symptoms
occur such as numbness, pain, loss of
strength, change in skincolor or texture,
or loss of feeling inthe fingers, hands, or
joints, discontinue the use of this unit
and seek medical attention. An anti-vi-
bration system does not guarantee the
avoidance of these problems. Users
who operate power tools on a continual
and regular basis must monitor closely
their physical condition and the condi-
tion of this unit.
SAVETHESErNSTRUCTIONS
CARTON CONTENTS
Model 358.797750
Edger
Screws
Locknuts
Tube
Cabie Ctamp
Hex Wrench
Container of Oit
Examine parts for damage. Do not use
damaged parts.
NOTE: Ifyou need assistance or find
parts missing or damaged, call the
1-800 number found on the front page
of this manual.
ASSEMBLY
WARNING: If received assembled,
repeatall steps to ensureyour unitis
properlyassembledand allfasteners
aresecure.
This Operator's Manualhas been de-
velopedtohelp you assemble the unit
andto provideitssafe operation.Itis
importantthatyou readtheentireman-
ualto become familiar withtheunitbe-
foreyoubegin assembly.
Read your Operator's Manual.
Toolsyou will need:
• Screwdriver
• AdjustableWrench
• HexWrench(provided)
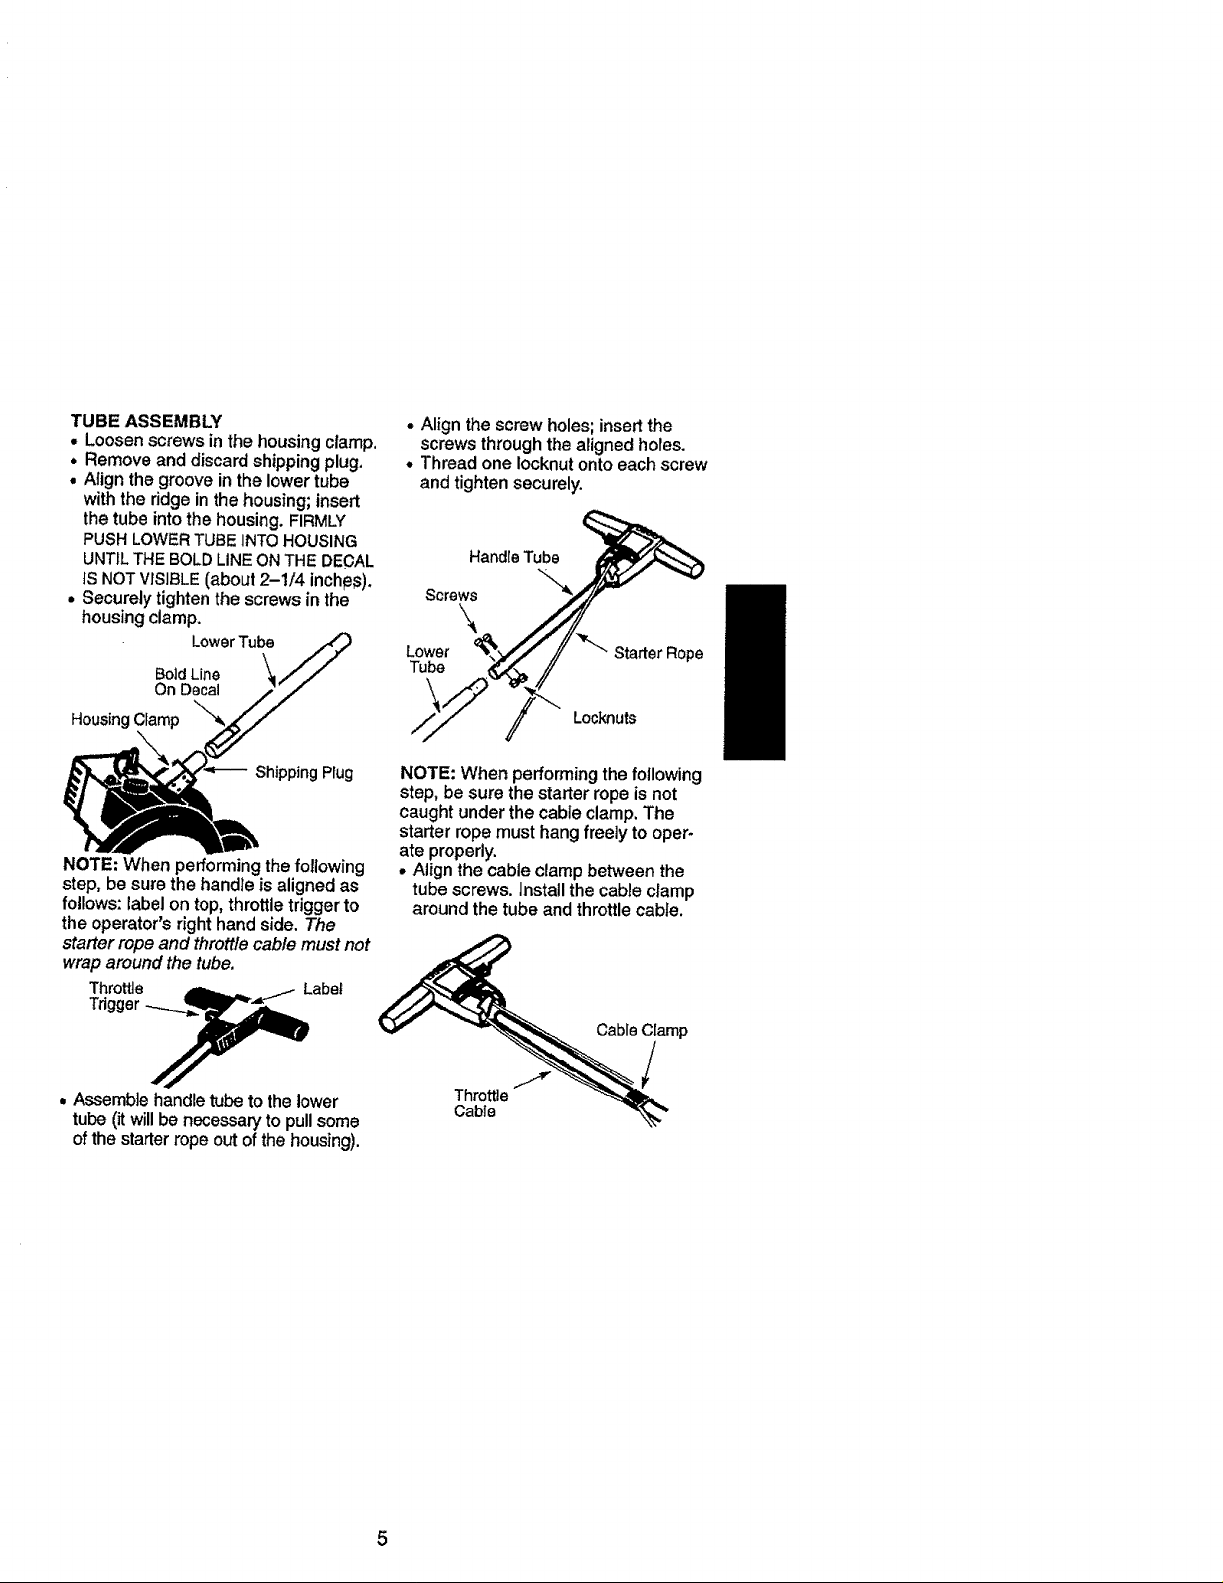
TUBE ASSEMBLY
o Loosen screws in the housing clamp.
• Remove and discard shipping plug,
° Nign the groove in the lower tube
with the ridge in the housing; insert
the tube intothe housing. FIRMLY
PUSH LOWER TUBE INTO HOUSING
UNTIL THE BOLD LINE ON THE DECAL
IS NOTVISIBLE (about 2-1/4 inches),
• Securely tighten the screws in the
housing clamp,
LowerTube
E_ld Line
On Decal
HousingClamp
, Align the screw holes; insert the
screws through the aligned holes.
° Thread one Iocknut onto each screw
and tighten securely.
Handle Tube
Screws
.\
Lower
Tube
\
Starter Rope
Locknuls
Shipping Plug
NOTE: When performing the following
step, be sure the handle is aligned as
follows: label on top, throttle trigger to
the operator's right hand side. The
starter rope and throttle cable must not
wrap around the tube.
Trigger
Throttle_abe|
• Assemble handle tube to the lower
tube (itwill be necessary to pull some
of the starter rope out of the housing).
NOTE: When performing the following
step, be sure the starter rope is not
caught under the cable clamp. The
starter rope must hang freely to oper-
ate properly,
• Align the cable clamp between the
tube screws. Install the cable clamp
around the tube and throttle cable.
 Loading...