

Craftsman 358797320 Owner’s Manual
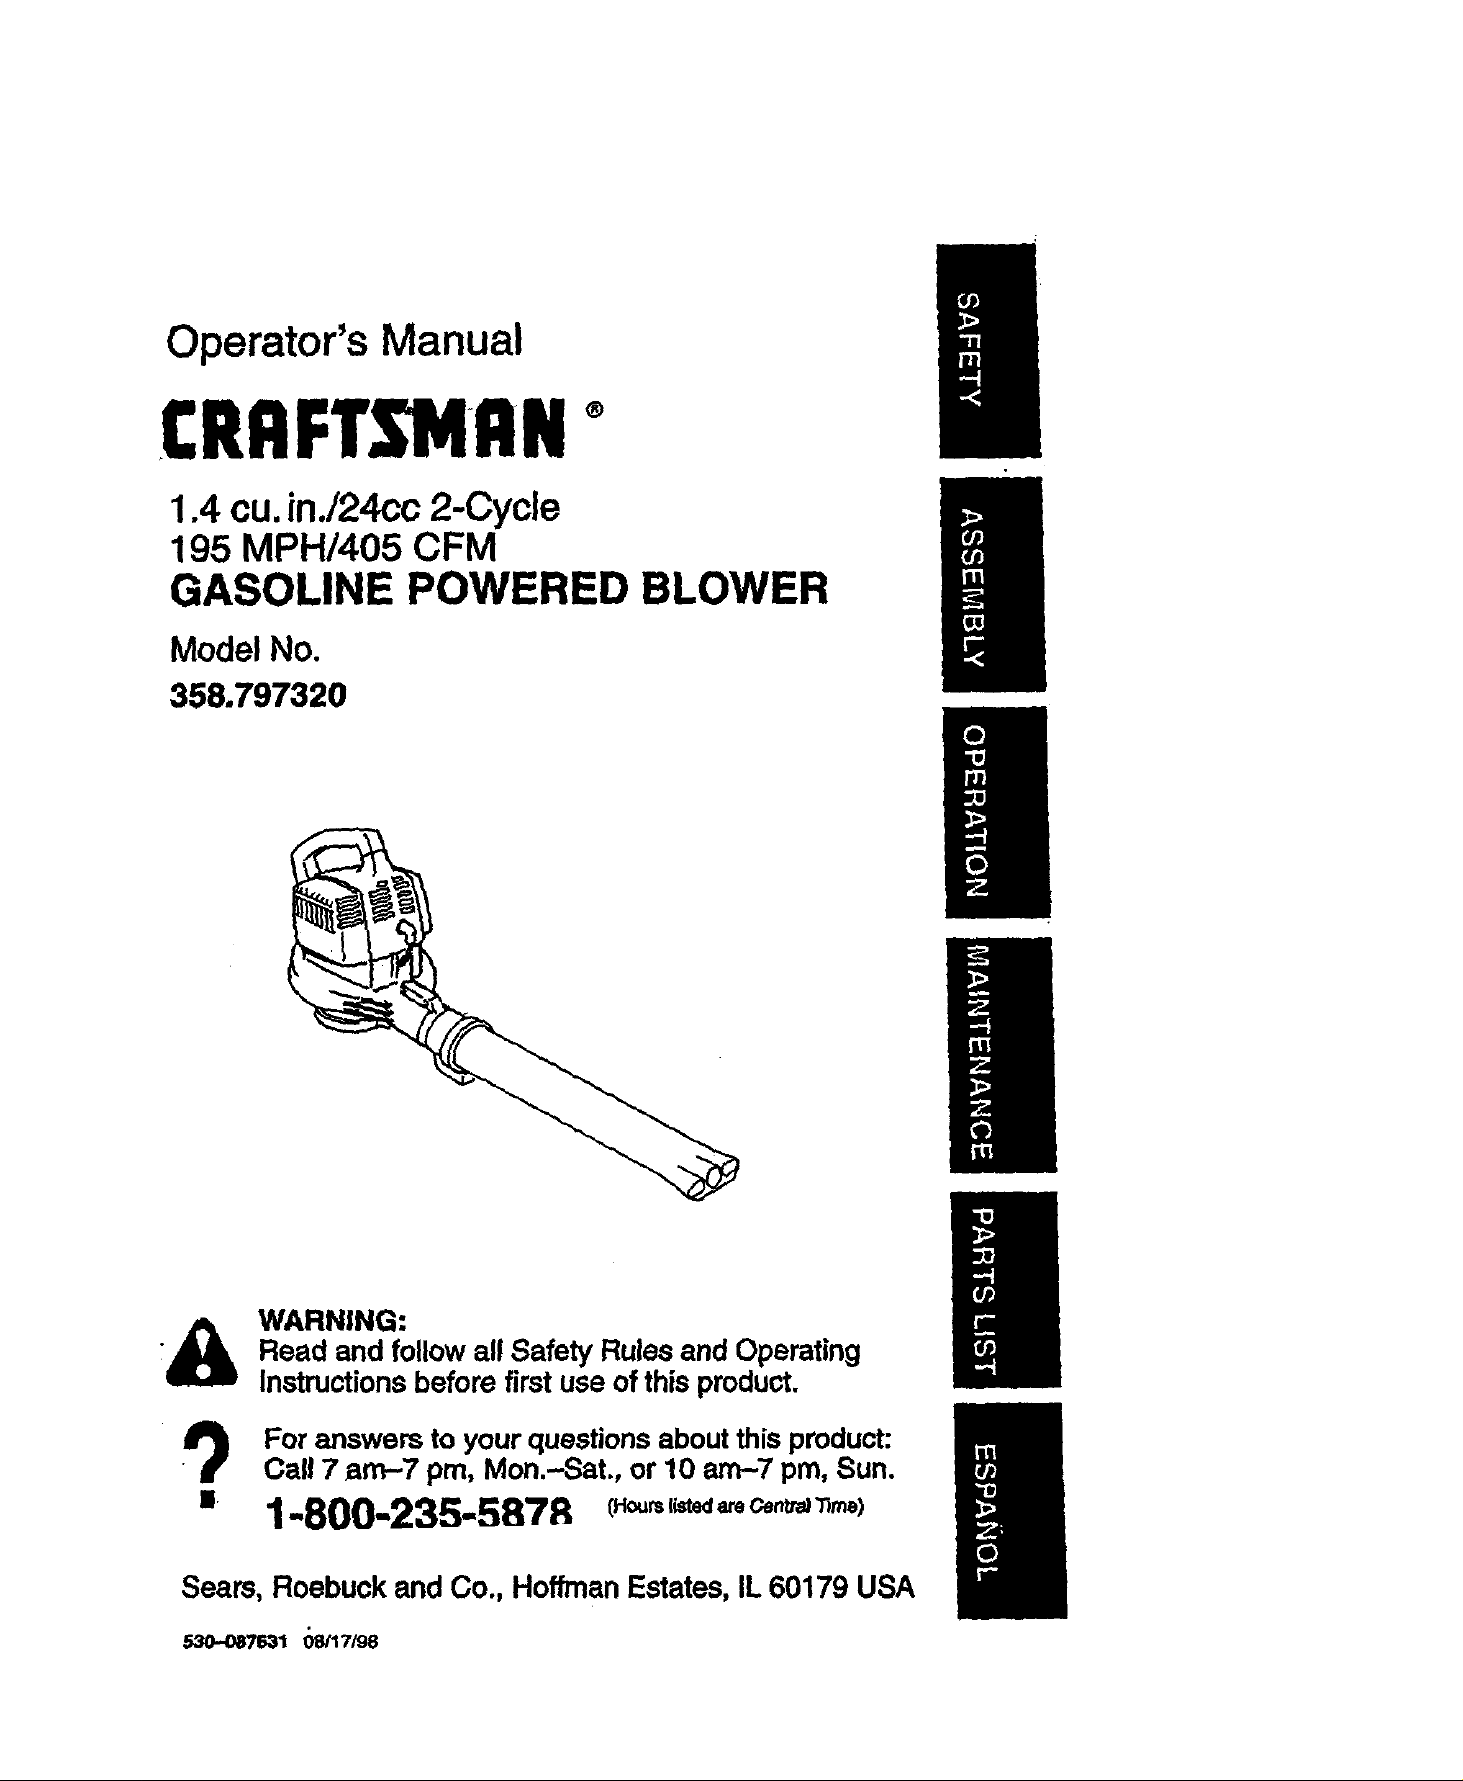
Operator's Manual
CRRFT 4RN
1.4 cu.in./24cc 2-Cycle
195 MPH/405 CFM
GASOLINE POWERED BLOWER
Model No.
358,797320
: Read and follow all Safety Rules and Operating
_11 AFINING:
Instructions before first use of this product.
For answers to your questions about this product:
Call 7 am-7 pm, Mon.-Sat., or 10 am-7 pm, Sun.
Sears, Roebuckand Co., HoffrnanEstates,IL60179 USA

Warranty Statement 2 Storage 9
Safety Rules 2 TroubleshootingChart 10
Assembly 4 Parts List 12
Operation 5
Maintenance 8 Spanish 15
Service & Adjustments 9 Parts and Ordedng Back
FULL TWO YEAR WARRANTY ON CRAFTSMAN ® GAS BLOWER
For two(2) years from date of purchase, when this Gas Blower is maintained,
lubdceted, end tuned upaccordingto the instructionsInthe operator's manual,
Sears willrepair,free of charge, any defects in matedal or workmanship.
This warranty excludes blowertubes, spark plug, and air cleaner, which are ex-
pondable parisand become worn dudngnormaluse.
Ifthisblowerisusedforcommercialpurposes,thiswarrantyappliesfor90 daysfrom
the date of purchase. IfthisBlowerisusedforrentalpurposes,this warrantyapplies
for30 daysfromthe date of purchase.This warrantyapplies onlywhile this product
isin use inthe United States.
WARRANTYSERVICEISAVAILABLEBYRETURNINGTHE BLOWERTO THE NEAREST
SEARSSERVICECENTERIN THEUNITEDSTATES.
This warranty givesyou specificlegal rights,and you may also have other rights
which vary fromstate to state.
Sears, Roebuck and Co. D/817WA Hoffman Estates, IL 60179
FailuretofollowallSafety Rulesand Pre-
cautionscan resultin serious injury.
KNOW YOUR UNIT
• Read yourOporator's Manual care-
fully untilyou completely understand
and can follow all warnings and
safety rules before operating the unit.
• Restrict unitto users who understand
and willfollow all warnings and safety
_ rules inthis manual.
PLAN AHEAD
• Alwayswear eye protectionwhenop-
erating,servicing,orperformingmain-
tanance on unit.Wearing eye protec-
tionwill help to preventrocksor debris
frombeing blownor rico_ into
eyes andface which can resultin
blindnessand/or serious injury.
• Always wear respirator or face mask
when workingwith unit in dustyenvi-
ronments.
• Secure hair above shoulderlength.
Secure or remove jewelry, loose
-- clothing,or clothingwith loosely
hanging straps,ties, tassels,etc.
They can be caught in moving parts.
• Do notoperate unitwhen you are tired,
i11,upset,or if you are underthe influ-
ence of alcohol,drugs,or medicaticn.
• Keep children,bystanders,and anF
realsaway from work area a mini-
mum of 50 feet (15 m) when starting
or operating unit.
• inspectarea beforestartingunit.Re-
moveall debrisand hardobjectssuch
as rocks,glass,wire, etc. thatcan rico-
chet,be thrown, orotherwisecause
injuryordamage duringoperation.
HANDLE FUEL WITH CAUTION
• Eliminate all sources of sparks or
flame (includingsmoking,open
flames, or work that can cause
sparks) in the areas where fuel is
mixed,poured, or stored.
• Mixend pourfuel in en outdoorarea;
storefuelIn a cool, dry,woll venhlated
place;useanapproved,markedcon-
tainerforall fuet,_.,rpose_
• Do notsmoke who• handlng fuel or
while operatingthe unit.
• Do nottillfuel tank whileengine is
running.
-2-
• Wipe up fuel spills before startingen-
gine.
• Move at least 10 feet (3 meters)
away from fuel and fueling site before
starling engine. -,, :....
- OPERATE YOUR UNIT SAFELY
• Stop the engine before opening the
vacuum inlet door.The engine must
be stopped and the impellerblades
no longerturning to avoid serious in-
juryfrom the rotatingblades.
• Inspect unit before each use for
worn, loose, missing, or damaged
parts. Do not use untilunit isin
proper workingorder.
• Keep outsidesurfacas fres from oil
and fuel.
• Never start or run engine inside a
closed room or building.Breathing
exhaust fumes can kill.
• Toavoid static electricityshock, do
notwear rubber gloves or any other
insulatedgloves while operating unit.
• Do notset'unit on any surface except
a clean, hard area while engine is
running.Debris such as gravel, sand,
dust, grass, etc. could be picked up
by the air intake and thrown out
throughdischarge opening, damag-
ing unit, pmperb], or causing sedous
injuryto bystanders or operator.
• Avoiddangerous environments. Do
not use in unventilated areas or
where explosive vapors orcarbon
monoxide buildup could be present.
• Do not overreach or usefrom unsta-
ble surfaces such as ladders, trees,
steep slopes, rooftops,etc. Keep firm
footingand balance at all times.
• Never place objects insidethe blower
tube._;;'a_aysdirect the blowingde-
brisaway from people, animals,
glass, and solid objects suchas
trees, automobiles, walls, etc. The
force of air can cause rocks,dirt, or
sticksto be thrown orto ricochet
which can hurt people or animals,
break glass, or cause other damage.
• • Never run unitwithoutthe proper
equipment attached. When usi'ng
your unitas a blower, always _nstell
blowertubes. When using the option-
al vacuum kit, always installvacuum
tubes_and vacuum bag assembly.
Makt"s'urevacuum bag assembly is
completelyzipped.
• Check air intake opening, blower
tubes, andvacuum tubes frequently,
always with enginestopped and
spark plugdisconnected. Keep vents
and dischargetubes free of debris
which can accumulate and restrict
proper air flow.
• Neverl_ca Imyobje_ in 8it ir_ke
openingesthiscculdreslzictprcperair
flowand cause _ to the urd.
• Never usefor spreading chemicals,
fertilizers,or other substances which
may containtoxic materials.
• Toavoid spreading fire, do not use
near leaf or brush rims,fireplaces,
barbecue pits, ashtrays,etc.
• Use onlyforjobs explainedin this
manuel.
MAINTAIN YOUR UNIT PROPERLY
• Have all maintenance other than the
recommended procedures descdbed
in the Operator's Manuel performed
by Sears Service.
• Disconnect spark plug before per-
forming maintenance except for car-
buretor adjustments.
• Use only recommended CRAFTS-
MAN® replacement parts; use of any
other parts may void your warranty
and cause damage to your unit.
• Empty fuel tank before stodng the unit.
Use up fuel left in carburetor by staning
engine and letting it run until it stops.
• Do notuse any accessoryor attach-
ment otherthanthoserecommended
by manufacturerforusewithyourun'_
• Do notstorethe unit or fuel in a
closed area where fuel vapors can
reach sparks or an open flame from
hotwater heaters, electric motorsor
switches,furnaces, etc.
• Store in a dryarea out of reach of
children.
SPECIAL NOTICE: For users on U.S.
Forest Land and insome states, in-
cludingCalifornia(PublicResources
Codes 4442 and 4443), Idaho, Maine,
Minnesota, New Jersey, Oregon, and
Washington:Certain internalcombus-
tionengines operated onforest, brush,
and/or grasscovered land inthe above
areas are requiredto _ equipped with
a spark arrestor, maintained ineffective
workingorder, or the engine m.ust.be
constructed,equipped, and maintained
forthe prevention oftire. Check with
your state orlocal authoritiesfor regu-
lationspertainingtothese require-
ments. Failureto followthese require-
ments is a violationofthe law. Thi_ unit
isnotfactoryequippedwithasparkar-
restor;however, a spark arrestor is
available as an optional part. If a spark
arrestor isrequired in your area, con-
tact Sears Service for the correct kit.
The spark arrestor, blower tubes, and
nozzlesmust I_ assembled to unit to
be in full compliance with regulations.
SPECIAL NOTICE: Exposureto vibra-
tionsthrou9|l prolongeduse ofgasoline
poweredhand toolscouldcauseblood
vesselor ne_e damage in the fingers,
hands,and jointsof peopleproneto cir-
culationdisordersor abnormalsweging.
Prolongeduse incoldweather hasbeen
linkedto bloodvesseldamage in other-
wisehealthypeople. If symptomsoccur
suchas numbness, pain, lossof
strength,change in sldncolor or texture,
or lossof feelinginthe fingers,hands, or
•joints,dscor_e the useof this tool
a_ ssek _ att_ An
an_tJon systemdoes notguarantee
the avoidanceofthese problems.Users
who operate powertoolson a continual
and regularbasis mustmonitorclosely
their physicalcondition andthe condtion
ofthis tool.
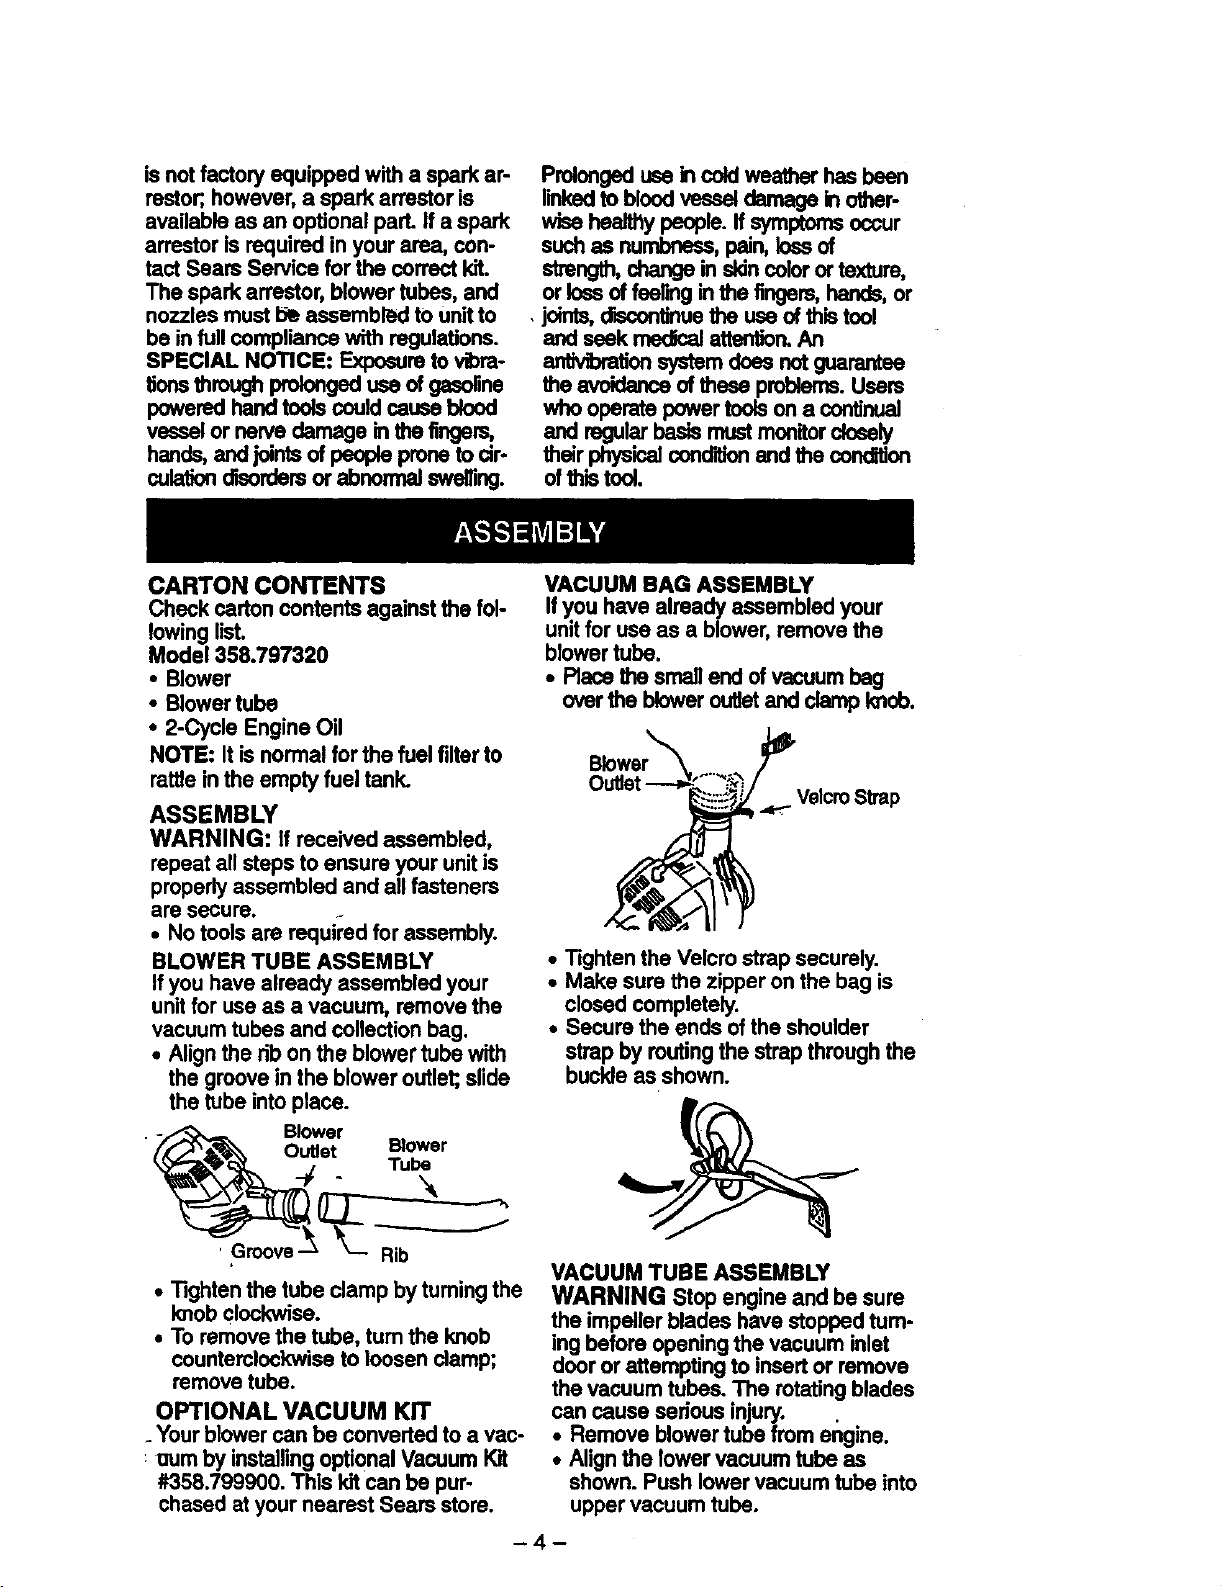
CARTON CONTENTS
Check cartoncontents against the fol-
lowinglist.
Model 358.797320
• Blower
• Blowertube
• 2-Cycle Engine Oil
NOTE: Itis normalfor the fuel filterto
rattleinthe empty fuel tank.
ASSEMBLY
WARNING: If received assembled,
repeat allsteps to ensure your unit is
properlyassembled and all fasteners
are secure.
• No tools are required forassembly.
BLOWER TUBE ASSEMBLY
Ifyou have already assembled your
unitfor use as a vacuum, remove the
vacuum tubes andcollectionbag.
• Alignthe rib on the blower tube with
the groovein the blower outlet;,slide
the tube intoplace.
- _ Blower
///"_ _'_ Outlet Blower
_3_ql_t,. _.; Tube
VACUUM BAG ASSEMBLY
Ifyou have already assembled your
unitfor use as a blower,remove the
blowertube.
• Race the smallend ofvacuum bag
overthe bloweroutletand clamp knob.
Blower
Velcm Strap
• Tighten the Velcro strap securely.
• Make sure the zipper onthe bag is
closed completely.
• Secure the ends of the shoulder
strap by routingthe strap through the
buckle as shown.
_ Rib
• Tighten the tube clamp by tuming the
knob clockwise.
• To remove the tube, turn the knob
counterclockwise to loosen clamp;
remove tube.
OPTIONAL VACUUM KIT
. Yourblowercan be converted to a vac-
uum by installingoptional Vacuum Kit
#358.799900. This kitcan be pur-
chased at your nearest Sears store.
VACUUM TUBE ASSEMBLY
WARNING Stop engine and be sure
the impeller blades have stopped tum-
ing before opening the vacuum inlet
door or attempting to insert or remove
the vacuum tubes. The rotating blades
can cause serious injury.
• Remove blower tube from engine.
• Align the lower vacuum tube as
shown. Push lower vacuum tube into
upper vacuum tube.
-4-
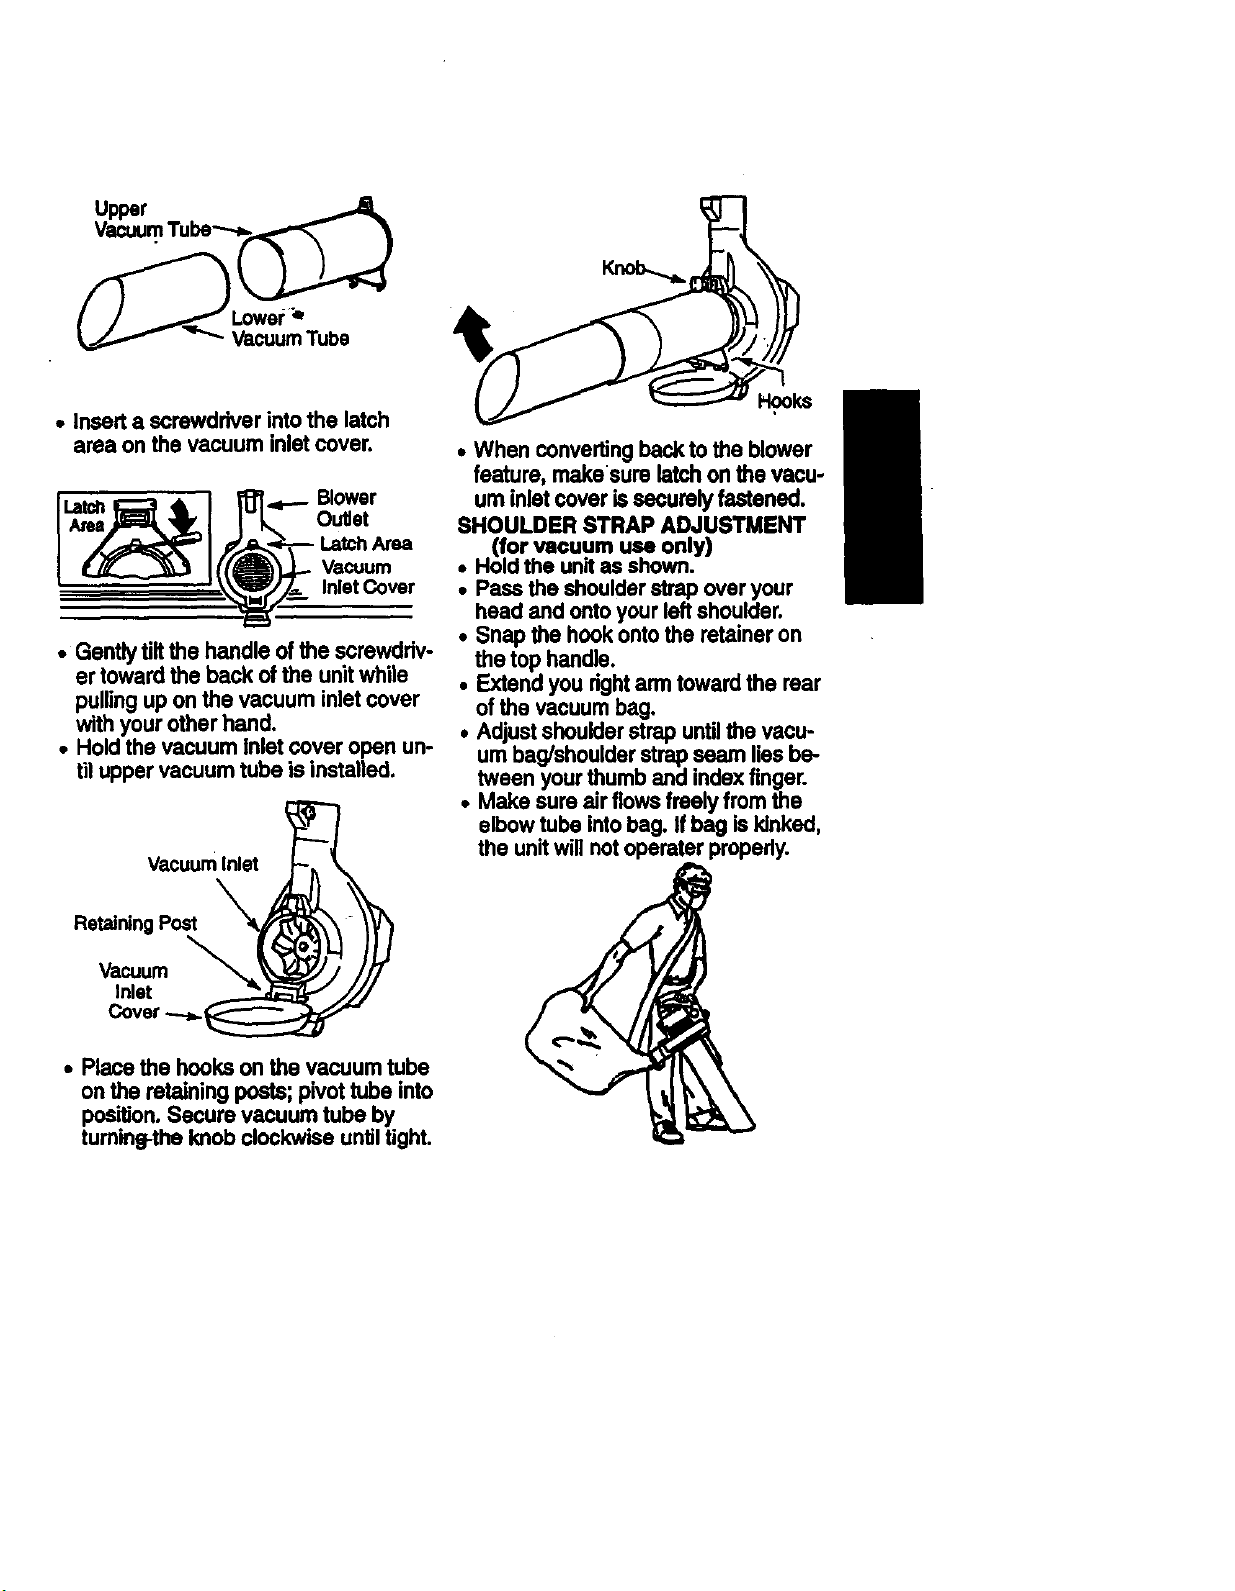
Lower
VacuumTube
• insert a screwdriver into the latch
area on the vacuum inletcover.
• Gently flit the handle of the screwdriv-
er towardthe back ofthe unitwhile
pullingup on the vacuum inletcover
with your otherhand.
• Hold the vacuum Inlet cover open un-
til upper vacuum tube is installed.
Vacuum Inlet
Hooks
• When converting back to the blower
feature, makesure latch onthe vacu-
um inlet cover issacumly fastened.
SHOULDER STRAP ADJUSTMENT
(for vacuum use only)
• Hold the unitas shown.
• Pass the shoulderstrap overyour
head and ontoyour left shoulder.
• Snap the hookontothe retaineron
thetop handle.
• Extendyoudghtarmtowardthe rear
of the vacuum bag.
• Adjustshoulderstrap untilthe vacu-
um bag/shoulder strapseam lies be-
tween yourthumb and index finger.
• Make sure air flowsfreely from the
elbowtube intobag. If bag iskinked,
the unitwill notoperater properly.
RetainingPost
Vacuum x,_
Inlet
Cover
• Place the hookson the vacuum tube
on the retainingposts; pivottube into
position.Secure vacuum tube by
turning-theImob clockwise untiltight.
 Loading...