

CRI:iFTIHnN°
_6 Operator's Manual g
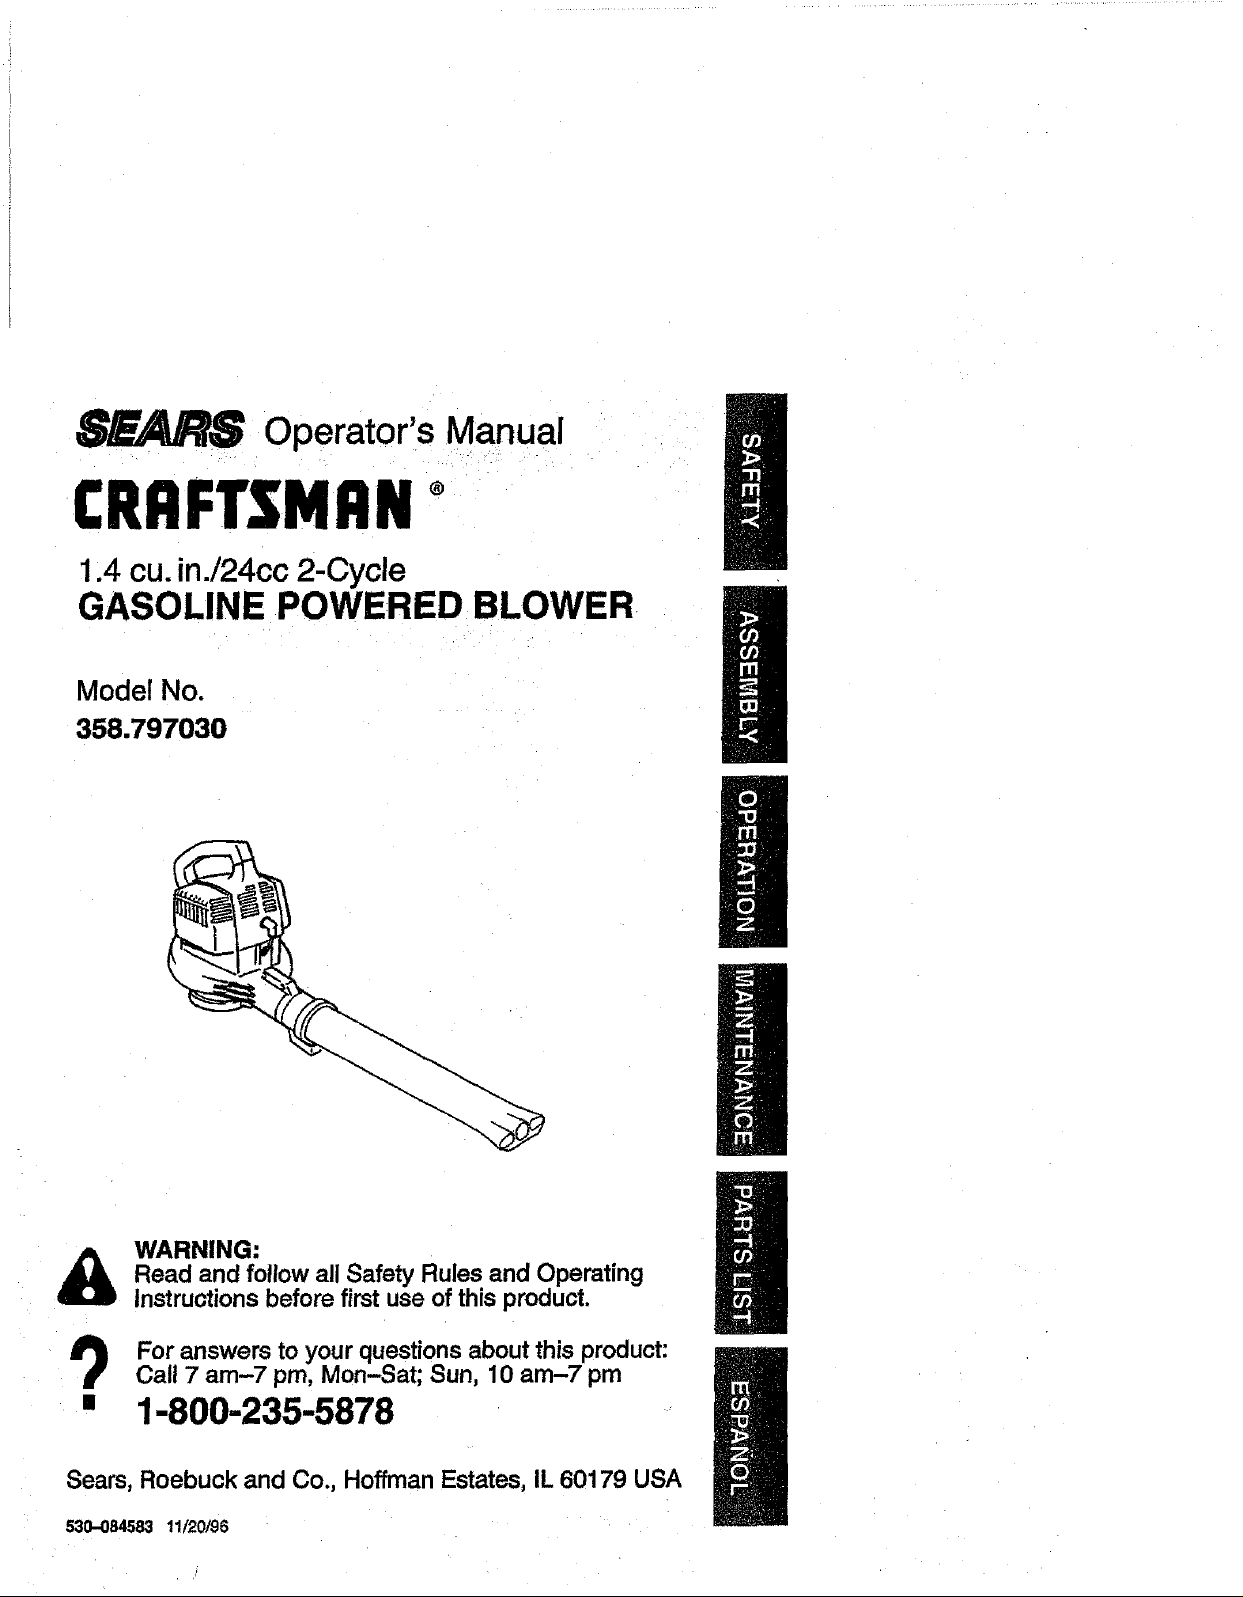
1.4 cu.in./24cc 2-Cycle
GASOLINE POWERED BLOWER
Model No.
358.797030
WARNING:
&
Read and follow all Safety Rules and Operating
Instructions before first use of this product.
B
Ii
For answers to your questions about this product:
Call 7 am-7 pro, Mon-Sat; Sun, 10 am-7 pm
[] 1-800-235-5878
Sears, Roebuck and Co., Hoffman Estates, IL 60179 USA
530-094583 11/20/96

WarrantyStatement 2 Storage 9
SafetyRules 2 TroubleshootingChart 10
Assembly 4 PartsList 11
Operation 6
Maintenance 8 Spanish 14
Service&Adjustments 9 Partsand Ordedng Back
FULLTWO YEAR WARRANTYON CRAFTSMAN®GAS BLOWER
Fortwo (2) yearsfrom date ofpurchase,when thisGas Blowerismaintained,
lubricated,andtuned upaccordingtotheinstructionsin theoperator'smanual,
Searswill repair,freeofcharge,any defectsin matedal orworkmanship.
Thiswarrantyexcludesblowertubes,sparkplug,and aircleaner,whichareex-
pendablepartsand becomeworn duringnormaluse.
Ifthisblowerisusedforcommercialpurposes,thiswarrantyappliesfor 90daysfrom
thedate ofpurchase.IfthisBlowerisusedforrentalpurposes,thiswarrantyapplies
for30 daysfrom the dateof purchase.Thiswarrantyappliesonlywhiisthisproduct
isin use intheUnitedStates.
WARRANTYSERVICE ISAVAILABLEBY RETURNING THE BLOWERTO THE
NEAREST SEARS SERVICE CENTER IN THE UNITEDSTATES.
Thiswarrantygivesyou specificlegalrights,andyoumay alsohave otherrights
whichvaryfrom statetostate.
Sears, Roebuck end Co. Dept.DI817WA Hoffman Estates,IL 60179
Failuretofollow allSafetyRulesandPre-
cautionscan resultinseriousinjury.
KNOW YOUR UNIT
- ReadyourOperator'sManualcare-
fully untilyou completelyunderstand
andcanfollowall warningsand
safetyrulesbeforeoperatingtheunit.
• Restrictunittouserswhounderstand
andwillfo!low all warningsandsafety
rulesinthismanual.
PLANAHEAD
• Always wear eyeprotectionwhenop-
erating,servicing,orperformingmain-
tenancaon unit.Weadngeyeprotec-
tion willhelptopreventrocksordebris
from beingbrownor ricochetinginto
eyesandface whichcanresultin
btin_ess and/orseriousinjury.
• Alwayswear respiratororface mask
whenworkingwithunitindustyenvi-
ronments.
• Securehairabove shoulderlength.
Secureor removejewelry,loose
clothing,orclothingwithloosely
hangingstraps,ties,tassels,etc.
They canbe caughtinmovingparts.
-2-
• Donotoperatethe unitwhenyouare
tired,ill,upset,orif youare underthe
influenceofalcohol, drugs,ormedi-
cation.
• Keepchildren,bystanders,and ani-
mals awayfrom workareaa mini-
mumof 50 feet (15 m) whenstarting
oroperatingunit.
• inspectthe area beforestartingthe
unit.Removeall debrisandhardob-
jectssuch as rocks,glass,wire,etc.
thatcan ricochet,bethrown,orother-
wisecauseinjuryordamageduring
operation.
HANDLE FUEL WITH CAUTION
• Eliminateall sourcesofsparksor
flame(includingsmoking,open
flames,orworkthatcan cause
sparks)inthe areas wherefuel is
mixed,poured,or stored.
• Mixandpourfuelin anoutdoorarea;
storefuelina cool,dry,wellventilated
place;usean approved,markedcon-
tainerforallfuel purposes.
+ Donotsmokewhilehandlingfuelor
whileoperatingthe unit.
• Donotfillfueltankwhileengineis
running.
• Wipeup fuel spillsbeforestarlingen-
gine.
• Moveat least10 feet (3 meters)
away from fuel andfuelingsitebefore
startingengine.
OPERATE YOUR UNIT SAFELY
• Stoptheenginebeforeopeningthe
vacuuminletdoor.The enginemust
bestoppedandthe impellerblades
nolongerturningtoavoidseriousin-
juryfrom the rotatingblades.
• Inspectunitbeforeeach usefor
worn,loose, missing,ordamaged
parts.Do notuse untilunitis in
properworkingorder.
• Keepoutsidesurfacesfree of oi!and
fuel.
° Neverstart or runengineinsidea
closedroomor building.Breathing
exhaustfumes can kill.
• Toavoidstaticelectdcityshock, do
notwearrubberglovesorany other
insulatedgloveswhile operatingunit.
• Donotset uniton any surfaceexcept
a clean,hard area whileengineis
running.Debrissuch as gravel,sand,
dust,grass,etc.couldbe pickedup
bythe air intakeandthrownout
throughdischargeopening,damag-
ingunit,property,orcausingsedous
injurytobystandersor operator.
° Avoiddangerousenvironments.Do
notuse inunventilatedareasor
whereexplosivevaporsorcarbon
monoxidebuildup couldbe present.
° Do notoverreachor use from unsta-
blesurfacessuchas ladders,trees,
steepslopes,rooftops,etc, Keepfirm
footing andbalanceat alltimes.
• Neverplaceobjectsinsidetheblower
tubes;alwaysdirecttheblowingde-
brisawayfrom people, animals,
glass,and solidobjectssuchas
trees,automobiles,walls,etc.The
forceofair can cause rocks,dirt,or
sticksto bethrownor to ricochet
which canhurtpeopleor animals,
breakglass,or cause otherdamage.
• Neverrununitwithouttheproper
equipmentattached.When using
yourunitas a blower,alwaysinstall
blowertubas.When usingtheoption-
al vacuumkit, alwaysinstallvacuum
tubesand vacuumbag assembly.
Makesurevacuumbag assemblyis
completetyzipped.
° Checkair intakeopening,blower
tubes,andvacuumtubesfrequently,
alwayswithenginestoppedand
sparkplugdisconnected.Keepvents
and dischargetubesfree ofdebris
whichcanaccumulateandrestrict
properairflow.
• Neverplaceanyobjectintheair in-
take openingasthiscouldrestrict
properairflow andcause damageto
theunit.
• Neverusefor spreadingchemicals,
fertilizers, orothersubstanceswhich
maycontaintoxicmaterials.
• Toavoidspreadingfire, donotuse
near leaforbrushfires,fireplaces,
barbecuepits,ashtrays,etc.
• Useonlyforjobsexplainedin this
manual.
MAINTAIN YOUR UNIT PROPERLY
• Haveall maintenanceotherthanthe
recommendedproceduresdescn'bed
inthe Operator'sManualperformed
bySears Service.
• Disconnectsparkplugbeforeper-
formingmaintenanceexceptfor car.
buretoradjustments.
• Useonlyrecommended CRAFTS-
MANereplacementparts;useofany
otherpartsmay voidyourwarranty
andcausedamageto yourunit.
• Emptyfueltankbeforestoringtheunit.
Useupfuel leftincarburetorby starting
engineand lettingit rununtilitstops.
• Donotuseanyaccessoryorattach.
meritotherthan those recommended
bymanufacturerfor usewithyourunit.
• Donotstorethe unitorfuel in a
closedarea wherefuelvaporscan
reachsparksoran open flamefrom
hotwaterheaters,electricmotorsor
switches,fumaces, etc.
• Storeinadryarea outofreachof
children.
SPECIAL NOTICE: For userson U.S.
ForestLandand insomestates, in-
cludingCaltfomia(PublicResources
Codes4442 and 4443), Idaho,Maine,
Minnesota,NewJersey,Oregon,and
Washington:Certaininternalcombus-
tionenginesoperatedonforest,brush,
and/orgrasscovered landinthe above
areas are requiredtobe equippedwith
a sparkarrestor,maintainedineffective
-3-

workingorder,or theenginemustbe
constructed,equipped,andmaintained
forthe preventionoffire. Checkwith
yourstate orlocalauthoritiesfor regu-
lationspertainingtotheserequire-
ments.Failureto follow theserequire-
mentsis a violationofthe law.Thisunit
isnotfactory equippedwitha spark ar-
restor,however,a sparkarrestoris
availableas an optionalpart.Ifa spark
arrestoris requiredinyourarea,con-
tact SearsService forthe correctkiL
The sparkarrestor,blowertubes,and
nozzlesmustbe assembledto unitto
beinfull compliancewithregulations.
SPECIAL NOTICE: Exposuretovibra-
tionsthroughprolongeduseofgaso-
linepoweredhand toolscouldcause
bloodvesselor nervedamagein the
fingers, hands,and jointsofpeople
pronetocirculationdisordersor abnor-
malswelling.Prolongeduseincold
weatherhasbeen linkedto bloodves-
sel damagein otherwisehealthy
people.If symptomsoccursuchas
numbness,pain,lossof strength,
changein skincolorortexture,orloss
offeeling in thefingers,hands,or
joints,discontinuethe useof thistool
andseek medicalattention.An
antivibraUonsystemdoesnotguaran-
tee theavoidanceoftheseproblems.
Userswhooperatepowertoolsona
continualand regularbasismustmoni-
torcloselytheirphysicalconditionand
the conditionofthistool.
CARTON CONTENTS
Checkcartoncontentsagainstthefol-
lowing lisL
Model 358.797030
• Blower
• Blowerfube
• 2-CycleEngineOil
NOTE; Itis normalfor the fuel filterto
rattleinthe emptyfuel tank.
ASSEMBLY
WARNING: If receivedassembled,
repeatallstepsto ensureyourunitis
properlyassembledandall fasteners
aresecure.
• Notoolsare requiredfor assembly.
BLOWER TUBE ASSEMBLY
, Aligntherib onthe blowertubewith
thegrooveinthe bloweroutlet;slide
thetubeintoplace.
_ _Btower
Outlet Blower
Tube
Gmova-_ _ Rtb
• Tightenthe tubeclampbyturningthe
knobclockwise.
• Toremovethetube, rumtheknob
counterclockwiseto loosendamp;
removetube.
OPTIONAL VACUUM KIT
Yourblowercan beconvertedtoa vac-
uumbyinstallingoptionalVacuumKit
#358.799900. Thiskitcanbe pur-
chasedat yournearestSearsstore.
VACUUM BAG ASSEMBLY
• Placethe smallendof vacuumbag
overthebloweroutletandclamp_.
Btower
Ve]cmStrap
Tightenthe Ve/crostrapsecurely.
•"Make sure thezipperon thebag is
closedcompletely.
• Securethe endsoftheshoulder
strapbyroutingthe strapthroughthe
buckleas shown.
-4-
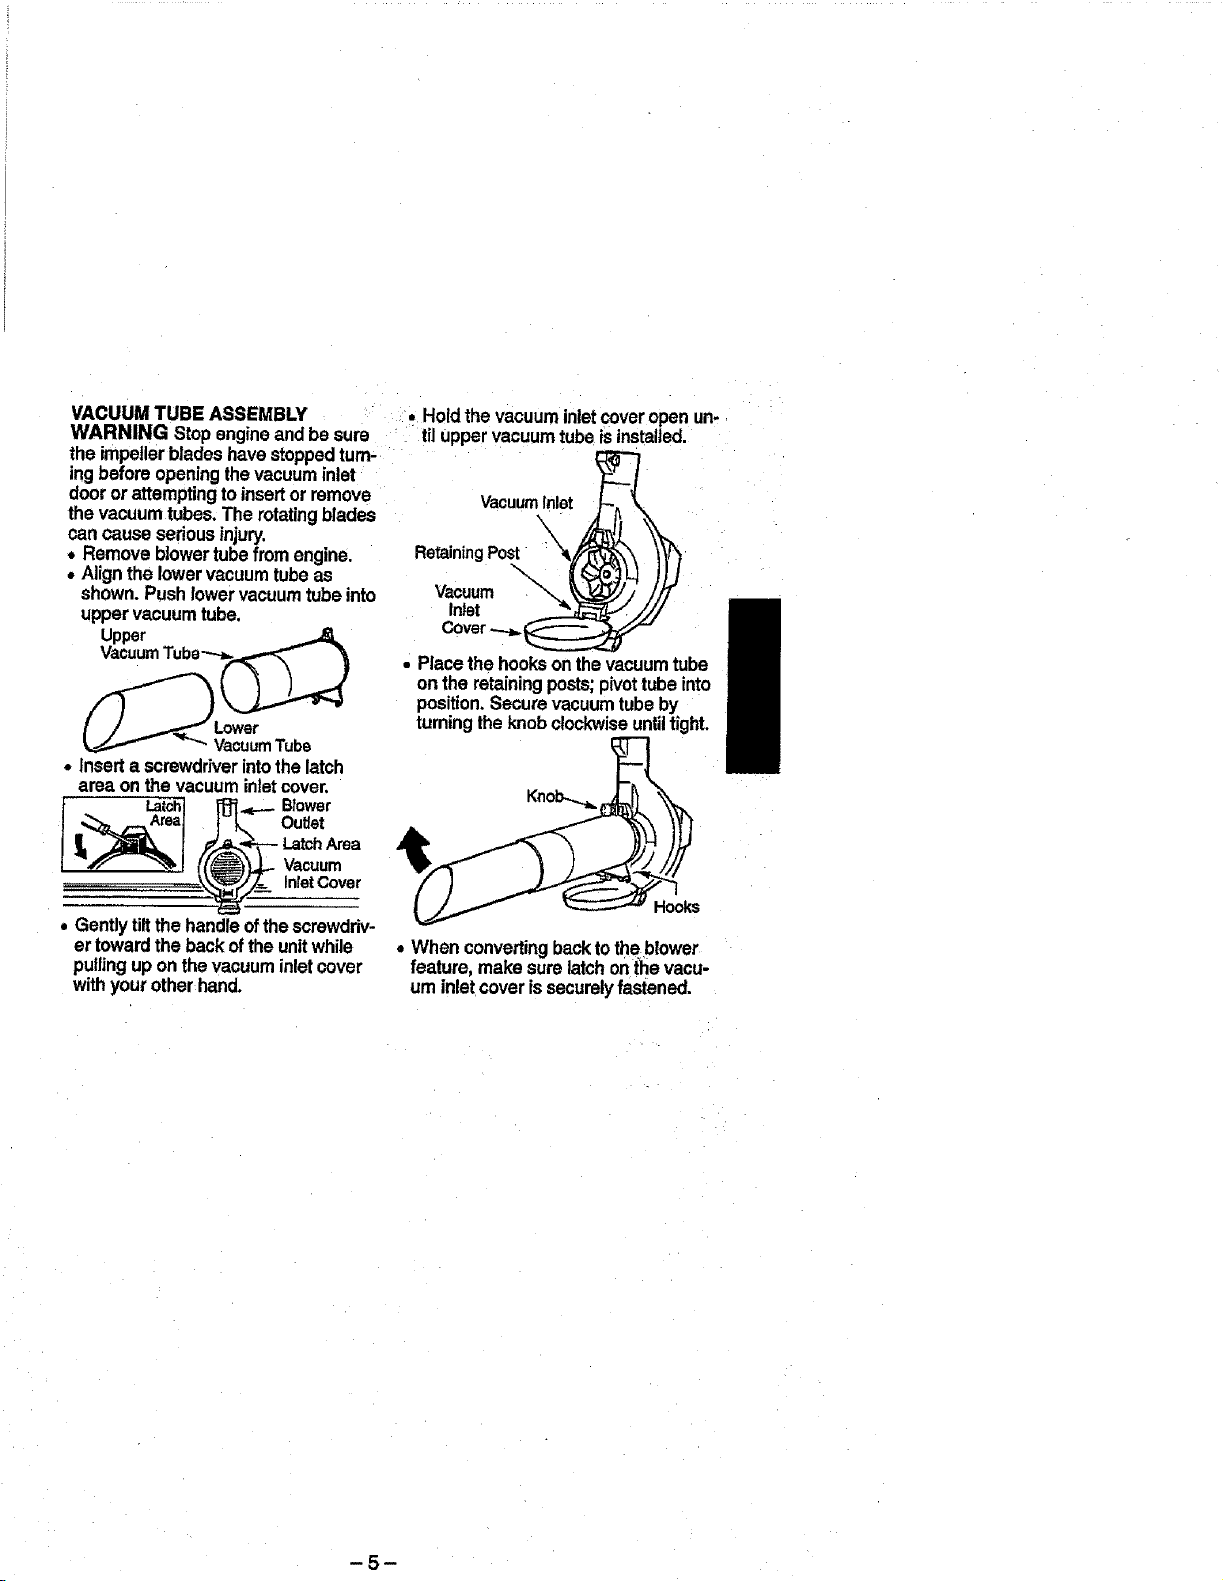
VACUUMTUBEASSEMBLY • Hold thevacuum inletcoveropen un-
WARNING Stopengineand be sure til uppervacuumtubeis installed.
the impellerbladeshave stoppedturn-
ingbeforeopeningthevacuuminlet
doororattemptingtoinsertor remove Vacuumlnle L
the vacuumtubes.The rotating blades _ /JJ_ \
canc=usese_ousinju_. - i \ !-_L \_
• Removeblowertubefromengine. HetaningPost "_ _ 't\l_
• Alignthelowervacuumtubeas _ I _! ))J
shown.Pushlowervacuumtubeinto Vacuum _ ___j/ //7
uppervacuumtube, Inlet t-- _ /_'
Upper _._ _°v°r"_'-_ _7:::_
VacuumTube-----_/.<_..._ "_ • Placethe hooksonthevacuumtube
( _ ) _ onthe retainingposts;pivottubeinto
./ ! J_ position.Securevacuumtubeby
_f /" _ Lower tumingtheknobclockwiseuntiltight.
• Inserta screwdriverintothe latch
areaon the vacuuminletcover.
I Latch _,._,.--_ Blower
-i._ ",-,l((_'_ Vacuum
_ _/_.__ InletCover Hooks
• Gentlytiltthe handleofthescrewdriv-
ertowardtheback ofthe unitwhile ° When convertingbacktothe blower
pullinguponthe vacuuminletcover feature, makesurelatchonthevacu-
withyourother hand. uminletcoverissecurelyfastened.
_ VacuumTube
,,__Areaj F _,. Outlet
-5-

MULCHINGBLADES
Yourblowerisequippedwithmulchingbladesasastandardfeature.Whenusingthe
optionalvacuumattachment,themulchingbladesautomaticallyreducedebrisata
ratioof upto 16:1.
KNOW YOUR BLOWER
READTHIS OPERATOR'S MANUALAND SAFETY RULES BEFORE
OPERATINGYOUR UNIT. Comparetheillustrationswithyour unitto familiarize
yourselfwiththelocation of thevadouscontrolsandadjustments.Save this
manualforfuturereference,
SparkPlug SpeedControl(_) ON/STOP
Blower _:o,o(_) -_-'_-_o_. '_ _/
ON/STOP SWITCH
The ON/STOP switchis usedtostop
the engine.The switchstaysin theON
position.Tostopengine,pushand hold
theswitchinthe STOP positionuntil
theenginecomestoa completestop.
COLD START(_
The ColdStart(_) helpstosupplyfuel
tothe carburetorduringstarting.This
allows youtostarta coldengine. Acti-
vate theColdStart(_) by movingthe
ColdStart_ levertotheStartposition.
After enginehasstarted, moveCold
Start(_) leverto the Run position.See
OPERATING
POSITION
Eye
Protection
BEFORE STARTING ENGINE
WARNING: Be sureto readthe fuel
informationinthesafetyrulesbefore
youbegin.Ifyoudonotunderstandthe
safetyrules,do notattemptto fuelyour
unit.Call 1-800-235-5878.
-6-
Pdmer(5_, _
Button"_J _I_. /
_. [)_--_'_ FuelMix
Switch
A.. _---._-f--\ FtltCap
Handle
the StartingYourEnginesectionfor
completestartinginformation.
PRIMER BUTTON_)
The PrimerButton(_ removesairfrom
thefuel linesand fillsthemwithfuel.
Thisallowsyoutostartthe enginewith
fewerpullsonthe starterrope.Activate
PrimerButton_) by pressingitandal-
lowing itto returntoitsoriginalposition.
SPEED CONTROL _)
The SpeedControl(_) controlsengine
speed.Moveitallthewayforwardfor full
speedoperation.Moveitall theway
rearwardforidlespeed.
m i i =
FUELING ENGINE
Thisengineiscertifiedto operateon
unleadedgasoline.Beforeoperation,
gasolinemust be mixedwitha good
quality2.cycleair-cooledengineoil.
We recommendCraftsmanbrandoil.
Mixgasolineandoil at a ratioof 40:1
(A40:1 ratioisobtainedbymixing3;2
ouncesof oilwithI gallonof unleaded
gasoline),DONOTUSEautomotiveoil
orboat oil.These oilswillcause engine
damage.When mixingfuel,follow
instructionsprintedon container.
Once oilisaddedtogasoline,shake
containermomentarilyto assurethat
the fuelis thoroughlymixed.Always
readand follow thesafetyrulesrelating
tofuel beforefuelingyouruniL
IMPORTANT
Experienceindicatesthat alcohol
blendedfuels (calledgasoholorusing
ethanolor methanol)canattract mois-
turewhichleadsto separationand
formation of acidsduringstorage.Acid-
icgas candamagethe fuel systemof
anenginewhilein storage.
Toavoidengineproblems,emptythe
fuelsystembeforestoragefor 30 days
orlonger.Drainthegas tank,startthe
engineandletit rununtilthefuel lines
andcarburetorare empty.Usefresh
fuel nextseason.
Neveruseengineorcarburetorcleaner
productsinthe fuel tankor permanent
damagemay occur.
Fuelstabilizeris an acceptable alterna-
tivein minimizingtheformation of fuel
gumdepositsduringstorage.Crafts-
manbrandoil isalreadyblendedwith
fuel stabilizer.See theSTORAGEsec-
tionfor additionalinformation.
STOPPING YOUR ENGINE
• Tostop theengine,pressand hold
thestop(_ switchuntilenginestops.
STARTING YOUR ENGINE
BEFORE STARTINGTHE ENGINE
YouMUSTmakesurethe tubesare se-
curebeforeusingthe unit.
• Fuelengine. Moveat least10feet (3
meters)awayfrom the fueling site.
• Holdtheunitinthestartingposition
•as shown.Makesurethe blowerend
isdirectedawayfrom people,ani-
mals,glass,and solidobjects.
WARNING: Whenstarlingengine,hold
theunitas illustrated.Donotset uniton
anysurfaceexcepta clean,hardarea
whenstartingengineorwhileengineis
running.Debrissuchas gravel,sand,
dust,grass,etc.couldbe pickedupby
theairintakeandthrown outthroughthe
dischargeopening,damagingtheunitor
property,orcausingseriousinjurytoby-
standersorthe operator.
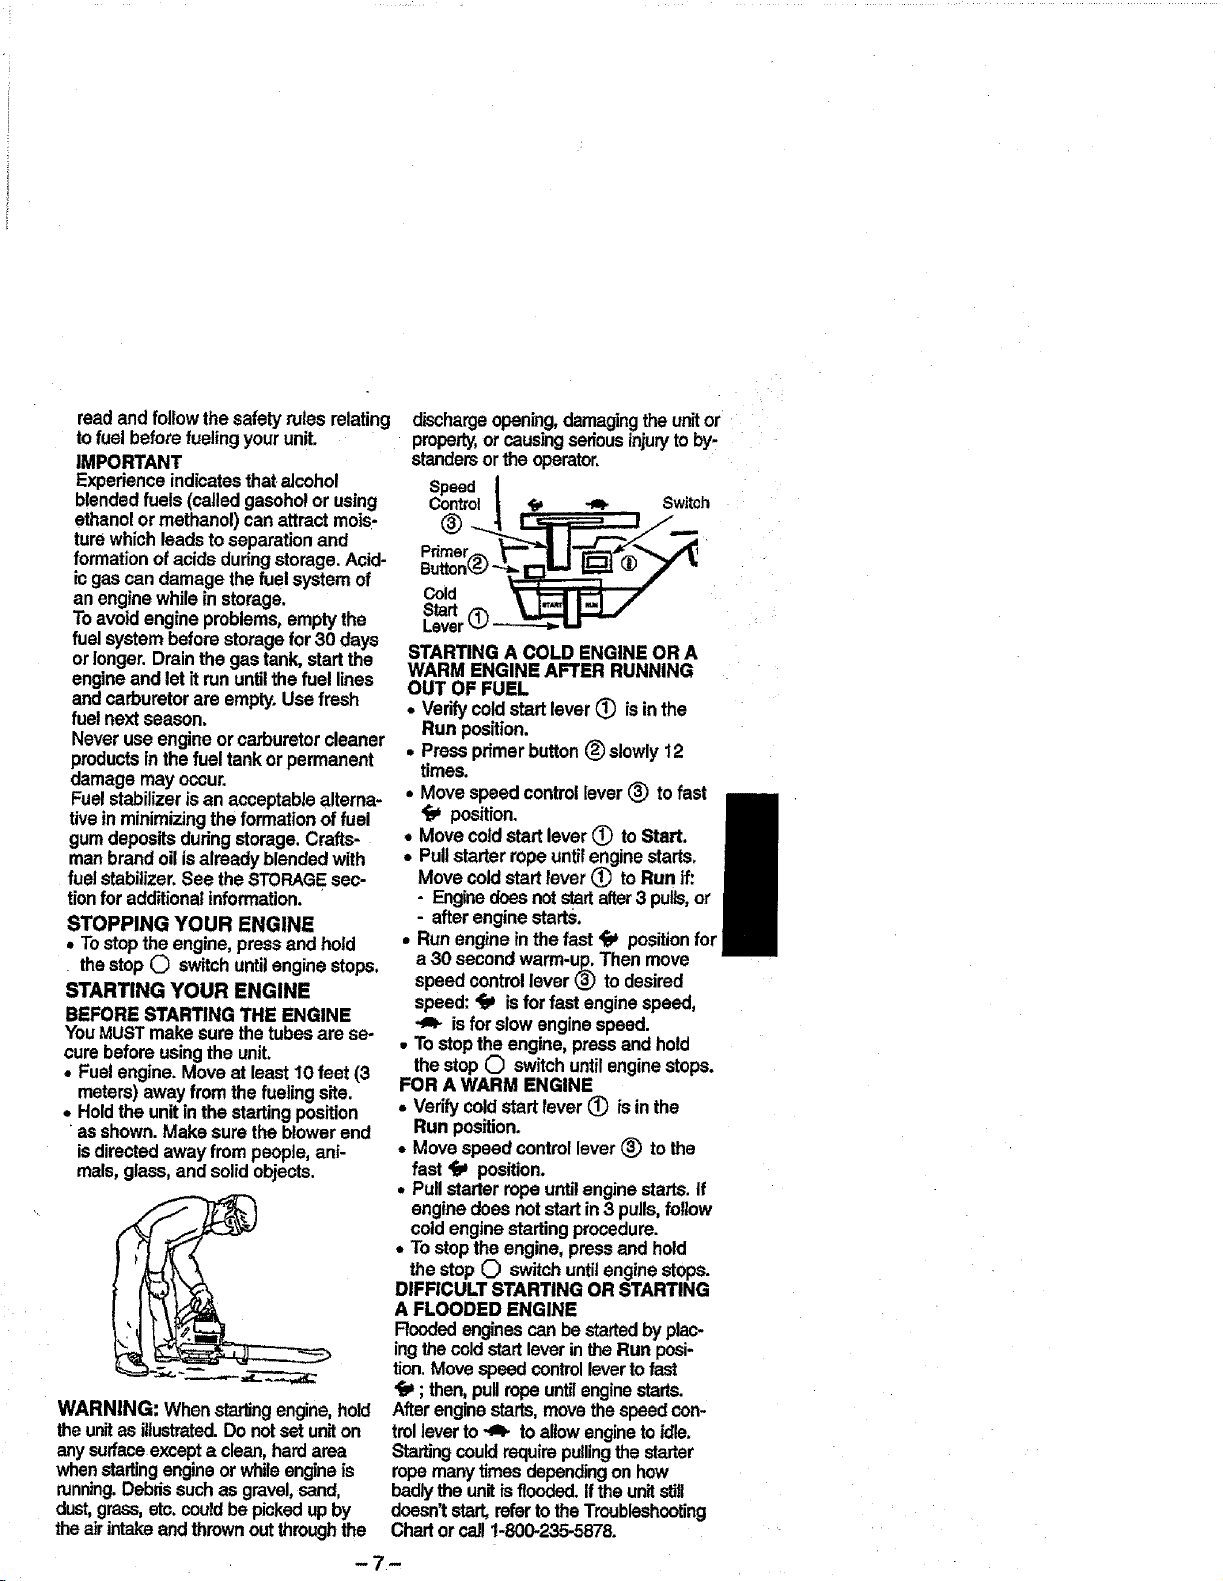
Speed I
ControlI _ "_e Switch
LSeta_r(_ --.___
STARTINGA COLD ENGINE OR A
WARM ENGINE AFTER RUNNING
OUT OF FUEL
• Verifycoldstartlever(_) is inthe
Run position.
• Pressprimerbutton(_)slowly12
times.
• Movespeedcontrollever_) tofast
_i* position.
• Movecoldstartlever(_) toStart.
• Pullstarterropeuntilenginestarts.
Movecoldstartlever (_ to Run if:
- Enginedoesnotstartalter3 pulls,or
- afterenginestarts.
• Runengineinthefast _-_positionfor
a 30 secondwarm-up.Then move
speedcontrollever(_) to desired
speed:_ isfor fastenginespeed,
isfor slowenginespeed.
• Tostoptheengine, pressand hold
thestop (_ switchuntilenginestops.
FOR A WARM ENGINE
• Verifycoldstart lever (_) is in the
Runposition.
• Movespeedcontrollever(_) tothe
fast '_ position.
° Pullstarterropeuntilenginestarts.If
enginedoesnotstart in3 pulls,follow
coldenginestartingprocedure.
• Tostoptheengine, pressand hold
the stopO switchuntilenginestops.
DIFRCULT STARTING OR STARTING
A FLOODED ENGINE
Rcodedenginescanbe startedbyplac-
ingthe coldstartleverinthe Run posi-
tion.Movespeedcontrollevertofast
_a*;then,pullrope untilenginestarts.
Afterenginestarts,movethespeedcon-
trolleverto _ toallowengineto idle.
Startingcouldrequirepullingthestarter
ropemanytimesdependingon how
badlythe unitisflooded.Ifthe unitstill
doesn'tstart,refertotheTroubleshooting
Chartorcell1-800-235-5878.
-7-
CUSTOMER RESPONSIBILITIES
CARE& MAINTENANCE TASK
Checkfor Loosefastenersandpads
Checkfordamaged0r wornparts
Cleanunitand labels
Cleanair filter
Replacesparkplug
Replacefuelfilter
GENERALRECOMMENDATIONS
The warrantyonthisunitdoesnotcov-
eritemsthathave beensubjectedto
operatorabuseornegligence.To re-
calvefujivaluefromthewarranty,the
operatormustmaintain unitas instruct-
edin thismanual. Vadousadjustments
willneedto be made periodicallyto
properlymaintain yourunit.
CHECK FOR LOOSE
FASTENERS AND PARTS
• SparkPlugBoot
• AirFilter
• HousingScrews
CHECK FOR DAMAGED OR
WORN PARTS
Refer replacementof damaged/worn
partstoyourSearsServiceCenter.
• On/StopSwitch- EnsureOn/Stop
switchfunctionsproperly.Tostopen-
gine,pushandhoJdswitchinthe STOP
positionuntilenginecomestoa com-
pletestop.Makesureenginestops;
thenrestartengineand continue.
• FuelTank- Do notuseunitiffueltank
showssignsofdamageorleaks.
• OptionalVacuumBag- Do notuse
vacuumbagifit istom or damaged.
CLEAN UNIT & LABELS
• Cleanthe unitusinga dampcloth
witha milddetergent.
• Wipeoffunitwitha cleandrycloth.
CLEAN AIR FILTER
Donotcleanfilterin gasolineorother
flammablesolvent.Doingso can
createa fire hazardorproduceharmful
evaporativeemissions.
WHEN TO PERFORM
Beforeeach use
Beforeeachuse
Aftereachuse
Every5 hoursofoperation
Yeady
Yearly
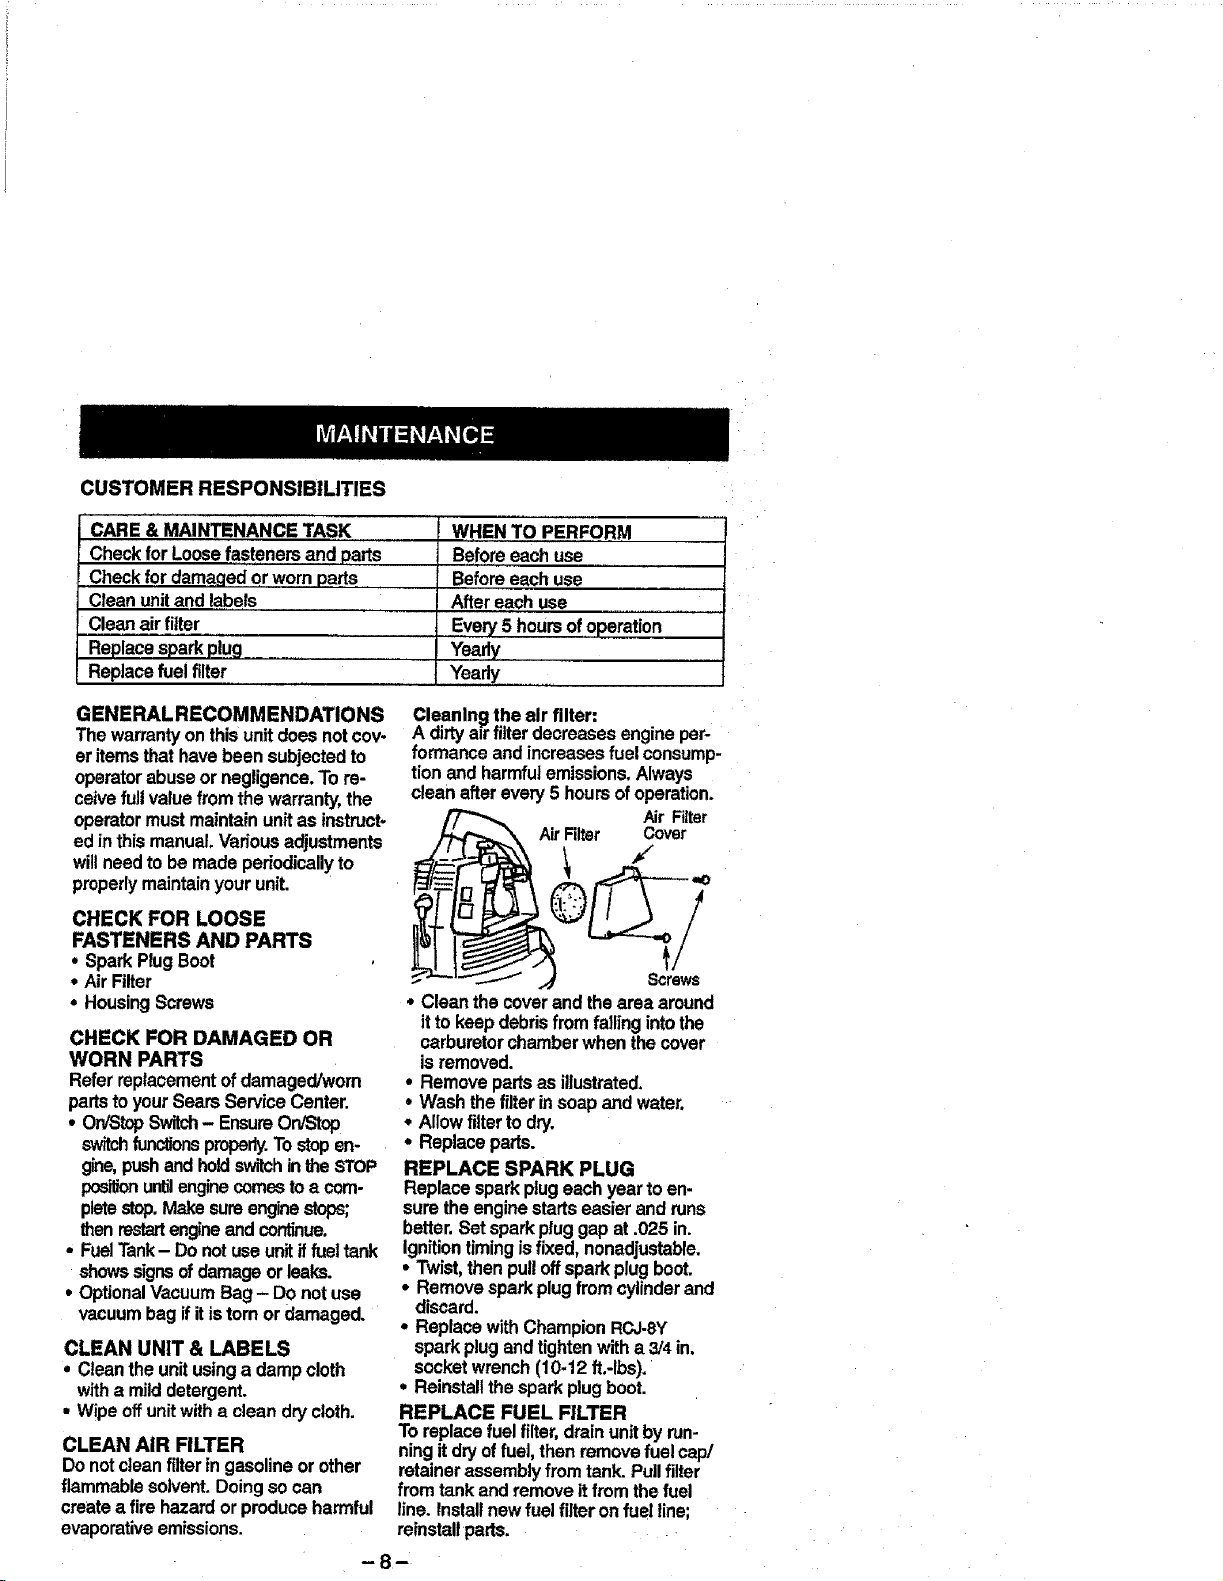
Cleanln9 the air filter:
A dirtyairfilterdecreasesengineper-
formanceandincreasesfuel consump-
tionandharmfulemissions.Always
clean afterevery5 hoursofoperation.
.__ Air Filter
AirRlter Cover
• Cleanthecoverandthe areaaround
itto keepdebrisfrom falling intothe
carburetorchamberwhen thecover
isremoved.
• Removepartsas illustrated.
• Washthefilter insoapand water,
• Allowfilterto dry.
• Replaceparts.
REPLACE SPARK PLUG
Replacesparkplugeach yearto en-
surethe enginestartseasierand runs
better,Setsparkpluggapat .025 in.
Ignitiontimingisfixed,nonadjustable.
• Twist,thenpulloffsparkplugboot.
• Removesparkplugfromcylinderand
discard.
• ReplacewithChampionRCJ-SY
sparkplugandtightenwitha 3/4in.
socketwrench(10-12 ft,-Ibs).
• Reinstallthesparkplugboot.
REPLACE FUEL FILTER
Toreplacefuel filter,drainunitby run-
ningitdryof fuel, then removefuel cap/
retainerassemblyfromtank. Pullfilter
from tankandremoveitfrom the fuel
line. Installnewfuel filteronfuelline;
reinstallpads.
Werecommendallserviceandadjust-
mentsnotlistedinthismanualbeper-
formed byyourSearsServiceCenter.
CARBURETOR ADJUSTMENT
Carburetoradjustmentiscriticaland if
doneimproperlycan permanentlydam-
agethe engineas well as thecarbure-
tor.tfyou requirefurther assistanceor
are unsureaboutperformingthispro-
cedure,call ourcustomerassistance
helplineat 1-800-235-5878.
Oldfuel, a dirtyairfilter,a dirtyfuel fil-
ter, orflooding may givethe impression
ofan improperlyadjustedcarburetor.
Checktheseconditionsbeforeadjust-
ingthe carburetor.
The carburetorhas beencarefullyset
atthefactory. Adjustmentsmaybe
necessaryifyounoticeanyof thefol-
lowingconditions:
• Enginewiltnotidle.See =IdleSpeed"
and=Mixture"underadjusting
procedure.
• Enginediesorhesitatesinstead of
accelerating.See =Acceleration
Check"underadjustingprocedure.
o Lossof power.See =Mixture"under
adjustingprocedure.
CARBURETOR PRESETS
Whenmakingcarburetorpresetadjust-
ments,do notforce plasticlimitercape
beyondthe stopsordamage willoccur.
Ifcarburetorpresetsare not needed,
proceedto=ADJUSTINGPROCEDURE,
IdleSpeed."
Toadjustpresets:
• Turnthe mixturescrewcounterclock-
wiseuntilit stops.
° Turnthe idlespeed screwclockwise
untilitstops. Nowturn countemlock-
wise4-1/2turns.
Startmotor,letit runfor3 minutes,and
proceedtothe adjustment section.If
enginedoesnotstart, refertotrouble-
shootingchartorcall 1-800-235-5878.
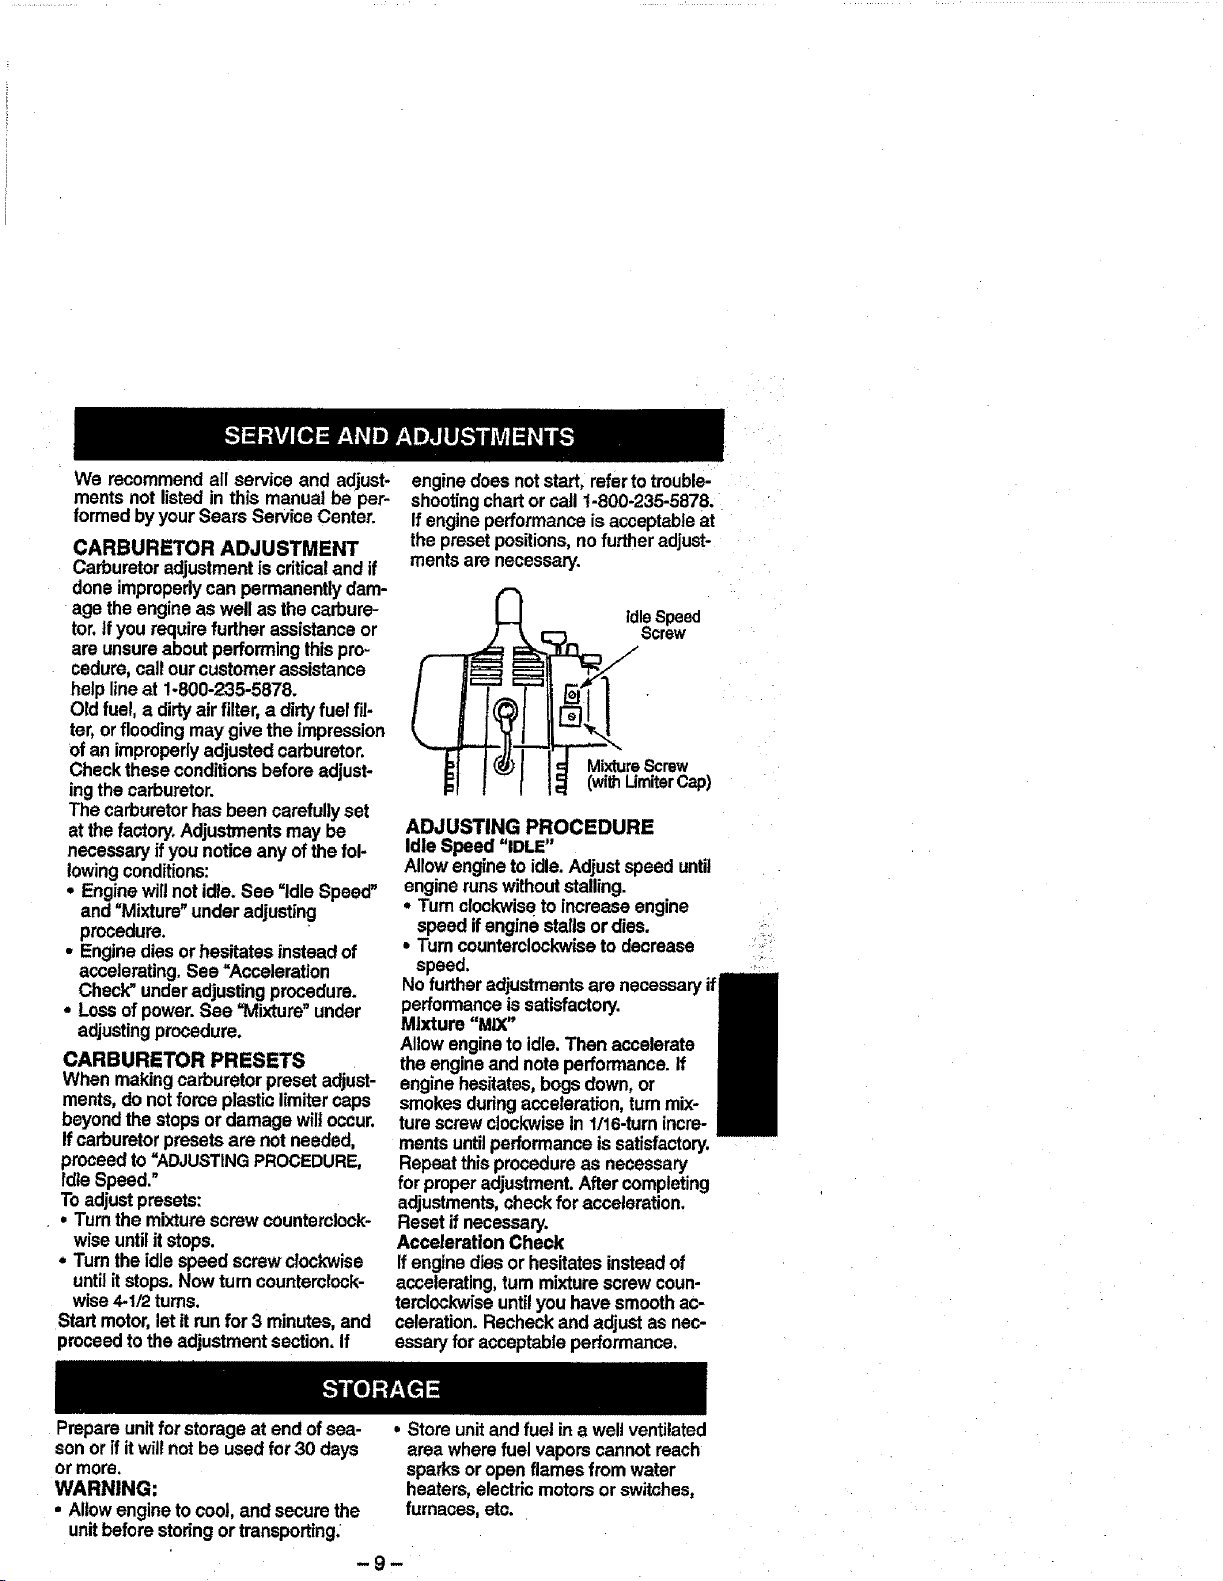
If engineperformanceisacceptableat
thepresetpositions,nofurther adjust-
mentsare necessary.
_dleSpeed
Screw
Mixture Screw
(withUrniterCap)
ADJUSTING PROCEDURE
Idle Speed "IDLE"
Allowenginetoidle.Adjustspeeduntil
enginerunswithoutstalling.
° Turnclockwisetoincreaseengine
speedifenginestallsordies.
• Turncounterclockwisetodecrease
speed.
Nofurtheradjustments .-
performanceissatisfactory.
Mixture "MIX"
Allowenginetoidle.Then accelerate
theengineand noteperformance.If
enginehesitates,bogsdown,or
smokesduringacceleration,tummix-
tursscrewclockwisein 1/16-tumincre-
ments untilperformanceissatisfactory.
Repeatthisprocedureas necessary
forproperadjustment.Aftercompleting
adjustments,checkfor acceleration.
Resetif necessary.
Acceleration Check
Ifenginediesor hesitatesinsteadof
accelerating, turnmixturescrewcoun-
terclockwiseuntilyouhave smoothac-
celeration.Recheckandadjustas nec-
essaryforacceptableperformance.
Prepareunitfor storageat endof sea-
sonor ifitwillnotbe usedfor 30 days
or more.
WARNING:
• Allowenginetocool,and securethe
unitbeforestoringortransporting.
• Storeunitandfuel ina wellventilated
areawherefuel vaporscannotreach
sparksoropenflamesfromwater
heaters,electricmotorsorswitches,
furnaces, etc.
-9-

• Store unitwithallguardsinplace.
Positionunitso thatanysharpobject
cannotaccidentallycauseinjury.
• Storeunitandfuelwelloutofthe
reachofchildren.
EXTERNAL SURFACES
• Ifyour unitistobe storedfor a period
oftime, cleanit thoroughlybefore
storage.Storeina cleandryarea.
• Lightlyoilextema!metalsurfaces.
FUEL SYSTEM
UnderFuelingEngineintheOperating
Sectionofthismanual,see message
labeledIMPORTANTregardingtheuse
ofgasoholinyourengine.
Fuelstabilizeris anacceptablealterna-
te in minimizingtheformationoffuel
gumdepositsduringslom_ge,Addstabi-
lizerto gasdineinfueltankorfuelstor-
agecontainer.Followthemixin.structicns
foundonstabi_er container.Runengine
at least5 minutesafteraddingstabilizer.
CRAFTSMAN40:1, 2-cycleengineoil
(aircooled)isalreadyblendedwithfuel
stabilizer.Ifyou donotuse thisSeam
o_,youcan add a fuel stabilizertoyour
fueltank.
INTERNAL ENGINE
• Removesparkplugandpour1tea-
spoonof40:1, 2-cycleengineoil(air
cooled)throughthesparkpfugopen-
ing.SJowlypul!thestarterrope8 to
10 timesto distributeoil.
• Replacesparkplugwithnewoneof
recommendedtypeand heatrange.
• Cleanair filter.
• Checkentireunitfor loosescrews,
nuts, and bolts.Replaceanydam-
aged, broken,Orwornparts.
• Atthe beginningofthe nextseason,
useonlyfresh fuel havingtheproper
gasolineto oilratio.
OTHER
• Donotstoregasolinefrom one sea-
sonto another.
• Replaceyourgasolinecanif itstarts
to rust.
TROUBLESHOOTING CHART
TROUBLE CAUSE
Enginewillnot _• Engineflooded.
start. • Fueltankempty. .
• Sparkplugnotfiring.
• Fuelnotreachingcarburetor.
REMEDY
• Sea=StartingInstructions."
• Filltankwithcorrectfuelmixture.
• tnstatlnewsparkplug.
• Checkfordirtyfuelfilter;,replace.
Checkforkinkedorsplitfueltins;
repairor replace.
• Compressionlow.
Engine willnot • Carburetorrequtresadjustment.
idleproperly. • Crankshaftsealsworn.
• Compressionlow.
,Enginewillnot • Airfilterdirty.
accelerate, • Sparkplugfouled.
lackspower,or • Carburstorrequiresadjustment_
diesundera ° Carbonbuildup.
load,
• Compressionlow,
Engine ° Chokepartiaflyon.
smokes • Fuelmixtureincorrect.
excessively.
• Airfilterdirty.
• Carburetorrequiresadjustment.
Engine • Fuelmixtureincorrect.
runshot. • Sparkplugincorrect.
• Carburetorrequiresadjustment.
• Carbonbuildup.
• ContactSearsService.
• See_CarburstorAdjustments."
• ContactSearsService.
• ContactSearsService.
• Cleanorreplaceairfilter.
• Cleanorreplacesparkplug;re-gap
• See"CarburetorAdjustments."
;• ContactSearsService.
• ContactSearsService.
• Adjustchoke.
• Emptyfueltankandrefillwith
correctrue!mixture.
• Cleanorreplaceairfilter.
• See_CarburetorAdjustments."
° See"FuelingYourUnit."
• Replacewithcorrectsparkplug.
• See=CarburetorAdjustments."
• ContactSearsService.
Ifsituationsoccurwhichare not covered inthismanual, use careand good
judgement.Ifyouneed assistance,contactyourSears ServiceCentedDepart-
mentor callthe CustomerAssistanceHelplineat 1-800-235-5878.
-10-

REPAIR PARTS "
,_k WARNING
All repal_ adjustments end
maintenance not €l_Crlbeel
I. the Operator's Manual
must be pe_ormed by quag.
fled eewJce personnel
39
40
45
41
42
48 44
Ref,
Pad:NO,
1.
2,
530049_
3,
_16209
4,
5_
530049_4
6.
5_049_9
7,
530015254
8,
5300_5852
9.
53O015775
I0+
21,
22.
23.
24.
25.
26.
27.
17,
18.
19.
20.
12,
13,
14.
15.
16.
I1.
530049SS4
530049495
530049494
,530069e2l
530049496
530049A_98
5304_044
530015966
530015849
530049315
5_04956_
530049325
53OO19246
530016211
53OO69572
530049537
530016212
530016207
Knob-ThrottleLever
Leazlwire-S_Ch
WTmClamp
CorbAss3,,
Lead_'re-Ground
ChokePJete
SP,_rertngCoverL_toh
Screw
AirBox Cover
Knob=Chel(eLever
ThrottleLever
Rlter-ChokePiete
Retainer-PurgeButton
Switch
PurgeButton
Sp_ing-PurgeButton
Nut
43
Oesorlpttor*
BlowerTube
CarburetorAdaptor
Screw
"throttlePJete
ThrottleUnkage
Cl_okeLever
Wave Washer
ChokeSlicer
Screw
W
SEARS MODEL 358.797030
1630 29
28
32
28, 530049312
29, 530049617
30. 530049323
31. 5300367_
_?.. 530049311
33. 530015_
34, 530015880
35. 530015820
37. 530049563
39. 5,._004_9314
40. 5300158,80
41, 530069247
42. 5,3_014362
43. 53OO49491
44. 530049527
45. 530069216
46, 5..'30049386
47. 530069813
48. 530049316
49. 530049383
NotShown
11
27 14 12
53O084583
53O084403
530049290
24 25 26
48 49 19 17
J
47
!
, DeeurlpUon
Housing-Left
GuideStarterRope II
leolator
I_Iulor
Housing-Right
Screw
Suew
BOR
Olamp-.a3!owerTube
Knob
Hsnd_e
MurmurCover
Screw
Line_Purge
FuetPl¢k-up Ass'y,
FuelTank Assay,
Gasket-Fuel Tank
LineI_Tank!Pu_le
FuelCap w/Retninur
Ga_et K'_
Nr Box
AirRlter
OperatorManu_l
EngineStop Decal
RightDecal
1
]
I

i ii innllnlll IHII IIIHIIIII III IIIIn I I In n
REPAIR PARTS
34 35
3347 [
86 37
36 4O
7 17
1 49 l_j
45 3 5
IRef. Part No.
1. 530015880
2. 530068_.32
3. 530069888
4. 530C_5.69
5. 530016164
& 530049501
7. 530015810
8. 530015815
9, 53001_40
10. 530029182
11, 530069817
12. 530095461
13_1 530015828
14,i 530626605
15, 530049318
16. 530402043
17. 530049297
lB. 530019181
19. 530049429
20. 530032125
21. 530032124
22. 530019179
2& 530015945
_4. 530_18
25. 530069819
E6, 530023817
27. 530016190 FlywheelSpaonr
I
18
_: 22 32
I T'lr
6 7468
Des_ptlon
,Screw
Rote
StarterPulley Kit
Starter Handle
Stader Sprbg
Fan HousingwfQeertng
8crew
8cmw
Isotator-pan Hag.
Eyelet
tmpel]er (Ind, 10)
MuinhB_.de Ass'y.
Washer-Flat
Nut
#tlat Door
Spring4=letumCover
Cra_case Cover
Gasket-Cree_<caselShroud
CranP.shettASS_.
Inner Beadng
OuterBee_'fng
CrankcaseSeal
RetainingPJng
Cra_k_ Ass'y÷
(tnca.20-23)
Flywhee!Ass'_.
(Incl.26)
_d_ater Dog
12
11
Ref. Part No.
28, 530049713
29, 530016203
80. 530049454
81, 530069816
32. 530015941
3& 530049502
34, 530015953
35. Champion
86. 530069818
37,i 5_19247
38. 530039163
89, 530016208
40. 530069864
41. 530049903
42, 530015162
43. 530069615
44. 53006_812
45, i 530016226
46. 530032108
47. 530069665
4& 530019162
49. 53C016080
NotShown
530049820
530084404
24
12 13 14
FoamSeal
MufflerBolt
Muffler CoverPlate
Muffer 10t
RetainerRtng-C'chaft
MufflerShield
,Screw
8p=rkRug (RCJ-SY)
Gasket10t
AirDam
tgnitlon Module
Bolt
Spark._,restor
PistonRing
Retailer
ConnectingRod
Ass_.
Pistonlot
(_n¢l,41 & 42}
PulteyRetainer
Beefing
rommat4gn. _odule
8P.m'/P-StmterPulley
Instru_ Dee_l
WarningDe¢_
13 26 27
16

I
I
REPAIR PARTS
i= r
CarburetorAssernbtvPartNumber 530069821 - 11NA-298_
1
Key Part Descr_on
No. No,
1 53003_1_ UmiterCap
2 530069811 C_rb. Repair Kit
3 530069844 Gask_ti;Dla.KR
2 3
Ootlon_l - Vacuum lot _Lq_7_N
1
5 6
,11
KEY PART DESCR|P'noN
NO. NO.
1 _ Va¢ Bagw/Slrsp
2 530094653 VacTube-Upper
-3 530095589 V=oT_be--Lower
4 530095468 Va¢ Tube-Upper
5 530049485 Knob-Vat Tube
6 530049686 Clip-Va¢ Tube
2
13

Declaraci6nde Garantfa 14 Servicioy Ajustes 22
Reglasde Seguridad 14 Almacenaje 23
Montaje 17 TablaDiagn6stica 24
Uso t9 Listade Plazas Centrode Manual
Mantenimiento 21 Repuestosy Encargos Contratapa
GARANTIADE DOSA_IOS COMPLETOS PARAEL PROPULSORDEAIRE A GA-
SOLINA DE LA MARCA CRAFTSMAN
Durantedoe (2) afios a partirdela fecha decompra,siemprequasehagael
mantenimiento,la lubricaci6ny losajustesenestePropulsorde Aim a Gasolina
segtlnlas instruccionesde ueoy mantenimiento enel manualdelusuario,Searsm
reparar_cualquierdefectode material o manode obragranturaitamente.
Estagarantfaexcluyelostubosdel propulsorde alre, la bujfay el fltrode aim,
quasonpiezas prescindiblesqua se puedangastarconel usonormal.
Siestepropulsordeaimesusadoconfines deusocomercial,estagarantfaaplicar&
solamentepor90dfasdespu_sdelafecha originalde compra.Siestepropuleoree
usadocon fines de alquiler,estagarantfa aplicardporsolo30 d{asdespu_sdela
fechaoriginal decompra.Estagarantfatienevalidezexclusivamentecuandoelapa-
ratoes uUlizadodentinde losEstadosUnidos.
SE OBTEDRA SERVtCIO BAJOGARANTIA DEVOLVIENDO ELAPARATOAL
CENTRO DESERVICIO SEARS MAS CERCANO EN LOS ESTADOS UNIDOS.
Estagarantfaconfieredetacheslegales especfficosal propletarfo,quetalvez
tengaasimismootrosderechosquavari'anentreestados.
Sears,Roebuck and Co. Dept.DI81TWA HoffmanEstates, IL 60179
De no sumplircon todas I_s Reglasy
Precaucionesde Seguddad,cotter&el
riesgodeaccidentesmuygraves.
CONOZCA SU APARATO
• Leael ManualdelUsuarfocuidado-
samentehasta quacomprendaper-
fectarnente todaslas advertenciase
instruccionesde seguddady las pue-
dacumplir,antesde ponerel aparato
enfuncionamlento.
• Limiteel uso del aparatoa aquellas
personasqua comprendantodaslas
advertenciase |nstrucciones dese-
guridaden estemanualy vayana
cumplirconelias.
PIENSE ANTES DE PROCEDER
• Useslempreproteccidnparalosojos
al haceruso, servicioo mantenimlen-
todel aparato. El usodeproteci6nde
ojosayudard a prevenirla pdrdidade
la vistay/u otrasheddasgraves,pro-
vocadasporpiedraso escombrosue
rebotenen losojosyen la cam atser
propulsadospot el aparato.
-14-
• Usesiempremascarilladefiltraci6nO
de protecci6npara la caraal trabajar
en ambientespolvorientos.
• Mantengaelcabellopor encimade
loshombros,atdndolo paratatefecto
sies necesado.Nousejoyas,ropa
suelta,niropa conliras,corbatas,
bodas,etc.qua cuelgenlibremente,
porquepodrfanquedarenredadasen
laspiezas enmovimiento delapara-
to.
• No useel aparatoestandocansado,
enfero,ansioso,nibajola infuencia
detalcohol,las drogasuotrosmedi-
camentos.
• Mantengaa nifios,espectadoresy
animalesa una distanciaminimade
15 metros(50 pies)al poneren mar-
cha o al usarel aparato.
• Inspeccioneel d.reaantesdeporter
en matodoslosescombrosy objetos
s(_lidostalescomopiedras,vidrio,
alambre, etc, qua el aparatopueda
arrojar al aim o hacerrebotarcau-

sandoheridasdeesteocualquier
ottomodeduranteelusedelmismo.
MANEJEELCOMBUSTIBLECONEX-
TREMeCUIDADO
• Eliminetodas lasposiblesfuentes de
chispanollamas (inclusiveloscigar-
dflos,lasllamasabertas,y cualquier
trabajoque causechispas)en las
dreas dondese mezcla,vierteo al-
macenael combustible.
° Mezcle y viertael combustibleal aire
libre,almaceneel combustibleen un
lugarfresco, secoy bienventilado;
sueunrecipienteaprobado para
combus_blesymamadopara todo
manejo de combusUble.
• No fumemientrastrabajaconel com-
bustiblenicuandoest_haciendouse
del aparato.
° NoIleneel tanquedecombustible
mientrasel motorseencuentreen
marcha.
° Limp_etodoslosderramesdecom-
bust_le antesde ponerel aparatoen
mamha.
• Al6jeseper Iomanes 3 metros(10
pies)de!combustibleydel lugarde
abasteciminetoantesde ponerel
motoren marcha.
HAGA USO SEGURO DE SU
APARATO
• Detengael motorantesde abrirla
compuertade entradadeaire delas-
pirador. El motordeberdencontrarse
detenidoy las cuehillasdelimpulsor
no deberdnestar girandopara evitar
sedosaecidentes provocadosperlas
cuchillasgirantes.
• Verifiqueper inspecct6n,antesde
cadause, que no hayapiezasgasta-
des, sueltas,nidafiadaso piezas
que falten. No use elaparato hasta
que este se encuentreenperfectas
condicionesdefuncionamiento.
• mantengalassuperficiesextems
libresde aceitie y de combustible.
• Nuncaponga el motoren marchani
Io deje en mamha dentrodeun recin-
too edificiocerrado.Respirarlosva-
poresdel combustiblele podriacau-
sar la muerte.
• Paraevitar el chequeper electricidad
estdtica,no use guantesde goma ni
ningLInotroguanteaislado al usarel
aparato.
° No apoye elaparatoconel motoren
mamha en ningunasuperficieque no
-15-
est6 limpiaoque noseas6fida.El
aparatopodriaaspirarescombros
talescomegavilla,arena,polvo,
c_sped,etc. per laentradade aspira-
ci6ny arrojarlos per lasalidade pro-
pulsion,dafiandoelaparatoy/u otros
objetos,ocausandogravesheridas
a espectadoreso al usuario.
• Eviteambientespeligrosos.No use
el aparatoenlugaressinventilaci6n
ni dondepudahabervaporesexplo-
siveso mon6xidodecarbono.
• No se extiendaexcesivamenteniusa
el aparatoensuperficiesinestables
talescomeescaleras,drboles, de-
clivesacentuadas,techos,etc.Man-
tenga el eqqilibrio,conlospiesen
unasuperfieieestableen todome-
mento.
• Nunca coloqueobjetosdentrode los
tubesde propulsi6n;siempredirija
losescombrosen direcoi6ncontrada
a dondepersonas,animales,vidrier-
asuotrosobjetoss61idostales come
drboles, autom6viles,paredes,etc.
se encuantran.Lafuerza del aim
puedearrojarohacerrebotarpie-
dras,tierraoramas,hidendoaperso-
naso animales,rompiendovidderas
ocausande otrosdafios.
• Nuncapongael aparatoan marcha
sin tonertodoetequipocorrespon-
dienteinstalado.AIusarel aparato
comepmpulsorde aim,siempre
instalelostubesde pmpulsi6n.AI
usarel equipoopcionalde aspira-
ci6n,siempminstalelostubesy la
bolsade aspiraci6n.AsegQreseque
lacremallerade labolsadeaspira-
ci6nse encuentreeompletamente
cerrada.
• Inspeccionefrecuentemente laaber-
tufade entradade aim,lostubesde
pmpulsin,lostubesde aspiraci6ny
eltubeen forma decodesiempre
conelmotordetenidoyla bujfades-
conectada.Mantengalasaberturas
de ventilaci6ny lostubesdedescar-
ga libresde escombrosque sepue-
den acumulary limitarla cir_ulaci6n
debidadeaire.
• Nuncacoloqueobjetoalgunodentro
dela entradade aireya que dehac-
adopodrfalimitarla circulaci6nclaire
y dafiarel aparato.
• Nuncause el aparato para esparcir
substanciasqufmieas,fertilizantes u
!

otrassubstanciasque puedancon-
tenermaterialest6xicos.
• Pare evitarla propagaci6nde incen-
dios,nouseel aparatocerca deho-
guerasde hogassecasode mator-
tales,de hogaresde leSa,deparril-
las,barbacoas,ceniceros,etc.
• Use elaparetoexclusivamentepare
los fines descdtoseneste manual.
HAGA EL MANTENIMIENTO DEL
APARATOEN LA FORMA DEBIDA
• Permitaque todomantenimiento
apartede losprocedimientosre.
omendadosdescritoseneste Manu-
al del Usuado,seenefectuadospor
un Centrode ServicioSears.
• Desconectela bujfaantesde hacer
cualquiermantenimiento,conla ex-
cepci6nde losajustesal carburador.
° Useexclusivamentelos repuestos
recomendadosd lamaroaCRAFTS-
MAN;el usodecualquierottore-
puestopodrdinvalidar la garantfao
da_arel aparato.
° Vacfael tanquede combustibleantes
de almacenarel aparato.Consuma
elcombustiblerestanteen elcarbu-
radorponiendoelmotoren marsha y
dejdndoloen mamhahasteque se
_ste se detenga.
• Nouseningdnaccesorio nipieza
adicionalapartede losrecomenda-
dospotelfabricante pareusercon
suaparato.
• Noalmaceneelaparato nielcom-
bustibleen un recintocerradodonde
losvaporesdtcombustiblepuedan
entraren contactoconchispasolla-
mas abiertasprocedentesdecalen-
tadoresde ague,motoreso interrup-
toreseldctrieos,calefactorescen-
trales,etc.
• Almaceneelaparatoenunlugar
seco,fuera del alcancede losniSos.
AVISO ESPECIAL: Paralosusuarios
en TierrasForestadasen losEstados
Unidosyen algunos estados,incluyen-
do California(C6digosde Recummos
Pdblicos4442y 4443), Idaho,Maine,
Minnesota,Nueva Jersey,Oreg6ny
Washington:Se requierea ciertosmo-
toresdecombusti6nintemaoperados
entierrascubiertasporbosques,ma-
torralesy/opasto,en lasdrea anterior-
mente mencionedas,quevenganequi-
padoscon rejillaanti-chispas,manten-
ida enperfoectoestadodefunciona-
miento, o queel motorest_construido
y equipadoparelaprevenci6nde in-
cendiosymantenidocorrectamente,
Consultecontasautoridedesestatales
o localesacerca de losreglamentsque
se relacionenconestosrequisitos,De
nocumplirconestosrequtsitos,usted
estate,en violaci6nde la ley.
Esteaparatonovieneequipdode
fdbdca con rejiltaanti-chispa;sinem-
bargola rejillaanti-chispavienedis-
poniblecomopiezaopcional.Sise re-
quiemreji[laanti-chispaen laIocalidad
dondeustedse encuentra,entreen
contactoconel Serviciode Searspare
obtenerelequipoderepuestoscorres-
pondiente.La rejillaanti-chispa,lostu-
bosde pmpulsi6nylas boqutllasdeb-
erdnester instaladosen elaparato
pare estaren totalcumplimientocon el
reglamento.
AVISO ESPECIAL: Elestarexpuestoa
lasvibracionesatrav6sdelusoprolon-
gadode herramientasde fuerzaa ga-
soline,puede causerdafiosalosva-
sossangufneosoa los nerviosde los
dedos,las manos y las coyunturasa
aquellas personaspropensasa los
trastomosde laeirculaci6noalas hin-
chazones anormales.El usoprolonga-
do enclimesfrfosha sidoasociado
con da_os a losvasossangufneosa
personasque pototraparteseen-
cuentranenperfectoestadode salud.
Si ocurrierasfntomastalescomoelen-
tumecimiento,eldolor,la falta desenti-
do enlos dedos,lasmanosoen las
coyunturas,pare de userestamdquina
de inmediatoy procureatenci6nm_di-
ca. Lossistemasdeanti-vibraci6nno
garantizanque se evitantalesproble-
mas. Los usuariosque hacenusocon-
tinuoy prelongadode las herramientas
de fuerza debenfiscaUzaratentamente
su estadoffsico y el estadodelapara-
to.
-16-

CONTENIDO DE LA CAJA
Verifiquequatodoslosarb'culosde la
sigu_entelistaest6nincluidos:
Modelo 358.797030
• PropulsordeAire
• Tubode Propulsi6n
• Aceitede Motora 2 Tiempos
AVISO: Es normalqua elfiltre de com-
bustiblegolpeteeen eltanque vac_'o.
MONTAJE
ADVERTENCIA: SI recibi6 elapara-
toya armado, repitatodoslospasos
pareasegumrsaquoel aparatohaya
sidoarmado correctamentey quato-
doslosfr]adoresse ecuentrenbien
fijos.
• Nose requiereningunaherramienta
parael montaje.
INSTALACION DEL TUBO DE
PROPULSION
• Alineelamoldura salientedef tubo
depropulsi6nconla renura en la sall-
da de aire dela proputsora;girehas-
ta encajar en su lugar.
EQUIPO OPCIONAL DE
ACCESORIOS DEL ASPIRADOR
Sopodr_convertirelpropulsoren as-
piradorainstalandoel Juegopare Aspi-
radoreoptativoN_358.799900,dispon-
ibleen lasucursaSearsrodscemana.
MONTAJE DE LA BOLSA DE
ASPIRACION
• Coloquelapuntapequefiade labol*
sa de aspiraci6nsobrela saiidade
propulsi6ny sujetela peritlaconla
abrazadera.
Banda
Salida o Airodo|Propulsor
Tubode Propulsi6n
_' MolduraSatiento
• Aprietelaabrazaderadeltubogiran-
do la perillahaciala derecha.
• Pare removerel tubo,giretaperilla
haciala izquierdapara aflojarla
abrazadera;remuevael tubo.
• Ajustebientabanda veicro,
• Asegdresedequa lacremallerase
encuentrecompletamentecerrada.
• Asegurelaspuntasde labandadel
hombrometiendo la bandaa trav6s
dela hebillaccmose ilustraa conti-
nuaci6n.
/
-17-

MONTAJE DEL TUBO DE
ASPIRACION
ADVERTENCIA: Detenga el motor
y aseg(Jrese de que las cuchillas
del imputsor no se encuentren gi-
rando antes de abrir la compuerta
de entrada de aire del aspirador o
de intentar introducir o remover los
tubos de aspiraciSn. Las cuchillas
girantes podrfan causar serios ac-
cidentes.
• Retireel tobo de propulsi6n
• Alineeel tubo de aspiraci6n inferior
comose ilustra. Introduzca el tubo de
aspiraci6n inferiordentro de!tubo de
aspiraci6nsuperior.
TubodeAspiraci6n__
• Introduzcaun destomillador dentro
del dreaajustadaen la compuertade
entradade aim delaspirador.
1% Area
• Coloquelosganchosquese encuen-
tranenel tubode aspiraci6nenel
postede retenci6n;gireel tubohasta
quedar en posici6n.Asegureeltubo
de aspiracidngirandola perillahacia
laderechahastaquedarajustado.
ioAIvolvera convertirel aparatoen
propulsorde aire,aseg,_resedeque
laparteajustadade ta compuertde
entradade aimdel aspiradorseen-
cuentrebienflja.
__ de Entrada
• Suavemente,gireel mangodel des-
tomilladorhaciala partetraseradel
aparato,mientras,tirehaciaardba de
la compuertade laentradade aim
del aspiradorconsu otramano.
• Sostengalacompuertadeentrada
de airedetaspiradorabiertahasta
queel tubode aspiraci6nquede
instalado.
2 i;2o,ooo,aN
-18-

CUCHILLAS DESMENUZADORAS
Su propulsorvieneequipadocon cuch,lasdesmenuzadorascomocaracter[stica
standard.Cuandouseeste accesorio opcionaldel aspirador,lascuchillasdesme-
nuzadorasreducirdnlosescombrosen unaproporci6ndehasta16:1.
CONOZCA SU PROPULSOR
LEA EL MANUALDEL USUARIO Y SUS REGLAS DE SEGURIDADANTES DE
COMENZAR A USAR ESTE PRODUCTO. Comparelas ilustracionessiguientes
consuaparatoparafamiliadzame conta Iocalizaci6ndeloscontrolesy ajustes
del mismo.Guardeeste manualparafuturasreferencias.
Interruptor
ControldeVe]ocidad(_
Bombeador_)
Tubode
Propulsl6n
ON/STOP
Mezclade
Combus-
tible.
Cuerda
\
MangoTrasero
iNTERRUPTOR ON/STOP
ElinterruptorON/STOP es usadopara
detenerel motor,el irrterruptorse man-
tendrden la posici6nON. Para detener
.el motor,presioneysostengael inter-
ruptoren laposici6nSTOP hastaque
el motorse detengaporcompleto.
ARRANQUE EN FRIO _),
ArranqueenFrfo _) ayudaa suplir
dconcombustibleelcarburadordu-
mnteel arranque.Estole permitirdar-
rancarel motorcuandose enouentre
fdr. Paraactivarel Arranqueen Frfr _
muevata palancadelArranqueen Fda
_a la posicibnRUN. Yea lasecci6n
de Arranquede Motorpara una infor-
.H I I I
POSIC{ON
DE USO
Pmtecci6n
Pgralos
jos
maci6nmdsdetaUadasobrela puesta
enmarcha.
BOMBEADOR_)
El Bombeador(_ retiraaim de las
Ifneasdecombustibleylas |lena con
combustible.Estole permitirdarrancar
elmotorconmenostironesde la euer-
da de arranque.Para activarel Bomb-
eador_ presioneel botbny luego
permitaquevuelvaa su posioi6norigi-
nal
CONTROL DE VELOCIDAD (_-
ElContro_de Velocidad_, controlala
velocidad'delmotor.Mu_valototalmente
haciadelanteparaconseguirmdxima
velocidad.Mudvalototalmentehacia
detrdspara¢onsegutrla marchalenta.
ANTES DE PONER EL MOTOR
EN MARCHA
ADVERTENCIA: AsegOresede
haberlerdo todala informaci6nsobre
el combustibleenlas reglasde
seguridadantes decomenzar,Sino
comprendelas
intenteabacstecer el aparatocon
combustible.Llameal 1-800-235-5878.
ABASTEClMIENTO DEL MOTOR
Este motorestdhabilitadopara
funcionar congasolinasinplomo.
Antesde usar,deberd mezclarla
gasolinaconun aceitede buena
-19-

calidadpara motoresde 2 tiempos
enfriadosaaire.
Recomendarcosel aceite dela marcha
WeedEater.Mezclela gasolinaconel
aceiteen laproporci6nde 40:1 (Se
obtieneunaproporci6nde40:1
mezclando3.2 onzasde aceitecon
cedegak_ndegasolinasinplomo).NO
USE aceitepara autom6viles ni para
barcas.Estosaceites da_ardnel
motor.AI mezclarelcombustible,siga
lasinstruccionesimpresasenel
recipiente.Unavez que hayaaSadido
elaceite a la gasolna,agiteel
recipientebrevementepare asegurar
queelcombustibleest_
completamentercezclado. SJemprelea
y sigalasreglasde seguridadque
tienenquever conel combustible
antesde abastecer el aparato.
IMPPORTANTE
Laexperienciaindicaqueloscombus-
tiblesmezcladosconalcohol,(loslla-
rcadosgasoholo losque tienenetano!
o metanol)puedenatraer hurcedad,Io
que puedecauserla separaci6ny la
formaci6nde tic!dosduranteel alrca-
cenaje.Lagasolina dcida puededa_ar
elsistercade combustibledel motor
duranteelalmacenaje.
Pareevitarproblemasconel motor,
deberdvaciarseelsistemade combus-
tibleantesde almacenarelaparato por
30 dfaso mds/
Vacfeel tanquede combustible,ponga
elmotoren marchay ddjeleen marcha
hastequelas Ifneasde combustibley
elcarburadorquedenvac|os.Use
combustiblefresco en lapro6x_matem-
rada.
_nca useproductosde limplezade
motorocarburadoren eltanquede
corcbustibleyaquede hacedopuede
provocardanospermanentes.
Unestabilizadorde combustiblees
unaaltemativaaceptablepareminimi-
zer laforrcaci6n de dep6sitosde goma
enel combustibleduranteel alrcace-
naje. Elaceite de lamamha Weed Eat-
er vleneya mezcladocon estabilizador
de combustible. Vea la secci6nde AL-
MACENAJEpare mds informaci6n.
PARA DETENER EL MOTOR
• paredetenerel motor,presioney
sostengael interruptorStop O has-.
ta queelmotorse detenga.
PARA PONER EL MOTOR
EN MARCHA
ANTES DE PONER EL MOTOR EN
MARCHA
-20-
Es OBLIGATORIOasegurarse quelos
tubosest_nbienfijosantesde usarel
aparato.
• Abastezcael motor,Ap_rtese porIo
menos 3 metros(10 pies) dellugar
deabastecirciento.
• Sostengaelaparato enta posici6n
dearranqueilustrada.Asegdresede
que laboquillade propulsi6nnoest6
direccionadahacia personas,an!-
males,vidrterasy otrosobjetoss61i-
dos.
ADVERTENCIA: AI arrancarel mo-
tor,sostengael aparatocomose iiustra
en lafigure. Apoyeel aparatoexclusi-
varcenteenuna superficie!ircpiay
s61idasiemprequevayaa efecturae!
arranqueysiemprequetenga que
apoyarel aparatoconel motoren Imar-
cha. Losescombrostalescorcogravil-
la, arena,tierm, c_sped,etc,, pueden
sersuccionadosporlaentradade aim
y arrojadesporlasalidade propulsi6n,
daSando el aparato uotros bienes
o causando graves heridas a es-
pectadores o al usuario.
Controlde
Vetocidad _ _ Interruptor
Palancade_ !
Arr q en\ i"--1/
PARA ARRANCAR UN MOTOR FRIO
O CALIENTE DESPUES DE QUEDAR
SIN COMGBUST|BLE
• Lentamente presione el bombeador
12 veces.
• Muevalapalancadelcebadorala po-
sici6nFull
• Mueva lapalanca del aceleradorala
posici6n_.
• "l]rede la cuerda de arranquefirme-
rcente hastaque el motorintentear-
rancar,pero no m_.sde 5 tirones(en

temperaturespordebajo de los 30° F,
tratecon8 tironesde la cuerdade ar-
ranque).
AVISO: Si el motortrata de arrancar
antes del quinto tir6n, procedacon el
pasosiguienteinmediatamente.
* Muevala palancadelcebadorala po-
sici6nHalfChoke,
oTire de la cuerda de arrenque firme-
rnentehastaqueelmotorse pongaen
marcha, perono mdsde 5 tirones(en
temperaturespordebajode los30° F,
tratrecon I0 tirones).Permitaque el
motormarchepot 5 segundos,luego
mueva lapalancadelcebadorala po-
sioi6nOff Choke.
° Permita que el aparato mamhe por
otros30 segundoscon ]apalancadel
cebador en la posici6n Off Choke
antesdemoverlapalancadelacelera-
dora la posici6n._P.
Si el motornoarranca despu6sde tirar
de lacuerdapor 5 veces(enla posioi6n
HalfChoke),repitadelpasode comoar-
rancarun motor"fifo". Si el motorper-
sistesin arrancar,procedacon "Arran-
que de MotorAhogado"i
RESPONSABILIDADDEL USUARIO
TAREADE CUIDADOY MANTENIMINENTO WHEN TO PERFORM
Verificarque nohayafijadoresflojosniptezas Antesde cada use
sueltas
Verificarque no hayapiezas dafiadaso Antesde cacJauso
gestadas
Umpiar el aparatoy susplasas Despu_sde cadauso
Limpiarel filtro de aire Cada 5 horasde uso
Cambiarlabuifa...... Anualmente
Cambiarelfiltor deJcombustible Anualmente
VERIFICAR QUE NO HAYA que el motorse detengacompleta-
PIEZAS SUELTAS NI FIJA- mente. Aseg_resede queel motor
DORES FLOJOS se detenga;luego vuelvaa arrancar
Cepuchade la Bujl'a elmotory contin6e.
Ffltrode Aire • TanquedeCompustible.Parede
• Torn,losde laCaja userelaparato sihay indiciosde
VERIFICAR QUE NO HAYA dafioso p_rdidasen el tanquede
PIEXZAS DAi_IADAS N! combustible.
GASTADAS • Bolasde laAspiradora.Pare deuser IIInl
El Centrode ServicioSearsdeber& labolsade aspiraci6nsi seenouen-
efecturatodocambiode piezas dana- tra dealquna manerarotaoda_ada.
deso gastadas.
• InterruptorOn/Stop.Aseg6rasede LIMPIE EL APARATO Y SBS
que el mterruptorOn/Stopfuncione PLACAS
deunaforma apropiade,para deten- ° Umpie el aparatousandountrapo
er el motor,presioney sostengael hdmedocon detergentesuave.
interruptoren la posici6n Stop hasta • S_queloconuntrapolimpio,
ARRANQUE DE MOTOR CALIENTE
CON COMBUSTIBLE
• Muevalapalancadelcebadoraiapo-
sici6nHalf Choke.
Mueva lapalanca del aceleradorala
i posici6n_.
Tire de la cuerda de arranque firme.
mentehastaqueelmotorse pongaen
marcha, perono mdsde 5 veces.
• Permitaqueelmotormarchepor5se-
gundostuego, mueva lapalancadel
cebadora a pisici6nOffChoke.
AVISO:lSi elmotornoarranca,tiredela
cuerdade arranque otras5 veces.Si el
motorcontinuasm arrancar,probabte-
mentese eneuentreahogado.
ARRANQUE DE MOTOR AHOGADO
Mueva lapalancadel cebadora la po-
sici6nOffChoke.Mueva te palancade-
laceleradorala posici6n,tB. Tire dela
cuerdade arranqueparaaclararelmo-
tordel excesode combustible.Esto
podrd,requerir quese tirede la cuerda
dearranquemuchasveces.
Si el aparato contimla sinarrancar,yea
la Table Diagn6stica o llame al
1-800-235-5878.
-21-
I

LIMPIEELFILTRODEAIRE
Nolimpis elfittrodeairs congasolina
niningdnottosolventeinflamable,ya
que de hacertopuedecrest peligrode
incendioy de emicionesevaporativas
noclvas.
Limpieza de! filtro del aire"
Losfiltros de airssuciosdisminuyenel
rendimientodelmotore incrementanel
consumode combustibley laproduc-
ci6nde emisionesnocivas.Siempre
limpieelfiltrode airs despudsded
cada5 boresdeuso,
7_ Cubie_a
Fiitride Airs _FeelAF'i:_er°
• Limpielacubiertay el dreacontigua
parsevitarquecaJgatierraen la
cdmarade|carburadorcuando
remuevalacubierta.
• Retire/aspiezascomose ilustra.
Permita9us el filtrose seque.
i aveelfiltroconaguay jab6n.
repongamspiezas.
CAMBIE LA BUJIA
Cambiela bujfaanualmente.La sepa-
raci6nde loselectrodosde ta bujfa
deberdserde .025 de pulgada.El en-
cendidoesfijoy noes ajustable.
• Gireyluegoretirelacapuchade la
bujfa.
• Retireiabujfadetcilindroy des_che-
la.
• Cdmbielapot unabujfaRCJ-SYy
ajustelaconunallavede 3/4 de pul-
gada.
• Vuelvaainstalarlacapuoha.
CAMBIE EL FILTRO DEL
COMBUSTIBLE
Parscambiarelfiltrodelcombustible,
vacieel aparatode todocombustible
dejandoel motoren mamhahaste que
se detenga.Luego,remuevael mon-
taje de latapa/retenedordeltanque.
Tiredelfiltroquese encuentraen el
tanquey retfrelodela Ifneade com-
bustible.Instaleunfiltor nuevoen la
Ifneade combustible;vuelvaa instalar
todaslaspiezas.
Recomendamosquetodoelmantenimi-
entoy todoslosajustes no listadosen
este manual sean efectuados pot un
Centrode ServicioAutorizado.
AJUSTES AL CARBURADOR
El ajusteal carburadoresde vitalim-
portanciaysi se haoeincorrectamente,
puededafiartantoelmotorcomoel
carburadorpermanentemente.Si usted
necesitamdsayudao no estdseguro
dec6mo hacerel procedimiento,flame
a_.nuestmteldfonodoayuda al consu-
midor,al 1-800-235-5878.
Elcombustiblevencido,elfiltrode sire
ode combustiblesucios,o elmotor
ahogadopuedendarla impresi6nde
carburaci6ndesajustada.Verifiquees-
tes condicionesantes de hacer cualqu-
ier ajuste.
Elcarburadorhasido cuidadosamente
ajustadoenla fdbrica. Posiblemente
serd necesarioIhacerajustessi se
notacualquierade las siguientescon-
die|ones:
• Elmotornoands enmercha lenta.
Vea =mamhaLenta"y "Mezcla" bajo
procedimientode ajuste.
- 22 -
• Elmotorse pars ose ah0ga cuando
debe acelerar.Vea _Ajustede Aceler:
aci6nbajoprocedimientode ajuste.
•Falta de potencia.Vea"Mezcla" bajo
proeedimientode ajuste.
PUNTOS DE PRECALIBRACION
AI hacerajustesno fueme tastapes
limitadoras de pldsticomdsslid de los
retenedoresopuedehaber dafios.Si
nose necesitanlospuntosde precalF
braci6n,passala secci6nde "Procedi-
miento deAjuste,Mamha Lenta'.
Parsajustar la precalibraci6n:
• Gireel tomlllodemezcla haciala iz-
quierdahastequese detenga.
• Gireeltomitlode la marchalenta ha-
cia la derechahasta quese detenga.
Luego,gfrelohaciala izquierda4
vueltasy media.
Pongael motoren marcha, permits
quemarcheper 3 minutos, luegopro-
cedecon la secci6nde ajustes.Si el
motornoarranca,veala table
diagn6sticao Ilameal 1-800-235-5878.
Siel funcionamiento del motores
aceptableconla posieionesantsriores,

no hardfalta hacer rodsfalta hacer
rods ajustes.
( Lenta
Tom_llod_la Marcha
o'T-_miflode MezcTa
(contapaslimita.
doras)
PROCEDIMIENTO DE AJUSTE
Marcha Lenta
Permitaclueel motortrabajeen mar-
chalenta.Ajustelas revolucioneshas-
ta queel motorse mantenga en mar-
chasinahogarse.
• Gtrehacia la derechaparaincremen-
tarta velocidaddel motorsiel motor
se ahogao se aparga.
• Gireeltomitlode |a marchalenta ha-
ciala derechahastaquese detenga.
Luego,gfrelohaciala izqulerda4
vueltasy media.
PROCEDIM1ENTODE AJUflTE
_ Permitaque el motortrabajeen mar-
" cha lenta.Ajustelasrevolucloneshas-
_ taque el motorse mantengaen mar-
chasinahogarse.
• Girehacialaderechaparainoremen-
tar ta veJocidaddel motorsiel motor
se ahoga o se apaga.
• Girehacia la izquierdaparabajar las
revoluciones. No ser_necesadoel
hacerm_sajustessiel rendimiento
es satisfactorlo,
Mezcla
Permita queel motortrabajeen mar-
chalenta,luegoacelereel motory
tomenotadel funcionamiento, siel mo-
torse ahoga,noacelera bienohumea
al ace|erar,gireeltomiltode ajuste de
mezcfa hacialaderecha enincmmen-
losde 1/16 devuelta0nicamentehas-
ta obtenerunfuncionamientocatisfac-
torio,Repitaeste procedimiento las
veces que sea neossario hasta obten-
er un rendimiento saUsfactorio,des-
pu6s de completarestos ajustes, verifi-
que la aceleraci6n. Ajuste nuevamente
sies neoesario.
Verificaci6n de Aceleraci6n
S!el motorse apaga ovacilaen lugar
deacelerar,gireel tomillodeajustede
mezclahaciala izquierdahastaconse-
guirunaaceieraci6npareja,Verifique
nuevamentey haga los ajustesnece-
sariosparaconseguirunfunclona-
miento aceptable.
Prepareel aparatopara el almacenaje
al finalde latemporadao sica a estar
sin usarporrods de30 dfas.
ADVERTENClA:
• Permitaqueel motorse enfrfey file
blenel aparatoantesde guardarloo
tmnsportarlo.
• Guardeet aparatoy elcombustible
en untugar bien ventUadodondelos
vaporesde combustibleno puedan
entraren contactoconchispaso lla-
masabiertasprovenientesde termo-
tanques,motoresointerruptores
el_ctricos,calefactorescentrales,etc.
• Guardeelaparatocon todoslospro-
tectoresen su lugary colo_ueel
aparatode modoque las plezasfilo-
sas no puedancausarbetidespot
accidente.
- Guardeel aparatoy el combustible
comp.letamentefuera delalcancede
losnmos.
SUPERFICIES EXTERNAS
• Siva a almacenar elaparatoporun
periodolargodetiempo,I/mpmlori-
gurosamenteprimero.Gu_rdeloen
unlugarlimpioyseco.
• Apl_queuna pequeSacantidadde
aceitealas superficiesmetdlicas ex-
temas.
SISTEMA DE COMBUSTIBLE
Bajoel Abastecimientodel Motor,en
laseccidnde Usode este manual,yea
elmensaje marchadocomoIMPOR-
TANTE referenteal usode gasoholen
sumotor,
Losestabilizadoresdecombustible
sonuna alternativa aceptable para
minimizarlaformaci6n delosdeposi-
tosde gomaduranteelalmacenaje.
Afiadaestabiiizadora la gasolinaenel
tanquede combustibleo enel reci-
pientepara alacenaje de combustible.
Siga lasinstruccionesde mezcla que
se encuentranen losenvasesdel esta-
bilizador,Pongael motoren mamhay
-23--

ddjeloen marchaporIorrenos5 minu-
tosdespu_sdehabedepuestoel esta-
bilizador Elaceitede la mamaWeed
Eater40:1 para motores a 2 tiempos
(enfriadosaaire)ya viene mezclado
conestabilizadorde combustiblesino
usaesteaceite,entoncespuedea_a-
dirunestabilizadoraltanquede com-
bustible
INTERIOR DEL MOTOR
• Retirela bujfay viertaunacucharadi-
ta deaceite 40:1 paremotores de 2
tiempos(enfriadosa aim)por laaber-
tufade labujfa Lentamentetirede la
cuerdade arranquede 8 a 10 veces
paradistribuirel aceite
TABLA DIAGNOSTICA
PROBLEMA CAUSA
E!motorno • Elmotorestdahogado
arranca • Eltanquedecombustibleest_
Elmotor no Elcarburadorrraquieraajuste
endaen ," Lasjuntasdelcig0etialestdn
marchalenta gastadas
comodebe • Lacompresi6nestdbaja
El motor no • ElfiltrodeaJraestdsucio
acelera,te • Labujfaest_carbonizada
faltapotencia
o seapaga * Elcarburadorrequieraajuste
bejocarga • Acumutaci6nde carb6im
Elmotor • Elcebadorest_ parcialmente
humea . accionado
excesivamente Lamezcla de combustiblese
Elmotor , La mezclade combustiblese
marcha hehechoincorractamente
contern • Seha instaladola bujraincor-
_eratura recta
elevada • Elcarburadorrequiere ajuste
vacfo
: La bujfano hacechispa
Elcombustiblenoestd
iltegandoalcarburador
• La compresi6nestdbaja_
• Lacomprasi6n estd baja
ha hechoincorrectarnente
• Elfiltrade aJraest_sucio.
• ElcarburadorrequieraaJuste
• AcumulacJ6nde carb6n.
• Reemptacela bujfaconotranueva
deltipoyde la gamadecalor recom-
endados
Examinetodoel aparatopareverifi-
carque no hayantomitlos,quebra
i Limpieelfiltro deairs
das o gastadas
AI principiode la pr6ximatemporada,
useexclusivamentecombustible
nuevoconla proporcl6ncorrectade
gasolinayaceite
OTROS
• Noguardela _gasolinadeunatempo-
radaa lasigutente
° Cambie elrecipientsde gasolinesi
se empiezaa oxidar
SOWC=ON
• Vea las=lnstruccionesde Arranque
* Lienseltanque conlamezcla
correctade combustible
• Instalsunabujfanueva
• Vedfiquesielfiltro de combustible
estd sucio;cdmbieloVerifiquesi
haydoblecesen la ffneade
combustibleo si dstase encuentra
[ panda; repdralaocdmbiela
i - Entreen contactoconsuCentrode
Servicio
• Vea"Ajustesal Carburado¢'
• EntreencontactoconsuCentro
de Serviclo.
• Entre encontactoconsuCentre
de $ervicio.
• Limpieocambieeltiltrodeairs.
• Limpieocambielabujfay calibre
fa separacldn.
• Vea "Ajustesa_Carburador".
• Entre en contactoconsuCentro
de Servicio,
• Entreen contactoconsuCentro
de Servicio,
Vea =Abastoc!mientode|Aparato;.
i uamD=ezaoujia pot correcta
Vea "Ajustosal Carburador"
• Entre en contatoconsuCentrode
Sewicio
• Vea "Abastecimiento delAparato"
• Cambie labujfaporla corracta
* Vea"Ajustas _dCarburador"
. Entre en contatocon suCentrode
Servicio
la
Sisituacionessurgieranno descritasen este manual,actue concuidadoyuseel
buensenUdocom0n Si necesitaraasistencia,entreen contactoconsu Centro/
Departamentode ServicioSearso Ilameal Tel_fonode Ayudaal Consumidoral
1-800-235.5878
-24-


For the repairor replacement parts you need
delivered directly toyour home
Call 7 am - 7 pm, 7 days a week
1-800-366-PART
(1-800-366-7278)
Para ordenar piezas con entrega a
domicilio - 1-800-659-7084
For in-home major brand repair service
Call 24 hours a day, 7 days a week
1-800-4-REPAIR
(1-800-473-7247)
Para pedir servicio de reparaci6n a
domicilio - 1-800-676-5811
For the location of a Sears Parts and
Repair Center in your area
Call 24 hours a day, 7 days a week
1-800-488-1222
For information on purchasing a Sears
Maintenance Agreement or to inquire
about an existing Agreement
Call 9 am - 5 pm, Monday-Saturday
1-800-827-6655
When requestingserviceor orderingparts,always
provide thefollowinginformation:
• ProductType • PartNumber
• ModelNumber • Part Description
America'sRepairSpecialists
 Loading...