

Craftsman 358796170 Owner’s Manual
operator'sl
manual.,
MODEL NO.
358,7r96170 '
_/ , STCRRFTSMRN®t
r22.2CC GASOLINE EDGER
.• , •%,j•
2 Cycle Engine
" !fl,WARN;NG:
read and follow all
Safety Rules, Precationsand
Operating Instructions, Fail-
ure to do so can result in
serious personal injury,
=Assembly
= Operation
i_Always Wear Eye Protection During Operation
.... : Sold by Sears. Roebuck and Co.,, Chicago. Ill. 60684 U.S.A._' •
666654-0108_t-01086: • - .
Fuel Mix 16:1
=Maintenance
= Repair Parts "
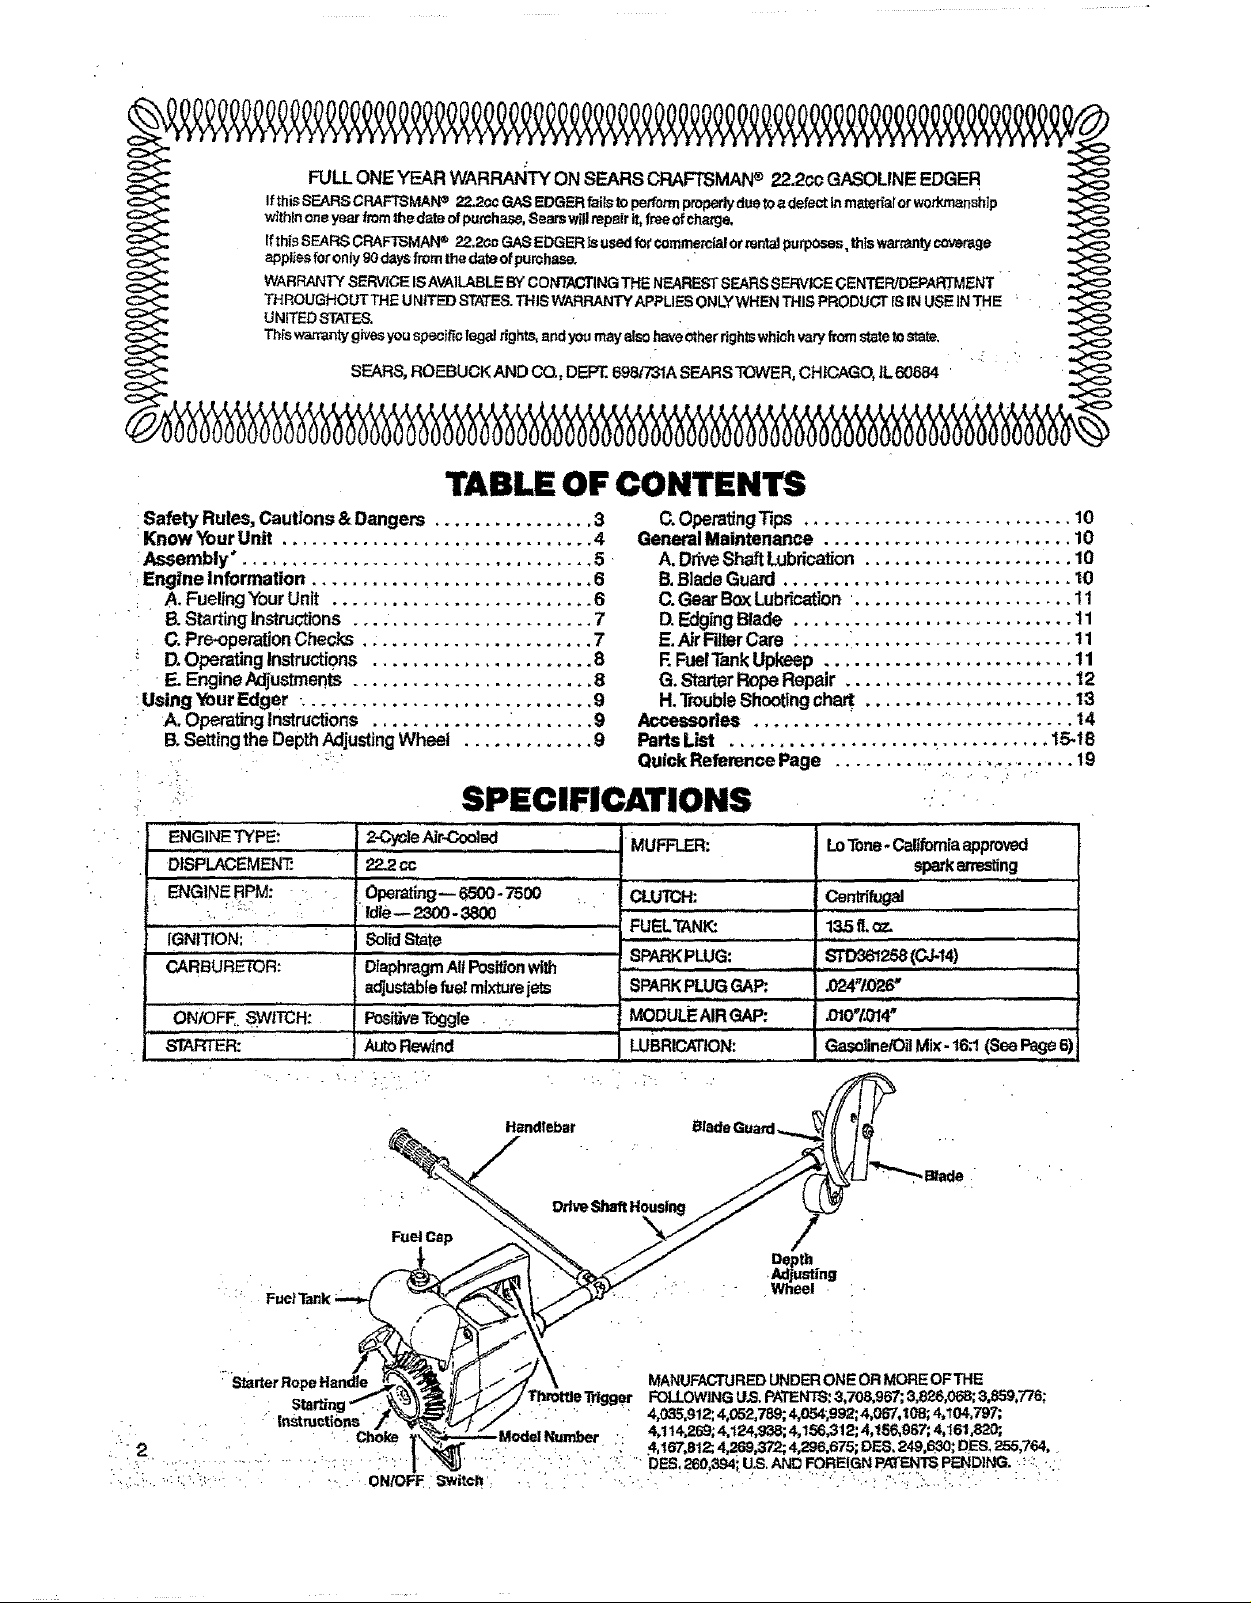
TABLE OF CONTENTS
• !Safety Rules,Cautions&Dangers ................ 3
•KnowYourUnit ............................... 4
:Assembly'. .................................. 5,
_.EngineInformation ............................ 6
• A. FuelingYour Unit .......................... 6
B.StartingInstructions.... .................... 7
: C.Pre-operationChecks ....................... 7
D.OperatingInstructions ...................... 8
E.Engine Adjustments ........................ 8
:UsingYourEdger +............................ 9
• A, Opera_nglnstructions ' .9
13.SettingtheDepthAdjusting Wheet ............. 9
SPECIFICATIONS
ENGINE TYPE:
DISPLACEMENT."
ENGINE RPM:
IGNITION:
CARBURETOR:
...........ON/OFF SWITCH: .
STARTER:
2-CycleAJr-Ooolad "................MUFFLER::
22_cc
Operating-- 6500.7500 :.. CLUTCH:
fdle-- 2300-3800 ..........
SolidState
..... FUELTANK:
......................SPARKPLUG:"
D_aphmgmAltPosPJonwith .......
adjustablefuetmixturejets SPARKPLUGGAP;.
,,,, ,, • , ",
AutoRewind
(3.OperatingTips ........................... 10
GeneralMaintenance ......................... 10
A.DriveShaftLubrication..................... 10
B.BladeGuard ............................. 10
C.GearBoxLubrication. ..................... 11
D.EdgingBlade ............................ 11
E,AirRlterCare ; ..... :...................... 11
F.FuelTankUpkeep ......................... 11
G.StarterRopeRepair ....................... 12
H.TroubleShootingchart ..................... 13
Accessories ................................ 14
PartsLiSt .................... _ .......... 15.t8
QUickReferencePage ......... :.............. .,. 19
, ' , .
LoTone-Californiaapproved
sparkarresting
Centd_gal
13,5g.<_
............
MODULEAIRGAP:
u i
LUBRICATION:
.024"i_26"
iiiiiiii ii ..................
iiiiiiiiiiiiiii i i i
Gasoline/OilMix-16:1(SeePage6)
Handlebar Blade Guard,.._ (( l_ '
'; Ddve,_rt H
Fuel Cap /
Depth
•Adjusting
: 'StarterRope Handle rottleTdgger FOi.LOWING LI.S.PATENTS:3,708.967; 3,826,068; 3.859,776;
" : " 2 ' " " '" " ......... : ': ...... : " M" :" " ' " '_ rr " DES 260,394iU.S ANDFOREIGN PATENTSPENDING. _::
_j_. " • MANUFACTUREDUNDER ONE OR MORE OFTHE
. . " " 4.035,912;4052,789; 4,054;g92;4,05"7,108;4,104,797;
•Model Number . 4.114.269;4.124,938; 4,156,312; 4.156,987; 4,161,820;
: . 4 167,812;4,269,372; 4 296,675; DF._,249,630; DES, 255,764,
SAFETY RULES, CAUTIONS & DANGERS
Failureto observethe followingSafetyRules andPrecautions canresultin seriouspersonal injury.
A. KNOW YOUR UNIT
1, Read your Operator's Manual carefully until you
completely understandand followall safety rules,
precautions_ and operating instructions before
operating theunit.
2. Restrict your unit to users Whounderstand and
follow all safetyrules,precautions, and operating
instructions inthis manual,
13. PLAN AHEAD
1. Always wear eye protection. The
blade guard will not prevent rocks
and debris from being thrown or
ricocheting into the eyes and face
which can resultin loss of vision or sedous per.
sona/ injur_.
2. Dress safely in long pants and wear boots or
safety shoe_ Donotwearlooseclothing,jewelry,short
pants orsandals;orgobarefoot.
& Do not operate the unitwhen you aretired, ill,or
upset; or ifyouateundertheinfluence ofalcohol,
: drugs or medication.
4. Inspect the areato be cut, Removealtdebris and
objectsthatcouldricochet,bethrownorcouldother-
wisecause injuryordamageduringedging.
5. Keepchitdren,bystanders,andanimatsaminimum
_ :of30 feet (10meters) away when starting oroper-
ating the unit.
C. HANDLE FUEL WITH CAUTION
1. Eliminateallsoumes of sparksorflame(incfuding
smoking, open flames, or work that could cause
sparks) in theareas where fuel is mixed,pouredor
stored.
2. Mix and pour fuel in an outdoor area; storefuel in
a cool, dry, well-ventilated place; and use an
approved, markedcontainer for allfuelpurposes.
3. Do not smoke while handling fuel or while
• operating the unit.
• •4. Wipe up allspills before starting the engine.
5. Move atleast10feet {3meters) awayfromfuel and
• fueling site beforestartingthe engine.
D. OPERATE YOUR UNIT SAFELY
1. Do not use any attachment other than those
supplied and recommended by Searsfor usewit.h
this unit,
2. Inspect the entire unit before each usefor worn,
loose,missing ordamagedparts.Donotuseuntilthe
unitis inproperworkingorder.
3. Keep the handles free of oil and fuel. unitfor 30 daysor more,
4. Neverstartorruntheengineinsideaclosedroom ..... 7. D0notstomtheunitorfuelinactosedareawhere
orbudding.Exhaustfumescontaindangerousearbon • ; hot water heaters,.furnaces,etc.
, monoxide.
5. Neveroperetethe edger without the blade guard : 8.Storeinadryareaoutofthereachofchildren.•
and handlebar securely in place, r J. _ ........ "
6. Make sure the blade stops turning when the
throttle trigger Is released and the engine runs
at idle speed. Forcorrection,referto "Carburetor
Adjustments"page8.
7. Stop the engine and let the unit cool off before
removing the fuel cap and refueling. Always
replacethe fuel cap securely.
8. Keep all parts of your body away from the blade
when startingor runningthe engine.
9. Avoidbodilycontact withthe muffler. Usecaution
whenchangingoperatingpos_onsThe muffler area
can be hotandcauseseriousbums.
10. Do nct overreach.Keepfirmfootingand balanceatall
times
11. Usetheedgerfromyourrightsideonly.Keepyour
lefthandonthehandlebarandyourrighthandonthe
powerunithandle.
Directthe dischargeof debds away from people,
animals, glass, and solid objects such as trees,
automobiles,walls, e_c,asthe unit isbeing operated
12. The fastturningblademaycauserocks,dirt, or sticks
to be thrown or to dcochetwhich may hurt people or
animals, breakglass,or causeotherdamage
13. Do not use the edger on graveled surfaces or in
extremely muddyareas.
14. Always push the unit slowly over rough ground.
StayaJertfor unevensidew_ks,holesinterrain,orother
similar conditions
15. Followthestepsbelowifthe bladestrikesaforeign
object or ffthe unitoperatesabnormally. Stopthe
engine, disconnectthe spark ptug and inspectfor
damage Donotuseuntilthe unit isinproperworkJng
• order
16. Stop the enginewhen theunitisnotinuse. Donot
leavea runningengineunattended.
17. Use only forjobs explained inthis manual.
E. MAINTAIN YOUR UNIT PROPERLY
1, Have allservice other then the items listed inthis
manual performed byyour SearsService Center,
2. Maintainthe unitaccording torecommended pro-
cedum,_
3. Disconnect the spark plug l_fom performing any
adjustment, inspectionor maintenanc_ _pt for
: carburetoradjustment.
•4. Be certain the blade will not contact any object
before making engine adjustments.
5. Use only genuine replacement parts as recom.
: mended bySeam. Theuseofanypart,or accessory
notspecifically recommendedforthisunitmaycreate
a hazardandlorvoid_ur warranty.
; 6. Always drainfuel from thetank beforestoring the
• _ fuelvaporscanreachsparksoran openflame from
r
SAVE THESE INSTRUCTIONS
KNOW YOUR UNIT
,i , ,,, ,,,,,,,,,
A, INTRODUCTION ..... _':
Yourunit willedgesidewalks,drivewaYsandcurbspre-
ciselyand neatly. ' '
Special Festumsinclude:
* 7" inch reversibleblade
- Adjustabledepth controlupto 2 inches
1800blade shield
* Extended handlebar
- Total weight - 14.5tbs.
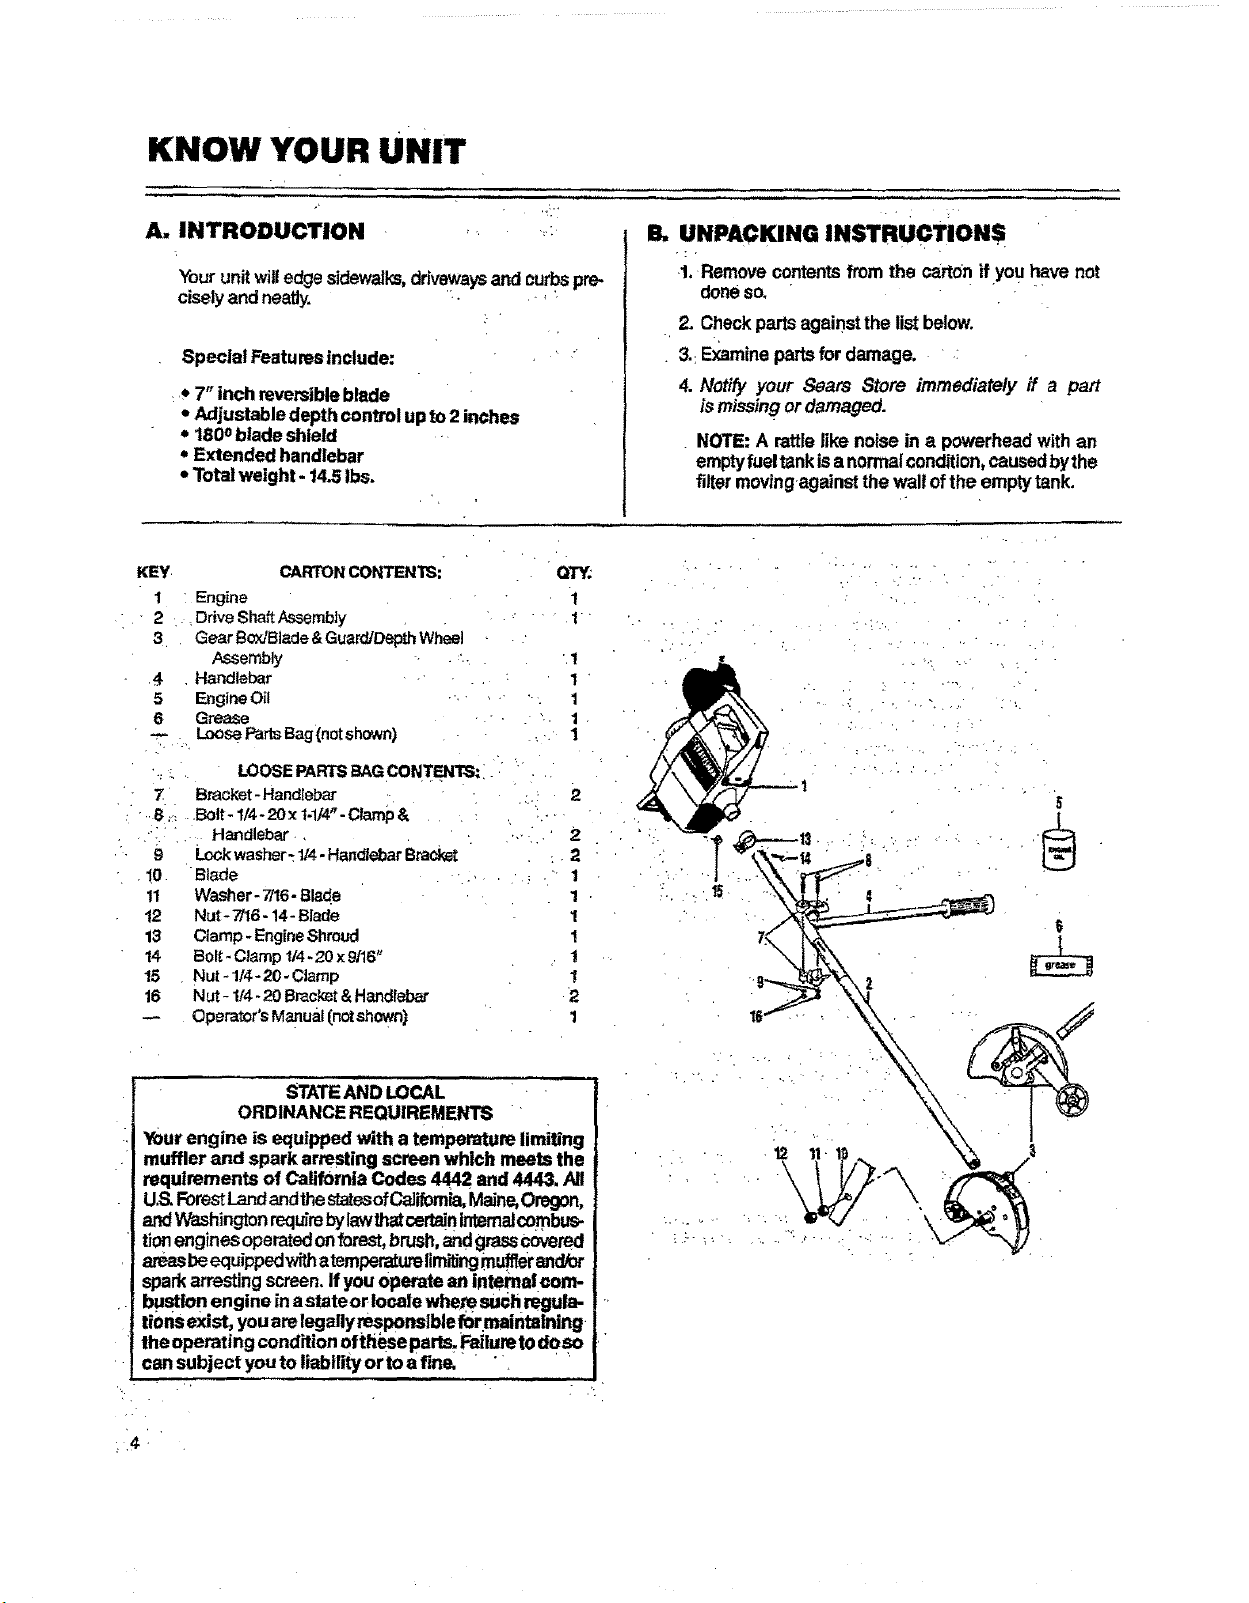
KEY CARTON CONTENTS: QT_
1 Engine 1
2 . .Drive Shaft Assembly " " 1
3 , Gear BccdBl_e & Guard/Depth Wheel
,4 Handlebar 1
Assembly .... 1
5 Engine Oil ........ 1
6 Grease " - " 1
"_7-, LoosePartsBag(notshown) 1
'.,_.. LOOSEPARTSBAGCONTENTS:
7 Bracket-Handlebar :- " • _ 2
: " r r 8" ' P_ ".Bolt - I/4 - 20Xt-1/4"- Clamp & --
. . .. Handlebar., 2
L_k washer- 1/4. HandlebarBracket
Blade
•!0.
11
Washer- 7/16-Blade
Nut-7/16-14- Blade
12
13
Clamp- EngineShroud
14
Bolt_Clamp t14.20 x9116"
15
Nut- 1/4-20- Clamp
16
Nut- I/4 -20 Brecht &Handlebar
Operator's Manual(notshown)
.2
B, UNPACKING INSTRUCTIONS _
1.Remove contents from the carton ifyo u havenot
doneso.
2. Checkpartsagainstthe listbelow.
3.:Examinepartsfordamage..:
4. Notify your Sears Store immediately if a part
ismissing or damaged.
NOTE: A rattlelike noise ina powerheadwith an
emptyfueltankisanormalcondition,causedbythe
filtermoving againstthewallofthe emptytank.
" ' "J _k
1
1
!
!
1
_TATEAND LOCAL
ORDINANCEREQUIREMENTS "
Yourengine is equipped with atemperature limiting
muffler and spark arresting screen which meets the
requirements of California Codes 4442 and 4443. All
U.S.ForestLandandthestatesofCalifomia_Maine,Oregon,
andWashingtonreqL_rebylawthst¢_ertainInternalcombus-
! tionenginesoperatedonfoP.st,brush,andgrasscovered
: amesbeequippedwithatemperaturefimitingmufflerand/or
sparkarrestingscreen.Ifyou operate an intern!!corn-
: bustlonengine inastateorlocalewhe_ suchregula-
tionsexist, youare legallyresponsibleformaintsining
theoperating conditionoftheseparts, Pailuretodoso
can subject youto liabilityorto a fine,.... . ' '
r, . ,
:141"

ASSEMBLY
. ,. . •
Your Operator's ManuaJhas been developed to help you
assemble the unit and tounderstand its safe operation. It is
important that you readyour manual completely to bacome
familiar with the unit before you begin assembly.
A, PREPARATION
1. READ YOUR OPERATOR'S MANUAL
2. Tools you will need: ' •
a. Slotted Screwdriver _'_
b.
11116inchwrench
(2)7/16inchwrenches
OF
(2)Adjustablewrenches
B. ASSEMBLY STEPS
1. DRIVE SHAFT HOUSING TO GEAR BOX
a. Loosenthe pinch clampbolt onthegearbox with
a 7116inch wrench. Figure 1.
b, Loosenthe index screw with a 5f16inch wrench.
Figure 1.
NOTE:Backthe indexscrew outenoughtoallow
clearance for the drive shaft housingbut still
keeping the spacer insidethe gearbox in place.
c. Pull out about 6 inches of the flexibleddve shaft
from the driveshaft housingandinse_tthe square
end of the flexib!e drive shaft into the square
opening in the gear box. Figure 2.
d, Push the drive shaft housing into the gear box
as far as it will go.
" NOTE:IfthePinch clampopeningl:0thegear-box-.-
istootight forthetubetoenter, spreadtheopen-
ing slightly with a screwdriver.
• L , ':
e. Line uptheindexscrewwiththe holeintheddve
shafthousingand tightenfirmlywitha 5/16inch
Wrench.
DRIVE SHAFT
HOUSING
NUT
Figure 1
DRIVE SHAFT
iii iiii ii i
f, _ghten the pinch clamp bolt securely witha 7/16
inchwrench.
2. BLADE
Wear gloves when installing the
bladeto help avoid injury.
a. Placethebladeonthebladeshaft matchingtheflat
area ofthe blade openingwiththe flatsideofthe
Shaft.Figure
" b. Installthe washerand hex nut on the bladeshaft.
• c- Tighten the nutfirmty with an 11116inch wrench.
Figure 3
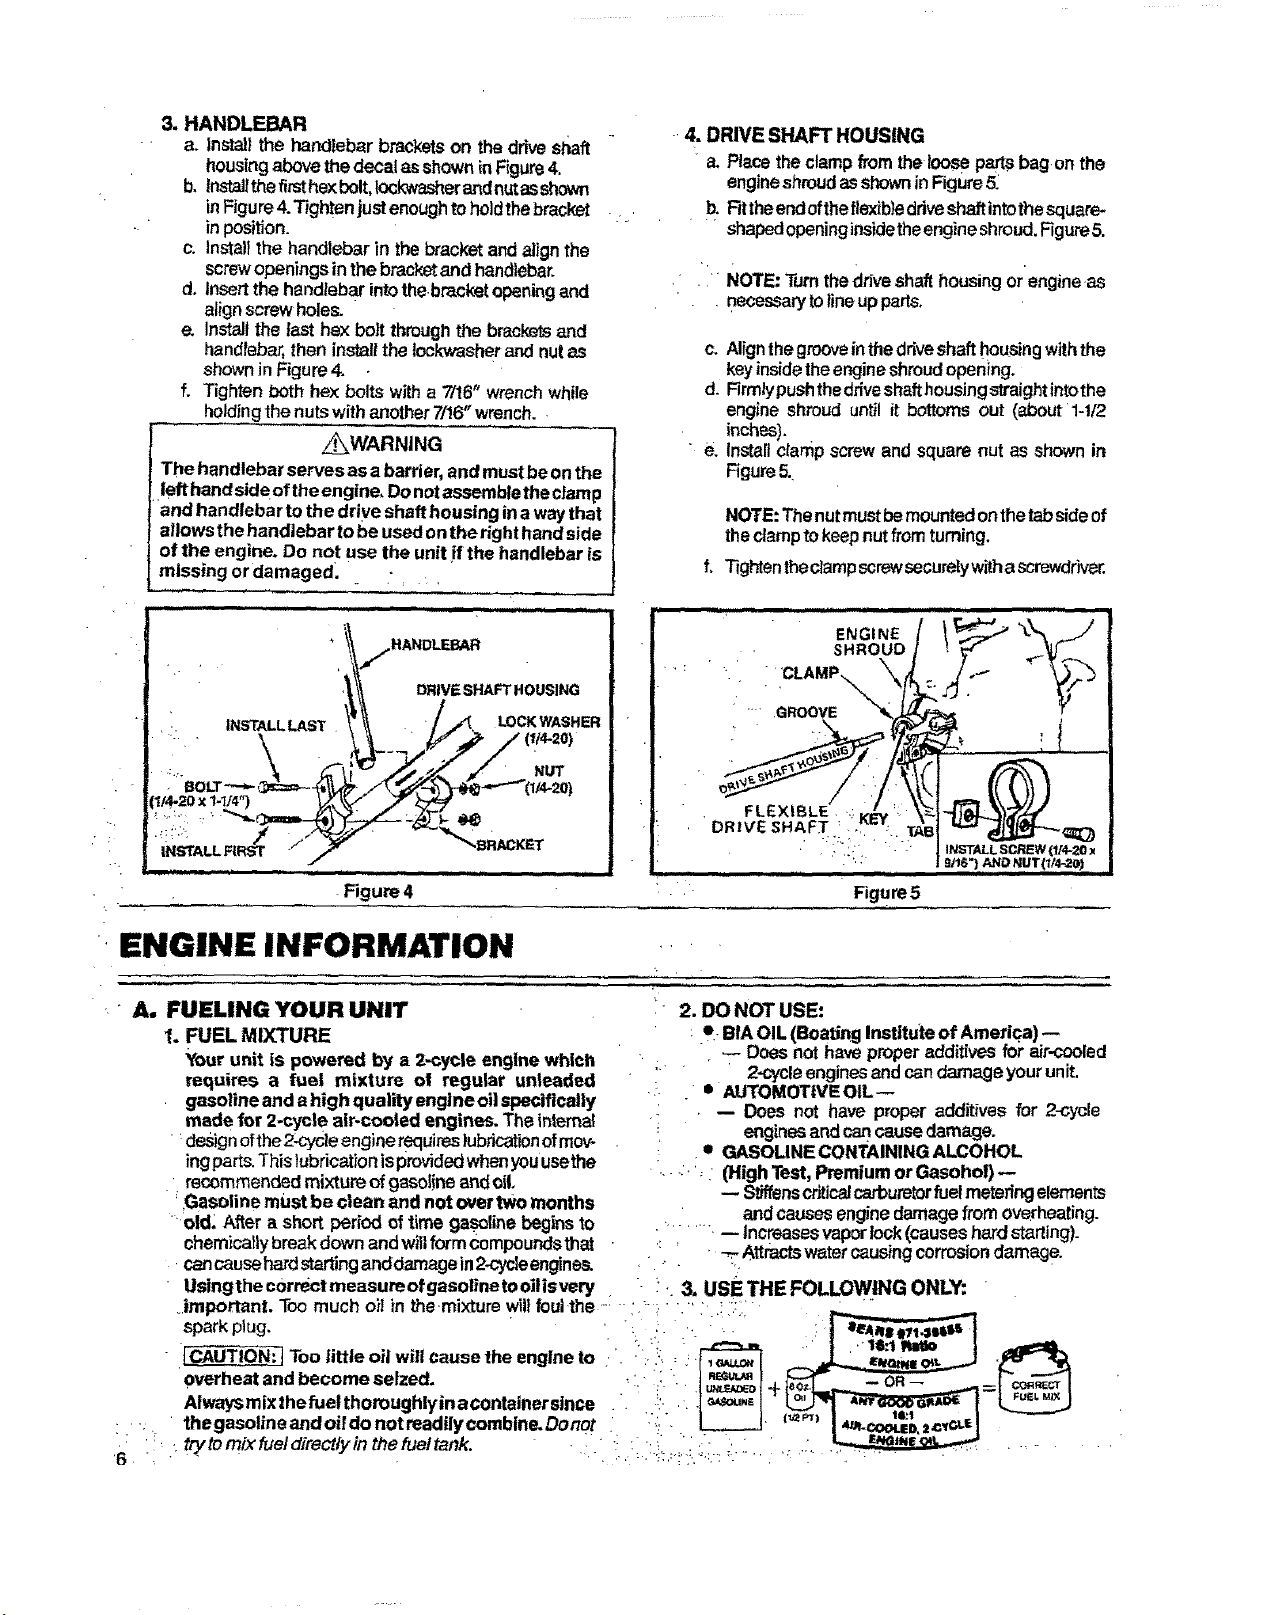
3.HANDLEBAR
a. installthe handlebarbracketsonthe driveshaft
housingabovethedecal asshowninFigure4.
b. Installthefirsthexbolt,lockwasherandnutasshown
inFigure4.Tightenjustenoughtoholdthebracket
inposition.
c. lnstatithe handlebarin the bracketandalignthe
screwopeningsin thebracketandhandlebar.
d. Insertthehandlebarintothebracket openingand
alignscrewholes.
e. Install the tast hexboil throughthe bracketsand
handlebar,then installthe Iockwasherand nutas
ShOWn Jn Figure4.
f. Tighten bothhex boltswith a ?/16r' wrench while
holdingthe nutswith another7/16"wrench..
z_WARNING
The handlebar servesasa barder,and mustbe onthe
lefthandsideof theengine, Donotassembletheclamp
'and handlebar to the drive shafthousing inawaythat
allowsthe handlebar tobe usedonthe righthandside
of the engine. Do not usethe unitif the handlebaris
missing or damaged.. ;
-.4. DRIVE SHAFT HOUSING
"a. Placethe clampfrom theloose partsbag,onthe
engineshroudasshowninFigure5.
b. Rt theendoftheflexibledriveshaftintothesquare-
" .... shapedopeninginsidetheengineshroud.Figure5.
. " NOTE:Turnthe driveshafthousingorengineas
. necessaryto lineupparts.
c. Alignthe groovein thedriveshafthousingwiththe
keyinsidetheengineshroudopening.
d. Firmlypushthedriveshafthousingstraightintothe
engine shroud until it bm'toms out (aboutl-tt2
inches).
• e. Installclamp screwand square nut as shown in
Figure5.
NOTE:Thenutmustbe mountedonthetabsideof
theclamptokeepnutfromturning.
f, Tightentheclarnpscrewsecurelywithascrewdr'rver.
. ,,,,,,,,, •
Figure 4 Figure5
ENGINE INFORMATION ....
• A, FUELING YOUR UNIT
1. FUEL MIXTURE
Your unit is powered by a 2-cycle engine which
requires a fuel mixture ot regular unleaded
gasolineand e high quality engine oilspecifically
made for 2*cyele air-cooled engines. Theinternal
designofthe2-cycleenginerequireslubricationofmov- .
ingparts.Thislubricationisprovidedwhenyouusethe
• recommendedmixture ofgasolineand oil,
' Gasoline mustbe clean andnot overtwo months
'old; After a short periodof time gasolinebeginsto
chemicallybreakdown andwillformCompoundsthat •
cancausehardstartinganddamagein2-cycleengines.
Usingthe c0rrectmeasure of gasolineto oilisvery .
.important. Too much oil in themixture wiltfoul-the--. - :.--. • -.' • ._i:. " _
sparkplug. " ' : -:; t I
TOO little oil will cause theengineto ..".' _r'_,,'. _ _ __ '_
overheatandbecomeselzed. '::: + I
Alwaysmixthefuelthoroughlyinacontainersinca .. !:- .. :J_ou,, I _L_,7 *_A__..I--L_
:.. thegasolineandoildonotreadilycombine.Donot :i,'.. L___J
6 :'• ttYt°mixfueldirectlyinthefueltank" "•. "_ ' _ ::'_r_'_'_'_' ;';'''_ _:." :" '' r_ '__ .......
• 2. DO NOT USE:
• .!- Bib,OIL(Boating Institute of America) --
Doesnot haveproperadditives forair-cooled
: " 2-cycleenginesandcandamageyour unit.
,!. .- • AUTOMOTIVEOIL
•: , -- Does not have proper additivesfor 2-cycle
engir_sand can_ damage.
• GASOLINECONTAININGALCOHOL
..--.., (HighTest,PremiumorGasohol)
-- Stiffenscriticalcarburetorfuel meteringelements
and causesenginedamagefrom overheating.
....... ,-- increasesvaporlock (causeshardstarting).
' _ Attractswatercausingcorrosiondamage.
. 3. use THE FOLLOWING ONLY: r
 Loading...