

Craftsman 358796050 Owner’s Manual
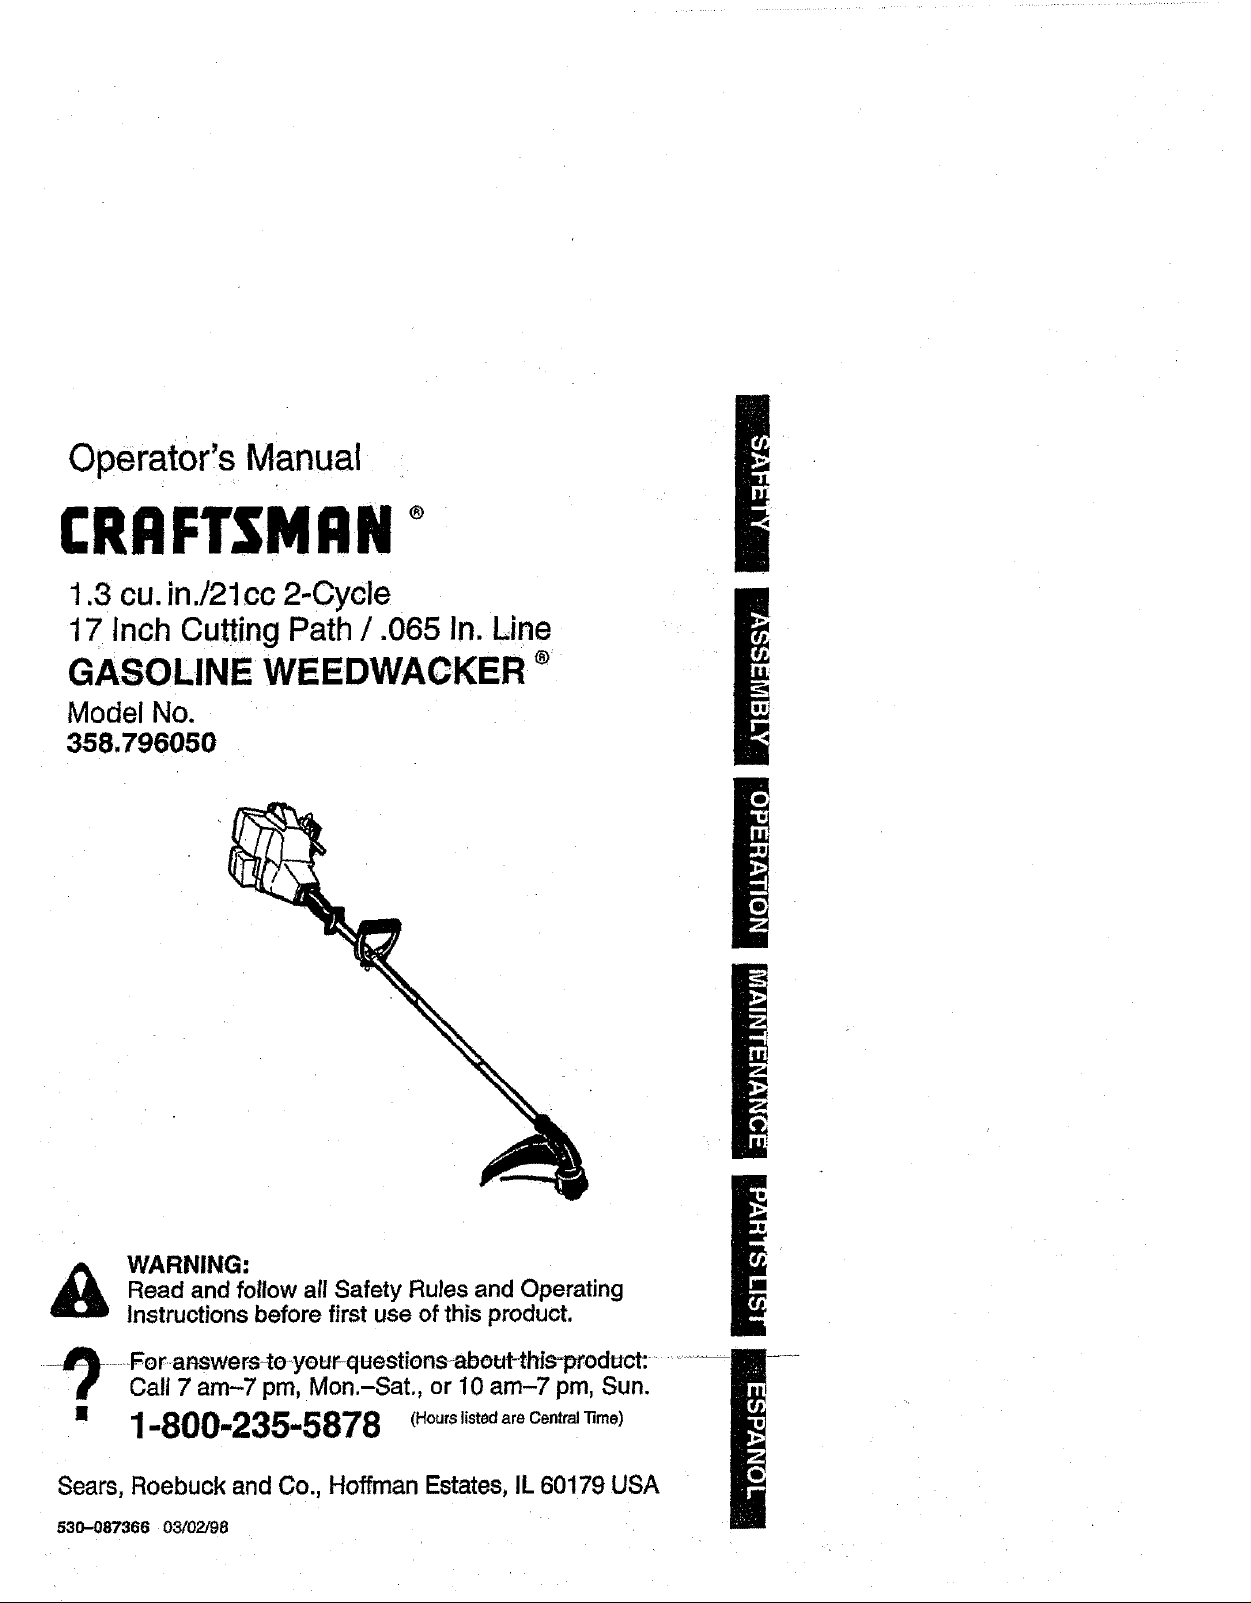
Operator's Manual
CRRFTSMRN°
1.3 cu. in./21cc 2-Cycle
17 Inch Cutting Path / .065 in. Line
GASOLINE WEEDWACKER ®
Model No.
358.796050
Read and follow all Safety Rules and Operating
WARNING:
Instructions before first use of this product.
--_-Fe r answers-to your-q uestionsabout-this=product:
Call 7 am-7 pm, Mon.-Sat., or 10 am-7 pm, Sun.
• 1-800-235"5878 (HourslistedareCe.tralTime)
Sears, Roebuck and Co., Hoffman Estates, IL 60179 USA
530-087366 03/02/98 M
Warranty Statement 2 Storage t
Safety Rules 2 Troubleshooting Chart 12
Assembly 4
Operation 5 Illustrated Parts Ust 13
Maintenance 9 Spanish !6
Service & Adjustments 10 Parts and Ordering Back
FULL ONE YEAR WARRANTY ON CRAFTSMAN GAS POWERED
WEEDWACKER_ LINETRIMMER
Foroneyearfrom thedate of purchase,whenthisCraftsmanGasPowered
Weedwacker®Line Trimmeris maintained,lubricated,and tunedupaccordingto
theoperatingandmaintenanceinstructionsintheOperator'sManual,Searswill
repair,free ofcharge,anydefectinmaterialsorworkmanship.
Thiswarrantyexcludesnylon_ine,sparkplug,and airfiiter,whicham expendable
partsand becomewornduringnormaluse.
If thisWeedwacker®LineTrimmeris usedfor commercialpurposes,thiswarran-
ty appliesforonly 90 daysfromthe date ofpurchase.IfthisWeedwacker®Line
Trimmerisusedforrentalpurposes,thiswarrantyappliesfor only30 daysfrom
thedateofpurchase.Thiswarrantyappliesonlywhilethisproductis in useinthe
UnitedStates.
WARRANTYSERVICEIS,AVAILABLEBYRETURNINGTHEWEEDWACKER®LINE
TRIMMERTOTHENEARESTSEARSSERVICECENTERINTHEUNITEDSTATES.
Thiswarrantygivesyou specificlegalrights,and you may alsohave otherrights
whichvaryfrom stateto state.
Sears, Roebuck and CO,,D/817WAHoffmanEstates, IL 60179
WARNING: When usinggardening
appliances,basicsafetyprecautions
mustalways befollowedtoreducethe
riskoffire andseriousinjury.Readand
"_aSafety info_rmationontheunit
follow all instructions.
Thispower unitcanbe dangerous!
Operator isresponsiblefor fol!owing
instructionsandwa-mingsonunitand
inmanual.ReadentireOperator's
Manual before using unit! Be thorough- crease the risk of injury. .....
ly fami)iar with the controlsand the .....
proper use of the unit. Restrict the use
of this unit to persons who have read,
understand, and w_l follow the instruc-
tions and warnings on the unit and in
the manual. Never allow children to
operate this unit.
DANGER: Never use blades or flail-
ing devices. This unit is designed for
line trimmer use only. Use of any other
accessories or attachments will in-
WARNING: Trimmerline throwsob-
jectsviolently.Youandotherscanbe
blinded/injured.Wear eyeandleg
protection.Keepbodypartsclearof
rotatingline.Keepchildren,bystand-
ers,andanimals50 feet (I 5 meters)
2
away. If approached stop unit immedi-
ately.
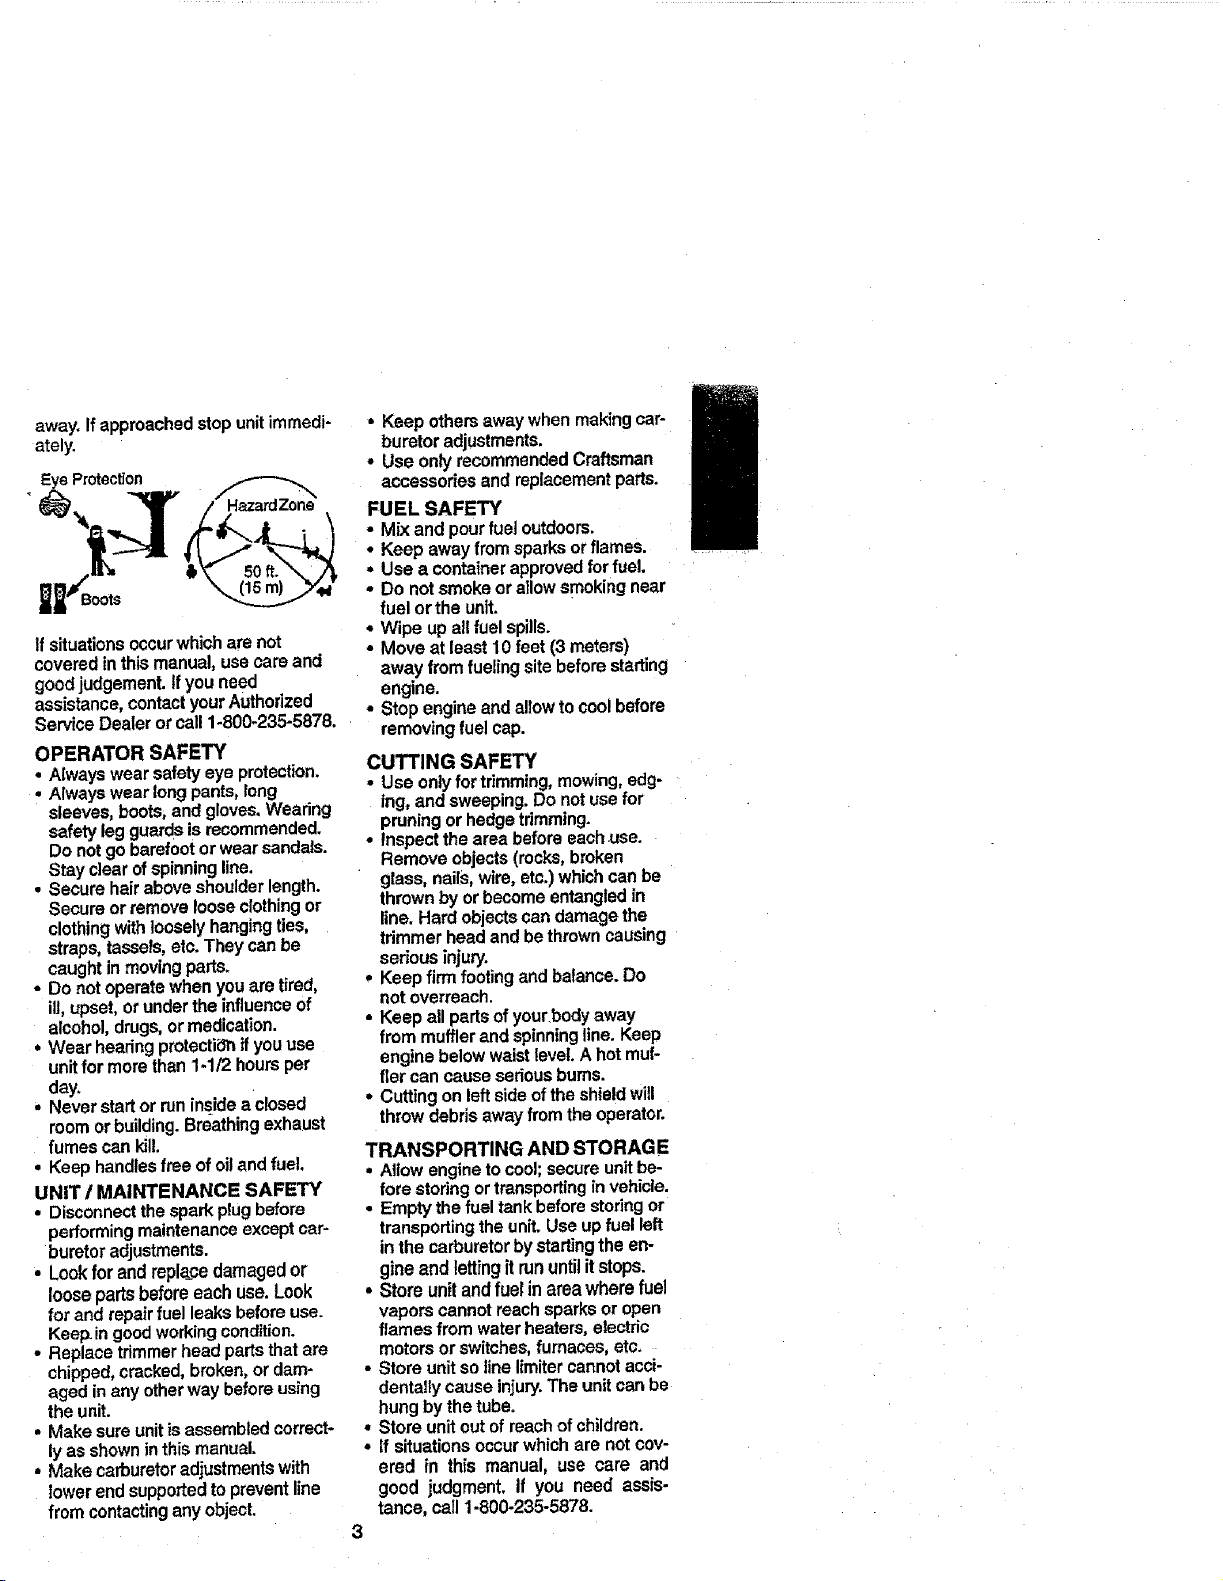
Eye Protection
If situationsoccurwhicharenot
coveredinthismanual,usecare and
goodjudgement.If youneed
assistance,contactyourAuthorized
ServiceDealerorcall1-800-235-5878.
OPERATOR SAFETY
• Always wearsafetyeye protection.
• Always wearlongpants,long
sleeves,boots,andgloves.Wearing
safetylegguardsisrecommended.
Do notgo barefootorwearsandals.
Stayclearofspinningline.
• Securehairaboveshoulderlength.
Secureor removelooseclothingor
clothingwithlooselyhangingties,
straps,tassels,etc.Theycanbe
caughtinmovingparts.
• Do notoperatewhenyouaretired,
ill,upset,orundertheinfluenceof
alcohol,drugs,ormedication.
* Wearheadngprotecti6nifyouuse
unitfor morethan1-1/2 hoursper
day.
• Neverstartorruninsideaclosed
roomorbuilding.Breathingexhaust
fumescankill.
• Keephandlesfreeofoilandfuel,
UNIT / MAINTENANCE SAFETY
• Disconnectthesparkplugbefore
performingmaintenanceexceptcar-
buretoradjustments.
• Lookfor and replacedamagedor
loosepartsbeforeeach use.Look
for and repairfuelleaksbeforeuse.
Keep.ingoodworkingcondition.
• Replacetrimmerheadpartsthat are
chipped,cracked,broken,ordam-
aged inany otherway beforeusing
theunit.
. Makesureunitisassembledcorrect-
lyasshowninthismanual.
° Make carburetoradjustmentswith
lowerendsupportedtopreventline
from contactinganyobject.
• Keep othersawaywhenmakingcar-
buretor adjustments.
• Use only recommendedCraftsman
accessories and replacementparts.
FUEL SAFETY
• Mix andpourfueloutdoors.
• Keep away fromsparksorflames......
• Usea containerapprovedfor fuel.
° Do notsmokeor atlowsmokingnear
fuelortheunit.
• Wipeupallfuel spills.
• Moveat least 10feet (3 meters)
away fromfueling site beforestarting
engine.
• Stopengineandallowtocoolbefore
removingfuelcap.
CUTTING SAFETY
• Use only for trimming, mowing, edg-
ing, and sweeping. Do not use for
pruning or hedge tdmming.
• Inspect the area before each.use.
Remove objects (rocks, broken
glass, nails, wire, etc.) which can be
thrown by or become entangled in
line. Hard objects can damage the
tdmmer head and be thrown causing
serious inju_.
• Keep firm footing and batance. Do
notoverreach.
• Keep all parts of your,body away
from muffler and spinning line. Keep
engine below waist level. A hot muf-
tier can cause serious bums.
• Cutting on left side of the shield will
throw debris away from the operator,
TRANSPORTING AND STORAG E
* Allow engine to cool; secure unitbe-
fore stodng ortransportingin vehicle.
• Empty the fuel tank before storing or
transporting the unit. Use up fuel left
in the carburetor by startingthe en-
gine and letting it run until it stops.
• Store unit and fuel in area where fuel
vapors cannot reach sparks or open
flames from water heaters, etectdc
motors or switches, furnaces, etc.
• Store unit so line limiter cannot acci-
dentally cause injury. The unit can be
hung by the tube.
. Store unit out of reach of children.
° If situations occur which are not cov-
ered in this manual, use care and
good judgment, if you need assis-
tance, call 1-800-235-5878.
3
SPECIAL NOTICE: Thisunitis not
equippedwitha temperaturelimiting
mufflerandsparkarrestingscreen
whichmeetstherequirementsofCali-
fornia Cedes4442 and444-3.AllU.S.
forestlandandtl_estatesofCalifornia0
Idaho,Maine,Minnesota,NewJersey,
Oregon,andWashingtonrequireby
lawthatmanyinternalcombustion en-
ginesbeequippedwithasparkarres-
torscreen.Ifyouoperateina locale
wheresuchregulationsexist,youare
legallyresponsiblefor installing and
maintainingthe operatingoondiUonof
these pads. Failuretodo soisa viola-
tionofthelaw. Refertothe MAINTE-
NANCEsectioninthismanual.
SPECIAL NOTICE; Exposureto
vibrationsthroughprolongeduse of
gasolinepoweredhandtools could
causeblood vesselor nervedamage
inthe fingers,hands, andjointsof
peopleproneto circulationdisordersor
abnormalswellings.Prolongedusein
coldweatherhasbeen linkedto blood
vesseldamageinotherwisehealthy
people.Ifsymptomsoccursuchas
numbness,pain,lossofstrength,
changeinskincolorortexture,orloss
offeelln9 inthe fingers,hands,or
joints,d_scontlnuetheuseofthis tool
andseekmedical attention.AnantF
vibrationsystemdoesnot guarantee
theavoidanceofthese problems. Us-
erswhooperatepowertools on a con-
tinualand regularbasismustmonitor
closelytheirphysicalconditionandthe
conditionofthistool.
CARTON CONTENTS
Checkcarton contentsagainstthefol-
lowinglist.
Model 358.796050
• Trimmer
• Shield
• Containerof Oil
, FuelContainer
• ExtraSpool
Examinepartsfor damage.Do notuse
damagedparts.
NOTE:tfyouneedassistance orfind
partsmissingordamaged,call
1-800-235-5878.
It isnormalforthe fuelfilterto rattle in
theemptyfueltank.
Findingfue!oroil reaidueonmuffleris
normalduetocarburetoradjustments
and testingdone bythe manufacturer.
ASSEMBLY
WARNING; If receivedassembled,
repeatallsteps to ensureyour unitis
properlyassembledandall fasteners
are secure.
ADJUSTING THE HANDLE
WARNING: Whenadjustingthehan-
dle,be sureit remainsbetweenthe
triggerandthesafetylabel.
t Loosenwingnutor knobonhandle.
• Rotatethehandleonthetube to an
uprightposition;retighten wingnut.
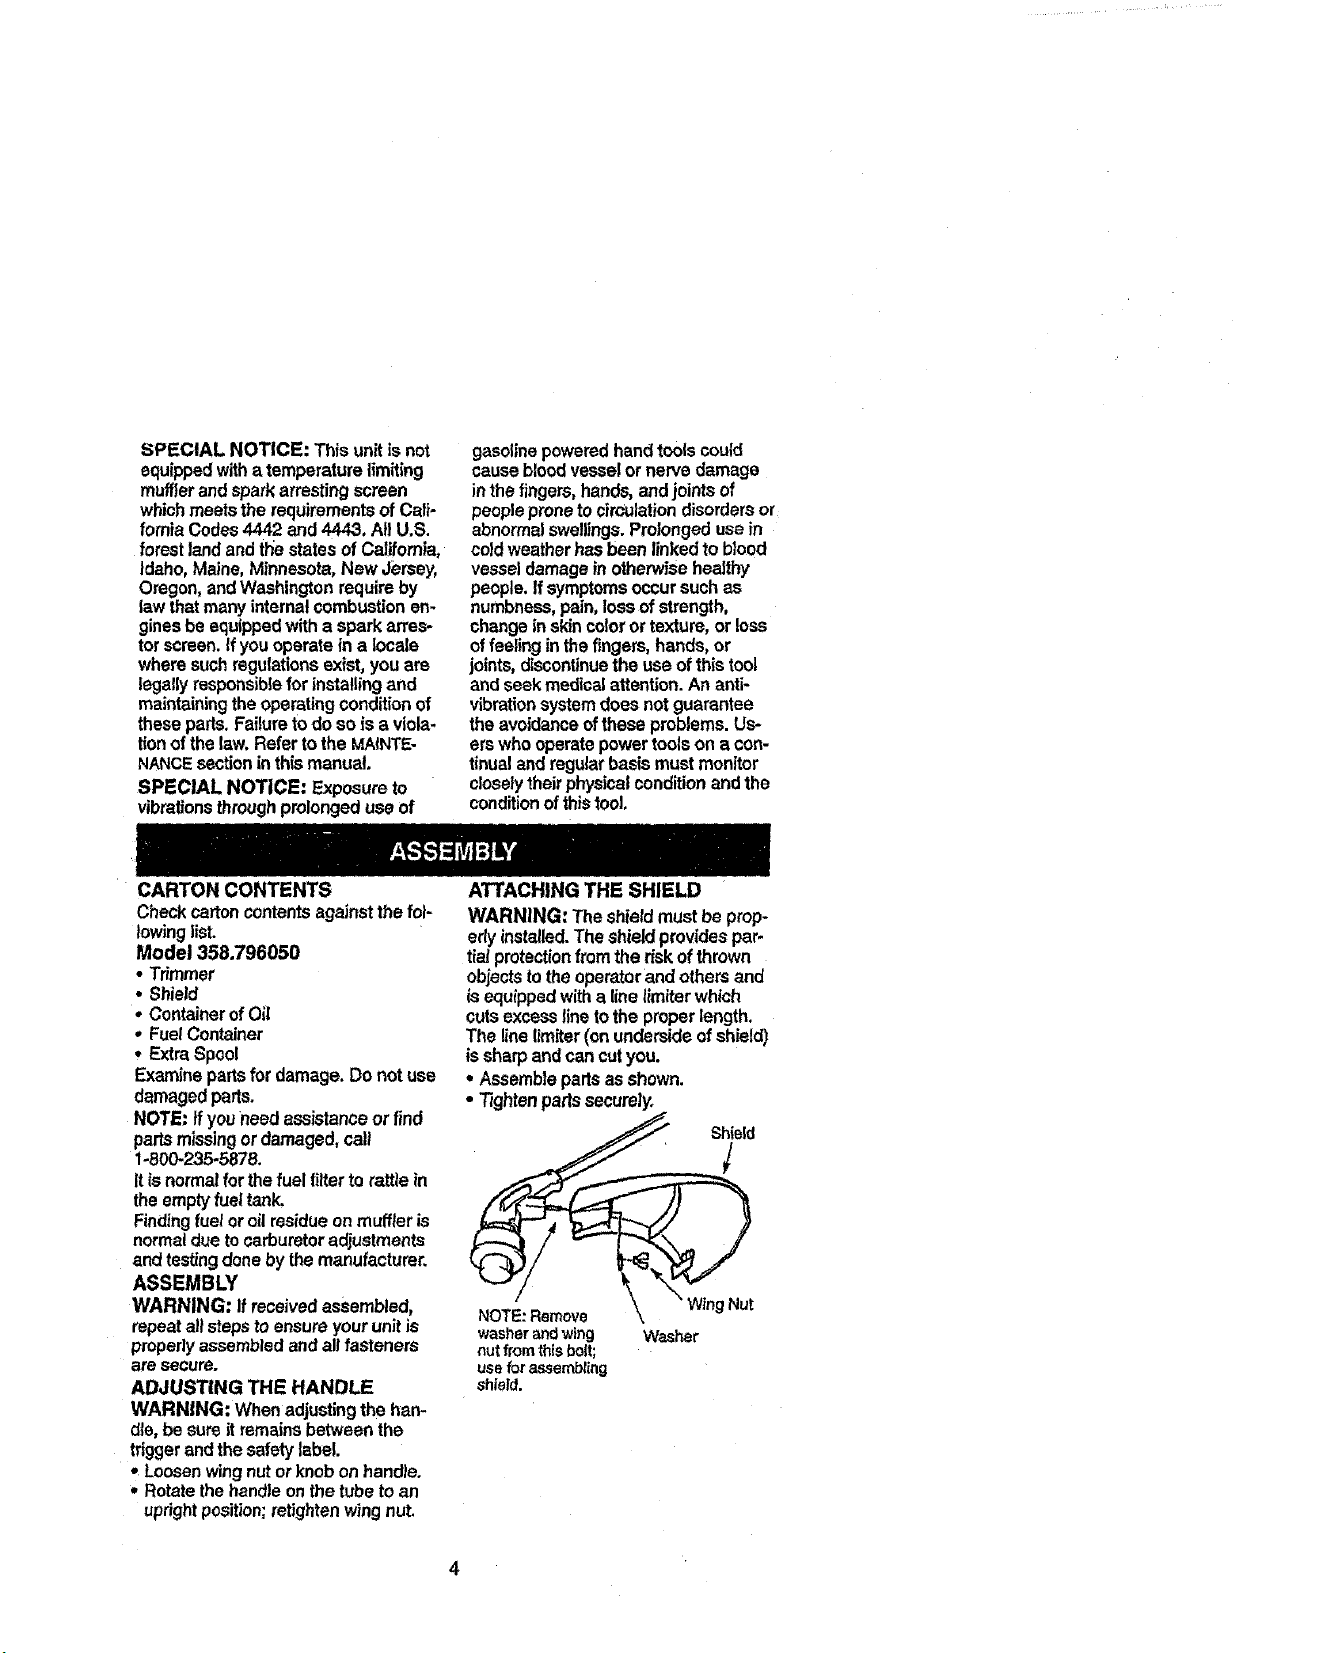
ATTACHING THE SHIELD
WARNING: Theshieldmustbe prop-
erlyinstalled.The shieldprovidespap
tiaiprotectionfromtheriskof thrown
objectstotheoperatorand othersand
is equippedwithalinelimiter which
cutsexcess line totheproperlength.
The lineIimiter(onundersideof shield)
is sharp andcancutyou.
• Assemblepartsasshown.
• Tightenpadssecurely.
_NOT_: Remove \ "Wing Nut
washer and wing Washer
nutfromthisbolt;
useforassembling
shield.
4
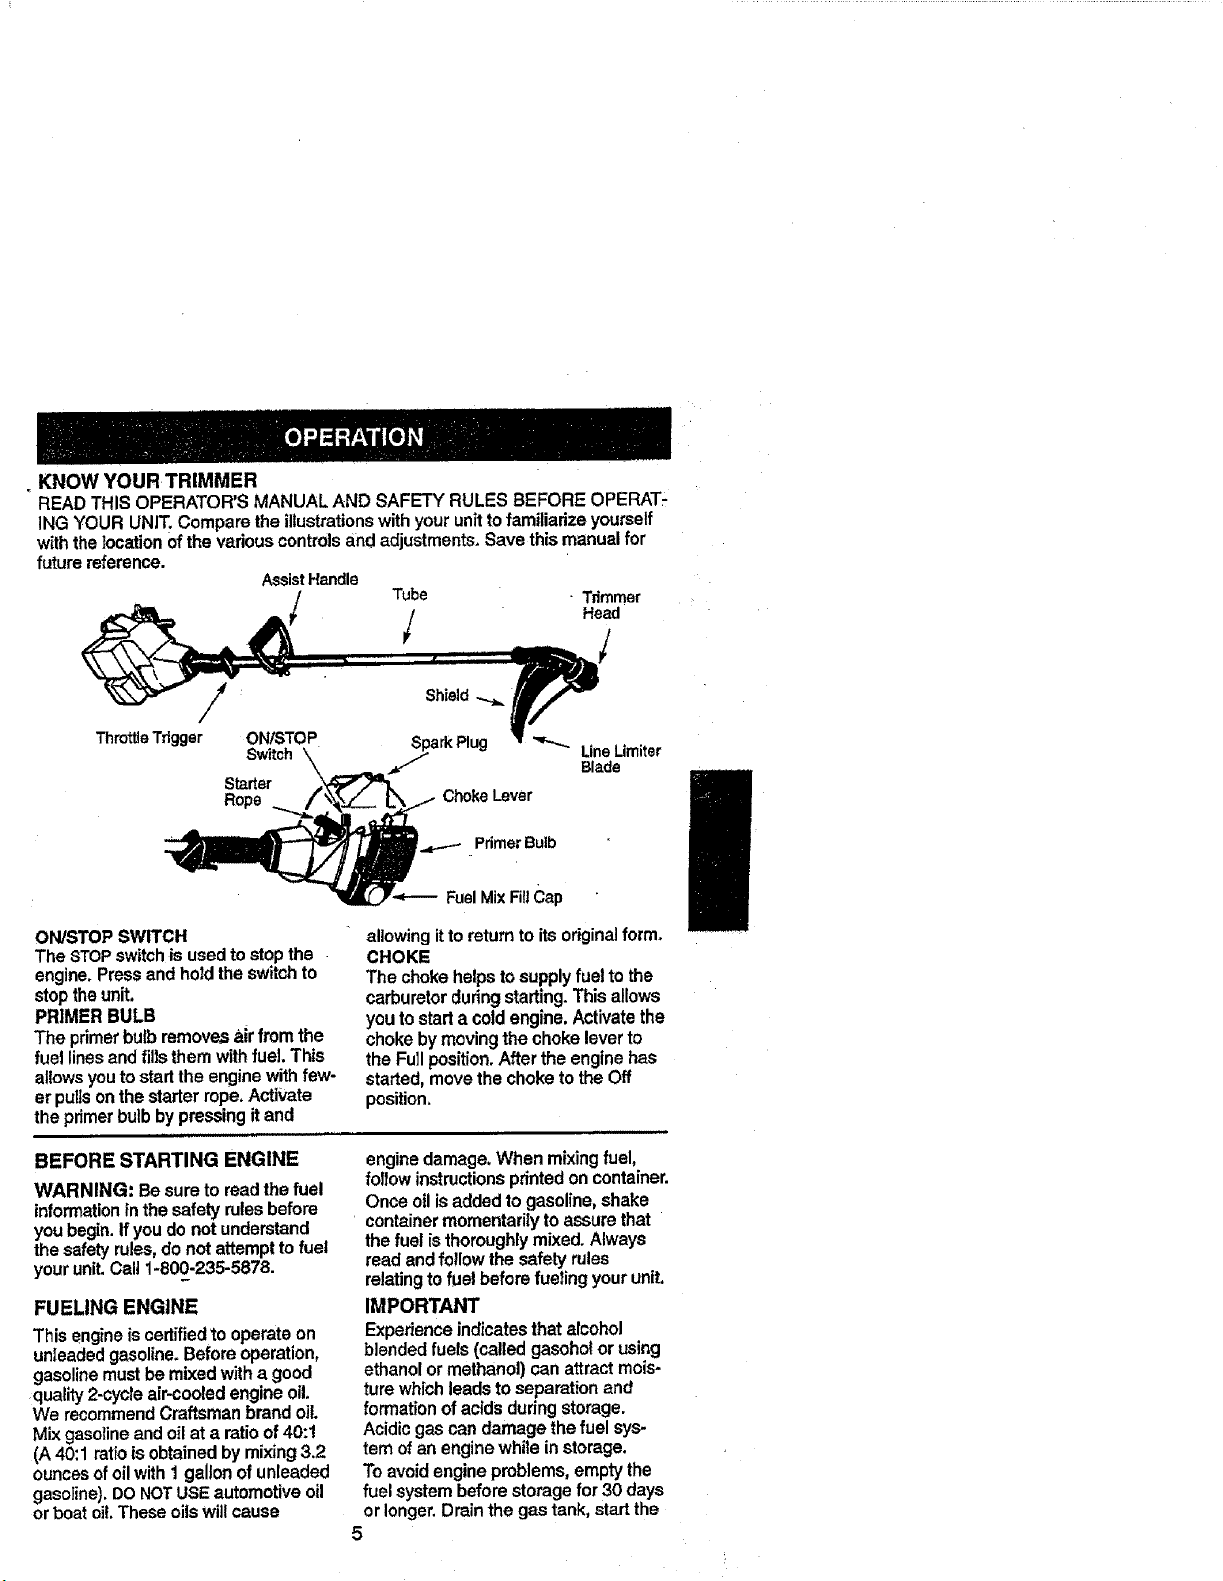
KNOW YOUR TRIMMER
READ THIS OPERATOR'S MANUAL AND SAFETY RULES BEFORE OPERAT-
ING "tOUR UNIT, Compare the illustrationswith your unit to familiarize yourself
with the location of the various controls and adjustments, Save this manual for
future reference.
._ssistHandle
Tube Trimmer
l Head
:
ThrottleTdgger ON/STOP
Switch
Starter
Rope
ON/STOPSWITCH
The STOPswitchisusedtostopthe
engine.Pressandhold theswitchto
stoptheunit.
PRIMERBULB
The primerbulbremovesairfrom the
fuel linesand fills themwithfuel. This
allowsyoutostartthe enginewithfew-
erpullsonthestarterrope,Activate
theprimerbulbbypressingitand
BEFORE STARTING ENGINE
WARNING: Be sure to read the fuel
informationinthe safety rules before
you begin. If you do not understand
the safety rules, do not attempt to fuel
your unit. Call 1-800-235-5878.
FUELING ENGINE
Thisengineis certifiedto operateon
unIeadedgasoline.Beforeoperation,
gasolinemustbemixedwitha good
quality 2-cycleair-cooledengineoil.
We recommendCraftsmanbrandoil.
Mixgasolineandoilata ratioof40:1
(A40:1ratioisobtainedby mixing3.2
ouncesofoilwith1gallonofunleaded
gasoline).DONOTUSEautomotiveoil
orboatoi!.Theseoilswillcause
Shield._
SparkPlug
Choke Lever
Primer Bulb
FuelMixFillCap
Line Umiter
Blade
allowingittoreturn to itsoriginalform.
CHOKE
The chokehelpstosupplyfuel to the
carburetorduring starting.Thisallows
youtostarta coldengine.Activatethe
chokebymovingthe chokeleverto
the Fullposition.After theenginehas
started,movethechoketothe Off
position.
enginedamage.When mixingfuel,
follow instructionsprintedoncontainer.
Once oilisaddedtogasoline,shake
containermomentarilytoassure that
thefuelisthoroughlymixed.Always
readandfollow the safetyrules
relatingtofuelbeforefueling yourunit.
IMPORTANT
Experienceindicatesthat alcohol
blendedfuels (calledgasoholor using
ethanolormethanol) canattractmois-
turewhichleadstoseparationand
formationofacidsduringstorage.
Acidicgascandamagethefuel sys-
temofanenginewhileinstorage.
Toavoidengineproblems,emptythe
fuelsystembeforestoragefor30 days
or longer.Drainthe gas tank,startthe
5
engineandletitrununtilthefuellines
and carburetorare empty. Use fresh
fuelnext season.
Never use engineor carburetorclean-
er productsinthe fueltank orperma-
nentdamagemayoccur.
See the STORAGEsectionfor addi-
tionalinformation.
STOPPING YOUR ENGINE
* Press and hold the ON/STOP switch
in the STOP position.
* If engine does not stop, move choke
lever to full position.
STARTING YOUR ENGINE
COLD ENGINE OR WARM ENGINE
AFTER RUNNINGOUTOF FUEL
WARNING: The tdmmerheadwill
turnwhilestartingthe engine.
Avoidany contactwiththemuffler.A
hotmufflercan causeseriousbums.
• Restengineandshieldon ground,
supportingtrimmerheadoffground.
• Slowlypressthe primerbulb6 times.
• MovethechokelevertotheFull
Chokeposition.
• Squeezeandhoistthethrottletrigger.
Keep throttletriggerfully squeezed
untilthe enginerunssmoothly.
Choke
Lever
• Pull starter rope sharply 5 times.
NOTE: Iftheenginesoundsasif it is
tryingto startbeforethe5thpull,goto
thenextstep.
• Move thechokelever tothe Half
Chokeposition.
, Pul_starter ropesharply untilengine
runs,butno morethan6 pulls.
NOTE: If theenginehas notstarted
after6 pulis(athalfchoke),checkto
make surethechokeleverisin the
properposition.Then,move thechoke
leverto theFullChokepositionand
presstheprimerbulb6 times;squeeze
andholdthethrottlet_ggerandpuJt
thestarterrope2 moretimes.Move
thechokelevertoHalf Chokeandpull
thestarterropeuntilthe engineruns,
butnomorethan6morepulls.Ifthe
enginestillhasnot started,it is prob-
ablyflooded.Proceedto "Startinga
FloodedEngine."
* Allowthe engineto run 10 seconds,
thenmovethechokeleverto Off
Choke.Allowthe unit to run for 30
moresecondsatOff Chokebefore
releasingthethrottle trigger.
NOTE: Ifenginedieswiththe choke
leverat theOffChokeposition,move
thechoke_evertoHalf Chokeandpull
theropeunt_engineruns.
STARTING A WARM ENGINE
. Movethechokelever tothe Half
Chokeposition.
. Squeezeandholdthe throttletrigger.
Keep throttletriggerfully squeezed
until theenginerunssmoothly.
• Pullstarterropesharply untilengine
runs,butnomorethan5 pu(Is.
• Allow enginetorun15 seconds,then
movethechokeleverto OffChoke.
NOTE"if engine hasnotstarted,pull
starter rope5morepulis.If enginestill
doesnot run,itisprobablyflooded.
DIFFICULT STARTING OR
STARTING A FLOODED ENGINE
Flooded engines can be started by
placing the chokeleverintheOff
Choke position;then, pull the rope to
clear the engineof excessfuel. This
couldrequirepullingthe starter handle
many t_mesdepending on howbadly
the unit is flooded.
)fthe unit stilt doesn'tstart, referto
TROUBLESHOOTINGchartor call
1-_S00-235-5878.
6
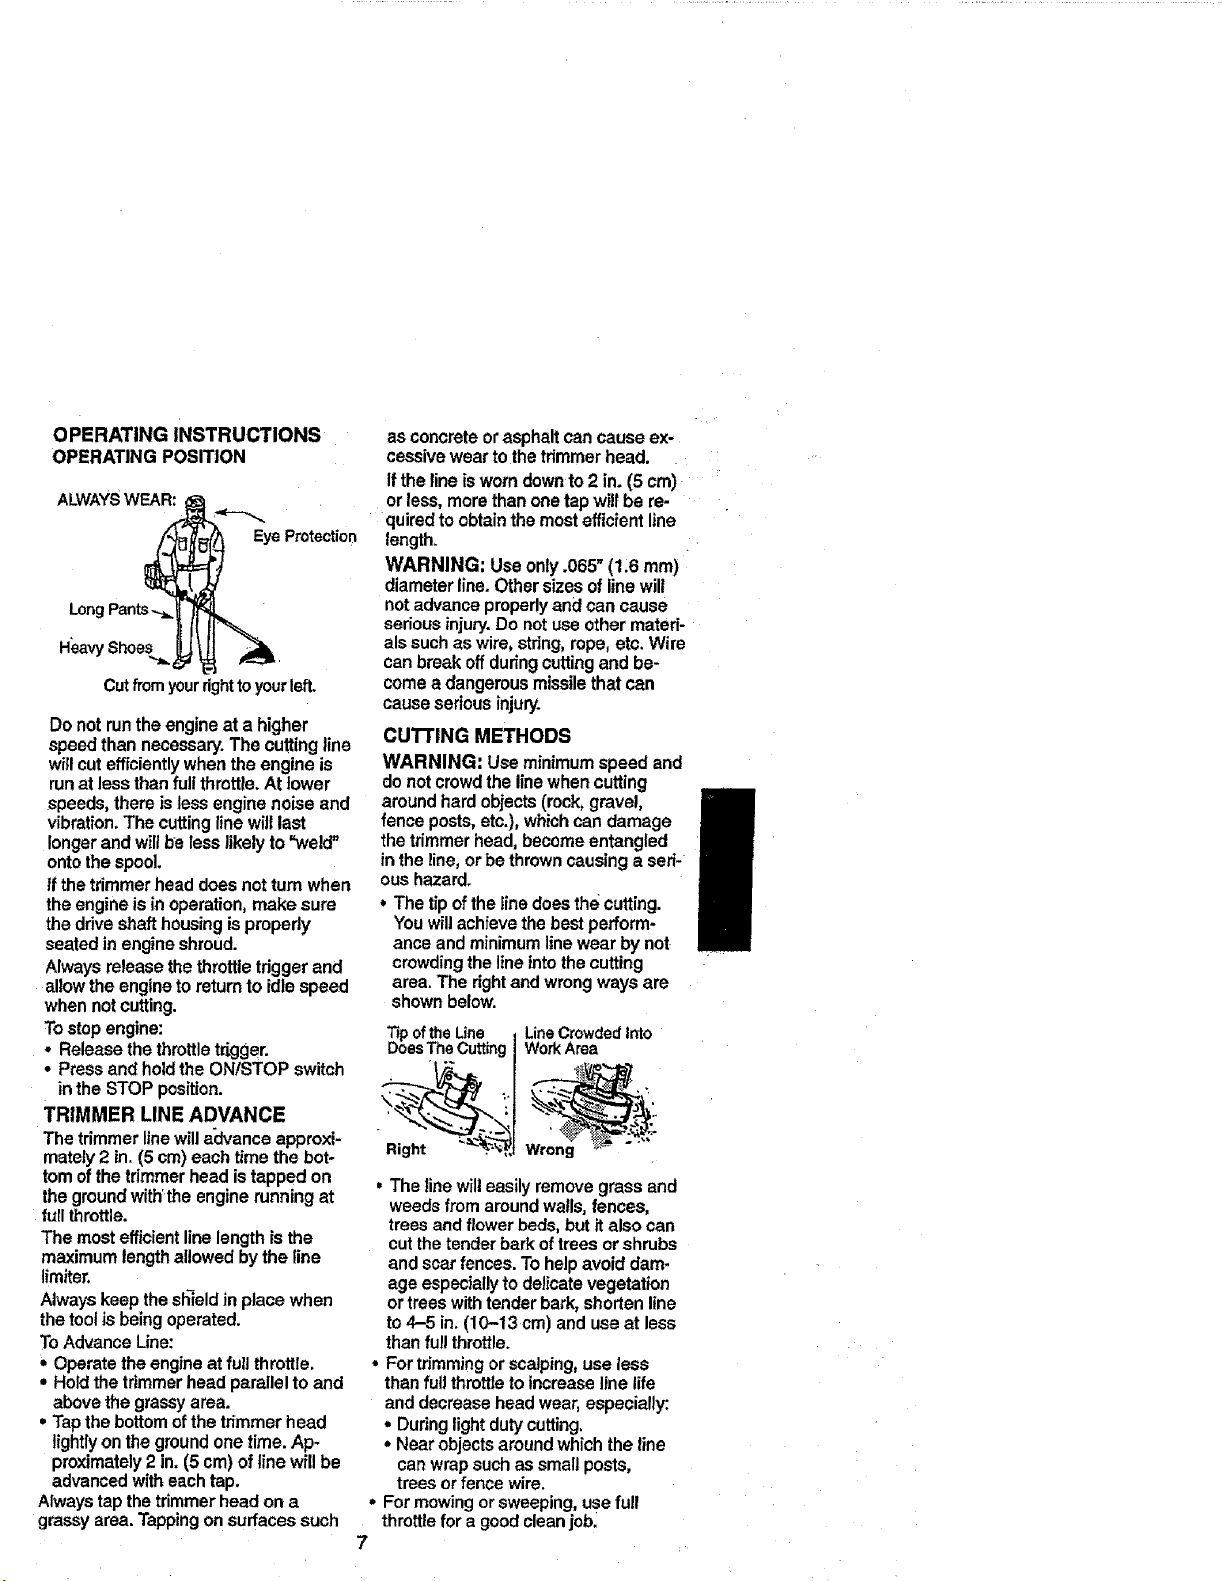
OPERATINGINSTRUCTIONS
OPERATINGPOSITION
ALW/_YSWEAR_<_._..._
_ Eye Protection
LongPants"_-t ____
Cut from yourrighttoyourleft.
Do not runthe engine at a higher
speed than necessary. The cutting line
willcut efficiently when the engine is
run at less than fullthrottle. At lower
speeds, there is less engine noise and
vibration. The cuttingline will last
longer and will be less likely to "weld"
onto the spool.
If the trimmer head does not turn when
the engine is in operation, make sure
the drive shaft housing is properly
seated in engine shroud.
Always release the throtUetrigger and
allow the engine to return to idle speed
when not cutting.
To stop engine:
* Release the throttle trigger.
• Press and holdthe ON/STOP switch
inthe STOP position.
TRIMMER LINE ADVANCE
The trimmer line will advance approxi-
mately 2 in. (5 cm) each time the bot-
tom of the tdmmer head is tapped on
the ground wJthrthe engine running at
full throttle.
The most efficient linelength is the
maximum lengthallowed by the line
limiter.
Always keep the shleld in place when
the toolis being operated.
To Advance Line:
, Operate the engine at full throttle.
, Holdthe trimmer head parallel to and
above the grassy area.
. Tap the bottom of the trimmer head
lightlyon the groundone time. Ap-
proximately 2 in. (5 cm) of line will be
advanced with each tap.
Alwaystap the trimmer head on a
grassy area. Tapping on surfaces such
as concrete or asphalt can cause ex-
cessive wear to the trimmer head.
If the line isworn downto 2 in. (5 cm)
or less, more than one tap will be re-
quired to obtain the most efficient line
length.
WARNING; Use only .065" (1.6 ram)
diameter line. Other sizes of line will
not advance properlyand can cause
serious injury.Do notuse other mated-
als such as wire, stdng, rope, etc. Wire
can break off during cuttingand be-
come a dangerous missile that can
cause serious injury.
CUTrlNG METHODS
WARNING: Use minimum speed and
do not crowd the line when cutting
around hard objects (rock, gravel,
fence posts, etc.), which can damage
the trimmer head, become entangled
in the line, or be thrown causing a seri-
ous hazard.
• The tip ofthe line does the cutting.
You wilt achfeve the best perform-
ance and minimumline wear by not
crowdingthe line into the cutting
area. The rightand wrong ways are
shown below.
TipoftheLine I LineCrowdedInto
WorkArea
DoesTh_Cutt_g _'_W"_'I,
Right " "_."_gl Wrong *_" "
, The line will easily remove grass and
weeds from around walls, fences,
trees and flower beds, but it also can
cut the tender bark of trees or shrubs
and scar fences. To help avoid darn-
age especially to delicate vegetation
or trees with tender bark, shorten line
to 4-5 in. (10-13 cm) and use at less
than full throttle.
• For trimming or scalping, use tess
than full throttle to increase line life
and decrease head wear, especially:
• During light duty cutting.
• Near objects around which the fine
can wrap such as small posts,
trees or fence wire.
• For mowing or sweeping, use full
throttle for a good cleanjob.
7
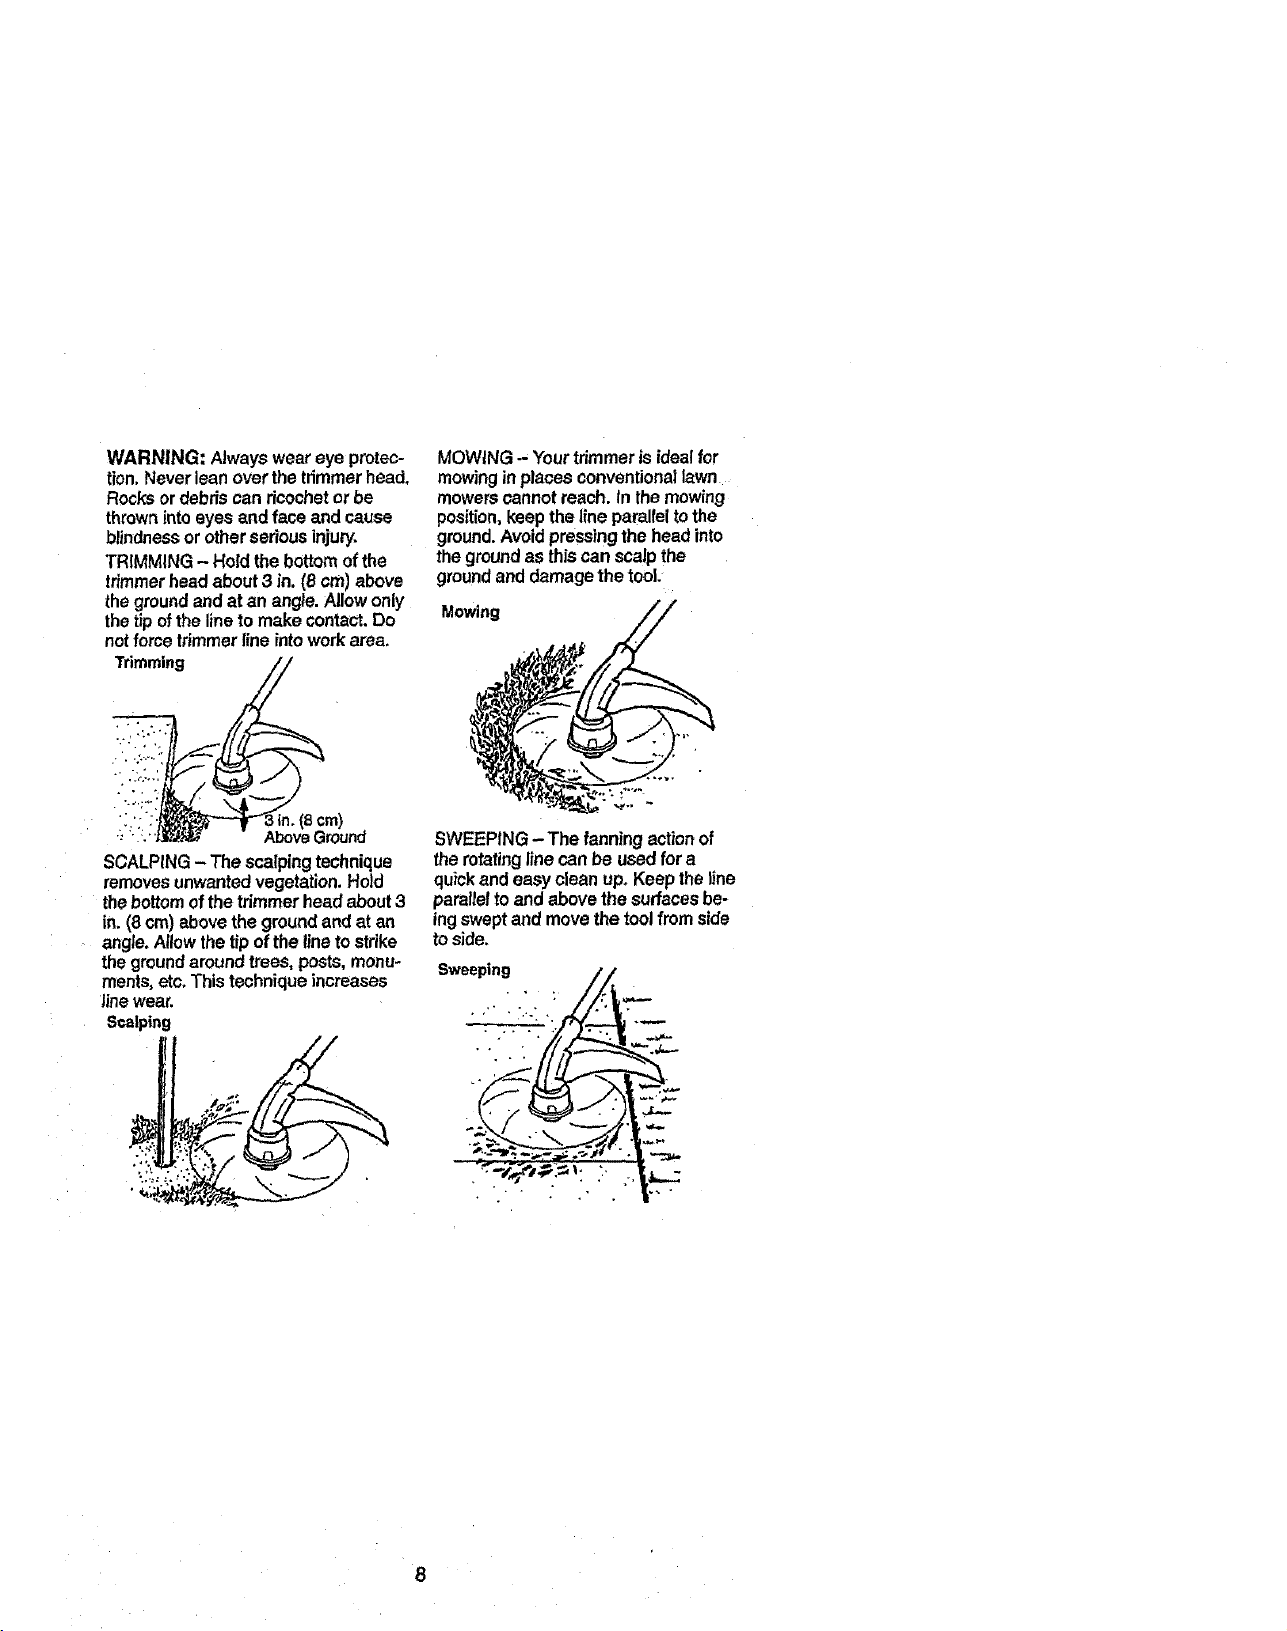
WARNING: Alwaysweareyeprotec-
tion.Neverleanoverthe trimmerhead,
Rocksordebris can ricochetor be
thrown intoeyesandface andcause
blindnessor otherseriousinjury.
TRIMMING- Holdthebottomofthe
trimmerheadabout3 in. (8 cm)above
theground andat anangle.Allow only
thetipofthe lineto makecontact.Do
notforcetrimmerlineintoworkarea.
Trimming
mr, nd
SCALPING- Thescalpingtechnique
removesunwantedvegetation.Hold
thebottom ofthetrimmerheadabout3
in. (8cm)abovethegroundandat an
angle.Allow thetipofthelinetostrike
thegroundaroundtrees,posts,monu-
ments,etc,Thistechniqueincreases
linewear.
Scalping
MOWING- Yourtrimmerisidealfor
mowinginplacesconventionallawn
mowerscannotreach.Inthemowing
position,keepthe line parallelto the
ground.Avoidpressingthe headinto
thegroundasthiscan scalpthe
groundanddamagethetool.
Mowing
SWEEPING- The fanning actionof
therotating linecanbe usedfor a
quickandeasycleanup, Keeptheline
parallel toandabovethesurfacesbe-
ingsweptand movethe toolfrom side
to side.
Sweeping , : ,"
8
MAINTENANCESCHEDULE
CARE & MAINTENANCE TASK
Check for Loose fastenem and parts
Check for damaged orwom parts
Clean unit and labels
Clean air fitter
Replace spark plus
GENERAL RECOMMENDATIONS
The warrantyonthisunitdoesnotcov-
eritemsthathavebeen subjectedto
operatorabuseornegligence.Tore-
ceivefull valuefrom the warranty,the
operatormustmaintainunitas instruct-
edinthismanual,Variousadjustments
willneedtobe made periodicallyto
properlymaintainyouruniL
CHECK FOR LOOSE
FASTENERS AND PARTS
• SparkPlugBoot
• AirFilter
• HousingScrews
• AssistHandleScrews
• Shield
CHECK FOR DAMAGED OR
WORN PARTS "
Referreplacementofdamaged/worn
partsto yourSears ServiceCenter.
• On/StopSwitch- EnsureOn/Stop
switchfunctions properlybypressing
theswitchtothe =Stop"position.
Makesureenginestops;thenrestart
engineandcontinue.
• FuelTank- DisconUnueuseof unitif
fueltankshowssignsofdamageor
leaks.
• Shield- Disconfinueuseof unitif
shieldisdamage_
CLEAN UNIT & LABELS
• Cleantheunitusinga dampcloth
with a milddetergent,
• Wipeoffunitwitha cleandrycloth.
CLEAN AIR FILTER
Donotcleanfilteringasolineorother
flammablesolventtoavoidcreatinga
fire hazardorproducingharmfulevap-
orativeemissions.
A d_rtyairfilterdecreasesengineper-
formanceandincreasesfuelconsump-
......WHENTOpERFORM,,,
Before each use
Before each use ,
After each use
Every 5 hours of operation
Yearly
tion and harmful emissions. Always
clean after every 5 hours of operation,
• Clean the cover and the area around
it to keep dirt from falling into the
carburetor chamber when the cover
is removed.
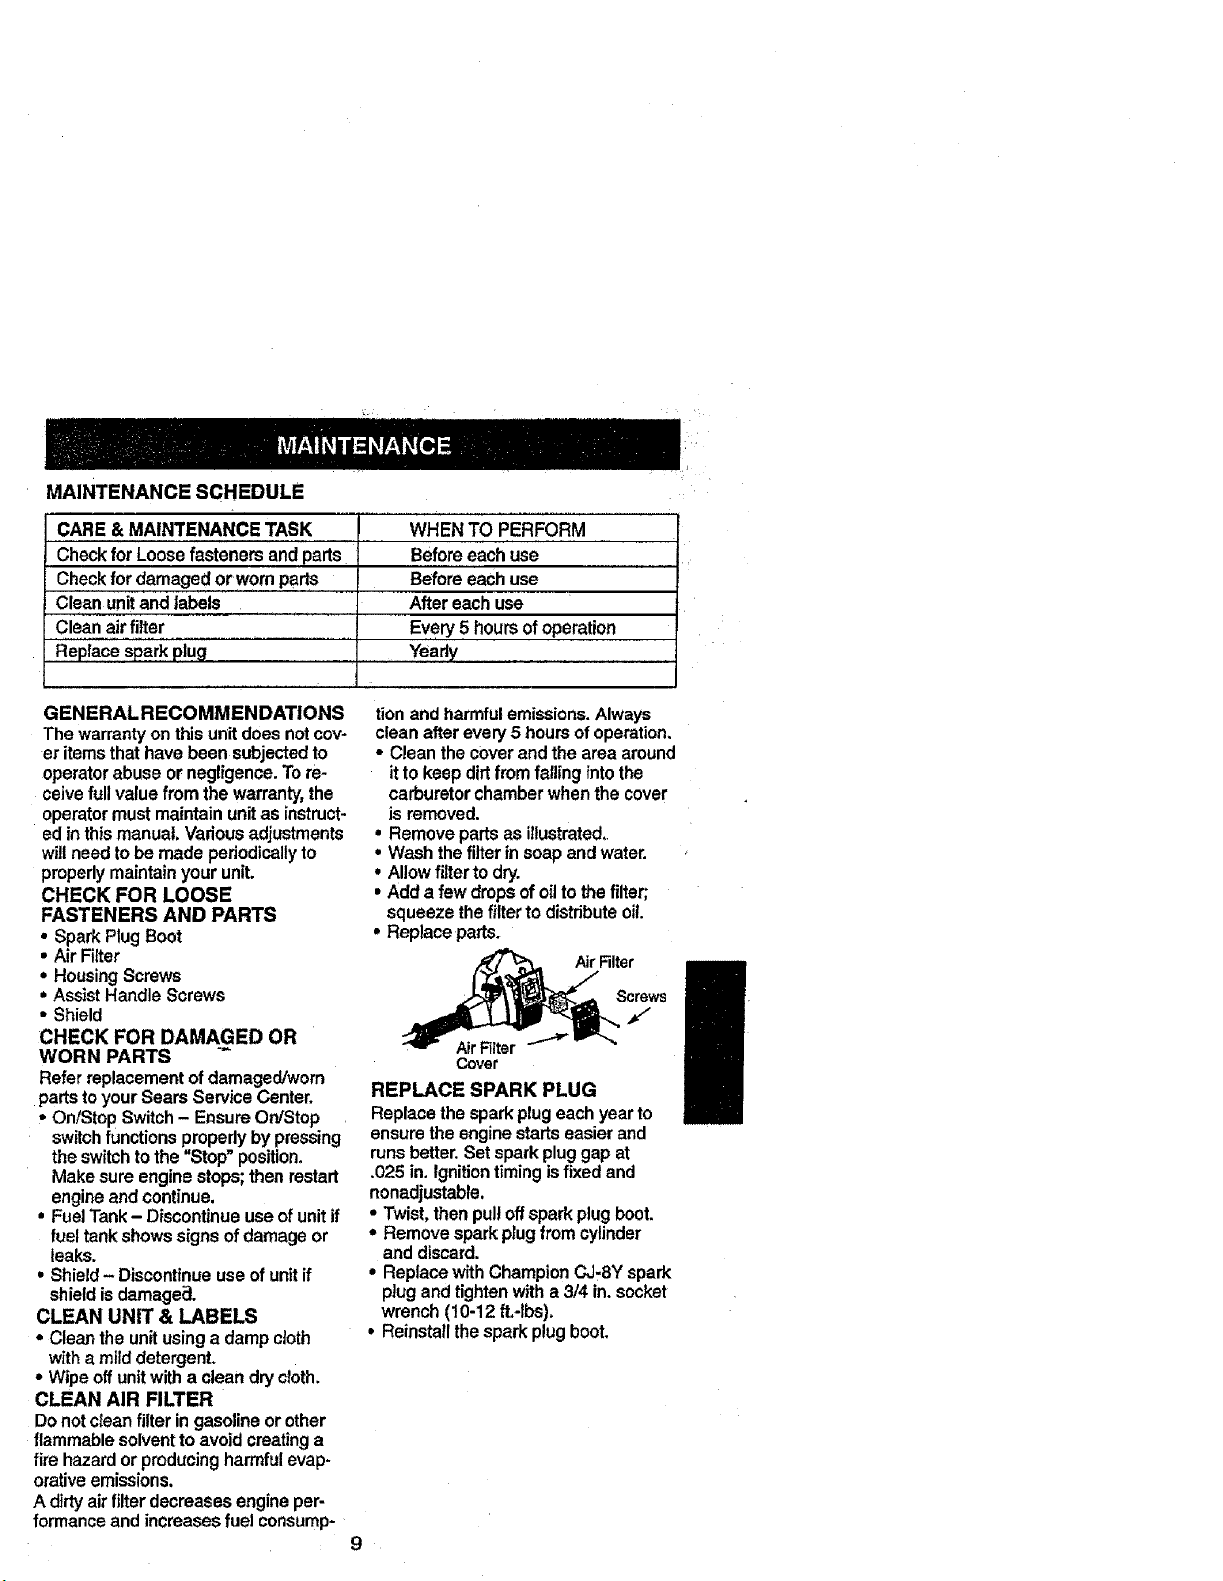
• Remove parts as illustrated,,
• Wash the filterin soap and water.
• Allow filter to dry.
• Add a few drops of oil to the filter;
squeeze the filter to distribute oil.
• Replace parts,
(_ ,_Rlter
Z*f"__..d_ Screws
Cover
REPLACE SPARK PLUG
Replace the spark plug each year to
ensure the engine starts easier and
runs better. Set spark plug gap at
.025 in. ignitiontiming is fixed and
nonadjustable.
• Twist, then pull off spark plug boot,
• Remove spark plug from cylinder
and discard.
• Replace with Champion CJ-8Y spark
plug and tighten with a 3/4 in. socket
wrench (10-12 ft.-tbs).
• Reinstatl the spark plug boot.
 Loading...