

Craftsman 358795631 Owner’s Manual

IMPORTANT MANUAL Do Not Throw Away
S _AUR8
Operator's
Manual
Model No.
358.795631
DANGER:
READ THE OPERATOR'S
MANUAL AND FOLLOW
ALL WARNINGS AND
SAFETY INSTRUCTIONS.
FAILURE TO DO SO CAN
RESULT IN SERIOUS
INJURY.
Always Wear Eye Protection
CRRFTSMRNo
21 cc (1.3 cu. in.) 2-CYCLE
22 Inch Blade
GAS HEDGE TRIMMER
• Assembly
• Operation
• Customer Responsibilities
• Service Adjustments
• Repair Parts
i
Sears, Roebuck and Co., Hoffman Estates, IL 60179 U.S.A.
530-084237 03/12/96

iiii ,,i,= ii iiiiii ii i ,i.,11,1,11ii iiiiiiiiiiiii iiii
SAFETY RULES
===================,,,,,H,= ,.i ii HII i i i i ,i = ,,,,,,,,,,,,,,,,,, ,,,=
• • TACT SPARK PLUG TO PREVENT ACCIDENTAL STARTING WHEN SETTING UP, TRANSPORTING,
i ^ CAU.iON,ALWAYSO,SCONNEOTSPA.KPLUGW,.=ANOP .OEW,.EW.ERECANNOTCONI
O' ADJ USTING OR MAKING RE,PAIRS.
OPERATOR SAFETY
• Always wear safety eye protection.
• Alwayswear heavy long pants, long sleeves,boots and
gloves. Do not go barefoot or wear sandals, short
pants, short sleeves. Being fully covered helps to pro-
tect you from pieces of toxic pfants thrown by the
blade.
• Secure hair so it above shoulder length. Secure loose
clothing or jewelry. Clothing with loosely hanging ties,
straps, tassels, etc. can be caught in moving pans.
Do not operate this unit when you are tired, il! or under
the influence of alcohol, drugs, or medication.
• Wear hearing protection ff you use this unit for more
than 1-1/2 hours per day.
• Never start or run the engine inside a closed room or
building. Breathing exhaust fumes can kill.
• Keep handles free of oiland fuel.
• if situations occur which are not covered in this manu-
al, use care and good judgement.
UNIT MAINTENANCE/SAFETY
• Look for and replace damaged or loose parts before
each use. Look for and repair fuel leaks before use.
Keep the unit in good workingcondition.
• Make sure the unit is maintained and assembled cor-
rectly as listed in this manual.
• Make carburetor adjustments with the blade supported
to prevent it from contacting any object. Hold the unit
by hand.
• Keep others away when making carburetor adjust-
ments.
• Use only quality SEARS accessories and replacement
parts as recommended for this unit.
• Have all maintenance and service not explained in tills
manual performed by your SEARS Ser_ce Center.
FUEL SAFETY
• Mix and pour fuet outdoors.
• Keep away from sparks or flames.
• Use a container approved for fuel.
• Do not smoke or allow smoking near fuel or the unit or
while using the unit.
• Wipe up all fuel spills before starting engine.
• Move at least 10 feet (3 meters) away from fueling site
before starting engine.
• Stop engine and allow unit to cool before removing_fue!
cap.
CUTTING SAFETY
• Inspectthe area to be cut before each use. Remove
objects (rocks, broken glass, nails, wire, string, etc.)
whichcan become entangled in the blade.
• Keep others including children, animals, bystanders
and helpers a minimum of 15 feet (5 meters) away.
Stopthe engine immediatelyif you are approached.
• Always keep the engine on the right-hand side of your
body.
• Hold the unit firmly with both hands.
• Keepfirm footing and balance. Do not over-reach.
• Keepthe blade below waist level.
• Do not raise the engine above your shoulder.
• Keep all parts of your body away from the blade and
muffler when engine is running.
• Useonly for jobs explained in this manual.
TRANSPORTING AND STORAGE
• Stopthe unit before transporting.
• Allow the engine to cool, and secure the unit before
storing or transporting in a vehicle.
• Empty the fuel tank before stodng or transporting the
unit. Use up any fue! left in the carburetor by starting
the engine and letting theengine run until it stops.
• Store unit and fuel in an area where fuel vapors cannot
reach sparks or open flames from water heaters, elec-
tric motor or switches,furnaces, etc.
• Store unit so the blade cannot accidentally cause
injury.
• Store the unit out of the reach of children.
SAFETY NOTICE .... I
jExposure to vibrationsthrough prolongeduseof gasolinepowered hand units could cause blood vessel or nerve damage in the tin-]
Jgers, hands, and joints of people prone to circulationdisorders or abnormal swellings. Prolonged use in cold weather has been|
Ilinked to blood vessel damage in otherwise healthy people. If symptoms occursuch as numbness, pain, loss of strength, change int
|skin color or texture, or lossof feeling in the fingers, hands or joints,discontinuethe use of thrs unitand seek medicala_ent=on. An|
]anti-vibration system does notguarantee the avoidance of these problems.Users who operate powertoo=son a continuatano regu-]
[lar basis must monitor closely their physical conditionand the conditionofthis unit.
LOOK FOR THIS SYMBOL TO POINT OUT IMPORTANT SAFETY PRECAUTIONS.
IT MEANS - ATTENTION!!! BECOME ALERT!!! YOUR SAFETY IS INVOLVED.
-2-

i i HIIIIIII, I II I II I II Illll III
SAFETY RULES
j ii I II i ii ii
DANGER:
THIS POWER UNIT CAN BE DANGEROUS! THIS UNIT CAN CAUSE SERIOUS INJURY INCLUDING
AMPUTATION OR BLINDNESS TO THE OPERATOR AND OTHERS. THE WARNINGS AND SAFETY
INSTRUCTIONS IN THIS MANUAL MUST BE FOLLOWED TO PROVIDE REASONABLE SAFETY AND
EFFICIENCY IN USING THIS UNI'I;.THE OPERATOR IS RESPONSIBLE FOR FOLLOWING THE WARN-
INGS AND INSTRUCTIONS IN THIS MANUAL AND ON THE UNI7;.READ THE ENTIRE OPERATOR'S
MANUAL BEFORE ASSEMBLING AND USING THE UNITTRESTRICT THE USE OF THIS POWER TOOL
TO PERSONS WHO READ, UNDERSTAND, AND FOLLOW THE WARNINGS AND INSTRUCTIONS IN
THIS MANUAL AND ON THE UNIT.NEVER ALLOW CHILDREN TO USE THIS TOOL.
WARNING:
CUTTING BLADE CAN THROW OBJECTS
VIOLENTLY. YOU CAN BE BLINDED OR
INJURED. ALWAYS WEAR EYE AND LEG
PROTECTION.
BLADE MOVES MOMENTARILY AFTER
TRIGGER IS RELEASED. THE CUTTING
BLADE CAN SERIOUSLY CUT YOU OR
OTHERS. ALLOW CUTTING BLADE TO
STOP BEFORE REMOVING IT FROM THE
CUT.
HAZARD ZONE FOR CUTTING BLADE.
THE CUTTING BLADE CAN SERIOUSLY
CUT YOU OR OTHERS. OTHERS CAN BE
BLINDED OR INJURED. KEEP PEOPLE
AND ANIMALS A MINIMUM OF 15 FEET
(5 METERS) AWAY.
LEG GUARDS
Ii
EYE PROTECTION BOOTS
HAZARDZONE
READ OPERATOR'S MANUAL. FOLLOW
ALL WARNINGS AND INSTRUCTIONS.
FAILURE TO DO SO CAN RESULT IN SERI-
OUS INJURY.
-3-
OPERATOR'S
MANUAL
SAFETY
LABEL

CONGRATULATIONS on your purchase of a Sears
Craftsman Gas Hedge Trimmer. It has been designed,
engineered and manufactured to give you the best possi-
ble dependability and performance.
Should you experience any problems you cannot easily
remedy, please contact your nearest Sears Service Cen-
ter/Department. Sears has competent, well trained tech*
niciansand the proper tools to serviceor repair this unit.
Please read and retain this manual. The instructionswill
enable you to assemble and maintain your unit properly.
Always observe the "SAFETY RULES."
PRODUCT SPECIFICATIONS
CUTTING BLADE ............... 22"
ENGINE .............................. 21 cc, 2-cycle Air-Cooled
FUEL/OIL MIX RATIO......... 40:1 (3.2 oz. oil per one
gallon of gasoline
IGNITION ............................ Solid State
(air gap .010" to .014")
IGNITION TIMING .............. Non-adjustable, fixed
SPARK PLUG .......:............. Champion (RCJ-SY)
MODEL NUMBER: 358.795631
SPARK PLUG GAP.............. 024 to .028"
DATE CODF__JSERIALNO.:
ENGINE RPM ..................... 9,000 RPM Max.
DATE OF PURCHASE:
THE MODEL AND SERIAL NUMBER WILL BE
FOUND ON THE PRODUCT.
YOU SHOULD RECORD BOTH SERIAL NUMBER
AND DATEOR PURCHASE AND KEEP IN A SAFE
PLACE FOR FUTURE REFERENCE.
i i ,
MAINTENANCE AGREEMENT
A Sears Maintenance Agreement is available on this
product.Contactyour nearest Sears store for details.
CUSTOMER RESPONSIBILITIES
• Read and observe the safety ruJes.
• Follow a regular schedule in maintaining, caring for,
and using your unit.
For users on U.S. Forest Land and in some states, includ-
ing California (Public Resources Codes 442 and 443),
Idaho, Maine, Minnesota, New Jersey, Oregon, and
Washington: Cert_n internal combustion engines operated
on forest, brush, and/or grass-covered lands in the above
areas are required to be equipped with a spark arrestor,
i
maintained in effectiveworkingorder,or the enginemust be
constructed, equipped, and maintained for theprevention of
fire. Check with your state or local authoritiesfor regulations
pertaining to these requirements. Failure to follow these
requirements is a violation of the law. This unitis not facto-
ry.equipped with a sparkarreston however, a spark arrestor
is available as an optional part. If a spark arrestor is
required in your area, contact your SEARS Service
Center/Department for the correctk_t.
MANUFACTURED UNDER ONE OR MORE OF THE FOU_OWtNG U.S.
PATENTS:4,940,028; 4,904,827; 4,846,123, 4,463,544; 4,45,1,983; 4,364,
435; 4,286,675;/re,32,266 Other U.S. and Foreign Pat_ts Psr'_ng.
SPECIAL NOTICE
• Follow the instructions under'Customer Responsibili-
ties"and "Storage" sections of this Operator's Manual.
FULL ONE YEAR WARRANTY ON CI_AFTSMAN GAS-POWERED HEDGE TRIMMER
Forone (1) year from the date or purchase,whenthisCraftsmanGas-Powered HedgeTrimmerismaintained,lubri-
cated and tuned-up according to the owners manual,Sears will repair, free of charge, any defect in materials or
workmanship.
, ii
This warranty excludes spark plug,airfilter, and the bladewhich are expendable parts and may become worn dur-
ingnormal use.
If this Hedge Trimmer is usedfor commercialpurposes,this warranty applies for only90 daysfrom the date of pur-
chase, ff this Hedge Trimmer is used for rental purposes, this warranty applies for only 30 days from the date of
purchase.
THIS WARRANTY APPLIES ONLYWHILE THIS PRODUCT IS USED IN THE UNITED STATES
WARRANTY SERVICE IS AVAILABLE BY RETURNING THE HEDGE TRIMMER TO THE NEAREST SEARS
SERVICE CENTER IN THE UNITED STATES.
This warranty gives you specific legal rights, andyou may also have other rights which vary from state to state.
SEARS, ROEBUCK AND CO., D/817WA, HOFFMAN ESTATES, IL 60179
-4-

i iii iii i ii iii IHIII | I II
TABLE OF CONTENTS
i , ii i1|11 i i iii iiiiii i
Safety Rules .................................................................... 2 Service and Adjustments............................................... 16
Product Specifications ..................................................... 4 Storage .......................................................................... 17
Warranty.......................................................................... 4 TroubleShooting..........:.................................................18
Operation.........................................................................7 RepairParts...................................................................19
Customer Responsibilities ............................................. 13 Ordering Repair Parts/Service ........................ Back Cover
i i1| ii ii i i i i iiiii i iii
INDEX
I IIIIIHI II I I I II
A
Accessories.................................................... ................. 5
Air Fitter ......................................................................... 14
C
Carburetor Adjustments ................................................. 16
Customer Responsibilities ............................................. 13
Cutting Blade Lubrication .............................................. 13
E
Engine
FueVOil ....................................................................... t 1
Spark Plug .................................................................. 14
Starting ....................................................................... 12
Storage ....................................................................... 17
F
Fuel Filter....................................................................... 15
Fueling........................................................................... 11
H
Hardware Contents .......................................................... 6
K
Know Your Hedge Trimmer ............................................... 7
iiiilll iiiii ii i iii iiii IIIIIIHII I
Maintenance Schedule ................. ................................. 13
Model Number ................................................................ .4
Operation ......................................................................... 7
Ordering Repair Parts ..................................... Back Cover
Service and Adjustments ............................................... 16
Spark Plug ..................................................................... 14
Specifications ................................................................... 4
Starting .......................................................................... 12
Storage .......................................................................... 17
Trimming Methods ......................................................... 10
Trouble Shooting ............................................................ 18
Warranty ....................................................................... ..4
i IHI IIIIH, IIIIIII III
M
O
S
T
W
ACCESSORIES
i ,i illll ii i iiii iiiii ii i
These accessories and attachments were available when the unit was originally purchased.They are also available at
most Sears retail outlets and service centers. Most Sears stores can order these items for you when you provide the
model number of your unit.
i i iiiii
SAFETY
GOGGLES
Accessories
SPARK AIR
PLUG RLTER
-5-
2-CYCLE
ENGINE OIL
m!
I

ii ,=ll|=ll I,,,,H,I ,,I II II I ,ll I I Ill
HARDWARE CONTENTS
i i i iiiiiiiiii i iiiiiiiii ii i / .i i i iiiiiiil,lml ii i i iiiiiii i ii i i
ENGINE OIL OPERATOR'S MANUAL
THIS MODEL COMES FULLY ASSEMBLED
NOTE: It is normalto hear the fue! filter rattlein an empty
fuel tank.
TO REMOVE HEDGETRIMMER FROM
CARTON
• Remove loose parts includedwith Hedge Trimmer.
• Remove all packing material.
• Check carton thoroughlyfor additionalloose parts.
. Use cardboard lineras work surface during inspection
of unit.
,..6 _

i illlliiillii i |lllll i i iiiiml ii iiiiiiiii
OPERATION
iiiiiiiiiiii ii i i i i iiiiiiiii i iiiii iii i ii iiiiiii i ii ii iiiiiiiii
KNOWYOUR HEDGETRIMMER (Fig. 1)
READ THIS OPERATOR'S MANUAL AND SAFETY RULES BEFORE OPERATING YOUR HEDGE TRIMMER. Compare
the ittustratienswith yourunit to familiarize yourselfwith the location of the various controlsand adjustments. Save this
manual for future reference.
AIR R LTER
CHOKE LEVER SWITCH
ON/OFF
REAR
HANDLE
|
SPARK PLUG
u w
\
FUEL CAP
CUTTING BLADE
THROTrLE THROTTLE
LOCK-OUT LOCK
THROTTLE
TRIGGER
FRONT
._r.,,HAND GUARD
/_
STARTER MUFFLER
HANDLE
ii i = i1,1 iiii iii i i i iiiiiiiii1=111 i iii iiiiii
Figure 1
The ON/OFF SWITCH is used to stop the engine. The CHOKE LEVER activates the choketo provide addi-
tional fuel to the engine when starting a cold engine.
The STARTER ROPE HANDLE is used for starting the
engine. The THROTTLE TRIGGER controls engine speed.
The PRIMER BULB cimulates fuelto the carburetor.
-7-
| ....................
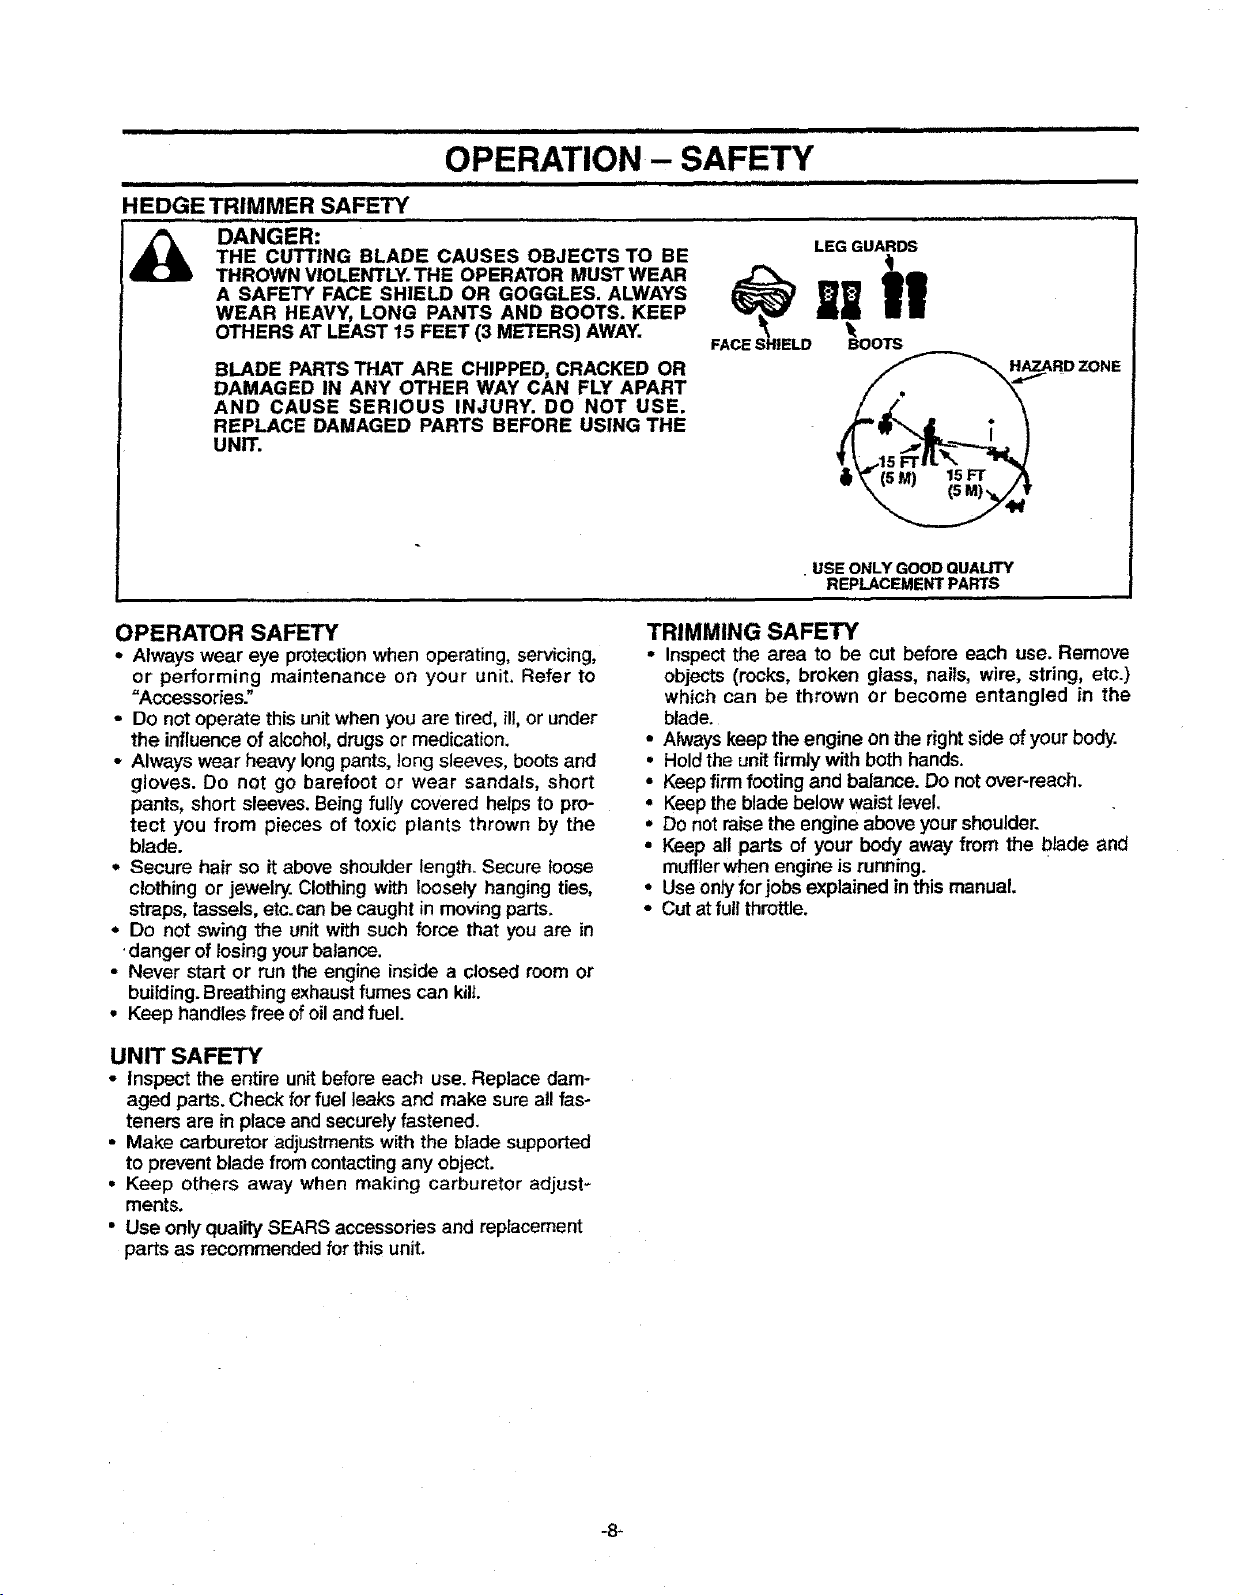
OPERATION - SAFETY
................................ , ,,,, ,, ,
HEDGE TRIMMER SAFETY
i_ DANGER:
THE CUTTING BLADE CAUSES OBJECTS TO BE
THROWN VIOLENTLY.THE OPERATOR MUST WEAR
A SAFETY FACE SHIELD OR GOGGLES. ALWAYS
WEAR HEAVY, LONG PANTS AND BOOTS. KEEP
OTHERS AT LEAST 15 FEET (3 METERS) AWAY.
BLADE PARTS THAT ARE CHIPPED, CRACKED OR
DAMAGED IN ANY OTHER WAY CAN FLY APART
AND CAUSE SERIOUS INJURY. DO NOT USE.
REPLACE DAMAGED PARTS BEFORE USING THE
UNIT.
ill = 111
÷
FACE SHIELD
i
LEG GUARDS
|1
BOOTS
USE ONLY GOOD QUALITY
REPLACEMENT PARTS
OPERATOR SAFETY
• Always wear eye protectionwhen operating, servicing,
or performing maintenance on your unit. Refer to
=Accessories."
• Do not operate this unit when you are tired, ill,or under
the influence of alcohol drugs or medication.
o Always wear heavy long pants, long sleeves, boots and
gloves. Do not go barefoot or wear sandals, short
pants, short sleeves. Being fulJy covered helps to pro-
tect you from pieces of toxic plants thrown by the
blade.
o Secure hair so it above shoulder length. Secure loose
clothing or jewelry. Clothing with loosely hanging ties,
straps, tassels, etc.can be caught in moving parts.
• Do not swing the unit with such force that you are in
•danger of losing your balance.
• Never start or run the engine inside a closed room or
building. Breathing exhaust fumes can kilt.
• Keep handles free of oiland fuel.
UNIT SAFETY
• Inspect the entire unitbefore each use. Replace dam-
aged parts. Check for fuel leaks and make sure al!fas-
teners are in place andsecurelyfastened,
• Make carburetor adjustments with the blade supported
to preventblade from contactingany object.
• Keep others away when making carburetor adjust-
ments.
• Use only qualitySEARS accessoriesand replacement
parts as recommended forthis unit.
TRIMMING SAFETY
• Inspect the area to be cut before each use. Remove
objects (rocks, broken glass, nails, wire, string, etc.)
which can be thrown or become entangled in the
blade.
• Always keep the engine on the right side of your body.
• Holdthe unit firmly with both hands.
• Keepfirm footing and balance. Do not over-reach.
, Keep theblade below waist level.
• Do not raise the engine above your shoulder.
• Keep all parts of your body away from the blade and
muffler when engine is running.
• Useonty forjobs explained !n this manual.
• Cut at full throttle.

i i i
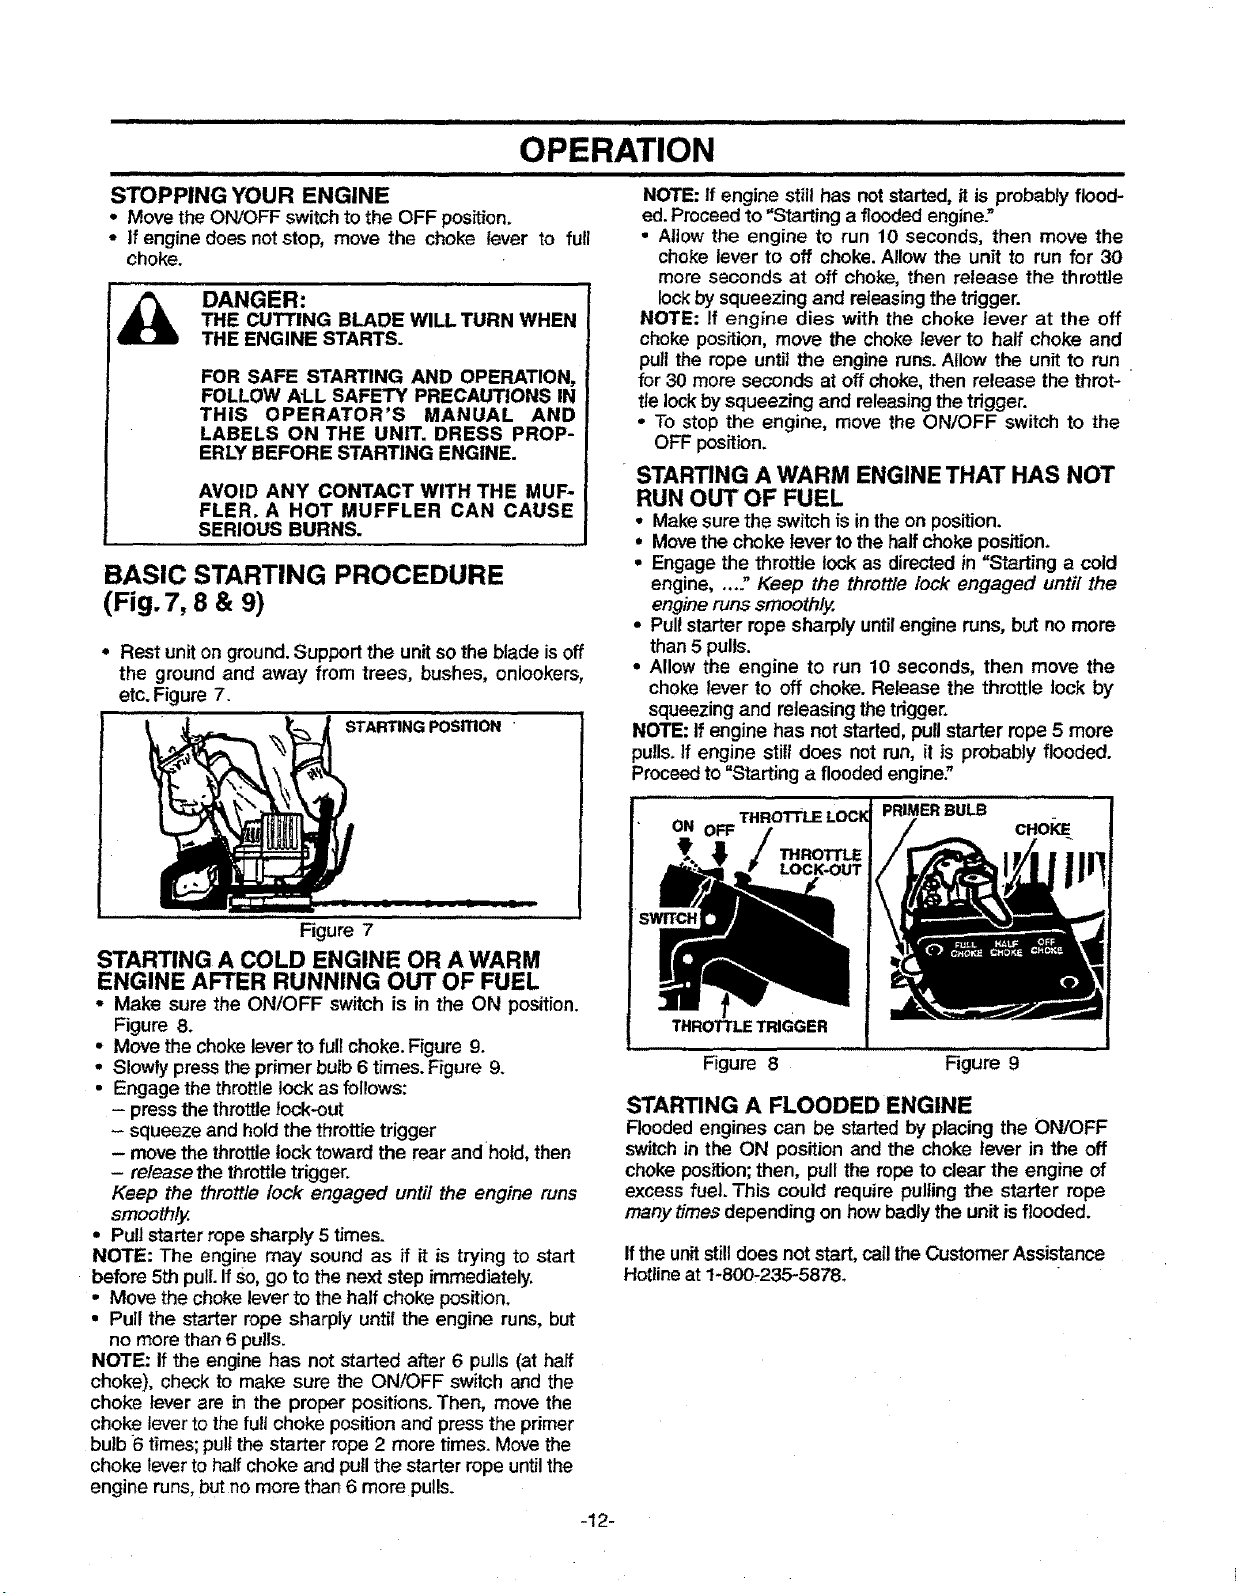
OPERATION
HOWTO USE YOUR HEDGE TRIMMER NOTE' Verity the throttle trigger stays in the advanced
position.
STOPPING YOUR ENGINE
• Move start/stop switch to the "STOP" position.
• If engine does not stop, pull choke knob out fully.
THROTTLE CONTROL GROUP (Fig. 2)
THROTTLE LOCKOUT
• The throttle lockout prevents unintentional actuation of
the throttletrigger.
• You must depress the throttle lockout with thepalm of
yourhand before actuatingthe throttletrigger.
THROTTLE TRIGGER
• The throttle trigger allows for variable controlof engine
speed.
• The throttle triggerisactuated by the index fingeron your
righthand.(After the throttlelockout is depressed).
THROTTLE LOCK
• The throttle lock allows the faster engine speeds during
starting.
• The throttle lockis engaged by the following steps:
- Grasp the rear handle and depress the throttle lockout.
- Squeeze the throttle trigger fully and hold.
- Depress the throttle lockw_thyour forefinger and hold.
- Release your grip on the throttle trigger and throttle
lockout.
• Squeezing the throttle trigger will release the fast idle
setting. If the throttle trigger is squeezed accidentally
during starting, it will be necessary to reset throttle lock.
CHOKE
• The choke is set by pullingthe choke lever out.fully for
coldor refueledengine starts.
PRIMER BULB
• The primer bulb is usedto circulate fuel to the carburetor.
• The primer bulb is activated by pressing on it with your
thumb.
PRIMER
BULB
CHOKE THROTTLE
ON/OFF LOCK
THROTTLE
TRIGGER
Figure 2
,9,

i ,,,, ,,,,i,u,iiiiii m. ,,,,,i,,,,, i ilUl u i,iiiii i
OPERATION
=11 ,,,,,= i = , ,=,= i
STOPPING "fOUR ENGINE
• Move the ONIOFF switchtothe OFF position.
• If engine does not stop, move thechokelevertothefull
choke position.
THROTTLE TRIGGER (Fig. 3)
The throttle trigger controlsthe enginespeed.
NOTE: The blade should stop when the throttle trigger is
released and the engine returns to idlespeed.
THROTrLE TRIGGER
Figure 3
OPERATIN G/USE TIPS (Fig. 4)
ALWAYS CUT AT MAXIMUM SPEED. DO
w...,.o
NOT CROWD THE BLADE INTO THE CUT
WHICH CAN DAMAGE THE BLADE,
BECOME ENTANGLED, OR BE THROWN
CAUSING A SERIOUS HAZARD.
ALWAYS WORK GOING AWAY FROM PEO-
PLE AND SOLID OBJECTS SUCH AS
WALLS, LARGE STONES, TREES, AUTO-
MOBILES, ETC.
ALWAYS WEAR EYE PROTECTION.NEVER
LEAN OVER THE BLADE. ROCKS OR
DEBRIS CAN RICOCHET OR BE THROWN
INTO EYES AND FACE AND CAUSE BLIND-
NESS OR OTHER SERIOUS INJURY.
• Allow the cutting blades to reach full speed before
entering the material to be cut.
• Always work going away from peopleand solid objects
such as walls, large stones, trees, automobiles,etc.
• If blade stalls, immediately stop the engine. Make sure
the ON/OFF switch is off, the spark plug is disconnect-
ed, and the blade has stopped moving before clearing
ioammeddebris from the cutting blade.Inspect the blade
r damage and have _trepaired or replaced as needed.
° To stop the engine, move the ON/OFF switch to the
OFF position.
o Always keep the air vents clean. Stop the unit, make
sure the cutting blade has completely stopped moving,
and disconnect the spark plug before cleaning.
TRIMMING METHODS (Fig.5_ & 6)
NOTE: Do nottryto cut stems larger than 3/8"thick.
TOP cu'n'ING
• For new or young growth: When trimming new or
younggrowth,use a wide, sweeping motion. Figure 5A.
A slight,downwardtiltof the cuttingblades in the direc-
tion ofmotion gives the best cuttingresults.
• For older, thicker growth: Trim older, thicker growth
byusinga sawing motion. Figure5!3.
• For precise, level cuts: If a precisely level cut is
desired, stretch a piece of string across the length of
the hedge. Guide the cutting blades slowly across the
top of the string.Figure 6.
SIDE cu'n'ING
• When tdmming the sides of the hedge, begin at the
bottom and cut upward, tapering the hedge inward at
the top., Figure 6' (inset). Cutting in this method will
leave the body of the hedge narrower at the top.This
shape will expose more ofthe hedge, resulting in more
uniform growth.
Figure 5
A B
Figure 4
Figure 6
AIR VENTS
-10-

HI iii i I i ii i i= ii
OPERATION
i H= H
BEFORE STARTING ENGINE
WARNING:
BE SURE TO READ THE FUEL SAFETY
INFORMATION IN THE SAFETY RULES
SECTION ON PAGE 2 OF THIS MANUAL
BEFORE YOU BEGIN.
IFYOU DO NOT UNDERSTAND THE FUEL
SAFETY SECTION DO NOT ATTEMPT TO
FUEL YOUR UNIT; SEEK HELP FROM
SOMEONE WHO DOES UNDERSTAND
THE FUEL SAFETY SECTION'OR CALL
THE CUSTOMER ASSISTANCE HOTLINE
AT 1-800235-5878.
GASOLINE
The two-cycle engine on this product requires a fuel mix-
ture of regular unleaded gasoline and a high quality 40:1
2-cycle engine oil (AIR-COOLED) for lubrication of the
bearings and other moving parts.The correct fuel/oil mix-
ture is 40:1 (see Fuel Mixture Chart). Too little oil or the
incorrect oil type will cause poor performance and may
cause the engine to overheatand seize.
Gasoline and oil mustbe premixed in a clean approved
fuel container. Always use fresh regular unleaded gaso-
line.
This engine is certifiedto operate on unleaded gasoline.
IMPORTANT: Experience indicates that alcoholblended
fuels called gasohol (or using ethanolor methanol) can
attract moisture, which leads to oil/gas separation and
formation of acids during storage. Acidic gas can dam-
age the fuel system of an engine while in storage. To
avoid engine problems,the fuel system should be emp-
tied before storage for 30 days or longer. Drain the gas
tank, then runthe fuel out ofthe carburetorandfuel lines
by startingthe engineand lettingit rununtilit stops. Use
fresh fuel next season. See STORAGE instructions for
additional information. Never use engine or carburetor
cleaner productsin the fuel tank or permanent damage
may occur.
FUEL STABILIZER
Fuel stabilizer is an acceptable alternative in minimizing
the formation of fue! gum deposits dudng storage. Add
stabilizer to gasoline in fuel tank or storage container.
Always follow the fuel tank or storage container. Always
follow the fuel mix ratio found on the stabilizer container.
Run engine at [east 5 minutes after adding stabilizer to
allow the stabilizer to reach the carburetor. You do not
have to drain the fuel tank for storage ff you are using
fue! stabilizer.
i = = ,,= ,= i ill
2-CYCLE AIR-COOLED ENGINE OIL
CRAFTSMAN 40:1 2-cycle engine oil (AIR-COOLED) is
strongly recommended.This oil is specially blended with
fuel stabilizersfor increasedfuel stability(extends fuel life
upto 5 times longer)and reducedsmoke.
If CRAFTSMAN 2-cycte engine oil (AIR-COOLED) is not
available, use a good quality 2-cycle engine oil (AIR-
COOLED) that has a recommended fuel mix ratio of40:1.
IMPORTANT! Do no use:
• AUTOMOTIVE OIL
• BOAT OILS (NMMA, BIA, etc.)
These oils do not have proper additivesfor 2-cycle AIR-
COOLED engines and can cause engine damage.
GASOLINE AND OIL MIXTURE
Mix gasoline and oilas follows:
• Consult chart for correct quantities.
• Do not mix gasoline and oil directly in the unit's fuel
tank.
FOR ONE GALLON:
• Pour 3,2 ounces of high quality,40:1 2-cycle engine oil
(AIR-COOLED) into an empty, approved one gallon
gasoline container.
• Add one gallon of regular unleaded gasoline to the gal-
lon container, then securely replace the cap.
- Shake the container.
• The mixture is now readyforuse.Fuel stabilizercan be
added at this time if desired;follow mixing instructions
on the label.
FUEL MIXTURE CHART
40:1 Fuel:Oil Mix Ratio
Gasoline Oil (fl. oz.)
1 gallon 3.2
I
NOTE: Fuel containers may hold more thanthe specified
amount. If too much gasoline is in the container, the
resulting gas-to-oil fue! mixture will not be correct for
proper engine operation.
2.5 gallons 8.0
CRAFTSMAN 40:1 2-cycle engine oil (AIR-COOLED) is
specially blended with fuel s_abilizers, if you do not use
this Sears oil, you can add a fuel stabilizer (such as
CRAFTSMAN No.33500) to your fuel tank.
-1"1-
i ii i I,IHI IIIIIII I =11 IIIIIIIII I IIIII ,I,,,11,11111II IIII ]
OPERATION
,,,,,,=r= ,= =,,,= I I
STOPPING YOUR ENGINE
- Move the ON/OFF switch to the OFF position.
• If engine does not stop, move the choke lever to full
choke.
DANGER:
THE CUTTING BLADE WILL TURN WHEN
THE ENGINE STARTS.
FOR SAFE STARTING AND OPERATION,
FOLLOW AtL SAFETY PRECAt_rlONS IN
THIS OPERATOR'S MANUAL AND
LABELS ON THE UNIT. DRESS PROP-
ERLY BEFORE STARTING ENGINE.
AVOID ANY CONTACT WITH THE MUF-
FLER, A HOT MUFFLER CAN CAUSE
SERIOUS BURNS.
BASIC STARTING PROCEDURE
(Fig. 7, 8 & 9)
• Rest uniton ground. Support the unitso the blade is off
the ground and away from trees, bushes, onlookers,
etc. Figure 7.
q STARTING Posmo_
=,,= i,==
NOTE: ff engine still has not started, it is probably flood-
ed. Proceed to "Starting a flooded engine."
• Altow the engine to run 10 seconds, then move the
choke lever to off choke. Allow the unit to run for 30
more seconds at off choke, then release the throttle
lock by squeezing and re!easing the trigger.
NOTE: If engine dies with the choke lever at the off
choke position, move the choke lever to half choke and
pull the rope unt_ the engine runs. Allow the unit to run
for 30 more seconds at off choke, then release the throt-
tie lock by squeezing and releasing the trigger.
• To stop the engine, move the ON/OFF switch to the
OFF position.
STARTING A WARM ENGINE THAT HAS NOT
RUN OUT OF FUEL
• Make sure the switchis inthe on position.
• Movethe chokelever to the halfchokeposition.
• Engagethe throttle lock as directedin =Starting a cold
engine.... / Keep the throttle lock engaged until the
engine runs smoothly.
• Pullstarter rope sharply until engine runs, but no more
than 5 pulls.
• Allow the engine to run 10 seconds, then move the
choke lever to off choke. Release the throttle lock by
squeezing and releasing the trigger.
NOTE: If engine has not started, pullstarter rope 5 more
pulis.If engine still does not run, it is probably flooded.
Proceedto "Starting a flooded engine."
L ----It.
Figure 7
STARTING A COLD ENGINE OR A WARM
ENGINE AFTER RUNNING OUT OF FUEL
° Make sure the ON/OFF switch is in the ON position.
Figure 8.
- Move the chokelever to full choke. Figure 9.
• Slowlypress the primer bulb6 times.Figure 9.
• Engage thethrottlelockas follows:
- pressthe throttlelock-out
- squeeze and holdthe throttletrigger
- movethe throttlelock toward the rearandhold, then
- releasethe throttletrigger.
Keep the throttle lock engaged until the engine runs
smoothly.
• Pull starter rope sharply 5 times.
NOTE: The engine may sound as if it is trying to start
before 5th pull. If so, go to the next step immediately.
• Move the choke lever to the half choke position.
• Pull the starter rope sharply until the engine runs, but
no more than 6 pulls.
NOTE: If the engine has not started after 6 pulls (at half
choke), check to make sure the ON/OFF switch and the
choke lever are in the proper positions. Then, move the
choke leverto the full choke position and press the primer
bulb 6 times; pullthe starter rope 2 more times. Move the
choke lever to half choke and pull the starter rope until the
engine runs, but no more than 6 more pulls.
ON OFF
THROTTLE
LOCK*OUT
THROTrLE TRIGGER
Figure 8 Figure 9
STARTING A FLOODED ENGINE
Floodedengines can be started by placing the ON/OFF
switchin the ON position and the choke lever in the off
choke position;then, pull the ropeto clear the engine of
excess fuel, This could require pullingthe starter rope
manytimesdepending on howbadly the unitis flooded.
Ifthe unitstill does not start, cat! theCustomer Assistance
Hctline at 1-800-235-5878.
-12-
 Loading...