

IMPORTANT MANUAL Do Not Throw Away
8F_A/RS
Operator's
Manual
Model No.
358,795630
CUSTOMER
ASSISTANCE
DANGER:
READ THE OPERATOR'S
MANUAL AND FOLLOW
ALL WARNINGS AND
SAFETY INSTRUCTIONS.
FAILURE TO DO SO CAN
RESULT IN SERIOUS
INJURY.
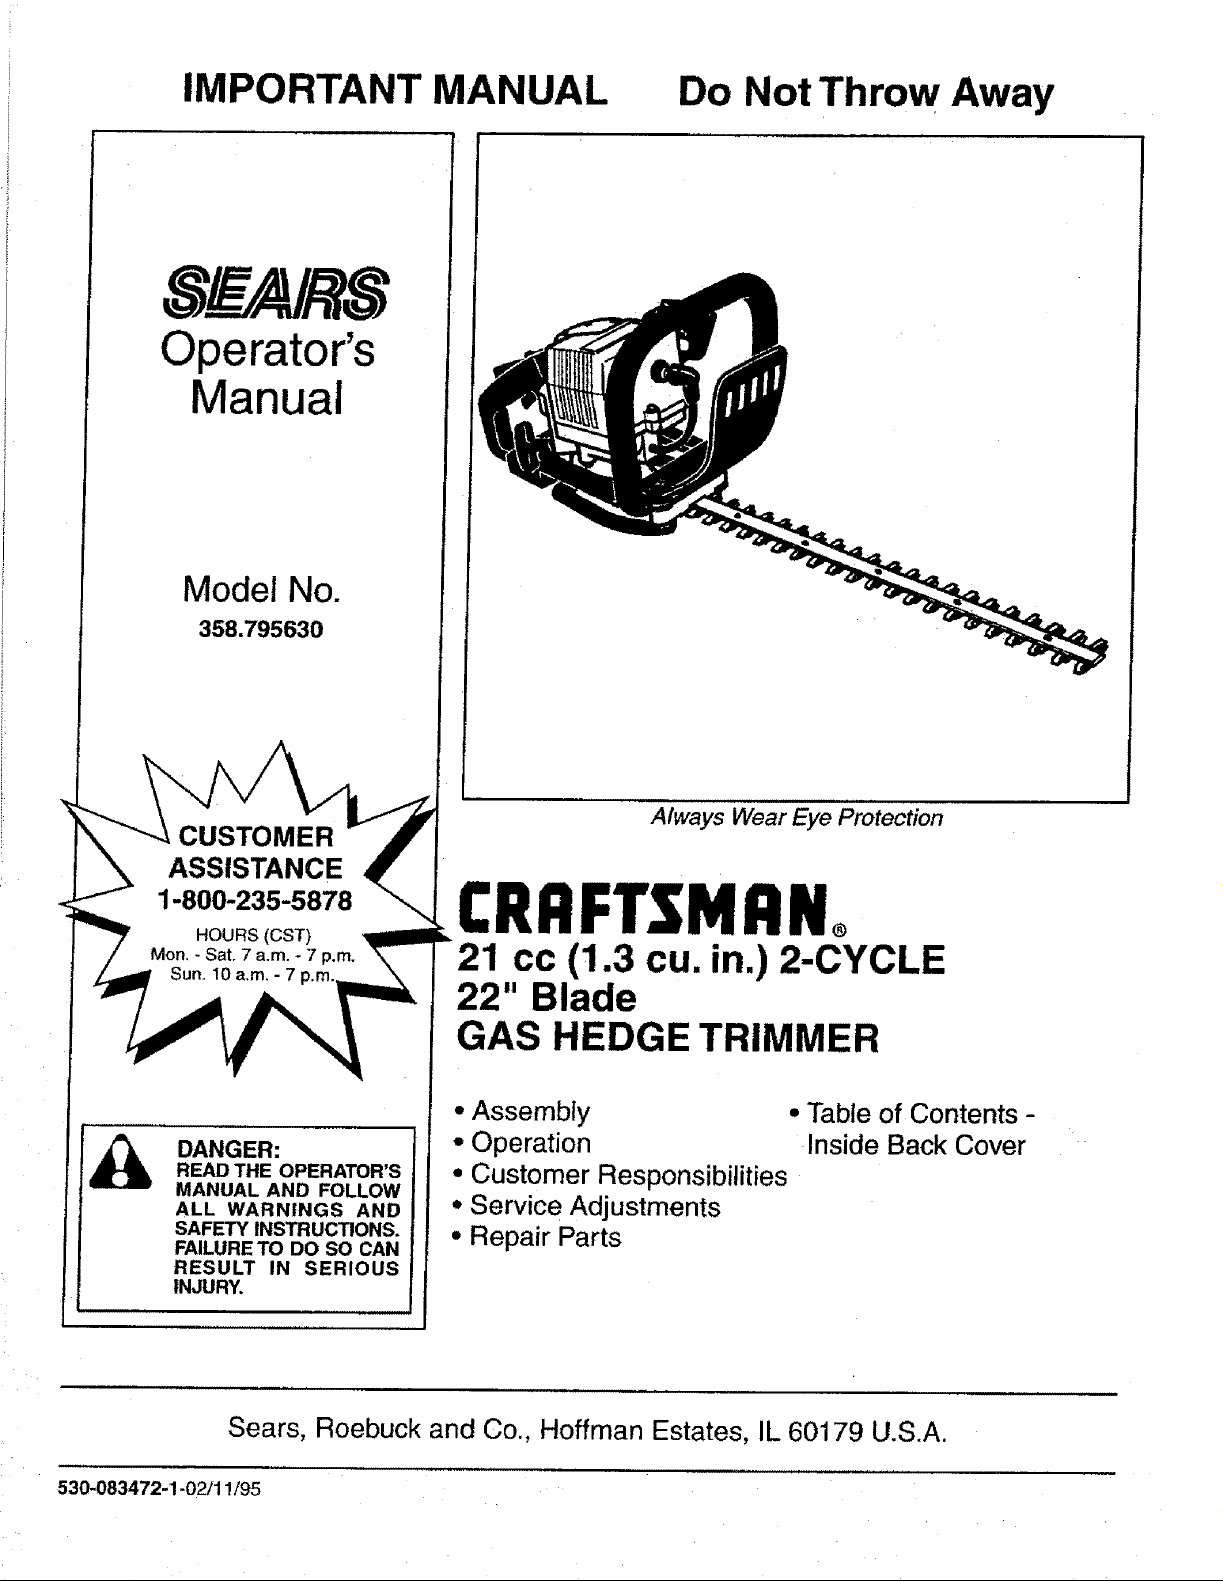
Always Wear Eye Protection
CRRFTSMRNo
cc (1.3 cu. in.) 2-CYCLE
22" Blade
GAS HEDGE TRIMMER
• Assembly • Table of Contents -
• Operation Inside Back Cover
• Customer Responsibilities
• Service Adjustments
• Repair Parts
Sears, Roebuck and Co., Hoffman Estates, IL 60179 U.S.A.
530-083472-1-02/11/95
i =i i inI INIII =11111==11=1
SAFETY RULES
CAUTION: ALWAYS DISCONNECT SPARK PLUG WIRE AND PLACE WIRE WHERE IT CANNOT CON- I
TACT SPARK PLUG TO PREVENT ACCIDENTAL STARTING WHEN SETTING UP, TRANSPORTING,
IADJUSTING OR MAKING REPAIRS.
OPERATOR SAFETY
• Always wear safety eye protection.
• Always wear heavy long pants, long sleeves, boots and
gloves. Do not go barefoot or wear sandals, short
pants, short sleeves. Being fully covered helps to pro-
tect you from pieces of toxic plants thrown by the
blade.
• Secure hair so it above shoulder length. Secure loose
clothing or jewelry. Clothing with loosely hanging ties,
straps, tassels, etc. can be caught in moving parts.
• Do not operate this unit when you are tired, ill or under
the influence of alcohol, drugs, or medication.
• Wear hearing protection if you use this unit for more
than 1-t/2 hours per day.
• Never start or run the engine inside a closed room or
building. Breathing exhaust fumes can kill.
• Keep handles free of oil and fuel.
• If situations occur which are not covered in this manu-
al, use care and good judgement.
UNIT MAINTENANCE/SAFETY
• Look for and replace damaged or loose parts before
each use. Look for and repair fuel leaks before use.
Keep the unit in good working condition.
• Make sure the unit is maintained and assembled cor-
rectly as listed in this manual.
= Make carburetor adjustments with the blade supported
to prevent it from contacting any object. Hold the unit
by hand.
• Keep others away when making carburetor adjust-
ments.
• Use only good quality SEARS accessories and re-
placement parts as recommended for this unit.
FUEL SAFETY
• Mix and pour fuel outdoors.
• Keep away from sparks or flames.
• Use a container approved for fuel.
= Do notsmoke or allow smoking near fuel or the unit or
while using the unit.
• Wipe up all fuel spills before starting engine.
• Move at least 10 feet (3 meters) away from fueling site
before starting engine.
•• Stop engine and allow unit to cool before removing fuel
cap_
CUTTING SAFETY
• Inspect the area to be cut before each use. Remove
objects (rocks, broken glass, nails, wire, string, etc.)
which can become entangled in the blade.
* Keep others including children, animals, bystanders
and helpers a minimum of 50 feet (15 meters) away.
Stop the engine immediately if you are approached.
, Always keep the engine on the right-hand side of your
body.
. Hold the unit firmly with both hands.
= Keep firm footing and balance. Do not over-reach.
• Keep the blade below waist level
. Do not raise the engine above your shoulder.
• Keep all parts of your body away from the blade and
muffler when engine is running.
• Use only for jobs explained in this manual.
TRANSPORTING AND STORAGE
° Stop the unit before transporting.
• Allow the engine to cool, and secure the unit before
storing or transporting in a vehicle.
• Empty the fuel tank before storing or transporting the
unit. Use up any fuel left in the carburetor by starting
the engine and letting the engine run until itstops.
• Store unit and fuel in an area where fuel vapors cannot
reach sparks or open flames from water heaters, elec-
tric motor or switches, furnaces, etc.
• Store unit so the blade cannot accidentally cause
injury.
= Store the unitoutof the reach ofchildren.
I SAFETY NOTICE I
Exposure to vibrations through prolonged use of gasoline powered hand units could cause blood vessel or nerve damage in the fin- I
gers, hands, and joints of peopleproneto circulation disorders or abnormal swellings.Prolonged use in cold weather has beenJ
linkedto blood vessel damageinotherwisehealthypeople. If symptomsoccursuchas numbness,pain,loss of strength, change inl
skin color or texture, or loss of feeling in the fingers, hands orjoints,discontinuethe use ofthis unit and seek medical attention.An |
anti-vibrationsystem does not guaranteethe avoidance ofthese problems.Userswho operatepower tools on a continual and regu-_
lar basis must monitor closely their physical condition and theconditionofthisunit, J
[ _ LOOK FOR TH'S SYMBOl TO PO'NT OUT 'MPORTANT SAFE_ P"EOAU"O "'-
IT MEANS - ATI'ENTION!!! BECOME ALERT!!! YOUR SAFETY IS INVOLVED.
-2-
DANGER:
THIS POWER UNIT CAN BE DANGEROUS! THIS UNIT CAN CAUSE SERIOUS INJURY INCLUDING
AMPUTATION OR BLINDNESS TO THE OPERATOR AND OTHERS. THE WARNINGS AND SAFETY
INSTRUCTIONS IN THIS MANUAL MUST BE FOLLOWED TO PROVIDE REASONABLE SAFETY AND
EFFICIENCY IN USING THIS UNIT. THE OPERATOR IS RESPONSIBLE FOR FOLLOWING THE WARN-
INGS AND INSTRUCTIONS IN THIS MANUAL AND ON THE UNIT. READ THE ENTIRE OPERATOR'S
MANUAL BEFORE ASSEMBLING AND USING THE UNIT! RESTRICT THE USE OF THIS POWER TOOL
TO PERSONS WHO READ, UNDERSTAND, AND FOLLOW THE WARNINGS AND INSTRUCTIONS IN
THIS MANUAL AND ON THE UNIT. NEVER ALLOW CHILDREN TO USE THIS TOOL.
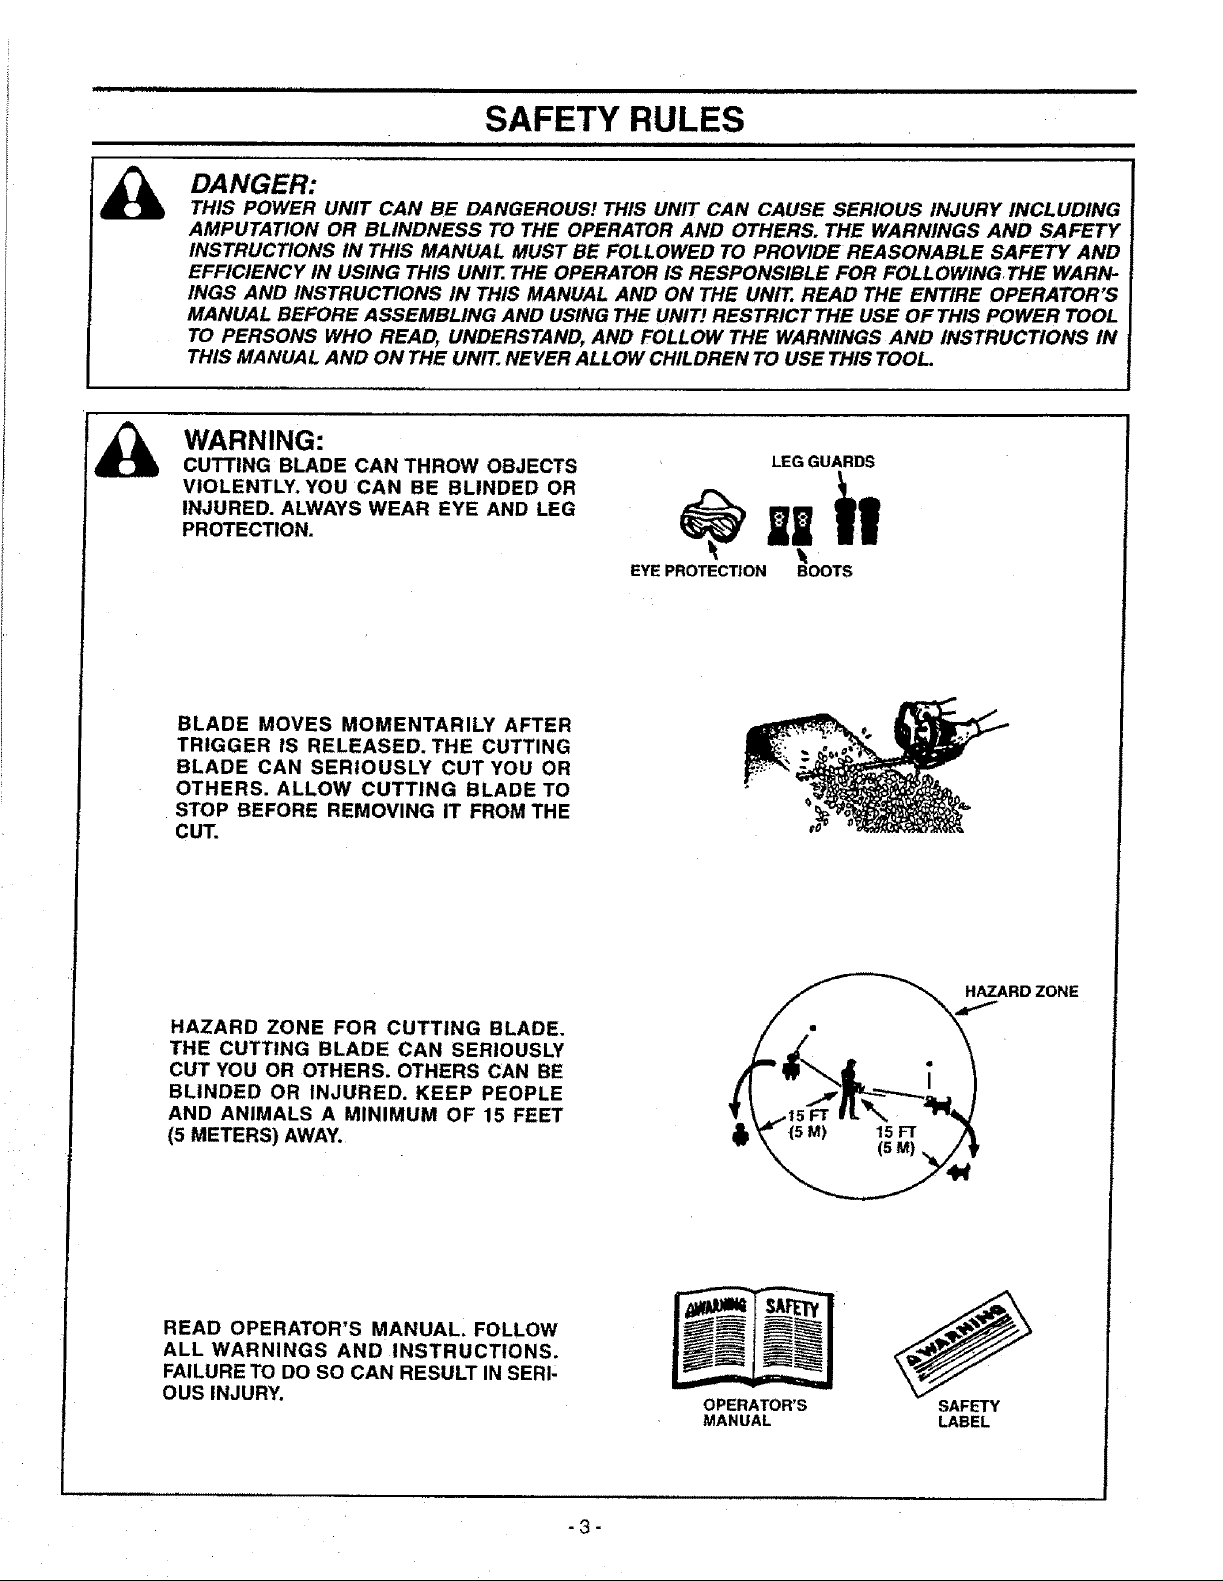
WARNING:
CUTTING BLADE CAN THROW OBJECTS
VIOLENTLY. YOU CAN BE BLINDED OR
INJURED. ALWAYS WEAR EYE AND LEG
PROTECTION.
BLADE MOVES MOMENTARILY AFTER
TRIGGER IS RELEASED. THE CUTTING
BLADE CAN SERIOUSLY CUT YOU OR
OTHERS. ALLOW CUTTING BLADE TO
STOP BEFORE REMOVING IT FROM THE
CUT.
LEG GUARDS
EYE PROTECT|ON BOOTS
HAZARDZONE
HAZARD ZONE FOR CUTTING BLADE.
THE CUTTING BLADE CAN SERIOUSLY
CUT YOU OR OTHERS. OTHERS CAN BE
BLINDED OR INJURED. KEEP PEOPLE
AND ANIMALS A MINIMUM OF 15 FEET
(5 METERS) AWAY.
READ OPERATOR'S MANUAL. FOLLOW
ALL WARNINGS AND INSTRUCTIONS.
FAILURE TO DO SO CAN RESULT IN SERI-
OUS INJURY.
-3-
OPERATOR'S
MANUAL
SAFETY
LABEL
CONGRATULATIONS on your purchase of a Sears
Craftsman Gas Hedge Trimmer. It has been designed,
engineered and manufactured to give you the best possi-
ble dependability and performance.
Should you experience any problems you cannot easily
remedy, please contact your nearest Sears Service Cen-
ter/Department. Sears has competent, well trained tech-
nicians and the proper tools to service or repair this unit.
Please read and retain this manual. The instructions wilt
enable you to assemble and maintain your unit properly.
Always observe the "SAFETY RULES."
MODEL NUMBER: 358.795630
DATE CODE/SERIAL NO.:
DATE OF PURCHASE:
THE MODEL AND SERIAL NUMBER WILL BE
FOUND ON THE PRODUCT.
YOU SHOULD RECORD BOTH SERIAL NUMBER
AND DATE OR PURCHASE AND KEEP IN A SAFE
PLACE FOR FUTURE REFERENCE.
MAINTENANCE AGREEMENT
A Sears Maintenance Agreement is available on this
product. Contact your nearest Sears store for details.
CUSTOMER RESPONSIBILITIES
• Read and observe the safety rules.
° Follow a regular schedule in maintaining, caring for,
and using your unit.
- Follow the instructions under "Customer Responsibili-
ties" and "Storage" sections of this Operator's Manual.
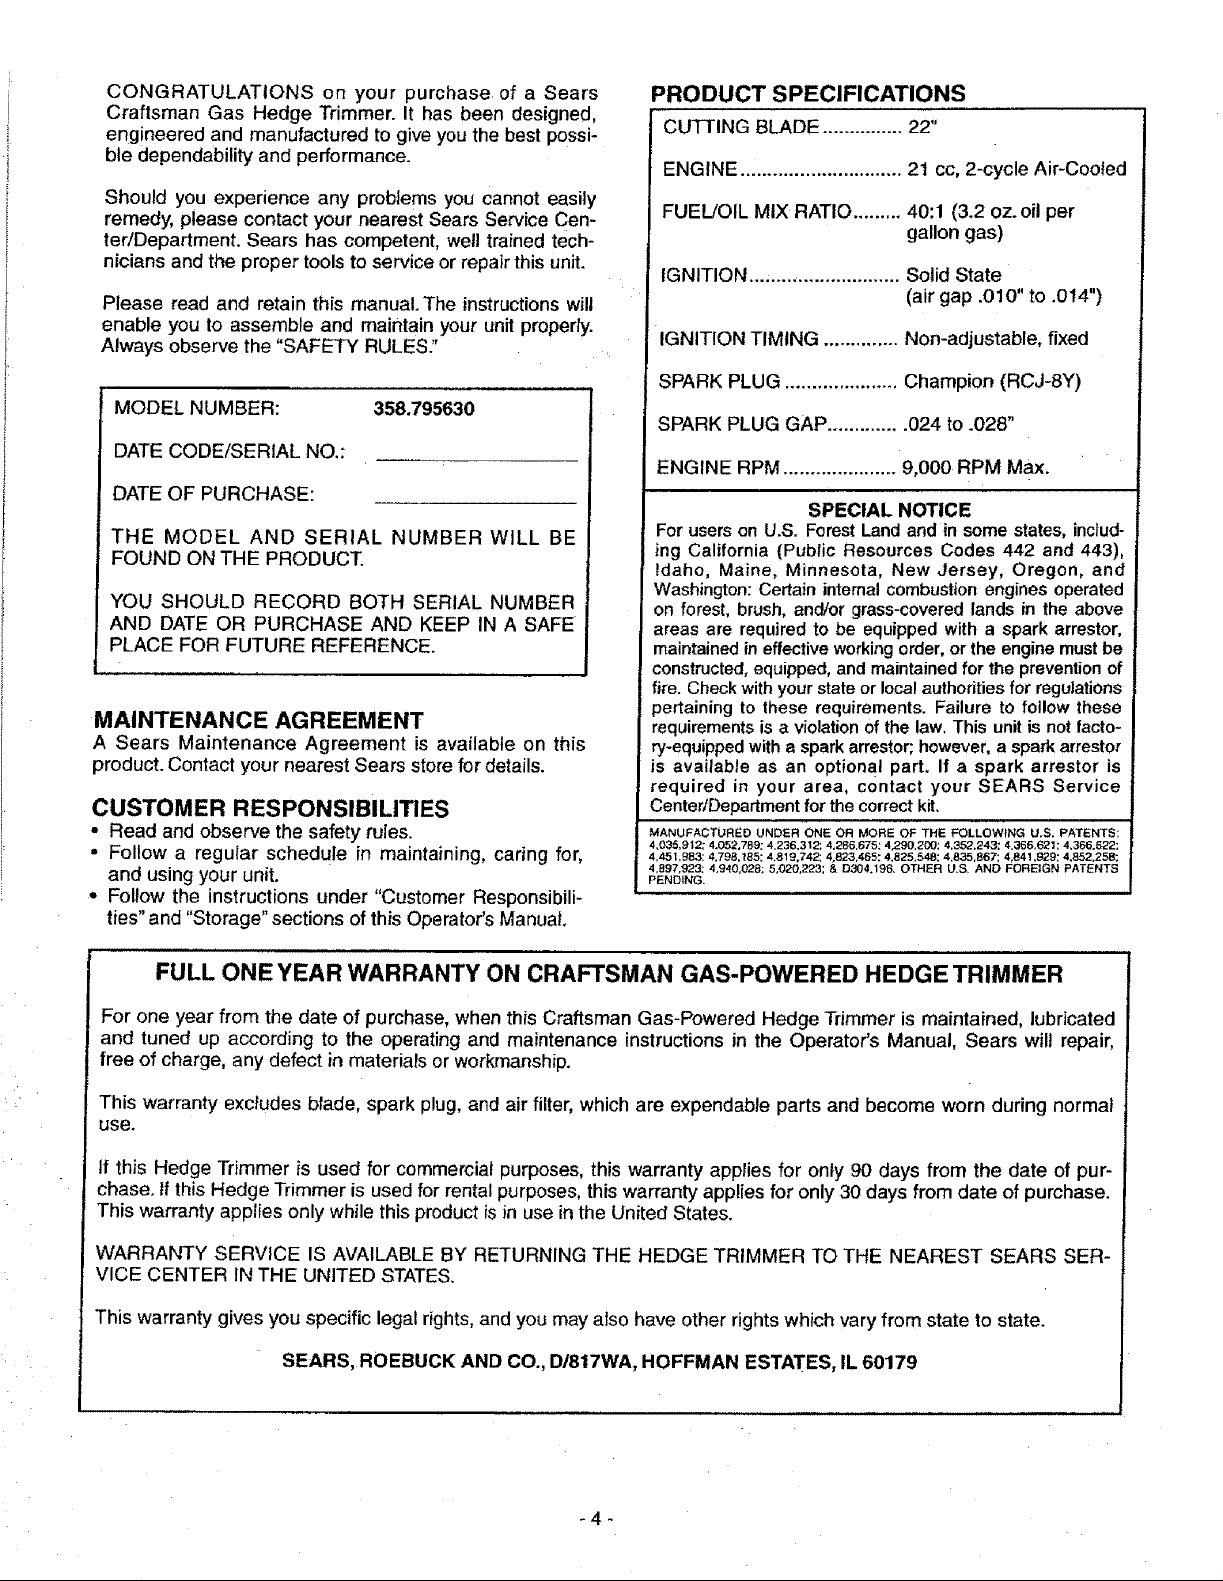
PRODUCT SPECIFICATIONS
CUTTING BLADE ............... 22"
ENGINE .............................. 21 cc, 2-cycle Air-Cooled
FUEL/OIL MIX RATIO......... 40:1 (3.2 oz.oil per
gallon gas)
IGNITION ............................ Solid State
(air gap .010" to .014")
IGNITION TIMING .............. Non-adjustable, fixed
SPARK PLUG ..................... Champion (RCJ-8Y)
SPARK PLUG GAP .............. 024 to .028"
ENGINE RPM ..................... 9,000 RPM Max.
SPECIAL NOTICE
For users on U.S. Forest Landand in somestates, includ-
ing California (Public Resources Codes 442 and 443),
tdaho, Maine, Minnesota, New Jersey, Oregon, and
Washington: Certain internal combustion engines operated
on forest, brush, and/or grass-covered lands in the above
areas are required to be equipped with a spark arrestor,
maintained in effective working order, or the engine must be
constructed,equipped, and maintainedfor the prevention of
fire. Check with your state or localauthorities for regulations
pertaining to these requirements. Failure to follow these
requirementsis a violation of the law. This unit is not facto-
ry-equippedwith a spark arrestor; however, a spark arrestor
is available as an optional part. if a spark arrestor is
required in your area, contact your SEARS Service
Center/Departmentfor the correct kit.
MANUFACTURED UNDER ONE OR MORE OF THE FOLLOWING U.S. PATENTS:
4,035,912; 4.052.78.9; 4,236.312; 4,286,675; 4,290,200; 4_352,243; 4,366,621; 4,366.622;
4,451,983; 4,798,t85: 4,819,742; 4,823,465: 4,825,548: 4.835,867; 4,841,929: 4.852,25B;
4,897,923; 4.940,028; 5,020,223; & D304.196_ OTHER U.S. AND FOREIGN PATENTS
PENDING.
FULL ONE YEAR WARRANTY ON CRAFTSMAN GAS-POWERED HEDGE TRIMMER
For one year from the date of purchase, when this Craftsman Gas-Powered Hedge Trimmer is maintained, lubricated
and tuned up according to the operating and maintenance instructions in the Operator's Manual, Sears will repair,
free of charge, any defect in materials or workmanship.
This warranty excludes blade, spark plug, and air filter, which are expendable parts and become worn during normal
use.
if this Hedge Trimmer is used for commercial purposes, this warranty applies for only 90 days from the date of pur-
chase, tf this Hedge Trimmer is used for rental purposes, this warranty applies for only 30 days from date of purchase.
This warranty applies only while this product is in use in the United States.
WARRANTY SERVICE IS AVAILABLE BY RETURNING THE HEDGE TRIMMER TO THE NEAREST SEARS SER-
VICE CENTER IN THE UNITED STATES.
This warranty gives you specific legal rights, and you may also have other rights which vary from state to state.
SEARS, ROEBUCK AND CO., D/817WA, HOFFMAN ESTATES, IL 60179
-4-
]
i iiiiiiii iiiiiiiiiiiiii iii
HARDWARE CONTENTS
lUlll iiii iiii i i
ENGINE OIL
THIS MODEL COMES FULLY ASSEMBLED
NOTE: It is normal to hear the fuel filterrattle in an empty
fuel tank.
OPERATOR'S MANUAL
, , J
TO REMOVE HEDGETRIMMER FROM
CARTON
• Removelooseparts included with Hedge Trimmer.
• Remove looseplastic parts bag from the carton.
° Remove all packingmaterial.
• Checkcartonthoroughlyfor additional loose parts.
• Usecardboard liner as work surface during inspection
of unit.
-- -_ • m,,, ,,,I m rim = =1 = = ........................................
OPERATION
nfi ._ ii J ,lllli i _ _ • ....
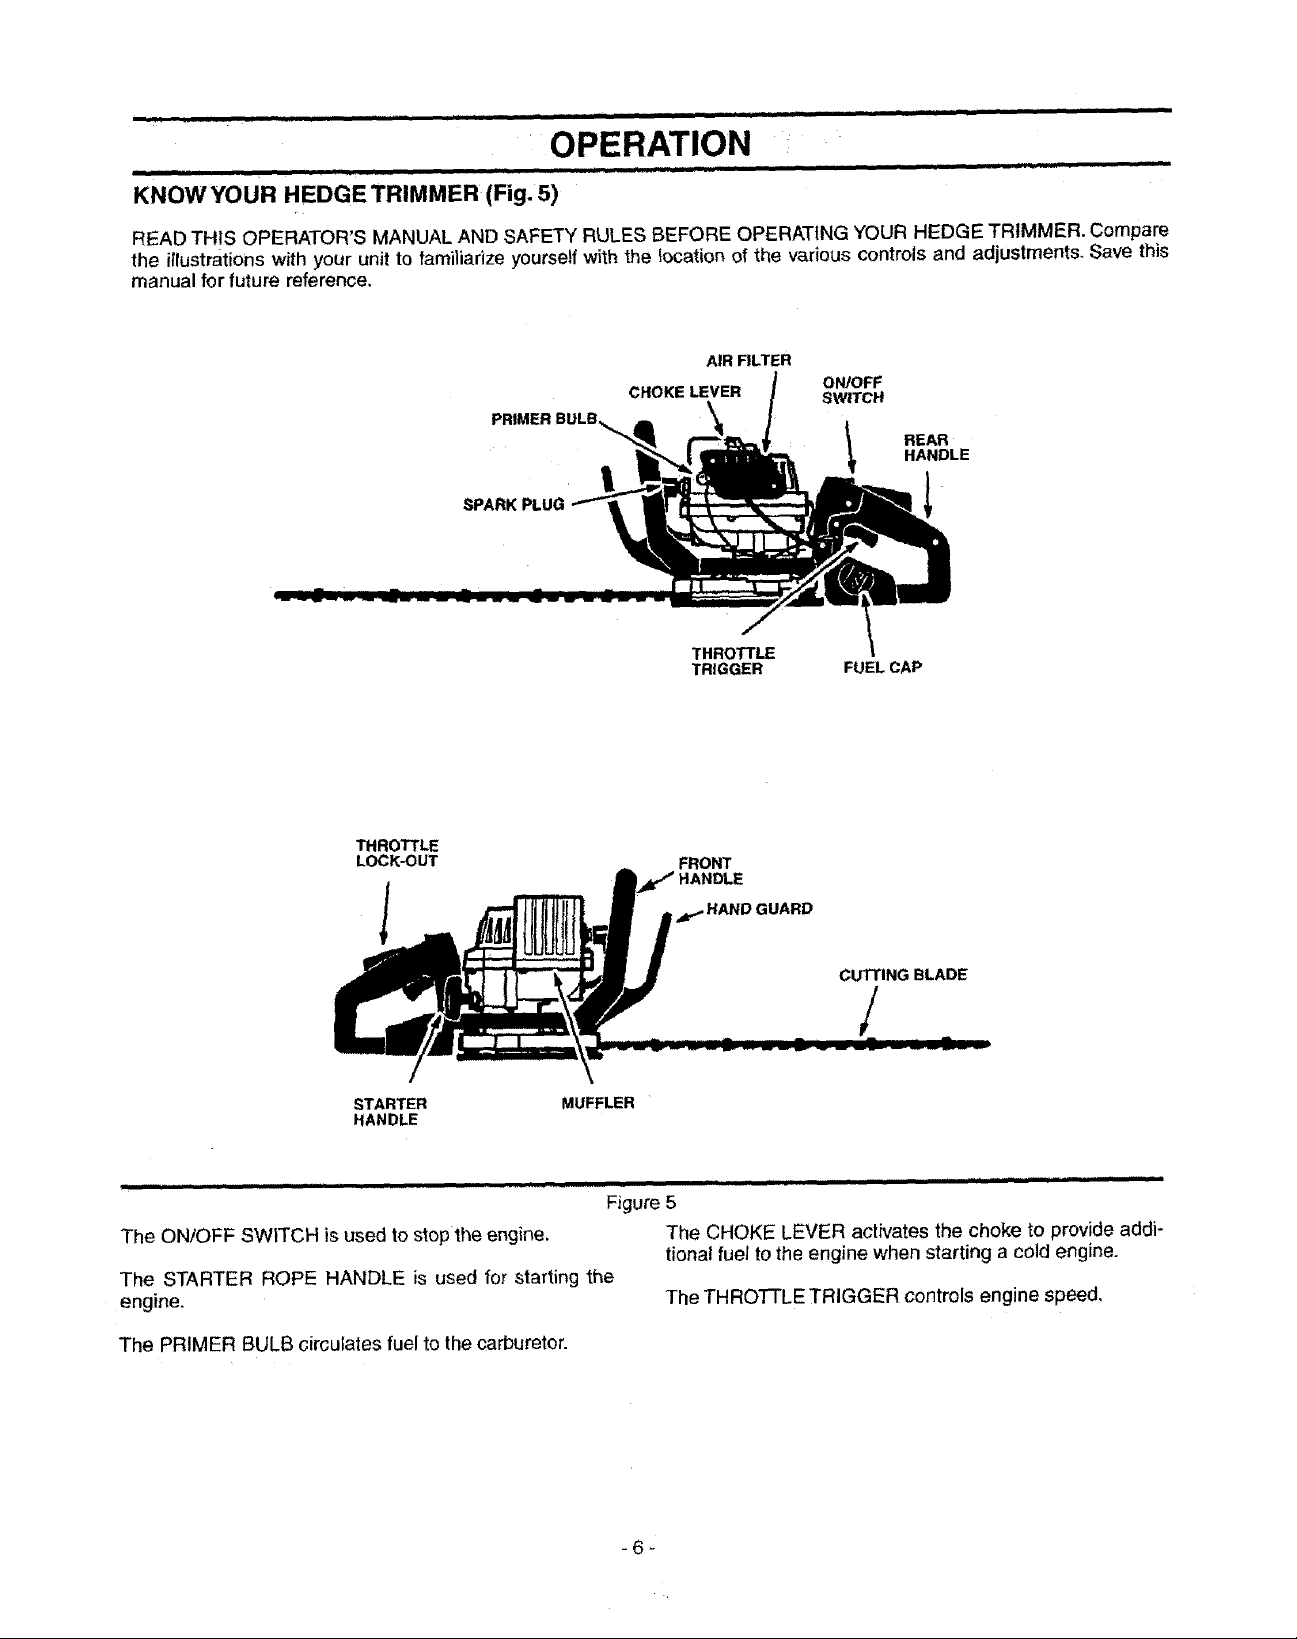
KNOW YOUR HEDGE TRIMMER (Fig. 5)
READ THIS OPERATOR'S MANUAL AND SAFETY RULES BEFORE OPERATING YOUR HEDGE TRIMMER. Compare
the ittustrationswith your unit to familiarize yourself with the location of the various controls and adjustments. Save this
manual for future reference.
AIR FILTER
CHOKE LEVER SWITCH
PRIMER BULB.,_,..
ON/OFF
REAR
HANDLE
t
SPARK PLUG
THROTTLE
TRIGGER FUEL CAP
THROTTLE
LOCK-OUT
FRONT
HANDLE
r_ HAND GUARD
CUTTING BLADE
/
STARTER MUFFLER
HANDLE
Figure 5
The ON/OFF SWITCH is used to stop the engine, The CHOKE LEVER actfvates the choke to provide addi-
tional fueI to the engine when starting a cold engine.
The STARTER ROPE HANDLE is used for starting the
engine. The THROTTLE TRIGGER controls engine speed,
The PRIMER BULB circulates fuel to the carburetor.
-6-

Ul III I IIIIIIIIIIII I III _IHI Jlllll UJLI
HEDGE TRIMMER SAFETY
DANGER:
THE CUTTING BLADE CAUSES OBJECTS TO BE
THROWN VIOLENTLY. THE OPERATOR MUST WEAR
A SAFETY FACE SHfELD OR GOGGLES. ALWAYS
WEAR HEAVY, LONG PANTS AND BOOTS. KEEP
OTHERS AT LEAST 15 FEET (3 METERS) AWAY.
BLADE PARTS THAT ARE CHIPPED, CRACKED OR
DAMAGED IN ANY OTHER WAY CAN FLY APART
AND CAUSE SERIOUS INJURY. DO NOT USE.
REPLACE DAMAGED PARTS BEFORE USING THE
UNIT.
OPERATION - SAFETY
iiiii, ii, iii iiiiiiihlllll
LEG GUARDS
@ ,il
FACE SHIELD BOOTS
HAZARDZONE
USE ONLY GOOD QUAUTY
REPLACEMENT PARTS
OPERATOR SAFETY
• Always wear eye protection when operating, servicing,
or performing maintenance on your unit. Refer to
"Accessories."
° Do not operate this unit when you are tired, ill, or under
the influence of alcohol, drugs or medication.
• Always wear heavy long pants, long sleeves, boots and
gloves. Do not go barefoot or wear sandals, short
pants, short sleeves. Being fully covered helps to pro-
tect you from pieces of toxic plants thrown by the
blade.
• Secure hair so it above shoulder length. Secure loose
clothing or jewelry. Clothing with loosely hanging ties,
straps, tassels, etc. can be caught in moving parts.
• Do not swing the unit with such force that you are in
danger of losing your balance.
• Never start or run the engine inside a closed room or
building. Breathing exhaust fumes can kiIL
• Keep handles free of oil and fuel.
UNIT SAFETY
• Inspect the entire unit before each use. Replace dam-
aged parts. Check for fuel leaks and make sure all fas-
teners are in place and securely fastened.
• Make carburetor adjustments with the blade supported
to prevent blade from contacting any object.
• Keep others away when making carburetor adjust-
ments.
• Use only recommended accessories or attachments.
TRIMMING SAFETY
• Inspect the area to be cut before each use. Remove
objects (rocks, broken glass, nails, wire, string, etc.)
which can be thrown or become entangled in the
blade.
° Always keep the engine on the right side of your body.
° Hold the unit firmly with both hands.
• Keep firm footing and balance. Do not over-raach.
• Keep the blade below waist level.
• Do not raise the engine above your shoulder.
• Keep all parts of your body away from the blade and
muffler when engine is running.
• Use only for jobs explained in this manual.
• Cut at full throttle.
-7-
== i i =llllU i i
OPERATION
H =,,,,= H,
STOPPING YOUR ENGINE
° Move the ON/OFF switch to the OFF position.
• Ifengine does not stop, move the choke lever to the fuli
choke.
THROTTLE TRIGGER (Fig. 7)
• The throttle trigger controls the engine speed.
NOTE: The blade should stop when the throttle trigger is
released and the engine returns to idle speed.
THROTTLE TRIGGER
Figure 7
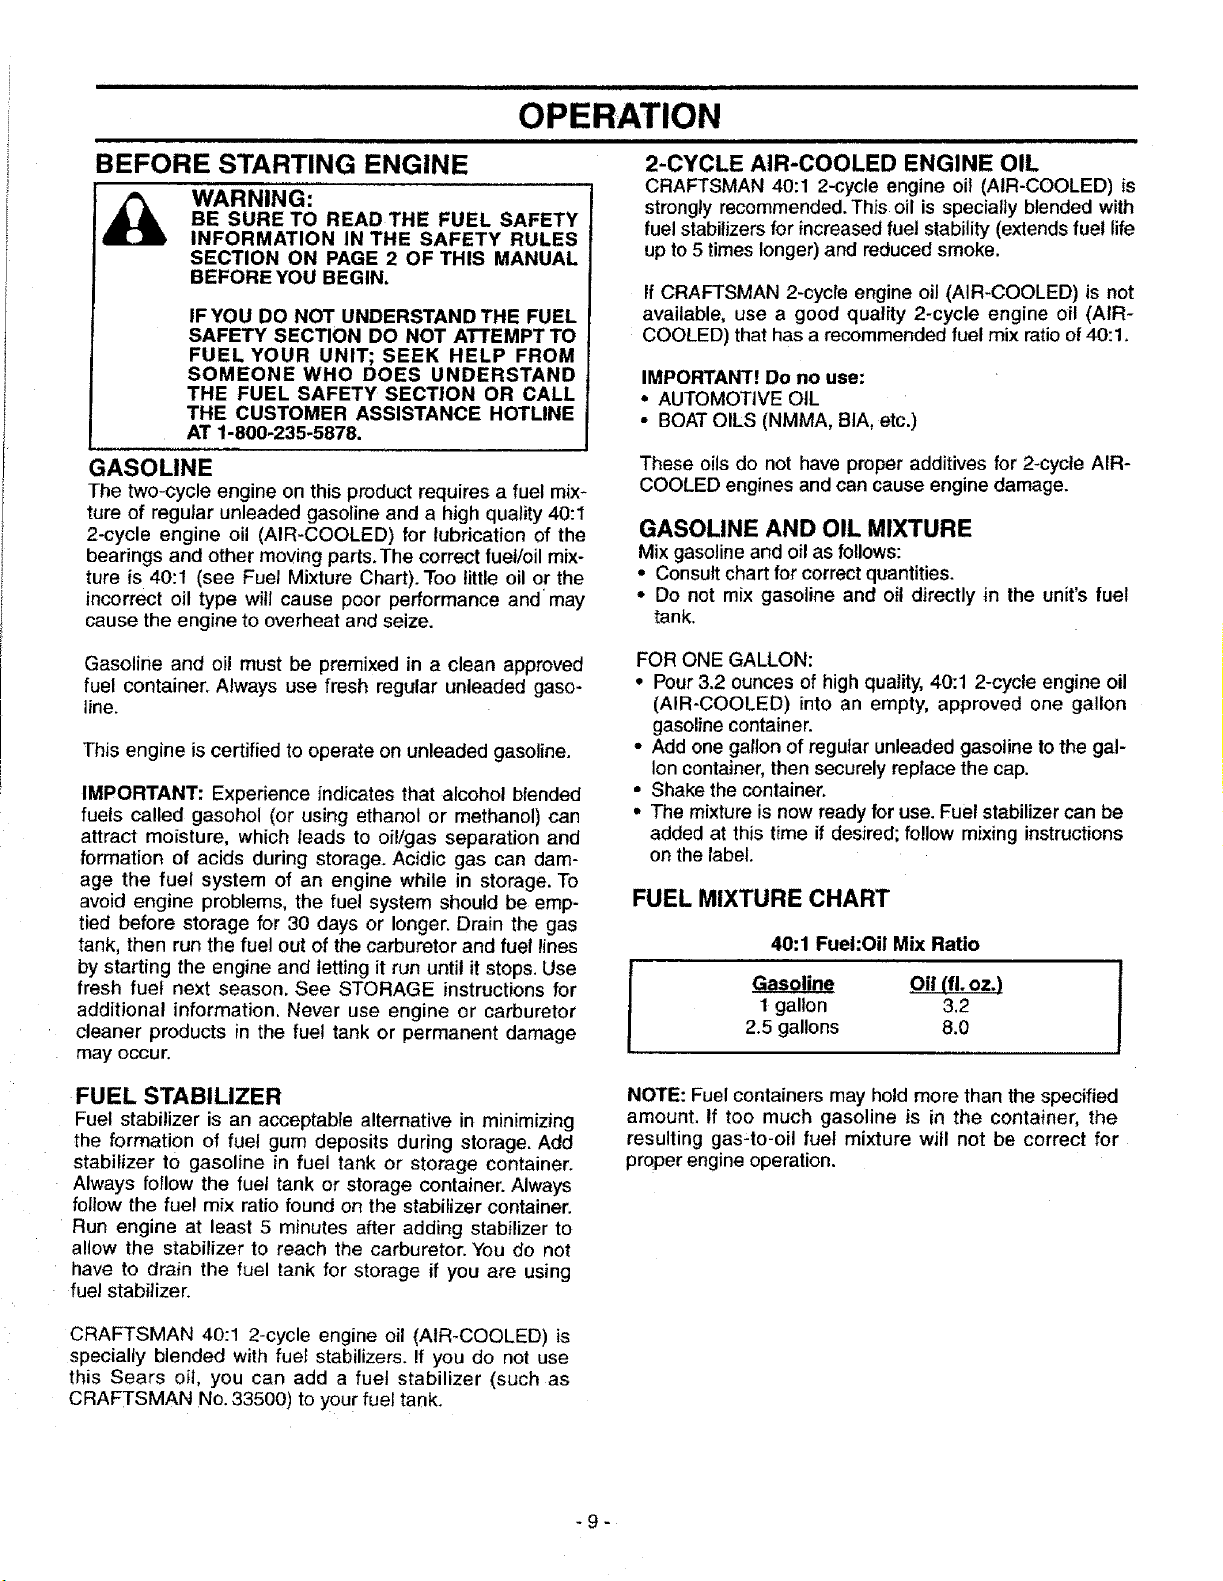
OPERATING/USE TIPS (Fig. 8)
I_ WARNING:
Allow the cutting blades to reach futl Speed before
entering the material to be cut.
• Always work going away from people and solid objects
such as walls, large stones, trees, automobiles, etc.
• If blade stalls, immediately stop the engine. Make sure
the ON/OFF switch is off, the spark plug is disconnect-
ed, and the blade has stopped moving before clearing
jammed debris from the cutting blade. Inspect the blade
for damage and have it repaired or replaced as needed.
• To stop the engine, move the ON/OFF switch to the
OFF position_
• Always keep the air vents clean. Stop the unit, make
sure the cutting blade has completely stopped moving,
and disconnect the spark plug before cleaning.
ALWAYS CUT AT MAXIMUM SPEED. DO
NOT CROWD THE BLADE INTO THE CUT
WHICH CAN DAMAGE THE BLADE,
BECOME ENTANGLED, OR BE THROWN
CAUSING A SERIOUS HAZARD.
ALWAYS WORK GOING AWAY FROM PEO-
PLE AND SOLID OBJECTS SUCH AS
WALLS, LARGE STONES, TREES, AUTO-
MOBILES, ETC.
ALWAYS WEAR EYE PROTECTION. NEVER
LEAN OVER THE BLADE. ROCKS OR
DEBRIS CAN RICOCHET OR BE THROWN
INTO EYES AND FACE AND CAUSE BLIND-
NESS OR OTHER SERIOUS INJURY.
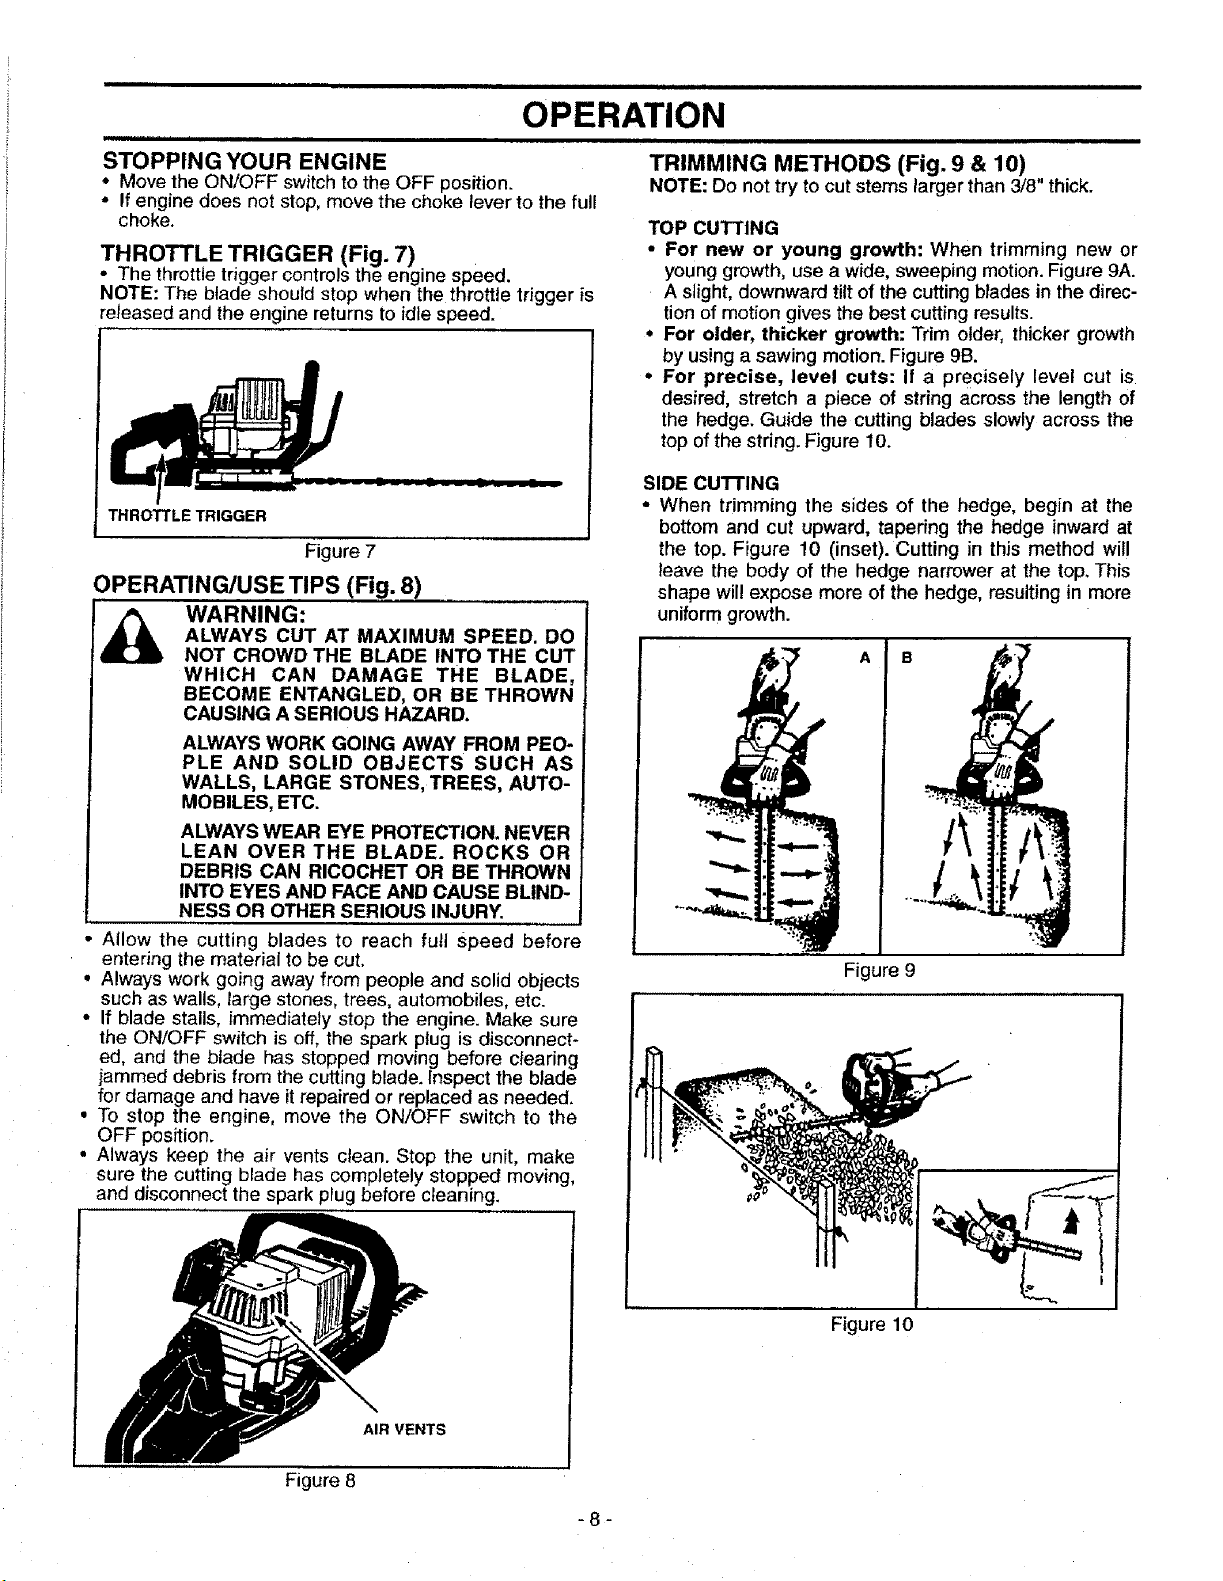
TRIMMING METHODS (Fig. 9 & 10)
NOTE: Do not try to cutstems larger than 3/8" thick.
TOP CUTTING
• For new or young growth: When trimming new or
young growth, use a wide, sweeping motion.Figure 9A.
A stight,downward tiltof the cuttingbtades in the direc-
tion of motion gives the best cutting results.
• For older, thicker growth: Trim older, thicker growth
by using a sawing motion.Figure 9B.
° For precise, level cuts: If a precisely level cut is
desired, stretch a piece of string across the length of
the hedge. Guide the cutting blades slowly across the
top of the string. Figure 10.
SIDE CUTTING
• When trimming the sides of the hedge, begin at the
bottom and cut upward, tapering the hedge inward at
the top. Figure 10 (inset). Cutting in this method will
leave the body of the hedge narrower at the top. This
shape will expose more of the hedge, resultingin more
uniform growth.
Figure 9
Figure 8
Figure 10
AIR VENTS
-8-
i ii iilll i i i i i iiii, ,i i,,i i
OPERATION
BEFORE STARTING ENGINE
WARNING:
BE SURE TO READ THE FUEL SAFETY
INFORMATION IN THE SAFETY RULES
SECTION ON PAGE 2 OF THIS MANUAL
BEFORE YOU BEGIN.
IFYOU DO NOT UNDERSTAND THE FUEL
SAFETY SECTION DO NOT ATTEMPT TO
FUEL YOUR UNIT; SEEK HELP FROM
SOMEONE WHO DOES UNDERSTAND
THE FUEL SAFETY SECTION OR CALL
THE CUSTOMER ASSISTANCE HOTLINE
AT 1-800-235-5878.
GASOLINE
The two-cycle engine on this product requires a fuel mix-
ture of regular unleaded gasoline and a high quality 40:1
2-cycle engine oil (AIR-COOLED) for lubrication of the
bearings and other moving parts, The correct fuel/oil mix-
ture is 40:1 (see Fuel Mixture Chart). Too little oil or the
incorrect oil type will cause poor performance and may
cause the engine to overheat and seize.
Gasoline and oil must be premixed in a clean approved
fuel container, Always use fresh regular unleaded gaso-
line.
This engine is certified to operate on unleaded gasoline.
IMPORTANT: Experience indicates that alcohol blended
fuels called gasohol (or using ethanol or methanol) can
attract moisture, which leads to oil/gas separation and
formation of acids during storage. Acidic gas can dam-
age the fuel system of an engine while in storage. To
avoid engine problems, the fuel system should be emp-
tied before storage for 30 days or longer. Drain the gas
tank, then run the fuel out of the carburetor and fuel lines
by starting the engine and letting it run until it stops. Use
fresh fuel next season. See STORAGE instructions for
additional information. Never use engine or carburetor
cleaner products in the fuel tank or permanent damage
may occur.
2-CYCLE AIR-COOLED ENGINE OIL
CRAFTSMAN 40:1 2-cycle engine oil (AIR-COOLED) is
strongly recommended. This oil is specially blended with
fuel stabilizers for increased fuel stability (extends fuel life
up to 5 times longer) and reduced smoke.
If CRAFTSMAN 2-cycle engine oil (AIR-COOLED) is not
available, use a good quality 2-cycle engine oil (AIR-
COOLED) that has a recommended fuel mix ratio of 40:1.
IMPORTANT! Do no use:
• AUTOMOTIVE OIL
• BOAT OILS (NMMA, BIA, etc.)
These oils do not have proper additives for 2-cycle AIR-
COOLED engines and can cause engine damage.
GASOLINE AND OIL MIXTURE
Mix gasoline and oil as follows:
• Consult chart for correct quantities.
- Do not mix gasoline and oil directly in the unit's fuel
tank.
FOR ONE GALLON:
° Pour 3.2 ounces of high quality, 40:1 2-cycle engine oil
(AIR-COOLED) into an empty, approved one gallon
gasoline container.
• Add one gallon of regular unleaded gasoline to the gal-
lon container, then securely replace the cap.
• Shake the container.
° The mixture is now ready for use. Fuel stabilizer can be
added at this time if desired; follow mixing instructions
on the label.
FUEL MIXTURE CHART
40:1 Fuel:Oil Mix Ratio
Gasoline Oil (ft. oz.)
1 gallon 3,2
I
2.5 gallons 8.0 I
FUEL STABILIZER
Fuel stabilizer is an acceptable alternative in minimizing
the formation of fuel gum deposits during storage. Add
stabilizer to gasoline in fuel tank or storage container.
Always follow the fuel tank or storage container. Always
follow the fue! mix ratio found on the stabilizer container.
Run engine at least 5 minutes after adding stabilizer to
allow the stabilizer to reach the carburetor. You do not
have to drain the fuel tank for storage if you are using
fue! stabilizer.
CRAFTSMAN 40:1 2-cycle engine oil (AIR-COOLED) is
specially blended with fuel stabilizers. If you do not use
this Sears oil, you can add a fuel stabilizer (such as
CRAFTSMAN No. 33500) to your fuel tank.
NOTE: Fuel containers may hold more than the specified
amount. If too much gasoline is in the container, the
resulting gas-to-oil fuet mixture will not be correct for
proper engine operation.
-9-
i
OPERATION
STOPPING YOUR ENGINE
• Move the ON/OFF switch to the OFF position.
• If engine does not stop, move the choke lever to the full
choke.
THE CUTTING BLADE WILL TURN WHEN
DANGER:
THE ENGINE STARTS,
FOR SAFE STARTING AND OPERATION,
FOLLOW ALL SAFETY PRECAUTIONS IN
THIS OPERATOR'S MANUAL AND
LABELS ON THE UNIT. DRESS PROP-
ERLY BEFORE STARTING ENGINE.
AVOID ANY CONTACT WITH THE MUF-
FLER. A HOT MUFFLER CAN CAUSE
SERIOUS BURNS.
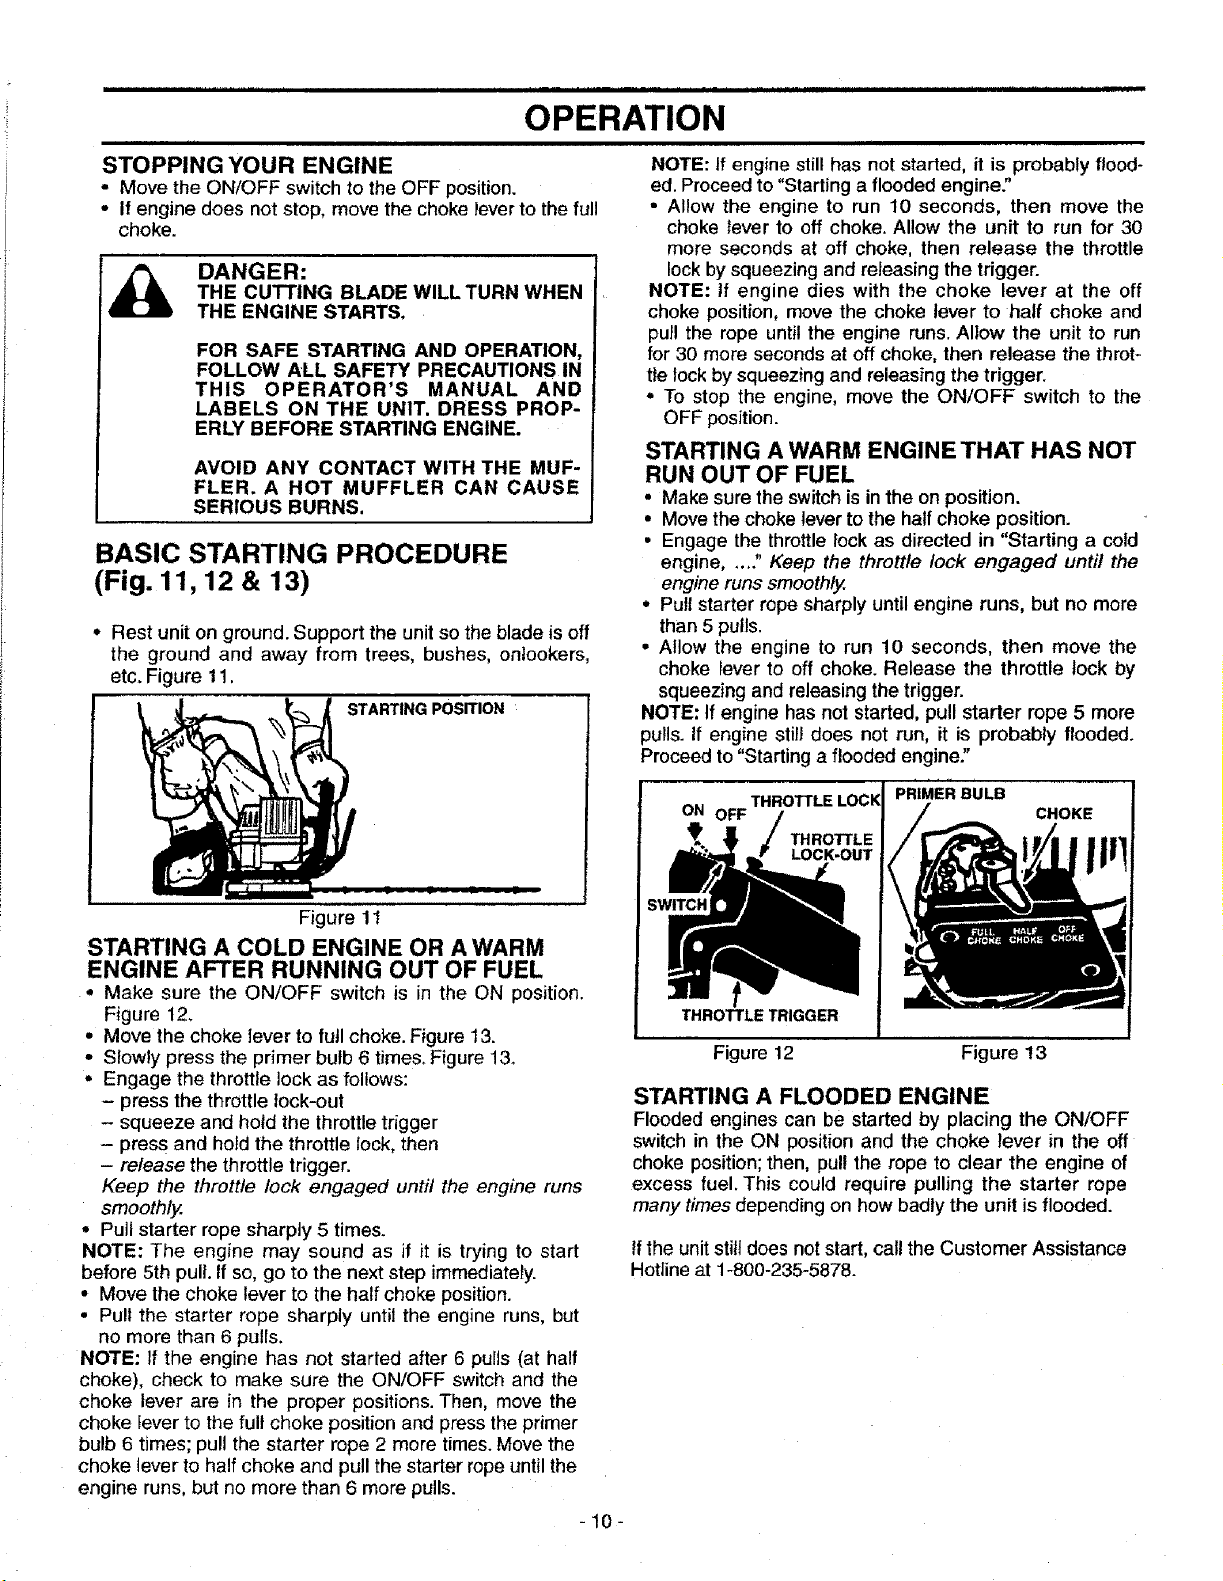
BASIC STARTING PROCEDURE
(Fig. 11, 12 & 13)
• Rest unit on ground. Support the unit so the blade is off
the ground and away from trees, bushes, onlookers,
etc. Figure 11.
STARTING POSITION
NOTE: If engine still has not started, it is probably flood-
ed. Proceed to "Starting a flooded engine:'
• Allow the engine to run 10 seconds, then move the
choke fever to off choke. Allow the unit to run for 30
more seconds at off choke, then release the throttle
lock by squeezing and releasing the trigger.
NOTE: If engine dies with the choke lever at the off
choke position, move the choke lever to half choke and
pull the rope until the engine runs. Allow the unit to run
for 30 more seconds at off choke, then release the throt-
tle lock by squeezing and releasing the trigger.
• To stop the engine, move the ON/OFF switch to the
OFF posJtion.
STARTING A WARM ENGINE THAT HAS NOT
RUN OUT OF FUEL
• Make sure the switchisin the on position.
• Move the choke lever to the half choke position.
• Engage the throttlelock as directed in "Starting a cold
engine .... ." Keep the throttle lock engaged until the
engine runs smoothly.
° Pull starter rope sharply until engine runs, but no more
than 5 pulls.
• Allow the engine to run 10 seconds, then move the
choke lever to off choke. Release the throttle lock by
squeezing and releasing the trigger.
NOTE: If engine has not started, pull starter rope 5 more
pulls.If engine still does not run, it is probably flooded.
Proceed to "Starting a flooded engine'.'
Figure 11
STARTING A COLD ENGINE OR A WARM
ENGINE AFTER RUNNING OUT OF FUEL
. Make sure the ON/OFF switch is in the ON position.
Figure 12.
= Move the choke lever to full choke. Figure 13.
• Slowly press the primer bulb 6 times. Figure 13.
• Engage the throttle lockas follows:
- press the throttle tock-out
- squeeze and hold the throttle trigger
- press and hold the throttle lock, then
- release the throttle trigger.
Keep the throttle lock engaged until the engine runs
smoothly.
• Pull starter rope sharpty 5 times.
NOTE: The engine may sound as if it is trying to start
before 5th pull If so, go to the next step immediately.
• Move the choke lever to the half choke position.
• Pull the starter rope sharply until the engine runs, but
no more than 6 pulls.
NOTE: If the engine has not started after 6 pulis (at half
choke), check to make sure the ON/OFF switch and the
choke lever are in the proper positions.Then, move the
choke lever to the full choke position and press the primer
bulb 6 times; pull the starter rope 2 more times.Move the
choke lever to half choke and pull the starter rope until the
engine runs, but no more than 6 more pulls.
ON OFF
THROTTLE TRIGGER
THROTFLE LOCK PRIMER BULB
THRO'fTLE
LOCK.OUT
Figure 12 Figure 13
STARTING A FLOODED ENGINE
Flooded engines can be started by placing the ON/OFF
switch in the ON positronand the choke lever in the off
choke position;then, pull the rope to clear the engine of
excess fuel. This could require pulling the starter rope
many timesdepending on how badly the unit is flooded.
If the unit still does not start, call the Customer Assistance
Hotiine at 1-800-235-5878.
-10-
CHOKE
CUSTOMER RESPONSIBILITIES
L ,,,HH= I Jl = ==,H,,,,
MAINTENANCE SCHEDULE
=H ,,i = , ===1=== ii
Fill in dates as you complete regular service Before After Every Yeady Service Dates
Use Use 5 Hrs.
Check for damaged or worn parts _"
Check for loose fasteners and parts _
Clean unit ,,"
,, ,
Cutting blade lubrication ,,"
Clean air filter
L ,. ,,,,
Replace spark plug ,/
Inspect muffler (service if necessary) v_
GENERAL RECOMMENDATIONS
The warranty on this hedge trimmer does not coveritems
that have been subjected to operator abuse or negli-
gence.To receive full value from the warranty,the opera-
CLEAN UNIT AND LABELS
• Clean the unit using a damp cloth with a mild deter-
gent.
• Wipe off the unit with a clean dry cloth.
tor must maintain hedge trimmer as instructed in this
manual.
Some adjustments will need to be made periodically to
properly maintain your unit
All adjustments in the Service and Adjustments section
of this manual should be checked at least once each
season
BEFORE EACH USE
CHECK FOR DAMAGED/WORN PARTS
. Cutting blade - replace cutting blade parts that are
bent, warped, cracked, or damaged in any way.
• Fuel cap - replace broken or leaking fuel cap.
• Debris shield - reptace debris shield that is bent,
warped, cracked, or damaged in any way.
• Once a year, replace the spark plug, replace air filter A
new spark plug and a clean/new air filter element
assures proper air-fuel mixture and helps your engine
turn better and last tonger.
• Follow the maintenance schedule in this manual.
DISCONNECT THE SPARK PLUG
WARNING:
BEFORE PERFORMING MAINTENANCE
EXCEPT FOR CARBURETOR ADJUST-
MENTS.
REPLACE CUTTING BLADE PARTS THAT
ARE CRACKED, CHIPPED, OR DAMAGED
IN ANY OTHER WAY BEFORE USING THE
UNIT.
INSPECT THE ENTIRE UNIT. REPLACE
DAMAGED PARTS. CHECK FOR FUEL
LEAKS AND MAKE SURE ALL FASTEN-
ERS ARE IN PLACE AND SECURELY
FASTENED.
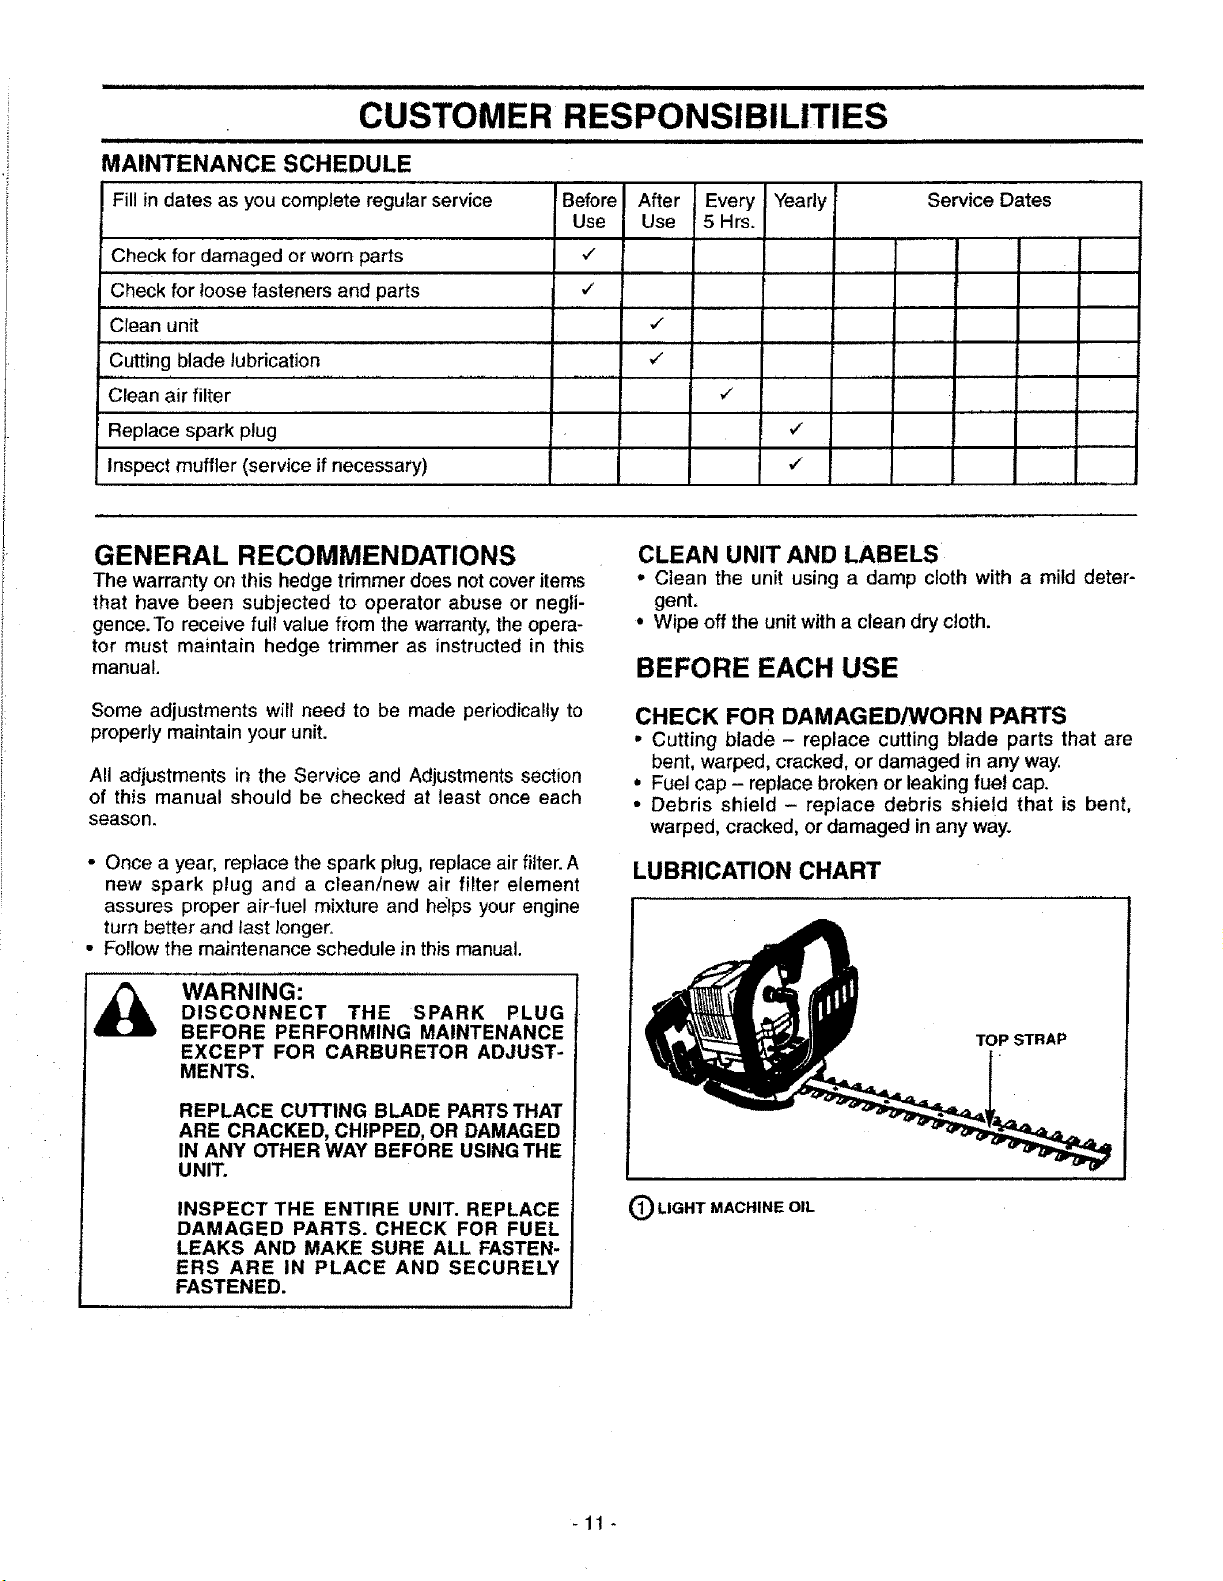
LUBRICATION CHART
TOP STRAP
O LIGHT MACHINE OIL
-11 -
i i i i iiiiiiii i i Jill
CUSTOMER RESPONSIBILITIES
i i J
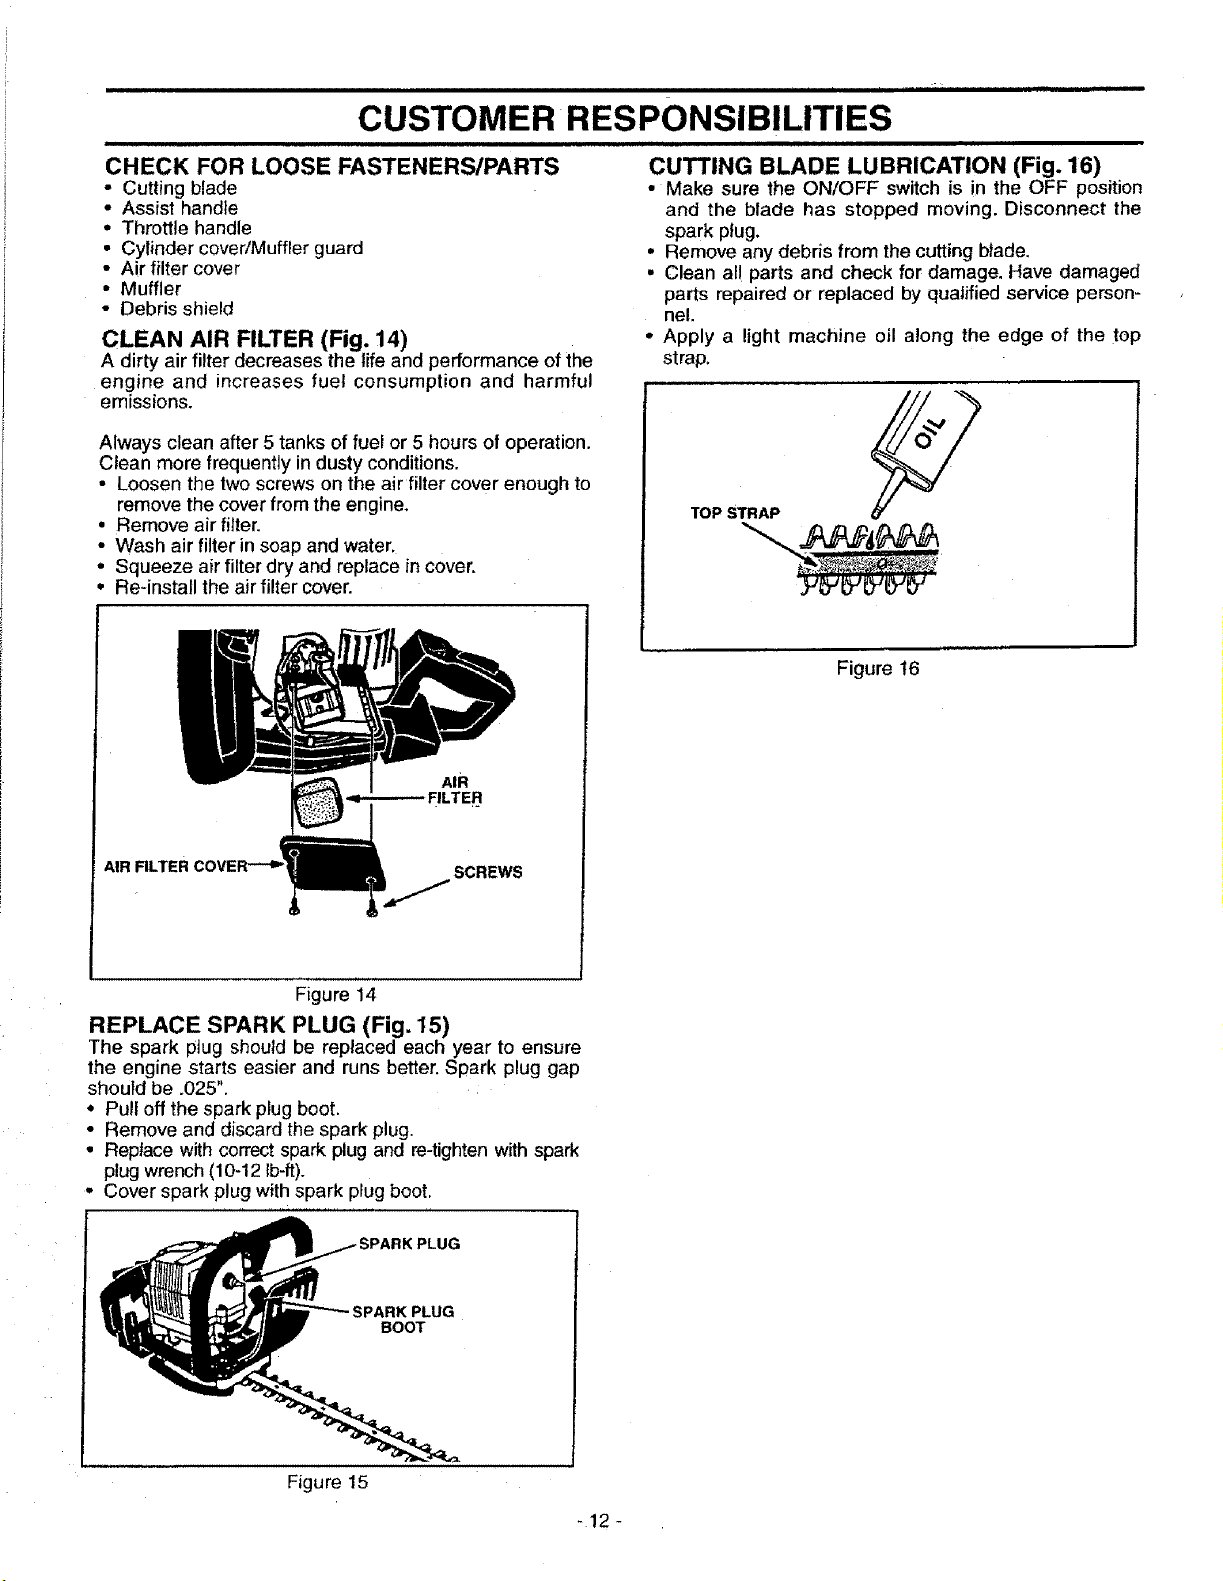
CHECK FOR LOOSE FASTENERS/PARTS CUTTING BLADE LUBRICATION (Fig. 16)
• Cutting blade • Make sure the ON/OFF switch is in the OFF position
• Assist handle and the blade has stopped moving. Disconnect the
• Throttle handle spark plug.
• Cylinder cover/Muffler guard • Remove any debris from the cutting blade,
• Air filter cover • Clean all parts and check for damage, Have damaged
• Muffler parts repaired or replaced by qualified service person-
* Debris shield nel.
CLEAN AIR FILTER (Fig. 14) - Apply a light machine oil along the edge of the top
A dirty air filter decreases the life and performance of the strap.
engine and increases fuel consumption and harmful
Always clean after 5 tanks of fuel or 5 hours of operation.
Clean more frequently in dusty conditions.
emissions.
• Loosen the two screws on the air filter cover enough to
remove the cover from the engine. TOPSTRAP
• Remove air filter. "___ _ ,,n_ __,!#'k_ _
• Wash air filter in soap and water.
• Squeeze air filter dry and replace in cover.
• Re-install the air filter cover. _JI_JlY_ J
AIR FILTER
SCREWS
Figure 14
REPLACE SPARK PLUG (Fig, 15)
The spark plug should be replaced each year to ensure
the engine starts easier and runs better. Spark plug gap
should be ,025".
* Pull off the spark plug boot.
° Remove and discard the spark plug.
, Replace with correct spark plug and re-tighten with spark
plug wrench (10-12 Ib-ft).
- Cover spark plug with spark plug boot.
Figure 16
Figure 15
BOOT
-12 -

i ii ii iiii i i iiiiiiii i i i HIIIIIIIIIIIIIIIIII
SERVICE AND ADJUSTMENTS
ii iii iii iiiiiiiiiii n ii iii ii iiiiiiiiiiiiiii
CARBURETOR ADJUSTMENTS
Carburetor adjustment is critical and if done improperly can permanently damage the engine as well as the carbure-
tor. Please readall instructions and consult theTroubleshooting section of this manual before beginning this process.
Ifthe engine does not operate according to these instructions after repeating the adjusting steps, do not use the unit.
Call the 1-800 number listed on the front of this manual for further assistance or take itto your nearest Sears Service
Center/Department.
If engine does not start, it may be flooded. If in doubt, LOWSPEED _,_
read the section on flooded engine in the starting section MIXTURE IDLESPEED
of this manual prior to beginning any adjustments. ADJUSTMENT ADJUSTMENT
If you are unsure about adjusting the carburetor or expe-
rience any problem while attempting this process, please
call the 1-800 number Iisted on the front cover of this
manual for further assistance,
The carburetor has been adjusted at the factory for sea
teve! conditions. Adjustments may become necessary if
the unit is used at significantly higher altitudes or if you
notice any of the following conditions:
• Engine will not continue to run at idle position. See
"Idle speed adjustment."
• Blade continues to move when the engine idles.See
"idle speed adjustment."
• Engine dies or hesitates when it should accelerate.
See "Acceleration check."
• Loss of cutting power which cannot be corrected by
cleaning the air filter. See "High speed adjustment."
NOTE: Do not attempt to turn the adjustments beyond
the stops as damage can occur.
WARNING:
MAKE CARBURETOR ADJUSTMENTS
WITH THE LOWER END SUPPORTED TO
PREVENT BLADE FROM CONTACTING
ANY OBJECT. HOLD UNIT WITH YOUR
HAND.
THE BLADE WILL BE SPINNING DURING
MOST OF THIS PROCEDURE. WEAR
YOUR PROTECTIVE EQUIPMENT AND
OBSERVE ALL SAFETY PRECAUTIONS.
HIGH SPEED
MIXTURE
Figure 17
ADJUSTING PROCEDURE
PREPARATION
• Use a fresh fuel mix. See the Fueling section.
• Start the engine. Trim hedges for 3 minutes to warm
engine. The engine must be at operating temperature
before carburetor adjustments can be performed cor-
rect/y.
IDLE SPEED ADJUSTMENT
• Allow engine to idle.
• Adjust idle speed until the engine continues to run
without stalling and without blade moving.
- Turn idle speed adjustment clockwise to increase
engine speed if the engine stalls or dies.
- Turn idle speed adjustment counterclockwise to slow
engine down and/or to keep blade from moving.
• No further adjustments are necessary if the blade does
not move at idle speed and if performance is satis-
factory.
Screwswith
LirniterCaps
H L
IN "LOW SPEED MIXTURE ADJUSTMENT"
RECHECK IDLE SPEED AFTER EACH
ADJUSTMENT. THE CUTTING BLADE
MUST NOT MOVE AT IDLE SPEED.
CARBURETOR PRESETS (Fig. 17)
NOTE: In most cases, your engine can be made to run
properly with minor carburetor adjustments. Refer to trou-
ble shooting suggestions above for the condition you are
experiencing and follow the instructions. The basic carbu-
retor settings are provided in the fo!lowing instructions.
• Turn low speed adjustment and high speed adjustment
counterclockwise to the limiter stops. Do not attempt to
turn beyond the stops as damage can occur.
• Turn the idle speed adjustment clockwise I furlturn.
-13-

====m= === ,11 =1 iii i i iiii
SERVICE AND ADJUSTMENTS
H =
LOW SPEED MIXTURE ADJUSTMENT
• Allow the engine toidle.
• Turn the low speed adjustment slowly clockwise until
the speed increases.Do not attempt to turn beyond the
stops as damage can occur.
• Turn the low speed adjustment counterclockwise until
the speed decreases. Do not attempt to turn beyond
the stops as damage can occur.
• Set the low speed adjustment at the midpoint between
the two positions.
• Readjust the idlespeed (see "Idle speed adjustment").
HIGH SPEED MIXTURE ADJUSTMENT
CAUTION: Do not operate the engine at
full throttle for prolonged periods while
making high speed adjustments as dam-
age to the engine can occur.
NOTE: Adjust the high speed adjustment 1/16 of a turn
at a time. A turn of 1/16 inch is about the width of the
screwdriver slot in the top of the adjustment.
CLEAN/REPLACE FUEL FILTER (Fig. 18 & 19)
• Run fuel tank dry of fuel before proceeding with this
step.
• Remove fuel cap and allow it to hang to side of motor.
• Using a small pair of needle nose pliers, grasp fuel cap
retainer, holding it in tank opening and pull out.
• With cap out of tank, use a small section of bent wire
similar to that shown in the illustration to catch fuel line
and slowly pull from tank. When fuel filter appears in
opening, grasp with fingers and remove from tank.
• Once filter is out of tank, hotd fuel line close to fuel fit=
ter. Remove fuel filter by twisting and pulling at the
same time.
• To clean fue! filter, submerge in warm soapy water for
10 minutes. (We recommend a very light mixture of
dish washing liquid.) Then agitate until filter is clean,
rinse thoroughly in warm water, air dry.
• Reverse process for installation.
• To replace fuel filter, use same procedure, but install
new filter.
• Allow the engine to idle, then squeeze the throttle fully.
NOTE: Perform the following steps at ful! throttle.
• Turn the high speed adjustment'counterclockwise until
it stops. Do not attempt to turn beyond the stops as
damage can occur.
• Turn the adjustment the minimum amount clockwise
until the engine runs smoothly. Do not attempt to turn
the beyond the stops as damage can occur.
• If the engine accelerates and runs smoothly, no further
adjustments are necessary.
• Recheck and follow steps in "Acceleration check."
CAUTION: If the engine does not operate
according to these instructions after
repeating the adjusting steps, do not use
the tool.Take it to your authorized service
dealer.
ACCELERATION CHECK
•AItow the engine to idle,
• Squeeze the throttle trigger iuIly. If the engine does
not accelerate smoothly, turn the low speed adjust-
ment counterclockwise a small amount (no more than
the width of the slot in the adjusting screw).
• Repeat previous step until smooth acceleration is
obtained. Do not attempt to turn beyond the stops as
damage can occur.
NOTE: It may be necessary to repeat "Idle speed adjust-
ment" through "Acceleration check" to obtain correct
adjustments.
FUELLINE
FUEL CAP
Figure 18
FUELUNE
FUEL-
FILTER FILTER ,'_
BARREL NECK
Figure 19
BENTWIRE
FUEL FILTER
-14-

STORAGE
=
Immediately prepare your unit for storage at the end of
the season or if it will not be used for 30 days or more.
I_ WARNING:ALLOW THE ENGINE TO COOL, AND
SECURE THE UNIT BEFORE STORING
OR TRANSPORTING IN A VEHICLE.
STORE UNIT AND FUEL IN AN AREA
WHERE FUEL VAPORS CANNOT REACH
SPARKS OR OPEN FLAMES FROM
WATER HEATERS_ ELECTRIC MOTORS
OR SWITCHES, FURNACES, ETC.
STORE UNIT WITH ALL GUARDS IN
PLACE. POSITION SO THAT ANY SHARP
OBJECT CANNOT ACCIDENTALLY
CAUSE INJURY TO PASSERS BY.
STORE THE UNIT OUT OF THE REACH
OF CHILDREN.
i ======================= = = H==,, ml
INTERNAL ENGINE
Never use engine or carburetor cleaner products in the
fuel tank or permanent damage may occur to fuet system
components. Follow these instructions:
• Drain the fuel from the unit into an approved fuel con-
tainer.
• Drain the fuet lines and carburetor by starting the
engine and letting it run until it stops.
• Allow the engine to cool before storage.
IMPORTANT: It is important to prevent gum deposits
from forming in essential fuel system parts such as the
carburetor, fuel fitter, fuel hose or tank during storage.
Also, experience indicates that alcohol blended fuels,
those that use ethanof or methanol (called gasohol or
oxygenated fuel), can attract moisture and form acidic
gas which will damage your engine. To avoid engine
problems, the fuel system should be emptied before stor-
age of 30 days or longer.
GAS TRIMMER STORAGE INSTRUCTIONS
If your trimmer isto be stored for a period oftime, clean it
thoroughly prior to storage. Remove any dirt, leaves, oil,
grease, etc. Store in a clean dry area.
• Clean the entire unit.
• Clean air filter. Refer to "Customer Responsibilities."
• Lightly oil external metal surfaces to prevent rust from
forming.
• Re-assemble all loose parts, being sure that all han-
dles and guards are in ptace and are securely fas-
tened. Reptace any damaged parts.
• The recommended storage position is either vertically
with the fuel cap on top, or horizontally with the fuel
cap up. Do not store unit with the cutting attach-
ment up, above the engine.
I& CAUTION: Wear protective gloves when
handling. The blade is sharp and can cut
you,
Fuel stabilizer is an acceptable alternative in minimizing
the formation of fuei gum deposits during storage. Add
stabilizer to the gasoline in the fuel tank or fuel storage
container. Always follow the mix instructions found on
stabilizer containers. Run engine at least 5 minutes after
adding stabilizer to allow the stabilizer to reach the car-
buretor.
CRAFTSMAN 40:! 2-cycte engine oil (AIR-COOLED) is
specially blended with fuel stabilizer. If you do not use
this Sears oil, you can add a fuel stabilizer (such as
CRAFTSMAN No. 33500) to your fuel tank.
FUEL SYSTEM
• Remove spark plug and pour 1 teaspoon of 40:1
2-cycte engine oil (AIR-COOLED) through the spark
piug opening.Slowly pull the starter rope 8 to 10 times
to distribute oil to inner engine surfaces.
• Replacespark plug with a new one of the recommended
typeand heat range. Refer to "Product Specifications:
• Clean air filter. Refer to "Customer Responsibilities"
• Re-install all covers and hardware removedfor access;
tighten all screws and fasteners,
• Check entire unit for loose screws, nuts, and bolts.
Replace any damaged, broken, or worn parts.
• Lightly oil external metal surface to prevent rust from
forming.
= Use fresh fuel having the proper gasofine to oil ratioat
the beginning of the next season.
OTHER
• Do not store gasoline from one season to another.
° Replace your gasoline can if your can starts to rust.
Rust and/or dirt in your fuel system willcause problem&
• Store your unit in a well ventilated area and covered, if
possible, to prevent dust and dirt accumulation.Do not
cover with plastic. Plastic cannot breathe and will
inducecondensation and eventual rust or corrosion.
IMPORTANT: Never cover unit while engine and exhaust
areas are stitl warm.
-15_

,,=h= ,=., =111i =11 inlnll
TROUBLE SHOOTING CHART
,,H ,H ================= I,.H= = = i
TROUBLE SHOOTING CHART
SYMPTOM
Engine wilt not start or
will run only for a few
seconds after starting.
,,,,,,,,
Engine will not idle
properly.
Engine will not
accelerate, lacks
power, or dies
; under a load.
Engine smokes
excessively.
Engine runs hot,
Cutting attachment
moves at idle speed.
, ,,,,,,,, ,,,
Cutting blade stops
under a toad or does
not turn when the
engine is accelerated.
CAUSE
t. Fueltankempty
2. Engine flooded.
3. Spark plug not firing.
4. Fuel not reaching carburetor.
5. Carburetor requires adjustment,
6. Air filter dirty.
7, Fue! filter dirty.
8. None of the above,
1. Idle speed set too fast or too slow.
2, Carburetor requires adjustment.
3. None of the above.
,,,,,,,,,,,,.........
1. Air filter dirty.
2. Spark plug fouled.
3. Carburetor requires adjustment.
4. Muffler outlets plugged.
5. None of the above,
1. Air filter dirty.
2. Fuel incorrect.
3. Carburetor requires adjustment.
1. Fuel incorrect.
2, Carburetor set too low (lean).
3. Spark plug incorrect.
4. None of the above.
,, , , ,
1, Carburetor requires adjustment.
2. Throttle cable binding.
3. Clutch requires repair.
, , ,,, , ,,
1. Forcing blade into material being cut.
2. Blade clogged with debris.
3. None of the above.
REMEDY
1. Filltank withcorrect fuel mixture.
2. See "Starting Instructions."
3. Installnew plug/check ignitionswitch.
4. Clean fuel filter; inspect fuel line.
5. See "CarbUretor Adjustments."
6, Clean or replace air fiffer.
7. Contact your SEARS Service Center/Dept.
8. Contact your SEARS Service Center/Dept.
1. See "Carburetor Adjustments."
2. See "Carburetor Adjustments."
3. Contact your SEARS Service Center/Dept.
1. Clean or replace air filter.
2. Clean and re-gap or replace spark plug.
3. See "Carburetor Adjustments7
4. Contact your SEARS Service Center/Dept,
5, Contact your SEARS Service Center/Dept.
,,,,, ,, ,,,,, , ,,,J,,,,,,, ,,,,Li,,
1. Clean or replace air filter.
2. Refuel with correct fuel mixture.
3. See "Carburetor Adjustments."
1. See "Fueling Your Unit."
2. See "Carburetor Adjustments:'
3. Replace withcorrect plug.
4. Contact your SEARS Service Center!Dept.
1. See "Carburetor Adjustments?
2. Contact your SEARS Service Center/Dept.
3. Contact your SEARS Service Center/Dept.
,,,,, ,,,,,,,,,, ,
1. Cut at a slower pace.
2. Clean debris from blade.
3. Contact your SEARS Service Center/Dept.
If situations occur which are not covered in this manual, use care and good judgement,
ff you need assistance, contact your SEARS Service Center/Department or the
CUSTOMER ASSISTANCE HOTLINE at 1-800,235-5878.
-16-

REPAIR PARTS
SEARS BUSHWACKER - MODEL 358.795630
44.
39. 43.
40.
\
41. 42.
\ \
\ 53.
52.
\
49.
48.
\
47.
10.
11.
12.
13.
14.
15.
16.
17.
18.
19.
20.
21.
22.
23-
24.
Ref.
1.
2.
3.
4.
5.
6,
7,
8.
9.
Part No.
530-015935
530-037631
530-029929
530-019181
530-014307
530-032125
530-015945
530-019179
530-032124
530-014861
530-015941
530-016080
530-039149
530-036145
530-039163
530-015954
530-O37730
530-O29939
530-015828
530-015930
530-069232
530-015963
530-015496
530-069353
Description
Screw-Shrou_
Shroud
Crankcase Cover
Gasket-C'case
Crankshaft Ass'y.
Inner Bearing
Retaining Ring
Crankcase Seal
Outer Bearing
Crankcase Ass'y.
(Incl. 6-9)
Retaining Ring
Screw-Flywheel
Rywheel
Spacer-Ignition Module
Ignition Module
Screw-ignition Module
Spring-Starter Dog
Starter Dog
Washer-Thrust
Flywheel Spacer
Rope Kit
Retainer-Starter Putiey
Screw-Retaining
Starter Puiley
44.
Ref.
25.
26.
27.
28.
29.
30.
31.
32.
33.
34.
35.
36.
37.
38.
39.
40.
41.
42.
43.
45.
46.
47.
48.
Pert No.
530-029395
530-027569
530-015810
530-044396
530-014947
530-019182
530-069615
530-029930
530-014362
530-036180
530-O23877
53O-069352
530-019223_
530-029924i
530-O69613
530-015953
530-069614
STD PM2
530-019185
530-037632
530-016014
530-014384
530-015775
530-019194
Description
Starter Spring
Starter Handle
Screw
Clutch Ass_J.Kit
Fan Housing
Grommet
Connecting Rod Kit
Muffler Spring
Fue! Pick-up Ass'y.
Muffler Screen
Line Fitting
Muffler Kit
Cylinder Gasket
Piston Ring
Piston Kit
(Incl. 38 & 55)
Screw-Cylinder
Cylinder
Spark Plug
Gasket-CylindJCarb.
Carb. Adaptor
Screw-Carb. Adaptor
Throttle Cable Ass'y.
Screw
Gasket-CarbJAdaptor
Ref.
49.
50.
51.
52.
53.
54.
55.
56.
57.
58.
59.
60.
NotShown
,_ WARNING
All repairs, adjustments
and maintenance not de-
scribed in the Operator's
Manual must be performed
by qualified service per-
sonnel.
Part No.
530-069652
530-036192
530-015849
530-029934
530-036193
530-015635
530-015162
530-014973
530-069616
530-069247
530-069599
530-016103
530-083038
530-085199
530-038294
Description
Carburetor Ass'y Kit
(incl. Limiter Caps)
Air Box
Screw-Air Box
Air Filter Foam
Air Fiiter Cover
Screw-Air Filter Cover
Piston Pin Retainer
C'cese & C'shaft Assy.
(Incl. 5 & 10)
Gasket Kit
(Incl. 4, 37, 43 & 48)
Fuel Line
Return Line
Retainer Clip
Operator Manual
Carton
Starting Instruction
-17-

26,
REPAIR PARTS
SEARS BUSHWACKER - MODEL 358.795630
_etor Assembly - _ 30_7.
# 830-069652
I Ref.
1.
2.
3.
4.
5.
6*
11.
12.
13.
14.
!6,
17.
18.
t9.
20.
2'L
Part No.
530-029954
530-036443
530-015775
530-029958
530-015940
530-015770
530-038305
530-029956
530-036122
530-036123
530-015934
530-047196
530-094992
530-029946
530-048113
530-015886
530-029916
530-03212!
530-095074
530-029948
530-036228
Description
IgnitionSwitch
LeadWireAss'y.
Screw-ThrottleTdgtger
TriggerLever
Screw-Handle Cover
Screw-HandleCover
HandleCover
ThrottleTrigger
Throffie Lockout
TriggerSpring
Screw-Gear Box
RearHandle& Tank
Ass'yo
Front Handle
isolator Spring
Ctutch Drum
Screw
Gear Box Plate
Bushing Bfade
Blade Ass'y. (22")
Blade Seal
Pinion Ass'y.
22.
23,
24.
25.
26.
27,
28.
29.
30.
31.
32.
33.
34.
35.
36.
37.
38.
39.
Ref.
Part No.
530-016013
530-069355
530-036046
530-01487 f
530-015955
530-015805
530-014399
530-035014
530-035389
530-035f64
530-035166
530-035028
530-035031
530-035172
530-035008
530-035139
530-035236
530-069656
............................. i i iii i
Description
Drive Gear Bearings
Ddve Gear Ass'y.
i Isolator Plate
Fuel Cap Ass,y.
Screw-Handle
Screw-Pinien
Gear Box Ass'y.
(Inc!. 21, 22 & 27)
Metering Diaphragm
Metering Diaphragm
Gasket
Pump Gasket
Pump Diaphragm
Metering Pin
Metedng Lever
Fuef Inlet Screen
Inlet Needie Valve
Metedng Lever
Spring
Metering Lever Pin
Screw
Carburetor Repair
Kit (IncL 33-38,
40 & 43-45)
-18-
Ref. Pan No.
40. 530-035319
41. 530-035313
42. 530-069652
43. 530-035361
44. 530-038317
45. 530-038318
Description
WeiGh Plug
Gasket!Diaphragm
Kit (Incl. 29-32)
Carburetor Ass'y. Kit
(Incl. LimiterCaps)
Primer Bulb
Limiter Cap-Low
Limiter Cap-High

i. i i i1,,,,,,,, ,,,,,,nllll,lll i iiiii i i ii ] i ] i
TABLE OF CONTENTS
,H,I,,,,,I I ,I I
Safety Rules .................................................................... 2 Service and Adjustments ............................................... 13
Product Specifications ..................................................... 4 Storage .......................................................................... 15
Warranty ........................................ .................................. 4 Trouble Shooting ........... ,................................................ 16
Operation......................................................................... 6 Repair Parts ........................ :.......................................... 17
Customer Responsibilities ...... _...................................... 11 Ordering Repair Parts/Service ................. ,..................... 20
INDEX
iii HII ,,,,1111,,11IH,,I I I I I I I I III II IIIIII I I IIIIIIIIII II I I ,11 III ,, I, II I,,I,,,111 I I
A
Accessories .................................................. i................ 19
Air Filter ......................................................................... 12
C
Carburetor Adjustments ................................................. 13
Customer Responsibilities ............................................. 11
Cutting Blade Lubrication .............................................. 12
E
Engine
Fuel/Oil ......................................................................... 9
Spark Plug .................................................................. 12
Starting ....................................................................... 10
Storage,. ..................................................................... 15
F
Fuel Filter ....................................................................... 14
Fueling............................................................................. 9
H
Hardware Contents .......................................................... 5
K
Know Your Hedge Trimmer ............................................... 6
Maintenance Schedule .................................................. 11
Model Number ............................................................... ,4
Operation ......................................................................... 6
Ordering Repair Parts .................................................... 20
Service and Adjustments ............................................... 13
Spark Plug ..................................................................... 12
Specifications.: ................................................................. 4
Starting ................................. ;........................................ 10
Storage .......................................................................... 15
Trimming Methods ........................................................... 8
Trouble Shooting ............................................................. 16
Warranty ..................................... ..................................... 4
M
O
S
T
W
ii itlllJiJiiiJt Nil III II I I I I I
ACCESSORIES
These accessories and attachments were available when the unit was originally purchased. They are also available at
most Sears retail outrets and service centers. Most Sears stores can order these items for you when you provide the
model number of your unit.
Accessories
SAFETY
GOGGLES
SPARK
PLUG
AIR
FILTER
2-CYCLE
ENGINE OIL
-19-

8 _A/k?8
CRRFTSMRN°
Operator's
Manual
Model No.
358.795630
IFYOU NEED REPAIR
SERVICE OR PARTS:
REPAIR SERVICE
1-800-4-REPAIR
(1-800-473-7247)
ORDERING PARTS
1-800,FON-PART
(1-800-366-7278)
21 cc (1,3 cu. in.) 2-CYCLE
22" Blade
GAS HEDGE TRIMMER
Each Gas Hedge Trimmer _ has its own model number. The
model number for your unit will be found on a decal attached to
the unit.
All parts listed herein may be ordered from any Sears,
Roebuck and Co. Service Centers and most Retail Stores.
WHEN ORDERING REPAIR PARTS, ALWAYS GIVE THE
FOLLOWING INFORMATION AS SHOWN IN THIS LIST:
• PRODUCT-"GAS HEDGE TRIMMER"
• MODEL NUMBER- 358.795630
• PART NUMBER
CUSTOMER
ASSISTANCE
1-800-235-5878
HOURS(CST)
Mon.- Sat. 7 a.m. - 7 p.m.
Sun, 10 a.m.- 7p.m.
Sears, Roebuck and Co., Hoffman Estates, IL 60179 U.S.A.
• PART DESCRIPTION
Your Sears Merchandise has added value when you consider
that Sears has service units nationwide staffed with Sears
trained technicians.., professional technicians specifically
trained on Sears products, having the parts, tools and equip-
ment to insure that we meet our pledge to you, we service what
we sell.

MANUAL IMPORTANTE No Io deseche
Manual del
Operario
Modelo No.
358.795630
ADVERTENClA:
LEA EL MANUAL DEL
OPERADOR Y SIGA
TODAS LAS INSTRUC-
CINES Y ADVERTEN-
CIAS DE SEGURIDAD.
SI NO LO HACE CORRE
EL RIESGO DE SUFRIR
LESIONES.
Use siempre una protecciSn para los ojos
DE 2 TIEMPOS 21cc
22" Cuchiila
GAS PROTEGE GUARNECEDOR
• Armado * Tabla de materias -
• Operaci6n
• Responsabilidades del cliente
• Ajustes de servicio
• Piezas de repuesto
Car&tula posterior int.
Sears, Roebuck and Co., Hoffman Estates, IL 60179 EE.UU.
530-083472-1-02/11/95

REGLAS DE SEGURIDAD
ill i i ii, ill i liHillllll ii ii, i i i,ii
l_ ATENCION: PARA IMPEDIR EL ARRANQUE ACCIDENTAL DURANTE LA PREPARACION, TRANS-
SEGURIDAD DEL OPERADOR
* Usa siempre protecci_n ocular de seguddad.
• Usan siempre cu largos sudaderas pesados, cu largas man-
gas, betas y guantes. No van con los pies descalzos ousan
sandalias, sudaderas cortes, mangas cortas. Qua se cubrir
compietamente ayuda protegerle de piezas de plantas t6xicas
arrejadas per la cuchifla.
- El pale seguro de mode que Iongitud de hombre anterior. Los
vestidos de soltura seguros o joyas. Los vestidos con colgan-
do d_bilmente vinculos, fajas, bodas, etc. Puedan estar cogi-
do en moviendo partes.
• No manejar esta mdqu_na estando cansado, enfermo o
despu_s de haber ingerido bebidas alcoh61icas, dregas o
medicinas.
* Pretegerse los sides cuando se vaya a usar esta mdquina per
rods 1-I/2 horas al dia.
* Nunca arrancar o hacer funcionar el motor en un lugar encer-
rado o edificio, La aspiraciSn de los gases de escape puede
causar la muerte.
° Mantener los mangos libres de aceite y combustible.
• Si llegan a ocurrir situaciones no explicadas en este manual,
tarter cuidado y actuar juiciosamente.
SEGURIDAD/MANTENIMIENTO DE LA
MAQUINA
• Inspeccionar en busca de piezas da_adas o suettas y cam-
biarlas antes de usar la mdquina. Vet si hay fuga de com-
bustible y reparar antes de usar. Mantener la mdquina en
buenas condiciones.
• Asegurar de mantener y armar correctamente la m_quina
come se indica en este manual.
• Hagan ajustes de carburador con la cuchi]la sostenida para
evitarlo de contactar cualquiera objeto. Sestenga la unidad a
mane.
• No dejar que nadie se acerque mientras se ajusta el carbu-
fader.
• Utilice sotamente buena calidad SEARS accesodos y rempla-
zo parte come recomendados per esta unidad.
SEGURIDAD CON EL COMBUSTIBLE
• Mezclar y reabastecer de combustible al aire libra.
• Noacercarachsipas oltamas expuestas.
PORTE, AJUSTE O REPARACION, SIEMPRE DESCONECTAR EL CABLE DE LA BUJIA Y COLOCAR-
LO EN UN LUGAR DONDE NO PUEDATOCAR LA BUJIA,
• Usar un contenedor aprobado para combustible.
• No fumar ni dejar que nadie fume cerca det combustible o de
la mdquina o mientras se estd usando la mdquina.
• L'mpiar e! combustible derramado antes de arrancar e! motor.
• Alejarse al menos 10 pies (3 metros) de tugar de abastec-
imiento de combustible antes de arrancar el motor.
* Apagar el motor y (tejar que la m&quina se enfrie antes de
quitar la tapa det combustible.
SEGURIDAD DURANTE EL CORTE
• Inspecciene el &rea para set cortar antes de cada use.
Retiren objetos (rocas, vidrio quebrado, uSas, alambre, cuer-
da, etc.) cual puede se enreda en la cuchiHa.
* Mantengan otros ni_os incluyentes, animales, espectadores y
ayudantes un minims de 50 pies (15 metros) lejos. Detenga la
m&quina inmediatamente si usted estuviera enfocado.
• Siempre mantener el motor al lade derecho del cuerpo.
• Sujetar tam&quina firmemente con ambas manes.
• Mantener un paso firme y buen equilibrio. No tratar de alcan-
zar m_s art&de Io seguro.
• Mantenga la cuchilla (tebajo nivel de ta cintura.
• No ]evanta la m&quina anteriormente su hombre.
• Mantengan partes todas de su cuerpo lejos de la cuchilla y
silenciador cuando mdquina esta corriendo.
• Usar la m_quina solamente para los trabajos explicados en
este manual.
TRANSPORTING AND STORAGE
• Apajar la m_quina antes de transportada.
• Dejar qua el motor se engrie y sujetar bien la maquina antes
de guardada o transportarla en un vehiculo.
• Vaciar el tanque de gasolina antes de guardar o transportar la
mdquina. Gastar todo el combustible restante en el carbu-
radoro Para ells, arrancar el motor y dejarlo funcionar hasta
que se pare.
° Guardar la m,_quina y el combustible en un lugar donde los
vapores (tel combustible no alcancen las chispas o llamas
expuestas de calentadores de agua, restores electricos o
interruptores, calefactores, etc.
• Guardar la m&quina de tal manera que el cuchilla no pueda
causar accJ(tentalmente alguna lesi6n:
• Guarar la m_quina lejos del alcance de tos ni,fios_
AVISO DE SEGURIDAD
La exposicion a vibraciones a tray,s del use prolongadode herramientasmanualesimpulsadaspergasolina puedecausardar3osa Ios vases san-
uineoso a los nervlos de los dedos, manes y mur3ecasdelaspersonassusceptiblesa trastomoscirculatorioso a hinchazonesanormales. El use
pro!ongadoen ch'masfr{os ha side relacionado con lesionesa los vases sanguineossufridosperpersonasper Iodem&ssanas. Si se presentans_n-
tomas en las manes tales come adormecimiento, dolor,perdidade fuerza,cambioen el color o taxturade la piel, o p_rdida de sensibilidad en los
dedos, [asmaneso la muneca, discontinue el use deesta herramientaysolicitsatenciSnmedica.Un sistema antivibratoriono garantiza [aanulaci6n
de estos problemas. Lbs usuarfosqua operanherramientasde poder en una base continuay regulates tienen qua monitorear estrechamenta su
condici6n fisica y la condici6n de esta unidad.
t_ BUSQUE ESTE SIMBOLO PARA PUNTUALIZAR PRECAUCIONES IMPORTANTES DE SEGURIDAD" I
SIGNIFICA - iIiATENCION!!! iiiESTE ALERTA!!! ESTA EN JUEGO SU SEGURIDAD.
-2-

PELIGRO:
iESTA MAQUINA MOTORIZADA PUEDE SER PELIGROSA! ESTA MAQUINA PUEDE PROVOCAR
AMPUTACION DE INCLUIR DE LESI6N SERIA 0 CEGUERA AL OPERADOR Y DEMAS PERSONAS,
SE RECOMIENDA RESPETAR LAS INSTRUCCIONES DE SEGURIDAD Y ADVERTENCIAS QUE
APARECEN EN ESTE MANUAL PARA PROPORCIONAR UNA SEGURIDAD Y RENDIMIENTO RAZON-
ABLES DURANTE EL USO DE ESTA MAQUINA. EL OPERADOR ES RESPONSABLE DE RESPETAR
LAS ADVERTENCIAS Y SEGUIR LAS INSTRUCCIONES DADAS EN ESTE MANUAL Y EN LA
MAQUINA. LEER TODO EL MANUAL DEL OPERADOR ANTES DE ARMAR Y USAR ESTA MAQUINA.
PERMITIR EL USO DE LA MAQUINA MOTORIZADA SOLAMENTE A LAS PERSONAS QUE HAYAN
LEIDO. ENTENDIDO Y SEGUIDO LAS INSTRUCCIONES Y ADVERTENCIAS EN ESTE MANUAL YEN
LA MAQUINA. NUNCA PERMITEN NII_OS UTILIZAR ESTA HERRAMIENTA,
ADVERTENCIA:
EL CORTE DE CUCHILLA PUEDE LANZAR
OBJETOS VIOLENTAMENTE. USTED
PUEDE ESTAR CEGADO O ESTADO
DA_IADO. USA SIEMPRE PROTECClON
DE PIERNAY OJO.
CARETA
LA CUCHILLA SE MUEVE MOMENTh.NEA-
MENTE DESPUES DE QUE GATILLO ESTA
LIBERADO, LA CUCHILLA CORTADORA
PUEDE CORTARLE SERIAMENTE U
OTROS. PERMITA CUCHILLA CORTADO-
RA DETENER ANTES DE RETIRANDOLA
DEL CORTE.
PIERNERAS
BOTAS
ZONA DE PELIGRO PARA CUCHILLA
CORTADORA. LA CUCHILLA CORTADO-
RA PUEDE CORTARLE SERIAMENTE U
OTROS. OTROS PUEDEN ESTAR CEGADO
O ESTADO DANADO, MANTENGA GENTE
Y ANIMALES UN M|NIMO DE 15 PIES (5
METROS) LEJOS.
LEER EL MANUAL DEL OPERADOR.
RESPETAR TODAS LAS ADVERTENCIAS Y
SEGUIR LAS INSTRUCCIONES. EL NO
HACERLO PUEDE DAR POR RESULTADO
GRAVES LESIONES.
-3-
MANUAL DEL
OPERADOR
ZONE DEPEUGRO
ETIQUETA DE
SEGURtDAD

FELICITACIONES por su compra de un cortamalezas
Proteja Guarnecedor a gasolina Craftsman de Sears, Ha
sido dise6ado, concebido y fabricado para proporcionar la
mejor confiabilidad y rendimiento posibles.
En caso de experimentar algSn probleroa que no pueda
resovler f_cilmente, comun_quese con el centro/departa-
mento de servicio Sears mAs cercano. Sears cuenta con
t_cnicos competentes y capacitados y las herramientas
adecuadas para reparar esta mAquina.
Le rogamos que lea y conserve este manual. Estas instruc-
ciones le permit[ran armar y mentener su mAquina correc-
tamente. Siempre respete las "REGLAS DE SEGURIDAD."
NUMERO DE MODELO:
358.795630
C0DIGO DE FECHA/
NOMERO DE ORDEN:
FECHA DE COMPRA:
ESPECIFICACIONES DEL PRODUCTO
CORTE DE CUCHILLA ...... 22"
MOTOR ............................... 2 tiempos, 21 cc enfr[ado
por aire
PROPORCION DE MEZCLA
GASOLINAiACEITE ........... 40:1 (3.2 oz de aceite por
gal6n de gasolina)
ENCENDIDO ...................... Estado s61ido
(entrehierro .010" a .014")
REGULAClON DEL
ENCENDIDO ...................... No ajustable, fijo
BUJIA .................................. Champion (RCJ-8Y)
DISTANCIA ENTRE
ELECTRODOS .................... 024 to .028"
EL NUMERO DE MODELO Y DE SERIE SE ENCUENTRA
RPM DEL MOTOR .............. 9,000 RPM M_x.
EN LA CALCOMANIA PEGADA EN LA MAQUINA.
ANOTE EL NUMERO DE SERIE Y LA FECHA DE
COMPRA Y GUARDE LAINFORMACtON EN UN LUGAR
SEGURO PARA REFERENCtA FUTURA,
CONTRATO DE MANTENIMIENTO
Se ofrece un contrato de mantenimiento Sears para este
producto. Para detalles, comunicaroe con la tienda Sears mas
cercana.
RESPONSABILIDADES DEL USUARIO
• Lea y respete las reglas de seguridad.
• Siga un programa regular de mantenimiento, cuidado y uso
de la m_.quina.
-Siga las instrucciones dadas en las secciones de
"Responsabilidades det usuario" y "Almacenamiento" en
este manual del operador.
Para los usuarios en tierras forestales de EE.UU. yen algunos
estados,incluyendo California (Recursos P_blicoscodigos4442 y
4443), Idaho, Maine, Minnesota, New Jersey, Oregon y
Washington: Se requiem que ciertos motoros de combusti6n
intema operados en bosques, arbustos y/o tierras cubiertas de
_asto en las zonas antes mencionadas esten equipados con
chispero, mantenido en buenas condiciones,o el motordebe estar
construido,equipadoy mantenido para la prevenci6nde incendios.
Averiguar con tas autoridades estatales o Jocaleslas regulaciones
retativas a estos requisitos. El incumplimientode estos requisitos
infringe ]a ley. Esta mdquina no esta equipada de fabrica con un
chispero, no obstante se ofrece uno como equipo opcional.Si en
su zona se requiero el uso de chispero, comuniquese con el
centro/departamento de servicio de Sears para el conjunto
CO_Tec_o.
FABRICADO BAJO UNA O MAS DE LAS SIGUIENTES PATENTES DE EE.UU.:
4,035,912; 4,052,789; 4,161,820; 4,167,812; 4,1'83,138; 4,189,833; 4,2!1,004;
4,286,675; 4,362,074; 4,451,983; 4,798.185; 4,823,465; 4,841,929; 4,940,029;
5,020,223; OTRAS PATENTES DE EE.UU. Y EXTRANJERAS PENDIENTES.
AVISO ESPECIAL
GARANTIA COMPLETO DE UN AI_IO PARA EL CRAFTSMAN
PROTEJA GUARNECEDOR A GASOLINA
Per un (!) aSo desde la fecha de compra cuando esta unidad a gasolina Craftsman Proteja Guarnecedor a gasolina sea mantenida,
lubricada y puesta a punto de acuerdo con las instrucciones de operaciSn y mantenimiento en el manual del operario, Sears reparard
libre de costo cualquier defecto de material o de mano de obra.
Esta garantia exduye ta cuchi!la, buifa y filtro de aire, las cuales son partes desechabres que se desgastan durante el uso normal.
Esta garantla se aplica durante 90 dias solamente desde la fecha de compra si este Proteja Guarnecedor alinee guarnecedor se usa
para fines comerciales. Esta garantia se aptica durante 30 dias solamente desde la fecha de compra si este Proteja Guarnecedor ali-
nee guamecedor se usa para fines de alquiler. Esta garantfa se aplica s61omientras este producto se use en los Estados Unidos.
EL SERVICIO DE GARANTIA ESTA DISPONIBLE DEVOLVIENDO EL PROTEJA GUARNECEDOR AL CENTRO O DEPARTAMEN-
TO DE SERVIClO DE SEARS MAS CERCANO £N LOS ESTADOS UNIDOS.
Esta garantfa te otorga derechos legales especfficos y usted puede tambi4n tener otros derechos que vat,an de estado a estado.
SEARS, ROEBUCK AND CO. DI817WA, HOFFMAN ESTATES, IL 60179
-4-

==11111111 I, ILJ,=,IH,,HH=,III I1,111 I II II II I
CONTENIDO DE TORNILLERIA
ACEITIE DE MOTOR MANUAL DEL OPERADOR
ESTE MODELO VIENE COMPLETAMENTE
ENSAMBLADO
NOTA: Es norrnat para ofr el ruido de filtro de €omustible
en un tanquede comustiblevacio.
PARA RETIRAR PROTEGER
GUARNECEDOR DE CARTON
• Retiren partes de soltura incluidas con Protegen
Guarnecedor.
• Retire bolsa de partes de pt,_sticosuelta del cart6n.
• Retire material de empaque todo.
• Revise cart6n totalmente para soltura adicional parte.
• Utilice delineador de cart6n corn0 superficiede trabajo
durante inspecci6n de unidad.
-5-

H
OPERAClON
CONOZCA SU PROTEJA GUARNECEDOR (Fig. 5)
LEER ESTE MANUAL DEL OPERADOR Y LAS REGLAS DE SEGURIDAD ANTES DE MANEJAR ESTE PROTEJA
GUARNECEDOR. Comparar las ilustraciones con la m_quina para aprender la ubicaci6n de los distintos controtes y los
ajustes. Conservar este manual para referencia futura.
FILTRO DE AIRE
ESTRANGULADOR tNTERRUPTOR
PERA DE CEBADO
DE PARADA
ASA
TRASERO
|
GATILLO
ACELERADOR
TAPA DE
COMBUS_BLE
CERRADURA DE
GAZNATE FUERA
ASA DE SILENCIADOR
tNICIADOR
E! INTERRUPTOR DE PARADA se usa para apagar el
motor.
Ei ASA DE INICtADOR se usa para arrancar el motor.
La PERA DE DEBADO hace circular combustible por el
carburador.
ASA DE
.,w."GUARDIA DE MANO
CORTE DE CUCHILLA
/
Figura 5
El ESTRANGULADOR activa la estrangulaciSn por
proveer combustible adicional a la m_quina cuando
comenzar una rn_quina frfa.
El GATILLO DEL ACELERADOR controla la vetocidad
del motor.
-6.

== ii ==HI
OPERACION - SEGURIDAD
H= H== = =H,
SEGURIDAD DE PROTEJA GUARNECEDOR
PELIGRO:
LA CUCHILLA CORTADORA CAUSAN OBJETOS
PARA ESTAR ARROJADO VIOLENTAMENTE. EL
OPERADOR TIENE QUE USAR UN ESCUDO DE
CARA DE SEGURIDAD O GAFAS PROTECTORAS.
NO PERMITIR QUE NADIE SE ACERQUE MAS DE 15
PIES (5 METROS) DE DISTANCIA.
LOS COMPONENTES DEL CUCHILLA QUE ESTEN
PICADOS, TRIZADOS O DANADOS DE CUALQUIER
OTRA FORMA PUEDE SALIR LANZADOS ¥ CAUSAR
GRAVES LESIONES. NO USAR LA MAQUINA. COM-
BIAR LAS PIEZAS DANADAS ANTES DE USARLA,
PIERNERAS
@ ,iw
CARETA BOTAS
ZONA DE PELIGRO
USAR SOLAMENTE
REPUESTOS DE BUENA CALIDAD
SEGURIDAD DEL OPERADOR
• Usa siempre protecci6n ocular cuando operando,
prestar servicio, o ejecutar mantenimiento en su
unidad. Refieran "Accesorios."
• No manejar esta maquina estando cansado, enfermo o
despu_s de haber ingerido bebidas alcoh61icas, dro-
gas o medicinas.
• Usan siempre cu largos sudaderas pesados, cu largas
mangas, botas y guantes. No van con los pies descal-
zos o usan sandalias, sudaderas cortos, mangas cor-
tas. Que se cubrir completamente ayuda protegerle de
piezas de plantas t6xicas arrojadas per la cuchilla.
• El pelo seguro de modo que tongitudde hombro ante-
rior. Los vestidos de soltura seguros o joyas. Los vesti-
dos con colgando d_bilmente vinculos, fajas, borPas,
etc. Puedan estar cogido en moviendo partes.
• No se balancea la unidad con tai fuerza que usted est_
en peligro de perder su balance.
• Nunca arrancar o hacer funcionar el motor en un lugar
encerrado o edificio. La aspiraci6n de los gases de
escape puede causar ia muerte.
• Mantener !os mangos libres de aceite y combustible.
SEGURIDAD CON LA MAQUINA
• Inspeccionar toda la m_quina antes de cada uso.
Cambiar las piezas dahadas. Buscar si hay fuga de
combustible y asegurar que todos los tornillos y tuer-
cas est_n en su lugar y bien apretados.
• Hagan ajustes de carburador con la cuchitla sostenida
para evitar cuchilla de contactar cuatquiera objeto.
• No permitlr que nadie se acerque mientras se ajusta el
acelerador.
• Usar sotamente accesofios o fijaciones de buena cati-
dad.
SEGURIDAD DE ARREGLARSG
• Inspeccionar el lugar donde se va a cortar antes de
cada uso. Quffar los objetos {piedras, vidrios rotos,
clavos, alambre, cordeles, etc.) que puedan salir lanza-
dos o queden enredados en el cuchitla.
• Siempre mantener el motor al lado derecho del cuerpo.
* Sujetar la m_quina firmemente con ambas manos.
. Mantener un paso firme y buen equilibrio. No tratar de
alcanzar m,_s alia de Io seguro.
o Mantenga tacuchilla debajo nivel de la cintura.
• No levanta la m,_quina antedormente su hombro.
. Mantengan partes todas de su cuerpo lejos de la
cuchilla y silenciador cuando m_.quina est_ corriendo.
- Usar la m&quina sotamente para los trabajos explica-
dos en este manual.
o Corte en gaznate compteto.
-7-

OPERACION
=
PARADA DEL MOTOR
• Empujar y tener el interrupter en ia posici6n "off."
• Si el motor no pare, mover el estrangulador hacia abajo
estrangulaci6n m&xima.
GATILLO DEL ACELERADOR (Fig. 7)
o El gatiito del acelerador controlala velocidad del motor.
NOTA: La cuchilla deberia detener cuando el gatillo de gaznate
est_ I_erado y ta mdquina regresa a velocidadociosa.
GATILLO DEL ACELERADOR
Figure 7
OPI=RAOIONISUGI=FIENCIAS (Fig.B)
I_IL ADVERTENCIA:
- Permilan las cuchiltas cortadoras alcanzar a toda vetocidad
antes de entrando el material para ser cortar.
• Siempre trabajo yendo lejos de gente y objetos sblidos tal
como paredes, piedras grandes, &rboies, autom6viles, etc.
• Si pesebres de cuchilla, inmediatamente detienen la m&quina.
• Aseg6rese el EN / FUERA interruptor es fuera, el bujfa est&
desconectado, y la cuchitla se ha movimiento detenfdo antes
de limpiando restos estrujados de la cuchJlla cortadora.
Inspeccionen los por los dafios de cuchilla y hayan repar6 o
remplaz6 como se neces_te.
• Pare detener ta m,_quina, mover la EN / FUERA cambia ala
POSIClON DE APAGADO.
• Mantienen siempre los ventiletes de aire limpios.Detenga la
unidad, asegerese la cuchifla cortadora se ha movimiento
completamente detenido, y desconecta el bujla antes de
fimpiando.
CORTA SIEMPRE A VELOCIDAD MAXIMA. NO
AMONTONA LA CUCHILLA EN EL CORTE QUE
PUEDE DANAR LA CUCHILLA, SE ENREDA, O
SE ARROJE CAUSAR UN PEUGRO SERIO.
SIEMPRE TRABAJO YENDO LEJOS DE GENTE
Y OBJETOS S(_LIDOS TAL COMO PAREDES,
PIEDRAS GRANDES, ARBOLES,
AUTOMOVILES, ETC.
USA SIEMPRE PROTECCI6N OCULAR. NUNCA
DELGADO SOBRE LA CUCHILLA. LAS ROCAS
O RESTOS PUEDEN HACIENDO FUEGO DE
REBOTE O ESTANDO ARROJADO EN OJOS Y
CEGUERA DE CARA Y CAUSA U OTRA
LES1ON SERIA.
ARREGLARSG DE METODOS (Fig. 9 & 10)
NOTA: No intentan para cortar tallos mayores que 3/8" gruesos.
PRINCIPAL CORTADOR
• Por crecimiento nuevo o jdven: Cuando arreglarsg crec-
imiento nuevo o j6ven, utilize un ancho, barrer movimiento.
Figure 9A. Una ligeramente, hacia abajo inclinaci6n de Ias
cuchitlas cortadoras en direcci6n de movimiento da a los
mejores resuitados cortadores.
• Pare rods viejo, grueso crecimtento: Arregle mds viejo,
grueso crecimiento utiliza un serrar hacer. Figure 9B.
• Pare precise, nivd corta: Si un precisamente corte de nivel
est& deseado, alarga una pieza de cuerda a tray,s de le ion-
gitud de] protege. Guien las cuchiUas cortadoras lentamente a
trav6s de la parte superior de la cuerda. Figure 10.
CORTE DE LADO
- Cuando arreglarsg tos lados del protege, comienzan en et
fondo y corte hacfa arriba, disminuir la protege adentro en la
parte superior. Figura 10 (intercalaci6n). El interrumpir este
m6todo dejara et cuerpo de la protege m_s estrecha en la
parle superior. Esta forma expondr_ m_s det protege, crec-
imiento m&s uniforme de resultar en.
Figura 9
Figura 8
Figure 10
AIRE EXPRESA
-8-

iii ii iiii i i iiiiiii ,,,,,,,,,,,,,, ,,,,,,,,,,,,,,,,,,,,,,,,,,,
OPERACION
iii iiii iiiiii i i i iii iiiiiiiii i iiii iiiii IH I II
ANTES DE ARRANCAR EL MOTOR: ACEITE PARA MOTOR DE 2 TIEMPOS
ADVERTENCIA:
SIEMPRE LEER LA INFORMAClON SOBRE
SEGURIDAD CON EL COMBUSTIBLE QUE
APARECE EN LA SECClON 'REGLAS DE
SEGURIDAD' EN LA PAGINA 2 DE ESTE
MANUAL ANTES DE COMENZAR.
Si NO SE ENTIENDE LO INDICADO EN LA
SECCION DE SEGURIDAD CON EL
COMBUSTIBLE, NO TRATAR DE LLENAR DE
COMBUSTIBLE LA MAQUINA; PEDIR LA
AYUDA DE ALGUIEN QUE SEPA COMO
HACERLO O LLAMAR A LA LINEA DIRECTA
DEATENClON AL CUENTE AL 1-800-235-5878.
GASOLINA
El motor de dos tiempos en este producto requiem una
mezcla de combustible de gasolina regular sin ptomo y un
aceite para motorde 2 tiemposde buena calidad (ENFRIADO
POR AIRE) para lubdcar loscojinetesy otras piezas m6viles.
La propomi6n correcta de combustible/aceite es 40:1 (ver
Cuadro de la mezcla de combustible).Muy poca cantidad de
aceite o tipo incorrecto de aceite causar_n funcionamiento
deficiente y puede causar el sobrecalentamiento y
agarrotamiento del motor,
Gasolina y el aceite deben mezclarse previamente en un
recipiente fimpio aprobado para gasolina. Siempre usar
gasolinaregularsin plomo fresca.
Estemotor est_certificadoparaoperaren gasolinasinplomo.
y aceitedde motorde 2 tiemposCRAFTSMAN 40:1.
IMPORTANTE: La experiencia indica que los combustibles
mezclados conalcohol, Ilamados gasohol,(el uso de etanol o
metanol) puede atraer humedad, 1o cual conduce a la
separaci6ndel aceite y la gasolina y a la formaci6n de dcidos
durante el almacenamiento. El gas &cido puede da_ar el
sistemade combustibledel motor mientras esta almacenado.
Para evitar problemasen el motor, el sistema de combustible
debe vaciarse antes de guardar la ma.quinapot un perfodode
30 d{as o rods. Vaciar el tanque de gasolina, luego hacer
funcionar el motor hasta que se pare, para agotar el
combustiblemstante en el carburador y tuber_a.La pr6xima
temporada usarcombustiblefresco. Para m_.sdetaltes,ver las
instruccionesdeALMACENAMIENTO. Nunca usar productos
limpiadores del motor o del carburador en el tanque de
combustible,puesse da_arfa permanentemente.
ESTABILIZADOR DEL COMBUSTIBLE
El estabilizadores una altemativa aceptable para minimizarla
formaci6n de dep6sitosgomososen et combustibleduranteel
almacenamiento.ASadir el estabilizador a ta gasolina en el
tanquede combustibleo contenedor de combustible.Siempre
usar la proporci6nde mezcla de combustible indicada en et
envase del estabilizador.Hacer funcionar el motor pot unos 5
minutos despu_s de a_adir el estabilizador para que _ste
llegue al carburador. No es necesado vaciar el tanque de
combustible para el almacenamiento cuando se usa
estabilizadorde combustible.
Et aceite para motor de 2 tiempos "CRAFTSMAN 40:1"
(ENFRIADOS POR AIRE) es una mezcla especialmente
preparada con estabilizadores de combustible. Si no se usa
este aceite Sears, se puede aSadir un estabilizador de
combustible (tal como Craftsman No. 33500) al tanque de
combustible. - 9 -
Se recomienda et uso del aceite para motor de 2 tiempos
"CRAFTSMAN 40:1" (ENFRIADOS POR AIRE). Este aceite
estd especialmente mezclado con estabilzadores de com-
bustible para incrementar la estabilidad del combustible
(prolonga la duraci6n del combustiblehasta 5 veces m_.s) y
reduce e! despredimiento de humo.
Si no se tiene disponible aceite para motor de 2 tiempos
CRAFTSMAN, usar un buen aceite para motor (ENFRIA-
DO POR AIRE) de 2 tiempos que tenga la mezcla de com-
bustible de 40:1 recomendada.
ilMPORTANTE! No usar:
• ACEtTE PARAAUTOMOVlLES
° ACEITES PARA EMBARCACIONES (NMMA, BIA, etc.)
Estos aceites no tienen los aditivos adecuados para
motores de 2 timpos (ENFRtADOS POR AIRE) y pueden
dahar el motor.
MEZCLA DE GASOLINA Y ACEITE
La mezcla de gasolina y aceite es la siguiente:
• Consu{tar el cuadropara las cantidades correctas.
* No mezclar la gasolina y ef aceite directamente en el
tanque de combustible de la m,_quina.
PARA UN GALON:
• Verter 3.2 onzas de aceite de buena calidad para
motor de 2 tiempos (ENFRIADOS POR AIRE) a un
contenedor vac{o de un gal6n aprobado para gasolina.
• ASadir un gal6n de gasolina regular sin plomo al
contenedor de un gaf6n y cerrar bien la tapa. Agitado
moment_eamente.
• La mezcta est,. lista para su utilizacion. En este momento
se puede aSadir et estabilizador si se desea; seguir las
instrucciones para hacer la mezcla que se dan en la
etiqueta.
CUADRO DE MEZCLA DE COMBUSTIBLE
Proporci6n de la mezcla de combustibleJaceite 40:1
Gasolina Aceite (oz. fluida)
1 galSn 3.2
2.5 galones 8.0
NOTA: Ase combustible contenedores puedan sostener
m_s que la cantidad especiflcada. Si demasiado gasolina
estuviera en el recipiente, el consiguiente gas mezcla de
comustible de aceite no ser& correcta por operaci6n de
m_quina adecuada.

OPERACION
PARADA DEL MOTOR
- Empujar y tener el interrupteren la posici6n "off."
• Si el motor no para, mover el estrangulador hacia abajo
estrancju/aci6n m_xima.
LA CUCHILLA CORTADORA VOLTEARA
PELIGRO:
CUANDO LA M_,QUINA COMIENZA.
PARA EL ARRANQUE Y OPERACION
SEGUROS, TOMAR TODAS LAS MEDIDAS DE
PRECAUCION INDICADAS EN EL MANUAL
DEL OPERADOR Y ETIQUETAS PEGADAS EN
LA MAQUINA. USAR LA ROPA ADECUADA
ANTES DE ARRANCAR EL MOTOR.
EVITE CUALQUIERA CONTACTO CON LA
SILENCIADORo EL SILENCIADOR CAL1ENTE
PUEDE CAUSAR GRAVES QUEMADURAS.
PROCEDIMIENTO BASICO DE
ARRANQUE (Fig. 11, 12 & 13)a
Descansa unidad en t_erra.Sostenga la d de mode que
fa cuchilta es fuera de la tierra y lejos de arboles, arbustos,
espectadores, etc. Figura 11.
POSICION DE ARRANQUE
= = i , ,,, =
NOTA: Si m&quina a0n no hubiem comenzado, est_ inundado
probabtemente. Proceda "lnicio de de una mdquina inundada." '
• Permita ]a mdquina correr 10 segund0s, entonces mover la
palanca de estrangulaci6n estrangular fuera. Permita la
unidad correr per 30 m,_s segundes en fuera estrangulaci6n,
entonces fibera la cerradura de gaznate apretando y liberando
el gatillo.
NOTA: Si troqueles de m&quina con la palanca de estrangu-
laci6n en la fuera posici6n de estrangulaci6n, mover la paianca
de estrangulaci6n a estranguJaci6nmedia y jala la cuerda hasta
que la mdquina corre. Permita la unidad correr per 30 mds
segundos en fuera estrangulaci6n, entonces libera la cerradura
de gaznate apretando y liberando el gatil!o.
° Para detener la mdquina, mover la EN / FUERA cambia a la
POSICION DE APAGADO.
COMENZANDO UNA MAQUlNA CALIDA QUE
NO HA ACABADO COMUSTIBLE
° Aseg,3reseel interrupter est& en la en posici6n.
• Mover la palanca de estrangulacibn a la posici6n de estrangu-
laci6nmedia.
• Ajuste la cerradura de gaznate come dirigida en "lnicio de de
una mdquina fria ..... " Mantiene /a cerradura de gaznate
prometida basra que /a m_quina corre suavemente.
• Ja|e cuerda de iniciador marcadamente hasta que m,_quina
corra, pete no rods que 5 jala.
• Permita la mdquina correr 10 segundes, entonces mover la
palanca de estrangulaci6n estrangular fuera. Ubere la cer-
radura de gaznate apretando y liberando el gatitlo.
NOTA: Si mdquina no hubiera comenzado, jala cuerda de inici-
ador 5 jala m_s.Si maquina a6n nocorriera, est_ inundado prob-
abiemente. Proceda "lnicio de de una maquina inundada."
__ :- Z
Figura 1t
ARRANQUE DE UN MOTOR FRIO O CALIENTE
DESPUES DE AGOTARSE EL COMBUSTIBLE
• AsegOrese el EN/FUERA interrupter est_ en la EN posici6n.
Figura 12.
• Mover la palanea de estrangutaei6n para Ilenar estrangu-
laei6n. Figura 13.
• Presionan lentamente las 6 veces de bulbo de devecionario.
Figura 13.
o Ajuste la cerradura de gaznate come seguir:
- presiona a la cerradura de gaznate- fuera
- apriete y sostenga el gatillo de gaznate
- preeiona y sostiene la cerradura de gaznate, entonces
- tibere el gatillo de gaznate.
Mantenga la cerradura de gaznate prometida hasta que la
m_quina corre suavemente.
• Jale cuerda de iniciador marcadamente 5 veces.
NOTA: If so, go to La mdquina puede sonar come si est& inten-
tando comenzar anles 5 jalar. Si asf, va al siguiente paso
inmediatamente.
• Mover la palanca de estrangufaci6n a la posici6n de estrangu-
laci6n media.
° Jale la cuerda de iniciador marcadamente hasta que la
m_quina corre, pero no m&s que 6 jala.
NOTA: Si la m&quina no ha comenzado despu_s de 6 jala (en
estrangulaci6n media), cheque seen para asegura la EN f
FUERA cambia y ta palanca de estrangulaci6n estz_nen las posi-
ciones adecuadas. Entonces, mover ta palanca de estrangu-
taci6n enteramente posici6n y prensa a de estrangulaci6n las 6
veces de butbo de devocionario; Jale la cuerda de iniciador 2
m_.sveces. Mover la palanca de estrangutaci6n a estrangulaci6n
media y jale la cuerda de fniciador hasta que la m&quina corm,
pero no m&s que 6 jala m&s.
EN DE GAZNAT'£
INTERRUPTOR
GA_LLO ACELERADOR
CERRADURA PERA DE CEBADO
ESTRANGULACI(_N
Figura 12 Figura 13
COMENZANDO UNA MAQUINA INUNDADA
Las mdquinas inundadas pueden estar comenzado eolocando la
EN/FUERA cambian en la en posici6ny la palanca de estrangu-
laci6n en la fuera posici6n de estrangulaci6n; entonces, jala la
cuerda para despejar la m_quina de comustible excesivo. Esta
puede requefir ialar la cuerda de iniciadortouches depender de
de veces come malamente la unidad est_ inundado.
Si la unidad ann no comienza, llama la Asistencia de Cliente
Hotline a 1-800-235-5878.
-10-

iiii r l ,,11 i _ , ..........................
RESPONSABILIDADES DEL USUARIO
iiiiii iiiiiiiiiii ,, iiiiiiiii, i ii ii
PROGRAMA DE MANTENIMIENTO
Anotar Jas fechas despu_s de
cornpletar el rnantenirnientoregular
Revisaren busca de piezas da5adas o desgastadas
Revisarel apriete delos sujetadores y piezas
Limpiar la m_quina
Corte de cuchilla lubricaci6n
Limp_ar el filtro de aire
...... ,,,, ,,
Cambiar la bujia
Inspeccionar el silenciador(reparar si es necesado)
Antes Despuds Cada Carla ' Fechas de
',de usar de usar 5 Hrs. aSo mantenirniento
v"
, ..... ,,, ,,,, ,,,,,, ,
,/
v"
[
,,,, , u ,, L
v"
RECOMENDACIONES GENERALES
La garantfa en este protege guarnecedor no cubre
detalles que hart estado expuesto a abuso o negligencia
de operador. Para recibir Ilenar valor de la garantfa, el
operador tiene que mantener proteger guarnecedor
como instruido en este manual.
Es necesario hacer algunos ajustes peri6dicamente para
mantener en buenas condiciones esta m_quina.
Todos los ajustes indicados en ta secciSn de manten-
imiento y ajustes en este manual deben hacerse por Io
menos cada estaci6n.
• Una vez al aSo, cambiar la bujia y el filtro de aire. Una
bujfa nueva y un elemento del filtro de aire nuevo o
limpio asegura ta mezcla correcta de aim-combustible
y ayuda a que el motor funciones mejor y dure m_.s
tJempo.
• Seguir el programa de mantenimFento indicado en este
manual.
ADVERTENCIA:
DESCONECTAR LA BUJIA ANTES DE
HACER LOS TRABAJOS DE MANTEN-
IMIENTO EXCEPTO PARA AJUSTAR EL
CARBURADOR.
REEMPLACEN PARTES DE CUCHILLA
CORTADORAS QUE ESTAN RENUNClA-
DO, PICADOS O DA_tADO EN CUAL-
QUIER OTRO MODO ANTES DE UTI-
LIZANDO LA UNIDAD.
LIMPIAR LA MAQUINA Y LAS ETIQUETAS
• Limpiar esta m_quina con un trapo hL_medocon deter-
gente suave.
• Secar la m_quina con un trapo limpio y seco.
ANTES DE CADA USO
INSpECCIONAR EN BUSCA DE PIEZAS
DANADAS O DESGASTADAS
• Corte de cuchilla - reemplacen partes de cuchilla cor_
tadoras que estdn doblado, combadas, renunciadas, o
da_adas de cualquier modo.
• Tapa del combustible - cambiada sJ estd rota o tiene
fugas.
• Escudos protectores - cambiarlos si est_n doblados,
combados, trizados o daSados de cualquier otra forma.
LUBRICATION CHART
O FAJA PRINCIPAL
INSPECCIONAR TODA LA MAQUINA,
CAMBIAR LAS PIEZAS DANADAS,
REVISAR SI HAY FUGA DE COM-
BUSTIBLE Y ASEGURAR QUE TODOS
LOS TORNILLOS Y TUERCAS ESTEN EN
SU LUGAR Y BIEN APRETADOS.
Q ACEITE DE M_QUINA DE LUZ

RESPONSABILIDADES DEL USUARIO
ii i iiH III,IHIII
REVISAR EL APRIETE DE LOS
SUJETADORES/PIEZAS
• Corte de cuchftla
• Asa auxiliar
• Mango det aceferador
• Protector de! silenciador/Tapa decilindro
• Tapa de! filtro de aire
• Silenciador
• Escudo protector
LIMPIAR EL FILTRO DE AIRE (Fig' 14)
El fittm de aire sucio reducela duraci6ny el rendimientodel motor
y aumenta el consume de combustibley emisionesnocivas.
Siempre limpiar el filtro despu6s de 5 llenadas del tnaque de
combustible 5 5 horas de operaci6n, cualquiera que ocurra
primero. Limpiarlo rods frecuentemente si se trabaja en ambi-
entes muy polvorientos.
• Afiojen los dos torni!los en la cubierta de filtro de aire sufi-
ciente para retirar la cubierta de la m_quina.
• Sacar el filtro de aire_
• Lave filtro de aire en jab6n y agua.
- Apriete fiitro de aire seco y reemplace en cubierta.
• Reinstale {a cubierta de filtro de aire.
i ii iiiiiiiiiiiiiiiiiii iii iiiii i
CORTE DE CUCHILLA LUBRICAClON (Fig. 16)
• Aseg_rese el EN/FUERA interruptor est& en la POSICJON DE
APAGAOO y la cuchilla se ha movimiento detenido.
Desconecte el buj{a.
• Retiren cualesquier restos de la cuchilla cortadora.
• Las partes todos limpias y per los daSos de cheque. Hayan
daSado partes reparadas o rempfazadas per personal de ser-
vicio ca|ificado.
- Aplique un aceite de m_quina de luz alo largo del borde de la
faja principal.
FAJA PRINCIPAL
Figura 16
FILTRO
DE AIRE
TORNILLOS
Figura 14
CAMBIAR LA BUJIA (Fig. 15)
Cambiar la bujfa carla atSopara asegurar que el motor arranque
fdcilmente y funcfone mejor. La distancia entre electrodes debe
mdeir .025'L
• La torsi6n, entonces jala fuera beta de bujia.
• Retire bujla de cilindroy descarte.
• Reemptace con buj{a correcto y reapriete con arranque de
bujia (10-12 Ib-pie).
Reemplace bujfa.
BUJ{A
eUJ|A
Figura 15
-12-

ii i i Ill II IIIIIIIII IIII I
MANTENIMIENTO Y AJUSTES
iiiiiiiiiiiiiiiiiiiiiiiiiiiiiiiiiiiii i
AJUSTES DE CARBURADOR
El ajuste de! carburador es crftico y si se efectda incorrectamente puede da_ar permanentemente el motor asif tambi_n
como el carburador. Antes de comenzar los ajustes, pot favor lea todas las instrueciones y consulte la secci6n de
Localizacizbn de Fallas de este manual. No use la unidad, se el motor no opera de acuerdo con estas instrucciones despues
de repetir los pasos de ajuste. Por favor Ilame a nuestra linea de emergencia de asistencia al €liente a! 1-800-235-5878, para
asistencia adlcional.
Si el motor arranca puede estar ahogado. Si tiene dudas lea la
secci6n sobre motores ahogados en la secci6n del pdncipio de
este manual antes de cornenzar los a_ustes.
Si ud no seguro de ajustar el carburador o experiencia
•cualquier problema mientras intenta este proceso, por favor
llama los 1-800 n_mero tistado en la cubierta de frente de este
manual por posterior asistencia.
El carburador ha estado ajustado en fa fabrica para nivel de
mar condiciona. Los ajustes se pueden poner necesados si la
unidad estd utilizado en altitudes significativamente mas altas o
si usted notara cualquiera del siguientes condiciona:
• La m&quina no continuar& para correr a posici6n ociosa. Vea
"Ajuste de velocidad Ocioso. '+
° La cuchilla continOa para mover cuando la maquina ociosas.
Vea "Ajuste de velocidad Ocioso."
• La mdquina muere o duda cuando deberia acelerar. Vea
"Cheque de Aceleraci6n."
• P_rdida de poder cortador que no pueda estar corregido
limpiando e! filtro de aire. Vea "Ajuste de Alta Velocidad."
NOTA: No intenlan voltear los ajustes m&s alia de los lopes
como daSo puede ocurrir.
ADVERTENCIA:
HAGAN AJUSTES DE CARBURADOR CON EL
FIN M.4.S BAJO SOSTENIDO PARA EVITAR
CUCHILLA DE CONTACTAR CUALQUIERA
OBJETO. CONCORDAR CON UNIDAD SU
MANO.
LA CUCHIL.LA ESTARA GIRANDO DURANTE
LA MAYORIA DE ESTE PROCEDIMIENTO. USE
SU EQUIPO PROTECTOR Y OBSERVE PRE-
CAUCIONES DE SEGURIDAD TODAS LAS.
EN "AJUSTE DE MEZCLA DE VELOCIDAD
BAJO," REVISA VELOCIDAD DE NUEVO
OCIOSA DESPUES DE CADA AJUSTE. LA
CUCHILLA CORTADORA NO DEBE MOVER A
VELOCIDAD OCIOSA.
MEZCLA DE ALTA
AJUSTE DE
VELOCIDAD
OCIOSO DE FILTRO
VELOCIDAD (_
DEAtRE
Figura !7
AJUSTE DE
MEZCLA DE
H L
PROCEDIMIENTO DE AJUSTE
PREPARACION
• Utirice una mezcta de comustible fresca. Vea el Fueling sec-
ciona.
• Comience la m_quina. El adorno protege per 3 minutos
calentar mdquina. La m_quina tiene que set en temperatura
operativa antes de que ajustes de carburador pueden estar
desempe&ado correctamente.
AJUSTE DE VELOClDAD OCIOSO
• Permita m_quina ociosa.
• Ajuste velocidad ociosa hasta que la mdquina continOa para
correr sin pararse y sin movimiento de cuchilla.
- Voltee ajuste de vetocidad ocioso en direcci6n de las
manecillas del reloj para aumentar velocidad de m&quina
si los pesebres o troqueles de m&quina
- Voltee ajuste de velocidad ocioso contrano al de las agu-
jas del reloj para retardar m_quina abajo y/o para manten-
er cuchilla de volver.
• Ningunos posteriores ajustes son necesario si la cuchilla no
mover a velocidad ociosa y si desempe_o fuera satisfactorio.
PREGRADUACIONES DEL CARBURADOR
(Fig. 17)
NOTA: En la mayoria de los cases, su maquina puede estar
hecho pars correr adecuadamente con ajustes de carburador
menores. Refiera a sugerencias de Iocalizaci6n y arreglo de
problemas anteriormente para la condJci6n usted est,. experi-
mentando y seguir las instrucciones. Las posiciones de carbu-
rador b&sfcas estan proveido en e! siguientes instrucciones.
• Vottee ajuste de velocidad bajo y ajuste de affa velocidad
contrario al de las agujas del reloj al rimitador detiene. No
intentan voltear m_s alia de los topes como da_o puede
ocurrir.
• Voltee el ajuste de ve!ocidad ocioso en direcci6n de las
manecillas del reloj 1vuelta completa.
-13-

i i i iii iiiiii iiiiiiiiiiiiiiiiiiiiiii iiiii i i i iiii )m
MANTENIMIENTO Y AJUSTES
,,,,,,,,,,,,,,,,,,,,, i iiiii iiiii iiiiiiiiiiiiiiiiiiiii
AJUSTE DE MEZCLA DE VELOCIDAD BAJO
- Permita la m&quina ociosa. °
• Voltee el ajuste de velocidad bajo lentamente en direcciSn
de las manecillas def reloj hasta que la velocidad aumenta.
No intentan vo/tear m,_sall_ de los topes como da_o pueda
ocurt_r.
• Voltee el ajuste de velocidad bajo contrado al de las agujas
del reloj hasta que la velocidad dJsminuya. No intentan vol-
tear m_s a!l_ de los topes como da_o puede ocurrir.
. Establezca el ajuste de velocidad bajo en el apunta media*
dos de entre los dos posiciones.
• Reajuste )a velocidad ociosa (ve "ajuste de velocidad
Ocioso").
AJUSTE DE MEZCLA DE ALTA VELOCIDAD
PREVENGA: No opera la mdquina en gaznate j
hacen ajustes de alta velocidad como da_o a
completo para per_odos prolongados mientras J
la mdquina puede ocurrir.
NOTA: Ajuste el ajuste de alta velccidad 1/16 de una vuelta a
_avez. Una vuelta de 1/16 pulgada estd acerca del ancho del
destornillador acanala en la parte superior de!ajuste.
- Permila ta m&quina ociosa, entonces aprieta et gaznate com-
pletamente.
NOTA: Desempe5e el siguientes pasos en gaznate completo_
• Voltee el ajuste de alta velocidad contrario al de las agujas
del reloj hasta que detenga. No intentan voltear m_s all_ de
los topes como daSo puede ocurnr.
• Voltee el ajuste la cantidad mfnima en direcci6n de las
maneci)las del re)oj hasta que la m_quina corre suavemente.
No intentan voltear los m_s alia de los topes como da_o
puede ocurrir.
• Si la m,_quina acelera y torte suavemente, ningunos posted-
ores ajustes son necesario.
• Recheck y seguir pasos en "Cheque de Aceleraci6n."
LIMPIARJCAMBIAR EL FILTRO DE
COMBUSTIBLE (Fig. 18 & 19)
• Agotar el combustible del tanque antes de proceder con
este paso.
• Quitar la tapa de1 combustible y dejarla colgando por el
lado det motor.
• Con la ayuda de un par de alicates puntiagudos, agarrar
el retenedor de la tapa del combustible de la parte grande,
sujetdndolo en la boca del tanque, y tirado hacia afuera.
• Con la tapa fuera del tanque, usar un trozo pequeSo de
alambre doblado parecido al que se muestra en la
ilustraci6n para pescar la manguera de combustible y
lentamente tirada fuera del tanque. Cuando aparezca el
filtro de combustible en )a boca dei tanque, agarrado con
los dedos y sacaHo.
• Una vez que el filtro estd fuera dei tanque, agarrar la
manguera de combustible cerca det cuello del fiJtrocon el
pulgar y dedo _ndice de la mano izquierda mientras se
toma el cuerpo del fiffro con el pulgar y dedo indite de la
mano derecha. Retorcer el filtro con la mano derecha
mientms se le desconecta de la manguera.
• Para limpiar el filtro de combustible, sumergido en agua
jabonosa tibia pot 10 minutos (Se recomienda una mezcla
muy suave de liquido para tavar platos). Luego agitar el
fittro hasta que est_ timpio, enjuagarlo bien en agua tibia
y dejar secar aLaire.
• Para la instalaci6n proceder en orden inverso.
• Para reemplazar el filtro de combustible, usar el mismo
procedimiento, pero instalar un filtro nuevo.
PREVENGA: Si la mdquina no opera de acuer- 1
do con estas instrucciones despuds de repi- I
tiendo los pasos ajustadores, no utilizan la I
herramienta. Lo toma para su comerciante de [
servicio autorizado. I
CHEQUE DE ACELERAClON
• Permita la mdquina ociosa.
, Apriete el gatillo de gaznate completamente. Si la m_quina
no acelera suavemente, voltee el ajuste de velocidad bajo
contrario al de las agujas det reloj una cantidad pequeSa (no
rods que la ancho de la ranura en el tomillo ajustador).
• Repita paso previo hasta aceleraci6n suave est& obtenido.
No intentan vo/tear rn,_s a//_ de los topes como da_o puede
ocurrir.
NOTA: Puede ser necesaro para repetir "Ajuste de velocidad
Ocioso" a traves "Cheque de Aceleraci6n" obtener corregir
ajustes.
TAPADEL ,,.aII"
RETENEDOR
ICOMBUS_BLE
Figura 18
MANGUERA DE
COMBUSTIBLE
MANGUERADE FILTRODE
COMBUSTIVE _ _ COMBUSTIBLE
COMBUSTIBLE DEL FILTRO
-14-
Figura 19
ALAMBRE
DOBLADO

............................. , ,,,,,,,,,, ,,,,,,,,,,,,,,,,,,,,,,, iiiiii ,,,,,111ii
ALMACENAMIENTO
IIII,IH III IIIIIIIII I,,I I I
Preparar inmediatamente la m&quina para guardarla al final
de la temporada o si no se va a usar por 30 d/as o mas.
ADVERTENClA:
DEJAR QUE EL MOTOR SE ENFRIE Y
SUJETAR BIEN LA MAQUINA ANTES DE
GUARDARLA O TRANSPORTARLA EN UN
VEHICULO.
GUARDAR LA MAQUINA Y EL
COMBUSTIBLE EN UN LUGAR DONDE LOS
VAPORES DEL COMBUSTIBLE NO
ALCANCEN LAS CHISPAS O LLAMAS
EXPUESTAS DE CALENTADORES DE
AGUA, MOTORES ELECTRICOS O
INTERRUPTORES, CALEFACTORES, ETC.
GUARDAR LA MAQUINA CON LOS
PROTECTORES PUESTOS PARA QUE
NINGUNA PARTE AFILADA PUEDA
ACCIDENTALMENTE LESIONAR A UNA
PERSONA QUEPASE CERCA.
GUARDAR LA MAQUINA LEJOS DEL
ALCANCE DE LOS NINOS.
INSTRUCCIONES PARA ALMACENAR LA
CORTADORA A GAS
Si la m_quina va a estar guardada por cierto tiempo,
limpiarla a rondo antes de guardarla. Quitar toda la tierra,
hojas, aceite, grasa, etc. Guardarla en un lugar limpio y
seco.
• Limpiartoda _am,_quina.
° Limpiar et filtro de aire. Ver =Responsabilidades del
usuario,"
• Abrir el conjunto del cabezal de hilo semiautom_tico y
fimpiar la tierra, pasto o basura que se pueda haber
juntado. Inspeccionar et hilo de corte, si est_ viejo (como
tiza y pegajoso al tacto), sacar y botar. Instalar un hilo
nuevo la pr6xima vez que se vaya a usar la m_quina.
• Aceitar ligeramente las superficies met&licas externas
para impedir ta oxidaci6n.
° Volver a armar todas las piezas, asegurando que todos
los mangos y protectores est_n en su lugar y bien sujetos.
Cambiar las piezas que esten daffadas.
• La posici6n de almacenamiento recomenclada es ya sea
verticalmente con la tapa de combustible encima, u
horizontalmente con ia tapa de combustible hacia arriba.
No guardar la mdquina con el accesorio de corte
arriba, por encima del motor.
_ ATENCION: Usen guantes protectores
• La mdquina puede colgarse de la caja del eje impulsor
para que ellimitador det hito no cause alguna lesi6n.
cuando manipulando. La cuchilla es aguda
y puede cortarle.
MOTOR
Nunca usar productos limpiadores del motor o del
carburador en el tanque de combustible, pues se daSarian
permanentemente los componentes del sistema de
combustible.
Seguir estas instrucciones:
° Vaciar el combustible de la m_quina a un recipiente
aprobado para combustible.
• Arrancar el motor y dejarlo funcionar hasta que se pare
para vaciar las mangueras de combustible y et
carburador.
• Dejar que el motor se enfrfe antes de guardar la
m&quina.
IMPORTANTE: Es importante impedir que se formen
dep6sitos gomosos en las piezas esenciales de! sistema de
combustible tales como el carburador, filtro de combustible,
manguera de combustible o tanque durante el
almacenamiento. Tambi_n, se sabe que los combustibles
mezclados con alcohol, como el uso de etanol o metanol
(llamado gasohol o combustible oxigenado), pueden atraer
humedad y formar gas acido, el cual dafar_ el motor. Para
evitar problemas en el motor, vaciar el sistema antes de un
almacenamiento de 30 dias o m&s.
Et estabilizador es una altemativa aceptable para minimizar
la formaci6n de dep6sitos gomosos en et combustible
durante el almacenamiento. ASadir el estabilizador a la
gasolina en el tanque de combustible o contenedor de
combustible. Siempre usar la proporci6n de mezcta de
combustible indicada en el envase del estabilizador. Hacer
funcionar el motor por unos 5 minutos despues de afadir el
estabilizador para que este Ilegue at carburador.
El aceite para motor de 2 tiempos CRAFTSMAN 40:1
(ENFRIADOS POR AIRE) es una mezcla especialmente
preparada con estabilizadores de combustible. Si no se usa
este aceite Sears, se puede ahadir un estabitizador de
combustible (tal como Craftsman No. 33500) aJ tanque de
combustible.
COMBUSTIBLE SISTEMA
• Sacar la buiia y verter 1 cucharadita de aceite 40:1 por la
abertura de la bujia. Tirar lentamente la cuerda de
arranque unas 8 a 10 veces para distribuir el aceite por la
superficie intema det motor.
• Reemptazar la bujia con una nueva del tipo y gama de
calor recomendados. Ver "Especificaciones del producto."
• Limpiar el filtro de aire. Ver "ResponsabiJidades del
usuado".
• Reinstalar todas/as tapas y tomilleria que se sac6 pare
tener acceso; apretar todos los tornillos y sujetadores.
• Revisar toda la m_.quina en busca de tornillos, tuercas y
pernos sueltos. Cambiar las piezas que est_n da5adas,
rotas o desgastadas.
• Aceitar tigeramente las superficies de metal extedores
para impedir la oxidaci6n.
• AI comienzo de la prOxima temporada, usar combustible
fresco que tenga la proporci6n correcta de gasolina y
aceite.
OTROS
• No guardar gasotina de una temporada a la otra.
• Cambiar la lata de gasolina si comienza a oxidarse. El 6xido
y/o suciedad en el sistema de combustible causa problema.
• Guardar la m_quina en un lugar bien ventilado y cubierto,
si es posible, para impedir la acumufaciOn de polvo y
suciedad. No cubdr con pl_.stico. Et pl_.stico no permite la
respiraci6n e induce la condensaci6n y finalmente la
oxidaci(Sn.
tMPORTANTE: Nunca cubrir la m_quina mientras el motor
y [as _reas de escape est_n todavia calientes.
-15-

TABLA DE LOCALIZACION DE AVERIAS
TABLA DE LOCALIZACION DE AVERIAS
SINTOMA
El motor no arranca o t.
funciona solamente por 2.
unos pocos segundos 3,
despu_s de arrancar. 4.
E! motor no funciona 1.
bien a ve!ocidad
lenta.
El motor no acelera, le 1.
falta potencia o se 2.
apaga bajo carga. 3.
El motor humea 1.
excesivamente. 2.
Et motor no funciona 1.
caliente. 2,
El corte de adhesi6n 1.
se mueve a vetocidad 2,
ociosa. 3.
Et code de cuchilla !1.
detiene bajo una carga
o no voltea cuando la 2.
m_quina estd acelerado. 3.
CAUSA
Ase combustible tanque vaciar.
Motor ahogado
Bujia no tiene chispa.
Combustible no Ilega al carburador.
5.
El carburador requiere ajuste.
6.
E! filtro de aire sucio.
7.
El filtro de comustible sucio.
8.
Nada de Io anterior.
El conjunto de velocidad ocioso
demasiado r_pidamente o
demasiado lento.
2.
Et carburador requiemmajuste.
3,
Nada de Io anterior.
El filtra de aire sucio. 1.
El bujia daft6. 2.
El carburador requiere ajuste. :3.
4.
Los enchufes de silenciador 4.
conectaran.
5.
Nada de Io anterior. 5.
Filtro de aire sucio. 1.
Ase combustible incorrecto. 2.
3,
El carburador requiere ajuste. 3.
Ase combustible incorrecto. 1.
El conjunto de carburador 2,
demasiado bajo (delgado).
3.
El bujia incorrecto. 3.
4.
Nada delo anterior. 4.
,,,,, ,,,,,,,
El carburador requiere ajuste. 1.
El cable de gaznate obligatodo. 2,
La embrague requiem reparaciSn. 3,
i
La cucbilla de forcing en corte 1.
de ser material.
La cuchilla madrefia con restos, 2.
Nada de to anterior. 4.
SOLUCION
t. Llene tanque con mezcfa de c0mustible correcta.
2, Ver "lnstrucciones para el arranque."
3. lnstatar una bujla nueva/ravisar el interruptorde encendido.
4. Limpiar el filtrode combustible; inspeccionar la manguera.
5. Ver "Ajustes del carburador."
6. Limpio o reemplaza fittro de aira.
7. Contactar al Centro/Depto, de servicio SEARS.
8. Contactar ai CentrolDepto, de servicioSEARS.
1. Vet "Ajustes del carburador."
2.
Ver "Ajustes del carburador."
3,
Contactar al Centro/Depto. de servicio SEARS.
Limpio o reemplaza filtro de aire.
La brecha y limpia de nuevo o reemplaza bujla.
Ver "Ajustes del carburador,"
Contactar al Centro/Depto. de servicio SEARS,
Contactar al Centro/Depto. de servicio SEARS.
Limpiar o cambiar el fittro de aire.
Reabasteca de combustible con mezcla
de comustible correcta.
Ver "Ajustes del carburador."
Vea" Fueling Su Unidado"
Vean "Ajustes de Carburador."
Reemplace con Cfavija correcto,
Contactar al Centro/Depto. de servieio SEARS.
,,,,, ,,,,,,,, ,,,,,,,,,,,, ,,_
Vet "Ajustes de! carburador."
Contactar at Centro/Depto. de servicio SEARS.
Contactar al Centro/Depto. de servicio SEARS.
Cut at a slower pace.
Los restos limpios de cuchilla,
Contactar al Centro/Depto, de servicio SEARS.
,,,,, ,,,
,, ,,,, ,, j,,,,,,
Si flegaran a ocurrirsffuaciones no explicadas en este manual, tener cuidado y actuarjuiciosamente.
En case de necesitar ayuda, contactar al Centro/Departamento de servicio SEARS o Ilamar a la
LINEA DIRECTA DE A TENCION AL CLIENTE a! 1-800-235-5878.
-16-

=ll =ll=l=liii =l = i
NOTAS
m=H=H= H= ==== = = = ==
-17-

_18_

=,= H==H= =1 =1 I1=1 =,H =
TABLA DE MATERIAS
Reglas de seguridad ........................................................ 2
Especificaciones del producto ......................................... 4
Garantfa ..................................... _..................................... 4
OperciSn .......................................................................... 6
Mantenimiento y ajustes ................................................ 13
Almacenamiento ............................................................ 15
Localizacibn de averfas ...._............................................ 16
Pedido de piezas de repuesto/Servicio ......................... 20
Responsabilidades del usuario ...................................... 11
i i i i ii =
INDEX
=== ,, =,,,HI,,ii
A
Accesorios ..................................................................... 19
Ajustes de carburador .................................................... 13
Almacenamiento ............................................................ 15
Arreglarsg de M_todos .................................................... 8
B
Bujfa ............................................................................... 12
C
Comenzando ................................................................. 10
Conozca su proteja guarnecedor .................................... 6
Contenido de torni!lerfa ................................................... 5
Corte de cuchilla lubricaciSn .......................................... 12
E
Especificaciones .............................................................. 4
F
Filtro de aire ................................................................... 12
Filtro de combustible ...................................................... !4
G
Garantfa ........................................................................... 4
Gasolina ........................................................................... 9
i ii i ii ii
Localizaci6nde averias ................................................. 16
Mantenimiento y ajustes ................................................ 13
Motor
Combustibte/aceite ....................................................... 9
Bujfa............................................................................ !2
Arranque ..................................................................... 10
Almacenamiento ......................................................... 15
N0mero de modelo .......................................................... 4
Operaci6n ............................ _........................................... 6
Ordenando partes de reparaci6n ................................... 19
Programa de mantenimiento ......................................... 11
Responsabilidades del usuario ............. ;........................ 11
=,=, ,,,=,,==i =
L
M
N
O
P
R
ACCESORIOS
i = LLlll i II = =, H
Estos accesorios est_.n disponibles cuando se compra originalmente la m_quina. Tambi@n se encuentran disponibles en
la mayorfa de las tiendas y centros de serivicio Sears. La mayoria de las tiendas Sears puede pedir estos componentes
a hombre det usuario cuando se proporciona el mimero de modeto de la maquina.
GAFAS
PROTECTORA_
Accesorios
BUJtA F_LTRO
-19-
DE AIRE
ACEITIE PAR
MOTOR DE
2-TIEMPOS
SEARS

CRRFTSMRN
Manual del
Operario
Modelo No.
358.795630
SI USTED NECESITA
REPARACION, SERVICIO
O PIEZAS:
SERVICIO DE REPARACION
1-800-4-REPAIR
(1-800-473-7247)
ORDENES DE PIEZAS
1-800-FON-PART
(1-800-366-7278)
MOTOR DE 2 TIEMPOS 21cc
22".Cuchiila
GAS PROTEGE GUARNECEDOR
Cada Protege Guarnecedor a gasolina tiene su propio ndmero de
modelo. El nt_mero de modelo de ta m,_quina se encuentra en la cal-
comania pegada en la m&quina.
Todas las piezas aqui listadas pueden ordenarse en cualquier Centre
de Servicio y en la mayorfa de las tFendas minoristas de Sears,
Roebuck and Co.
AL ORDENAR LAS PIEZAS DE REPUESTO SIEMPRE INCLUYA LA
SIGUIENTE INFORMAClON COMO SE MUESTRA EN ESTA LISTA:
• PRODUCTO-"GAS PROTEGE GUARNECEDOR"
• NUMERO DE MODELO - 358.795630
• NUMERO DE LA PIEZA
• DESCRIPClON DE LA PIEZA
;ISTENCIA
AL CLIENTE
.1-800-235-5878
HORARIO (CST)
7a.m.-7
Sears, Roebuck and Co., Hoffman Estates, IL 60179 U.S.A.
Su mercaderia SEARS tiene rods varor cuando asted considere que
Sears tiene unidades de servicio en rode e! pais con personal de t_c-
nicos entrenados pot Sears... t_cnicos profesionales entrenados
especfficamente en los productos Sears con las piezas, herramientas
y equipo para asegurar que cumplamos con nuestra promesa a
usted, servimos Io que vendemos.
 Loading...